Embed Size (px)
Citation preview

Page 1 of 21
ELECTRONIC PERMIT AND PLAN REVIEW GUIDE
In an effort to create more efficient permitting, the city of Minnetonka has implemented an electronic application submission and plan review process. This document provides general information on how to apply for an electronic permit using ePermits and how to provide, review, and download approved plans using ProjectDox.
USING EPERMITS – https://epermits2.logis.org
Register for ePermits Account (one time only)
Apply for a Permit (for each project, address, and space)
Pay Permit Application Fee
USING PROJECTDOX – https://planreview.eminnetonka.com/projectdox
Register for ProjectDox account (one time only)
Navigating ProjectDox
Uploading Plans and Documents
Receiving and Reviewing Comments
Resubmitting Plans and Documents
Paying Permit Fees
Downloading Approved Plans
STEP 1
STEP 2
STEP 3
STEP 5
STEP 8
STEP 4
STEP 6
STEP 7
STEP 9
STEP 10

Page 2 of 21
Before submitting a permit application, you must have an ePermits account.
Note: If you are contractor new to the city of Minnetonka, please call 952-939-8394 to have your business entered into the contractor database prior to applying for a permit.
1. Visit: https://epermits2.logis.org. 2. Click on Minnetonka 3. Click the Account Link on the right side of the screen. 4. Fill in the required information. It is VERY important that your email address is entered
correctly. If it is not, you will not receive updates or notification of permit approval. 5. Click Create Account
A $20.00 application fee is required to apply for a permit. This fee must be paid “up front,” but will be deducted from the total permit fee. The application fee is non-refundable. Your permit review will not be begin until payment is received.
1. Once logged into ePermits, click Apply for Permit. 2. Click on the permit type you wish to apply for. 3. Read and accept the declaration at the bottom of the page. 4. Enter the address of the property for which permit is being applied. 5. Click Next. The address of the property will be validated by the ePermits system. If an error
occurs, please verify the address you entered and try again. 6. Enter in applicant information. This information will be transferred to the permit and will
be automatically entered into ProjectDox is the permit requires plan review. It is VERY important that your email address is entered correctly. If it is not, the electronic plan review process will not function.
7. Click Next. 8. Enter required information about the proposed project as prompted. 9. Enter a dollar amount into the valuation for the permit. This will be used to calculate the
total permit fee, which is paid at the time the permit is finally approved. Click Next.
1. The fee page will now show a total application fee of $20.00. Read the provided **NOTE and click Next.
STEP 1 REGISTER FOR AN EPERMIT ACCOUNT
STEP 2 APPLY FOR A PERMIT
STEP 3 PAY PERMIT APPLICATION FEE

Page 3 of 21
2. Click Check out with Paypal or click Continue Shopping if you have more permits to apply for.
3. Enter credit card information and click Continue. 4. Fill in your credit card information to complete the payment transaction. Click Authorize
this Transaction. 5. An Order Summary will be displayed. Print the summary or save it for your records. An
email receipt will also be sent to the email address use for the permit application. 6. If plan review is required, you will also receive an email invitation from ProjectDox. Note:
It may take 2-3 minutes for this email to appear in your inbox.
When a permit application has been submitted and the application fee has been paid, the applicant will received two emails from ProjectDox. For those applicants new to ProjectDox, the first invitation email will also include a temporary password to create a ProjectDox account. The Second email will request that plans and document be uploaded and will outline how to do this upload.
Logging In and Creating a User Profile
1. In the invitation email, click Login to PojectDox. This will open a web browser and take you directly to the ProjectDox login screen. You may also open a web browser and type in the city of Minnetonka ProjectDox URL:
planreview.eminnetonka.com/projectdox
2. Type the email address used for your permit application into the E-mail field and type or paste your temporary password into the Password field.
STEP 4 REGISTER FOR A PROJECTDOX ACCOUNT

Page 4 of 21
3. Click Login. You will then be taken to you User Profile. On this page, you will need to:
• Reset your password • Create a security question and
answer • Enter additional information
about yourself/company
4. Click Save.
You may return to the profile screen at any time by clicking on the Profile button on the Main Toolbar. More information on the toolbar can be found later in this manual.
If you ever forget your password, click Forgot Your Password.
Home Page
After saving your profile information, you will be taken to the ProjectDox Home Page. On this page you will find you Active Projects List (active permit applications.) If you have a task associated with an Active Project – for instance the task of uploading plans – this will appear in the Projectflow Tasks List.
The Active Projects List provides you with basic information about every active project/permit application you have submitted to the city of Minnetonka through ProjectDox, including project/permit number, description, review status and created date. You may sort your Active Project List by clicking on any one of these headings.
STEP 5 NAVIGATING PROJECTDOX

Page 5 of 21
The Active Project and Projectflow Tasks list are set to display a limited number of entries. Use these buttons to move to the previous, next, first, or last page of the lists.
The ProjectFlow Task List outlines tasks assigned to you for your active projects/permit applications.
Home Page Toolbar
The toolbar is located in the top right corner of the Home Page. The toolbar includes a group of buttons that provide primary navigation functions.
Button Guide
• The Back and Forward buttons function much like the back and forward button on a web browser. The buttons will take you the screen you previously or subsequently viewed.
• The Projects button will take you back to the home page, which list your currently Active Projects and Active Tasks.
• The Reload or Refresh button (green curved arrows) will refresh the current page you are on.
• The Search button (binoculars) allows you to search for a project based on certain information.
• The Help button (blue question mark) will take you to the ProjectDox Help website. You may use the index or search functions at this site to find instructions or information about ProjectDox.
• The Logout button will log you out of the ProjectDox site.
• The Recent Projects button will display the 15 most recently accessed projects. The most recently accessed will always be at the top of the list.
• The All Projects button will display all of your projects. • The Project Search field allows you to search on words or partial words that are located in
the “projects,” “owner,” “description,” or status fields.
Before you upload plans and documents associated with your permit application, confirm the file type and naming is consistent with the following:
STEP 6 UPLOADING PLANS AND DOCUMENTS
Page 6 of 21
File Types
• Drawing files must be in DWG (CAD), DGN (Microstation), or PDF. DWG files are preferred, as they make review time more efficient. PLEASE NOTE, staff will not alter original DWG files. Rather, a Changemark/comments layer will be created.
• Plans may be uploaded in an approved format, to scale, with output dimensions of one of the followings sheet sizes: 8 ½” x 11”, 11”x17”, 24”x 36”, or 30”x 42”
• Documents – including reports, calculations, energy computations, etc. – must be in a searchable PDF format.
File Naming Convention
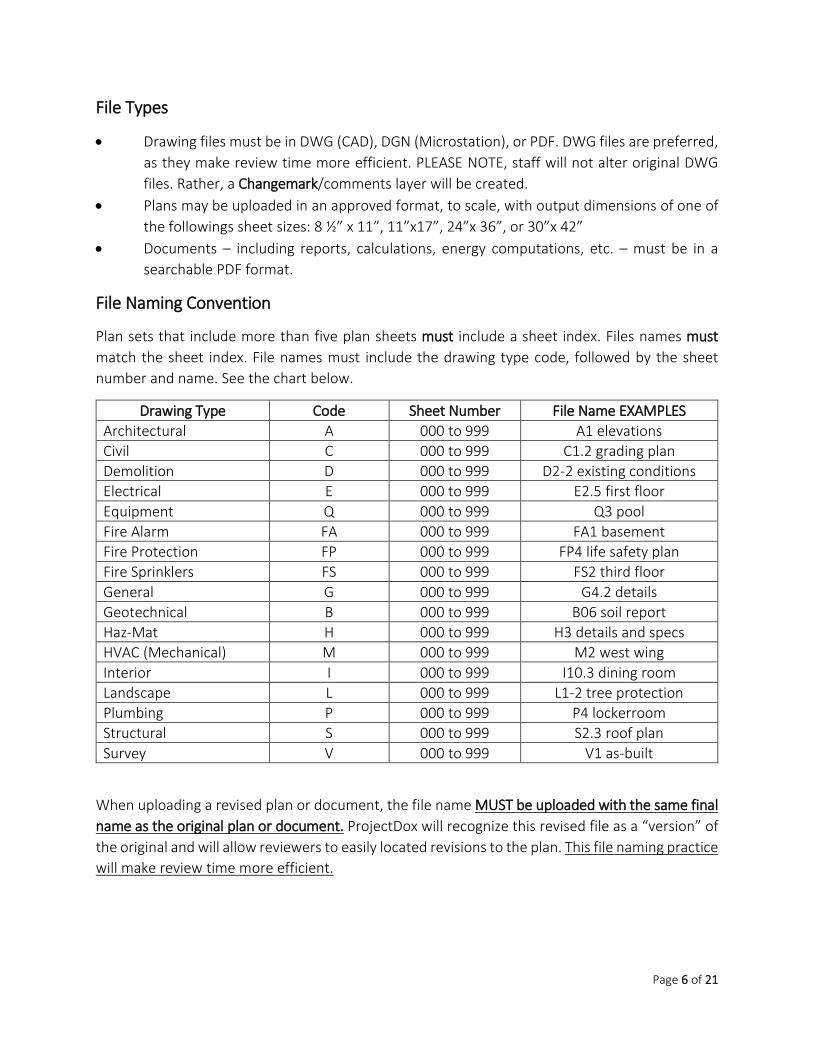
Plan sets that include more than five plan sheets must include a sheet index. Files names must match the sheet index. File names must include the drawing type code, followed by the sheet number and name. See the chart below.
Drawing Type Code Sheet Number File Name EXAMPLES Architectural A 000 to 999 A1 elevations Civil C 000 to 999 C1.2 grading plan Demolition D 000 to 999 D2-2 existing conditions Electrical E 000 to 999 E2.5 first floor Equipment Q 000 to 999 Q3 pool Fire Alarm FA 000 to 999 FA1 basement Fire Protection FP 000 to 999 FP4 life safety plan Fire Sprinklers FS 000 to 999 FS2 third floor General G 000 to 999 G4.2 details Geotechnical B 000 to 999 B06 soil report Haz-Mat H 000 to 999 H3 details and specs HVAC (Mechanical) M 000 to 999 M2 west wing Interior I 000 to 999 I10.3 dining room Landscape L 000 to 999 L1-2 tree protection Plumbing P 000 to 999 P4 lockerroom Structural S 000 to 999 S2.3 roof plan Survey V 000 to 999 V1 as-built
When uploading a revised plan or document, the file name MUST be uploaded with the same final name as the original plan or document. ProjectDox will recognize this revised file as a “version” of the original and will allow reviewers to easily located revisions to the plan. This file naming practice will make review time more efficient.

Page 7 of 21
Uploading
1. From the Projectflow Tasks List, click on the project/permit number for which there is an Applicant Upload Task. In the example below, this project/permit has a project name of “Instructions Test” and has the status of Applicant Upload.
Clicking on the project/permit number will open the project/permit’s main screen. The project/permit name will appear in the upper left corner of the project/permit’s main screen.
On the left side of the Project Page you will notice four to five folders.
• Drawings. This is the folder where you will upload all drawings related to you permit application, such as a survey, civil plans, architectural plans, etc.
• Documents. This is the folder where you will upload
any non-drawing files that are required, such as energy computations, specifications, stormwater management calculations, etc.
• Approved. When a permit application is approved,
city stall will place all approved, stamped plans in this folder for you to download. The folder will appear only when plans have been approved.

Page 8 of 21
• Information from City Staff. Staff will load information or template-type items into this folder which they would like you to review or use.
• As-Built. The applicant or staff may upload as-built drawings associated with the permit
application into this folder.
2. Click the Workflow Portals button on the upper right side of the Project Page.
The Applicant Upload task will display. Click on the task name and a dialog box will display, “Do you want to accept this task?”
3. Click on the Applicant Upload Task

Page 9 of 21
3. Click OK to accept the responsibility for completing this task.
An Eform window will appear.
4. Back on the Project Page, click on either the Drawings or Documents folder.
5. Click on the Upload Files button. Note: you may need to press the Refresh button if you do not see the Upload Files button.
6. The Upload Files dialog box will appear. Click on Browse for Files. Navigate to and select the files you would like to upload from your computer. OR you may “drag and drop” files into the dialog box.

Page 10 of 21
8. When you have selected files, they will appear in the Upload Files page. Click Upload Files. A page will then appear displaying the files that have been uploaded. Click Close.
When files have been uploaded to folders, thumbnail images of the files will be displayed on the right side of the screen. Under each thumbnail, you will see the file name, upload date and time, file size information, and the name of the user who uploaded the file.
9. When you have finished uploading all plans and documents, go to the Project Page and click on the Workflow Portals again. Click on your Applicant Upload Task. This will bring back your Eform.
10. Check the Box on the bottom on the form that confirms you “have uploaded all required drawings and documents.” Click Upload Complete.

Page 11 of 21
ProjectDox will automatically notify the city of Minnetonka that your permit application has been submitted. Following notification, city staff will complete a Prescreen of your application to determine if all required plans and documents have been uploaded. If all required items have been submitted, the plans will be routed to appropriate departments for review. Note: plans and documents will not be routed for review until all required items have been submitted.
Prescreen Comments
If the Prescreen determines that items are missing or area incomplete, you will receive an email notification from ProjectDox with instructions for resubmittal.
To view Prescreen Additions or Corrections:
1. Click the Project Access or Login to ProjectDox hyperlink in the email. 2. If you click Project Access, you will be taken directly to the project/permit’s main page. Click
the Workflow Portals button. Click the Applicant Upload task. Click OK to accept the task. (See diagrams on pages 8 –10 of this manual.)
STEP 7 RECEIVING AND REVIEWING COMMENTS

Page 12 of 21
3. If you click the Login to ProjectDox hyperlink, you will be taken directly to the ProjectDox home page. Click the Applicant Corrections task from the ProjectFlow Task list. Click OK to accept the task.
4. Regardless of whether
you clicked Project Access or Login to ProjectDox, after you click OK to accept the task an eForm will appear. Review the comments in the Reviewer Comments textbox and follow any instructions provided.
5. Upload additional plans and/or documents as outlined in Step 6: Uploading Plans and Documents.
Permit Review Comments
Once your permit application is determined to be complete, it will be routed to various city staff for review. If staff requires any corrections or additions to the submitted plans/documents, you will receive an email notification from ProjectDox with instructions for resubmittal. (See the following page.)

Page 13 of 21
To generally view staff Comments:
1. Click the Project Access or Login to ProjectDox hyperlink in the email. 2. If you click Project Access, you will be taken directly to the project/permit’s main page. Click
the Workflow Portals button. Click the Applicant Resubmit task. Click OK to accept the task. (See diagrams on pages 8–10 of this manual.)
3. If you click the Login to ProjectDox hyperlink, you will be taken directly to the ProjectDox home page. Click the Applicant Resubmit task from the ProjectFlow Task List. Click OK to accept the task.

Page 14 of 21
4. Regardless of whether you clicked Project Access or Login to ProjectDox, after you click OK to accept the task an eForm will appear. The eForm will display which departments have reviewed your permit application, the staff member from each department conducting the actual review, whether that staff member has requested any changes or additional information, and a brief comment about required changes or additions.
Staff may provide you permit review comments in three ways:
• Changemark Items. These are actual notation on plans. • Checklist Items. These are generally comments referencing specific city code or policy
requirements. • Memos. These outline specific conditions of approvals or next steps. Memos are customized
to your specific permit application.
Viewing Changemark Items
You may review changemark items in two ways, Option #1 and Option #2. Though both options provide the same information, the information is displayed in different ways.

Page 15 of 21
Option #1.
1. Click View Changemark Items button in the eForm. This will bring to you the Workflow Review Changemark Viewer, which displays thumbnails of the required changes and as well as specific comments from the staff reviewer.
If you scroll to the right of this Changemark Viewer, you may respond to individual staff comments by double-clicking in the corresponding Applicant Response column.
If you click on the Markup Name, you will be taken to the specific file Changemark.
Option #2.
1. Open the Drawings folder and scroll through the submitted plans. If staff has added a changemark to the plan, a small red pencil and exclamation point will be displayed next to the plan. (See the following page.)

Page 16 of 21
2. Click on the red pencil/exclamation point!
NOTE: The required changes will NOT appear if you click the on the image of the plan. You must click on the red pencil/exclamation point!
3. After you click on the red pencil/exclamation point, a Markups window will appear. If you would like to review all staff comments on that plan at the same time, which the city recommends you do, click Select All for View. Then click View/Edit.
If you would like to view comments by individual staff members, check the appropriate box and then click the View/Edit button.

Page 17 of 21
4. After you click
View/Edit, a plan viewer window will open. The general area of required changes will be noted on the plan. However, the details of the required changes will be noted on the right hand side of the window.
5. Click on the general title of the required change on the right hand side of the window. The plan will automatically zoom to the area requiring a change and further details will be outlined.

Page 18 of 21
NOTE: If you use Option #2, it is important to review all documents in the drawing and documents files for changemark items, as these denote required plan changes!
Viewing Checklist Items
1. Click the View Checklist Items button on the eForm. This will bring to you the Workflow Review Checklist Item Viewer, which displays specific comments from the staff reviewers.
Viewing Memos
1. On the project page, open the Information from City Staff folder and click on the memo documents.
To address staff comments – whether changemarks, checklist items, or memos – you generally must upload revised or additional plans and/or documents. To upload, follow the directions in Step 6: Uploading Plans and Documents. REMEMBER: When uploading a revised plan or document, the file name MUST be uploaded with the same final name as the original plan or document. ProjectDox will recognize this revised file as a “version” of the original and will allow reviewers to easily located revisions to the plan. This file naming practice will make review time more efficient.
Upon receipt of revised or additional uploaded plans and/or documents, staff will review will begin again. If staff requires any corrections or additions to the resubmitted plans/documents, you will again receive an email notification from ProjectDox with instructions for resubmittal. Once all plans and documents have been approved, you will receive an email from ProjectDox noting that
STEP 8 RESUBMITTING PLANS AND DOCUMENTS

Page 19 of 21
your permit has been approved. However, you will not be able to download your approved permit and stamped plans or schedule required inspections until your permit fees have been paid.
1. Click on the ePermits link in the approval email from ProjectDox. 2. Log into ePermits and click Pay for approved Plan Review Permit. 3. Enter the permit number or other information about the permit as prompted. 4. Enter payment information as prompted. 5. Upon payment, a Purchase Information screen will pop up. It will contain your payment
information and a PDF of your approved permit.
6. Click the Download the Permit PDF button. 7. Print the approved permit. NOTE: The permit must be posted at the job site.
STEP 9 PAYING PERMIT FEES
STEP 10 DOWNLOADING APPROVED PLANS

Page 20 of 21
After required permit fees have been paid, you will receive an email from ProjectDox noting that your stamped, approved plans are ready to be downloaded. NOTE: The approved, stamped plans must be posted at the job site.
1. Click on the Login to ProjectsDox link.
2. Open the Approved folder.
3. Click the checkboxes to select the documents to download.
4. Click the Download Icon.

Page 21 of 21
You may choose to download all the approved plans/documents at the same time, by checking the box at the top of the plan list and download button.
HAVE ANY QUESTIONS?
Please contact Susan Thomas, Assistant City Planner, at [email protected] or call the Inspections Division at 952-939-8394