Embed Size (px)
Citation preview

Electronic Case Filing
User’s Manual Eastern District of North Carolina
(December 2009)
CM/ECF User’s Manual (December 2009) Table of Contents 1
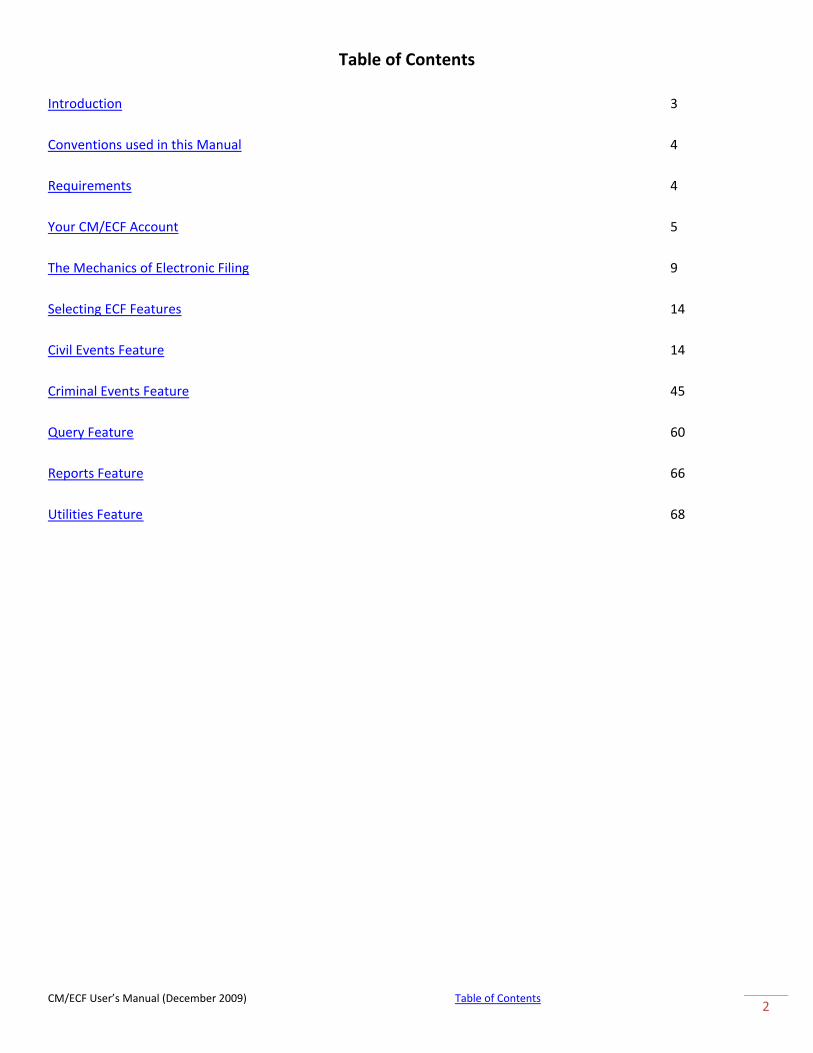
Table of Contents Introduction 3 Conventions used in this Manual 4 Requirements 4 Your CM/ECF Account 5 The Mechanics of Electronic Filing 9 Selecting ECF Features 14 Civil Events Feature 14 Criminal Events Feature 45 Query Feature 60 Reports Feature 66 Utilities Feature 68
CM/ECF User’s Manual (December 2009) Table of Contents 2

Electronic Case Filing System User’s Manual
Introduction The United States District Court for the Eastern District of North Carolina permits attorneys to file documents with the Court from their own offices over the internet. The court’s Standing Order (effective October 1, 2005), and the Local Rules authorize electronic filing in accordance with the Federal Rules of Civil and Criminal Procedure. This User’s Manual provides instructions on how to use the Electronic Case Filing (ECF) system to file documents with the court, or to view and retrieve docket sheets and documents for all cases assigned to this system. Users should have a working knowledge of Internet Explorer® and Adobe Acrobat®.
ECF System Capabilities The electronic filing system allows registered participants with Internet accounts and browser software, such as Netscape or Internet Explorer, to perform the following functions:
• Open the Court’s web page
• View or download the most recent version of the User’s Manual
• Self‐train on a web‐based ECF Tutorial
• Electronically file pleadings and documents in actual (“live”) cases
• View official docket sheets and documents associated with cases
• View various reports for cases that were filed electronically Help Desk Contact the Court’s Help Desk between the hours of 8:30 A.M. and 4:30 P. M., Monday through Friday, if you need assistance using ECF. Toll Free Help Desk 1‐866‐855‐8894 The Clerk’s Office shall deem the Court’s CM/ECF site to be subject to a technical failure on a given day if the site is unable to accept filings continuously or intermittently over the course of any period of time greater than one hour after 10:00 a.m. Eastern Time that day. Known systems outages will be posted on the Court’s web page, if possible. The initial point of contact for any practitioner experiencing difficulty filing a document electronically should be the ECF Help Desk. See Electronic Case Filing Administrative Policies and Procedures Manual, Section Q, for further details.
CM/ECF User’s Manual (December 2009) Table of Contents 3

Conventions used in this Manual
• Data to be entered by the user is shown enclosed in angle brackets: <data to be entered>.
• Command buttons are represented in this manual in [bracketed boldface type].
• Hyperlinks are represented in underlined boldface type.
Requirements
Hardware and Software Requirements The hardware and software needed to electronically file, view and retrieve case documents are the following:
A personal computer running a standard platform such as Windows®, Windows 95®, Windows 98®, Windows 2000®, Windows XP®, or Macintosh®. Internet service and a compatible browser (Netscape Navigator® 4.6 or 4.7 and Internet Explorer 5.5 were the only browsers tested on CM/ECF. The CM/ECF technical staff is currently testing Netscape® version 7.02 and Internet Explorer® version 6.0 to certify its compatibility with the Bankruptcy and District CM/ECF systems. There are, however, users currently accessing the system using Netscape Version 7.02 and Internet Explorer® version 6.0 with positive results. In either case, the browser must be JavaScript‐enabled.). Software to convert documents from a word processor format to portable document format (PDF). Adobe Acrobat PDF Writer®, as well as certain word processing programs can perform this function. Both Acrobat® Writer Version 3.X and 4.X meet the CM/ECF filing requirements. The CM/ECF technical staff is currently testing Version 5 to certify its compatibility with the CM/ECF system. For viewing documents, not authoring them, only Adobe Acrobat Reader® is needed. A PDF‐compatible word processor like Macintosh® or Windows®‐based versions of WordPerfect® and Microsoft Word®. A scanner to transmit documents that are not in a word processing system.
PACER Registration ECF users must have a PACER account with the Court in order to use the Query and Report features of the ECF system. If you do not have a PACER login, contact the PACER Service Center to establish an account. You may call the PACER Service Center at (800) 676‐6856 or (210) 301‐6440 for information or to register for an account. You may also register for PACER online at http://pacer.psc.uscourts.gov.
CM/ECF User’s Manual (December 2009) Table of Contents 4

Your CM/ECF Account
Registering for Access to ECF To receive a login name and password for the Eastern District of North Carolina CM/ECF system, participants must:
1. be allowed to practice in the Eastern District of North Carolina 2. take an Attorney Training class on using CM/ECF, taught by the Eastern District of North
Carolina, or another District Court; and 3. register.
Registration forms can be obtained on our web site at http://www.nced.uscourts.gov/cmecf/. Completed registration forms should be mailed to:
Clerk of Court United States District Court Eastern District of North Carolina Attn: ECF Attorney Registration Room 574 310 New Bern Avenue Raleigh, North Carolina 27601
Once an account has been established, and to ensure that the Clerk’s Office has correctly entered a registering attorney’s Internet e‐mail address into the ECF system, the Clerk’s Office will send the attorney an Internet e‐mail message after assigning the attorney a password. Registered users can visit a training version of the system on the Internet at http://ecf‐train.nced.uscourts.gov to practice ECF activities. We strongly recommend that registered users practice in the “training” ECF database before filing documents in the “live” ECF database. Maintaining Your Account From the Utilities menu you have the capability to:
1. maintain certain aspects of your ECF account with the Court, and 2. view a log of all your transactions within ECF.
Click on the Maintain Your Account hyperlink to open the Maintain User Account information screen.
CM/ECF User’s Manual (December 2009) Table of Contents 5

This screen displays all of the registration information that is contained within the ECF database for your account with the Court. This includes Bar Identification and Bar status. Clicking on the [Email information] button opens the following screen.
ECF will e‐mail to parties their Notices of Electronic Filing based upon the information entered in this screen. Perform the following steps to enter additional e‐mail addresses for individuals that you wish ECF to notify regarding new case pleadings and documents.
• From the screen depicted below, enter a check mark by clicking on the box to the left of the line, which reads “to these additional addresses”.
CM/ECF User’s Manual (December 2009) Table of Contents 6

Enter the e‐mail addresses of those individuals you wish to notify concerning ECF activity. This data entry field has a capacity of 250 characters for approximately ten e‐mail addresses.
• Stipulate the format of the ECF notices by selecting your choice from the bottom of the screen.
• If you wish to enter completely new information about your account, use the [Clear] button to clear the fields on this screen.
After updating your account information, click on the [Return to Account screen] button to return to your Maintain User Account screen. To edit or view login information about your account, select the button labeled [More User Information], from the Maintain User Account screen. ECF opens the screen depicted below.
This screen displays user login information and provides the means to change your ECF password. Notice that ECF displays a string of asterisks in the Password field. To change your ECF password, place your cursor in the Password field and delete the asterisks. Type in your
CM/ECF User’s Manual (December 2009) Table of Contents 7

new password. ECF displays the actual characters of your new password as you type. When you have completed your interface with ECF from this screen, click on the [Return to Account screen] button to reopen the Maintain User Account screen. When you are satisfied that all of your account information is accurate and up‐to‐date, click on the [Submit] button at the bottom of the Maintain User Account screen to submit your changes to ECF. ECF will notify you onscreen that your updates were accepted. If you changed passwords, you may begin using the new password during your next ECF session. View Your Transaction Log From the Utilities screen, click on the [View your Transaction Log] button. ECF opens a screen with two fields for entering the Date Selection Criteria for a Transaction Log Report. Enter the date range for your report and click on the [Submit] button. ECF displays a report of all your transactions in ECF within the date range you specified for Date Selection Criteria. See below for a sample transaction log report.
Use this feature of ECF to review your transactions and to verify that:
• all of the transactions you entered in the system are reflected in the Transaction Log
• no unauthorized individuals have entered transactions into ECF using your login name and password.
CM/ECF User’s Manual (December 2009) Table of Contents 8

Logout After you have completed all of your transactions for a particular session in ECF, you should exit from the system.
Click on the Logout hyperlink from the ECF Blue menu bar. ECF will log you out of the system and return you to the ECF login screen.
The Mechanics of Electronic Filing
User Interactions
There are three ways a user interacts with the system:
1. Entering information in data fields 2. Using command buttons to direct system activities 3. Mouse‐clicking on hyperlinks
Portable Document Format (PDF) Only PDF documents may be filed with the court. Additionally, users must set up Adobe’s Acrobat Reader® software in order to view documents that have been electronically filed in the system. When installing this product, please review and follow Adobe’s® directions to utilize Acrobat Reader® after installation.
Signatures; Affidavits of Service Documents which must contain original signatures or which require either verification or an unsworn declaration under any rule or statute shall be filed electronically with originally executed copies maintained by the filer. The filing party shall scan the original affidavit, and then electronically file it on the System. See the Electronic Case Filing Administrative Policies and Procedures Manual section J for signature restrictions. In the case of a stipulation or other document to be signed by two or more persons, the following procedure should be used: (a) The filing party or attorney shall initially confirm that the content of the document is acceptable to all persons required to sign the document and shall obtain the physical signatures of all parties on the document.
CM/ECF User’s Manual (December 2009) Table of Contents 9

(b) The filing party or attorney then shall file the document electronically, indicating the signatories, e.g., “/s/ Jane Doe,” “/s/ John Doe,” etc. (c) If the filing party or an attorney believes a document with original signatures has intrinsic value, the attorney shall retain the original document until two (2) years after the expiration of the time for filing a timely appeal of a final judgment or decree, or after receipt by the Clerk of Court an order terminating the action on appeal. (d) A non‐filing signatory or party who disputes the authenticity of an electronically filed document containing multiple signatures or the authenticity of the signatures themselves must file an objection to the document within 14 days of receiving the Notice of Electronic Filing.
How to Convert Documents to PDF Format You must convert all of your documents to PDF format before submitting them to the Court’s ECF system. The conversion process requires special software such as Adobe Acrobat Writer®. WordPerfect® versions 9 and 10 have Acrobat Writer® built‐in and can also be used to convert documents to PDF. Using any word processing program
• Install Acrobat Writer® on your computer
• Open the document to be converted
• Select the [Print] option (generally found in the File menu) and in the dialog box select the option to change the current printer. A drop down menu with a list of printer choices is displayed.
• Select Adobe PDFWriter®*
• “Print” the file. The file should not actually print out; instead the option to save the file as a PDF format file appears.
CM/ECF User’s Manual (December 2009) Table of Contents 10

• Make a note of the file location so you can find the document later when you are ready to upload it. Change the location if necessary by clicking in the “Save in” area of the window.
• Name the file, giving it the extension .PDF and click the [Save] button.
Depending on the word processing program being used, it may be necessary to find the printer selection option elsewhere. At that point, change the printer to Adobe PDFWriter®, and follow the directions above. *You must have Adobe Acrobat Writer® installed on your computer to see these choices listed.
Before sending the file to the court, users should preview the PDF formatted document to ensure that it appears in its entirety and in the proper format.
How to View a PDF File
• Start the Adobe Acrobat® program.
• Go to the File menu and choose Open.
• Click on the location and file name of the document to be viewed.
• If the designated location is correct, and the file is in PDF format, Adobe Acrobat Exchange loads the file and displays it on the screen.
• If the displayed document is larger than the screen or consists of multiple pages, use the scroll bars to move through the document.
• Click on the View menu for other options for viewing the displayed document. Choose the option that is most appropriate for the document.
How to Access the System Users can get into the system via the Internet by going to http://ecf.nced.uscourts.gov Or, you may go to the Eastern District of North Carolina’s Web site at www.nced.uscourts.gov and click on the Electronic Case Filing hyperlink.
Click on Eastern District of North Carolina‐Document Filing System to open the login screen and login to ECF:
CM/ECF User’s Manual (December 2009) Table of Contents 11

Users can access the Training Database by going to http://ecf‐train.nced.uscourts.gov
Logging In This is the login screen:
Enter your ECF Login and Password in the appropriate data entry fields. All ECF login names and passwords are case sensitive. This login will allow you to both file documents and query for general case information. Please see the section entitled Query Feature for information about use of a PACER login and password.
Note: Use your ECF login and password if you are entering the system to file a pleading or to maintain your account. If you only wish to enter ECF to query the database for case information or to view a document, enter your PACER login and password. You will be charged a fee to view ECF case dockets and documents.
Verify that you have entered your ECF login and password correctly. If not, click on the [Clear] button to erase the Login and Password entries and re‐enter the correct information. After you enter the correct login and password information, click on the [Login] button to transmit your user information to the ECF system.
• If the ECF system does not recognize your login and password, it will display the following error message on a new screen.
Login failed either your login name or key is incorrect
CM/ECF User’s Manual (December 2009) Table of Contents 12

• Click on the Back button in your browser and re‐enter your correct login and password. Once the Main Menu appears, choose from a list of hyperlinked options on the top bar.
Note: The date you last logged into the system appears at the bottom left corner of this screen. You should review this information each time you login for security reasons. If you believe your last login date and time are incorrect, or suspect an unauthorized party is using your login and password, please telephone the CM/ECF Help Desk (see p. 3) as soon as possible.
Manipulating the screens Each screen has the following two buttons:
• [Clear] clears all characters entered in the box(es) on that screen.
• [Next] or [Submit] accepts the entry just made and displays the next entry screen, if any.
CM/ECF User’s Manual (December 2009) Table of Contents 13

Correcting a mistake: Use the [Back] button on the internet browser toolbar to go back and correct an entry made on a previous screen. However, once the document is transmitted to the court, only the court can make changes or corrections.
Selecting ECF Features ECF provides the following features that are accessible from the Blue menu bar at the top of the opening screen.
Civil‐ Select Civil to electronically file all civil case pleadings, motions, and other court documents.
Criminal‐ Select Criminal to electronically file all criminal case pleadings, motions, and other court documents.
Query‐ Query ECF by specific case number, party name, or nature of suit to retrieve documents that are relevant to the case. You must login to PACER before you can query ECF.
Reports‐ Choose Reports to retrieve docket sheets and cases‐filed reports. You must login to PACER before you can view an ECF report.
Utilities‐ View your personal ECF transaction log and maintain personal ECF account information in the Utilities area of ECF.
Logout‐ Allows you to exit from ECF and prevents further filing with your password until the next time you log in.
Civil Events Feature Registered filers will use the civil feature of ECF to electronically self‐file and docket with the Court a variety of pleadings and other documents for civil cases. See the list of ECF documents on our website www.nced.uscourts.gov (ECF Civil Event List). This section of the manual describes the basic steps that you need to take in order to file a single motion with the Court. The process is consistent regardless of the event.
Filing a Civil Complaint Please see the Electronic Case Filing Administrative Policies and Procedures Manual for details on filing a new complaint. To open a case in person or by mail, present the Clerk’s office with a Civil Cover Sheet (JS‐44c), summons and the complaint, which lists the case party information, along with the filing fee. New cases are deemed filed the day the Clerk’s Office receives the complaint and any required filing fee. To open a civil case electronically, follow the steps provided below. There is an image of each screen with explanations and descriptions of what each field captures.
CM/ECF User’s Manual (December 2009) Table of Contents 14

An attorney may now open a civil case electronically. To open a case, an attorney must provide the Clerk’s office with a Civil Cover Sheet (JS‐44c), summons and the complaint, which lists the case party information, along with the filing fee. Every party shall review and comply with Fed. R. Civ. P. 7.1 and Local Rule 7.3. New cases are deemed filed the day the Clerk’s Office receives the complaint and any required filing fee. When opening a case electronically, the filing fee must be paid first. Effective April 9, 2006, the filing fee is $400.00. When the attorney is ready to pay the filing fee the attorney must have the name of the case that is to be opened. Fees may be paid by:
• credit card (by phone or in person)
Location Hours of Operation Telephone Number
Raleigh Clerk’s office 8:30 am to 4:30 pm 919‐645‐1700
Greenville Clerk’s office 8:30 am to 4:30 pm 252‐830‐6009
Wilmington Clerk’s office 8:30 am to 4:30 pm 910‐815‐4663
New Bern Clerk’s office 8:30 am to 4:30 pm 252‐638‐8534
• check (by mail or in person)
• cash (in person)
• pay.gov The filer will be given a receipt with a receipt number. The attorney will need this receipt number to complete the on‐line process of opening a civil case.
OPENING A CIVIL CASE
1. Click on Civil. 2. Select “Atty Open CV Case”
CM/ECF User’s Manual (December 2009) Table of Contents 15

In the Office field: Assign the case to a division pursuant to Local Civil Rule 40.1(c) Local Civil Rule 40.1(c)(1), EDNC Civil Actions. The clerk shall assign all civil actions to a division when the action is filed or removed. If one or more plaintiffs are residents of this District, the clerk shall assign the case to the division in which the first named such plaintiff resides. If no plaintiff resides in the Districts and one or more defendants reside in the District, the clerk shall assign the action to the division in which the first named such defendant resides. In the event no party resides in the District but the claim is alleged to have arisen in the District or to involve real property in the District, the clerk shall assign the action to the division in which such claim is alleged to have arisen or in which the real property is situated. In all instances, a case shall be assigned to a division at the discretion of the clerk. In removed actions, the matter will be assigned to the division in which the state court is located from which the action is removed.
Examples: Craven County – select Eastern Division Wake County – select Western Division Full list of counties in the District on next page
CM/ECF User’s Manual (December 2009) Table of Contents 16

CM/ECF User’s Manual (December 2009) Table of Contents 17

In the Case type field: cv = civil hc = habeas corpus ct = prisoner civil rights mc = miscellaneous (this selection is not activated and cannot be selected)
Leave the remaining fields blank.
This information is found on the completed civil cover sheet.
Jury demand: The removing defendant must change this field to ‘p’ if the plaintiff demanded a jury in the complaint.
Demand: This field is optional. Complete only if there is a monetary demand in the complaint.
CM/ECF User’s Manual (December 2009) Table of Contents 18

10 = $10,000.00 500 = $500,000.00
Arbitration code: Leave this field blank
County: This information is listed on the civil cover sheet. Use the county of residence of the first listed plaintiff, except in U.S. Plaintiff cases. In U.S. plaintiff cases, use the county of residence of the first listed defendant. In land condemnation cases, use the location of the tract of land involved.
Fee status:
pd (paid) – when payment is made at time of filing pend (IFP pending) – if case is initiated with a Motion to Proceed In Forma Pauperis wv (waived) – used by federal government agencies
Date transfer: Leave this field blank.
Once you have filled in all the appropriate fields, click Next.
Enter the last name of the business or plaintiff.
Click Search.
Click on Create new party if the party is not in the database.
CM/ECF User’s Manual (December 2009) Table of Contents 19

Last name: If the party is anyone other than an individual, (i.e., a company, a university, a municipality, etc.) the entire name of the party goes in the Last name field. This field will hold up to 200 characters.
Generation: Jr., Sr., III
Role: the role will always default to defendant and must be changed to the appropriate role.
Pro se: This field should only be “yes” if the party being added is legitimately pro se. Do not put ‘yes’ if the attorney is just unknown. Party text: This field is for descriptive information regarding the party (e.g., “in his official capacity”, “a Delaware corporation”, or “Commissioner of Social Security”). This field will hold up to 255 characters. Do not use this field for party aliases. Use the alias button at the bottom of the screen. Alias button: Used when the party has aliases (i.e., “formerly known as”, “also known as”, “doing business as”, “on behalf of” etc.) The party may have more than one alias.
CM/ECF User’s Manual (December 2009) Table of Contents 20

Corporate Disclosure
Corporate parent button: Parties must file separate corporate disclosures pursuant to Fed.R.Civ.P. 7.1 and Fed.R.Crim.P. 12. Click on the corporate parent button. Enter the name of the corporate parent in the text box. Click Search.
CM/ECF User’s Manual (December 2009) Table of Contents 21
If the corporate parent name does not appear, click the Create new corporate parent button:
There are text boxes in which to enter the name of the party’s corporate parent.
Click the Add corporate parent button.
CM/ECF User’s Manual (December 2009) Table of Contents 22
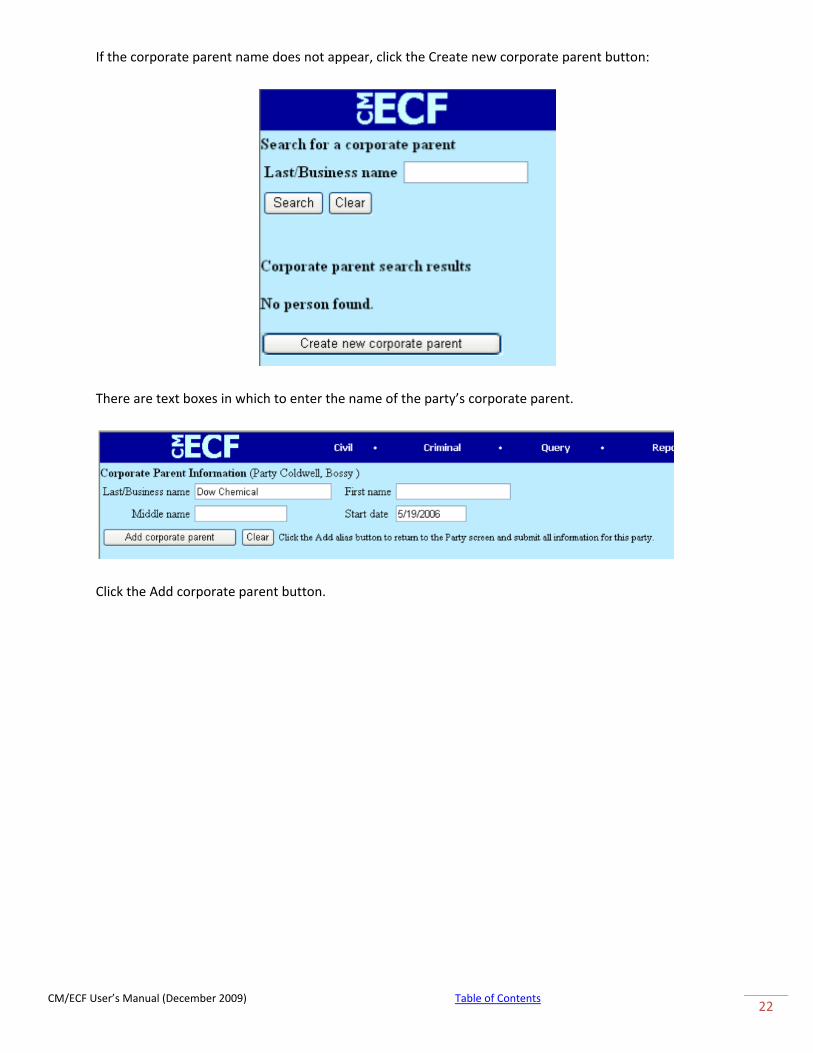
This returns the system to the Party Information screen.
To check what you have added, click on the Review button.
In the Review screen, the corporate parent is listed with the designation: cp Click the Return to Party screen and to go back to the Party Information screen.
CM/ECF User’s Manual (December 2009) Table of Contents 23

Continue these steps until you have entered all corporate parents. Once you have completed entry of all corporate parents, click the submit button.
You are ready to enter the second party in the lawsuit.
Review button: This button allows the filer to review all party information that has been entered, before it gets submitted. Submit button: Click this button to submit the party information. Cancel button: Click this button to cancel the information and return back one screen. Clear button: Click this button to remove information added to the screen.
CM/ECF User’s Manual (December 2009) Table of Contents 24
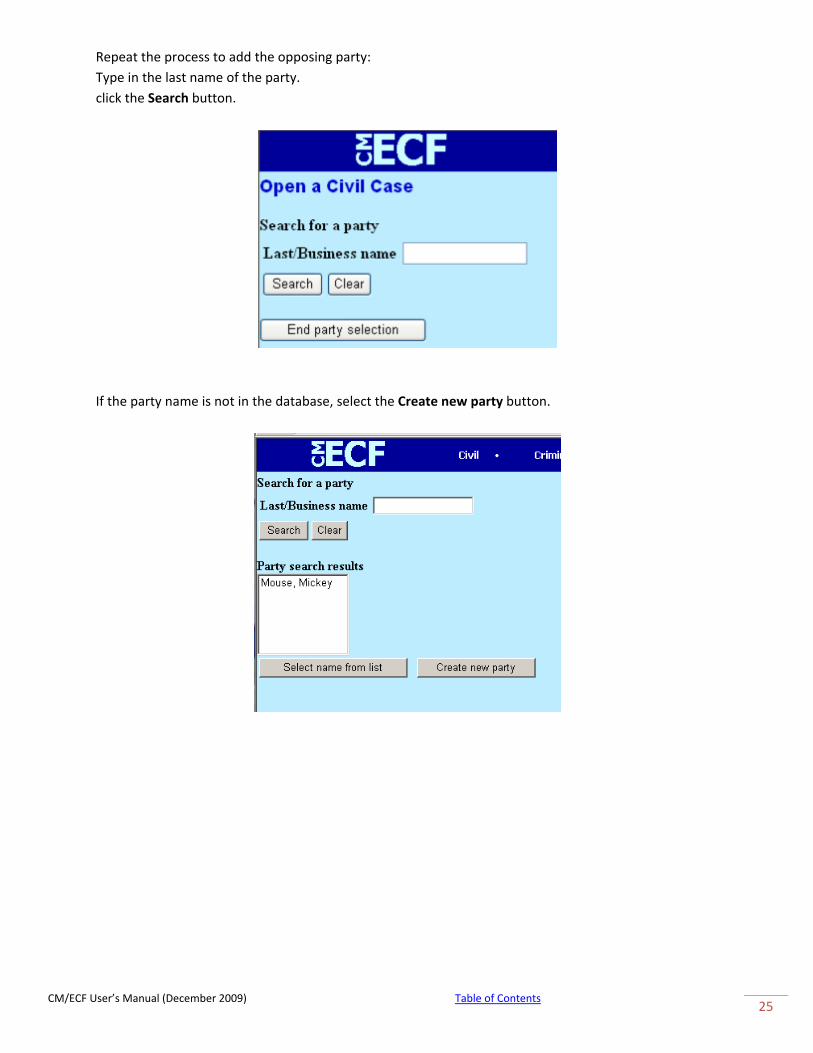
Repeat the process to add the opposing party: Type in the last name of the party. click the Search button.
If the party name is not in the database, select the Create new party button.
CM/ECF User’s Manual (December 2009) Table of Contents 25

Enter the party information.
Once you have entered all the parties, then you click the End party selection button. The system will issue a case number:
CM/ECF User’s Manual (December 2009) Table of Contents 26

Any electronically‐generated designation of a district judge or magistrate judge does not mean that the judge so designated is assigned to the case. Docket Lead Event?: This is any case initiating document (e.g., complaint, notice of removal, motion to proceed in forma pauperis, etc.). The lead event is where you, the attorney will be able to associate yourself with the party for whom you are filing. This association will trigger the electronic notification process in CM/ECF.
Once you click on the Docket Lead Event link, the system gives you a drop‐down box of potential lead events. Select the appropriate lead event. Click Next.
When your case initiating event is a Motion to proceed in forma pauperis (event in drop down list is Proceed In Forma Pauperis), attach the proposed complaint and summonses as attachments to the event. Do not docket the complaint as a separate event until the court has granted the motion to proceed in forma pauperis. A summons cannot be docketed separately until it has been issued by the court. The system remembers the last case you were working in and fills in that case number. Ensure that this is the correct case number and then click Next.
CM/ECF User’s Manual (December 2009) Table of Contents 27

Select the filing party from the box on the screen.
Click Next.
These boxes must be checked to activate the electronic notification process. This box should be checked if you are lead counsel. Associate with the party. Click Next.
CM/ECF User’s Manual (December 2009) Table of Contents 28

Select the party from the box that the initiating document is being filed AGAINST. Click Next.
Here is where you attach your initiating document in pdf format.
Prior to opening a case, the filing fee must be paid and the filer must have a court‐issued receipt number. That receipt number is entered in this field.
CM/ECF User’s Manual (December 2009) Table of Contents 29

You can add text to describe your initiating document in the text box.
This is the “point of no return” screen. Make sure the docket text is correct. If you discover an error here, click Clear. When you are satisfied that it is correct, Click Next.
CM/ECF User’s Manual (December 2009) Table of Contents 30

This is the Notice of Electronic Filing (NEF) that you will receive when you complete the filing of your initiating document. Congratulations, you have just opened your own civil case!
Filing Documents for Civil Cases There are eight basic steps involved in filing a document: 1) Select the type of document to file (see Attorney Event Menu); 2) Enter the case number in which the document is to be filed; 3) Designate the party(s) filing the document; 4) Specify the PDF file name and location for the document to be filed. 5) Add attachments, if any, to the document being filed. 6) Modify docket text as necessary 7) Submit the pleading to ECF 8) Receive notification of electronic filing
CM/ECF User’s Manual (December 2009) Table of Contents 31

After successfully logging into ECF, follow these steps to file a pleading.
1. Select the type of document to file. Select Civil from the blue menu bar at the top of the ECF screen. The Civil Event window opens displaying all of the events from which you may choose for your filing.
This section of the User's Manual describes the process for filing a Motion in ECF. The process is similar for filing other pleadings in ECF. Click on Motions, under Motions and Related Filings
The Motions screen appears and displays a motion selection field with a scroll bar next to it. Scroll through the menu until you find the type of motion or application you wish to file.
CM/ECF User’s Manual (December 2009) Table of Contents 32

For demonstration purposes, highlight Preliminary Injunction and click on Next.
Note: To select more than one motion, press and hold down the Ctrl key, and click on each of the desired multiple forms of relief.
2. Enter the case number in which the document is to be filed.
A new Motions screen opens with a Case Number field. Enter the number of the case for which you are filing a motion and click on Next.
• If the number is entered incorrectly, click Clear to re‐enter. If the computer prompts that you entered an invalid case number, click on Back to re‐enter.
• When the case number is correct, click on Next .
3. Designate the party(s) filing the document.
CM/ECF User’s Manual (December 2009) Table of Contents 33

Highlight the name of the party, or parties, for whom you are filing the motion. If you represent all defendants or all plaintiffs you may select the entire group by holding down the control key while pointing and clicking on each party of the groupAfter highlighting the parties to the motion, click on the Next button.
Note: All parties should have been added to the case when it was opened. If your party does not appear, make sure you are filing in the correct case.
Add/Create a New Party In rare cases you may need to add a party to the ECF system. If the party you represent is not listed in the “Select a Party” screen, click on Add/Create New Party. The screen depicted below will appear.
You must first perform a search to see if your party has already been entered in the ECF system. Type the first few letters of the party’s last name for an individual or the first few letters of the company name.
Note: Before adding a party, check your case number to ensure that you are working in the correct case. Then, thoroughly search for the party’s last name or the company’s name before adding a new record to the database. Example of an incorrect search parameter: THE NORTH CAROLINA BAR Example of a correct search parameter: NORTH CAROLINA BAR
If a match is found, ECF will display a list of party names. If the name of the party you represent appears in the list, click on it and then click [Select name from list]. Review the party information and select the party’s role in this filing. Click [Submit]. If a match is not found, or your party does not appear in the list, click [Create new party].
NOTE: Incorrectly added parties will be periodically updated by the systems administrator but may appear on your pick‐list from time to time. Always choose an existing party that is properly formatted over one that was added incorrectly when presented with a list of possible matches. Correct Example: JOHN W SMITH JR Incorrect Example: John W. Smith, Jr.
CM/ECF User’s Manual (December 2009) Table of Contents 34

ECF displays the following screen:
• For a company, enter the entire company name in the Last Name field. Choose the appropriate Role from the drop down list. Click [Submit].
• For an individual, fill out the Last Name, First Name, Middle Name, Generation and Title fields as appropriate. Choose the appropriate Role from the drop down list. Click [Submit].
• Leave all other fields blank. Use the "Party text" field to add additional information to describe your party. Information added to this field is case specific and will not be transferred to all cases in the system using that particular party name.
Example:
Last Name Field = ABC CORPORATION Party Text Field = A NORTH CARROLINA CORPORATION First Name Field = JOHN Middle Name Field = H Last Name Field = SMITH Party Text Field = WARDEN
CM/ECF User’s Manual (December 2009) Table of Contents 35

Modifying Party Roles It is important that the user select the correct party role when adding a new party. The system defaults to "defendant (dft:pty)", and it is up to the user to change this designation when applicable. To change the "Role" field, click the down arrow and either use the mouse and the scroll bar or the keyboard to move through the options until the correct party role is found. Selections are in alphabetical order.
Once selected, the party type will appear in the "Role" field as shown below:
4. Specify the PDF file name and location for the document to be filed. ECF accepts the party or parties you selected and refreshes the screen to display a new Motions screen depicted below. ECF displays a field for locating and entering the PDF file of the document (pleading) you are filing in ECF.
CM/ECF User’s Manual (December 2009) Table of Contents 36

Note: It is imperative that you attach an electronic copy of the actual pleading when prompted by the system. All documents that you intend to file in ECF MUST reside in PDF format. Otherwise, ECF will not accept the document and users will be unable to retrieve and read your document from within ECF.
• Click on the Browse button. ECF opens the following screen.
• Change the Files of type from: HTML Files to: ALL Files (*.*) Navigate to the appropriate directory on your computer and find the file name to select the PDF document you wish to file. Highlight the file to upload to ECF.
Note: In order to verify that you have selected the correct document, right mouse click on the highlighted file name to open a quick menu and left mouse click on [open]. Adobe Acrobat® or Acrobat Reader® will launch and open the PDF document that you selected. You should view it to verify that it is the correct document.
CM/ECF User’s Manual (December 2009) Table of Contents 37
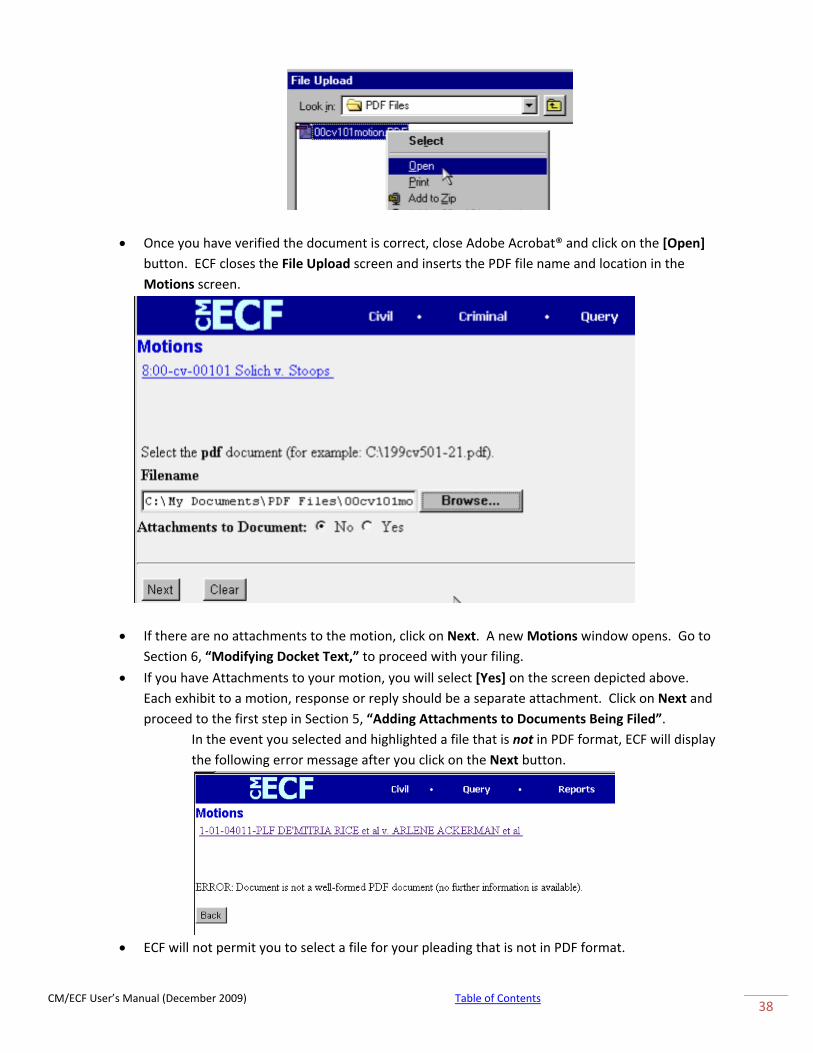
• Once you have verified the document is correct, close Adobe Acrobat® and click on the [Open] button. ECF closes the File Upload screen and inserts the PDF file name and location in the Motions screen.
• If there are no attachments to the motion, click on Next. A new Motions window opens. Go to Section 6, “Modifying Docket Text,” to proceed with your filing.
• If you have Attachments to your motion, you will select [Yes] on the screen depicted above. Each exhibit to a motion, response or reply should be a separate attachment. Click on Next and proceed to the first step in Section 5, “Adding Attachments to Documents Being Filed”.
In the event you selected and highlighted a file that is not in PDF format, ECF will display the following error message after you click on the Next button.
• ECF will not permit you to select a file for your pleading that is not in PDF format.
CM/ECF User’s Manual (December 2009) Table of Contents 38

• Click on the Back button and ECF will return to the Motions screen. Select and highlight the PDF file of your pleading and proceed as before. Failure to Select A Document to File If you fail to select a document to file with your pleading, ECF will display the error message depicted below.
• If you click [OK] from the screen depicted above ECF will return you to the Motions screen. You
cannot proceed without attaching a PDF document.
5. Add attachments to documents being filed.
Remember that each exhibit to a motion, response or reply should be a separate attachment. NOTE: Please see Section M of the Electronic Case Filing Administrative Policies and Procedures Manual for instructions on how to submit Proposed Orders for the Court’s approval. All proposed orders must be submitted in a format compatible with WordPerfect®, which is a “Save As” option in most word processing software. If you acknowledged the need to attach documents to your motion during the previous step, a new Motions screen appears.
• Click on Browse to search for the document file name of the attachment.
CM/ECF User’s Manual (December 2009) Table of Contents 39

• Next to the field for attachment Type, click on the arrow and ECF opens a pulldown screen. Highlight the type of attachment from the displayed selection.
• To describe the attachment more fully, click in the Description box and type a clear and concise description of the attachment. Your filing will be considered deficient if you do not perform this task.
• Click on [Add to List].
ECF adds the selected document as an attachment to the pleading. A new Motions screen opens to display the file name of the newly attached document.
• Repeat the sequence for each additional attachment.
• After adding all of the desired PDF documents as attachments, click on Next.
6. When attachments and exhibits are in paper format. All attachments or exhibits in paper form should be scanned using a scanner and appropriate software for the creation of files in PDF format when possible. Exhibits may be scanned into one or more files (each less than 2 MB in size) and attached for e‐filing using the procedure outlined above.
Tip: Be sure your scanner is set to black and white for text (unless it is a document that must be filed in color) and is set at a low image resolution, before scanning documents. The Clerk’s Office is using a scanner resolution of 200 x 200 in black and white mode.
Attachments or exhibits that cannot be scanned for e‐filing may be submitted to the Clerk’s Office in paper format. Attorneys may present paper filings using the following method:
E‐file a pleading indicating that certain attachments have not been scanned and will be, instead, filed with the clerk. Print the resulting Notice of Electronic Filing (NEF), attach it to the paper
CM/ECF User’s Manual (December 2009) Table of Contents 40

exhibits, and submit it to the clerk. Paper attachments submitted in this manner will be considered filed as part of the e‐filed pleading.
Note: For moderate length paper attachments, consider dividing them into two or more smaller attachments, scanning, and filing them electronically.
7. Modify docket text.
Click on the button shown here to open a modifier drop‐down list. Select a modifier if appropriate.
Click in the open text area to type additional text for the description of the pleading.
CM/ECF User’s Manual (December 2009) Table of Contents 41

Linking Documents (Refer to existing event) Some pleadings such as Briefs and Indexes should be “linked” to their related documents in the case. When filing these and certain other types of documents you will be presented with the following screen.
An “event” in CM/ECF is anything that has been filed in a case. To link the document you are currently filing to a previously filed document, check the box in front of “Refer to existing event(s)?” and click NEXT.
This screen requires that you filter the list of documents in the case by the type of document to which you want to link. The type list appears in alphabetical order. Document types in this list are the same as the types listed in the main filing menu. For example, to link to a Brief, you would choose the type “Oth_Doc” because Brief appears in the “Other Documents” section of
CM/ECF User’s Manual (December 2009) Table of Contents 42

the main menu. You must choose a type on this screen. You also have the option of entering filed dates or document numbers if you would like to further narrow your search. Once you select the type of document and click NEXT, you are presented with a list of documents that match your search criteria. For this example we have selected Motion as the type.
Click the checkbox for the document you wish to link to and click NEXT. You must link at least one document from the list. If you have arrived at this screen in error, click BACK on the browser toolbar and remove the check from the checkbox before the question “Refer to existing event(s)?” You will then be able to continue moving through the event without linking to a document.
Note: Many events offer users the ability to link to other documents in a case. When applicable, attorneys are encouraged to use this option as the linked records aid the judges and court staff when reviewing the case record.
8. Submit the pleading
• Click on the BACK button. A new Motions window appears with the complete text for the docket report.
• Review the docket text and correct any errors. If you need to modify data on a previous screen, click the BACK button on the internet browser toolbar to find the screen you wish to alter.
CM/ECF User’s Manual (December 2009) Table of Contents 43

• Click on the NEXT button to file and docket the pleading.
Note: The screen depicted above contains the following warning. Pressing the NEXT button on this screen commits this transaction. You will have no further opportunity to modify this transaction if you continue. At any time prior to this step, you can abort the ECF filing or return to previous screens by:
• clicking on any hyperlink on the Blue ECF menu bar to abort the current transaction. ECF will reset to the beginning of the process you just selected.
• clicking on the Web Browser BACK button until you return to the desired screen.
9. Notice of Electronic Filing.
ECF opens a new Motions window displaying an ECF filing receipt.
• The screen depicted above provides confirmation that ECF has registered your transaction and the pleading is now an official court document. It also displays the date and time of your transaction and the number that was assigned to your document. You should note this number on the document’s PDF file.
• Select [Print] on the internet browser toolbar to print the document receipt.
• Select [File] on the internet browser menu bar, and choose Save Frame As…from the drop‐down window to save the receipt to a file on the hard drive of your computer.
CM/ECF User’s Manual (December 2009) Table of Contents 44
Note: The Notice of Electronic Filing represents your Certificate of Service. The Court strongly urges you to copy it to a file on your computer hard‐drive, print it, and retain a hard copy in your personal files.
• ECF will electronically transmit the Notice of Electronic Filing to the attorneys who have filed a Notice of Appearance. The ECF filing report also displays the names and addresses of individuals who will not be electronically notified of the filing. It is the filer’s responsibility to serve hard copies of the pleading and the Notice of Electronic Filing to attorneys and parties who are not set up for electronic notification.
E‐Mail Notification of Documents That Were Filed
After a pleading is electronically filed, the ECF System sends a Notice of Electronic Filing to attorneys who have filed a Notice of Appearance. Individuals who receive electronic notification of the filing are permitted one "free look” at the document by clicking on the associated hyperlinked document number embedded in the Notice of Electronic Filing. The filer is permitted one free look at the document when they receive their Notice of Electronic Filing for that filing. (It is suggested that you note the document number assigned on your copy of the PDF file residing on your hard drive.) The Court strongly urges you to copy the Notice of Electronic Filing and pleading documents to your hard‐drive for future access. Subsequent retrieval of the case docket sheet and pleading from CM/ECF must be made through your PACER account and is subject to regular PACER fees.
Note: It is the responsibility of filers to send hard copies of the pleading and Notice of Electronic Filing to attorneys and pro se parties who have indicated they do not have E‐mail accounts.
Criminal Events Feature Registered filers will use the criminal feature of ECF to electronically self‐file and docket with the Court a variety of pleadings and other documents for criminal cases. See the list of ECF documents on our website www.nced.uscourts.gov (ECF Criminal Event List). Every party shall review and comply with Fed.R.Crim.P. 12.4 and Local Rule 12.3. Any electronically‐generated designation of a district judge or magistrate judge does not mean that the judge so designated is assigned to the case. This section of the manual describes the basic steps that you need to take in order to file a single motion with the Court. The process is consistent regardless of the event. Filing Documents for Criminal Cases There are ten basic steps involved in filing a criminal document:
1) Select the type of document to file (see Attorney Event Menu); 2) Enter the case number in which the document is to be filed;
CM/ECF User’s Manual (December 2009) Table of Contents 45

3) Designate the defendant that the filing relates to; 4) Verify that the case number and caption are correct. 5) Designate the party(s) filing the document; 6) Specify the PDF file name and location for the document to be filed. 7) Add attachments, if any, to the document being filed. 8) Modify docket text as necessary 9) Submit the pleading to ECF 10) Receive notification of electronic filing
After successfully logging into ECF, follow these steps to file a pleading.
1. Select the type of document to file.
Select Criminal from the blue menu bar at the top of the ECF screen. The Criminal Event window opens displaying all of the events from which you may choose for your filing. This section of the User's Manual describes the process for filing a Motion in ECF. The process is similar for filing other pleadings in ECF. Click on Motions, under Motions and Related Filings
CM/ECF User’s Manual (December 2009) Table of Contents 46

The Motions screen appears and displays a motion selection field with a scroll bar next to it. Scroll through the menu until you find the type of motion or application you wish to file.
For demonstration purposes, highlight Suppress and click on NEXT.
Note: To select more than one motion, press and hold down the Ctrl key, and click on each of the desired multiple forms of relief.
2. Enter the case number in which the document is to be filed.
A new Motions screen opens with a Case Number field. Enter the number of the case for which you are filing a motion and click on NEXT.
Note: if the case number you are working on is 1:00cr101, you could enter the case number in any of the following formats: 02‐100 02cr100 1:02‐cr‐100 1‐02‐cr‐100 1:02cr100
CM/ECF User’s Manual (December 2009) Table of Contents 47

• If the number is entered incorrectly, click CLEAR to re‐enter. If the computer prompts that you entered an invalid case number, click on BACK to re‐enter.
• When the case number is correct, click on NEXT.
3. Designate the defendant(s) that the filing relates to.
Click in the boxes to place a check next to each defendant’s name that this filing relates to. If it relates to all defendants in the case, check the box for “All Defendants” and leave the other boxes unchecked. When finished selecting defendants click on NEXT.
4. Verify the case number and caption is correct.
Click NEXT
5. Designate the party(s) filing the document.
CM/ECF User’s Manual (December 2009) Table of Contents 48

Highlight the name of the party or parties filing the motion. Click on the NEXT button.
Add/Create a New Party In rare cases you may need to add a party to the ECF system. If the party you represent is not listed in the “Select a Party” screen, click on Add/Create New Party. The screen depicted below will appear.
You must first perform a search to see if your party has already been entered in the ECF system. Type the first few letters of the party’s last name for an individual or the first few letters of the company name. If a match is found, ECF will display a list of party names. If the name of the party you represent appears in the list, click on it and then click [Select name from list]. Review the party information and select the party’s role in this filing. Click [Submit]. If a match is not found, or your party does not appear in the list, click [Create new party].
CM/ECF User’s Manual (December 2009) Table of Contents 49

ECF displays the following screen:
• For a company, enter the entire company name in the Last Name field. Choose the appropriate Role from the drop down list. Click [Submit].
• For an individual, fill out the Last Name, First Name, Middle Name, Generation and Title fields as appropriate. Choose the appropriate Role from the drop down list. Click [Submit].
• Leave all other fields blank. Use the "Party text" field to add additional information to describe your party. Information added to this field is case specific and will not be transferred to all cases in the system using that particular party name.
Example: Last Name Field = ABC CORPORATION Party Text Field = A NORTH CARROLINA CORPORATION First Name Field= JOHN Middle Name Field = H Last Name Field = SMITH Party Text Field = WARDEN Modifying Party Roles It is important that the user select the correct party role when adding a new party. The system defaults to "defendant (dft:pty)", and it is up to the user to change this designation when applicable. To change the "Role" field, click the down arrow and either use the mouse and the scroll bar or the keyboard to move through the options until the correct party role is found. Selections are in alphabetical order.
CM/ECF User’s Manual (December 2009) Table of Contents 50

Once selected, the party type will appear in the "Role" field as shown below:
6. Specify the PDF file name and location for the document to be filed.
ECF accepts the party or parties you selected and refreshes the screen to display a new Motions screen depicted below. ECF displays a field for locating and entering the PDF file of the document (pleading) you are filing in ECF.
Note: It is imperative that you attach an electronic copy of the actual pleading when prompted by the system. All documents that you intend to file in ECF MUST reside in PDF format. Otherwise, ECF will not accept the document and users will be unable to retrieve and read your document from within ECF.
CM/ECF User’s Manual (December 2009) Table of Contents 51

• Click on the BROWSE button. ECF opens the following screen.
• Change the Files of type from: HTML Files to: ALL Files (*.*)
• Navigate to the appropriate directory on your computer and file name to select the PDF document you wish to file.
• Highlight the file to upload to ECF.
Note: In order to verify that you have selected the correct document, right mouse click on the highlighted file name to open a quick menu and left mouse click on [open]. Adobe Acrobat or Acrobat Reader will launch and open the PDF document that you selected. You should view it to verify that it is the correct document.
CM/ECF User’s Manual (December 2009) Table of Contents 52

• Once you have verified the document is correct, close Adobe Acrobat® and click on the [Open] button in the lower right corner of the File Upload window. ECF closes the File Upload screen and inserts the PDF file name and location in the Motions screen.
• If there are no attachments to the motion, click on NEXT. A new Motions window opens. Go to Section 6, “Modifying Docket Text”, to proceed with your filing.
• If you have Attachments to your motion, you will select [Yes] on the screen depicted above. Each exhibit to a motion, response or reply should be a separate attachment. Click on NEXT and proceed to the first step in Section 5, “Adding Attachments to Documents Being Filed”.
In the event you selected and highlighted a file that is not in PDF format, ECF will display the following error message after you click on the NEXT button.
CM/ECF User’s Manual (December 2009) Table of Contents 53

• ECF will not permit you to select a file for your pleading that is not in PDF format.
• Click on the BACK button and ECF will return to the Motions screen. Select and highlight the PDF file of your pleading and proceed as before.
Failure to Select a Document to File If you fail to select a document to file with your pleading, ECF will display the error message depicted below.
• If you click [OK] from the screen depicted above ECF will return you to the Motions screen. You cannot proceed without attaching a PDF document.
7. Add attachments to documents being filed.
Remember each exhibit to a motion, response or reply should be a separate attachment. If you acknowledged the need to attach documents to your motion during the previous step, a new Motions screen appears.
CM/ECF User’s Manual (December 2009) Table of Contents 54

• Click on BROWSE to search for the document file name of the attachment.
• Next to the field for attachment Type, click on the arrow and ECF opens a pulldown screen. Highlight the type of attachment from the displayed selection.
o To describe the attachment more fully, click in the Description box and type a clear and concise description of the attachment. Your filing will be considered deficient if you do not perform this task.
• Click on [Add to List].
ECF adds the selected document as an attachment to the pleading. A new Motions screen opens to display the file name of the newly attached document.
CM/ECF User’s Manual (December 2009) Table of Contents 55

• Repeat the sequence for each additional attachment.
• After adding all of the desired PDF documents as attachments, click on NEXT. 8. When attachments and exhibits are in paper format
All attachments or exhibits in paper form should be scanned using a scanner and appropriate software for the creation of files in PDF format when possible. Exhibits may be scanned into one or more files (each less than 2 MB in size) and attached for e‐filing using the procedure outlined above. Tip: Be sure your scanner is set to black and white for text (unless it is a document that must be filed in color) and is set at a low image resolution, before scanning documents. The Clerk’s office is using a scanner resolution of 300 x 300 in black and white mode. Attachments or exhibits that cannot be scanned for e‐filing may be submitted to the Clerk’s Office in paper format. Attorneys may present paper filings using the following method: E‐file a pleading indicating that certain attachments have not been scanned, but rather, will be filed with the clerk. Print the resulting Notice of Electronic Filing (NEF), attach it to the paper exhibits, and submit it to the clerk. Paper attachments submitted in this manner will be considered filed as part of the e‐filed pleading.
Note: For moderate length paper attachments, consider dividing them into two or more smaller attachments, scanning, and filing them electronically.
Linking Documents (Refer to existing event) Some pleadings such as Briefs and Indexes should be “linked” to their related documents in the case. When filing these and certain other types of documents you will be presented with the following screen.
An “event” in CM/ECF is anything that has been filed in a case. To link the document you are currently filing to a previously filed document, check the box in front of “Refer to existing event(s)?” and click NEXT.
CM/ECF User’s Manual (December 2009) Table of Contents 56

This screen requires that you filter the list of documents in the case by the type of document to which you want to link. The type list appears in alphabetical order. Document types in this list are the same as the types listed in the main filing menu. For example, to link to a Brief, you would choose the type “Oth_Doc” because Brief appears in the “Other Documents” section of the main menu. You must choose a type on this screen. You also have the option of entering filed dates or document numbers if you would like to further narrow your search. Once you select the type of document and click NEXT, you are presented with a list of documents that match your search criteria. For this example we have selected Motion as the type.
Click the checkbox for the document you wish to link to and click NEXT. You must link at least one document from the list. If you have arrived at this screen in error, click BACK on the browser toolbar and remove the check from the checkbox before the question “Refer to existing event(s)?” You will then be able to continue moving through the event without linking to a document.
CM/ECF User’s Manual (December 2009) Table of Contents 57

Note: Many events offer users the ability to link to other documents in a case. When applicable, attorneys are encouraged to use this option as the linked records aid the judges and court staff when reviewing the case record.
9. Modify docket text.
Click on the button shown here to open a modifier drop‐down list. Select a modifier if appropriate.
Click in the open text area to type additional text for the description of the pleading.
10. Submit the pleading.
• Click on the NEXT button. A new Motions window appears with the complete text for the docket report.
CM/ECF User’s Manual (December 2009) Table of Contents 58

• Review the docket text and correct any errors. If you need to modify data on a previous screen, click the BACK button on the internet browser toolbar to find the screen you wish to alter.
• Click on the NEXT button to file and docket the pleading.
Note: The screen depicted above contains the following warning. Pressing the NEXT button on this screen commits this transaction. You will have no further opportunity to modify this transaction if you continue. At any time prior to this step, you can abort the ECF filing or return to previous screens by:
• clicking on any hyperlink on the Blue ECF menu bar to abort the current transaction. ECF will reset to the beginning of the process you just selected.
• clicking on the Web Browser BACK button until you return to the desired screen. 11. Notice of Electronic Filing
ECF opens a new Motions window displaying an ECF filing receipt.
CM/ECF User’s Manual (December 2009) Table of Contents 59

• The screen depicted above provides confirmation that ECF has registered your transaction and the pleading is now an official court document. It also displays the date and time of your transaction and the number that was assigned to your document. You should note this number on the document’s PDF file.
• Select [Print] on the internet browser toolbar to print the document receipt.
• Select [File] on the internet browser menu bar, and choose Save Frame As…from the drop‐down window to save the receipt to a file on the hard drive of your computer.
Note: The Notice of Electronic Filing is your confirmation that a document has been filed. The Court strongly urges you to copy it to a file on your computer hard‐drive, print it, and retain a hard copy in your personal files.
• ECF will electronically transmit the Notice of Electronic Filing to the attorneys and parties to the case who have supplied their E‐mail addresses to the Court. The ECF filing report also displays the names and addresses of individuals who will not be electronically notified of the filing. It is the filer’s responsibility to serve hard copies of the pleading and the Notice of Electronic Filing to attorneys and parties who are not set up for electronic notification.
E‐Mail Notification of Documents That Were Filed
After a pleading is electronically filed, the ECF System sends a Notice of Electronic Filing to the designated attorneys and parties who have supplied their E‐mail addresses to the Court. Only attorneys of record in the case are able to view pleadings in Criminal cases via the internet. Attorneys in multi‐defendant cases can only view, via the internet, those filings which relate directly to the party they represent. All other pleadings may be viewed at the courthouse. Individuals who receive electronic notification of the filing are permitted one "free look” at the document by clicking on the associated hyperlinked document number embedded in the Notice of Electronic Filing. The filer is permitted one free look at the document. The Court strongly urges you to copy the Notice of Electronic Filing and pleading documents to your hard‐drive for future access. Subsequent retrieval of the case docket sheet and pleading from CM/ECF must be made through your PACER account and is subject to regular PACER fees. Note: It is the responsibility of filers to send hard copies of the pleading and Notice of Electronic Filing to attorneys and pro se parties who have indicated they do not have E‐mail accounts.
Query Feature Registered participants should use this feature to query the Electronic Case Filing (ECF) system for specific case information. To enter the Query mode, click on Query from the Blue menu bar of ECF.
CM/ECF User’s Manual (December 2009) Table of Contents 60

ECF opens the PACER Login screen. You must enter your PACER login and password before ECF permits you to query the ECF database.
Note: Your PACER login and password are different from your ECF login and password. You must have a PACER account in order to retrieve, view, and print certain documents. Beginning July 2002, you will be charged a fee of $.08 per page to access documents, docket sheets, etc. from ECF.
After you enter your PACER login and password, ECF opens a Query data entry screen as depicted below. If you know the number that the Court has assigned to the case, enter it in the Case Number field and click on the [Run Query] button. ECF opens the query screen depicted in Figure B on the next page.
You may query the ECF database by the name of a party or an attorney to the case. Enter the last name of the party in the appropriate field. If more than one person with that name is in the database, ECF returns a screen from which to select the correct name (Figure A). If you click on the name of the party, ECF will open the query screen depicted in Figure B. If the individual is a party to more than one case, ECF will open a screen listing all of the party’s cases. Click on the case number hyperlink and ECF opens the query screen depicted in Figure B.
CM/ECF User’s Manual (December 2009) Table of Contents 61

Figure A
After querying the database by case number, name, or nature of suit, ECF opens the Query window for the specific case you selected. See Figure B. You may also query a case by the nature of suit. You must enter a range for either the filed date or the last entry date in order for the query to run. To search for all cases of a certain type, use the date 1/1/1970 as the "beginning of time". When you run the query, if there is more than one case that meet those criteria, you will get a screen similar to the one in Figure A, but listing multiple case numbers.
Figure B
1‐01‐01465‐JR HARRELL V. DISTRICT OF COLUMBIA James Robertson, presiding
Date filed: 07/02/2001 Date of last filing: 08/20/2001 Query Alias Associated Cases Attorney Case Summary Deadline/Hearing Docket Report Filers History/Documents Party Related Transactions Status
At the top of the window, ECF displays the case number, parties to the case, presiding Judge, date that the initial claim was filed, and date of last filing for the case. You may choose specific case information from a large list of query options by clicking on the appropriate hyperlinked name on the screen. The following paragraphs describe several of the available case‐specific query options. Attorney Displays the names, addresses, and telephone numbers of the attorneys who represent each of the parties to the case.
CM/ECF User’s Manual (December 2009) Table of Contents 62

Case Summary Provides a summary of current case‐specific information as represented below.
1‐01‐01465‐JR HARRELL V. DISTRICT OF COLUMBIA James Robertson, presiding
Date filed: 07/02/2001 Date of last filing: 08/20/2001
Case Summary
Office: Washington, DC Filed: 07/02/2001 Jury Demand: Both Demand: Nature of Suit: 442 Jurisdiction: Federal Question Cause: 28:1983 Civil Rights Disposition: County: Terminated: Origin: 1 Reopened: Lead Case: None Related Case(s): None Flags: JURY, TYPE‐H Party 1: WAYNE HARRELL (pla) Party 2: DISTRICT OF COLUMBIA (DFT) Atty: Ruth Ann Lowery Represents Party 1: pla Phone: (202) 789‐6064 Fax: (202) 789‐6190 E‐mail: [email protected] Atty: David A. Jackson Represents Party 2: dft Phone: (202) 724‐6618
Deadlines/Hearings Produces a screen that allows you to query the database by various means to obtain hearing and other schedule deadlines. If you query as illustrated below, ECF opens the Deadline/Hearings screen depicted on the next page.
After the window opens, if you click on a document number, ECF will display the actual Scheduling Order for the conference or hearing.
CM/ECF User’s Manual (December 2009) Table of Contents 63

If you click on the button to the left of the Deadline/Hearing title, ECF will display the docket information and related docketing entries for the hearing that you selected. Docket Report When you select Docket Report, ECF opens the Docket Sheet screen as depicted below.
You may select a date range for your docketing report as well as a range of docketing numbers. If you leave the range fields blank, ECF will default to print the entire docketing report. Place a checkmark in the box to Include links to Notice of Electronic Filing if you wish to view them from the docket sheet. After you have selected the
CM/ECF User’s Manual (December 2009) Table of Contents 64

parameters for your report, click on the [Run Report] button. ECF will run your custom docketing report and display it in a window as depicted below.
The document numbers in the middle column are hyperlinks to PDF files of the actual documents. Place your pointer on the button next to the document number and click to display the Electronic Notification Report for the document. History/Documents This selection queries the database for case event history and documents associated with the case. After you click on the History/Documents hyperlink, ECF opens the screen depicted below. You may select the sort order for the query report and choose to exhibit all events or only those with documents attached. ECF also offers you the option to display the docket text in the report. After making your selections, click on the [Run Query] button. ECF queries the database and builds your report. The image below depicts a portion of a History/Documents report. This particular report lists all of the events and documents associated with the case in reverse chronological order. It also displays the docketing text for all docketed events.
CM/ECF User’s Manual (December 2009) Table of Contents 65

You may view a PDF file of actual documents by clicking on the document number in the far‐left column of the onscreen report. Other Queries The process for selecting and running other queries in the Query feature of ECF is similar to what has been described above.
Reports Feature The Reports feature of ECF provides the user with several report options. After selecting the Reports feature from the Blue menu bar, ECF opens the Reports screen depicted below:
CM/ECF User’s Manual (December 2009) Table of Contents 66

Calendar Events Cases Filed Docket Sheet If you select Cases Filed or Docket Sheet from the screen depicted in Figure 25, ECF will ask you to login to PACER. You may view Court Calendar Events for a case without logging into PACER. Docket Sheet Click on the Docket Sheet hyperlink and ECF opens the PACER login screen. Enter your PACER login and password. Click on the [Login] button and ECF will open the Docket Sheet report query window depicted below.
This is the same query window that ECF displayed when you selected Docket Report from the Query feature. Enter the case number for your docket sheet in the Case Number field. Select parameters for the remainder of the data entry fields and click on the [Run Report] button. ECF will display a full docket sheet for the case you selected. See the Query feature section of this manual for a depiction of a partial docket sheet report. If you do not need a complete docket sheet, you can narrow the query using the date filed/entered fields. ECF also offers various sorting options from the Docket Sheet query screen. Civil Cases Report The Civil Cases report provides you with the flexibility to query the ECF database to locate cases electronically filed within a specific date range, or by Nature of Suit and Cause Code. When you click on the Civil Cases hyperlink, ECF displays a query screen as depicted here.
CM/ECF User’s Manual (December 2009) Table of Contents 67

Note: If you are not logged into PACER, ECF will display the PACER login screen. Login to PACER and ECF will open the Civil Cases Report screen. Enter the range of case filing dates for your report and select a Nature of Suit or Cause Code, if you wish to narrow your search. If you leave all fields blank, ECF will display a report for all cases opened in ECF. This picture depicts part of a report of all cases filed in ECF at the U.S. District Court from 9/23/2002 to 10/23/2002.
The far‐left column of the Cases Filed report contains hyperlinked case numbers. If you click on a particular case number, ECF opens the Docket Sheet report window from which you can retrieve the docket sheet for the selected case. Follow the instructions in the previous section for a Docket Sheet report.
Utilities Feature The Utilities feature provides the means for registered users to maintain their account in ECF and to view all of their ECF transactions.
CM/ECF User’s Manual (December 2009) Table of Contents 68

Your Account This section of the Utilities feature provides you the capability to maintain certain aspects of your ECF account with the Court and to view a log of all your transactions within ECF. The functionality of this portion of CM/ECF is discussed in full beginning on page 5 of this manual. Miscellaneous ECF provides three Miscellaneous functions within the Utilities feature of the system.
• Legal Research
• Mailings
• Verify a Document When you click on the Legal Research hyperlink from the Miscellaneous screen, ECF opens a new screen that contains hyperlinks to a Law Dictionary, a Medical Dictionary, and Westlaw via the Internet. Select the Verify a Document hyperlink to open a query screen and enter data in the screen fields to locate a particular document attached to a specific case number. There is also a Mailings hyperlink that opens a new screen for making or requesting mailings from ECF.
CM/ECF User’s Manual (December 2009) Table of Contents 69