Embed Size (px)
Citation preview

PRODUCT FEATURES
A NOTE TO YOUThank you for purchasing a DAEWOO Dryer. Please read this manual carefully, as it provides instructions on safe installation, use, and maintenance Record the model and serial numbers, and retain the manual for future reference. For more information, please visit our website at http://www.e-daewoo.com <http://www.e-daewoo.com/>
Ver. 2010 2ND
" OUTSTANDING PERFORMANCEBesides the large capacity, you can benefit from faster drying time, quietoperation, and energy efficiency.
" STAINLESS STEEL DRUMStainless steel drum resists rust.
" DIGITAL FABRIC CAREMulti-Level temperature control takes better care of your clothes.
" EASE OF USEAn entire selection of user-friendly functions make operating the dryereasier.
" ONE TOUCH SELECTIONSTo choose an option, press its button once. No need to press buttons multiple times to scroll through a listof options.
Your dryer provides sensor drying and time drying programs.
Sensor DryThe dryer senses the dampness of the laundry and automatically determines the heat level and operationtime. You might see a sudden increase or decrease in operation time if the sensor determines more or lessdrying is required. This is not a malfunction.
Time DryUse TIME DRY to select heat level and drying time manually. This can be used if clothes are not as dry asyou like them at the end of the cycle. Use TIME DRY for heavy and bulky items and thick work.
What are Sensor Dry and Time Dry?
CONTACT INFORMATION
Website : http://www.e-daewoo.com
Call : 1-877-393-7823(1-877-DWESVC3)
Electric and Gas DryerDWR-WE3011WW/RR, DWR-WE31WW, DWR-WE33WS/SS/RR
DWR-WG3011WW/RR, DWR-WG31WW, DWR-WG33WS/SS/RR

2
[SEEKING WARRANTY SERVICE]The warranty information for your dryer is located at the end of this manual. Warranty Service is available bycontacting the nearest DAEWOO Service Center. If this product is installed and operated according to the instructions in this manual, DAEWOO willrepair or replace any parts defective in material or workmanship throughout the warranty period, beginning with thedate of purchase.
Warranty Restriction :If the dryer is subjected to other than single family use, all warranty coverage is effective for only 90 days.You will need the complete model and serial number when requesting warranty service. A proof of purchase is alsorequired.Use the space below to record the model number and serial number of your new DAEWOO dryer.
Model Number
Serial Number
Date of Purchase
❈ Staple your receipt here for convenience when contacting service.
WARNING!
For your safety, the recommendations in this manual must be followed. To reduce the risk of fire or explosion,electric shock or to prevent property damage, personal injury, or death when using your appliance follow basic precautions
NOTE : These manual should be retained for future reference.
FOR YOUR SAFETYDo not store or use gasoline or other flammable vapors and liquids in the vicinity of this or any other appliance.
- Do not store or use gasoline or other flammable vapors and llqulds in the vicinlty of this or any other appllance.
- WHAT TO DO IF YOU SMELL GAS• Do not try to light any appliance.• Do not touch any electrical switch; do not use any phone in your building.• Clear the room, building or area of all occupants.• Immediately call your gas supplier from a nel ghbor’s phone. Follow the gas supplier’s Instructions.• If you cannot reach your gas supplier, call the fire department.
- Install ation and service must be performed by a qualified lnnstaller, service agency or the gas supplier.
WARNING : For your safety the information in this manual must be followed to minimize the risk of fire orexplosion or to prevent property damage, personal lnjury or dearth.
IMPORTANT WARRANTY AND SAFETY INSTRUCTIONS

3
■ Type : Electric and Gas Dryer
■ Rating : Please refer to the rating label regarding
detailedinformation.
■ Size : 27 x 32.4 x 40.1 inches
■ Capacity : 7.0 cu.ft. IEC, 10.4kg(22.9lb)
DWR-WE3011WW/RR
7.3 cu.ft. IEC, 10.4kg(22.9lb)
DWR-WE31WW, DWR-WE33WS/SS/RS
■ Weight : 128 Ibs (58.5 kg)
❈ Specifications are subject to change by manufacturer.
PART 1. SPECIFICATIONS............................................................................................................................3
PART 2. INITIAL STEPS FOR INSTALLING YOUR DRYER........................................................................7
PART 3. ACCESSORIES INSTALLATION ..................................................................................................17
PART 4. ELECTRICAL REQUIREMENTS FOR ELECTRIC DRYER ........................................................18
PART 5. ELECTRICAL REQUIREMENTS FOR GAS DRYERS ................................................................24
PART 6. GAS REQUIREMENTS AND INSTRUCTIONS ............................................................................25
PART 7. USER - MAINTENANCE INSTRUCTIONS ...................................................................................26
PART 8. OPERATING YOUR DRYER.........................................................................................................28
PART 9. TROUBLESHOOTING GUIDE ......................................................................................................35
■ Accessories
❈ Design of pedestals is subject tochange without manufacturersnotice.
Dryer Rack (Option) Pedestal (Option) Skating Kit (Option)
TABLE OF CONTENTS
PART 1 SPECIFICATIONS

4
[IMPORTANT SAFETY INSTRUCTIONS]
1) Read all instructions before using the appliance.2) Do not dry articles that have been previously cleaned in, washed in, soaked in, or spotted with gasoline, dry-
cleaning solvents, or other flammable or explosive substances, as they give off vapours that could ignite or explode.3) Do not allow children to play on or in the appliance. Close supervision of children is necessary when the appliance
is used near children.4) Before the appliance is removed from service or discarded, remove the door to the drying compartment.5) Do not reach into the appliance if the drum is moving.6) Do not install or store this appliance where it will be exposed to the weather.7) Do not tamper with controls.8) Do not repair or replace any part of the appliance or attempt any servicing unless specifically recommended in the
user-maintenance instructions or in published user-repair instructions that you understand and have the skills tocarry out.
9) Do not use heat to dry articles containing foam rubber or similarly textured rubber-like materials.10) Clean lint screen before or after each load.11) Keep area around the exhaust opening and adjacent surrounding areas free from the accumulation of lint, dust, and
dirt.12) The interior of the appliance and exhaust duct should be cleaned periodically by qualified service personnel.13) Do not place items exposed to cooking oils in your dryer. Items contaminated with cooking oils may contribute to a
chemical reaction that could cause a load to catch fire.14) Do not use fabric softners or products to eliminate static unless recommended by the manufacturer of the fabric
softner or product.15) This dryer is designed only for residential use.16) Ensure pockets are free from small irregularly shaped hard objects, foreign material, etc. ie. coins, knives,pins, etc.
These objects could damage your dryer.17) Do not wash clothing with large buckles, buttons, or other heavy metal or solid decorative things.
[SAVE THESE INSTRUCTIONS]USING INSTRUCTIONS1) Do not overload the drum, that may cause poor drying and wrinkling.2) Do not over dry fabrics such as knitted fabrics and flannel.3) Do not dry items such as elastic bands, plastics,rubberized items, or sneakers that might melt or ignite in the dryer.4) Check the lint filter is in place.5) Make sure the laundry is not caught when the door is closed to prevent fabric damage.6) Check the filter every cycle because a clogged filter causes fire hazardous condition and affects the dryer
efficiency.7) When cleaning the surface of the drum, you should use a non-abrasive stainless steel cleaner.8) To prevent a short circuit or penetrating moisture, make sure the lamp cover is firmly closed.9) Do not sit on top of the dryer.
WARNING!
To help reduce any risk of electric shock, fire, or other personal injury or property damage when using yourAppliance, please exercise care and follow basic safety precautions, including the following:
NOTE: Because of continuing product improvements, Daewoo reserves the right to change specificationswithout notice. For complete details, see the Installation Instructions packed with your product beforeselecting cabinetry, making cutouts, or beginning installation.

5
[GROUNDING INSTRUCTIONS]A. For a grounded, cord-connected appliance:This appliance must be grounded. In the event of malfunction or breakdown, grounding will reduce the risk ofelectric shock by providing a path of least resistance for electric current. This appliance must be equipped with acord having an equipment-grounding conductor and a grounding plug. The plug must be plugged into anappropriate outlet that is properly installed and grounded in accordance with all local codes and ordinances.
Do not modify the plug provided with the appliance. If it will not fit the outlet, have a proper outlet installed by aqualified electrician.
B. For a permanently connected appliance:This appliance must be connected to a grounded metal, permanent wiring system; or an equipment-groundingconductor must be run with the circuit conductors and connected to the equipment-grounding terminal or lead onthe appliance.
WARNING!
Improper connection of the equipment grounding conductor can result in a risk of electric shock.Check with a qualified electrician or service representative or personnel if you are in doubt as to whether theappliance is properly grounded.

6
California Safe Drinking Water and Toxic Enforcement ActThis act requires the governor of California to publish a list of substances known to the state to cause cancer, birthdefects or other reproductive harm and requires businesses to warn customers of potential exposure to suchsubstances.Gas appliances can cause minor exposure to four of these substances, namely benzene, carbon monoxide,formaldehyde and soot, caused primarily by the incomplete combustion of natural gas or LP fuels.Properly adjusted dryers will minimize combustion. Exposure to these substances can be minimized further byproperly venting the dryer to the outdoors.Do not allow children to play on or in the appliance. Close supervision of children is necessary when the applianceis used near children.
WARNING!
• Keep flammable materials and vapors, such as gasoline, away from the dryer.• Place dryer at least 18 inches above the floor for a garage installation.• Failure to do so can result in death, explosion or fire.
WARNING!
To reduce the risk of fire or explosion, electric shock, property damage, personal injury or death when using thisappliance, please follow all instructions and information, including those in this manual and instructions providedby your gas supplier.• Do not store or use any gasoline, dry-cleaning solvents other flammable vapors or liquids in the area
surrounding this appliance.• Do not dry anything that has or ever had anything flammable on it, even after washing.• No washer can completely remove oil. Do not dry any articles that have or ever had any kind of oil on them,
including cooking oil.• Articles containing foam, rubber, rubber-like materials, plastic or similar materials should be air dried.• Failure to follow these instructions can result in fire, death or serious injury.• A qualified service person or company must perform installation and service of this appliance.
7
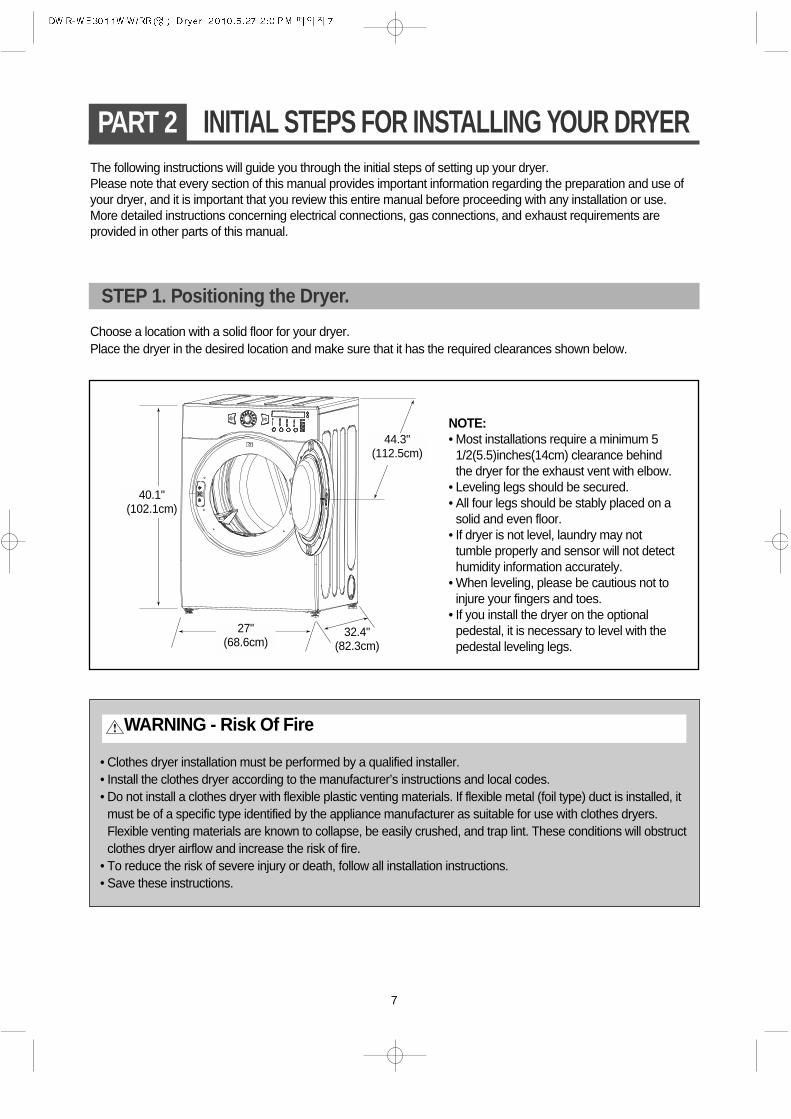
The following instructions will guide you through the initial steps of setting up your dryer.Please note that every section of this manual provides important information regarding the preparation and use ofyour dryer, and it is important that you review this entire manual before proceeding with any installation or use. More detailed instructions concerning electrical connections, gas connections, and exhaust requirements areprovided in other parts of this manual.
Choose a location with a solid floor for your dryer.Place the dryer in the desired location and make sure that it has the required clearances shown below.
NOTE: • Most installations require a minimum 5
1/2(5.5)inches(14cm) clearance behindthe dryer for the exhaust vent with elbow.
• Leveling legs should be secured.• All four legs should be stably placed on a
solid and even floor.• If dryer is not level, laundry may not
tumble properly and sensor will not detecthumidity information accurately.
• When leveling, please be cautious not toinjure your fingers and toes.
• If you install the dryer on the optionalpedestal, it is necessary to level with thepedestal leveling legs.
PART 2 INITIAL STEPS FOR INSTALLING YOUR DRYER
40.1"(102.1cm)
27"(68.6cm)
44.3"(112.5cm)
32.4"(82.3cm)
STEP 1. Positioning the Dryer.
• Clothes dryer installation must be performed by a qualified installer.• Install the clothes dryer according to the manufacturer’s instructions and local codes.• Do not install a clothes dryer with flexible plastic venting materials. If flexible metal (foil type) duct is installed, it
must be of a specific type identified by the appliance manufacturer as suitable for use with clothes dryers.Flexible venting materials are known to collapse, be easily crushed, and trap lint. These conditions will obstructclothes dryer airflow and increase the risk of fire.
• To reduce the risk of severe injury or death, follow all installation instructions.• Save these instructions.
WARNING - Risk Of Fire

8
Minimum clearances on above, behind, and sides of the unit, as shown below, are required.
Those required minimum clearances are set forth in the picture below. Please keep the following instructions inmind when installing in a closet or recessed area:• Consider allowing additional clearance for installation and servicing.• Wall, door and floor molding may necessitate additional clearances.• Additional inches of clearance are recommended to reduce noise while operating.• Consider the space needed for companion appliances.• For closet installations, the picture below shows the minimum required ventilation openings for the door.A louvered door with comparable ventilation openings is also acceptable.
Once in position, adjust the leveling legs of the dryer until it is level from left to right and front to back.The leveling legs must remain firmly on the floor and the dryer should not rock. The maximum slope of the dryerfrom left to right or front to back should not exceed 2.5 cm (1 inch). If the dryer is not level, and if the slope exceeds2.5 cm (1 inch), a load may not tumble properly and internal sensors may malfunction.
NOTE: Other sections of this manual also provide important information concerning the placement of and clearancesfor your dryer.Please review this entire manual before proceeding with any installation.
Closet Door Closet Side View Closet-Front View
ventilationhole
ventilationhole
14" max(35.6cm)
18"(45.72cm)
32.4"(82.3cm)1"
(2.54cm)1"
(2.54cm)0"
(0cm)0"
(0cm
27"(68.6cm)

9
Open in position, adjust the leveling legs of the dryeruntil it is level from left to right and front to back. Besure to tighten the leveling leg lock nuts against thebottom of the dryer.The leveling legs must remain firmly on the floor andthe dryer should not rock. The maximum slope of the dryer from left to right orfront to back should not exceed 1”(2.5 cm). If the dryeris not level, and if the slope exceeds 1” (2.5 cm), aload may not tumble properly and internal sensorsmay malfunction.
NOTE: Other sections of this manual also provideimportant information concerning the placement ofand clearances for your dryer.Please review this entire manual beforeproceeding with any installation.
Installation nstructions

10
In addition to the following warnings, please refer to manual section on Exhaust Requirements and Maintenance.
IMPORTANT: To reduce the risk of fire, combustion, and gas accumulation, the dryer must be vented to theoutdoors. Please follow the instructions (and all others in this manual) very carefully.
• Foil-type flexible ducts complied with the outline for clothes dryer transition duct, Subject UL 2158A, shall be used.• Do not use plastic or thin foil duct.• Use 4" (10.2 cm) diameter rigid or semi-rigid metal duct (NOTE! Venting materials are not supplied with the dryer,
and you should obtain the venting materials necessary for proper installation)• Use the maximum duct length and number of bends refered to "USER-MAINTENANCE INSTRUCTIONS".• Position the dryer such that the exhaust duct run is as short as possible.• The duct shall not be assembled with screws or other fastening means that extend into the duct and catch lint.
Clean old ducts before installing this dryer• The male end of each section of exhaust duct must point away from the dryer.• Use as few elbow joints as possible.• Use duct tape on all duct joints.• Insulate ductwork that runs through unheated areas in order to reduce condensation and lint build-up on pipe
walls.
PLEASE BE AWARE THAT FAILURE TO EXHAUST THE DRYER CORRECTLY WILL VOID THEDRYER’S WARRANTY.
Combustible materials, gasoline, and other flammable vapors and liquids must not be stored nearthe dryer.
The dryer must be disconnected from the gas supply piping system during pressure testing atpressures greater than 1/2psi(3.5kPa).
The dryer must be exhausted to the outdoors.
WHEN DISCARDING OR STORING YOUR OLD CLOTHES DRYER, REMOVE THE DOOR.
STEP 2. Connecting the Exhaust System
WARNING!• To reduce the risk of fire this appliance MUST BE EXHAUSTED OUTDOORS.• The appliance shall not be exhausted into a chimney, a wall, a ceiling, an attic, a crawl space, or a concealed
space of a building.• Only rigid or flexible metal duct should be used, for exhausting.• The total length of flexible metal duct shall not exceed 2.4 m.• Do not use plastic or thin foil duct.• Failure to follow these instructions can result in death or fire.• Clean old ducts before installing this dryer.• The exhaust must be vented to the outside.• Improper taping and incorrect installation will cause dryer malfunction.

11
■ ALTERNATE EXHAUST DIRECTIONS
1. Remove screw and exhaust duct.
2-1. Detach and remove the knockout thatmatches the desired venting direction(Right side not available on Gas Dryers)
2-2. Reconnect the new duct[8.66 inch(22cm)]to the blower housing, and fixing the ductto the base.
3-1. Insert the male end of a 4" elbow into thefemale end of a short duct. Tape the joint.
3-2. Insert this assembly elbow first throughthe hole in the dryer and push the femaleend of the elbow onto the male end of theblower output shaft. Tape the joint.

12
STEP 3. Connection of Gas Supply
(Gas dryer only). In addition to the following, please refer to manual section on Gas Requirements and Instructions.
1. New stainless steel flexible connector. Use this type of connector only if allowed by local codes. Use Design AGACertified Connector.
2. 1/8" NPT Pipe Plug (for checking inlet gas pressure)3. Equipment Shut-Off Valve Installed within 6’ (1.8 m) of dryer.4. Iron Pipe. Shorter than 20’ (6.1 m) Use 3/8" pipe. Longer than 20’ (6.1 m) - Use 1/2" pipe.5. 3/8" N.P.T. Gas Connection.
1. Confirm that the type of gas available in your laundry room is appropriate for the dryer. The dryer is prepared forNatural Gas with a 3/8" NPT gas connector.
2. Remove the shipping cap on the gas connector at the back of the dryer. Make sure that you don’t damage thethreads of the gas connection pipe when you remove the shipping cap.
3. Connect the dryer to your laundry room’s gas supply using a new flexible stainless steel connector (as notedbelow, use a new stainless steel flexible connector if allowed by your local codes).
4. Securely tighten all connections between the dryer and your laundry room’s gas supply. Turn on your laundryroom’s gas (both supply and check all pipe connections internal and external) for gas leaks with a non-corrosiveleak detection fluid.
5. For LP (Liquefied Petroleum) gas connection, refer to this manual’s section entitled Gas Requirements andInstructions.
2
35
1
4
NOTE: Make sure the burner orifice is proper for the type of gas you have.For instance, using LPG with LNG orifice will result in death, fire or explosion. Or using LNG with LPG nozzle will not allow the burner to ignite.If needed, orifice conversion should be done by a qualified service technician and mark or put the label of thecurrent type of orifice on the dryer.If changing the orifice, also adjust the gas valve.

13
STEP 4. Electrical Plug Connections
Following steps are several warnings and instructions concerning making the electrical connection for electricdryers.More detailed information concerning the electrical connection is provided in the manual section entitled ElectricalRequirements for Electric Dryer.It is important that you thoroughly review that section and the remainder of this manual, before taking any steps toinstall or use this dryer.
1. Use only a new UL listed No. 10 (copper wire only) three or four conductor power supply cord kit rated 240 Volts(minimum) 30 Amperes and labeled as suitable for use in a clothes dryer.
2. A four-wire cord is required for manufactured (mobile) home installations and where local codes do not allowgrounding of this appliance through neutral.
3. Electrical Plug Connections.4. For additional instruction on connecting the dryer to an electrical power source, please refer to this manual's
section on Electrical Requirements and Electric Dryer.
NOTE:
Burner input requirementsIf your house is located at the elevations up to 10,000 feet.Adjusting burner input setting is not required at this elevation because AGA certifies this dryer will not have anyproblem with the BTU rating at this altitude.If your house is located above 10,000 feet, you are required to adjust a four percent (4%) reduction of the burnerBTU rating indicated on the model/serial rating plate.
WARNING!
• Use a new UL listed 30 amp power supply cord.• Use a UL approved strain relief.• Disconnect power before making electrical connections.• Connect neutral wire (white or center wire) to center terminal.• Ground wire (green or bare wire) must be connected to green ground connector.• Securely tighten all electrical connections• See installation instructions for complete instructions.• Failure to do so may result in fire or electrical shock.

14
STEP 5. Preparation of the Dryer
Prior to the first use of this appliance, use all purpose cleaning products or a solution of detergent and water, withdamp cloth to remove from the inside of the dryer drum/drying compartment any dust or dirt that may haveaccumulated inside the dryer.Plug-in your dryer after reviewing the following parts on your dryer’s Electrical Requirements.
STEP 6. Confirming Heat Source Operation
Confirming Heat Source in Gas DryersClose the door to the dryer drum/drying compartment and, after completing all steps in this manual for properinstallation of this dryer, start the dryer on a heat setting.After the dryer starts, the igniter will glow red and the main burner will ignite.
STEP 7. Dryer Airflow
Effective dryer operation requires appropriate dryer airflow. The adequacy of the airflow can be measured by evaluating thestatic pressure.Static pressure in the exhaust duct can be measured with amanometer, placed on the exhaust duct approximately 1 ft. (30.5cm) from the final outlet.Static pressure in the exhaust duct should not exceed 7.6mm watercolumn. The dryer should be checked while the dryer is running with no load.
Confirming Heat Source in Electric DryersClose the door to the dryer drum/drying compartment and, after completing all steps in this manual for properinstallation of this dryer, start the dryer on a heat setting.The exhaust air or the exhaust pipe should be warm after the dryer has been operating for three minutes.
WARNING!
If all air is not purged from the gas line, the gas igniter may go off before the gas and the main burner haveignited. If this happens, the igniter will re-attempt gas ignition after approximately two minutes.
Manometer
Measuring Static pressure
MAXIMUM STATIC PRESSURE IN
WATER COLUMN7.6mm
Exhaust Duct

15
STEP 9. Additional Instructions for Installation of Your Dryer in a Manufactured or Mobile Home.
The following instructions are applicable to installations of the dryer in a manufactured or mobile home.Any installation in a manufactured or mobile home must comply with the Manufactured Home Construction andSafety Standards Title 24 CFR, Part 32-80 or Standard CAN/CSA0Z240 MH and local codes and ordinances. If you are uncertain whether your proposed installation will comply with these standards, please contact a serviceand installation professional for assistance. (CONTACT INFORMATION : 1-877-393-7823(1-877-DWESVC3)
The following instructions apply to any installation of the dryer in a manufactured or mobile home:1) The electrical connection for an electric dryer must be a 4-wire connection. More detailed information concerning
the electrical connection is provided at the manual section entitled Electrical Requirements for Electric Dryer2) To reduce the risk of combustion and fire, the dryer must be vented to the outside.3) Electric dryers may be vented to the outside using the back, left, right, or bottom panel.4) Gas dryers may be vented to the outside using the back, left, or bottom panel. Gas dryers must not be vented to
the outside using the right side panel because of the burner housing.5) The dryer exhaust duct must be affixed securely to the manufactured or mobile home structure, the exhaust duct
must be made of a material that will resist fire and combustion, and it is recommended that you use a rigid orflexible metal pipe.
6) DO NOT connect the exhaust duct with any other exhaust duct, vent, or chimney.7) Make sure the dryer has adequate access to outside fresh air to ensure proper operation.
The opening for outside fresh air must be at least 25 in2 (163 cm2).8) It is important that the clearance of the duct from any combustible construction be at least 2 inches (5 cm), and,
when venting the dryer to the outdoors, the dryer can be installed with a clearance of 1 inch at the sides and backof the dryer.
9) Please be aware that venting materials are not supplied with the dryer. You should obtain the venting materials necessary for proper installation.
WARNING!
DO NOT connect exhaust ducts with metal screws or fasteners that extend into the duct.DO NOT vent the exhaust duct under the manufactured or mobile home.
STEP 8. Procedure for Reversing the Door
The door on your dryer can be installed to open either to the left or the right. Follow these instructions to reverse thedirection in which your door opens:Note : Door and latch should be aligned at the center when closed.

16
STEP10. Connecting the inlet hose
The dryer must be connected to the cold water faucet using thenew inlet hoses. Do not use old hoses.1. If space permits, attach the brass female end of the “Y”
connector to the cold water faucet.2. Turn the cold water faucet off.3. Attach the straight end of long hose to “Y” connector.4. Using pliers, tighten the coupling with an additional two-thirds
turn.5. Attach angled end of long hoses to fill the valve at the bottom
of the dryer’s rear frame. Screw on coupling by hand until it isseated on fill valve connector.
6. Using pliers, tighten the coupling with an additional two-thirdsturn.
7. Check that the water faucets are on.8. Check for leaks around “Y” connector, faucets and hoses.

17
Stacking Kit Installation Instructions(DRYER & PEDESTAL)
To ensure safe and secure installation, please observe the instructions below.
1) Remove pedestal, installation hardware, and instructions are in the shipping carton.2) Position dryer on top of the pedestal.
A : Uninstalling an electric dryer:1Unplug the power supply cord,2Pull the dryer away from the wall enough to loosen
the vent clamp.Loosen the clamp and carefully remove the exhaust vent from the dryer exhaust outlet.
B : Uninstalling a gas dryer:1Shut off gas.2Unplug power cord.3Disconnect gas line from dryer.4Pull away and loosen vent clamp.5Disconnect venting.
PART 3 ACCESSORIES INSTALLATION
WARNING!
Incorrect Installation can cause serious accidents.The weight of the dryer and the height of installation makes the stacking procedure too risky for one person.This procedure should be performed by 2 or more experienced service personnel.
NOTE: Because of the weight of the dryer two or more people may be needed.If dryer was previously installed, uninstall it as followsRefer to pedestal installation manual.(Pedestal Model : P-W151)

18
The following are additional instructions regarding electrical connections and requirements for electric dryers.
Instructions for Grounding of your Electric Dryer:
a) This dryer must be connected to a grounded metal, permanent wiring system or an equipment-groundingconductor must be run with the circuit conductors and connected to the equipment-grounding terminal orlead on the dryer.
b) The dryer has its own terminal block that must be connected to a separate 60 Hertz single phase ACcircuit, fused at 30 Amperes (the circuit must be fused on both sides of the line).
ELECTRICAL SERVICE FOR THE DRYER SHOULD BE OF MAXIMUM RATE VOLTAGE LISTED ONTHE NAMEPLATE.DO NOT CONNECT DRYER TO 110, 115, OR 120 VOLT CIRCUIT.
c) If branch circuit to dryer is fifteen feet (4.50 m) or less in length, use U.L. (Underwriters Laboratories) listedNo. 10 A.W.G. wire (copper wire only), or as required by local codes.If over fifteen feet (4.50 m), use U.L. (Underwriters Laboratories) listed No. 8 A.W.G. wire (copper wireonly), or as required by local codes.Allow sufficient slack in wiring so dryer can be moved from its normal location when necessary.
d) The power cord (pigtail) connection between wall receptacle and dryer terminal block IS NOT supplied withdryer. Type of pigtail and gauge of wire must conform to local codes and with instructions mentioned on thefollowing pages.
e) The method of wiring the dryer is optional and subject to local code requirements. Refer to examples onnext page.
f) You must select the method by which to wire your dryer according to local code and ordinancerequirements.Sample methods are included in the following pages.
PART 4 ELECTRICAL REQUIREMENTS FOR ELECTRIC DRYERS
Important Warning
To help prevent fire, electric shock, serious injury or death, the wiring and grounding must conform to the latestedition of the National Electrical Code, ANSI/NFPA 70 and all applicable local regulations.Please contact a qualified electrician to check your home’s wiring and fuses to ensure that your home hasadequate electrical power to operate the dryer.
120V/ 240V, 60 Hertz, 3-Wire Installation

19
Review the following options to determine the appropriate electrical connection for your home:
Use the instructions in this section if your home has a4-wire receptacle (NEMA type 14-30R) and you will beusing a UL listed, 120/240 volt minimum, 30 amp,dryer power supply cord.
Use the instructions in this section if your home has a3-wire receptacle (NEMA type 10-30R) and you will beusing a UL listed, 120/240 volt minimum, 30 amp,dryer power supply cord.
4-wire receptacle (NEMA type14-30R)
3-wire receptacle (NEMA type10-30R)
If this type is available at your home. you will beconnecting to a fused disconnect or circuit breakerbox.
If this type is available at your home. you will beconnecting to a fused disconnect or circuit breakerbox.
4-wire direct 3-wire direct

20
Important : Grounding through the neutral conductor is prohibited for (1) newbranch-circuit installations, (2) mobile homes, (3) recreationalvehicles, and (4) areas where local codes prohibit groundingthrough the neutral conductor. Prepare minimum 5 ft (1.52 m) oflength in order for dryer to be replaced. First, peel 5 inches (12.7cm) of covering material from end. Strip 5 inches of ground wireinsulation. After cutting 11/2 inch (3.8 cm) from 3 other wires peelinsulation back 1 inch (2.5 cm). Make ends of 3 wires a hook shape.
Then, put the hooked shape end of the wire under the screw of the terminal block (hooked end facing to theright) and pinch the hook together and screw tightly.1. Connect neutral wire (white) of power cord to center terminal block screw.2. Connect red and black wires to the left and right terminal block screws.3. Connect ground wire (green) of power cord to external ground screw and move neutral ground wire of
appliance and connect it to center screw.4. Make sure that the strain relief screw is tightened.
Be sure that all terminal block nuts are on tight and power cord is in right position.
4-wire connection : Direct wire

21
Important : Grounding through the neutral conductor is prohibited for (1) newbranch-circuit installations, (2) mobile homes, (3) recreationalvehicles, and (4) areas where local codes prohibit grounding throughthe neutral conductor. Prepare minimum 5 ft (1.52 m) of length inorder for dryer to be replaced. First, strip 3 1/2 inches (8.9 cm) ofouter sheath from end and strip 1 inch of insulation from eachconductor.
3-wire connection : Direct wire
Then, put the hooked shape end of the wire under the screw of the terminal block (hooked end facing rightward)and pinch the hook together and tighten the screw securely.1. Connect neutral wire (white) of power cord to center terminal block screw.2. Connect red and black wires to the left and right terminal block screws.3. Make sure that the strain relief screw is tightened.
Be sure that all terminal block nuts are on tight and power cord is in right position.

22
• lf your local codes or ordinances do not allow the use of a 3-wire connection, or you are installing your dryer ina mobile home, you must use a 4-wire connection.
1. Connect neutral wire (white) of power cord to center terminal block screw.2. Connect red and black wires to the left and right terminal block screws.3. Connect ground wire (green) of power cord to external ground screw and move neutral ground
wire of appliance and connect it to center screw.4. Make sure that the strain relief screw is tightened.
Be sure that all terminal block nuts are on tight and power cord is in right position.
Option 1: 4-wire connection with a power supply cord.

23
lf your local codes or ordinances permit the connection of a frame-grounding conductor to the neutral wire, usethese instructions.If your local codes or ordinances do not allow the connection of a frame-grounding conductor to the neutral wire,use the instructions under Section 1: Optional 3- wire connection.
Option 2: 3-Wire connection with a power supply cord.
• If your local codes or ordinances do not allow the connection of a frame-groundingconductor to the neutral wire, use the instructions under this section.1. Connect neutral wire (white) of power cord to center terminal block screw.2. Connect ground wire of appliance and neutral wire
of power cord to center terminal block screw.3. Connect red and black wires to the left and right
terminal block screws.4. Make sure the strain relief screw is tightened. Be
sure that all terminal block nuts are on tight andpower cord is in right position.
5. Connect independent ground wire from externalground connector to proper ground.
Option 3: Optional 3-wire connection.
Section 1

24
Following are additional instructions regarding electrical connections and requirements for gas dryers.
120 Volt, 60 Hertz, with 3-Prong Grounding Plug
PART 5 ELECTRICAL REQUIREMENTS FOR GAS DRYERS
Important Warning
To help prevent fire, electric shock, serious injury or death, the wiring and grounding must conform to thelatest edition of the National Electrical Code, ANSI/NFPA 70, or the Canadian Electrical Code, CSA C22.1,and all applicable local regulations. Please contact a qualified electrician to check your home’s wiring andfuses to ensure that your home has adequate electrical power to operate the dryer.
Electrical Requirements for Your Dryer:
a) Please note that the wiring diagram is provided inside the dryer control hood. Label all wires prior to disconnectionwhen servicing the dryer, because wiring errors can cause serious injury to you and your dryer.
b) Your dryer is designed to be used on a separate branch, polarized, three-wire, effectively grounded, 120 Volt, 60Hertz, AC (alternating current) circuit protected by a 15 Ampere fuse, equivalent fuse or circuit breaker.
c) Use separately fused circuits for washers and dryers, and DO NOT operate a washer and a dryer on the samecircuit.
a) The dryer has a three-prong plug to help guard against shock. The plug should be plugged directed into a properlygrounded three-prong receptacle that is rated 120 Volts AC (alternating current) 15 Amps. This plug, in order to beproperly and fully effective, must be plugged into a properly installed outlet that is grounded in accordance with alllocal codes and ordinances.
b) The dryer must be grounded in order to reduce the risk of electric shock, including a malfunction or breakdown.c) If your laundry room does not meet the specifications required by this manual, or if you are uncertain whether or not
your laundry room meets these specifications, please have a qualified service person or company.Review your laundry room’s electrical supply for any problems.
STANDARD 120 VOLT, 60 HERTZ, 3-WIRE EFFECTIVELYGROUNDED CIRCUIT1 L12Ground3Neutral Side4Round Grounding Prong5Neutral
WARNING!
Do not overload the circuit by operating other appliances on the same circuit when this appliance isoperating, by using an extension cord to connect the dryer to the power source, or by using any adapter toallow additional cords to connect to the same outlet.
WARNING!
DO NOT modify the plug provided with the dryer. If it does not fit the outlet in your laundry room, a properoutlet will need to be installed in your laundry room by a qualified service person or company.

25
1. Gas supply requirements: Liquefied Petroleum (L.P.) Gas (2,500 Btu/ft3 (93.1 MJ/m3)) service must be providedat 10 + 1.5 in. water column pressure.
2. A qualified technician must perform the LP gas coversion.Contact your local gas service branch if you require additional assistance or information.
3. Isolate the dryer from the gas supply piping system by closing its individual manual shut-off valve during anypressure testing of the gas supply system at test pressure equal to or less than 2/1 psi (3.45 kPa).
4. Supply Line Requirements. Your laundry room must have a rigid gas supply line to your dryer.In the United States, an individual manual shutoff valve MUST be installed within at least 6 feet (1.8 m) of thedryer, in accordance with the National Fuel Gas Code ANSI Z223.1. A 1/8 in. N.P.T. pipe plug must be installedas shown.
5. If using a rigid pipe, the rigid pipe should be 1/2 inch IPS. If acceptable under local codes and ordinances andwhen acceptable to your gas supplier, 3/8 inch approved tubing may be used where lengths are less than 20 feet(6.1 m). Larger tubing should be used for lengths in excess of 20 feet (6.1 m). It is also important that you usepipe joint compound that is insoluble in LP gas.
6. To reduce the danger of gas leaks, explosion, and fire, please follow and observe the following instructions andWARNINGS.• Connect the dryer to the type of gas shown on the nameplate.• Use new flexible stainless steel connectors.• Use Teflon tape and pipe joint compound insoluble in LP gas on all pipe threads.• Purge gas supply of air and sediment before connecting the gas supply to the dryer in order to prevent gas
valve contamination. Before tightening connection between gas supply and dryer, purge remaining air until odorof gas is identified.
• DO NOT use an open flame to inspect for gas leaks; instead use a non-corrosive leak detection fluid
Following are important instructions and information concerning the requirements for the gas supply and service forgas dryers.
PART 6 GAS REQUIREMENTS AND INSTRUCTIONS
Important Warning
The gas supply and service for a gas dryer must comply with all local codes and ordinances. In the absence of any local codes or ordinances in your area, the gas supply and service for your gas dryermust comply with the latest edition of the National Fuel Gas Code, ANSI Z223.1/NFPA 54.
WARNING!
DO NOT attempt any disassembly of the dryer. Any disassembly requires the attention and tools of anauthorized and qualified service person or company.
WARNING!
• Use a new AGA or CSA approved gas supply line.• Install a shut-off valve.• Securely tighten all gas connections.• If connected to LP, have a qualified person make sure gas pressure does not exceed 13 in. water column.• Examples of a qualified person include licensed heating personnel, authorized gas company personnel, and
authorized service personnel.• Failure to do so can result in death, explosion, or fire.

26
Maximum length of 4”(10.2 cm) diameter rigid
metal duct
65 feet (19.8 m)
55 feet (16.8 m)
47 feet (14.3 m)
36 feet (11.0 m)
28 feet (8.5 m)
55 feet (16.8 m)
47 feet (14.3 m)
41 feet (12.5 m)
30 feet (9.1 m)
22 feet (6.7 m)
Maximum length of 4”(10.2 cm) diameterflexible metal duct
45 feet (13.7 m)
35 feet (10.7 m)
30 feet (9.1 m)
25 feet (7.6 m)
20 feet (6.1 m)
35 feet (10.7 m)
27 feet (8.2 m)
21 feet (6.4 m)
17 feet (5.2 m)
15 feet (4.5m)
Number of 90° Elbows
0
1
2
3
4
0
1
2
3
4
Weather HoodType
Recommended
Use Only for Short RunInstallations
NOTE: Deduct 6 feet (1.8 m) for each additional elbow. It is not recommended to use more than 4 90° elbows.
Exhaust Requirements and Instructions:
1. Venting materials are not provided with the dryer and you should obtain the necessary venting materials.For example, the outer end of exhaust pipe must have a weather hood with hinged dampers to prevent back-draft when the dryer is not in use.
2. The exhaust duct must be four inches (10.2 cm) in diameter with no obstructions. The exhaust duct should bekept as short as possible. Make sure to clean any old ducts before installing your new dryer.
3. Rigid or semi-rigid metal ducting is recommended for use as transition ducting between the dryer and and thewall. In special installations when it is impossible to make a connection with the above recommendations, then aUL-listed flexible metal transition duct may be used between the dryer and wall connection only.The use of this ducting will affect dry time.
4. DO NOT use sheet metal screws on exhaust pipe joints or other fastening means which extend into the duct thatcould catch lint and reduce the efficiency of the exhaust system. Secure all joints with duct tape.
5. To maximize operating results, please observe the duct length limitations noted in the chart above.
Following are important instructions and information concerning the exhaust requirements for your dryer.
PART 7 USER-MAINTENANCE INSTRUCTIONS
Important Warning
To reduce the risk of fire, electric shock, or injury to person, read the IMPORTANT SAFETY INSTRUCTIONS beforeoperating this appliance. To reduce the risk of fire, combustion, or accumulation of combustible gases, DO NOTexhaust dryer air into an enclosed and unventilated area, such as an attic, wall, ceiling, crawl space, chimney, gas vent,or concealed space of a building. To reduce the risk of fire, DO NOT exhaust the dryer with plastic or thin foil ducting.

27
Exhaust and Dryer Maintenance
1. After one year of use, the interior and complete exhaust system of the dryer should be examined and cleaned ifnecessary.
2. Before one year of use, when drying performance has become unsatisfactory, please examine and clean theexhaust duct for better drying performance.
3. Check the weather hoods frequently to ensure the dampers are moving freely, that the dampers are not pushedin and that nothing has been set against the dampers.
4. A qualified service person or company should be used to perform this maintenance.5. A Flexible Metal Vent Kit, sold separately, can be used to exhaust the dryer when it is placed in hard to reach
location. This Kit comes in two pieces, one to attach on the dryer and the other to attach on the wall exhaustoutlet. After attaching two separate pieces to the dryer and the wall, the dryer may be returned to its finalposition, after which the two pieces themselves can be connected.
6. Ordinarily, the dryer drum will need no care. Wipe the exterior of the dryer as required, and always wipe theexterior of the dryer in the event any detergent, bleach, or other washing products is spilled on the dryer.
7. Clean the control panel with a damp cloth as necessary. Warning: spray pre-wash products may damage thefinish of the control panel.
8. Please clean the lint filter either before drying each load or after drying each load.9. Always make sure the lint filter is clean before starting a new load, because a clogged lint filter may increase
drying times.10. Annually remove the lint filter and attach it to the vacuum duct. See item #2 above.11. Please note that the wiring diagram is provided inside the dryer control hood. Label all wires prior to
disconnection when servicing the dryer, because wiring errors can cause serious injury to you and your dryer.
Cleaning the Lint Screen
1. Clean the lint filter once either before or after drying each load. Always make sure the lint filter is clean before starting a new load, because a clogged lint filter may increase drying times.
2. To clean, pull the lint screen straight up and roll any lint off the screen with your fingers.Do not rinse or wash screen to remove lint. Push the lint screen firmly back into place.
3. Always ensure the lint screen is firmly secured before running the dryer. Running the dryer with a loose lintscreen may cause overheating and damage to the dryer and articles being dried.
4. Some articles may shed more lint than others, causing the lint screen to fill rapidly. Remove lint from the lint screen before and after drying these articles, such as new towels.
5. In the event lint falls off of the lint screen and into the dryer during removal, inspect the exhaust hood andremove any lint.
6. Laundry detergent and fabric softener residue can build up on the lint screen, causing longer drying times. The screen is likely blocked if lint falls off the screen. In order to prevent this type of build up, and help ensureproper operation of your dryer, clean the lint screen with a nylon brush every six months or more frequently, ifnecessary. The lint filter can also be washed as follows:a) After rolling the lint off of the screen with your fingers, wet both sides of the screen with hot or warm water.b) Wet a nylon brush with hot water and liquid detergent and scrub the lint screen with the brush to remove the
buildup of detergent and fabric softener.c) After the residue has been removed, rinse screen with hot water.d) After drying the lint screen with a clean towel, firmly replace the lint screen in your dryer.
WARNING!
Disconnect the dryer’s electric power prior to any cleaning or maintenance.

28
WARNING!
Fire HazardNo washer can completely remove oil. Do not dry anything that has ever had any type of oil on it (includingcooking oils). Items containing foam, rubber, or plastic must be air dried. Failure to follow these instructions canresult in death or fire.
WARNING!
Explosion HazardKeep flammable materials and vapors, such as gasoline, away from dryer.Do not dry anything that has ever had anything flammable on it (even after washing). Failure to follow theseinstructions can result in death, explosion, or fire.
Following are instructions for starting and using your new dryer. Please refer to specific sections of this manual formore detailed information. Important Warning: To reduce the risk of fire, electric shock, or injury to person, read this entire manual, including
the Important Safety Instructions. before operating this dryer.
PART 8 OPERATING YOUR DRYER
22Cycle Selection
44Status, Check Filter,Drying, Cooling,Wrinkle Care
55Est. TimeRemaning
33Time ChangeButton
66Child Lock
77Option Buttons
qqBeeper
88DryingTimeControl
99Temp.Control
00DrynessIntensityControl
wwStart/PauseButtonBeeper
11Power Button

29
■ Select cycles designed for option
A. If you select Rack Dry, the previous course and operation goes off. B. If you select Rack Dry, Wrinkle Care, Anti-Bacterial, or Damp-Dry-Beep is not available.
Level More Time Less TimeCustom
Rack DryWrinkle Anti Damp Dry
Program Care Bacterial Beep
Bulky/Large O O O O O
Heavy Duty O O O O O
Cotton/Towls O O O O O
Normal O O O O O
Perm Press O O O O
Delicates O O O O
Ultra Delicates O O O O
Speed Dry O O O O O
Freshen Up O O O O O
Air Dry O O O O O
Dry O O O O O

30
• Use this button for power on or off.
• Turn the knob to select the desired cycle basedon laundry types and conditions.
(1) Sensor Dry Cycles
Sensor Dry Cycles allow you to match the cycle to theload you are drying. Each cycle dries certain fabrics atthe recommended temperature.A sensor detects the moisture in the load andautomatically adjusts the drying time for optimal drying
Bulky/LargeUse for drying heavy fabrics such as quilts andblankets.Heavy DutyUse for drying heavy fabrics such as jeans, corduroysor work clothes.Cotton/TowelsUse for drying denims, towels, heavy cottons.NormalUse for drying sturdy fabrics such as casual clothes.Perm. PressUse for permanent pressed and synthetic items.DelicatesUse for drying synthetic fabrics, washable knit fabricsand no-iron finishes.Ultra DelicateUse for drying gentle items such as workout wear,shear and lace items.
(2) Manual Dry Cycles
Use Manual Cycles to select a specific amount ofdrying time and a drying temperature. When a Manual Cycle is selected, the ESTIMATEDTIME REMAINING display shows the actual timeremaining in your cycle. You can change the actualtime in the cycle by pressing MORE TIME or LESSTIME.
Speed DryUse for small loads or loads that need less dryingtime.Freshen UpUse this cycle to remove wrinkles from items, such asclothes packed in a suitcase or items wrinkled frombeing left in the dryer too long.Air DryUse the Air Dry Modifier for items that require dryingwithout heat such as rubber, plastic and heatsensitivefabrics.Warm UpUse this cycle to remove wrinkles or smell from items,such as clothes packed in a suitcase or items wrinkledfrom being left in the dryer too long.Preheating use of cold clothing.
MidHigh
WARM UP
1 Power Button
2 Cycle Selection

31
NOTE: Time change button is available onlywith Manual Dry, Time Dry and RackDry programs.
NOTE: Don’t use the rack for normal tumbledrying. The rack is shipped in place in yourdryer. Please remove the rack beforeusing this dryer for the first time.
WARNING!
For better drying performance and safety,clean lint filter every single use.
• Press MORE TIME or LESSTIME until the desired dryingtime is set.
3 Time Change Button
(1) Child LockChild Lock can be used to prevent children fromchanging options on control panel while the dryer isrunning. When Child Lock is enabled, all the buttonswill be locked and Child Lock will glow. To enableChild Lock, Press and hold Beeper Dry for 3 seconds,until there is a single beep tone and Child Lock isdisplayed on the status window. To disable ChildLock, press and hold Beeper Dry for 3 seconds again.
6 Child Lock
• When Wrinkle Care is selected, the light forWrinkle Care will glow in the display. When power is on, CHECK FILTER is displayeduntil start/pause is selected.
4 Status/Clean Filter/Wrinkle Care Indicator
• The display shows theestimated time remaining. Inaddition to this, if the dryerhas some problem, it displayserror messages. Refer totroubleshooting guide
5 Estimated Time Remaining
(1) CUSTOM PROGRAM
Set up your favoritecombination of settings andsave them here for one touchrecall.
1. Select a cycle.2. Change DRY LEVEL and TEMP. CONTROL.3. Select OPTIONS you want.4. Press and hold the CUSTOM PROGRAM.
To recall your stored CUSTOM PROGRAM PressCUSTOM PROGRAM button, then pressSTART/PAUSE.
(2) Rack Dry
Rack Dry is designed touse for items which are notsuitable for tumble dryingsuch as sweaters, silk or lingerie.This option may be used for drying Sneakers.
7 Option Buttons
1
3
2
1. Open the door.Hold the dryer rack withboth hands.
2. Put the dryer rack into thedrum.
3. Make sure Dryer RACK isevenly spaced right ontothe drum inside.

32
(3) Wrinkle Care
This option helps to preventwrinkles on your laundry.When you select the wrinklecare option, the dryer will periodically tumble for up tothree hours afterthe cycle has completed.You can use this option in case you can not removelaundry immediately after drying is done.
(4) Anti Bacterial
This option reducesbacteria by using hightemperature during thecycle.This option can only be used with the Heavy Duty,Cotton/Towels and Normal cycles.
(5) Damp Dry Beep
When you select the dampdry beep option, a beep willalert you when your load is just damp enough for ironing or pressing.This notice will allow you to remove lightweight itemsthat are dried or other items that you may wish to iron.
Low 20
20/30
50/30
50
20
Low/UltraLow
Air Dry/Ultra Low
Air Dry
Air Dry
* Reset time as needed to complete drying.
Suggested Itemsfor Rack Drying
TemperatureSetting
SuggestedTime*(Minutes)
Washable wool items
Stuffed toys withcotton or polyesterfiber filling
Stuffed toys, foamrubber filled.
Foam rubber pillows
Athletic shoes
NOTE: Do not use this cycle with delicate fabrics.
NOTE: DRY LEVEL selections can only be madewhile using Sensor Dry Cycles. Selecting MORE Dry or LESS Dryautomatically adjusts the needed timewhich is already sensed.
• Use Time Dry Option to changeDrying Time on your own. You can select the desiredoperation time manually bypressing Time Dry button between20 to 60 minutes.
8 Time Dry
• Use Temp. Control Option to selecttemperatures for the ManualCycles. Press TEMP. CONTROLuntil the desired temperaturesetting glows. Temperaturemodifiers cannot be used with theSensor Dry Cycles.
When Using Air Dry
This chart shows examples of items that can be driedusing AIR DRY.
• Check to see that coverings are securely stitched.• Shake and fluff pillows by hand periodically during
the cycle.• Dry item completely. Foam rubber pillows are slow
to dry.
9 Temp. Control
Type of Load Default Time*(Minutes)
Foam rubber-pillows,padded bras, stuffed toys
20 - 30
20 - 30
40 - 50
10 - 20
Plastic shower curtains,tablecloths
Rubber-backed rugs
Olefin, polypropylene,shear nylon
* Reset cycle to complete drying, if needed.

33
Heavy Work Clothes4 jeans 2 sweatpants 4 work pants 2 sweatshirts 4 work shirts Cotton/Towels10 bath towels 14 wash cloths 10 hand towels Mixed Load3 sheets 9 T-shirts 4 pillow cases 9 Shorts 3 shirts 10 handkerchiefs 3 blouses
Following are sample loads for Super CapacityDryers:
NOTE: DRY LEVEL selections can only be madewhile using Sensor Dry Cycles. Selecting MORE Dry or LESS Dryautomatically adjusts the needed timewhich is already sensed.
NOTE: DRY LEVEL selections can only be madewhile using Sensor Dry Cycles. SelectingMORE Dry or LESS Dry automaticallyadjusts the sensed time needed.
• Use these buttons to set dry level• First, select sensor dry cycle.• Select dry level to adjust how much
you want to dry the load.As the cycle runs, the controlsenses the dryness of the load andadjusts the time automaticallybased on the selected drynesslevel.
Dry Level10
• The BEEPER controls the volumeof the beep that is made when youpress any of the buttons on thecontrol panel. Press BEEPER toadjust the sound level or turn off thesignal.
Beeper11
• Use this button for start or pause.
Start / Pause Button12
11Before use
• Clean lint screen before or after each cycle.• Place laundry into dryer and shut door. See
Loading.• Turn the knob to select the drying cycle you want.
The preset setting for Sensor Dry Cycles or ManualCycles will glow. The estimated or actual cycle time(in minutes) will show in the display.
22Loading
• Determine load size by the amount of space theload requires rather than the weight of the load.
• Avoid overloading the dryer.Following these instructions can help reduceyour utility bill, prolong the life of your clothes,and decrease the likelihood of uneven dryingand wrinkle.
33To use a sensor dry cycle
• Select DRY LEVEL to adjust how dry you wantthe load. As the cycle runs, the control sensesthe dryness of the load and adjusts the timeautomatically for the selected dryness level.
• Select the desired options.• Press START/PAUSE
Starting your dryer

34
44To use a manual dry cycle
• Select a Manual Dry Cycle.• Press MORE TIME or LESS TIME until the desired
drying time is displayed.Tap MORE TIME or LESS TIME and the time willchange by 1 minute interval.
• Press TEMP. CONTROL until the desiredtemperature indicator glows.
• (OPTIONAL STEP) If desired, select OPTIONS. Formore details, see Options.
• Press START/PAUSE. Be sure the door is closed.• If you do not press START/PAUSE within 10 minutes
of selecting the cycle, the dryer will automaticallyshut off.
• If you wish to end your drying cycle after pressingSTART/PAUSE, press START/PAUSE again. To stop your dryer at any time Press START/PAUSEor open the door.
NOTE: The MORE TIME or LESS TIME featurecan be used with Manual Dry, Time Dryand Rack Dry Cycles.
55Pausing or restarting
• To pause the dryer at any time:Open the door orpress START/PAUSE.
• To restart the dryer Close the door. PressSTART/PAUSE.
NOTE: Drying will continue from where the cycle wasinterrupted if you close the door and pressSTART within 10 minutes. If the cycle is interrupted for more than 10minutes, the dryer will shut off.Select new cycle settings before restarting thedryer.
1
2
3

35
PART 9 TROUBLESHOOTING GUIDESave time and money! Review the charts on the following pages first and you may not need to call for service.
Question
• Is the dryer plugged in?
• Is the fuse blown, or is thecircuit breaker tripped?
What to Do
Confirm that the dryer’s plug is securely and completely pushed into thelaundry room’s power outlet.
Check your home’s or laundry room’s fuse box/circuit breaker box and replacethe fuse or reset the circuit breaker. (IMPORTANT: electric dryers generally use two fuses or breakers.)
1. Problem: My Dryer Won’t Start
Question
H1
H2
H5
H3(GAS TYPE)
H7(GAS TYPE)
H8(GAS TYPE)
What to Do
Humidity sensor error. Power off and restart.
Temperature sensor error. Power off and restart.
Heater temperature control problem. Call our Customer Care Center.
Flame detector problem. Call our Customer Care Center.
Gas valve or gas blocked problem. Check your gas supply and the connectionof gas hoses and valves.
Igniter or Flame Detector problem. Call our Customer Care Center.
4. Problem: My Dryer Displayed An Error Code.
Question
• Is the fuse blown, or is thecircuit breaker tripped?
• Is the gas supply or serviceblocked or off?
What to Do
If the fuse is blown or the circuit breaker tripped, the dryer might tumble but notheat. Check your home’s or laundry room’s fuse box/circuit breaker box andreplace the fuse or reset the circuit breaker. (IMPORTANT: electric dryers generally use two fuses or breakers.)
Confirm that the house gas shutoff and the dryer gas shutoff are both fullyopen.
2. Problem: My Dryer Doesn’t Heat
Question
• Did you follow the instructionson your fabric softener product?
• Are you drying clean and dirtyclothes together?
• Were your clothes entirelyclean?
What to Do
Confirm and follow the instructions provided with your fabric softener product.
Make sure to use your dryer to dry only clean items, because dirty items cansoil clean clothes placed in the same load or later placed in the dryer drum.
Stains on dried clothes are actually stains that weren’t cleansed during thewashing process. Please review and confirm that you are following yourwashing instructions and that the clothes are being completely cleaned.
3. Problem: There Are Greasy Spots On My Clothes.

36
Question
• Is your lint filter full?
• Did you properly sort your load oflaundry?
• Do your clothes have excess staticelectricity?
• Did you overload your dryer?
• Did you place any paper, tissue, or othersimilar material in the load?
What to Do
Please refer to the manual section on cleaning the lint filter, andplease confirm that the lint filter is clean. It is important that the lintfilter is clean before each new load of laundry.
In order to reduce the amount of lint in a load of laundry, sort lintproducers (like a fuzzy white cotton towel) separately from clothesthat might catch lint (such as a pair of black linen pants).
See comments below under. There Is Static In My Clothes AfterDrying.
Divide your larger load into smaller loads.
Sometimes a person might forget to take a piece of paper or a tissueout of a pocket, and this paper, tissue, or similar material can causeexcess lint in a load of laundry.Confirm that the pockets of pants, shirts, and other articles of clothingare empty before washing and drying.
5. Problem: There Is Lint On My Clothes
Question
• Did you use fabric softener?
• Did you over dry the load of laundry?
• Are you drying synthetic, permanentpress and blends?
What to Do
Try using a fabric softener to reduce static electricity.
Over-drying a load of laundry can cause a build up of static electricity.Try using a fabric softener or adjust your settings and use a shorterdrying time.
These materials can cause static to build up in a load of dried clothes.Try using a fabric softener.
6. Problem: There Is Static In My Clothes After Drying
Question
• Are you using consistent heat settingsand consistent load sizes?
What to Do
The drying time for a load will vary depending on the heat setting, thetype of heat used (electric, natural or LP gas), the size of the load, thetype of fabrics, the wetness of the clothes and the condition of theexhaust ducts and lint filter.
7. Problem: The Drying Time Is Not Consistent
Question
• Is water found around cabinet coverwhen opening the door?
What to Do
This is normal because this is condensed moisture by drying.
8. Problem: Water Is Found Around The Cabinet Cover When Opening The Door.

37
Question• Did you properly sort your loads of
laundry?
• Are you drying large loads of heavyfabrics?
• Are the dryer controls properly set?
• Is the lint filter clean before each newload of laundry?
• Are the exhaust ducts clear and properlyconfigured?
• Is the fuse blown, or is the circuit breakertripped?
• Did you overload your dryer?
• Did you under load your dryer?
What to DoSeparate heavy weight items from light weight items when creatingloads.
Heavy fabrics take longer to dry because they tend to retain moremoisture. To help reduce and maintain more consistent drying timesfor large and heavy fabrics,separate these items into smaller loads ofa consistent size.
Use the appropriate control settings for the type of load you are drying.
Please confirm that the lint filter is clean prior to each new load oflaundry.
Confirm through review of the appropriate sections of this manual thatthe exhaust venting ductwork is properly configured. Confirm that theventing is free of obstructions. Confirm that the outside wall dampersare moving freely, that the dampers are not pushed in, and thatnothing has been set against the dampers.
Check your home’s or laundry room’s fuse box/circuit breaker boxand replace the fuse or reset the circuit breaker. (IMPORTANT: electric dryers generally use two fuses or breakers.)
Divide your larger load into a number of smaller loads.
If you are only drying a handful of items, add a few extra pieces tohelp ensure proper tumbling action.
9. Problem: It Takes Too Long For My Clothes To Dry
Question• Are you following the care instructions for
your garment?
What to DoTo avoid shrinkage, please carefully follow the care and useinstructions for your garment, because some fabrics will naturallyshrink when washed. Other fabrics can be washed but will shrinkwhen dried in a dryer.
11. Problem: My clothes are shrinking
Question
• Are you over drying your laundry?
• Are you removing your laundry from thedryer soon after the drying cycle is complete?
What to Do
Over drying a load of laundry can lead to wrinkled clothes. Try ashorter drying time, and remove items while they still retain a slightamount of moisture.
Remove your laundry from the dryer after the drying cycle ends andeither hang or fold the items.
10. Problem: My Clothes Are Wrinkled

VVIISSIIOONN CCRREEAATTIIVVEE,, IINNCC..서울 종로구 통의동
6번지 이룸빌딩 4층
ABOUT THIS MANUALABOUT THIS MANUAL
담 당 배상일 대리님
브 랜 드 DAEWOO 언 어 영어
F. MODEL WM-북미향 Dryer MANUAL
B. MODEL DWR-WE3011WW/RR, DWR-WE31WW, DWR-WE33WS/SS/RR
DWR-WG3011WW/RR, DWR-WG31WW, DWR-WG33WS/SS/RR
일 정 1차
2차
3차
4차
제 판 한 인인 쇄쇄 애드컴
MEMO 접수: (총37p)
연락처
VISION 담 당 방 문 수
TEL: 730-0660 FAX: 730-3788
10.05.27-표지 _ 신규 1p