Embed Size (px)
Citation preview


Page 2/14
EINAR 5 Install Guide
Adaptive Recognition America Adaptive Recognition Hungary
Adaptive Recognition Nordic Adaptive Recognition Singapore
[email protected] WWW.ADAPTIVERECOGNITION.COM
EINAR 5
Datasheet and Install Guide
Document version: 2021.07.29.
–
Table of Contents
1. EINAR 5 DATASHEET ................................................................................................................................ 3
2. INSTALLATION INSTRUCTIONS ............................................................................................................. 4
3. CABLE LAYOUTS ........................................................................................................................................ 8
3.1. Ethernet connection .......................................................................................................................... 8
3.2. IO connection .................................................................................................................................... 10
4. RECOMMENDED CAMERA POSITION ................................................................................................. 11
5. ACCESSING THE WEB INTERFACE ...................................................................................................... 13
6. CONTACT INFORMATION ...................................................................................................................... 14

Page 3/14
EINAR 5 Install Guide
Adaptive Recognition America Adaptive Recognition Hungary
Adaptive Recognition Nordic Adaptive Recognition Singapore
[email protected] WWW.ADAPTIVERECOGNITION.COM
1. EINAR 5 DATASHEET
EINAR 5 EINAR 5T EINAR 5W Camera Sensor size 1/2.5" Max. Resolution 5 MP (2560x1920)
Video Streams Primary Stream: 25 fps (2560x1920, 2048x1536)
Secondary Stream: 25 fps (1920x1440, 1280x960, 960x720, 640x480)
Light sensitivity Day/Night/IR:
0,65 lux / 0,01 / 0 lux Day/Night:
0,65 lux / 0,01 lux Shutter 1/6,25 s - 1/6400 s Day/Night mode True Lens focal length 3-10 mm 9-22 mm 3-10 mm
Lens FOV Horizontal: 27°-87°
Vertical: 21°-71° Horizontal: 15°-35°
Vertical: 12°-26° Horizontal: 27°-87°
Vertical: 21°-71°
IR LED 4 high power IR LEDs,
850nm IR 4 high power IR LEDs,
850nm IR 4 high power LEDs,
White WDR mode True (120dB) Compression Video compression H.264 SVC (Hierarchical P), MJPEG Bit rate 500Kbps - 18Mbps Video stream Dual streaming via RTSP(H.264) and HTTP(MJPEG) Network Protocols TCP/IP, DHCP, DNS, SNMP, HTTP, HTTPS, RTSP, NTP, UPnP Security Camera side username and password Interface Ethernet 10BaseT/100BaseTX, RJ-45 socket Storage microSD card Reset button Factory reset (IP address reset) General
Design IP67 metal housing
Operating temp. range -30 - +55 °C
Power requirement POE+ (802.3 at) Power consumption Max. 17W, tip. 5 W Dimensions 165×124×100 mm (L×W×H) – without bracket Weight 1540g (with bracket) Certification CE: EN 55022, EN 55024, RoHS, FCC
* Please note that the camera will not operate until its internal temperature reaches + 10 ° C, which can be up to 5 minutes at -25 ° C.
Page 4/14
EINAR 5 Install Guide
Adaptive Recognition America Adaptive Recognition Hungary
Adaptive Recognition Nordic Adaptive Recognition Singapore
[email protected] WWW.ADAPTIVERECOGNITION.COM
2. INSTALLATION INSTRUCTIONS Tools required Contents of the box
• 4 mm Allen key • Quick Install Guide
• TX10 screwdriver • Mountable, IP67 protected RJ45 connector housing
• Eyelet lugs for grounding
Mounting the camera
The camera can be mounted using 3 mounting holes with a diameter of 6 mm on the console. When
mounting, take into consideration the weight of the camera (1540g), always happen with the
appropriate fittings for the given wall structure.
Weight (base camera) 1200g Weight (wall bracket) 340g
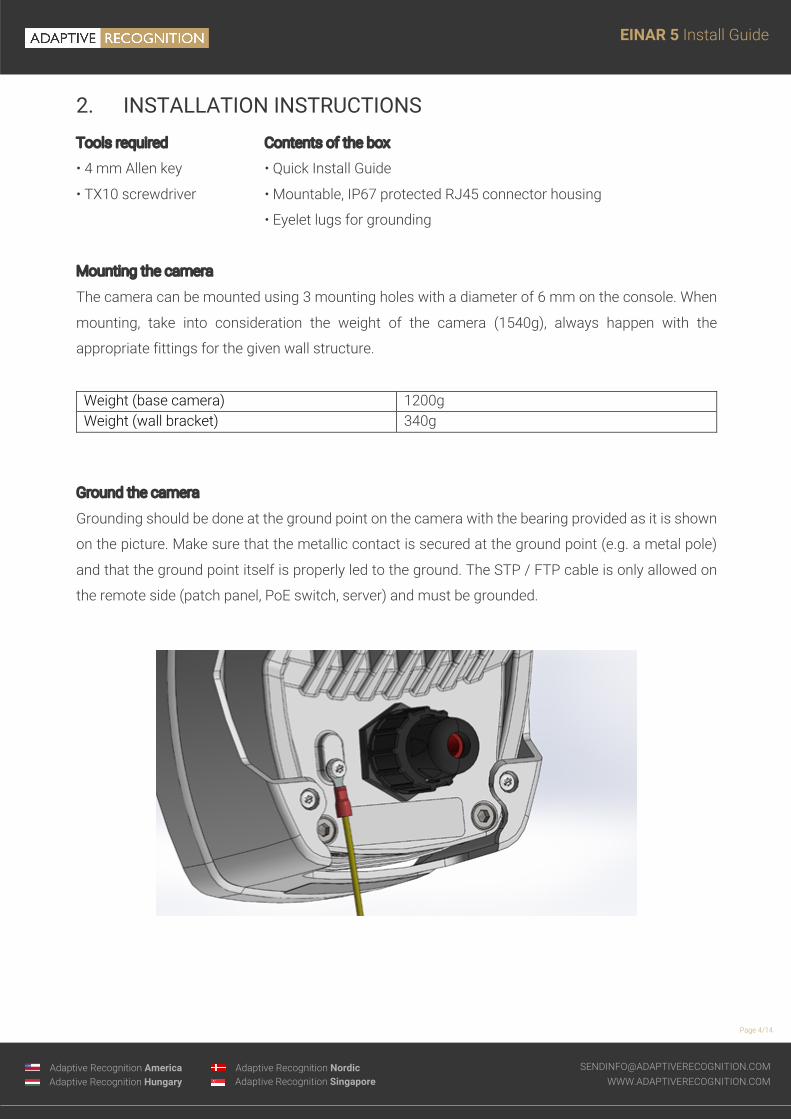
Ground the camera
Grounding should be done at the ground point on the camera with the bearing provided as it is shown
on the picture. Make sure that the metallic contact is secured at the ground point (e.g. a metal pole)
and that the ground point itself is properly led to the ground. The STP / FTP cable is only allowed on
the remote side (patch panel, PoE switch, server) and must be grounded.

Page 5/14
EINAR 5 Install Guide
Adaptive Recognition America Adaptive Recognition Hungary
Adaptive Recognition Nordic Adaptive Recognition Singapore
[email protected] WWW.ADAPTIVERECOGNITION.COM
Adjust the view direction of the camera
Loosen the screws marked 2, 3 (tilt) and 4 (turn) by using a 4 mm Allen key, while holding the camera
so that it does not “knock down”, then set it to the desired position. The horizontal direction can be
adjusted by loosening screw 1. If the device is in the correct direction, tighten all screws on the bracket.
Assemble the waterproof cover of the RJ45 connector
The enclosed IP67 shielded RJ45 connector housing must be assembled as shown. Before damaging
the RJ45 insert, the components of the connector housing must be pulled onto the cable in the order
shown! The crimped RJ45 insert is placed in the housing A. The fastener B is pulled onto the housing
A, and then the sealing insert C is pushed all the way between the clamping arms of the housing A on
the cable. The seal is then clamped to the cable with the clamping part D.

Page 6/14
EINAR 5 Install Guide
Adaptive Recognition America Adaptive Recognition Hungary
Adaptive Recognition Nordic Adaptive Recognition Singapore
[email protected] WWW.ADAPTIVERECOGNITION.COM
Disconnect the connector
The connector can only be disassembled with the cable connected to the device, otherwise the
mounting tab of the RJ45 insert will not be accessible. First loosen D, then pull back on the cable, then
release B so we can pull parts A and C off the cable. The RJ45 insert then remains in the connector
thanks to its own retaining tab and can be removed by pressing it.
Adjust the zoom and focus
The camera lens can be remotely controlled, so zoom and focus can be adjusted from the camera
web interface or Intellio Video Management Software (IVS).
Once the angle of view has been adjusted remotely, the autofocus function automatically adjusts the
focus after a few seconds, which can be adjusted as needed in both the web interface and the
management software.
For a detailed description of the lens remote control, see the description of the camera's web interface
and the Intellio Video System's user manual.
Restore factory defaults
If you experience some malfunctions or critical errors in the camera, and the software-based reset
does not help, you have an option to physically reset it. In this case, press and hold the reset button
(1) until the status LED (2) lights up continuously (approx. 10 s) and then release the button.
To access the reset button, you must first remove the service port cover with a TX10 screwdriver.
Perform the operation in a clean, low-humidity room!
Further disassembly of the camera is prohibited, as this may void the warranty and damage the
watertight insulation!

Page 7/14
EINAR 5 Install Guide
Adaptive Recognition America Adaptive Recognition Hungary
Adaptive Recognition Nordic Adaptive Recognition Singapore
[email protected] WWW.ADAPTIVERECOGNITION.COM
Insert the microSD card
You can insert a microSD card into the device by removing the service port cover as shown in the
attached figure. The use of the card is described in the user manual.
Perform the operation in a clean, low-humidity room!

Page 8/14
EINAR 5 Install Guide
Adaptive Recognition America Adaptive Recognition Hungary
Adaptive Recognition Nordic Adaptive Recognition Singapore
[email protected] WWW.ADAPTIVERECOGNITION.COM
3. CABLE LAYOUTS
3.1. ETHERNET CONNECTION
Pin# Data POE (802.3at/af) 10/100BaseTX 1000BaseT
1 TX+ TP1+ A1
2 TX- TP1- A1
3 RX+ TP2+ A2
4 - TP3+ B1
5 - TP3- B1
6 RX- TP2- A2
7 - TP4+ B2
8 - TP4- B2 Connector allocation standard: EIA / TIA-568B (straight cable pinout) Due to the POE power supply, all 4 pairs of wires must be connected even with a 10 / 100BaseTX data connection!

Page 9/14
EINAR 5 Install Guide
Adaptive Recognition America Adaptive Recognition Hungary
Adaptive Recognition Nordic Adaptive Recognition Singapore
[email protected] WWW.ADAPTIVERECOGNITION.COM

Page 10/
14
EINAR 5 Install Guide
Adaptive Recognition America Adaptive Recognition Hungary
Adaptive Recognition Nordic Adaptive Recognition Singapore
[email protected] WWW.ADAPTIVERECOGNITION.COM
3.2. IO CONNECTION
EINAR IO waterproof connector and cable pin layout:
PIN4: IO_I_N (black) PIN5: IO_I_P (brown) PIN6: IO_O_A (white) PIN7: IO_O_B (blue)

Page 11/
14
EINAR 5 Install Guide
Adaptive Recognition America Adaptive Recognition Hungary
Adaptive Recognition Nordic Adaptive Recognition Singapore
[email protected] WWW.ADAPTIVERECOGNITION.COM
4. RECOMMENDED CAMERA POSITION A good ANPR engine can read the plates from images taken in various conditions. However, if you
want to achieve over 95% recognition rate with short recognition times, you have to calculate the
position of the camera accurately. The best position is if the angle between the camera axis and the
direction of the vehicle movement is minimal and the camera should be installed 1 – 1,5 meters above
the headlights of the vehicles.
The distance between the camera and plate is also important. If the camera is too far from the plate,
the characters may not be large enough for recognizing them. In this case, zoom-in until you reach the
proper size. If the distance is too short it may happen that a part of the plate is over the camera’s field
of view (when the vehicle is near to the side of the lane or the plate is not at the middle of the vehicle).
Try to adjust the direction of the camera so that the number plates are horizontal in the picture!
From the point of ANPR/LPR the most important is the size of the characters on the image. For English
characters it is recommended to have at least 16 pixel average character height, for Arabic or other
special characters it is recommended to have 20 pixel height (due to they are more calligraphic than
the English characters). The too large characters are also not suitable for ANPR, therefore try to avoid
settings where the character size is greater than 50 pixels in height. A line width of a character on the
image should be at least 2 pixels.
Proper character sizes (in pixels)

Page 12/
14
EINAR 5 Install Guide
Adaptive Recognition America Adaptive Recognition Hungary
Adaptive Recognition Nordic Adaptive Recognition Singapore
[email protected] WWW.ADAPTIVERECOGNITION.COM
For more information, check How to Install an ANPR camera video on Adaptive Recognition channel.

Page 13/
14
EINAR 5 Install Guide
Adaptive Recognition America Adaptive Recognition Hungary
Adaptive Recognition Nordic Adaptive Recognition Singapore
[email protected] WWW.ADAPTIVERECOGNITION.COM
5. ACCESSING THE WEB INTERFACE 1. Start a browser and enter the camera IP address into the address bar of the browser.
2. Type the username and the password on the displayed login interface and click on [Login].
The default user account is the following:
Username: admin
Password: admin
3. After signing in, the web interface of the camera is displayed on which the required settings
can be performed.
Default IP Address
According to the factory setting of the Einar cameras, they request IP address from the DHCP server.
The DHCP server lists the IP addresses of the DHCP clients, thus the received IP addresses belonging
to the cameras connected to the network can be seen on that interface.
Link-Local IP Address
If there is no DHCP in the network the cameras will get a default IP address based on their MAC
address (Serial Number). The cameras will also be accessible via their link-local IP address.
For example: if the MAC address of the camera is 00-19-B4-01-42-1A, than its IP is 169.254.aa.bb; ‘aa’
is the decimal value of the digit one before the last in the MAC address (hexa 42, decimal 66), ‘bb’ is
the decimal value of the last digit in the MAC address (hexa 1A, decimal 26), so the IP is 169.254.66.26.
Finding Cameras
The cameras on the network can be found by using the Einar DeviceTool.
During running, the program continuously looks for detectible cameras on the network and displays
them in a list where the current IP address of the camera can be read. If the cameras still do not appear,
then make sure that the firewall does not block the multicast protocol on the network and the cameras
and the PC logically are in the same network range.

Page 14/
14
EINAR 5 Install Guide
Adaptive Recognition America Adaptive Recognition Hungary
Adaptive Recognition Nordic Adaptive Recognition Singapore
[email protected] WWW.ADAPTIVERECOGNITION.COM
6. CONTACT INFORMATION
Headquarters: Service Address: Adaptive Recognition, Hungary Inc. Adaptive Recognition, Hungary Inc. Alkotás utca 41 HU- Ipari Park HRSZ1113/1 HU 1123 Budapest Hungary 2074 Perbál Hungary Phone: +36 1 201 9650 Phone: +36 1 2019650 Fax: +36 1 201 9651 E-mail: [email protected] Web: adaptiverecognition.com
Adaptive Recognition Hungary Technical Support System (ATSS) is designed to provide you the
fastest and most proficient assistance, so you can quickly get back to business.
Information regarding hardware, software, manuals and FAQ are easily accessible for customers who
previously registered to enter the dedicated ATSS site. Besides offering assistance, the site is also
designed to provide maximum protection while managing your business information and technical
solutions utilized.
New User
If this is your first online support request, please create an account by clicking on this link.
Returning User
All registered ATSS customers receive a personal access link via e-mail. If you previously received a
confirmation message from ATSS, it contains the embedded link that allows you to securely enter the
support site.
If you need assistance with login or registration, please contact [email protected]
for help.