Embed Size (px)
Citation preview

EFIS 2.0 Training Materials Child Care User

Contents Module 1 Basic Planning....................................................................................................................................................... 3
Module 2 Basic Planning Through Smart View ........................................................................................................ 17
Module 3 Advanced Smart View ..................................................................................................................................... 29
Module 4 Data Entry Validation ...................................................................................................................................... 40
Module 5 Version Management ....................................................................................................................................... 47
Module 6 Sign-off and Approvals .................................................................................................................................... 55
Appendix A – Connection Details .................................................................................................................................... 61
2

Module 1 Basic Planning
3

Ex.1 Basic Planning through Workspace Reference Document Planning Workspace Login Log into Planning Workspace by entering the Workspace URL in the browser (Firefox or IE) and entering your credentials when prompted by the Go Secure screen. Opening the application From the menu, select Navigate / Applications / Planning / Application My Tasks List Once the application opens, it will default to the “My Task List” screen
Data Input and Results Form Clicking the Schedule 2.4 task under Input and Results once will open the composite form. Notice that the form has three tabs.
4

In the drop-down menu, select the Version you will be working with (Recipient Working Version). Make sure to click the Refresh Arrow (see screenshot below).
Save/ Calculate the data: In order to save/calculate the data, the form needs to be saved. This is done using the file menu by selecting File->Save, by clicking the Save icon on the main menu, or by clicking Ctrl + S on the keyboard. The form is set up to run the calculation on save, meaning that every time the save is done, the whole submission is re-calculated. Enter data into a cell in the first tab (Child Care Expenses) and save the form
Instructions In order to view the instructions on how to complete input forms, click on the Task Instructions tab next to the Task Title at the top. Follow the link inside to the instructions for the selected schedule.
5
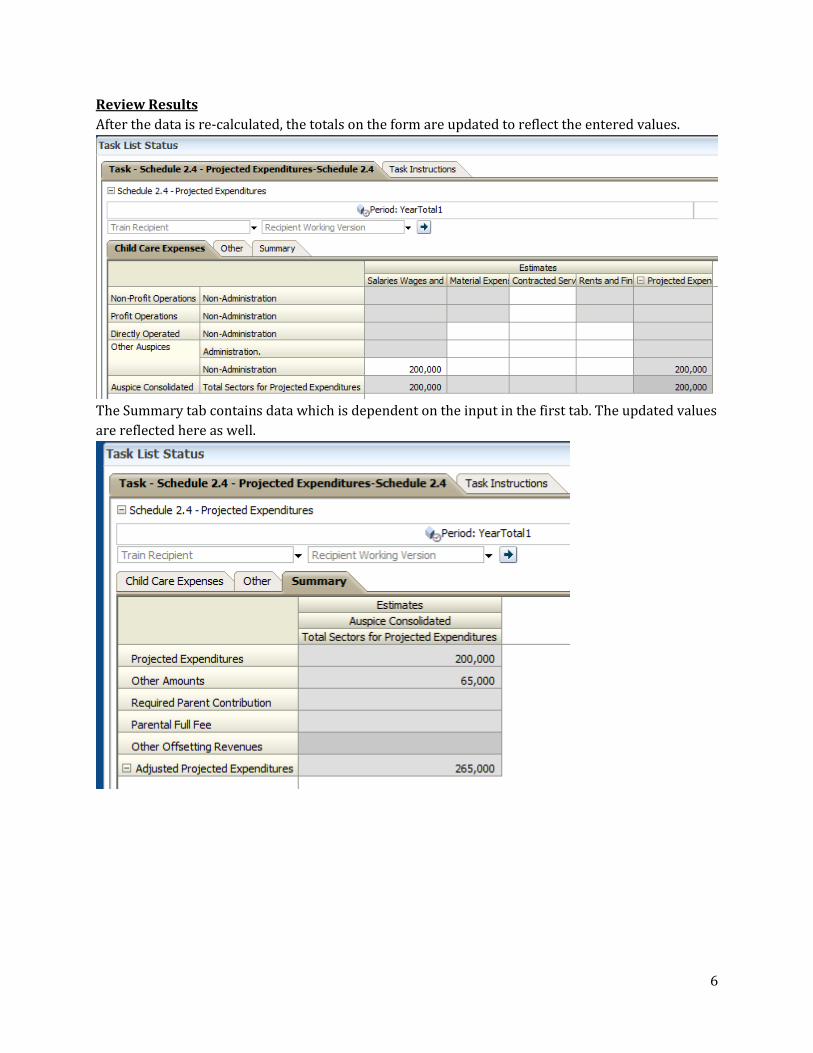
Review Results After the data is re-calculated, the totals on the form are updated to reflect the entered values.
The Summary tab contains data which is dependent on the input in the first tab. The updated values are reflected here as well.
6
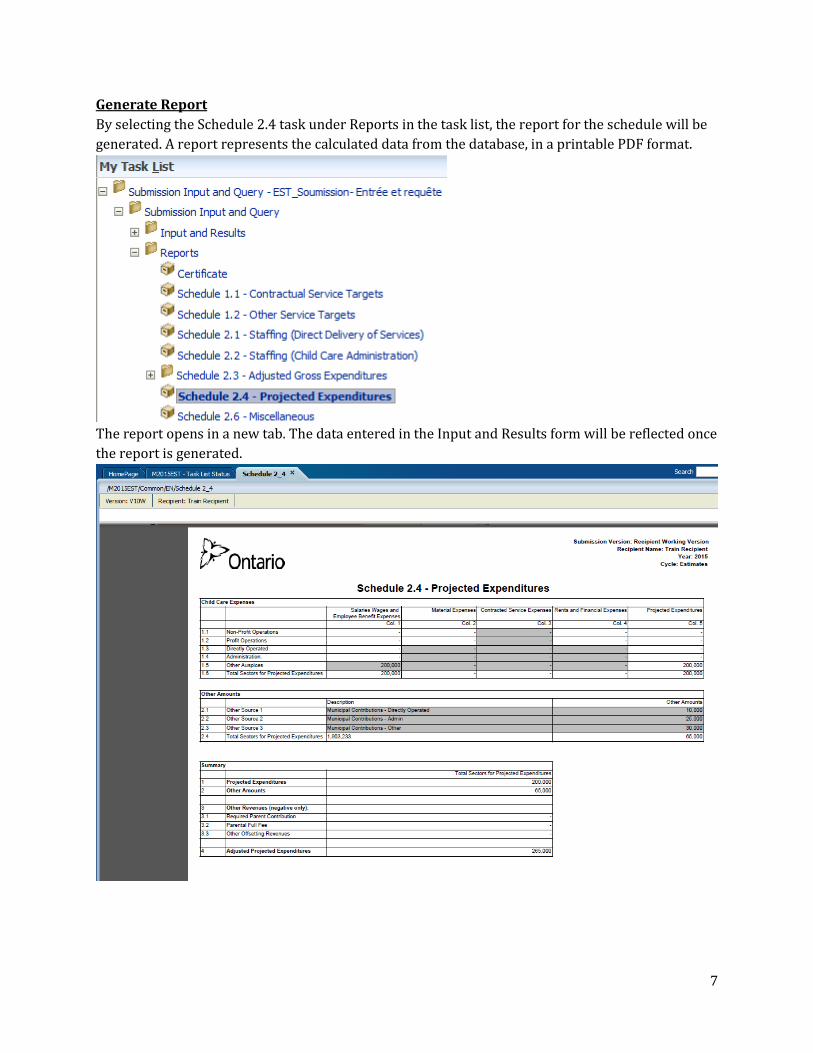
Generate Report By selecting the Schedule 2.4 task under Reports in the task list, the report for the schedule will be generated. A report represents the calculated data from the database, in a printable PDF format.
The report opens in a new tab. The data entered in the Input and Results form will be reflected once the report is generated.
7

Ex. 1 – Basic Planning through Workspace Hands-on Exercise Login to Training
1. Log into workspace using the Workspace URL 2. Open your Planning Application – TRAINMCC
My Task List
3. Under My Task Lists, expand the Submission Input and Query, and locate your Input and Results, Reports and Validation Formats tasks.
Input
4. Under the Input and Results task list, open the Schedule 2.4 task. Using the Recipient Working Version input the Child Care Expense numbers for all Contracted Service Expenses. Input data for into the Other Expenses Source 1. Make sure to enter both the Description and Other Expense amount
5. If you do not know your values, enter random values. 6. Save the form.
Results
7. After the form completes saving and recalculating, review the totals and pay attention to how the inputs are reflected in the totals. Review all three tabs to make sure results are correct.
8. Make a change to the input data, save and review the results to make sure that the changes you have made are reflected.
Report
9. Open the report for Schedule 2.4 using the appropriate Task List and Task 10. Make sure to select your Recipient and the correct version (Recipient Working Version
(V10W)) 11. Once the report generates, review that the results are as expected (they should reflect the
same values that you see in the input and results forms. 12. Close the Report
8
Ex.1 Basic Planning Hands-on Exercise Solution Topics covered:
• Login / Open Application • Input and Results • Reports
Login / Open Application
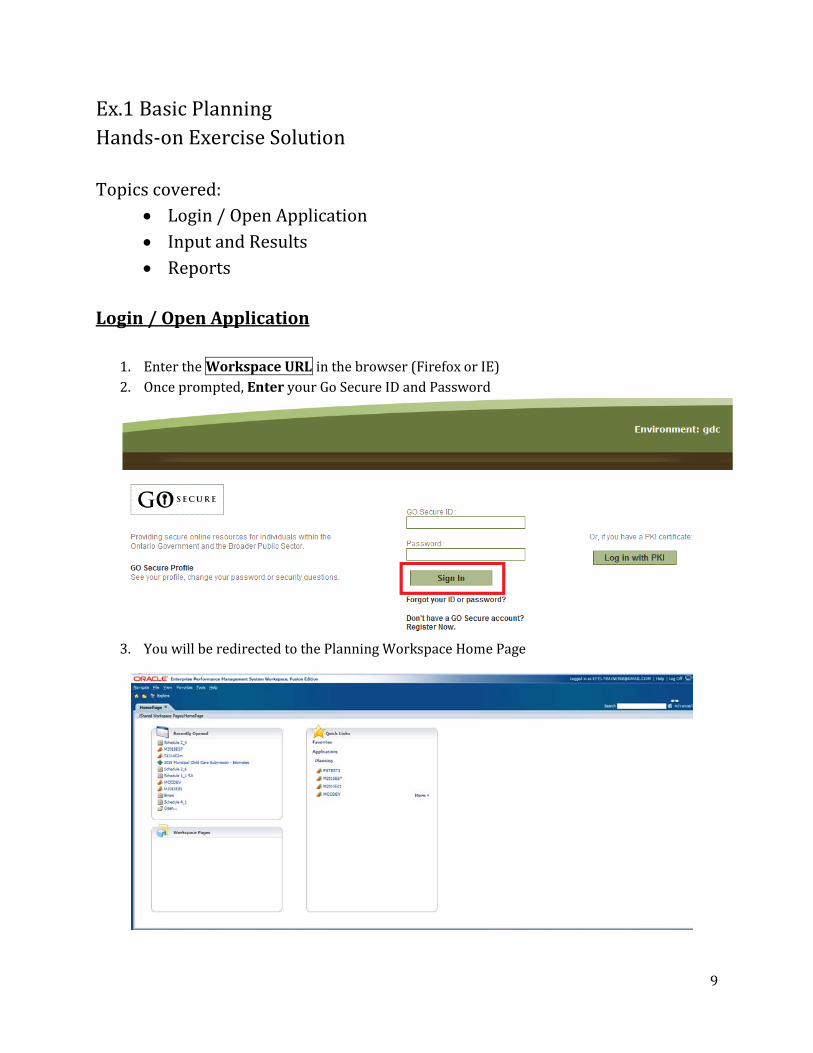
1. Enter the Workspace URL in the browser (Firefox or IE) 2. Once prompted, Enter your Go Secure ID and Password
3. You will be redirected to the Planning Workspace Home Page
9

4. To open the appropriate Planning Application there are four options available from the
HomePage screen: a. Recently opened b. Quick links c. Navigate -> Application -> Planning -> TRAINMCC d. File -> Open -> Applications -> Planning -> TRAINMCC
10

5. Once the application is opened, you will be taken to My Task List which houses the forms necessary for Input and Results, the reports as well as the Validation formats. Under my Task List select Submission Input and Query
a. You will now see the Task List Status open up in the main window
b. In order to open your form, expand Submission Input and Query using the [+] icon
beside the folder name c. Further expand Input and Results and select (single click) the Schedule 2.4 task. This
will open the necessary form for Schedule 2.4
11
Input: Exercise 1 - Input
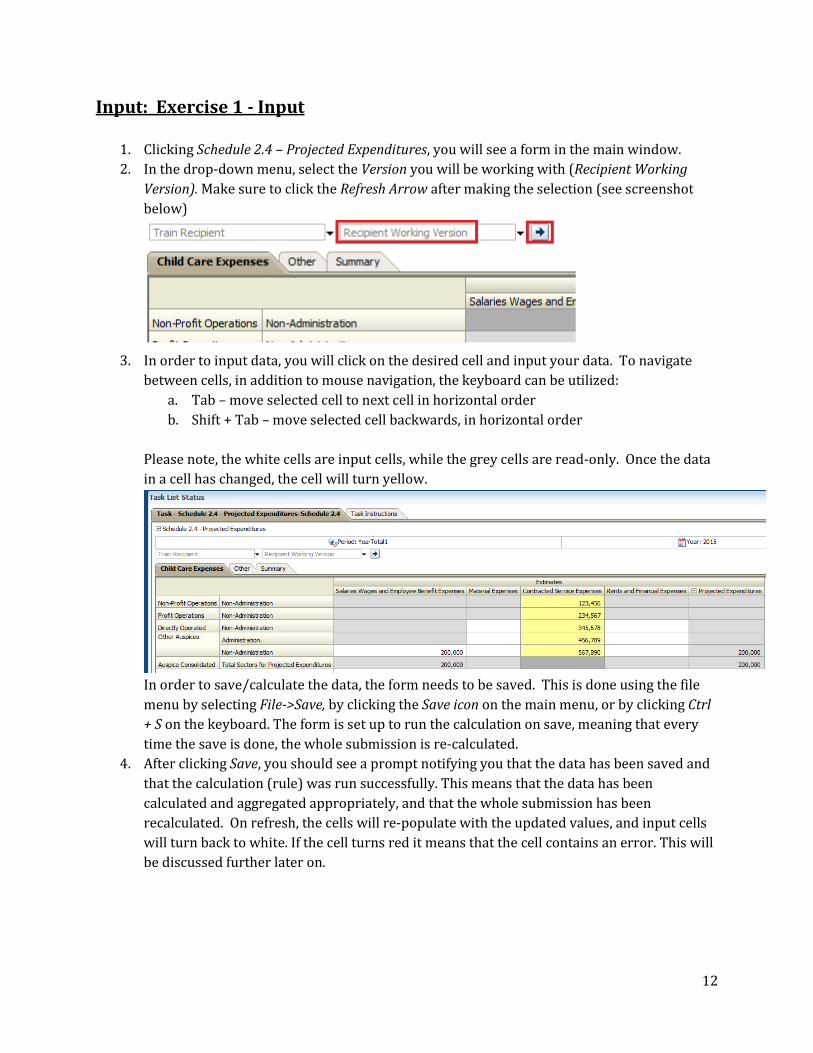
1. Clicking Schedule 2.4 – Projected Expenditures, you will see a form in the main window. 2. In the drop-down menu, select the Version you will be working with (Recipient Working
Version). Make sure to click the Refresh Arrow after making the selection (see screenshot below)
3. In order to input data, you will click on the desired cell and input your data. To navigate
between cells, in addition to mouse navigation, the keyboard can be utilized: a. Tab – move selected cell to next cell in horizontal order b. Shift + Tab – move selected cell backwards, in horizontal order
Please note, the white cells are input cells, while the grey cells are read-only. Once the data in a cell has changed, the cell will turn yellow.
In order to save/calculate the data, the form needs to be saved. This is done using the file menu by selecting File->Save, by clicking the Save icon on the main menu, or by clicking Ctrl + S on the keyboard. The form is set up to run the calculation on save, meaning that every time the save is done, the whole submission is re-calculated.
4. After clicking Save, you should see a prompt notifying you that the data has been saved and that the calculation (rule) was run successfully. This means that the data has been calculated and aggregated appropriately, and that the whole submission has been recalculated. On refresh, the cells will re-populate with the updated values, and input cells will turn back to white. If the cell turns red it means that the cell contains an error. This will be discussed further later on.
12
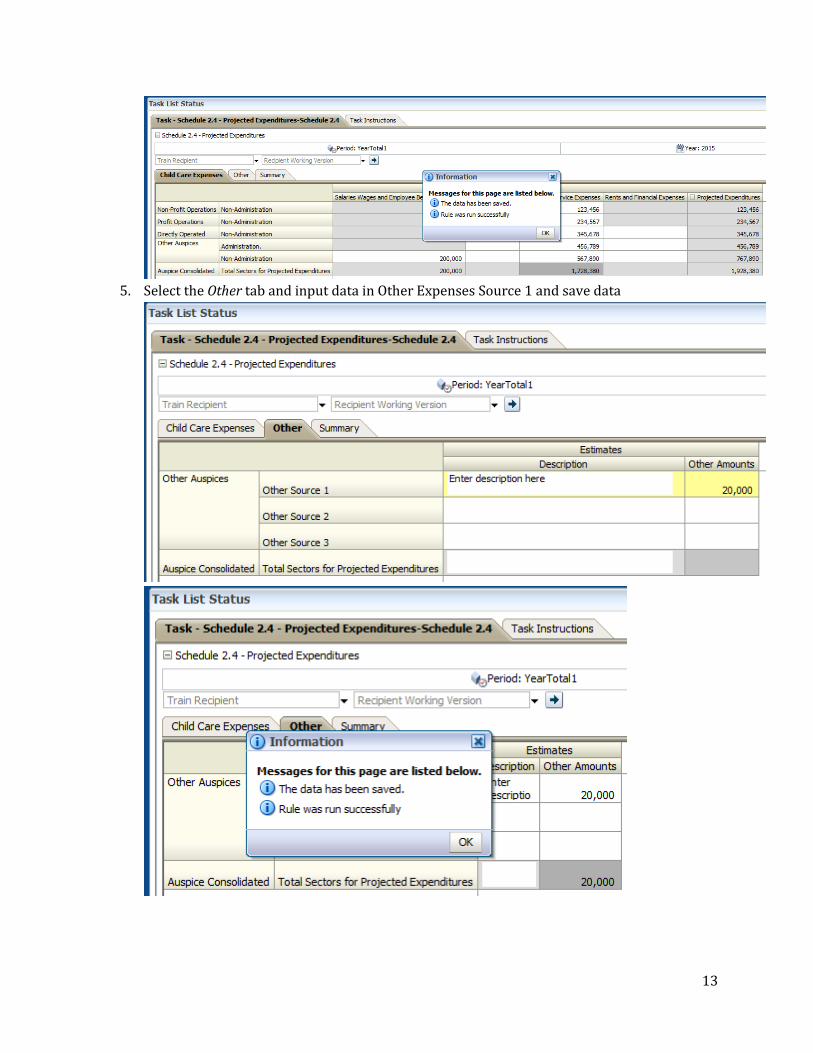
5. Select the Other tab and input data in Other Expenses Source 1 and save data
13

Results: Exercise 1 - Results
6. Clicking through the tabs contained in the Input and Results - Schedule 2.4 – Projected Expenditures task, you will be able to review the results generated by the calculation, driven by your input values. The totals on the Child Care Expenses tab and Other tab are reflected on the first two lines of the Summary tab.
14

7. Navigate to the Schedule 2.4 – Projected Expenditures, Child Care Expenses tab and change the Contractual Service Expense data for Non-Profit Operations and save. Review the results to see that the changes are reflected.
15

Report: Exercise 1 - Report 8. Clicking Reports - Schedule 2.4 – Projected Expenditures from the Task List, will send a
request for a report to be generated. A new tab will open and you will receive a prompt asking you to choose the Version and Recipient.
After choosing the correct Version / Recipient combination and clicking OK, a PDF report will be generated. The numbers input / calculated earlier in the exercise should be reflected on this report.
16

Module 2 Basic Planning Through
Smart View
17

Ex.2 Basic Planning through Smart View Reference Document Options – Shared Connections URL Under the Smart View Ribbon -> Options -> Advanced
Change the Shared Connections URL: Smart View Providers URL To find the Smart View Providers URL Navigate to Explore Training Exercises Double Click “SmartViewURL.txt”
18

Options – Data Options Make sure that all the options with a check-box are unchecked. Under #NoData/Missing Label choose what you want the empty cells to display on your forms (the default label is #Missing). Clearing the field is consistent with how Workspace is set up.
Options – Save as Default Options Click the arrow beside OK and select Save as Default Options. This will ensure that the options will be saved as default and you will not be required to repeat this step every time Smart View is opened.
Connecting to Planning Application Smart View Ribbon -> Panel -> Shared Connections -> Oracle Hyperion Planning
19

Task Lists Expand the TRAINMCC Application and expand Task Lists. Double-click the Submission Input and Query task list.
All the tasks are displayed. Double-click to open each input and results form.
20

Open form in Smart View from Workspace To open a form in Smart View from Workspace, make sure that the form is open and then
• click the “Open in Smart View” button • or navigate to File -> Open in Smart View
It is likely that you will receive a security warning the first time this is attempted: • In Internet Explorer click “Continue”
• In Firefox click “No”
21

If Smart View is disabled you will not see the Smart View ribbon in Excel. In order to re-enable Smart View, the following steps need to be taken: In Excel, select File Options Add-ins. Under Manage, choose Disabled Items and click Go. Oracle Hyperion Smart View for Office Fusion Edition will appear in the Disabled Items list box, select the Add-in and click the Enable button. SmartView will now be enabled and available.
22
Ex.2 Basic Planning through Smart View Hands-on Exercise
Connection
1. Open Excel and make sure that a workbook is open 2. Before proceeding, make sure all settings in Smart View are properly configured (see
reference sheet) 3. Connect to Oracle Hyperion Planning 4. Open Planning Application TRAINMCC
My Task List
5. Open the Submission Input and Query task list and expand task list to view input and result forms
Input
6. Using the Schedule 2.4 – Projected Expenditures form, input values into the Materials Category (column) as you did in Exercise 1 for Contracted Service. Make sure that the version you are entering to is Recipient Working Version.
7. Save the input data
Results
8. After the process completes, and the submission is recalculated the results should be updated. Review that the results are reflected on all tabs.
9. Go back to the Planning Application and view the changes under the Input and Results for this schedule.
10. Open the report and review the results
23
Ex.2 Basic Planning through Smart View Hands-on Exercise Solutions Topics covered:
• Connection • Task Lists • Input • Results
Connection
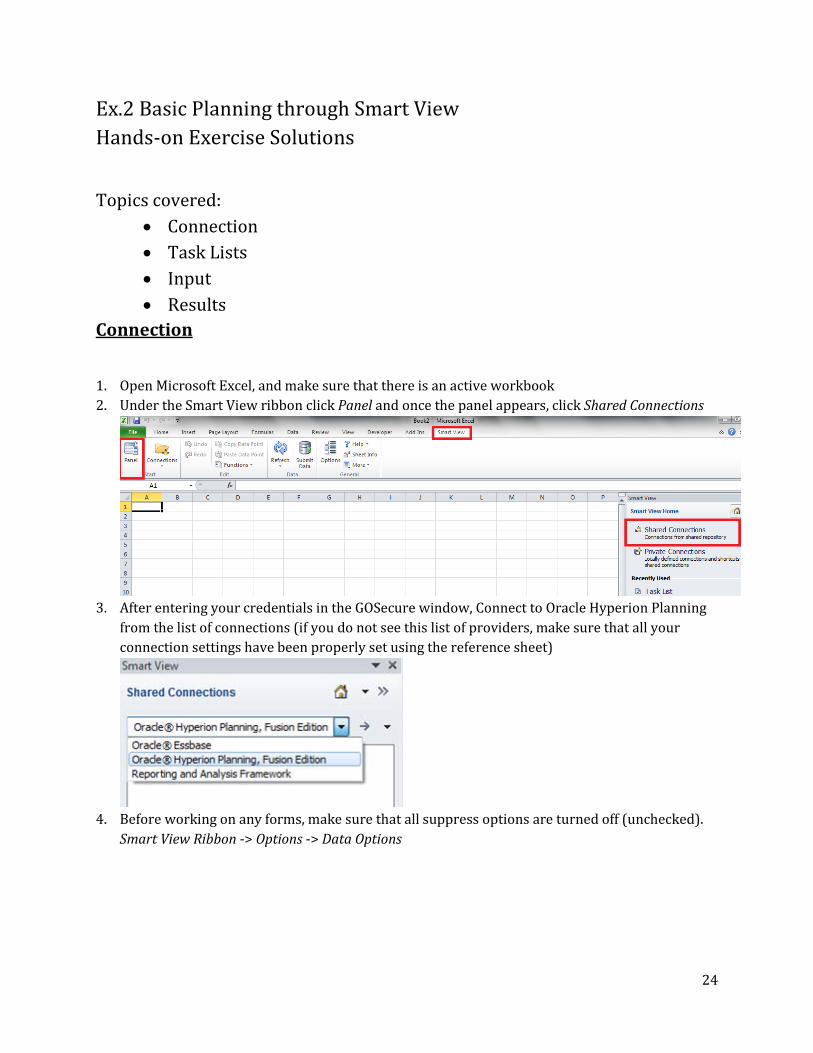
1. Open Microsoft Excel, and make sure that there is an active workbook 2. Under the Smart View ribbon click Panel and once the panel appears, click Shared Connections
3. After entering your credentials in the GOSecure window, Connect to Oracle Hyperion Planning
from the list of connections (if you do not see this list of providers, make sure that all your connection settings have been properly set using the reference sheet)
4. Before working on any forms, make sure that all suppress options are turned off (unchecked).
Smart View Ribbon -> Options -> Data Options
24
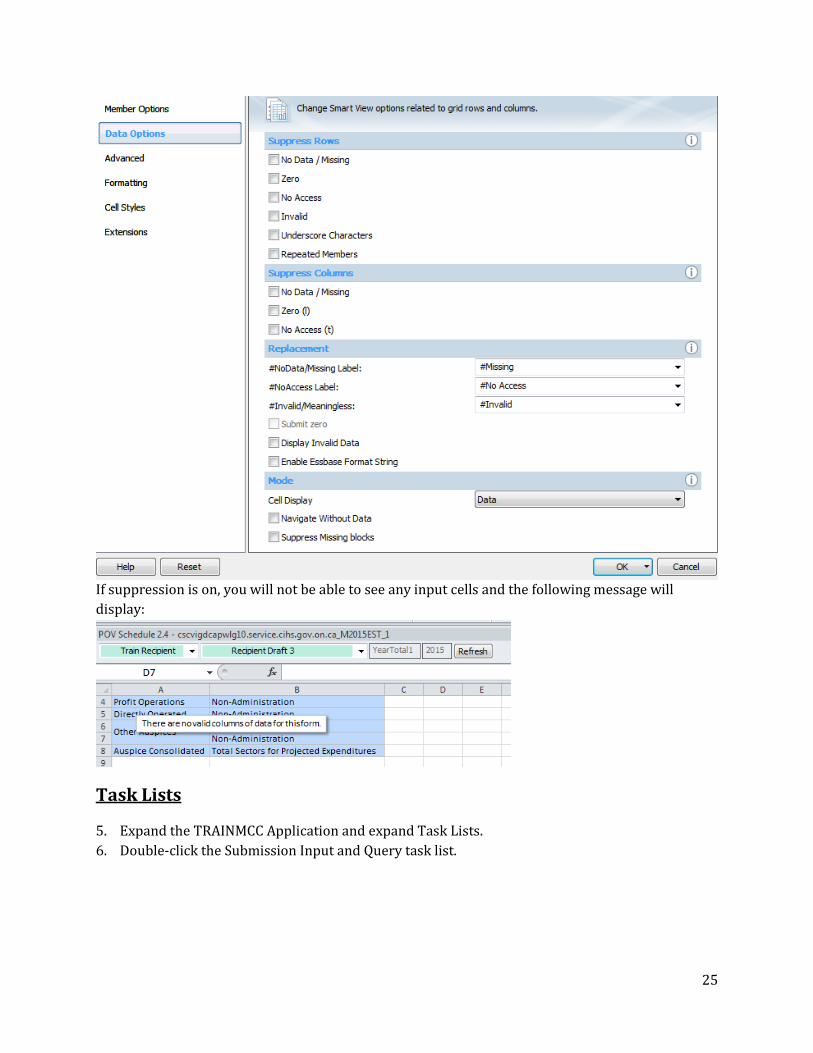
If suppression is on, you will not be able to see any input cells and the following message will display:
Task Lists
5. Expand the TRAINMCC Application and expand Task Lists. 6. Double-click the Submission Input and Query task list.
25
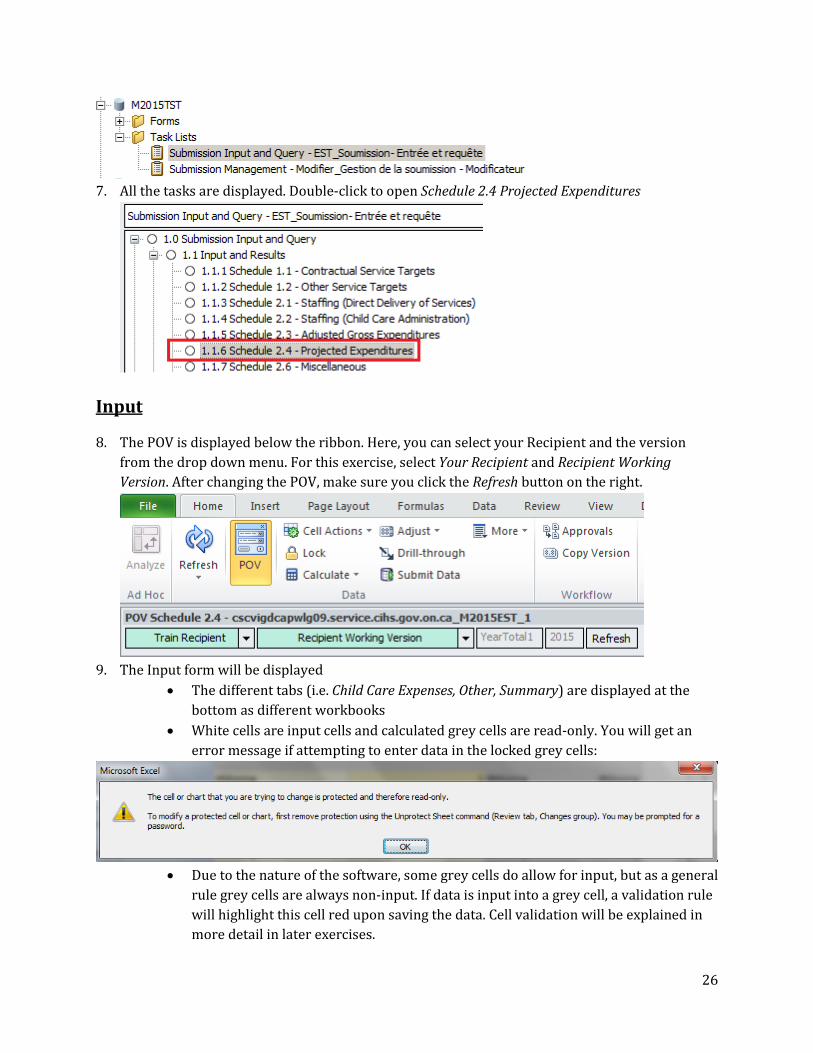
7. All the tasks are displayed. Double-click to open Schedule 2.4 Projected Expenditures
Input
8. The POV is displayed below the ribbon. Here, you can select your Recipient and the version from the drop down menu. For this exercise, select Your Recipient and Recipient Working Version. After changing the POV, make sure you click the Refresh button on the right.
9. The Input form will be displayed
• The different tabs (i.e. Child Care Expenses, Other, Summary) are displayed at the bottom as different workbooks
• White cells are input cells and calculated grey cells are read-only. You will get an error message if attempting to enter data in the locked grey cells:
• Due to the nature of the software, some grey cells do allow for input, but as a general
rule grey cells are always non-input. If data is input into a grey cell, a validation rule will highlight this cell red upon saving the data. Cell validation will be explained in more detail in later exercises.
26

10. Enter data for Material Expenses
11. Under the Planning ribbon or the Smart View ribbon, click Submit Data. This button has the exact same functionality as the “Save” button in the web version of Planning.
12. As soon as the data is submitted, the calculations are executed. Total Material Expenses are calculated and displayed automatically.
27
Result
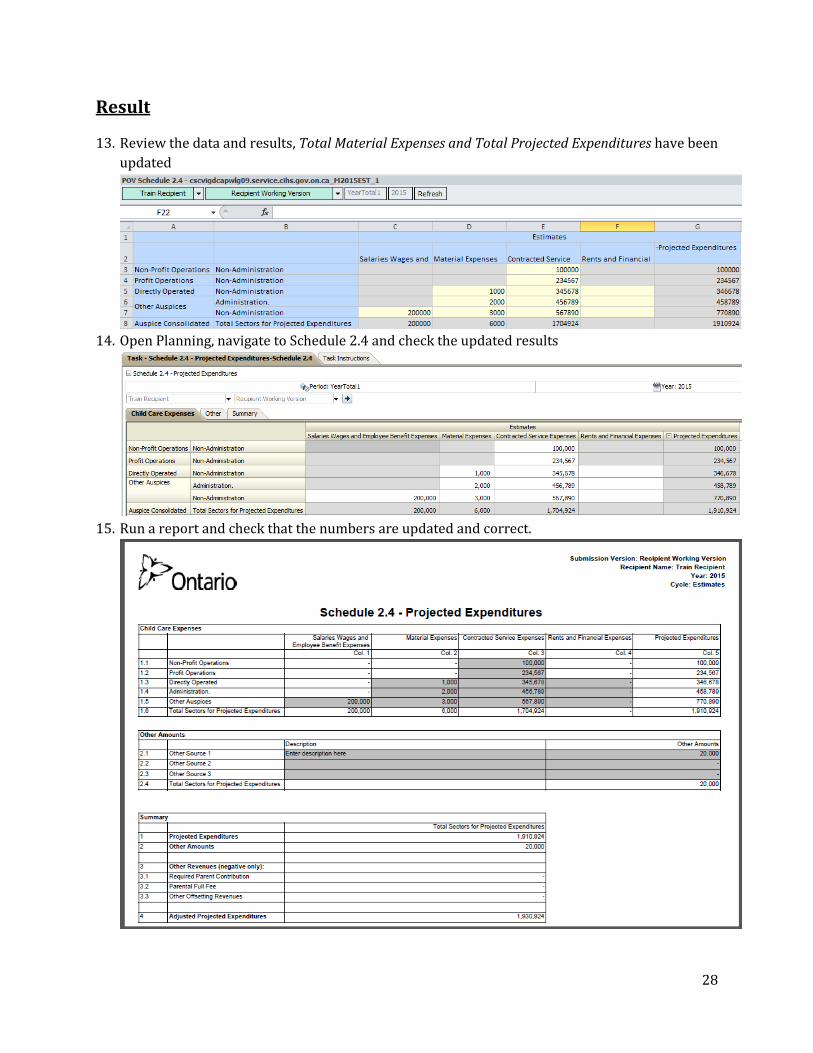
13. Review the data and results, Total Material Expenses and Total Projected Expenditures have been updated
14. Open Planning, navigate to Schedule 2.4 and check the updated results
15. Run a report and check that the numbers are updated and correct.
28

Module 3 Advanced Smart View
29

Ex.3 Advanced Smart View Reference Document Undo Button – Excel vs. Smart View
Pasting a Grid of Data When attempting to paste a data grid without Unprotecting Sheet
To Unprotect Sheet
Copy / Paste into the unprotected sheet
30
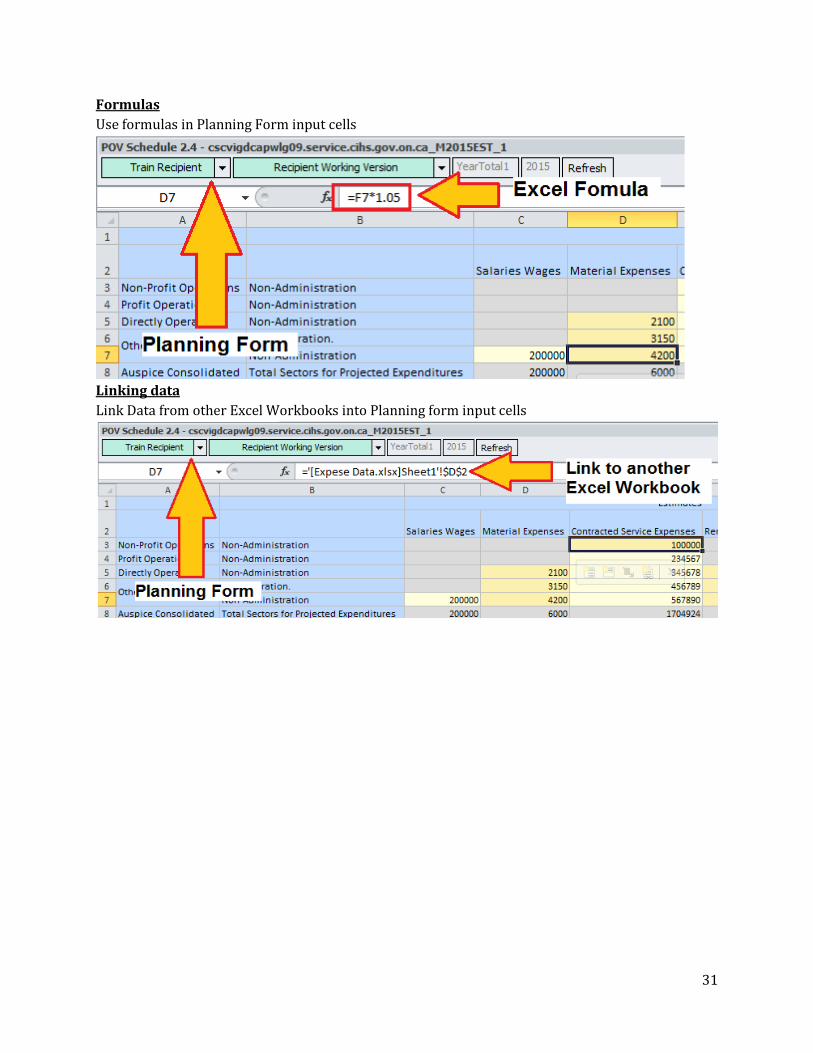
Formulas Use formulas in Planning Form input cells
Linking data Link Data from other Excel Workbooks into Planning form input cells
31

Saving forms and submitting at a later point Create an Excel workbook which can be edited “offline” and submit data at a later point
32

Ex.3 Advanced Smart View Hands-on Exercise
For this exercise you will need the data file named Ex3 - Data.xlsx which can be downloaded to your desktop by going to Explore -> Training Exercises
Open form in Smart View 1. Using the task list, open Schedule 2.1 – Staffing (Direct Delivery of Service)
Undo in Smart View 2. Using Recipient Working Version input data in all columns for Program Staff 1 in the Total tab. 3. Clear out all the data that was just input by using the correct Undo function.
Enter Data with Formula 4. Having cleared the sheet using the Undo functionality above, enter the following Program Staff
data and save: a. Program Staff 1:
i. Description: Teacher 1 ii. Number of Staff: 50
iii. Number of FTEs: 50 iv. Salaries: Write a formula to calculate the total Salaries assuming that the
salary is $50,000 per FTE b. Program Staff 2:
i. Description: Teacher 2 ii. Number of Staff: 25
iii. Number of FTEs: 25 iv. Salaries: Write a formula to calculate the total Salaries assuming that the
salary is $60,000 per FTE
Link to another file 5. With the form still open and connected to Smart View, open the Ex3 - Data.xlsx workbook. 6. In the Smart View form, create a formula that will link the data cells to the remaining staff data
cells in the Service Staff worksheet of the Ex3 - Data.xlsx workbook. 7. Save the data and review the results.
33

Change values in linked file 8. In the Service Staff worksheet of the Ex3 - Data.xlsx workbook change the Salary for Home
Visitor to 330,000. Navigate back to the Smart View form and save the updated data. Using the Planning Application review the final results.
Save the working file 9. Save the Smart View working file as Ex3 - Offline.xlsx on your desktop. 10. After closing Excel completely, re-open the Ex3 - Data.xlsx workbook. In the Service Staff
worksheet change the Salary for Home Visitor to 400,000 11. Re-open Ex3 - Offline.xlsx and save the changed values to the Planning Application (Excel might
block automatic links to other workbooks. In this case, click the yellow “Enable Content” in order to link the data once more).
12. Through the Planning Application review that the saved value is now 400,000.
Copy and Paste Data 13. Open the Schedule 1.2 – Other Service Targets form. 14. Using the data grid in the Other Service Targets worksheet of the Ex3 - Data.xlsx workbook
update the data using a one-time copy and paste function. Using the Planning Application verify that the correct data was loaded.
34

Ex.3 Advanced Smart View Hands-on Exercise Solution For this exercise you will need the data file named Ex3 - Data.xlsx which can be downloaded to your desktop by going to Explore -> Training Exercises
1. Open Excel, Log into Smart View Planning, navigate to the target application and open the
Submission Input and Query Task List 2. Double click the Schedule 2.1 – Staffing (Direct Delivery of Service) task to open it 3. “Undo” in Smart View
a. Under Program Staff 1 enter data into all the columns b. Under the Smart View ribbon, click the “Undo” button until all the data you had
previously input is cleared.
4. Input data into Description, Number of Staff and Number of FTEs for Program Staff 1 and
Program Staff 2 5. In the Salaries column enter the formulas for Teacher I and Teacher II respectively:
a. [E4]=D4 * 50000 b. [E5] =D5 * 60000
35

6. The calculation totals should appear and the cell should change colour.
7. Click the Submit Data button under the Planning or the Smart View ribbon. The totals will be
updated and all the cells will go back to their original colour. 8. From the desktop (assuming this is where you saved the file), open Ex3 - Data.xlsx 9. Starting at Program Staff 3 / Description (cell [B6]) enter a formula that points to the
corresponding data cell in the Service Staff worksheet. Remove the anchors ($) from the formula, and use copy/paste functionality to distribute the formula to all the cells.
10. Click Submit Data 11. Navigate to Ex3 - Data.xlsx and change the value of Program Staff 9 / Salaries (cell D9) to
330,000 12. Navigate back to the Smart View form and review that the cell value has been updated.
36

13. Click Submit Data. The data will be saved to the database, the cell colour will change back to a
lighter shade and the formula will still remain. 14. Save the file to the desktop as Ex3 - Offline.xlsx 15. Close both files and exit from Excel. 16. Reopen Ex3 - Data.xlsx and change the value of Program Staff 9 / Salaries (cell D9) to 400,000 17. Re-open Ex3 - Offline.xlsx. If the Security Warning pops up, click Enable Content
37

18. The Salaries cell under Program Staff 9 should now show 400,000. The cell shading is still light yellow, due to the fact that the Excel sheet is currently not connected to the database.
19. Click Submit Data. Once the form refreshes, it establishes a connection to the database. At this
point the new value has not been changed, and the shading of the cell will indicate that it is different than what is currently in the database.
20. Clicking Submit Data one more time will update the database with the new value. 21. Close Ex3 - Offline.xlsx
38
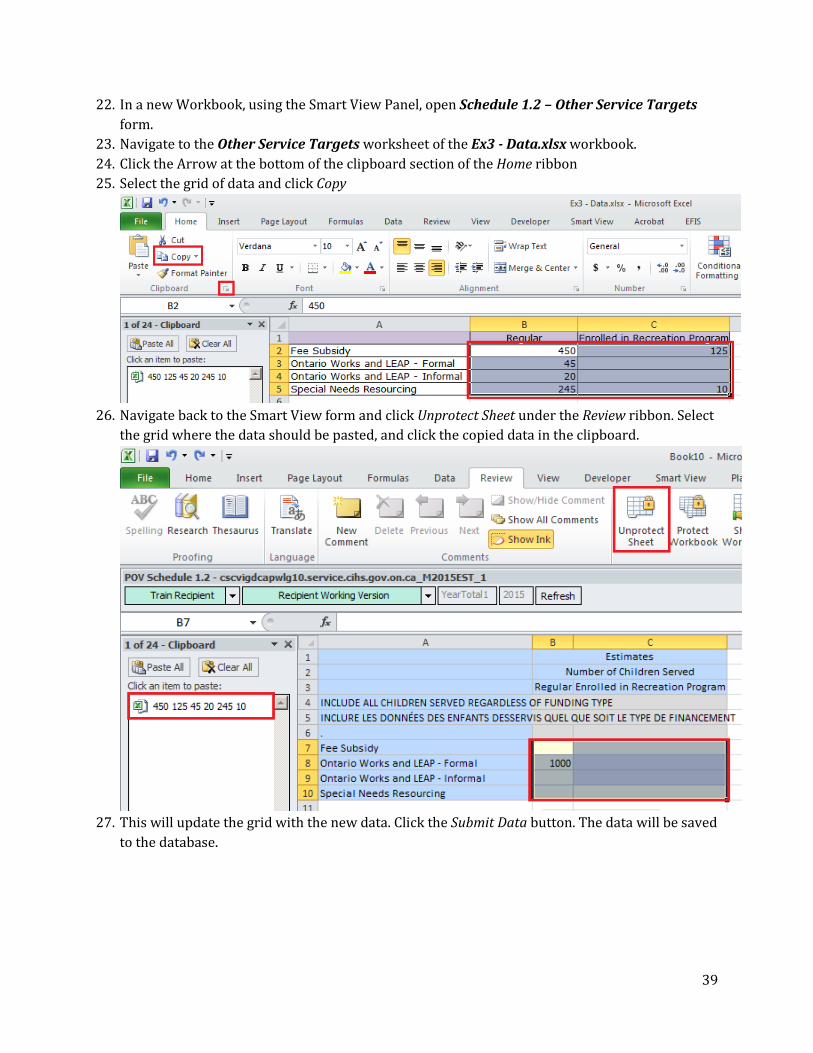
22. In a new Workbook, using the Smart View Panel, open Schedule 1.2 – Other Service Targets form.
23. Navigate to the Other Service Targets worksheet of the Ex3 - Data.xlsx workbook. 24. Click the Arrow at the bottom of the clipboard section of the Home ribbon 25. Select the grid of data and click Copy
26. Navigate back to the Smart View form and click Unprotect Sheet under the Review ribbon. Select
the grid where the data should be pasted, and click the copied data in the clipboard.
27. This will update the grid with the new data. Click the Submit Data button. The data will be saved
to the database.
39

Module 4 Data Entry Validation
40

Ex.4 Data Validation Reference Document Cell Colouring • White – Input Cell • Grey – Non-input cell • Red – Cell containing validation Error
To check the data entry validation • Go to My Task List -> Submission Input and Query -> Validation Formats -> Schedule 1.2 • A Validation form exists for each Input form and each cell has a input validation definition as
shown below:
Data Entry Validation – Definitions
41

Validating Full Submission – Recipient Working Version Only • Open Validate And Promote for Approval, Select Recipient, click Actions - > Validate
• If there is invalid data in any forms the Sub-Status changes to a link labelled “Invalid Data”
• The validation creates a new Task List containing links to all forms which have invalid data in
them. Follow the links to make changes
42

Ex.4 Data Validation Hands-on Exercise Open Form
1. Open the input form Schedule 1.2 – Other Service Targets for your Recipient and Recipient
Working Version.
Enter Data
2. Enter the -200 data in Fee Subsidy Enrolled in Recreation Program under TotalGrid1 3. Save the data
Review Validation Errors
4. Upon refresh, review the cells which have failed the validation
Review Validation Format and Correct Data
5. By using the correct Validation Format form as a reference, correct the invalid data and re-save
the schedule. 6. View that all cells have passed validation
43
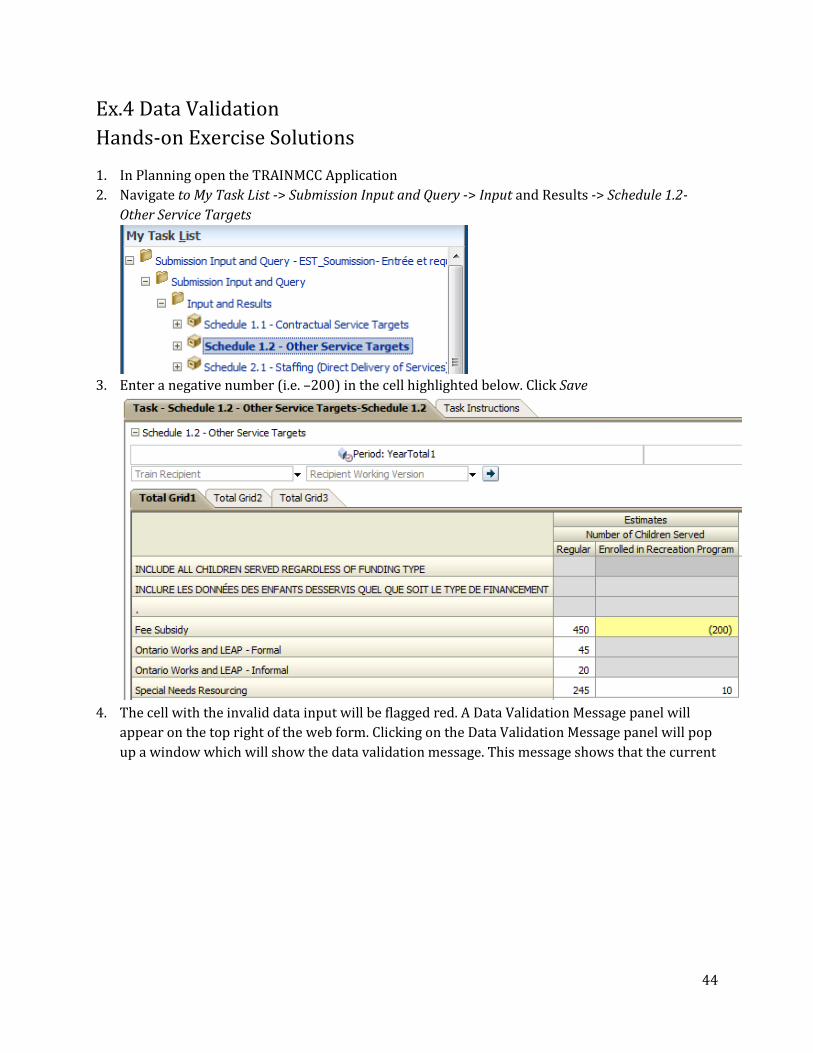
Ex.4 Data Validation Hands-on Exercise Solutions
1. In Planning open the TRAINMCC Application 2. Navigate to My Task List -> Submission Input and Query -> Input and Results -> Schedule 1.2-
Other Service Targets
3. Enter a negative number (i.e. –200) in the cell highlighted below. Click Save
4. The cell with the invalid data input will be flagged red. A Data Validation Message panel will
appear on the top right of the web form. Clicking on the Data Validation Message panel will pop up a window which will show the data validation message. This message shows that the current
44

data is an invalid input type.
5. Navigate to Validation Formats -> Schedule 1.2. Using the same intersection as the input form,
check the expected input data format. The cell indicated below expects a positive integer value. Refer to the reference sheet for explanation of each expected value.
45
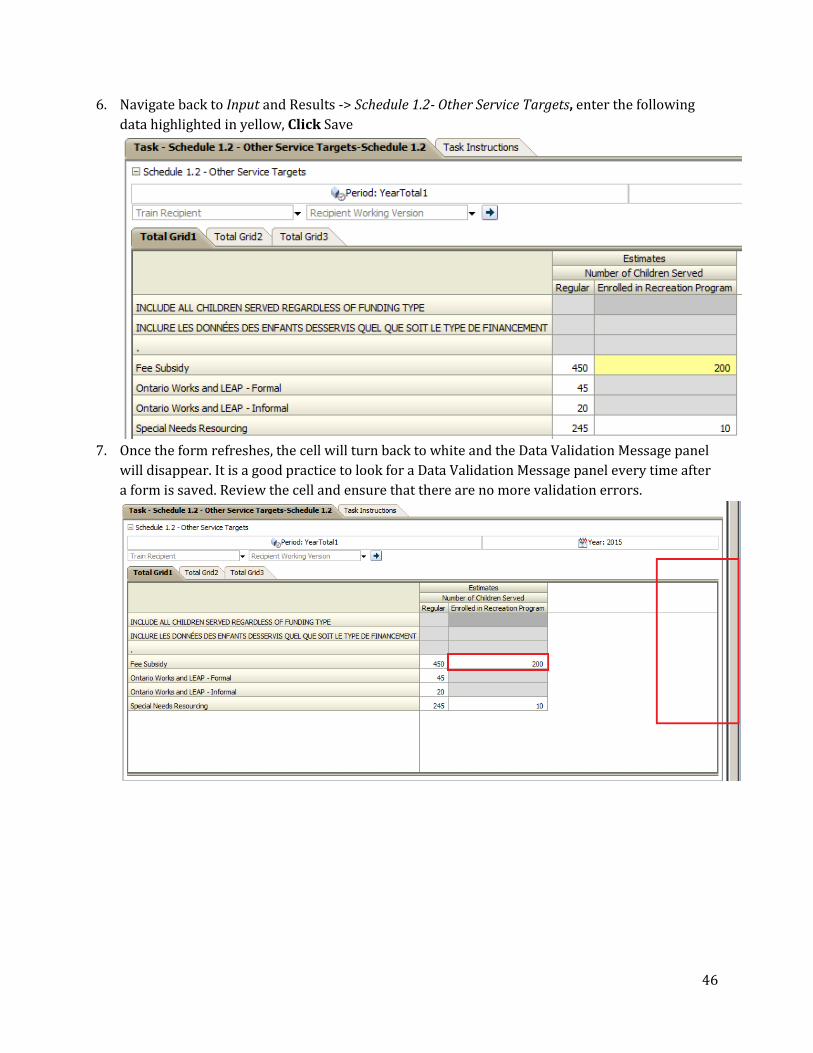
6. Navigate back to Input and Results -> Schedule 1.2- Other Service Targets, enter the following data highlighted in yellow, Click Save
7. Once the form refreshes, the cell will turn back to white and the Data Validation Message panel
will disappear. It is a good practice to look for a Data Validation Message panel every time after a form is saved. Review the cell and ensure that there are no more validation errors.
46

Module 5 Version Management
47
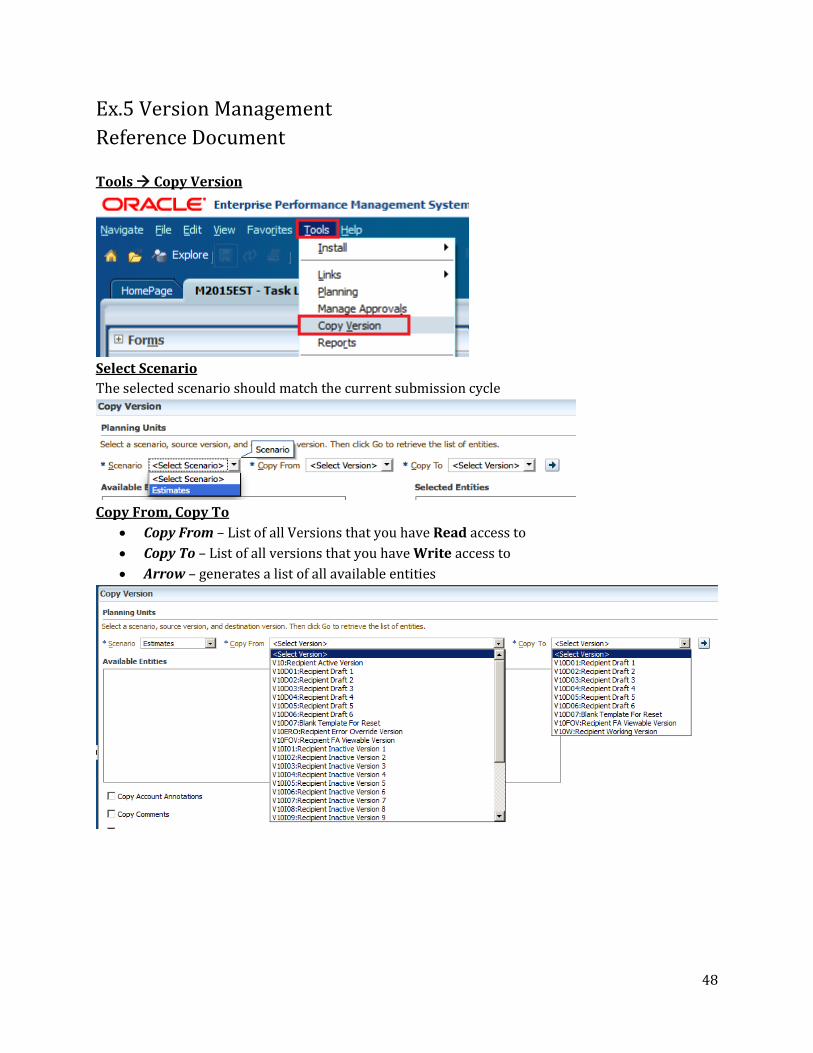
Ex.5 Version Management Reference Document Tools Copy Version
Select Scenario The selected scenario should match the current submission cycle
Copy From, Copy To
• Copy From – List of all Versions that you have Read access to • Copy To – List of all versions that you have Write access to • Arrow – generates a list of all available entities
48
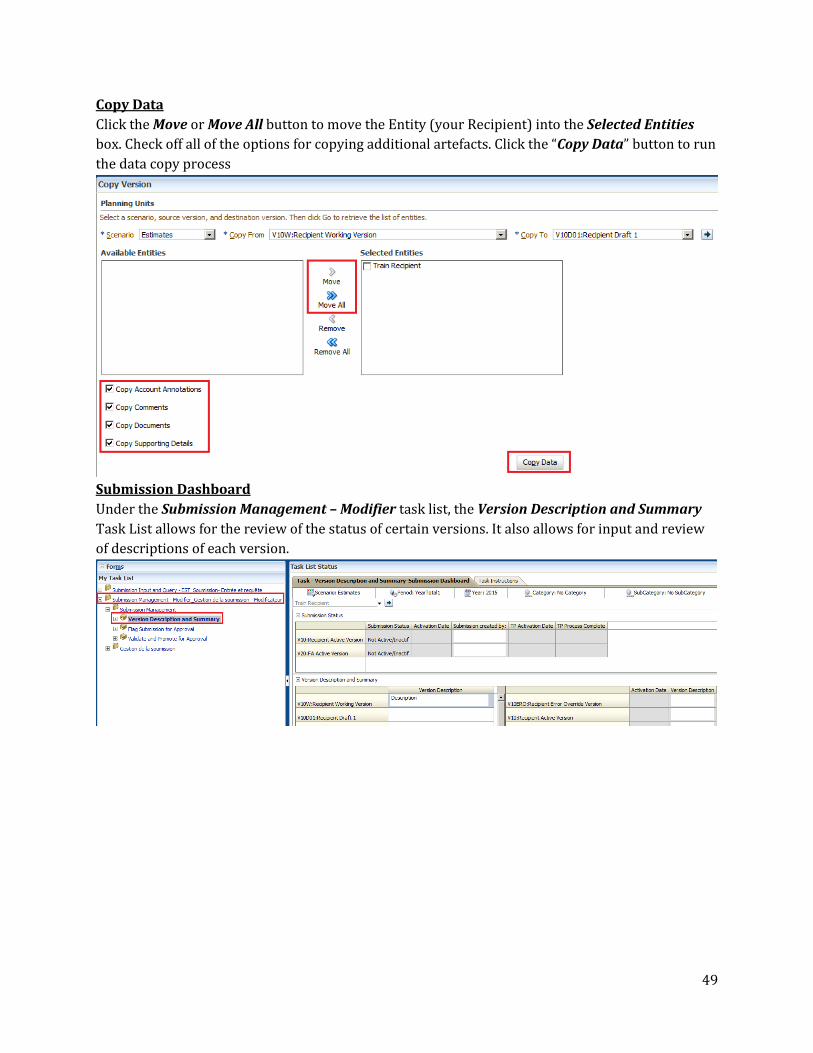
Copy Data Click the Move or Move All button to move the Entity (your Recipient) into the Selected Entities box. Check off all of the options for copying additional artefacts. Click the “Copy Data” button to run the data copy process
Submission Dashboard Under the Submission Management – Modifier task list, the Version Description and Summary Task List allows for the review of the status of certain versions. It also allows for input and review of descriptions of each version.
49

Versions that Modifier has WRITE and READ access to Recipient Versions
Versions Recipient User can WRITE to
V10W Recipient Working Version ***
This version allows the Recipient User to work on their submission by entering data and running calculations.
Although data can be copied to and from this version, this is the only version which can be verified and promoted in the
Approvals module.
*** Once the submission has been promoted, the access to this version changes to READ, meaning that the version cannot be written or
copied to
V10D01 Recipient Draft 1 Draft versions are also versions that the user can manipulate
data in. They are used during the submission process to manage data changes and keep back-ups when needed.
However, if a draft version is the final version that the user wishes to submit, they must copy the data into Recipient
Working Version.
V10D02 Recipient Draft 2 V10D03 Recipient Draft 3 V10D04 Recipient Draft 4 V10D05 Recipient Draft 5 V10D06 Recipient Draft 6
V10FOV Recipient FA Viewable Version
Version for review by FA. The FA does not have access to view Recipient Working Version. If a Recipient User needs the FA to
review the data in that version for any reason, they would copy the data into "FA Viewable Version". This allows for the
FA to review and give feedback to the Recipient User.
V10D07 Blank Template For Reset Used as a blank draft that can be used to clear or reset data in a version.
Versions Recipient User can
READ FROM
V10ERO Recipient Error Override Version
Used at the point where Approver submits data that has errors but is tagged as "Error Override".
V10 Recipient Active Version
The final version which is submitted to the Ministry. Once the Recipient User promotes the Recipient Working Version, an
approver is responsible for approving the data and promoting it to the Recipient Active Version.
V10I01 Recipient Inactive Version 1
Versions used as a historical / audit record of previously active versions.
V10I02 Recipient Inactive Version 2 V10I03 Recipient Inactive Version 3 V10I04 Recipient Inactive Version 4 V10I05 Recipient Inactive Version 5 V10I06 Recipient Inactive Version 6 V10I07 Recipient Inactive Version 7 V10I08 Recipient Inactive Version 8 V10I09 Recipient Inactive Version 9 FA Versions
V20 FA Active Version The final version which is submitted by the Ministry for payout purposes.
50
Ex.5 Version Management Hands-on Exercise
Scenario Using TRAINMCC, you have completed all of your data input into Recipient Working Version. You have contacted the FA and want them to review the data before going any further.
Add Description
1. Navigate to the Version Description and Summary Dashboard and add description the Recipient Working Version. The description should be meaningful to you and the FA
Data Copy 2. Copy data from the Recipient Working Version to the appropriate version which the FA
can review. Use the reference chart in order to determine which version is best suited for this purpose.
Review 3. Navigate to the Version Description and Summary Dashboard and review that the
description for the newly populated (“copy to”) version contains the correct text. 4. View that the data in Schedule 2.4 to confirm the data was successfully copied to the correct
version.
51
Ex.5 Version Management Hands-on Exercise Solutions Topics covered:
• Add Description • Copy Version • Review
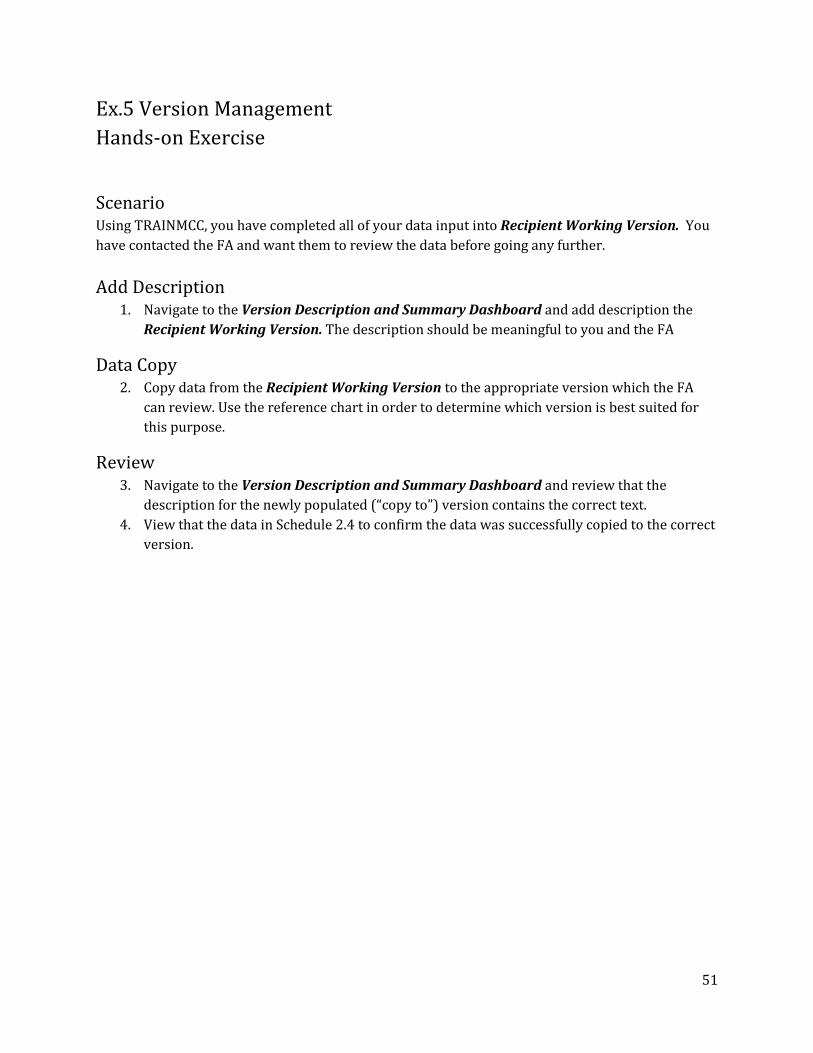
Add Description to Version
1. Open the Version Description and Summary Dashboard Task from the Task List 2. Enter a description to the Recipient Working Version by clicking on the field, entering
data, and clicking Save
52

Copy Version Copy data from V10W (Recipient Working Version) to V10FOV (Recipient FA Viewable Version)
1. Select Tools -> Copy Version from the menu 2. Select V10W: Recipient Working Version in the Copy From dropdown menu 3. Select V10FOV: Recipient FO Viewable Version in the Copy To dropdown menu 4. Refresh the list of entities (Recipients) using the arrow button
5. Under Available Entities select Your Recipient 6. Click the Move or Move All button to move the Entity into the Selected Entities box. 7. Check off all of the options for copying additional artefacts. 8. Click the “Copy Data” button to run the copy process
9. A final confirmation window will pop up to warn that data will be overwritten in the
“Selected Entities” for the “Copy To” version. At this point, review that the correct versions and entities are selected, and click OK.
10. Once the process completes, a window will pop up to inform the user that the copy was
successful.
53

Review 1. In order to ensure that the data copied successfully, navigate back to Version Description
and Summary 2. The description that was entered for Recipient Working Version earlier, should now also
appear under Recipient FA Viewable Version
3. Open Schedule 2.4 using Recipient FA Viewable Version and ensure that the data matches
what you had input into Recipient Working Version in the earlier exercises
54

Module 6 Sign-off and Approvals
55

Ex.6 Sign-off and Approvals - Modifier Reference Document Promotion Confirmation • Required prior to promotion – flag is reset every time the submission is re-calculated
Validate and Promote • Submission Management Task List -> Validate and Promote for Approval • To promote, user would click on the “Change Status” button (or Actions > “Change Status”)
• Once the Change Status window pops up, select Promote as the action and <Automatic> as the
next owner and click OK
56

• To view submission history
o Click Details Button
o Click the toggle for chart area to hide the chart and have more screen size o History will be displayed, user is able to select each status change to view any available
Annotations
57
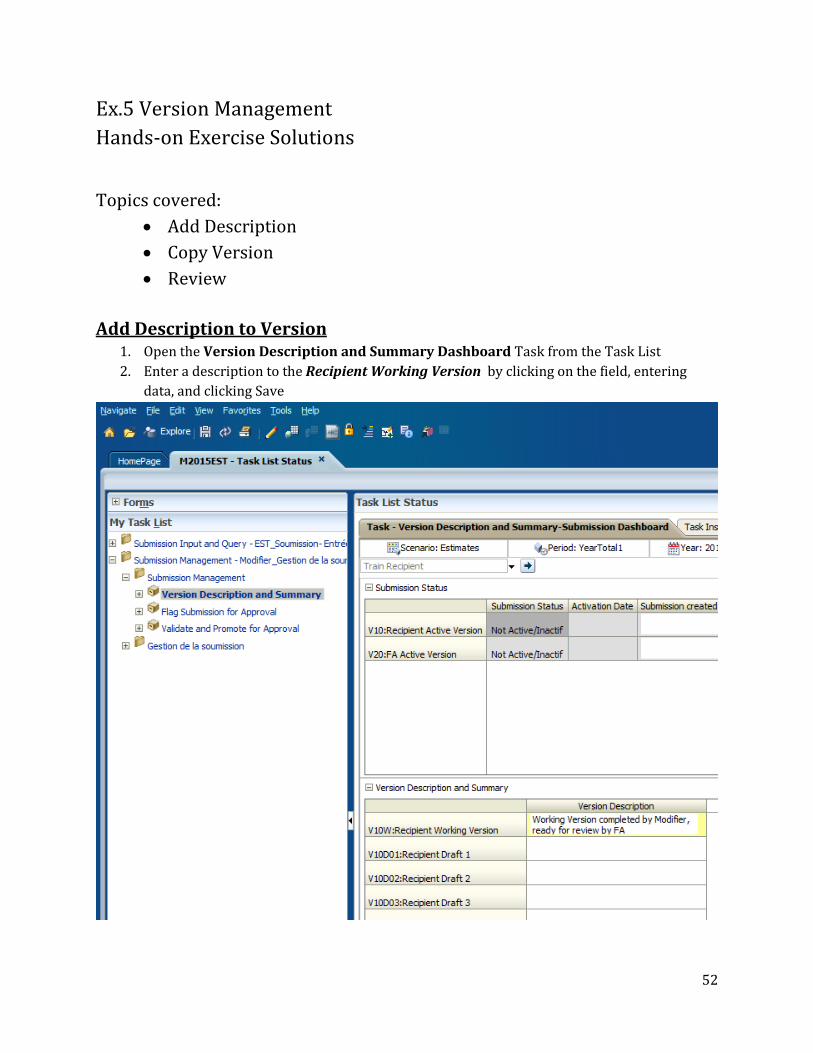
• Once a submission has been promoted, the Recipient Working Version becomes read-only
58
Ex.6 Sign-off and Approvals - Approver Reference Document Approver Process to Make Active 1. After the Modifier has promoted the submission successfully, the Recipient Approver is next in
line. The Recipient Approver has read-only access to Recipient Working Version that was submitted, and is thus able to review the full submission.
2. At this point the approver has two options: a. Reject Submission – if the approver is not satisfied with the submission they can reject
it. This will re-start the approvals process and the Modifier will be in charge of changing the necessary data and re-promoting the submission
b. Sign-off on the Submission – if the Approver is satisfied with the submission they can promote it further down the line by signing off on it. This would move the submission into Recipient Active Version
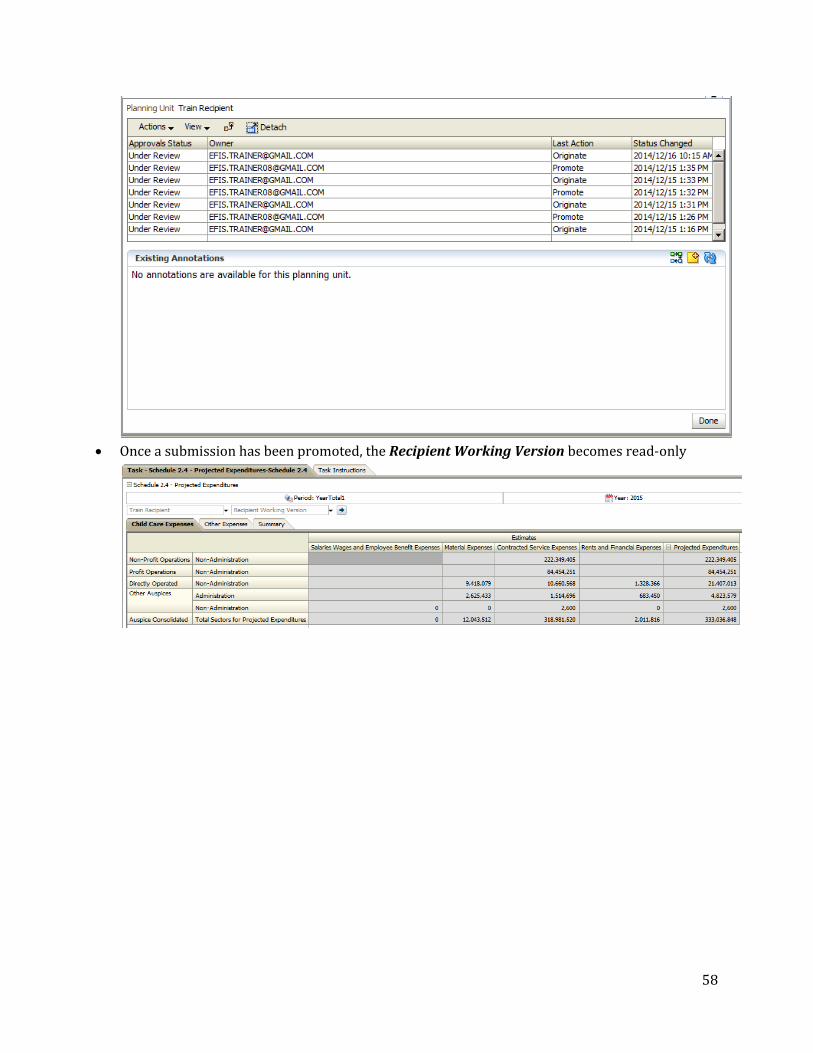
Reject Submission 3. Navigate to Submission Approval -> Submission Management -> Reject Submission
a. Select the Recipient and click Actions -> Change Status b. In the pop-up select Reject as the action and <Automatic> as next owner c. Click OK d. This rejects the submission and the Modifier is once again responsible for correcting
and re-promoting the submission
59

Sign-off on Submission
4. Navigate to Submission Approval -> Submission Management -> Recipient Approver Sign-off a. Active Flag – Shows the current status of the Recipient Active Version b. Sign Off Confirmation – shows that the Modifier has promoted the submission
5. Under “Are you sure you want to sign-off the current submission?” select Yes
6. Click Save 7. Once the form refreshes, the Submission Status will change to Active and will have the current
date as the “Activation Date”
60

Appendix A – Connection Details
Workspace URL
https://efis.fma.csc.gov.on.ca/workspace/index.jsp
Smart View Providers URL
https://efis.fma.csc.gov.on.ca/workspace/SmartViewProviders
Appendix A – Connection Details