Embed Size (px)
Citation preview
Effective Team Management with VSTS and TFS
A Guide for Scrum Masters—Chaminda ChandrasekaraSanjaya Yapa
www.allitebooks.com

Effective Team Management with
VSTS and TFSA Guide for Scrum Masters
Chaminda ChandrasekaraSanjaya Yapa
www.allitebooks.com

Effective Team Management with VSTS and TFS
ISBN-13 (pbk): 978-1-4842-3557-7 ISBN-13 (electronic): 978-1-4842-3558-4 https://doi.org/10.1007/978-1-4842-3558-4
Library of Congress Control Number: 2018945102
Copyright © 2018 by Chaminda Chandrasekara, Sanjaya Yapa
This work is subject to copyright. All rights are reserved by the Publisher, whether the whole or part of the material is concerned, specifically the rights of translation, reprinting, reuse of illustrations, recitation, broadcasting, reproduction on microfilms or in any other physical way, and transmission or information storage and retrieval, electronic adaptation, computer software, or by similar or dissimilar methodology now known or hereafter developed.
Trademarked names, logos, and images may appear in this book. Rather than use a trademark symbol with every occurrence of a trademarked name, logo, or image we use the names, logos, and images only in an editorial fashion and to the benefit of the trademark owner, with no intention of infringement of the trademark.
The use in this publication of trade names, trademarks, service marks, and similar terms, even if they are not identified as such, is not to be taken as an expression of opinion as to whether or not they are subject to proprietary rights.
While the advice and information in this book are believed to be true and accurate at the date of publication, neither the authors nor the editors nor the publisher can accept any legal responsibility for any errors or omissions that may be made. The publisher makes no warranty, express or implied, with respect to the material contained herein.
Managing Director, Apress Media LLC: Welmoed SpahrAcquisitions Editor: Nikhil KarkalDevelopment Editor: James MarkhamCoordinating Editor: Divya Modi
Cover designed by eStudioCalamar
Cover image designed by Freepik (www.freepik.com)
Distributed to the book trade worldwide by Springer Science+Business Media New York, 233 Spring Street, 6th Floor, New York, NY 10013. Phone 1-800-SPRINGER, fax (201) 348-4505, e-mail [email protected], or visit www.springeronline.com. Apress Media, LLC is a California LLC and the sole member (owner) is Springer Science + Business Media Finance Inc. (SSBM Finance Inc.). SSBM Finance Inc. is a Delaware corporation.
For information on translations, please e-mail [email protected], or visit http://www.apress.com/rights-permissions.
Apress titles may be purchased in bulk for academic, corporate, or promotional use. eBook versions and licenses are also available for most titles. For more information, reference our Print and eBook Bulk Sales web page at http://www.apress.com/bulk-sales.
Any source code or other supplementary material referenced by the author in this book is available to readers on GitHub via the book’s product page, located at www.apress.com/978-1-4842-3557-7. For more detailed information, please visit http://www.apress.com/source-code.
Printed on acid-free paper
Chaminda ChandrasekaraDedigamuwa,Colombo, Sri Lanka
Sanjaya YapaKandy, Sri Lanka
www.allitebooks.com

Let this book be the ultimate guide for scrum masters to make their team run the extra mile . . .
www.allitebooks.com

v
Chapter 1: Handling Teams �������������������������������������������������������������������1
VSTS and TFS ��������������������������������������������������������������������������������������������������������1
Team Project Collections, Team Projects, and Teams ��������������������������������������2
Work Items ������������������������������������������������������������������������������������������������������3
Iterations/Sprints and Areas ����������������������������������������������������������������������������3
Determining the Ideal Size for Teams �������������������������������������������������������������������4
Getting Started ������������������������������������������������������������������������������������������������4
Monitoring the Progress of the Teams �����������������������������������������������������������16
Large Teams ��������������������������������������������������������������������������������������������������������17
Getting Started with Large Teams �����������������������������������������������������������������18
Monitoring the Progress of Multiple Teams ���������������������������������������������������27
Summary�������������������������������������������������������������������������������������������������������������27
Chapter 2: Working with a Backlog ���������������������������������������������������29
Defining Work ������������������������������������������������������������������������������������������������������30
Work That Delivers Value to Clients ���������������������������������������������������������������30
Support Work ������������������������������������������������������������������������������������������������31
Spike Items ����������������������������������������������������������������������������������������������������31
Table of Contents
About the Authors ��������������������������������������������������������������������������������ix
About the Technical Reviewer �������������������������������������������������������������xi
Acknowledgments �����������������������������������������������������������������������������xiii
Introduction ����������������������������������������������������������������������������������������xv
www.allitebooks.com

vi
Backlog ���������������������������������������������������������������������������������������������������������������32
Levels of Backlog ������������������������������������������������������������������������������������������32
Adding Defects/Bugs to the Backlog �������������������������������������������������������������35
Grooming Your Backlog ���������������������������������������������������������������������������������36
Prioritizing the Backlog ���������������������������������������������������������������������������������42
Estimating Your Backlog Work �����������������������������������������������������������������������42
Getting Stakeholder Feedback ����������������������������������������������������������������������45
Defining a Process ����������������������������������������������������������������������������������������������46
Planning with a Small Team ��������������������������������������������������������������������������50
Planning with a Large Team ��������������������������������������������������������������������������55
Visualizing Your Plan��������������������������������������������������������������������������������������55
The Sprint Zero or the Pre-Sprint ������������������������������������������������������������������������56
Summary�������������������������������������������������������������������������������������������������������������56
Chapter 3: Working on the Iteration ���������������������������������������������������57
Starting the Sprint �����������������������������������������������������������������������������������������������58
Daily Activity �������������������������������������������������������������������������������������������������������60
Planning the Day �������������������������������������������������������������������������������������������60
Choosing Work for the Day ����������������������������������������������������������������������������64
Tracking and Resolving Impediments and Other Supportive Work ���������������������66
Handling Supportive Work within the Team ���������������������������������������������������67
Handling Impediments/Roadblocks ���������������������������������������������������������������70
Working with Code ����������������������������������������������������������������������������������������������71
Testing the Work �������������������������������������������������������������������������������������������������72
Monitoring the Progress��������������������������������������������������������������������������������������74
Avoiding Defects �������������������������������������������������������������������������������������������������78
Facilitating Unavoidable Changes �����������������������������������������������������������������������81
Handling Disaster Situations �������������������������������������������������������������������������������82
Table of ConTenTsTable of ConTenTs

vii
Release Stability �������������������������������������������������������������������������������������������������84
Visualizing and Positively Impacting the Team ���������������������������������������������������88
Summary�������������������������������������������������������������������������������������������������������������92
Chapter 4: Work After an Iteration �����������������������������������������������������93
Review ����������������������������������������������������������������������������������������������������������������94
Handling Partially Done Stories ��������������������������������������������������������������������������96
Moving Partially Completed Work to the Backlog �����������������������������������������������96
Visualizing and Analyzing the Completed Work ������������������������������������������������100
Velocity ��������������������������������������������������������������������������������������������������������100
Burndown and Burnup���������������������������������������������������������������������������������102
Lead Time and Cycle Time ���������������������������������������������������������������������������105
Cumulative Flow ������������������������������������������������������������������������������������������106
Planning the Next Iteration �������������������������������������������������������������������������������110
Forecasting Future Work �����������������������������������������������������������������������������112
Planning Capacity for the Next Iteration ������������������������������������������������������113
Continuous Improvement ����������������������������������������������������������������������������������114
Summary�����������������������������������������������������������������������������������������������������������115
Chapter 5: Roadmap/Project Plan and Resources ����������������������������117
Creating the Project Plan/Product Roadmap �����������������������������������������������������118
Creating the Project Plan/Product Roadmap �����������������������������������������������118
Business Analysis ���������������������������������������������������������������������������������������������137
Office Integration �����������������������������������������������������������������������������������������137
The Mobile Interface �����������������������������������������������������������������������������������������141
Summary�����������������������������������������������������������������������������������������������������������142
Table of ConTenTsTable of ConTenTs

viii
Chapter 6: Adapting VSTS/TFS to Your Team’s Process ��������������������143
Customizing Shared Resources ������������������������������������������������������������������������144
Customizing Team Projects and Processes �������������������������������������������������������144
Customizing VSTS with Template Inheritance ���������������������������������������������145
Customizing VSTS with Hosted XML �����������������������������������������������������������154
Customizing with TFS On-premises XML�����������������������������������������������������156
Customizing the Access to Work Tracking Tools �����������������������������������������������157
Customizing the Test Experience ����������������������������������������������������������������������159
Additional Customization Options ���������������������������������������������������������������������159
The Pros and Cons of VSTS vs� TFS �������������������������������������������������������������������160
Summary�����������������������������������������������������������������������������������������������������������161
Index �������������������������������������������������������������������������������������������������163
Table of ConTenTsTable of ConTenTs
ix
About the Authors
Chaminda Chandrasekara is a Microsoft
Most Valuable Professional (MVP) for Visual
Studio Application Lifecycle Management
(ALM) and a Scrum Alliance® Certified
ScrumMaster (CSM) who believes in
continuous improvement of the software
development lifecycle. He is a Senior
Consultant - DevOps for Tentacle Technologies
MSC Sdn.Bhd., Malaysia, assigned to work for
Jabil Circuit Sdn. Bhd. He is an active Microsoft
Community Contributor (MCC) who is well
recognized for his contributions in Microsoft forums, TechNet galleries,
wikis, and Stack Overflow and he contributes extensions to Visual Studio
Team Services/Team Foundation Server (VSTS/TFS) in the Microsoft
Visual Studio Marketplace. He also contributes to other open source
projects in GitHub. Chaminda published his first book, Beginning Build
and Release Management with TFS 2017 and VSTS (www.apress.com/
in/book/9781484228104), in June 2017, and he blogs about technology
at https://chamindac.blogspot.com and http://devopsbeyondms.
blogspot.com/.

x
Sanjaya Yapa currently works as a Microsoft
Dynamics CRM consultant at Oaktan Pty
Ltd. in Melbourne, Australia. He has more
than 12 years of experience in the industry
and has been working with various Microsoft
technologies since 2005. Sanjaya possess a
wealth of experience in software development,
team leadership, product management, and
consultancy. He specializes in Microsoft
Dynamics CRM and Visual Studio Application
Lifecycle Management. Sanjaya blogs on
technology and has been sharing his knowledge and expertise via
https://techjukebox.wordpress.com and https://almbox.wordpress.com.
abouT The auThorsabouT The auThors
xi
About the Technical ReviewerMittal Mehta has total 15 years of IT
experience. Currently, he is working as a
configuration manager and is MCP in TFS
2012. He also has experience working in
build-release, DevOps, automation and
configuration area since last 8 years in
Microsoft Technologies.

xiii
Acknowledgments
A special thank you must go to Indaka Raigama, who has been a
brilliant CEO, mentor, and leader for us, and who has given us so many
opportunities to research with VSTS/TFS while working for him. It is these
opportunities that laid the foundation for this book. Also, we are thankful
for all the mentors who have encouraged and helped us during our careers
and who have provided us with so many opportunities to gain the maturity
and the courage we needed to write this book.
We would also like to thank our friends and colleagues who have
helped and encouraged us in so many ways. Last, but in no way least, we
owe a huge debt to our families. Not only because they have put up with
late-night typing, research, and our permanent air of distraction, but
also because they have had the grace to read what we have written. Our
heartfelt gratitude is offered to them for helping us make this dream come
true.

xv
Introduction
Agility in software development is becoming mandatory as technology
rapidly evolves, causing business processes to improve day by day. Because
Visual Studio Team Services/Team Foundation Server (VSTS/TFS) is an
application lifecycle management tool, it has enormous capabilities for
improving the way a software development team works, if it is used wisely.
The project management role in software development projects/
products is now moving toward servant leadership with Agile/Scrum
practices, and thus it functions more as a facilitator than as a manager.
Tools can help empower teams and enable them to deliver software, with
high quality, while rapidly adapting to the changes happening in the tech
world. Effective Team Management with VSTS and TFS: A Guide for Scrum
Masters gives you essential know-how so you can use TFS/VSTS effectively
and also enables you to empower your teams. This text provides a deep
analysis of practical issues and how to overcome them and details the
process of adopting the tool for your style of work.
Rather than just explaining the features, this book describes VSTS/TFS
features as solutions to the challenges of building better Agile teams. It
also discusses how to handle small, ideally sized Agile teams practically
by facilitating large teams to support large-scale projects, by working
with distributed teams in different geographical locations, and so on—all
skills that deepen your ability to get successful project/product outcomes
from your teams. Special focus is given to common pitfalls that you can
unintentionally fall into while using the tool that will prevent you from
creating teams governed by the terms of the tool, as opposed to teams that
find their own better process for creating long-term sustainability.

1© Chaminda Chandrasekara, Sanjaya Yapa 2018 C. Chandrasekara and S. Yapa, Effective Team Management with VSTS and TFS, https://doi.org/10.1007/978-1-4842-3558-4_1
CHAPTER 1
Handling TeamsAgility in software development is becoming mandatory as technology
rapidly evolves causing business processes to improve day by day. The
project management role in software development projects/products
is now moving toward servant leadership with Agile/Scrum practices,
thus it functions more as a facilitator and delivery enabler, rather than as
a manager. Tools can help empower teams and enable them to deliver
software, with high quality, while providing both accountability and
visibility. The scrum masters or delivery enablers should use these tools
effectively without awakening remnants of the autocratic evil attitude of
“I am the project manager, do as I say,” which can happen as a result of
the overwhelming amount of data and information that is available with a
particular tool.
In this chapter, we briefly discuss key concepts of Visual Studio Team
Services (VSTS), a cloud version of TFS provided as a software as a service
(SaaS), and Team Foundation Server (TFS). Then we dive deep into using
VSTS/TFS effectively to overcome the challenges of empowering small,
large, and geographically distributed teams.
VSTS and TFSBecause VSTS/TFS is an application lifecycle management (ALM) tool,
it has a wide range of capabilities for improving the ability of a software
development team to deliver higher-quality software products/projects in

2
a shorter period of time. In this book, you gain essential knowledge and
understanding so that you can use VSTS/TFS effectively to empower your
teams. The following explanations of VSTS/TFS concepts will help you
digest the details we discuss in this and upcoming chapters.
VSTS/TFS offers a collaborative platform on which teams can manage
versioning of software code files, plan and track work, including code
bugs/defects and issues/impediments they face, and automate the process
of building, testing, and releasing software to enable development and
operation (DevOps). For further information on key concepts of VSTS/
TFS, refer to https://docs.microsoft.com/en-us/vsts/user-guide/
concepts?toc=/vsts/user-guide/toc.json&bc=/vsts/user-guide/
breadcrumb/toc.json.
Team Project Collections, Team Projects, and TeamsThe account in VSTS or a team project collection in on-premises TFS,
is the isolated broad grouping of team projects. A team project can
represent a product/project team or even an entire development team
that is working on multiple projects for an organization. In a team
project, you are provided with a source control repository (or multiple
repositories) and a place in which a team of developers or teams can
plan, collaborate, and track the work they are carrying out. Additionally,
a team project provides build, test, and deploy components for a software
product(s)/project(s). When you create a new team project, a team with
a team project name is created by default. You can add more than one
team inside your team project.
When you connect to VSTS/TFS, you are connecting with an account
or a team project collection. You can define one or more team projects
within that collection. When you create a team project, a team by the
same name is created by default; this is sufficient for smaller teams.
Chapter 1 handling teams

3
In a scenario that includes multiple projects and multiple teams,
you may need to create multiple team projects and teams under a
single account or project collection. For further reading, please refer
to https://docs.microsoft.com/en-us/vsts/user-guide/team-
projects-teams-repos#what-is-a- team-project. We discuss team
projects and teams in detail, later in this chapter.
Work ItemsA work item is any type of work you do as a team member or as a team.
A work item type (WIT) in VSTS/TFS is provided with fields, a layout, and
a specific workflow that allows you to track the work being carried out by
the team. Features, user stories, product backlog items, bugs, tasks, test
cases, and so on are some of the available work item types by default. You
can also introduce your own work item types and alter the behavior of
the existing default work item types. In Chapter 2, we discuss the effective
usage of these work items to facilitate your team needs.
Iterations/Sprints and AreasYou should use the iteration/sprint paths to group work into time periods
and this is mapping to Agile/Scrum, iterations and sprints concept. You
can use the area to group the work items for a team, product/project,
or feature/module of a piece of software. To learn more details about
iterations and areas, refer to https://docs.microsoft.com/en-us/vsts/
work/customize/about-areas-iterations. We will discuss these in
further detail later in this chapter.
Now that you have a basic knowledge of VSTS/TFS concepts, let’s
focus on the more important aspects of using this tool. Because you are
a facilitator (you may be thinking, “Am I not the manager anymore?”
The answer is no, you are not the manager any longer. Instead, you are
the delivery enabler, so change your attitude right now!), you may have
Chapter 1 handling teams

4
a few different types of projects/products to deliver with the help of
your team(s):
• Short-Term Project: This type of project is developed and
delivered within a short period of time. Ideally you can
handle this project with a small Agile/Scrum team made
up of three to nine members as per latest scrum guide.
• Long-Running or Complex and Large Product/Project:
To deliver this type of project, you will require a large
number of team members, and you may have all of
them in the same geolocation.
• Long-Running or Complex and Large Product/Project:
To deliver this type of project, you will require a large
number of team members, and you may have them in
different geolocations and time zones.
Determining the Ideal Size for TeamsWhat is the ideal team size? What you need for a small project that can be
completed within three to six months with the short warranty period might
differ from what you need for a long-running product that has a roadmap
for delivering features in very small chunks, which can be facilitated by a
small team. On the other hand you might want to have a large team if it is
required to deliver bulk of work urgently, which we will discuss later in this
chapter. You may encounter many other project/product requirements
that influence team size.
Getting StartedTo begin, it is crucial that you make sure that you are underpinning the
right framework for executing the project/product. Let’s dive deep into the
steps that will help you lay the groundwork for a small team using VSTS/
TFS. First you must create the team project for the team.
Chapter 1 handling teams

5
Creating a Team Project
Before creating the team project, you need to make the following decisions:
• Determine the process template.
Out of the box, VSTS/TFS comes with three process
templates: Agile, Scrum, and CMMI (Capability
Maturity Model Integration). The process template
defines the work item types and how they behave
in your project. Each template has its own pros
and cons. Once you have selected the template, it
can be customized, but you cannot change it to a
different default template at a later stage. So, be sure
to discuss this choice with your team and decide
which template is best for your project/product
development. You can find more information at this
link: https://docs.microsoft.com/en-us/vsts/
work/guidance/choose- process.
• Decide on the version control repository.
Make sure to consult your technical team before you
decide which version control system to use. VSTS/TFS
comes with Team Foundation Version Controlling (TFVC)
and Git (Team Foundation Git). Each of these repositories
has its own advantages and disadvantages. Use this link
to help you decide on the best version control system for
your situation: https://docs.microsoft.com/en-us/
vsts/tfvc/comparison-git- tfvc.
Chapter 1 handling teams

6
Once you have made these two decisions, you can begin creating the
team project. To do so, click the gear icon on top right corner of the home
page of VSTS/TFS. This action takes you to the Administration Overview
page. Click New Team Project to create the new team project.
You can find out more details about creating team projects here:
https://docs.microsoft.com/en-us/vsts/accounts/create-team-
project?tabs=vsts. As illustrated in Figure 1-1, make sure to provide the
Project Name, the Version Control, and the Work Item Process template.
Figure 1-1. Creating a new project
Chapter 1 handling teams
7
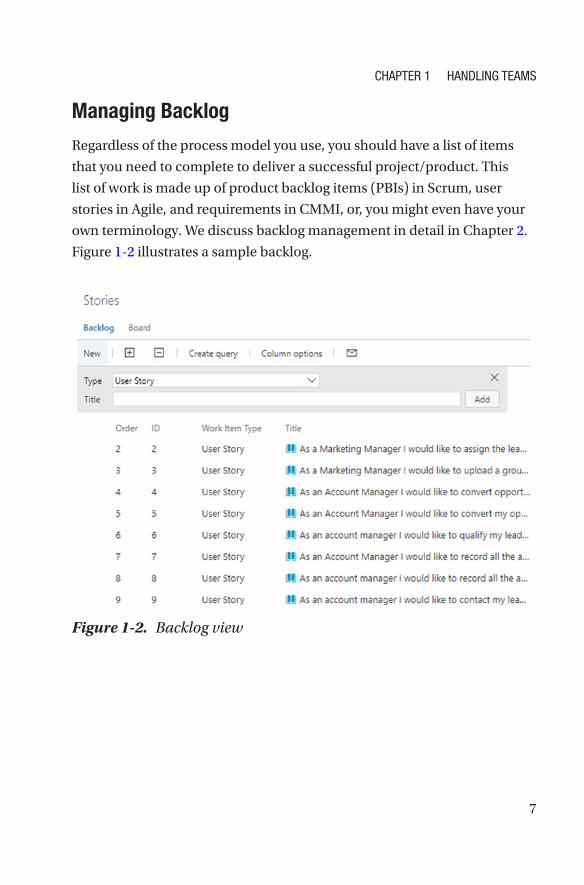
Managing Backlog
Regardless of the process model you use, you should have a list of items
that you need to complete to deliver a successful project/product. This
list of work is made up of product backlog items (PBIs) in Scrum, user
stories in Agile, and requirements in CMMI, or, you might even have your
own terminology. We discuss backlog management in detail in Chapter 2.
Figure 1-2 illustrates a sample backlog.
Figure 1-2. Backlog view
Chapter 1 handling teams

8
Isolating the Work of a Small Team
If you are working on a smaller project and you need to deliver it in a short
period of time, you can work with a single team with a backlog. But when
the project becomes complex—for instance, if the project needs support
once it goes live—how do you handle the complexity of working with new
feature development while still supporting production issues?
The challenge here is not to interrupt the ongoing new feature
development while you are catering to client issues and fixing them as
soon as possible. In such scenarios, you must effectively manage both
workloads with full visibility and still require a level of isolation of support
work and new feature development activities.
You can accomplish this easily with the Teams feature inside a team
project of VSTS/TFS. For instance, you can create two different teams in
addition to the default team—one for handling the new development work
and the other for handling the support work. (Creating teams and adding
team members is described here: https://docs.microsoft.com/en-us/
vsts/work/scale/multiple-teams).
One important thing to remember here is that, when you create
these two new teams in the team project, you must create an area that
belongs to each team. You might be wondering what an area is in VSTS/
TFS. Fundamentally, an area enables you to group your work by its team,
product, feature, module, or business functionality. An area not only
provides categorization, but it also controls access to work items. For the
default team that is created for your team project, you get a default area as
well. So, when you create teams, you get the opportunity to select whether
the team requires an area or not (see Figure 1-3). To create a new team,
follow these steps:
1. Click the Settings(gear) icon on the top right corner
of the project portal.
Chapter 1 handling teams

9
2. When you are redirected to the Administration page,
click the New Team option from the Overview tab.
3. In the Create New Team page, enter your team name, select
your permissions, and make sure the Team Area checkbox
is checked. Click Create Team (see Figure 1-3).
Figure 1-3. Creating a new team
Chapter 1 handling teams

10
In Figure 1-4, you must select an area for each team you create so you
can organize your backlog and the work items. You can create subareas
under each team area, but make sure you do not create an area structure
that is too complex; because doing so will cause too much overhead in
work item management as well as in permissions management.
Figure 1-4. An area structure for a small team
In addition to creating an area structure, you can configure multiple
teams to share the same work area (see https://docs.microsoft.com/
en-us/vsts/work/scale/set-team-defaults#set-team-default-area-
paths). For instance, in some scenarios, you might want, several teams to
share the default area.
You can also use the area to allocate work specific to each team; for
instance, you can assign the development work to the development team
simply by changing the area path of the work item. Similarly, you can
assign the support work that comes from the client to the support team
Chapter 1 handling teams
11
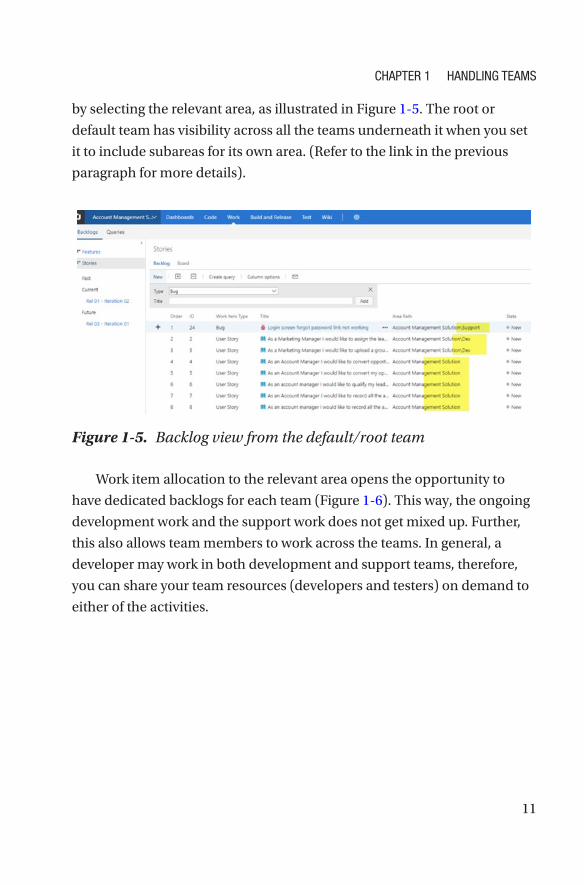
by selecting the relevant area, as illustrated in Figure 1-5. The root or
default team has visibility across all the teams underneath it when you set
it to include subareas for its own area. (Refer to the link in the previous
paragraph for more details).
Figure 1-5. Backlog view from the default/root team
Work item allocation to the relevant area opens the opportunity to
have dedicated backlogs for each team (Figure 1-6). This way, the ongoing
development work and the support work does not get mixed up. Further,
this also allows team members to work across the teams. In general, a
developer may work in both development and support teams, therefore,
you can share your team resources (developers and testers) on demand to
either of the activities.
Chapter 1 handling teams

12
We have now explored how you can use VSTS/TFS teams and areas
to separate the work within a small team depending on its activity. This
enables you to manage the work as well as for individual action teams
(dev/support) to work without any collisions.
Managing Delivery Cadence
Now that we have set up the teams and the area hierarchy to organize the
backlog, it’s time to come up with a plan for releasing the goods to the end
users. Basically, we need to finalize how often we should do this. We know the
clients would love to see the results of their investments as early as possible.
In theory, with the Agile practice that we incorporate with the project/
product development work, we should release software to the end users in
short iterations. Say you want to have three weeks of iterations; that is, you are
planning to release software at the end of every three weeks or your delivery
cadence is three weeks. Remember, the software delivery cycle time or
delivery cadence might be different based on the complexity of the project.
Once you have decided that the completed work will be released every
three weeks (this can be a different time frame such as one week or a
month depending on your team needs) or, in other words, that the length
of your iterations is three weeks, you can go ahead and set the iterations in
VSTS/TFS (Figure 1-7).
Figure 1-6. Development team backlog view
Chapter 1 handling teams

13
As mentioned earlier, you can use the areas to organize work items into
teams, products, features, modules, or business functionalities, and you
can use the iterations to organize your work items based on the release
priority. This is where you build your release cadence. So, by the end of
each iteration, you and your team will be releasing the software to the end
users. But is this actually possible? The reality is that when you kick off the
project, by the end of the first iteration of the cycle, most of the time you do
not yet have anything to deliver to the users. It might take a minimum of
three to four cycles to get something out. What can you do in the meantime
to get things lined up nicely?
You can easily set up a release cycle with a release hierarchy. That is,
you can organize your iterations under releases as illustrated in Figure 1- 8.
In this scenario, you are releasing goods at the end of each release, but not
at each iteration. In other words, you are making sure that the end user
gets a real business value at the end of each release cycle/iteration.
Figure 1-7. Managing iterations
Chapter 1 handling teams

14
You might want to have a different release cadence for your dev/
feature development team and for the support activities. For example, let’s
say you deliver hotfixes weekly/daily/on demand, whereas you deliver
new features to the system monthly/quarterly. What are your options for
handling such a situation with VSTS/TFS? In each team, you can decide
which iterations are visible or which the team should work with. Here are
the choices:
• Backlog Iteration: This allows you to set which work
items appear in your backlog and boards for the team.
• Default Iteration: This defines which iteration the work
items get assigned to if they are created from the team
context.
Figure 1-8. Iterations grouped into releases
Chapter 1 handling teams

15
You can select a set of iterations to appear in the backlog and the
board view for iterations. Play around with the different settings to figure
out the ideal setup for your team and for your team project. For example,
if you have set up a release cadence comprising two iterations per one
release, as shown in Figure 1-8, it is recommended that you select the
iterations for your team as shown in Figure 1-9 to obtain the Work tab
view shown in Figure 1-10.
Figure 1-9. Iterations selection for the team
Figure 1-10 shows the Backlogs view. If you inspect it carefully,
note that you can see iterations belonging to two releases. Adopting
naming conventions similar to those shown in this sample may help you
recognize which iteration you are referring to and to which release cycle
the iteration belongs.
Chapter 1 handling teams

16
Assuming you use this recommended approach, make sure you
remember to alter these setting to come up with the best solutions for your
needs. Remember not to let the tool dictate the terms of your process; you
should decide how to model the tool to suit the process that works for you.
Monitoring the Progress of the TeamsWhether you have a single team in your VSTS/TFS team project or multiple
teams, make sure to monitor the progress of the ongoing work. As a scrum
master, if you are not supporting your team, so the team understands and
rectifies any blockings, then your team will fail to keep the momentum
going. Of course, the team may reveal these issues toward the latter part
of an iteration, but you should have an easy way to identify these issues
sooner rather than later. If your team does not identify these delays as early
as possible and work to rectify them, you and the team will fail to deliver
the project on time.
So how can you handle this? This is when you can use the reporting
and work tracking capabilities of VSTS/TFS—such as queries, charts,
Kanban boards, and dashboards—to track the ongoing work on a daily
basis and on demand. We dive deep into this rich set of capabilities
throughout the chapters in this book.
Figure 1-10. The team’s Work tab view
Chapter 1 handling teams
17
Large TeamsIn the previous section of this chapter, we discussed how to handle ideally
sized Agile teams. But in some scenarios, you must manage a much
larger team, maybe due to the complexity and the tight deadlines of the
project/product. Some projects/products are very complex and have many
modules. Others must be delivered in a short period of time with critical
deadlines that must be met along the way. To meet these requirements of
project/product development, you have no other option than to use a large
team, which goes beyond the recommendations of the Agile practice. As
the team gets bigger, naturally it leads to various complications in terms of
teamwork, collaboration, communication, and other issues.
When the team gets larger and the amount of work to be delivered is
huge and critical, the best way to handle the situation is to divide the work
up among team members. Make sure you focus on business modules
rather than technical reasons when you divide teams in this manner.
Simply dividing your team into the Java-Dev team, the C# Dev team, or UI
Development and Backend Development using technical reason as criteria
of division does not help; we discuss this in more depth later in this chapter.
It is also vital that you make sure to monitor the work in progress
for all teams at all times. If you do not, it is very likely that you will miss
the deadlines or that you will run into last-minute impediments or risks
within the software development process. Miscommunication among
stakeholders from different subteams is another thing to keep an eye on.
It is dangerous not to have a clear vision of where the project is heading.
Also, when the teams start to release each of the components of the system
and do the integrations between them, if you did not lay the proper plans
well in advance, things get worse. In the following sections, we discuss
how to divide a large team and manage it effectively and efficiently
while still leveraging the features of VSTS/TFS as an application lifecycle
management (ALM) tool.
Chapter 1 handling teams

18
Getting Started with Large TeamsAs we already discussed for small teams, you start by creating the team
project. This step is pretty much the same, regardless of your team size.
With the help of your technical team, you can decide on which source
control and the VSTS/TFS team project template (Agile, Scrum, or CMMI)
to use.
In order to avoid managerial complexities, you must make required
decisions about how to execute the project/product development at very
early stages of the process. For instance, let’s assume the project is very
complex and has several modules, such as Membership Management,
Events Management, Finance Management, Case Management, and
so on. In such scenarios, what is the ideal way to proceed? You should
modularize the development process so that all application modules are
developed in parallel by multiple teams. Having said that, the challenge is
to decide on how to divide your team to deliver modules in parallel. There
are various ways of doing this, and you should consider the best solution as
the example we are discussing below, that gives the business value quickly
to your product/project end users.
Technically inspired team members might want to divide the team
based on the technical aspects. For instance, they might want to divvy up
the work into categories like the following: front-end development, business
process and plugin development, database development, and so on.
The danger of this approach is that the whole team might eventually lose
the focus of the project’s business purpose and continue to focus only on
its technical aspects. At all times, the aim of the team should be to deliver
value to the end users. With divisions like this, you and the team are not
releasing the value to the end users. Instead, your team is focused on merely
completing the work assigned to them. As a result, the integration becomes
tedious and causes unnecessary delays.
Chapter 1 handling teams

19
Figure 1-11. A nested team structure. This is not possible with VSTS/TFS
Therefore, the most appropriate way of dividing a team is based on the
business functions of the project. For instance, you can create different
teams to develop membership management, finance management, case
management, events management, and so on. Each team has its own set of
developers and testers and its own scrum master. Remember earlier that
we created two different teams to handle development work and support
work. Similarly, you can create the relevant teams under the main team
project and assign the team members to each team you created. You may
want to have both a development and a support subteam for each team.
However, nested teams are not a possibility in VSTS or TFS, which means
you cannot have a team structure like the one shown in Figure 1-11.
Chapter 1 handling teams

20
In fact, it is not necessary to have such a complex team structure.
Obviously, for a large team and a complex project, you might be able to
have one or two separate support teams that are working on all modules
support activity. So, you could set up a team for each module and then set
up a support team or two under the root team.
Having said that, what should you do if you really want to have both
a dev team and a support team for each of the modules because you
are handling each individual module in a totally decoupled manner
technically and each has independent release cadences of its own? A
workaround for this is to create all required teams with areas assigned
to them and then move the required module to dev team areas under
the relevant module areas as children. Does this sound confusing? Let’s
simplify it with few steps.
1. Create each team with an area (refer back to Figure 1-3)
so that the teams look like those shown in Figure 1-12.
Figure 1-12. Module teams and a dev and support team for each module
Chapter 1 handling teams
21
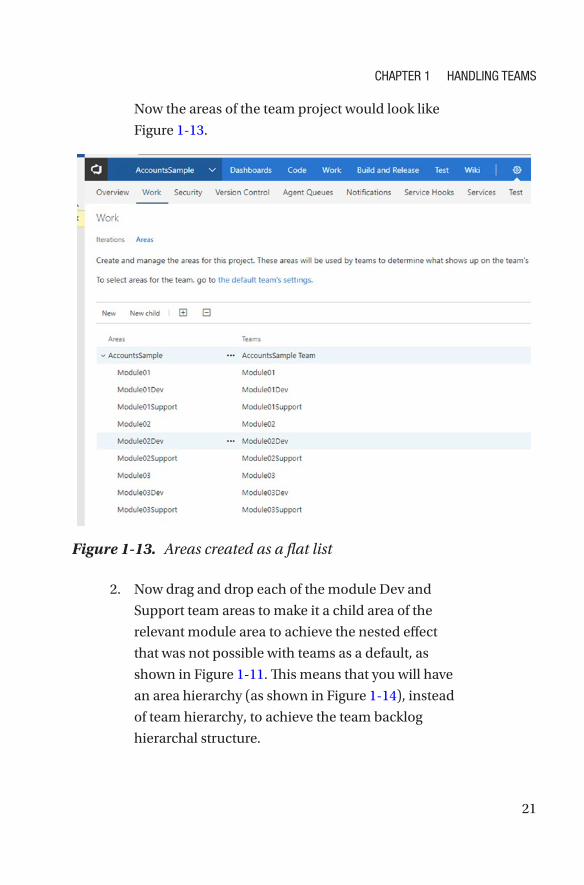
Now the areas of the team project would look like
Figure 1- 13.
Figure 1-13. Areas created as a flat list
2. Now drag and drop each of the module Dev and
Support team areas to make it a child area of the
relevant module area to achieve the nested effect
that was not possible with teams as a default, as
shown in Figure 1-11. This means that you will have
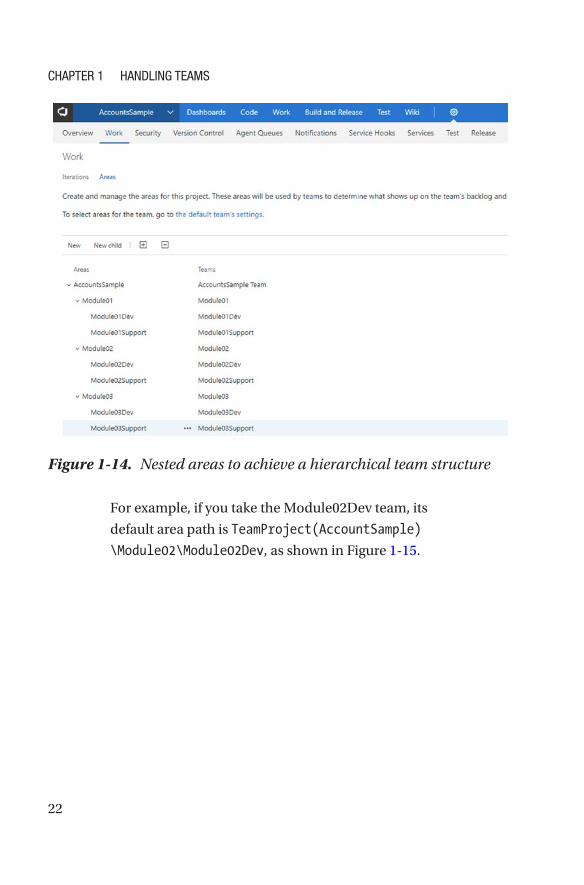
an area hierarchy (as shown in Figure 1-14), instead
of team hierarchy, to achieve the team backlog
hierarchal structure.
Chapter 1 handling teams
22
For example, if you take the Module02Dev team, its
default area path is TeamProject(AccountSample)
\Module02\Module02Dev, as shown in Figure 1-15.
Figure 1-14. Nested areas to achieve a hierarchical team structure
Chapter 1 handling teams
23
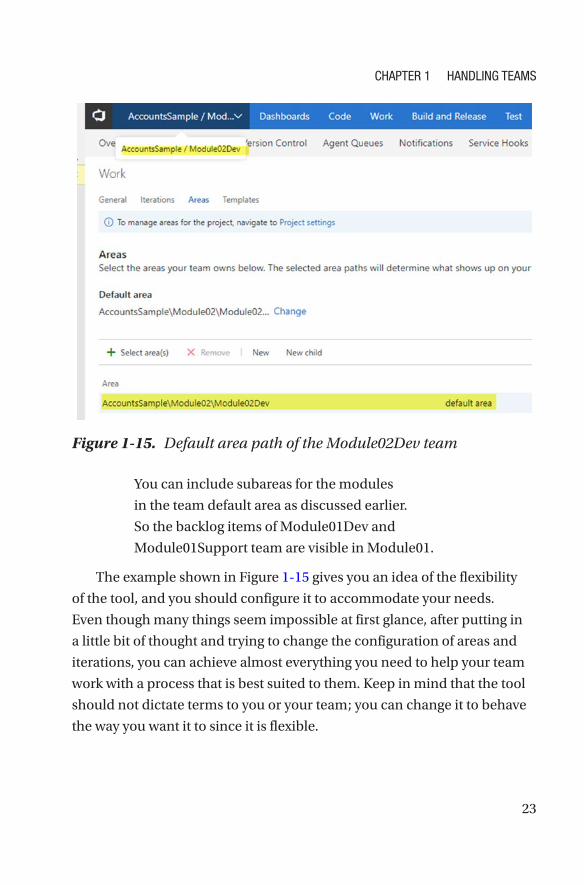
Figure 1-15. Default area path of the Module02Dev team
You can include subareas for the modules
in the team default area as discussed earlier.
So the backlog items of Module01Dev and
Module01Support team are visible in Module01.
The example shown in Figure 1-15 gives you an idea of the flexibility
of the tool, and you should configure it to accommodate your needs.
Even though many things seem impossible at first glance, after putting in
a little bit of thought and trying to change the configuration of areas and
iterations, you can achieve almost everything you need to help your team
work with a process that is best suited to them. Keep in mind that the tool
should not dictate terms to you or your team; you can change it to behave
the way you want it to since it is flexible.
Chapter 1 handling teams

24
You can share resources and easily add them to multiple teams based
on your requirements. For instance, you can share user experience experts
between teams. It is good practice to nominate someone to lead each of
these teams and take ownership of the scrum master role in each team
so that he or she can track the progress and communicate with the scrum
master (you) who oversees the whole project.
This becomes very complicated if the team is split over different
geolocations. You can follow up with the same principle to divide the
teams, but remember that the team is working from different locations. Do
not divide the team based on the location and assign a module; instead,
always keep a mixture of people from different locations in one team that
is responsible for a module. Again, you can use the Teams feature of VSTS/
TFS along with areas and iterations to manage such teams.
As explained earlier, when you create teams, behind the scenes a
separate work area is created for each team you created. That is the default
behavior. However, you can deselect the “Create an area path with the
name of the team” checkbox that is shown in Figure 1-3 to create a team
without a default area. Then you can go to the team setting and set the
default area of the team to any existing area, or you can create a new area
and set it to the team default area. The important thing to remember is
a team must have a default area to make the backlog, boards, and so on
work. You should experiment and set up the VSTS/TFS team project to
your liking using the flexibility it has.
Organizing the Backlog of Larger Teams
Because the backlog for a larger project will be so large, a flat structure
of requirements is not going to work simply because multiple business
functions and multiple teams will be working on those functions
simultaneously. Such a scenario is when you get to use the VSTS/TFS work
items (epics/features/user stories) to their full potential. For instance, you
can create a hierarchy of work items as illustrated in Figure 1-16. We discuss
backlog management more in Chapter 2.
Chapter 1 handling teams

25
Figure 1-16. Organized backlog
In the beginning of this section, we discussed how to divide the teams.
Ideally, a larger team should be divided into multiple teams that focus on
the business functionality. As explained previously, this is the appropriate
method for delivering business value to the end user in large projects. As
we know so far, when creating teams, behind the scene VSTS/TFS also
creates the areas by default, which enables you to assign the work items to
the relevant team by simply changing the area path. Now that you have set
up the teams, the work items management is the next step therefore you
should gain an understanding, to begin the project/product development,
which we will discuss in detail in Chapter 2.
Chapter 1 handling teams
26
Defining the Delivery Cadence for Multiple Teams
As with ideally sized teams, you must define the delivery cadence for the
project/product development for large teams. Remember this is very tricky
since different teams are going to be working on features of each module
they are assigned to and the work they undertake might have different
levels of complexity.
Some teams might demand a longer delivery cadence based on the
functionality on which they are working. For example, one team might
like to have a three-week delivery cadence and another team might like
to have a four-week delivery cadence. Even though VSTS/TFS supports
different lengths of iterations, if you do not properly set up iterations and
manage the work, your project deleivery targets and quality of deleivery
may well end up in chaos. So, to make your work simpler, set up a delivery
cadence of the same length and every team will be aligned with it. This is
very handy when it comes to integration because you will be releasing fully
baked goods to the clients. However, this decision again depends on the
technical architecture and platforms your team chooses to deliver to the
project.
It is important to plan well and define what the delivery cadence is
for each of your teams before you start the project. For this, you need
to get the support of your technical teams and consider all aspects; for
example, if you have a very loosely coupled module design that has the
ability to support previous versions of other modules with newer versions
of a different module, you can consider having different delivery cadences
for each module. Or, you might want to work in different iteration cycles
in each module but maintain the same delivery cadence for all modules.
For this, you can share one level of iterations with all modules to denote
releases and then have different child iterations for each module team.
These are just a few ideas, but to make your iteration setup to really work,
you need to figure out how you want it, and then manipulate VSTS/TFS to
behave the way you want the iterations to behave.
Chapter 1 handling teams
27
Monitoring the Progress of Multiple TeamsWhen you start executing the project/product development work, it is
extremely important to know the current status of your teams. When
you are executing large projects, it is vital to identify any setbacks or
delays as early as possible so you can take corrective actions to mitigate
the issues. As explained earlier, VSTS/TFS comes with a set of reporting
tools such as queries, charts, Kanban boards, and dashboards; these
enables you to stay in touch with your teams. We cover these topics in
detail later in this book.
SummaryThis chapter was dedicated to how you should handle teams. We explored
how you can use VSTS/TFS to set up the team project, teams, areas, and
iterations. We also detailed how you can use this tool to manage ideally
sized Agile teams and large-scale Agile teams. You should now have a
good understanding of how to organize the team structure, and with
that, we can move on to Chapter 2 in which we talk more about backlog
management and how to share work with different teams.
Chapter 1 handling teams
29© Chaminda Chandrasekara, Sanjaya Yapa 2018 C. Chandrasekara and S. Yapa, Effective Team Management with VSTS and TFS, https://doi.org/10.1007/978-1-4842-3558-4_2
CHAPTER 2
Working with a BacklogThe backlog is the list of items or tasks that you must complete to
successfully deliver your software project/product. We briefly identified
the capability VSTS/TFS offers to manage your backlog in Chapter 1.
This list of work might be comprised of new features to be implemented
(new requirements), alterations to existing features per feedback from
stakeholders (changes to requirements), or issues (bugs) reported in
already delivered components of the software that need to be fixed.
The backlog has to be analyzed for business-value creation and the
difficulty/risk involved in the implementation, and based on those facts,
the list should be prioritized so you deliver the most valuable items first
to the client. In Agile practice, you are familiar with using the backlog
grooming activity to clarify and deepen the knowledge of the requirements
specified in a backlog. This helps your team to identify the risks involved
and the effort required in implementing the requirement.
In this chapter, we explore the essentials of managing an effective
backlog to support your team to deliver the expected outcome of the
software product/project. We discuss the capabilities of VSTS/TFS that
enable you to leverage these to the benefit of your team.
30
Defining WorkWork is what your team has to do to deliver a software project to your
client. This can be an individual development task, a business functionality
requirement that needs to be implemented, a testing activity, a test case
that is specified to identify how the requirement should be tested, a defect
reported, and so on. These different types of work that you need to perform
can be categorized into the following three main categories: The following
subsections explain them briefly.
• Work that deliver value to clients
• Work that supports the work that delivers value to clients
• Work that will eventually deliver value to clients but
that presently needs ground work to enable it to be
implemented in the future (aka Spike items)
The following subsections explain them briefly.
Work That Delivers Value to ClientsThis type of work is the most important that you need to perform, and you
should understand clearly what you need to do for each task. In general,
this type of work is called requirements of the client. In addition to these
requirements, this type of work can also include issues/defects reported in
software where fixes of them also deliver a value to the client. In the Agile
world, this work is called user stories and any issues/defects are referred
to as bugs; in the Scrum process, you call this work product backlog items
(PBIs), but each issue is still a bug. For the CMMI-based practices, the
terminology used is slightly different; you have requirements as the main
types of work and, again, bugs as the term used for issues or defects. In
VSTS/TFS, the project templates are available with work items using the
same terminology to map with Agile, Scrum, or CMMI processes. You do
Chapter 2 Working With a BaCklog

31
have flexibility to introduce your own types of work items, however; we
discuss this further in Chapter 6.
Support Work This type of work helps you complete the work that delivers value to your
client. In order to deliver requirements and defect fixes, your team needs
to perform development tasks, test the requirements and defects, and so
on, but this type of work also includes other supportive tasks like getting a
server environment ready or providing a new laptop to your team member.
This types of supportive work that your team must do needs to be handled
separately from your backlog. We discussing how to handle this in future
chapters.
Important tip of the two categories of work we just discussed, only work that delivers value to your client should be in your backlog. if you put other supportive work in your backlog, it will jeopardize the whole purpose of having a backlog. this is a common mistake made by many scrum masters and teams that you should avoid.
Spike ItemsYou may come across some work that will eventually be valuable to your
client, but that is not right now. For example, you might want to do some
research on a new technological improvement that is not delivering any
value to your client in its current iteration. However, you believe this
research may help improve some components of your product/project
in future iterations, or that it may introduce a new attractive feature to
the software project that will be valuable to the client. Unlike supportive
work, you should add such items to the backlog; mark/tag them as “Spike”
Chapter 2 Working With a BaCklog

32
items by using work item tags. Work item tags in VSTS/TFS help you filter
work items in queries or in backlog, and such tags are one or two keyword
phrases you use to mark/categorize work items. You can reuse a tag you
define for one work item in other work items. (You can learn more about
how to work with work item tags at https://docs.microsoft.com/en-us/
vsts/work/track/add-tags-to-work-items).
BacklogAlthough you may have your own backlog that delivers value to improve
the quality of your life, in this book, we only focus on software delivery.
So, in this text, the backlog we refer to involves the work that delivers
value to your client business processes by providing the functionality of
a software development project/product. This backlog should comprise
requirements and defects to be fixed. Requirements might be vague at a
software project’s initial stages. For instance, you might start with just a list
of user stories in a generic format, that is, “As a person(s), I want something
to happen for some reason.” Later, you have to get clarification from your
client and understand more details about the requirements. This activity
is called backlog grooming; your team and the client should collaborate to
make it a success.
Levels of BacklogYou might want to group requirements in your backlog to clarify your
requirements list. Grouping them into different levels will help you align
your requirements with your product/project roadmaps. For example, let’s
consider a retail banking solution. This could have several modules such
as Savings Accounts, Lending, Fixed Deposits, Standing Orders, and so on.
The Lending module can be broken down into even smaller divisons, say
Loans and Leasing. Any one of these modules might need several features
Chapter 2 Working With a BaCklog

33
implemented. For example, the Savings Accounts module may require an
Account Opening feature, a Cash Withdrawal/Deposit feature, an Account
Closing feature, and so on. Each of these features may also have multiple
functionalities, for instance, the Account Opening feature might comprise
Register Customer, Open Account, and First Cash Deposit.
How can you accommodate this requirement in VSTS/TFS? By default,
VSTS/TFS has three levels—Epics, Features, and Stories/Backlog Items/
Requirements—for the backlog, and two of these three levels are already
enabled (Epics is the only one that isn’t). You can easily enable and disable
the levels for the backlog by selecting/deselecting the checkboxes for each,
as shown in Figure 2-1. If you want more levels or you want to alter the
existing backlog levels, you can perform further customizations, which we
discuss in Chapter 6.
Figure 2-1. Selecting backlog levels
Chapter 2 Working With a BaCklog

34
Once you have the required levels enabled for your team, you can start
setting up your backlog in the VSTS/TFS team project Work tab. You can
add Epics and Features to group your backlog items. Then you can add
Stories/Backlog Items/Requirements to your backlog.
You can group your user stories/backlog items/requirements as
children of the feature work item(s) and a feature can be a child item of an
epic. Figure 2-2 shows one backlog organized this way. You can also select
multiple backlog items/stories and drag and drop them to reorganize by
reordering or reparenting them with different features.
Figure 2-2. An organized backlog
Chapter 2 Working With a BaCklog

35
Important tip You have the option of having a parent-child relationship among user stories (backlog items/requirements), but this kind of hierarchical backlog with one backlog level is not good practice. this is especially true in the User Story/requirement/Backlog item level; in this level, you must not have hierarchies, even though this is technically possible in VStS/tFS. a flat list of user stories helps keep things simple, and it also prevents you from creating stories that violate inVeSt (independent, negotiable, Valuable, estimable, Small, testable) principles (https://xp123.com/articles/invest-in-good-stories-and-smart-tasks/).
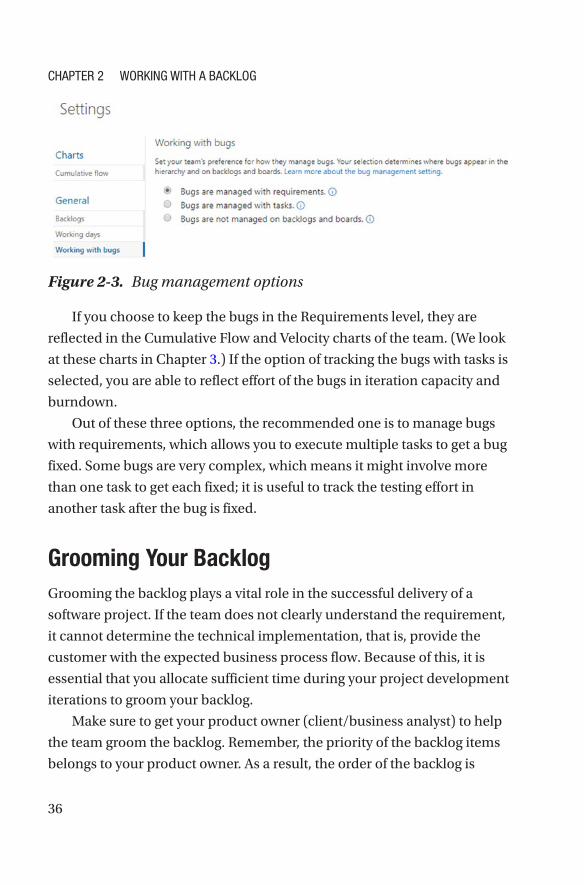
Adding Defects/Bugs to the BacklogDefects/bugs are detected in software once it starts getting tested at
the quality assurance phase. You should add these bugs to the backlog
because fixing them delivers value to your client. As a tool, VSTS/TFS
allows you the flexibility to decide at which level the bugs should be
handled (Figure 2-3). You have the option of keeping them in the same
level of requirements, which allows you to add them as backlog items, or
you can use them in the level of development or other tasks, as achild item
of a requirement that needs to be done for achieving that requirement.
There is also a third option—in which you do not have bugs in either
backlogs or boards—but this is not a recommended approach at all.
Chapter 2 Working With a BaCklog
36
If you choose to keep the bugs in the Requirements level, they are
reflected in the Cumulative Flow and Velocity charts of the team. (We look
at these charts in Chapter 3.) If the option of tracking the bugs with tasks is
selected, you are able to reflect effort of the bugs in iteration capacity and
burndown.
Out of these three options, the recommended one is to manage bugs
with requirements, which allows you to execute multiple tasks to get a bug
fixed. Some bugs are very complex, which means it might involve more
than one task to get each fixed; it is useful to track the testing effort in
another task after the bug is fixed.
Grooming Your BacklogGrooming the backlog plays a vital role in the successful delivery of a
software project. If the team does not clearly understand the requirement,
it cannot determine the technical implementation, that is, provide the
customer with the expected business process flow. Because of this, it is
essential that you allocate sufficient time during your project development
iterations to groom your backlog.
Make sure to get your product owner (client/business analyst) to help
the team groom the backlog. Remember, the priority of the backlog items
belongs to your product owner. As a result, the order of the backlog is
Figure 2-3. Bug management options
Chapter 2 Working With a BaCklog

37
decided by the product owner. Make sure to support your team to get the
items on the top of the list clarified in the backlog grooming sessions
(see Figure 2-4).
Figure 2-4. The backlog
Definition of Done (DoD)
How do you make sure your team gets backlog items done (that is,
they make sure each backlog item is developed, tested, and ready for
production)? The key is the acceptance criteria for the backlog items.
When you collaboratively define acceptance criteria with your
product owner, your team should understand the real requirement.
Chapter 2 Working With a BaCklog

38
This collaboration and understanding minimizes the risk and drastically
improves your team’s chance of delivering a requirement successfully.
Definition of Ready (DoR)
How ready is your backlog item for implementation? Make sure your
backlog items meet the following criteria before you take each into an
iteration/sprint to implement it: the backlog item needs to be clear and
understood by the team, it should have acceptance criteria that is defined
so that everyone agrees on a DoD; the item should be testable; and it
should be feasible to implement within a sprint. Such items are referred
to as DoR-met backlog items, which can be taken into a sprint as shown in
Figure 2-5. If the backlog item does not meet these criteria, it should be
broken down to a more granular level.
Figure 2-5. DoR vs. DoD
Chapter 2 Working With a BaCklog

39
Using Work Item Fields
You can use the fields in the VSTS/TFS work items to provide more clarity
for your backlog items. Let’s discuss a few such important fields.
• Acceptance Criteria: As discussed earlier, this is the
most important field in any backlog item (user
story/backlog item/requirement and bug work items).
This field defines the criteria that must be met before
the customer accepts the item as done. It is important
to have clear criteria defined in this field to ensure that
the entire team knows exactly what the conditions are
that should be satisfied in the implementation.
• Story Points/Effort/Size: This field contains the relative
effort estimation as a numeric value. It can be defined
with any numeric unit of measurement that your team
prefers to use. This is the Agile/Scrum relative size
value used to identify the team velocity or in other
words how much work (total effort) the team can
perform. VSTS/TFS has automated velocity charts and
the capability to forecast the amount of work that can
be delivered in each iteration, which we discuss later.
You can learn more about team velocity here:
www.agilealliance.org/glossary/velocity.
• Title: This field briefly explains what the backlog item
is. For stories/requirements, you can use the format of
“As a person(s), I want something to happen for some
reason.” For bugs, you can use the same format or just a
few words to clarify what the issue is.
Chapter 2 Working With a BaCklog

40
• Description: This field should address three major
questions: why, what, and for whom this item should
be implemented. How it should be implemented
should not be included here; instead this should be
described with the child tasks defined to implement
the story or fix the bug. The team should be able to
define test cases and tasks based on the description of
the backlog item.
• Iteration Path: Iteration defines where the backlog item
belongs. When you define a backlog, normally it should
be at the root of a team project, meaning the team
project name would be the iteration path. We discuss
the other alternatives in Chapter 3.
• Area Path: This field defines which team or which
specific submodule the backlog item belongs to. As we
discussed in Chapter 1, depending on the setting you
have established for each team, the visibility of backlog
items changes when you set the iteration path. We
cover how to use this field more in Chapter 3.
• Priority: Rating of the requirement or bug related to the
business is defined in this field. Allowed values are 1, 2,
and 3, which have the following specific meanings; the
default value is 2.
1. Cannot ship without implementing this story or
fixing the bug.
2. Cannot ship without the item, but this value is
not needed to attend to this item immediately.
3. This value is optional to implement based on
the risk and resource availability.
Chapter 2 Working With a BaCklog
41
The preceding fields are a common set that you can use, but there are
specific fields in each work item type—for example, repro steps field in
bugs helps to capture the steps on how to reproduce a given bug.
Using Test Cases and Tasks
The test case should describe what the expected implementation of the
backlog item is and how it will be tested. To make the implementation
successful, it is vital that you write test cases as much as possible before
you implement the backlog item. However, it is okay to add more test
cases even after implementation as the actual testing occurs, because new
scenarios that were not predicted before may be visible at this point. In
VSTS/TFS, test cases are added to a user story/backlog item/requirement
or even to a bug with a special relationship link called “tested by.” From the
test case perspective, the relationship is called “tests.” For example, a story
is tested by a test case and a test case tests the user story.
In VSTS/TSF, Task (the Task work item) should be a child relationship
with the backlog items or bugs set to behave as backlog items. This is
possible only if “Bugs are managed with requirements” is selected under
the Product Backlog settings.
A task should describe the full or partial implementation of the backlog
item and how it should be implemented. If it is a small implementation,
one task may be sufficient for describing how the backlog item should
be implemented. If a single task cannot do the full implementation,
multiple tasks can be used to describe the details of implementation by
dividing work among the tasks. In a practical scenario, the team focuses
on completing a task within six hours, and during the estimation, if it is
evident that it is going to take more than six hours, then the team must
divide the task into multiple tasks. There can be tasks other than the
implementation/development of a backlog item such as test case writing
tasks, testing tasks, test automation development tasks, and so on. You can
use Activity field of the task to identify the type of task to which the task can
be linked with team capacity as described later in this chapter.
Chapter 2 Working With a BaCklog

42
Prioritizing the BacklogYour team should be involved in grooming the backlog. This means that they
may be introducing new stories and breaking down product-owner- defined
large stories, into smaller, testable, and feasible stories. However, which
story/backlog item should be considered for development first is totally
owned by the product owner or your client. Hence, prioritizing the backlog
is neither your responsibility nor something you or your team should do.
So how can you make sure the items are implementation ready
according to the priority of your client? Make sure your team always
focuses on the top of the backlog when it is performing the grooming
activity. If you must break a larger story into smaller stories, communicate
to the product owner that you have made a few stories out of one to make
the project more feasible. The product owner may then reprioritize the
stories/backlog items. In VSTS/TFS, to prioritize the backlog items, the
product owner can drag and drop items in the preferred order so that
the topmost items are the highest priority items and the priority order is
identified as top to bottom.
Estimating Your Backlog WorkEstimating work plays an important part in project delivery. In Agile
development, empowering your team and identifying their velocity (how
much they can deliver in an iteration) is vital. To prevent yourself (as the
scrum master) from micromanaging the team, you should focus on a few
things, especially when you are estimating tasks.
Keeping this in mind, let’s look at what the options are for estimating
work. You are already familiar with estimating using relative sizes for backlog
items in general Agile/Scrum practices. In the previous section, we discussed
the Story Points/Effort/Size work item field as being the field you use to
capture the relative size of a backlog item. Relative estimation is described
here: www.agilealliance.org/glossary/relative-estimation/. There
Chapter 2 Working With a BaCklog
43
is one limitation in VSTS/TFS when it comes to relative estimation; you
must always use a numeric scale to estimate relatively. It can be any
numeric scale of your choice. There are few free extensions in Visual Studio
Marketplace (https://marketplace.visualstudio.com/search?term=es
timate&target=VSTS&category=All%20categories&sortBy=Relevance)
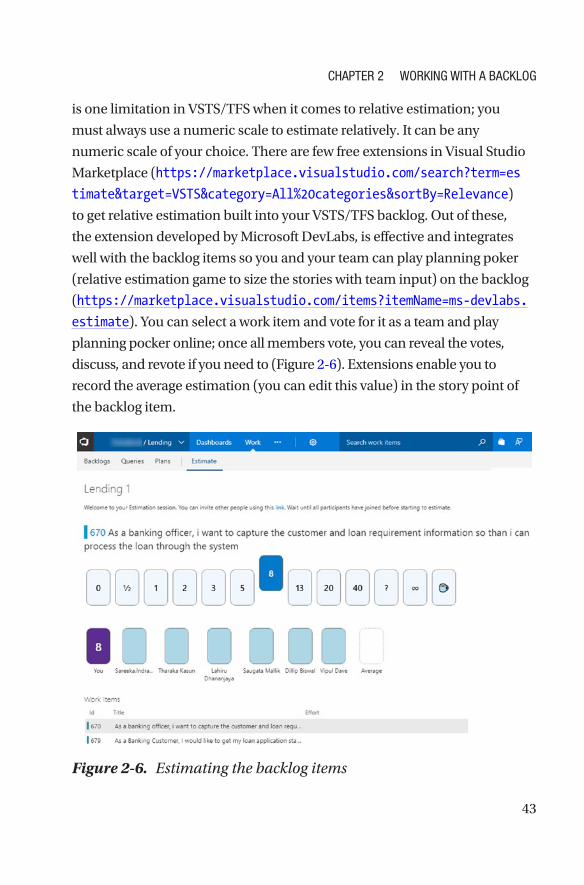
to get relative estimation built into your VSTS/TFS backlog. Out of these,
the extension developed by Microsoft DevLabs, is effective and integrates
well with the backlog items so you and your team can play planning poker
(relative estimation game to size the stories with team input) on the backlog
(https://marketplace.visualstudio.com/items?itemName=ms-devlabs.
estimate). You can select a work item and vote for it as a team and play
planning pocker online; once all members vote, you can reveal the votes,
discuss, and revote if you need to (Figure 2-6). Extensions enable you to
record the average estimation (you can edit this value) in the story point of
the backlog item.
Figure 2-6. Estimating the backlog items
Chapter 2 Working With a BaCklog
44
For now, let’s skip the topic of estimating tasks since it is more relevant
to work in the iteration. We discuss tasks and task estimation in detail later
in this chapter.
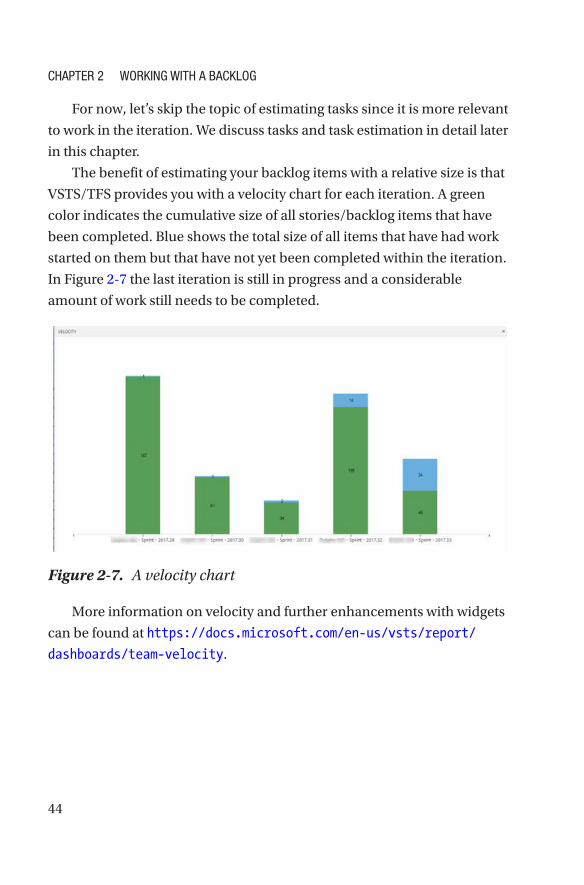
The benefit of estimating your backlog items with a relative size is that
VSTS/TFS provides you with a velocity chart for each iteration. A green
color indicates the cumulative size of all stories/backlog items that have
been completed. Blue shows the total size of all items that have had work
started on them but that have not yet been completed within the iteration.
In Figure 2-7 the last iteration is still in progress and a considerable
amount of work still needs to be completed.
Figure 2-7. A velocity chart
More information on velocity and further enhancements with widgets
can be found at https://docs.microsoft.com/en-us/vsts/report/
dashboards/team-velocity.
Chapter 2 Working With a BaCklog

45
Getting Stakeholder FeedbackFeedback is vital in order to understand the stakeholder expectations.
A stakeholder may want to give feedback on a user story or on the
application itself. This can take the form of just feedback or it might be a
bug reported by the client. Your team may also want to request feedback
from your client on the application or on a user story/backlog item.
VSTS/TFS provides rich functionality for enabling all such scenarios.
For instance, your stakeholders can add an extension to their browser
from https://marketplace.visualstudio.com/items?itemName=ms.
vss-exploratorytesting-web. This extension allows your stakeholders to
use a browser to provide feedback on the application or report bugs. The
extension should be connected with VSTS/TFS and if a bug is reported
using this extension, it appears on your team’s backlog. In addition to
reporting bugs, stakeholders can create test cases or tasks using the
Test and Feedback extension, as shown in Figure 2-8. When feedback is
provided without a feedback request, it is identified as voluntary feedback.
Figure 2-8. The Test and Feedback browser extension
In the VSTS/TFS web portal, there is an option to request feedback,
and when such a request is made, stakeholders can provide feedback for
the request (https://docs.microsoft.com/en-us/vsts/manual-test/
stakeholder/provide-stakeholder-feedback#provide).
Chapter 2 Working With a BaCklog

46
Defining a ProcessHow your team wants to work with the backlog is another important
aspect that you should help them identify. Kanban boards help you define
this process for your backlog items. The process can be as simple as
• New ➤ Active ➤ Resolved➤ Closed workflow
or something like this:
• New ➤ Ready ➤ Solutioning ➤ DevReady ➤ Active ➤
Testing ➤ DeployedStaging ➤ ProductionDeployed
VSTS/TFS provides you with a Kanban board for backlog in which you
can define your own columns. You must have a start column and an end
column that are set to the New and Closed states, and then you can alter
the middle set of columns, allow them to be used, and set the work item
state of your preference (Figure 2-9). For each column, you have to define
the state of each backlog item type to be used. You have the ability to
introduce your custom states to work items, which we discuss in Chapter 6.
You can learn how to add/edit columns at https://docs.microsoft.com/
en-us/vsts/work/kanban/add-columns#add-or-rename-columns.
Chapter 2 Working With a BaCklog

47
Another important aspect of effective team management is limiting
your work in progress no matter what the process is that you are following.
If your team has four developers and you have each working on a different
backlog item, this is not going to help in achieving iteration goal. Instead,
help your team pick the topmost items from the backlog, and make sure
they finish them before they move down the backlog order. The idea is that
this helps a team move the backlog items from left to right in the Kanban
board as soon as possible. Having too many items and too much work
in progress may end up in disaster because your team will have nothing
totally completed by the end of an iteration. Having 99 percent completed
is not valuable as an iteration goal. We discuss this more in Chapter 3.
VSTS/TFS Kanban boards help you set a work-in-progress (WIP) limit
for each column and indicate in red if you have gone past the number, as
shown in Figure 2-10.
Figure 2-9. Kanban board customization
Chapter 2 Working With a BaCklog
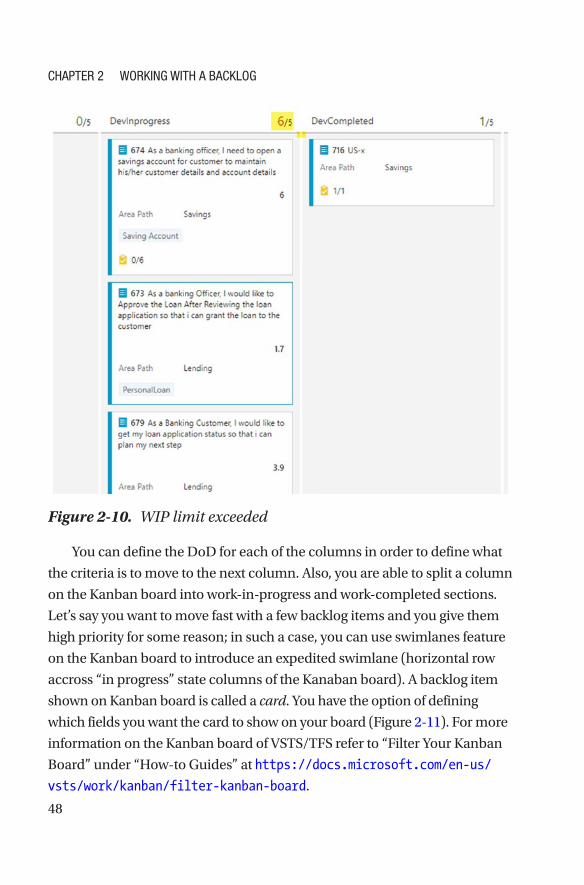
48
You can define the DoD for each of the columns in order to define what
the criteria is to move to the next column. Also, you are able to split a column
on the Kanban board into work-in-progress and work-completed sections.
Let’s say you want to move fast with a few backlog items and you give them
high priority for some reason; in such a case, you can use swimlanes feature
on the Kanban board to introduce an expedited swimlane (horizontal row
accross “in progress” state columns of the Kanaban board). A backlog item
shown on Kanban board is called a card. You have the option of defining
which fields you want the card to show on your board (Figure 2- 11). For more
information on the Kanban board of VSTS/TFS refer to “Filter Your Kanban
Board” under “How-to Guides” at https://docs.microsoft.com/en-us/
vsts/work/kanban/filter-kanban-board.
Figure 2-10. WIP limit exceeded
Chapter 2 Working With a BaCklog

49
Figure 2-11. Card fields
A Kanban board can be used to provide more information visually.
For instance, you can set different card and text colors to get your team’s
attention on the required items. For example, let’s say a backlog item is
staying on the backlog longer than a week as a development in progress
and it is an alarm to your team, which is indicating possible failure of
achieving the iteration goal. The VSTS/TFS card style rules will help you
indicate such cases visually in the Kanban board as shown in Figure 2-12.
Chapter 2 Working With a BaCklog

50
So far, we have only discussed the backlog and Kanban board and have
not yet discussed the task board details. For a focus on the task board, refer
to Chapter 3, where we discuss the execution of an iteration.
Planning with a Small TeamWe discussed ideal-sized Agile teams in Chapter 1, and we identified
the advantage of using the team concept in VSTS/TFS, that is, to have a
Developmental (Dev) team and a Support team. With this approach, you
can have a different workflow in your Kanban board at the Root/Default
or Team Project level and two different workflows for the Dev team and
Support team on their Kanban boards. This is because you can set up
Kanban columns based on the team.
Figure 2-12. Card style rules
Chapter 2 Working With a BaCklog

51
The advantage of this is from the Team Project perspective; you might
want to monitor both the Dev team and Support team work. For instance,
team project root team Kanban board would be a combination of Kanban
columns of both the teams or a subset of columns for the teams. The Dev
team and the Support team might require different approaches, and you
can decide columns based on each team’s requirement.
You might want to work in the same release cadence or different
release cadences for the two teams. You can set up the iterations for each
team by selecting the required iterations to appear in the backlog, as we
discussed in Chapter 1. The Area Path of each team helps you distinguish
each team’s backlog and isolate one from the other.
Let’s take one team’s perspective and analyze what it needs to do to be
effective. It already has a backlog in place and has test cases defined for top
level backlog items. The team has its backlog items in the ready state (DoR) for
development with clear acceptance criteria (DoD). The backlog is prioritized
by the product owner and the team has performed relative estimations on the
backlog items. From this point, teams first task is to select backlog items from
the top of backlog for the first iteration. The team should do this in an Agile/
Scrum sprint planning session if it is following one of those processes.
Task Estimations
It is at this point in the process that you and your team might make a lot of
mistakes. Since VSTS/TFS supports hour-based estimates, you may want
to use hours to recrd effort for a task. Then you might start monitoring
team members to see whether they put the right number of hours toward
each task as they complete the task. Eventually the individual goal focus
will develop over the team goal. But a sprint burndown chart (we discuss
the burndown chart more in Chapter 3, but you can also find out more at
https://docs.microsoft.com/en-us/vsts/work/scrum/sprint-burndown)
would be useful, wouldn’t it? How about a story point/size/effort (Backlog
item relative effort value) burndown (Figure 2- 13)? Sounds great, but how
can you do it? Let’s look at the possibilities here.
Chapter 2 Working With a BaCklog

52
To estimate how long a task will take, you can use the simplest
mechanism—just divide the backlog item size/effort/story points by a
number of tasks, and assign each of the tasks an Original Estimate value
and Remaining Work value before the work starts, as the resultant value.
You may argue that the effort value should not be equal to each of the tasks
as task complexity might differ from task to task and would take a different
amount of effort to achieve. But the thinking here is that the backlog item
is done when all tasks are 100 percent complete. So, you do not really
need to do complex estimations and waste your team’s time. Another
advantage to this estimation of tasks is that it can be fully automated. You
can create a simple PowerShell script to call the REST API of VSTS/TFS and
autocalculate the task estimations; you can then assign the autocalculated
task effort value via the script to each task’s Original Estimate and
Remaining Work fields. Then you can run this script with a scheduled
build each day 15–30 minutes before midnight (or you can let it run every
2 hours or so to get more accuracy) to recalculate task estimation based on
the number of tasks and the available estimate value in backlog item for
each backlog item in the current iteration. You can enhance this script to
Figure 2-13. Story point burndown
Chapter 2 Working With a BaCklog
53
assure that the Remaining Work value of the tasks that are in a Closed state
is set to zero.
This is a practically tested formula for a few teams and it works really
well for two main reasons: one, it is simple to understand and implement;
and two, the team does not have to waste time on estimating tasks after they
estimate the backlog items relatively. If the task effort value calulation and
assignment are automated with scripts, the formula works even better, since
team members just have to close the respective tasks once they are done to
get a burndown working. Even the addition of a new task to the backlog item
in the middle of the sprint does not require a manual calculation because
the script takes care of it and assigns effort with a recalculation. We further
discuss practical usage and the advantages of this approach in Chapter 3.
One other important aspect of being effective in managing teams while
using VSTS/TFS as a tool, is the size of the tasks you define to implement
the backlog items. Generally, a task should fit within a day, meaning the task
should be accomplished within a day or less. A task that expands to more
than a day mostly likely is not defined well enough and is vague. In general,
if a task is defined with a clear DoD and technical implementation details
for a backlog item that is groomed and sized properly, it should fit within a
day. You have to make sure your team understands this fact and breaks the
tasks into achievable, granular levels. There can be some exceptions to this,
but the majority of the tasks should be achievable within a day.
Capacity Planning
You should know how much effort capacity you have within your team.
This information gives you insight into how much work you can take
on with the team for a given iteration. Especially if you share resources
among Dev and Support teams in your project, this knowledge helps
prevent overallocation. VSTS/TFS provides rich feature capability to allow
for capacity planning in your iterations (https://docs.microsoft.com/
en-us/vsts/work/scale/capacity-planning). Again, for this, use the
Chapter 2 Working With a BaCklog

54
same unit you have used for the backlog item in your relative estimation.
Define a rough value for each team member of how many story points/
size/effort he/she can do per day. Remember to avoid using hours as your
units—we discussed the disadvantages of the hour-based task estimation
in the previous section. You have the capability to define team off days and
team member holidays, and you can even define how much capacity you
have based on activity type (development, testing, and so on). This activity
type is linked with the Activity field of your Task work items and this gives
valuable information to the team about the capacity they have for a given
iteration (the Iteration backlog view) with respect to the activities and task
requirements shown in Figure 2-14.
Figure 2-14. Capacity
Chapter 2 Working With a BaCklog

55
Planning with a Large TeamAll that we discussed in ideal-sized teams applies to large teams as well,
with the exception that you are applying all of this information to small
teams within a large team. Make sure to use the Area Path to separate each
team’s backlog from the other teams’ and that you share the same iterations
for all teams or that you use different iterations for each team depending on
your requirements. We discussed iterations for large teams in Chapter 1.
If your team is distributed in different geolocations and in different time
zones, you might have a bit of an issue with burndown charts and the like
depending on the default time zone setting in your TFS server or your VSTS
account. The problem is that a team that is working in a different time zone
from VSTS/TFS will not really start or end their work day so that it matches
the start and end of the day shown in burndown or iteration. The ideal
solution is to set up a preferred time zone for each team, but unfortunately
no such feature is available in VSTS/TFS as of the writing of this book. If
such a feature did exist, you could go against the rules we discussed in
Chapter 1—you could mix different geolocation members within teams and
use separate teams for each geolocation. But considering the facts, as we
discussed them in Chapter 1, mixing the team with a bit of discrepancy in
the start and end time of the work day is worthwhile for distributed teams.
Visualizing Your PlanAnother valuable extension you can add to your VSTS/TFS is
named Delivery Plans, which allows you to visualize the work status of
your teams and team projects on an iteration-based calendar
(https://marketplace.visualstudio.com/items?itemName=ms.vss-plans).
You can set markers for important dates and add filter criteria to filter work
items to be shown in the plan. You can learn more about delivery plans in
https://docs.microsoft.com/en-us/vsts/work/scale/review-team-
plans; we discuss the effective usage of these in Chapter 5.
Chapter 2 Working With a BaCklog

56
The Sprint Zero or the Pre-SprintThe sprint zero/no-sprint/pre-sprint is the initial time of a project where
you set up the solution structure, get the development machines ready,
and so on. An essential part of the start of a project is to set up the build
deployment pipelines (the continuous integration and continuous delivery
[CI/CD] pipelines). You can learn all the basics you need to implement
successful build and release pipelines in one of the co-author’s books,
Beginning Build and Release Management with TFS 2017 and VSTS, which
is available at www.apress.com/in/book/9781484228104.
You should also get all your test and deployment environments ready
before your project/product development sprints start. This enables
your team to focus on implementing customer requirements rather
than worrying about how to get the work deployed or tested. Many Agile
starting teams have failed because they have not identified how important
the level of automation is to be really agile.
SummaryIn this chapter, we explored how to set up a proper backlog and backlog
tasks for your teams. We identified many features in VSTS/TFS to help you
set up your required backlog and to help you track and visualize the work
your team is planning to do. We also discussed common mistakes you may
make due to the overwhelming capabilities of VSTS/TFS, and we especially
focused on how you can avoid the micromanagement that results from
misuse of features.
In the next chapter, you learn how to leverage VSTS/TFS features to
empower your team while executing a project iteration.
Chapter 2 Working With a BaCklog
57© Chaminda Chandrasekara, Sanjaya Yapa 2018 C. Chandrasekara and S. Yapa, Effective Team Management with VSTS and TFS, https://doi.org/10.1007/978-1-4842-3558-4_3
CHAPTER 3
Working on the IterationIn the previous two chapters, we discussed how to set up the project,
populate the backlog, define the delivery cadence, create teams, plan for
the team process, groom the backlog, prioritize the backlog items, size the
requirements, and plan the iteration. We even discussed getting things
in place—such as a solutions structure, build and deployment pipelines,
and testing environments—in a pre-iteration time period. Doing all of this
prior to the first iteration enables your team to focus more singlemindedly
on implementing backlog items once you kick off project work, but while
making sure to allocate sufficient time for backlog grooming. In previous
chapters, we also discussed the challenges faced by both ideal-sized and
large teams during this initial planning stage and how you and your team
can use VSTS/TFS features effectively to overcome these challenges.
This chapter is dedicated to executing a project, starting with the first
iteration, and it provides practical solutions to common challenges the
team faces when using VSTS/TFS. We discuss the following in detail:
• Getting ready for the iteration and daily activity
• Tracking and resolving roadblocks and performing
other supportive work
• Working with code and testing the work

58
• Exploring progress-monitoring options
• Avoiding rather than fixing defects
• Facilitating unavoidable and mandatory fixes
• Handling disaster situations during the iteration
• Ensuring the stability of the releases
• Visualizing the iteration and positively impacting
the team
Starting the SprintNow everything is set for you to start your first sprint. That is, your team
has decided what to deliver by the end of the new sprint by selecting a few
backlog items for the sprint from the top of the backlog. As we discussed
in Chapter 2, you should have tasks defined for each of the backlog items
to help get them completed. Make sure you have estimated task efforts by
simply dividing the relative size of backlog items (story points/effort) by
the number of tasks each contains. You have probably already automated
this process, as we recommended in Chapter 2.
Make absolutely sure you have determined each individual team
member’s capacity using the same scale that you used to relatively
estimate backlog items. Again, capacity should have been assigned
according to the activity type, as we discussed in Chapter 2. Make sure the
available capacity to complete each activity (development, testing, etc.) for
the iteration is visible to the entire team in a number of story points/sizes.
Make sure to have your solution architecture ready to start
development work. Another thing that you must understand is
that solution architecture is not similar to the foundation of some
construction project. Because a building is planned fully ahead of time
and is constructed according to this plan, it can have a fixed foundation.
Software, on the other hand, always has to evolve depending on customer
needs as well as technological changes. So, the architecture of a solution
Chapter 3 Working on the iteration

59
should also be flexible so it can evolve and improve as the software
project/product gets developed. That does not mean your team should
not consider platform, tools or architecture when building software. The
team should plan for suitable platforms, a technological architecture, and
development tools with the current knowledge it has about the system that
needs to be implemented. But at the same time, the team should have the
flexibility to let the solution architecture evolve and be willing to adapt to
new platforms or other technologies as the software system matures and as
more of the customer’s requirements get identified and developed.
Your team should have a sufficient number of test cases developed
for the backlog items in the iteration by now. But that is, of course, the
ideal situation, and maybe your team has more work to do in the iteration.
This is fine as long as the team has enough details in the backlog items
and well-defined acceptance criteria, with tasks defined to describe the
implementation. Based on these, the team can add more test cases to the
backlog items during the iteration. However, at a minimum, having at least
a few test cases that describe how to test the backlog item’s main scenarios
definitely helps the team progress with the implementation.
It is important to get the development environments ready, before
the start of the iteration, with the required development tools, software
development kits (SDKs), and any other additional tools your team needs.
Your team might discover more tools and platform it needs during the
iteration as the software project evolves; we discuss how to handle such
situations later in this chapter.
The other most important task you need to perform before you begin
the iteration is getting the testing environments ready to start testing the
software components once their development is complete. Your team has to
get the packaging and deployment of the software automated and deploy it
to another environment for testing. Again, it is okay if not all these tasks are
fully completed before the start of the project development work with the
first iteration. We discuss how to handle such tasks and how to automate the
packaging and deployment of software components later in this chapter.
Chapter 3 Working on the iteration

60
Make sure you utilize your team members effectively to accomplish
all the tasks mentioned so far. Remember that these activities are different
from and are in addition to the main backlog item implementations.
Your team also has to perform backlog grooming activities in your main
backlog to get the items ready for future iterations. For all these reasons,
the team needs a significant amount of time, and you should keep all these
facts in mind when you are setting up capacity for individual members
of the team. Allow the team members having more reduced capacity
in the initial iterations, partially because there might be more non-
backlog implementation work in the initial stages of a project/product
implementations.
You may think that setting up environments, setting up build release
pipelines, or activities associated with backlog grooming should also be in
the backlog so you can track them and know how many resources they are
consuming, but in fact, this not good practice. You need to remember that
these are supportive activities that are not generating value to the customer
directly. These activities should not be in the main product backlog, and
although you should track them, you should do so separately from the main
backlog; we discuss this further in a later section of this chapter.
Daily ActivityPrior to beginning each iteration—regardless of whether it is the first, a
middle one, or the last one in the project’s life—you and your team need to
do some quick planning for the day to ensure effective execution.
Planning the DayMost likely, you are already familiar with the daily stand-up or daily scrum,
which is a 15-minute time-boxed event. Planning for a day does not need
more than 15 minutes since you already have a well-groomed backlog in
place and the team knows what is in their hands to deliver.
Chapter 3 Working on the iteration

61
The general questions defined in such scrums are these:
• What did I do yesterday?
• What will I do today?
• Are there any roadblocks?
Always make sure the discussion of these questions is conducted from
the perspective of the team’s goals rather than personal goals. Take this
time to focus your team and empower them; let them strive toward the
team goal. If you make this quick discussion on a course of action for the
day into a daily update on the status of individuals, each team member
will only worry about getting individual tasks done and about the number
of tasks on her shoulders. Team members will not focus, as they should,
on the team goal of getting backlog items done or on helping each other
get them done. Individual performance is important, but getting the team
to collaboratively and supportively work together, targeting backlog items
to be completed, is what makes the project a success. Having said that, it
is okay to use the sprint board and change the status of tasks during the
daily stand-up. Ideally the team should not wait until the stand-up to make
status changes or other updates to the work items, however.
So, this meeting is not a time for each team member to state, “I have
done this and that, and I will do this today,” to make their individual profile
impressive. After all, consider that team member who helped another
member who was struggling with a task due to a technical difficulty; the
helping team member has nothing of her own to declare accomplished,
so she might get embarrassed. You should encourage team members to
help others, but do not allow a team member to declare that he just helped
another and could not get any of his own work done for days. Helping
others toward an iteration goal is good, but team members cannot just do
nothing on their own goals by claiming that they were helping others all
the time, because this adversely affects the team goals.
Chapter 3 Working on the iteration

62
VSTS/TFS provides a board (sprint board) for sprint execution, which
you can use for planning the day, review the past day, and seeing whether
the team is marching forward toward the iteration goal of getting the
selected backlog items done. You can set up rules similar to the backlog
board card style rules we discussed in Chapter 2 to visualize the work that
is done and to highlight any bottlenecks with different colors (Figure 3-1).
To set up rules, go to Settings page of the relevant board.
Figure 3-1. Taskboard rules
Visualizing the task states and story progress in boards reduces the
time of the stand-up meeting because no one needs to ask what each
individual has done, because it is indicated on the board in colors. For
example, Figure 3-2 shows tasks that have been in progress for more than
two days in red.
Chapter 3 Working on the iteration

63
In addition to the task/iteration board, the team should also look
at the backlog board. It offers insight to the team on how they are
progressing with the backlog. They can use style rules to highlight current
sprint backlog items and can even indicate items waiting in the “in
progress” state for a longer time. Additionally, story point burndown, as
we discussed in Chapter 2, can also provide valuable information to the
team in daily planning and help identify the team’s ability to get the work
completed on time.
In the daily stand-up, the team should bring forward any
impediments/roadblocks that are affecting team progress. These issues
should be handled separately from the main backlog, however; we discuss
them later in this chapter.
Figure 3-2. Taskboard indicating tasks not moving forward
Chapter 3 Working on the iteration

64
Choosing Work for the DayIdeally, team members voluntarily pick the tasks they plan to perform
during the day. In Chapter 2, we discussed the size of these tasks, and how
the work necessary to accomplish each task should generally fit within a
day. The team should focus on the top of the iteration backlog and work
from top to bottom. The individual who picks the first task of a particular
backlog item should activate the backlog item as well. The task must be set
to active once the team member starts working on it.
When team members complete tasks, they should change the
task to the done/closed state. These practices allow the automated
burndown of story points (discussed in Chapter 2) to work. Once all the
development tasks of a backlog item are done, it should be moved to a
resolved/committed state or any other custom state that represents that
development is done and testing has been started. When a backlog item is
ready to be closed, some prefer to keep it active until it reaches production.
You can have a custom set of columns on the board that show exactly to
which environment the backlog item is currently deployed and that it is
working as expected. You are able to introduce custom states to represent
the same types of stages; we discuss these in Chapter 6.
Getting the first few backlog items done and moved to the testing
phase takes a couple of days in any given iteration. So, in the first few
days, quality assurance (QA) members of the team might have to work on
getting more test cases added to the backlog items in the iteration, getting
prepared for implementing test automation, and helping the development
members. How to help development members is discussed later in the
chapter. Additionally, QA members can look at the main backlog and
review the items to help the team groom the backlog.
Chapter 3 Working on the iteration

65
What we’ve just described is a typical situation, because, in reality, it is
really hard to find multiskilled team members. If all of your team members
have the ability to code, test, and do other tasks as well, that would be
ideal, because then anyone can pick any type of the tasks. This situation is
rare, though.
Make sure to encourage the team to do deployments to test
environments as much as possible during an iteration. This requires the
team to have automated deployments in place to support the frequent
deployments with stability. Remember that your team may discover bugs
while testing the newly built backlog items. Your team must fix these bugs
within the iteration and they should be added to the iteration backlog, just
below the relevant backlog item. The relevant backlog item should not be
considered ready for production until all bugs have been found in testing
and are fixed. The team should not expect such bugs to be considered
additional work or new backlog issues that have been added to iteration;
these bugs do not remove items from the bottom of backlog as the team is
not meant to create the bugs in the first place if they carefully implement
the backlog items properly. There can, however, be very rare exceptions to
this that we discuss later in this chapter.
Make sure the entire team, with the support of the product owner,
participates in regular backlog grooming sessions. Due to current iteration
goals, you should not skip this activity, as doing so is apt to create bigger
problems for future iterations when team members have unclear backlog
items to work on. Grooming sessions do not have to happen daily but
should happen regularly to make sure sufficient backlog for future
iterations is groomed before the start date of those iterations is reached.
Ideally close to 10 percent of iteration time duration should be spent on
backlog grooming.
Chapter 3 Working on the iteration

66
Tracking and Resolving Impediments and Other Supportive WorkAs we discussed in Chapter 2 and in previous sections of this chapter,
some tasks support the implementation of other backlog items, such as
getting a test environment ready, implementing build release pipelines,
or removing any other roadblocks the team encounters while trying to
progress with their work in the backlog. Some of these tasks may get
reported in the daily stand-up meetings and some may be identified well
before the project starts.
As you can see, these tasks can be divided into two categories: one is
the roadblocks/impediments identified during project execution, such as
a developer machine does not have enough RAM, a license needs to be
purchased for a software tool, and so on; the other category is things that
would improve and help the team continue the project execution, such
as setting up the testing or staging environment or getting a build release
pipeline implemented to automate deployments. Again, purchasing
machines in a cloud platform or creating virtual machines inside the on-
premises servers in order to set up the testing or staging environment falls
under the first category of roadblocks/impediments. After the team gets
the virtual machines, setting up the testing or staging environment is work
that needs to be carried out by the team. The team may have to get the
automated deployments working for the environment.
As you can see, roadblocks/impediments need some external support
to get resolved, whereas the other supportive work to implement the
backlog can be handled mostly by the team. There is no hard-fixed rule,
but generally, these two types of work are differentiated.
Chapter 3 Working on the iteration

67
Handling Supportive Work within the TeamFirst, let’s look at how to get done the work that the team has to do. You
may want to add this work to the backlog, and the problem with that is
your customer/product owner is apt to be confused by work internal to the
team that appears in the backlog.
However, you can consider making a separate backlog of tasks for your
team project. You can keep track of this work to be executed by defining
it with an isolated area path that you make invisible to your customer/
product owner by deselecting it for the default/root team of the team
project. This way it does not appear in the main backlog.
Let’s clarify this with an example setup. First, set up an area for extra
activities (see Figure 3-3).
Figure 3-3. Defining an ExtraActivity area
Chapter 3 Working on the iteration

68
Then, set up the default team with areas you want to be visible other
than the ExtraActivity area (Figure 3-4). This makes work items under the
ExtraActivity area that are not visible to the main backlog so the product
owner does not see these ExtraActivity work items. For this ExtraActivity
area, you can set up a separate team if you prefer to handle this work
separately from your development iterations. If you want to include them
in your development team backlog, make sure the ExtraActivity area
is selected for the development team. This way you can handle these
activities with the team capacity but without confusing your product
owner.
Figure 3-4. Default team without ExtraActivity area
Chapter 3 Working on the iteration

69
Additionally, you can skip the ExtraActivity work items visibility to the
Delivery Plans feature, which we discussed in Chapter 2, by adding a tag to
the backlog items in this area and by adding criteria to omit the tag in the
plan. The tag should be used since Area Path is not currently supported in
the Delivery Plan feature field criteria, as shown in Figure 3-5 (https://
docs.microsoft.com/en-us/vsts/work/scale/review-team-plans#edit-
a-plan-add-field- criteria-customize-cards-and-add-markers).
Figure 3-5. Field criteria in the Delivery Plan
When you handle this supportive work, without having it visible to
the default team, there is likely to be a discrepancy in capacity view if you
share the same iteration information to the default/root team. To prevent
this, set up the root team capacity to disregard the capacity allocated to
the internal extra activities. For on-premise TFS, you can add a custom
activity type by customizing the Task work item Activity field, similar to
steps described for customizing pick list fields (https://docs.microsoft.
com/en-us/vsts/work/customize/add-modify-field#picklist). This
adds new activity types to capacity in iterations. For VSTS, you cannot add
custom activity types as of the writing of this book.
Chapter 3 Working on the iteration
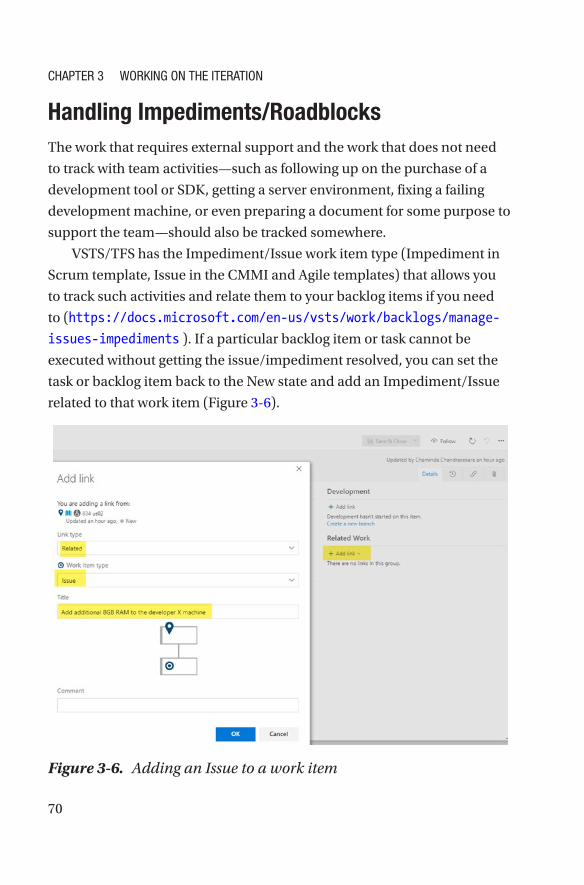
70
Handling Impediments/RoadblocksThe work that requires external support and the work that does not need
to track with team activities—such as following up on the purchase of a
development tool or SDK, getting a server environment, fixing a failing
development machine, or even preparing a document for some purpose to
support the team—should also be tracked somewhere.
VSTS/TFS has the Impediment/Issue work item type (Impediment in
Scrum template, Issue in the CMMI and Agile templates) that allows you
to track such activities and relate them to your backlog items if you need
to (https://docs.microsoft.com/en-us/vsts/work/backlogs/manage-
issues- impediments ). If a particular backlog item or task cannot be
executed without getting the issue/impediment resolved, you can set the
task or backlog item back to the New state and add an Impediment/Issue
related to that work item (Figure 3-6).
Figure 3-6. Adding an Issue to a work item
Chapter 3 Working on the iteration

71
Working with CodeHow to do development work, such as version controlling source code,
branching strategies for source code repositories, and so on is not in the
scope of this book. But for the sake of completeness, let’s look at few areas
where you can help your team.
If your team decides to work with the Git version control of TFS, it is a
good practice to have a proper branching strategy. It is a good idea to have
a branch for each backlog item and get it merged to development or the
master branch via a pull request. You also have the option of creating a code
branch from your backlog items as shown in Figure 3-7, which will be useful
to your team. Again, do not interfere too much with these areas; rather,
empower your technical team to make the required decisions, and let them
keep on improving how they want to handle the development aspects.
Figure 3-7. A branch of a backlog item
Chapter 3 Working on the iteration

72
Your team should always associate the work items with the commits/
check-ins they make, regardless of whether they use TFVC (Team
Foundation Version Control) or Git. You can ask the team to follow
instructions in https://docs.microsoft.com/en-us/vsts/work/track/
link-work-items-support-traceability#link-work-items-code-
artifacts- and-builds.
You should encourage your team to use the code review features of
VSTS/TFS to allow them to have good coding standards. If TFVC is used,
your team can follow the instructions at https://docs.microsoft.com/
en-us/vsts/tfvc/get-code-reviewed-vs, and if Git code is used, you can
review it with pull requests (https://docs.microsoft.com/en-us/vsts/
git/pull-requests).
Additionally, your team can utilize tools such as SonarQube and Veracode
to create quality and secure code, which we discuss later in the chapter.
Testing the WorkTesting plays an important role in software development and you may
want to use Test Driven Development (TDD) as well. Regardless of which
process you use, testing is a key aspect of software development and should
be done thoroughly to ensure your team delivers a quality project/product.
Your team can use unit tests to start development testing, aided by
VSTS/TFS, which will provide code coverage. Your team can then integrate
the unit tests with continuous integration builds (we discuss this later
in the chapter) to automate the process as well as to help publish code
coverage results the team can view (https://docs.microsoft.com/
en-us/vsts/build-release/tasks/test/publish-code-coverage-
results). The extension in Visual Studio Marketplace comes with a
dashboard widget for code coverage with a build (https://marketplace.
visualstudio.com/items?itemName=shanebdavis.code-coverage-
dashboard-widgets). We discuss dashboards later in this chapter.
Chapter 3 Working on the iteration
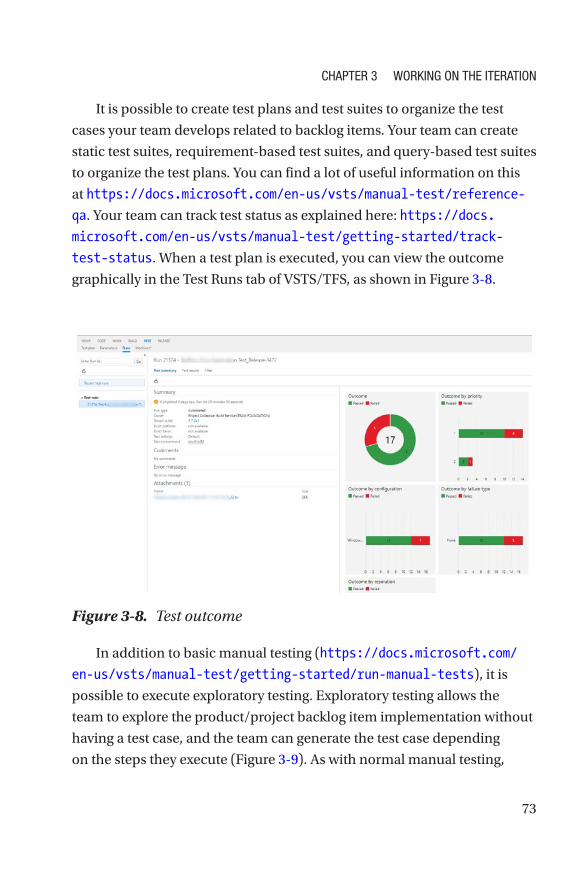
73
It is possible to create test plans and test suites to organize the test
cases your team develops related to backlog items. Your team can create
static test suites, requirement-based test suites, and query-based test suites
to organize the test plans. You can find a lot of useful information on this
at https://docs.microsoft.com/en-us/vsts/manual-test/reference-
qa. Your team can track test status as explained here: https://docs.
microsoft.com/en-us/vsts/manual-test/getting-started/track-
test-status. When a test plan is executed, you can view the outcome
graphically in the Test Runs tab of VSTS/TFS, as shown in Figure 3-8.
Figure 3-8. Test outcome
In addition to basic manual testing (https://docs.microsoft.com/
en-us/vsts/manual-test/getting-started/run-manual-tests), it is
possible to execute exploratory testing. Exploratory testing allows the
team to explore the product/project backlog item implementation without
having a test case, and the team can generate the test case depending
on the steps they execute (Figure 3-9). As with normal manual testing,
Chapter 3 Working on the iteration
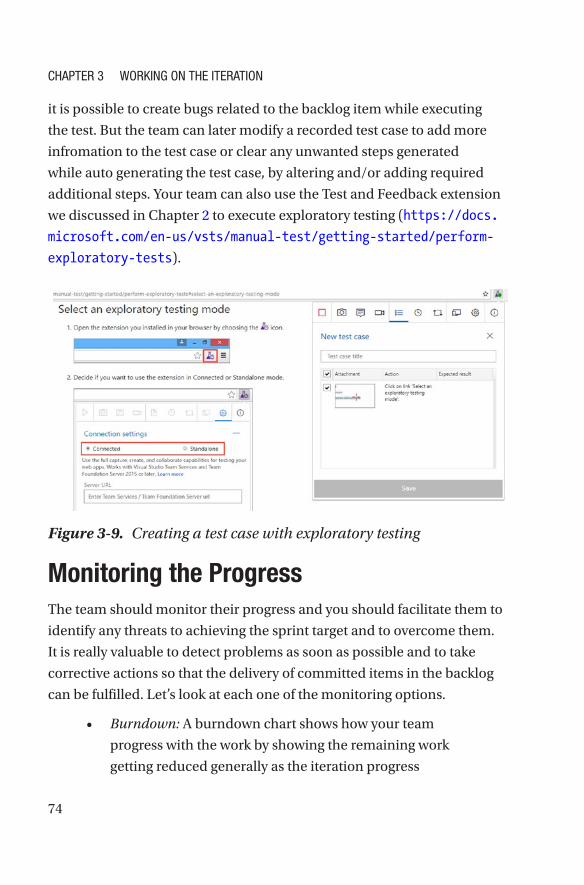
74
it is possible to create bugs related to the backlog item while executing
the test. But the team can later modify a recorded test case to add more
infromation to the test case or clear any unwanted steps generated
while auto generating the test case, by altering and/or adding required
additional steps. Your team can also use the Test and Feedback extension
we discussed in Chapter 2 to execute exploratory testing (https://docs.
microsoft.com/en-us/vsts/manual-test/getting-started/perform-
exploratory-tests).
Figure 3-9. Creating a test case with exploratory testing
Monitoring the ProgressThe team should monitor their progress and you should facilitate them to
identify any threats to achieving the sprint target and to overcome them.
It is really valuable to detect problems as soon as possible and to take
corrective actions so that the delivery of committed items in the backlog
can be fulfilled. Let’s look at each one of the monitoring options.
• Burndown: A burndown chart shows how your team
progress with the work by showing the remaining work
getting reduced generally as the iteration progress
Chapter 3 Working on the iteration

75
graphically. In Chapter 2, we discussed using a story
point burndown chart to identify the team progress in
the iteration. Remember that even though you can use
burndown with hour estimations on tasks, doing so is
time-consuming, and there is no real benefit to looking
at hours as long as the team does not deliver 100
percent of the backlog items. A story point burndown,
on the other hand, can indicate more effectively the
total story points in the current iteration and how the
team is getting them done. If more and more story
points are getting added due to the discovery of bugs
within the iteration, or due to more backlog items
getting added (we discuss this later in the chapter),
burnup will happen instead of burndown.
• Backlog Capacity View: We discussed capacity in
Chapter 2; Figure 3-10 indicates that in this instance,
overall team capacity would not be enough, even
though some activity types have enough team capacity.
These very early indications help the team take
corrective actions sooner than later.
Chapter 3 Working on the iteration

76
• Task Board and Backlog Board: The team should always
look at these two boards and, as discussed previously,
the styles on the cards on the board will help the team
recognize the bottlenecks or any items that require the
team’s attention. Focusing on boards helps the team
limit the work in progress and attend to the backlog from
top to bottom. The team can take necessary corrective
actions based on the indications it sees on these boards.
Figure 3-10. Capacity on iteration backlog view
Chapter 3 Working on the iteration

77
• Velocity Chart: The velocity chart helps to explain the
team’s capability of achieving story points/size/effort
on backlog items. When you run a couple of sprints,
you can identify the average velocity of the team. This
information helps the team and you to forecast future
work (we discuss forecasting future work in Chapter 4).
• Cumulative Flow Diagram: This diagram shows the
progress from the perspective of all the iterations, from
a defined time period up to the present. The cumulative
flow diagram (Figure 3-11) also indicates the work in
progress and the rate at which work items are getting
completed vs. the rate at which items are getting added
to the team project. In addition to the cumulative flow
chart that is available by default in the backlog view, a
more configurable widget is available in VSTS. You can
view more details on cumulative flow at https://docs.
microsoft.com/en-us/vsts/report/dashboards/
cumulative-flow.
Figure 3-11. The cumulative flow diagram
Chapter 3 Working on the iteration

78
• Queries, Charts, and Dashboards: You can write custom
queries and create charts and dashboards, which
we discuss in the section “Visualizing and Positively
Impacting the Team,” later in this chapter.
• Build Deployments, and Test Outcomes: Teams can
create dashboard widgets, charts, and so on to monitor
the builds, deployments, and test outcomes, which we
discuss further in “Visualizing and Positively Impacting
the Team.”
Avoiding DefectsDefects/bugs in software are costly and can even affect your team’s
reputation with clients. The cost defect increases as it reaches each
stage in a software delivery lifecycle, and bugs found in production can
even cost you your project, as shown in Figure 3-12. A simple bug that
is miscalculating interest on savings accounts in a banking application
or interest provisioning process can cost millions of dollars, and your
customer, or bank, may be in a big trouble with their clients; surely you
will be in even deeper trouble.
Chapter 3 Working on the iteration

79
You can take many actions to identify bugs/defects as soon as possible. If
your team performs good backlog grooming sessions and prepares test cases
well before the iteration starts, they have a really good starting point from
which to detect defects early. Fixing bugs detected at the backlog grooming
level only costs your team a small amount of time and effort. The team might
have to alter a few test cases and redefine some tasks and backlog item
content, including acceptance criteria. Even if the team has to abandon a
backlog item entirely and re-create new backlog items in agreement with the
product owner, finding bugs early is not a big cost at all.
In the development stage of software, a lot of bugs may occur if your
team did not follow certain good practices. Code review is one such good
practice that your team can follow, as we discussed earlier. Sometimes it is
better to use two minds rather than one to get a component implemented.
You can do this by introducing pair programming when it makes sense
to do so. An article at www.ppig.org/papers/17th-chong.pdf provides
you with more insight on when and how pair programming works. We
mentioned already that sometimes the QA members of the team are
Figure 3-12. The cost of a bug
Chapter 3 Working on the iteration

80
idle at the start of iterations and have a bit of time when they can help
the developers. That help can come in the form of pair testing with the
developers. At any time of the iteration, if the developer is ready to show
what he is working on, the tester can sit with him at his developer machine
and test the application. This way your team can identify issues well before
they reach the testing stage.
Your team will also test the backlog items developed in the testing
stage and fixing any bugs they detect. Once the first set of backlog items
completes development, your team starts developing the next set of
backlog items. The team does not have enough time to test all the backlog
items developed in previous iterations in any given iteration. But it is
risky to release the project/product to production without testing each
and every component. Manually doing this sort of regression is not
feasible. Therefore, your team can introduce test automation to reduce
the size of the team needed for regressions. The ideal solution would be
to run a daily smoke test suite on your solutions and deploy nightly to the
testing environment. We discuss VSTS/TFS options to implement such
automation later in the chapter. The work done by the team for automation
can also be tracked with the supportive work tracking strategy that we
discussed in a previous section of this chapter.
Your team should test the applications they develop for load and
performance under stress. This gives the team the opportunity to detect
performance issues and fix them early, otherwise, these may be encountered
in the production a few months after the release. VSTS/TFS with Visual
Studio offers many options to perform load and performance tests as
described at https://docs.microsoft.com/en-us/vsts/load- test/.
You should keep your staging environment set up similar to your
production environment. This allows the team to find bugs that could
occur in production well before they actually reach production.
Chapter 3 Working on the iteration

81
Your team should also make sure that each deployment to the testing
or staging environment happens in exactly the same way as it would
happen in production. For this to work, before they deploy to testing/
staging, the team should make the a replica equivalent to the production-
deployed version of the product’s testing/staging environment. This means
that if any additional deployment on top of the production version has
happened in these environments, it should be reverted to the production
version before each deployment happens. Infrastructure as code and
automated deployment tools with VSTS/TFS will help your team achieve
this goal. When you perform deployments in this way, you are assured that
production will not fail due to deployment issues.
Identifying the cause of defects in the production environment is a
most difficult activity, but many modern tools can help you with this. One
such tool is Application Insights (https://azure.microsoft.com/en-us/
resources/videos/application-insights-how-to-detect-issues-
solve-problems-and-continuously-improve-your-web-applicati/).
Facilitating Unavoidable ChangesThe unforeseen can happen at any time in life, and in software
development this is no different. For instance, you may discover a bug in
your current iteration development that requires the team to go back to
the drawing board and think things through from the beginning. Or the
team may find a large, unfixable bug within the iteration just as you are
almost at the end of it. You may have to give up a backlog item as a result.
Your product owner/customer may demand that you take a new backlog
item into the sprint. She may say that without it, she will not accept the
iteration. Or perhaps a sudden critical bug will surface in production that
needs the whole team’s attention to fix.
Chapter 3 Working on the iteration

82
No matter how these types of requirements arise, you must help
the team handle them in a graceful manner. For example, if you must
take a new backlog item into the current iteration, negotiate with the
product owner to take out one or more items from the bottom of the
iteration backlog to accommodate the incoming item. Make sure to
discuss the issue with the team and get their technical opinion so you
can constructively communicate with all the stakeholders, including the
product owner, and come to an agreement that everyone is willing to
accept. Facilitating necessary discussions with technical leadership and
business owners is key to your success managing these situations. You can
use VSTS/TFS boards and other progress monitoring options we discussed
earlier to give the current picture to every stakeholder and bring them all
onto the same page. The discussion should focus on how everyone comes
out of this situation instead of devolving into pointing figures at each other.
Certain cases might cause your current iteration work value to become
null and void. In such cases, with the product owner’s consent, it is
possible to abandon an iteration. If this is done, all the remaining work
should return to the backlog and be groomed, sized, and reprioritized
before you start the next sprint. We discuss this more in Chapter 4.
Handling Disaster SituationsAnother challenge in supporting an Agile team is handling disaster
situations. Disaster can come in many forms, for example,
• Your key team members may fall sick during a critical
time.
• Your developer or testing environment hardware may
fail suddenly.
• A natural disaster may interfere with your team
members’ ability to carry out their duties.
Chapter 3 Working on the iteration
83
• Your team may discover a technical design failure in
the project that points to the necessity of a complete
overhaul.
Regardless of the type of disaster, successful management of it relies
heavily on facilitating collaborative and constructive discussion among
all stakeholders. In a situation in which a team member cannot attend
work for some reason, other team members will jump in and cover up
for her if you set the right mood in the team as their facilitator. The team
should always feel that you are there to back them up and that they can
count on you. If you can cultivate the team’s trust in each other and in you
as their servant leader, the team will be able to come out of any situation,
miraculously. It is this team spirit, mutual trust, and collaboration that
makes teams succeed.
Accountability for team members’ or a team’s action and visibility
are also important aspects of team building. VSTS/TFS provides visibility
in all actions of the team, which allows team members to be responsible
for their actions. As their facilitator, you should always support them to
overcome any mistakes they make by helping individual team members
and by letting other team members help, rather than by using accusations,
by pointing fingers, or by placing blame on the team or an individual.
Even though VSTS/TFS provides visibility, sometimes you need to keep
certain problems within the team and manage them yourself rather than
escalating everything to higher management for punishment and control
purposes.
Always discuss the disaster situation with the team, and lay out a plan
together; only then should you present it to stakeholders (product owner,
higher management of the company) alone (without the team) and get
their buy-in for the plan. Keep supporting and facilitating the team and be
with them to overcome the situation. No matter what tool you use, success
lies in how you build trust and relationships within your team. After all,
people and relationships are more important than the tools and processes.
Chapter 3 Working on the iteration
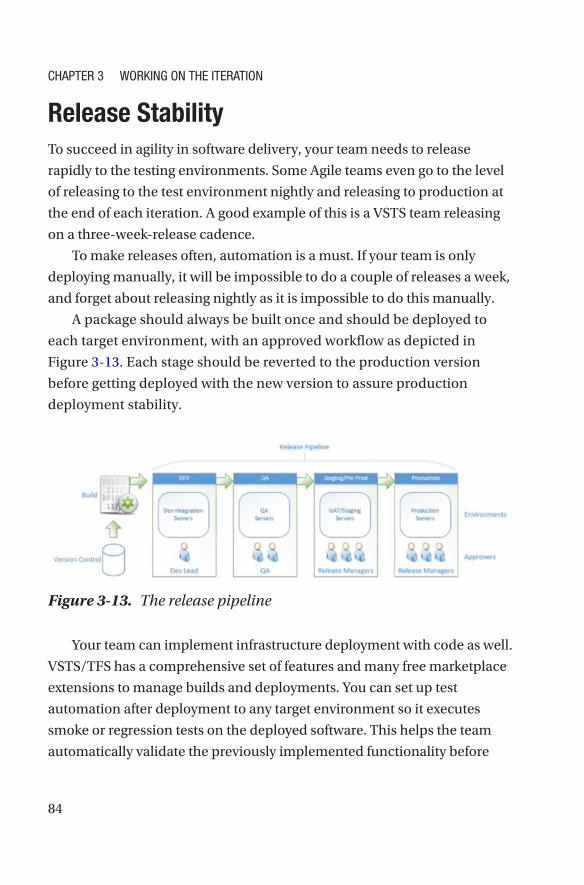
84
Release StabilityTo succeed in agility in software delivery, your team needs to release
rapidly to the testing environments. Some Agile teams even go to the level
of releasing to the test environment nightly and releasing to production at
the end of each iteration. A good example of this is a VSTS team releasing
on a three-week-release cadence.
To make releases often, automation is a must. If your team is only
deploying manually, it will be impossible to do a couple of releases a week,
and forget about releasing nightly as it is impossible to do this manually.
A package should always be built once and should be deployed to
each target environment, with an approved workflow as depicted in
Figure 3- 13. Each stage should be reverted to the production version
before getting deployed with the new version to assure production
deployment stability.
Figure 3-13. The release pipeline
Your team can implement infrastructure deployment with code as well.
VSTS/TFS has a comprehensive set of features and many free marketplace
extensions to manage builds and deployments. You can set up test
automation after deployment to any target environment so it executes
smoke or regression tests on the deployed software. This helps the team
automatically validate the previously implemented functionality before
Chapter 3 Working on the iteration
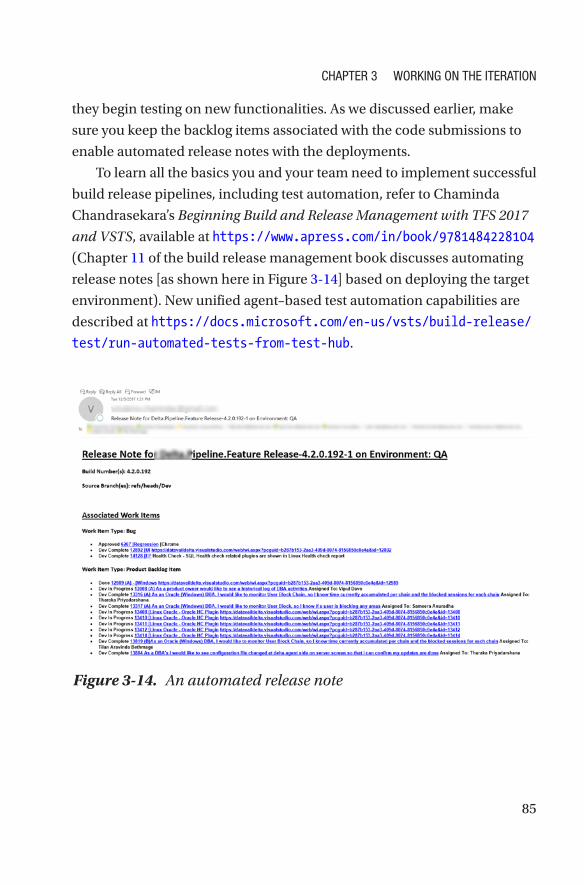
85
they begin testing on new functionalities. As we discussed earlier, make
sure you keep the backlog items associated with the code submissions to
enable automated release notes with the deployments.
To learn all the basics you and your team need to implement successful
build release pipelines, including test automation, refer to Chaminda
Chandrasekara’s Beginning Build and Release Management with TFS 2017
and VSTS, available at https://www.apress.com/in/book/9781484228104
(Chapter 11 of the build release management book discusses automating
release notes [as shown here in Figure 3-14] based on deploying the target
environment). New unified agent–based test automation capabilities are
described at https://docs.microsoft.com/en-us/vsts/build-release/
test/run-automated-tests-from-test-hub.
Figure 3-14. An automated release note
Chapter 3 Working on the iteration
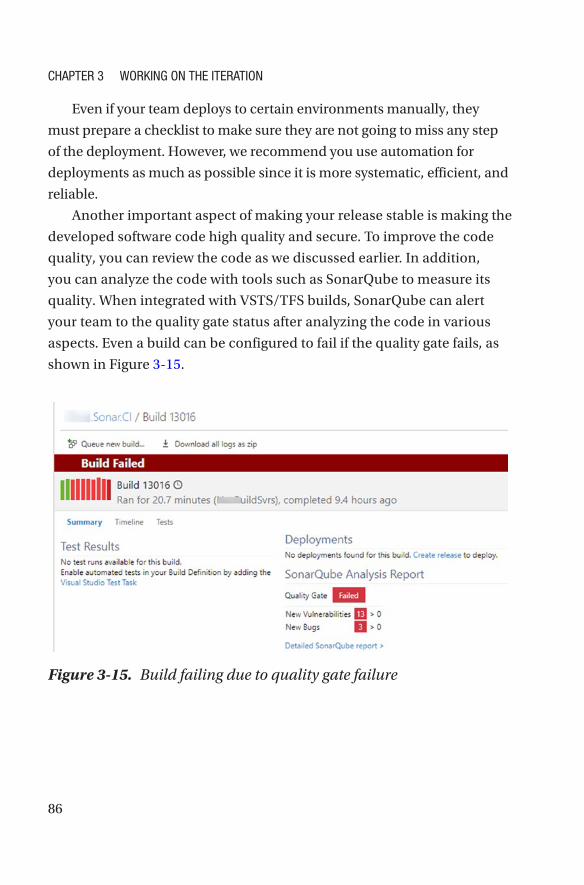
86
Even if your team deploys to certain environments manually, they
must prepare a checklist to make sure they are not going to miss any step
of the deployment. However, we recommend you use automation for
deployments as much as possible since it is more systematic, efficient, and
reliable.
Another important aspect of making your release stable is making the
developed software code high quality and secure. To improve the code
quality, you can review the code as we discussed earlier. In addition,
you can analyze the code with tools such as SonarQube to measure its
quality. When integrated with VSTS/TFS builds, SonarQube can alert
your team to the quality gate status after analyzing the code in various
aspects. Even a build can be configured to fail if the quality gate fails, as
shown in Figure 3- 15.
Figure 3-15. Build failing due to quality gate failure
Chapter 3 Working on the iteration

87
The build provides a link to access detail information of the analysis
performed, on the SonarQube server with a lot of drill-down capability so
you can further analyze the reasons for the quality gate status (Figure 3-16).
Your team can learn how to set up SonarQube for VSTS/TFS builds at
http://chamindac.blogspot.com/2017/02/sonarqube-extension-for-
vststfs.html.
Figure 3-16. The SonarQube project dashboard
You can also use the Veracode (not free) platform to analyze the
security aspects of the code with VSTS/TFS builds (Figure 3-17). An
extension is available in the Visual Studio Marketplace (https://
marketplace.visualstudio.com/items?itemName=Veracode.veracode-
vsts- build-extension) that you can use to upload your binaries and
trigger a Veracode scan.
Chapter 3 Working on the iteration

88
Visualizing and Positively Impacting the TeamIn a previous section of the chapter, we discussed many options available
in VSTS/TFS that you can use to monitor the progress of your team. Let’s
look at how queries and dashboards can help you visualize the status of
the project in different aspects.
You can write different queries (https://docs.microsoft.com/en-us/
vsts/work/track/using-queries) to filter your work items in various ways.
You have the ability to create trend charts (https://docs.microsoft.com/
en-us/vsts/report/dashboards/charts) using those queries and then
add them to the default dashboard (https://docs.microsoft.com/en-us/
vsts/report/dashboards/add-charts-to- dashboard), or create your own
Figure 3-17. Veracode scan on a VSTS/TFS build
Chapter 3 Working on the iteration

89
dashboards in VSTS/TFS (https://docs.microsoft.com/en-us/vsts/
report/dashboards/dashboards) as shown in Figure 3-18.
Figure 3-18. A dashboard with charts
You can include build, deployment-related charts, and test results,
including test automation results, in dashboards. VSTS supports Analytics
widgets in dashboards to allow for further visualizing capability with
the Cumulative Flow Diagram (CFD), Velocity, Lead Time, Cycle Time,
Burndown, and Burnup widgets (https://docs.microsoft.com/
en-us/vsts/report/analytics/analytics-widgets-vsts). All these
visualizations will help you and your team identify any issues and take
corrective actions.
Chapter 3 Working on the iteration

90
Bombarded with the overwhelming availability of data on the progress
of your team, at times, you might make wrong choices. Such choices
sometimes cause chaos in projects. For instance, if you are looking at the
burndown on the last day of the iteration, and you tell the team it has done
an awful job, the members are apt to be demotivated, which will lead to
the team giving up on everything.
But how can you make sure you positively impact the team? First,
remember that you should be the facilitator or enabler. You should provide
support to help your team understand and practice Agile/Scrum. You
should help the team focus on team goals rather than individual goals. You
must always energetically look for process improvements and guide the
team to adopt such improvements in an enjoyable way.
You must also play the role of negotiator, especially between the team
and the product owner. You must effectively communicate with both
parties and ensure collaboration between them. Your job is to bridge the
gap between your team and the client’s business. Your responsibility is
to work closely with the product owner to identify business challenges
and also support the team to accommodate business requirements in an
effective way.
You should positively influence your team and the business team and
have the ability to set reasonable expectations in the product owner, by
negotiating and influencing him, if he is highly demanding. You can use
the visualization capability of VSTS/TFS to create the background required
for such negotiations.
You should also be the protector of the team, by shielding them from
interferences and impediments, and you should keep their focus on the
sprint goal. You must strike a balance when protecting the team, however,
as you must also keep in mind the business’s interests. Be resourceful so
you can creatively remove impediments from the team.
Chapter 3 Working on the iteration

91
Conflict resolution also plays an important part in your role. You must
earn everyone’s trust and respect. If conflicts are positively impacting the
work, such as various opinions on technology implementations, encourage
the team to have such conflicts and resolve them constructively to improve
the quality of work. This is also true with challenges that are geared
toward improving the process. But if the conflicts are rising between team
members due to personal issues, make sure these are fixed immediately as
political conflicts within an Agile team spell disaster.
Another of your responsibilities is building your team. It is important
for you to accept your team’s smaller failures since lessons learned from
failure are often worth more than the advice you give before failure. Lower
the bar when necessary and celebrate small, regular successes in the team.
This positive momentum will help you raise the bar later and celebrate
much higher success stories with your team. Happiness in the working
environment is important to making your team succeed, so help your team
enjoy life while they work hard for the team goals.
You should be disruptive when you need to be and be sure to show
empathy for the people around you. Do not be afraid to break the rules
and make changes. Your willingness to experiment and go ahead with
continuous improvements will surely influence your team to strive for
success. Maybe introducing a mid-sprint review to get feedback from the
product owner will be helpful, or perhaps you can conduct this type of
review within the team to check on the team’s progress. However, avoid
micromanaging at all costs; trusting your team and earning their trust is
a vital part of your role, no matter what tools you use or how capable your
tools are in implementing Agile practices.
You can use VSTS/TFS visualization capabilities to build awareness in
the team; they should think about where they are heading and when they
need to take necessary corrective actions. You can influence your team by
showing the team’s progress visually and by parsing the team for success,
so that the team keeps on updating work items as the members progress
Chapter 3 Working on the iteration

92
with work. Correctly representing status is important for the team, and
team members should understand the value of this by experiencing the
benefits of the correct status visibility. Let the team members be innovative
with the VSTS/TFS tool and help them come up with creative solutions
to the challenges they face. Creating automated steps as often as you can,
such as automating the task estimation as we discussed in Chapter 2, is
productive as well as effective to the productivity of the team.
SummaryIn this chapter, we focused on daily activity and positively working with
iteration goals, while effectively using VSTS/TFS as a tool. You learned the
importance of performing backlog grooming activities, while working on
the current iteration in order to make the requirements ready for the next
iterations. We discussed several challenges an Agile team may face and
how you can act as a successful servant leader to overcome them, using
tools as well as other traits that you should cultivate. We also highlighted
the importance of the cultural impact on an Agile team’s success.
In the next chapter, we explore how we should come to the end of
an iteration and set the background to start the next iteration. We then
discuss in more detail what steps you need to followed to make continuous
improvements to the team in the coming iterations.
Chapter 3 Working on the iteration

93© Chaminda Chandrasekara, Sanjaya Yapa 2018 C. Chandrasekara and S. Yapa, Effective Team Management with VSTS and TFS, https://doi.org/10.1007/978-1-4842-3558-4_4
CHAPTER 4
Work After an IterationIn previous chapters, you learned about the things that you need to set up
before you and your team can start working on an iteration and how you
can effectively execute an iteration using VSTS/TFS as a tool. In previous
chapters, we also described challenges you will face in the initial planning
and execution of the iteration and how you can use VSTS/TFS capabilities
effectively to overcome them. However, be aware that the features and
information availability in VSTS/TFS may lead you to circumstances
in which micromanagement may creep in and disrupt the purpose of
building agility in your team; we also discussed such pitfalls in previous
chapters to make you cautious and aware of these and to prevent you from
falling into them. With this knowledge, you can build empowered teams
and practice Agile using VSTS/TFS as a helpful tool, rather than one that
misleads your processes and practices.
In this chapter, we go through post-iteration activities and steps
you need to perform to get getting ready for the next iteration. First, it
is important to review the completed work from the previous iteration
and make sure you and your team understand how to handle partially
completed work before you move onto the next iteration. Discussing
challenges faced by the team in previous iteration helps the team make
improvements to how they will work in coming iteration. In this chapter
we discuss in detail how to pick items for the next iteration and what you
should avoid during post-iteration activities and planning for the next
iteration to be an effective Agile team. Our objective here is to explore the

94
Analytics widgets in VSTS that allow you determine the lead times, the
cycle times, and the forecasting capabilities of the work that your team
would deliver in the future iterations, and to help you plan your releases in
a predictable way.
ReviewAs we discussed in Chapter 2, each user story or bug fix should meet
the definition of done (DoD) in order for it to be released to the client
environments. A shippable increment of software expected at the end of
an Agile/Scrum iteration should comprise backlog items (stories) and/
or bug fixes that are fully developed and tested and that can be deployed
to production environments, but only if the client is happy with the
implementation.
You should only select the 100-percent developed and tested stories
and fixes while making sure you avoid including partially finished work
in the version that you release after the iteration. Skipping the partially
done work is a challenge in the release increment if proper branching
and/or architectural patterns are not followed by the team. Even though
discussing how to define software architecture so it supports the capability
to switch features on and off in a release is out of scope of the book, it is an
important aspect your team should consider when implementing software.
In such scenarios, feature toggles will save the day. A feature toggle is
a feature switch or flipper that helps you keep your production code in
sync with the development version. This is extremely useful in scenarios
in which the end users are not ready for the new feature. For more details
about feature toggles, check this out: https://dev.to/samueleresca/
continuos-delivery-using-feature-toggle.
By the end of the iteration, your team should have DoD-met stories
and bug fixes deployed to the preproduction environment, but only
after they have been fully tested in previous stages such as development
Chapter 4 Work after an IteratIon

95
integration, quality assurance (QA), user acceptance testing (UAT), and
so on. As per Agile/Scrum practices, teams should demonstrate each of
their completed features in the sprint review meeting to the client/product
owner to get final approval before deploying them to production. If the
demonstration is done in a preproduction environment, the validity and
reliability of the software increment becomes higher as it is much closer to
the production implementation.
Product owners may or may not approve the release to production,
but such releases that are not approved should not be considered total
failures of implementation as long as the team understands what needs
to be fixed and accepted DoD criteria are met for each feature. In cases in
which there is a gap between the team’s understanding of DoD and the
product owner’s, discussion of how to improve the way the criteria for
DoD is defined should ensue; we discuss this later in this chapter. Some
teams follow a different release cadence from iteration length and have
multiple iterations before a release to production happens. Even in such
situations, it is worth demonstrating the completed features at the end of
each iteration, as this gives the team an opportunity to get early feedback
on implementation, and this satisfies the Agile thinking of fail fast, fail
often. This phrase should not be misunderstood as invitation to fail or an
encouragement of failure. Rather, fail fast, fail often allows your teams
to learn fast and fix issues sooner rather than later, which keeps the cost
of fixes lower, because the cost is much higher when bugs are detected
and need to be fixed toward the end of project, or in production, as we
discussed in the Chapter 3. To understand more about fail fast, fail often
in the context of success, take a look at www.arrkgroup.com/thought-
leadership/fail-fast-fail-often-explained/.
Once the review session with the product owner/client is done, the
owner/client can start providing feedback on the implementation of the
iteration. This can happen as voluntary feedback or the team can request
feedback for individual implemented features and get the feedback as we
discussed in Chapter 2.
Chapter 4 Work after an IteratIon

96
Handling Partially Done StoriesIf work is not 100-percent complete, the features it contains cannot be
included in the increment that is shipping at the end of the iteration, since
partially done work cannot generate value to the client business process
to improve it. The completed portion of the work should remain in the
iteration that just ended, and any in-progress tasks and not-yet-started
tasks of a story or a bug fix should be taken back to the backlog. Some
teams do this incorrectly by moving the incomplete work directly to the
next iteration; this should be avoided because the partially completed
work should be evaluated, reprioritized, and re-estimated before the
decision is made to work on them in the next iteration. This is because
priorities might have changed in the project, so other work may now need
to be given higher priority than the partially completed work from the
previous iteration.
Moving Partially Completed Work to the BacklogYou can move the user story/product backlog item (PBI) or a bug work
item to the backlog by changing its iteration path to the backlog iteration
path. Then you have to move all child tasks that are in progress or new to
the backlog by changing their iteration paths to the backlog iteration path.
Instead of changing each work item manually, simply drag and drop the
story/PBI or bug work item to the backlog, which automatically moves
the child tasks that are not closed back to the backlog. Closed child tasks
remain in the iteration since the work for them was already completed in
the iteration, as we discussed earlier. If you need to, you can drag and drop
multiple stories and bugs by highlighting them and dragging (Figure 4-1).
Chapter 4 Work after an IteratIon

97
Instead of dragging and dropping after you highlight required work
items, you can right-click to access the menu, click Move to Iteration, and
then click the Backlog menu option to move them to the backlog with the
child tasks that are not closed (Figure 4-2).
Figure 4-1. Drag and drop the story to the backlog
Chapter 4 Work after an IteratIon

98
When you move the parent work items to the backlog by dragging
and dropping or using the menu, the closed task work items remain in
the iteration; the parent work item remains visible inside the iteration
even though it has been moved to the backlog. This behavior correctly
represents the partially done work (tasks completed) for a story or a bug in
a given iteration. Figure 4-3 illustrates completed tasks that remain in the
iteration with a the user story has been moved to the backlog.
Figure 4-2. Moving stories to the backlog using the menu
Chapter 4 Work after an IteratIon

99
Once moved to the backlog, the story/PBI or bug work items should
be re-estimated after the remaining effort is evaluated. There may have
been changes to acceptance criteria or even requirement changes to these
items. In the planning session for the next sprint, discuss and select these
work items depending on their priority and the priority of other work
items. In other words, once moved back to the backlog, all these items are
considered similarly to other backlog items, and they go through the same
process to get selected for the next or any future iteration. You can even
have a backlog grooming session between the iterations to evaluate these
work items compared to other work items that are already prioritized and
groomed in the backlog. We discuss this more later in the chapter when we
go through the process of planning the next iteration.
Figure 4-3. Completed tasks remains in the iteration
Chapter 4 Work after an IteratIon
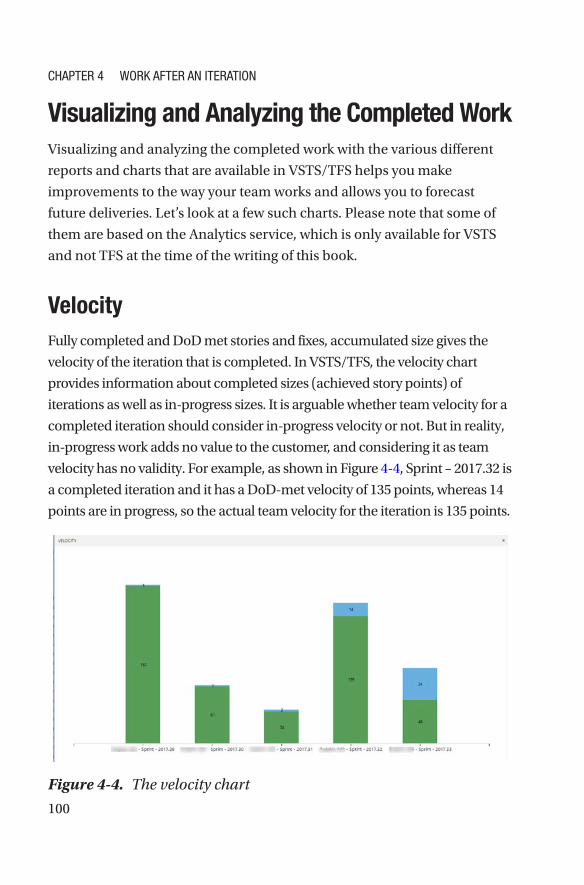
100
Visualizing and Analyzing the Completed WorkVisualizing and analyzing the completed work with the various different
reports and charts that are available in VSTS/TFS helps you make
improvements to the way your team works and allows you to forecast
future deliveries. Let’s look at a few such charts. Please note that some of
them are based on the Analytics service, which is only available for VSTS
and not TFS at the time of the writing of this book.
VelocityFully completed and DoD met stories and fixes, accumulated size gives the
velocity of the iteration that is completed. In VSTS/TFS, the velocity chart
provides information about completed sizes (achieved story points) of
iterations as well as in-progress sizes. It is arguable whether team velocity for a
completed iteration should consider in-progress velocity or not. But in reality,
in-progress work adds no value to the customer, and considering it as team
velocity has no validity. For example, as shown in Figure 4-4, Sprint – 2017.32 is
a completed iteration and it has a DoD-met velocity of 135 points, whereas 14
points are in progress, so the actual team velocity for the iteration is 135 points.
Figure 4-4. The velocity chart
Chapter 4 Work after an IteratIon

101
VSTS provides an additional widget to identify and provide more
information on the velocity of the team. To get this widget, you need to
install the Analytics extension to VSTS from VSTS Marketplace. Once the
extension is installed, you can set up the Velocity widget in the dashboard
(we discussed dashboards in Chapter 3) of the team. This Velocity widget
provides you with achieved velocity vs. planned velocity, and work
completed late also can be identified (Figure 4-5). More information on
this Velocity widget can be found at https://docs.microsoft.com/en-us/
vsts/report/dashboards/team-velocity .
Figure 4-5. The Velocity widget in VSTS
Chapter 4 Work after an IteratIon

102
Using each iteration velocity, you should calculate an average velocity
for the team; do this manually because VSTS/TFS does not provide an
average velocity calculation automatically at the time of the writing of this
book. The following is the formula for this:
Average Velocity = Accumulated Velocity in All Iterations/ No. of Iterations
If you are using the Scrum process template for on-premises TFS
with SQL Server Reporting Services (SSRS), you get a velocity report that
provides an average velocity line that is useful for forecasting work for
future iterations. In other words, if your team has completed a few sprints,
your ability to forecast future sprints greatly improves. For further reading,
please visit https://docs.microsoft.com/en-us/vsts/report/sql-
reports/velocity?view=vsts. We discuss this topic more later in this
chapter.
It is important to keep in mind that velocity is not a key performance
indicator (KPI) for the team. It just provides the capacity of the team and
gives the team the ability to forecast and take on work for future iterations.
You should not expect the team to increase its velocity as a performance
measurement objective; instead the team should find its own velocity that
can work on a sustainable phase.
Burndown and BurnupIn addition to the velocity chart, the Analytics extension provides a few
other useful widgets. Just search for Analytics in the VSTS Marketplace.
Burndown and Burnup widgets provide you with a wealth of information
on how your team is progressing. You can learn more about these widgets
at https://docs.microsoft.com/en-us/vsts/report/dashboards/
configure-burndown-burnup-widgets. It is important to configure
these charts per your team requirements and understand the meaning
of each of the values and lines shown. The information provided in
Chapter 4 Work after an IteratIon

103
https://docs.microsoft.com/en-us/vsts/report/dashboards/
configure-burndown- burnup-widgets#interpret-a-burndown-or-
burnup-widget-chart provides a comprehensive overview of the
interpretation of these charts; the following is a summary of the most
critical points:
• Total Scope: The scope change of the project is
represented by the line that considers the completed
work as well. Figure 4-6 shows a significant increase in
scope.
Figure 4-6. The burndown line
Chapter 4 Work after an IteratIon

104
• Burndown: The burndown line plotted in the chart shows
how fast your team gets the work completed. In Figure 4-6,
the average burndown shows as a negative value because
the burndown rate has decreased as an average due to
an increase in the remaining work, probably due to the
significant scope increase in the project.
• Burnup: If the burnup chart is analyzed for the same
time period (see Figure 4- 7), it provides another view
of how the work is progressing. Even though the scope
has increased, the team has completed a significant
amount of work. The total scope increase is almost 50
percent, which justifies the negative burndown average
in Figure 4-6.
Figure 4-7. The burnup chart
Chapter 4 Work after an IteratIon

105
Lead Time and Cycle TimeIdentifying the lead time and cycle time of your team helps you determine
how long it takes for work to go through development and testing to get
completed.
• Lead Time: The total time it takes to complete the work
item starting at the time it was created
• Cycle Time: The time it takes to complete the work item
starting at the time the active work began
The Analytics extensions displayed in Figure 4-8 are available in the
VSTS Marketplace, which we discussed in previous section. To learn how
to configure the extension, go to https://docs.microsoft.com/en-us/
vsts/report/dashboards/cycle-time-and-lead-time.
Chapter 4 Work after an IteratIon

106
Cumulative FlowIn addition to the default cumulative flow chart available in the backlog
view, a more configurable Cumulative Flow widget is available in the VSTS,
which you can enable by installing the Analytics extension from the VSTS
Marketplace. In this Cumulative Flow widget, illustrated in Figure 4-9, you
can set up which backlog level you should consider for cumulative flow,
whereas the default available chart considers all the work items available
to the team.
Figure 4-8. Lead time and cycle time
Chapter 4 Work after an IteratIon

107
Understanding the patterns of cumulative flow helps you identify the
answers to a few questions and you can then use those to make decisions
to take necessary corrective actions.
Understanding How the Work Is Progressing
When you use the Analytics extension, you can filter the backlog for the
Cumulative Flow widget. Work in progress should have mostly thin parallel
lines, while the last column should increase in size gradually. If a widening
gap appears in the work in progress (WIP), as shown in Figure 4-10, work
is not getting completed and the team is working on too many items in
parallel, which is not a good sign. The team should take action to complete
work together as a team without starting on other new work.
Figure 4-9. The backlog items’ cumulative flow
Chapter 4 Work after an IteratIon
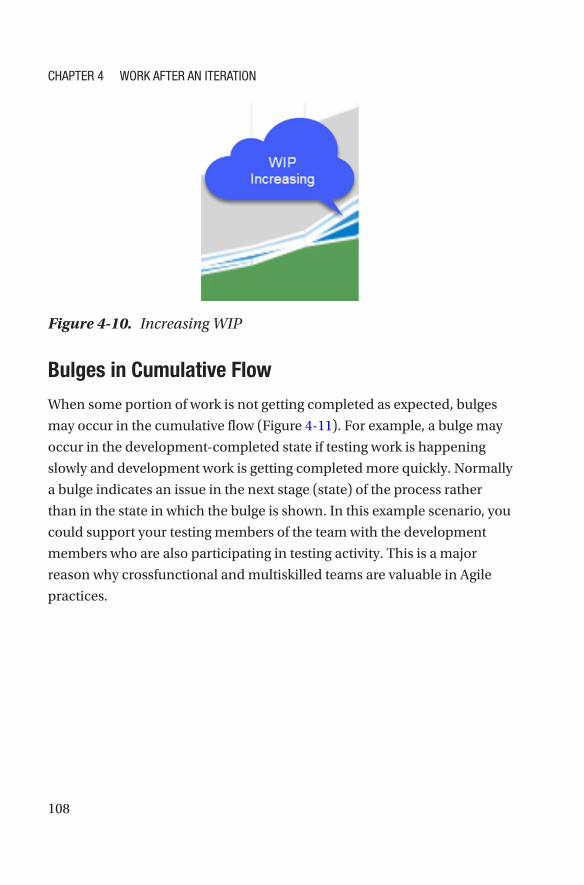
108
Bulges in Cumulative Flow
When some portion of work is not getting completed as expected, bulges
may occur in the cumulative flow (Figure 4-11). For example, a bulge may
occur in the development-completed state if testing work is happening
slowly and development work is getting completed more quickly. Normally
a bulge indicates an issue in the next stage (state) of the process rather
than in the state in which the bulge is shown. In this example scenario, you
could support your testing members of the team with the development
members who are also participating in testing activity. This is a major
reason why crossfunctional and multiskilled teams are valuable in Agile
practices.
Figure 4-10. Increasing WIP
Chapter 4 Work after an IteratIon

109
Flat Lines and Scope Changes
A flat line in the cumulative flow diagram (CFD) may occur when the team
takes more time than planned to get work moved from one process state to
another. This could be because the team has not updated the work items
regularly, which may have caused the flat lines. A similar effect can happen
even in burndown and burnup charts if the team does not update work
items regularly. Always encourage the team to drag the work items to the
relevant column in the Kanban boards, and use the daily scrum meeting
to check that and identify if the work item is in the right column. Flat lines
occur when multiple process states do not progress as planned, and if one
state progresses while the other does not, then a bulge, as explained in
previous section, may occur.
Scope changes are also visible (Figure 4-12) when the initial state of the
process is made available to the CFD. You can find details on configuring
the Cumulative Flow widget at https://docs.microsoft.com/en-us/
vsts/report/dashboards/cumulative-flow#configure-the-cfd-widget
and the built-in cumulative flow chart at https://docs.microsoft.com/
en-us/vsts/report/dashboards/cumulative-flow#configure-the-
built-in-cumulative- flow-chart.
Figure 4-11. A Bulge in the cumulative flow
Chapter 4 Work after an IteratIon

110
All of these charts and widgets provide you and the team with valuable
information about how well your team is progressing with the work. It is
important that you communicate the meaning of these charts to the team
and explain how to interpret them. When the team understands what
each change happening in these charts and widgets indicates, with your
support, they can make quality decisions about necessary improvements
in order to rapidly add value for your end users (clients).
Planning the Next IterationWe have already discussed the importance of conducting a review of
previous 100-percent completed iteration work with the participation
of client/product owner, of getting the in-progress work of the previous
Figure 4-12. Flat lines and scope changes
Chapter 4 Work after an IteratIon
111
iteration back to the backlog, and of visualizing and understanding the
completed work with the help of the charts and diagrams that are available
in VSTS/TFS. None of the in-progress work should remain in the previous
iteration; it should all be in the backlog before you plan your next sprint.
In addition, no items should be selected for any of the future iterations
at this stage. Some teams make the mistake of assigning work for a few
iterations into future. This is a really bad practice because until you
complete an iteration, you cannot know what will remain as in-progress
work. Additionally, the priorities of your client business might change and
the backlog may require reprioritization. So we strongly discourage you
from assigning work for future iterations; in your sprint planning session,
you should only assign work for the next immediate iteration if you
really want to embrace agility. You may be wondering how to predict the
releases when you have no work planned for future iterations. You can find
the answer to this later in this chapter, when we discuss the forecasting
capabilities of VSTS/TFS.
Another important factor for successful sprint planning for the next
iteration is having a well-groomed and sized backlog by the end of a given
sprint. Many teams lose focus of the backlog when they start working on an
iteration, and as a result, they run into an imprecise set of backlog items,
which need lots of clarifications, before they can size or add a definition
of done (DoD). In simple terms, backlog items are not met with definition
of ready (DoR), which we discussed in Chapter 2. To prevent this from
happening, your team should invest a required amount of time on the
backlog grooming activity during an iteration, as explained in Chapter 3.
With a DoR-met backlog—including the in-progress items from the
previous iteration re-estimated and reprioritized—and considering the
other backlog items that depend on the current business priorities of the
project, your team should pick the topmost items of the backlog to assign
to the next iteration. How many items your team picks should be based on
the average velocity of the team. Let’s now spend more time on this and
the forecasting capabilities of VSTS/TFS.
Chapter 4 Work after an IteratIon

112
Forecasting Future WorkVSTS/TFS allows you to forecast work based on the average velocity so
you can predict how many backlog items can be completed at the end
of each future iteration. You can use On/Off forecasting and Show/Hide
in-progress work to get the desired view. As we discussed earlier in the
chapter, you need to calculate the average velocity of your team. When you
have, place it in the “Forecasting based on velocity of” field, as shown in
Figure 4-13. The forecasting lines are drawn based on this velocity value
and the number of future iterations you have selected for the team. For
more information on forecasting with VSTS/TFS refer to https://docs.
microsoft.com/en-us/vsts/work/scrum/forecast.
Even though Figure 4-13 shows in-progress work assigned to an
iteration, no items are assigned to an iteration since the figure was created
in the middle of an iteration. At this point just before a sprint planning
session, when you look at the forecast, you should have no items assigned
to an iteration. However, you can use a forecasting tool at any point in time
to get an idea of how many sprints you need to complete the backlog items
or to find out how much work your team can complete by a given iteration.
Chapter 4 Work after an IteratIon

113
The average-velocity-based forecast gives you a hint on how much of
your backlog your team should pick up for the next iteration. Your team
can just follow this hint or make its own decision on how many items
to pick; for example, it is okay to be a bit overly ambitious or cautious
when you are deciding the work item count for next iteration. It takes few
iterations for the team to get into a rhythm and identify the sustainable
velocity.
Planning Capacity for the Next IterationYou can easily copy over the capacity plan from the previous iteration by
clicking the link to copy capacity from the previous iteration, as shown
in Figure 4-14. You may also have to change the team off days and the
individual off days after copying over the capacity, and you may need to
alter whether any member of the team was reallocated or add new team
Figure 4-13. Forecasting with VSTS/TFS
Chapter 4 Work after an IteratIon
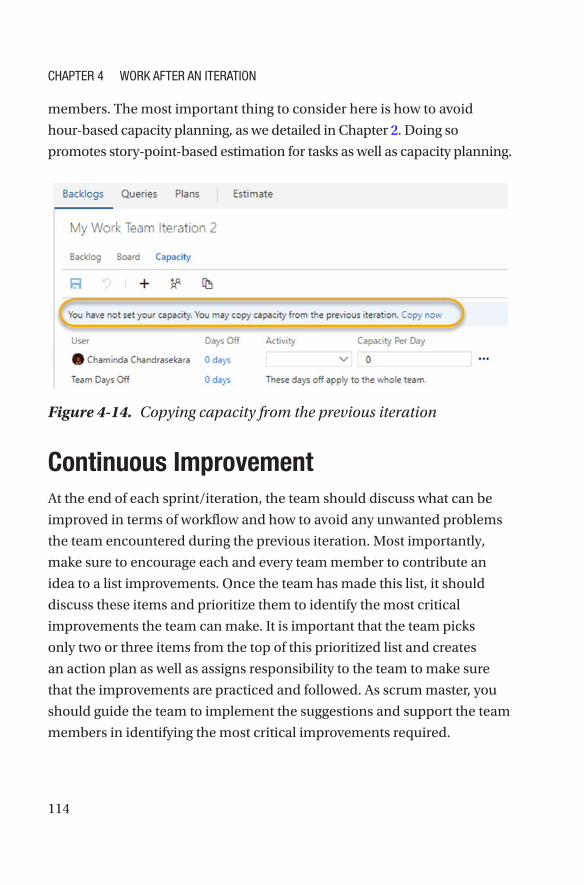
114
members. The most important thing to consider here is how to avoid
hour- based capacity planning, as we detailed in Chapter 2. Doing so
promotes story-point-based estimation for tasks as well as capacity planning.
Figure 4-14. Copying capacity from the previous iteration
Continuous ImprovementAt the end of each sprint/iteration, the team should discuss what can be
improved in terms of workflow and how to avoid any unwanted problems
the team encountered during the previous iteration. Most importantly,
make sure to encourage each and every team member to contribute an
idea to a list improvements. Once the team has made this list, it should
discuss these items and prioritize them to identify the most critical
improvements the team can make. It is important that the team picks
only two or three items from the top of this prioritized list and creates
an action plan as well as assigns responsibility to the team to make sure
that the improvements are practiced and followed. As scrum master, you
should guide the team to implement the suggestions and support the team
members in identifying the most critical improvements required.
Chapter 4 Work after an IteratIon

115
During this discussion, make sure to evaluate whether the team’s
previously taken actions on improvements are successfully implemented
or not and the impact of those improvements. Sometimes these
improvement attempts cause more problems to team productivity
and agility, so this evaluation will help the team improve on previous
improvements. In simple terms, there is no best solution—there is always a
better solution than the previous one, however, and the solutions will keep
on improving. Making the team believe in continuous improvements by
letting them experience the benefits of them should be your goal. Without
confining yourself to a framework for this meeting, generally called a
retrospective in the Agile world, you should continually improve how you
handle this meeting using lessons you learned from each past meeting.
SummaryIn this chapter, we discussed how to use VSTS/TFS effectively for
post- iteration activities and for planning the next iteration. We evaluated
some visualizing capabilities used to analyze the completed work in order
to identify issues or any possible improvements.
In this chapter, we continued our focus on organizing and handling
small and large teams, managing backlog, and working as Agile teams in
iterations as well as post-iteration activities. In the next chapter, we look at
some additional features you can utilize as a scrum master and that your
team can utilize to help visualize and plan project roadmaps, facilitate
business analysis, capture requirements, get stakeholder feedback, and
provide visibility and accountability of the team activities.
Chapter 4 Work after an IteratIon

117© Chaminda Chandrasekara, Sanjaya Yapa 2018 C. Chandrasekara and S. Yapa, Effective Team Management with VSTS and TFS, https://doi.org/10.1007/978-1-4842-3558-4_5
CHAPTER 5
Roadmap/Project Plan and ResourcesSo far in this book, we have discussed how to use VSTS/TFS to manage
different stages and issues that the team faces during software product/
project development. In this chapter, we discuss planning the product
roadmap or the project plan, facilitating the Business Analysis phase with
office integration, and the mobile interface of VSTS/TFS. Also, we look
at providing the visibility to top management by effectively utilizing the
resources available within VSTS/TFS.
Whether you are working on a software project or product
development, you and your team must have a plan that describes the
path to completion. For project development, we normally use a project
plan, and for software product development we use a product roadmap to
illustrate when the project will be delivered or when the product features
will be delivered. This chapter guides you on how to use various tools that
you can integrated with VSTS/TFS to build such a plan.
In addition, we discuss how the business analysis functionality is
facilitated with VSTS/TFS using the Microsoft Office integration and
mobility. Also, we talk about how you can use all these resources to increase
the visibility of the top management. Let’s now dive deep into the facts.

118
Creating the Project Plan/Product RoadmapAs we discussed earlier in this book with Agile practices, the delivery
timelines are tightly coupled to the iterations. That is, at the end of each
iteration, or maybe every x months, the team delivers goods to the end
users. Program managers, project managers, or product owners are
interested in visualizing when the artifacts are delivered to the end users.
This level of information is crucial for the internal stakeholders so that
they can keep the end users up to date with delivery timelines. Ideally,
this information is illustrated in a plan so that both internal and external
stakeholders can see the whereabouts of the development process. For a
software project, as mentioned earlier, this takes the form of the project
plan, and for product development, it is the product roadmap that
showcases such information.
So here’s the challenge: How do you create such a plan and keep the
plan synchronized with ongoing work? There are many tools that you can
used to create such a plan. The problem is that sometimes you have to
manually update your plan based on the ongoing progress, or maybe the
integration of such tools is very painful and time-consuming, or you have
to spend time learning how to use new tools. VSTS/TFS has the answer to
these challenges and also allows you to spending less time on learning and
integration. Let’s look at how you can use these integration tools effectively
to create a nice, high-level picture that the stakeholders can use to see the
project/product vision and the future.
Creating the Project Plan/Product RoadmapIn earlier chapters, you learned how to create the backlog and set up the
delivery cadence in VSTS/TFS. You can use the out-of-the-box Kanban
boards for tracking daily progress with low-level details, but this does not
give you an idea of the big picture that is relevant to the top-level managers
and external stakeholders. However, one thing you can easily do is look
Chapter 5 roadmap/projeCt plan and resourCes

119
at the Features backlog, and if the target dates are entered, you can get an
idea of when the features will be delivered (Figure 5-1).
Figure 5-1. Features with target dates
This view gets pretty complex the more features you have because each
feature is delivered in a different timeframe based on its business value
and priority. Program managers, project managers, or product owners do
not have time to go through every feature to build that one picture that
illustrates the project plan/product roadmap, and you/your managers
simply cannot present a list of features to the end users. As a workaround,
you could write a query and extract features based on the timelines on
which they will be delivered, or you could group the features using the
query and have a separate list of features extracted to a given criteria.
Neither of these techniques gives you or your superiors the expected level
of information, however; it simply improves the clarity.
Chapter 5 roadmap/projeCt plan and resourCes

120
Using Microsoft Excel
This is where Microsoft Office integration with VSTS/TFS becomes very
handy without any cost. First, let’s address the issue of preparing the road
map or the project plan using VSTS/TFS integration with Microsoft Excel.
First, you need to write a VSTS/TFS query for the features and extract them
as a whole. The most obvious option is to open the query with Excel. From
the Visual Studio Marketplace, select the Excel add-in and install it on your
system if you don’t already have it installed.
The VSTS Open in Excel extension is available in the VSTS
Marketplace, under the Plan and Track category (Figure 5-2). Just click the
green FREE link and the add-on will be installed.
Figure 5-2. Marketplace extensions
When installed successfully, you can see an Excel icon within the
query toolbar (Figure 5-3).
Figure 5-3. The Open in Excel extension
Chapter 5 roadmap/projeCt plan and resourCes

121
To open your query with Excel, click the Team menu and then click
New List to connect to VSTS/TFS with your credential. Then select the
project and the list of queries is displayed. Figure 5-4 illustrates the query
opened in Excel. Note that the results in Excel are automatically equipped
with filters that you can use to filter out information. The best part of this
is that you can use Excel features to manipulate the data you extract from
VSTS/TFS.
Figure 5-4. A query loaded in Excel
As you can see, the query in Figure 5-4 extract features with target
delivery timelines, which gives interested stakeholders a much better
picture of what is going on. Because pretty much everyone knows how to
use Excel, you can easily share information in this way with your end users.
Basically, stakeholders are more interested in when the features are getting
completed than the actual implementation details. But a view like the one
in Figure 5-4 does not give them the information they want, especially
when there are so many features in the backlog. This is common in large
and complex projects/product development. Therefore in such scenarios,
listing the features top to bottom may not be sufficient. They will still have
to use the filters to see the relevant information, however.
Chapter 5 roadmap/projeCt plan and resourCes

122
By using the chart features in Excel, you can create a Gantt chart that
illustrates the timelines (Figure 5-5). (Go to https://www.ablebits.com/
office-addins-blog/2014/05/23/make-gantt-chart-excel/ to learn
how to create this Gantt chart with Excel.) As you can see, this Gantt chart
clearly shows the timelines and gives your stakeholders an idea of when
the features are going to be available with just a quick glance. This appears
to be a nice way of presenting some complex information. Basically, they
do not have to scan throug a long list of features top to bottom.
Figure 5-5. A Gantt chart
There are some other templates you can use for similar purposes.
In the next section, we look into integrating with Microsoft Project, which
extends more capabilities and features.
Chapter 5 roadmap/projeCt plan and resourCes

123
Integration with Microsoft Project
The project plan/product roadmap that we developed in the preceding
scenario is kind of primitive. What if your stakeholders want to decide
when to release the features based on client requests or based on the
market demands? Or what if they want to see the resource allocation for
each work item?
Microsoft Project is a great tool for handling such scenarios and it
tracks ongoing work against time. Above all, it is popular among program
managers, project managers, and product owners for tracking progress
and identifying any delays. Whether you are working on a software product
or project development, you can use Project to illustrate the project plan or
the roadmap.
For this example, let’s assume a scenario in which you have created the
backlog with the help of your business analysts and now it is time for the
stakeholders to decide when they want to see the features delivered. This is
actually setting the high-level objectives for the team.
As the scrum master, your objective is to share the work items with the
product owner/project or program managers so that they can decide when
the items will be delivered to the end user. So how can you share the work
items?
The steps are similar to the ones for using Excel:
1. First you must create a query to extract the required
work items.
2. Then you need to open the results with Project by
establishing a link between Project and VSTS/TFS.
3. To establish a connection between VSTS/TFS and
Project, click the New List on Project’s Ribbon. The
Connect to Team Fondation Server window appears.
4. Select Team Foundation Server from the drop-down
on the top or click the Server button to add a new
connection.
Chapter 5 roadmap/projeCt plan and resourCes

124
5. Finally, select the team project collection and
then the appropriate team project. For further
information, go to https://docs.microsoft.
com/en-us/vsts/user-guide/connect-team-
projects#connect-from-microsoft-excel-or-
project.
With the latest release of Microsoft Project online, these capabilities
are extended and enhanced. On the Visual Studio Marketplace, you can
find more details (Figure 5-6).
Figure 5-6. Microsoft Project Marketplace extensions
You can find more details on how to use Project here: https://docs.
microsoft.com/en-us/vsts/work/backlogs/office/create-your-
backlog-tasks-using-project.
One could argue that the stakeholders can’t use VSTS/TFS to update
the timelines in our scenario. Of course they can, but only if they are
willing to open each and every feature and enter the starting and ending
timelines. The other problem with our scenario is, as we mentioned earlier,
it does not give stakeholders a high-level view from which to visualize the
Chapter 5 roadmap/projeCt plan and resourCes

125
Figure 5-8 illustrate the query opened in Project. Note that it retrieves
features as well as the user stories underneath them.
Figure 5-7. The feature backlog
timelines. Project gives this visualization, however. Figure 5-7 illustrates
the results of the query we created to extract the features. As you can see,
the start and finish dates are blank; your managers will decide when they
want the releases to be available.
Chapter 5 roadmap/projeCt plan and resourCes

126
Now your managers can decide on and enter the dates for the items
that will be delivered. Once this information is updated it can produce a
Gantt Chart similar to the one in Figure 5-9. Stakeholders can even publish
changes, which will update the VSTS/TFS work items as well.
Figure 5-8. Features and stories in Project
Chapter 5 roadmap/projeCt plan and resourCes

127
Note that Project can connect and pass your updates to VSTS/TFS
as soon you click the Publish button on the Ribbon; when you do, your
backlog is updated (Figure 5-10). Project can be your top management
window to the product/project backlog.
Figure 5-9. Gantt chart with Project
Figure 5-10. Dates updated in VSTS/TFS work items
Chapter 5 roadmap/projeCt plan and resourCes

128
This is one particular scenario, but there are many times when you can
use Project to create all the features, user stories, and tasks you need to
build your backlog. Remember synchronizing from VSTS/TFS to Project,
which is other way around, is not straightforward, it requires you to
modify the work item templates and further technical configurations. So
without making things too complicated, use Project to enhance VSTS/TFS
connectivity and keep in mind that doing so is more suitable for project
development than product development.
Using Delivery Timelines
Now that we have looked into using Excel and Project to create project
plans/product roadmap, you may be wondering what to do if your
stakeholders want to see a more detailed view. Or let’s say, for instance,
that you have multiple teams working on a large project. In such scenarios,
your stakeholders may want to know which team is working on what part
of the project and when the features are going to be delivered. As we all
now know, Project has features to manage resources, but these are two
different tools and you and your stakeholder have to shift between the
tools to access information. This will be cumbersome when there are
multiple teams working in a large complex project. This means that you
are not using VSTS/TFS to its full potential for creating a better plan. You
could integrate on-premises TFS with the Project server, as explained
in https://docs.microsoft.com/en-us/vsts/work/tfs-ps-sync/
synchronize-tfs-project-server, but this is no longer supported in TFS
2017 and newer.
So, by utilizing VSTS/TFS, you can create a nice delivery plan for your
stakeholders by simply installing the Delivery Plans add-on from the Plan
and Track category of the VSTS Marketplace (Figure 5-11). Just click the
green FREE link underneath the title and the add-on will be installed.
Chapter 5 roadmap/projeCt plan and resourCes

129
Once you install the Delivery Plans add-on, you can see a Plan tab
right next to the Backlog and Queries tabs. So, where exactly can we use
this tool and what level of information does it give us? Sometimes two or
more teams will be working together on the same project, probably either
because of the complexity or to speed up the delivery. Your program
manager/product owner wants to see this whole picture.
You can easily put up a delivery plan. No queries are required, and you
can use the existing information from the backlog. Remember, for the tool
to work, you must first set up the teams and your release cadence. Also,
you must assign your work items to the teams. Once you have done this,
it is easy to build the delivery plan. Just click the New button to create a
new plan and in the New Delivery Plan window, provide the Plan Name,
Project, Team, and the Backlog. Once the plan is created, you can see it
listed as illustrated in Figure 5-12.
Figure 5-11. The Delivery Plans extension
Chapter 5 roadmap/projeCt plan and resourCes

130
The nice thing about this add-on is that you can have multiple plans,
which make it an ideal tool for product management. Usually, for product
management, you need to have a current plan and a future plan in which
the future plan provides information to answer end user queries.
So, let’s move back to our scenario in which multiple teams are
working on the same project. When you set up your plan, it will look
something like Figure 5-13.
At the top, this plan highlights when the features will be delivered,
and in order to deliver the features, what user stories must be complete
and when. You can easily move the work items and define the release
timelines; for instance, in this case, every two months there will be a
release. Figure 5-14 illustrates a similar scenario.
Figure 5-12. Delivery plans
Chapter 5 roadmap/projeCt plan and resourCes

131
Figu
re 5
-13.
A d
eliv
ery
plan
Chapter 5 roadmap/projeCt plan and resourCes

132
Figu
re 5
-14.
An
othe
r de
live
ry p
lan
Chapter 5 roadmap/projeCt plan and resourCes

133
Figure 5-15. The Open in Power BI marketplace extension
For more information on delivery plans, refer to https://docs.
microsoft.com/en-us/vsts/work/scale/review-team-plans.
Power BI Integration
For progress reporting, Microsoft Power BI is the number one tool
available, and it has some exceptional reporting capabilities. While
executing a project, you are required to report the progress you are
making and how well the project is doing. In addition to built-in
VSTS/TFS dashboards, you can use Power BI integration to build
state-of-the-art dashboards for VSTS. (As of the time of the writing of this
book, Power BI integratation is supported in VSTS only. TFS on-premise
support will be added in a future TFS version). You can find the Open In
Power BI plugin in the VSTS Marketplace under the Plan and Track category
(Figure 5-15). In addition to this extension, there are few dependencies. For
instance, there are three data connection mechanisms and prerequisites
which are listed in detail in the URI provided below.
Once it is installed successfully, you can see the Open in Power BI
links, as illustrated in Figure 5-16.
Chapter 5 roadmap/projeCt plan and resourCes

134
Remember you must have Power BI installed on your computer,
and you should also check out the other dependencies, described at
https://docs.microsoft.com/en-us/vsts/report/powerbi/overview,
like the Analytics extension, which we discussed in Chapter 4. When you
click these options, the work items of the query are downloaded as .pbit
files. You can open these via the Power BI desktop application, and to do
so, you need to provide credentials. Once you have opened a work item,
you have access to the rich features to create a nice Power BI dashboard
(Figure 5- 17).
Figure 5-16. The Open in Power BI links
Chapter 5 roadmap/projeCt plan and resourCes

135
Figu
re 5
-17.
The
Pow
er B
I das
hboa
rd
Chapter 5 roadmap/projeCt plan and resourCes

136
The following links may help you gain more knowledge about Power
BI/VSTS integration.
• Connect to VSTS with the Power BI Date Connector:
https://docs.microsoft.com/en-us/vsts/report/
powerbi/data-connector-connect
• Connect to VSTS using the Power BI ODate feed:
https://docs.microsoft.com/en-us/vsts/report/
powerbi/access-analytics-power-bi
• Connect using the Power Query and VSTS functions:
https://docs.microsoft.com/en-us/vsts/report/
powerbi/data-connector-functions
• Explore example reports for the Power BI Data
Connector: https://docs.microsoft.com/en-us/
vsts/report/powerbi/data-connector-examples
Other Integrations
Like the tools explained earlier, there are many other integrations that
you can use to create the project plan or the product roadmap. Some of
them are free and some comes with a price tag. One such integration is
the VSTS Solution Template for Power BI (https://powerbi.microsoft.
com/en-us/blog/announcing-visual-studio-team-services-vsts-
solution-template/). The bottom line is that even though so many fancy
integrations are out there, you must decide which integration is best for
your team.
Chapter 5 roadmap/projeCt plan and resourCes

137
Business AnalysisAs we all know, business analysis is one of the tedious activities in a project
lifecycle. Either business analysts or product owners must take over this
task, and it is one of the important activities as requirement clarity has
an immense impact on the success of a project. Instinctively, these two
groups are likely to use Microsoft Word to capture the requirements in the
form of a requirements document. Later they will enter the requirements
into the project/product management tool used by your team. Needless to
say, this doubles the effort needed and requires more time.
This task gets even harder when changes are coming in from the end
users before the sign-up. Now the business analyst/product owner must
update both the document and the content in your tool. The problem
becomes worse if the scale of the project is bigger and changes will have
critical impacts. In this section, we discuss the answer to these problems
with more familiar tools such as Microsoft Office integrated with VSTS/TFS.
Office IntegrationTraditionally, business analysts or product owners have written the
requirements as a document, the requirements documentation. But the
development team works with a tool to manage work items such as
VSTS/TFS and conventionally, developers do not like to read lengthy
documents. So, either you, the scrum master, or the business analyst or
product owner must convert and enter the requirements into the VSTS/
TFS, which requires additional effort and time.
We all use Microsoft Office for documentation purposes. Microsoft
Word, PowerPoint, and Visio are key tools required for business analysis
activities. The good news is that to overcome the issues just mentioned,
you don’t have to learn new tools. It is just a matter of using the tools that
you are familiar with together with VSTS/TFS and reducing the workload.
Chapter 5 roadmap/projeCt plan and resourCes

138
Smart Office4TFS
This third-party tool, available at (www.modernrequirements.com/
product/smartoffice4tfs-professional-2/), is popular among modern
business analysts and directly addresses the issues just mentioned. It
also creates a more collaborative platform on which, from the beginning,
all of your team members can stay up to date with ongoing work. This
tool integrates with Microsoft Word, Visio, Outlook, and Excel. First, let’s
discuss how this tool can help you create requirements.
Let’s assume that your business analyst/product owner has been
commissioned to write the requirements for a project; the process of
identifying and documenting requirements is tedious but vital. If the
requirements are not captured correctly, then the end result will not
meet user expectations. This is not a state that any of us want to be in.
Therefore, to capture the user requirements accurately, the business
analyst or the product owner has to continue discussions with the end
users during the requirements capturing phase. Remember, no matter how
many sessions you participate in to capture the requirements, they will
change. As Agile teams, we accept this fact.
Imagine you are discussing the high-level business flows with the
client, and at the same time, you are using Visio to create the process flow.
Changing this time and again until you finalize the flow with the client is
going to be a painful task. But Smart Visio4Tfs (https://marketplace.
visualstudio.com/items?itemName=ModernRequirementsbyeDevTe
ch.SmartVisio4TFS) will save the day for you by allowing you to create
the feature in TFS as soon as you create the flow diagram. You can easily
publish the changes back to VSTS/TFS by just clicking the Publish button.
And this is not it! For each stage of the process flow, you can create
the user stories and relevant tasks directly from Visio. The same applies
to Smart Word4TFS (https://marketplace.visualstudio.com/
items?itemName=edevtech-mr.SmartOffice4TFS), where you can use the
Chapter 5 roadmap/projeCt plan and resourCes

139
predefined templates for the Agile, Scrum, or CMMI process templates to
define the work items. These templates can map the work item hierarchy
of your process template.
Additionally, you can use Smart Outlook4TFS to perform the tasks
related to requirements capture. Also, through Outlook, you can easily
manage your backlog.
Smart Excel4TFS is capable of automatically generating various
matrixes, such as such as the Requirements Traceability matrix, Work Item
Decomposition matrixes, and so on. This is especially useful in scenarios
in which exceptionally large volumes of work items exist in your project,
the SmartExcel4TFS allow you to visualize the relationship between
the work items. This setup also allows you to organize the work items
in different perspectives, which is useful in product management and
program management.
Using PowerPoint for Storyboarding
When we are capturing business requirements, presenting the
requirements as a wireframe helps illustrate our understanding of the
requirements. You can use so many tools to create the wireframes that
are available in the market, but keeping them synchronized with your
requirements is a challenge. The top benefits of creating wireframes are
that they increase the user’s level of understanding and improve the user’s
experience. On the other hand, one picture is worth a thousand words.
Out of the box, TFS/VSTS integrates with Microsoft PowerPoint,
which enables you to create amazing wireframes. Just click the wireframe
link on the drop-down of the work item and you can create a wireframe
to represent your requirements. Figure 5-18 illustrates how to start a
storyboard for a user story.
Chapter 5 roadmap/projeCt plan and resourCes

140
When you are directed to PowerPoint, find the Storyboarding tab on
the Ribbon to open the storyboarding tools (Figure 5-19).
You can use these tools to build up the wireframes for your
requirements (Figure 5-20).
Figure 5-19. Storyboarding tools
Figure 5-18. Starting storyboarding for a user story
Chapter 5 roadmap/projeCt plan and resourCes

141
Figure 5-20. Storyboarding with PowerPoint
Again, when you use this method, you don’t have to learn any new
tools and you use a tool that you already familiar with. You can learn more
about the storyboarding here: https://docs.microsoft.com/en-us/vsts/
work/backlogs/office/storyboard-your-ideas-using-powerpoint.
One important thing to keep in mind is that you might not need all
these integrations. So think carefully and chose the tools that you need to
improve the productivity of the team as a whole.
The Mobile InterfaceAt present, mobile access to any application is essential, especially when
we are working at client sites gathering requirements and attending
workshops. It would be ideal if you could enter requirements into the
backlog directly from your tablet while you are discussing them with
your client. To address this, Microsoft has started to improve the mobile
interface of VSTS/TFS. At the time of the writing this book, mobile
access to the application is very primitive, but the good news is that it is
continuously improving.
Chapter 5 roadmap/projeCt plan and resourCes

142
You can find more information about the mobile interface here:
https://docs.microsoft.com/en-us/vsts/collaborate/mobile-work.
SummaryIn this chapter, we discussed several issues/challenges faced by program
managers, product owners, project managers, and business analysts and
how various integrations of TFS can be used to overcome them. The nice
thing about all these Microsoft Office integrations is that you do not have to
spend time learning new tools or practices. Additionally, these integrations
reduce the workload and remove errors, especially in requirements
capture. As a scrum master, you can use these Office integrations together
with your top managers and direct the team to success in delivering the
end-user expectations.
In the next chapter, we look at options for customizing VSTS/TFS to
adopt to your team’s process, rather than your team adapting to the tool.
Chapter 5 roadmap/projeCt plan and resourCes
143© Chaminda Chandrasekara, Sanjaya Yapa 2018 C. Chandrasekara and S. Yapa, Effective Team Management with VSTS and TFS, https://doi.org/10.1007/978-1-4842-3558-4_6
CHAPTER 6
Adapting VSTS/TFS to Your Team’s ProcessIn Chapters 1 through 4, we looked at how to run Agile development
while leveraging the capabilities VSTS/TFS has to offer. Then in Chapter 5,
we discussed project roadmaps and project plans and how to integrate
Microsoft Office with VSTS/TFS to understand how VSTS/TFS can help
you get a holistic view of a project/product.
We also talked about how you should not adapt to the tool demands;
instead, you should adapt the tool to a process that works better for your
team. As your team continually improves the process, the tool should be able
to adapt accordingly. In this chapter, we explore the capabilities of VSTS/TFS
from the perspective of adaptability to your process. Customizability in
VSTS/TFS can be identified in following broader categories.
• Customizing shared resources
• Customizing team projects and processes
• Customizing access to work tracking tools
• Customizing the test experience
• Additional customization options
144
VSTS and on-premises TFS have different customization capabilities;
we discuss them in detail under each of the broad categories we cover
in this chapter. You can adapt VSTS/TFS to your team’s needs with this
knowledge.
In addition to customizations, we look at the pros and cons of using
VSTS (cloud) vs. TFS (on-premises) for your team needs.
Customizing Shared ResourcesArea paths, iteration paths, tags, and shared queries are few important
shared resources that you can customize. Area paths allow you to group
work items by product, feature, or team area. Iteration paths allow you
to group work into time-related events, such as iterations/sprints or
milestones. Tags let you filter your backlog items in queries. You can use
shared queries to obtain information on work items and visualize them
using query-based charts and dashboards that include those charts,
which can be shared among the team. Additionally, you can create private
queries only visible to you. We discussed these items and how to use them
effectively in previous chapters.
Customizing Team Projects and ProcessesCustomizing the team project and process allows you to change VSTS/TFS
to adapt to the process of your team. VSTS/TFS contains three types of
process templates.
• Agile
• Scrum
• CMMI
Chapter 6 adapting VStS/tFS to Your team’S proCeSS

145
Three major types of process customizations are available in VSTS/TFS
depending on whether you are using the cloud or on-premise instances
and based on how the VSTS (cloud) instance is created.
• Inheritance: This customization is only available in
VSTS and it supports WYSIWIG (what-you-see-is-what-
you-get) editing.
• Hosted XML: This customization is only available
in VSTS accounts migrated from on-premises
TFS. Customizations are possible via the export and
import of process templates.
• On-premises XML: This customization is only available
for on-premises TFS, and customizations are possible
via the export and import of process templates.
Customizing VSTS with Template InheritanceVSTS allows you to inherit the default available Agile, Scrum, or CMMI
templates to customize them. You are not normally allowed to customize
the system/default template; in order to do so, you must create an
inherited template. Once you’ve created this template, you can introduce
new fields, hide existing fields, change the status workflow of work items,
introduce new work items, and so on. You can create an inherited process
template using the existing default template in the Process tab of the VSTS
Account Admin mode as shown in Figure 6-1.
Chapter 6 adapting VStS/tFS to Your team’S proCeSS

146
Once you have created an inherited template, you can change the
existing team project to use it or you can create a new team project with
the inherited template. The changes you make in an inherited template
are applied to all projects that use that template. In following sections,
we discuss a few scenarios you may want to customize. You can use the
Witadmin command-line tool in VSTS accounts with the inheritance
process model to list information about team projects (https://docs.
microsoft.com/en-us/vsts/work/customize/reference/witadmin/
witadmin-customize-and-manage-objects-for-tracking-work).
Adding a Custom Field
You have the option of setting up new fields with different input types;
for example, you may create a field that expects text data or numeric data
or a text-based pick list or a numeric picklist (Figure 6-2). If you require
a checkbox type of a field, you can set its Type as a Boolean field. The
Identity field type allows you to define fields similar to the Assign To field
Figure 6-1. Creating an inherited process template
Chapter 6 adapting VStS/tFS to Your team’S proCeSS
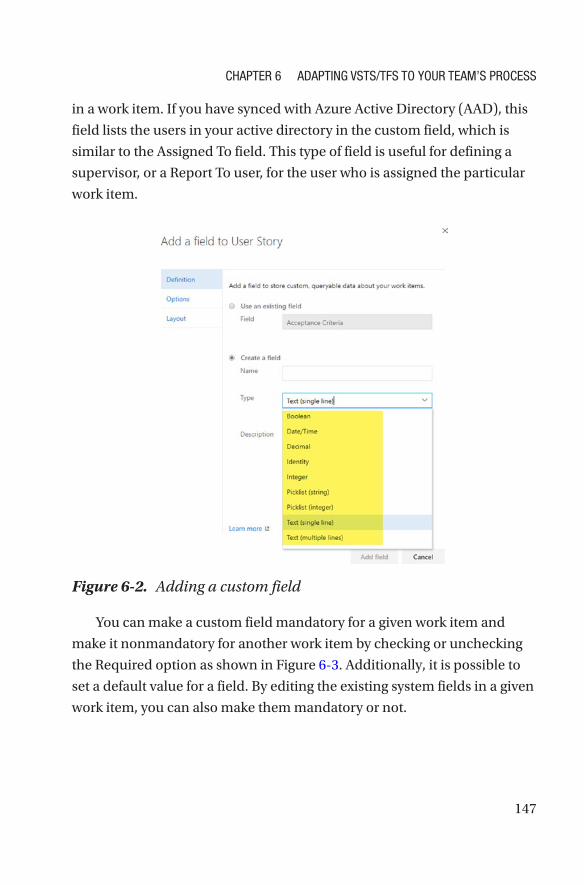
147
in a work item. If you have synced with Azure Active Directory (AAD), this
field lists the users in your active directory in the custom field, which is
similar to the Assigned To field. This type of field is useful for defining a
supervisor, or a Report To user, for the user who is assigned the particular
work item.
Figure 6-2. Adding a custom field
You can make a custom field mandatory for a given work item and
make it nonmandatory for another work item by checking or unchecking
the Required option as shown in Figure 6-3. Additionally, it is possible to
set a default value for a field. By editing the existing system fields in a given
work item, you can also make them mandatory or not.
Chapter 6 adapting VStS/tFS to Your team’S proCeSS

148
You can place an added custom field in any of the available layout
groups, such as Classification, Planning, and so on, or you can create a
new layout group and place the new custom field in it. It is also possible
to edit the layout group of the custom field after you created it, but it is not
possible to change an existing default field layout group (Figure 6-4).
Figure 6-3. Making a filed mandatory for a work item
Figure 6-4. Defining a layout group for a custom field
Chapter 6 adapting VStS/tFS to Your team’S proCeSS

149
You can find more information on custom fields for work items at
https://docs.microsoft.com/en-us/vsts/work/customize/process/
customize-process-field?toc=/vsts/work/customize/toc.json&bc=/
vsts/work/customize/breadcrumb/toc.json#add-a-custom-field.
Modifying an Existing Field
You may want to alter an existing field or change selectable value options.
But be aware that the only allowed changes for an existing field are
changing a default value, making the field mandatory or not, or changing
its label. If you want to make more modifications to a field, you can hide
the existing field (Figure 6-5) and add a custom field with the same label.
Figure 6-5. Hiding an existing field
Chapter 6 adapting VStS/tFS to Your team’S proCeSS

150
Changing the Status Workflow of a Work Item
If you do not like the columns in the work item boards, refer back to
Chapter 2, where we discussed how to add new columns or change
existing columns. But in that discussion, you were limited to the available
set of state values in the work item and you may have used the same state
in multiple columns of the board for a work item. With inherited process
templates, you can now define your own states for a work item. You can
use a new custom state that you define in a work item in another work item
as well. You also have the option of hiding existing states (Figure 6-6) in a
work item so that you can create your own custom state workflow.
Figure 6-6. Add a new state or hide an existing state
Chapter 6 adapting VStS/tFS to Your team’S proCeSS

151
However, you cannot hide a state if it is the only state in a given state
category, such as Proposed, InProgress, and so on. You are not allowed to
add new state categories except the categories that are available by default.
Another limitation is that you cannot add a new state or hide an existing
state in the Completed category at the time of the writing of this book.
However, you may add a state to an available but by default unused state
category in a given work item template. For example, the Removed state
category is not used in the Agile template bug work item by default, but
you can introduce a new state to this category in the bug work item using
an inherited template.
Once you set up the new states in your work items, you may have to
alter the board columns in the Work tab (https://docs.microsoft.com/
en-us/vsts/work/kanban/add-columns#add-or-rename-columns) to
reflect the changes and the board may not be viewable until you fix the
board columns with visible states if you have hidden any existing states
from a work item.
Custom Rules
You may want to add your own rules to work items depending on the field
values or state changes in a work item. For example, you can set a rule so
that a product backlog item cannot move to the InProgress state from a
Proposed state if the work item’s Acceptance Criteria (Definition of Done)
is not defined. Custom rules enable you to enforce the process steps
(Figure 6-7).
Chapter 6 adapting VStS/tFS to Your team’S proCeSS

152
Custom Backlog Levels and Work Items
If you find available portfolio backlog levels are not sufficient for your
team’s needs, you can add additional top levels to the portfolio backlog as
shown in Figure 6-8. You can define a new work item type and assign it to
the new level.
Figure 6-7. Defining custom rules
Chapter 6 adapting VStS/tFS to Your team’S proCeSS

153
You can add any additional work item types to any backlog level as you
require (Figure 6-9). You can set the default work item type for the backlog
level and even select a new custom work item as the default work item for
the backlog level.
Figure 6-8. Adding a new portfolio backlog level
Chapter 6 adapting VStS/tFS to Your team’S proCeSS

154
Customizing VSTS with Hosted XML Hosted XML is available only in VSTS when you have migrated an on-
premises TFS project collection to VSTS (https://docs.microsoft.
com/en-us/vsts/articles/migrate-to-vsts-from-tfs). In a migrated
VSTS account, default process templates and process templates with
customizations from projects that are migrated are available. You can
export any of the default or project-based custom templates, modify them,
and import them, overwriting a project-based custom template in the
process. You are allowed to export a default template and import it as a
custom template, but you cannot import a process template with a default
template name, meaning you cannot overwrite default templates. Instead,
you can create a new project with the default or custom process templates.
Ignore the warning in Figure 6-10, as this image was taken from a dry run
migration of TFS to VSTS.
Figure 6-9. Custom work item types
Chapter 6 adapting VStS/tFS to Your team’S proCeSS
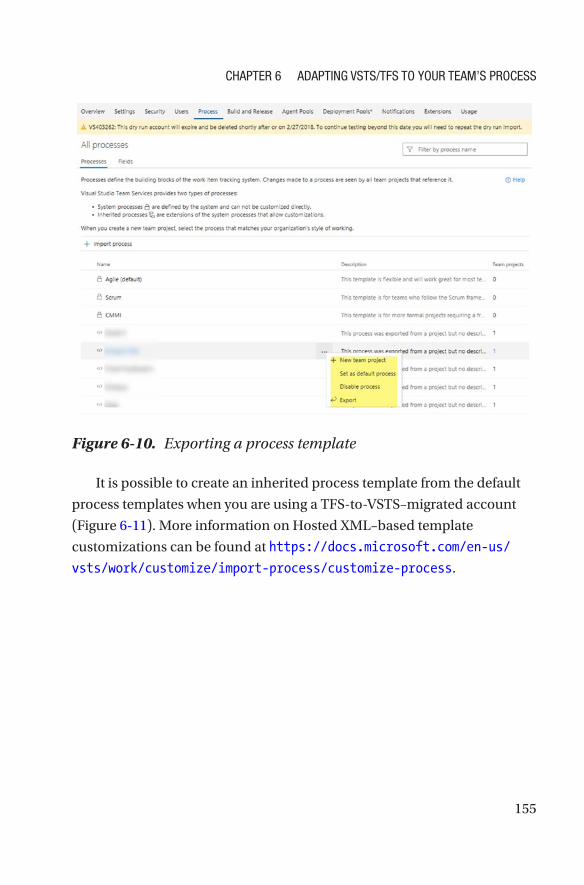
155
It is possible to create an inherited process template from the default
process templates when you are using a TFS-to-VSTS–migrated account
(Figure 6-11). More information on Hosted XML–based template
customizations can be found at https://docs.microsoft.com/en-us/
vsts/work/customize/import-process/customize-process.
Figure 6-10. Exporting a process template
Chapter 6 adapting VStS/tFS to Your team’S proCeSS

156
You can use the Witadmin command-line tool in VSTS accounts with
the Hosted XML process model to list information about team projects
(https://docs.microsoft.com/en-us/vsts/work/customize/reference/
witadmin/witadmin-customize-and-manage-objects-for-tracking-work).
Customizing with TFS On-premises XMLThe most customizable process template type is on-premises XML,
which is only available for TFS (Figure 6-12). This process template type
is similar to Hosted XML; using it, you can export a custom template or a
default template, but you are only allowed to import as a custom template.
However, you cannot create inherited templates from default templates in
on-premises XML, so there is no WYSIWIG editing available for TFS at the
time of the writing of this book. More information on on-premises XML
process model customizations can be found at https://docs.microsoft.
com/en-us/vsts/work/customize/on-premises-xml-process-model.
Figure 6-11. Inheriting and exporting is supported in the default process template
Chapter 6 adapting VStS/tFS to Your team’S proCeSS

157
The Witadmin command-line tool can be used for listing as well as
editing the template in on-premises XML (https://docs.microsoft.
com/en-us/vsts/work/customize/reference/witadmin/witadmin-
customize- and-manage-objects-for-tracking-work).
Customizing the Access to Work Tracking ToolsIn VSTS/TFS there are many options that restrict or grant users access to
different features or work tracking items. When you add a member to a team
in a team project, by default, the contributor access permissions are granted
to that user, enabling the user to contribute most of the work to code,
builds and deployments, work items, and testing. Refer to https://docs.
microsoft.com/en-us/vsts/security/permissions-access to understand
the general permission and access control settings in VSTS and TFS. More
information is available at https://docs.microsoft.com/en-us/vsts/
security/about-permissions, and subtopics appear under How-To Guides
highlighted in the Figure 6-13.
Figure 6-12. Options for on-premises XML
Chapter 6 adapting VStS/tFS to Your team’S proCeSS
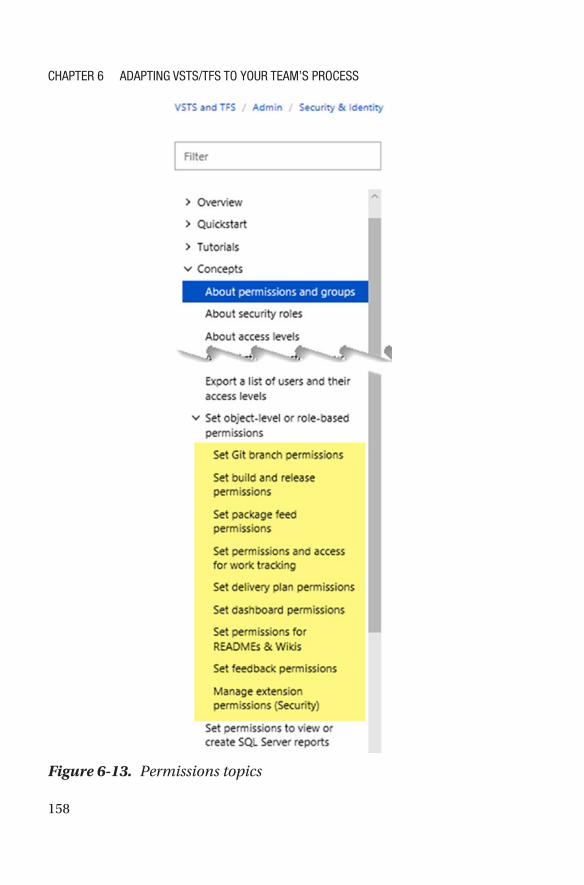
158
Figure 6-13. Permissions topics
Chapter 6 adapting VStS/tFS to Your team’S proCeSS

159
Customizing the Test ExperienceTesting is an important aspect of the software delivery process as we have
discussed in previous chapters. How to customize the testing experience
for different configurations is explained at https://docs.microsoft.com/
en-us/vsts/manual-test/test-different-configurations.
Additional Customization OptionsIf you find that the level of customization to VSTS/TFS as explained in the
preceding sections is not sufficient for your process needs, you can move
on to these unsupported, but often used, customization options:
• As we have discussed several times in this book, you
can use Visual Studio Marketplace tools (https://
marketplace.visualstudio.com/vsts) to add
additional behavior changes to your VSTS/TFS.
• You can create your own tools and add them to your
VSTS/TFS. To create the tools you need, use the extension
project template information at https://marketplace.
visualstudio.com/items?itemName=JoshGarverick.
VSTSExtensionProjectTemplates. When creating your
own tools, you are able to utilize REST API for VSTS/
TFS (https://docs.microsoft.com/en-us/rest/api/
vsts/). The extensions you create can be published to
Visual Studio Marketplace for others to use (https://
docs.microsoft.com/en-us/vsts/extend/publish/
overview).
Chapter 6 adapting VStS/tFS to Your team’S proCeSS
160
• If you do not find the feature you want and you are
unable to create your own tool, then you can opt to
request that feature from Microsoft here: https://
visualstudio.uservoice.com/forums/330519-team-
services.
The Pros and Cons of VSTS vs. TFSThe major benefits of using VSTS over TFS are that you do not have to
manage the infrastructure needs of TFS and you get feature updates
automatically, every three weeks. Normally you get quarterly updates for
on-premises TFS, but performing those upgrades is your responsibility—
they do not happen automatically.
You also have to perform upgrades to on-premises TFS when new
versions are released, and doing so may require you to upgrade your
servers’ operating systems, their SQL server version, and so on, as per the
requirement of the released TFS version.
However, for VSTS, in order to build your projects, you may need
to maintain your own build infrastructure with agents (https://docs.
microsoft.com/en-us/vsts/build-release/actions/agents/v2-
windows, https://docs.microsoft.com/en-us/vsts/build-release/
actions/agents/v2-osx, https://docs.microsoft.com/en-us/vsts/
build-release/actions/agents/v2-linux) configured on your own
hardware if your team has a specific SDK or other software needs that are
not available in the hosted build services (https://docs.microsoft.com/
en-us/vsts/build- release/concepts/agents/hosted).
You have greater customization ability in on-premise TFS than in
VSTS, but in VSTS, WYSIWIG editing in the inheritance process model is
more appealing than the XML customizations.
VSTS comes with a monthly recurring cost and TFS has a different
pricing model. More details on VSTS/TFS pricing can be found at https://
docs.microsoft.com/en-us/vsts/billing/.
Chapter 6 adapting VStS/tFS to Your team’S proCeSS
161
SummaryIn this chapter, we looked at the various customization options that are
available in VSTS/TFS to enable you to adapt the tool to suite your process
needs. It is important for you to remember that the tool is not what is
improving how your teams perform, it is the process that is continually
improved by the team that utilizes the tool and adapts the tool to the needs
of the team making successful project/product deliveries a possibility.
In this book, we have gone through how you as a scrum master should
utilize VSTS/TFS as a tool to support your teams process improvements. In
the first four chapters, we discussed various aspects of VSTS/TFS including
handling Agile projects, managing backlogs, planning iterations, working
within a day, and how to work after an iteration. In the final two chapters,
we discussed roadmaps and planning and the customization capabilities
that are available in VSTS/TFS to adapt the tool to the team’s needs.
Chapter 6 adapting VStS/tFS to Your team’S proCeSS
163© Chaminda Chandrasekara, Sanjaya Yapa 2018 C. Chandrasekara and S. Yapa, Effective Team Management with VSTS and TFS, https://doi.org/10.1007/978-1-4842-3558-4
Index
AApplication lifecycle management
(ALM) tool, 1
BBacklog
bug management options, 36defects/bugs, 35grooming sessions, 32, 37
acceptance criteria, 39area, 40description, 40DoD, 37–38DoR-met backlog items, 38estimation, 42iteration, 40prioritization, 40, 42story points/effort/size, 39stakeholder feedback, 45title, 39test and feedback browser, 45velocity chart, 44work item fields, 39
iteration, 96large team planning, 55
levels of, 32Kanban boards, 46–50small team planning
advantages, 51capacity planning, 53–54Dev team, 50story point burndown, 52task estimations, 51–53
sprint zero/no-sprint/ pre- sprint, 56
visualization, 55work definition
categories, 30delivers value, 30–31requirements, 30spike items, 31–32support work, 31user stories, 30
CCumulative flow diagram (CFD)
bulges, 108chart, 106–107flat lines and scope
changes, 109work in progress, 107

164
Customization optionsbroader categories, 143level of, 159projects and processes
hosted XML, 154on-premises XML, 156template inheritance, 145types of, 144
shared resources, 144template inheritance
backlog levels and work items, 152
custom rules, 152existing field, 149fields, 146layout group, 148process, 146work item boards, 150
testing, 159VSTS vs. TFS, 160work tracking tools, 158
D, E, F, G, HDefinition of done (DoD)
backlog, 37–38review, 94
Definition of ready (DoR), 38
Developmental (Dev) team, 50
Development and operation (DevOps), 2
I, JIteration
activities and steps, 93backlog, 96
drag and drop bugs, 96menu option, 98task work items, 98–99
backlog item, 71code process, 71continuous improvement, 114defects/bugs, 78details, 57monitoring progress
backlog capacity view, 75build deployments and test
outcomes, 78burndown, 74cumulative flow diagram, 77disaster situations, 82iteration backlog view, 76options, 74queries, charts and
dashboards, 78task and backlog board 76velocity chart, 77
partially completed work, 96planning, 110
capacity, 113forecast work, 112in-progress work, 111progress, 62scrum, 60
Index

165
sprint planning, 111taskboard rules, 62
positive impact, 88release stabilities
automated release note, 85build failing due, 86meaning, 84pipeline, 84Veracode scan, 88
review, 94sprint
backlog, 58development work, 58pipelines/activities, 60testing environments, 59
supportive workdefault team, 68delivery plan, 69ExtraActivity area, 67impediments/roadblocks, 70team handling, 67tracking and resolving
impediments, 66work item, 70
testingexploratory, 74outcome, 73TDD, 72unit tests, 72
unavoidable changes, 81visualizing and
analyzing, 88, 100burndown and burnup, 102cumulative flow, 106
lead time and cycle time, 105velocity, 100
work process, 64
K, LKanban boards
card fields, 48–49customization, 46–47process definition, 46VSTS/TFS card style rules, 49–50WIP limit, 47–48
M, NMicrosoft Project (integration)
connection, 123dates updates, 127details, 124feature backlog, 125Gantt chart, 127scenario, 123stories and features, 126
Mobile interface, 141
OOffice integration
documentation purposes, 137PowerPoint, 139–141requirements
documentation, 137smart office4TFS, 138–139storyboarding, 139
Index

166
PProduct backlog item
(PBI), 7, 30, 96Project plan/product roadmap
business analysis, 137challenges, 118creation, 118delivery plans extension, 129features backlog, 118–119integration
connection, 123dates updates, 127feature backlog, 124–125Gantt chart, 126–127Marketplace extension
details, 124Power BI, 133scenario, 123stories and features, 125–126VSTS/TFS work
items, 127–128Microsoft Excel
excel extension, 120Gantt chart, 122integration, 120marketplace extensions, 120query loaded, 121toolbar, 120
mobile interface, 141target dates, 119
Q, RQuality assurance (QA), 64, 95
SSoftware development kits
(SDKs), 59SonarQube project, 87SQL Server Reporting Services
(SSRS), 102
TTeam Foundation Server (TFS), see
VSTS/TFSTeam Foundation Version
Controlling (TFVC), 5Test Driven Development (TDD),
72
UUser acceptance testing (UAT), 95
VVisual Studio Team Services
(VSTS), see VSTS/TFSVSTS/TFS
collaborative platform, 2concepts, 1–2delivery cadence
backlog iteration, 14default iteration, 14managing iterations, 13monitoring progress, 16releases, 14selection, 15
Index

167
work tab view, 16ideal team size, 4
area structure, 10backlog, 7default/root team, 11delivery cadence, 12development team, 12small team, 8team project creation, 5
large teams, 17business functions, 19default area path, 23delivery cadence, 26flat list, 21hierarchical team
structure, 22
module teams, 20monitoring progress, 27nested team structure, 19organized backlog, 25steps, 20
team project collection, 2iterations/sprints and
areas, 3work items, 3
W, X, Y, ZWork item type (WIT), 3Work in progress (WIP)
cumulative flow, 107Kanban boards, 47
Index