Embed Size (px)
Citation preview

ECE-L304 Lecture 6
Review of Step 5
Introduction to Step 6 and 7Final Lecture
Quiz Next Week

ECE-L304 Lecture 7 2
Up to now ADC is running
What is your sampling rate? DAC is running
What is your resolution? 555 Timer is running (or close to running)
What is the frequency and duty cycle?

ECE-L304 Lecture 7 3
The final stretch - What remains? Build 17 bit address generator for RAM
Using 2 8 bit counters + ? Build Control Circuitry to:
Take a reading on the ADC Store it to RAM Once RAM is filled, output recorded
waveform
ECE-L304 Lecture 7 4
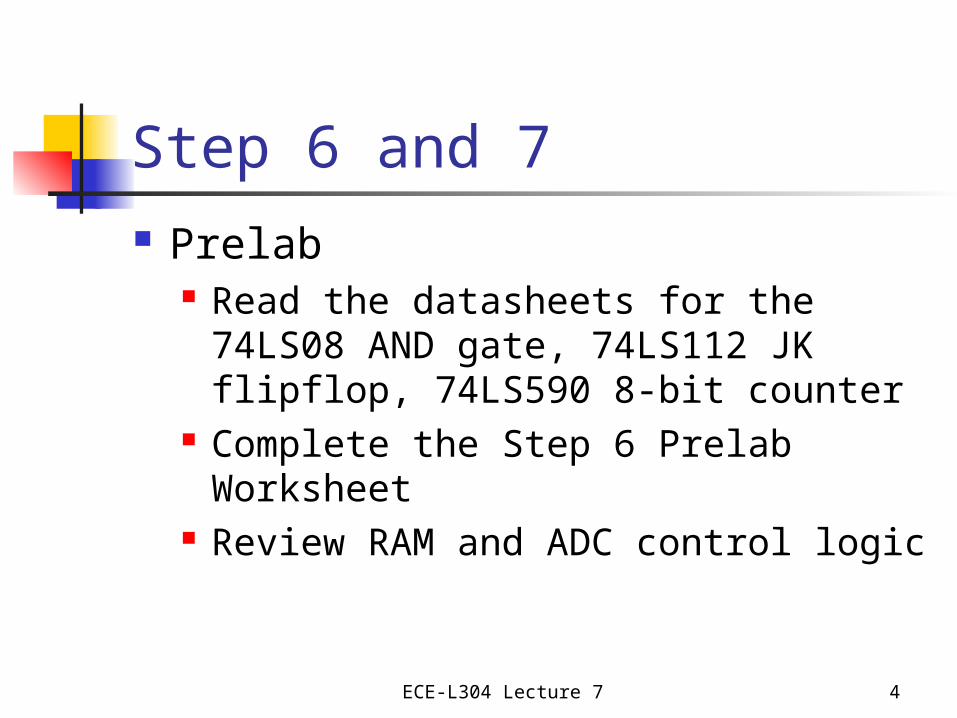
Step 6 and 7 Prelab
Read the datasheets for the 74LS08 AND gate, 74LS112 JK flipflop, 74LS590 8-bit counter
Complete the Step 6 Prelab Worksheet Review RAM and ADC control logic

ECE-L304 Lecture 7 5
Project CircuitProgress to Date
ADC DAC
8 8
RAM
AddressGen
R/WControl
Clock

ECE-L304 Lecture 7 6
Project CircuitStep 7 Blocks
ADC DAC
8 8
RAM
AddressGen
R/WControl
ClockADC
Control
2 17
?

ECE-L304 Lecture 7 7
Step 6 Part 1
Assemble the 16-bit address generator Place the circuitry according to your floorplan Use the 555 counter as the clock for now
Design and build a circuit that will provide a 17th bit
This step is required to get full hardware credit Confirm functionality using the logic
analyzer

ECE-L304 Lecture 7 8
Step 674LS590 Description
8-Bit Counter With Register Parallel Register Outputs Choice Of 3 State Or Open Collector
Register Outputs Guaranteed Counter Freq DC To 20
MHz

ECE-L304 Lecture 7 9
Step 674LS590 Description
Multi-chip applications “For cascading, a ripple carry output RCO is
provided. Expansion is easily accomplished for two stages by connecting RCO of the first stage to CCKEN of the second stage. Cascading for larger count chains can be accomplished by connecting RCO of each stage to CCK of the following stage.”

ECE-L304 Lecture 7 10
Step 6Cascaded 74LS590 Chips
G
CCLK
CCLKEN
RCLK
CCLR
RCO
A7
A6
A5
A4
A3
A2
A1
A0
LO
HI
CLK
G
CCLK
CCLKEN
RCLK
CCLR
RCO
A7
A6
A5
A4
A3
A2
A1
A0
LO
HI
A7
A6
A5
A4
A3
A2
A1
A0
A15
A14
A13
A12
A11
A10
A9
A8

ECE-L304 Lecture 7 11
Step 674LS590 Description
“Both the counter and register clocks are positive edge triggered. If the user wishes to connect both clocks together, the counter state will always be one count ahead of the register.”

ECE-L304 Lecture 7 12
Part 2 - Measure AND Time Delay Wire the clock signal into two AND gates in
series to create a delay Measure the delay and use this signal as the
input for your control circuitry Use the oscilloscope to measure delay by
placing the input and output signals on the screen simultaneously, trigger on the input signal and use the cursors to measure the delay between edges

ECE-L304 Lecture 7 13
Step 6 Prelab Analyze the control circuit used in the
Step 4 simulation
Q
Qfrom AddressGenerator
TC = Terminal Count

ECE-L304 Lecture 7 14
Step 6 Prelab Graph the expected outputs
QQbarCLKRE (OE)WE0101010101
RE = Read EnableOE = Output EnableWE = Write Enable
Draw these curves

ECE-L304 Lecture 7 15
Step 6 Prelab In your Prelab Workbook
Sketch the schematic Sketch your control circuitry and timing
diagrams needed to control circuit

ECE-L304 Lecture 7 16
What should the circuit do? The circuit should have two stages
1- Take 2^17 readings from the ADC and store then in the RAM
2- Take the ADC offline and write the recorded signals from the RAM to the bus for output
Note - The ADC output and the RAM input/output are all on the same bus, meaning that the ADC cannot write outputs to the bus at the same time as the RAM

ECE-L304 Lecture 7 17
Part 3 - Control Circuitry First - decide which signals are involved in
the control circuitry 555 Timer ADC controls RAM controls
Second - create a timing diagram that describes what the signals need to look like in order to control the circuit properly

ECE-L304 Lecture 7 18
Board Center Connectors ADC Control
CS_, RD_, WR_, INTR_ Power, GND RAM Control
CE1_, CE2, OE_, WE_ RAM Addresses
A16 - A0

ECE-L304 Lecture 7 19
RAM Controls Subset of NEC RAM (uPD431000A) Control
Table:
We also have CS1 and CS2 to deal with
WE OE Mode L X WRITE H L READ
Active LowLogic

ECE-L304 Lecture 7 20
ADC Control Get the ADC off-line
Our acquisition system has only one data bus, which is shared by the ADC and the DAC
We have to take the ADC off-line during the RAM READ cycle so we do not have the ADC and RAM writing to the bus simultaneously
ECE-L304 Lecture 7 21
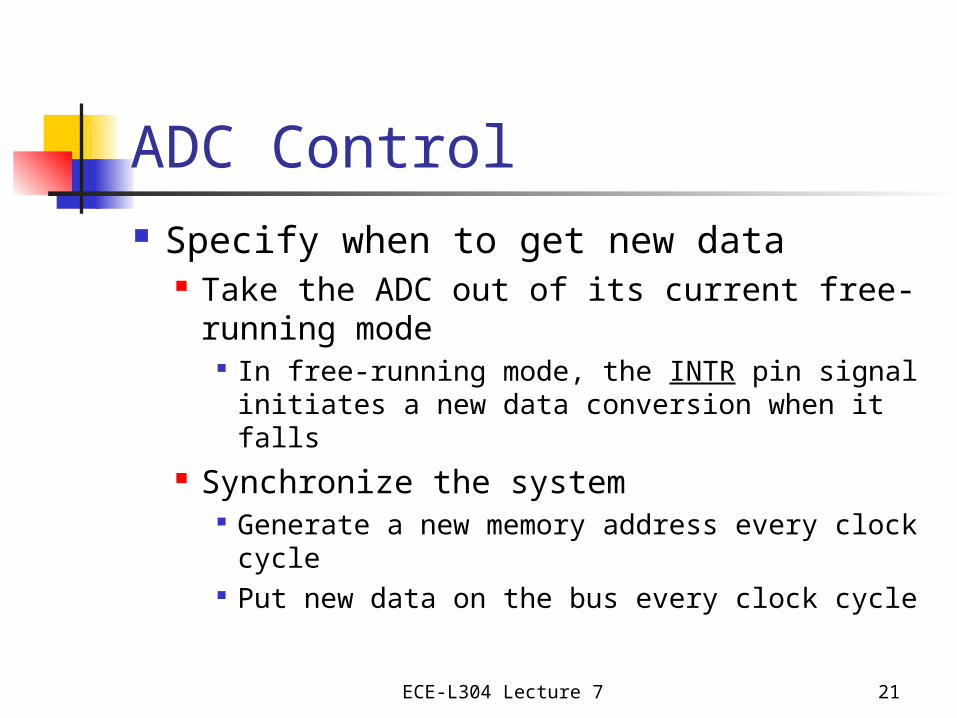
ADC Control Specify when to get new data
Take the ADC out of its current free-running mode
In free-running mode, the INTR pin signal initiates a new data conversion when it falls
Synchronize the system Generate a new memory address every clock
cycle Put new data on the bus every clock cycle

ECE-L304 Lecture 7 22
ADC ControlADC0804 Pins
CS = Chip SelectRD = ReadWR = WriteINTR = Interrupt
1
3
5
7
9
2
4
6
8
10 11
13
15
17
19
12
14
16
18
20CS
RD
WR
CLK IN
INTR
DB0
DB7
•
•
•
•

ECE-L304 Lecture 7 23
ADC ControlFree-Running Circuit
CS = Chip SelectRD = ReadWR = WriteINTR = Interrupt
1
3
5
7
9
2
4
6
8
10 11
13
15
17
19
12
14
16
18
20CSRDWRCLK ININTR
DB0
DB7
•
•
•
•
Start

ECE-L304 Lecture 7 24
ADC ControlFree-Running Circuit
While CS is low, acquisition starts whenever WR drops
How can this happen? Start switch is
grounded INTR output falls
1
3
5
7
9
2
4
6
8
10 11
13
15
17
19
12
14
16
18
20CSRDWRCLK ININTR
DB0
DB7
•
•
•
•
Start

ECE-L304 Lecture 7 25
ADC ControlFree-Running Circuit
While CS and RD are low, data will appear at the outputs [DB7:DB0] as soon as it is ready About 72 internal
clock cycles
1
3
5
7
9
2
4
6
8
10 11
13
15
17
19
12
14
16
18
20CSRDWRCLK ININTR
DB0
DB7
•
•
•
•
Start

ECE-L304 Lecture 7 26
ADC ControlFree-Running Circuit
Rising transition on WR begins the conversion
100 ns min

ECE-L304 Lecture 7 27
ADC ControlFree-Running Circuit
RD must be low for data to appear at outputs. When RD is high, outputs are Hi-Z.

ECE-L304 Lecture 7 28
ADC Control Redesign the connections to the ADC
control pins to get the results you want Details of the pin functions are on the data
sheet Diagrams of control sequences are on the
data sheet


The first task is to make sure the 555 clock and the ADC internal clock are coordinated.

If WE_ never rises, no conversions will occur.

If there are no conversions, INTR_ will stay high.

There should be no pulses on WR_ in READ mode.

When RD_ is high the ADC output is high-impedance.

OE_ is low in READ mode.

ECE-L304 Lecture 7 36
Draw a Timing Diagram for the Control Circuitry Which signals are involved Which ones are inputs and which are outputs What should the signals look like in order to
get the correct behavior Try writing the sequence of steps down in
words first, then creating the timing diagram Keep in mind which signals are active low
and active high, what state does a signal need to be in during a stage where it is not switching?

ECE-L304 Lecture 7 37
Timing Diagram Complete a timing diagram and circuit
schematic for the controls Have Eric check your results before you
begin construction, and be ready to answer questions about your decisions

ECE-L304 Lecture 7 38
Hints Don’t connect power supplies
incorrectly now, if your RAM goes you will not be happy
Remove your ADC chip during control signal testing
Check your ADC internal clock - is it fast enough?

ECE-L304 Lecture 7 39
Optimizing the Circuit Goal: Record audio to your specs Storage is limited
131,072 sites in RAM (217) Acquisition speed is limited
ADC internal clock must make about 72 cycles per conversion
High speed = high bandwidth High speed = short capture time

ECE-L304 Lecture 7 40
Optimize the Circuit You have a design goal for how you
want your circuit to function If necessary to meet this goal:
Adjust the ADC internal clock frequency Adjust the on-board (555) clock

ECE-L304 Lecture 7 41
Test the Circuit Display analog input (sine or ramp) and
analog output on scope During the RAM WRITE cycle, the data on
the bus comes from the ADC The DAC automatically converts it back to
analog. At low frequencies, the DAC output should
be identical to the analog input

ECE-L304 Lecture 7 42
Test the Circuit Display analog input (sine or ramp) and
analog output on scope During the RAM READ cycle, the data on
the bus comes from the RAM The DAC automatically converts it back to
analog The DAC output should be identical to the
analog input of the previous acquisition cycle

ECE-L304 Lecture 7 43
Test the Circuit Note the length of the acquisition (WRITE)
cycle. Does it equal 131,072 times the period of the on-board clock?
Note the length of the READ cycle. Does it equal 131,072 times the period of the on-board clock?
If you want to see if the circuit is really working, pull the RAM chip Your output should be 0 during the READ cycle

ECE-L304 Lecture 7 44
Experimental Results

ECE-L304 Lecture 7 45
Deliverables Test 1 - Bandwidth
Analog in, analog out Determine failure frequency
A = (Goal - Measured)/Goal A ≤ 0 (measured exceeds goal) 20 pts 0.95 ≤ A < 1 18 pts 0.90 ≤ A < 0.95 16 pts A < 0.90 14 pts

ECE-L304 Lecture 7 46
Deliverables Test 2 - Address Generator
Working 17 bits 20 pts Working 17 bits, novel design 22 pts Working 16 bits 16 pts < 16 bits 10 pts

ECE-L304 Lecture 7 47
Deliverables Test 3 - RAM/ADC Control
Working and in sync 20 pts Working not in sync 15 pts Not working 10 pts

ECE-L304 Lecture 7 48
Deliverables Test 4 - Timing
ADC internal clock period INTR period 555 timer period Record time Playback time

ECE-L304 Lecture 7 49
Deliverables Test 4 - Timing
For record time: R = (Calculated - Measured)/Calculated If R ≥ 0.9 10 pts If R < 0.9 5 pts

ECE-L304 Lecture 7 50
Deliverables Test 5 - Playback
Is DAC output from stored data? Yes 20 pts No 10 pts

ECE-L304 Lecture 7 51
Deliverables Test 6 - Construction
Has the circuit been constructed neatly and with a reasonable floorplan?
0 to 10 pts

ECE-L304 Lecture 7 52
Deliverables Test 7 - Return Board
Has the circuit been returned in good condition?
Good Condition multiplier = 1.0 Damaged multiplier = 0.8 Not Returnedmultiplier = 0.0

ECE-L304 Lecture 7 53
Deliverables Write up your control design:
Design criteria what were the specs you wanted sketch the desired output waveforms
Sketch the control schematic Show any equations used, and define
terms if necessary

ECE-L304 Lecture 7 54
Deliverables Write up your control design:
Discuss what changes were made to the circuit to optimize performance
How effective were they? Document the performance change

ECE-L304 Lecture 7 55
Deliverables Have your circuit functionality verified Comment on your observations and
provide conclusions on the entire experiment
Any improvements to this Step? Any improvement to the lab course?
Yes, we do have class next week

ECE-L304 Lecture 7 56
Quiz Next Week ADC operation
Sampling rate vs internal clock Resolution
DAC Resolution
Wire Wrapping Basic Instrument Operation Quiz will be in Bossone 303 starting at 6pm
and ending at 6:45pm promptly, no exceptions