Embed Size (px)
Citation preview
ECE 3740 Systems Engineering Principles Project 5
Android GUI for the IoT Thing
Fall 2016 P5.1 Due Date: (See the course web page) P5.2 Due Date: (See the course web page) P5.3 Due Date: (See the course web page)
Introduction
The Systems Engineering Principles Project 5 (SEP Project 5) consists of the series Assignment 9, Laboratory 5, and Assignment 10. The SEP Project 5 has three objectives: to develop an Android GUI TCP/IP rapid prototype client; to add the TCP/IP client software to the GUI; and to connect the Android GUI TCP/IP client to the MX7cK TCP/IP server through a Java TCP/IP proxy server.
P5.1 (Assignment 9): Android GUI TCP/IP rapid prototype client
1. Design a rapid GUI prototype for controlling four LEDs, monitoring three push buttons, and reading a temperature sensor on a fictitious board. This design does not communicate, send commands, or receive messages from the MX7cK board. It is just a GUI shell. Recall that rapid prototyping is the process of quickly mocking up the future state of a system (like a GUI), for validating it with the stakeholders.
2. Design a test-plan and procedure (TPP) of your GUI. Submit your TPP to the TA for marking. If you can demonstrate your software to the tester, then you do not need to create and submit a TPP.
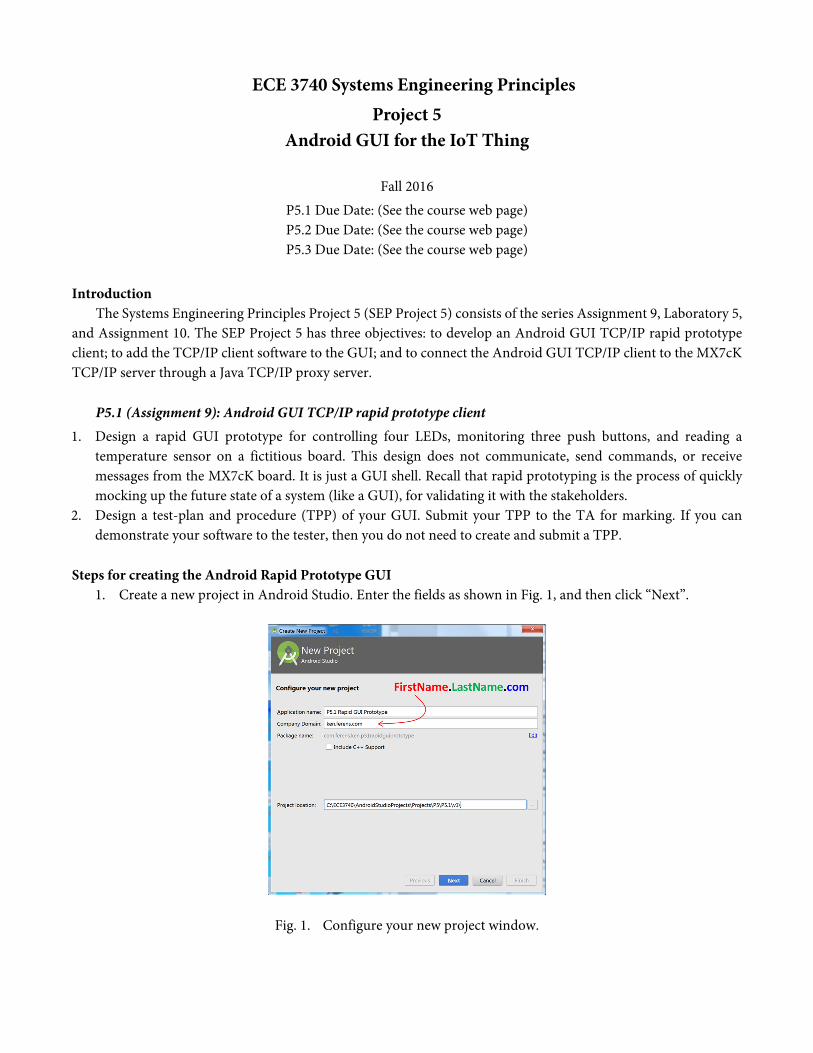
Steps for creating the Android Rapid Prototype GUI 1. Create a new project in Android Studio. Enter the fields as shown in Fig. 1, and then click “Next”.
Fig. 1. Configure your new project window.

2. Click “Next” in the next window “Select the form factors your app will run on”. 3. Select “Empty Activity” in the “Add an Activity to Mobile” window, and then click “Next”. 4. Click “Finish” in the next window “Customize the Activity”. 5. Run the app: Run on an emulator. Select “Nexus 6” in the “Select Hardware” window, and click Next. In the
“System Image” window, select “Nougat 24 x86_64”, and click on Download (this will take a few minutes). Click on Finish. Select “Nexus 6 API 24” in the “Select Deployment Target” window, and click OK. If requested, install “instant run”. Note: “Gradle Build Running” at the bottom of the page on Android Studio. Wait for this to complete. Note: wait for “Waiting for target device to come online” to complete. When done, the emulator screen should be as shown in Fig. 2.
Fig. 2. Emulator view of the “Hello World” app.
6. Delete the “Hello World” TextView widget. You can delete this either by deleting the widget in the design
view of the app->res->activity_main.xml file, or directly deleting the xml text, as shown in Fig. 3.
Fig. 3. Deleting the “Hello World” TextView widget. Notice that when you delete the XML description of the
“hello World” TextView widget, then the corresponding graphic widget in the “Design” view disappears (Fig. 4).
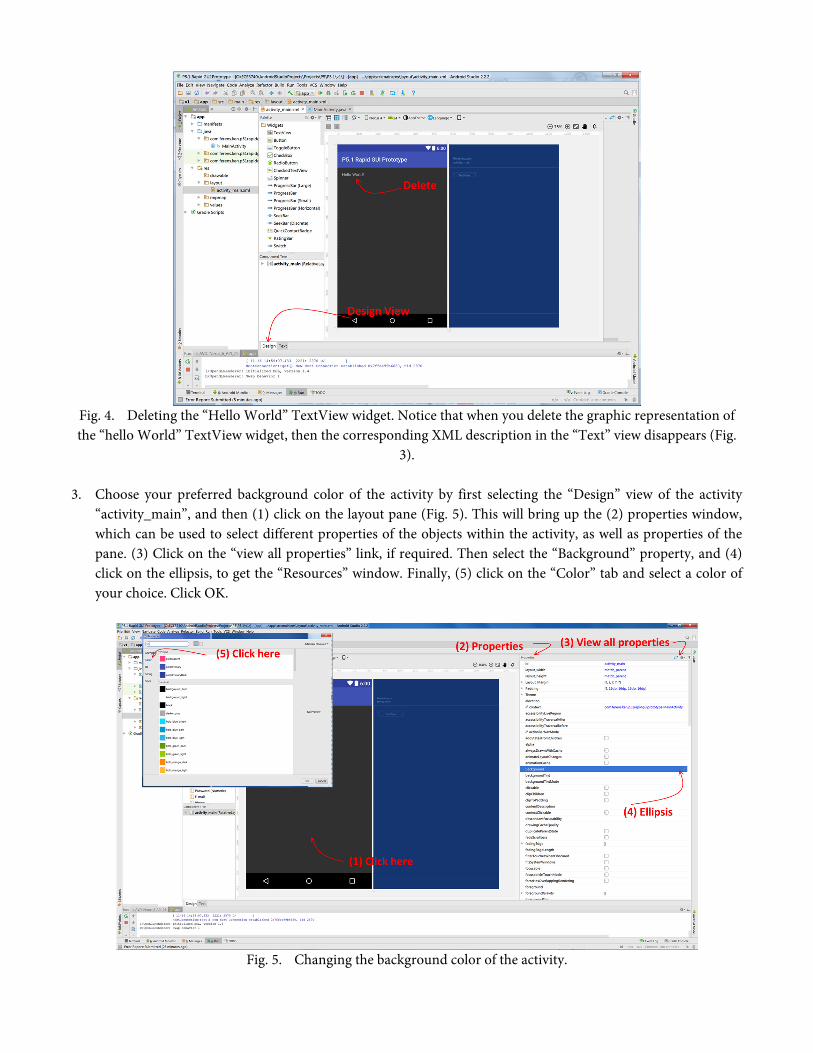
Fig. 4. Deleting the “Hello World” TextView widget. Notice that when you delete the graphic representation of the “hello World” TextView widget, then the corresponding XML description in the “Text” view disappears (Fig.
3).
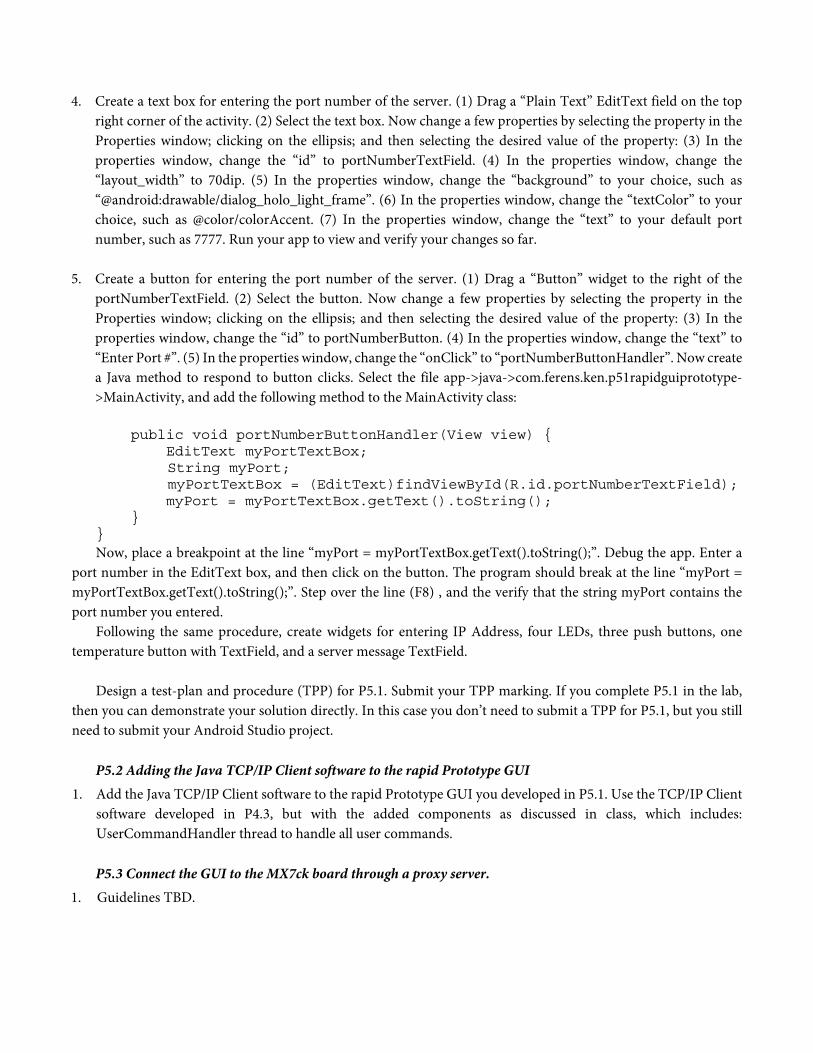
3. Choose your preferred background color of the activity by first selecting the “Design” view of the activity “activity_main”, and then (1) click on the layout pane (Fig. 5). This will bring up the (2) properties window, which can be used to select different properties of the objects within the activity, as well as properties of the pane. (3) Click on the “view all properties” link, if required. Then select the “Background” property, and (4) click on the ellipsis, to get the “Resources” window. Finally, (5) click on the “Color” tab and select a color of your choice. Click OK.
Fig. 5. Changing the background color of the activity.
4. Create a text box for entering the port number of the server. (1) Drag a “Plain Text” EditText field on the top
right corner of the activity. (2) Select the text box. Now change a few properties by selecting the property in the Properties window; clicking on the ellipsis; and then selecting the desired value of the property: (3) In the properties window, change the “id” to portNumberTextField. (4) In the properties window, change the “layout_width” to 70dip. (5) In the properties window, change the “background” to your choice, such as “@android:drawable/dialog_holo_light_frame”. (6) In the properties window, change the “textColor” to your choice, such as @color/colorAccent. (7) In the properties window, change the “text” to your default port number, such as 7777. Run your app to view and verify your changes so far.
5. Create a button for entering the port number of the server. (1) Drag a “Button” widget to the right of the portNumberTextField. (2) Select the button. Now change a few properties by selecting the property in the Properties window; clicking on the ellipsis; and then selecting the desired value of the property: (3) In the properties window, change the “id” to portNumberButton. (4) In the properties window, change the “text” to “Enter Port #”. (5) In the properties window, change the “onClick” to “portNumberButtonHandler”. Now create a Java method to respond to button clicks. Select the file app->java->com.ferens.ken.p51rapidguiprototype->MainActivity, and add the following method to the MainActivity class: public void portNumberButtonHandler(View view) { EditText myPortTextBox;
String myPort; myPortTextBox = (EditText)findViewById(R.id.portNumberTextField); myPort = myPortTextBox.getText().toString(); } } Now, place a breakpoint at the line “myPort = myPortTextBox.getText().toString();”. Debug the app. Enter a
port number in the EditText box, and then click on the button. The program should break at the line “myPort = myPortTextBox.getText().toString();”. Step over the line (F8) , and the verify that the string myPort contains the port number you entered.
Following the same procedure, create widgets for entering IP Address, four LEDs, three push buttons, one temperature button with TextField, and a server message TextField.
Design a test-plan and procedure (TPP) for P5.1. Submit your TPP marking. If you complete P5.1 in the lab,
then you can demonstrate your solution directly. In this case you don’t need to submit a TPP for P5.1, but you still need to submit your Android Studio project.
P5.2 Adding the Java TCP/IP Client software to the rapid Prototype GUI 1. Add the Java TCP/IP Client software to the rapid Prototype GUI you developed in P5.1. Use the TCP/IP Client
software developed in P4.3, but with the added components as discussed in class, which includes: UserCommandHandler thread to handle all user commands.
P5.3 Connect the GUI to the MX7ck board through a proxy server.
1. Guidelines TBD.