Embed Size (px)
Citation preview
ECDL Module 7 WORKBOOK
Information & Communication Microsoft Office 2003 Edition for ECDL Syllabus 4.5 (UK only)

PAGE 2 - ECDL MODULE 7 (OFFICE 2003) - WORKBOOK
© 1995-2007 Cheltenham Courseware Ltd. All trademarks acknowledged. E&OE. No part of this document may be copied without written permission from Cheltenham Courseware unless produced under the terms of a courseware site license agreement with Cheltenham Courseware. All reasonable precautions have been taken in the preparation of this document, including both technical and non-technical proofing. Cheltenham Courseware and all staff assume no responsibility for any errors or omissions. No warranties are made, expressed or implied with regard to these notes. Cheltenham Courseware shall not be responsible for any direct, incidental or consequential damages arising from the use of any material contained in this document. If you find any errors in these training modules, please inform Cheltenham Courseware. Whilst every effort is made to eradicate typing or technical mistakes, we apologise for any errors you may detect. All courses are updated on a regular basis, so your feedback is both valued by us and will help us to maintain the highest possible standards. Sample versions of courseware from Cheltenham Courseware (Normally supplied in Adobe Acrobat format): If the version of courseware that you are viewing is marked as NOT FOR TRAINING, SAMPLE, or similar, then it cannot be used as part of a training course, and is made available purely for content and style review. This is to give you the opportunity to preview our courseware, prior to making a purchasing decision. Sample versions may not be re-sold to a third party. For current license information This document may only be used under the terms of the license agreement from Cheltenham Courseware. Cheltenham Courseware reserves the right to alter the licensing conditions at any time, without prior notice. Please see the site license agreement available at: www.cheltenhamcourseware.com.au/agreement Contact Information Australia / Asia Pacific / Europe (ex. UK) / Rest of the World Email: [email protected] Web: www.cheltenhamcourseware.com.au USA / Canada Email: [email protected] Web: www.cheltenhamcourseware.com UK Email: [email protected] Web: www.cctglobal.com
FOR USE AT THE LICENSED SITE(S) ONLY © Cheltenham Courseware Ltd. 1995-2007 www.cheltenhamcourseware.com

PAGE 3 - ECDL MODULE 7 (OFFICE 2003) - WORKBOOK
ECDL Approved Courseware The ECDL Foundation has approved these training materials and requires that the following statement appears in all ECDL Foundation approved courseware. European Computer Driving Licence, ECDL, International Computer Driving Licence, ICDL, e-Citizen and related logos are trade marks of The European Computer Driving Licence Foundation Limited (“ECDL-F”) in Ireland and other countries. Cheltenham Courseware is an entity independent of ECDL-F and is not associated with ECDL-F in any manner. This courseware publication may be used to assist candidates to prepare for ECDL tests. Neither ECDL-F nor Cheltenham Courseware warrants that the use of this courseware publication will ensure passing of ECDL tests. This courseware publication has been independently reviewed and approved by ECDL-F as complying with the following standard: Technical compliance with the learning objectives of ECDL syllabus 4. Confirmation of this approval can be obtained by reviewing the Courseware Section of the website www.ecdl.com The material contained in this courseware publication has not been reviewed for technical accuracy and does not guarantee that candidates will pass ECDL tests. Any and all assessment items and/or performance-based exercises contained in this courseware publication relate solely to this publication and do not constitute or imply certification by ECDL-F in respect of ECDL tests or any other ECDL-F test. For details on sitting ECDL tests and other ECDL-F tests in your country, please contact your country's National ECDL/ICDL designated Licensee or visit ECDL-F’s web site at www.ecdl.com. Candidates using this courseware publication must be registered with the National Licensee, before undertaking ECDL tests. Without a valid registration, ECDL tests cannot be undertaken and no ECDL test certificate, nor any other form of recognition, can be given to a candidate. Registration should be undertaken with your country's National ECDL/ICDL designated Licensee at any Approved ECDL test certificate Test Centre. Syllabus 4 is the official syllabus of the ECDL certification programme at the date of approval of this courseware publication.
FOR USE AT THE LICENSED SITE(S) ONLY © Cheltenham Courseware Ltd. 1995-2007 www.cheltenhamcourseware.com

PAGE 4 - ECDL MODULE 7 (OFFICE 2003) - WORKBOOK
IC1.1. COURSE SETUP INSTRUCTIONS ................................................................................................ 7 IC1.2. THE INTERNET.................................................................................................................................. 8
IC1.2.1. CONCEPTS / TERMS ..................................................................................................................... 8 IC1.2.1.1. Understanding and distinguish between the Internet and World Wide Web ................ 8 IC1.2.1.2. Defining and understanding the terms HTTP, URL, hyperlink, ISP & FTP ................. 8 IC1.2.1.3. Understanding the make-up and structure of a Web address ........................................ 8 IC1.2.1.4. Knowing what a Web Browser is and what it is used for ................................................. 8 IC1.2.1.5. Knowing what a search engine is and what it is used for................................................ 8 IC1.2.1.6. Understanding the terms cookie and cache ...................................................................... 9
IC1.2.2. SECURITY CONSIDERATIONS ....................................................................................................... 9 IC1.2.2.1. Knowing what a protected Web site is ............................................................................... 9 IC1.2.2.2. Knowing what a digital certificate is .................................................................................... 9 IC1.2.2.3. Knowing what encryption is and why it is used................................................................. 9 IC1.2.2.4. Being aware of the danger of infecting the computer with a virus ................................. 9 IC1.2.2.5. Being aware of the possibility of being subject to credit card fraud when on the Internet 9 IC1.2.2.6. Understanding the term firewall .......................................................................................... 9
IC1.2.3. FIRST STEPS WITH THE WEB BROWSER ..................................................................................... 9 IC1.2.3.1. Opening and closing Microsoft Explorer .......................................................................... 10 IC1.2.3.2. Changing the Web browser Home Page ......................................................................... 10 IC1.2.3.3. Displaying a web page in a new window ......................................................................... 12 IC1.2.3.4. Stopping a Web page from downloading......................................................................... 13 IC1.2.3.5. Refreshing a Web page...................................................................................................... 13 IC1.2.3.6. Using Help ............................................................................................................................ 14
IC1.2.4. ADJUSTING SETTINGS ................................................................................................................ 14 IC1.2.4.1. Displaying or hiding toolbars.............................................................................................. 15 IC1.2.4.2. Displaying or hiding images on a Web page ................................................................... 15 IC1.2.4.3. Displaying previously visited URLs using the browser address bar ............................ 16 IC1.2.4.4. Deleting browsing history ................................................................................................... 17
IC1.3. WEB NAVIGATION ......................................................................................................................... 19 IC1.3.1. ACCESSING WEB PAGES ........................................................................................................... 19
IC1.3.1.1. Going to a URL (Uniform Resource Locator) .................................................................. 19 IC1.3.1.2. Activating a hyperlink/image link ....................................................................................... 19 IC1.3.1.3. Navigating backwards and forwards between previously visited Web pages ............ 20 IC1.3.1.4. Completing a web based form and entering information............................................... 20
IC1.3.2. USING BOOKMARKS ................................................................................................................... 21 IC1.3.2.1. Bookmaking a Web page ................................................................................................... 21 IC1.3.2.2. Displaying a bookmarked Web page................................................................................ 22
IC1.3.3. ORGANISING BOOKMARKS ......................................................................................................... 22 IC1.3.3.1. Creating a bookmark folder................................................................................................ 22 IC1.3.3.2. Adding Web pages to a bookmark folder......................................................................... 22 IC1.3.3.3. Deleting a bookmark ........................................................................................................... 23
IC1.4. WEB SEARCHING .......................................................................................................................... 24 IC1.4.1. USING A SEARCH ENGINE .......................................................................................................... 24
IC1.4.1.1. Selecting a specific search engine ................................................................................... 24 IC1.4.1.2. Carrying out a search for specific information using a keyword phrase...................... 24 IC1.4.1.3. Combining selection criteria in a search .......................................................................... 24 IC1.4.1.4. Copying text, an image or URL from a Web page to a document ............................... 25 IC1.4.1.5. Saving a Web page to a location on a drive as a txt file or html file ............................ 26 IC1.4.1.6. Downloading files from a Web page to a location on a drive........................................ 27
IC1.4.2. PREPARATION ............................................................................................................................ 28 IC1.4.2.1. Previewing a Web page ..................................................................................................... 28 IC1.4.2.2. Changing Web page orientation and paper size ............................................................ 28 IC1.4.2.3. Changing Web page margins ............................................................................................ 29
IC1.4.3. PRINTING .................................................................................................................................... 30
FOR USE AT THE LICENSED SITE(S) ONLY © Cheltenham Courseware Ltd. 1995-2007 www.cheltenhamcourseware.com

PAGE 5 - ECDL MODULE 7 (OFFICE 2003) - WORKBOOK
IC1.4.3.1. Choosing Web page print output options......................................................................... 30 IC1.5. ELECTRONIC MAIL ........................................................................................................................ 33
IC1.5.1. CONCEPTS / TERMS ................................................................................................................... 33 IC1.5.1.1. Understanding the make-up and structure of an E-mail address................................. 33 IC1.5.1.2. Types of Email Programs ................................................................................................... 33 IC1.5.1.3. Understanding the advantages of E-mail systems ......................................................... 33 IC1.5.1.4. Understanding the disavantages of E-mail systems ...................................................... 33 IC1.5.1.5. Understanding the importance of network etiquette (netiquette) ................................. 33
IC1.5.2. SECURITY CONSIDERATIONS ..................................................................................................... 34 IC1.5.2.1. Understanding guidelines and regulations on using email............................................ 34 IC1.5.2.2. Being aware of the possibility of receiving unsolicited mail (spam) ............................. 34 IC1.5.2.3. Being aware of the danger of infecting the computer with a virus ............................... 34 IC1.5.2.4. Knowing what a digital signature is................................................................................... 34
IC1.5.3. FIRST STEPS WITH E-MAIL.......................................................................................................... 35 IC1.5.3.1. Opening and closing Microsoft Outlook ........................................................................... 35 IC1.5.3.2. Opening a mail inbox for a specified user........................................................................ 35 IC1.5.3.3. Opening one or several mail messages........................................................................... 37 IC1.5.3.4. Switching between open messages ................................................................................. 38 IC1.5.3.5. Closing a mail message ..................................................................................................... 38 IC1.5.3.6. Using Help ............................................................................................................................ 38
IC1.5.4. ADJUSTING SETTINGS ................................................................................................................ 40 IC1.5.4.1. Adding and removing message inbox headings such as sender, subject or date received 40 IC1.5.4.2. Displaying and hiding toolbars .......................................................................................... 41
IC1.6. MESSAGING .................................................................................................................................... 42 IC1.6.1. READING A MESSAGE ................................................................................................................ 42
IC1.6.1.1. Flagging a mail message. Removing a flag mark from a mail message..................... 42 IC1.6.1.2. Marking a message as unread or read ............................................................................ 43 IC1.6.1.3. Opening and saving a file attachment to a location on a drive ..................................... 43 IC1.6.1.4. Potential problems when receiving attached files .......................................................... 44
IC1.6.2. REPLYING TO A MESSAGE.......................................................................................................... 44 IC1.6.2.1. Using the reply or reply to all functions ............................................................................ 44 IC1.6.2.2. Replying with or without original message insertion ...................................................... 45
IC1.6.3. SENDING A MESSAGE................................................................................................................. 46 IC1.6.3.1. Creating a new message ................................................................................................... 46 IC1.6.3.2. Email netiquette ................................................................................................................... 47 IC1.6.3.3. Using formatting tools ......................................................................................................... 47 IC1.6.3.4. Inserting a mail address in the ‘To’ field........................................................................... 47 IC1.6.3.5. Copying (Cc) and blind copying (Bcc) a message to another address / addresses.. 47 IC1.6.3.6. Inserting a title in the ‘Subject’ field .................................................................................. 48 IC1.6.3.7. Using a spell-checking tool ................................................................................................ 48 IC1.6.3.8. Attaching a file to a message ............................................................................................ 49 IC1.6.3.9. Issues when sending file attachments ............................................................................. 49 IC1.6.3.10. Sending a message with high or low priority .............................................................. 49 IC1.6.3.11. Sending a message using a distribution list................................................................ 50 IC1.6.3.12. Forwarding a message................................................................................................... 50
IC1.6.4. COPYING, MOVING AND DELETING ............................................................................................ 51 IC1.6.4.1. Copying or moving text within a message or between other active messages.......... 51 IC1.6.4.2. Copying text from another source into a message......................................................... 53 IC1.6.4.3. Deleting text in a message................................................................................................. 53 IC1.6.4.4. Deleting a file attachment from an outgoing message................................................... 53
IC1.7. MAIL MANAGEMENT..................................................................................................................... 55 IC1.7.1. TECHNIQUES .............................................................................................................................. 55
IC1.7.1.1. Recognising some techniques to manage e-mail effectively ........................................ 55 IC1.7.2. USING ADDRESS BOOKS............................................................................................................ 55
IC1.7.2.1. Creating a new address list/distribution list ..................................................................... 55 IC1.7.2.2. Adding a mail address to an address list ......................................................................... 56
FOR USE AT THE LICENSED SITE(S) ONLY © Cheltenham Courseware Ltd. 1995-2007 www.cheltenhamcourseware.com

PAGE 6 - ECDL MODULE 7 (OFFICE 2003) - WORKBOOK
IC1.7.2.3. Deleting a mail address from an address list .................................................................. 56 IC1.7.2.4. Updating an address book from incoming mail............................................................... 57
IC1.7.3. ORGANIZING MESSAGES............................................................................................................ 57 IC1.7.3.1. Searching for a message by sender, subject or mail content ....................................... 57 IC1.7.3.2. Creating a new folder for mail............................................................................................ 58 IC1.7.3.3. Moving messages to a new folder for mail ...................................................................... 59 IC1.7.3.4. Sorting messages by name or by date............................................................................. 60 IC1.7.3.5. Deleting a message ............................................................................................................ 60 IC1.7.3.6. Restoring a message from the mail bin/deleted items folder........................................ 61 IC1.7.3.7. Emptying the mail bin / deleted items folder.................................................................... 61
IC1.7.4. PREPARING TO PRINT ................................................................................................................ 62 IC1.7.4.1. Previewing a message ....................................................................................................... 63 IC1.7.4.2. Choosing print output options............................................................................................ 63
FOR USE AT THE LICENSED SITE(S) ONLY © Cheltenham Courseware Ltd. 1995-2007 www.cheltenhamcourseware.com

PAGE 7 - ECDL MODULE 7 (OFFICE 2003) - WORKBOOK
IC1.1. Course Setup Instructions Instructions for the Course Tutor • Uninstall and then reinstalled the Internet Explorer Program (during the
course changes will be made such as adding favourites and changing the home page)
• You need to provide a connection to the Internet. • You need to set up an email address which the student can use. • You will need to send a few emails to the student's email address so that they
can practice tasks such as retrieving and replying to emails. • Copy the sample files to a folder called MODULE 7 SAMPLES.
FOR USE AT THE LICENSED SITE(S) ONLY © Cheltenham Courseware Ltd. 1995-2007 www.cheltenhamcourseware.com

PAGE 8 - ECDL MODULE 7 (OFFICE 2003) - WORKBOOK
IC1.2. The Internet
IC1.2.1. Concepts / Terms
IC1.2.1.1. Understanding and distinguish between the Internet and World Wide Web
• Make sure that you can answer the following questions: - What is WWW short for? - What is the difference between the Internet and the WWW? - What is a web browser?
IC1.2.1.2. Defining and understanding the terms HTTP, URL, hyperlink, ISP & FTP
• Make sure that you can explain the meaning of the following terms (and what the abbreviations are short for): - HTTP - URL - Hyperlink - ISP - FTP
IC1.2.1.3. Understanding the make-up and structure of a Web address
• The address of a Web site is given by something called its URL (Uniform Resource Locator). The structure of the URL is very precise. For instance, if you wish to use your Web browser to visit the Microsoft Web site you would have to use the URL below. HTTP://WWW.MICROSOFT.COM
IC1.2.1.4. Knowing what a Web Browser is and what it is used for • Can you list two examples of Web browsing applications? • What is the function of a web browser?
IC1.2.1.5. Knowing what a search engine is and what it is used for
• What is the function of a search engine? • Does a search engine have a list of every single web site on the Internet, and
if not why not?
FOR USE AT THE LICENSED SITE(S) ONLY © Cheltenham Courseware Ltd. 1995-2007 www.cheltenhamcourseware.com

PAGE 9 - ECDL MODULE 7 (OFFICE 2003) - WORKBOOK
IC1.2.1.6. Understanding the terms cookie and cache • Explain the term cookie. • What is a cache?
IC1.2.2. Security Considerations
IC1.2.2.1. Knowing what a protected Web site is • What is a protected web site? • How might access to a web site be restricted? • Why might access to a web site be protected?
IC1.2.2.2. Knowing what a digital certificate is • What is a digital certificate? • When might a digital certificate be used?
IC1.2.2.3. Knowing what encryption is and why it is used • What is encryption? • Give an example of an encryption program. • Why are governments insisting on 'back-doors' in encryption programs? • Which is more secure, 128 bit encryption or 32 bit encryption?
IC1.2.2.4. Being aware of the danger of infecting the computer with a virus
• If you download a program from the Internet can it contain a computer virus? • If you download a document from the Internet can it contain a computer
virus? • Will a virus checker prevent infection from any computer virus?
IC1.2.2.5. Being aware of the possibility of being subject to credit card fraud when on the Internet
• Why is it necessary to be very wary about giving your credit card details to a web site?
IC1.2.2.6. Understanding the term firewall • What is a firewall?
IC1.2.3. First Steps with the Web Browser
FOR USE AT THE LICENSED SITE(S) ONLY © Cheltenham Courseware Ltd. 1995-2007 www.cheltenhamcourseware.com

PAGE 10 - ECDL MODULE 7 (OFFICE 2003) - WORKBOOK
IC1.2.3.1. Opening and closing Microsoft Explorer
Opening the Microsoft Internet Explorer • Switch on your PC and if necessary enter your ID and password. • Double click on the Internet Explorer icon displayed on your Desktop to start
the Internet Explorer program.
To close the Microsoft Internet Explorer • To close your web browser, click on the application close icon (the x at the
top-right of the application window).
IC1.2.3.2. Changing the Web browser Home Page
To set a home (i.e. opening) page • Double click on the Internet Explorer icon displayed on your Desktop to start
the Internet Explorer program. • Click on the TOOLS drop down menu. • Click on the INTERNET OPTIONS command.
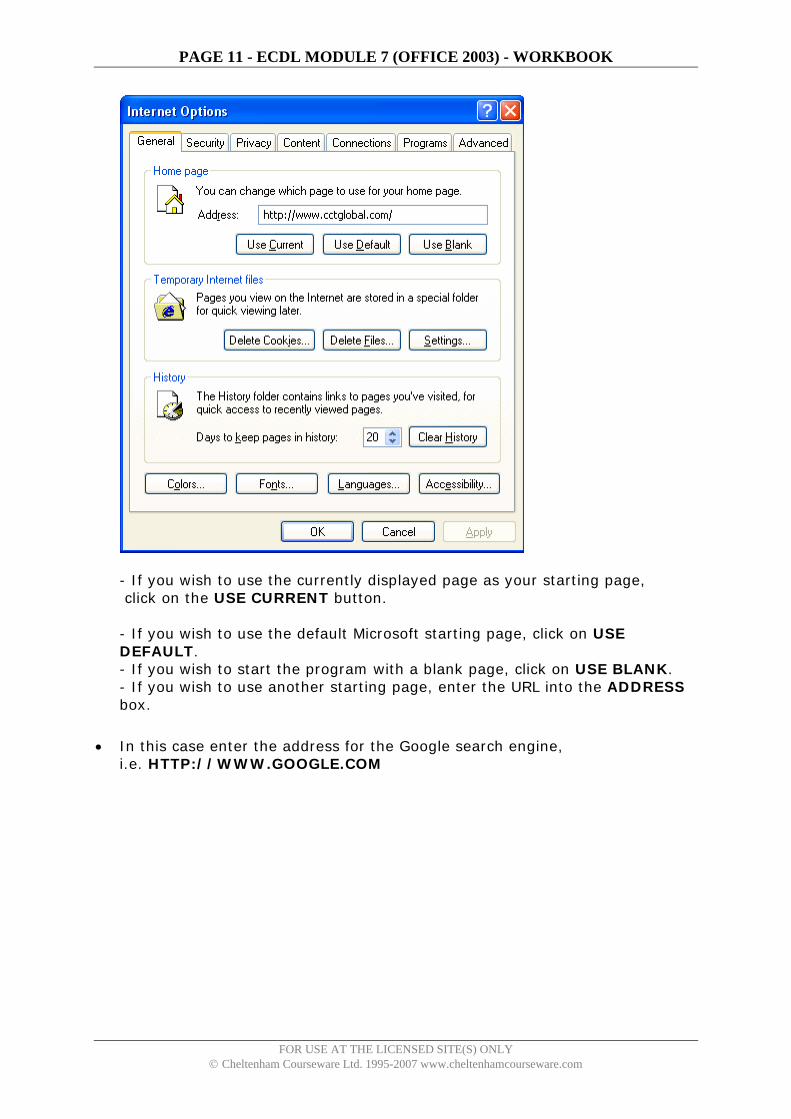
• The INTERNET OPTIONS dialog box is displayed. Click on the GENERAL
tab of the INTERNET OPTIONS dialog box.
FOR USE AT THE LICENSED SITE(S) ONLY © Cheltenham Courseware Ltd. 1995-2007 www.cheltenhamcourseware.com
PAGE 11 - ECDL MODULE 7 (OFFICE 2003) - WORKBOOK
- If you wish to use the currently displayed page as your starting page, click on the USE CURRENT button. - If you wish to use the default Microsoft starting page, click on USE DEFAULT. - If you wish to start the program with a blank page, click on USE BLANK. - If you wish to use another starting page, enter the URL into the ADDRESS box.
• In this case enter the address for the Google search engine,
i.e. HTTP://WWW.GOOGLE.COM
FOR USE AT THE LICENSED SITE(S) ONLY © Cheltenham Courseware Ltd. 1995-2007 www.cheltenhamcourseware.com

PAGE 12 - ECDL MODULE 7 (OFFICE 2003) - WORKBOOK
• Click on the OK button to close the INTERNET OPTIONS dialog box. • To check if this worked correctly, close the Internet Explorer program and
then re-open the program. The Google home page should be displayed.
IC1.2.3.3. Displaying a web page in a new window
To display a specific web page • Open the Internet Explorer program. • In the ADDRESS BAR section of the program window enter the full URL
address of the page which you wish to display. In this case enter the URL HTTP://WWW.MICROSOFT.COM and press the ENTER key. You should see the Microsoft web site home page displayed.
FOR USE AT THE LICENSED SITE(S) ONLY © Cheltenham Courseware Ltd. 1995-2007 www.cheltenhamcourseware.com

PAGE 13 - ECDL MODULE 7 (OFFICE 2003) - WORKBOOK
To force a web page to display within a new window. • Right click on a hyperlink, and from the popup menu displayed, select the
OPEN IN NEW WINDOW command.
TIP: Another way to do this is to depress the SHIFT key while clicking on a hyperlink. However this may not always work, it depends on what version of Internet Explorer you are using.
• Try using these techniques on some of the hyperlinks on the web page you
are viewing. • You should see that when you use these techniques multiple copies of the
Internet Explorer start opening up. You can see the icons for each copy in the Taskbar along the bottom of your screen.
• Before continuing close all copies of the Internet Explorer program.
IC1.2.3.4. Stopping a Web page from downloading
To stop a page downloading (once it has started downloading) • Re-start the Internet Explorer program. • Redisplay the Microsoft home page (by entering the URL of
http://www.microsoft.com into the address bar and pressing the ENTER key).
• The web page will start loading within your web browser. Before the loading is complete, click on the STOP icon to stop the download.
IC1.2.3.5. Refreshing a Web page
To refresh a page download • Click on the REFRESH icon.
TIP: If clicking on the Refresh icon does not seem to do what you want, try pressing the SHIFT key while clicking on the REFRESH icon.
FOR USE AT THE LICENSED SITE(S) ONLY © Cheltenham Courseware Ltd. 1995-2007 www.cheltenhamcourseware.com

PAGE 14 - ECDL MODULE 7 (OFFICE 2003) - WORKBOOK
IC1.2.3.6. Using Help
Accessing the built-in tutorial • Click on the HELP drop down menu and then click on CONTENTS AND
INDEX.
• You will see the following Help dialog box displayed. You can browse through
the contents pages or click on the SEARCH tab and type in a question.
• Spend a little time investigating some of the Help options available. • You can also click on other tabs within the dialog box to access other help
features. Experiment! Remember to make use of the feature after you have completed the course. Most programs have built-in help, SO USE IT!
• Close the Help dialog box before continuing.
IC1.2.4. Adjusting Settings
FOR USE AT THE LICENSED SITE(S) ONLY © Cheltenham Courseware Ltd. 1995-2007 www.cheltenhamcourseware.com

PAGE 15 - ECDL MODULE 7 (OFFICE 2003) - WORKBOOK
IC1.2.4.1. Displaying or hiding toolbars
To hide or display toolbars within the Microsoft Internet Explorer. • Click on the VIEW drop down menu and select the TOOLBARS command.
This will display a submenu, from which to can opt to display or hide toolbars.
• Make a note of which toolbars are displayed. • Experiment with displaying all the toolbars, and then with just one toolbar. • Before continuing, reset the toolbar display to its original setting.
IC1.2.4.2. Displaying or hiding images on a Web page
To set Microsoft Internet Explorer to not display images • Click on the TOOLS drop down menu and select the INTERNET OPTIONS
command. • Click on the ADVANCED tab within the dialog box.
FOR USE AT THE LICENSED SITE(S) ONLY © Cheltenham Courseware Ltd. 1995-2007 www.cheltenhamcourseware.com

PAGE 16 - ECDL MODULE 7 (OFFICE 2003) - WORKBOOK
• Scroll down until you see the option relating to SHOW PICTURES.
• Remove the tick next to this option so that the browser will load pages, but
not display any pictures which might be contained within the pages. • Close the dialog box and then close the Internet Explorer. • Re-start the Internet Explorer program and you should see that graphics are
no longer displayed.
Setting Microsoft Internet Explorer to display images • Click on the TOOLS drop down menu and select the INTERNET OPTIONS
command. • Click on the ADVANCED tab within the dialog box. • Scroll down until you see the option relating to SHOW PICTURES. • Make sure that this option is selected and then click on the OK button to
close the dialog box. • Close and then re-start the Internet Explorer program and you should see
that graphics are once again displayed.
IC1.2.4.3. Displaying previously visited URLs using the browser address bar
FOR USE AT THE LICENSED SITE(S) ONLY © Cheltenham Courseware Ltd. 1995-2007 www.cheltenhamcourseware.com

PAGE 17 - ECDL MODULE 7 (OFFICE 2003) - WORKBOOK
To use the browser address bar to revisit URLs • Click on the down arrow to the right of the Address bar and select from the
list displayed. You should see previous web pages displayed, when you click on an item within the list.
To view the history trail • The history trail is a list of previously visited web sites. You can even use
links within the list to revisit these sites. Click on the HISTORY icon.
A display box is displayed down the left side of the screen. Within this you can select how to display pages you have visited, (i.e. today's, last week etc).
• Select TODAY and a list of sites visited today will be displayed. • Click on a link within the history window to display the relevant web page.
IC1.2.4.4. Deleting browsing history
Deleting the history trail • Click on the TOOLS drop down menu and select the INTERNET OPTIONS
command. • Make sure that the GENERAL tab is selected within the dialog box. • Within the HISTORY section of the dialog box, click on the CLEAR HISTORY
button.
FOR USE AT THE LICENSED SITE(S) ONLY © Cheltenham Courseware Ltd. 1995-2007 www.cheltenhamcourseware.com

PAGE 18 - ECDL MODULE 7 (OFFICE 2003) - WORKBOOK
• Re-examine the History Trail as outlined in the previous exercise and verify
that the history trail is now empty.
FOR USE AT THE LICENSED SITE(S) ONLY © Cheltenham Courseware Ltd. 1995-2007 www.cheltenhamcourseware.com

PAGE 19 - ECDL MODULE 7 (OFFICE 2003) - WORKBOOK
IC1.3. Web Navigation
IC1.3.1. Accessing Web Pages
IC1.3.1.1. Going to a URL (Uniform Resource Locator)
To go directly to a Web page • Enter the web address for the Microsoft web site into the URL ADDRESS bar
at the top of the Microsoft Internet Explorer program and then press the ENTER key. The URL is HTTP://WWW.MICROSOFT.COM
You should find that the page is displayed.
IC1.3.1.2. Activating a hyperlink/image link
Activating an Internet link • As you move the mouse pointer over a Web page displayed within your web
browser, occasionally you will notice that the mouse pointer shape changes to the shape of a hand (pointing upwards). The pointer changes to indicate a hyperlink. Some hyperlinks are text based, while others are embedded within pictures. On well designed web sites, you will see a popup displayed if you leave the mouse pointer over an image which contains a hyperlink. An example of a hyperlink popup is illustrated below.
• Click on a hyperlink graphic and the page you are viewing will be replaced by the page which the link points to.
• Experiment with clicking on text based hyperlinks. REMEMBER: Text based links are often (but not always) underlined and displayed in blue text.
FOR USE AT THE LICENSED SITE(S) ONLY © Cheltenham Courseware Ltd. 1995-2007 www.cheltenhamcourseware.com

PAGE 20 - ECDL MODULE 7 (OFFICE 2003) - WORKBOOK
IC1.3.1.3. Navigating backwards and forwards between previously visited Web pages
Using the Back and Forward button • A quick way to go back to the last Web page you visited is to use the Internet
Explorer BACK button. On badly designed sites this may be the only way to escape from the page you are viewing.
• Experiment with using the Forward and Back buttons.
IC1.3.1.4. Completing a web based form and entering information
Completing a web based form • In most cases a web based form will look similar to the equivalent printed
form. You can enter data in the normal way, sometimes selecting options from drop down menus. Normally you need to use the TAB key (not the ENTER key) to move from field to field within the form. When you have finished there is often a button at the bottom of the form (called submit or something similar). Clicking on this button will transmit the form across the Internet.
• In this case rather than go to a real web page on the internet, we are going to view a web type form that is actually stored on your hard disk. In the address bar enter the following address: C:\MODULE 7 SAMPLES\CONTACT.HTML
FOR USE AT THE LICENSED SITE(S) ONLY © Cheltenham Courseware Ltd. 1995-2007 www.cheltenhamcourseware.com

PAGE 21 - ECDL MODULE 7 (OFFICE 2003) - WORKBOOK
• The following form should be displayed.
• Enter your details into the form and then click on the REQUEST button at the
bottom. NOTE: This form does not send any information to anyone, it simply allows you to practice filing in a form using different types of input controls such as drop down lists and check boxes.
IC1.3.2. Using Bookmarks
IC1.3.2.1. Bookmaking a Web page
Adding a Web page to your favourites (bookmark) list • First we need to display a Web page. Enter the following URL so that the
Microsoft home page is displayed in your browser. HTTP://WWW.MICROSOFT.COM
• When you wish to add the current page to your favourites, click on the
FAVORITES drop down menu (NOT THE FAVORITES ICON). This will display a drop down menu, from which you should select the ADD TO FAVORITES command.
• In the name section of the dialog box, enter the name MICROSOFT. • To add the current page to your favorites, click on the OK button. • Use the same method to create favorites for the following web pages and use
the following names:
FOR USE AT THE LICENSED SITE(S) ONLY © Cheltenham Courseware Ltd. 1995-2007 www.cheltenhamcourseware.com

PAGE 22 - ECDL MODULE 7 (OFFICE 2003) - WORKBOOK
CNN: http://www.cnn.com AMAZON: http://www.amazon.co.uk LASTMINUTE: http://www.lastminute.com
IC1.3.2.2. Displaying a bookmarked Web page
To open a bookmark (favourite) • In the last exercise you created a favorite for the Microsoft home page. To
test if this worked close the Internet Explorer program and then re-open the Internet Explorer program.
• Click on the FAVORITES icon and select the Microsoft page from within your favorites list. The correct URL will be entered into the ADDRESS bar and the Web page will be displayed.
IC1.3.3. Organising Bookmarks
IC1.3.3.1. Creating a bookmark folder
To create a new folder within your favorites • Click on the FAVORITES drop down menu and then select the ORGANIZE
FAVORITES command, which will display the ORGANIZE FAVORITES dialog box.
• Click on the CREATE FOLDER button. • Enter the name of the new folder (in this case THE GOOD STUFF) and then
press the ENTER key. Close the dialog box.
IC1.3.3.2. Adding Web pages to a bookmark folder
FOR USE AT THE LICENSED SITE(S) ONLY © Cheltenham Courseware Ltd. 1995-2007 www.cheltenhamcourseware.com

PAGE 23 - ECDL MODULE 7 (OFFICE 2003) - WORKBOOK
To add a web page to a particular bookmark folder • First we need to display a web page of interest. Enter the following URL so
that the BBC home page is displayed in your browser. HTTP://WWW.BBC.CO.UK
• Click on the FAVORITES drop down menu, and select the ADD TO
FAVORITES command. This will display a dialog box.
• Click on the CREATE IN button. • Select the folder in which you wish to add the favourite, such as THE GOOD
STUFF. • Click on the OK button.
IC1.3.3.3. Deleting a bookmark
To delete or rename a bookmark • Click on the FAVORITES drop down menu and then select the ORGANIZE
FAVORITES command, which will display the ORGANIZE FAVORITES dialog box.
• Select one of the bookmarks you previously added and then click on the
DELETE button.
FOR USE AT THE LICENSED SITE(S) ONLY © Cheltenham Courseware Ltd. 1995-2007 www.cheltenhamcourseware.com

PAGE 24 - ECDL MODULE 7 (OFFICE 2003) - WORKBOOK
IC1.4. Web Searching
IC1.4.1. Using a Search Engine
IC1.4.1.1. Selecting a specific search engine
Examples of Search Engines • Some of the major search engines include:
ASK JEEVES http://www.ask.com GOOGLE http://www.google.com LYCOS http://www.lycos.com MSN http://www.msn.com YAHOO http://www.yahoo.com
• To use any of these enter the Search Engine URL into the address bar of your
browser and then press the ENTER key. Experiment with visiting a few of these search engines. Alternatively, click on the SEARCH icon within your browser to see a list of search engines.
IC1.4.1.2. Carrying out a search for specific information using a keyword phrase
Using keywords and phrases • Search for web sites containing information about FRANCE. • Try searching using a few of the search engines listed in the previous
exercise. You will find that you get different results with different search engines!
IC1.4.1.3. Combining selection criteria in a search
Using + and " symbols to narrow your search • Try searching for information about HOLIDAYS IN FRANCE, using the
following search combinations.
FOR USE AT THE LICENSED SITE(S) ONLY © Cheltenham Courseware Ltd. 1995-2007 www.cheltenhamcourseware.com

PAGE 25 - ECDL MODULE 7 (OFFICE 2003) - WORKBOOK
HOLIDAYS IN FRANCE HOLIDAYS+IN+FRANCE 'HOLIDAYS IN FRANCE' Try searching using a few of the search engines listed in the previous exercise. Again, you will find that you get different results with different search engines!
IC1.4.1.4. Copying text, an image or URL from a Web page to a document
To copy a web image from a web page to a document • Display a web page containing an image, such as http://www.bbc.co.uk. • Right click on the image within the web page, and select the COPY
command.
• This will copy the image to the Clipboard. The image can then be pasted into
a document using the normal PASTE command. Display the WordPad program, (by clicking on the START icon, then clicking on ALL PROGRAMS, then on ACCESSORIES and finally on WORDPAD). Paste the image into the WordPad document. Save the file as MY PIC1 in a folder called MODULE 7 SAMPLES. Close the WordPad program.
• Another way to retrieve a picture is to right click on the image within the web page and from the popup menu displayed select the SAVE PICTURE AS command. You would then be able to save the image to disk. In this case save the image as MY PIC2, in a folder called MODULE 7 SAMPLES.
FOR USE AT THE LICENSED SITE(S) ONLY © Cheltenham Courseware Ltd. 1995-2007 www.cheltenhamcourseware.com

PAGE 26 - ECDL MODULE 7 (OFFICE 2003) - WORKBOOK
To copy a web address from a web page to a document • Right-click over a web address hyperlink within a web page and then select
the COPY SHORTCUT command. You can then paste the web address from the Clipboard into your document. The URL can then be pasted into a document using the normal PASTE command. Display the WordPad program, (by clicking on the START icon, then clicking on ALL PROGRAMS, then on ACCESSORIES and finally on WORDPAD). Paste the image into the WordPad document. Save the file as MY SHORTCUT in a folder called MODULE 7 SAMPLES. Close the WordPad program.
IC1.4.1.5. Saving a Web page to a location on a drive as a txt file or html file
To save a web page as a specific file type • Display a web page which you wish to save to disk. • Click on the FILE drop down menu and select the SAVE AS command. • Click on the down arrow to the right of the SAVE AS TYPE section of the
dialog box.
FOR USE AT THE LICENSED SITE(S) ONLY © Cheltenham Courseware Ltd. 1995-2007 www.cheltenhamcourseware.com
PAGE 27 - ECDL MODULE 7 (OFFICE 2003) - WORKBOOK
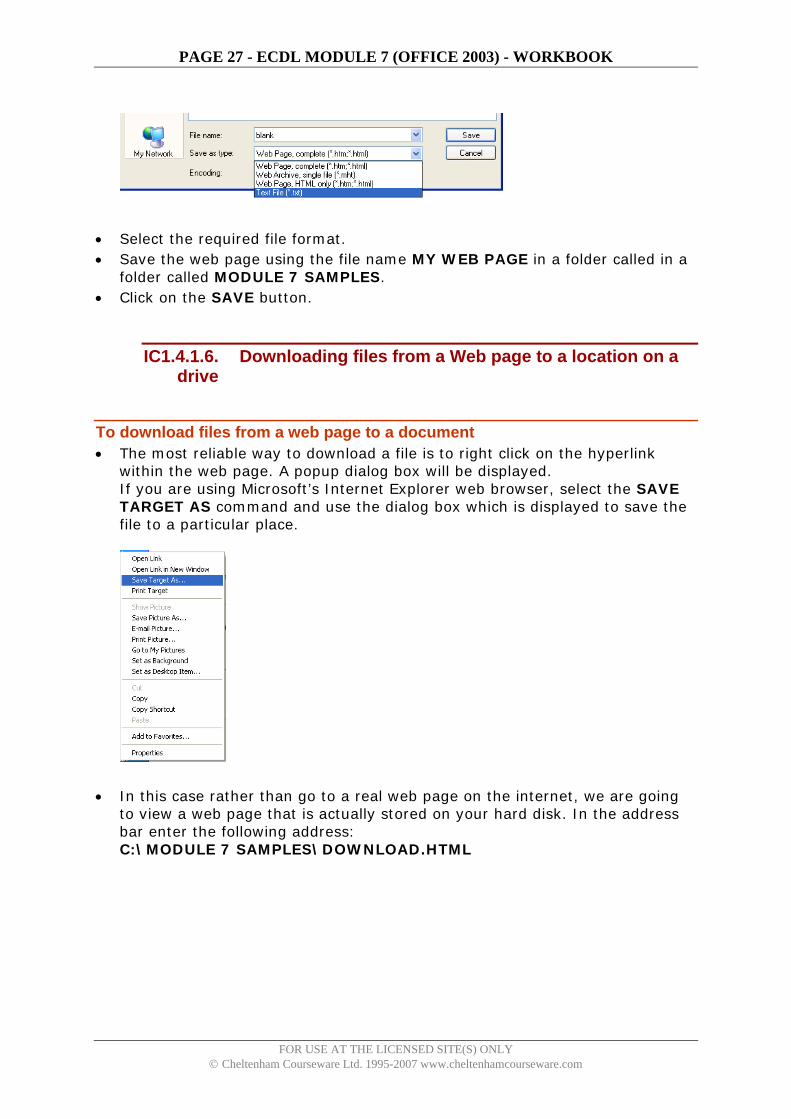
• Select the required file format. • Save the web page using the file name MY WEB PAGE in a folder called in a
folder called MODULE 7 SAMPLES. • Click on the SAVE button.
IC1.4.1.6. Downloading files from a Web page to a location on a drive
To download files from a web page to a document • The most reliable way to download a file is to right click on the hyperlink
within the web page. A popup dialog box will be displayed. If you are using Microsoft’s Internet Explorer web browser, select the SAVE TARGET AS command and use the dialog box which is displayed to save the file to a particular place.
• In this case rather than go to a real web page on the internet, we are going
to view a web page that is actually stored on your hard disk. In the address bar enter the following address: C:\MODULE 7 SAMPLES\DOWNLOAD.HTML
FOR USE AT THE LICENSED SITE(S) ONLY © Cheltenham Courseware Ltd. 1995-2007 www.cheltenhamcourseware.com

PAGE 28 - ECDL MODULE 7 (OFFICE 2003) - WORKBOOK
• The following page should be displayed.
• Experiment with saving these files in the MODULE 7 SAMPLES folder:
- Rename the TEXT file to DOWNLOADED TEXT. - Rename the IMAGE file to DOWNLOADED IMAGE. - Rename the SOUND file to DOWNLOADED SOUND. NOTE: If you ever need to download video and software then normally the same method will work.
• Close the Internet Explorer program before continuing.
IC1.4.2. Preparation
IC1.4.2.1. Previewing a Web page
To preview a web page before printing • Open the Internet Explorer program and view a web page of your choice. • Click on the FILE drop down menu and select the PRINT PREVIEW
command. The web page will be displayed on screen as it would be printed. • If necessary, use the arrows on the toolbar to view other pages. • Once finished, click on the CLOSE button to leave PRINT PREVIEW mode.
IC1.4.2.2. Changing Web page orientation and paper size
FOR USE AT THE LICENSED SITE(S) ONLY © Cheltenham Courseware Ltd. 1995-2007 www.cheltenhamcourseware.com

PAGE 29 - ECDL MODULE 7 (OFFICE 2003) - WORKBOOK
To setup your page using Microsoft Internet Explorer • Click on the FILE drop down menu and select the PAGE SETUP command to
display the PAGE SETUP dialog box.
From here you can set paper size, orientation, margins and also choose whether to use headers and footers. Spend a little time investigating the options available.
IC1.4.2.3. Changing Web page margins
To change your web page margins • Click on the FILE drop down menu and select the PAGE SETUP command to
display the PAGE SETUP dialog box. • Within the Margins section of the dialog box, select the required, top, bottom,
left or right margins. Make sure that you understand how you would change these values.
FOR USE AT THE LICENSED SITE(S) ONLY © Cheltenham Courseware Ltd. 1995-2007 www.cheltenhamcourseware.com

PAGE 30 - ECDL MODULE 7 (OFFICE 2003) - WORKBOOK
IC1.4.3. Printing
IC1.4.3.1. Choosing Web page print output options
To print a web page • To print a page displayed within Microsoft Internet Explorer, you would
normally simply click on the PRINT icon located in the application toolbars. Try this now.
• If you want more control over printing, click on the FILE drop down menu and select the PRINT command. This will display the PRINT dialog box, from where you can select options such as the number of pages which you wish to print or which physical printer you wish to use.
• Investigate some of the options available.
To print selected frames within a framed Web site • Many Web sites use what are called frames. This is commonly used when the
Web designers wish to display a menu of options down, say the left hand side of the screen. These menu buttons stay on the screen when you navigate through the Web site, only the data in the right part of the screen changes. Printing from sites like this can be problematic.
• In this case rather than go to a real web page on the internet, we are going to view a framed web site that is actually stored on your hard disk. In the address bar enter the following address: C:\MODULE 7 SAMPLES\FRAMED_WEB.HTML
FOR USE AT THE LICENSED SITE(S) ONLY © Cheltenham Courseware Ltd. 1995-2007 www.cheltenhamcourseware.com

PAGE 31 - ECDL MODULE 7 (OFFICE 2003) - WORKBOOK
• Click within the frame to the right. • Open the Print dialog box, and select the Options tab. You will see you have
the ability to Print frames as laid out on the screen, Only the selected frame or All frames individually.
• Print only the selected frame (i.e. the right frame).
To print selected text on a web page • Display the 'starting' page within the web (i.e. the original page with some
text on it). • Select the line of text shown below (to do this move your mouse pointer to
the start of the text you want to select and hold down the left mouse button. Drag your mouse across the text to be printed and the text will be highlighted. Release the mouse button, the text will remain highlighted).
• Click on the FILE drop down menu and select the PRINT command. The
PRINT dialog box will be displayed. • From the PRINT RANGE section of the dialog box select the SELECTION
option.
FOR USE AT THE LICENSED SITE(S) ONLY © Cheltenham Courseware Ltd. 1995-2007 www.cheltenhamcourseware.com

PAGE 32 - ECDL MODULE 7 (OFFICE 2003) - WORKBOOK
• Click on the PRINT button to print the selected text. • Close the Internet Explorer program.
FOR USE AT THE LICENSED SITE(S) ONLY © Cheltenham Courseware Ltd. 1995-2007 www.cheltenhamcourseware.com

PAGE 33 - ECDL MODULE 7 (OFFICE 2003) - WORKBOOK
IC1.5. Electronic Mail
IC1.5.1. Concepts / Terms
IC1.5.1.1. Understanding the make-up and structure of an E-mail address
The structure of an email address • Make sure that you understand the items that make up a complete email
address.
IC1.5.1.2. Types of Email Programs
Email Programs • Name a program used for accessing email. • Name a web-based email service.
IC1.5.1.3. Understanding the advantages of E-mail systems
Advantages of using email • Make sure that you understand the advantages of using email.
IC1.5.1.4. Understanding the disavantages of E-mail systems
Disadvantages of using email • Make sure that you understand the disadvantages of using email.
IC1.5.1.5. Understanding the importance of network etiquette (netiquette)
Netiquette • What is Netiquette? • Describe the function of the subject in an email. • Why should you always spell check your emails?
FOR USE AT THE LICENSED SITE(S) ONLY © Cheltenham Courseware Ltd. 1995-2007 www.cheltenhamcourseware.com
PAGE 34 - ECDL MODULE 7 (OFFICE 2003) - WORKBOOK
IC1.5.2. Security Considerations
IC1.5.2.1. Understanding guidelines and regulations on using email
Sensitive content • Why should you be careful sending sensitive material by email?
Phishing • What is phishing?
Idenity Theft • What is identity theft?
Business rules and regulations • Why would an organisation have regulations for use of email?
IC1.5.2.2. Being aware of the possibility of receiving unsolicited mail (spam)
Spam • What is spam?
IC1.5.2.3. Being aware of the danger of infecting the computer with a virus
Dealing with unsolicited mail • Why should you be very careful about opening files which are attached to
email (if you do not know the person who sent you the email)? • Can a Microsoft Word document contain viruses?
IC1.5.2.4. Knowing what a digital signature is
What is a digital signature? • What is the function of a digital signature?
FOR USE AT THE LICENSED SITE(S) ONLY © Cheltenham Courseware Ltd. 1995-2007 www.cheltenhamcourseware.com

PAGE 35 - ECDL MODULE 7 (OFFICE 2003) - WORKBOOK
IC1.5.3. First Steps with e-mail
IC1.5.3.1. Opening and closing Microsoft Outlook
To start Outlook using the Start menu • Click on the START button to display the start menu and click on the
MICROSOFT OFFICE OUTLOOK 2003 command.
To close Outlook • Click the CLOSE icon in the top right hand corner of the Outlook screen
OR click on the FILE drop down menu and select the EXIT command OR press ALT+F4.
IC1.5.3.2. Opening a mail inbox for a specified user
To open the Inbox folder • Load the Outlook program by clicking on the START button to display the
start menu and click on the MICROSOFT OFFICE OUTLOOK 2003 command.
• Click on INBOX (displayed in the Mail group section of the Navigation pane displayed at the left of the Outlook window).
FOR USE AT THE LICENSED SITE(S) ONLY © Cheltenham Courseware Ltd. 1995-2007 www.cheltenhamcourseware.com

PAGE 36 - ECDL MODULE 7 (OFFICE 2003) - WORKBOOK
The Inbox Screen • The messages are listed down the screen, the message flags, senders email
address or name and the date the message was received are displayed for each message. The Reading pane occupies the right half of the screen and displays the text of the selected message.
To select a message • If necessary, open the INBOX folder. • Click on the appropriate message in the message list.
Message Status Icons • Outlook displays icons to the left of the message to indicate the message
status. Make sure that you know the function of the following icons.
FOR USE AT THE LICENSED SITE(S) ONLY © Cheltenham Courseware Ltd. 1995-2007 www.cheltenhamcourseware.com

PAGE 37 - ECDL MODULE 7 (OFFICE 2003) - WORKBOOK
IC1.5.3.3. Opening one or several mail messages
To check for new messages • If necessary, open the INBOX folder. • Click the SEND/RECEIVE icon, located on the STANDARD toolbar
OR press the F9 key.
To read a message • Double click on a message you wish to read to open the MESSAGE window.
The message header, as illustrated, displays the details of the message in 5 fields: FROM: The name or email address of the person who sent the message TO: The names or email addresses of the recipients of the message are listed here, separated by a semicolon CC: The names or email addresses of persons receiving a copy of the message are listed here, separated by a semicolon SUBJECT: A short description of the message topic SENT: Date message was sent
• Once you have read the message, close the MESSAGE window by clicking on
the CLOSE icon in the top right of the MESSAGE window.
To print a message • If necessary, open the INBOX folder.
FOR USE AT THE LICENSED SITE(S) ONLY © Cheltenham Courseware Ltd. 1995-2007 www.cheltenhamcourseware.com

PAGE 38 - ECDL MODULE 7 (OFFICE 2003) - WORKBOOK
• Double click on the message you wish to print to open the MESSAGE window.
• Click the PRINT icon on the MESSAGE window toolbar.
To delete a message • If necessary, open the INBOX folder. • Select the message you wish to delete. • Press the DELETE key
OR click on the DELETE icon, located on the STANDARD toolbar.
NOTE: An email deleted using this method is not removed from the system, it is moved to the DELETED ITEMS folder.
IC1.5.3.4. Switching between open messages
To switch between open Message windows • Open a couple of messages. • To view another open message, simply click on the item in your Windows
Taskbar.
IC1.5.3.5. Closing a mail message
To close a Message Window • Within the MESSAGE window, click on the FILE drop down menu and select
the CLOSE command. Alternatively, select the MESSAGE window you want to close and press the ALT+F4 key combination.
• Close all open messages.
IC1.5.3.6. Using Help
FOR USE AT THE LICENSED SITE(S) ONLY © Cheltenham Courseware Ltd. 1995-2007 www.cheltenhamcourseware.com

PAGE 39 - ECDL MODULE 7 (OFFICE 2003) - WORKBOOK
To display the Office Assistant • Select the SHOW THE OFFICE ASSISTANT command from the HELP
menu.
To hide the Office Assistant • Right click on the Office Assistant and from the menu displayed, click on the
HIDE command.
• Re-display the Office Assistant before continuing.
"What is this" Help • Within many dialog boxes you will see a question mark symbol in the top-
right corner of the dialog box. Not all dialog boxes have this feature however. To use "What is this", click on the question mark and Outlook will automatically display any relevant help.
• To experiment with using this form of help, click on the TOOLS drop down
menu and select the OPTIONS command. This will display a dialog box, in which you can use 'What's This' Help.
FOR USE AT THE LICENSED SITE(S) ONLY © Cheltenham Courseware Ltd. 1995-2007 www.cheltenhamcourseware.com

PAGE 40 - ECDL MODULE 7 (OFFICE 2003) - WORKBOOK
• Click on the HELP button to view help for this dialog box.
IC1.5.4. Adjusting Settings
IC1.5.4.1. Adding and removing message inbox headings such as sender, subject or date received
To remove an Inbox heading • Open the INBOX folder. • If necessary, remove the Reading pane to better allow you view the
messages listed in the Inbox folder. To do this select VIEW>READING PANE>OFF from the drop down menu.
• To remove a heading (e.g. Subject), right click on the heading and select the REMOVE THIS COLUMN command. Try this now.
To add an Inbox heading • Open the INBOX folder. • If necessary, remove the Reading pane to better allow you view the
messages listed in the Inbox folder. To do this select VIEW>READING PANE>OFF from the drop down menu.
• Right click on any of the current headings and select the FIELD CHOOSER command from the menu. The FIELD CHOOSER window will be displayed.
FOR USE AT THE LICENSED SITE(S) ONLY © Cheltenham Courseware Ltd. 1995-2007 www.cheltenhamcourseware.com

PAGE 41 - ECDL MODULE 7 (OFFICE 2003) - WORKBOOK
• Available column headings are listed in the centre of the FIELD CHOOSER window. To view a different selection of column headings select from the drop down list at the top of the window.
• Once you have located the column heading you want to add to the Inbox, simply drag and drop the heading on top of the existing column headings. Experiment.
IC1.5.4.2. Displaying and hiding toolbars
To display or hide a toolbar • To display a toolbar, select the TOOLBARS command from the VIEW menu
to display the TOOLBARS drop down menu. A list of toolbars is displayed. • Choose the TOOLBAR you want to display by clicking on it from the list.
• If you remove the tick next to one of the toolbars in the drop down list it will
not be displayed! • Experiment. Make sure that the Standard toolbar is displayed before
continuing.
FOR USE AT THE LICENSED SITE(S) ONLY © Cheltenham Courseware Ltd. 1995-2007 www.cheltenhamcourseware.com

PAGE 42 - ECDL MODULE 7 (OFFICE 2003) - WORKBOOK
IC1.6. Messaging
IC1.6.1. Reading a Message
IC1.6.1.1. Flagging a mail message. Removing a flag mark from a mail message
To flag a message • You can mark or flag messages in your Inbox to remind you to respond to the
email. • If necessary, open the INBOX folder. • Double click on the message you wish to flag to display the MESSAGE
window. • Click the FOLLOW UP icon on the MESSAGE window toolbar to display the
FLAG FOR FOLLOW UP dialog box.
• Click the down arrow to the right of the FLAG TO text box to display a list of
flag types. Select the flag you require.
• You may also set a due date for the flag by clicking the down arrow to the
right of the DUE BY text box and selecting the required date from the displayed calendar.
• Click on the OK button to set the flag and close the FLAG FOR FOLLOW UP dialog box.
• Experiment!
To remove a flag mark from a mail message • Double click on the message with the flag you wish to clear to display the
MESSAGE window. • Click the FOLLOW UP icon on the MESSAGE window toolbar to display the
FLAG FOR FOLLOW UP dialog box. • Click on the CLEAR FLAG button.
FOR USE AT THE LICENSED SITE(S) ONLY © Cheltenham Courseware Ltd. 1995-2007 www.cheltenhamcourseware.com

PAGE 43 - ECDL MODULE 7 (OFFICE 2003) - WORKBOOK
• Experiment!
IC1.6.1.2. Marking a message as unread or read
To mark a message as unread. • If necessary, open the INBOX folder. • Right click on the message and select the MARK AS UNREAD command.
• Experiment!
To mark a message as read. • If necessary, open the INBOX folder. • Right click on the message and select the MARK AS READ command.
• Experiment!
IC1.6.1.3. Opening and saving a file attachment to a location on a drive
To open an attached file • If necessary, open the INBOX folder. • Double click on the message containing the attached file to open the
MESSAGE window. • Double click on the file icon displayed beneath the Subject line. • You should always be wary of opening files from un-trusted sources, Outlook
may display the following dialog box:
FOR USE AT THE LICENSED SITE(S) ONLY © Cheltenham Courseware Ltd. 1995-2007 www.cheltenhamcourseware.com

PAGE 44 - ECDL MODULE 7 (OFFICE 2003) - WORKBOOK
• Click on the OPEN button to open the file. • Outlook will start the appropriate application and open the file. • Experiment!
To save a file attached to a message • If necessary, open the INBOX folder. • Double click on the message containing the file you wish to save to display
the MESSAGE window. • Click on the MESSAGE window FILE drop down menu and select the SAVE
ATTACHMENTS command. • If the message contains more than one attached file the SAVE ALL
ATTACHMENTS dialog box will be displayed enabling you to select the files you wish to save. Select the files as required and click on the OK button.
• The SAVE ATTACHMENT or SAVE ALL ATTACHMENTS dialog box will be displayed. Select the folder you wish to save in and click on the SAVE button.
• If necessary, click on the CLOSE button to close the SAVE ALL ATTACHMENTS dialog box.
IC1.6.1.4. Potential problems when receiving attached files
Issues when receiving files • Why might you experience problems opening a file attached to an email? • What is the file extension used to identify a program file?
IC1.6.2. Replying to a Message
IC1.6.2.1. Using the reply or reply to all functions
FOR USE AT THE LICENSED SITE(S) ONLY © Cheltenham Courseware Ltd. 1995-2007 www.cheltenhamcourseware.com
PAGE 45 - ECDL MODULE 7 (OFFICE 2003) - WORKBOOK
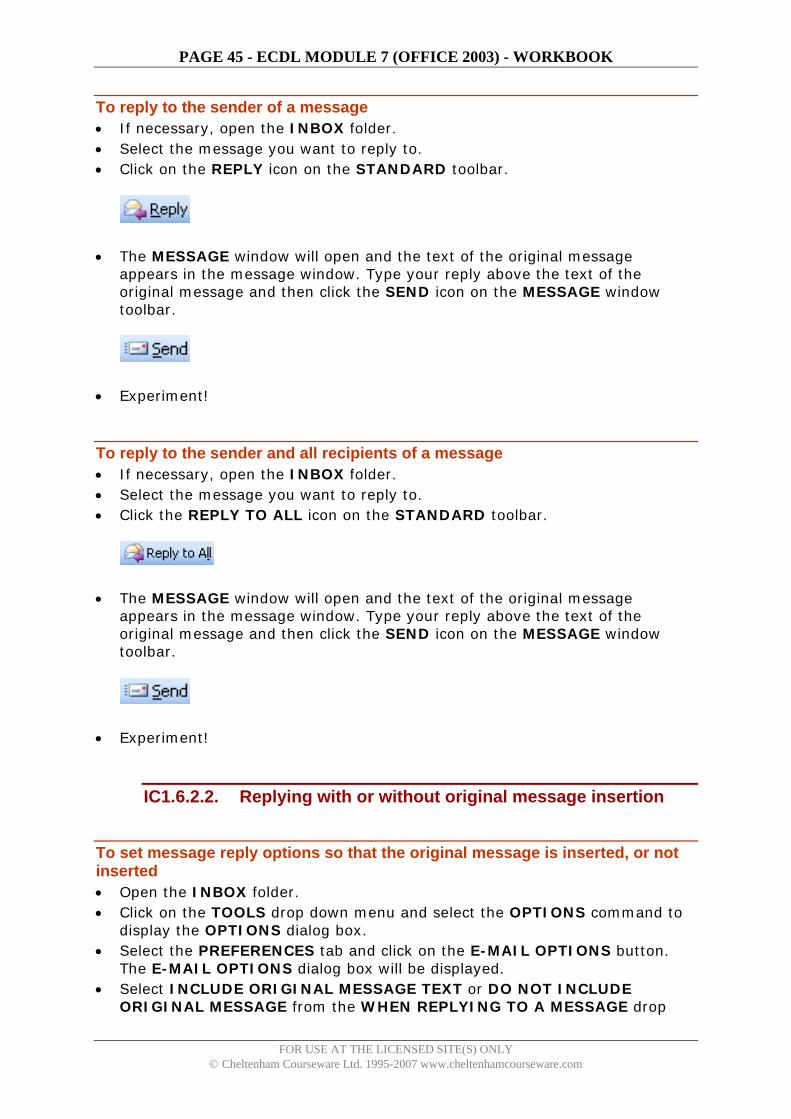
To reply to the sender of a message • If necessary, open the INBOX folder. • Select the message you want to reply to. • Click on the REPLY icon on the STANDARD toolbar.
• The MESSAGE window will open and the text of the original message
appears in the message window. Type your reply above the text of the original message and then click the SEND icon on the MESSAGE window toolbar.
• Experiment!
To reply to the sender and all recipients of a message • If necessary, open the INBOX folder. • Select the message you want to reply to. • Click the REPLY TO ALL icon on the STANDARD toolbar.
• The MESSAGE window will open and the text of the original message
appears in the message window. Type your reply above the text of the original message and then click the SEND icon on the MESSAGE window toolbar.
• Experiment!
IC1.6.2.2. Replying with or without original message insertion
To set message reply options so that the original message is inserted, or not inserted • Open the INBOX folder. • Click on the TOOLS drop down menu and select the OPTIONS command to
display the OPTIONS dialog box. • Select the PREFERENCES tab and click on the E-MAIL OPTIONS button.
The E-MAIL OPTIONS dialog box will be displayed. • Select INCLUDE ORIGINAL MESSAGE TEXT or DO NOT INCLUDE
ORIGINAL MESSAGE from the WHEN REPLYING TO A MESSAGE drop
FOR USE AT THE LICENSED SITE(S) ONLY © Cheltenham Courseware Ltd. 1995-2007 www.cheltenhamcourseware.com

PAGE 46 - ECDL MODULE 7 (OFFICE 2003) - WORKBOOK
down list.
• Click on OK to close the E-MAIL OPTIONS dialog box. • Click on the OK button to close the OPTIONS dialog box. • Experiment!
IC1.6.3. Sending a Message
IC1.6.3.1. Creating a new message
To open the Inbox folder • Click the INBOX icon on the Navigation pane
OR press CTRL-SHIFT-I.
To create a new message • Open the INBOX folder. • Select the NEW MAIL MESSAGE icon from the STANDARD toolbar
OR press CTRL-N to display the MESSAGE window.
FOR USE AT THE LICENSED SITE(S) ONLY © Cheltenham Courseware Ltd. 1995-2007 www.cheltenhamcourseware.com

PAGE 47 - ECDL MODULE 7 (OFFICE 2003) - WORKBOOK
• Enter your message into the message text area in the lower half of the dialog box.
IC1.6.3.2. Email netiquette • Why should you avoid using all uppercase letters in your emails? • Why is a descriptive subject line important?
IC1.6.3.3. Using formatting tools
Formatting your email • Experiment with using the icons on the Formatting toolbar to make your
message look more interesting.
IC1.6.3.4. Inserting a mail address in the ‘To’ field
To address an Email • Type the email address of the person you wish to send the message to into
the TO text box.
• In this case use an email address supplied by your tutor.
IC1.6.3.5. Copying (Cc) and blind copying (Bcc) a message to another address / addresses
To send a copy of a message to another address • Whilst composing your message in the MESSAGE window, enter the address
of the person you want to send a copy to into the CC text box.
FOR USE AT THE LICENSED SITE(S) ONLY © Cheltenham Courseware Ltd. 1995-2007 www.cheltenhamcourseware.com

PAGE 48 - ECDL MODULE 7 (OFFICE 2003) - WORKBOOK
• In this case use an email address supplied by your tutor for the cc field.
To send a copy of a message to another address using blind carbon copy • A blind carbon copy is a copy of the message which is sent to someone in
secret, other recipients of the message will not know that the person has received the message.
• Whilst composing your message in the MESSAGE window, display the Bcc field by clicking on the VIEW drop down menu and selecting the BCC FIELD command, or click on the down arrow to the right of the OPTION button and select BCC from the menu.
• Type the address of the person you wish to received the blind carbon copy into the BCC text box. Again in this case use an address supplied by your tutor.
IC1.6.3.6. Inserting a title in the ‘Subject’ field
To set the message subject • Enter a short overview of the message into the SUBJECT text box, such as
'THE FIRST EMAIL SENT BY <your name>'
IC1.6.3.7. Using a spell-checking tool
To spell check your message • Click within the MESSAGE window message text area. • Click the MESSAGE window TOOLS drop down menu and select the
SPELLING command to spell check your message. If Outlook encounters a word it thinks is spelt incorrectly the SPELLING dialog box will be displayed. Once the spell check has been completed, the following dialog box will be displayed. Click the OK button or press ENTER to close the dialog box.
FOR USE AT THE LICENSED SITE(S) ONLY © Cheltenham Courseware Ltd. 1995-2007 www.cheltenhamcourseware.com

PAGE 49 - ECDL MODULE 7 (OFFICE 2003) - WORKBOOK
IC1.6.3.8. Attaching a file to a message
To insert a file into a message • Once you have finished entering the text of your message, click the INSERT
FILE icon on the MESSAGE window toolbar (or click the INSERT drop down menu and select the FILE command). The INSERT FILE dialog box will be displayed.
• Select the file you wish to attach to the message. In this case select a file called computer.jpg, which is stored in a folder called MODULE 7 SAMPLES.
• Select INSERT to close the INSERT FILE dialog box. An icon will appear beneath the message subject to indicate the presence of a file.
IC1.6.3.9. Issues when sending file attachments • Why should you be aware of the size of the files you attach to a message? • What type of file should you avoid attaching to messages? • Why would you use file compression when sending files?
IC1.6.3.10. Sending a message with high or low priority
To open the Message Options dialog box • Click on the OPTIONS icon, located on the MESSAGE window toolbar to
display the MESSAGE OPTIONS dialog box.
To set message importance • Click the down arrow to the right of the IMPORTANCE box and select from
the menu displayed. In this case select HIGH.
FOR USE AT THE LICENSED SITE(S) ONLY © Cheltenham Courseware Ltd. 1995-2007 www.cheltenhamcourseware.com

PAGE 50 - ECDL MODULE 7 (OFFICE 2003) - WORKBOOK
To set message sensitivity • To set the sensitivity of the message, click the down arrow to the right of the
SENSITIVITY box and select from the menu displayed. In this case select PRIVATE.
To send the message • Once you have entered your data and addressing information, click on the
SEND button to send the message.
IC1.6.3.11. Sending a message using a distribution list
To reply to a message sent to a distribution list • Open the INBOX folder. • Select the message you wish to reply to. • Click on the REPLY TO ALL icon and your response will be sent to the sender
and all members of the distribution list
OR click on the REPLY icon and your response will be sent only to the sender of the message.
• Experiment.
IC1.6.3.12. Forwarding a message
To forward a message • If necessary, open the INBOX folder. • Select the message you wish to forward.
FOR USE AT THE LICENSED SITE(S) ONLY © Cheltenham Courseware Ltd. 1995-2007 www.cheltenhamcourseware.com

PAGE 51 - ECDL MODULE 7 (OFFICE 2003) - WORKBOOK
• Select the FORWARD icon from the STANDARD toolbar; the MESSAGE window will be displayed.
• Type the email address of the person you wish to forward the message to into the TO text box, your tutor will supply a forwarding email address.
• You may enter any comments about the message above the original message in the message text area of the MESSAGE window.
• Send the message by clicking the SEND icon on the MESSAGE window toolbar.
• Experiment.
IC1.6.4. Copying, Moving and Deleting
IC1.6.4.1. Copying or moving text within a message or between other active messages
To copy text to the Clipboard from a message • Open a message and within the MESSAGE window, select the text you wish
to copy to the Clipboard. • From the EDIT menu select the COPY command
• You can paste the text into another application, such as WordPad. To open
the WordPad program click on the START icon, and the click on the ALL PROGRAMS button. Click on the ACCESSORIES group and then select WORDPAD. Within the WordPad program, click on the EDIT drop down menu and select the PASTE command. The copied text will be displayed.
• Save the WordPad document as a file called MY COPIED TEXT in a folder called MODULE 7 SAMPLES. Close the WordPad program.
To paste text from the Clipboard into a message • First we need to copy some text to the Clipboard. In this case we will open a
WordPad file and copy text within the WordPad program to the Clipboard. To open the WordPad program click on the START icon, and the click on the
FOR USE AT THE LICENSED SITE(S) ONLY © Cheltenham Courseware Ltd. 1995-2007 www.cheltenhamcourseware.com
PAGE 52 - ECDL MODULE 7 (OFFICE 2003) - WORKBOOK
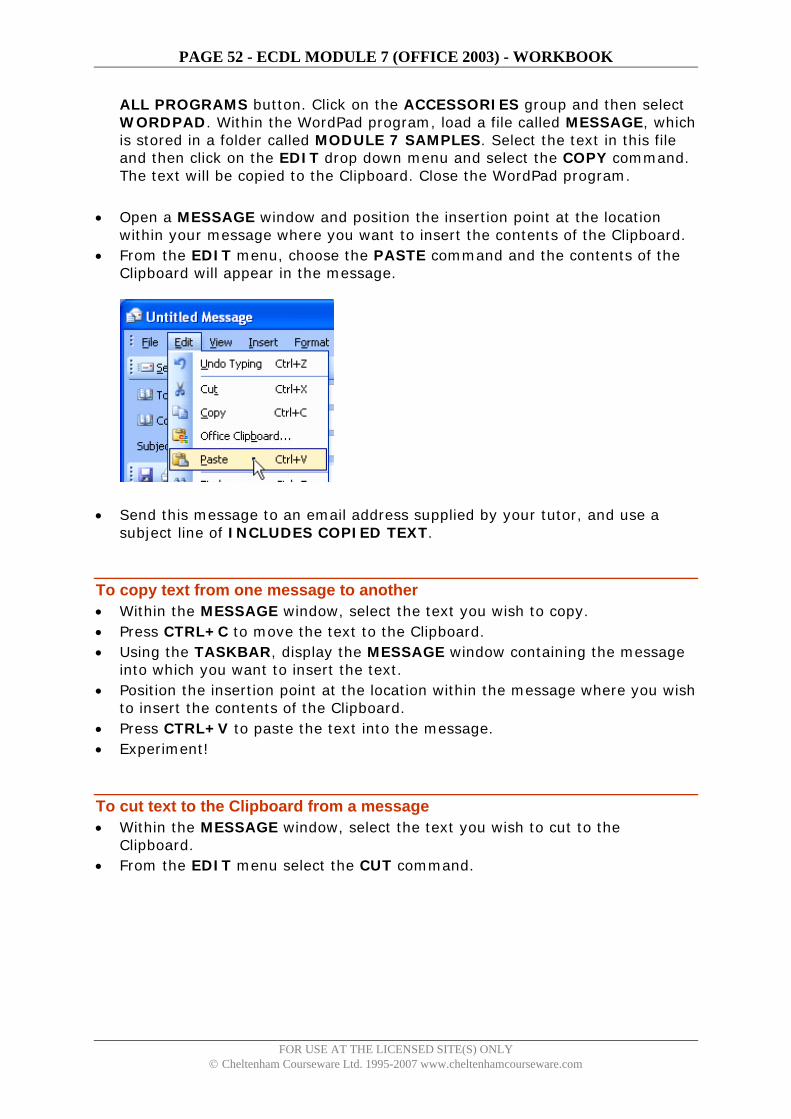
ALL PROGRAMS button. Click on the ACCESSORIES group and then select WORDPAD. Within the WordPad program, load a file called MESSAGE, which is stored in a folder called MODULE 7 SAMPLES. Select the text in this file and then click on the EDIT drop down menu and select the COPY command. The text will be copied to the Clipboard. Close the WordPad program.
• Open a MESSAGE window and position the insertion point at the location
within your message where you want to insert the contents of the Clipboard. • From the EDIT menu, choose the PASTE command and the contents of the
Clipboard will appear in the message.
• Send this message to an email address supplied by your tutor, and use a
subject line of INCLUDES COPIED TEXT.
To copy text from one message to another • Within the MESSAGE window, select the text you wish to copy. • Press CTRL+C to move the text to the Clipboard. • Using the TASKBAR, display the MESSAGE window containing the message
into which you want to insert the text. • Position the insertion point at the location within the message where you wish
to insert the contents of the Clipboard. • Press CTRL+V to paste the text into the message. • Experiment!
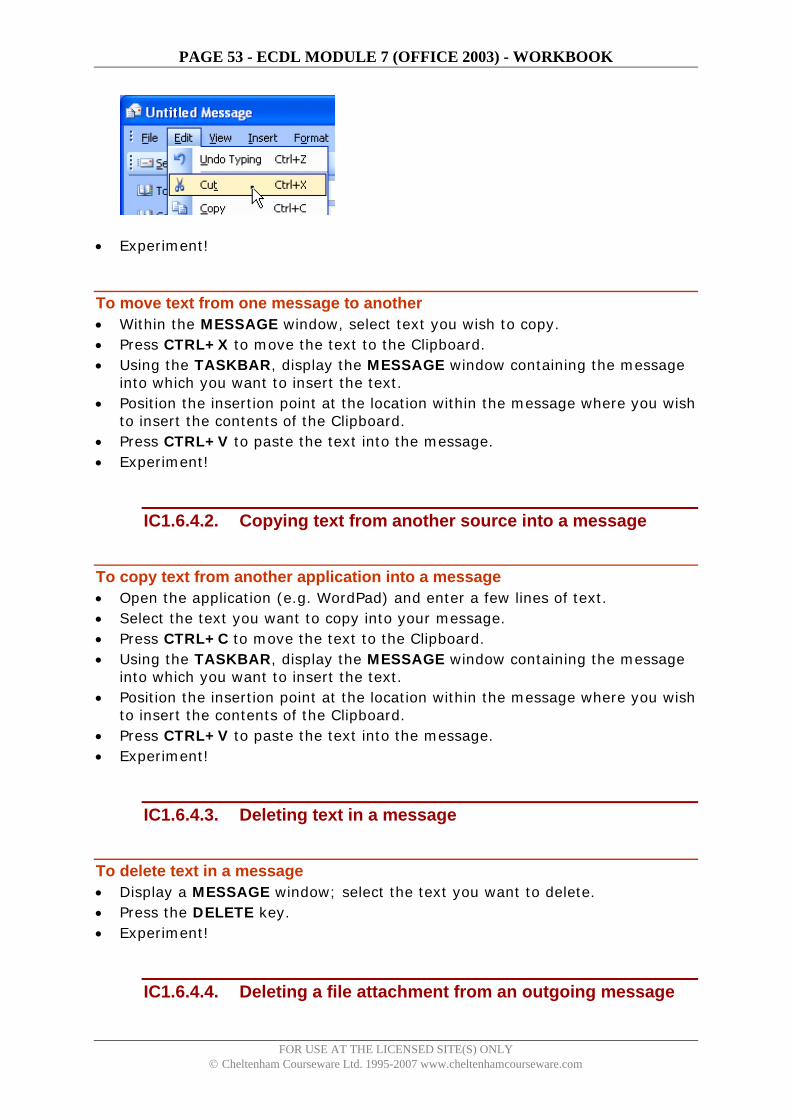
To cut text to the Clipboard from a message • Within the MESSAGE window, select the text you wish to cut to the
Clipboard. • From the EDIT menu select the CUT command.
FOR USE AT THE LICENSED SITE(S) ONLY © Cheltenham Courseware Ltd. 1995-2007 www.cheltenhamcourseware.com
PAGE 53 - ECDL MODULE 7 (OFFICE 2003) - WORKBOOK
• Experiment!
To move text from one message to another • Within the MESSAGE window, select text you wish to copy. • Press CTRL+X to move the text to the Clipboard. • Using the TASKBAR, display the MESSAGE window containing the message
into which you want to insert the text. • Position the insertion point at the location within the message where you wish
to insert the contents of the Clipboard. • Press CTRL+V to paste the text into the message. • Experiment!
IC1.6.4.2. Copying text from another source into a message
To copy text from another application into a message • Open the application (e.g. WordPad) and enter a few lines of text. • Select the text you want to copy into your message. • Press CTRL+C to move the text to the Clipboard. • Using the TASKBAR, display the MESSAGE window containing the message
into which you want to insert the text. • Position the insertion point at the location within the message where you wish
to insert the contents of the Clipboard. • Press CTRL+V to paste the text into the message. • Experiment!
IC1.6.4.3. Deleting text in a message
To delete text in a message • Display a MESSAGE window; select the text you want to delete. • Press the DELETE key. • Experiment!
IC1.6.4.4. Deleting a file attachment from an outgoing message
FOR USE AT THE LICENSED SITE(S) ONLY © Cheltenham Courseware Ltd. 1995-2007 www.cheltenhamcourseware.com

PAGE 54 - ECDL MODULE 7 (OFFICE 2003) - WORKBOOK
To delete an attached file from a message • First attach a file to a message using techniques previously described. • Icons displayed beneath the message subject will represent any files attached
to the message. • Click once on the file you want to delete. • Press the DELETE key.
FOR USE AT THE LICENSED SITE(S) ONLY © Cheltenham Courseware Ltd. 1995-2007 www.cheltenhamcourseware.com

PAGE 55 - ECDL MODULE 7 (OFFICE 2003) - WORKBOOK
IC1.7. Mail Management
IC1.7.1. Techniques
IC1.7.1.1. Recognising some techniques to manage e-mail effectively
Managing your emails • Make sure that you understand common techniques when managing
messages.
IC1.7.2. Using Address Books
IC1.7.2.1. Creating a new address list/distribution list
To create a new address book distribution list • Open the INBOX folder. • Click on the TOOLS drop down menu and select the ADDRESS BOOK
command. The ADDRESS BOOK window will be displayed. • Click on the FILE drop down menu and select the NEW ENTRY command.
The NEW ENTRY dialog box will be displayed. • Select the NEW DISTRIBUTION LIST option & click on the OK button to
open the DISTRIBUTION LIST window. • Type a name for the distribution list into the NAME text box. Use the name
“My Dist List”. • Click on the ADD NEW button.
• Type the name of the person you want to add to the distribution list into the DISPLAY NAME text box, you a name provided by your tutor.
• Type the email address of the person into the E-MAIL ADDRESS text box, once again use an email address provided by your tutor.
FOR USE AT THE LICENSED SITE(S) ONLY © Cheltenham Courseware Ltd. 1995-2007 www.cheltenhamcourseware.com

PAGE 56 - ECDL MODULE 7 (OFFICE 2003) - WORKBOOK
• Click on the OK button. The new member will be displayed in the list. • To close the DISTRIBUTION LIST window click on the SAVE AND CLOSE
button. • To close the ADDRESS BOOK window, click on the CLOSE icon in the top
right corner of the window.
IC1.7.2.2. Adding a mail address to an address list
To add an email address to a distribution list • Open the INBOX folder. • Click on the TOOLS drop down menu and select the ADDRESS BOOK
command. The ADDRESS BOOK window will be displayed. • Double click on the MY DIST LIST entry in the address book. • The DISTRIBUTION LIST window will be displayed as illustrated.
• Click on the ADD NEW button. • Type the name of the person you want to add to the distribution list into the
DISPLAY NAME text box. Use a name provided by your tutor. • Type the email address of the person into the E-MAIL ADDRESS text box.
Once again, use an address provided by your tutor. • Click on the OK button. The new member will be displayed in the list. • Add more entries to your list. Ask your tutor for a list of names & email
addresses to use. • To close the DISTRIBUTION LIST window click on the SAVE AND CLOSE
button. • To close the ADDRESS BOOK window, click on the CLOSE icon in the top
right corner of the window.
IC1.7.2.3. Deleting a mail address from an address list
FOR USE AT THE LICENSED SITE(S) ONLY © Cheltenham Courseware Ltd. 1995-2007 www.cheltenhamcourseware.com

PAGE 57 - ECDL MODULE 7 (OFFICE 2003) - WORKBOOK
To remove an email address from a distribution list • Open the INBOX folder. • Click on the TOOLS drop down menu and select the ADDRESS BOOK
command. The ADDRESS BOOK window will be displayed. • Double click on the distribution list you wish to edit. The DISTRIBUTION
LIST window will be displayed. • Select the person you want to remove from the list by clicking on their name. • Click on the REMOVE button. • To close the DISTRIBUTION LIST window click on the SAVE AND CLOSE
button. • To close the ADDRESS BOOK window, click on the CLOSE icon in the top
right corner of the window.
IC1.7.2.4. Updating an address book from incoming mail
To add the sender of a message to your address book • Open the message from the person you want to add to your address book. • Right click on the senders name or email address in the FROM text box of
the message header section of the MESSAGE window. A popup menu will be displayed, select the ADD TO OUTLOOK CONTACTS command.
• The CONTACT window will open; here you can enter additional information about the message sender.
• Once finished, click on the SAVE AND CLOSE icon located on the CONTACT window toolbar.
IC1.7.3. Organizing Messages
IC1.7.3.1. Searching for a message by sender, subject or mail content
To search for a message • If necessary, open the INBOX folder. • Click the TOOLS drop down menu and select the FIND command
OR click the FIND icon on the STANDARD toolbar.
• Enter the keyword you wish to search for into the LOOK FOR text box.
FOR USE AT THE LICENSED SITE(S) ONLY © Cheltenham Courseware Ltd. 1995-2007 www.cheltenhamcourseware.com
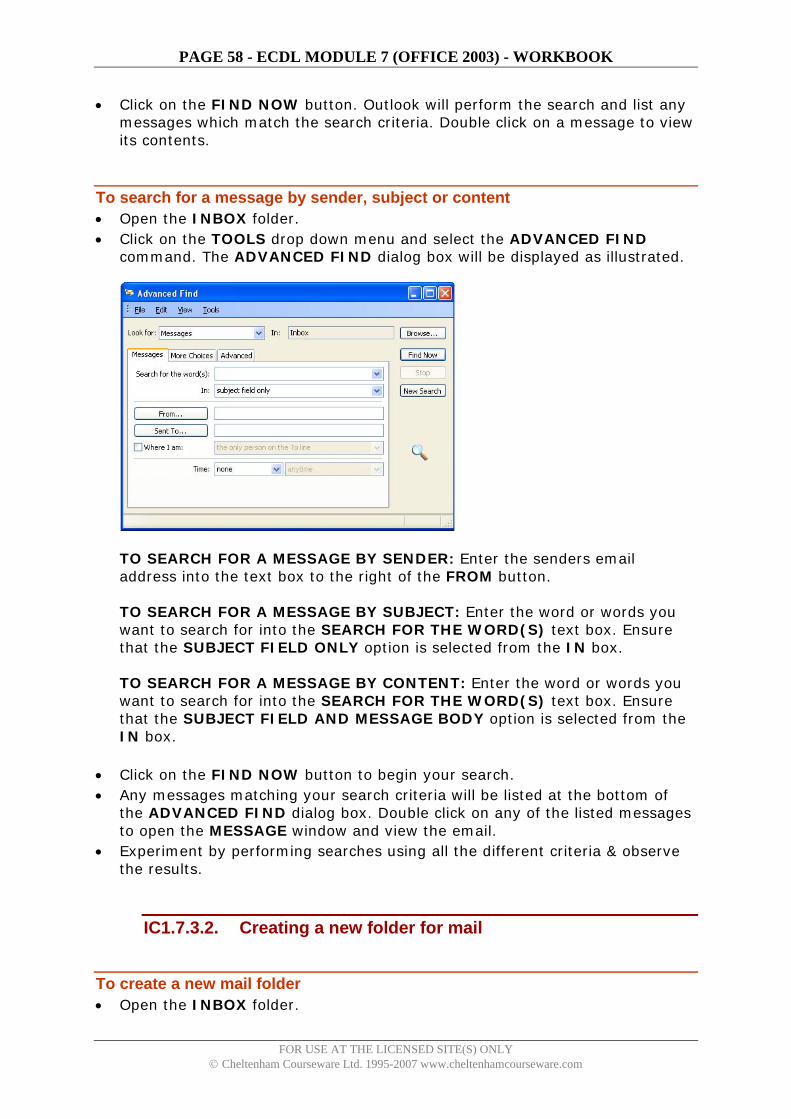
PAGE 58 - ECDL MODULE 7 (OFFICE 2003) - WORKBOOK
• Click on the FIND NOW button. Outlook will perform the search and list any messages which match the search criteria. Double click on a message to view its contents.
To search for a message by sender, subject or content • Open the INBOX folder. • Click on the TOOLS drop down menu and select the ADVANCED FIND
command. The ADVANCED FIND dialog box will be displayed as illustrated.
TO SEARCH FOR A MESSAGE BY SENDER: Enter the senders email address into the text box to the right of the FROM button. TO SEARCH FOR A MESSAGE BY SUBJECT: Enter the word or words you want to search for into the SEARCH FOR THE WORD(S) text box. Ensure that the SUBJECT FIELD ONLY option is selected from the IN box. TO SEARCH FOR A MESSAGE BY CONTENT: Enter the word or words you want to search for into the SEARCH FOR THE WORD(S) text box. Ensure that the SUBJECT FIELD AND MESSAGE BODY option is selected from the IN box.
• Click on the FIND NOW button to begin your search. • Any messages matching your search criteria will be listed at the bottom of
the ADVANCED FIND dialog box. Double click on any of the listed messages to open the MESSAGE window and view the email.
• Experiment by performing searches using all the different criteria & observe the results.
IC1.7.3.2. Creating a new folder for mail
To create a new mail folder • Open the INBOX folder.
FOR USE AT THE LICENSED SITE(S) ONLY © Cheltenham Courseware Ltd. 1995-2007 www.cheltenhamcourseware.com

PAGE 59 - ECDL MODULE 7 (OFFICE 2003) - WORKBOOK
• Click on the FILE drop down menu and select the NEW command. • Choose FOLDER from the submenu, the CREATE NEW FOLDER dialog box
will be displayed. • Type a name for the folder into the NAME text box. Use the name
IMPORTANT MAIL. • Click on the OK button to close the CREATE NEW FOLDER dialog box.
IC1.7.3.3. Moving messages to a new folder for mail
To move a message to a different folder • Open the INBOX folder and select the message you want to move by clicking
on the entry in the message list. • Right click on the highlighted message to display a popup menu. • Select the MOVE TO FOLDER command as illustrated.
The MOVE ITEMS dialog box will be displayed.
FOR USE AT THE LICENSED SITE(S) ONLY © Cheltenham Courseware Ltd. 1995-2007 www.cheltenhamcourseware.com

PAGE 60 - ECDL MODULE 7 (OFFICE 2003) - WORKBOOK
• Select the folder you want to move the message to by clicking on the entry in
the MOVE ITEMS dialog box. In this case select the IMPORTANT MAIL folder.
• Click on the OK button to close the MOVE ITEMS dialog box and move the message.
IC1.7.3.4. Sorting messages by name or by date
To sort the contents of the Inbox • If necessary, open the INBOX folder. • Click on the heading of the field you wish to sort the message list by, e.g. to
sort the messages by sender, click on the FROM field heading. An arrow will appear to indicate the direction of the sort.
• Click the field heading again to reverse direction of the sort if required. Experiment with sorting the Inbox folder using all the available field headings.
IC1.7.3.5. Deleting a message
To delete a message • Open the INBOX folder. • Select the message you want to delete by clicking on the entry in the
message list and then press the DELETE key.
FOR USE AT THE LICENSED SITE(S) ONLY © Cheltenham Courseware Ltd. 1995-2007 www.cheltenhamcourseware.com

PAGE 61 - ECDL MODULE 7 (OFFICE 2003) - WORKBOOK
IC1.7.3.6. Restoring a message from the mail bin/deleted items folder
To open the Deleted Items Folder • Click on the DELETED ITEMS icon located in the Navigation pane.
To restore a message from the Deleted Items Folder • Open the DELETED ITEMS folder. • Select the message you wish to recover. • Click on the EDIT drop down menu and select the MOVE TO FOLDER
command. The MOVE ITEMS dialog box will be displayed as illustrated below.
• Select the folder you want to move the item to from the list by clicking on the appropriate icon in the MOVE ITEMS dialog box, in this case select the Inbox folder.
• Click on the OK button to recover the message.
IC1.7.3.7. Emptying the mail bin / deleted items folder
To empty the Deleted Items Folder • If necessary, open the Deleted Items folder.
FOR USE AT THE LICENSED SITE(S) ONLY © Cheltenham Courseware Ltd. 1995-2007 www.cheltenhamcourseware.com

PAGE 62 - ECDL MODULE 7 (OFFICE 2003) - WORKBOOK
• Click on the TOOLS drop down menu and select the EMPTY “DELETED ITEMS” FOLDER command. The following dialog box will be displayed.
• To delete the contents of the Deleted Items folder click on the YES button or
press ENTER.
To automatically empty the Deleted Items Folder when you exit Outlook • Click on TOOLS drop down menu and select the OPTIONS command to
display the OPTIONS dialog box. • Click on the OTHER tab to display the OTHER folder. • Select the EMPTY THE DELETED ITEMS FOLDER UPON EXITING option.
• Click on the OK button.
IC1.7.4. Preparing to Print
What printing options are available? • Click on the FILE drop down menu and select the PRINT command. This will
display a dialog box.
FOR USE AT THE LICENSED SITE(S) ONLY © Cheltenham Courseware Ltd. 1995-2007 www.cheltenhamcourseware.com

PAGE 63 - ECDL MODULE 7 (OFFICE 2003) - WORKBOOK
• The PRINT dialog box allows you to set options to control how messages are
printed. • Click on the CANCEL button to close the PRINT dialog box.
IC1.7.4.1. Previewing a message
To preview a message prior to printing • Select the message you want to print. Click on the FILE drop down menu
and select the PRINT PREVIEW command. • The message will be displayed as it would be printed. • When you have finished previewing the message, click the CLOSE button on
the toolbar.
IC1.7.4.2. Choosing print output options
To choose what to print • Select the message you want to print. Click on the FILE drop down menu
and select the PRINT command. This will display a dialog box.
FOR USE AT THE LICENSED SITE(S) ONLY © Cheltenham Courseware Ltd. 1995-2007 www.cheltenhamcourseware.com

PAGE 64 - ECDL MODULE 7 (OFFICE 2003) - WORKBOOK
TO PRINT THE ENTIRE MESSAGE: Within the PAGE RANGE section of the dialog box, select the ALL option. TO PRINT ONLY PART OF THE MESSAGE WHICH YOU HAVE PRE-SELECTED: Within the PAGE RANGE section of the dialog box, click on SELECTION. TO PRINT A SPECIFIED NUMBER OF COPIES: Within the NUMBER OF COPIES section of the dialog box, enter the number of copies required. TO PRINT A MESSAGE TO A FILE: Click on the PRINT TO FILE check box.
• If a printer is available experiment with using the various printing options listed above.
FOR USE AT THE LICENSED SITE(S) ONLY © Cheltenham Courseware Ltd. 1995-2007 www.cheltenhamcourseware.com


![© Cheltenham Computer Training 1995 - 2000 ECDL/ICDL [Module One] - Basic Concepts of Information Technology ECDL/ICDL - Module 1 Basic Concepts of Information](https://img.dokumen.tips/doc/110x75/56649e2e5503460f94b1deeb/-cheltenham-computer-training-1995-2000-ecdlicdl-module-one-basic.jpg)


![ECDL module 5: using databases [To be continued]](https://img.dokumen.tips/doc/110x75/58709b321a28ab412b8b7a4f/ecdl-module-5-using-databases-to-be-continued.jpg)