Embed Size (px)
Citation preview

ECA Risk Report
User Guide August 19, 2015
Table of Contents Introduction ....................................................................................................................... 1
Getting Started .................................................................................................................. 1
User Names and Passwords .............................................................................................. 2
Preparing to Enter Data ................................................................................................... 3
Accessing the ECA Risk Report ....................................................................................... 3
Logging into Gateway ....................................................................................................... 4
Banner Icons ...................................................................................................................... 5
Selecting a Unit .................................................................................................................. 5
Main Menu ......................................................................................................................... 6
Risk Assessment ................................................................................................................ 8
Annual Reporting ............................................................................................................ 11
Beginning Balances, Receipts and Expenditures – Upload Option ............................ 13
Beginning Balances, Receipts and Expenditures – Manual Option ........................... 18
Cash Reconcilement ........................................................................................................ 22
Report Certificate............................................................................................................ 26
Review .............................................................................................................................. 29
Report Output ................................................................................................................. 30
Submit .............................................................................................................................. 33
Frequently Asked Questions .......................................................................................... 35

1
Introduction
The State Board of Accounts (SBOA) has implemented the ECA Risk Report through the Indiana Gateway for
Government Units (Gateway) for the fiscal year ending June 30, 2015 and following.
Per IC 5-11-1-4 school corporations are required to provide electronically and in a manner prescribed by the State
Examiner, financial reports for the fiscal year not later than sixty days after the close of the fiscal year.
Effective July 1, 2015, Public Law 181-2015 amended IC 5-11-1-25 to require the SBOA to develop risk based
examination criteria and then determine the frequency each audited entity is required to be examined based on the
results of a risk based assessment.
The ECA Risk Report filed through Gateway is a part of the financial reports required to be filed by the school
corporation per IC 5-11-1-4 and has been designed as the tool for school corporations to provide the risked based
criteria for their extra-curricular accounts (ECAs) to allow SBOA to evaluate for an appropriate level of risk.
Getting Started
1) What schools are required to complete the ECA Risk Report?
All schools and turn around academies with extra-curricular accounts must complete the ECA Risk Report
through the Gateway. This does not apply to charter schools.
2) Is completion of the ECA Risk Report via Gateway mandatory?
Yes. The ECA Risk Report filed through Gateway is a part of the financial reports required to be filed by the
school corporation per IC 5-11-1-4.
3) When is the ECA Risk Report due?
The ECA Risk Report is due sixty days after the end of the fiscal year, which is August 29. This is the same
due date as the school corporation Annual Financial Report required per IC 5-11-1-4.
4) What happens if the ECA Risk Report is not submitted via Gateway?
SBOA will only recognize submission of the ECA Risk Reports through Gateway. SBOA will not accept the
report in paper form or in any other format. If it is not submitted through Gateway, as prescribed, the extra-
curricular account (ECA) will be considered high risk and the Department of Local Government Finance
(DLGF) may not approve the budget of the school corporation in accordance with IC 5-11-1-4.
5) Who is responsible for completing and submitting the ECA Risk Report?
The fiscal officer for the school corporation, usually the school treasurer/controller, is responsible for
submitting the ECA Risk Report. This is the same person that is responsible for submitting the Annual
Financial Report on Gateway for the school. The fiscal officer can assign edit rights to ECA Treasurers or other
users to specific ECAs by completing the ECA Delegation of Authority Form found on our website. Edit rights
gives the user access to enter, change and delete data as well as generate the various reports within the ECA
Risk Report. However, they will not be able to submit the report. The fiscal officer must submit the report. If
changes need to be made after the report is submitted, the fiscal officer must un-submit the report.

2
User Names and Passwords
As an authorized user of the Indiana Gateway for Government Units, you will have a user name and password to
access the Gateway program. Your user name is the email address on file with SBOA. You will be responsible for
all information entered into Gateway under your user name and password.
6) How do I obtain a user name and password to login?
If you are the Fiscal Officer (Treasurer/Controller) responsible for submitting and do not already have a
Gateway user name and password, please send your request to our help desk at [email protected]. Include
your name, job title, email address, school corporation name, county and the ECA names you need access to
submit.
If you are an ECA Treasurer or other user that needs access, the Fiscal Officer (Treasurer/Controller) must
request access for you by completing the ECA Delegation of Authority Form found on our website. If someone
no longer requires access to the ECA Risk Report, please let us know by completing the Delegation of
Authority form or emailing our help desk so their access can be removed. Please notify our help desk if your
email address changes so you will not miss any emails sent by SBOA to Gateway users.
7) What is my password?
Your initial password should have been automatically emailed to you when your Gateway user name was
created. If you have forgotten your password, you may click on the “Forgot your password?” link located on
the Gateway login screen. This will direct you to enter your user name (which is your email address). When
you click “Submit”, a new password will be emailed to you. If you don’t receive the new password at the
expected address, contact us at [email protected]. After using this new password to log in, this initial
password should be changed by clicking “Account Settings” and clicking on the “Change Password” link.
8) My password will not work and the "forgot password" function will not recognize my user name. How
can I get my password reset?
A user name will be locked if there have been 5 consecutive invalid login attempts. To unlock your user name,
contact us at [email protected] and we will unlock your user name and email you a new password. This
control prevents others from inappropriately attempting to access Gateway through password guessing. We
regret any inconvenience this may cause you.
9) How do I change my password?
To change your password, you must first login in with your current user name and password. Click on
“Account Settings” which is located under the Gateway heading. Scroll to the bottom of the Account Settings
screen and click on the “Change Password” link.
10) What are the password requirements?
Passwords must be at least seven characters long.
11) Can my user name and password be shared with others in my office so that they can enter and review
data?
Each person that needs update access to Gateway should have their own user name and password. The Fiscal
Officer (Treasurer/Controller) may request that additional user names be created with either Edit rights or Read
Only rights by completing the ECA Delegation of Authority Form found on our website. The Fiscal Officer
(Treasurer/Controller) is responsible for submitting a complete and accurate ECA Risk Report regardless of
who entered or reviewed the data.
12) How long can the Gateway screens be inactive before being timed out of the Gateway system?
For security purposes and to limit resource usage, after 20 minutes of inactivity the Gateway system will time
out. To resume work, you will need to re-enter your user name and password.

3
Preparing to Enter Data
13) Can I upload data from my financial accounting system into the ECA Risk Report? If so, what
information can be uploaded and what format is required?
Yes, you can upload the information on the Schedule of Balances, Receipts and Expenditures. There are links
within the application to download the three templates needed, but if you want prepare the files ahead of time,
you can use the links below. If you download the templates from the links below, make sure to rename the file
so that you won’t lose your work if you subsequently download the file from the application and it overwrites
the file that contains your school’s data. When completing these files, be sure to use the EXACT SAME fund
names in each file. If the fund names within the three files do not match exactly, this will create an upload
error. The templates can be downloaded here:
https://gateway.ifionline.org/ECA/Fund_Template.xlsx
https://gateway.ifionline.org/ECA/Receipts_Template.xlsx
https://gateway.ifionline.org/ECA/Expenditures_Template.xlsx
14) When I’m ready to upload my Fund, Receipts, and Expenditures files, how should the files be named?
You may name the upload files any name you wish, but they must be one of the following file types and have
these file extensions: Excel files (.xlsx or .xls) or Comma Separated Value files (.csv). Most computer systems
allow you to download data in a (.csv) format.
For more details on this process, see the Beginning Balances, Receipts and Expenditures – Upload Option
section of the user guide.
Accessing the ECA Risk Report
15) How do I log in?
The Gateway login screen is located at https://gateway.ifionline.org/login.aspx. Your user name is your email
address. Please bookmark this web address.
16) What web browser should I use?
The Gateway login screen states that the site works best in Firefox and Chrome. Internet Explorer (IE) is not a
supported browser, but should generally work if you have version 9 or above. If you are using IE version 9 with
Gateway applications, you should turn Compatibility View On.
To turn Compatibility View on or off, click the Compatibility View button as shown below. A light colored
button indicates that Compatibility is Off, while a dark button indicates that Compatibility is On. You can also
change to compatibility view by going to the Tools Menu, and clicking on Compatibility View. A checkmark
by Compatibility View indicates that it is On.
When you report problems, please let us know which browser and version you are using.

4
Logging into Gateway
Click this link to go to the login screen: https://gateway.ifionline.org/login.aspx
Enter your User Name (your e-mail address)
Enter your Password
Click the “Log In” button
Click on the “ECA Risk Report” link or the button next to it.

5
Banner Icons
17) The top banner (shown above) includes Home, About, Account Settings, Help, and Logout buttons.
What are these for?
The Home button allows you to select other Gateway applications.
The About button provides background about the Gateway system.
The Account Settings button is used to change your password.
The Help button provides links to User guides and other reference material for each application.
The Logout button is used to logout.
Selecting a Unit
The ECAs assigned to you are listed. Click on your ECA name. If your ECA is not listed, the wrong ECA appears,
you do not have the correct role, or there are any other discrepancies, request that the Fiscal Officer
(Treasurer/Controller) email [email protected] so that the access problem can be corrected. The Fiscal
Officer’s (Treasurer/Controller) list should include a link for each ECA within the school corporation and should
have the Submitter role, as noted below.
Then select the year for the reporting period ending June 30, for example, “2015 Fiscal Year – ECA Risk
Reporting”

6
Main Menu
The Main Menu guides you through the ECA Risk Report sections. When accessing the Annual Reporting section,
breadcrumbs appear on both the top and bottom of the screens that allow you to access the various subsections or
return to the Main Menu, as noted below.
This User guide addresses each of these sections in the same order in which they appear in the Main Menu and are
summarized below.
Risk Assessment – 20 questions to answer along with follow-up questions. If applicable, will upload an SA-9.
Annual Reporting – includes the following 4 subsections accessed through the breadcrumbs:
Schedule of Balance, Receipts and Expenditures
Cash Reconcilement
Report Certificate
Review
Report Output – 5 reports are available to view or open in an Excel or PDF document.
Submit – Report is not filed until it is submitted. This is only available to the Fiscal Officer (Treasurer/Controller).
Below is an example of what the Main Menu should look like before any data has been entered. However, those
with Editor or Read Only access will not have the Submit option on their Main Menu.

7
Note that there is a “Status” column on the right side of the Main Menu to track your progress.
Note below after the ECA Risk Report has been submitted, the Fiscal Officer (Treasurer/Controller) is able to see the
date/time stamp when it was submitted under the Status column. There is also a link to click to “Unsubmit” the
report if errors are subsequently identified. Changes cannot be made within the Risk Assessment and Annual
Reporting sections because the links are no longer available. Only the “Report Output” section is available for use
after it has been submitted. If errors are found after the report is submitted, the Fiscal Officer (Treasurer/Controller)
must unsubmit the report by clicking the “Unsubmit” link under the Status column.

8
Risk Assessment
There are 20 questions that must be answered. Some have follow-up questions depending upon your answer. For
Question 17, you must upload the Form SA-9 Accountable Items Review, if it is used.
NOTE: ALL Risk Assessment questions must be answered before any of the responses will be saved.
After answering ALL questions, click on the “Click here to Save Risk Assessment” button and you will see a large
message in red indicating whether there are missing required fields, or the form has been saved. If there are
missing fields, you must answer the questions that have “*Required” on the right next to the answers. If you leave
the Risk Assessment without answering ALL of the questions then NONE of your answers will be saved.
If there were no missing fields, then you will see the message “Form Saved” as shown below.

9
Below is an example of a completed Risk Assessment after generating a PDF file from the Report Output section.

10
Below is a sample of the SA-9 form that should be uploaded as part of Question 17 if it is used to account for
vending machine activity.

11
Annual Reporting
Beginning this year, the expenditures need to be classified and summarized by BOTH the “Purpose of
Expenditure” AND by the “Vendor Paid”. For example, if there were 10 payments that were made to 5 different
vendors all for the same purpose and paid from the same fund, in prior years this would have been summarized and
reported within one row. But this year it will be summarized by vendor, requiring 5 rows of data. Because of this
change, most schools will find it even more advantageous to use the upload option. You can upload files of your
funds and beginning balances, receipt detail and expenditure detail. This option is discussed in more detail below.
Classifications
The classifications (Source of Receipts, Nature of Receipts, and Purpose of Expenditure) should come from the
classifications/descriptions within your accounting system. If these do not exist, below is some general guidance
on how to classify your transactions:
For the “Source of Receipts”, examples include admissions, state distributions, local grants, federal distributions
(lunch), sales, etc.
For the “Nature of Receipts”, examples include ticket sales, XYZ grant, PTO donations, vending machines, etc.
For the “Purpose of Expenditure”, examples include dues, officials, transportation, meals, tickets, insurance, repair
of equipment, laundry and cleaning, equipment, etc.
Do not net receipts and expenditures to the extent that the report will be incomprehensible. Neither receipts nor
expenditures should be combined and listed as miscellaneous items.
Fund Names
If you have numerous funds and/or you prefer to have funds displayed in a certain order, you may want to prefix
the fund names with fund numbers. Both the Summary Schedule and Detail reports within the ECA Risk Report
sort the funds alphabetically as text fields, not as numeric fields. For example, if you choose to prefix your fund
name with the fund numbers of 9, 33, and 111 the funds would be sorted in the following order: 111, 33, and 9
since it sorts by the first character. To enable these fund numbers to appear in numerical order, you will need to add
leading zeros to the fund numbers (e.g. 009, 033, and 111). If you have uploaded your files and later decide you
would like to see the funds listed in a different order, you will either need to modify all of the upload files, or you
can simply modify the fund name on-line and you will not need to make any changes to the receipts and
expenditures.
Negative Receipts and Negative Expenditures
The ECA Risk Report will not allow you to enter a negative receipt amount or a negative expenditure amount. If
your accounting system allows negative amounts (e.g. refunds, voids, or other types of negative entries), you may
need to make adjustments to your extracted data before finalizing the upload files. For example, you may need to
classify negative expenditures as positive receipts, classify negative receipts as positive expenditures, and/or net the
related transactions. If the related negative and positive transactions net to $0, these should not be included in the
upload file or entered manually because $0 receipts and expenditures will also create submission errors.
Transfers between Funds
If there are transfers between funds, these amounts will not have a vendor associated with them. If the extract from
your accounting system does not clearly document these in the receipts and/or expenditures upload files, one
alternative is to list these transfers as being paid to a vendor such as “Transferred to XX Fund” and the Source of
Receipts could be listed as “Transferred from XX Fund”. The goal is to appropriately summarize and classify all
transactions affecting the fund balances, and to document them within the ECA Risk Report as clearly as possible
with a minimal amount of effort.
12
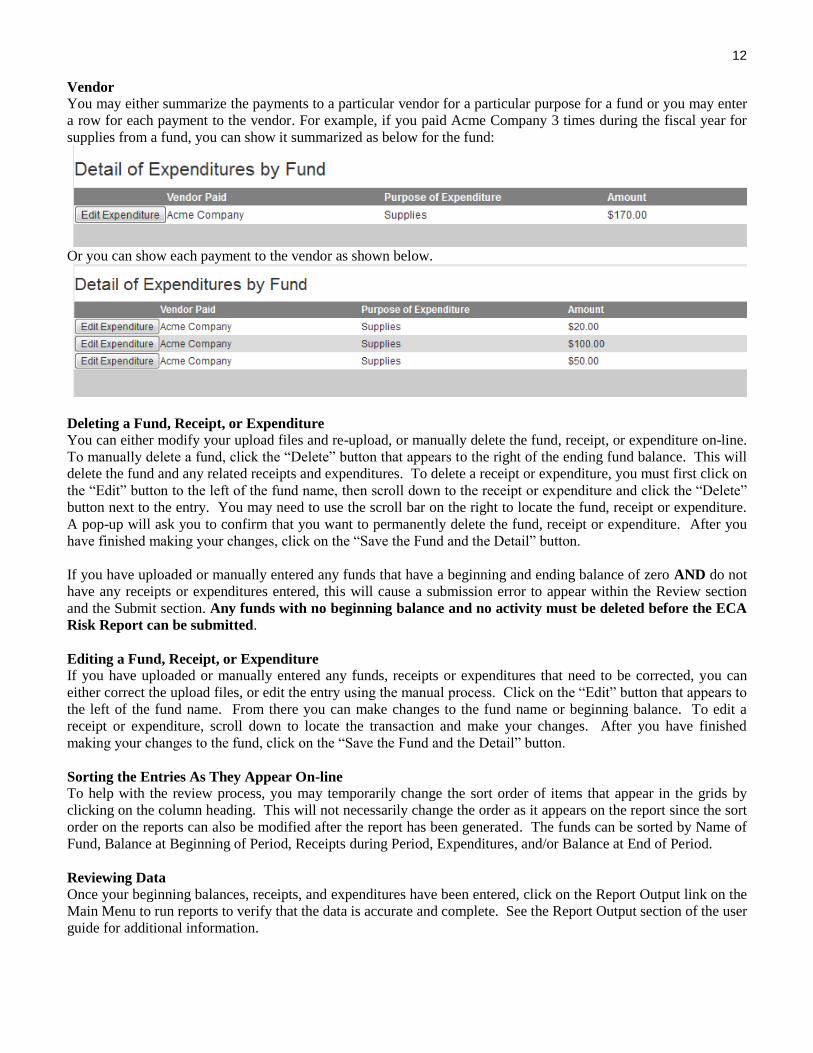
Vendor
You may either summarize the payments to a particular vendor for a particular purpose for a fund or you may enter
a row for each payment to the vendor. For example, if you paid Acme Company 3 times during the fiscal year for
supplies from a fund, you can show it summarized as below for the fund:
Or you can show each payment to the vendor as shown below.
Deleting a Fund, Receipt, or Expenditure
You can either modify your upload files and re-upload, or manually delete the fund, receipt, or expenditure on-line.
To manually delete a fund, click the “Delete” button that appears to the right of the ending fund balance. This will
delete the fund and any related receipts and expenditures. To delete a receipt or expenditure, you must first click on
the “Edit” button to the left of the fund name, then scroll down to the receipt or expenditure and click the “Delete”
button next to the entry. You may need to use the scroll bar on the right to locate the fund, receipt or expenditure.
A pop-up will ask you to confirm that you want to permanently delete the fund, receipt or expenditure. After you
have finished making your changes, click on the “Save the Fund and the Detail” button.
If you have uploaded or manually entered any funds that have a beginning and ending balance of zero AND do not
have any receipts or expenditures entered, this will cause a submission error to appear within the Review section
and the Submit section. Any funds with no beginning balance and no activity must be deleted before the ECA
Risk Report can be submitted.
Editing a Fund, Receipt, or Expenditure
If you have uploaded or manually entered any funds, receipts or expenditures that need to be corrected, you can
either correct the upload files, or edit the entry using the manual process. Click on the “Edit” button that appears to
the left of the fund name. From there you can make changes to the fund name or beginning balance. To edit a
receipt or expenditure, scroll down to locate the transaction and make your changes. After you have finished
making your changes to the fund, click on the “Save the Fund and the Detail” button.
Sorting the Entries As They Appear On-line
To help with the review process, you may temporarily change the sort order of items that appear in the grids by
clicking on the column heading. This will not necessarily change the order as it appears on the report since the sort
order on the reports can also be modified after the report has been generated. The funds can be sorted by Name of
Fund, Balance at Beginning of Period, Receipts during Period, Expenditures, and/or Balance at End of Period.
Reviewing Data
Once your beginning balances, receipts, and expenditures have been entered, click on the Report Output link on the
Main Menu to run reports to verify that the data is accurate and complete. See the Report Output section of the user
guide for additional information.

13
Beginning Balances, Receipts and Expenditures – Upload Option
Creating Upload Files
There is a method to MANUALLY enter beginning balances, receipts and expenditures, but in almost all cases it
will be MUCH easier to use the UPLOAD process to enter your financial data. The manual process can be used
after uploading if you need to make minor changes such as changing fund numbers/names so the funds will be
listed in the desired order when sorted by fund name.
The links to the upload file templates are located on the upload screens. The Receipts and Expenditures templates
are not accessible until the beginning fund balances have been successfully uploaded. So if you prefer to create all
of the upload files before starting the upload process the links below can be used. Just make sure that if you chose
to download the links from the application that they do not overwrite the files you’ve already created.
https://gateway.ifionline.org/ECA/Fund_Template.xlsx
https://gateway.ifionline.org/ECA/Receipts_Template.xlsx
https://gateway.ifionline.org/ECA/Expenditures_Template.xlsx
IT IS CRITICAL THAT EACH FUND NAME USED IN THE RECEIPTS AND/OR EXPENDITURES FILE
ALSO EXIST IN THE BEGINNING BALANCE FILE EVEN IF THERE WAS A $0 BEGINNING BALANCE
IN THE FUND. If a fund name has not been included in the Fund upload file, you will receive an error message
when uploading receipts and/or expenditures to a Fund not previously added. If the fund names in the three files
don’t match, it will not be possible to compute an ending balance that agrees with your records. If you have a fund
that has NO beginning balance, NO receipts and NO expenditures, do not include that Fund in any of the upload
files. If the fund has a beginning balance, but no receipts or expenditures, the fund will only exist in the Fund
upload file. If the fund has no receipts, the Fund will only be included in the Fund upload file and the Expenditures
upload file.
The receipts and expenditures files should not have any negative amounts. If you have negative receipts, they
should be entered as expenditures and if you have negative expenditures, they should be entered as receipts.
All fields on the templates are required. Do NOT leave any fields blank.
It is highly recommended that the financial data be uploaded by extracting the data from your computerized
accounting system rather than entering the information via the on-line screens. The fund names and classifications
(source of receipts, nature of receipts, vendor and purpose of expenditure) should come from the classifications
used within your accounting system.
You can upload an Excel (.xls or .xlsx) file or a Comma Separated Values (.csv) file. Make sure your file has all of the
same data fields and in the same order as the template. For example, a file created to be the fund Excel file should
have the fund names in the first column and the beginning fund balances in the second column. You must have the
same exact column headings in your upload file as in the template. Use the same case and do not include any
extra spaces, dashes, etc.
If you are uploading an Excel file, you must have the same exact sheet name as in the template. The sheet name
is the name on the tab on the worksheet. For example, the sheet name for the fund template is Fund. See screen
shot below. Use the same case and do not include any extra spaces, dashes, etc.

14
Any time files need to be re-uploaded, all data from previously uploaded files (e.g. beginning fund balances,
receipts and expenditures) and/or manually entered funds and amounts will be automatically cleared out when the
new files are uploaded. The previously entered data cannot be restored. If problems are isolated to just the receipts
or expenditures file, it is a good idea to upload all three files even if the system does not require you upload the
Funds file again.
Processing Upload Files
From the Main Menu, select Annual Reporting.
To begin the Upload process, click the “Click here to upload Files” button.
If you have not already downloaded the Fund template, click on the blue “Click to download the Fund Excel
template” link. Open the downloaded Excel file named “Fund_Template.xlsx” to enter your fund names and
beginning balances.
Below is an example of the template with sample entries. Note that you may choose to include the fund number as
part of the fund name, if including the number helps when locating and sorting funds. If you choose to include the
fund number as part of the fund name, remember to include the number in all three upload files.
Sample Completed Fund Excel Template

15
After the Fund file has been completed and saved to your computer then you are ready for Step 1. Click on the
“Choose File” button. Then navigate to the path where you saved your completed Fund Template.xlsx file and
click “Open”. The various template files can be renamed anything as long as it ends in “.xlsx” or “.xls”. If you only
have an older version of Excel, you can change the file extension from “.xlsx” to “.xls” before proceeding
Note below that the name of the file you just selected appears on the screen.
Step 2: Click on the “Upload File” button.

16
After Step 2 has been completed, Step 3 through Step 6 appear, along with a red message indicating the “File was
successfully uploaded”. Note also that at the bottom of the screen the list of uploaded funds and beginning
balances appear. If you need to download the Receipts and/or Expenditures templates click on the corresponding
blue links.

17
Sample Completed Receipts Excel Template
Sample Completed Expenditures Excel Template
Step 3 and Step 4 to upload the Receipts file, and Step 5 and Step 6 to upload the Expenditures file are similar to
Step 1 and Step 2. After the Receipts file is uploaded, the total receipt amounts by fund appear and after the
Expenditures file is uploaded, the total expenditure amounts by fund appear. The system calculated ending fund
balance should agree with your records. If it does not agree with your records, you must review the information to
determine the error. You can do this by going to the Report Output menu and printing the Schedule of Balances and
the Detailed Receipts and Expenditures You can edit individual funds or related receipts and/or expenditures by
clicking on the “Edit” button that appears next to the fund name. See screen shot below.
Re-uploading Files Due to Errors
If you identify errors and want to re-upload files, make any necessary corrections to the upload files, go to the Main
Menu and click on Annual Reporting. Click on the “Click here to upload Files” button and repeat the same upload
steps.

18
Beginning Balances, Receipts and Expenditures – Manual Option
IF YOU CHOOSE NOT TO UPLOAD, you can enter the data manually.
To add a fund, click on the “Click here to Add a New Fund” link, then fill in the fund name and beginning balance.
Then click on “Save the Fund and the Detail” to save the fund.
You can also enter a receipt and/or expenditure at this time. If you do, make sure you enter data in all of the fields
and click the “Save Receipt” and “Save Expenditure” buttons before clicking the “Save the Fund and Detail” button
or you may lose the receipt and expenditure that you entered.
Note that there is a scroll bar on the right to scroll down to see the other funds. The totals at the bottom of the
screen provide a running total for your entries and consist of the beginning balance, receipts, expenditures, and
ending balance for all funds.

19
After you save the fund, the screen will appear as below. You can click the “Edit” button on the left next to the fund
name to make any changes to the fund and to add receipts and expenditures to the fund. Click the “Delete” button
on the right next to the ending balance to delete the fund and all of its receipts and expenditures.
When you are editing a fund, the screen will appear as below. You can make changes to the fund name and
beginning balance and click the “Save the Fund and the Detail” button to save the changes. Click the “Cancel”
button if you do not wish to save the changes. To enter receipts and expenditures, use the scroll bar on the right.

20
To add another receipt, enter data in all of the fields below and click on the “Add Receipt” button. To edit a receipt
that has already been entered, click on the “Edit Receipt” button on the left next to the receipt. To delete a receipt,
click on the “Delete” button to the right of the receipt.
If you click on the “Edit Receipt” button, the screen will appear as below. Make the changes and click the “Save”
button to save the changes or the “Cancel” button to discard the changes.
To add an expenditure, enter data in all of the fields below and click on the “Add Expenditure” button. To edit an
expenditure that has already been entered, click on the “Edit Expenditure” button on the left next to the Vendor
Name. To delete an expenditure, click on the “Delete” button to the right of the expenditure.
If you click on the “Edit Expenditure” button, the screen will appear as below. Make the changes and click the
“Save” button to save the changes or the “Cancel” button to discard the changes.
When you are finished adding receipts and/or expenditures for a fund, click on the “Save the Fund and Detail”
button at the top or the bottom of the screen to make sure all of your changes for the fund are saved.

21
Note: As you are entering and making changes to the fund information, the receipts and the expenditures, you may
need to scroll up and down to see all of the data. Also, make sure that you click the correct “Delete” button
when deleting data. There is a delete button for the fund, each receipt and each expenditure. Read the
confirmation box and make sure you are deleting what you intended.

22
Cash Reconcilement
The Cash Reconcilement section can be accessed by selecting “Annual Reporting” from the Main Menu, and then
clicking on the “Cash Reconcilement” breadcrumb at the top (or bottom) of the screen.
All cells in this section are required. Enter a 0 (zero) in any cell that is not applicable. The Total of Outstanding
Checks and the Balance are calculated for you.
Definitions
Depository Balance – Enter the ending balance on your bank statement for the period ending or including
June 30.
Cash On Hand – Enter the amount included in your June 30 fund balances that was on hand, but was not
deposited (e.g. petty cash, change fund).
Deposits In Transit – Enter deposits not included within the bank statement due to timing (e.g. June 30
deposit made after the bank’s close of business).
Other Reconciling Items – Examples include bank errors not yet corrected, any bank statement
transactions dated between July 1 and the ending date of your bank statement. Retain documentation of
these items for audit.

23
Total of Outstanding Checks – Calculated from the outstanding checks entered on the Cash
Reconcilement when you click the “Save and Calculate Total of Outstanding Checks and Balance” button.
There is no upload process for outstanding checks, so these should be entered individually on the Cash
Reconcilement screen.
Balance – Computed when you click the “Save and Calculate Total of Outstanding Checks and Balance”
button.
To enter outstanding checks, click on the Add new record link at the top or the bottom of the grid.
Enter the information in the cells and click the Insert button to add the check or the Cancel button to discard it.
After the check is added, you can click on the red X on the right next to the check to delete it or click on the Edit
button on the left to make changes.
By clicking on the column heading, you can change the sort order so that it sorts by Date, Check Number or
Amount.

24
Click on the “Save and Calculate Total of Outstanding Check and Balance” button to calculate balances and save
the Cash Reconcilement.
If you leave a field blank, the form will not be saved and you will see “Required field” in red next to the blank cell.

25
After the form is saved, you can go to the “Review” by clicking on the breadcrumb at the top or the bottom of the
screen to determine if the reconciled balance agrees with the ending balance of the funds entered on the prior
screen. If it does not balance, the error message will state, “Balance End of Period Total of $xx,xxx.xx does not
match Cash Reconcilement balance of $xx,xxx.xx.” You must then go back to the Schedule of Balances, Receipts
and Expenditures and/or the Cash Reconcilement to correct any errors so that the report is in balance. You will not
be able to submit until the report is in balance.
26
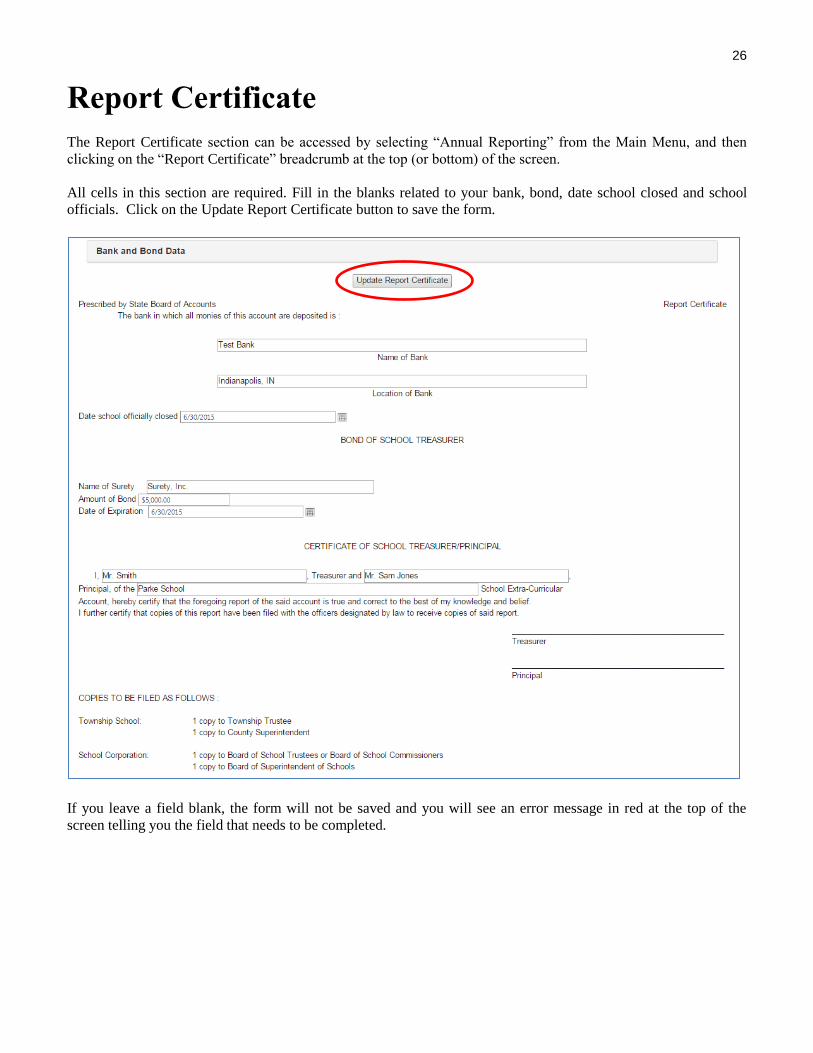
Report Certificate
The Report Certificate section can be accessed by selecting “Annual Reporting” from the Main Menu, and then
clicking on the “Report Certificate” breadcrumb at the top (or bottom) of the screen.
All cells in this section are required. Fill in the blanks related to your bank, bond, date school closed and school
officials. Click on the Update Report Certificate button to save the form.
If you leave a field blank, the form will not be saved and you will see an error message in red at the top of the
screen telling you the field that needs to be completed.

27
When all of the fields are completed and you click on the Update Report Certificate button, you will see the
message “Form Saved Successfully” in red at the top of the screen.
On the next page below is an example of a completed Report Certificate after generating the report from the Report
Output section. If you have not already done so, you can print, sign and send copies to the officials listed at the
bottom of the form, as applicable.

28

29
Review
The Review section can be accessed by selecting “Annual Reporting” from the Main Menu, and then clicking on
the “Review” breadcrumb at the top (or bottom) of the screen.
Please carefully review the fund names, transaction amounts, classifications, and system calculated ending balances
as they appear on-line or on the various reports to make sure they are correct. If you identify any errors, you may
either correct the upload files and then re-upload all three files, or you may add, modify, or delete any of the
uploaded fund descriptions, beginning balances, receipts or expenditure amounts, and/or classifications from within
the Annual Reporting section. Also, review the Cash Reconcilement, Report Certificate, and Risk Assessment
reports to verify they are correct.
Submission Errors and Warnings
The Review section (and the Submit section which is only accessible by the Fiscal Officer (Treasurer/Controller))
contains a list of all system identified submission errors and warnings. Any errors must be fixed before the ECA
Risk Report can be submitted. Warnings indicate possible problems, but will not prevent you from submitting your
ECA Risk Report. Click on the link next to the error or warning to quickly navigate to the appropriate screen to
review the information and make any corrections needed.

30
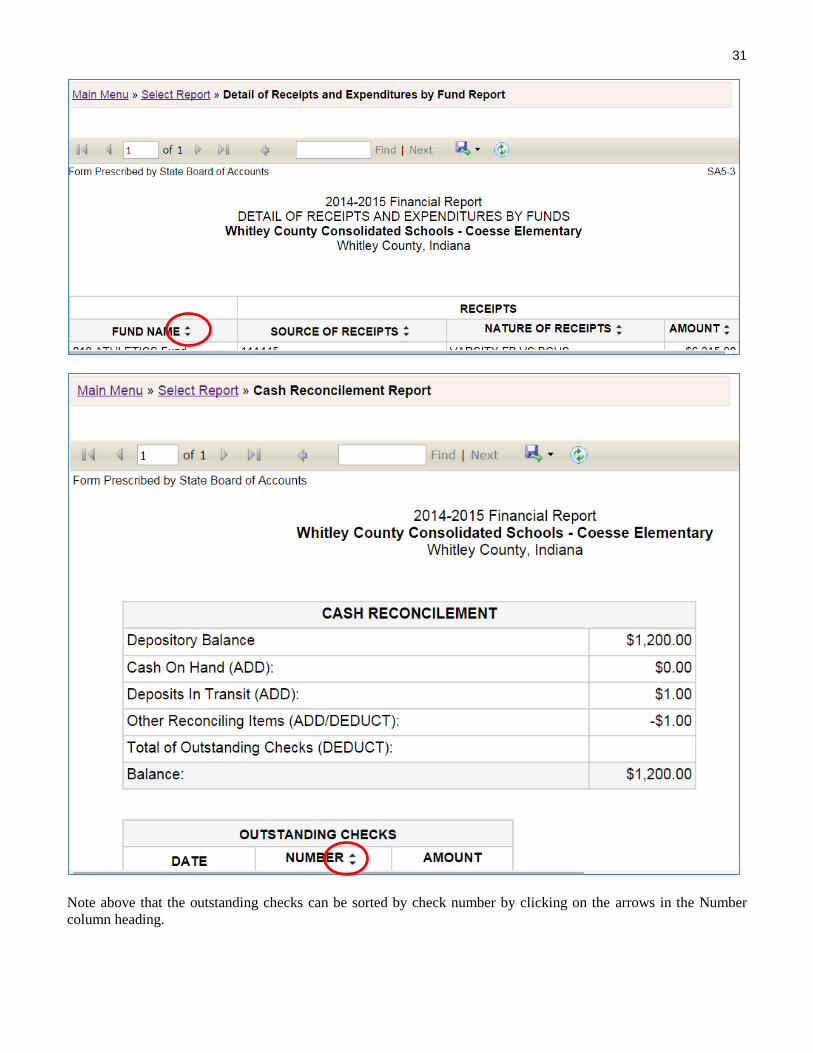
Report Output
After you have entered the data, you can go to the Report Output section on the Main Menu to view the reports on-
line or save the reports to a PDF or Excel file. These reports are useful for reviewing entries for accuracy. Once the
ECA Risk Report has been submitted, the Report Output section is the only section that is available to use.
From the Main Menu, select Report Output and click on any of the report names to generate an on-line version of
the report.
Below are examples of how the on-line reports appear. Note that the column headings have arrows next to them.
By clicking on these, you can change the sort order. If you choose to export the report to an Excel or PDF file, it
will be sorted in the order that you selected.
31
Note above that the outstanding checks can be sorted by check number by clicking on the arrows in the Number
column heading.

32
To save the reports to your computer, click on the Export icon, and select either PDF or Excel.
For an example of the Risk Assessment Report, see the Risk Assessment section of the user guide.
For an example of the Report Certificate, see the Report Certificate section of the user guide.

33
Submit
The submission process is the last step and it can only be performed by the Fiscal Officer (Treasurer/Controller)
who should have Submitter rights for the ECA Risk Report. Your report is not filed with SBOA until it is
submitted.
From the Main Menu, select Submit and then you will see the screen below.
If there are errors, it cannot be submitted. Warnings will indicate potential problems which will need to be
reviewed. However, warnings will not prevent you from submitting. If you only have Edit rights, you will not be
able to go to this section. An individual with Editor rights can access this same information by going to the Review
section. Once there are NO errors, the “Submit Form” button will appear at the VERY BOTTOM of the screen,
below any warnings.
After reading and agreeing to the certification statement, click on the “Submit Form” button. After you click the
“Submit Form” button, the submit status changes and the submitted date/time appears at the bottom of the Main
Menu under the Status column.
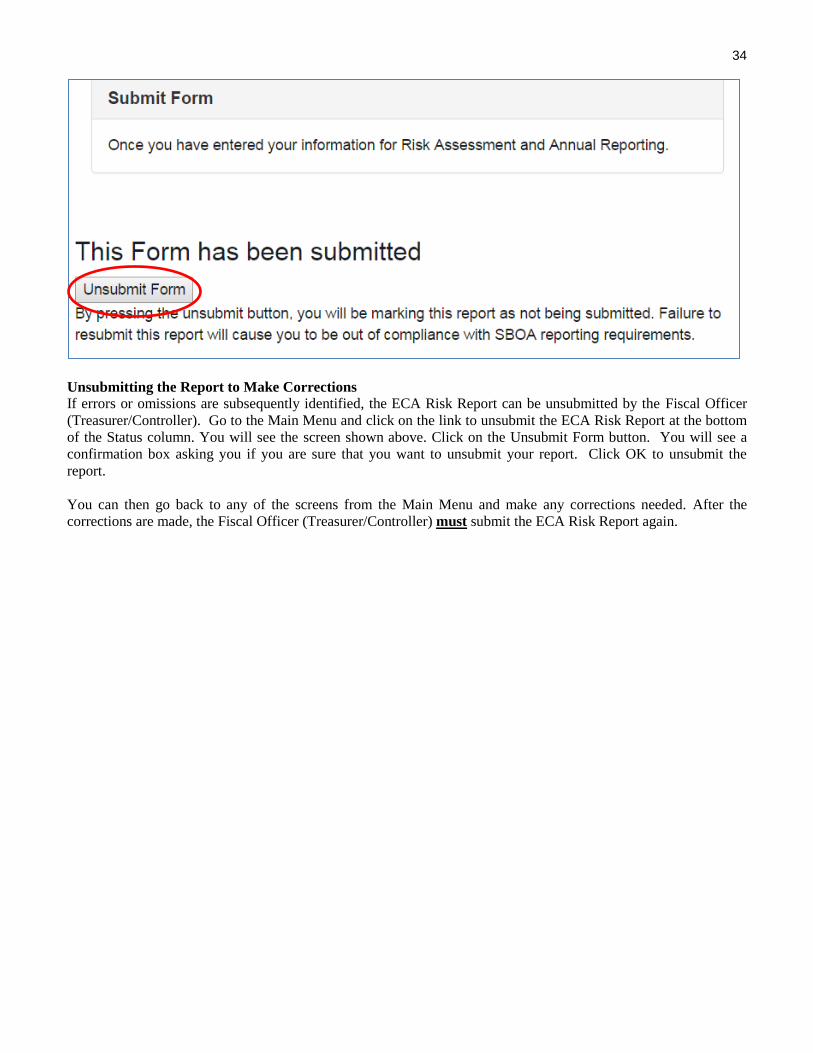
At that point, the following screen appears to confirm that the ECA Risk Report has been submitted:
34
Unsubmitting the Report to Make Corrections
If errors or omissions are subsequently identified, the ECA Risk Report can be unsubmitted by the Fiscal Officer
(Treasurer/Controller). Go to the Main Menu and click on the link to unsubmit the ECA Risk Report at the bottom
of the Status column. You will see the screen shown above. Click on the Unsubmit Form button. You will see a
confirmation box asking you if you are sure that you want to unsubmit your report. Click OK to unsubmit the
report.
You can then go back to any of the screens from the Main Menu and make any corrections needed. After the
corrections are made, the Fiscal Officer (Treasurer/Controller) must submit the ECA Risk Report again.

35
Frequently Asked Questions
The Frequently Asked Questions will be updated from time to time based upon common questions we receive to
our help desk at [email protected].
1) If I have questions, who should I contact?
If this user guide does not adequately answer your questions, email [email protected]. This would include
questions such as requesting user names and passwords, obtaining access to your particular school ECA, what
type of data should be entered, how transactions should be classified or how to answer the risk assessment
questions.
If you are having technical issues, contact IBRC at [email protected]. This includes questions such as what to
do when you have a server error messages that fills the entire screen, data is not saved even though the “Save”
buttons have been clicked, links not working or receiving invalid submission errors such as the reconciliation
report balances, but it still generates a submission error.
2) Do I need to send any hard copy printed ECA Risk Reports to the State Board of Accounts?
No. Please do not send SBOA any of the reports you are able to generate from the ECA Risk Reports. The
submission process allows SBOA to access the information directly from Gateway and includes the necessary
certification language.
3) How do I know if my ECA Risk Report has been submitted?
If you are the Fiscal Officer (Treasurer/Controller) that submitted the report, you will see the date/time stamp
when it was submitted on the last line in the Status column on the Main Menu. If there is no date/time stamp,
the ECA Risk Report has not been submitted.
If you only have edit rights, you will not see the date/time stamp, but the status on the Risk Assessment and
Annual Reporting will be “Submitted”.
4) I downloaded the Excel templates to upload data, but I don’t have the latest version of Excel. Can I still
upload using my old version of Excel?
The various template files can be renamed anything as long as it ends in .xlsx or .xls. If you have Excel
versions 97-2003 simply remove the last “x” from the file extension, enter your data, save and upload the file.
5) Our school corporation hired a CPA firm to audit our ECAs. Are we still required to submit the ECA
Risk Report on Gateway?
Yes. Any review of the ECA records that you have contracted with a CPA firm to do should be treated as a review
to assist you in making management decisions and is not a substitute for our responsibility to review your records
or for you to submit required reports to us.