Embed Size (px)
Citation preview

EasySiteWizard Professional 8.3
User Guide

2
Contents 1. INTRODUCTION .................................................................................................................................................. 3
2. NAVIGATION ...................................................................................................................................................... 4
3. MAIN MENU ....................................................................................................................................................... 4
4. ALTERNATIVE NAVIGATION ................................................................................................................................ 5
5. HOW TO CREATE A NEW SITE ............................................................................................................................. 5
6. LANDING PAGE ................................................................................................................................................... 6
6.1 STEP 1: SITE DETAILS ....................................................................................................................................... 6 6.2 STEP 2: CHOOSE A LANDING PAGE DESIGN ............................................................................................................. 7 6.3 STEP 3: EDITOR SECTION................................................................................................................................... 9 6.4 STEP 4: WIZARD COMPLETED........................................................................................................................... 14
7. MULTI-PAGE SITE .............................................................................................................................................. 14
7.1 STEP 1: SITE DETAILS ..................................................................................................................................... 14 7.2 STEP 2: CHOOSE DESIGN................................................................................................................................. 15 7.3 STEP 3: SITE MENU ....................................................................................................................................... 18 7.4 STEP 4: EDIT YOUR SITE .................................................................................................................................. 20 7.5 STEP 5: WIZARD COMPLETED........................................................................................................................... 21
8. MANAGE SITES SECTION................................................................................................................................... 22
8.1 EDITOR SECTION ........................................................................................................................................... 23 8.2 CREATE A MENU FOR YOUR SITE ....................................................................................................................... 24 8.3 SITE MENU EDITOR ....................................................................................................................................... 25 8.4 HOW TO SAVE YOUR WEBSITE ........................................................................................................................... 29 8.5 MASTER PAGE ENHANCEMENTS ....................................................................................................................... 29 8.6 MANAGE PAGES ........................................................................................................................................... 33 8.7 ADDING OR EDITING A TEXT BLOCK ................................................................................................................... 34 8.8 LAYER CONTROL ............................................................................................................................................ 36 8.9 ADD A TABLE ................................................................................................................................................ 37 8.10 ADDING AN IMAGE ........................................................................................................................................ 38 8.11 MODIFYING FONT STYLE, COLORS, AND TEXT SIZE ................................................................................................ 49 8.12 CREATE A HYPERLINK TO ANOTHER PAGE OR SITE.................................................................................................. 50 8.13 CREATE A BULLETED LISTS ............................................................................................................................... 52 8.14 CREATE A HEADING ....................................................................................................................................... 53 8.15 CHECK SPELLING ........................................................................................................................................... 54 8.16 ADDING A WIDGET TO YOUR PAGE ..................................................................................................................... 55 8.17 FULLSCREEN MODE ....................................................................................................................................... 65 8.18 PREVIEW ..................................................................................................................................................... 65 8.19 PUBLISH ...................................................................................................................................................... 65
9. TUTORIAL ......................................................................................................................................................... 68
10. SUPPORT ...................................................................................................................................................... 68
3
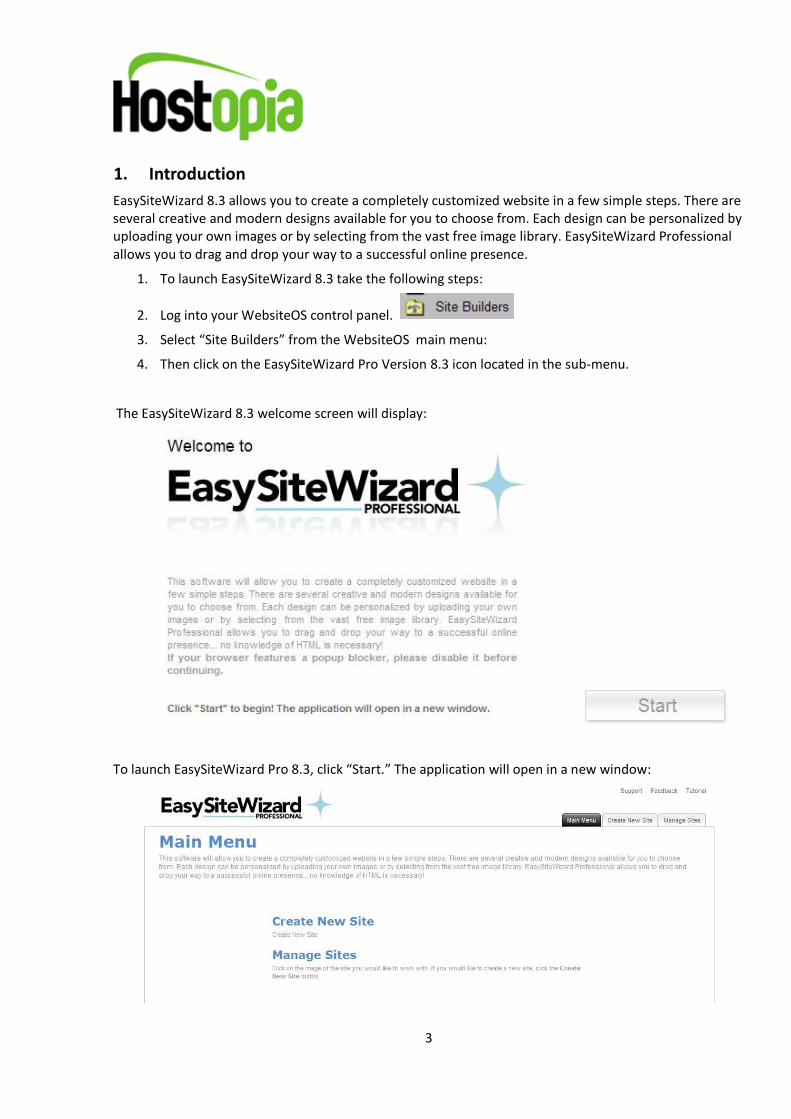
1. Introduction EasySiteWizard 8.3 allows you to create a completely customized website in a few simple steps. There are several creative and modern designs available for you to choose from. Each design can be personalized by uploading your own images or by selecting from the vast free image library. EasySiteWizard Professional allows you to drag and drop your way to a successful online presence.
1. To launch EasySiteWizard 8.3 take the following steps:
2. Log into your WebsiteOS control panel.
3. Select “Site Builders” from the WebsiteOS main menu:
4. Then click on the EasySiteWizard Pro Version 8.3 icon located in the sub-menu.
The EasySiteWizard 8.3 welcome screen will display:
To launch EasySiteWizard Pro 8.3, click “Start.” The application will open in a new window:

4
2. Navigation There are two ways to navigate within EasySiteWizard Pro 8.3. You may navigate using the Main Menu or navigate using Alternative Navigation.
3. Main Menu The main menu is located on the top right corner of EasySiteWizard 8.3.
Main Menu: Links you to the Main Page of EasySiteWizard Pro 8.3
Create New Site: Allows you to create new site.
Manage Sites: Allows you to publish/edit/delete the site.
Support: Opens online help files for EasySiteWizard Pro 8.3 in a new window.
Feedback: This option allows you to send a feedback concerning EasySiteWizard Pro 8.3
Tutorial: A flash demo will be presented to the user upon how to use the application.

5
4. Alternative Navigation At the base of every page you will find alternate navigation buttons. They will appear as follows:
These buttons will allow you to go back and forth between Sites and Designs.
5. How to Create a New Site
1. Click the “Create New Site” button
2. You will find the two options: Landing Page which allows you creating a basic site with a single page and Multi-page site which allows you to create site with multiple pages and options.

6
6. Landing Page To create the new site in Lending Page take the following steps:
6.1 Step 1: Site Details
Fill in the following fields to build your site:
Company Name: the name of your company as it will be shown on your website's main page
Company description: insert your company’s description
Site URL: this is the URL where people will be able to view your site when it is published
Publish To (directory): if you do not want to publish your webpage to the main directory (e.g. http://www.mydomain.com/), you can specify a subdirectory, such as http://www.mydomain.com/anotherdirectory/
Enable syndication (RSS 2.0, Atom 1.0): enabling this option will allow people to know when you have updated your website via RSS
Phone number: you should indicate your contact phone number.
Toll free number: you should indicate your toll free number
Address: the address at which your company locates
City: the city where your company locates
State/Province: state or province where your company locates
ZIP / Postal Code: you should indicate the ZIP / Postal Code of the region your company locates at.

7
Email address: you should indicate the email address of the site’s owner.
Contact Us Form: select whether your site will contain “Contact Us Form” or not.
Google Map: select whether your site will contain the link to Google Map indicating your company’s location or not.
6.2 Step 2: Choose a landing page design
The “Choose a landing page design” screen allows you to select a design in order to use it as the starting point for your website.
The Landing Page does not provide the design search function. You can select only among the designs offered by this screen.

8
Having selected the design you want to use click on it. The design will enlarge, and you will then be able to select the design or select another design.
Using the “Add to Favorites” button you can add a template to your "Favorites"; this is an easy way to organize and choose between a smaller selection of templates that you like. You will be able to view
Favorites section by clicking the sign.
Some templates are available in more than one color scheme. Click the color buttons to select a general color scheme.

9
6.3 Step 3: Editor Section
When you have selected the design you want to use click the “Apply” button and you will get to the Editor Section. See the following screenshot.
The Editor Section allows you to edit, manage and modify the design you have selected. Editor allows you to “Save page”, “Create a new page”, “Add a text block”, “Add a table”, “Add an image”, “Create a web form”, “Undo/Redo” actions, “Font properties”, “Create a bulleted list”, “Create a heading”, “Create a hyperlink to another page or site”, “Check spelling” add Widgets and Advanced Options to your page.
6.3.1 The Editor Toolbar
Some Editor Tools are grayed out, until a Text Block has been selected:
Please note that Editor Options like “Font properties”, “Create a hyperlink to another page or site”, “Create a heading”, “Check spelling” can only be used when a Text Block is selected. To select a text block double left click on text block area.
6.3.2 Moving Objects within your Site
1. Left click and hold the object (i.e. Image, Text Block) you wish to move.

10
2. A grid overlay will appear, in order to assist you in aligning the object you are moving.
3. Move your mouse to the desired location.
4. Unclick.
When you double left click any objects (i.e. Image, Text Block) on the design you will have the ability to modify or copy its contents and place them anywhere on the page:

11
6.3.3 Menu editor
You can move the site’s navigation to any location by single left clicking “Menu editor.” “Menu editor” also gives you the option to add subcategory options within it.
6.3.3.1 How to Move Menu Editor
1. Single left click and hold the “Menu editor.”
2. Move the “Menu editor” to the desired location.
3. Unclick.
6.3.3.2 Vertical/Horizontal menu orientation
Vertical view:
Horizontal view:

12
• In the “Editor” section click the button
• Select “Edit Site Menu” from the drop-down menu.
• A new window will open where the user can choose to display the menu vertical or horizontal by selecting the appropriate radio button.
• When done click “Apply” for the changes to take effect.
6.3.3.3 Font properties
In this section you may choose a font type by clicking on the drop down menu. You may also choose the font size by entering the desired size in the field provided.
You can also choose a font color and a font hover/active color by clicking on the button. A color picker will be shown from where you can choose the desired color for your font as well as for your font hover/active color.

13
You may also write color’s HEX index in the respective field.
Click “Apply” to save the changes.
Click “Cancel” to dismiss all changes.
6.3.3.4 Alignment and Font Style
In order to choose an alignment, click on the appropriate button.
You may also choose to have your font bolded, italics or underlined by clicking on the appropriate buttons. The buttons function in the same way as in Microsoft Word.
left centre right justify bold italics underlined
Font style:
You may choose the appropriate font style and font size from the drop down menus provided.

14
6.3.3.5 Buttons Background
In order to choose a background display for your buttons you have 2 options available: either choose a color or choose to insert an image (available in your image library) from the drop down menu.
A third option is to select “disabled” in which case you will not have the choice of choosing neither a color nor an image for that button.
The color picker in Site Menu Editor gives the user an ability to change font and background color of the site menu items. Color picker is called once color field with HEX value it clicked on.
** If you were on the Multi-page section of this guide, click here to go back
** If you were on the Manage Sites section of this guide, click here to go back
6.4 Step 4: Wizard Completed
When you are done adding your changes to your website press “Next” button to save changes. This screen offers you the following options:
• Preview your website;
• Publish your website (if you would like to make your website publicly available);
• Go to Manage Sites;
• Go back to Editor.
To return to Main Menu press “Cancel” button
7. Multi-page site To create the new site in Multi-page site take the following steps.
7.1 Step 1: Site Details
To indicate site details necessary to create your site fill in the following fields:

15
• Site Title: This is the name of your website, as it will appear on your website's main page.
• Tagline: This is a secondary text line which appears immediately underneath the website title. This section can be left blank.
• Site URL: This is the URL where people will be able to view your site when it is published.
• Publish To (directory): If you do not want to publish your webpage to the main directory (e.g. http://www.mydomain.com/), you can specify a subdirectory, e.g. http://www.mydomain.com/anotherdirectory/
• Enable syndication (RSS 2.0, Atom 1.0): Enabling this option will allow people to know when you have updated your website via RSS.
7.2 Step 2: Choose Design
The “Choose design” screen allows you to select a design in order to use it as the starting point for your website.

16
Start by selecting a category of designs.

17
Then, click on the design you want to use. The design will enlarge, and you will then be able to select the design or select another design.
Using the “Add to Favorites” button you can add a template to your "Favorites"; this is an easy way to organize and choose between a smaller selection of templates that you like. You will be able to view
Favorites section by clicking the sign.
Some templates are available in more than one color scheme. Click the color buttons to select a general color scheme.
7.2.1 Search function
You can also search for a template within the selected design category by entering a keyword or the corresponding template ID. You may also search for a template within all the design categories by selecting the “all designs” option from the drop down menu.

18
7.3 Step 3: Site Menu
Having selected the design you want to work with press “Apply” to create your site menu.
The following screen will appear:
7.3.1 Menu Buttons
Main buttons are utilized for the initial topic or subject of the site. Generally used as a focal point of what items are most important in the navigation (i.e. Home, Contact Us, Furniture etc.)
7.3.2 Subcategory Buttons
As the navigation branches off subcategories become available. This allows you to go into detail about the particular topic or subject. (i.e. Main Category: Furniture => Subcategory: Chairs, Couches, Tables, etc.)

19
7.3.3 Creating a Main Category/Subcategory Button
1. Click “Menu editor”
2. Select the button
3. In Button Properties, label the button.
4. Label Hover Tooltip
5. Select “Link to” and click Page (drop down menu will appear to select pages within your site)
URL, Blog, Store, Chat, Email, and Schedule
6. Check “Open in a new Window” if you wish the button to open a new browser.
7. Click “Apply”/“Cancel” to accept/dismiss changes.
20
7.3.4 Deleting a Button
1. Click on the Button you wish to delete
2. Click “Delete this button.”
** If you were on the Manage Sites section of this guide, click here to go back
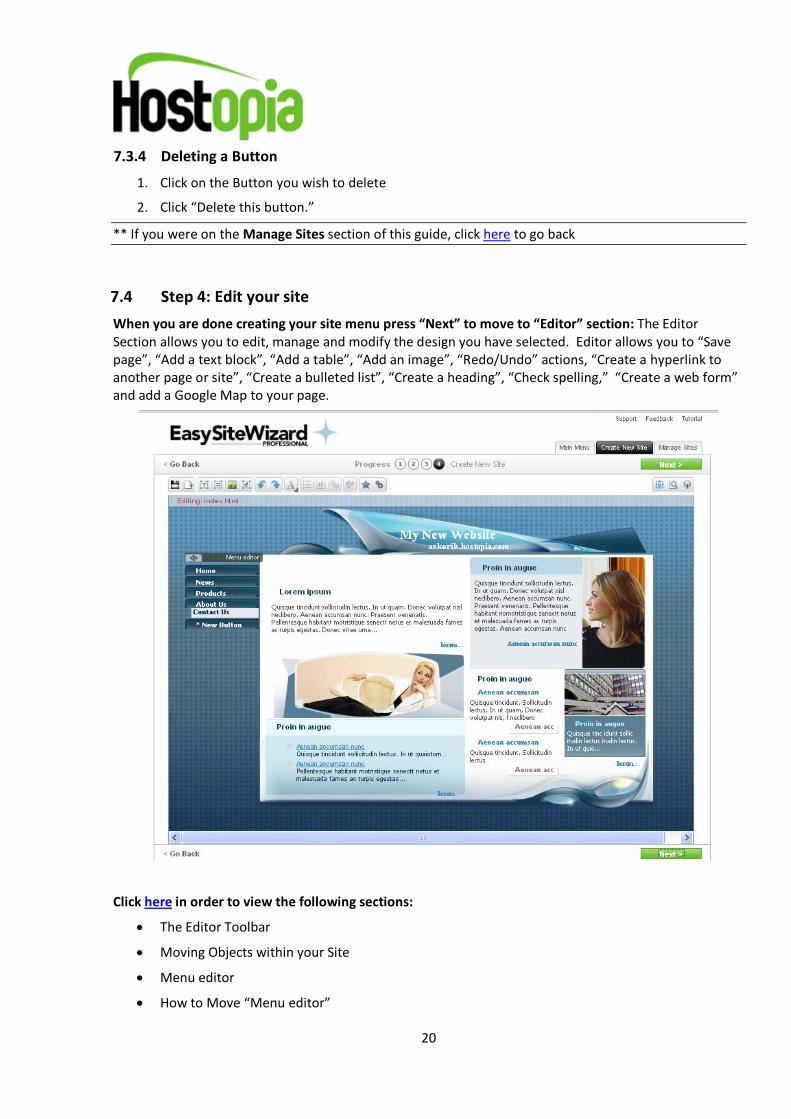
7.4 Step 4: Edit your site
When you are done creating your site menu press “Next” to move to “Editor” section: The Editor Section allows you to edit, manage and modify the design you have selected. Editor allows you to “Save page”, “Add a text block”, “Add a table”, “Add an image”, “Redo/Undo” actions, “Create a hyperlink to another page or site”, “Create a bulleted list”, “Create a heading”, “Check spelling,” “Create a web form” and add a Google Map to your page.
Click here in order to view the following sections:
• The Editor Toolbar
• Moving Objects within your Site
• Menu editor
• How to Move “Menu editor”

21
• Vertical/Horizontal menu orientation
• Font properties
• Alignment and Font Style
• Buttons Background
7.5 Step 5: Wizard Completed
When you are done adding your changes to the website press the “Next” button to save changes. This screen offers you the following options:
• Preview your website;
• Publish your website (if you would like to make your website publicly available);
• Go to Manage Sites;
• Go back to Editor.
To return to Main Menu press “Cancel” button

22
8. Manage Sites Section
This section contains sites you will be able to work with.
Under this section you will be able to edit site details, choose new designs for your site, close/delete site.
Mentioned features will be described below, under the Editor Section.
If you would like to create a new site, click the button. To edit your site, click the
button.

23
8.1 Editor Section
The Editor Section allows you to edit, manage and modify the design you have selected. Editor allows you to “Save page”, “Add a text block”, “Add a table”, “Add an image”, “Redo/Undo” actions, “Create a hyperlink to another page or site”, “Create a bulleted list”, “Create a heading”, “Check spelling,” “Create a web form” and add a Google Map to your page.
Click here in order to view the following sections:
• The Editor Toolbar
• Moving Objects within your Site
• Menu editor
• How to Move “Menu editor”
• Vertical/Horizontal menu orientation
• Font properties
• Alignment and Font Style
• Buttons Background
24
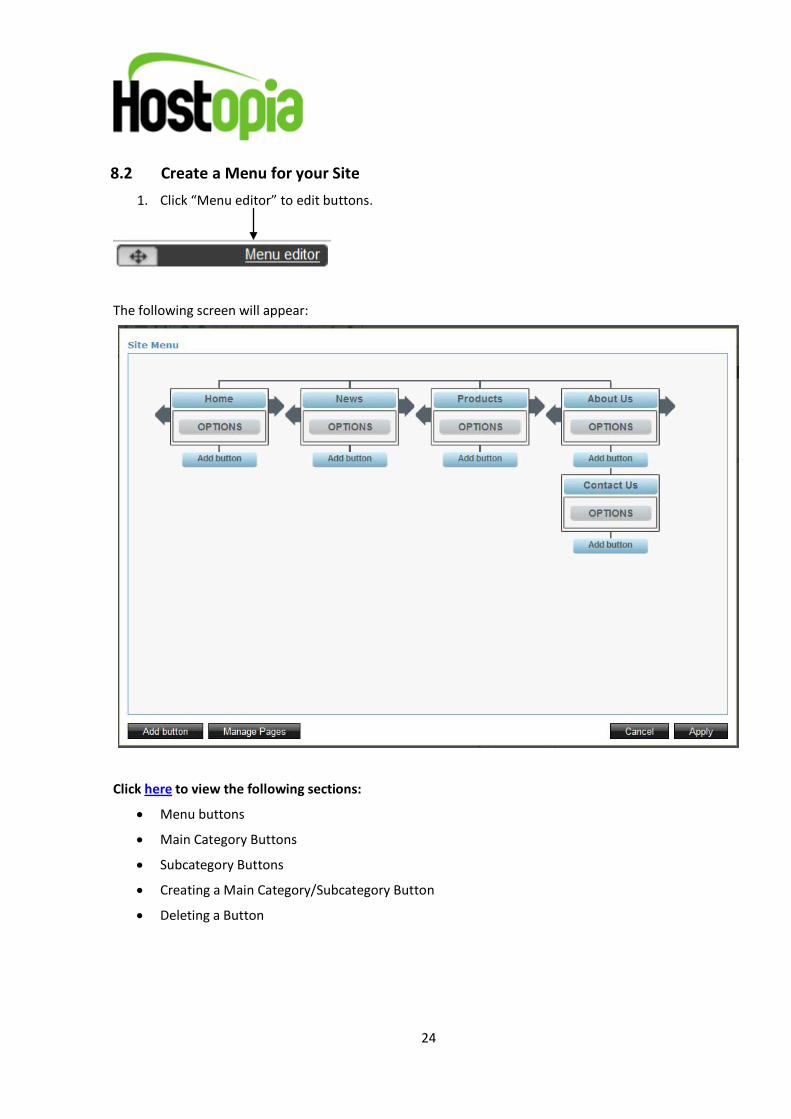
8.2 Create a Menu for your Site
1. Click “Menu editor” to edit buttons.
The following screen will appear:
Click here to view the following sections:
• Menu buttons
• Main Category Buttons
• Subcategory Buttons
• Creating a Main Category/Subcategory Button
• Deleting a Button

25
8.3 Site Menu Editor
This allows you to set properties for individual buttons of the site (font, background, button border, padding of text inside the button, button margin). A Preview feature was also added to the Site Menu Editor, so you can see the changes of properties on the fly without having to exit the Menu Editor.
General view:
8.3.1 Preview panel and check mark “Apply settings to all buttons”
Site buttons preview is added to easily review changes made without exiting Site Menu Editor every time properties are changed.
The “Apply settings to all buttons” feature will be checked by default. It allows you to apply same parameters for all buttons at once. If unchecked – buttons can be configured separately.
1. Select the “Apply settings to all buttons” checkbox in order to apply all the changes to all
buttons.
2. Click “Apply” in order to save the changes.

26
8.3.2 Buttons dimensions option
Option to set button dimensions. You can modify button height and width. Both are set in pixels.
1. Enter the number of pixels desired in the provided boxes for both the height and the width of
a button.
2. Click “Apply” in order to save the changes.
8.3.3 Button Border option
Option to set border dimensions to a particular site button. Pressing the respective button calls a pop-up menu. User can configure three parameters of button border – style, thickness and color.
1. In order to set the border of a button click the button located next to the “Button Border” section.
2. A border button menu pop up will open where you can set the border style, thickness and color of the button. While setting these parameters you will be able to see a border preview on the right side of the pop-up menu. Use the drop down menus to select a border style and thickness. For choosing a color click on color picker and a color palette will open from where you will be able to choose a color for the button border.
3. Click “Apply”/“Cancel” to save/dismiss all the changes.

27
8.3.4 Interior Padding option
Option to set interior padding of the button. Pressing the respective button calls a pop-up menu. You can adjust top, bottom, left and right parameters.
1. In order to set the interior padding of a button click the button located next to the “Interior Padding” section.
2. The Interior padding menu pop up will open where you can set/adjust the top, left, bottom and right parameters of a button.
3. Click “Apply”/“Cancel” to save/dismiss all the changes.

28
8.3.5 Button Margin option
Option to set margin of the button. Pressing the respective button calls a pop-up menu. You can adjust top, bottom, left and right parameters.
1. In order to set the margins of a button click the button located next to the “Button Margin” section.
2. The Button Margin menu pop up will open where you can set/adjust the top, left, bottom and right margins of a button.
3. Click “Apply”/“Cancel” to save/dismiss all the changes.

29
8.4 How to save your website
Saving your work is recommended throughout your session of EasySiteWizard Pro 8.3 Please take the following steps to save your website changes.
1. Click to save.
2. You will be prompted with a drop down menu with four saving options: “save page”, “restore from auto save”, “restore from backup” and “save as template”.
User is able to save the page they are working on.
User is able to retrieve their work from auto save (When switching from one page to the next, EasySiteWizard Pro 8.3 will automatically save).
User is able to retrieve their work from backup.
Allows certain domains to save their current site as an actual template.
3. It is recommended that you save every page that is modified.
• When switching from one page to the next, EasySiteWizard Pro 8.3 will automatically save work done. You have the ability to switch between saved sites.
Please note:
• You can review roll back/ roll forward changes per web page (every version is saved with date/time so that can be selected) - There is a history kept of each save. When you save your website site (this is the current save the one that would be published). The previous save would then be put in a directory, as a backup, which could then be restored.
8.5 Master Page Enhancements
This feature implies the inability to edit master page elements when on ordinary pages (Home, News, etc.), hence site title, tag line, menu editor are only editable on Master Page.
The Master Page elements are dimmed when viewing ordinary pages.
Choose create a New Site within the “Sites” section.
Functionality
1. Select a design to be used for your website form within the “Designs” section.
2. When you proceed to the “Editor” section you will be prompted with a message asking whether you would like to configure Master Page.

30
You should note that all changes applied to your master page will be visible when previewing or publishing your final site.
3. After clicking “Yes” you will be able to start editing your Master Page as shown below.

31
Site Menu Editor Site Title and Tagline
Text Blocks Images
Within the Master page the following elements can be edited:
a)
You may insert images and text blocks within the Master Page. Please note that the images and text blocks inserted on the Master Page can only be edited within the Master Page.
Text blocks and images
b)
The position of the Site Menu Editor can be changed on the Master Page only. When in ordinary pages, Site Menu Editor can be accessed (new pages can be added, existing ones – deleted), but its position is locked.
Site Menu Editor
c)
If the site is build off the Master Page, site title and tag line are considered as Master Page elements and are not editable when in ordinary pages.
Site title and tag line

32
4. Please note that after finalizing the editing of the Master Page and when clicking on any other page within the site (example: the user may click on “Products” or “Contact” page to start editing) the master page elements will appear dimmed to enable the user to distinguish the master page elements. This allows the user to view the location of the Master Page elements, and position other elements accordingly.
5. In order to review the site page without dimmed elements click on “Preview” or “Publish”.
You will be able to see the final site including both Master Page elements as well as ordinary page elements.
1. Click on the “Save” button.
If you would like to return to edit the Master page elements:
2. From the extended menu select “Edit Master Page”.
You will be returned to the Master Page where you may continue to edit the elements within the Master Page.

33
8.6 Manage Pages
Manage Pages allows you to create, rename and duplicate pages.
This section allows you to structure and organize the naming conventions you wish to utilize on your site.
To “Manage Pages”
Click on the
8.6.1 How to Create a New Page
1. Fill in the name of the page.

34
2. Enter a page title. The page title should be related and relevant to your page content. The page title appears on top of your browser and is a significant element in the search engine with regards to rankings.
3. Enter a summary of your new page and try to include relevant keywords as some search engines will use this summary as part of the website results. This summary will not be visible on your page, its purpose being to provide a clear definition of what your page contains with a significant relation to the search engine.
4. Enter several keywords that you would like your page to be found by. These keywords can also be phrases containing words found on your main site as well as on this newly created page. Please make sure that the keywords chosen are to be found in your page content as these keywords will be used by search engines to find your page.
5. Click” Apply” to create the new page.
8.6.2 How to Delete a Page
1. Select from Existing Pages the name of the page you wish to delete.
2. Click “Delete Page” button.
8.6.3 How to Duplicate a Page
1. Select from Existing Pages the name of the page you wish to duplicate.
2. Click “Duplicate page”.
8.6.4 How to Edit a Page
1. Select from Existing Pages the name of the page you wish to edit
2. Click “Edit Page Properties” or “Edit Page Content”
8.6.5 Complete Your Edit
When you are finished managing your pages click “Close”
8.7 Adding or Editing a Text Block
Adding texts allows additional customization to your site. Many of the text blocks that exist in each of the designs are placeholders that require editing.
8.7.1 Adding a Text Block
1. Click the icon; a text block will appear.

35
2. In order to help you find the initial location of the new textbox, the border around the new textbox will flash for a moment after it appears.
3. Type/Paste text into the text block.
4. Once you are finished adding text, click outside of the text block within the Page.
8.7.2 Editing a Text Block
1. Double left click on the text; a grayed boxed area will appear on the text block.
2. You will be able to edit text once the outline is visible
3. Type/Paste text into the text block.
4. Once you are finished adding text, click somewhere on the page outside of the Text Block.
8.7.3 How to Resize a Text Block
1. Double left click on the text block.
2. Mouse over the smaller boxes for the direction you wish to increase the size of the text block.
3. Click and hold your mouse on the small box .
4. Move the mouse in the direction you wish to resize the text block.
8.7.4 How to Delete a Text Block
1. Double left click on the text block.
2. Click on the bottom right corner.
3. The text block should now be removed.
8.7.5 How to Duplicate a Text Block
1. Double left click on the text block you wish to duplicate.
2. Click on located on the bottom right corner.

36
3. The text block should now be duplicated.
4. Click and hold the duplicate text block to the desired location
5. Unclick.
8.7.6 How to Move a Text Block
1. Put your mouse over the text you wish to move
2. Click and hold the mouse.
3. Move your mouse to the location where you wish to place your text.
4. Unclick
8.8 Layer Control
Layers are a common method for determining which objects should cover (or obscure) another object. Layers determine if objects should overlap (or one is directly on top of the other). Objects such as text fields and images which are on a "higher" layer can cover objects which are on a "lower" layer. Although this is supported in some drawing applications, in EasySiteWizard, no two objects can be at the same layer level.
Layer control can be managed in EasySiteWizard by right-clicking on an object that the user would like to move to another layer. Right-clicking an editable object (text area or image) should bring up the following menu options:
• Bring to front: This will put the selected object "on top of" all other objects. All other images and text fields, if moved so they overlap the object which has been "sent to front" will not obscure this field.
If a second object is selected and "bring to front" is used, then this second object would be considered "on top of" the first one.
• Send to back: This will put the selected object "behind" all other objects. Essentially, the opposite of "bring to front"; all overlapping text areas or images will obscure the object that was sent to the back.
If a second object is selected and "send to back" is used, then this second object would be considered "behind" the first one.
• Move forwards: This will move the object one layer closer to the front.
• Send backwards: This will move the object one layer closer to the back.
Mouse over Text

37
8.9 Add a table
You can add a table by simply clicking on the “add table” button within the Editor Toolbar.
When you click on “Add table” icon the following table editor pop up will be displayed:
Here you can set the number of columns and rows of your table as well as the height, width and border type by entering the values in the provided boxes. You may set up the border of your table by clicking on the button next to the “Border” section. The following table border editor will be displayed:
1. Choose the style of your border from the drop down menu.
2. Choose your thickness from the drop down menu.
3. Choose a color by clicking on the button next to the color section.
4. Click “Apply”/“Cancel” to save/dismiss the changes made.

38
Please note: You will be able to see a preview of your border on the same page under the “Border Preview” section.
Please note: Once you have created your table by double clicking on it you will be able to change the table settings.
8.10 Adding an Image
You can build your own library of images by uploading the image files; and or utilize the free image library to place additional images into your site. When you click on the icon a menu pops up on the left side of the screen, this allows you to add additional images to your site.

39
1. Your library.
There are 3 Types of Libraries:
2. Free library
3. Template images
8.10.1 How to Upload an Image to “Your library”
1. Click on the top menu icon to add an image.
2. Click “Upload” button. New window will appear allowing you to browse your local computer for the images you would like to put on your site.
3. Click “Browse”.
4. Search for image on your computer.
5. Check off “Optimize” if you wish to scale down your image size and keep the aspect ratio.
6. Click “Upload.” Once your image is uploaded it will be located in a panel underneath “Upload” to
view a larger version of your image, click on the magnifying glass .
7. With your mouse, click and hold the image you wish to insert into your webpage.
8. Move your mouse to the desired location of the image.
9. Unclick.
10. Click the on the bottom right corner to close Images.
8.10.2 How to Use the “Free library”
Free library houses approximately 10,000 stock images available for you to use on your site.
1. Click on the Free library tab.
2. Select the category best suited for you site (i.e. Nature).

40
a. You can search through the entire image library by keyword by selecting "All Categories" and conducting a keyword search.
b. You can refine your search by selecting a specific category and then searching by keyword.
3. Click and Hold the image you wish to place onto your site.
4. Move your mouse to the desired location. Unclick.
8.10.3 How to Delete an Image from your Site
1. Double left click the Image.
2. Click on the Red X
8.10.4 How to Resize an Image from “Your library” or “Free library”
1. Double left click the image.
2. Mouse over the smaller boxes for the direction you wish to increase the size of the Image.
3. Click and hold your mouse on the small box
4. Move the mouse in the direction you wish to resize the Image.
Please note, that you cannot resize any of the default images provided by the design.

41
8.10.5 Image Properties
Image Editor allows you to modify images from “Your library” or “Free library.”
Adding Image Properties
1. Double click on the image you wish to modify. 2. Click “Image Properties.” 3. The image properties screen will pop up.

42
In the image properties interface, you can add a clickable link (URL) to the image, as well as alt text which will be displayed if the user's browser is not set to automatically load images. If you add a link, you can also specify that the link should open in a new window by placing a checkmark beside "open in a new window".

43
8.10.6 Editing Images
Modifying an image with Image Editor 1. Double click on the image you wish to modify. 2. Click “Edit.” 3. The image editor screen will pop up.

44
8.10.7 Image Editor
The Image Editor allows you to modify images you have uploaded or selected from the library. The Image Editor consists of the following:
Icon Description
Tools: A tool bar that allows you to modify the image.
The following can be found under Tools:
Crop, Resize, Rotate, Contrast, Brightness, Sharpness, Exposure, Red-eye Reduction, Effects, and Undo.
Image View: This allows you to zoom in and out of the image.

45
Thumbnail (Original Image): Allows you to revert back to the original image.
History Bar: shows the past steps of the resulting image. You can return to a specific step by click on the thumbnail.
Cancel & Save
You must click “Save,” if you wish to keep all modifications made to the image.
Click “Cancel,” if you wish to exist and dismiss all changes.
8.10.8 An in-depth look at Image Editor Tools
Icons Descriptions
Crop 1. Click “Crop,” select the portion of the
image you wish to keep. 2. Highlight the section you wish to crop by
dragging your mouse over the desired portion of the image.
3. Click “Crop,” to modify image. a. If you do not wish to crop an
image that has been highlighted, click on the image again.
Resize 1. Click “Resize,” to modify size of the image. 2. A screen will pop up allowing you to
specify height and width of the image in pixels.
a. Check Preserve aspect ratio, to maintain the ratio of height and width of the image.
3. Click “Apply,” to accept changes. 4. Click “Close” to exit screen without
accepting changes.

46
Rotate
Click “Rotate,” to turn image counter clockwise.
Contrast 1. Click “Contrast,” to either
increase/decrease gradient of color within the image.
2. You can change the contrast by selecting either the bar which will allow you to move from left (decrease, -100) to right (increase, 100).
a. Or you can specify the intensity of the gradient by entering a number into the text box (-100, 0 100)
3. Click “X” to if you do not wish to make any modifications.
Brightness 1. Click “Brightness,” to either
increase/decrease the amount of light in color of the image
2. You can change the brightness by selecting either the bar which will allow you to move from left (decrease, -100) to right (increase, 100).
a. Or you can specify the intensity of the light by entering a number into the text box (-100, 0 100)
3. Click “X” to if you do not wish to make any modifications.
Sharpness 1. Click “Sharpness,” to either
increase/decrease the density of the image.
2. You can change the density by selecting either the bar which will allow you to

47
move from left (decrease, -100) to right (increase, 100).
a. Or you can specify the density number into the text box (-100, 0 100)
3. Click “X” to if you do not wish to make any modifications.
Exposure 1. Click “Exposure,” to either
increase/decrease the amount of light allowed in the image
2. You can change the degree of light in the image by selecting either the bar which will allow you to move from left (decrease, -100) to right (increase, 100).
a. Or you can specify the intensity of the exposure by entering a number into the text box (-100, 0 100)
3. Click “X” to if you do not wish to make any modifications.
Red-eye Removal 1. Click “Red-eye Removal,” to enable crop
feature. 2. Highlight the section you wish to have red
eye reduced; by dragging your mouse over the desired portion of the image.
3. Click “Red-eye Removal,” to modify image.
Effects 1. Click “Effects,” to select different color
effects to be done to the image. 2. Select one of the following two options:
a. Grayscale b. Sepia (Shades of brown, similar to
grayscale) 3. Click “X” to exit if you do not wish to
make any modifications to effects.
Undo
This button allows you to retract the last step that was done. By clicking “Undo” twice, you will revert two

48
steps back. The number of times “Undo” is selected will be equivalent to the number of steps reverted back. This is based on how many steps you have done.
Flip
This button lets you flip the image horizontal or vertical.
8.10.9 Undo/Redo
You can undo/redo as many steps as you wish based on the current section and actions done per session.
Click on
1) Undo
to undo last action you have done.
Click on
2) Redo
to redo last action you have done.
Bold, Italicize, Underline, Font Properties
1. Double left click on the text block; a boxed grayed area will appear on the Text Block.
Modifying Text
2. You will be able to edit text once the button is visible. Click this button in order to edit the text.
3. Highlight the text you wish to Bold, Italicize, and or Underline.
Bold
Underline
Italicize Font Changles

49
4. Click the corresponding icon:
5. Once you are finished modifying text, click somewhere on the page outside of the text block.
8.11 Modifying Font Style, Colors, and Text Size
1. Double left click on the text block you wish to modify.
2. Highlight the text you wish to modify.
3. Click the icon.
4. A screen will pop up allowing you to Select Colors.
5. Use the bar below in order to select the Font Style and Font Size.
Default Fonts (Tahoma, Arial, Helvetica, etc) allow a browser to display the Font you have specified. However, there is the possibility that the user viewing your site may not have the specified font on their local PC. When that happens, it goes to the next default Font available.
Note:

50
8.12 Create a Hyperlink to another Page or Site
Hyperlinks allow you to refer to pages that exist within your website and sites outside of your own domain.
1. Highlight the text you wish to link from.
2. Click on to insert a link onto your page.
8.12.1 External Website
1. Type in the desired URL.
Click “Apply” to insert the link on your page.

51
8.12.2 Internal page on my website
1. Choose an existing page on your website from the drop down menu.
2. Click “Apply” to insert the chosen link.
8.12.3 Document or other file
1. You may also upload a file by clicking on “Browse”. The pop up will prompt you to localize the file on your computer.
2. Once you have localized the file you wish to upload click on “Apply”.

52
8.12.4 Send Email
1. Enter an email address.
2. Click on “Apply” to insert the link.
8.13 Create a Bulleted Lists
Bulleted lists help organize text when sentences or paragraphs are not required. There are two ways to create bulleted lists. You can either use existing text to create you lists, or you can create a fresh list by creating a new text block.
8.13.1 Creating a Bulleted List with Existing Text
1. Double left click an existing text block
2. Highlight the text you wish to put in your bulleted list
3. Click
8.13.2 Using a New Text Block to Create a Bulleted List
1. Create a new text block
2. Click
3. A bullet will appear; type in your text
4. Hit the “Enter” key on your keyboard to set your next bullet
5. Repeat steps 3-4 till bulleted list is complete

53
Each new sentence/fragment is by default bulleted. If you wish to break a paragraph into an additional bullet, place your mouse on the text of an existing bullet and hit enter.
Note:
Original Paragraph Bulleted List (default) Existing Paragraph broken into Bulleted List
Lorem ipsum dolor sit amet, consectetuer adipiscing elit, sed diem nonummy nibh euismod.
Tincidunt ut lacreet dolore magna.
Aliguam erat volutpat.In pede mi, aliquet sit amet, euismod in, auctor ut, ligula.
• Lorem ipsum dolor sit amet, consectetuer adipiscing elit, sed diem nonummy nibh euismod.
• Tincidunt ut lacreet dolore magna.
• Aliguam erat volutpat.In pede mi, aliquet sit amet, euismod in, auctor ut, ligula.
• Lorem
• ipsum
• dolor
• sit
• amet
• consectetuer
• adipiscing
• elit,
• sed
• diem
• nonummy nibh euismod.
• Etc.
8.14 Create a Heading
Headings are primarily used as titles to indicate the meaning of a section of text. There are two ways to create headings. You can use an existing line of text, or create a fresh new heading.
8.14.1 Using an Existing Line of Text to Create a Heading
1. Double left click an existing Text Block.
2. Highlight the Text you wish to make into a Heading.
3. Click
8.14.2 Creating a New Heading
1. Create a new text block.
2. Click
3. Type in the text you wish to use for your heading.

54
4. Once you satisfied with your Heading, Click “Enter” to begin a new line.
8.15 Check Spelling
Spell check is available to verify the spelling within each text block.
55
8.15.1 How to Check Spelling within a Text Block
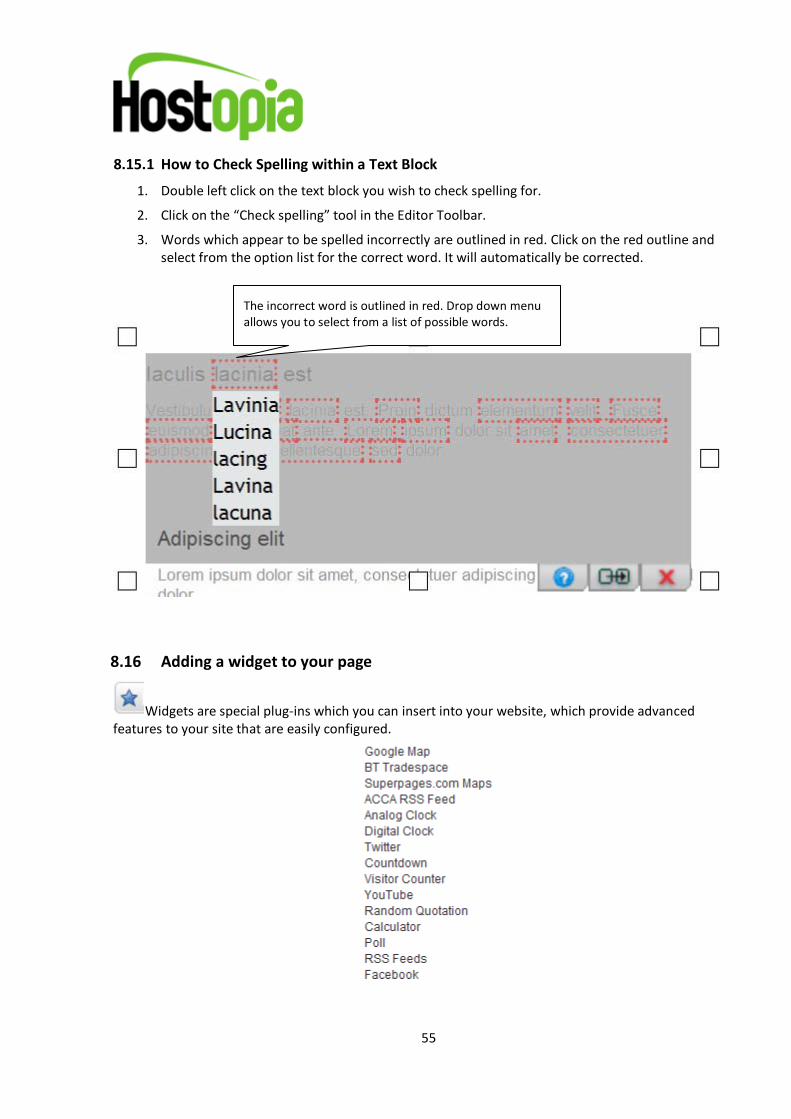
1. Double left click on the text block you wish to check spelling for.
2. Click on the “Check spelling” tool in the Editor Toolbar.
3. Words which appear to be spelled incorrectly are outlined in red. Click on the red outline and select from the option list for the correct word. It will automatically be corrected.
8.16 Adding a widget to your page
Widgets are special plug-ins which you can insert into your website, which provide advanced features to your site that are easily configured.
The incorrect word is outlined in red. Drop down menu allows you to select from a list of possible words.

56
8.16.1 Google Maps
Click the “Widgets" icon and select "Google Map"; this will place a Google map onto your site.
1. Enter an API Key.
a. To get an API Key click on “Get A Key” link.
b. Register for a Free API Key.
c. An API Key must be created in order for Google to allow linking to their maps.
2. Enter the Address you wish to use for the map.
3. Select map size (i.e. Small, Medium, Large)
Once you are satisfied with the location of your map, click “Apply”
8.16.2 Remove Google Map from your site
1. Double click the grey bar on top of your Google Map. A red “X” should appear on the bottom right hand corner.
2. Click the “X.”

57
8.16.3 BT Tradespace
Click “Apply” in order to place a button on your page that links to BT Tradespace.
8.16.4 Superpages.com Maps
1. Enter the Address you wish to use for the map.
2. Select map size (i.e. Small, Medium, Large)
3. Once you are satisfied with the location of your map, click “Apply”.
8.16.5 ACCA RSS Feed
Choose the width and height and click on “Apply”.

58
8.16.6 Analog Clock
Choose the width and height and click on “Apply”.
8.16.7 Digital Clock
Choose the width and height and click on “Apply”.
8.16.8 Twitter

59
Configure the look and feel of twitter on your page by choosing the desired design such as background and text color.
8.16.9 Countdown
With this widget you can set up a countdown to a specific date.
1. Choose the background and text color and size from the available options.
2. Enter the specific date on which you should be notified.
3. Enter the text which should be displayed when notified on the specified date.
8.16.10 Visitor Counter
You can customize the counter's font, size and color to suit the design of your site. The hit counter provides you with a very basic measure of your site's traffic.

60
8.16.11 YouTube
Insert a YouTube video on your page by providing the relevant URL.
8.16.12 Insert a quotation
This widget lets you define a series of quotes which will display randomly on your site.

61
1. Click the “add” button to enter a quote.
2. Choose the style.
3. Click “Apply” to display it on your page.
8.16.13 Calculator
This widget will insert a calculator on your page.

62
8.16.14 Poll
1. Enter a question to be displayed on your page.
2. Click the “add” button to enter a new option.
3. Choose the font color and width.
4. Click “Apply” to display it on your page.
8.16.15 RSS Feed
1. Enter a URL.
2. Choose the width, height and style.
3. Click “Apply” to save the changes.

63
8.16.16 Facebook
1. Press “Like button” to set the widget’s configuration;
2. The screen appears that offers options to input detailed settings that will be used to create the widget
3. Fill in the offered fields to create a widget:

64
URL to Like: Insert the URL to like;
Layout Style: Determines size and amount of social context next to the button.
Show Faces: Check the box if you want the profile pictures to be shown below the button.
Width: Set the width of the plugin, in pixels.
Verb to display: Select the verb you want to be displayed near the button
Font: Select the font of the plugin
Color Scheme: Select the color scheme of the plugin. 4. When all the fields are filled in press “Apply” to save the changes; Press “Cancel” to
return to the Editor.
5. At the site page you will see the widget created.
8.16.16.1 Configure widget
1. Press “Like box” to set the widget’s configuration;
2. The screen appears that offers options to input detailed settings that will be used to change the widget
3. Fill in the offered fields:
Facebook Page: Insert the page name or URL of the Facebook Page for this Live box.
Width: Set the width of the plugin, in pixels.
Color Scheme: Set the color scheme of the plugin.
Connections: Shows quantity of Facebook users who like this page.
Show stream: Check the box if you want to show the profile stream for the public profile.

65
Show header: Check the box if you want to show the "Find us on Facebook" bar at top. Only shown when either stream or connections are present.
4. Press “Apply” to save settings and return to Editor with the widget on the page; Press
“Cancel” to return to the editor.
8.17 Fullscreen Mode
Fullscreen mode provides you with the ability to open the Editor’s screen to the full monitor size in order to facilitate the editing process.
8.18 Preview
Preview launches a new browser which allows you to view the site prior to publishing. To preview the site, click on “Preview.”
8.19 Publish
Once you are satisfied with the content you have created with EasySiteWizard Pro 8.3, you may wish to publish the site.

66
8.19.1 Publishing Your Site
1. Click to publish your site.
2. A prompt will appear, indicating that any existing content will be overwritten.
3. Check the URL location (i.e. http://screenshots.company.com).
4. Click “Yes”/“No” to accept/dismiss publishing the site
5. A prompt will appear notifying you that your site has been published to specified URL.
8.19.2 Publishing your Site with RSS Feeds
You must first enable RSS feeds in the “Sites” section and select the existing or new website you would like to use.
1. Enable RSS
Enabling RSS
2. Click on the check box next to the orange RSS icon.
3. Click Apply.

67
1. Once RSS is enabled you will be able to click “Publish.”
Updating RSS Feeds
2. Enter information into the following fields:
a. Headline
b. Content
3. Select from the drop down menu you wish to link RSS to.
4. Click “Update Fields.” Once the fields are updated, you will be provided with the links for your RSS feeds.

68
9. Tutorial
Clicking on this button you will be presented with a flash demo on how to use EasySiteWizard Pro 8.3 application.
Click on to see a flash demo of the particular heading, icons and buttons within the document. The user will find these yellow stars all throughout the tutorial and they are meant to give the user a “live” demonstration of the functionality of this application.
10. Support
Clicking this button will open EasySiteWizard's online help file system. Online help provides a good overview and basic explanations of the various functions in EasySiteWizard.


![Revised VIP User Manual[1] - Under Armourunderarmour.custhelp.com/euf/assets/VIP User Manual.pdf · itemsviaaninsuredandtraceable"carrier"service"since"Under"Armour"isnot"responsible"forpackages"lostin"](https://img.dokumen.tips/doc/110x75/5b823c257f8b9ae87c8e0e89/revised-vip-user-manual1-under-user-manualpdf-itemsviaaninsuredandtraceablecarrierservicesinceunderarmourisnotresponsibleforpackageslostin.jpg)