Embed Size (px)
Citation preview
Door Inside
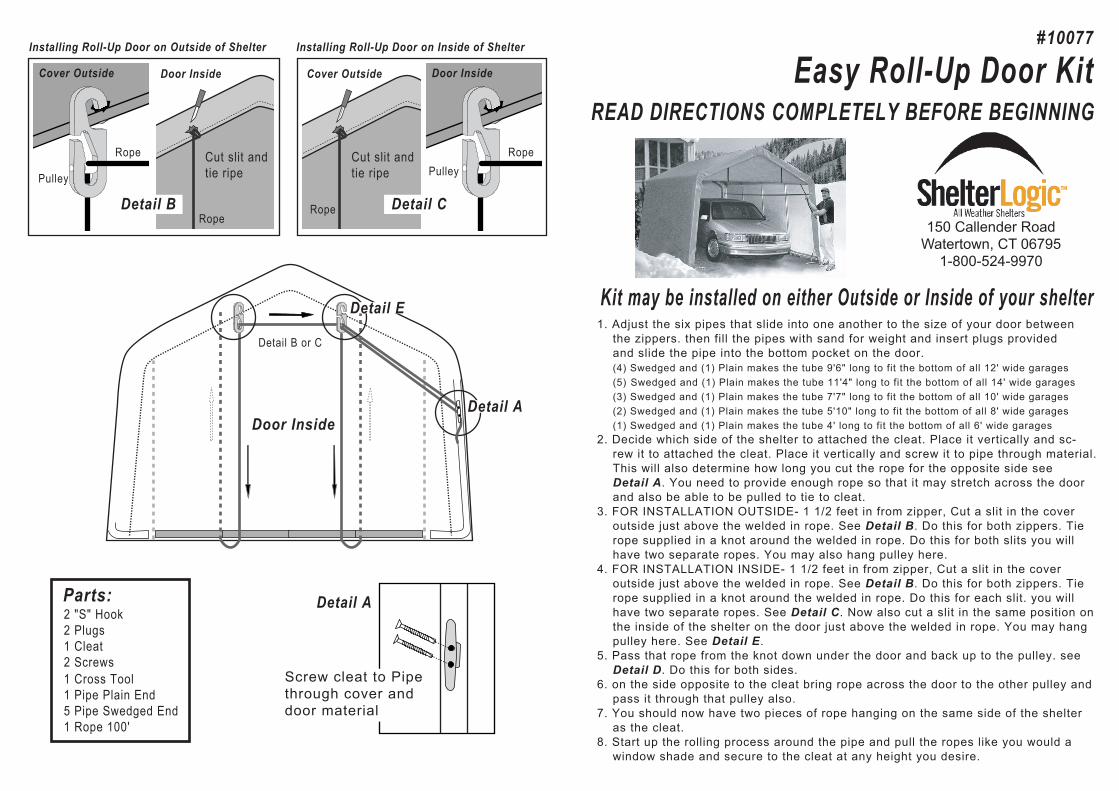
#10077
Easy Roll-Up Door Kit
1. Adjust the six pipes that slide into one another to the size of your door between the zippers. then fill the pipes with sand for weight and insert plugs provided and slide the pipe into the bottom pocket on the door. (4) Swedged and (1) Plain makes the tube 9'6" long to fit the bottom of all 12' wide garages (5) Swedged and (1) Plain makes the tube 11'4" long to fit the bottom of all 14' wide garages (3) Swedged and (1) Plain makes the tube 7'7" long to fit the bottom of all 10' wide garages (2) Swedged and (1) Plain makes the tube 5'10" long to fit the bottom of all 8' wide garages (1) Swedged and (1) Plain makes the tube 4' long to fit the bottom of all 6' wide garages2. Decide which side of the shelter to attached the cleat. Place it vertically and sc- rew it to attached the cleat. Place it vertically and screw it to pipe through material. This will also determine how long you cut the rope for the opposite side see Detail A. You need to provide enough rope so that it may stretch across the door and also be able to be pulled to tie to cleat.3. FOR INSTALLATION OUTSIDE- 1 1/2 feet in from zipper, Cut a slit in the cover outside just above the welded in rope. See Detail B. Do this for both zippers. Tie rope supplied in a knot around the welded in rope. Do this for both slits you will have two separate ropes. You may also hang pulley here.4. FOR INSTALLATION INSIDE- 1 1/2 feet in from zipper, Cut a slit in the cover outside just above the welded in rope. See Detail B. Do this for both zippers. Tie rope supplied in a knot around the welded in rope. Do this for each slit. you will have two separate ropes. See Detail C. Now also cut a slit in the same position on the inside of the shelter on the door just above the welded in rope. You may hang pulley here. See Detail E.5. Pass that rope from the knot down under the door and back up to the pulley. see Detail D. Do this for both sides.6. on the side opposite to the cleat bring rope across the door to the other pulley and pass it through that pulley also.7. You should now have two pieces of rope hanging on the same side of the shelter as the cleat.8. Start up the rolling process around the pipe and pull the ropes like you would a window shade and secure to the cleat at any height you desire.
Kit may be installed on either Outside or Inside of your shelter
2 "S" Hook2 Plugs1 Cleat2 Screws1 Cross Tool1 Pipe Plain End5 Pipe Swedged End1 Rope 100'
READ DIRECTIONS COMPLETELY BEFORE BEGINNING
Detail A
Rope
Cover Outside
Pulley
Rope
Door Inside
Cut slit andtie ripe
Rope
Door Inside
Pulley
Rope
Cover Outside
Cut slit andtie ripe
Installing Roll-Up Door on Outside of Shelter Installing Roll-Up Door on Inside of Shelter
Detail B or C
Detail E
Detail A
Detail B Detail C
Parts:
Screw cleat to Pipe through cover and door material
150 Callender RoadWatertown, CT 06795
1-800-524-9970