Embed Size (px)
Citation preview

Revision 1.00 Last Updated: 06-04-14
Entering an ITOP Record
(Induced Termination of Pregnancy)
Easy Reference Guide
Revision 1.00 Last Updated: 06-04-14 2
Enter an ITOP Record Directions: Follow these directions to enter an ITOP Record using Georgia Vital Events Registration System (GAVERS).
Log in and open the “ITOP Module.” Here’s how…
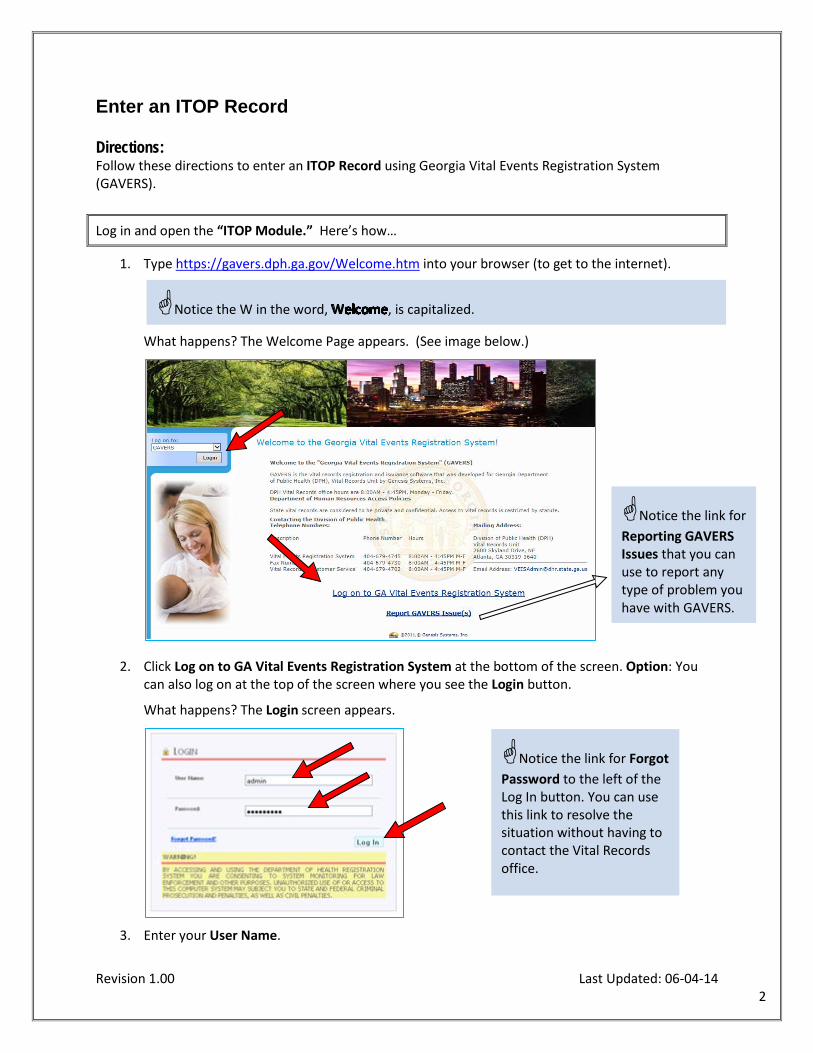
1. Type https://gavers.dph.ga.gov/Welcome.htm into your browser (to get to the internet).
What happens? The Welcome Page appears. (See image below.)
2. Click Log on to GA Vital Events Registration System at the bottom of the screen. Option: You can also log on at the top of the screen where you see the Login button.
What happens? The Login screen appears.
3. Enter your User Name.
Notice the W in the word, , is capitalized.
Notice the link for Reporting GAVERS Issues that you can use to report any type of problem you have with GAVERS.
Notice the link for Forgot Password to the left of the Log In button. You can use this link to resolve the situation without having to contact the Vital Records office.

Revision 1.00 Last Updated: 06-04-14 3
4. Enter your Password (NOT your PIN).
5. Click the Log In button.
What happens? The Select Location screen appears.
6. Click the dropdown arrow and select your Facility. Click OK.
What happens? The Home Page appears. (NOTE: The first time you login, you may be asked to change your password. Please choose a word with upper and lower case letters, 8 characters in length including a symbol. You may also be asked to disable any popup blockers.)
7. Click the ITOP tab at the top of the screen (shown with a red circle).

Revision 1.00 Last Updated: 06-04-14 4
8. Click the dropdown arrow next to Function and click ITOP Registration.
What happens? The ITOP Home Screen appears (See below).
• Notice that the Home Screen is where you’ll enter information about the Facility (red arrow), General Information (red arrow) and Patient Information (not shown).
• Notice the fields with red * next to them which are required fields.
• Notice the red bracket down the left side of the image below showing the names of the Tabs (or screens) where you will enter information from the ITOP Worksheet.
If there are any records in the Late Record work queue, you will see a message alerting you of these late records.

Revision 1.00 Last Updated: 06-04-14 5
Complete the Facility and Patient parts of the ITOP Record. Here’s how…
1. Select the New button (arrow below).
What happens? The form is ready for you to complete and the Patient Tab is revealed.
Notice that the Record Type field is automatically populated as Hospital ITOP.
The Facility Name and Address are also automatically populated. NOTE: Please check the Facility Name and Address carefully for accuracy.
2. In the Facility Information area of the screen, enter the Patient ID number.
Revision 1.00 Last Updated: 06-04-14 6
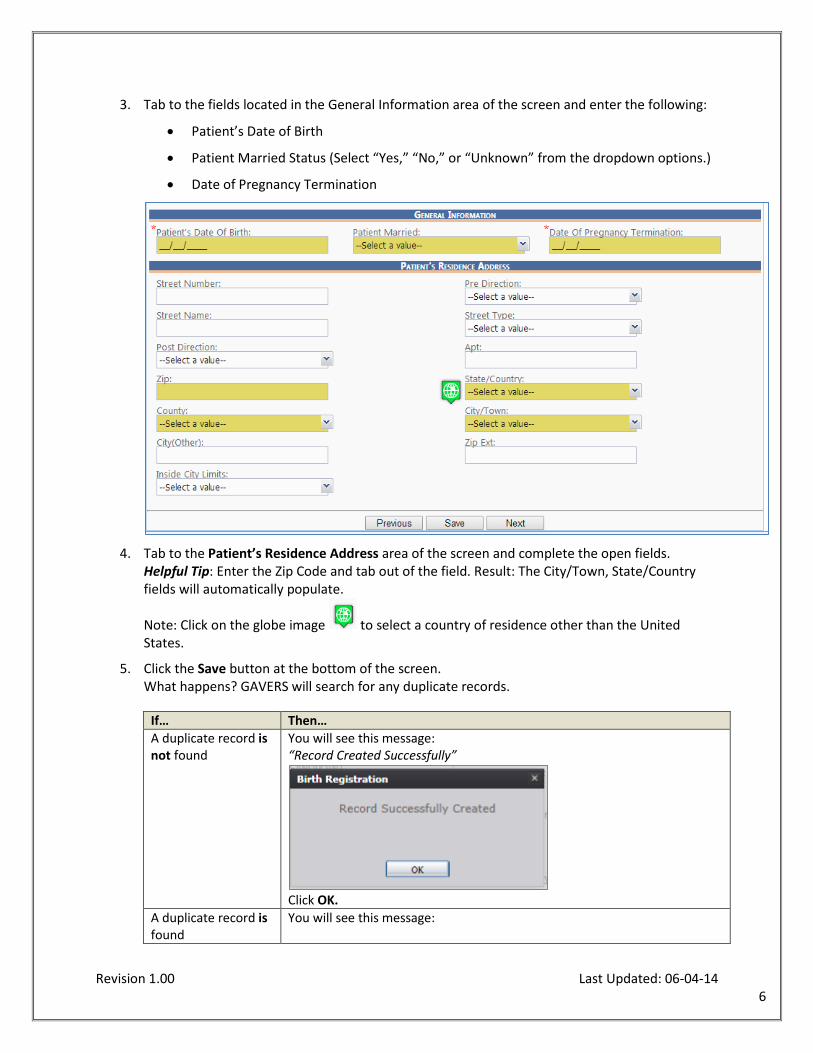
3. Tab to the fields located in the General Information area of the screen and enter the following:
• Patient’s Date of Birth
• Patient Married Status (Select “Yes,” “No,” or “Unknown” from the dropdown options.)
• Date of Pregnancy Termination
4. Tab to the Patient’s Residence Address area of the screen and complete the open fields.
Helpful Tip: Enter the Zip Code and tab out of the field. Result: The City/Town, State/Country fields will automatically populate.
Note: Click on the globe image to select a country of residence other than the United States.
5. Click the Save button at the bottom of the screen. What happens? GAVERS will search for any duplicate records.
If… Then… A duplicate record is not found
You will see this message: “Record Created Successfully”
Click OK.
A duplicate record is found
You will see this message:
Revision 1.00 Last Updated: 06-04-14 7
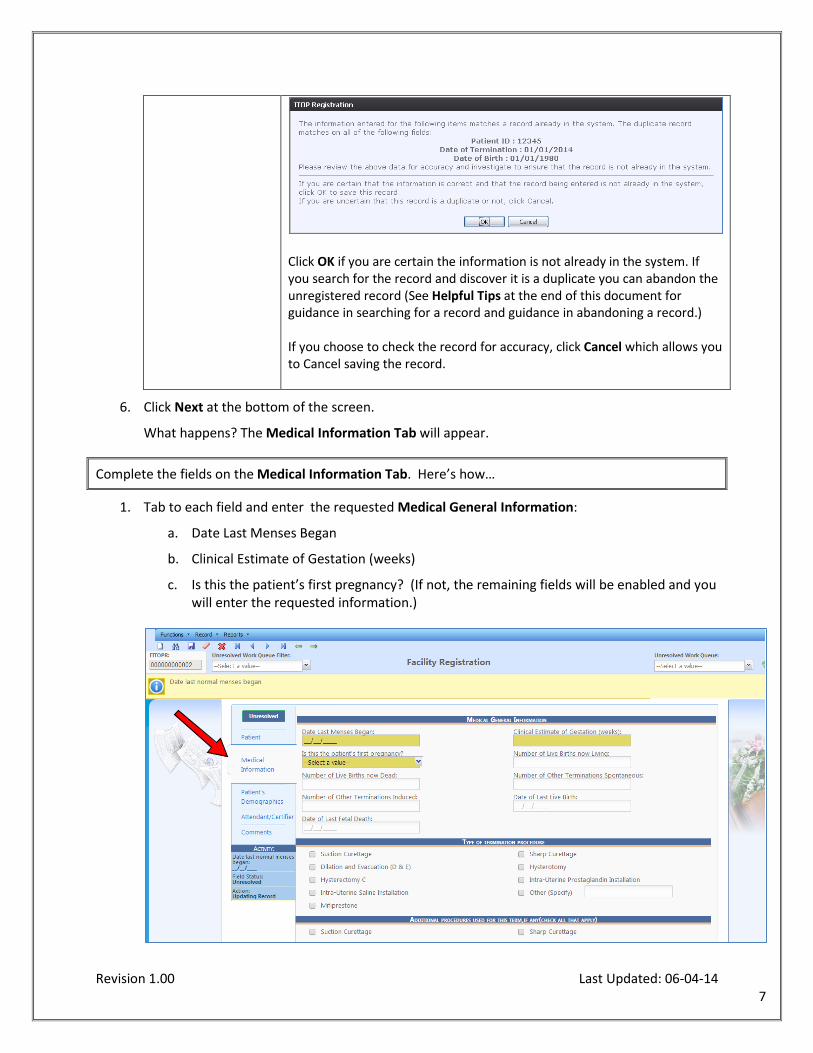
Click OK if you are certain the information is not already in the system. If you search for the record and discover it is a duplicate you can abandon the unregistered record (See Helpful Tips at the end of this document for guidance in searching for a record and guidance in abandoning a record.) If you choose to check the record for accuracy, click Cancel which allows you to Cancel saving the record.
6. Click Next at the bottom of the screen.
What happens? The Medical Information Tab will appear.
Complete the fields on the Medical Information Tab. Here’s how…
1. Tab to each field and enter the requested Medical General Information:
a. Date Last Menses Began
b. Clinical Estimate of Gestation (weeks)
c. Is this the patient’s first pregnancy? (If not, the remaining fields will be enabled and you will enter the requested information.)

Revision 1.00 Last Updated: 06-04-14 8
2. Check the appropriate responses in the remaining areas on the Medical Information Tab regarding the:
a. Type of Termination Procedure used
b. Additional Procedures Used
c. Complications of Pregnancy Termination
d. Successful Induction
3. Select the appropriate response from the dropdown menu regarding the patient’s History of Alcohol or Drug Abuse.
4. Click Save.
5. Click Next.
What happens? The Patient’s Demographics Tab appears.

Revision 1.00 Last Updated: 06-04-14 9
Complete the fields on the Patient’s Demographic Tab. Here’s how…
1. Tab through and complete the fields on the Patient’s Demographic Tab.
2. Click the Save button (at the lower part of the screen). (NOTE: Save does not show on this
image.)
3. Click Next.
What happens? The Attendant/Certifier Tab appears.
Select only one checkbox in the Hispanic Origin section.
In the Patient’s Race section, select as many choices as apply. Note that selecting more than two checkboxes will bring up a window asking you to verify that you meant to select more than two

Revision 1.00 Last Updated: 06-04-14 10
Complete the fields on the Attendant/Certifier Tab. Here’s how…
1. Search for the Attending Physician in the drop down menu.
If… Then… If the name appears in the dropdown…
Select the Name and Tab to the next field. What happens? The attendant’s information will appear in the appropriate sections.
If the name does not appear in the dropdown list…
Click on the green “Lens” button and search for the name. If found, select the Name and Tab to the next field.
If the name is not found… Select the Add New option at the bottom of the dropdown list. What happens? The Add On Fly (AOF) window appears. (See details in the Helpful Tips.) (See next image.)
Complete all fields with a red asterisk* and any other information you can. Be sure to add the Doctor’s License number.
Click OK. What happens? The new informaton will populate the record.

Revision 1.00 Last Updated: 06-04-14 11
2. Review or complete the Person Completing the Report. Your name will appear in the appropriate fields.
Note: Clicking on the Comments Tab reveals the window shown below where you can add any additional comments.
3. Click the Unresolved button.
If… Then… If there are any unresolved fields shown in the list…
Click on the field’s link, go directly to the unresolved field and resolve the problem.
If there are no unresolved issues to solve…
Click Save and the record will be saved.
4. Click Save.

Revision 1.00 Last Updated: 06-04-14 12
Certification and Release
Complete the Certification and Release process. Here’s how…
1. Go to Record on the Menu bar.
2. Click Certify on the dropdown menu.
What happens? The Certification screen appears.
3. Once you are satisfied the ITOP Record is accurate and complete, click the Certification button.
Clicking the Preview button allows you to see the entire completed ITOP Worksheet where you can easily check all entries for accuracy before certifying the record. Close the Preview window.
Revision 1.00 Last Updated: 06-04-14 13
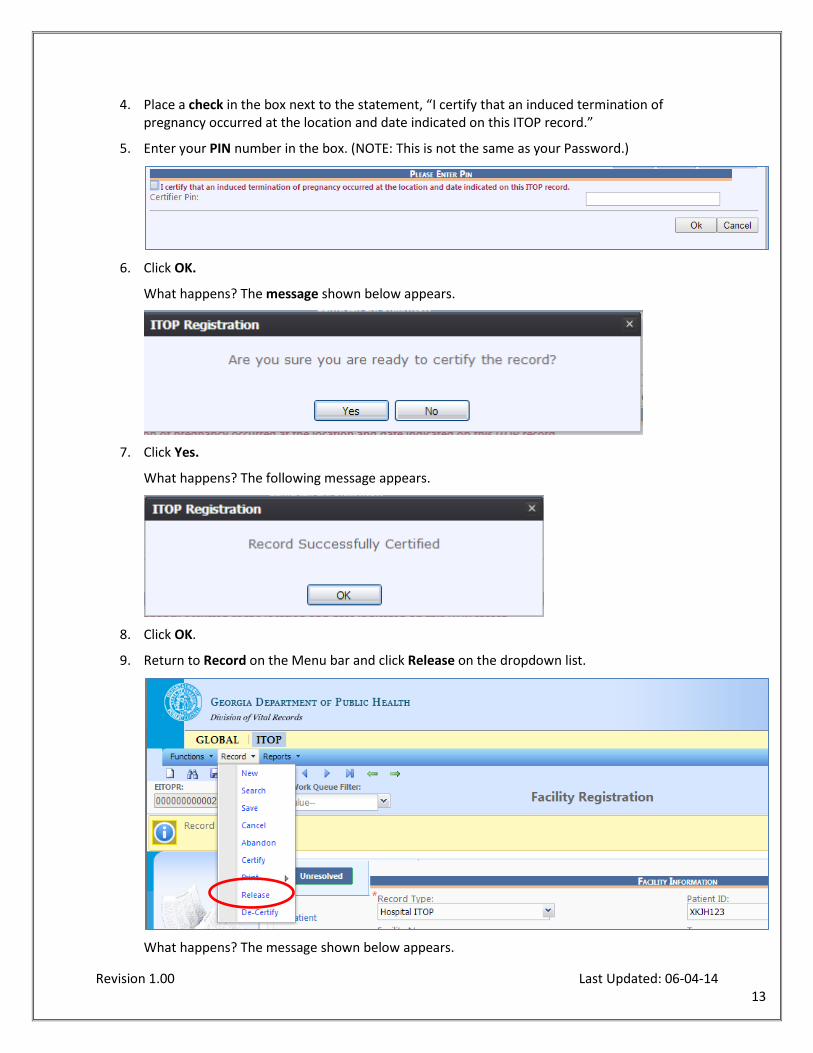
4. Place a check in the box next to the statement, “I certify that an induced termination of pregnancy occurred at the location and date indicated on this ITOP record.”
5. Enter your PIN number in the box. (NOTE: This is not the same as your Password.)
6. Click OK.
What happens? The message shown below appears.
7. Click Yes.
What happens? The following message appears.
8. Click OK.
9. Return to Record on the Menu bar and click Release on the dropdown list.
What happens? The message shown below appears.

Revision 1.00 Last Updated: 06-04-14 14
10. Click Ok. The Record is released to the State Vital Records Office.

Revision 1.00 Last Updated: 06-04-14 15
Helpful Tips
Add-On-Fly (AOF) • This function is used when you cannot find the attendant (doctor) you want to populate in the
boxes under attendant.
• Click on Add New in the drop down menu.
• Complete the fields so that you can add the Attendant’s name for this Record.
Search for a Registered Record 1. Click on the binoculars icon at the top of the page (Search).
2. You can search by several of the fields; however you need to enter a Date of Pregnancy Termination as a required search field.

Revision 1.00 Last Updated: 06-04-14 16
Searching for a Record Not Completed 1. Go to the top of the page, and find Unresolved Work Queue Filter.
2. Use drop down arrow, and click on All Unresolved.
3. That will bring up all records that are not registered.
4. Go to the top right of the page, and find Unresolved Work Queue. Use the drop down arrow to find the record you want to complete.
Printing Forms
• You may print confirmations, blank worksheets, etc., by clicking on Record (at the top).
• Select the Record/Print/Blank ITOP Worksheet. The application will open the PDF version of the form.
• Click the “Print” icon in the PDF window to print the document.
• When the document is printed, close the PDF browser window using the X in the upper right-hand corner of the screen to return to the GAVERS ITOP application.
Reports
1. The only report available to Facility users is the User Productivity Report (ITOP). To run the report for your facility, click on Reports at the top of the tool bar beside Record.
2. Select the User Productivity Report (ITOP) menu option.
The User Productivity Report Screen will appear.
3. Select a specific location parameter. Also, enter at least a “year of termination” date range (e.g. xx/xx/2012 to xx/xx/2013). You can also specify a specific date range (e.g. 05/12/2012 to 01/01/2013).
4. Choose the desired report format by selecting “Excel” or “PDF”. Complete the fields in the input screen and click Generate.
The report will load in an Excel or PDF format. The following data elements will appear on the report:
• User ID • Number of Records Registered • Avg # of Days from Date of Event to Date of Registration

Revision 1.00 Last Updated: 06-04-14 17
5. Print the document from the PDF window or from Microsoft Excel.
6. When the document is printed, close the PDF browser window or Microsoft Excel using the X in
the upper right-hand corner of the screen to return to the GAVERS application.
Making Corrections
• You are allowed to make corrections before you certify a record, but not after it is released.


![Fax Reference Guide - Xeroxdownload.support.xerox.com/pub/docs/WCM24/userdocs/... · Fax Reference Guide ... Enter recipient’s Fax No. Memory :100% [ Fax No. ] Transmitting documents](https://img.dokumen.tips/doc/110x75/5e832a3407bd17145979ab9c/fax-reference-guide-fax-reference-guide-enter-recipientas-fax-no-memory.jpg)