Embed Size (px)
Citation preview
Find more free crochet patterns and crafty undertakings at www.makemydaycreative.com Please do not reproduce this project pdf– provide a link to it instead
You are welcome to make and sell items from this project. If you can give me credit for the project, please do!
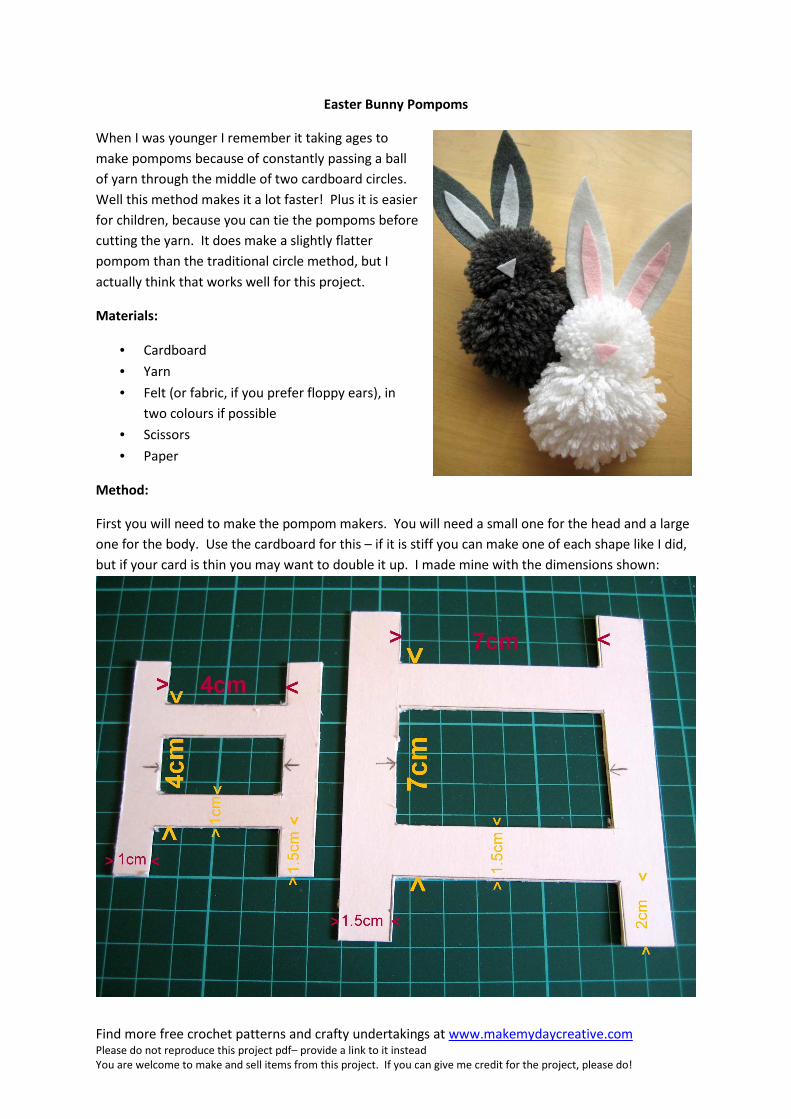
Easter Bunny Pompoms
When I was younger I remember it taking ages to
make pompoms because of constantly passing a ball
of yarn through the middle of two cardboard circles.
Well this method makes it a lot faster! Plus it is easier
for children, because you can tie the pompoms before
cutting the yarn. It does make a slightly flatter
pompom than the traditional circle method, but I
actually think that works well for this project.
Materials:
• Cardboard
• Yarn
• Felt (or fabric, if you prefer floppy ears), in
two colours if possible
• Scissors
• Paper
Method:
First you will need to make the pompom makers. You will need a small one for the head and a large
one for the body. Use the cardboard for this – if it is stiff you can make one of each shape like I did,
but if your card is thin you may want to double it up. I made mine with the dimensions shown:

Find more free crochet patterns and crafty undertakings at www.makemydaycreative.com Please do not reproduce this project pdf– provide a link to it instead
You are welcome to make and sell items from this project. If you can give me credit for the project, please do!
You will also need to make a template for the ears. It is handy to make the ears before you make
the pompoms. Draw out the shape below on some paper to make a template. Large ears make for
a cuter bunny, in my opinion, and my ears were 9cm tall and 7cm wide.
Once you have drawn your paper template, cut it out and place it on a folded piece of felt. Put the
base of the ears at the fold line, so that when you cut it out you have a double layer which is joined
at the base. Draw around and cut out the ears (but not along the fold).
Lie a piece of yarn across the middle and fold and stick the ears together (I used a regular glue stick),
so that the yarn is sandwiched between the layers. Trim the edges if needed.
Now you can cut and stick on an inner ear colour if you like, using a second colour of felt.

Find more free crochet patterns and crafty undertakings at www.makemydaycreative.com Please do not reproduce this project pdf– provide a link to it instead
You are welcome to make and sell items from this project. If you can give me credit for the project, please do!
Now make the pompoms! Start with the smaller pompom. Simply wrap the yarn around the
pompom makers. Try to make even layers and keep wrapping until you have done around 4 layers
(the more you do the puffier the pompom, but also the more irregular the strands will be in length.
Pull the strands to one side and thread through a length of yarn around the middle of the pompom.
Tie as tight as you can without deforming the pompom maker. Thread a second piece of yarn
around in exactly the same way, but don’t tie it yet.
Now the fun bit! Cut the yarn carefully at both ends. Once you have completed cutting, tie the
second piece of yarn you put around the pompom, as tight as you possibly can. You may notice the
original piece you tied around is very loose now; you can cut it away if you like.
Find more free crochet patterns and crafty undertakings at www.makemydaycreative.com Please do not reproduce this project pdf– provide a link to it instead
You are welcome to make and sell items from this project. If you can give me credit for the project, please do!
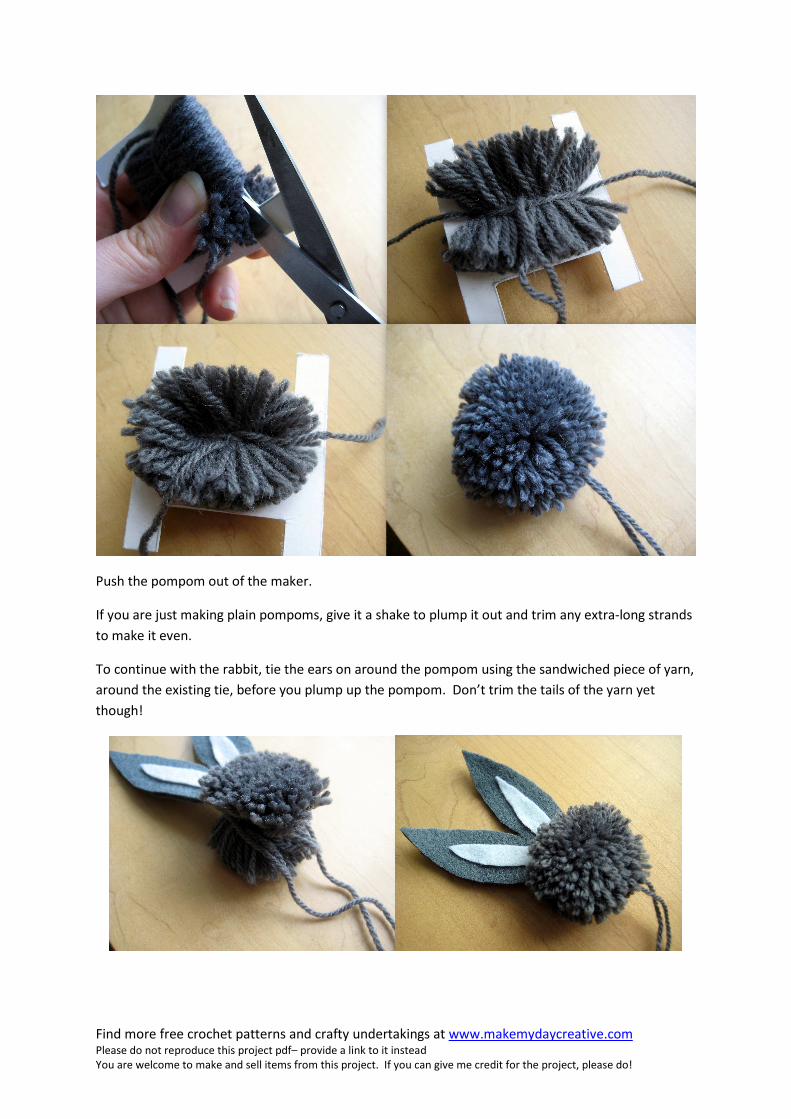
Push the pompom out of the maker.
If you are just making plain pompoms, give it a shake to plump it out and trim any extra-long strands
to make it even.
To continue with the rabbit, tie the ears on around the pompom using the sandwiched piece of yarn,
around the existing tie, before you plump up the pompom. Don’t trim the tails of the yarn yet
though!

Find more free crochet patterns and crafty undertakings at www.makemydaycreative.com Please do not reproduce this project pdf– provide a link to it instead
You are welcome to make and sell items from this project. If you can give me credit for the project, please do!
Make the large pompom in exactly the same way. Tie the head pompom to the body pompom using
the tails of yarn from the head.
Plump up the pompoms and trim any excess yarn. Cut a small piece of felt and glue on to make a
nose.
![The Mystery of the Easter Bunny Costume416749]Y3... · Easter Bunny Costume Members of the local Women’s Institute have an annual Easter bunny egg hunt. Fred, the groundsman, always](https://img.dokumen.tips/doc/110x75/60029314d148892fee3e9f51/the-mystery-of-the-easter-bunny-costume-416749y3-easter-bunny-costume-members.jpg)