Embed Size (px)
Citation preview
EarthLink Business
SIP Trunking
Panasonic KX-TDE/NCP IP PBX
Customer Configuration Guide
Implementation Guide
2
Proprietary and Confidential – EarthLink Business
Publication History
First Release: Version 1.0 – August 30, 2011
CHANGE HISTORY
Version Date Change Details Changed By
1.0 8/30/2011 Original Document Draft Dantley Thompon
1.1 12/27/2013 Modified for Panasonic KX-
TDE/NCP Mike Machnik
AUTHOR: Dantley Thompson EarthLink Engineering
Implementation Guide
3
Proprietary and Confidential – EarthLink Business
Table of Contents
Document Purpose ________________________________________________4
Product Summary _________________________________________________4
Network Architecture and Design ________________________________________5
Media Attributes and Codec Negotiation ____________________________________7
Codec Support ______________________________________________________ 7
G.711u ___________________________________________________________ 7
G.729a ___________________________________________________________ 7
Packetization Time ____________________________________________________ 7
DTMF Support ______________________________________________________ 7
Fax and Modem Support Requirements ____________________________________8
North American Numbering Plan Format ____________________________________8
Quality of Service Policy _____________________________________________8
EarthLink SIP Trunking to IP PBX Interoperability _______________________________9
Adtran Software Version Tested ___________________________________________ 9
IP PBX Software Version Tested ____________________________________________ 9
EarthLink Open Issues & Non-Supported Features ________________________________ 9
Panasonic Open Issues & Non-Supported Features ________________________________ 9
IP PBX Configuration for EarthLink SIP Trunking with Adtran CPE _____________________10
Panasonic KX-TDE/NCP IP PBX Configuration with Adtran SIP Proxy ____________________ 10
Panasonic KX-TDE/NCP IP PBX NAT Traversal Configuration without Adtran SIP Proxy _________ 24
Product Support and Contact Information __________________________________37
EarthLink SIP Trunking Turn-up Testing Procedure _____________________________38
Implementation Guide
4
Proprietary and Confidential – EarthLink Business
Document Purpose The purpose of this document is to provide a detailed technical description and best practices for
successful implementation of the EarthLink SIP Trunking Product for the Panasonic KX-TDE/NCP with the
Adtran CPE with and without SIP Proxy. This document provides information relative to the overall
network topology as well as definition and configuration standards for each device associated with the
product. Also described within this document are product guidelines and product limitations. This
document is to serve as product reference and guide to EarthLink Customers.
Product Summary The EarthLink Business SIP Trunking product is a complete VoIP (Voice over IP) solution based on the SIP
(Session Initiation Protocol) signaling protocol. The SIP Protocol is responsible for set-up and tear-down
of voice calls and overall feature and functionality. The SIP Trunking product can be offered as an overlay
to several of EarthLink’s existing products such as Internet and MPLS based products. EarthLink Business’
SIP Trunking solution will be served off a MetaSphere Call Feature Server (CFS) fronted by an
Oracle/Acme Packet SBC (Session Border Controller). The CFS acts as the centerpiece for call control and
feature interaction. The EarthLink Business SIP Trunking Product will primarily use Adtran CPE (Customer
Premise Equipment) and will not be configured as a SIP Proxy. The Panasonic KX-TDE/NCP can be
provisioned in two modes, NAT Traversal on the Panasonic KX-TDE/NCP or behind the SIP Proxy on the
Adtran CPE. The MetaSphere CFS Platform is a geo-redundant, high availability solution and serves as
the primary element in EarthLink’s Hosted Voice and SIP Trunking Product families.
In addition to the basic call control, advanced call routing functionality is available with EarthLink’s SIP
Trunking product with MetaSphere Enhanced Application Server (EAS) Platform which consists of
multiple applications and servers integrated into high availability solution.
The Oracle/Acme Packet SBC masks private to public IP Address space to provide a safe and secure
means of communication between the SIP Server and IP PBX. All SIP traffic destined to, or originating
from the MetaSphere CFS, traverses through the Oracle/Acme Packet SBC. The same policy relates to
the CPE device installed at the customer premise. The Oracle/Acme Packet SBC will resolve NAT
(Network Address Translation) related issues exposed when SIP traffic passes through a firewall.

Implementation Guide
5
Proprietary and Confidential – EarthLink Business
Network Architecture and Design The EarthLink Business SIP Trunking solution consists of several key network elements that are
connected to the existing core routing infrastructure. The MetaSwitch Call Feature Server, IP/TDM
Gateways, and Oracle/Acme Packet SBC’s are geographically diverse with reach-ability at both layer two
and layer three to provide failover capability and redundancy. Split-Horizon DNS servers are used to
resolve the SIP domain to the appropriate regional SBC. Adtran CPE will be connected to the EarthLink
network via the traditional means such as Ethernet, PPP (Point to Point Protocol), or MLPPP (Multilink
Point-to Point Protocol). T1, or bonded T1 services MUST be provisioned to either the Adtran TA5000 or
directly to the Cisco 7609 (Edge Router) to allow for proper QoS (Quality of Service) behavior. The first
diagram below provides a high level look at the primary components that complete the SIP Trunking
product. The second diagram provides a detailed layout for the connections between the Adtran CPE
and Customers IP PBX.
MetaSwitch Application Server
Acme Packet SBC
T1/Ethernet
Title: EarthLink Business SIP Trunking Test Bed Network Topology
Rev.01 Date: 8/30/2011 Drawing by: Dantley Thompson
Eth 0/1
Eth 0/2
EarthLink Business Product CertificationSIP Trunking Network Topology
SIP SIP SIP
SIPEarthLink
VoIPNetwork
Split-HorizonDNS Server
SIP
PSTN
Cisco P.E.
IP Station
IP Station
Analog FaxAdtran FXS 0/1
Adtran CPE
OK
PHONEMESSAGE
CONTACTS MENU CALL LOG
VOLUME
ABC DEF
JKL MNOGHI
1 2 3
4 5 6
TUV WXYZPQRS
7 8 9
*
[
0 #
.,@
MUTESPEAKER
HEADSET
FORWARD
OK
PHONEMESSAGE
CONTACTS MENU CALL LOG
VOLUME
ABC DEF
JKL MNOGHI
1 2 3
4 5 6
TUV WXYZPQRS
7 8 9
*
[
0 #
.,@
MUTESPEAKER
HEADSET
FORWARD
CustomerEthernet Switch
Server
Panasonic KX-TDE/NCP
Figure 1-EarthLink SIP Trunking-Network Topology
Implementation Guide
6
Proprietary and Confidential – EarthLink Business
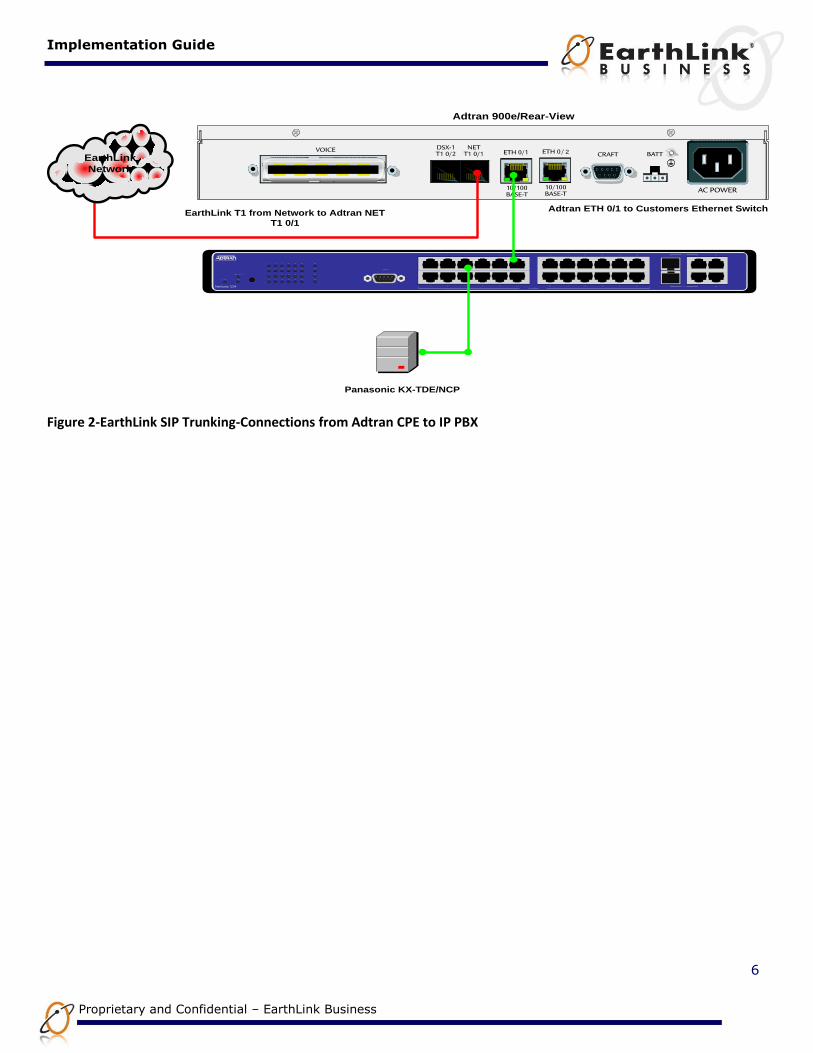
2
EarthLink T1 from Network to Adtran NET
T1 0/1
Adtran ETH 0/1 to Customers Ethernet Switch
Adtran 900e/Rear-View
EarthLink
Network
1 3 5 7 9 1 1 1 3 1 5 1 7 1 9 2 1 23 G3G1
LINK / A C T
S T A T PoE
1
2
3
4
5
6
7
8
9
10
11
12
13
14
15
16
17
18
19
20
21
2 4 6 8 1 0 1 2 1 4 1 6 1 8 2 0 2 2 24
22
23
24
G1
G2
G3
G4
CONSOLE
G4G2
Power over Ethernet
Panasonic KX-TDE/NCP
Figure 2-EarthLink SIP Trunking-Connections from Adtran CPE to IP PBX
Implementation Guide
7
Proprietary and Confidential – EarthLink Business
Media Attributes and Codec Negotiation
Codec Support A voice codec (coder/decoder) is a hardware/software module/algorithm that takes an analog or digital
voice stream and encodes it into an IP packet. For the EarthLink Business SIP Trunking Product, we
currently support two (2) of the most common codec’s utilized in the continental United States, G.711u
and G.729a. The preferred codec offered by EarthLink in the default configuration model is G.711u, then
G.729a. Basically this means that the call will negotiate using the G.711u codec first, as long as the
terminating end sends G.711u as the first or primary offered codec. The paragraphs below provide more
detailed information related to the codec’s and other requirements associated with proper negotiation
of the media/RTP.
G.711u G.711u is the most common uncompressed audio codec deployed in the US. Because it is
uncompressed, it supports the highest level of quality for the call. Typically the G.711u consumes
90Kbps-100Kbps per call. The standard sampling rate of 8kHz is used for the G.711u codec.
G.729a G.729a is the most common codec utilized to support compressed audio utilized in the US. Because it is
compressed, it is perceived to have a lower voice quality than that of G.711u, however most people
would never be able to tell the difference. Typically the G.729 consumes 30Kbps-40Kbps per call. The
standard sampling rate of 8kHz is used for the G.729a codec.
Packetization Time Packetization Time determines how often the audio stream is sampled and how often an IP packet is
created. The standard packetization times are 10ms, 20ms, 30ms, and 40ms. EarthLink Media
Gateway’s have been statically configured to use a 20ms packetization time. IP Phones and/or Voice
Applications will need to configure their equipment for a 20ms packetization time before audio traffic
can be reliably passed across the EarthLink IP Voice network.
DTMF Support EarthLink supports the transmission of Dual-Tone Multi-frequency (DTMF) digits through the
implementation of RFC2833. This RFC covers the basis of including DTMF digits within the media/RTP
path of the call. EarthLink recommends for Customers to configure their IP PBX’s and/or Voice
Applications to use RFC2833 to allow for DTMF to be passed properly and detected across the EarthLink
IP Voice network.

Implementation Guide
8
Proprietary and Confidential – EarthLink Business
Fax and Modem Support Requirements Currently, analog devices such as faxes and modems MUST be provisioned using the G.711u codec only.
“SIP” to analog lines are supported as SIP Lines off the Adtran FXS Ports or a Cisco 2102 ATA (Analog
Terminal Adapter). The customer may also configure the IP PBX to use analog extensions for faxes and
modems. This method can be supported utilizing the G.711u codec only. T.38 is currently not supported.
North American Numbering Plan Format Currently, the EarthLink Business Hosted Voice product only supports the North American Numbering
Plan Format. A Global Numbering Plan Format, such as E.164, is currently not supported.
Quality of Service Policy To ensure the best possible voice quality, EarthLink will mark and match all VoIP traffic related to SIP
(Session Initiation Protocol) and RTP (Real-Time Transport Protocol). EarthLink VoIP and/or Real-Time
based appliances and applications are configured to use DSCP (Differentiated Services Code Point) “46”
for all signaling traffic (SIP) and DSCP “46” for all Real-Time traffic (RTP) for Layer three priority. The
Customers IP PBX MUST also be configured to use DSCP “46” to provide prioritization for SIP and RTP.
Marking the DSCP field in the IP packet header will allow for packet classification to be matched and
provide priority across EarthLink’s network. This also ensures QoS specifications outlined in SLA (Service
Level Agreements) can be sufficiently met between EarthLink and the customer.

Implementation Guide
9
Proprietary and Confidential – EarthLink Business
EarthLink SIP Trunking to IP PBX Interoperability SIP Trunking interoperability testing was performed between EarthLink and the IP PBX. All phases of the
test plan were executed against the actual configuration used in a customer deployment. The
information below provides the Adtran and IP PBX software versions tested as well as an issue summary
and non-supported elements discovered during compliance testing in the EarthLink Lab.
Adtran Software Version Tested Adtran TA908e version A4.09
IP PBX Software Version Tested Panasonic KX-TDE/NCP 7.1105
EarthLink Open Issues & Non-Supported Features Registration is currently not supported for the EarthLink SIP Trunking Product.
T38 faxing is not currently supported.
Panasonic Open Issues & Non-Supported Features UPDATE message releases call.

Implementation Guide
10
Proprietary and Confidential – EarthLink Business
IP PBX Configuration for EarthLink SIP Trunking with Adtran CPE The steps below provide a step by step guide for configuration of the Panasonic KX-TDE/NCP for the
EarthLink SIP Trunking Product. Basic configuration of the Panasonic KX-TDE/NCP should be complete
and the Panasonic KX-TDE/NCP must be connected to the LAN prior to configuring the system for SIP
Trunking.
Panasonic KX-TDE/NCP IP PBX Configuration with Adtran SIP Proxy SIP trunk configuration for Panasonic KX-TDE/NCPE provided by Labib Labib of Panasonic.
EarthLink SIP Trunks Configuration Guide
(Proxy Solution)
PBX Platform: KX-TDE/NCP

Implementation Guide
11
Proprietary and Confidential – EarthLink Business
Overview This document describes the configuration procedures required for the KX-TDE100/200/600 and NCP500/1000 to make full use of the capabilities of EarthLink SIP Trunks Services.
The SIP trunks services of the TDE/NCP PBX are provided through virtual CO line cards (V-SIPGW16) which are designed to be easily integrated into an Internet Telephony Service provided by an ITSP (Internet Telephony Service Provider). This guide describes the specific configuration items for the virtual SIP Gateway card in addition to the PBX basic configuration related to SIP trunks functionality. It also describes basic Network configuration to familiarize dealers with the network setup. It does not describe the purpose and use of all configuration options on the virtual SIP Gateway card. For those details, see the KX-NCP500/1000 and KX-TDE100/200/600 Programming Manual for Virtual SIP CO Line Card
and the KX-TDE100/200/600 and KX-NCP500/1000 Manuals available from Panasonic reseller website.
Implementation Guide
12
Proprietary and Confidential – EarthLink Business
DSP card and Activation keys
The PBX has to be equipped with a DSP card in order to provide communication between the TDM
side of the PBX and the SIP trunks.
Activation keys for SIP-Trunks has to be installed in the PBX to provide the SIP-trunks functionality
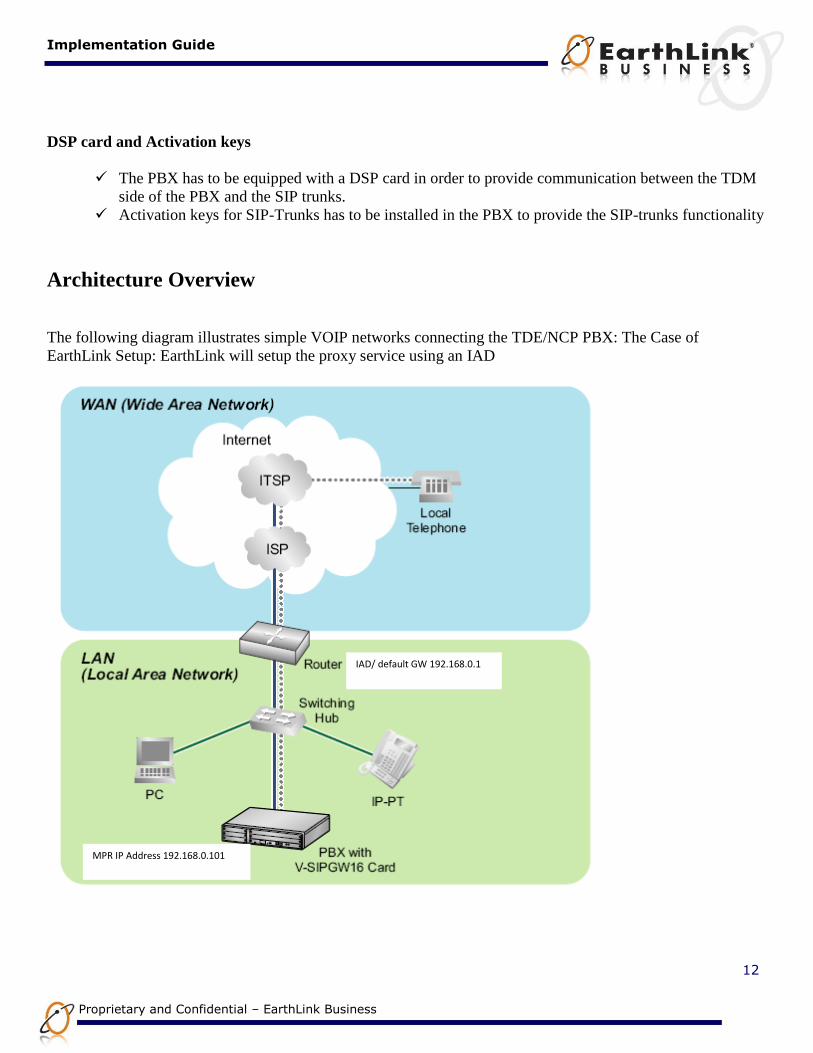
Architecture Overview
The following diagram illustrates simple VOIP networks connecting the TDE/NCP PBX: The Case of
EarthLink Setup: EarthLink will setup the proxy service using an IAD
MPR IP Address 192.168.0.101
VOIP IP Address 192.168.0.102
IAD/ default GW 192.168.0.1
Implementation Guide
13
Proprietary and Confidential – EarthLink Business
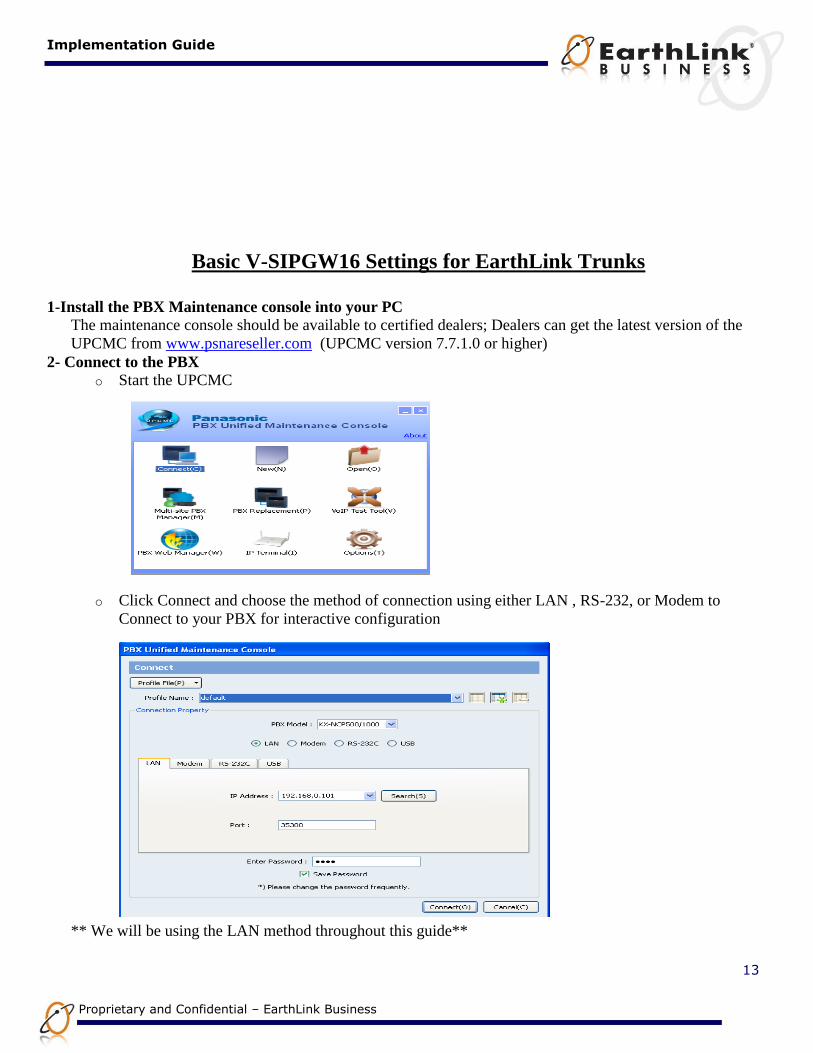
Basic V-SIPGW16 Settings for EarthLink Trunks
1-Install the PBX Maintenance console into your PC
The maintenance console should be available to certified dealers; Dealers can get the latest version of the
UPCMC from www.psnareseller.com (UPCMC version 7.7.1.0 or higher)
2- Connect to the PBX
o Start the UPCMC
o Click Connect and choose the method of connection using either LAN , RS-232, or Modem to
Connect to your PBX for interactive configuration
** We will be using the LAN method throughout this guide**

Implementation Guide
14
Proprietary and Confidential – EarthLink Business
Provide the IP address of the MPR card and the password of the INSTALLER Level
Go to 1-Configuration, 1-Slot, move your mouse over the MPR card and select the card property
Make sure that the default gateway should be the end router LAN IP address

Implementation Guide
15
Proprietary and Confidential – EarthLink Business
Make sure that you have a valid DSP-VOIP LAN address
3- Installing V-SIP W16 card
o Go to 1-Configuration, 1-Slot, move your mouse towards the IPCMPR virtual shelf and click on
select shelf
Implementation Guide
16
Proprietary and Confidential – EarthLink Business
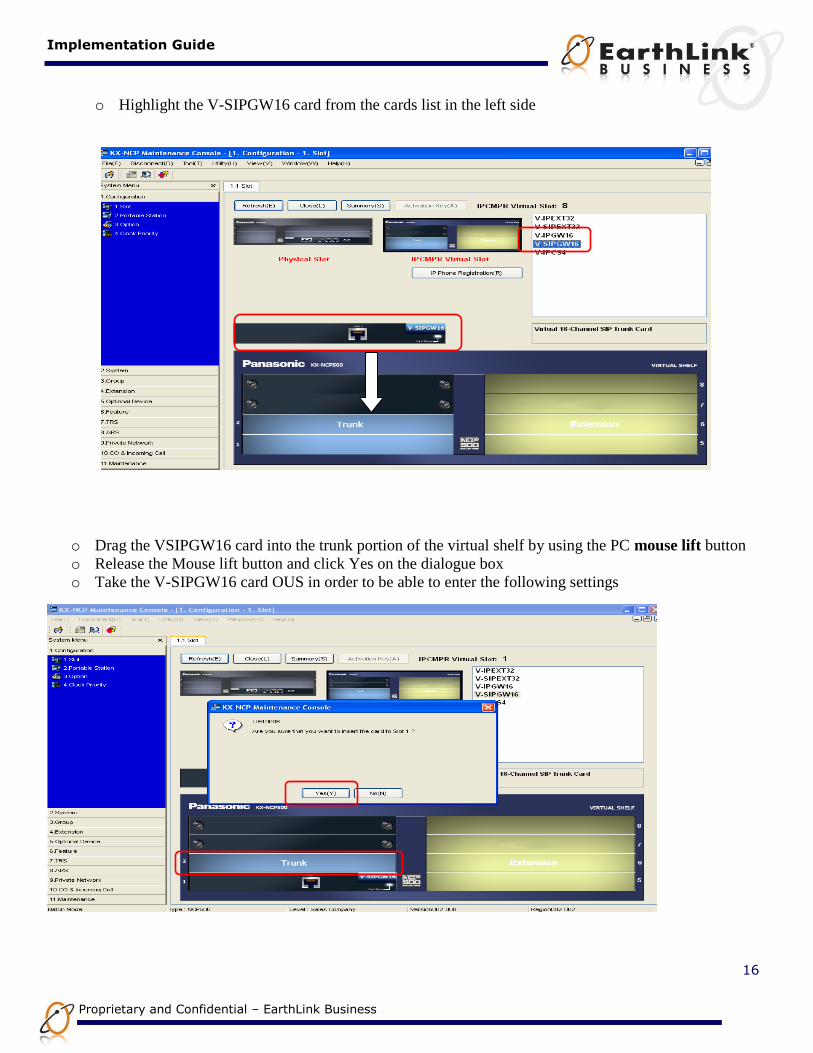
o Highlight the V-SIPGW16 card from the cards list in the left side
o Drag the VSIPGW16 card into the trunk portion of the virtual shelf by using the PC mouse lift button
o Release the Mouse lift button and click Yes on the dialogue box
o Take the V-SIPGW16 card OUS in order to be able to enter the following settings
Implementation Guide
17
Proprietary and Confidential – EarthLink Business
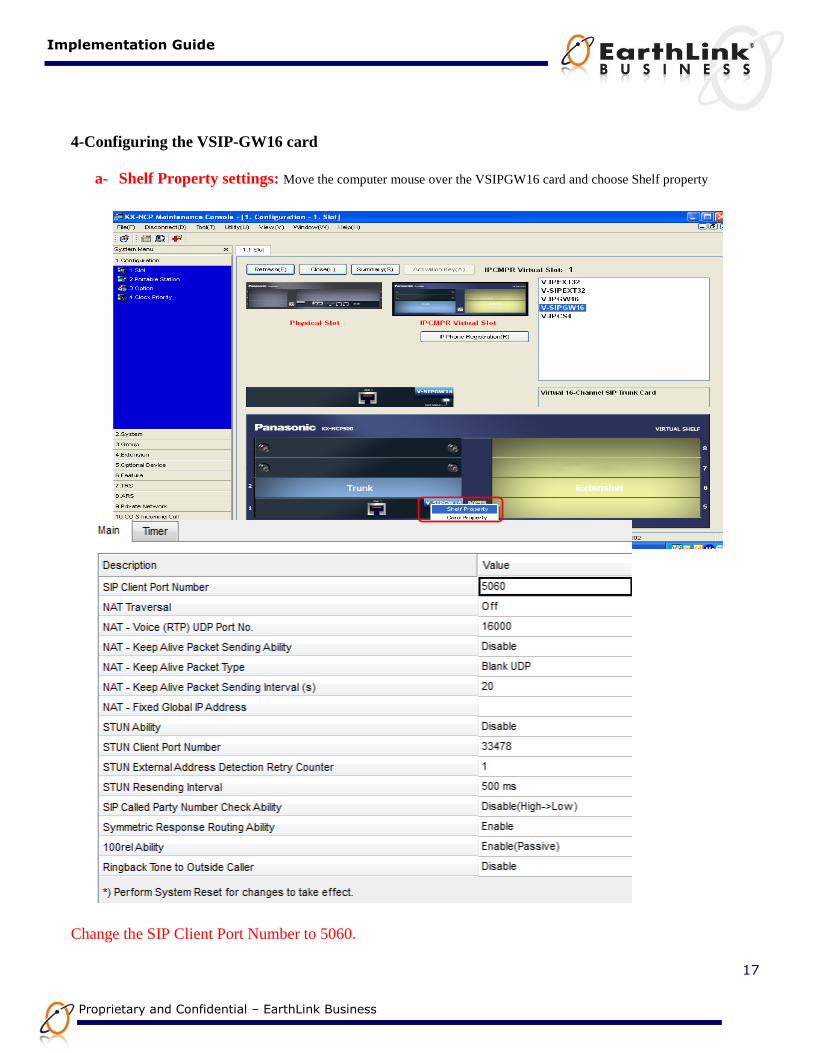
4-Configuring the VSIP-GW16 card
a- Shelf Property settings: Move the computer mouse over the VSIPGW16 card and choose Shelf property
Change the SIP Client Port Number to 5060.

Implementation Guide
18
Proprietary and Confidential – EarthLink Business
Click Apply and then OK to exit the shelf property settings screen.
Go to “Utility” in the PCMC Menu , and choose “Reset By Command” from the drop down menu
Choose “SD Backup” and Follow the prompts to reset the PBX and keep the present files in order for the
above changes to take effect.

Implementation Guide
19
Proprietary and Confidential – EarthLink Business
b- Port Property settings:
Move the computer mouse over the VSIPGW16 card and choose port property
Basic Channel setup: Please locate the EarthLink SIP Trunks account details from your EarthLink account Welcome
letter/email....
o Main tab: According to the standard EarthLink SIP trunk account, we need to configure the Basic Channel Port as follows:
1- Port 1 channel attribute = Basic channel
2- Provider name= EarthLink
3- SIP Server Name= 192.168.0.1 ( IAD IP address)
4- SIP server port number =5060
5- SIP service Domain = blank
6- Subscriber number = 1234567890 (EarthLink Account DID/BTN)
o Account tab:
1- user name == BTN
2- Authentication ID== same asUsername 3- Password == Blank
o Register Tab: 1- Register Ability= Disable
o NAT Tab: Same as default
o Option Tab:
Implementation Guide
20
Proprietary and Confidential – EarthLink Business
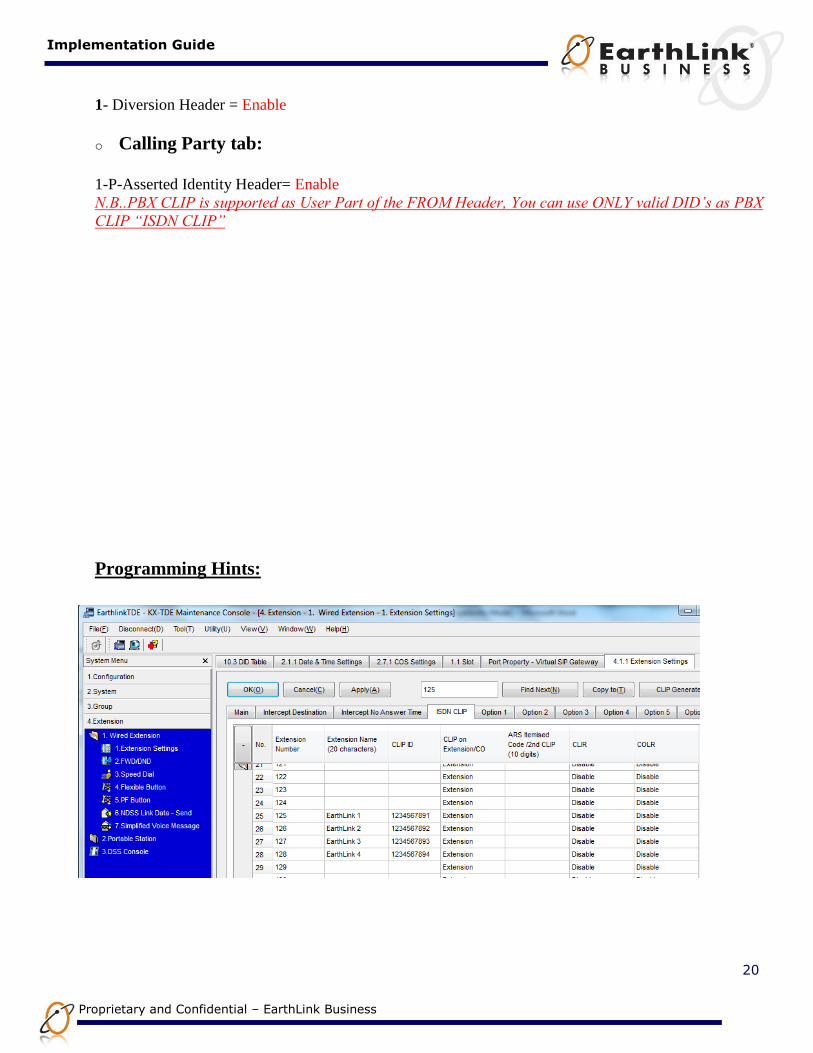
1- Diversion Header = Enable
o Calling Party tab:
1-P-Asserted Identity Header= Enable
N.B..PBX CLIP is supported as User Part of the FROM Header, You can use ONLY valid DID’s as PBX
CLIP “ISDN CLIP”
Programming Hints:

Implementation Guide
21
Proprietary and Confidential – EarthLink Business
o Called party Tab: Same as default
o Voice/Fax Tab: Changes from Default settings: “for all channels”
1- 1st Codec Priority = G.729 a
2- 2nd
Codec Priority = G.711u
3- 3rd
Codec Prioirty = None
o RTP/RTCP Tab: Same as default
o T.38, T.38 Option Same as default
o DSP Same as default
o Supplementry services: Changes from Default settings:
1- CNIP (Receive) = Yes ( All Channels, Basic and Additional)
2- Attended Transfer (REFER)= Yes ( All Channels, Basic and Additional)
3- Blind Transfer (REFER)= Yes ( All Channels, Basic and Additional)
Additional DID’s
Please set the channel attribute for number of ports depending on the number of active SIP lines
as”additional channel for channel 1”
Implementation Guide
22
Proprietary and Confidential – EarthLink Business
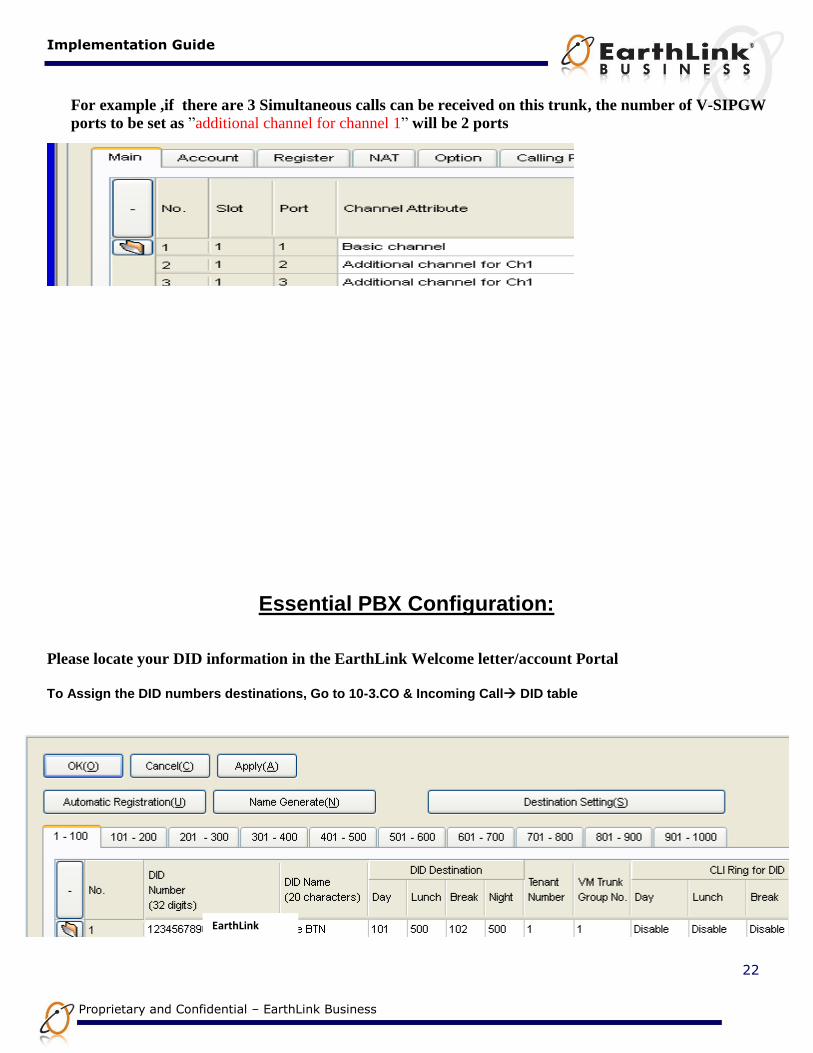
For example ,if there are 3 Simultaneous calls can be received on this trunk, the number of V-SIPGW
ports to be set as ”additional channel for channel 1” will be 2 ports
Essential PBX Configuration:
Please locate your DID information in the EarthLink Welcome letter/account Portal
To Assign the DID numbers destinations, Go to 10-3.CO & Incoming Call DID table
EarthLink
Implementation Guide
23
Proprietary and Confidential – EarthLink Business
SIP trunks Activation keys:
1- The DSP card installed onto the PBX MPR Card has preinstalled number of SIP trunks activation keys (DSP4 and DSP16 have 4 IP trunks and DSP64 has 16 IP trunks)
2- To obtain additional activation keys, you need to purchase the appropriate activation key codes (For IP Trunks) and access the Key Management System. You can download the activation keys as an activation key file from the Key Management System. To download the activation keys, enter the MPR ID number shown on the IPCMPR Card in the PBX, and activation key number and registration ID provided on each activation key code.
3- To check the Number of Activation Keys Installed into your system Go to 1- Configuration, 1-Slot, click on Activation Keys (Top of the PBX image)
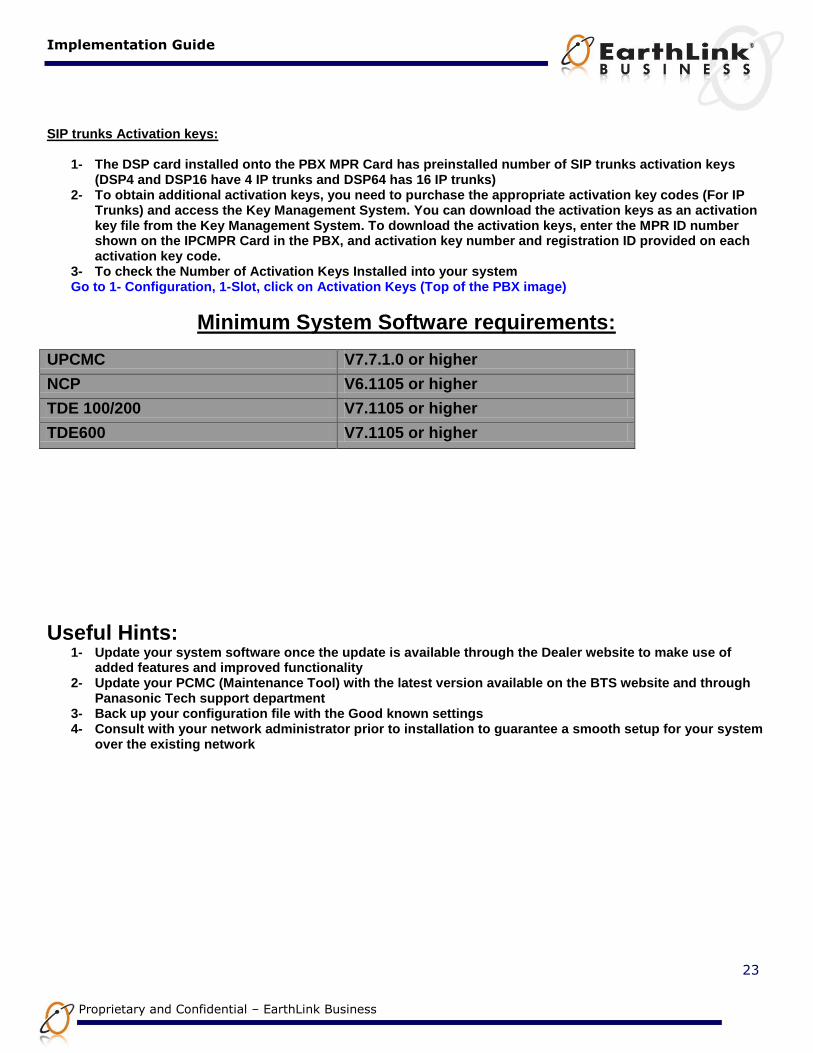
Minimum System Software requirements:
UPCMC V7.7.1.0 or higher
NCP V6.1105 or higher
TDE 100/200 V7.1105 or higher
TDE600 V7.1105 or higher
Useful Hints:
1- Update your system software once the update is available through the Dealer website to make use of added features and improved functionality
2- Update your PCMC (Maintenance Tool) with the latest version available on the BTS website and through Panasonic Tech support department
3- Back up your configuration file with the Good known settings 4- Consult with your network administrator prior to installation to guarantee a smooth setup for your system
over the existing network
Implementation Guide
24
Proprietary and Confidential – EarthLink Business
Panasonic KX-TDE/NCP IP PBX NAT Traversal Configuration without Adtran SIP Proxy
EarthLink SIP Trunks Configuration Guide
(NAT Traversal Solution)
PBX Platform: KX-TDE/NCP
Overview
This document describes the configuration procedures required for the KX-TDE100/200/600 and NCP500/1000
to make full use of the capabilities of EarthLink SIP Trunks Services.
The SIP trunks services of the TDE/NCP PBX are provided through virtual CO line cards (V-SIPGW16) which
are designed to be easily integrated into an Internet Telephony Service provided by an ITSP (Internet Telephony
Service Provider).
This guide describes the specific configuration items for the virtual SIP Gateway card in addition to the PBX
basic configuration related to SIP trunks functionality. It also describes basic Network configuration to
familiarize dealers with the network setup. It does not describe the purpose and use of all configuration options
on the virtual SIP Gateway card. For those details, see the KX-NCP500/1000 and KX-TDE100/200/600
Programming Manual for Virtual SIP CO Line Card and the KX-TDE100/200/600 and KX-NCP500/1000
Manuals available from Panasonic reseller website.
DSP card and Activation keys
The PBX has to be equipped with a DSP card in order to provide communication between the TDM
side of the PBX and the SIP trunks.
Activation keys for SIP-Trunks has to be installed in the PBX to provide the SIP-trunks functionality

Implementation Guide
25
Proprietary and Confidential – EarthLink Business
Architecture Overview
The following diagram illustrates simple VOIP networks connecting the TDE/NCP PBX: The Case of
EarthLink Setup: EarthLink will provide services directly through its SBC. Public IP address will be provided
and programmed as WAN side IP address of the end router in the PBX site.
Port Forwarding is required in the end router:
Port 5060 UDP to be FWD to MPR IP address (192.168.0.101)
Port range 16000~16063 UDP to be FWD to DSP VOIP IP address (192.168.0.102)
MPR IP Address 192.168.0.101
VOIP IP Address 192.168.0.102
EarthLink SBC:
stat-msblt.voiplab.elnk.us
End Router IP address:
1.2.3.4
LAN Default GW:
192.168.0.1

Implementation Guide
26
Proprietary and Confidential – EarthLink Business
Basic V-SIPGW16 Settings for EarthLink Trunks
1-Install the PBX Maintenance console into your PC
The maintenance console should be available to certified dealers; Dealers can get the latest version of the
UPCMC from www.psnareseller.com (UPCMC version 7.7.1.0 or higher)
2- Connect to the PBX
o Start the UPCMC
o Click Connect and choose the method of connection using either LAN , RS-232, or Modem to
Connect to your PBX for interactive configuration
** We will be using the LAN method throughout this guide**
Provide the IP address of the MPR card and the password of the INSTALLER Level
Implementation Guide
27
Proprietary and Confidential – EarthLink Business
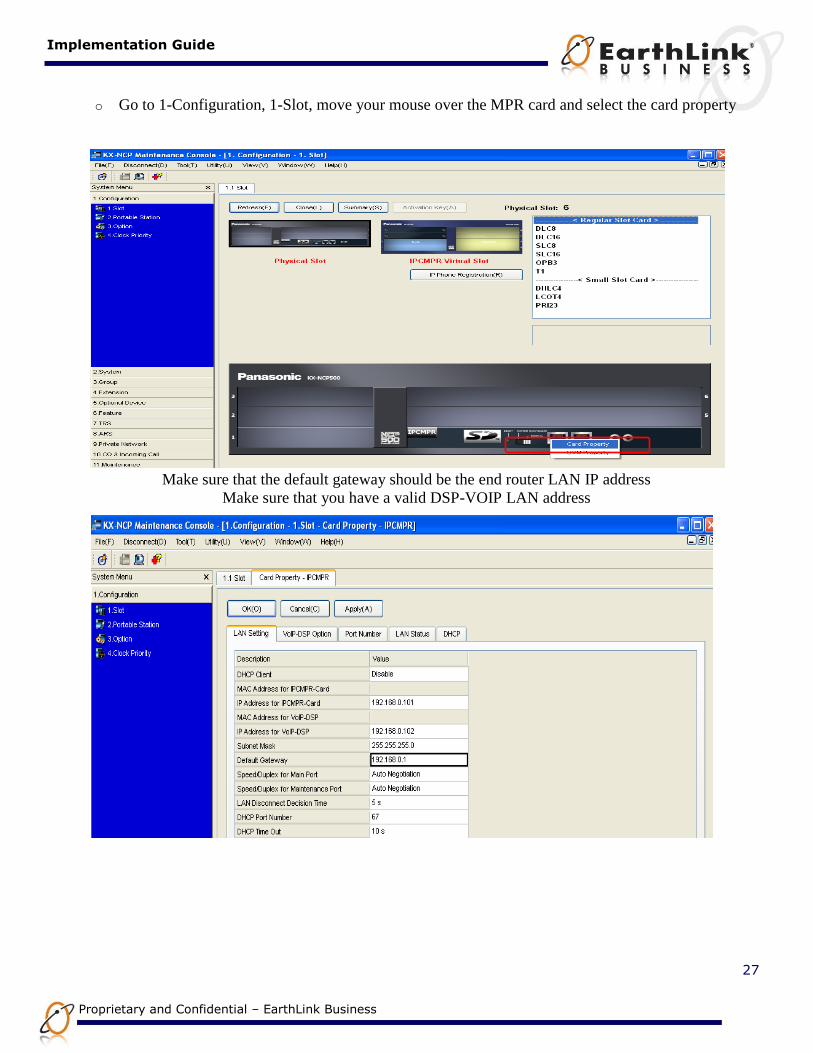
o Go to 1-Configuration, 1-Slot, move your mouse over the MPR card and select the card property
Make sure that the default gateway should be the end router LAN IP address
Make sure that you have a valid DSP-VOIP LAN address
Implementation Guide
28
Proprietary and Confidential – EarthLink Business
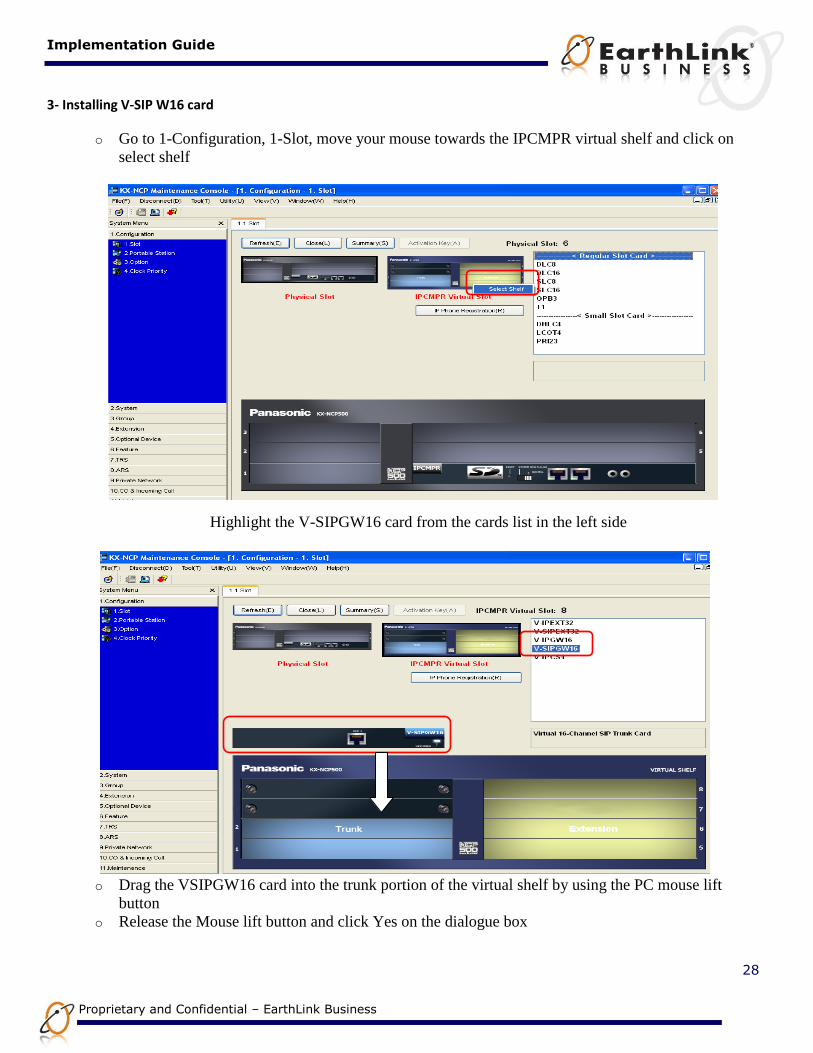
3- Installing V-SIP W16 card
o Go to 1-Configuration, 1-Slot, move your mouse towards the IPCMPR virtual shelf and click on
select shelf
Highlight the V-SIPGW16 card from the cards list in the left side
o Drag the VSIPGW16 card into the trunk portion of the virtual shelf by using the PC mouse lift
button
o Release the Mouse lift button and click Yes on the dialogue box

Implementation Guide
29
Proprietary and Confidential – EarthLink Business
o Take the V-SIPGW16 card OUS in order to be able to enter the following settings
4-Configuring the VSIP-GW16 card
a- Shelf Property settings: Move the computer mouse over the VSIPGW16 card and choose Shelf property
Implementation Guide
30
Proprietary and Confidential – EarthLink Business
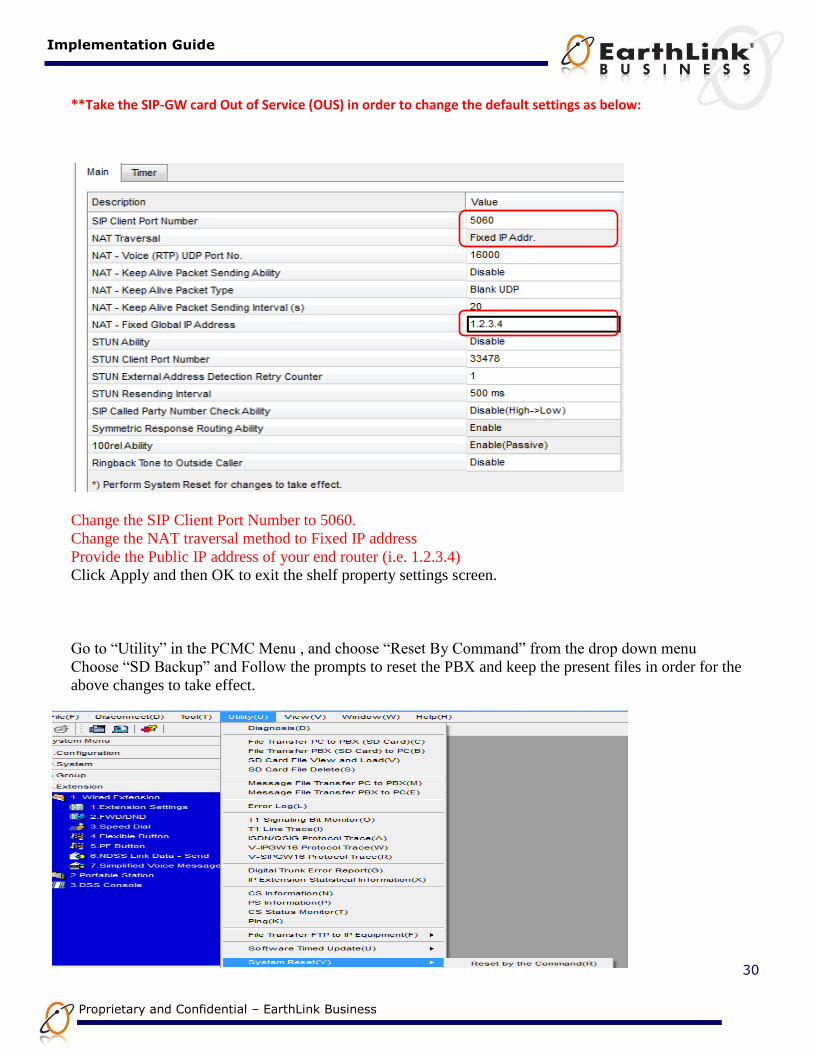
**Take the SIP-GW card Out of Service (OUS) in order to change the default settings as below:
Change the SIP Client Port Number to 5060.
Change the NAT traversal method to Fixed IP address
Provide the Public IP address of your end router (i.e. 1.2.3.4)
Click Apply and then OK to exit the shelf property settings screen.
Go to “Utility” in the PCMC Menu , and choose “Reset By Command” from the drop down menu
Choose “SD Backup” and Follow the prompts to reset the PBX and keep the present files in order for the
above changes to take effect.
Implementation Guide
31
Proprietary and Confidential – EarthLink Business
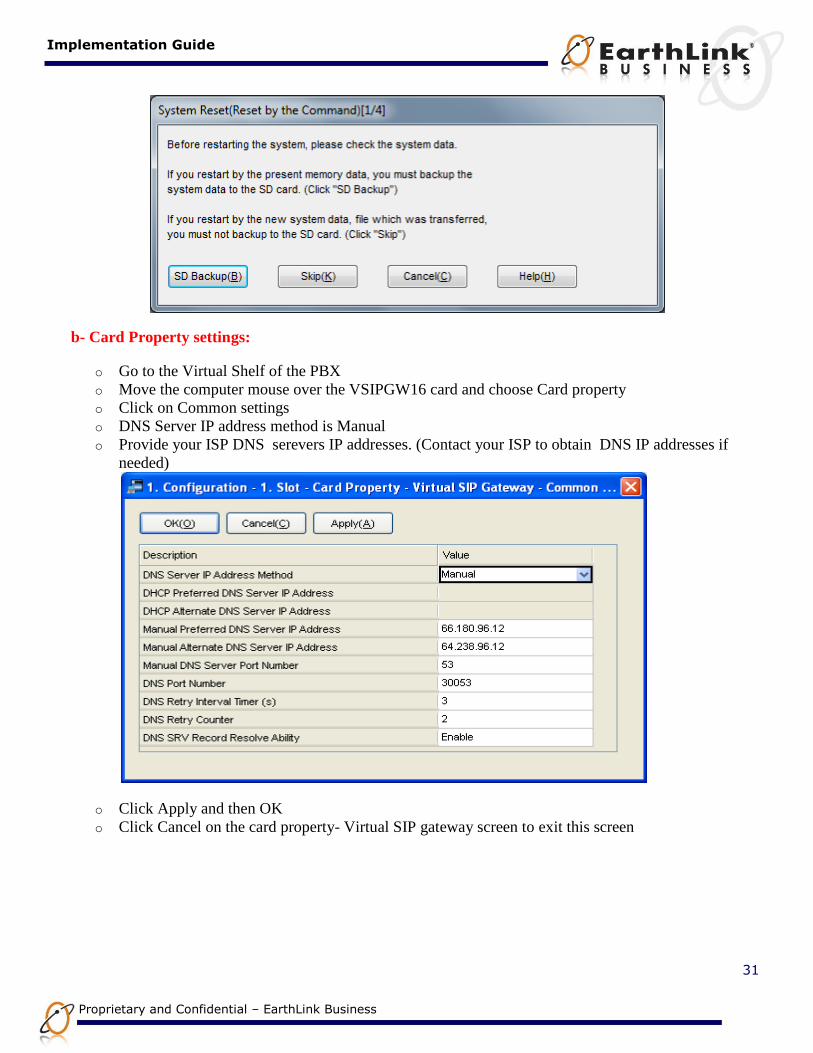
b- Card Property settings:
o Go to the Virtual Shelf of the PBX
o Move the computer mouse over the VSIPGW16 card and choose Card property
o Click on Common settings
o DNS Server IP address method is Manual
o Provide your ISP DNS serevers IP addresses. (Contact your ISP to obtain DNS IP addresses if
needed)
o Click Apply and then OK
o Click Cancel on the card property- Virtual SIP gateway screen to exit this screen

Implementation Guide
32
Proprietary and Confidential – EarthLink Business
c- Port Property settings:
Move the computer mouse over the VSIPGW16 card and choose port property
Basic Channel setup:
Please locate the EarthLink SIP Trunks account details from your EarthLink account Welcome
letter/email....
o Main tab:
According to the standard EarthLink SIP trunk account, we need to configure the Basic Channel Port as
follows:
7- Port 1 channel attribute = Basic channel
8- Provider name= EarthLink
9- SIP Server Name= stat-msblt.voiplab.elnk.us ( Earthlink SBC address)
10- SIP server port number =5060
11- SIP service Domain = blank
12- Subscriber number = 1234567890 (EarthLink Account DID/BTN)
o Account tab: 4- user name == BTN ( Example : 1234567890)
5- Authentication ID== same asUsername
6- Password == Blank
o Register Tab:
2- Register Ability= Disable
o NAT Tab:
Same as default
o Option Tab:
1- Diversion Header = Enable

Implementation Guide
33
Proprietary and Confidential – EarthLink Business
o Calling Party tab:
1-P-Asserted Identity Header= Enable
N.B..PBX CLIP is supported as User Part of the FROM Header, You can use ONLY valid DID’s as PBX
CLIP “ISDN CLIP”
Programming Hints:
o Called party Tab:
Same as default
o Voice/Fax Tab:
Changes from Default settings: “ For ALL channels”
4- 1st Codec Priority = G.729 a
5- 2nd
Codec Priority = G.711u
6- 3rd
Codec Prioirty = None
o RTP/RTCP Tab:
Same as default
o T.38, T.38 Option
Same as default
Implementation Guide
34
Proprietary and Confidential – EarthLink Business
o DSP
Same as default
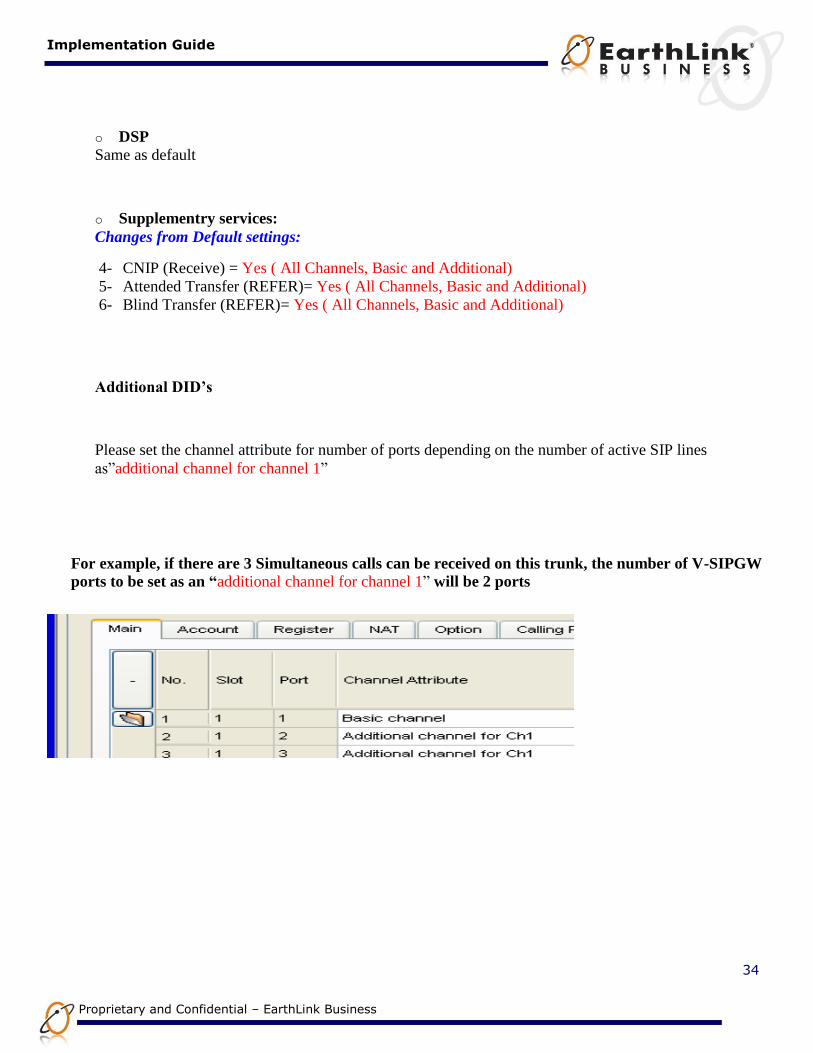
o Supplementry services:
Changes from Default settings:
4- CNIP (Receive) = Yes ( All Channels, Basic and Additional)
5- Attended Transfer (REFER)= Yes ( All Channels, Basic and Additional)
6- Blind Transfer (REFER)= Yes ( All Channels, Basic and Additional)
Additional DID’s
Please set the channel attribute for number of ports depending on the number of active SIP lines
as”additional channel for channel 1”
For example, if there are 3 Simultaneous calls can be received on this trunk, the number of V-SIPGW
ports to be set as an “additional channel for channel 1” will be 2 ports
Implementation Guide
35
Proprietary and Confidential – EarthLink Business
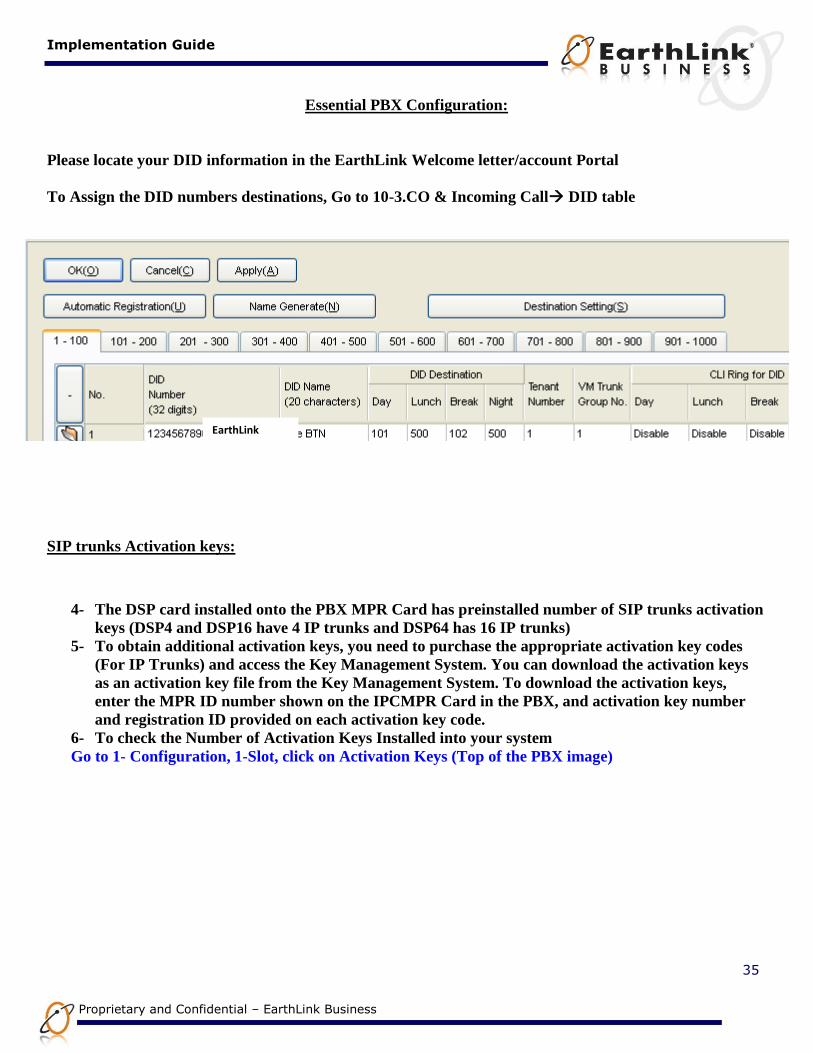
Essential PBX Configuration:
Please locate your DID information in the EarthLink Welcome letter/account Portal
To Assign the DID numbers destinations, Go to 10-3.CO & Incoming Call DID table
SIP trunks Activation keys:
4- The DSP card installed onto the PBX MPR Card has preinstalled number of SIP trunks activation
keys (DSP4 and DSP16 have 4 IP trunks and DSP64 has 16 IP trunks)
5- To obtain additional activation keys, you need to purchase the appropriate activation key codes
(For IP Trunks) and access the Key Management System. You can download the activation keys
as an activation key file from the Key Management System. To download the activation keys,
enter the MPR ID number shown on the IPCMPR Card in the PBX, and activation key number
and registration ID provided on each activation key code.
6- To check the Number of Activation Keys Installed into your system
Go to 1- Configuration, 1-Slot, click on Activation Keys (Top of the PBX image)
EarthLink

Implementation Guide
36
Proprietary and Confidential – EarthLink Business
Minimum System Software requirements:
UPCMC V7.7.1.0 or higher
NCP V6.1105 or higher
TDE 100/200 V7.1105 or higher
TDE600 V7.1105 or higher
Useful Hints:
5- Update your system software once the update is available through the Dealer website to make use
of added features and improved functionality
6- Update your PCMC (Maintenance Tool) with the latest version available on the BTS website and
through Panasonic Tech support department
7- Back up your configuration file with the Good known settings
8- Consult with your network administrator prior to installation to guarantee a smooth setup for
your system over the existing network
Implementation Guide
37
Proprietary and Confidential – EarthLink Business
Product Support and Contact Information The information below provides contact information for assistance in configuration and troubleshooting
EarthLink’s SIP Trunking service.
EarthLink Support: (800)239-3000
24x7 Support Availability
http://www.earthlinkbusiness.com/support/support.xea
Panasonic:
Mon-Fri 9am – 9pm EST
1-800-528-6747 Option 1
http://www.panasonic.com/business/unified-communication/support.asp
Implementation Guide
38
Proprietary and Confidential – EarthLink Business
EarthLink SIP Trunking Turn-up Testing Procedure To ensure proper call negotiation can be established between EarthLink and the IP PBX, the test steps
below MUST be executed during the initial turn-up process.
SIP Trunking Test Steps:
1. Test an outbound call to a Local Number. Check for Ring-back, 2-way Audio, and Call Quality.
2. Test an outbound call to a Long Distance Number. Check for Ring-back, 2-way Audio, and Call
Quality.
3. Test an outbound call to an International Number. Check for Ring-back, 2-way Audio, and Call
Quality.
4. Test an outbound call to a Toll-Free Number. Check for Ring-back, 2-way Audio, and Call Quality.
5. Test an inbound call that lasts greater than 10 minutes
6. Test an outbound call that lasts greater than 10 minutes
7. Test simultaneous inbound and outbound calls to PSTN
8. Test an outbound Call to Operator “0”
9. Test an outbound Call to Directory Assistance “411”
10. Test a “911” Call (IDENTIFY TO THE 911 OPERATOR THAT THIS IS A TEST). Ask them to provide
phone number, address and secondary or alternate number if available.
11. Test an inbound call to an internal DID. Check for Ring-back, 2-way Audio, and Call Quality.
12. Test an inbound call to Auto-Attendant. Check DTMF and Call Quality
13. Test an outbound call to an Auto-Attendant/IVR and verify DTMF
14. Test Call Transfer off-site
15. Test Call Forward off-site
Notes: