Embed Size (px)
Citation preview
EarlyMath Skills
for Mac & Windows
USER’S GUIDE
MARBLESOFT

Early math skillsfor Mac & Windows
MARBLESOFT12301 Central Ave NESuite 205Blaine, MN 55434(763) 755-1402
Created by
Mark Larson J. William Horne
Consultants
Janet Notheis Volkmar, B.A., M.S.Edith Anderson Otterson, B.A.
Faculty of Hennepin Technical Institute, Minneapolis, MNSally EndrisSharon Speaks-SeelingJudith NormandinBecky BorcherdingKaren Berger
Illustration
Jeff Felson, B.A.Lisa BladeSteve Mills

Marblesoft makes no warranties, either expressly or implied, regarding the software described in this manual and its suitability to a particular purpose.
In no event shall Marblesoft be liable to anyone for special collateral, incidental or consequential damages in connection with or arising from the purchase or use of these programs. Marblesoft shall not be liable for any claim against the user of these programs by any other party. Marblesoft’s liability shall in no event exceed the price actually paid by the customer for the use of the software.
Marblesoft does warrant for one year after purchase of Early Math Skills by the customer, the software shall reasonably conform to the standards defined in this manual. Marblesoft specifically does not warrant that the software will operate uninterrupted or error-free. The sole and exclusive remedy for a failure of the software to perform in accordance with the accompanying documentation is for the customer to return the software to Marblesoft and to notify Marblesoft in writing of the nonperformance within one year of purchase. Marblesoft’s sole obligation shall be to provide the customer with a performing copy of the software within a reasonable time after receiving notification of nonperformance.
Marblesoft reserves the right to make improvements to Early Math Skills at any time and without notice. Marblesoft reserves the right to provide software upgrades at a reasonable fee. By accepting an upgrade, the customer agrees to destroy all prior copies of the software and documentation. The terms and conditions of this agreement apply to any and all upgrades.
Warranty Disclaimer

Copyright NoticeThis manual and the Early Math Skills programs are copyrighted. Any reproduction, in whole or in part, of this manual or the Early Math Skills software is prohibited by federal copyright laws, including unauthorized electronic reproduction of the Early Math Skills CD. The copyright laws provide for criminal penalties of up to one year imprisonment and/or a $10,000 fine.
This product is sold for use on a single computer at a single location. Contact Marblesoft for information regarding site licensing.
Early Math SkillsCopyright © 1984-2005 by Marblesoft, 12301 Central Ave NE, Blaine, MN 55434.All Rights reserved. Macintosh version copyright © 1994-2005 by Marblesoft. Windows version copyright © 2002-2005 by Marblesoft.
Apple®, Macintosh® and MacOS® are registered trademarks of Apple Computer, Inc.
Windows® is a registered trademark of Microsoft, Inc.
IntelliKeys™ is a trademark of IntelliTools, Inc.

ContentsIntroduction 6
System Requirements 7About Colors and Monitor Size 9 Installing Early Math Skills 11
Running Early Math Skills 13Choosing an Activity 13Setting the Level of Difficulty 13Early Addition I 14Early Addition II 16Sequencing Up 18Sequencing Down 20Early Subtraction I 22Early Subtraction II 24More Than/Less Than 26
Input Methods 28Input Devices 28Input Options 30Scanning Options 31
Prompting and Reinforcement 33Speech 33Sound Effects 34Don’t say “No” 35Blind Prompts 35Repeat Prompts Delay 35Reinforcement 36
Program Control 37Ignore Some Responses 37Rate of Advancement 38Fonts 39Full Screen Mode 39Use Stop Sign 39Customize Colors 40Close Activity 40Pause 41Quit 41
Student Scores 42New Student File 42Open Student File 43Save Student Scores 43Close Student File 43
Reviewing Student Files 44Tab-Delimited 45Monospaced 48
Preferences 49
Keyboard Shortcuts 50
Technical Support 51
6
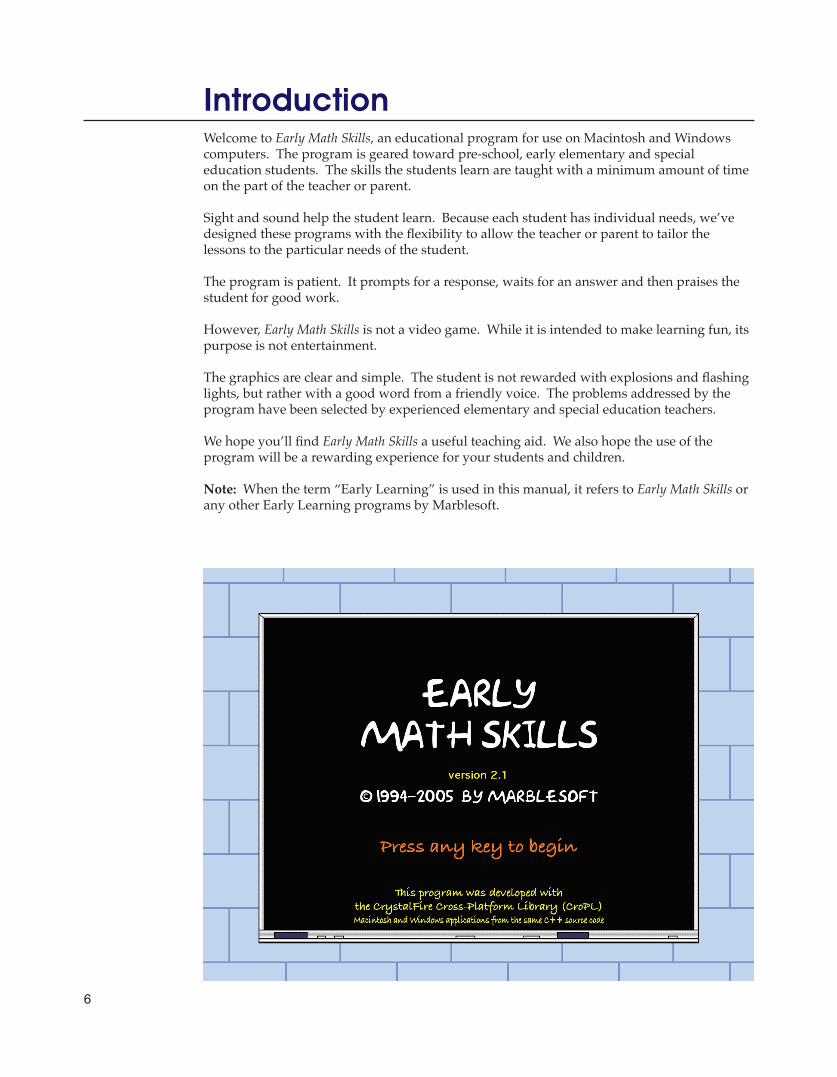
IntroductionWelcome to Early Math Skills, an educational program for use on Macintosh and Windows computers. The program is geared toward pre-school, early elementary and special education students. The skills the students learn are taught with a minimum amount of time on the part of the teacher or parent.
Sight and sound help the student learn. Because each student has individual needs, we’ve designed these programs with the flexibility to allow the teacher or parent to tailor the lessons to the particular needs of the student.
The program is patient. It prompts for a response, waits for an answer and then praises the student for good work.
However, Early Math Skills is not a video game. While it is intended to make learning fun, its purpose is not entertainment.
The graphics are clear and simple. The student is not rewarded with explosions and flashing lights, but rather with a good word from a friendly voice. The problems addressed by the program have been selected by experienced elementary and special education teachers.
We hope you’ll find Early Math Skills a useful teaching aid. We also hope the use of the program will be a rewarding experience for your students and children.
Note: When the term “Early Learning” is used in this manual, it refers to Early Math Skills or any other Early Learning programs by Marblesoft.

7
System RequirementsEarly Math Skills requires at least the following minimum system:
Macintosh
• 64 MB RAM• 13” color monitor• CD-ROM drive• MacOS 9.0.4 or later (runs natively on OS X as well).
In addition, Marblesoft recommends the following:
• 17” color monitor• 32-bit color (“Millions” of colors)
To determine your system configuration, in MacOS 9, choose “About this Computer” from the Finder’s Apple menu. A window something like the one on the right appears:
In this example, we can see that we have 640 MB RAM, a 280 MB block free for the application, and MacOS 9.2. In OS X, choose “About this Mac” from the Apple menu. In this example, we can see that we have 512K of RAM and Mac OS 10.4.2.
8
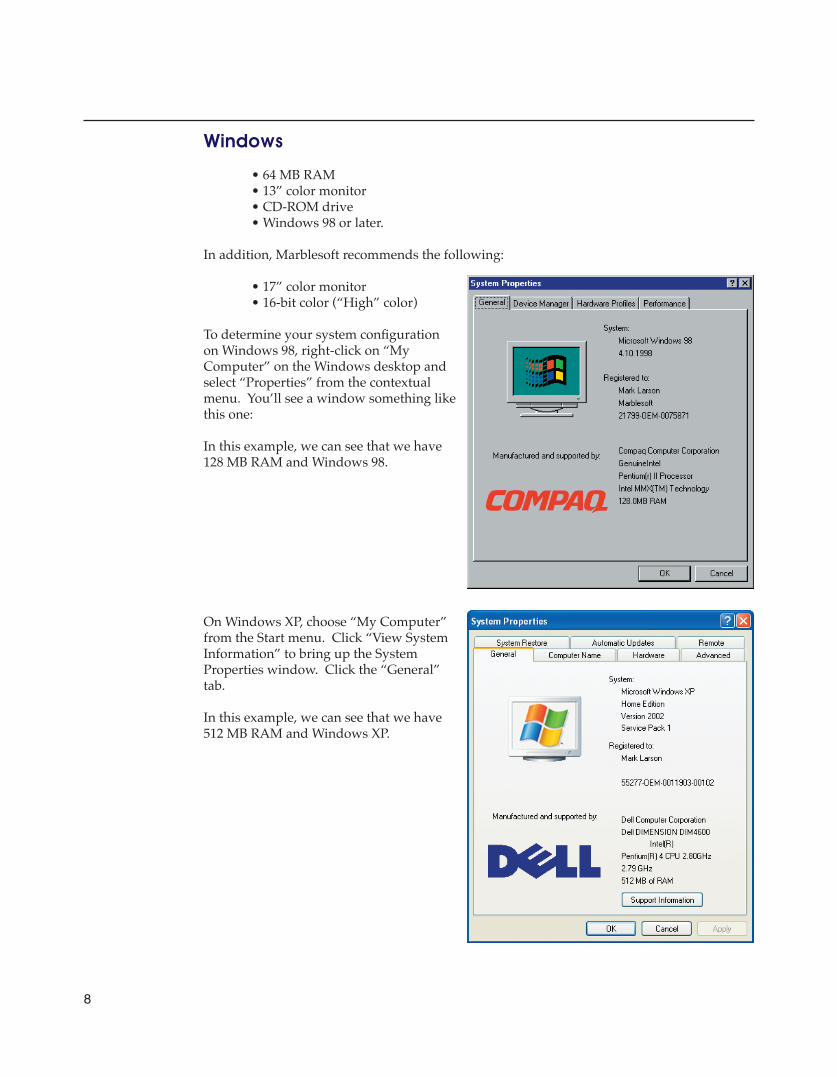
Windows
• 64 MB RAM• 13” color monitor• CD-ROM drive• Windows 98 or later.
In addition, Marblesoft recommends the following:
• 17” color monitor• 16-bit color (“High” color)
To determine your system configuration on Windows 98, right-click on “My Computer” on the Windows desktop and select “Properties” from the contextual menu. You’ll see a window something like this one:
In this example, we can see that we have 128 MB RAM and Windows 98.
On Windows XP, choose “My Computer” from the Start menu. Click “View System Information” to bring up the System Properties window. Click the “General” tab.
In this example, we can see that we have 512 MB RAM and Windows XP.
9
Most educational programs display an image of a fixed size, typically 640 x 480 pixels, no matter what size monitor the program is running on. On large monitors, the program “letterboxes” the image, filling the unused portion of the screen with black.
In order to provide the sharpest possible image for your students, Early Math Skills is optimized to fill all monitors up to 1280 x 960 pixels. That not only means a larger image for the student to see, but more pixels, creating a sharper image. In fact, with Early Math Skills running on a 1280 x 960 monitor, you get 4 times as many pixels as a typical program displaying just 640 x 480 pixels.
To get the best possible image, set your monitor to the highest possible resolution that will display 32-bit color, up to 1280 x 960. Early Math Skills will automatically fill the screen with the sharpest possible image. This is particularly important on Windows computers, where graphics can look rough and jagged when scaled down to fit small monitors.
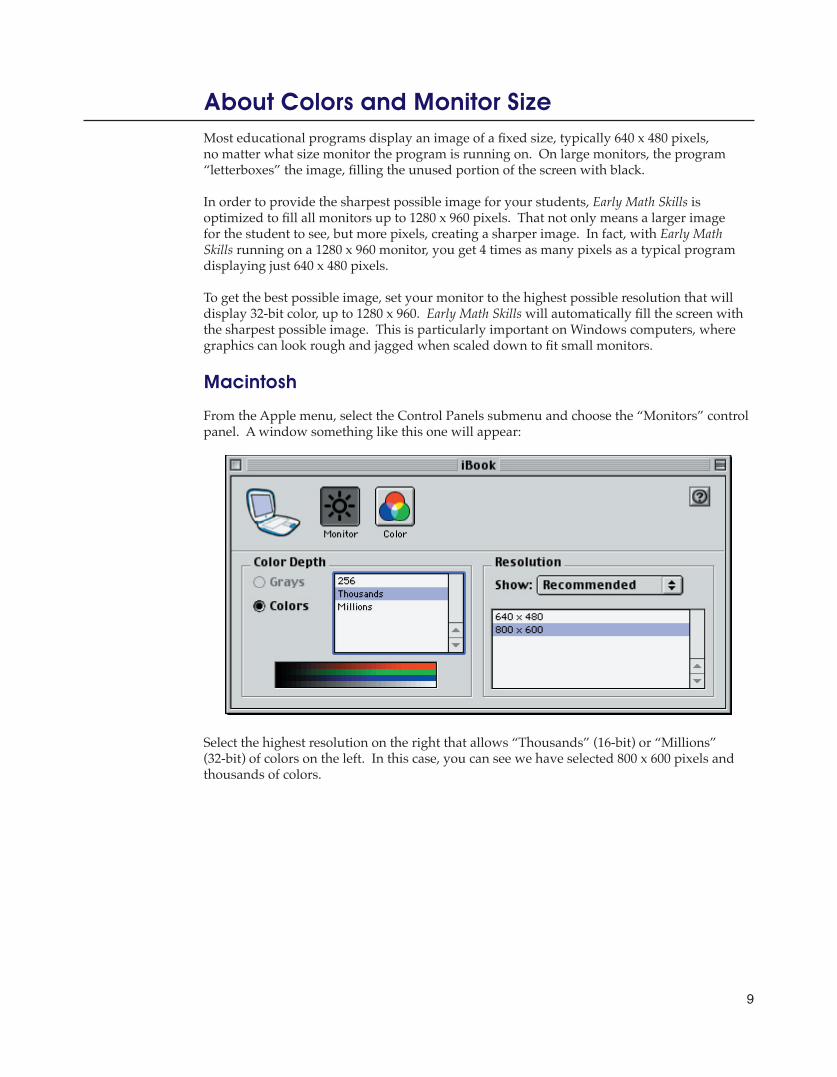
Macintosh
From the Apple menu, select the Control Panels submenu and choose the “Monitors” control panel. A window something like this one will appear:
Select the highest resolution on the right that allows “Thousands” (16-bit) or “Millions” (32-bit) of colors on the left. In this case, you can see we have selected 800 x 600 pixels and thousands of colors.
About Colors and Monitor Size
10
Windows
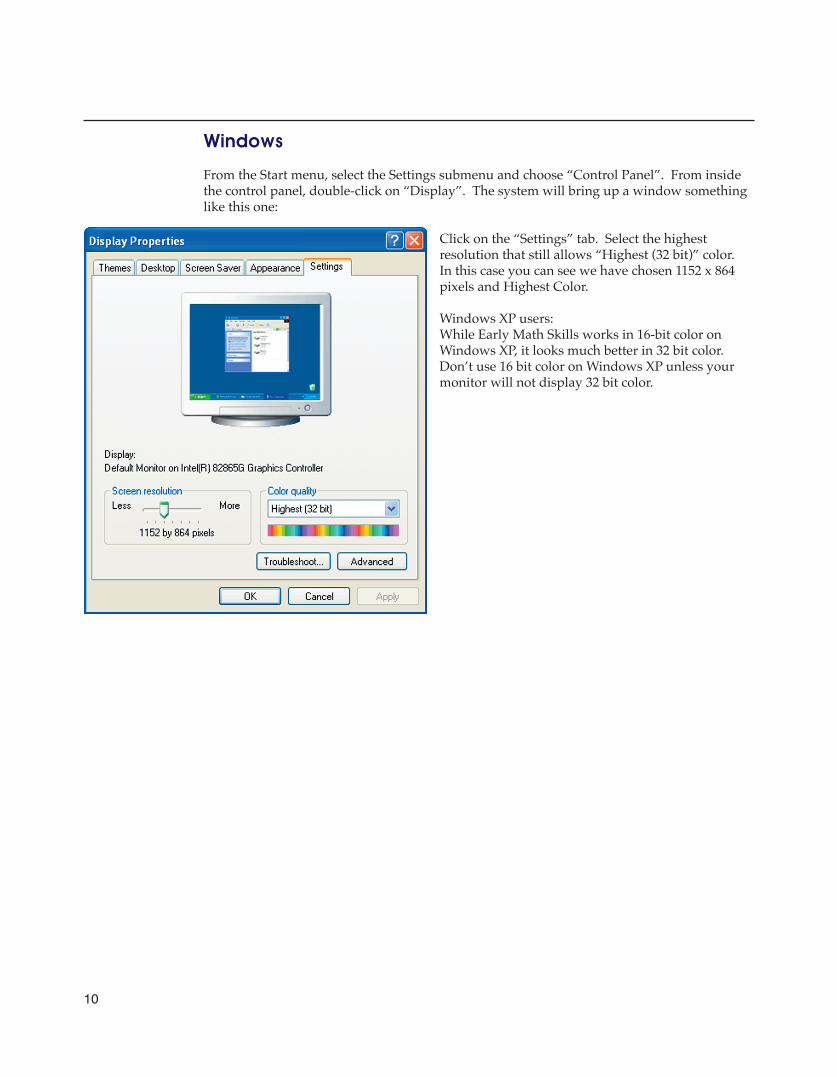
From the Start menu, select the Settings submenu and choose “Control Panel”. From inside the control panel, double-click on “Display”. The system will bring up a window something like this one:
Click on the “Settings” tab. Select the highest resolution that still allows “Highest (32 bit)” color. In this case you can see we have chosen 1152 x 864 pixels and Highest Color.
Windows XP users:While Early Math Skills works in 16-bit color on Windows XP, it looks much better in 32 bit color. Don’t use 16 bit color on Windows XP unless your monitor will not display 32 bit color.
11
Installing Early Math Skills
Macintosh
Before installing or running Early Math Skills, read the “Read Me First” file on the CD for any changes that were made after this manual was finished. Place the disk into a drive and double-click on the “Read Me First” icon.
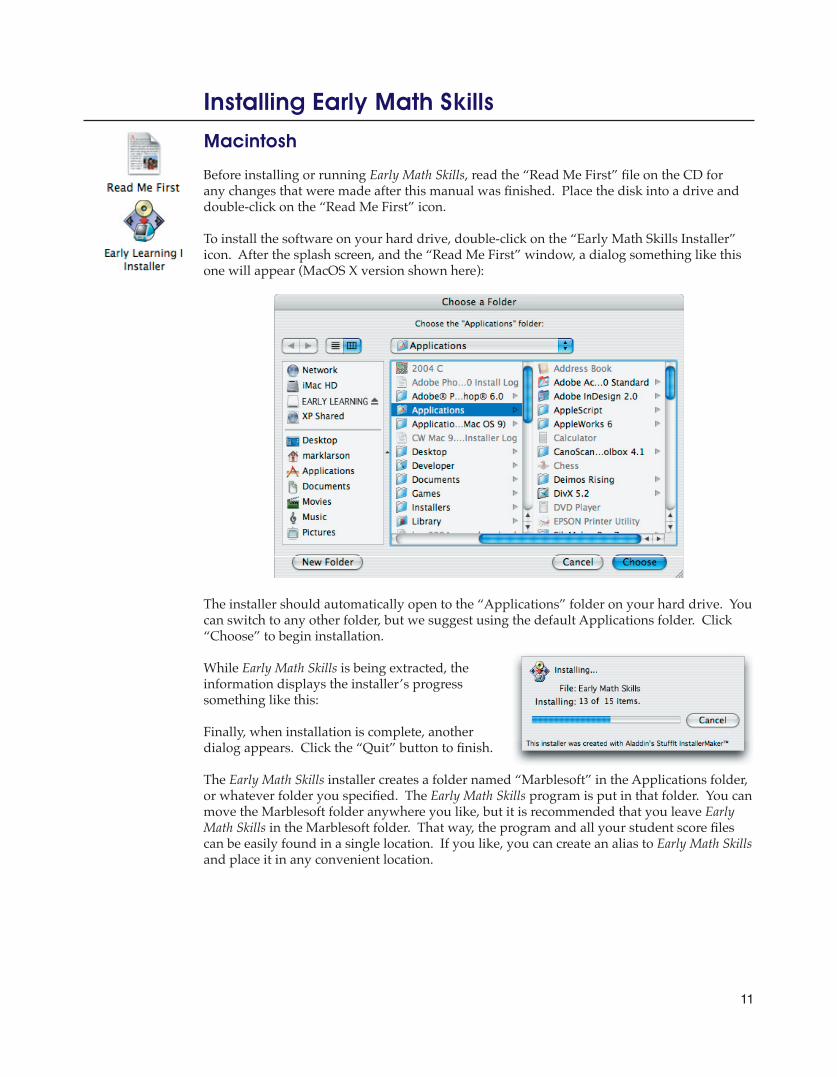
To install the software on your hard drive, double-click on the “Early Math Skills Installer” icon. After the splash screen, and the “Read Me First” window, a dialog something like this one will appear (MacOS X version shown here):
The installer should automatically open to the “Applications” folder on your hard drive. You can switch to any other folder, but we suggest using the default Applications folder. Click “Choose” to begin installation.
While Early Math Skills is being extracted, the information displays the installer’s progress something like this:
Finally, when installation is complete, another dialog appears. Click the “Quit” button to finish.
The Early Math Skills installer creates a folder named “Marblesoft” in the Applications folder, or whatever folder you specified. The Early Math Skills program is put in that folder. You can move the Marblesoft folder anywhere you like, but it is recommended that you leave Early Math Skills in the Marblesoft folder. That way, the program and all your student score files can be easily found in a single location. If you like, you can create an alias to Early Math Skills and place it in any convenient location.
12
Windows
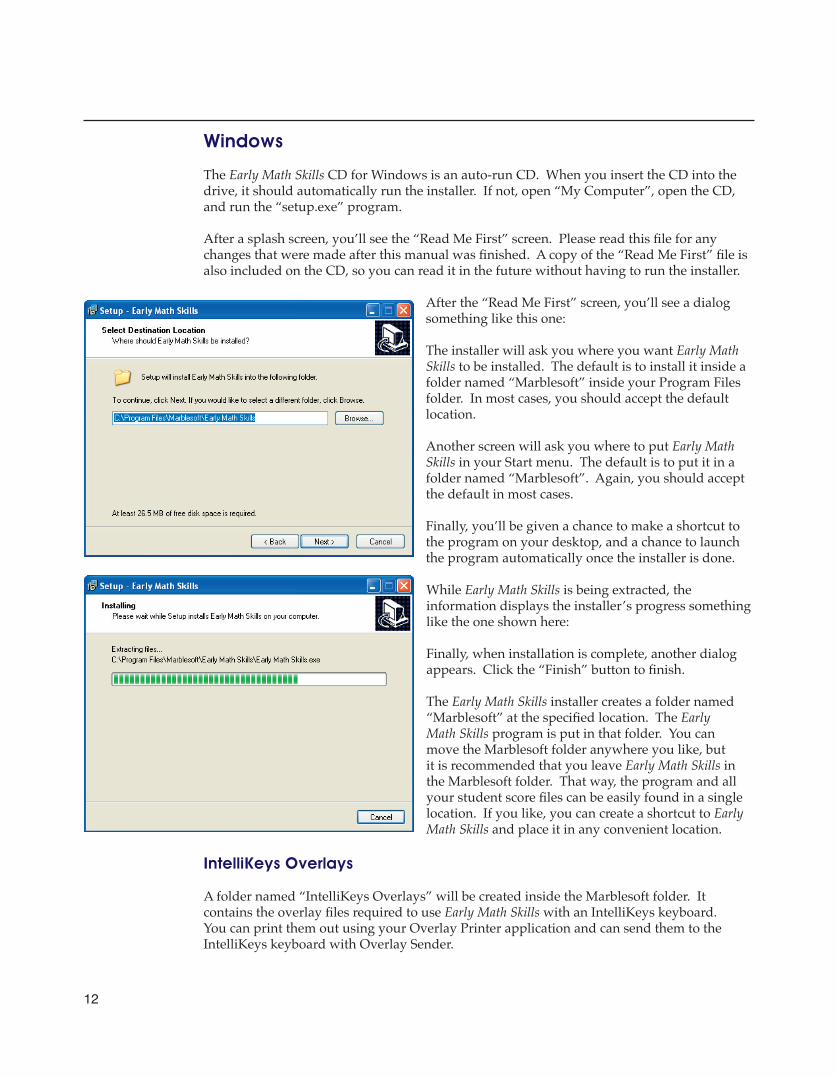
The Early Math Skills CD for Windows is an auto-run CD. When you insert the CD into the drive, it should automatically run the installer. If not, open “My Computer”, open the CD, and run the “setup.exe” program.
After a splash screen, you’ll see the “Read Me First” screen. Please read this file for any changes that were made after this manual was finished. A copy of the “Read Me First” file is also included on the CD, so you can read it in the future without having to run the installer.
After the “Read Me First” screen, you’ll see a dialog something like this one:
The installer will ask you where you want Early Math Skills to be installed. The default is to install it inside a folder named “Marblesoft” inside your Program Files folder. In most cases, you should accept the default location.
Another screen will ask you where to put Early Math Skills in your Start menu. The default is to put it in a folder named “Marblesoft”. Again, you should accept the default in most cases.
Finally, you’ll be given a chance to make a shortcut to the program on your desktop, and a chance to launch the program automatically once the installer is done.
While Early Math Skills is being extracted, the information displays the installer’s progress something like the one shown here:
Finally, when installation is complete, another dialog appears. Click the “Finish” button to finish.
The Early Math Skills installer creates a folder named “Marblesoft” at the specified location. The Early Math Skills program is put in that folder. You can move the Marblesoft folder anywhere you like, but it is recommended that you leave Early Math Skills in the Marblesoft folder. That way, the program and all your student score files can be easily found in a single location. If you like, you can create a shortcut to Early Math Skills and place it in any convenient location.
IntelliKeys Overlays
A folder named “IntelliKeys Overlays” will be created inside the Marblesoft folder. It contains the overlay files required to use Early Math Skills with an IntelliKeys keyboard. You can print them out using your Overlay Printer application and can send them to the IntelliKeys keyboard with Overlay Sender.

13
To start Early Math Skills, double-click on its icon. Press a key or click the mouse when the title screen appears to bring up the main menu.
The first time you run Early Math Skills, the program creates a preferences file in your system folder or registry and creates a folder named “ Student Scores” in the same folder as the Early Math Skills program. This folder is the folder where you can keep your students’ scores from Early Math Skills or any of Marblesoft’s other Early Learning programs.
Choosing an Activity
Early Math Skills uses a simple on-screen menu to allow the student to select an activity. The student can select one of the four activities with the mouse or by typing a key from “1” to “4”. Alternately, the activities can be selected directly from the Activity menu.
A Note About the Menu Bar
When Early Math Skills is run for the first time, the menu bar is hidden so the student can use the program in full-screen mode. To show the menu bar and its contents, you can press (Mac ⌘-F, Win Ctrl-F) at any time.
When you are through with an activity, simply select another activity from the Activity menu or press (Mac ⌘-W, Win Ctrl-W) to return to the main menu.
Setting the Level of Difficulty
Each activity in Early Math Skills has multiple levels of difficulty. To change levels, pull down the Activity menu and select from these three choices:
“Advance a Level” (Mac ⌘-A, Win Ctrl-A) advances the program one level.
“Back a Level” (Mac ⌘-B, Win Ctrl-B) sends the program back one level.
“Go to Level...” (Mac ⌘-L, Win Ctrl-L) brings up a dialog asking you to select the level you want to run.
Note
Unless noted otherwise, the following sections describe the activities while in the keyboard mode. The activities in the other modes may be slightly different.
Running Early Math Skills
14
Early Addition I teaches addition with the numbers placed horizontally across the screen. The program will drill the student on sums from 2 to 9. The teacher can optionally select sums from 0 to 20.
On the lowest levels, two sets of objects are shown on the screen for the student to count. After they are counted individually, the two sets are combined and the student is asked to count the new set and input the answer.
As the program progresses, the “+” and “=” signs are introduced and the clues are gradually taken away until the student is solving equations on the screen with no objects to count.
The program scales the color icons to make them as large as possible, up to a certain limit. The smaller the numbers being practiced, the bigger the icons.
Digitized speech guides the student through each problem. The teacher can choose wheth-er the program uses the words “and” and “is” or the words “plus” and “equals”. (See Choosing the Numbers on page 15 for a description of this feature.)
Levels of Difficulty
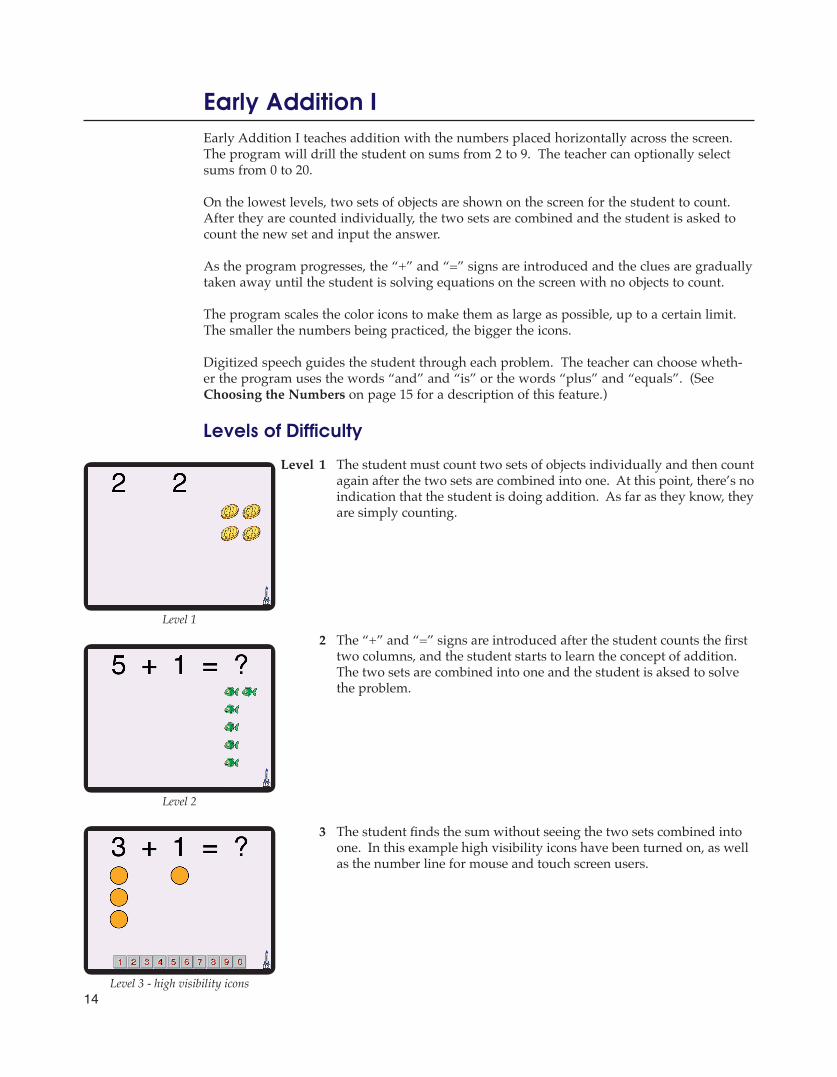
Level 1 The student must count two sets of objects individually and then count again after the two sets are combined into one. At this point, there’s no indication that the student is doing addition. As far as they know, they are simply counting.
2 The “+” and “=” signs are introduced after the student counts the first two columns, and the student starts to learn the concept of addition. The two sets are combined into one and the student is aksed to solve the problem.
3 The student finds the sum without seeing the two sets combined into one. In this example high visibility icons have been turned on, as well as the number line for mouse and touch screen users.
Early Addition I
Level 2
Level 3 - high visibility icons
Level 1

15
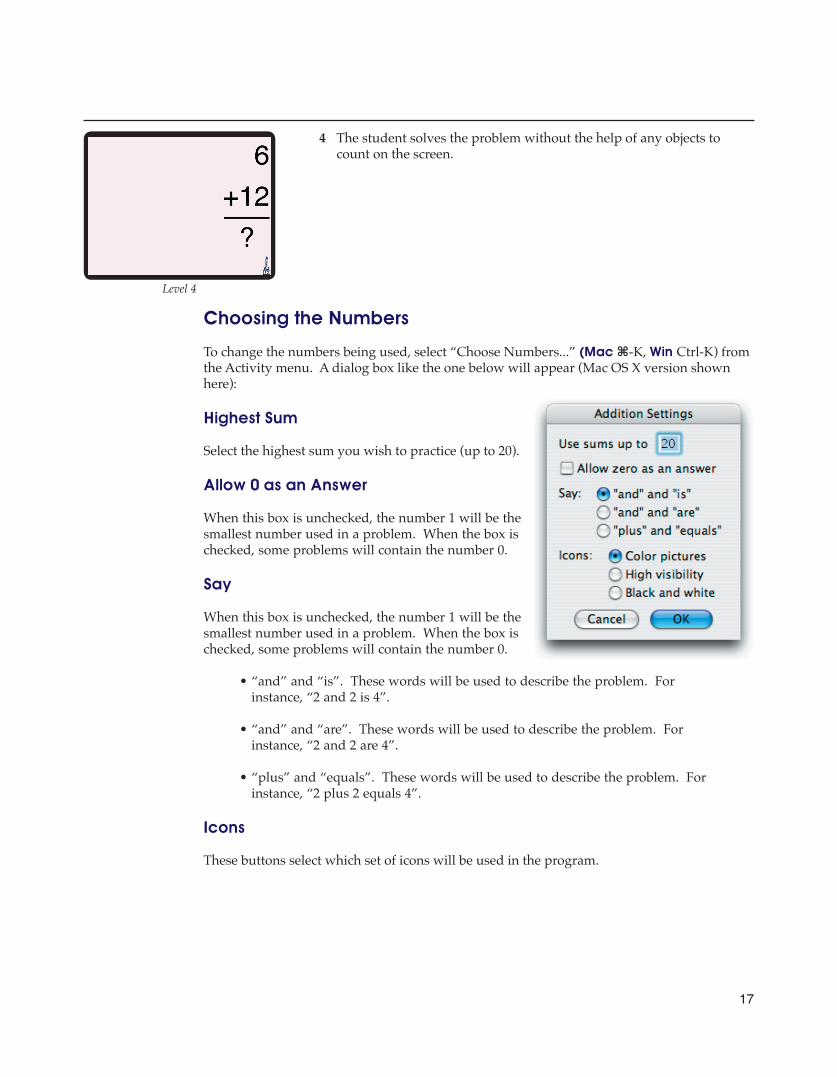
4 The student solves the problem without the help of any objects to count on the screen.
Choosing the Numbers
To change the numbers being used, select “Choose Numbers...” (Mac ⌘-K, Win Ctrl-K) from the Activity menu. A dialog box like the one below will appear (Mac OS X version shown here):
Highest Sum
Select the highest sum you wish to practice (up to 20).
Allow 0 as an Answer
When this box is unchecked, the number 1 will be the smallest number used in a problem. When the box is checked, some problems will contain the number 0.
Say
When this box is unchecked, the number 1 will be the smallest number used in a problem. When the box is checked, some problems will contain the number 0.
• “and” and “is”. These words will be used to describe the problem. For instance, “2 and 2 is 4”.
• “and” and “are”. These words will be used to describe the problem. For instance, “2 and 2 are 4”.
• “plus” and “equals”. These words will be used to describe the problem. For instance, “2 plus 2 equals 4”.
Icons
These buttons select which set of icons will be used in the program.
Level 4

16
Early Addition II teaches addition with the numbers placed vertically down the screen. The program will drill the student on sums from 2 to 9. The teacher can optionally select sums from 0 to 20.
On the lowest levels, two sets of objects are shown on the screen for the student to count. After they are counted individually, the two sets are combined and the student is asked to count the new set and input the answer.
As the program progresses, the “+” sign and “equals” line are introduced and the clues are gradually taken away until the student is solving equations on the screen with no objects to count.
The program scales the color icons to make them as large as possible, up to a certain limit. The smaller the numbers being practiced, the bigger the icons.
Digitized speech guides the student through each problem. The teacher can choose wheth-er the program uses the words “and” and “is” or the words “plus” and “equals”. (See Choosing the Numbers on page 17 for a description of this feature.)
Levels of Difficulty
Level 1 The student must count two sets of objects individually and then count again after the two sets are combined into one. At this point, there’s no indication that the student is doing addition. As far as they know, they are simply counting.
2 The “+” sign and “=” line are introduced after the student counts the first two columns, and the student starts to learn the concept of addition. The two sets are combined into one and the student is aksed to solve the problem.
3 The student finds the sum without seeing the two sets combined into one. In this example color picture icons have been turned on.
Early Addition II
Level 1 - high visibility icons
Level 2 - after answer
Level 3 - color picture icons
17
4 The student solves the problem without the help of any objects to count on the screen.
Choosing the Numbers
To change the numbers being used, select “Choose Numbers...” (Mac ⌘-K, Win Ctrl-K) from the Activity menu. A dialog box like the one below will appear (Mac OS X version shown here):
Highest Sum
Select the highest sum you wish to practice (up to 20).
Allow 0 as an Answer
When this box is unchecked, the number 1 will be the smallest number used in a problem. When the box is checked, some problems will contain the number 0.
Say
When this box is unchecked, the number 1 will be the smallest number used in a problem. When the box is checked, some problems will contain the number 0.
• “and” and “is”. These words will be used to describe the problem. For instance, “2 and 2 is 4”.
• “and” and “are”. These words will be used to describe the problem. For instance, “2 and 2 are 4”.
• “plus” and “equals”. These words will be used to describe the problem. For instance, “2 plus 2 equals 4”.
Icons
These buttons select which set of icons will be used in the program.
Level 4
18
Sequencing Up presents a series of ascending numbers with one or more numbers missing. The student is asked to find the missing number(s). The teacher can specify sequences rang-ing from 1 to 6 through 0 to 99. See Choosing the Numbers on page 19 for instructions on changing the number range.
On the lower levels the sequence is shown with one number missing. A key is shown at the top of the screen to help the student find the missing number. As the difficulty level increas-es, the key is removed and the sequences become longer with more numbers missing. On the highest levels, two or more missing numbers can appear at the start of the sequence.
Levels of Difficulty
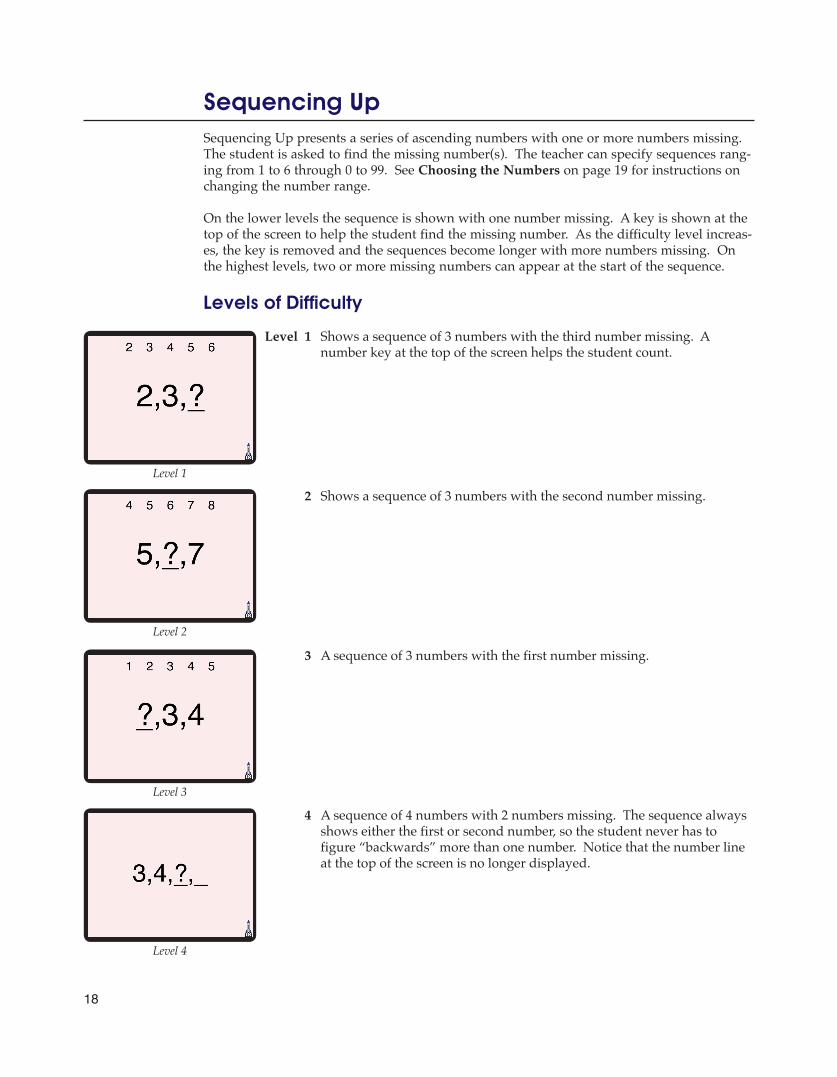
Level 1 Shows a sequence of 3 numbers with the third number missing. A number key at the top of the screen helps the student count.
2 Shows a sequence of 3 numbers with the second number missing.
3 A sequence of 3 numbers with the first number missing.
4 A sequence of 4 numbers with 2 numbers missing. The sequence always shows either the first or second number, so the student never has to figure “backwards” more than one number. Notice that the number line at the top of the screen is no longer displayed.
Sequencing Up
Level 1
Level 2
Level 3
Level 4

19
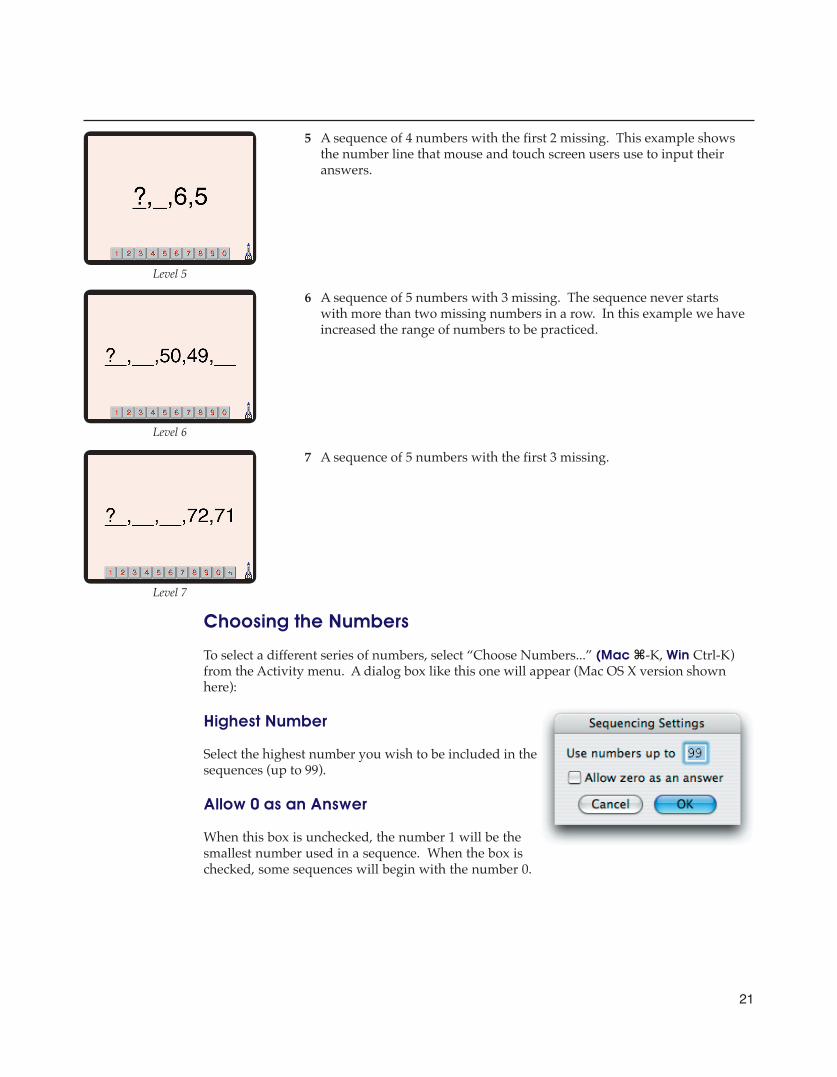
5 A sequence of 4 numbers with the first 2 missing. This example shows the number line that mouse and touch screen users use to input their answers.
6 A sequence of 5 numbers with 3 missing. The sequence never starts with more than two missing numbers in a row. In this example we have increased the range of numbers to be practiced.
7 A sequence of 5 numbers with the first 3 missing.
Choosing the Numbers
To select a different series of numbers, select “Choose Numbers...” (Mac ⌘-K, Win Ctrl-K) from the Activity menu. A dialog box like this one will appear (Mac OS X version shown here):
Highest Number
Select the highest number you wish to be included in the sequences (up to 99).
Allow 0 as an Answer
When this box is unchecked, the number 1 will be the smallest number used in a sequence. When the box is checked, some sequences will begin with the number 0.
Level 5
Level 6
Level 7

20
Sequencing Down presents a series of descending numbers with one or more numbers miss-ing. The student is asked to find the missing number(s). The teacher can specify sequences ranging from 1 to 6 through 0 to 99. See Choosing the Numbers on page 21 for instructions on changing the number range.
On the lower levels the sequence is shown with one number missing. A key is shown at the top of the screen to help the student find the missing number. As the difficulty level increas-es, the key is removed and the sequences become longer with more numbers missing. On the highest levels, two or more missing numbers can appear at the start of the sequence.
Levels of Difficulty
Level 1 Shows a sequence of 3 numbers with the third number missing. A number key at the top of the screen helps the student count.
2 Shows a sequence of 3 numbers with the second number missing.
3 A sequence of 3 numbers with the first number missing.
4 A sequence of 4 numbers with 2 numbers missing. The sequence always shows either the first or second number, so the student never has to figure “backwards” more than one number. Notice that the number line at the top of the screen is no longer displayed.
Sequencing Down
Level 1
Level 2
Level 3
Level 4
21
5 A sequence of 4 numbers with the first 2 missing. This example shows the number line that mouse and touch screen users use to input their answers.
6 A sequence of 5 numbers with 3 missing. The sequence never starts with more than two missing numbers in a row. In this example we have increased the range of numbers to be practiced.
7 A sequence of 5 numbers with the first 3 missing.
Choosing the Numbers
To select a different series of numbers, select “Choose Numbers...” (Mac ⌘-K, Win Ctrl-K) from the Activity menu. A dialog box like this one will appear (Mac OS X version shown here):
Highest Number
Select the highest number you wish to be included in the sequences (up to 99).
Allow 0 as an Answer
When this box is unchecked, the number 1 will be the smallest number used in a sequence. When the box is checked, some sequences will begin with the number 0.
Level 5
Level 6
Level 7

22
On the lowest levels, a number of objects are presented on the screen for the student to count. After determining the number of objects, the student types the answer on the key-board. Some of the objects are moved away and counted again. Finally, the remaining set is counted.
As the program progresses, the “-” and “=” signs are introduced and the clues are gradually taken away until the student is solving equations on the screen with no objects to count.
Digitized speech guides the student through each problem. The teacher can choose whether the program uses the words “minus” and “is”, “minus” and “are” or the words “minus” and “equals”. (See Choosing the Numbers on page 23 for a description of this feature.)
Levels of Difficulty
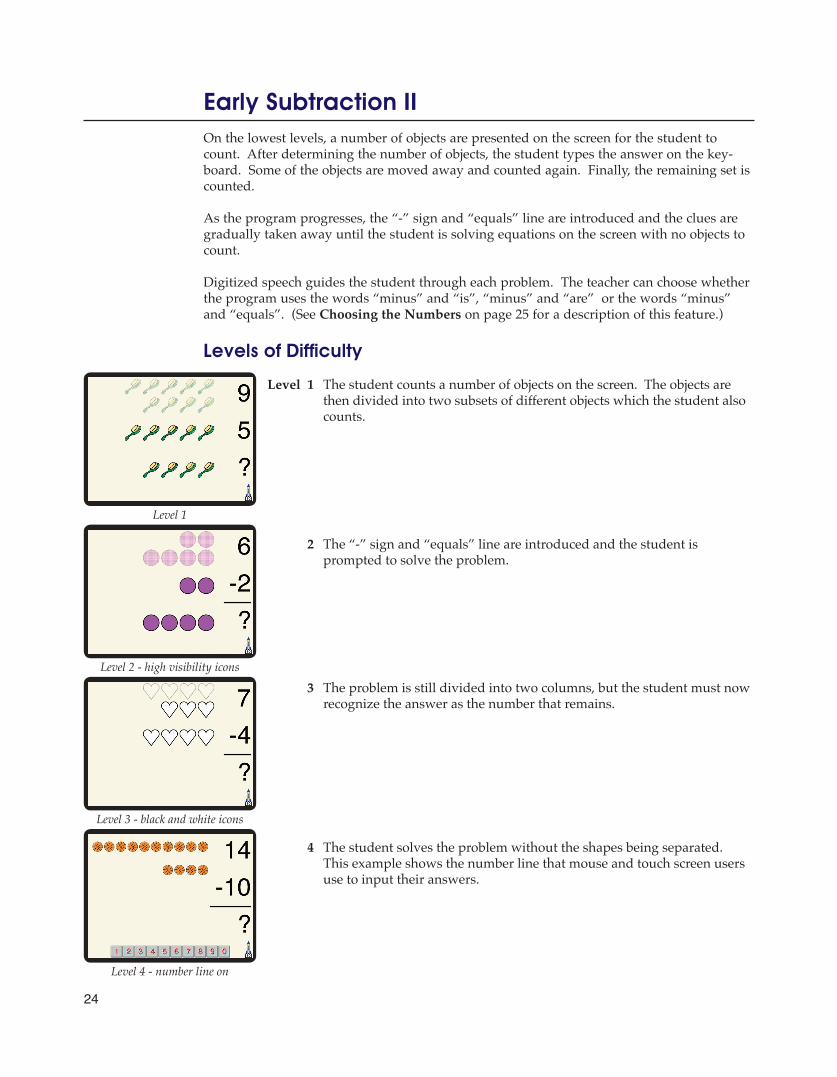
Level 1 The student counts a number of objects on the screen. The objects are then divided into two subsets of different objects which the student also counts.
2 The “-” and “=” signs are introduced and the student is prompted to solve the problem. This example shows the number line that mouse and touch screen users use to input their answers.
3 The problem is still divided into two columns, but the student must now recognize the answer as the number that remains.
4 The student solves the problem without the shapes being separated.
Early Subtraction I
Level 1
Level 2 - number line on
Level 3 - high visibility icons
Level 4 - black and white icons
23
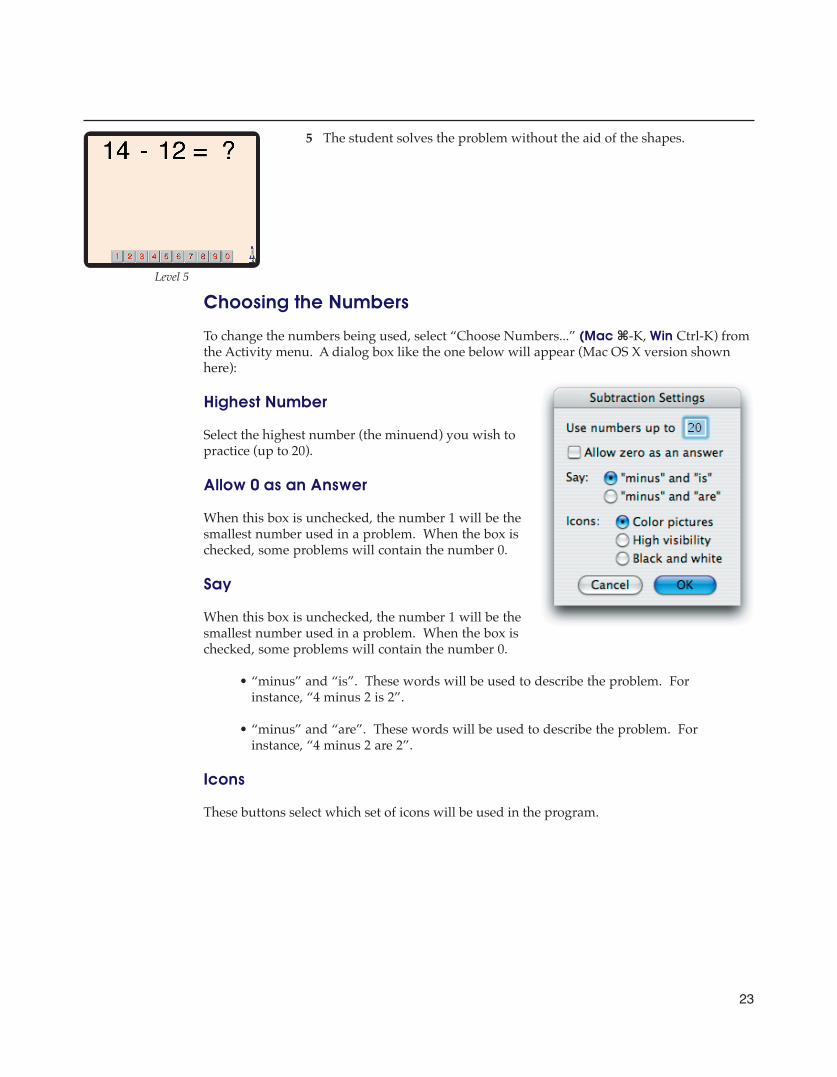
5 The student solves the problem without the aid of the shapes.
Choosing the Numbers
To change the numbers being used, select “Choose Numbers...” (Mac ⌘-K, Win Ctrl-K) from the Activity menu. A dialog box like the one below will appear (Mac OS X version shown here):
Highest Number
Select the highest number (the minuend) you wish to practice (up to 20).
Allow 0 as an Answer
When this box is unchecked, the number 1 will be the smallest number used in a problem. When the box is checked, some problems will contain the number 0.
Say
When this box is unchecked, the number 1 will be the smallest number used in a problem. When the box is checked, some problems will contain the number 0.
• “minus” and “is”. These words will be used to describe the problem. For instance, “4 minus 2 is 2”.
• “minus” and “are”. These words will be used to describe the problem. For instance, “4 minus 2 are 2”.
Icons
These buttons select which set of icons will be used in the program.
Level 5
24
On the lowest levels, a number of objects are presented on the screen for the student to count. After determining the number of objects, the student types the answer on the key-board. Some of the objects are moved away and counted again. Finally, the remaining set is counted.
As the program progresses, the “-” sign and “equals” line are introduced and the clues are gradually taken away until the student is solving equations on the screen with no objects to count.
Digitized speech guides the student through each problem. The teacher can choose whether the program uses the words “minus” and “is”, “minus” and “are” or the words “minus” and “equals”. (See Choosing the Numbers on page 25 for a description of this feature.)
Levels of Difficulty
Level 1 The student counts a number of objects on the screen. The objects are then divided into two subsets of different objects which the student also counts.
2 The “-” sign and “equals” line are introduced and the student is prompted to solve the problem.
3 The problem is still divided into two columns, but the student must now recognize the answer as the number that remains.
4 The student solves the problem without the shapes being separated. This example shows the number line that mouse and touch screen users use to input their answers.
Early Subtraction II
Level 1
Level 2 - high visibility icons
Level 3 - black and white icons
Level 4 - number line on
25
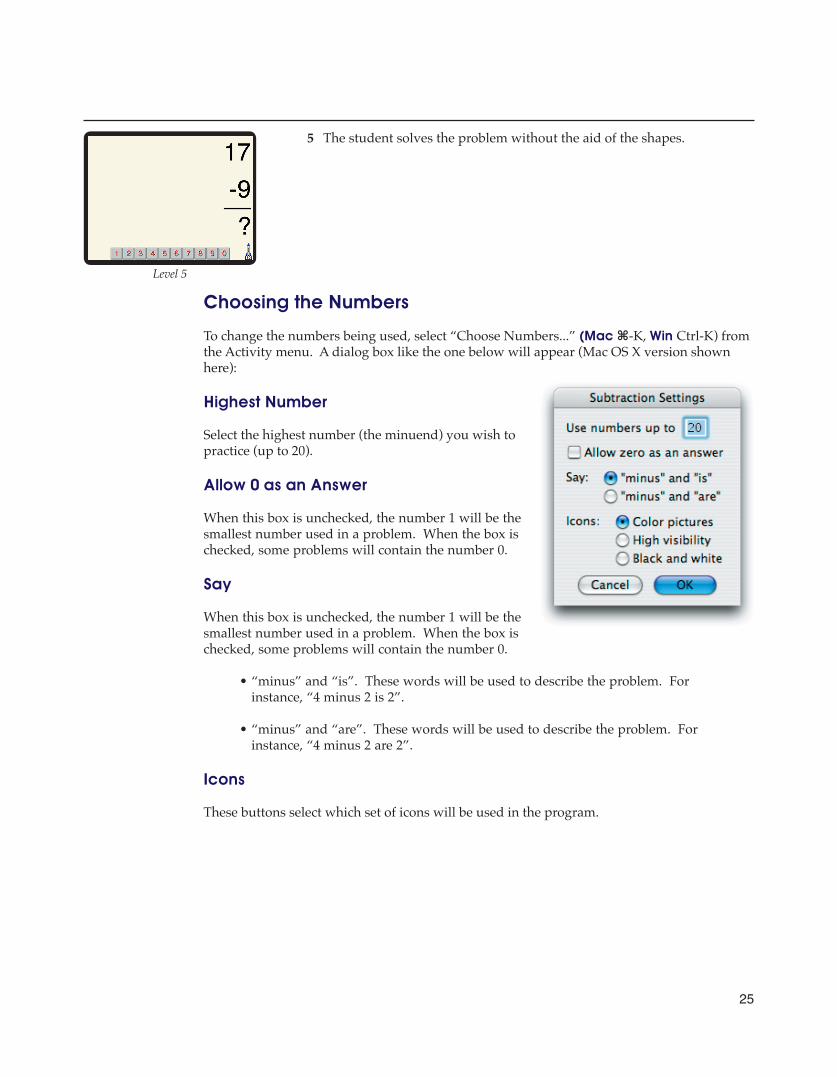
5 The student solves the problem without the aid of the shapes.
Choosing the Numbers
To change the numbers being used, select “Choose Numbers...” (Mac ⌘-K, Win Ctrl-K) from the Activity menu. A dialog box like the one below will appear (Mac OS X version shown here):
Highest Number
Select the highest number (the minuend) you wish to practice (up to 20).
Allow 0 as an Answer
When this box is unchecked, the number 1 will be the smallest number used in a problem. When the box is checked, some problems will contain the number 0.
Say
When this box is unchecked, the number 1 will be the smallest number used in a problem. When the box is checked, some problems will contain the number 0.
• “minus” and “is”. These words will be used to describe the problem. For instance, “4 minus 2 is 2”.
• “minus” and “are”. These words will be used to describe the problem. For instance, “4 minus 2 are 2”.
Icons
These buttons select which set of icons will be used in the program.
Level 5
26
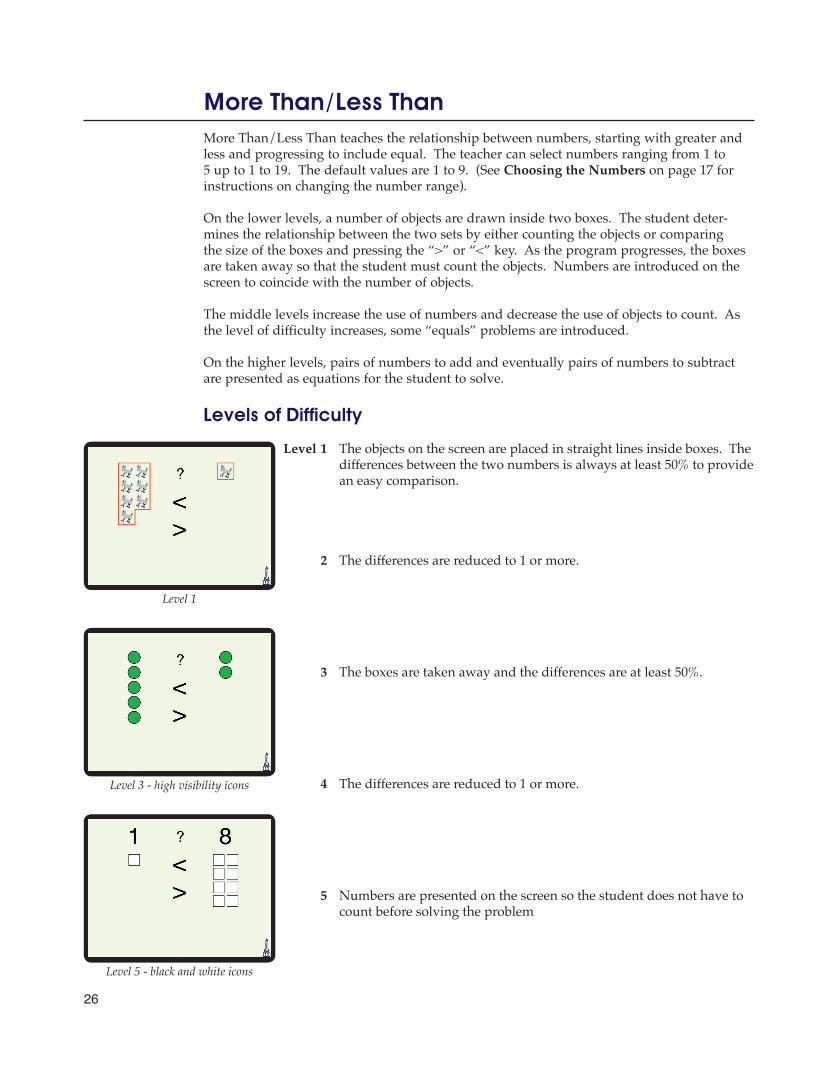
More Than/Less Than teaches the relationship between numbers, starting with greater and less and progressing to include equal. The teacher can select numbers ranging from 1 to 5 up to 1 to 19. The default values are 1 to 9. (See Choosing the Numbers on page 17 for instructions on changing the number range).
On the lower levels, a number of objects are drawn inside two boxes. The student deter-mines the relationship between the two sets by either counting the objects or comparing the size of the boxes and pressing the “>” or “<” key. As the program progresses, the boxes are taken away so that the student must count the objects. Numbers are introduced on the screen to coincide with the number of objects.
The middle levels increase the use of numbers and decrease the use of objects to count. As the level of difficulty increases, some “equals” problems are introduced.
On the higher levels, pairs of numbers to add and eventually pairs of numbers to subtract are presented as equations for the student to solve.
Levels of Difficulty
Level 1 The objects on the screen are placed in straight lines inside boxes. The differences between the two numbers is always at least 50% to provide an easy comparison.
2 The differences are reduced to 1 or more.
3 The boxes are taken away and the differences are at least 50%.
4 The differences are reduced to 1 or more.
5 Numbers are presented on the screen so the student does not have to count before solving the problem
More Than/Less Than
Level 1
Level 3 - high visibility icons
Level 5 - black and white icons
27
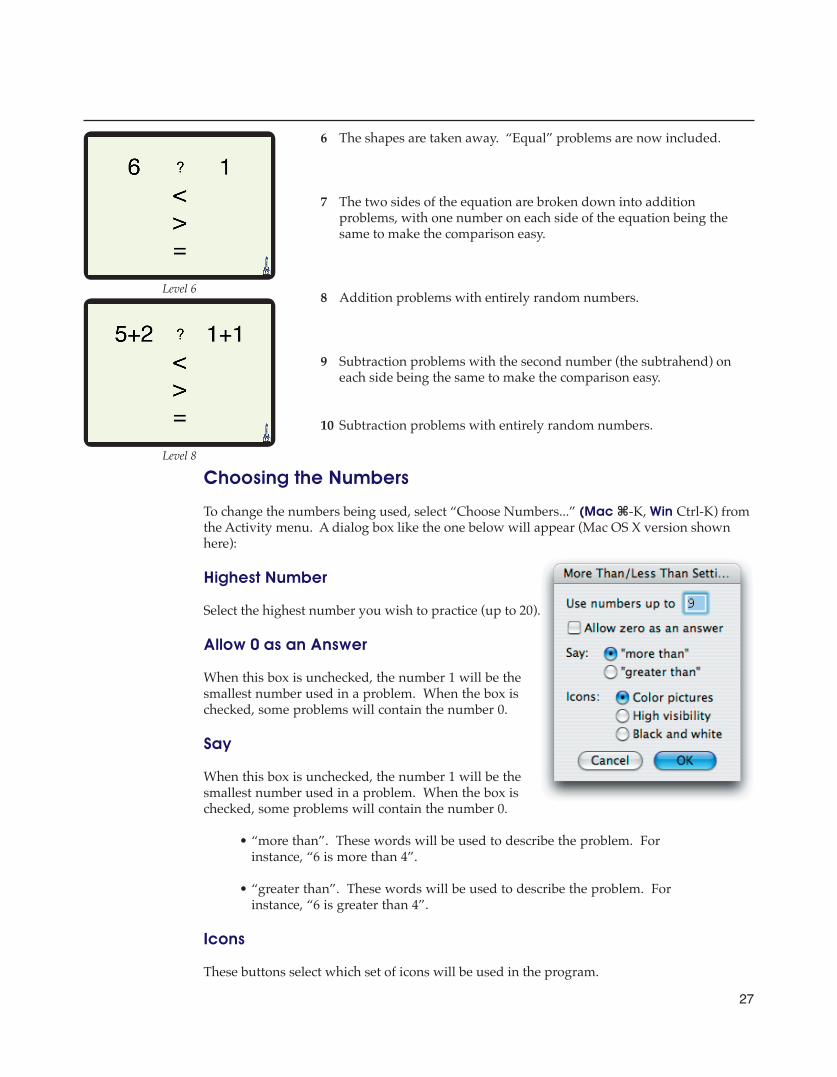
6 The shapes are taken away. “Equal” problems are now included.
7 The two sides of the equation are broken down into addition problems, with one number on each side of the equation being the same to make the comparison easy.
8 Addition problems with entirely random numbers.
9 Subtraction problems with the second number (the subtrahend) on each side being the same to make the comparison easy.
10 Subtraction problems with entirely random numbers.
Choosing the Numbers
To change the numbers being used, select “Choose Numbers...” (Mac ⌘-K, Win Ctrl-K) from the Activity menu. A dialog box like the one below will appear (Mac OS X version shown here):
Highest Number
Select the highest number you wish to practice (up to 20).
Allow 0 as an Answer
When this box is unchecked, the number 1 will be the smallest number used in a problem. When the box is checked, some problems will contain the number 0.
Say
When this box is unchecked, the number 1 will be the smallest number used in a problem. When the box is checked, some problems will contain the number 0.
• “more than”. These words will be used to describe the problem. For instance, “6 is more than 4”.
• “greater than”. These words will be used to describe the problem. For instance, “6 is greater than 4”.
Icons
These buttons select which set of icons will be used in the program.
Level 6
Level 8

28
Input MethodsEarly Math Skills supports a variety of input methods, allowing the teacher to fill each student’s individual needs. You can control the input method by using the Input Options and Scanning Options dialogs.
Early Math Skills has two basic modes of operation, called “Standard” and “Yes/No”. In standard mode, the program accepts input from the keyboard or mouse, or from most other input devices, such as the TouchWindow or the IntelliKeys extended keyboard.
In “Yes/No” mode, the program presents problems in a way that the student can answer “yes” or “no”. The student can answer by using a single switch, or by using one switch for “yes” and one for “no”. The program scans all the possible answers, waiting for the student to answer “yes” or “no”.
Input DevicesThis section describes the input devices supported by Early Math Skills and how to use them.
Keyboard
The standard keyboard or any alternative keyboard like the BigKeys can be used in either standard or yes/no mode. In standard mode, the student types the answer on the keyboard. In yes/no mode, the student presses the spacebar to answer “yes”. When doing dual-switch scanning, the student can also press “y” to answer “yes” and “n” for “no”.
Mouse
In standard mode, the student just clicks the mouse on the answer to select it. In some cases, the program needs a numeric input from the student. In those cases, a number line is drawn at the bottom of the screen. The student enters numbers by clicking on them in the number line.
In yes/no mode, the student just clicks the mouse to answer “yes”. There’s no way to answer “no” with the mouse, so step scanning should not be used for mouse input, since it requires two switches (see Input Methods - Scanning Options).
TouchWindow
When using a TouchWindow, it works exactly like the mouse, as described above. The TouchWindow can be used for either standard or yes/no input.
29
IntelliKeys
The IntelliKeys keyboard can be used in either standard or yes/no mode. Overlay files for use with Early Math Skills are provided in the IntelliKeys Overlays folder inside the Marblesoft folder. The Yes No Overlay is for use in yes/no mode. The other overlays are for use in the standard keyboard mode.
To use the IntelliKeys, you must first print the overlay using the Overlay Printer program that came with your IntelliKeys. Then load it into the IntelliKeys keyboard using Overlay Sender. Finally, run Early Math Skills and select the appropriate input mode.
All overlay files are set up for single switch access through the two ports on the left side of the IntelliKeys keyboard. Connect the “yes” switch to Input 1, and the optional “no” switch to Input 2. This way, you can run any activity in either standard or yes/no mode without ever having to change overlays.
Switches
Early Math Skills works with any number of single-switch devices. These are connected in a number of ways. Typically, you will attach them by plugging them into another device like an IntelliKeys keyboard or a switch-adapted mouse, or into a dedicated interface device like the Don Johnston Switch Interface.
You can either use a single switch or two switches with Early Math Skills. With a single switch, the student answers “yes” and waits for the program to answer “no”. With two switches, the student answers both “yes” and “no”.
Hook the first switch up to the computer so that it sends a “y” or “1” key, a space character, or a mouse click. For dual-switch input, hook up the second switch so that it sends an “n” or a “2”.
If you are connecting the switches through the switch inputs on the IntelliKeys keyboard, load the “Yes No” overlay, which is pre-programmed to send a “y” from switch 1 and an “n” from switch 2.
30
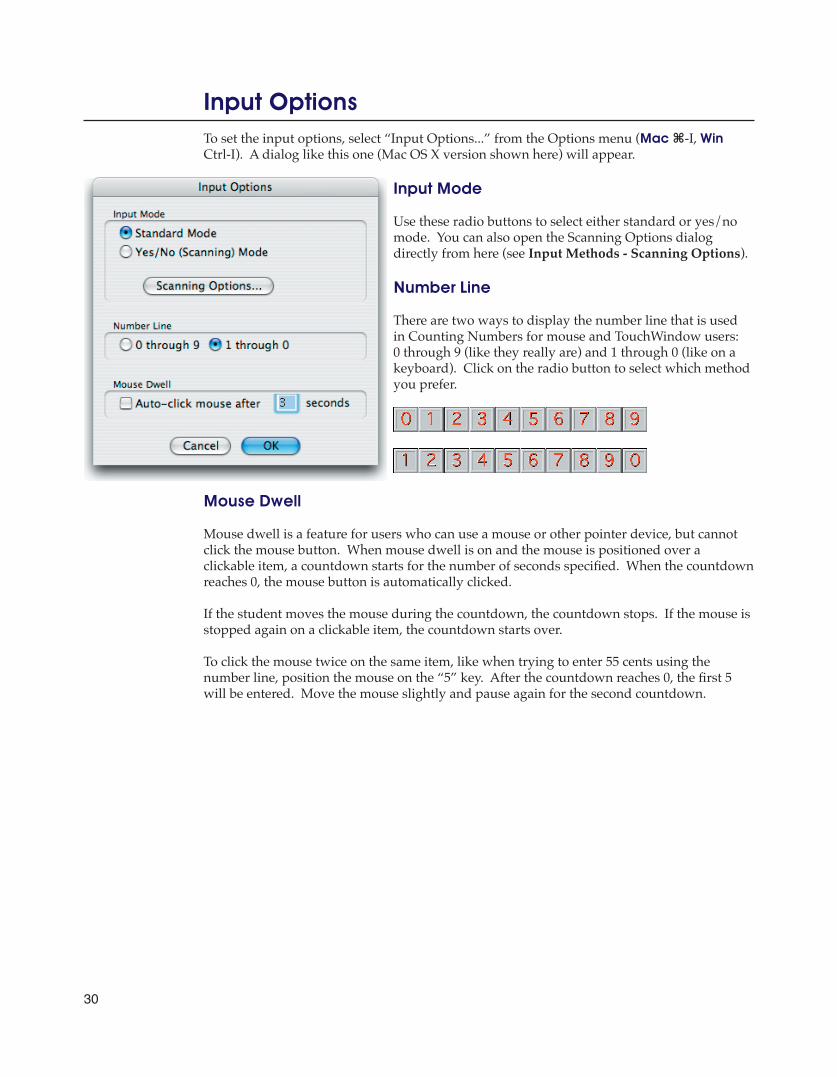
Input OptionsTo set the input options, select “Input Options...” from the Options menu (Mac ⌘-I, Win Ctrl-I). A dialog like this one (Mac OS X version shown here) will appear.
Input Mode
Use these radio buttons to select either standard or yes/no mode. You can also open the Scanning Options dialog directly from here (see Input Methods - Scanning Options).
Number Line
There are two ways to display the number line that is used in Counting Numbers for mouse and TouchWindow users: 0 through 9 (like they really are) and 1 through 0 (like on a keyboard). Click on the radio button to select which method you prefer.
Mouse Dwell
Mouse dwell is a feature for users who can use a mouse or other pointer device, but cannot click the mouse button. When mouse dwell is on and the mouse is positioned over a clickable item, a countdown starts for the number of seconds specified. When the countdown reaches 0, the mouse button is automatically clicked.
If the student moves the mouse during the countdown, the countdown stops. If the mouse is stopped again on a clickable item, the countdown starts over.
To click the mouse twice on the same item, like when trying to enter 55 cents using the number line, position the mouse on the “5” key. After the countdown reaches 0, the first 5 will be entered. Move the mouse slightly and pause again for the second countdown.
31
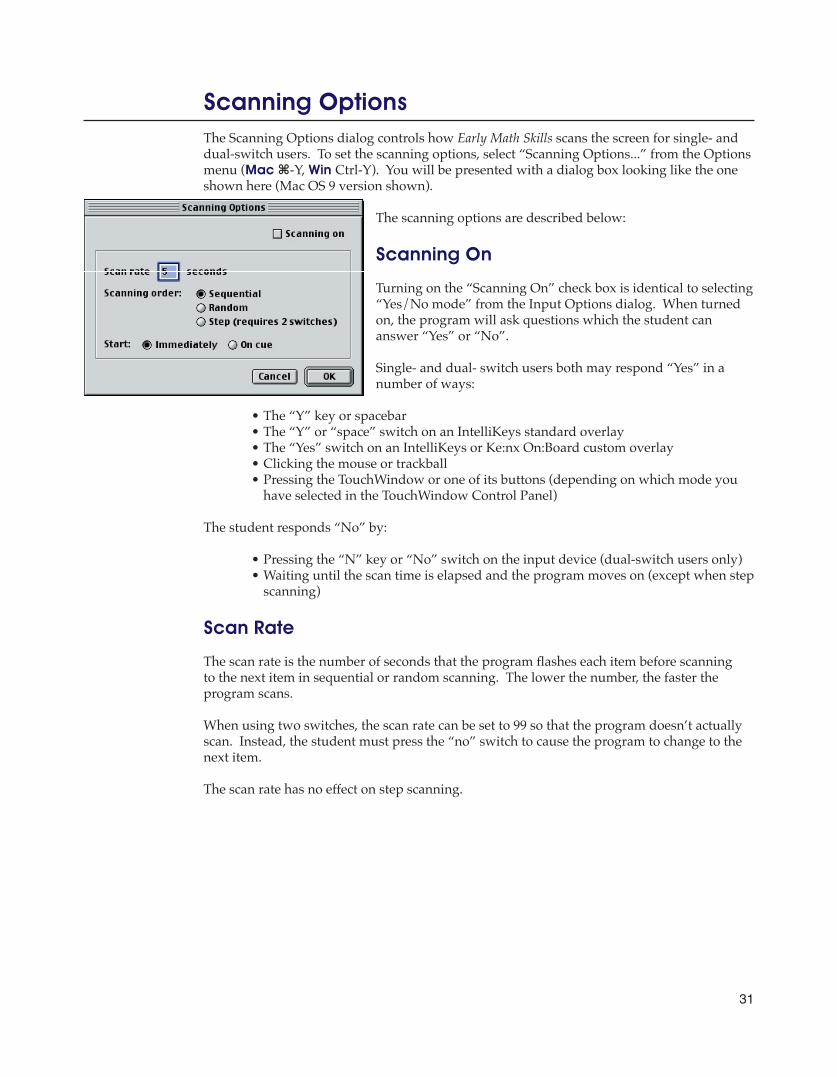
Scanning OptionsThe Scanning Options dialog controls how Early Math Skills scans the screen for single- and dual-switch users. To set the scanning options, select “Scanning Options...” from the Options menu (Mac ⌘-Y, Win Ctrl-Y). You will be presented with a dialog box looking like the one shown here (Mac OS 9 version shown).
The scanning options are described below:
Scanning On
Turning on the “Scanning On” check box is identical to selecting “Yes/No mode” from the Input Options dialog. When turned on, the program will ask questions which the student can answer “Yes” or “No”.
Single- and dual- switch users both may respond “Yes” in a number of ways:
• The “Y” key or spacebar• The “Y” or “space” switch on an IntelliKeys standard overlay• The “Yes” switch on an IntelliKeys or Ke:nx On:Board custom overlay• Clicking the mouse or trackball• Pressing the TouchWindow or one of its buttons (depending on which mode you
have selected in the TouchWindow Control Panel)
The student responds “No” by:
• Pressing the “N” key or “No” switch on the input device (dual-switch users only)• Waiting until the scan time is elapsed and the program moves on (except when step
scanning)
Scan Rate
The scan rate is the number of seconds that the program flashes each item before scanning to the next item in sequential or random scanning. The lower the number, the faster the program scans.
When using two switches, the scan rate can be set to 99 so that the program doesn’t actually scan. Instead, the student must press the “no” switch to cause the program to change to the next item.
The scan rate has no effect on step scanning.

32
Scanning Order
Early Math Skills provides 3 types of scanning. Use the scanning order radio buttons to select the type of scanning most appropriate for your students.
Sequential Scanning
When sequential scanning is on, the program always scans in order from left to right, top to bottom or smallest to largest. This gives the student advantage of anticipating what the next item will be, allowing the scan rate to be set a little lower (faster) because the student doesn’t need to rethink the problem after every scan. In addition, dual-switch users can more quickly respond “no” using this method of scanning.
Random Scanning
In random scanning, the program scans randomly among the items on the screen. Some students will find this method more interesting. When random scanning, the program scans to the “correct” item often enough that the student will not become frustrated.
Step Scanning
Step scanning is sequential scanning with one little difference. When step scanning, the scan rate is ignored and the student must use a second switch to answer “no”. The program will scan each item until the student answers either “yes” or “no”.
Starting Method
Use the “Start” buttons to select the scanning start method. Start “Immediately” means that the program will begin scanning automatically as soon as the problem is displayed.
When the start “On cue” button is on, the program will present the problem, then wait until the student presses a switch before scanning. While the program is waiting for the cue, it flashes an image like this one to signal that it is waiting:
Use on cue scanning to give the student unlimited time to solve the problem without being distracted by scanning objects on screen.
Either starting method works with any of the three scanning orders.
33
Prompting and ReinforcementEarly Math Skills allows the teacher to custom-tailor the prompts and reinforcement that the program provides to best suit each student’s needs.
SpeechDigitized speech is the key to Marblesoft’s success in helping the student to understand the problem that is presented and why an answer is correct or incorrect. Much care has been taken to making the speech clear, informative and easy to understand.
There are four levels of speech from which to choose. To set the speech level, choose a level from the Speech submenu under the Options menu.
The four levels of speech are described here:
Sassy
Sassy speech provides all the prompting and reinforcing speech of verbose (described below), but does it in a much more playful way. You might not like this for certain students, but for others it adds a dimension of fun. There are even a few playful insults that your students will find amusing, at least. Enjoy!
Verbose
The default speech level is called “verbose”. Verbose speech prompts the student for an answer, corrects mistakes and rewards correct answers. When verbose speech is on, the student is prompted again if an extended period of time passes without a response or if a second attempt at a problem is needed.
Brief
Brief speech is limited to the minimum prompting that the student needs to solve a problem. This option is useful when a student is using Early Math Skills in a setting where too much speech may be distracting to other students.
Off
When speech is off, audible tones are used to prompt, correct and reward the student. These tones are consistent among all activities so their purpose is easily understood by the student.
34
Sound EffectsEarly Math Skills uses sound effects to prompt, correct and reward the student. Some sound effects are only played when speech is set to “off”. Others can be turned on or off by the teacher. Turn sound effects options on an off by using the Sound Effects menu under the Options menu. The sound effect options are described here:
All Effects
When all effects are turned on, Early Math Skills plays sounds to prompt, correct and reward the student.
Limited
When sound effects are limited, the program plays only the sound effects that are needed to prompt the student for a response, and to identify whether an answer is right or wrong.
Off
When sound effects are off, Early Math Skills makes no sounds other than speech.
Click on Keypress
Selecting this option causes a slight “click” sound to be played whenever the student presses a key or switch on an input device.
Reward Sound
At the bottom of the Sound Effects menu is a list of sounds from which you can choose the sound that is played after a correct answer. When you select a sound, it then becomes the “reward” sound for the next problem.
35
Don’t Say “No”When “Don’t say ‘No’” is checked on the Options menu, Early Math Skills does not say the word “no” or play the “wrong” sound after a wrong answer. Instead, the program just displays the answer as usual and prompts the student to try again.
When the check mark is off, the program will say “no” or play the “wrong” sound depending on the current speech and sound effect levels.
To change the “Don’t say ‘No’” option, just select it from the Options menu to toggle it on or off.
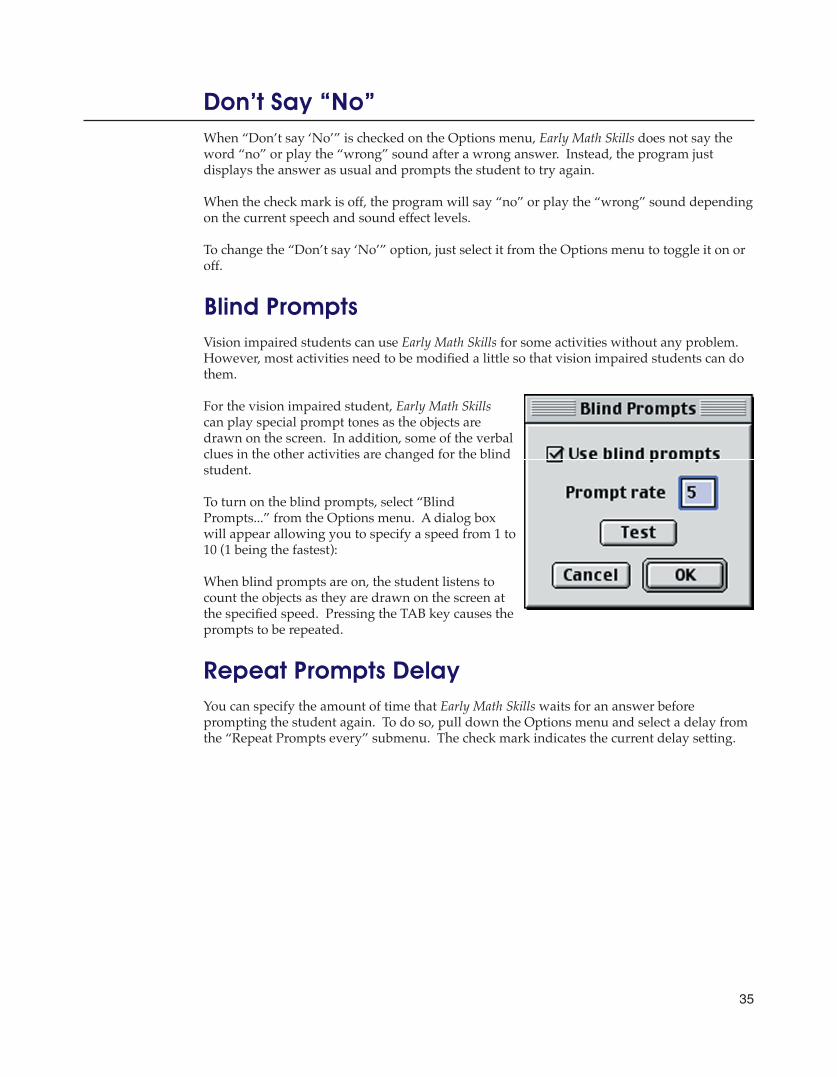
Blind PromptsVision impaired students can use Early Math Skills for some activities without any problem. However, most activities need to be modified a little so that vision impaired students can do them.
For the vision impaired student, Early Math Skills can play special prompt tones as the objects are drawn on the screen. In addition, some of the verbal clues in the other activities are changed for the blind student.
To turn on the blind prompts, select “Blind Prompts...” from the Options menu. A dialog box will appear allowing you to specify a speed from 1 to 10 (1 being the fastest):
When blind prompts are on, the student listens to count the objects as they are drawn on the screen at the specified speed. Pressing the TAB key causes the prompts to be repeated.
Repeat Prompts DelayYou can specify the amount of time that Early Math Skills waits for an answer before prompting the student again. To do so, pull down the Options menu and select a delay from the “Repeat Prompts every” submenu. The check mark indicates the current delay setting.

36
Early Math Skills can be made to display either a small rocket ship or a hot air balloon in the lower right corner of the screen. To turn on this option, pull down the Options menu and select either the rocket or the balloon from the Reinforcement menu.
The launch pad shows the number of correct answers needed in order to reach the next level (see Program Control - Rate of Advancement).
As the student answers problems correctly, the launch pad counts down. If a wrong answer is given, the countdown starts over.
When the countdown reaches 0, the ship is full of fuel and takes off. The program then advances to the next level.
Reinforcement
37
Program ControlThe following sections describe some other options that control the way that Early Math Skills functions.
Ignore Some ResponsesIn some cases, you may want the program to ignore certain responses from the student, and, of course, Marblesoft provides a way for you to do it!
To ignore some responses, use the Ignore submenu in the Options menu. The three options are described here:
Ignore Wrong Responses
When this item is checked, the program will ignore all wrong answers. Using this option, only correct answers will be responded to or recorded in the student scores.
Ignore “Stray” Responses
The default behavior is for the program to ignore any responses outside a certain range. For instance, when using Counting Numbers, a stray response would be pressing a letter key. This option should be used for the student who is easily distracted by the computer’s negative responses or the student with limited motor control who has trouble physically pressing the right key or switch.
Ignore None
You can also have Early Math Skills acknowledge all responses. Typically, the word “No” or a sound effect is played after a wrong answer (see Prompting and Reinforcement - Don’t say “No”), and the key that was pressed is shown on the screen. The student is then prompted to try again.
38
Rate of AdvancementEarly Math Skills automatically sets the level of difficulty according to the student’s scores and the parameters set by the teacher. There are four settings which determine when the program will advance or go back a level, and when the student is shown the correct answer.
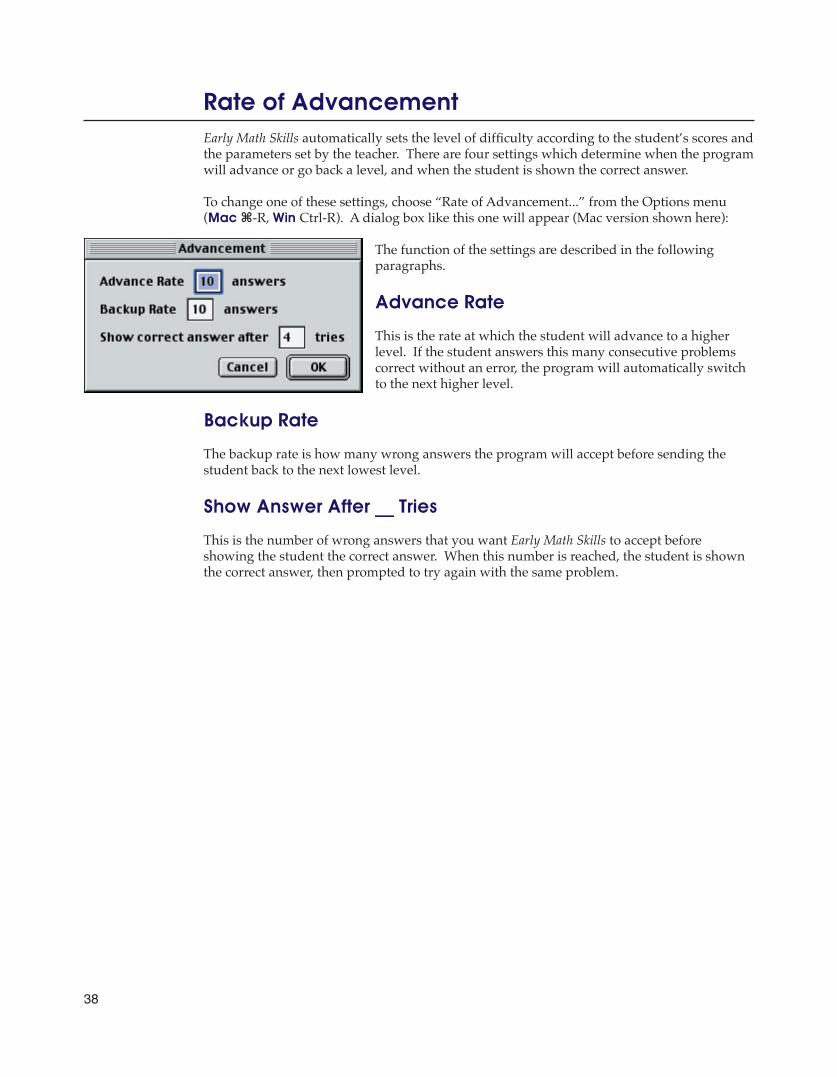
To change one of these settings, choose “Rate of Advancement...” from the Options menu (Mac ⌘-R, Win Ctrl-R). A dialog box like this one will appear (Mac version shown here):
The function of the settings are described in the following paragraphs.
Advance Rate
This is the rate at which the student will advance to a higher level. If the student answers this many consecutive problems correct without an error, the program will automatically switch to the next higher level.
Backup Rate
The backup rate is how many wrong answers the program will accept before sending the student back to the next lowest level.
Show Answer After __ Tries
This is the number of wrong answers that you want Early Math Skills to accept before showing the student the correct answer. When this number is reached, the student is shown the correct answer, then prompted to try again with the same problem.
39
FontsYou can select a font from the Font submenu in the Options menu. That font will then be used for the text that the student sees on screen.
Why would you want to do such a thing? Well, for instance, you might want to choose Arial or Helvetica because they look the most like the keyboard. Or, you might choose Times or Bookman because the characters look like the text in a child’s book.
You can choose a script font when a child is ready to learn cursive letters, or perhaps choose a whimsical font just for fun. You could also use a font-making utility to create a font from the student’s own handwriting!
Full Screen ModeYou can hide the menu bar by choosing “Full Screen Mode” from the Options Menu (Mac ⌘-F, Win Ctrl-F). The program will hide the menu bar and use as much of the screen as possible to make the largest possible image for the student to see.
While in full screen mode, menu shortcuts (Mac ⌘-, Win Ctrl-) still work. To use a menu item that does not have a shortcut, you’ll need to exit full screen mode by typing (Mac ⌘-F, Win Ctrl-F) again.
Use Stop SignYou can allow keyboard users to return to the main menu and select another activity by choosing “Use Stop Sign” from the Options menu. When this option is on, a small stop sign icon will be drawn in the lower left corner of the screen. When the stop sign is on, the student can exit the current activity by clicking on the stop sign or pressing the “Esc” key.
“Use Stop Sign” has no effect when the program is in yes/no mode. When in yes/no mode, use the “Close Activity” command described below.

40
Some of the program’s colors can be changed to make the problems easier to see for your low-vision students. To customize a color of an item, choose the item from the Customize Colors menu. A color picker like this one will appear (Mac version shown):
Select the new color you would like to use and press “OK”.
Following is a description of the colors you can customize.
Screen Backgrounds
The screen background is the solid color used as the background for the problems. The program uses light pastel colors as defaults. Each activity has its own background color. You can only change the background color for the current activity.
Warning: Most text and prompting is black and cannot be changed. If you make the background too dark, it will be hard for the student to see the text.
Number Line Numbers
This is the color for the numbers that are printed on the number line at the bottom of the screen for mouse and TouchWindow users on Counting Numbers. You can only set this option from Counting Numbers.
Number Line Keys
This is the background color for the number line at the bottom of the screen for mouse and TouchWindow users on Counting Numbers. You can only set this option from Counting Numbers.
Close ActivityTo exit the current activity, select “Close xxx” from the File menu (Mac ⌘-W, Win Ctrl-W) where xxx is the name of the activity. The program will return to the main menu, where you can select a different activity.
You can also jump directly to any activity by using the following keyboard short cuts:
Mac Win Activity⌘-1 Ctrl-1 Early Addition I⌘-2 Ctrl-2 Early Addition II⌘-3 Ctrl-3 Sequencing Up⌘-4 Ctrl-4 Sequencing Down⌘-5 Ctrl-5 Early Subtraction I⌘-6 Ctrl-6 Early Subtraction II⌘-7 Ctrl-7 More Than/Less Than
Customize Colors
41
PauseEarly Math Skills prompts the student for a response every few seconds if the student has not yet answered (see Prompting and Reinforcement - Repeat Prompts Delay). In Yes/No mode, the program also repeats the “Yes/No” question each time it scans to a different item.
You can temporarily turn off these prompts by selecting “Pause” from the Activity Menu or typing (Mac ⌘-P, Win Ctrl-P) from the keyboard. While in pause mode, Early Math Skills continues to display the problem, but does not prompt the student again until an answer is given.
Use the pause mode to give the student an unlimited amount of time or when the program is sitting unattended and you just want it to BE QUIET!
QuitTo quit Early Math Skills:
Macintosh
Select “Quit” from the File menu or type ⌘-Q.
Windows
Type Ctrl-Q, or use the Windows-standard Alt+F4. When not in full screen mode, you can also choose “Exit” from the File menu or type Alt+F/X.
42
Student ScoresEarly Math Skills contains a built-in system for tracking and reporting a student’s progress. The program is designed to work in conjunction with all of the programs in Marblesoft’s Early Learning series. To take advantage of this feature, you should save the student files in a folder named “Student Scores” that is located inside the same folder as the Early Learning programs. Early Math Skills will automatically create this folder the first time you run it.
The following sections describe student files and how to create, modify, record and report them.
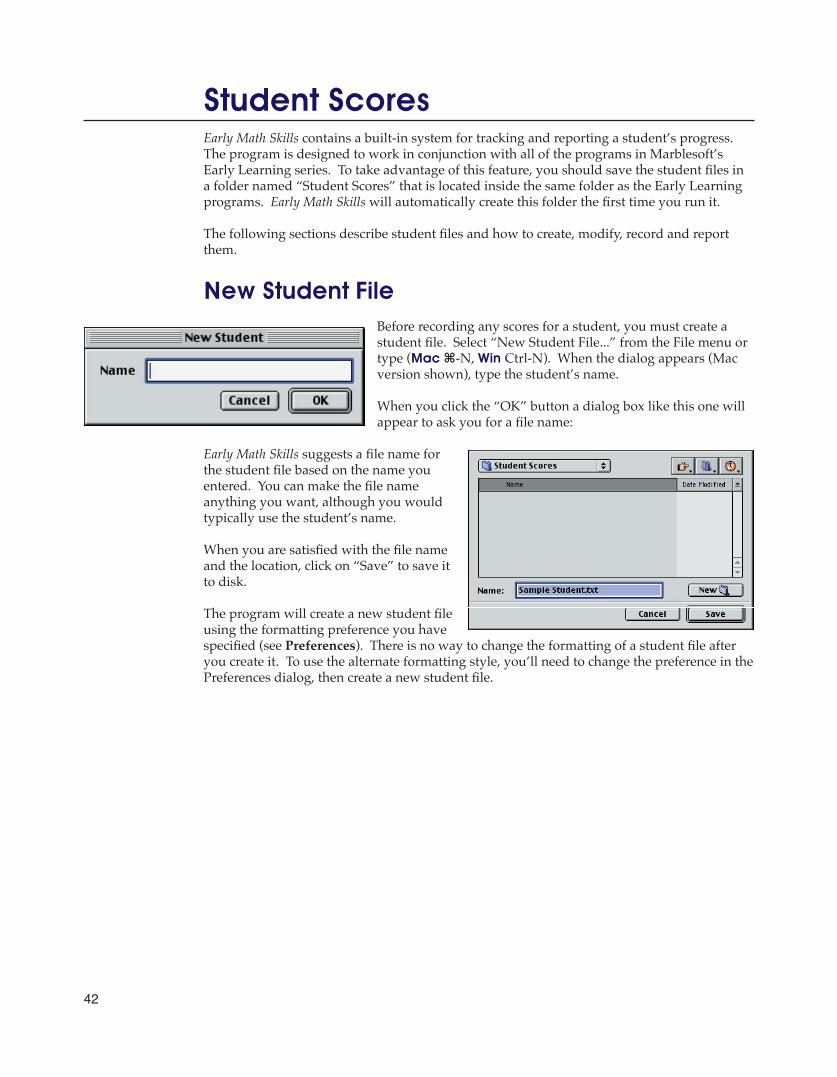
New Student FileBefore recording any scores for a student, you must create a student file. Select “New Student File...” from the File menu or type (Mac ⌘-N, Win Ctrl-N). When the dialog appears (Mac version shown), type the student’s name.
When you click the “OK” button a dialog box like this one will appear to ask you for a file name:
Early Math Skills suggests a file name for the student file based on the name you entered. You can make the file name anything you want, although you would typically use the student’s name.
When you are satisfied with the file name and the location, click on “Save” to save it to disk.
The program will create a new student file using the formatting preference you have specified (see Preferences). There is no way to change the formatting of a student file after you create it. To use the alternate formatting style, you’ll need to change the preference in the Preferences dialog, then create a new student file.

43
To begin recording scores to a student’s file, choose “Open Student File...” from the File menu or type (Mac ⌘-O, Win Ctrl-O). A dialog box will prompt you to select the student file you want (Mac version shown here):
Locate the student file and click on “Open”. The program will open the file and automatically begin recording the scores for that student. They will be recorded until the file is closed or until another student file is opened.
Save Student ScoresWhen the student is finished with Early Math Skills, select “Save Student Scores” from the File menu or type (Mac ⌘-S, Win Ctrl-S). The scores will be added to the student’s file.
When a student’s scores are saved, Early Math Skills also saves all the current program settings. These settings are then used by all Early Learning programs (version 2.1 or later). For instance, if you turn scanning on and save a student file, scanning will be on the next time you open that student’s file in Early Math Skills or any other Early Learning program.
Along with the program settings, Early Math Skills saves the current activity and difficulty level for the student, so it can be restored when the student’s file is next opened.
You should only save the scores at the end of a session. Early Math Skills records the scores a full session at a time. If you save the scores in mid-session and again at the end, the program treats them as two separate sessions, making the records longer and less easy to read.
If you forget to save the scores, the program will remind you before you open another student file or quit.
Close Student FileTo stop recording a student’s scores, select “Close Student File” from the File menu. If there are any unsaved records, you will be prompted to save them before the file is closed.
Open Student File
44
Reviewing Student FilesEarly Learning student scores are saved in text files that can easily be opened, edited and printed using any typical text editor or word processor. How you will prepare your student files for printing depends on the formatting option you had set in your preferences dialog (see Preferences) when you created the student file.
Using a word processor or spreadsheet program, you can easily create a report showing a single student’s progress over time, or perhaps a comparison or summary of several students. We’ll leave the creativity up to you. This section describes only how to format the student score data.
When you open or import a student file into a word processor, it will begin with a header something like this:
Early Learning Student Scores
Student: Kristi JohnsonFile created 11/8/05
Format: Tab delimited (or, in the case of a monospaced file...)Format: Monospaced
Open this file in a word processor or spreadsheet program to see the columns formatted correctly.
Do not modify the first six lines of this file, or the Early Learning programs may not be able to read it. If you want to make changes above the dotted line, duplicate the file and make your changes to the copy.
----------
The first six lines cannot be modified if you wish to record any more scores to the same file. The preferred method is to save the file with a different name, then modify the copy. Once you’ve created an editable copy, you can modify it as described on the next few pages.
The first two paragraphs show the report title, the student’s name and the date the file was created. Modify these lines as you wish.
The third paragraph, beginning with “Format:” and the fourth paragraph, beginning with “Do not modify” are informational only, and can be deleted.
The dotted line signifies the end of the header and the beginning of the student scores. The scores will be formatted differently depending on the formatting method set when the file was created. The two formatting methods are described below.
45
This is the default format an is the easiest to create professional-looking reports. You can edit and print tab-delimited scores using any text editor, but usually you would use either a word processor or a spreadsheet program.
A word processor allows you to quickly format and print great looking reports. Editing the scores in a spreadsheet gives you powerful formatting options plus the ability to create your own summary and statistical reports based on the student scores.
Both methods are described here:
Word Processor
When you open or import a student file into a word processor, the scores will usually look something like this:
Date: 11/8/05Early Addition I Attempts Right Wrong Stray No Err %No Err Level 1 13 13 1 0 12 92 Level 2 17 17 2 0 15 88 Level 3 7 6 3 2 3 43
----------
Date: 11/11/05Sequencing Up Attempts Right Wrong Stray No Err %No Err Level 3 7 7 0 0 7 100More Than/Less Than Attempts Right Wrong Stray No Err %No Err Level 1 12 11 4 1 9 75
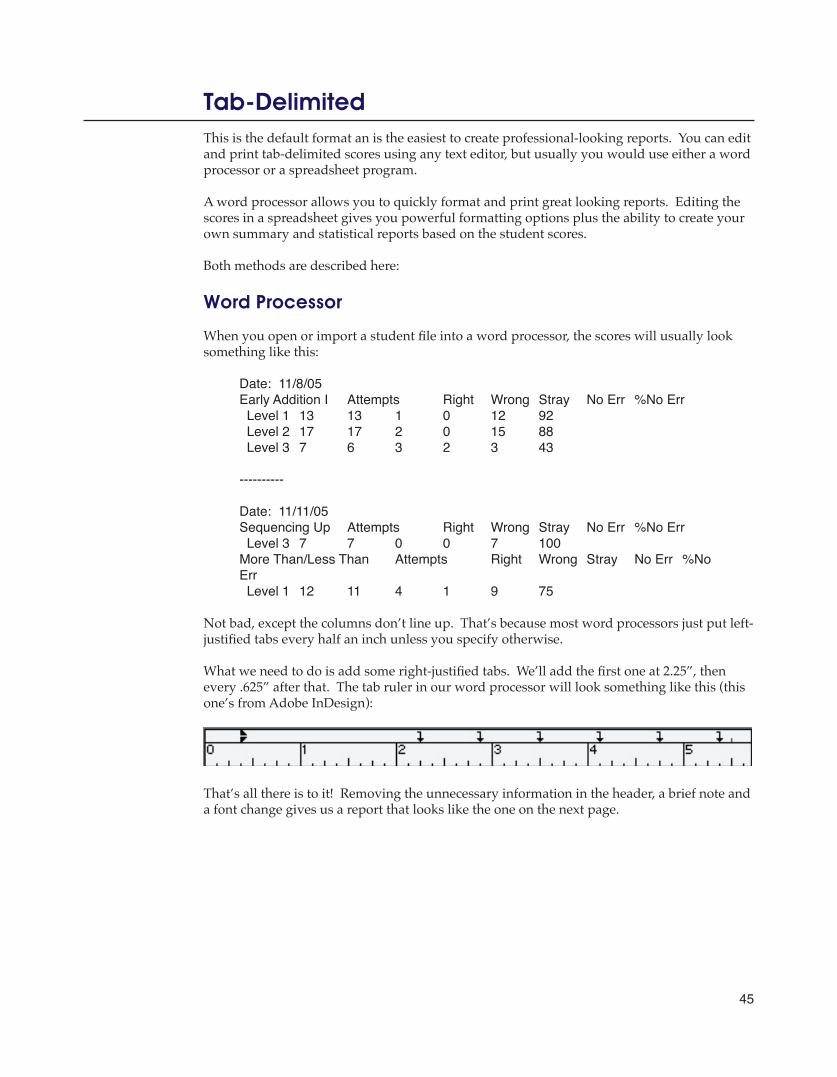
Not bad, except the columns don’t line up. That’s because most word processors just put left-justified tabs every half an inch unless you specify otherwise.
What we need to do is add some right-justified tabs. We’ll add the first one at 2.25”, then every .625” after that. The tab ruler in our word processor will look something like this (this one’s from Adobe InDesign):
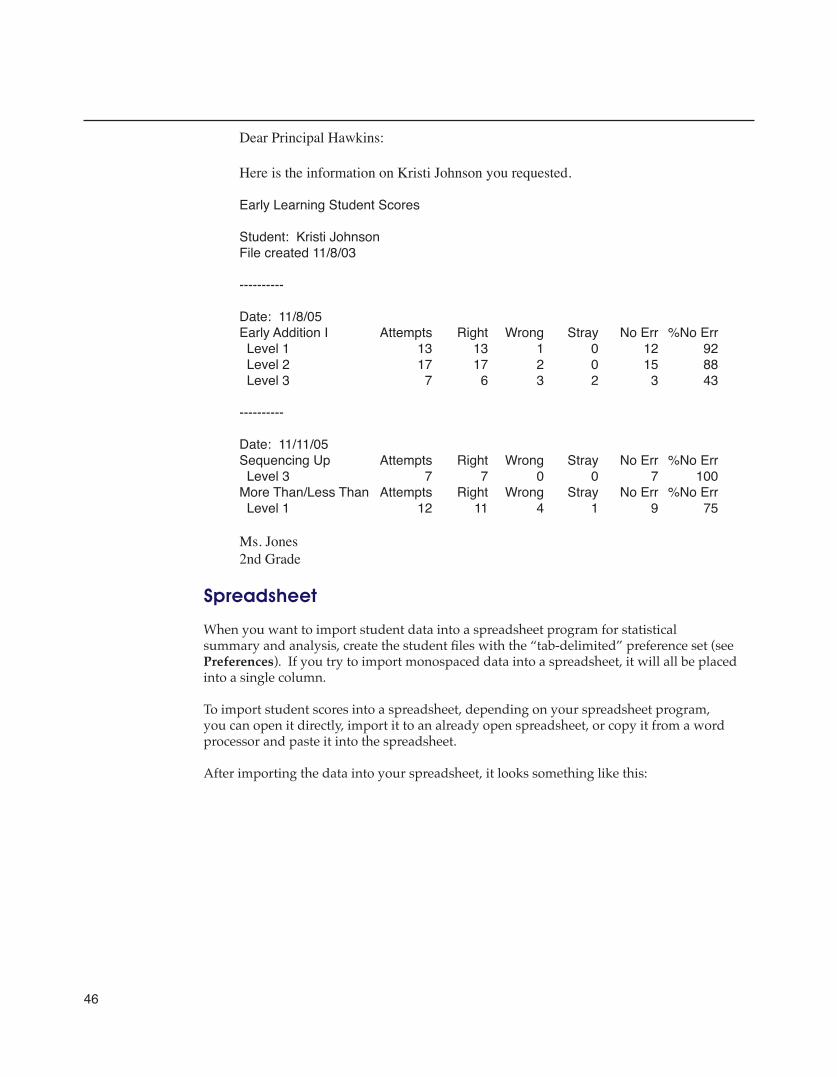
That’s all there is to it! Removing the unnecessary information in the header, a brief note and a font change gives us a report that looks like the one on the next page.
Tab-Delimited
46
Dear Principal Hawkins:
Here is the information on Kristi Johnson you requested.
Early Learning Student Scores
Student: Kristi JohnsonFile created 11/8/03
----------
Date: 11/8/05Early Addition I Attempts Right Wrong Stray No Err %No Err Level 1 13 13 1 0 12 92 Level 2 17 17 2 0 15 88 Level 3 7 6 3 2 3 43
----------
Date: 11/11/05Sequencing Up Attempts Right Wrong Stray No Err %No Err Level 3 7 7 0 0 7 100More Than/Less Than Attempts Right Wrong Stray No Err %No Err Level 1 12 11 4 1 9 75
Ms. Jones2nd Grade
Spreadsheet
When you want to import student data into a spreadsheet program for statistical summary and analysis, create the student files with the “tab-delimited” preference set (see Preferences). If you try to import monospaced data into a spreadsheet, it will all be placed into a single column.
To import student scores into a spreadsheet, depending on your spreadsheet program, you can open it directly, import it to an already open spreadsheet, or copy it from a word processor and paste it into the spreadsheet.
After importing the data into your spreadsheet, it looks something like this:
47
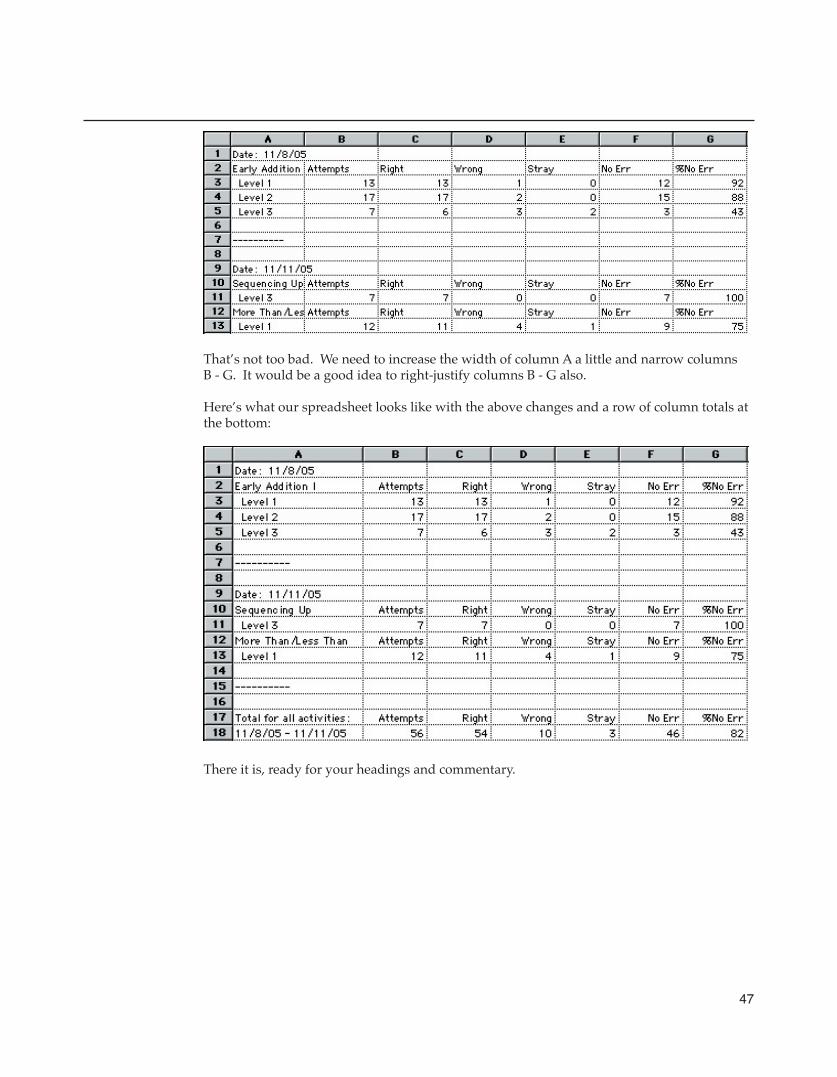
That’s not too bad. We need to increase the width of column A a little and narrow columns B - G. It would be a good idea to right-justify columns B - G also.
Here’s what our spreadsheet looks like with the above changes and a row of column totals at the bottom:
There it is, ready for your headings and commentary.

48
MonospacedThe alternate format for student score files is the “monospaced” format. This is useful when you don’t have complete control over the formatting of text and the setting of tabs, such as when sending e-mail or formatting Web pages (without using tables).
When you import a monospaced student score file into a word processor, the score data usually looks something like this:
Date: 11/8/05Early Addition I Attempts Right Wrong Stray No Err %No Err Level 1 13 13 1 0 12 92 Level 2 17 17 2 0 15 88 Level 3 7 6 3 2 3 43
----------
Date: 11/11/05Sequencing Up Attempts Right Wrong Stray No Err %No Err Level 3 7 7 0 0 7 100More Than/Less Than Attempts Right Wrong Stray No Err %No Err Level 1 12 11 4 1 9 75
Instead of tabs separating the columns, a monospaced contains the correct number of spaces between columns to line them up correctly when using a monospaced font, such as Courier. Monospaced fonts are fonts where every character is the exact same width, so it’s easy to predict how much space they will take on the page.
When formatting student scores for a Web page, use the <pre> tag around the text you want monospaced. Here’s an example of some monospaced student scores formatted for HTML. The example is shown in Courier font. (The <pre> and <\pre> tags are hidden by the browser so they won’t show on the finished Web page.)
<pre>Date: 11/8/05Early Addition I Attempts Right Wrong Stray No Err %No Err Level 1 13 13 1 0 12 92 Level 2 17 17 2 0 15 88 Level 3 7 6 3 2 3 43
----------
Date: 11/11/05Sequencing Up Attempts Right Wrong Stray No Err %No Err Level 3 7 7 0 0 7 100More Than/Less Than Attempts Right Wrong Stray No Err %No Err Level 1 12 11 4 1 9 75</pre>
There it is, ready to e-mail or publish on the Web.

49
PreferencesEarly Math Skills remembers most program settings when you quit the application. All settings such as the currency you’re using, activity settings, input and reinforcement options and scanning settings are saved when you quit and restored exactly as you left them the next time you run the program.
There are a couple of preferences that you set from the Preferences dialog. To set them, select “Preferences...” from the Edit menu. A dialog something like this one will appear (Mac version shown here):
When the “Load student at startup” box is checked, the program will bring up the “Open Student File” dialog automatically every time you run the program.
The “Save student scores” buttons set which type of student score files will be created. Existing student score files are not affected by this setting, only student files created after the preference is changed.
50
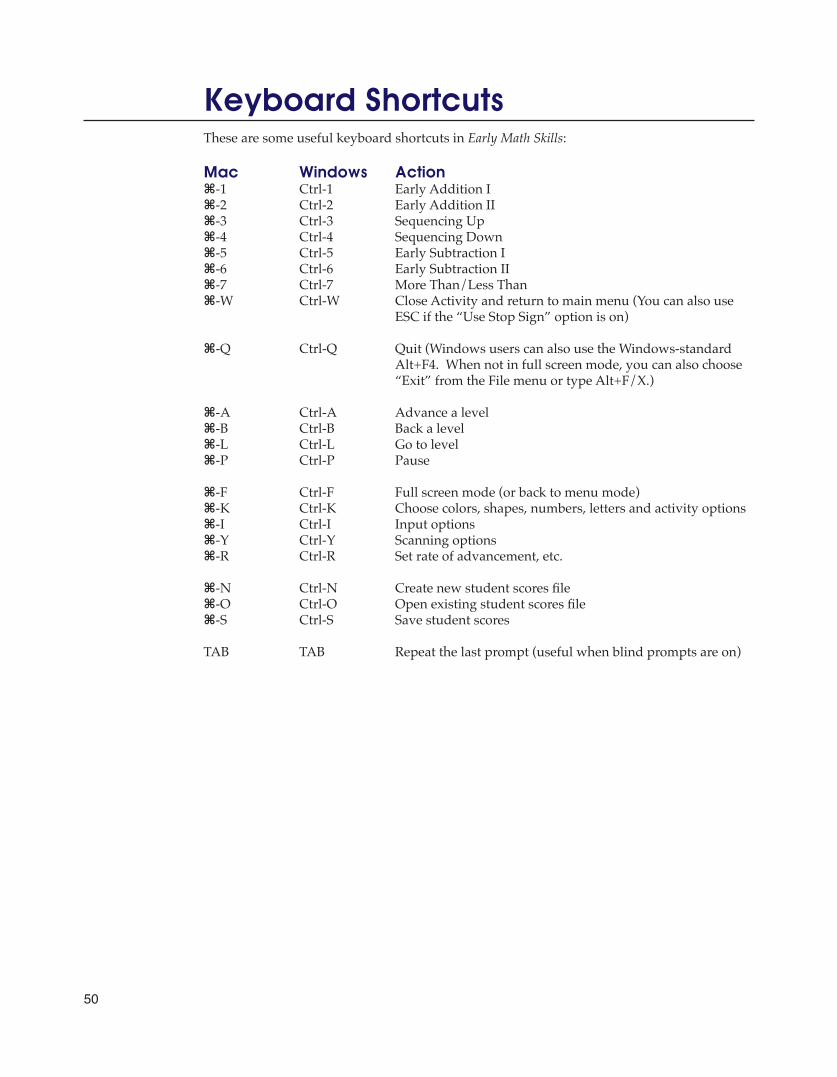
Keyboard ShortcutsThese are some useful keyboard shortcuts in Early Math Skills:
Mac Windows Action⌘-1 Ctrl-1 Early Addition I⌘-2 Ctrl-2 Early Addition II⌘-3 Ctrl-3 Sequencing Up⌘-4 Ctrl-4 Sequencing Down⌘-5 Ctrl-5 Early Subtraction I⌘-6 Ctrl-6 Early Subtraction II⌘-7 Ctrl-7 More Than/Less Than⌘-W Ctrl-W Close Activity and return to main menu (You can also use
ESC if the “Use Stop Sign” option is on)
⌘-Q Ctrl-Q Quit (Windows users can also use the Windows-standard Alt+F4. When not in full screen mode, you can also choose “Exit” from the File menu or type Alt+F/X.)
⌘-A Ctrl-A Advance a level⌘-B Ctrl-B Back a level⌘-L Ctrl-L Go to level⌘-P Ctrl-P Pause
⌘-F Ctrl-F Full screen mode (or back to menu mode)⌘-K Ctrl-K Choose colors, shapes, numbers, letters and activity options⌘-I Ctrl-I Input options⌘-Y Ctrl-Y Scanning options⌘-R Ctrl-R Set rate of advancement, etc.
⌘-N Ctrl-N Create new student scores file⌘-O Ctrl-O Open existing student scores file⌘-S Ctrl-S Save student scores
TAB TAB Repeat the last prompt (useful when blind prompts are on)
51
Technical SupportIf you are having trouble with Early Math Skills or need help understanding some of the program’s features, feel free to take advantage of our free technical support.
Marblesoft Technical Support12301 Central Ave NE Suite 205Blaine, MN 55434
Phone
(763) 502-0440
If you call, please leave numbers where you can be reached both during and after normal business hours. Don’t forget to leave your area code!
Fax
(763) 862-2920
World Wide Web
www.marblesoft.com
Early Math Skills has evolved for more almost two decades into the program it is today. A big part of that evolution has been the suggestions from teachers and parents on how to make improvements to the program. Please continue to make those suggestions so that Early Math Skills keeps getting better!