Embed Size (px)
Citation preview
www.platinum.matthey.come-mail [email protected]


1
The Pure Opportunity
The Far Eastern Obsession
The Western Renaissance
The Unique Image
The Designer’s Medium
The Richest Heritage
Main Index
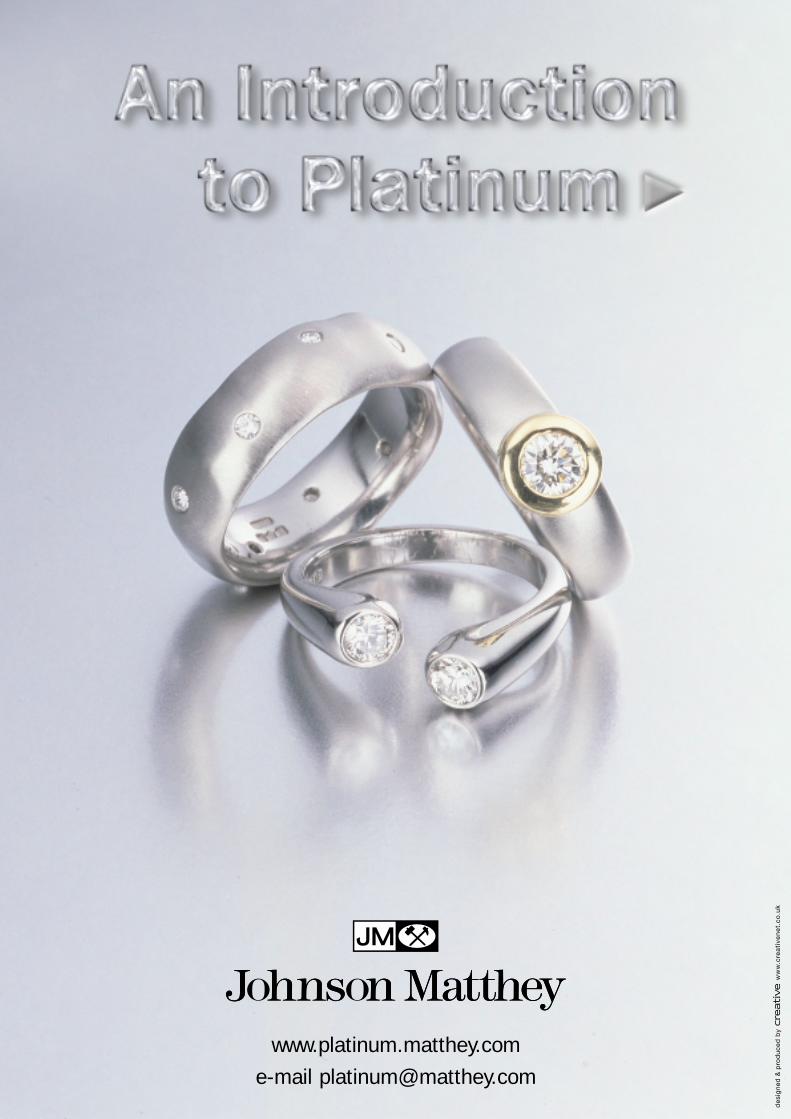
The Pure Opportunity
Platinum’s origins in jewellery go back nearly 2,000 years to the
pre-Columbian Indian civilisations of South America.
Its modern tradition begins with the European court jewellers of
the 18th century and extends to the exquisite creations of the
great jewellers of the Edwardian era and the Art Deco period.
Today, it is used by jewellers around the world with skill and
inspiration to create dazzling innovations in jewellery technique
and design.
Contrast the shimmering brilliance of Japanese gem-set rings
and pure platinum necklaces with the subdued satin finish and
technical virtuosity of German design. Or compare the ice and fire
of Italian platinum and gold combinations with the novel mixtures
of materials and forms from the elite jewellers of New York.
Platinum jewellery, its markets, its image, its design and its
heritage - all can be your opportunities.
Index
2
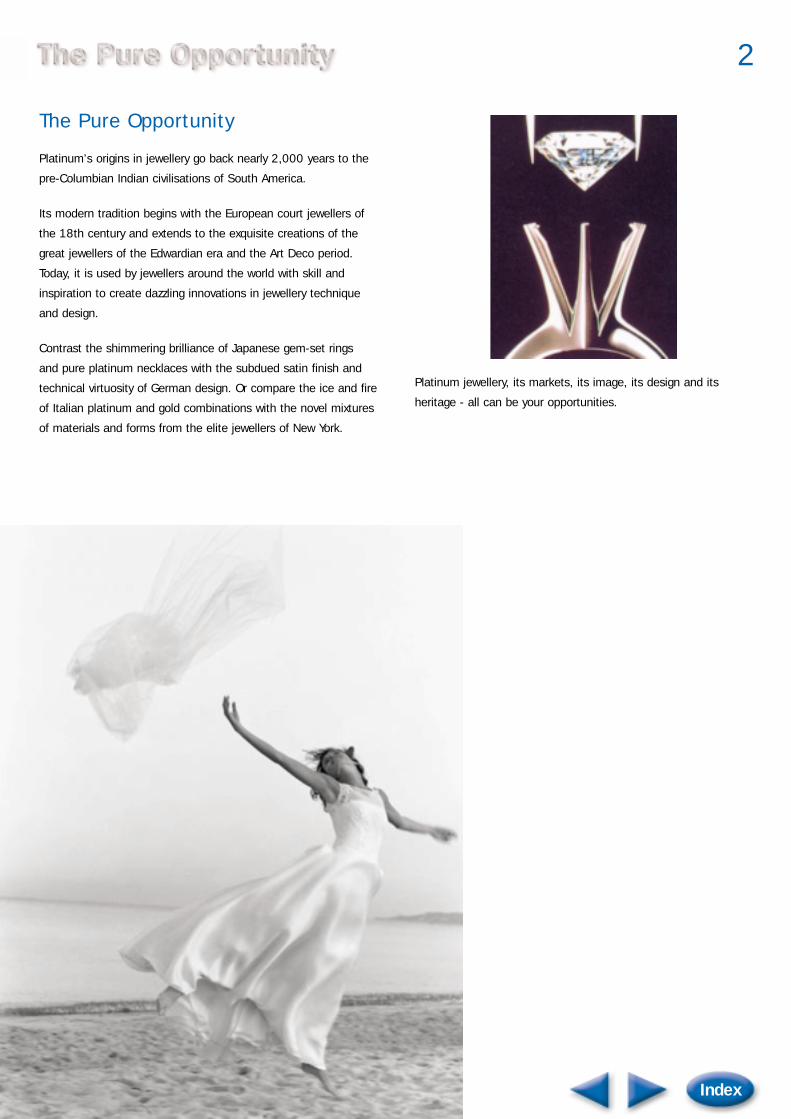
The Far Eastern Obsession
The world’s principal platinum jewellery market is Japan.
Platinum, introduced after the Meiji restoration in 1868, rapidly
achieved a special position in the minds of the Japanese people
that remains unchanged to this day.
Platinum combines high quality, prestige and value with an
appeal, by virtue of its white colour, to traditional Japanese
modesty and sobriety.
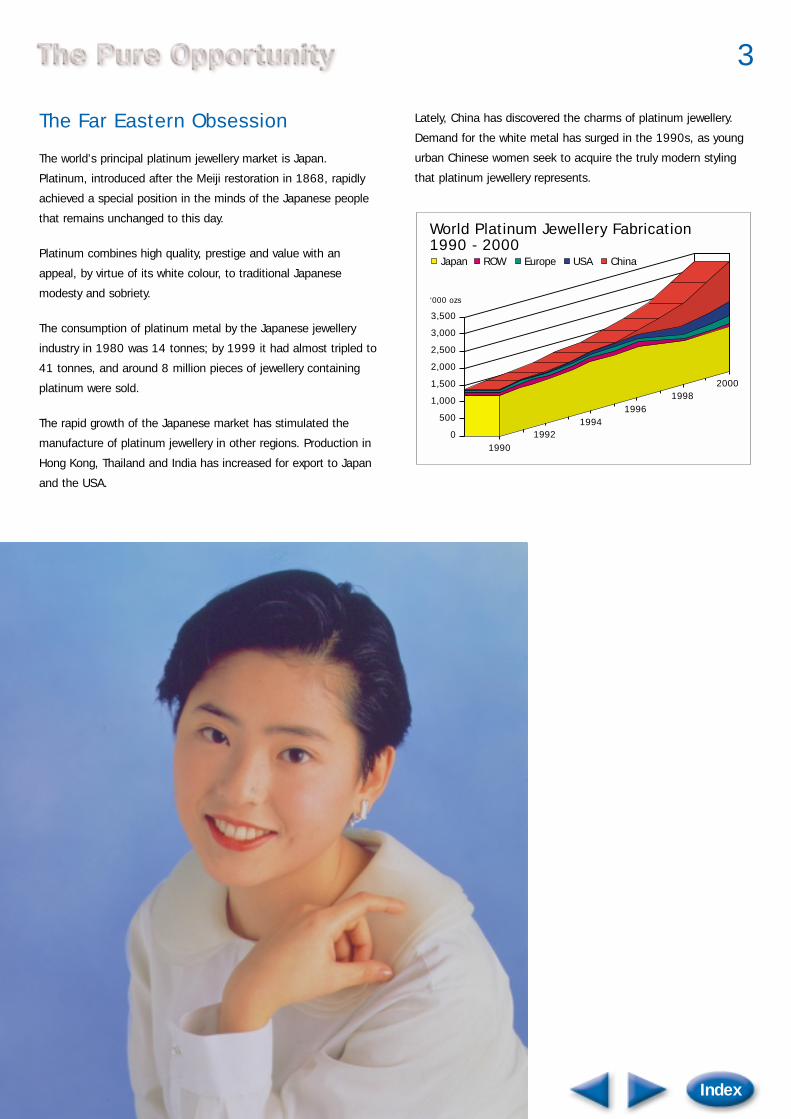
The consumption of platinum metal by the Japanese jewellery
industry in 1980 was 14 tonnes; by 1999 it had almost tripled to
41 tonnes, and around 8 million pieces of jewellery containing
platinum were sold.
The rapid growth of the Japanese market has stimulated the
manufacture of platinum jewellery in other regions. Production in
Hong Kong, Thailand and India has increased for export to Japan
and the USA.
Lately, China has discovered the charms of platinum jewellery.
Demand for the white metal has surged in the 1990s, as young
urban Chinese women seek to acquire the truly modern styling
that platinum jewellery represents.
Index
3
World Platinum Jewellery Fabrication1990 - 2000
Japan
‘000 ozs
ROW Europe USA China
3,500
3,000
2,500
2,000
1,500
1,000
500
01990
19921994
19961998
2000

The Western Renaissance
Platinum jewellery in Europe existed in the 1920s and 1930s,
but virtually disappeared during World War II. Its post-war
resurgence began in Germany, where jewellers diversified out of
gold into platinum, introducing novelty to their product range and
profit from the higher added value of platinum jewellery. They
gave platinum a distinct identity characterised by stark modern
design and the prevalent use of a satin finish. Platinum jewellery
became established in the high-value sector of the German
market, acquiring an image of exclusive confidentiality, and today
encompasses the mass markets through more classical
platinum designs.
Italian jewellers began experimenting with platinum in the 1980s,
combining it with gold, creating warmth and softness around the
cool strength of platinum, imbuing each piece with characteristic
Italian sensuality. Expert at manipulating form, they have
achieved the illusion of volume without the corresponding weight
and expense and famed for their expertise in the design and
production of light pendant chains they now export all over
the world.
During the 1920s the United States was the largest consumer of
platinum for jewellery - the role of Japan today. Now, platinum
jewellery in the USA is undergoing a renaissance, begun by the
individual style and limited edition creations of New York
designers, and carried on by the appeal of platinum bridal
jewellery - the expression of a relationship which is pure, valued
and unique.
Index
4
Platinum Jewellery Demand 2000
China37% Japan
41%
ROW2%
USA12%
Europe8%

The Unique Image
Throughout the world, platinum jewellery is made in a purity of at
least 85 per cent platinum, and in Europe and the U.S.A., 95 per
cent is the norm. Contrast this with gold jewellery, sometimes as
diluted as 8 carat. The buyer of platinum jewellery will be aware
of another special aspect of the metal - its relative scarcity. Only
a little more than 150 tonnes of platinum were mined in 1999,
compared to 2,576 tonnes of gold and 27,626 tonnes of silver.
Because 50 per cent of the world’s supplies are consumed in a
variety of essential industries, the quantity available for jewellery
is not infinite. Many jewellers reflect this characteristic of rarity by
limiting the production of their platinum jewellery to just a few
examples of each design.
Technically, no other precious metal compares to platinum for
strength and resistance to tarnish. This is why silver was
discarded as the material for setting diamonds. Once the
technique of melting platinum in the workshop was established,
jewellers could use platinum’s structural strength and
untarnishable whiteness to show off diamonds at their best.
Today, the highest class diamond jewellery will usually be
mounted in delicate platinum settings to secure and preserve the
natural brilliance of the stones.
Platinum is not just for women. It is also ideal for a man’s
jewellery collection. Its cool, subdued look complements the male
psyche; discreet, elegant, imposing and strong.
Platinum need not be expensive to be special. As a young
person’s jewellery in a lighter style it still carries the mystique of
the rare and the valuable, the hard won metal which takes
10 tonnes of rock to be broken to produce a single ounce.
Index
5
The Designer’s Medium
The techniques for working gold jewellery cannot simply be
applied to platinum, which makes different demands on the
jeweller’s skills. Platinum requires a scrupulously clean working
environment, melting and casting equipment capable of operating
at high temperature (pure platinum melts at 1769°C) and careful
attention to polishing technique. Of course, there are superb
advantages in platinum too - it can be repeatedly heated and
cooled without the hardening and tarnishing effects produced in
gold alloys.
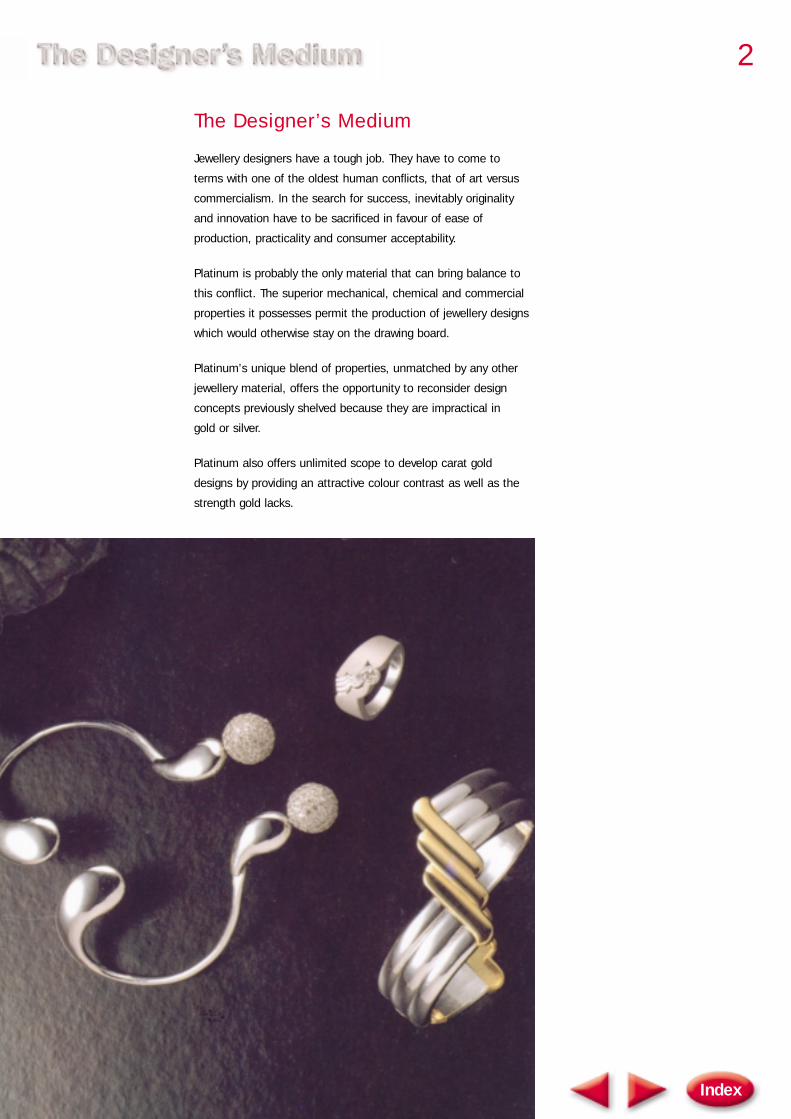
The techniques for working in platinum are already well
developed and, once mastered, allow free rein to the jewellery
designer’s imagination. Even the most slender sections of
platinum permanently retain their shape, giving the designer a
freedom not possible with other materials.
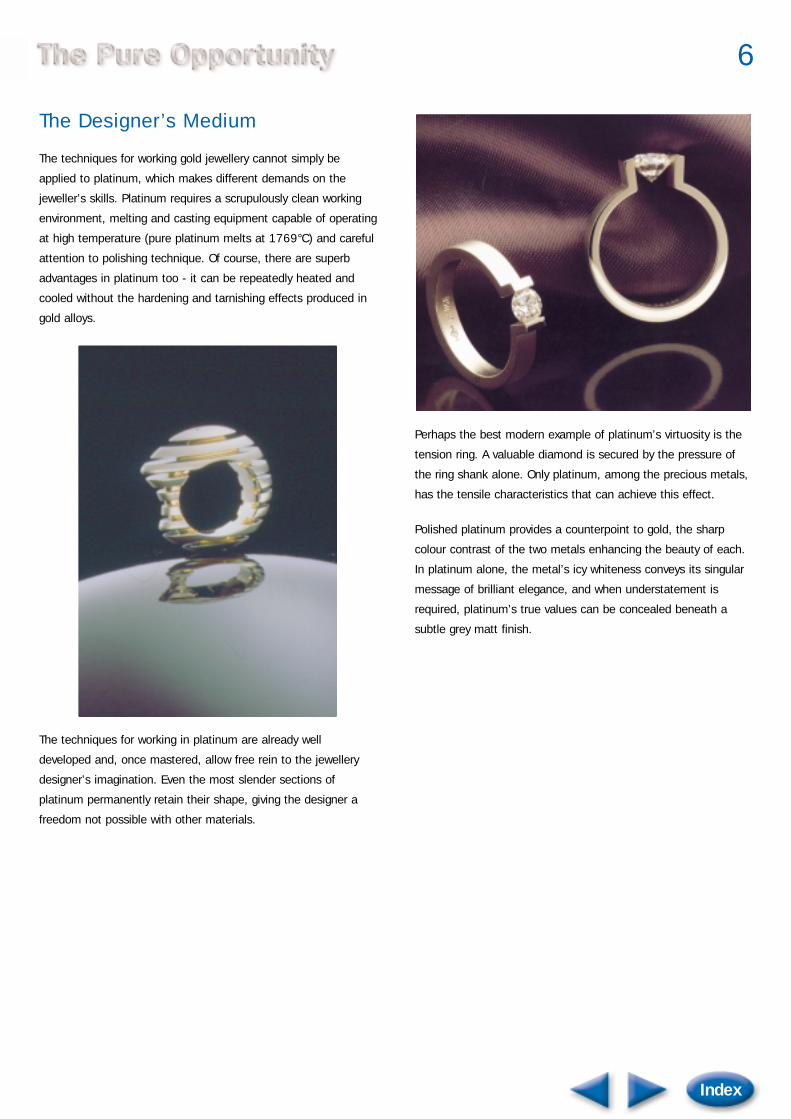
Perhaps the best modern example of platinum’s virtuosity is the
tension ring. A valuable diamond is secured by the pressure of
the ring shank alone. Only platinum, among the precious metals,
has the tensile characteristics that can achieve this effect.
Polished platinum provides a counterpoint to gold, the sharp
colour contrast of the two metals enhancing the beauty of each.
In platinum alone, the metal’s icy whiteness conveys its singular
message of brilliant elegance, and when understatement is
required, platinum’s true values can be concealed beneath a
subtle grey matt finish.
Index
6

The Richest Heritage
Platinum jewellery has a proud heritage. Cartier, Tiffany, Fabergé,
Van Cleef and Arpels, Buccellati, all have used and continue to
use and appreciate the fine qualities of platinum for men’s and
women’s jewellery of the highest character. The famed jewels of
the Duchess of Windsor were set in platinum. Platinum graces
the Crown Jewels of the Kings of England, the Tsars of Russia
and the Emperors of Japan.
Platinum, the metal which extends the boundaries of jewellery
design and amplifies the brilliance of precious stones, can add
value, excitement and prestige to your jewellery collection too.
Index
7
Duchess of Windsor wears a tiara inplatinum made by Cartier.


1
The Designer’s Medium
Platinum’s Qualities
Stone Set Platinum
Textured Platinum
Combination Platinum
Delicate Platinum
Modern Platinum
Main Index
The Designer’s Medium
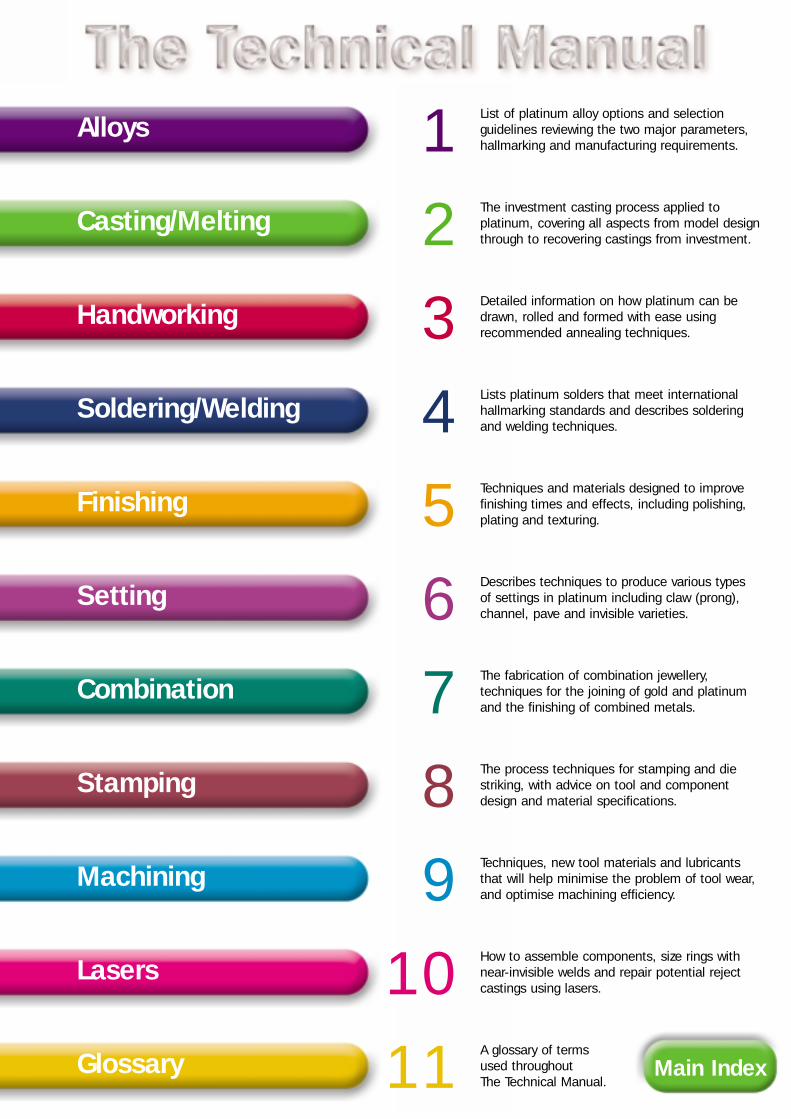
Jewellery designers have a tough job. They have to come to
terms with one of the oldest human conflicts, that of art versus
commercialism. In the search for success, inevitably originality
and innovation have to be sacrificed in favour of ease of
production, practicality and consumer acceptability.
Platinum is probably the only material that can bring balance to
this conflict. The superior mechanical, chemical and commercial
properties it possesses permit the production of jewellery designs
which would otherwise stay on the drawing board.
Platinum’s unique blend of properties, unmatched by any other
jewellery material, offers the opportunity to reconsider design
concepts previously shelved because they are impractical in
gold or silver.
Platinum also offers unlimited scope to develop carat gold
designs by providing an attractive colour contrast as well as the
strength gold lacks.
Index
2

Platinum’s Qualities
It’s ductile . . . and can be extensively deformed, even in a hard
condition, without becoming brittle. Fine or detailed structures,
such as claw settings and filigree, can be worked without fear of
cracking.
. . . and tough, assuring long term shape and rigidity and offering
benefits such as secure stone setting and durable necklet or
bracket links.
It’s strong . . . structures have excellent shape retention even
when manufactured from thin sections, tubes or fine wire, and
even after soldering or annealing.
. . . even when hot, this strength doesn’t disappear and complex
soldering to a high degree of dimensional accuracy is possible
with minimal jigging or support.
It work-hardens quickly . . . so annealed structures can quickly
regain rigidity with little further working
. . . and has low spring-back, which makes it perfect material for
setting soft or brittle precious stones.
It’s oxidation resistant . . . even when soldering or annealing, so
component parts can be polished prior to final assembly. Intricate
designs where some parts are out of the reach of polishing tools
are thus achievable.
. . . and solders easily, leaving small, neat but strong joints ideal
for construction of delicate frameworks. Its low thermal
conductivity allows precise multiple stage soldering.
It’s modern . . . a variety of finishes expands the design options
even further. Polished, brushed, grit-blasted, hammered,
repousse and embossed finishes all retain platinum’s lunar-lustre
which combines perfectly with all the shades of gold, from red to
pale yellow.
. . . and has unlimited design opportunities, so when you next sit
down in front of a blank sheet of paper think what platinum has
to offer and stretch your imagination.
Index
3

Stone Set Platinum
Use platinum for setting all precious stones, not just diamonds.
Its brilliant whiteness and high reflectivity enhances their colours.
Its strength and low spring-back means that once bent into
position the claws (prongs) retain the stones securely, an
essential consideration when working with soft or brittle stones
such as opals or emeralds.
Textured Platinum
Even textured platinum has a lunar-like lustre. Try different
finishes to enhance jewellery designs. Brushed, grit-blasted,
hammered, embossed, granulated, repousse or chased finishes
are easy to apply using conventional techniques, even prior to
final assembly.
Combination Platinum
Use platinum in combination with any shade of carat gold from
red right through to pale yellow. The attractive colour contrast will
add an extra dimension to any design and platinum’s strength
can be utilised in areas where gold might fail.
Delicate Platinum
Use platinum to build delicate but rigid structures. Its strength
means that light sections can be used and its low heat
conductivity allows close proximity of numerous solder joints.
Modern Platinum
Use platinum’s properties to create innovative and original
designs such as the tension ring. Tension created by the
torque is strong enough to hold a gemstone as securely as
a conventional setting.
Index
4
Platinum - use it for all its worth

Glossary 11
1
2
3
4
5
6
7
8
9
Alloys
Casting/Melting
Handworking
Soldering/Welding
Finishing
Setting
Combination
Stamping
Machining
10Lasers
A glossary of terms used throughout The Technical Manual.
List of platinum alloy options and selectionguidelines reviewing the two major parameters,hallmarking and manufacturing requirements.
The investment casting process applied toplatinum, covering all aspects from model designthrough to recovering castings from investment.
Detailed information on how platinum can bedrawn, rolled and formed with ease usingrecommended annealing techniques.
Lists platinum solders that meet internationalhallmarking standards and describes solderingand welding techniques.
Techniques and materials designed to improvefinishing times and effects, including polishing,plating and texturing.
Describes techniques to produce various typesof settings in platinum including claw (prong),channel, pave and invisible varieties.
The fabrication of combination jewellery,techniques for the joining of gold and platinumand the finishing of combined metals.
The process techniques for stamping and diestriking, with advice on tool and componentdesign and material specifications.
Techniques, new tool materials and lubricantsthat will help minimise the problem of tool wear,and optimise machining efficiency.
How to assemble components, size rings withnear-invisible welds and repair potential rejectcastings using lasers.
Main Index
Alloys
Selection of Platinum Alloysfor Jewellery
The Manufacturing Process
Wrought and HandworkingFabrication
Solders
1
ManualIndex
Selection ofPlatinum Alloysfor Jewellery
Pure Platinumworks beautifully, it can be readilywelded andsoldered and takesa lustrous polish,but unless it isfinished in a heavilycold-worked state,it is too soft forhardwearingjewellery. Smallamounts of certainalloying elementscan give platinumthe properties that make it idealfor jewellery.
Choosing a suitable alloy depends on:
1. The method used to make the jewellery.
2. The market into which it is to be sold.
Items suitable for sale in one country may not
meet the standards of fineness required for
hallmarking by another country to be sold
as “platinum”.
Market Regulations
Most countries specify that for an item to be
described as "platinum" it must comprise not less
than 85% platinum.
Some specify how much platinum group metals
may be used in addition to a minimum platinum
content.
Some allow a small negative tolerance at the
nominal fineness levels. A few allow other marks
and fineness levels above and/or below 850 fine.
Hallmarking and other standards for platinum will
be dealt with in detail in a later section of the
manual but to make a first selection, alloys may
be grouped according to the fineness acceptable
in the country where the jewellery is intended to
be marketed.
Japan, China and Hong Kong
These countries allow 999, 950, 900 and 850
qualities. Japan allows a small (0.5%) negative
tolerance but China and HK do not. 900 fine
is the most common quality but in Japan 999
is commonly used for wedding rings.
United States of America
Items must contain a minimum of 50% pure
platinum and 95% total platinum group metals
(PGMs), to be described as platinum.
Above 95% Pt, they can be stamped
“PLATINUM” or “PLAT”.
From 85% to 95% Pt, the platinum fineness
must also be stamped, eg. “900 Pt” or “Plat
900” for a 90% platinum alloy or “850 Pt” or
“850 Plat” for an 85% platinum alloy.
From 50% to 85% Pt, all the PGMs
constituting and their fineness levels have to
be stamped,
eg.,”585 Plat. 365 Pall” or “585 Pt. 365 Pd”.
Only the USA allows “carat platinum” alloys.
Europe
Countries adopting the Convention of the
Control & Marking of Articles of Precious
Metals of 1972 are:
Austria, Ireland, Sweden, Denmark*,
Norway, Switzerland, Finland, Portugal*
and United Kingdom
Although these countries have previously used
a single 950 fine (no negative tolerance)
platinum standard they have recently
introduced 3 other platinum finenesses in
accordance with ISO recommendations. These
finesses are 850,900,950 and 999. Most
others, including:
Belgium+, Greece+, Spain+, France+,
Italy*+, Netherlands+, Germany and
Luxembourg
customarily use the 950 fine standard. Some
(*) allow small negative tolerances; others (+)
allow iridium to count as platinum. Germany
allows other finenesses for special
applications.
Alloys
Index
1.1

TheManufacturingProcess
The other aspectthat affects thechoice of a suitableplatinum alloy isthe method ofmanufacture of thejewellery. There aregeneral purposealloys but it is bestto select one thatis suited to casting,handworking orautomatedproduction,depending on which ispredominant in fabricating the piece.
Wrought andHandworkingFabrication
Even a 5% alloy addition can harden or improve
castability of platinum but, of course, there is
considerably more scope if regulations allow
greater additions, even if part of that must be
platinum group metals.
Table 1B summarizes the most commonly
available jewellery alloys. Melting ranges,
properties, density and other remarks are
representative of the nominal compositions of an
alloy type. The table does not give every minor
variation since small percentage changes required
to comply with marking regulations have a
minimal effect on the properties of an alloy.
Some countries allow a negative tolerance on the
fineness of the finished item and some do not, so
manufacturers may standardize their jewellery
alloys at slightly different levels. For instance, at
the popular 950 fine level, casting grain, or
wrought semi-finished products, may be supplied
at 960, 955 or 950 fine but they are all intended
to finish with nominal 950 level properties.
If the platinum jewellery market demanded, and
marking regulations allowed, the technology exists
for the leading precious metals suppliers to
supply alloys ready-made for a range of “carat
platinum jewellery”.
Casting
Cobalt and/or palladium have been used to
create casting alloys at various levels of fineness.
Cobalt suppresses oxygen levels in the melt,
improves fluidity and castability and gives a good
final hardness without reducing the melting range
significantly. Palladium produces a softer casting.
Copper alloy can also be cast if necessary but as-
cast surfaces tend to be rougher and more
difficult to polish than cast cobalt alloys.
Combining alloying elements can further enhance
particular properties. For instance, a combination
of 3% cobalt and either 2 or 7% palladium may
be used for 950 or 900 fine platinum to combine
good castability with a particular polishing ability
and colour. All of the casting alloys can be joined
to wrought components by either soldering
or welding.
Alloys
Index
1.2
Copper, cobalt, gold, iridium, palladium and
ruthenium alloy easily with platinum. Where the
hardnesses and ductilities in Table 1B are for
annealed materials, the differences between the
alloys reflect the hardening effect of the alloying
element itself. This affects the hardness of the
alloy in the annealed or “soft” state, typical at the
start of operations such as rolling, drawing,
stretching, stamping, texturing, soldering and
welding. Figure 1A shows that, of the platinum
group metals, ruthenium and iridium have a
greater hardening effect than palladium. It is also
possible to use limited amounts of non-platinum
group metals such as copper or tungsten; the
latter considerably raises the unworked hardness
and springiness for clasps, pins, bangles, and
complex stone settings.
General working platinum is said to workharden
rapidly compared with gold. Compared with
18 carat yellow gold alloy, this is true. It is
convenient for making strong finishing
components but requires increasing power and
more annealing stages. However, there is little
difference between the rate of work-hardening of
general working platinum alloys and typical 18
carat white golds. Figure 1B compares typical
results for platinum with only 5% copper, a
commonly used general purpose platinum
working alloy, with results for 18 carat white and
yellow golds.

Solders
The development of solders followssimilar lines tojewellery alloys butis furthercomplicated by theneed to achieveworkingtemperatures belowthe melting point ofplatinum and tomeet markingregulations.
Automated Methods
Palladium is used when an alloy with a
comparatively low rate of work hardening is
needed, eg. for high profile stamping; and there
is evidence that copper reduces tool wear. An
85% platinum/10% palladium/5% copper alloy is
used in Germany, Italy and Japan for the
Japanese chain market because of its balance of
softness without causing undue tool wear.
Figure 1A. Effect of different alloying elements on the annealedhardness of platinum.
Figure 1B. Effect of work hardening.
Usually, 3 to 5 solders form a range of working
temperatures to enable soldered joints to be
made efficiently at different stages of assembly.
Most platinum solders are mixtures of precious
metals, not always including platinum (but, if not,
then usually palladium) with melting ranges from
extra easy at about 950°C., to extra hard at over
1500°C. At the higher melting point end of the
range it is possible to accommodate more
platinum and so there is less risk of the solder
disqualifying a platinum item at the marking stage
and there is no need to use fluxes. Overuse of
solders is a common reason for an item to fail at
final assay. The best practice is to buy to a
manufacturer's specification and not to make
solders for platinum in-house; it is rarely
economical in the long run. There is already a
more than adequate range for jewellery purposes.
The use of up to 4 precious metals and
sometimes other metal components, means that
the total combinations of solders are too
numerous to classify in a simple table. So, Table
1A quotes a range typical of what is available
worldwide, but there are many variations.
Table 1A.
Solder Working Fineness FluxGrade Range ºC Precious
MetalsExtra Easy 935-955 950 RequiredEasy 1010-1029 950 RequiredMedium 1179-1217 999.9 Not RequiredMedium Hard 1319-1342 999.9 Not RequiredHard 1422-1445 999.9 Not RequiredExtra Hard 1519-1533 999.9 Not Required
Further Details
The choice of alloys outlined in Table 1A and 1B
are dealt with in more detail in the context of
each of the manufacturing processes including
welding and soldering, in later modules of the
manual. Terms printed in italics are also defined
in a platinum jewellery context in the glossary.
Alloys
Index
1.3
240
200
160
120
80
40
0 5 10 15
W
Co
Ru*
Cu
Ir*
Pd*
*Platinum Group Metals
% Alloying Element in Platinum
Har
dnes
s, H
v.
280
240
200
160
120
0 10 20 30 40 50 60 70% Reduction in Section% Reduction in Section
18ct White Gold: 750Au/125Ag/125Cu18ct Yellow Gold: 750Au/150Pd/100CuNiGeneral Working Platinum: 950Pt/50Cu
Har
dnes
s, H
v.D
uctil
ity

Table 1B. Outline properties of alloys for platinum jewellery, internationally.
Alloys
Index
1.4Composition: Pt/PGMs Melt Range Hardness Ductility Density Applications/Notes Countries % of Alloying Elements Fineness Solid Liquid Hv %Elongn g/cm3 of Main Interest
999 1773 1773 50 40 21.4 Stamped "Pt 1000" JAP
990 1773 1773 50 40 21.4 990 fine, chuk pak gam HK; EUR
5% Copper 950 1725 1745 120 29 20.0 Gen purpose, medium hard GER; HK; 108(C) can be cast. EUR
5% Cobalt 950 1750 1765 135 20 20.8 Fluid for hard castings GER; HK; EUR3% Cobalt/7% Palladium 900 1730 1740 125(C) - 20.4 Hard castings JAP5% Cobalt/10% Palladium 850 1710 1730 150(C) - 19.9 Harder castings JAP1.5% Indium/3% Gallium 950 1550 1650 225 26 19.3 Hard, springy, can be cast HK; EUR
5% Iridium 950 1780 1790 80 30 21.4 High work-hardenability for GER; JAP10% Iridium 900 1780 1800 110 25 21.5 safety catches, pins, GER; JAP; USA15% Iridium 850 1800 1820 160 15 21.5 springs, watch backs, JAP20% Iridium 800 1815 1830 200 10 21.6 fine wire work, chain, mesh GER
5% Palladium 950 1755 1765 60 22 20.6 Castings, delicate settings HK; JAP;68(C) 22(C) EUR
10% Palladium 900 1740 1755 80 22 19.8 General purpose in Japan HK; JAP72(C) 22(C)
15% Palladium 850 1730 1750 90 22 19.1 Chain making HK; JAP64(C) 22(C)
36.5% Pd/5% Copper 585Pt 1580 1650 160 - 15.4 Typical 14ct platinum USA950PGM
5% Ruthenium 950 1780 1795 130 32 20.7 Gen purpose, good machining HK; EUR; properties USA
5% Tungsten 950 1830 1845 135 20 21.3 Hardenable for springiness EUR; GER
NOTES: 1. Hardnesses and Ductilities in Table 1B are for the annealed state except those marked (C), which are for as-cast state.2. Pt/PGMs Finenesses are in Parts per Thousand.

Casting/Melting
Alloying, Casting and Melting
Arranging Wax Models forPlatinum Casting
The Investment Process
The Casting Process
Recovering the Casting
Good Housekeeping with Scrap
2
ManualIndex
Alloying,Casting andMelting
Casting is a basicmethod for makingclaws and headsettings, ringshanks with orwithout settingsattached, charms,chain links, braceletand brooch parts.
Follow the route:
• Select the pattern(s), usually metal originals.
• Form rubber about the pattern(s).
• Make models in wax.
• Design sprues in wax and build selected
models onto a wax base.
• Surround with a suitable flask.
• Invest with refractory slurry and de-air.
• Allow to set.
• Heat to dry, de-wax and preheat for casting.
• Choose alloy and weigh out charges.
• Melt, “stir” and superheat to casting
temperature.
• Spincast to preheated investment moulds.
• Cool whole cast mould.
• Knock out the castings while hot and
quench in water.
• Clean up and trim sprues from castings.
The use of platinum introduces nothing new in
principle nor in the sequence of operations. Most
platinum jewellery castings are custom-made by
specialists to clients' specifications and patterns.
But the precision casting of platinum is a logical
extension of skills for gold, and can be done on a
craft or small commercial batch scale. Casting
platinum is not difficult.
If a master pattern is common to both 18 carat
gold and standard platinum, the cast weight of
the platinum alloy will be about 30% higher than
for the gold.
Weight for weight, platinum alloy is 19.5 to
20.5 times heavier than the wax, depending on
the alloy.
With 18 carat gold, a 3% apparent contraction
compared with the master pattern is usually
allowed for the relative expansion/contraction of
the investment and gold alloy. Platinum requires
no such allowance because of the stability of the
special investment.
Platinum casting alloys offer a high degree of
fluidity to fill small sections and reveal textures.
In some respects, because oxidation and gas
resistance of platinum requires no fluxes or
degassing, the process is simpler than with
18 carat gold or standard silver.
Casting scrap may be safely recycled and even
100% scrap melt charges can be used.
It is the rapid loss of heat on casting that
presents the major difference.
This can be countered by:
• Careful sprue design.
• Using the most refractory and dense
investment.
• A high investment preheat temperature.
• Plenty of melting power, to obtain a higher
casting temperature.
• A high torque (acceleration) spinning arm.
Brief Reminder of Casting Alloys
Table 2A summarises the most commonly
available platinum casting alloys. Several more of
the alloys in Table 1B (Section 1) may be cast
although they were not developed specifically for
casting. Other casting alloys are available if
market demands and marking regulations allow
their economic use.
Cobalt alloys are preferred for rings, brooch and
bracelet parts because of strength and hardness.
Palladium alloys are softer and are preferred for
settings and delicate patterns. The cobalt alloys
are slightly bluer and the palladium alloys slightly
greyer than pure platinum.
Casting/Melting
Index
2.1

Arranging WaxModels forPlatinumCasting
Table 2A Outline properties of casting alloys for platinum jewellery.
Small-Scale Single LayerArrangement
There is no reason why a jeweller should not
cast, say, 35 to 70grams of platinum settings or
the parts of a ring or brooch, in a single layer on
a flat cone, using short, straight sprues (Figure
2A). This minimises the travel of the molten
metal during spin-casting and the distance of
feeding with still-liquid metal during solidification.
Figure 2A. A small arrangement of head settings where waxesspread from the wider part of the cone. Only about one third ofthe cone would be filled with molten metal but this would stillensure feeding with minimum scrap.
The cone is more a gate to the real casting space
than a reservoir of feeder metal. However,
sufficient metal is still needed to fill a proportion
of the base as well as the actual castings, to add
pressure when the metal is cast. If too much is
used, some is likely to splash back when
spinning. Platinum scrap can be remelted with
virtually no losses, but minimising scrap keeps
inventory costs down and the productive yield of
each melt high.
Medium-Scale BranchingArrangement
A more typical weight for a platinum jewellery
melt is 100 to 450 grams. If more is required in
one session, a number of moulds would be used.
Bearing in mind the high density of platinum
casting alloys (20 to 21 g/cm3) this may mean,
say, 10 - 20 head settings or 4 - 24 ring shanks.
These are normally arranged along branches off
the base, but mainly in a single layer (Figures 2B
to 2D).
Tree Arrangement
Waxes may be mounted in tree fashion where
there is the capacity for melting and casting
shots of 400 grams and over, but the same
"short distance" sprues still apply. A tree might
consist of a total melt of 900 grams with 500
grams in a central stem with short sprues off and
400 grams of castings. Although the stem may
be tapered a little to increase percentage yield,
this configuration tends to be less effective in
metal utilisation. Casts of up to 1 kilogram have
been made.
Casting/Melting
Index
2.2Composition: Pt Recommended Casting Temp Range ºC Applications/Notes% of Alloying Elements Fineness Large Castings ➔ Small Castings
100 1973 ➔ 2173 999.5 Fine PT5% Cobalt 95 1965 ➔ 2165 Fluid for hard castings5% Cobalt/5% Palladium 90 1935 ➔ 2135 Fluid for harder castings3% Cobalt/7% Palladium 90 1940 ➔ 2140 Hard castings5% Cobalt/10% Palladium 85 1930 ➔ 2130 Harder castings3% Cobalt/12% Palladium 85 1930 ➔ 2130 Med hard castings
1.5% Indium/3% Gallium 95 1850 ➔ 2050 Hard, springy, can be cast5% Indium 95 1965 ➔ 2165 No metal-mould reaction10% Indium 90 2000 ➔ 2200 Smooth, bright surfaces1.5% Indium/3.5% Palladium 95 1965 ➔ 2165 Finer detail
5% Palladium 95 1965 ➔ 2165 Softer castings, intricate settings10% Palladium 90 1950 ➔ 2150 Softer castings, intricate settings15% Palladium 85 1950 ➔ 2150 Softer castings, intricate settings5% Ruthenium 95 1995 ➔ 2195 Some roughness and difficult to
fill finest sections

Assemblies Versus IntegralCasting
It is sometimes better to design a piece in
sections and assemble them by soldering or
welding (Figures 2B and 2C). Cleaning and
polishing of separate parts may be more efficient
than with an integral casting (Figure 2D).
As with any jewellery alloy, platinum casting is
more difficult with:
• Long wire & tube sections,
• Large thin areas,
• Deep holes or cavities with small openings,
• Forms that curve back on themselves,
• Claws(prongs) thicker at the tips than the
base,
• Sharp inverted V-shapes.
Design should tend away from these extremes.
Figure 2B. A typical single layer set-up for ring shanks weighingabout 120 grams, contained in a 65mm circle by 45mm highwith its economical feeder head. It fits a standard 75mmdiameter by 100mm high flask.
Figure 2C. A group of claw/head settings for part-finishing andthen joining to shanks.
Figure 2D. Bulkier head settings cast integral with shanks.
Sprue Design.
Care at the wax arrangement and sprue design
stage minimises the proportion of process scrap
and scrap castings.
•It is often thought that platinum castings require
thicker sprues than gold, but if the correct
amount of superheat is used there is no need.
•The minimum sprue cross-section should not be
less than the largest cross-section of the
casting it directly feeds because the sprue must
freeze last to allow feeding to compensate for
casting shrinkage.
•Where sprues join, they need smooth fillets to
avoid turbulent metal flow.
•It may help to sprue a ring, offset tangentially,
or to several points at the edge of a horizontal
ring. Alternatively, two or three simple sections
may be cast in a stack and parted on a
lathe later.
Figure 2E. Examples of Sprue Design.
Casting/Melting
Index
2.3
The InvestmentProcess
Platinum alloys are cast at over 2000ºC into
investment moulds preheated to about 1000ºC,
so the most refractory, thermal shock and metal
penetration-resistant investments must be used,
such as those developed for stainless steel,
nickel or cobalt superalloy precision castings.
Investment Compounds
While gypsum-based investments (a refinement of
Plaster of Paris known as Hydrocal) are
satisfactory for silver and most gold alloys, they
are unsuitable for platinum due to lack of
refractoriness and sulphur contamination.
Platinum investment mixtures are normally the
phosphate type. They consist of a refractory flour
such as silica, mixed with ethanol, or acid
phosphate and magnesia, to form a pourable
cream. They are usually thixotropic with the
powder more difficult to wet uniformly and easier
to re-separate than plaster investments. They
need to be uniformly mixed using a dough mixer
rather than a whisk.
Investing
Attention to detail in investing the pattern is
important. Adequate vibration and vacuum de-
airing is needed to get rid of bubbles, particularly
from the surfaces of the wax patterns. The
subsequent drying out, dewaxing, burnout, firing
and preheat prior to casting differ, one formula
from another, for optimum results. For instance,
while a gypsum-based formula sets in about 6-7
minutes and may be dewaxed with steam, a
phosphate-based formula sets in about 14-18
minutes and, once set, should not be kept moist.
(Steam dewaxing of phosphate may not be
harmful but it does require careful control and
most platinum casters favour dry dewaxing.) A
gypsum binder may benefit from a retarder while
platinum investments may benefit from an
accelerator to speed up setting. Once started, the
burnout cycle should be completed or the flask
discarded. Avoid reheating a partially fired flask
from a previous day. With the removal of moisture
in the initial firing, the subsequent re-expansion
would probably cause serious cracking of the
mould and scrap castings. Details are important;
shortcuts should be avoided and the investment
manufacturer's instructions for a specific
investment should be followed closely.
A whisk is designed to introduce air into the mix
and although this may help mobility of the
investment to some extent, this is counter-
productive. The investment has to be de-aired
again in the short period between pouring and
setting. Finely divided air bubbles or foam is the
worst form to deal with and produces large
changes in volume between investment de-airing
and setting. A dough hook is mechanically more
satisfactory and introduces a more controllable
amount of air.
Flasks
Flasks must be made from metal that will
withstand many uses at the burnout temperature,
which is finally about 1000ºC. Stainless steel
may be used but flasks made from Inconel are
usually more economic, taking a balance of initial
cost and long life. Flask size is limited by the
clearances in the casting machine at its largest,
but it must be large enough to comfortably
contain the casting array, leaving not less than
7mm between the inside of the flask and the
nearest wax. Suitable flasks are supplied in a
range of sizes, typically 50 to 100mm high by
about 65 mm diameter for small machines, and
125 or 150 by 100mm diameter for large
machines, cut from 1.0 to 1.5mm wall tube, or
sheet, rolled and welded. The capacity of each
size of flask without patterns in place should be
noted so that a total amount of investment
needed for a series of casts can be estimated to
avoid shortfall or excessive waste.
Flask Lining
Until recently, most texts dealing with investment
for gold and silver jewellery casting advised that
an asbestos paper liner should be used on the
inside of the flask before pouring the investment.
This acted as a blotting paper during investment
and as a mildly refractory cushion against
Casting/Melting
Index
2.4

The CastingProcess
TemperaturesInvolved.The investmentassembly cannot bepreheated much over1000ºC, so there isa 750ºC gapbetween the freezingtemperature of themelt and theinvestment surface.This chilling factor ishigh and solidificationtime is typically onlythree or four secondscompared with goldat more than 20 seconds. With 18 carat gold thetemperaturedifference is onlyabout 300ºC, a much lower chilling factor.
expansion and shrinkage of the investment during
firing. Modern substitutes for asbestos paper are
available, but there is no need to use a flask liner
at all with the high refractory investments used
for platinum casting.
Reinvesting or Co-Casting with Platinum
The versatility of the lost-wax investment process,
and good hot strength and excellent oxidation
resistance of platinum jewellery alloys combine to
form an excellent basis for co-casting solid
platinum with another molten alloy. Probably the
commonest example of this in the past has been
to produce a gem setting in platinum, pre-polish
it and then attach it to a wax ring shank pattern.
This is then reinvested, preferably with the special
refractory mixture described above for casting
platinum on its own. The new wax is melted out,
leaving the platinum setting in place. Even
preheating prior to the second casting stage does
not oxidise the platinum alloy. When another
jewellery alloy such as molten 18 carat gold is
injected it solidifies in contact with, and welds
firmly to, the solid platinum alloy piece already
in place.
Many other combinations are possible, giving a
versatile style of design for combination jewellery
where marking regulations allow. This subject is
dealt with more fully in the section on
combination jewellery.
The best way to avoid premature freezing of
platinum alloy is to use a superheat of about
200°C for a heavy cross-section such as a
wedding ring blank, increasing to about 400ºC for
a light cross-section such as a diamond setting.
To find the casting temperature, add this
superheat to the liquidus temperature given in
Table 1B. This projects casting temperatures of
1850ºC to 2200ºC (see Table 2A).
Unlike most 18 carat golds, the difference
between the beginning (liquidus) and end of
solidification (solidus) for platinum casting alloys,
is only a few °C. They have a narrow
liquidus/solidus gap and freeze more like a pure
metal, so there is no difficult pasty zone feeding
that might lead to shrinkage porosity.
Melting
Platinum alloys are melted by oxy-fuel flame or
medium frequency induction melting. Butane or
coal gas may be the fuel composite but only
oxygen is capable of giving a sufficiently fierce
flame for melting and welding; air places too
much of a cooling burden. The hottest part of the
flame is just beyond the sharply defined inner
cone. It is possible to achieve a reasonably high
rate of melting with an oxy-fuel gas cutting torch
without using the supplementary cutting oxygen
supply. This is the main method used for castings
by the craftsman, usually with a spring-powered
vertical spin casting machine (see Figure 2F).
This is a cost-effective way of introducing
platinum casting to a manufacturing operation
traditionally dominated by gold production.
Figure 2F. Vertical spin casting machine.
More productive precision casting on a
commercial scale followed the development of
crucibles that would act both as a melting pot in
an induction coil and as a pouring ladle in a high
acceleration horizontal spin-cast machine.
Melting losses are low, melting is rapid given
plenty of power, and the melt is homogenised by
the induction current.
Casting/Melting
Index
2.5
Power/heat conversion can be as high as 95%
efficient. A 5kVA melting set is required for speed
of melting and good temperature control, for up
to 300 grams melts and lOkVA for melts up to
about 650 grams.
The Charge
It is difficult to guarantee homogeneity in small
melts starting with pure platinum and addition
alloy; particularly aiming at a precise fineness.
The safer practice is to remelt grain already to
specification, or chopped sheet/rod which will
have been homogenised by prior working. No flux
is needed when melting standard platinum
jewellery alloys because the melt does not
oxidise. It is rarely necessary to prod the charge
or stir the melt when using electric melting but, if
necessary, a refractory (eg., tungsten carbide or
fused~silica rod) stirrer must be used because
most metals alloy too readily with platinum.
Crucibles
Carbon based crucibles are not satisfactory
because platinum is embrittled by dissolved
carbon, so high temperature (up to 2300ºC),
refractory crucibles are used. Fused silica,
alumina or zirconia, (possibly with a cushion of
magnesia granules or a prefired internal glaze)
crucibles may be used, the choice depending on
the balance of cost and number of melts in one
session. As a precaution against thermal shock, it
helps to heat the crucible slowly for the first in a
series of melts; preheating in the burnout furnace
is useful provided the crucible does not contact
any residual wax. It does no harm to preheat the
first metal charge in the crucible at the
same time.
Judging When to Cast
Molten platinum, free from oxides and flux, has
very high emissivity. The photocell reading may
only be a guide to the right point to cast the
metal, aided by its colour as seen through
familiar goggles. It is essential to always use
adequate eye protection including ultraviolet and
colour filtration, to protect against remote
splashes or burning an image into the retina of
the eye. This also provides a consistent degree of
colour and intensity filtration for the judgement of
casting temperature. Even through dark green
welding goggles, the surface of the melt above
1800ºC is a glaring pearly white but, with
practice, it is possible to judge the difference
between nominal 1800, 2000 and 2200ºC.
Crucible life at these temperatures is short, so
platinum casting specialists prefer to bring the
melt up to about 2000ºC, hold on balanced
power while the mould is placed and then time
the input of power to a small or large degree of
superheat. Pouring is to a time signal rather than
at an apparent temperature. Older machines can
just melt a limited weight of platinum with full
power. As the casting temperature is approached,
heat losses just about balance the maximum
power input and the temperature ceases to rise
further. More recent machines have pre-
programmed power control with automatic
frequency tuning so that heat generates well
within the melt. The power is automatically
reduced as the pre-selected temperature
is reached.
Spin-Casting
The method that has produced the most
consistent quality is spin casting. This centrifuges
the dense platinum alloy quickly into the mould
to minimise premature cooling. Some machines
have an electronic controller that cuts off melting
power, lowers the coil quickly and powerfully
accelerates the spin arm carrying the preheated
mould. Machines have generally developed with
high acceleration and the necessary energy has
to be provided quickly at start-up. Nevertheless,
there can be too much acceleration and platinum
can impact beyond unrestricted sprues with
considerable force and produce a coarse finish
due to mould penetration. A useful compromise
is to use a horizontal sprue off the base and
steeply angled branches off either the horizontal
or vertical stems (Figure 2C). This achieves high
feeding pressure without direct impact.
Casting/Melting
Index
2.6

Recovering theCasting
When the casting array has solidified but not
cooled below red heat, the flask should be held
in tongs and the array hammered out and
plunged into cold water. This begins the process
of breaking up the residual investment around
the casting. Do not quench the whole flask,
even horizontally, red-hot: it may cause
a scalding eruption!
While flasks can be rounded again and re-used
many times, it helps to knock out the casting by
hammering the open ends rather than the flask.
High temperature investments are tenacious and
some or all of steam cleaning, hydrofluoric acid,
and grit blasting (alumina grit/glass beads) are
effective in removing them. A rough silicon
carbide grain can clean most surfaces while
smooth, ball-shaped grit is useful for compacting
and brightening surfaces.
Sprues should be removed as neatly as possible
to avoid lengthy filing. Short-nosed piano-wire
cutters shear through most sprues and pick off
other small nodules readily. A fine slitting disc is
useful if there is good straight access to the
sprue root; otherwise, a piercing saw may be
used. Specialist casters normally leave a residual
sprue root of about 1mm to be removed by the
client rather than risk undercutting the profile of
the component itself. Castings may be readily
joined to wrought platinum components and there
is no clear different technique between joining
castings to wrought platinum components and
the repair of castings. Minor casting faults can be
closed by welding. This can be done by reducing
a cut-off sprue to wire and using it as a weld filler
using techniques outlined in the section on
soldering/welding and lasers.
Most platinum castings are hand-finished; hence
the need for as good an as-cast finish as
possible. However, barrelling is possible using a
tumble-polisher with burnishing compound and
polishing shapes in much the same way as
for white gold - as detailed in the section
on finishing.
WARNING
Hydrofluoric acid (use 1 part to 3 parts water)
is a very aggressive liquid, which:
• Fumes even when cold.
• Corrodes through glass and most metals.
• Dissolves away residual investment.
• Can only be contained in lead, polyethylene
or paraffin wax containers.
• Requires containers with easily removable
covers.
• Must be handled with industrial grade
rubber or plastic gloves, wood or plastic
covered tongs.
• Must be washed off with plenty of water
after use.
Keep soda solution (100 grams sodium
carbonate in 4 litres of water) near to
neutralise any HF burns or smears and carry
out the whole process under a ventilated
hood. Use eye shields or protective glasses.
Casting/Melting
Index
2.7

GoodHousekeepingwith Scrap
• Always carefully segregate, package and
label cast trimmings, sprues and scrap
castings, by alloy type if not by job number.
• Re-melt any specific casting alloy with a
proportion of new grain or squares, but an
occasional all clean scrap charge is fine.
• Small amounts of a single, clean, general or
handworking alloy can be fused together on
a ceramic tile with a welding torch; forged,
reheated and used for small jobs such as
drawing or machining.
• Mixed, dirty or sweepings type scrap is best
returned for refining. It may first be burnt off
and steel filings/grindings removed with a
magnet, except with Pt-Co alloys which
are magnetic.
Keep a Record of Your Process
Platinum alloys are valuable and should not be
mixed indiscriminately, either as good product or
as scrap. All production should be recorded with
job number, pattern configuration, alloy, casting
temperature, weight yielded and notes of the
results. Batches of castings and scrap should
also be correspondingly labelled with the job
number. Good records build up good experience
for successful repeats and identify "lessons learnt"
and economic recovery by minimising scrap.
Casting/Melting
Index
2.8
Handworking
Handworking of Platinum
Specific HandworkingProcesses
Platinum Working Equipment
3
ManualIndex

Handworking ofPlatinum
Mechanical workingof platinum jewelleryalloys, whether byhand for individuallycrafted pieces orsmall batches byspecialistmanufacturers tocatalogue designs,is similar to theworking of mostwhite golds. Foreconomic reasons,most workers preferas smooth a surfaceas possible ratherthan remove metal.It is very importantto maintaincleanliness to avoidcontamination thatleads toembrittlement,particularly whenhot-working.Otherwise hot andcold working arestandard. Platinumalloys are oxidationresistant, formableand easily annealed,but die and toolwear can be aproblem for thelarge scale producerif suitableprecautions are not taken.
Hot-Working
At its simplest, an alloy is hot-worked above the
annealing temperature so that any work-
hardening is relieved as quickly as it is generated.
Hot-working is best if economic batches have to
be subjected to considerable reductions or
repeated shaping blows. There are no significant
problems in hot-working normal platinum
jewellery alloys. Even casting alloys can be hot-
worked. A typical example of hot-working
platinum is the open die forging of 5kg cast
ingots of chain-making alloys at 1100 to 1200ºC.
Reductions of up to 70% may be made between
reheats to form slabs for thin strip rolling or bars
for wire drawing prior to automatic chain making.
Cold-Working
The general annealing temperature for platinum
alloys is about 1000ºC and the jobbing jeweller
rarely needs to work them so extensively that
prolonged or repeated heating above 1000ºC is
justified. Cold-working and annealing is normally
preferred because it more accurately controls the
properties of the piece prior to joining and
polishing. Such cold-working operations include
rolling, section-drawing, hammering and pressing.
A few platinum alloys work harden fairly rapidly
and the work necessary to continue deforming
those that start off relatively hard is significant;
cracking is less of a problem.
Figure 3A shows examples of some 5% and 10%
alloys of platinum compared with a typical
18 carat gold alloy. Alloys like platinum-palladium
have a lower rate of work-hardening. With most
platinum jewellery alloys it is possible to make
reductions in cross-section of up to 70% between
anneals if there is adequate power. For good
repeated practice it is better to choose
reduction/annealing sequences to suit each alloy
and so control grain size and mechanical
properties. Normally, reductions of less than
30% between anneals should be avoided
because a combination of light cold work and
frequent anneals can cause coarse grain
growth and corresponding orange peel surface
effect. In most cases, though not all, this is
undesirable because it complicates the finishing
and polishing of the piece.
Figure 3A. Rate of work hardening of several (initially annealed)platinum alloys.
When cold working platinum:
• Keep all tooling clean
• Do not use excess lubrication
• Keep roll surface and dies highly polished
• Clean drawplates of beeswax, other
lubricants, and metal particles that could
damage a high finish
• There is a tendency to smear or drag wear
on working tools
• Keeping a high tool polish minimises wear.
Annealing
Almost all platinum jewellery alloys resist
oxidation during annealing and either
conventional torch flames (air- or oxy-fuel gas) or
electric furnace annealing may be used. Furnace
annealing allows better control of the level and
evenness of temperature and, in turn, the
mechanical properties of the component. Most
cold worked alloys begin to stress-relieve at
600ºC (dull-red) and they soften rapidly at
1000ºC (bright orange) which may be regarded
as the general annealing temperature. Because
of the speed and ease of annealing and oxidation
resistance, many workers use a gas torch for
inter-stage anneals.
Handworking
Index
3.1

Where very thin, heavily cold-worked or highly
stressed sections are to be annealed it is
advisable to stress-relieve by heating for period
of a few minutes at 500 to 600ºC before full
annealing or strongly heating for soldering or
welding. Time at the full annealing temperature
will depend on the thickness of the section, but
1 minute per mm of section thickness should
be sufficient for thicknesses up to about 5mm.
Too frequent annealing or annealing for too
long can cause grain growth which may make
subsequent working or polishing to a smooth
surface more difficult. Except for platinum-
ruthenium, platinum alloys do not generally age
harden and so can be either cooled in air or
water quenched from the annealing temperature
without harm.
Contamination
Platinum combines with most molten metals.
While this is useful for making alloys with
controlled characteristics, it can also cause
trouble. For instance, small amounts of
aluminium, lead or tin can cause low melting
point compounds with platinum and this can lead
to intergranular cracking called hot-shortness
(silver, indiscriminately alloyed with platinum
can cause intergranular cracking, but this is
very unlikely under ordinary annealing
conditions). Intergranular cracking is more likely
to be caused by arsenic, boron, magnesium, or
silicon. While it is not common, it is possible, in a
reducing flame during melting, joining or
annealing, to liberate aluminium or silicon from
refractory materials such as crucibles or support
bricks, or carborundum (silicon carbide)
abrasives. This can only occur under reducing
conditions, when the platinum alloy is in close
contact with the support, well above red heat.
Hydrocarbons such as oils or grease are typical
contaminants that can give rise to unexpected
reducing conditions. It is important to avoid
trapping potential contaminants in the metal
during working processes such as rolling, drawing,
hammering, cutting or abrading. Good
housekeeping prevents these potential
problems by avoiding contamination.
Most metal contaminants of platinum surfaces
may be removed by pickling in hot, but not
boiling, 10% nitric acid, prior to annealing. Iron
contamination is best removed with hot
hydrochloric acid.
If contamination has occurred after heating, it is
very difficult to correct other than by cutting it out
and repairing by joining in a new piece of clean
alloy. Attempts to solder intercrystalline cracking
or to dilute the effect by annealing usually results
in spreading the problem.
Handworking
Index
3.2Annealing Temperature Guide
For most metals and alloys, the annealing temperature in °C is a little over half the melting point in ¡Kelvin. (Add 273 to the normal melting point in ºC., to get ºK.)
mptºC mptºK AnnealºCStandard Silver 890* 1163 5819ct Gold 800-960* 1153 577 about14ct Gold 850-920* 1158 579 600ºC18ct Gold 900-990* 1218 609Pt 1000 fine 1773 2046 1023Pt 585 fine 1580 1853 927Pt-5%Cu 1725 1998 999Pt-5%Ir 1780 2053 1027Pt-5%W 1830 2103 1052Pt-10%Pd 1740 2013 1007
*mpt varies with ratio of the other metals alloyed with gold.
Annealing temperatures are not exact; they vary in practice with annealing time and with the amount of prior cold work. Heavy work at low temperatures lowers the normal annealing temperature. Except for the extremes ofcarat platinum alloys at the low end & Pt-Ir or Pt-W alloys at the high end, an annealing temperature of 1000ºC is adequate for most purposes.
}
Some Possible Causes:
• Lead-Tin solders on the same work bench
• Charcoal soldering blocks
• Abrasives rolled into the surface
• Filings from other precious or non-precious
metals
• Filings or drillings from gemstones or
mineral crystals
• Oils, grease or soaps used for drawing,
rolling, etc.
• Machining suds (lubricants)
Some Preventatives:
• Avoid reducing flames and furnace
atmospheres
• Use oxidising conditions; platinum itself will
not oxidise
• Avoid trapping contaminants in platinum
during working
• Degrease and positively clean surfaces
before heating
• Avoid contaminated supports during heating
and joining
• Prefer refractory supports to charcoal
when joining
SpecificHandworkingProcesses
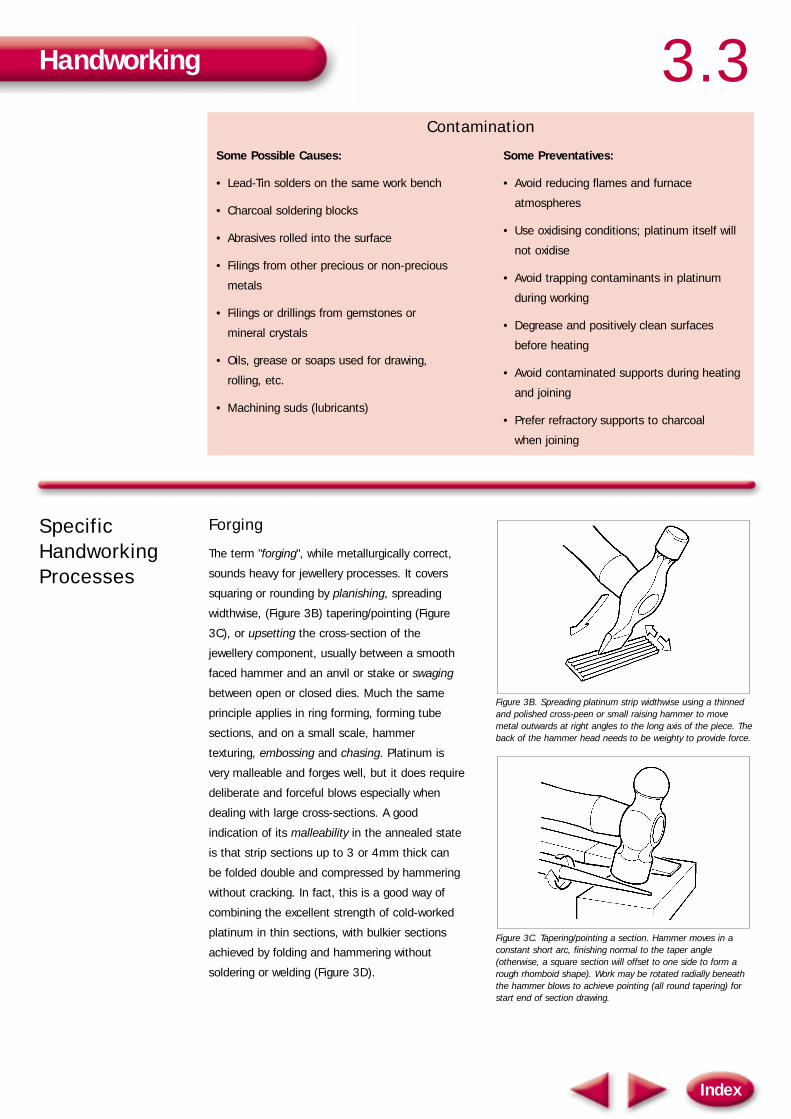
Forging
The term "forging", while metallurgically correct,
sounds heavy for jewellery processes. It covers
squaring or rounding by planishing, spreading
widthwise, (Figure 3B) tapering/pointing (Figure
3C), or upsetting the cross-section of the
jewellery component, usually between a smooth
faced hammer and an anvil or stake or swaging
between open or closed dies. Much the same
principle applies in ring forming, forming tube
sections, and on a small scale, hammer
texturing, embossing and chasing. Platinum is
very malleable and forges well, but it does require
deliberate and forceful blows especially when
dealing with large cross-sections. A good
indication of its malleability in the annealed state
is that strip sections up to 3 or 4mm thick can
be folded double and compressed by hammering
without cracking. In fact, this is a good way of
combining the excellent strength of cold-worked
platinum in thin sections, with bulkier sections
achieved by folding and hammering without
soldering or welding (Figure 3D).
Figure 3B. Spreading platinum strip widthwise using a thinnedand polished cross-peen or small raising hammer to movemetal outwards at right angles to the long axis of the piece. Theback of the hammer head needs to be weighty to provide force.
Figure 3C. Tapering/pointing a section. Hammer moves in aconstant short arc, finishing normal to the taper angle(otherwise, a square section will offset to one side to form arough rhomboid shape). Work may be rotated radially beneaththe hammer blows to achieve pointing (all round tapering) forstart end of section drawing.
Handworking
Index
3.3Contamination

To maintain good shape control, use square or
radial blows as appropriate; otherwise the
section tends to offset to one side or the other.
Once the near final dimensions are achieved, the
section can be trued by planishing, die drawing or
even rolling. It can of course be finished by filing
but it is always preferable to use compression
processes to conserve metal weight and minimise
the need for extensive surface finishing.
Anneal after about each 30-35% reduction in
cross-sectional area even though platinum will
usually withstand greater reductions without
cracking; its workhardening ability is such that it
requires considerable increases in force to
continue working. Heavily work-hardened
platinum alloys can dent stake, anvil and hammer
surfaces, making it progressively more difficult to
maintain a good surface finish on the work.
Figure 3D. Platinum strip/tape can be repeatedly doubled backon itself and, in effect, cold forged to produce a thick section(which may then be locally annealed, if required) attached to afiligree section (which may be left cold-worked).
Section and tubular section drawing
With draw plates, channelled and taper-ended
platinum strip can be formed into more precise
channel sections, hollow ring stock and seamed
tube (Figure 3E). Thin rod and wire can be
modified to many different cross-sections.
Prepolished dies are available commercially, but
some craft jewellers prefer to draw simple
sections through a hand-made draw plate. This is
still possible with platinum, but time consuming if
complex sections are attempted. The limiting
factor is the smearing ability of platinum on
insufficiently polished die surfaces or where the
interface pressure is very high such as at tight
corners and re-entrant sections. While hand-
made draw plates may be satisfactory (with acid
cleaning) for an occasional piece of craft jewellery
in platinum, economic batches demand best
quality tungsten carbide drawing dies kept in a
high state of polish, particularly in the work zone;
otherwise platinum will further roughen the
surface and lead to platinum build up and loss of
cross-sectional accuracy.
Figure 3E. Starting a thin walled tube from strip with a taper cutsmoothly at the lead end, hammered into a channel to startcurving the tube wall and completed by die drawing (with seamwelding if necessary).
Reducing tubular cross-sections with the wall
finding its own thickness is known as sinking
(Figure 3F). This is a simple variant on wire
drawing and wire drawing dies may be used.
Where the wall has to be controlled for short
platinum hollow sections for jewellery it is
convenient to use a mandrel. This is a polished
steel rod or hard-drawn wire (piano wire as
slender as 0.5 mm diameter may be used)
whose external shape matches that of the
required internal cross-section of the platinum
component. The mandrel is placed inside the
starter tube and the two are co-drawn through
the die sequence. In the first few passes the
mandrel is loose inside the platinum, but after
being drawn down onto the mandrel the platinum
wall is controlled between the mandrel and the
die. The total reduction in the wall cross-sectional
area between anneals should be limited to about
35%, particularly after the platinum is in full
contact with the mandrel, so an inter-stage
anneal before the platinum grips the mandrel is
advisable. The mandrel must start with a length
greater than the finishing length of the platinum
tube or it will be enclosed. The mandrel also
introduces another dragging friction interface
that, with platinum, requires careful lubrication
and techniques to remove the mandrel.
Handworking
Index
3.4

Figure 3F. Tube sinking with relative wall thickening compared tomandrel drawing for short lengths. the mandrel controls the wallthickness and also takes part of the load at the short end.
Lubrication and mandrelseparation
A hard soap such as “Pale curd industrial” in bar
or powder form is used on the die and the
mandrel for lubrication and to ease the removal
of the platinum tube after drawing is completed.
Bar soap can be applied to a stout mandrel by
rubbing; soap powder can be tapped into the
tube bore prior to mounting on the mandrel. To
get a better finish, particularly on the outside of
the finished section, it helps to use a soft soap
lubricant for the last two or three passes.
Figure 3G. Loosening the mandrel by tapping with parallel barsor “castanets”.
Attempting to drag the mandrel out of the tube is
likely to tear or buckle the platinum. To free the
tube from the mandrel after completing the final
pass, it must be burnished off with one or two
passes through rolls that just pinch across a
series of outer diameters and impart a slight
degree of twist. In effect, the tube wall is slightly
expanded away from the mandrel. For occasional
short lengths, it is possible to achieve the
roller/twist effect with a pair of parallel tool steel
rods (or tungsten carbide for very long life)
gripped in a handle with a gap just a little larger
than the outer diameter of the platinum tube to
be removed. These are “played like castanets”
along and around the mandrel/tube combination
to achieve many small pinching blows to loosen
the tube (Figure 3G). The loose tube, now off the
mandrel, may be given a finishing pass through
the last die hole again to clean up the surface
and shape.
Spinning and Doming
The ductility of platinum makes it quite amenable
to spinning. The jobbing jeweller is unlikely to
need to spin large pieces into deep shapes but, if
so, the most ductile alloy is preferable to avoid
the need for too many annealing stages. Virtually
all alloys can be spun to produce shallow dished
shapes for jewellery pieces in a single stage. The
metal is worked against a former at a shallow
angle and the strain is not severe. Relatively deep
pieces may need two stages with an interstage
anneal, mainly to reduce the off-centre pressure
to be exerted by the burnisher (Figure 3H).
Making small round shapes up to hemispherical
depth is best accomplished by doming. Platinum
jewellery alloys respond well to this technique.
Indeed, doming of a blank, and perhaps
annealing, may be useful as a start to spinning.
Some of the larger scale (deep drawing and deep
spinning) or more continuous working processes
(stamping), and processes like ring sizing more
akin to finishing operations, will be dealt with
later in the Manual.
Figure 3H. Outline sketch of small scale spinning arrangementfor making a collet for a stone setting from a sheet-circle usinga burnisher. The bottom section may be parted off and may beuseful as a bezel ring.
Handworking
Index
3.5

Cutting
One of the most frequently used processes in
handworking a piece of jewellery is cutting to
shape or length, by piercing and sawing, slitting,
drilling, filing or grinding. On a small scale, there
is little need to differentiate between tools,
grades and techniques for white gold and for
platinum. It is always worthwhile minimising the
amount of metal removed or scrapped, by
carefully sizing the piece to minimise or eliminate
the need for cutting. Often, platinum wires, tubes
or strips will be thin, taking advantage of high
strength. As with any hard jewellery alloy, it is
unwise to cut thin sections with coarse settings.
Jewellers' (tool steel) saw blades are rated from
8/0 for the very finest pierced work, through 0,1
and 2 which are better for silver but too coarse
for most platinum jewellery work, and on up to
size 8.
Platinum alloys appear to wear out saw blades
and similar hand tools more quickly than do gold
or silver. This is because the alloys cold weld very
well. Metal builds up on cutting edges, followed
by stick/slip binding/removal of the debris, and
this causes extra wear. Figure 3I sketches the
different effects between aluminium, gold/silver,
and platinum alloys on a coarse saw blade.
Compromise between too smooth and too
coarse. Use around 3/0 grade which is a good
general purpose blade for white gold and
platinum. The blade should travel at a fairly flat
angle (about 15 degrees or less) to the cut
surface to avoid excessive snagging at the leading
edge. Filing should also be done at a similarly flat
angle with frequent changes of the file surface
and cleaning. The lubricant "oil of wintergreen"
has been proven to be effective in relieving wear
on files.
“Sanding” papers should be chosen for their free-
cutting ability, in which case the abrasive particles
will remain upright on a stiff bonded backing
paper. 240 and 400 grades are usually adequate
in two stages. It is often better to part off
platinum sections with thin alumina or silicon
carbide disks running at 1300 to 3800 M/min.
peripheral speed rather than use a lathe tool
which tends to leave a coarse burr and
undergoes rapid tool wear.
Figure 3I. Sketch of different modes of debris buildup/clearance on a jewellers’ sawblade.
PlatinumWorkingEquipment
Ideally, rolls, dieplates, dies, saw blades, chasing
tools, files, grinding wheels, and similar tools
where there is a degree of sliding movement
during working, should be kept specifically for
platinum alloys only. This is because platinum is
more vulnerable to contamination from other
metals picked up under working conditions.
Polished hammer and stake faces cause fewer
problems because the impact is normally square
rather than sliding. Large platinum jewellery
producers, in Japan for instance, dedicate separate
parts of the same factory, let alone separate
tooling, to platinum or gold jewellery production.
If this is not economical, then the best
alternative is to apply good housekeeping and
segregate tooling used for platinum; clean it
and the working areas before and after
platinum working. This ensures maximum
recovery of platinum scrap and sweepings and
minimises cross contamination of platinum. For
instance, when the same rolls are used for
platinum and other metals, platinum should be
placed in 10% nitric acid at 70ºC to remove any
residues of other metals before any annealing or
joining process.
Handworking
Index
3.6

Soldering/Welding
Joining Processes
Welding
Soldering
Eye Protection
4
ManualIndex
JoiningProcesses
Platinum jewellery alloy components may be
joined efficiently by:
• Fusion welding
• Pressure or friction (dry) welding
• Spot-welding
• Laser-welding (See Chapter 10)
• Soldering
• Mechanical processes such as rivetting
• Powerful adhesives.
Since platinum alloys do not oxidise, fusion
welding and soldering are straight-forward
extensions of traditional precious metal joining
processes and so they predominate for platinum
alloys too. The good hot strength and oxidation
resistance of platinum alloys allows them to
stand up to intensive local heating in welding and
soldering, without need for extensive jigging which
would otherwise restrict access and remove heat.
There are no adverse reasons, apart from lack of
familiarity or the wrong scale of working, why
other joining processes should not be used.
Platinum welds readily to itself by hammering,
friction and upsetting, electrical resistance spot-
welding and laser welding, but components may
need to be selected or designed to take full
advantage of such processes. For instance,
friction welding tends to be more economic as a
medium scale batch process, while hammer
welding is a satisfying craft technique for chunky
rather than filigree work.
Heat Sources
Most soldering and welding operations on
platinum jewellery alloys are carried out at
temperatures above 1500ºC and often near
2000ºC, so an oxy-fuel gas flame or electric arc
must be used. While the electric arc (including
TIG welding) is used in fabricating platinum for
chemical and similar industrial applications on a
medium scale, it is not usually appropriate for the
jewellery manufacturer or craftsman. On the other
hand, the non-oxidising nature of platinum allows
burners to be designed to give a very precise
bright hot flame using a little excess oxygen. With
practice, these can be used with pinpoint
accuracy on platinum jewellery pieces either for
welding or soldering (Figure 4A).
Order of preference of fuel gases with oxygen
for platinum welding/soldering:
Hydrogen 1
Propane, C3H8
Butane, C4H10 2
Natural Gas, CH4+C2H6
Acetylene, G2H2 3
based on risk of carbon pick-up. Even
acetylene is OK with excess oxygen.
Small flames need a low oxygen pressure under
tight flow control, otherwise the flame will lift off
the torch tip and extinguish. This may need an
additional low pressure regulator working at about
1 to 2 pounds pressure mainly to regulate
volume flow. As with all precision oxy-fuel gas
flame control, the nozzle-tip sizes need to be
matched with a particular fuel gas and its
corresponding oxygen ratio.
Platinum jewellery lends itself particularly well to
soldering or welding using an oxy-hydrogen flame.
The gases may be supplied from pressure bottles
but they may also be generated in situ by
electrolysis. There are transportable units (Figure
4B) that use potassium hydroxide solution as the
electrolyte, which is split (only the water) into
hydrogen and oxygen which are fed separately at
low pressure to well designed burner jets. These
can produce an initially neutral flame so small
(22 gauge jet) as to precision weld a narrow
platinum band for sizing, or at the large extreme
(13 gauge jet), melt more than 50 grams of
platinum scrap. The rate of burning at the jet
determines the pressure in the reservoir system
which, in turn, controls the rate of electrolysis.
The temperature of the flame can be lowered and
the luminescence increased, by allowing the gas
to pick up small quantities of volatile organics,
such as methyl alcohol, methyl ethyl ketone
(MEK), or acetone. The Williams Oxyflame
Soldering/Welding
Index
4.1
}
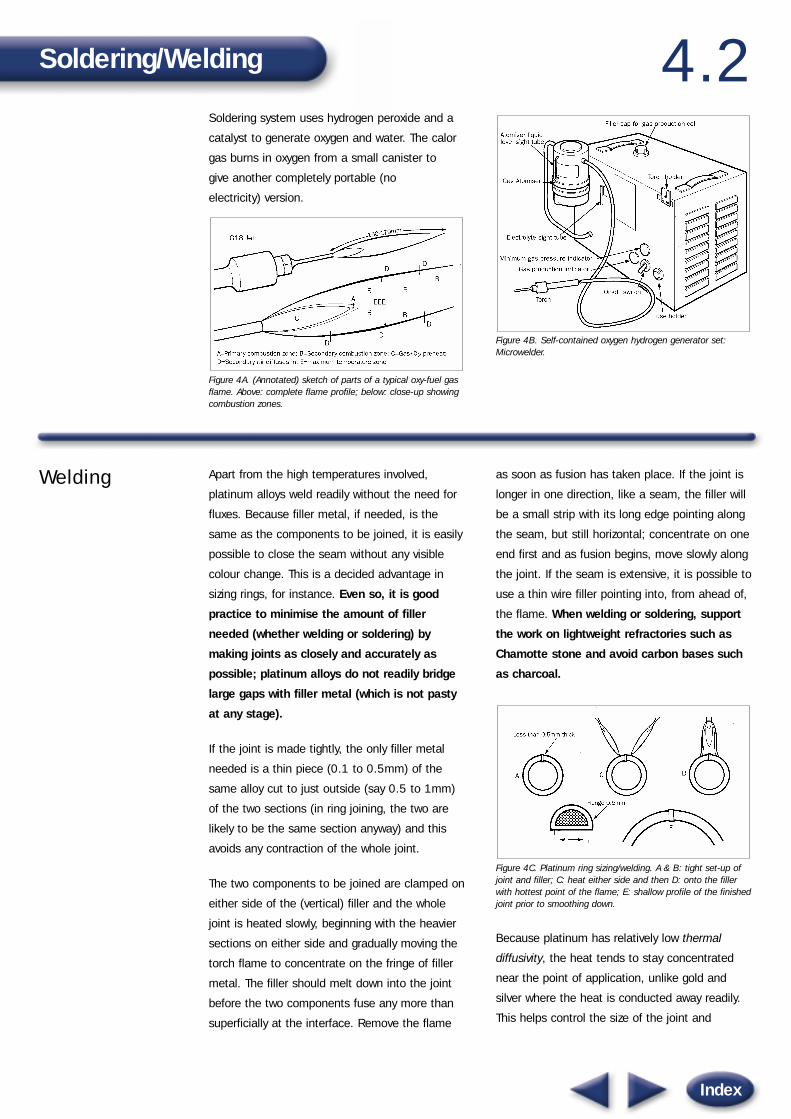
Soldering system uses hydrogen peroxide and a
catalyst to generate oxygen and water. The calor
gas burns in oxygen from a small canister to
give another completely portable (no
electricity) version.
Figure 4A. (Annotated) sketch of parts of a typical oxy-fuel gasflame. Above: complete flame profile; below: close-up showingcombustion zones.
Figure 4B. Self-contained oxygen hydrogen generator set:Microwelder.
Welding Apart from the high temperatures involved,
platinum alloys weld readily without the need for
fluxes. Because filler metal, if needed, is the
same as the components to be joined, it is easily
possible to close the seam without any visible
colour change. This is a decided advantage in
sizing rings, for instance. Even so, it is good
practice to minimise the amount of filler
needed (whether welding or soldering) by
making joints as closely and accurately as
possible; platinum alloys do not readily bridge
large gaps with filler metal (which is not pasty
at any stage).
If the joint is made tightly, the only filler metal
needed is a thin piece (0.1 to 0.5mm) of the
same alloy cut to just outside (say 0.5 to 1mm)
of the two sections (in ring joining, the two are
likely to be the same section anyway) and this
avoids any contraction of the whole joint.
The two components to be joined are clamped on
either side of the (vertical) filler and the whole
joint is heated slowly, beginning with the heavier
sections on either side and gradually moving the
torch flame to concentrate on the fringe of filler
metal. The filler should melt down into the joint
before the two components fuse any more than
superficially at the interface. Remove the flame
as soon as fusion has taken place. If the joint is
longer in one direction, like a seam, the filler will
be a small strip with its long edge pointing along
the seam, but still horizontal; concentrate on one
end first and as fusion begins, move slowly along
the joint. If the seam is extensive, it is possible to
use a thin wire filler pointing into, from ahead of,
the flame. When welding or soldering, support
the work on lightweight refractories such as
Chamotte stone and avoid carbon bases such
as charcoal.
Figure 4C. Platinum ring sizing/welding. A & B: tight set-up ofjoint and filler; C: heat either side and then D: onto the fillerwith hottest point of the flame; E: shallow profile of the finishedjoint prior to smoothing down.
Because platinum has relatively low thermal
diffusivity, the heat tends to stay concentrated
near the point of application, unlike gold and
silver where the heat is conducted away readily.
This helps control the size of the joint and
Soldering/Welding
Index
4.2

simplifies making multiple joints in the same
piece of jewellery. The joint should finish with just
the smallest "bulge" of matching colour which can
be smoothed down to the original cross-section.
This technique is well suited to joining relatively
heavy and particularly matching sections such as
ring shanks, shanks to head settings with
shoulders, bangle sections, and pendant and
brooch parts.
Warning
Even with very small oxy-gas flames capable of
dealing with small sections of platinum, never
attempt preheating, let alone welding, without
using properly selected welding goggles. The
heat builds up in thin sections very quickly and
the radiation emitted over 1000ºC is likely to
cause eye damage; radiation at the melting
point is certain to cause damage to the
unprotected eye.
On the other hand, it is not so easy to join thin
sections of platinum this way because the heat
will build up very quickly in exposed sections of
the order of 1mm thick or less and lead to
premature melting. This may be overcome by
using fine oxy-gas flames to fuse into a tiny bead,
thin wire sections that have already been pinched
or twisted together without any additional filler.
Wire as fine as 0.3mm can be welded if a small
enough flame is used.
Because platinum has low heat conductivity, it is
possible to make good repairs without damaging
either set stones or the surface finish of the bulk
of the piece. Obviously, one should avoid playing
the flame on any stone at all and keep well away
from sensitive stones such as opal. Traditional
ways of protecting stones with heat sinks such as
a wad of wet cotton wool should still be used.
When planning a repair on a platinum piece,
welding can be very useful in avoiding colour
mismatch, but it is wise to consider whether
there has previously been soldering near to the
proposed repair site. If there has and welding is
carried out close enough to allow significant heat
diffusion, then there is a danger that the
previously soldered joint will give way. If so, a
solder repair is preferable.
Figure 4D. Sketch of a seam weld with (i) strip filler in place,and, (ii) filler wire fed towards the flame; both moving awayfrom the already welded zone.
Laser Welding
(See Chapter 10).
Friction, Spot and Stitch Welding
Freedom from oxidation at high temperatures, the
tendency to smear by dragging at a platinum
surface and the need for very little additional
deformation, makes platinum an ideal material
for friction welding. In this process, a stud-like
shape is rotated under light pressure against a
flat surface to generate friction and heat. At an
appropriate temperature (which with platinum is
theoretically cold welding) the rotation is stopped
and pressure is applied to weld the two
surfaces together.
Figure 4E. Outline diagram of (small-scale) spot welder set-upwith schematic of the weld cycle characteristics.
Spot welding is usually achieved by electrical
resistance heating at an interface, with the power
led in through stout electrodes that are also
capable of delivering a punch pressure to finish
the weld. Stitch welding is, in effect, an
overlapping series of spot welds, and in both
Soldering/Welding
Index
4.3

cases, the timing of the whole process is
electronically controlled (Figure 4E).
Again, these processes are more compatible with
batch production of simple jewellery operations,
such as joining studs to front designs in earrings
and bosses to brooches, rather than a one-off
craft approach.
Soldering Platinum components may be soldered readily
with a wide range of solders, some of which can
be worked at temperatures low enough to use a
gas-compressed air torch. However, to obtain a
better colour match, it is advisable to select
solders that also include platinum, and some of
these flow at temperatures only achievable by
oxy-gas flame melting. This is the method
assumed in the following section. Otherwise,
sound joining of jewellery platinum components
is simply dependent on good standard
soldering practice:
• Design for good soldering
• Fit the parts as closely as possible
• Use the minimum amount of solder
• Use a precise, oxidising flame just large
enough for the job
• Keep the joint and its surroundings clean
• You may not need a flux
• Parts may be prepolished before joining.
Platinum jewellery alloys retain their shape near
their melting points, so jigging is not difficult. Use
low thermal capacity jig parts not too near the
joint area and confine the flame close to the joint
with the solder in place. Use many small pieces
of solder uniformly along the joint rather than a
few large pieces. In this way the solder will flow
only where it is needed and heating should be
stopped immediately flow occurs; no extensive
preheating or any post-heating of the
components is necessary.
Keep the jig clear of the flame to avoid
contamination with, for example, iron binding
wire, dirty steel clips and charcoal supports.
Most of what has been said about avoiding
contamination in annealing and hot working of
platinum applies to soldering too; no
carbonaceous substances, borates, or silicon
under reducing conditions. Attempts to solder up
cracks or join parts broken due to contamination
usually spread the problem rather than cure it.
The highest in a suitable series of solders flows
about 100ºC below the melting point of the
corresponding platinum alloy. There are roughly
100ºC temperature differences between the
solders in a given series so this allows
considerable flexibility during multi-stage soldering
operations. (See the section on solder
compositions).
The wettability between platinum and solders is
excellent, so there is no need to use excess.
Another reason for limiting the amount of solder
is to minimise the mismatch in colour in the
resulting joint. Some solders, the low-platinum,
low melting point ones in particular, differ in
colour from the platinum alloy components, and
diffusion of platinum back into the joint is low so
the colour is not affected by the platinum in the
body of the jewellery. As a general rule, solders
with the higher melting temperatures give the
nearest colour match to platinum and they are
also less likely to polish out of the joint. In the
worst cases, the mismatch may be disguised by
rhodium plating but many workers prefer
simply to use closely matching solder in
minimum quantities.
Soldering/Welding
Index
4.4
The absence of fluxes, except for the lowest
melting point solders (where the flux is to protect
the solder, not the platinum), means that the
usual adhesiveness of flux cannot be used to
support the solder paillons in place. In practice, a
small amount of non-borate flux may be used for
this purpose, although it is not necessary
metallurgically. Alternatively, solder may be
clipped in the joint or supported by a thin
extension of stock wire that is allowed to melt
free at the last moment.
Solder Compositions
The development of solders follows similar lines
to jewellery alloys but is more complicated by the
need to meet marking regulations, match colours,
and also achieve working temperatures below the
melting point of platinum. Usually, a series of 3
to 5 solders forms a sufficient enough range of
working temperatures to enable soldered joints
to be made efficiently at different stages
of assembly.
Most platinum solders are mixtures of precious
metals, not always including platinum (but, if not,
then usually palladium) with melting ranges from
extra easy at about 950ºC., to extra hard at over
1500ºC. At the higher melting point end of the
range it is possible to accommodate more
platinum and so there is less risk of the solder
disqualifying a platinum item at the
marking stage.
Japan has a range of solders for platinum
jewellery from several grades of 999.9 fine in
total platinum group metals plus gold and/or
silver, to ones at 700 fine containing some
copper and other non-precious metals.
It is rarely economical in the long run for the
craftsman or small manufacturing jeweller to
make his own solders for platinum; several
fabricators make a more than adequate range for
jewellery purposes. It is important not only to
control the high working temperatures of the
solders accurately, but also the colour and the
relative hardness of the soldered joint. This
combination of properties is achieved by varying
proportions of platinum, palladium, gold and
silver; all precious metals that can contribute to
the normal rule that solders for 950 fine platinum
must also be 950 in precious metals total.
The deep yellow of gold quickly gives way to the
white of platinum or palladium on adding a
relatively small amount of either. For example, an
alloy of 70%/30% gold/platinum is only faintly
yellowish and increasing the platinum to 40%
produces platinum white. This applies even more
with palladium and a solder of 20 or 30%
palladium in gold is a white metal. There may be
copper and zinc in lower melting point platinum
solders as they alloy readily with platinum. As
long as they amount to less than 10%, the solder
will not discolour on heating, so retaining the
oxidation resistance which is so helpful in working
with platinum. Platinum solders at the higher end
of the range do not need fluxes.
The use of 2 to 4 precious metals and
sometimes up to 3 other metal components,
means that the total combinations are too
numerous to classify in a simple table. So, Table
4A quotes a (Hallmarking) range typical of what is
available worldwide, but there are many other
variations, particularly where marking regulations
do not specify such close control of solders.
Solders for platinum start at about 1700ºC and
drop at about 100ºC intervals down to as low as
900ºC, but very few, if any, jewellery operations
require such a full range. Most standard platinum
alloy products are soldered with platinum
containing solders at perhaps no more than two
or three stages in the higher temperature end of
the range.
Soldering/Welding
Index
4.5
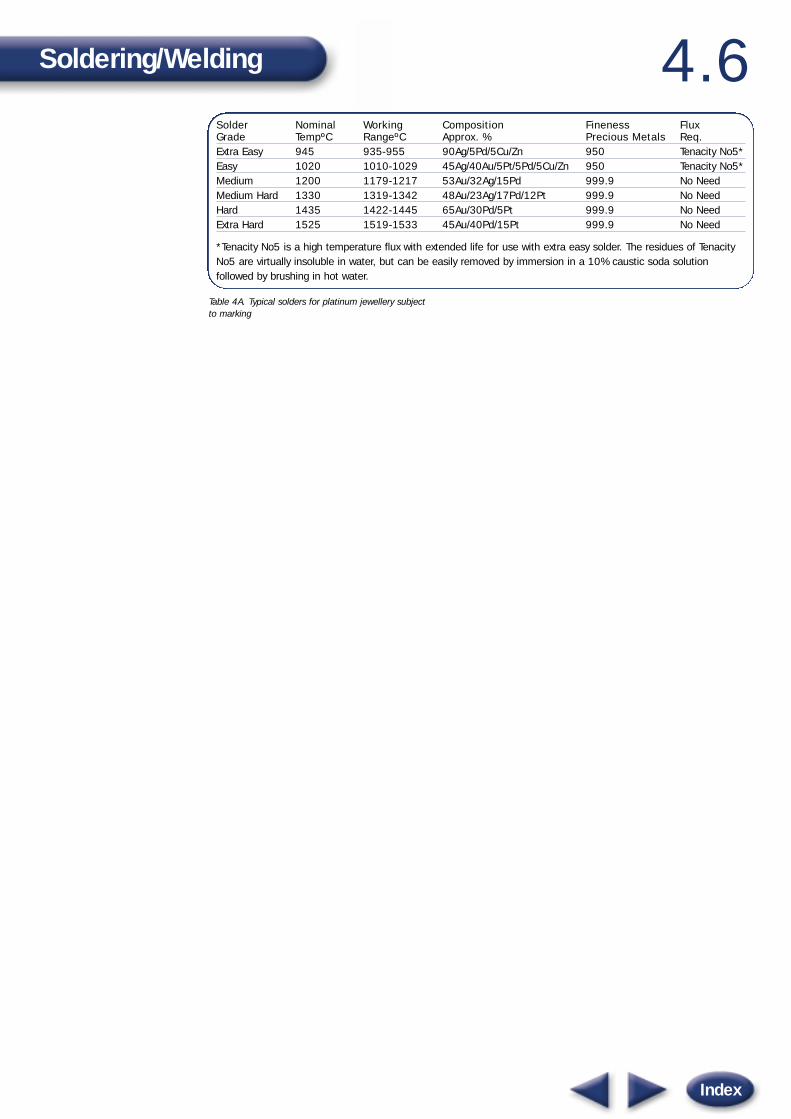
Table 4A. Typical solders for platinum jewellery subject to marking
Soldering/Welding
Index
4.6Solder Nominal Working Composition Fineness FluxGrade TempºC RangeºC Approx. % Precious Metals Req.Extra Easy 945 935-955 90Ag/5Pd/5Cu/Zn 950 Tenacity No5*Easy 1020 1010-1029 45Ag/40Au/5Pt/5Pd/5Cu/Zn 950 Tenacity No5*Medium 1200 1179-1217 53Au/32Ag/15Pd 999.9 No NeedMedium Hard 1330 1319-1342 48Au/23Ag/17Pd/12Pt 999.9 No NeedHard 1435 1422-1445 65Au/30Pd/5Pt 999.9 No NeedExtra Hard 1525 1519-1533 45Au/40Pd/15Pt 999.9 No Need
*Tenacity No5 is a high temperature flux with extended life for use with extra easy solder. The residues of TenacityNo5 are virtually insoluble in water, but can be easily removed by immersion in a 10% caustic soda solutionfollowed by brushing in hot water.
Eye Protection Most soldering, and all welding operations on
platinum jewellery, involve temperatures in excess
of 1500ºC at the joint face and between 2000
and 2800ºC in the heat source. The white
radiation at these temperatures is very intensive
and the proportion of ultraviolet radiation is much
higher than for ordinary diffused daylight. This
combination presents a very real hazard to the
unprotected eye. Even a short exposure is certain
to leave an after-image on the retina that will
persist for several minutes and distort both
positioning and colour judgement. Longer
exposures will produce "arc-eye" or even
permanent damage to the retina. Choosing a
correct filter system requires a reasonable
compromise between filtering out all possible
dangerous radiation and leaving enough intensity
and colour to enable the operator to judge
position, temperature and melting in the work-
piece. Platinum sections are likely to be
lightweight, but they are melted at even higher
temperatures than steel. Grade 5/GW (Shade 5,
gas welding) filters can be used for short spells
when soldering platinum alloys but choose at
least grade 6/GW when using the highest
temperature platinum solders for long periods.
BS679 9EW, or its international equivalent
(shade 9, electric welding), to 11EW filter
glasses, should be used for long welding
exposures; grade 9 for the molten pool under the
highest temperature flame, grade 10 for TIG Arc
work. These are very dense filters which do not
allow the operator to see well enough without the
light from the heat source to position the source
and workpiece. One way round this is to use flip-
front goggles that allow a low density filter while
positioning and use safety filters which can be
brought down as soon as the work begins to
radiate. Auto-darkening filters are also available,
which change quickly between positioning mode
and welding mode. Because of the small scale
and speed of operation, it is comfortable to wear
goggles with the appropriate filters when working
with platinum jewellery alloys. Heavier jobs and
more extended spells are often better handled by
using a filter screen between the head and the
work area.
Although perhaps less dangerous to the eye itself,
the infra-red component of high-temperature
flames and arcs also needs to be guarded
against. It is unfortunately quite common to find
precision arc-welders with bright, apparent "sun-
burn" around the lower face and throat, if not
screened. This is mainly due to infra-red direct
from the heat source. While an occasional short
exposure to the skin may not be harmful in itself
(personal discomfort usually quickly reminds the
occasional operator that welding and soldering
heat sources radiate heat very directly!), repeated
or prolonged exposure is dangerous. The skin
should be covered or the head and shoulder area
screened, not just the eyes.
Warning
On no account try using even the densest
sunglasses; at the ultra-violet end of the
spectrum they may offer some protection
against general sunlight, but not against a
sharp concentrated image of an arc or
oxy-gas flame.
Soldering/Welding
Index
4.7
Finishing
Finishing and Texturing of Platinum for Jewellery
Filing
Barrel and Vibratory Polishing
Rhodium Plating
5
ManualIndex

Finishing andTexturing ofPlatinum forJewellery
Opinions differ on the difficulty of polishing
platinum, although once well polished it stays
free from tarnish virtually for ever. As with any
other metal, the polished surface of some of
the platinum alloys may scratch with heavy
every-day wear. Matt-finished platinum tends to
burnish and highly polished platinum tends to
matt a little. With reasonable protection from
knocks and abrasion, highly polished platinum
can be brilliant and kept that way. For example,
a high proportion of Japanese platinum-
palladium alloy is plated thinly with rhodium,
which scarcely alters the colour but does
impart some extra wear resistance.
Alternatively, platinum may be given one or a
combination of textured finishes ranging from a
"silky polish" to patterned or random texturing
by, in effect, greater and greater degrees of
milling of the surface. Platinum alloys respond
to polishing or texturing well; most likely it is
the wear or clogging of the polishing media or
texturing tools that gives the impression that
platinum is difficult. Minimising this effect
is the secret of good and productive
platinum finishing.
The Polishing Process
A high polish is put on most metals by removing
pits and scratches with successively finer
abrasives. The abrasive particles are much harder
than the metal and act like tiny machine tool
bits. The particles may break up, change cutting
angle, become debonded or clogged. When the
finest bonded wheel or paper mounted abrasives
have been used, the process is continued with
abrasives/polishes held in emulsified fats as
soaps, waxes, or creams applied to rotating disks
or mops. The abrasive particle size may now be
so small as to give the impression that they do
not cut/scratch, but they continue to do so on a
microscopic scale and there is a great increase in
the general friction at the interface. This heats a
thin layer of the surface that tends to flow rather
than be cut. This smears over the remaining fine
scratches and the surface presents a high lustre.
Platinum alloys differ one from another in their
“polishability” and are neither very easy nor very
difficult. Understanding the underlying process
helps towards efficient (time, quality of finish,
cost of equipment and consumables) finishing of
platinum jewellery alloys.
Because platinum does not oxidise, it is good
practice to polish individual components fully
as early as possible in the production
sequence, while there is ready access to
surfaces that may be screened after
final assembly.
There are no easy short cuts, but:
• Be very selective of the first grade of
abrasive.
• Choose the minimum first grade of
grit/compound that totally removes the
deepest defects (castings) or scratches
(wrought).
• Cut/polish across line defect such as solder
lines to minimise dragout and see just when
the defect is under control.
• Work only on the defects until the local
texture matches the bulk of the surface.
• Work more generally with finer grades of
abrasives, to remove totally scratches from
the previous grade, polishing at 90° to the
previous direction.
• Finish by buffing with a rouge type of polish.
• Prefer points, wheels, buffs, mops, that are
stiff or medium hard rather than easily
penetrated.
• Frequently renew abrasive polishing medium
or use fresh surfaces.
• There is no need to use every intermediate
grade, but sensible spacing is required.
• Do not use a file and attempt to remove the
marks with a fine emery paper - it will clog
very quickly!
Finishing
Index
5.1
Filing The favourite files for platinum are precision
Swiss watch maker's files from Vallorbe. All files
clog eventually with most metals, but these high
precision cut files appear to clog less rapidly with
platinum and respond better to cleaning than do
cheaper, less precise versions. Platinum clogs a
file in much the same way as it sticks to a saw
blade or machine tool tip (see sections on
Handworking and on Machining). Smearing is
worst where the dragging friction at the interface
is highest, as in burnishing, and least when the
tool is presented as a knife edge with a positive
rake. As wear takes place, the interface will grow
and the situation will become progressively worse,
but not as quickly as when starting with a
negative rake, as Figure 5A shows. Good filing
and most of the finer grinding operations on
platinum follow the same principle on a smaller
and smaller scale. The file should be cutting
only on its forward stroke and not dragging in
contact with platinum on the return stroke.
After minimum filing, decide whether to follow
traditional methods or a carefully selected
sequence of graded abrasives.
Traditionally, various stones, emery boards, and
abrasive loaded thread would be used depending
on access to fine detail. These have a decreasing
abrasive effect until the whole piece can be
subjected to open polishing on mops. Traditionally
named polishing media still available include
Water of Ayr stone, pumice, emery, brown or
yellow tripoli, emerald compo, ruby powder,
emerald powder, diamantine, white, green, red
and purple rouges, and also proprietary named
compounds (see Suppliers Database). Most of
these will work to some extent with platinum, but
the difficulty is prejudging the likely depth of cut,
avoiding too much penetration or too slow a rate
of finishing, and premature clogging of
the medium.
Finishing
Index
5.2The secret is to choose just sufficient cut at
each stage to remove the previous marks
before the new medium becomes clogged. This
is the reason for repeating the advice not to
remove any more platinum than is absolutely
necessary, particularly at the start of the finishing
operation. Choose the finest file, emery wheel or
paper that will just produce an even abraded
texture. Follow with a grade two or three grades
finer for the next stage, and so on. It helps to use
firm buffing wheels such as felt at the medium
polish stage and reinforced close stitched mops
for colouring/fine polishing. A typical sequence is
given in the box to the right; increase or decrease
the number of stages with practice.
Repeated practice allows operators to choose the
combination of techniques they feel happy with.
To choose a good series of grades it is helpful to
understand the various methods of grading
particle sizes and the way in which they are
“presented” to the metal.
After casting, or sawing or fine filing of only
high spots, typical finishing might include:
Fine, clean No. 4, No. 5 or No. 6 files.
Edges may be burnished with oiled tungsten
carbide burnisher.
(Tumble polishing might be inserted here for
batch products).
Sand with 240, 400 and 600 silicon grade
carbide or alumina papers.
Buff with alumina compound, then hard rouge.
Use sound techniques; avoid sloppy filing
strokes, wrong wheel speeds and cross-
transfer of abrasives.

Index
Modern abrasive systems are much more
predictable and consistent in their cutting effects.
In many cases, they are modifications of
traditional materials, often synthesised rather
than natural, but more carefully graded and
standardised than the original natural product.
A carefully controlled range of white 'compo' bars
now consist of variously calcined alumina
particles, sized and suspended in different
formulae of emulsified fats rather than the
classical tripoli. The main development has been
to 'present' the abrasive/polish in a wide variety of
geometries, some long lasting, others
consumable or renewable.
Figure 5A. The importance of having a positive rake betweenthe tool face (leading edge) and platinum. Shown here as astationary tool face leading into a rotating platinum ring as ingloss turning. The principle also holds for abrasion pointsmoving across or rotating against a stationary platinum piece.
Abrasives Grading Systems
At the coarse end, there is an internationally
accepted method for describing grinding wheels.
At the fine end there is a little less consistency
due to different methods of size ranging and the
introduction of diamond dust and diamond
compounds as polishing media. A complete
system description includes:
The abrasive compound:
• Natural or synthetic.
• Its hardness.
• Grain shape and so expected groove shape.
• Grain size.
• Friability, producing fresh surfaces.
The support medium:
• Wheel, disk, flap-wheel belt, paper, plastic
mesh, etc.
• The bond between the particles and medium.
• Optimum (linear) working speed at the
interface.
Coarse and medium grain sizes are determined
by sieve size, but national standards differ.
Particle size decreases consistently with
increasing sieve number within each standard
series, but a FEPA 240 grade may not give
precisely the same result as an ASTM 240 grade.
In choosing sanding grades for platinum, the
differences are not likely to be noticeable, but it
is best to stick to one grading system.
The finest particles are sized by sedimentation.
Again, the grading is consistent within a given
standard system, but may not be precisely
comparable across different systems. As a result,
finer grades of silicon carbide papers may be
described differently by different manufacturers
and also differ from diamond-based systems
rated in micron sizes.
Table 5A shows equivalents near enough to place
different polishing media in decreasing order of
cutting/scratch depth.
The depth of scratches produced depends not
only on the size of the abrasive particles but also
on their orientation and the depth to which they
are sunk into the backing coat on the abrasive
cloth, paper or plastic film. The most precisely
distribution coatings are produced by electrostatic
coating (Figure 5B) and this is the type preferred
for platinum alloys because the particles are
upright, remain proud of the backing and so
resist clogging better. Cloth, paper and film
abrasive surfaces appear as sheets, strips, belts,
discs, and flap brushes. A wide range of shapes
and flexibility has resulted in recent years from
suspending abrasives in a 3-dimensional web of
plastic non-woven fibres, ranging from simple
hand-pads to rotary shapes that can be very
Finishing 5.3

Table 5A. A comparison of orders of decreasing coarseness ofcut or finish based on gradings with grit or diamond sizes.
usefully adapted to jewellery making. For
instance, cylinders of such materials, loaded with
2-3 grades of alumina, are very useful for
polishing inside rings as a replacement for the
more usual flying brush (Figure 5C).
Figure 5B. Schematic diagram of the process of attracting theparticles onto the initial bond layer of an abrasivecloth/paper/film. The particles appear to remain betterorientated for work on platinum than the more traditionalcoated media does.
Figure 5C. Polishing using a hand-held machine tool.
Similarly, there are larger diameter wheels made
by a radial arrangement or spiral winding the
abrasive loaded plastic mesh followed by
controlled compaction and rebonding (Figure 5D).
Finishing
Index
5.4Standard Grades Av. Grit Diamond Grade Emery
FEPA ASTM JIS diam. (mm) (micron*) Paper GradeP60 0.25P80 0.18P100 0.13P120 0.10P150 0.08P180 0.07 IGP220 220 0.06P240 240 0.05 60P280 240 280 0.04 IMP320 0.03 45 IP360 280 320 40 IFP400 360 0.02 1/0P500 320 400 0.014P600 360 500 0.010 30 2/0P800 400 0.007 20 3/0P1000 500 600P1200 600 1200 0.004 15 4/0(1500) 1500 12(1800) 800 2000 9(3000) 2500 5(4000) 3000 4(11000) 6000 2(14000) 8000 1
1 micron (µ) = 0.001mm; 1/1000in - 25µ
FEPA: Federation of European Producers of AbrasivesASTM:American Society for Testing and MaterialJIS: Japanese Institute of Standards

Finishing
Index
5.5
Figure 5D. A selection of wheels showing the shape and surfacetexture typical of compacted plastic mesh, radial or spiralwound, loaded with abrasive in situ: (Courtesy 3M’s Scotch-Brite).
Lightweight, slightly spongy, polyvinyl acetate
wheels, carrying a carefully chosen range of
abrasives and polishing rouges, are used in Japan
for most finishing operations on platinum
jewellery (Figure 5E).
Figure 5E. Japanese polishing using a rotating polyvinyl acetate wheel.
Thirdly, there are abrasive-loaded rubber wheels
and points (Cratex type) that also work on the
basis of controlled wear continually exposing fresh
abrasive to the work face (Figure 5F). Indeed,
the working face should be dressed with a
dressing tool to clean up and reshape the
working surface. With all three types, the built-in
abrasive may be supplemented by carefully
chosen white (calcined alumina) 'compo'.
Figure 5F. Rotary brushes, flap-wheels, shaped meshes andvarious types of points may be used in many ways to producetextured/matt areas and patterns.
The recent developments appear to offer
increased efficiency in working on platinum
surfaces, mainly because they wear away under
control rather than lose their cutting ability due to
early clogging. They are likely to at least partly
replace the traditional woven fabric and felt
buffing wheels loaded with fine abrasive waxes
and rouge polishes.
The type of abrasive (corundum-calcined alumina;
chromic oxide; silicon carbide; quartzite or
crystobalite silica; cubic boron nitride; synthetic or
natural diamond) determines the hardness and
friability (which in turn determines the generation
of fresh cutting surfaces). The bond (vitrified,
resin, rubber, shellac, wax, soap) largely
determines the porosity of the structure, its heat,
wear resistance and ability to keep particles at
the designed "cutting angle". The more the bond
the less the porosity and access of coolant or
lubricant, but the stronger the wheel. Varying the
abrasive, its size distribution, the amount and
type of bond (whether waterproof, oil-proof or
flexible) and the final shape (wheel, point, disc,
paper, and paste on a carrier), creates a vast
range of grinding/polishing characteristics.
Careful choice is required to do an efficient job
on platinum jewellery alloys, varying from
soft platinum-palladium to deliberately
hardened alloys.
A dimension that is not so easily transferred from
a large scale to finishing jewellery is the speed of
rotation of wheels. What really matters is the
relative linear speed between the abrasive
particles and the platinum surface. With hand
finishing there is little scope for varying the
speed, but using rotary hand tools and bench
polishers introduces a wide speed range.
Japanese practise (Figure 5E) in the final stages
of finishing prefers a high linear speed but
achieved by using 12" (300mm) diameter cellular
PVA wheels charged with polishing compound
working at a maximum of 1600m/min for coarse
(400 mesh) buffing, to a maximum of
2000m/min for fine (1000 mesh) prior to finish
polish. This requires a speed of rotation of about
2120 rpm. For a hand rotor disc of, say, 25mm

Barrel andVibratoryPolishing
Matt or polished finishes
can be obtained by
barrelling or in a vibratory
polisher, but since
platinum production is
usually on a small scale,
the processes are not
commonly used.
Abrasive particles used in these processes are
usually chosen so that they break down
progressively in use, exposing new smaller cutting
edges, so effectively moving gradually to a higher
grade of polish than would have resulted from the
starting grade of abrasive. Platinum pieces
cannot be successfully polished in a batch
mixed with gold. Where there is an economic
batch, platinum may be first subjected to a mild
abrasive compound with ceramic chips to pad out
and disperse the abrasive medium, followed by
bright burnishing with a polishing powder and
hardened steel shapes. This imparts a burnished
finish and is more suitable for smoothly rounded
pieces than for intricate sharp cut edges that may
be rounded off to some extent.
Matt Finishing
Platinum lends itself particularly well to controlled
matt finishes ranging from a silky/satin “near
polish” to a distinctly directional brush line finish.
Polished platinum has excellent light (both colour
accuracy and brilliance) and image reflectivity
but, because of this, it also shows up lack of
uniformity in reflectivity as well. Indeed, it is
usually better to matt finish unprotected,
particularly convex, areas that are likely to be
subjected to heavy wear, than to rely on
preserving the uniformity of a high polish long
term. Polished areas juxtaposed with matt
finishes are a very useful design feature. One
may also progress to coarser but still attractive
milled, engraved or diamond-cut patterns
produced by edge tooling. Platinum's tarnish
resistance ensures that the differences between
mirror facets, polished areas and controlled matt
finishes are preserved long-term.
Figure 5G. A selection of diamond tools for producing deepertextures or faceted designs on platinum.
Finishing
Index
5.6diameter, the rpm to achieve the same linear
speed should be over 25000! This is scarcely
possible under load when the hand tool is
actually creating useful polishing friction. The
same part of the surface of the small tool would
also be in contact with the platinum many times
more frequently than for the large wheel, thus
encouraging more rapid clogging. Heat release is
more concentrated and if not controlled, will
cause the bond to plasticise and smear over the
work. There is also a far greater chance of work
snagging on wheels at high peripheral speeds
than on the large-scale slower rotating versions.
Table 5B relates when diameter, rotational speeds
and linear speeds. Note how wheel wear requires
increasingly greater rotational speed to achieve
constant linear speed.
Table 5B. The relationship between abrasive wheel diameter,revolutions per minute, and linear peripheral speed (K = 1000rpm).
Wheel Diameter Linear/Peripheral Speed (Meters/Minute)(MM) (INCH) 750 1000 1600 1800 2000 2200 2400 2600 3000
6 0.25 40K 53K10 0.4 24K 32K 51K20 0.79 12K 16K 25K 29K 32K 35K25 1.0 10K 13K 20K 23K 25K 28K 31K50 2.0 5K 6K 10K 11K 13K 14K 15K 17K 19K80 3.15 3000 4000 6400 7200 8000 8800 9600 10K 12K100 4 2400 3200 5100 5800 6400 7000 7640 8280 9550125 5 1910 2550 4070 4580 5090 5600 6110 6620 7640150 6 1590 2120 3400 3820 4250 4670 5100 5520 6370200 8 1200 1590 2550 2870 3185 3500 3820 4140 4780300 12 795 1060 1700 1910 2120 2330 2550 2760 3180
RO
TA
TI
ON
AL
SP
EE
D

Finishing
Index
5.7A necessary feature of all these finishes is to
produce them from at least one grade of finish
more polished than the grade desired. This
helps judge the uniformity and boundary of the
matt finish; it produces the desired effect in one
pass with less risk of clogging. It is considerably
more difficult to produce a good effect by
approaching from the coarser abrasive
grade finish.
Even without changing the grade of abrasive, it is
possible to produce an apparently different
texture by changing the “brushing” direction. For
instance, on an occasional craft piece, stroking a
ring shank circumferentially with a hand-pad of
Scotch-Brite product will produce a medium matt
finish, while careful stoking transversely across
the width of the ring band will give a distinctly
more matt appearance. The depth of scratches is
much the same but there is greater scatter of
incident light.
Similar differential effects can be produced with
grit blasting (mini-jet grit blasters may be used
like a fine pointed brush), steel wire wool, steel or
brass wire rotary brushes. Rotary abrasive flap
brushes and shaped meshes are the most
versatile. Highlight lines and mirror streaks can be
produced with highly polished sintered tungsten
carbide minitools. Diamond tools can also be
used, although there is a greater degree of wear
than might be expected from experience with
silver and white gold. This can be reduced by
minimising the area to be faceted and the depth
of each cut. Again, it is best to arrange these
deeper cuts and mini facets on a previously
polished or carefully matted surface rather than
attempt to use this method of decoration to save
some previous stages in the overall finishing
process. Figure 5G illustrates some of the
diamond tools for achieving these effects.
Indentation and Beaded Type Textures
Platinum responds well to coarser textures being
superimposed on either a fine brushed or a
polished finish. Hammer texturing, repoussé,
chasing, embossing (including roll embossing)
may be used, preferably on annealed platinum.
Thinner gauges may often be used, compared
with, say, silver. Chasing 26 gauge (0.46 mm)
platinum reacts much the same as chasing 22
gauge (0.71 mm) silvers. It should not be
necessary to re-anneal the platinum during such
work unless there has been repeated reversals
locally (in embossing, for instance) which may
give rise to fatigue cracking or premature tearing.
The most straight-forward way of emphasising
texture contrast is by maintaining the tooling in
as highly polished condition as possible, using
single strong blows or cuts at each point rather
than a series of overlapping applications and
starting with a high polish on the whole piece.
The high spots should remain well polished and
they, or alternatively other areas, may then be
matted with rotary brushes, abrasive mesh
shapes or points as described in the section
above. The alternative method of starting with a
matt surface and polishing the high spots after
the decoration stage requires more patience with
platinum than with most gold or silver; chased or
embossed platinum high spots do not
automatically take up a polish from the impacting
tools. On the other hand, starting with a matt
surface and deliberately matting the tools does
overcome the problem of slipping and inaccuracy
of hammering during chasing. In general,
platinum may be finished easier by burnishing
rather than by polishing.
Platinum surfaces can be decorated by
granulation, or beading back from edges with a
welding torch. In both processes, the oxidation
resistance is a great advantage, but the high
density of platinum tends to flatten the beads
more towards a drop shape rather than spheres.
It is possible to retain more bead height in
granulation by soldering than by welding, where
wetting between the whole lower half of the bead
and the surface is virtually simultaneous
with adhesion.

RhodiumPlating
Finishing
Index
5.8
Japanese platinum jewellery makers rhodium
plate the majority of their production unless there
is need to differentiate between a gold and
platinum finish in a mixed piece. The plate
imparts a greater surface hardness (about 800
HV) than for platinum alone and it also disguises
colour differences due to solder lines. It is only
effective on already well-polished surfaces and
does not cover up surface defects. The plating
can be confined to specified areas by masking
other areas (such as gold areas in mixed metal
pieces) with cellulose lacquer or chlorinated
rubber paint.
Before plating, surfaces are degreased, followed
by hot electrolytic alkaline cleaning. The
electrolyte is normally rhodium sulphate, supplied
as a concentrated solution of 100g/l of rhodium
in dilute sulphuric acid, which is further diluted
with distilled water to give a suitable
concentration, depending on the thickness of
plate required. As little as 1/2 to 1 micron (µ) is
enough to give colour and some protection; 5µ is
the maximum that should be needed for jewellery
pieces. These thicknesses may be achieved from
solutions containing 2 to 4 g/l of rhodium
immersed for 1 to 5 minutes. Glass or polythene
vats are recommended. Since the process is an
insoluble electrode process (platinum, platinised
titanium or stainless steel) the surface area is not
critical but should be run at 35°C with current
density about 10 A/ft2 (0.07 A/in2) or
0.001 A/cm2) to give about 1/2 to 1µ of plate
thickness per minute. Bath concentration should
not fall below about 90%. It is not normally
necessary to agitate the bath vigorously (this may
cause crazing) but an occasional tap to remove
bubbles which can cause pits may be useful.
Large-scale producers have a fully automated and
controlled plant, with an overhead-placing gantry.
Each operation on the multi-batch process is pre-
selected by the process controller. Typical cycle
time for a complete tray of 18 to 40 pieces would
be about 45 minutes with a total production rate
of 2000-4000 pieces a day. A typical finished
plate thickness would be about 4.5µ.
There is virtually no difference in brilliance
between a polished platinum finish and a
rhodium plated finish except for slightly more
blue/white colour with the rhodium plate. It is very
difficult to see the difference as produced, but
after 12 month's hard wear the difference may
be greater.
For unusual textures it is well worth exploring the
fusion of platinum wire clippings, platinum
powder, even carefully selected and arranged
lemels, to a platinum surface by welding or
soldering. This requires no flux and the original
surface conditions are retained without need for
extensive polishing.
It is always useful to remember that individual
components can be textured differently and
later assembled by soldering or welding without
changing the texture contrast.
Good Housekeeping
From what has been said above, it should be
apparent that the finishing of platinum pieces is
not fundamentally different from gold and silver,
but that there is a greater chance of clogging or
apparently wearing out abrasive and polishing
media. The time penalty in going back to correct
a deeper than necessary scratch or similar fault
is more significant. Every effort should be made
to avoid transferring coarser particles to
finer processes.
• Store different grades of tripoli wheels,
buffs and compo bars in separate plastic
bags or boxes.
• Keep abrasive papers flat, not face to face,
in stiff envelopes (photographic paper
packets are just about right), each reserved
for one grade only.
• Keep points, hand-pads and rotary shapes
strictly in separate plastic bags or boxes
according to grade.
• Ensure that each operative wears rough-
surfaced rubber tips on all fingers (or gloves)
and only processes one grade at a time
between washing.
• Separate grinding, buffing and final polishing
stages into separate chambers.
• Always expose platinum to fresh abrasive/
polishing media rather than risk clogging.
• Maintain working place cleanliness at a high
standard; even grease from the hand and
atmospheric dust can provide an
unintentional but effective grinding medium!
• As soon as platinum jewellery is finished, wrap
it in tissue or put it into a presentation case.
Finishing
Index
5.9

Setting
Jewellery Settings and Platinum
Setting and MountingTechniques
6
ManualIndex

JewellerySettings andPlatinum
Platinum isregarded as thebest availablematerial for gemsettings, particularlyfor diamonds, bothon the grounds ofcomplementarycolour and highstrength in thinsections such asclaws and collets.The most notablefeature of platinumis its ability to deadset, meaning that itstays very firmlywhere it is put andneither springsback nor sags.
Although white golds and platinum alloys have
improved in the last 40 years platinum jewellery
alloys still have the better combination of strength
and ductility. Modern design and fashion,
particularly where "only the best will do", has
extended platinum use not only to settings for
other white stones but to virtually all gem quality
coloured stones too. It is not surprising that in
countries where a white precious metal is
preferred, the whole piece is made up in platinum
alloy.
Design has developed to include other precious
metals alongside platinum for attractive colour
contrast reasons where marking regulations
permit; not as a cheap substitute. So, the original
good setting characteristics of platinum now
support a much wider range of designs.
Making Settings - DesignConsideration
Because of the relatively high strength and
stiffness of platinum, claws, bezels and collets of
fine section are stronger than expected on first
experience. Settings in platinum need not be
heavy unless that is a desired design
characteristic. For instance, wire no more than
0.6mm diameter is sufficient for claws to hold
stones up to a third of a carat and shaping from
1mm wire is about right around one carat.
Different grades of platinum alloy may be used in
the same piece. For instance, a setting for a
delicate stone such as an emerald may be
combined with a hardwearing shank and/or an
ornate complex cast shape; all joinable after
finishing as individual components. All of the hall-
markable platinum jewellery alloys are equally
suitable for different types of settings and the
final choice may depend on the design of the rest
of the piece.
If the designer wishes to take advantage of
the finer points of difference:
• Pt-palladium alloy is a little softer for opals,
emeralds and similar "soft" stones.
• Pt-copper alloy is better for raising grains
and pavé work. It usually gives the best
colour match with solders.
• Pt-cobalt alloy is best for complex as-cast
settings but it also retains good claw
setting capability.
• Shanks in any of the three alloys are good
for stretching up to size.
The shaping of platinum for jewellery has been
dealt with under "Handworking" and there are no
unusual problems in making settings by hand.
Ideally, the metal within the setting should be
left in a partly work- hardened state. However,
it is now possible to make or buy stamped or
precision cast settings in standard sizes, with
bearer and setting areas already partially shaped,
or more complex special shapes with remarkably
good surface finish as-cast. Even a cast setting is
worked slightly when being cleaned up, trimmed,
eased into position and burnished. With a little
preplanning, it is possible to confine the
annealing effects of soldering and welding to near
the actual joint and rely on residual work-
hardening further away for useful additional
strength in, for instance, the tips of claws. If
there is doubt about the continuing ability to work
the setting without cracking thin sections, start
with material in the annealed state. Always get
as much of the finishing to size and polishing
done before assembling the setting. Even
soldering, welding or annealing after that stage
does not oxidise the metal and it is all the
easier to finish the assembled piece, including
the settings, with a light final polishing
or burnishing.
Setting
Index
6.1
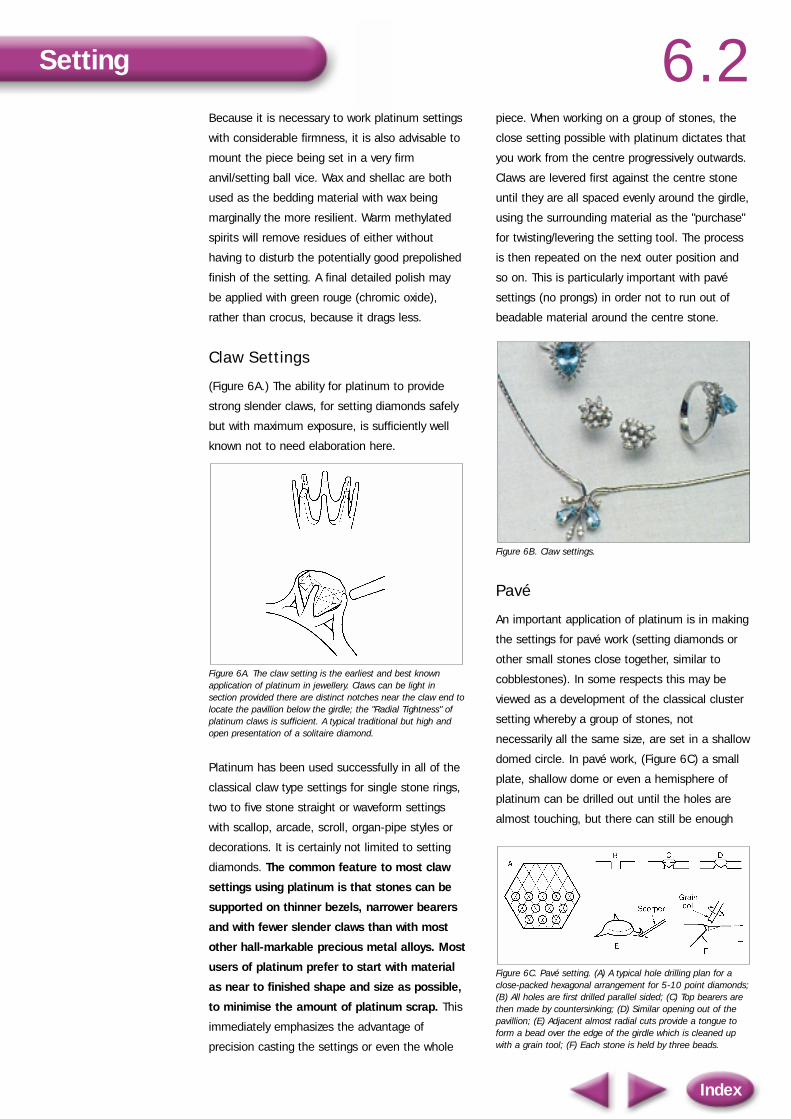
Because it is necessary to work platinum settings
with considerable firmness, it is also advisable to
mount the piece being set in a very firm
anvil/setting ball vice. Wax and shellac are both
used as the bedding material with wax being
marginally the more resilient. Warm methylated
spirits will remove residues of either without
having to disturb the potentially good prepolished
finish of the setting. A final detailed polish may
be applied with green rouge (chromic oxide),
rather than crocus, because it drags less.
Claw Settings
(Figure 6A.) The ability for platinum to provide
strong slender claws, for setting diamonds safely
but with maximum exposure, is sufficiently well
known not to need elaboration here.
Figure 6A. The claw setting is the earliest and best knownapplication of platinum in jewellery. Claws can be light insection provided there are distinct notches near the claw end tolocate the pavillion below the girdle; the "Radial Tightness" ofplatinum claws is sufficient. A typical traditional but high andopen presentation of a solitaire diamond.
Platinum has been used successfully in all of the
classical claw type settings for single stone rings,
two to five stone straight or waveform settings
with scallop, arcade, scroll, organ-pipe styles or
decorations. It is certainly not limited to setting
diamonds. The common feature to most claw
settings using platinum is that stones can be
supported on thinner bezels, narrower bearers
and with fewer slender claws than with most
other hall-markable precious metal alloys. Most
users of platinum prefer to start with material
as near to finished shape and size as possible,
to minimise the amount of platinum scrap. This
immediately emphasizes the advantage of
precision casting the settings or even the whole
piece. When working on a group of stones, the
close setting possible with platinum dictates that
you work from the centre progressively outwards.
Claws are levered first against the centre stone
until they are all spaced evenly around the girdle,
using the surrounding material as the "purchase"
for twisting/levering the setting tool. The process
is then repeated on the next outer position and
so on. This is particularly important with pavé
settings (no prongs) in order not to run out of
beadable material around the centre stone.
Figure 6B. Claw settings.
Pavé
An important application of platinum is in making
the settings for pavé work (setting diamonds or
other small stones close together, similar to
cobblestones). In some respects this may be
viewed as a development of the classical cluster
setting whereby a group of stones, not
necessarily all the same size, are set in a shallow
domed circle. In pavé work, (Figure 6C) a small
plate, shallow dome or even a hemisphere of
platinum can be drilled out until the holes are
almost touching, but there can still be enough
Figure 6C. Pavé setting. (A) A typical hole drilling plan for aclose-packed hexagonal arrangement for 5-10 point diamonds;(B) All holes are first drilled parallel sided; (C) Top bearers arethen made by countersinking; (D) Similar opening out of thepavillion; (E) Adjacent almost radial cuts provide a tongue toform a bead over the edge of the girdle which is cleaned upwith a grain tool; (F) Each stone is held by three beads.
Setting
Index
6.2

strong metal remaining in the network to retain
closely set stones at their girdles and show little
more than the raised bead. In this case, fully
annealed material should be used to avoid the
difficulty of hard spots in unannealed alloy
making the raising of beads or close fine
setting difficult, thus outweighing the
advantage of increased metal strength. Of
course there is no point in reducing the thickness
of the platinum to such an extent that the culets
of the stones make uncomfortable contact with
the wearer. Normally the pavé platform is raised
on the ring shank or brooch surround with a
gallery or basket back similar to those used for
cluster rings. Pavé and similar close display
settings are normally prepared by drilling recesses
in small sections of sheet or cleaning up recesses
in precision cast components and then producing
an accurate seating with a precision burr or
fraise. As with any other setting material, it is
important to match the stones beforehand so
that it is not necessary to produce too much
variation in seating sizes with the burrs. Only in
mass production is wear of drills and burrs likely
to be a problem.
Figure 6D. Pavé setting.
Channel Setting
Platinum is very good for making channel settings
for much the same reason as pavé; baguette
stones can be adequately supported by strong
but narrow edge bands, leaving the end girdles of
the stones touching apparently unsupported in
the centre of the channel. In practice, the sides
of the channel will be cross-braced with spacers,
particularly if handmade, but platinum does not
normally need cross-spacers below every pair of
Figure 6E. Channel settings. (A) to (c) handmade channel ringfor square or baguette stones with inside edges cut to formbearers from two flat rings and with spacers which must clearthe stones so they lie end to end (d) to (e) shows cast channelsection with (f) cast-in bearing which needs finishing with anonglette graver (use flatter 15¡ cutting edge than normal forgold at 30¡to 40¡) to seat the girdle just below the rim of thechannel (F), before turning the edge back over the stones (h)with a setting tool.
touching girdles. Cast channels may not need
many, if any, cross-spacers and the beginnings of
the bearer recess may be cast into the inner
upper edge of a standard channel. This reduces
the amount of graver work needed to complete
the bearer and of course reduces the weight of
the ring (Figure 6E). The bearer is deepened
sideways into the channel edge with an onglette
graver, the baguettes are 'snapped' in and the
thin top edge of the channel is forced over just
above the girdle of the stone.
Figure 6F. Channel settings.
Invisible Setting
Platinum readily supports the principle of pavé
and channel settings in that the continuity of the
stones from one to another is emphasized
without drawing too much attention to the setting
itself because it is strong but slender. It is
possible to arrange the stones in such a way that
no platinum is visible between them (Figure 6G).
This is done by cutting special grooves or inset
slots in the gemstones just below the girdle.
These receive very carefully prepared claws which
allow the stones to touch at the girdles above.
Either the crown facets, or total internal reflection
Setting
Index
6.3

Figure 6G. Principles of invisible settings. (A) to (C): Triangular,square/rectangular, hexagonal stones are best for closepacking: (D) Six-rayed star-cut stone in plan and elevation; (E)Double French or Cardinal cut similarly showing the position ofhidden grooves in all or alternate facets below the girdle intowhich pre-set prongs spring to hold the pattern in place.
in the case of diamonds and some simulants,
hide from view the small penetration into the
pavillion. This type of arrangement obviously
depends on strong claws with some springiness
and they must still be small to be well hidden.
Platinum is ideal for this application.
Figure 6H. Invisible settings.
Unusual Settings
The high mechanical properties of platinum and
the fact that it does not soften or relax with time
(except at high temperatures) has led to its use
in some innovative types of settings. The basis of
most of these is that the stress created by
elastically deforming platinum is predictable and
can be relied upon to grip a stone without
relaxation. By combining engineering stress
calculations with a good knowledge of what
stresses some gemstones will safely withstand,
it is possible to support the stones more
openly than would be possible using
conventional settings. In effect the stone is
clipped in a gap cut into a prestressed ring of
platinum. The gap is slightly less than the
diameter across the girdle of the stone and when
clipped into simple curved notch seatings in the
open ends of the ring, the stone is held firmly by
elastic hoop stress. The stone appears to be
suspended in space (Figure 6I). A similar principle
may be used to hold the stone in a "split
tube" setting.
Figure 6I. A “tension” ring setting.
Figure 6J. Tension settings.
Setting
Index
6.4

Setting andMountingTechniques
It is good practice with platinum to:
• Drill at a slow speed.
• Start holes with a pilot drill and then use a
drill size smaller than the stone to finish.
• Use sharp drills, resharpening often.
• Lubricate with beeswax or methyl salicylate
(oil of wintergreen) frequently.
• If the drill breaks, dissolve out with 30%
sulphuric acid.
• Use a new or well-cleaned burr only as
much as necessary to finish the seating.
• Keep millgrain wheels and burnishers
meticulously clean and reserved only for
platinum.
Opinions differ as to the best tools for setting
platinum against stones. It helps to have a matt
texture, to get an accurate positioning without
slipping in the initial stages of moving platinum
onto the girdle of the stone. On the other hand,
the finishing of the beading and the tidying up of
the surrounding setting is best done with a highly
polished burnisher. Platinum burnishes well, but it
also drags easily in contact with the slightest
trace of debris.
Transfer of debris from tools is avoided by
repeated retouching of the high polish on the tool
face after every few strokes. This is not as
arduous as it sounds if the initial polish on the
tool face is good. While a 4/0's emery finish is
good enough on a burnisher for gold, it is
advisable to use something better for platinum.
One classical method is to use putty powder
mixed with methylated spirits, spread on a
smooth piece of hardwood as the touch-up
polisher. Methyl salicylate (oil of wintergreen) in a
piece of sponge also acts as a good quick
lubricant for the next series of strokes after each
tool repolishing. For only occasional use,
hardened tool steel scorpers may be used for
platinum setting, provided the working face is
highly polished, though tungsten carbide tools
take and retain the best polish and should
therefore be used for repeated work on platinum
settings. In particular, the cutting edge of a
tungsten carbide scorper gives the sharpest and
neatest cut.
Setter's Wrist!
Advice on firmness of support, sharpness of tools,
lubrication, leverage, and as-cast setting
surfaces, is given in the interests of good quality
platinum settings, but there is another aspect.
The occasional worker in platinum often
complains that "platinum is hard on the wrists"!
Typical platinum settings do offer more resistance
than, say, 18 carat yellow gold, but this is the
reason for its success as an apparently slender
but strong setting for the stones. There is usually
no need to "move" as much platinum about in
cutting a seating, making a bead over a girdle, or
setting a claw, as would be the case with softer
alloys. Use short cutting strokes and frequent
lubrication; lever claws and material for beads
into place and maintain all tools in top condition.
Above all, cultivate a policy of "right first time",
with careful preplanning of each part of the
setting operation. Much of the frustration with
platinum comes from having to rework your, or
someone elses, previous errors, usually on now
work-hardened material, and having to remove
defects in otherwise well-polished areas!
Setting
Index
6.5

Combination
Combinations with Platinum
7
ManualIndex

Combinationswith Platinum
Platinum jewelleryalloys are attractiveand versatilecomponents incombination withother preciousmetals, particularlywith regard tomixed colours and textures.
Combination
Index
7.1There is no technical reason why platinum should
not be used in combination with other white
metals, especially when using its very good
settings capability. However, it is unusual for
platinum to be combined with silver, because of
the low colour contrast and large difference in the
inherent costs of platinum and silver. In some
countries, marking regulations dictate that the
combined piece is described as silver unless the
two metals can be separately distinguished. This
would seriously undervalue the piece. The
inherent values of platinum and 18 carat white
golds are more comparable, so there is less
deterrent to combining it with platinum,
particularly when taking advantage of the high
strength of platinum in light sections, delicate
settings and filigree work.
The most popular examples of platinum
combinations employ white platinum jewellery
alloys in contrast with one or more coloured golds
(Figure 7A). There are also ample opportunities to
vary texture. With its high melting point, good hot
strength, and freedom from oxidation, platinum
lends itself very well indeed to forming
components (even finished polished) and then
using soldering, fusion, welding, cold welding,
mechanical joining or even adhesives to
assemble the combined piece. There are very
many combinations of alloy and methods of
joining possible and this section of the manual
simply suggests various strategies rather than
trying to be an exhaustive catalogue.
Figure 7A Platinum/gold combination jewellery.
Assembling, Decorating, or Co-Working?
There are basically three routes to making
combination jewellery. For occasional one-off
pieces, the jeweller may combine components
each made as far as possible in a different alloy.
This is assembly. Combining a platinum setting at
the shoulders of a gold ring shank is a familiar
example. Alternatively, he may finish the bulk of
the piece in one alloy and add another of
different colour and/or texture. This is decoration.
Gold may be decorated with platinum and vice
versa by inlaying techniques, surface mounting,
differential etching or plating. There may be no
clear distinction between assembly and
heavy decoration.
Some simpler designs lend themselves to batch
production or a common design at an early stage
in the production sequence. For these, it is often
possible to devise a combination nearer the raw
material stage.
Examples of combination nearer the
semi-fabricated stage include:
• Bar of alternating layers of two or
more alloys.
• Sheet made from different alloy strips.
• Tube with different alloys concentrically
layered.
• Simple platinum shapes distributed regularly
or irregularly within a matrix of gold.
• Simple gold shapes distributed regularly or
irregularly in a platinum matrix.
These combinations may then be further co-
worked, or selectively cut, to form jewellery
components with some control over the resulting
pattern, but the basic arrangement is decided by
the initial combination pattern.

Combination
Index
7.2The remainder of this section gives examples of
ways in which platinum combination jewellery can
be produced, with the emphasis on the principles
and design planning, rather than on pattern
details. It should be apparent that platinum
is a very versatile precious metal for
combination jewellery.
Assembling Mixed Alloys by Co-casting with Platinum
The high melting point, relatively good hot
strength and excellent oxidation resistance of
platinum jewellery alloys are an excellent basis for
co-casting solid platinum with an alternative
molten alloy. Probably the commonest example of
this in the past has been to precision cast a gem
setting in platinum, prepolish it and then attach it
to a wax ring shank pattern.
This is then re-invested and the new wax melted.
The platinum setting is left in place such that it
welds solid to liquid when another jewellery alloy
such as 14, 18, or even 22 carat gold is
injected. Many combinations are possible, giving
a versatile style of design for combination
jewellery where marking regulations allow. If co-
casting is intended from the start, it is best to
make the platinum settings with dovetailed or
similar shoulder protrusions, to aid wax
attachment and liquid/solid co-cast welding.
(Figure 7B) outlines the method.
An extension of this method is to link together,
not weld or solder, platinum swivels, chain-links
or precast components, join them into the ends
of wax patterns, burn out and then co-cast with
another liquid jewellery alloy. The linked platinum
components are unaffected by the process and
can still swivel or slide on each other, but are
firmly joined to the other precious metal
components. This allows chains, bracelets and
similar structures to be produced already joined;
indeed, with the swivels already polished. Where
several links need to be made in one cast, it is
best to arrange them radially from a common
feeder from the tree base, rather than in-line.
Assembling Mixed Alloys byWelding and Soldering
The earlier section covering soldering/welding,
shows that platinum responds well to both; no
new principles are introduced by joining platinum
in these ways to other precious metals. The
general rule is to use platinum techniques when
joining platinum to fine gold (and normally,
22 carat gold) and carat gold joining techniques
when joining to 14, or more usually, 18 carat
golds. In the former case no fluxes are needed,
but operating temperatures are over 1,000°C. For
carat golds, temperatures below 1,000°C are
sufficient, particularly when soldering. A flux
appropriate to the carat gold or solder is used.
Combination welding and soldering
summary:
• Combinations of platinum and fine gold
require no flux.
• Joining is a relatively simple process;
if the shape is already a good fit.
• When inlaying platinum with 18 carat
golds, use gold solder flux; 18 carat gold
can oxidise.
• For surface decoration rather than inlaid,
use yellow gold solder and flux; they melt at
lower temperatures than platinum solders
and are easier to match with yellow gold
at edges.
Figure 7B. A precision cast platinum setting (A) can be co-castwith, say, gold. It helps to have small projections at theshoulder to locate the wax pattern for the ring shank. afterreinvesting, melting out the wax and casting with gold, theliquid gold/solid platinum interface makes a sound weld.

Combination
Index
7.3Co-Working
Several simple arrangements of platinum with
yellow golds can be made early in the working
process, so that the basic arrangement survives
subsequent working operations, to form a built-in
pattern. This may either be for stock or
customised, depending on the size of batch. The
most common example is alternate strips of
platinum and one or more coloured golds side by
side in sheet or strip form. Coupons cut from
such stock can be cross-rolled to broaden the
stripes, but normally further rolling is longitudinal,
in which case the stripes remain constant in
width and are elongated in proportion to the
reduction in thickness. Similarly, platinum shapes
may be arranged in a pattern in a mould and gold
cast around them. The original shapes completely
weld to the gold matrix and the resulting slab
may then be co-worked. The slab rolls down as
though it were a homogeneous solid, so the
shape will be elongated in the direction of rolling.
The plan shape can be controlled quite accurately
by cross-rolling or rolling at an angle, but the
amount may be limited by roll width and so
requires careful planning. The principle is shown
in Figure 7C, for platinum discs in a gold matrix,
but other simple shapes would behave in a
similar fashion. Gold discs in a platinum matrix
behave in the same way, although they are more
likely to be incorporated by inserting solid gold
discs in holes in platinum strip and co-rolling,
rather than by co-casting (which is, nevertheless,
quite possible).
Design using composite stock is likely to follow
the lines of "what manipulation process can I use
to re-arrange the composite pattern into an
interesting jewellery shape". In other words, the
design will be relatively simple. Some designers
have combined a good knowledge of rheology
(plastic deformation of solids, including mixed
metals) with a flair for original design.
Nevertheless, most original combination pieces of
jewellery are created by decoration and/or
assembly rather than co-working.
Inlay Or Intarsia Work
Originally, intarsia work referred to mosaic work
and in principle this can be done by inlaying
platinum shapes into gold or vice versa. In
creating some simple combination patterns, it is
possible to cut out, or better still, punch out,
shapes from platinum and fill the space with the
corresponding shape punched out of, say, 18
carat gold. The platinum shapes will then fit into
the gold spaces. Start with, 10 to 20% thicker
gauge flat and annealed material than the finally
required gauge. Following carat gold techniques
rather than platinum, small paillons should be
placed at intervals along the interface and the
parts soldered together from the intended
front side.
Figure 7C. Representation of the predictability of shapechanges when rolling a coupon of platinum discs in a gold matrix.
Finish the composite sheet by giving it a few light
passes through the rolling mill (Figure 7D). 18
carat gold solder melted into the holes of a drilled
platinum shank is an interesting design
alternative; the advantage being that the solder
melts easily into place (Figure 7E).
Figure 7D. Platinum/gold combination sheet.
Combination
Index
7.4One of the most popular and versatile decoration
techniques is to inlay wire sections into
cuts/grooves, milled, sawn or chased into the
other precious metal surface either previously
polished or prematted under control. Ideally, the
section of the groove should be wider at the
bottom than at the top (Figure 7F). This may be
done by making two or three cuts; the first main
cut follows the drawn out design with a square
graver (vertical sides) and this is followed up with
a fine graver, slanted so that it does not touch
the opposite upper lip, but so that it undercuts
slightly one side, and then the other side, of the
base of the first cut. The wire to be inlaid should
have a diameter about half the depth of the cut
and is set by hammering with a flat faced punch
so that it remains slightly above the surface of
the background when the groove is filled. A flat
graver may be used to trim away the extra inlaid
metal, or it may be ground down and the joint
surface polished or matted in the usual way.
Figure 7E. 18 carat gold solder and platinum ring.
Platinum wire let into 18 carat gold requires little
more than tamping into the groove, flatting and
polishing or matting. Platinum receiving fine gold
wire inlay may not need very much undercutting
because the platinum lip is usually strong
compared with the very malleable fine gold. The
filling requires little force and the two metals will
virtually cold weld.
For slightly more spread out lines, or bands, the
gold wire is first tacked into the start of the
groove, with a flame raising the temperature of
the wire just to melting point. The wire is then led
and simultaneously eased into the grooved
pattern, following along with the flame until the
groove has been filled. If the correct gauge
(usually between 0.25 and 0.75mm gauge) is
chosen, the gold should just stand proud of the
groove and simply needs flatting down and
polishing flush to finish.
Figure 7F. Inlay of a gold motif in platinum. the undercutting of the channel is exaggerated for clarity. In practice, platinumwould not need much of a lip to retain the gold.
Wider gold shapes in platinum can be created by
chasing the outline of the shape into the
platinum and fusing gold wire into the shallow
recess until it is just proud of the surroundings.
Where the area to be filled is larger still, it is
better to cut the gold from thin sheet to fill the
recess, and make up any small gaps with fine
wire filler.
Filigree Platinum
Platinum wire section (not necessarily only round
wire) is strong, even in thin sections, particularly
if used in the half-hard or even harder condition.
It is particularly effective in suspending other
precious metals or precious stones in a brooch
frame, or from a bangle, bracelet or necklace.
One neat way of making an end join or
suspension is to take the half-hard wire, say 0.15
to 0.45mm diameter, fuse one end into a tiny
sphere, thread the free wire through a hole in the
other metal, say 18 carat yellow gold, tension it
and then secure the free end by soldering to the
gold surround (Figure 7G). Alternatively, the
platinum wire can be given a head (and finally a
tail-end) by fusing on a small piece of fine gold of
predetermined weight. No flux is needed and the
fine gold fuses into a small sphere of predictable
diameter. This enables you to make fine gold
nodes or connection points at the ends or
meeting points of platinum filigree wires, to form

Combination
Index
7.5
Figure 7G. Filigree platinum. a diamond “ball” supported byplatinum strings in a gold frame. Two ways of finishing ends areshown. the frame should be pressed inwards while making theends, then allowed to spring back to tension the wire.
single suspensions, spider webs, networks and
meshes. Once the predetermined weight of fine
gold is tacked or twisted over the connection
point, it may be fused without flux by carefully
heating the junction just over the melting point of
gold (i.e. just over 1063°C). If the junction is
really overheated, the molten gold will dissolve
the platinum wire!
Wire Sections Combination
Manipulating wire sections by twisting, plaiting
single or multiple strands, twisting several strands
on a core, twisting or cross-linking chains and coil
weaving, are ancient techniques for making
jewellery. One of the easiest ways of exploring
platinum combination design and techniques is to
combine platinum and other precious metal wire
sections (not necessarily only round sections) by
twisting or plaiting (Figure 7H). This may be
followed by soldering (assembly) or by rolling or
forging (co-working) that will probably also cause
cold welding. Introducing platinum in this way
raises no fundamental problems, but the
following hints may help head off minor problems.
Figure 7H. Combining metals by twisting or plaiting
• Check the marking regulations in the
intended market; while touching wire
sections may each be markable, co-worked
sections may not be individually
distinguishable.
• Start with the platinum and the other
metal(s) equally soft to avoid the softer
twisting more than the harder.
• Choose annealing temperatures to suit the
other precious metal, but allow a longer
time for platinum to recover/stress relieve, if
not fully annealed.
• In making a ring/bracelet band, match the
wire ends to be joined at a diameter the
same as, or smaller than, finally required, or:
• Solder all the wire ends into a cross-piece to
disguise the mismatch.
• It is simpler to expand a band to size than
to cut back to size and attempt to rematch
the wire ends.
Engraved/Etched Patterns
A simple arrangement with good design potential
for platinum/gold combinations is to laminate
platinum with one of the carat golds or plate it
with 22 carat or fine gold. Fine line or broader
pattern shapes may then be produced by either
engraving or etching through the gold surface to
expose the bulk platinum beneath, which may
subsequently be matted rather than polished.
An etchant that attacks gold but will stop acting,
or slow down greatly, on reaching platinum is:
16% Hydrochloric acid,
8% Nitric acid,
1% Iron perchlorate,
75% Water.
Stop-out varnish, liquid asphaltum, hard ground,
and plating resist, all suitable for gold surfaces,
are normally suitable for protecting the retained
gold part of the design on platinum during
etching. However, once the platinum is exposed,
the gold does tend to etch away sideways more

rapidly than downwards. So, to retain (platinum)
lines in fine outline, it is advisable to stop etching
as soon as the fine lines have 'developed'.
Polishing Combination Pieces
Having gone to the trouble to make an effective
design by combining platinum with another metal
of different colour/texture, it is usual to try to
preserve the boundaries between the
components as precisely as possible. With a little
pre-planning and careful polishing it is possible to
minimise both the smearing of the softer metal
over the harder and the creation of a step
between the two. This is easier where the
boundary is simple, rather than convoluted, and
the operator has some control over the local
direction of polishing.
Figure 7I. Platinum /gold combination jewellery.
It is helpful to:
• Choose finishing techniques more
appropriate to platinum than the other
metal, even when platinum is in the
minority.
• Prefer a sharp cutting technique to a smear
polishing or burnishing technique throughout
finishing.
• Note that diamond paste polishing
techniques work on the basis that diamond
is so hard that it treats all precious metals
as equally "soft", so differential polishing is
minimised.
• Polish along the boundary rather than
across, particularly in the final polishing
stage. With intricate designs this may mean
using miniature rotary tools.
ConclusionAny combination design has to be carefully
considered from the point of view of
minimising mixed scrap. While clean, single
precious metal alloy scrap can usually be
remelted or joined economically, this is not
usually so for combined alloys which often
have to be recycled through an early stage
refining process. It is not surprising,
therefore, that combinations of platinum
with other precious metals are rarely made
for stock but rather to special order. Large
producers of platinum combination jewellery
tend to make up their own combination
semi-finished stock. They are skilled in
choosing economic routes, semis product
sizes and designs that are a good
compromise between versatile designs in
finished products that will sell well and
minimise precious metal scrap losses,
including the cost of slow moving inventory.
Combination
Index
7.6
Stamping
Introduction
Tool Materials
Blanking/Punching
Closed-Die Forming
Summary
8
ManualIndex
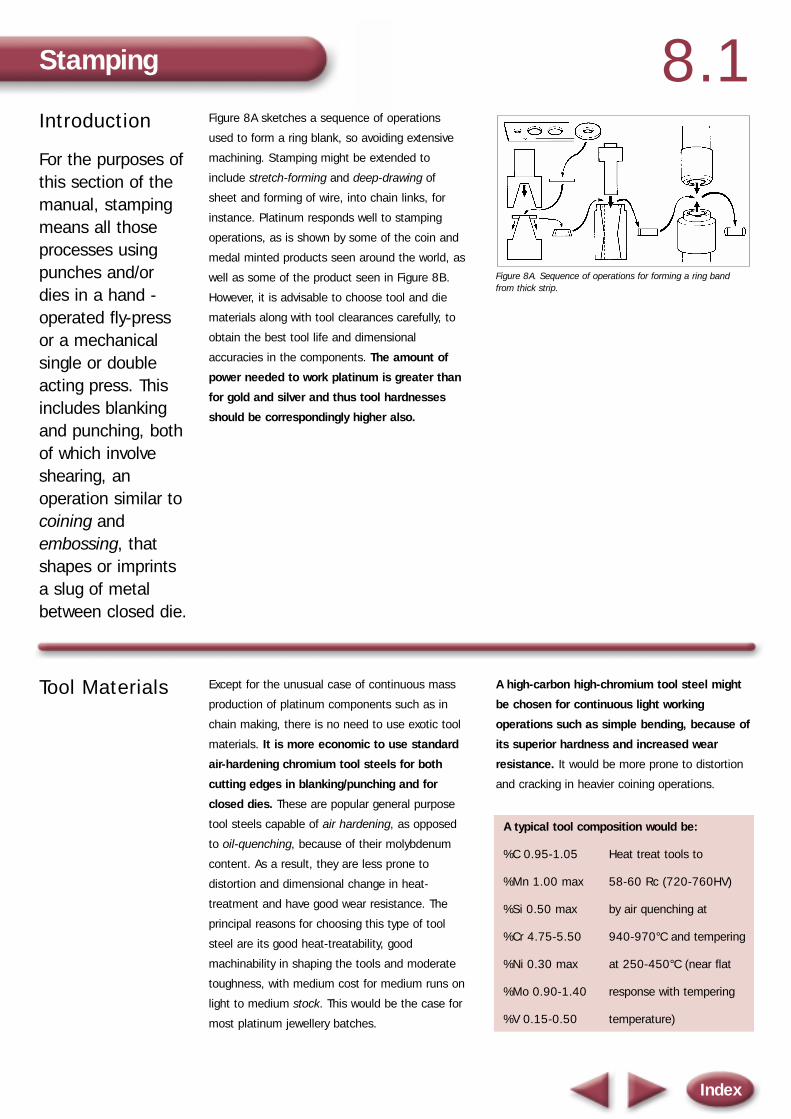
Introduction
For the purposes ofthis section of themanual, stampingmeans all thoseprocesses usingpunches and/ordies in a hand -operated fly-pressor a mechanicalsingle or doubleacting press. Thisincludes blankingand punching, bothof which involveshearing, anoperation similar tocoining andembossing, thatshapes or imprintsa slug of metalbetween closed die.
Figure 8A sketches a sequence of operations
used to form a ring blank, so avoiding extensive
machining. Stamping might be extended to
include stretch-forming and deep-drawing of
sheet and forming of wire, into chain links, for
instance. Platinum responds well to stamping
operations, as is shown by some of the coin and
medal minted products seen around the world, as
well as some of the product seen in Figure 8B.
However, it is advisable to choose tool and die
materials along with tool clearances carefully, to
obtain the best tool life and dimensional
accuracies in the components. The amount of
power needed to work platinum is greater than
for gold and silver and thus tool hardnesses
should be correspondingly higher also.
Figure 8A. Sequence of operations for forming a ring band from thick strip.
Tool Materials Except for the unusual case of continuous mass
production of platinum components such as in
chain making, there is no need to use exotic tool
materials. It is more economic to use standard
air-hardening chromium tool steels for both
cutting edges in blanking/punching and for
closed dies. These are popular general purpose
tool steels capable of air hardening, as opposed
to oil-quenching, because of their molybdenum
content. As a result, they are less prone to
distortion and dimensional change in heat-
treatment and have good wear resistance. The
principal reasons for choosing this type of tool
steel are its good heat-treatability, good
machinability in shaping the tools and moderate
toughness, with medium cost for medium runs on
light to medium stock. This would be the case for
most platinum jewellery batches.
A high-carbon high-chromium tool steel might
be chosen for continuous light working
operations such as simple bending, because of
its superior hardness and increased wear
resistance. It would be more prone to distortion
and cracking in heavier coining operations.
A typical tool composition would be:
%C 0.95-1.05 Heat treat tools to
%Mn 1.00 max 58-60 Rc (720-760HV)
%Si 0.50 max by air quenching at
%Cr 4.75-5.50 940-970°C and tempering
%Ni 0.30 max at 250-450°C (near flat
%Mo 0.90-1.40 response with tempering
%V 0.15-0.50 temperature)
Stamping
Index
8.1

Blanking/Punching
Closed-DieForming
Stamping
Index
8.2There is an optimum clearance between punch
and die which will produce a blank showing a
minimum amount of bending and with the edges
as smooth as possible. This varies from one
metal to another, being least for metals of high
ductility. The general rule for blanking and
punching platinum is that the clearance
between the punch outer diameter and the
internal diameter of the blank holder should be
3-4% of the stock thickness.
Since there is usually no need to anneal
between cutting the blank and its further
shaping, it is usual to start with annealed
material. However, some subsequent operations
work better with half-hard stock and it is not
difficult to blank from stock at a hardness of 85-
100Hv. Die wear is increased in cutting harder
material and if die life has to be maximised, the
platinum alloy should be used in the annealed
condition (for likely hardnesses, see Table 1B).
The clearest example of closed- die forming is the
minting of coins and medals, but the principle
extends to the stamping of components for
making up into "catalogue" jewellery with more or
less embossing on the surface. Coining demands
the highest pressures within closed dies, due to
the requirement for intricate surface designs and
the need for accurate, repeatable blank volumes.
These conditions demand a rigid and accurately
aligned machine frame and accurately matched
and unyielding dies. Most other stamping
operations on platinum are less demanding, but
in all cases, dies must be polished and well
maintained to minimise die wear.
Simple shapes such as leaves, petals and hearts,
may be blanked and shaped in one operation and
subsequently welded (possibly laser welded)
together in a variety of arrangements. Similarly,
findings such as simple settings for calibrated
precious stones, earring parts and brooch
components may be made this way (Figure 8B).
Forming chain links from tape or wire is a special
case of closed - die (continuous) forming. In such
cases, more specialised die materials or die
inserts, and processes such as plating, may be
used to extend the life of dies between recutting.
In long coining runs, the dies are usually
polished, chromium plated, and re-polished
periodically by specialists. The press operator can
also increase the overall life by occasionally
stress-relieving the whole die or the die inserts for
a few hours at 200 to 250°C.
Figure 8B. Stamped pieces.
There are no special problems in stamping
smaller batches of platinum using closed-die
tooling, except perhaps that the dies wear
slightly quicker than they would on gold alloys.

Summary The variety of operations that might be included
under the heading of "stamping" are wide, but
few jewellery manufacturers are likely to use
stamping machinery for long runs on platinum
production alone. Alternating between platinum
production and other precious metals does not
introduce any major problems; most platinum
jewellery alloys are amenable to precision
stamping. However, platinum alloys usually
require more force/power than working with, say,
18 carat gold and, so, in long runs, there is a
need for more robust dies and machinery. Dies
should be maintained more frequently in order to
continue to benefit from the inherently good
workability of platinum. Good housekeeping is, as
always with platinum, cost effective. For instance,
tools and dies used for various precious metals
must be cleaned before and after use on
platinum. Platinum readily picks up and retains
(often by effectively cold welding) other metals.
Such local contamination could even cause an
assay sample to fail, but is more likely to have an
adverse effect on the good working properties of
platinum, particularly after heat-treating, soldering
or welding. The good housekeeping details
given in the sections on soldering, welding
and handworking, apply to stamping
operations also.
Finally, stampings are most likely to be made
from wrought stock of consistent uniform
analysis, so the scrap represents a valuable
resource well worth segregating into a separate
batch identified by a single batch number and
not mixed in with miscellaneous scrap, lemels
or sweepings.
When stamping platinum:
• Keep all tooling clean.
• Do not use excess lubrication.
• Keep press surface and dies highly polished.
• Clean plates of beeswax, other lubricants,
and metal particles that could damage a
high finish.
• There is a tendency to smear or drag wear
on working tools.
• Keeping a high tool polish minimises wear.
Stamping
Index
8.3
Machining
Introduction
Technical Background
Processes
Parting Off
Machine Facetting
Gloss Turning
Heat Generation
Materials
Tools Setting
9
ManualIndex
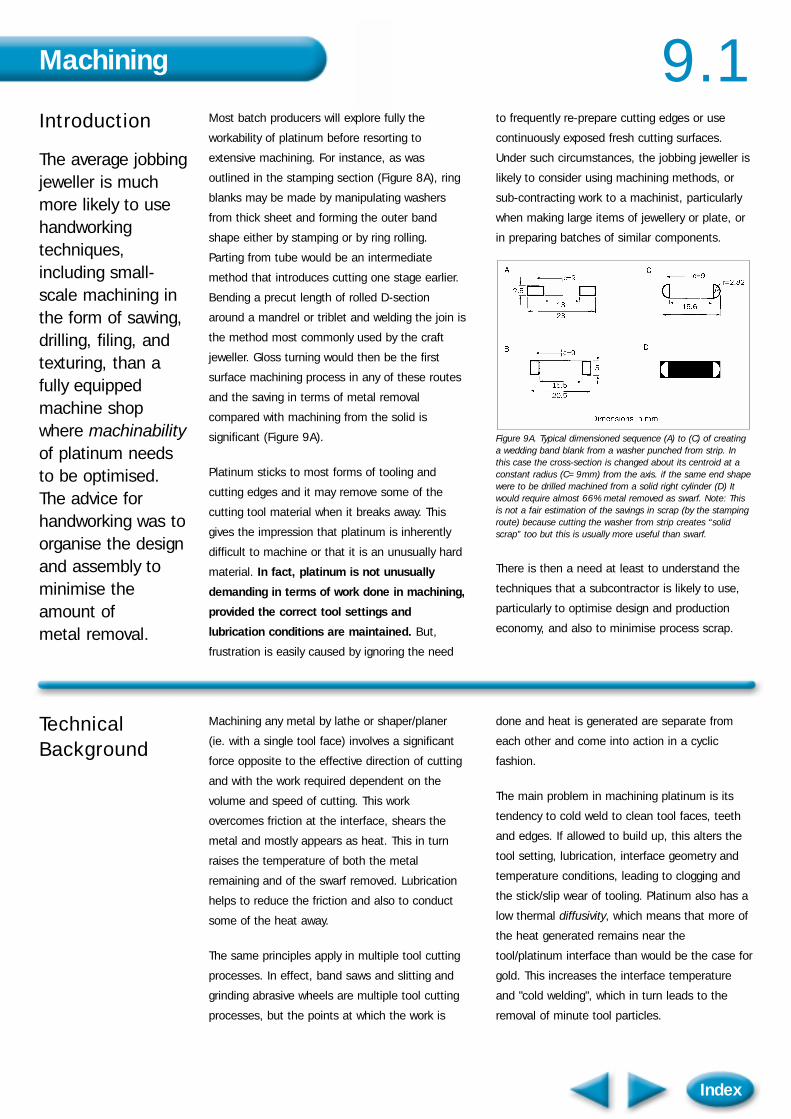
Introduction
The average jobbingjeweller is muchmore likely to usehandworkingtechniques,including small-scale machining inthe form of sawing,drilling, filing, andtexturing, than afully equippedmachine shopwhere machinabilityof platinum needsto be optimised.The advice forhandworking was toorganise the designand assembly tominimise theamount of metal removal.
Most batch producers will explore fully the
workability of platinum before resorting to
extensive machining. For instance, as was
outlined in the stamping section (Figure 8A), ring
blanks may be made by manipulating washers
from thick sheet and forming the outer band
shape either by stamping or by ring rolling.
Parting from tube would be an intermediate
method that introduces cutting one stage earlier.
Bending a precut length of rolled D-section
around a mandrel or triblet and welding the join is
the method most commonly used by the craft
jeweller. Gloss turning would then be the first
surface machining process in any of these routes
and the saving in terms of metal removal
compared with machining from the solid is
significant (Figure 9A).
Platinum sticks to most forms of tooling and
cutting edges and it may remove some of the
cutting tool material when it breaks away. This
gives the impression that platinum is inherently
difficult to machine or that it is an unusually hard
material. In fact, platinum is not unusually
demanding in terms of work done in machining,
provided the correct tool settings and
lubrication conditions are maintained. But,
frustration is easily caused by ignoring the need
to frequently re-prepare cutting edges or use
continuously exposed fresh cutting surfaces.
Under such circumstances, the jobbing jeweller is
likely to consider using machining methods, or
sub-contracting work to a machinist, particularly
when making large items of jewellery or plate, or
in preparing batches of similar components.
Figure 9A. Typical dimensioned sequence (A) to (C) of creatinga wedding band blank from a washer punched from strip. Inthis case the cross-section is changed about its centroid at aconstant radius (C=9mm) from the axis. if the same end shapewere to be drilled machined from a solid right cylinder (D) Itwould require almost 66% metal removed as swarf. Note: Thisis not a fair estimation of the savings in scrap (by the stampingroute) because cutting the washer from strip creates “solidscrap” too but this is usually more useful than swarf.
There is then a need at least to understand the
techniques that a subcontractor is likely to use,
particularly to optimise design and production
economy, and also to minimise process scrap.
TechnicalBackground
Machining any metal by lathe or shaper/planer
(ie. with a single tool face) involves a significant
force opposite to the effective direction of cutting
and with the work required dependent on the
volume and speed of cutting. This work
overcomes friction at the interface, shears the
metal and mostly appears as heat. This in turn
raises the temperature of both the metal
remaining and of the swarf removed. Lubrication
helps to reduce the friction and also to conduct
some of the heat away.
The same principles apply in multiple tool cutting
processes. In effect, band saws and slitting and
grinding abrasive wheels are multiple tool cutting
processes, but the points at which the work is
done and heat is generated are separate from
each other and come into action in a cyclic
fashion.
The main problem in machining platinum is its
tendency to cold weld to clean tool faces, teeth
and edges. If allowed to build up, this alters the
tool setting, lubrication, interface geometry and
temperature conditions, leading to clogging and
the stick/slip wear of tooling. Platinum also has a
low thermal diffusivity, which means that more of
the heat generated remains near the
tool/platinum interface than would be the case for
gold. This increases the interface temperature
and "cold welding", which in turn leads to the
removal of minute tool particles.
Machining
Index
9.1

Optimising the machining of platinum depends
on minimising friction by correct tool settings
and reducing and removing heat as efficiently
as possible with lubrication. Alternatively, it
may be possible to use tooling that is
specifically designed to break away cleanly,
thus constantly replenishing the
cutting surface.
The principle forces involved in lathe turning
(including gloss turning) the shaper/planer and
even boring and drilling, are similar. In lathe
turning, the tool remains stationary and the work
rotates; in shaping, the work is clamped and the
tool moves over it, but the relative movement and
force vector set up are essentially the same. They
are shown in Figure 9B, which illustrates the
principle forces and tool angles that have to be
considered to maximise machinability of platinum
by minimizing the cutting force and protecting the
cutting edge as long as possible. The
arrangement shown is for the shaper/planer, but
the principles extend to an external lathe cut,
where the work surface would be convex, and to
drilling/boring, where the work surface is normally
concave in relation to the tool tip. The most
important force contributing to the work is Fc, the
cutting force opposite to the direction of cutting.
Anything that can be done to reduce Fc will
reduce the total work done and heat
generated. Anything which increases Fc is likely
to increase friction, tool wear, distortion of the
interface and vibration.
What we need to do is to reduce the redundant
work more than the essential cutting work. This
requires careful choice of cutting speeds, cutting
depth, and cutting interface angles. Increasing
speed and/or depth of cut increases the force,
the rate of metal removal and the rate of heat
generated, but not necessarily the rate at which
the heat is removed. Altering the angle of the tool
face to the work, mainly alters the area of the
interface as wear takes place, the ease with
which lubricant gets to the working edge and
consequently the rate of heat removal. It also
changes the way in which swarf is generated and
cleared from the interface.
The forces, particularly Fc, but also friction,
and the heat generated:
Increase with
• Cutting speed.
• Depth of cut.
• Hardness of the metal.
Decrease with
• More lubrication.
• Optimum tool angles.
• ‘Sharp’ cutting edge.
Figure 9B. The tool/workpiece interface, showing the shearplane of the chip and the two main forces acting on the tool.
Processes Parting Off
It is common practice to part off tube into ring
blanks prior to gloss turning on a lathe. With
platinum, this can lead to rapid tool wear and
give rise to large burrs, too much kerf and poor
edge surface finish. So, it is better to slit the
platinum using thin alumina or silicon carbide
resin bonded discs. These can be as little as
0.3mm thick, provided they are run in disc guides
to avoid excessive flexing. Depending on the
diameter (the maximum safe speed decreases
with diameter) the effective surface speed may
be between 1300 and 3800 M/min. The surface
finish of the cut surfaces is determined by the
grade of abrasive used in the disc and may be
about 2 microns (µ) for a disc of 400 grade grit.
Machining
Index
9.2

A burr is produced on the inner surface of the
tube/band when finally slitting through. This is
minimised by a fast feed rate, particularly just
before break through, but this increases the rate
of disc wear. A compromise is to feed forward at
20 to 30mm/min at a disc peripheral speed of
about 1400 M/min, and to cool with water or
water soluble coolant/lubricant to prevent burning
the disc. Where there is sufficient demand to
justify taking all steps to increase quality and
productivity, it is also useful for the tube itself
to be rotated counter to the spin of the
slitting disc.
Machine Facetting
Platinum bands may be facetted using the same
type of machines as used for facetting gold
bands. These machines “scallop” tiny pieces of
metal away in a geometrically planned pattern
using a rotating disc with a lapped diamond on its
circumference. The only difference is in the likely
life between regrinds of the diamond cutting
edge. Whereas an average facet design might be
repeated on 100 or more gold bands before
regrinding the diamond, with platinum, the
number of repeats would be about 8-10. As the
depth of cut is also less, so each platinum ring
takes about 4 times as long to facet as a similar
design on 18 carat gold. It is possible to make
deep facet cuts on platinum, but this shortens
the life between diamond regrinds even more
drastically. A new or reground tool can be used
initially on either gold or platinum, but once it has
been used to facet platinum it should not be
used on gold; it will not give the expected high
finish, because of minute damage to the
diamond cutting edge.
This apparently expensive process should be seen
in perspective. The initial investment in diamond
tooling is no different, whether for gold or silver
(assuming the operator is facetting both gold and
platinum), so it is the regrind costs that have to
be compared. With careful process control
(shallow cuts, accurate setting, low rotor speed
with plenty of no-load time between cuts) tools
should last, say, 8 completed rings before a light
lapping is needed to restore an acceptable finish
ability. The costs compare well with skills costs for
hand-finishing a high bullion value ring.
It is possible to adapt the machine facetting
process to produce a prefinal polish state for a
plain band as a substitute for machine gloss
turning. The facetting machine is programmed to
make very small shallow cuts all over the top
surface of an accurately profiled and sized
platinum ring blank. This produces a highly
reflective finish automatically, but one which is
not absolutely smooth. If a smooth finish is
required, the final stage should be hand polishing
rather than a gloss-turning machine. The
difference is that the myriads of facets are
produced by the diamond moving quickly but
intermittently over the stationary ring surface,
while gloss turning rotates the ring continuously
beneath a single diamond point; there is no off-
load cycle time for heat to dissipate.
Gloss Turning
The most important small scale batch jewellery
machining operation is the gloss turning of
wedding bands, which requires more care when
employed on platinum than on yellow gold. The
standard jeweller's lathe tool for gloss turning gold
has a relatively obtuse cutting edge, with 15°
negative top rake and a narrow glossing flat
immediately below this edge. This is intended to
burnish after the cutting edge, but it also
interferes with lubrication between tool and
workpiece (Figure 9C). With platinum, a tool with
a more positive top rake lowers the cutting force.
However, tool wear is slower, lubricant access is
improved and deterioration in work surface finish,
although not burnished, is only very slight. This
tool tip arrangement is less robust than the
conventional negative top rake, but with the
mainly shallow cuts for glossing this is not a
problem. The effective machining speed in gloss
turning is a combination of the rotational speed
of the mandrel/ring blank and the speed of
traverse of the tool over the width of the band
(which will often be radiused).
Machining
Index
9.3

A high rpm combined with a slow traverse will
produce the finest grooves tightly packed.
Provided the tools are correctly set, sharp and
clean, this will give the best direct gloss effect
with platinum.
Figure 9C. Diamond glossing tool geometries.
However, a high rotational speed with worn tools
increases the rate of heat development,
decreases the specific heat removal capacity of
the lubricant and causes the wear problems to
rapidly escalate.
With platinum, gloss turning is best carried out
in two stages. Firstly, the surface is prepared
with a ceramic tool to remove all but the finest
blemishes, and then secondly, a diamond tool
produces the final gloss finish using only 2.5 to
3 micron cut depth.
Heat Generation
The rate at which heat is generated will depend
principally on the linear cutting speed, whilst the
rise in temperature will depend on the thermal
diffusivity of the tooling, the workpiece and the
lubricant. Doubling the surface speed from, say,
50M/min to lOOM/min will roughly double the
load, other things being equal, but it is unlikely to
increase the heat removal rate in compensation.
Gloss turning - Summary:
• Start with fully annealed material.
• Use a tool with 5° top rake and 5-7° front
face clearance.
• A rigid lathe set-up is essential to minimise
"chatter".
• Adjust surface speed to 70-110M/min.
• Make very light cuts 0.0025-0.005mm
deep.
• Use a slow traverse rate across the
band face.
• Use flush lubrication to remove heat
and swarf.
• The preferred gloss tooling material is single
crystal diamond.
Materials The order of increasing tool life is roughly:
• Tool steel.
• Cobalt bonded tungsten carbide tip.
• Glass bonded (polycrystalline) alumina
(sapphire).
• Cubic boron nitride.
• Sapphire.
• Diamond.
• Polycrystalline diamond compact.
Tools
All common tool materials will cut platinum; a
problem only arises when tool life is important, as
in extended gloss turning or repeated batch or
jobbing operations. Where tool life is a
consideration, tool steel and tungsten carbide do
not have as long lives as they do with gold or
silver and so more advanced materials should be
used. On the other hand, some large users take
the view that the bullion value of platinum
products is high enough to justify rough
machining first with tungsten tooling, to get as
good a finish as possible for a few pieces, and to
then discard the tool and finish with only a light
demand on more expensive tooling which has
Machining
Index
9.4
been kept in very good condition. The order of
the materials in producing increasing quality of
surface finish may be much the same, on the
grounds that surface finish depends on preserving
a clean cutting edge, free from significant wear.
However, there may be exceptions, as when
polycrystalline tools begin to wear they may
expose fresh cutting surfaces, which, with
platinum, helps continued sharp cutting. This will
usually spread the cutting edge and a broader cut
will often result in a poorer finish. To date, the
best combination of wear resistance and gloss
finish has resulted from finishing with a single
crystal diamond tool. It also helps to spend time
in setting up the tooling correctly and then to use
it on a run of all the same standard sized ring
blanks, rather than to change settings (with
inevitable slight inaccuracies) between different
sized blanks.
For consistent work on other than occasional
pieces it is necessary to use diamond. Both
single crystal and synthetic polycrystal diamond
have been used. Even so, the durability of the
diamond tool will be lower with platinum than
with other jewellery metals. Diamond is the
hardest material available, but diamond cutters
are well aware that even the abrasion resistance
hardness of diamond varies with different faces
and directions. Where a single crystal
diamond is used, it helps to orient the stone
so that the front face of the tool is a (100)
crystallographic plane.
Lubricants
Most machining fluids reduce tool loading
considerably compared with dry running; their
effectiveness to do so depends largely on their
viscosity and, in turn, their ability to remain at the
tool/work interface. However, different machining
fluids act in different ways. A cutting fluid is
designed to assist swarf and heat removal from
the cutting edge, while others of a more viscous
(thicker oil or gelatinous) nature tend to lift the
tool a little and so enhance the burnishing action
of the tool. The latter is better for gloss turning
for instance, while the former is more efficient in
precision cutting. Some fluids are compounded to
emphasize heat removal ability.
Traditional lubricants for slow speed or hand-
working of platinum include oil of wintergreen
(methyl salicylate) and 10% (by weight) gelatin in
water. Neither were developed specifically as long
lasting fine turning or gloss turning lubricants; and
neither contain inhibitors, so they can cause
corrosion or mould on the machine tool
components (not on the platinum!). Whilst they
do appear to have about the right sort of viscosity
and penetrability into the cutting face at low
speeds for maximum tool life, some of the
commercial cutting fluids are preferable. These
do contain inhibitors, so machine tools are better
protected and their dynamic viscosity and heat
scrubbing capacity can be better suited to
penetrating and staying at the difficult tool
platinum interface during high speed turning.
Machining
Index
9.5
Tools Setting The rake angle (ß) determines whether the tool
will remove metal in a ribbon or continuous chips
or whether it will plough a furrow instead of
cleanly removing metal. To cut rather than plough
requires a larger rake angle for a soft metal, such
as annealed platinum, than for a relatively harder
metal, such as steel. But, the practicable angle
also has to allow for the fact that the tool will
wear too quickly or even crumble if the angle is
too large. Some metals can be machined to a
better surface finish with a negative rake angle
which may also introduce a greater degree of
burnishing.The clearance angle affects the ability
to pass lubricant over the working interface and
the likelihood that the friction interface at the
back of the tool cutting edge will increase
significantly with only a little tool wear.
However, the clearance angle cannot be
decreased too much before the tool tip becomes
too fragile to maintain a firm stance and avoid
vibration. For platinum, avoiding interface friction
is of a higher priority than tool bulk, so rake angle
is always towards the positive side and the
clearance angle above average.
Typical setting should be:
• Rake angle (ß)=0 to 10°.
• Clearance angle =5 to 10°.
• Prefer annealed, to work hardened
platinum alloy.
• Depth of cut <0.05mm (0.005mm
preferred).
• Slow cutting speed <50M/min.
• Use good cutting fluid liberally.
Machining 9.6
Index
Lasers
Lasers and Platinum Jewellery
Laser Systems
Why Platinum Responds Well
Some Design Principles
Safety Considerations
10
ManualIndex
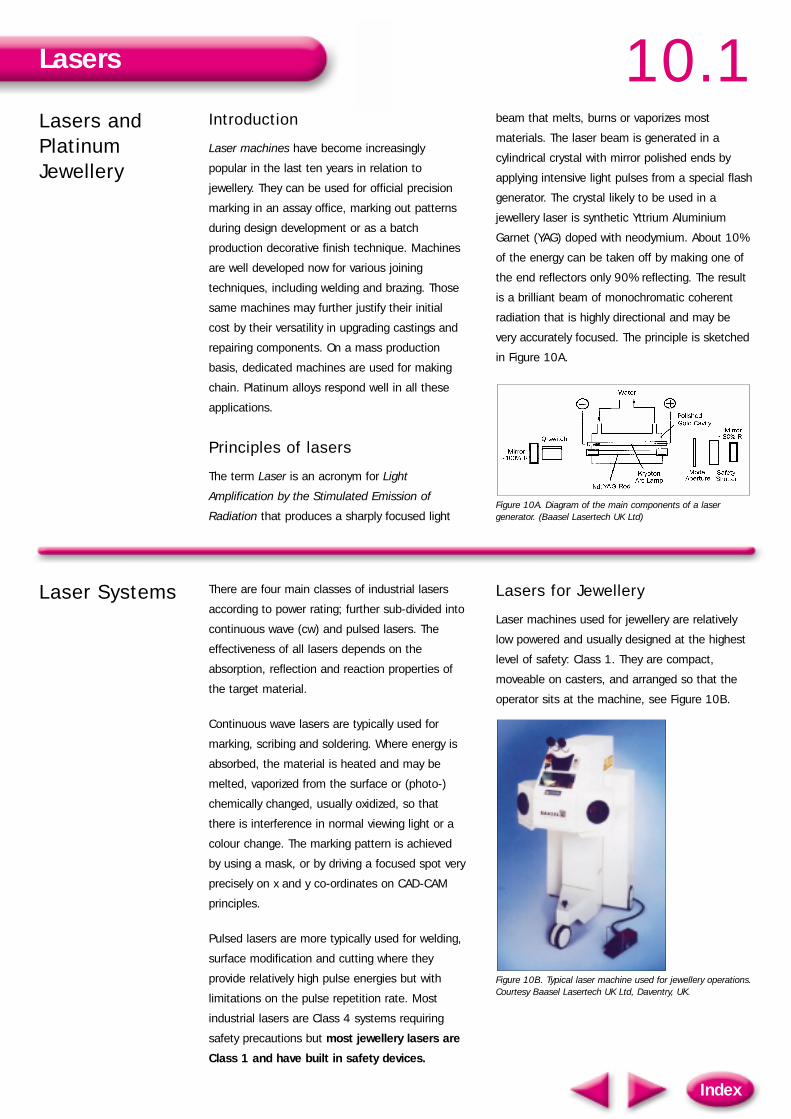
Lasers andPlatinumJewellery
Laser Systems There are four main classes of industrial lasers
according to power rating; further sub-divided into
continuous wave (cw) and pulsed lasers. The
effectiveness of all lasers depends on the
absorption, reflection and reaction properties of
the target material.
Continuous wave lasers are typically used for
marking, scribing and soldering. Where energy is
absorbed, the material is heated and may be
melted, vaporized from the surface or (photo-)
chemically changed, usually oxidized, so that
there is interference in normal viewing light or a
colour change. The marking pattern is achieved
by using a mask, or by driving a focused spot very
precisely on x and y co-ordinates on CAD-CAM
principles.
Pulsed lasers are more typically used for welding,
surface modification and cutting where they
provide relatively high pulse energies but with
limitations on the pulse repetition rate. Most
industrial lasers are Class 4 systems requiring
safety precautions but most jewellery lasers are
Class 1 and have built in safety devices.
Lasers for Jewellery
Laser machines used for jewellery are relatively
low powered and usually designed at the highest
level of safety: Class 1. They are compact,
moveable on casters, and arranged so that the
operator sits at the machine, see Figure 10B.
Figure 10B. Typical laser machine used for jewellery operations.Courtesy Baasel Lasertech UK Ltd, Daventry, UK.
Lasers
Index
10.1Introduction
Laser machines have become increasingly
popular in the last ten years in relation to
jewellery. They can be used for official precision
marking in an assay office, marking out patterns
during design development or as a batch
production decorative finish technique. Machines
are well developed now for various joining
techniques, including welding and brazing. Those
same machines may further justify their initial
cost by their versatility in upgrading castings and
repairing components. On a mass production
basis, dedicated machines are used for making
chain. Platinum alloys respond well in all these
applications.
Principles of lasers
The term Laser is an acronym for Light
Amplification by the Stimulated Emission of
Radiation that produces a sharply focused light
beam that melts, burns or vaporizes most
materials. The laser beam is generated in a
cylindrical crystal with mirror polished ends by
applying intensive light pulses from a special flash
generator. The crystal likely to be used in a
jewellery laser is synthetic Yttrium Aluminium
Garnet (YAG) doped with neodymium. About 10%
of the energy can be taken off by making one of
the end reflectors only 90% reflecting. The result
is a brilliant beam of monochromatic coherent
radiation that is highly directional and may be
very accurately focused. The principle is sketched
in Figure 10A.
Figure 10A. Diagram of the main components of a lasergenerator. (Baasel Lasertech UK Ltd)

A typical laser machine can weld almost all
metals and alloys quickly, reliably and precisely
but the efficiency does depend very much on the
properties of the target materials. Components to
be joined, or upgraded in the case of castings,
are arranged under visual control or jigged, and
exposed to one or more laser pulses. A typical
pulse lasts 2 to 10 milliseconds, (ms). The device
is equipped with a stereomicroscope and a cross
hair to facilitate the exact positioning of the parts
and to target the exact position on the work piece
where the laser pulse will strike. The height and
lateral position of the work piece can be adjusted
slightly within the field of the stereomicroscope.
One of the characteristics of a good jewellery
laser machine is the effective depth of focus of
the beam. The beam in the working zone is
shaped by a multi-element lens at the exit of the
laser generator. Normally, a machine used only
for marking needs little depth of focus as long as
the marking field is in a plane normal to the
beam so the optics are arranged to give a flat
field. The laser welder is easier to use if the
beam in the working zone is cylindrical because
the spot diameter does not change over several
millimeters of focus; see Figure 10C. As with a
macro camera lens, the depth of focus increases
with increasing working distance from the exit
lens to the work piece, the standoff distance.
Figure 10C. Laser beam shapes.
The total welding energy can be controlled by
adjusting the intensity of individual laser pulses,
pulse length and pulse frequency. Pulse to pulse
energy stability is also important so that
satisfactory settings for a particular job remain
consistent. Some machines can be pre-
programmed by storing different combinations of
settings that have been found satisfactory for
particular jobs. Suitable adjustments for various
materials can be made through trial and error but
certain heat flow principles allow good predictions
of suitable welding parameters. The overall speed
of the process is largely controlled by the time
taken to position the work for each pulse. Pulsing
normally takes place in still air but some cooling
is possible by directing an air or inert gas jet into
the work zone. Weld quality for reactive alloys can
be improved by using inert gas shielding but this
is largely unnecessary for platinum alloys. Any
vapour produced can be extracted from the work
chamber via an exhauster unit. Some machines
allow integrated control of the laser pulsing and
air/gas flow by using a pedal switch with two
operating pressures and single or sequenced
pulsing is decided by the length of time of the
pressure on the pedal. This leaves both hands
free to position the work. Each pulse is only a
small part of the total energy dissipated within
the laser generator itself, so this is cooled
effectively by a heat exchanger with an external
cooling water supply.
Table 10A. Typical Parameters For Jewellery Laser WeldingMachines.
The very high heat intensity laser beam pulse
generates a surface temperature well above the
melting point of platinum at a very small diameter
target spot. This allows the user to weld, under
ideal conditions, as close as 0.2 mm from
complicated and heat-sensitive component parts
such as hinges, catches, fasteners, settings,
most precious stones, and even, with care, pearls
and organic materials. Provided the heat flow
Lasers
Index
10.2
Approx Machine Size Range 700-1350 x 250-550Ht x width x depth, mm x 650-860Weight, kg 85-150Input Power supply 115 or 200-240V/
50-60Hz single phaseMax average operating power 30-80W #Focal spot diameter 0.2-2.0 mmPulse energy 0.05-80 J (Watt.sec)Peak pulse power 4.5-10 kWPulse duration 0.5-20 msPulse frequency Single to10 HzPulse energizing voltage* 200-400V# average light bulb power but because all in-phase,equivalent to an order of magnitude more.* Voltage used to trigger Xenon flash, which, in turn,affects the energy of the laser beam output
SW Performance -Why is a good beam quality so important?
Good beamquality
Bad beamquality
FocalArea
Misalignment of workpiece in beamdirection due tomanual positioning Spot diameter
remains nearlyconstant
Spot diameter changes dramatically

Figure 10D. Effect of varying laser controls on the cross section of the heat affected zone.
Lasers
Index
10.3Alloy Composition Pulse Energizing Pulse Length Comments
Voltage* MillisecondsPlatinum - all 200-300 1.5-10 Very good welding resultsGold - 999 fine 300-400 10-20 Darken target area; high power necessaryGold - 18ct yellow 250-300 2.5-10 Good welding resultsGold - 18ct white 250-280 1.7-5.0 Very good welding resultsSilver - 925/835 300-400 7.0-20 Darken target area; high power necessaryTitanium 200-300 2.0-4.0 Inert gas cover recommendedStainless Steel 200-300 2.0-15 Inert gas cover recommended
Table 10B. Typical Laser Welding Parameters For DifferentJewellery Materials.
away from the target is limited, it is possible to
retain heat-treated or cold-worked hardness in
most jewellery alloys; this works particularly well
with platinum jewellery alloys.
The parameters shown in Table 10B are based on
an average beam diameter of about 0.5mm on
the materials stated and may need adjustment
for other compositions. The three main control
parameters have slightly different effects on a
single material as shown in Figure 10D. Different
materials can have very different thermal
diffusivity properties, melting temperatures and
latent heats of melting. The way these important
physical properties combine together have a
marked effect on the energy intensity needed to
produce an effective weld. Welding is achieved
only with adequate heat being absorbed through
the surface, not when the beam is reflected off
the surface. The colour and reflectivity of the
surface is very important. Where there is a
combination of high reflectivity and high heat
dispersion (e.g. silver and high carat golds), it is
helpful to mark and darken the target spot or line
with a dark blue or black felt tip pen or
permanent marker. This effectively increases the
absorption coefficient of the surface.
0.2mm. beam diam., 2.5 ms pulse, incr. volts300V 350V 400V
2.5 ms pulse, 300V., incr. beam diam.0.25 2.5 4.5mm
0.2mm. beam diam., 300V., incr. pulse2.5ms 10ms 20ms
A B
C A Increasing voltage, increasespenetration.
B Extending pulse increasestotal pulse energy and radialheat flow.
C Greater beam diam., withconstant pulse energy givesheat spread rather thanpenetration.

Why PlatinumResponds Well
The efficiency of a laser welder differs from alloy
to alloy. The same set of control parameters will
result in the same power delivered in each
welding pulse but the melting effect of each pulse
depends on the proportion of the heat energy
absorbed through the surface rather than
reflected, and then on:
• Specific heat from room temperature to the
melting point
• Melting point (liquidus)
• Latent heat of melting
• Thermal diffusivity
While the melting points for most platinum
jewellery alloys are very high, their thermal
diffusivities are all similar and relatively low (table
10C) so the laser is able to deliver enough energy
to melt a very small focused spot at each pulse
but with only a small heat affected zone. With the
possible exception of palladium (lower melting
point at 1555°C) all the platinum group jewellery
alloys respond to the laser machine settings in a
very similar way. There are slight differences in
surface colour when melting in air (the copper
and cobalt alloys tend to be a little grayer, for
instance) but these differences have little effect
on the optimum control settings. On the other
hand, gold and silver alloys have much lower
melting points but five to seven times higher
capacity to transmit heat away from the target.
With platinum, the laser target can approach very
close to delicate stones and normally it is
unnecessary to remove stones before making
repairs, for instance. A skilled operator can
achieve welds with little or no scarring and in
most cases components should be near finish
polished before welding. Alternatively,
Metal/Alloy Melting Thermal. point °C diffusivity
999 Platinum 1773 0.245990 Platinum 1773 0.2455% Copper 1745 0.2885% Cobalt 1765 0.2233% Co/7%Pd 1740 0.2295%Co/10%Pd 1730 0.2205% Iridium 1795 0.24510% Iridium 1800 0.24215% Iridium 1820 0.24120% Iridium 1830 0.237Palladium 1555 0.2405% Palladium 1765 0.24710% Palladium 1755 0.24715% Palladium 1750 0.2475% Rhodium 1820 0.2505% Ruthenium 1795 0.2555% Tungsten 1845 0.267Fine Gold 1063 1.200Fine Silver 962 1.702
Table 10C. Melting point and thermal diffusivity for platinum alloys.
components can be tack welded together,
adjusted until positioned correctly and the final
welds can be made with laser settings that
improve the cosmetic finish of the tack welds.
While almost all platinum jewellery alloys fall into
this easily managed category, it is worthwhile
studying how to make minor variations in laser
settings to achieve optimum conditions for each
specific alloy.
Another feature of the localized heating effect of
the laser is that dissimilar alloys can be joined
more readily than when using more bulk melting
processes. There are still some incompatible pairs
but the laser welder can produce narrow weld
zones so that the change in colour or texture
between the two components is sharper and
better delineated.
Lasers
Index
10.4

Some DesignPrinciples
The most obvious common feature of a typical
range of laser welded platinum jewellery is that
remarkably small sections, thin stampings, low
gauge wire can be at least stitch welded with
precision. Welds that are more extensive and
repairs of casting defects (see later section) are
made by a series of overlapping pulses.
The laser is limited to joints that can be hit by the
direct beam, so, deep and undercut sites should
be avoided.
Figure 10E. Platinum and gold pendant where design andproduction take advantage of laser welding.
The essential points of the design in Figure 10E.
are that cold drawn square wire is used (with the
main stress on the diagonals) and several of the
components are elastically stressed so that they
give a sense of springiness and rigidity. The tightly
localised and limited heat diffusivity allows springy
and hard components to be joined with little or
no softening. This enables designs that make
good use of lightweight springy sections or robust
fasteners. The very limited heat affected zones
also allow joining of more dissimilar alloys (assay
rules allowing) than would be possible with large
scale melting. In good commercial practice, it
would be advisable to bring all the components in
Figure 10E to a higher degree of finish prior to
joining. Most of the high finish is preserved and it
is easier to clean up and polish separate
components than the finished piece.
The laser welder can also be used to make joints
in other ways. With careful control it is possible to
effectively spot weld through one light section to
another beneath but unlike normal spot welding
this does involve melting through the top layer.
Two or three thin components can be sandwich-
joined by, in effect, a laser version of riveting; see
Figure 10F.
Figure 10F. Simple "rivet-type" joining techniques.
Upgrading and Repairs
Some platinum jewellery manufacturers producing
pieces based on castings may feel that the initial
capital cost of a laser welder around $40,000 to
$50,000 is uneconomic. In practice there are
probably as many laser welders used for
upgrading castings as there are for making
welded pieces so it is not so difficult to justify a
dual-purpose arrangement. In addition, laser
machines on low power can do a useful job in
cleaning up and assembling wax patterns prior to
investment. Do not leave any wax residues
around when welding platinum alloys; it can
easily cause carbon contamination.
Ideally, platinum alloy jewellery castings should
meet a consistently satisfactory standard of
soundness. Some small surface defects can be
repaired at the fettling stage but small pinhole
defects sometimes only show up late during
polishing. The expense to both the finisher and
caster of returning such components for recasting
is often avoidable by using the laser welder to
upgrade the castings. This applies particularly
when the casting and finishing operations are on
the same site.
There are several techniques. A simple glossing of
a small area of rough surface texture may be
achieved by using a rapid repeat sequence of
pulses with the laser beam set relatively wide and
shallow. Small pinhole defects (around 0.25mm)
can be filled by similarly pulsing around the edge
Lasers
Index
10.5Drill hole to same diam.as platinum rivet wirethrou’ both thicknesses.
Fuse one end of rivetwire to small bead.
Thread rivet wire thro’both plates.
Laser weld slight rivetprotrusion to shape.
Platinum components can be laser rivetted by a variety of techiques,two of which are illustrated above.
Preformed hinges can be spot-welded or rivetted into place withprecision and without damage.
Rivets, in effect dowels, can be hidden by laser, thro’ the surface, to the rivet end receased beneath.
Staggering the rivets or spotwelds helps give lateral stability.
Drill hole to samediam. as platinum rivetwire but not thro’ back.
Only tack weld neededto back plate.
Thread thro’ top plate.
Laser weld slight rivetprotrusion to shape.
Rod end drilled1mm; spring wirewelded in with filter
Half hard 18ct gold,spring-bow, laser welded
Pair of hard drawnPt arcs laser welded
2 arcs free to vibrate

of the defect. Larger defects can be effectively
filled with fine filler wire touched into the defect
and, in effect, cut to size with the laser beam
striking the wire and then leveling the filler down
to the original surface. The colour of the filler can
usually be matched accurately to that of the
casting. The principles of the laser machine when
used for upgrading castings and when welding are
virtually identical so virtually all of the advice in
the sections above still applies. In particular the
same safety principles apply.
SafetyConsiderations
There is an IEC standard for Radiation Safety of
Laser Products, including equipment
classification, requirements and a user's guide.
The objects of the standard are to:
• protect persons from laser radiation in the
wavelength range 200nm to 1µm by
indicating safe working levels laser radiation
and by introducing a system of classification
of lasers and laser products according to
their degree of hazard.
• require both the manufacturer and the user
to supply information and establish
procedures so that proper precautions can
be adopted.
• ensure adequate warning to individuals of
hazards associated with accessible radiation
from laser products, by way of signs, labels
and instructions.
• reduce the possibility of injury by minimizing
unnecessary accessible radiation, give
improved control of the radiation through
protective features and provide safe usage
of laser products by specifying user control
measures.
The IEC standard, ref 2, defines four general laser
classes; but virtually all jewellery lasers are Class
1, with a pulse peak power of considerably less
than 1MW and are inherently safe or made safe
by engineering design. Most of the necessary
safety features are not only built in but the
machine cannot normally be operated unless the
necessary safety features are automatically
triggered, making them Class 1 lasers. Jewellery
lasers should fulfill the requirements that apply to
a Class 1 laser device for the absolute safety of
the operator and anyone else in the vicinity (i.e. it
has successfully passed official safety standards)
This should also ensure adequate eye protection.
Typical safety devices include:
• The laser will not operate until the operator has
put both arms through the hand openings and
activated both interlock switches. The
positioning of the interlock switches also
encourages safe and steady holding of the
work piece in the correct working position and
the arms safely block radiation escaping the
work zone.
• The best working position is determined by
using the microscope and this viewing field
automatically restricts the position to the
controlled zone. Apart from direct safety, it
greatly helps to prevent back and neck ache if
the seating to the microscope is adjusted so
that the body is always upright and relaxed and
the operator is calm and concentrating,
particularly when triggering laser pulses.
• The operator's eyes are protected against direct
laser radiation (and some of the secondary
radiation) by special shutters that close
momentarily over the view as the laser pulse is
triggered. This happens so quickly that the
operator does not normally notice the
disappearance of view.
Lasers
Index
10.6

• The laser beam generates secondary radiation,
including infrared and ultraviolet light, from
most materials. This can be observed through
the laser protective (filter) window without
damaging the eyes but visible secondary
radiation can cause headaches if the eyes are
directly exposed to it for any length of time.
The laser beam itself remains invisible.
• To ensure unhindered observation of the
process, the laser protective window is
otherwise completely transparent. A halogen
lamp illuminates the work in the operating zone
even when welding is taking place.
The only voluntary danger is to the unprotected
hands of the operator who could inadvertently
place part of a hand under the pulsing laser
beam and suffer local burns to the hands or
fingers. At the power of most jewellery welding
lasers, one or two pulses on the fingers may be
experienced (like needle jabs) without more than
short-term discomfort. Multiple pulses,
particularly at the same spot can produce a small
but potentially deep burn and this merits medical
attention to ensure no infection results. Only
under very unfavourable circumstances will the
secondary/scattered radiation reach an intensity
significant enough to burn the skin of the hands.
Normal exposure of the skin to low levels of
scattered radiation at the wavelength of 1064nm
can be regarded as physiologically safe. The
infrared laser radiation acts like normal heat
radiation.
Repeated laser pulsing of relatively high thermal
diffusivity materials can easily cause normal
heating of the component to a temperature that
can burn the fingers. Jewellery (rings, watches,
bracelets) should not be worn inside the work
zone as they may be struck by the laser beam
and even if they are not damaged they can
conduct heat to the fingers. A rapidly heated ring
is very difficult to remove from the finger in the
confines of a laser cabinet! In addition, jewellery
items can reflect or even focus the scattered
radiation and thus cause minor skin burns.
References/recommendations forfurther reading.
1. Utilization of lasers in the joining of gold and
platinum for jewelry, Costantino Volpe &
Richard D. Lanam, Proc. Sante Fe
Symposium on Jewelry Manufacturing
Technology, 1998.
2. Laser Machine Safety Standard. BS/EN60825
(IEC 825-1)
Lasers
Index
10.7

Glossary
Glossary
Comparative Weights and Measures
11
ManualIndex

Glossary
Definition of termsin italics and cross-references.
AcceleratorSpeeds setting of investments,
mainly for economic production
reasons. Based on strongly
crystalline substances such as
common salt, sodium citrate,
Rochelle salts. Platinum
investments are more likely to
need a retardant to allow time
for de-airing etc.
See also: De-airing, Gypsum-based, Retarder
Air-HardeningAn alloy construction or tool
steel capable of delaying
hardening after heating so that
there is time for cooling
(quenching) in air rather than
oil or water. Reduces cooling
stresses.
See also: Quenching
AnnealingSoftening work-hardened
metals by heating to a suitable
temperature (approximately
half the m.pt in °K) to cause
recrystallisation. For most
platinum alloys 1000°C is a
typical annealing temperature;
lower for heavily cold-worked
alloys.
See also: Cold-worked, Hot-worked, Work-harden
Arc-eyePainful, temporary, gritty
sensation apparent round the
eyeball overexposed to
intensive radiation from a
welding arc or high
temperature flame. Usually
seems worst at night after the
overexposure; lasts up to a day
or two; prevented by correct
goggles.
See also: Ultra-violet radiation, White radiation
BaguetteA relatively modern style of
stone cutting producing long
rectangular gemstones with
parallel facets.
Beading BackDecoration of a surface near
an edge by fusing the metal
locally and allowing it to ball
up and retreat with and over
the remaining edge.
See also: Granulation
Bezel SettingA bezel or box setting used for
cabochons and simple step cut
stones. Made by wrapping a
thin strip around the girdle, cut
to length and joined (off a
corner), stood on edge and
further joined to a base that
supports the stone.
See also: Claw (prong) setting, Millegrain
BurnisherUsed mainly as a short-
handled setting tool to
lever/wipe metal over the edge
of a stone and achieve a semi-
polish effect by surface
working.
See also: Scorper, Onglette graver
CaratUnit of weight for precious
stones: 1 carat = 100 points
= 0.2 gram. Also measure of
fineness of precious metals:
24 carat = 100% (pure), so
e.g. 18ct = 18/24 = 75%
precious metal content.
Carat PlatinumAn informal term applicable to
some platinum alloys in the
USA where platinum (as
distinct from platinum group
metals) may be present in
various proportions between
50% & 100% to match typical
carat gold proportions.
See also: Final assay,Fineness, Negative Tolerance
CarborundumSilicon carbide, SiC. hardness
9.5 on Mohs scale, made by
fusing sand and coke in an
electric furnace, grinding and
grading. Very brittle and best
adapted to grinding materials
"softer" than steel. SiC also
used as high-conductivity
refractory.
See also: Corundum, Emery,Wet and dry paper
Glossary
Index
11.1

CastabilityThe ability of an alloy to be
melted, poured into a mould,
retain sufficient fluidity, take up
an accurate detailed
impression of the mould cavity
and be extracted without
cracking. Difficult to quantify in
a single simple test.
See also: Chilling factor, Fluidity, Lost-wax casting
Casting GrainMetals, or more usually alloys,
prepared for melting and
subsequently casting, by
dividing charge material into
small gravel sizes by pouring
melt into water to form shot or
grains. Scrap offcuts may be
turned into grain for easier
remelting.
See also: Induction melting, Lost-wax casting
Casting TemperatureTemperature at which power is
switched off, coil lowered and
spin arm started up in
investment casting. Platinum
alloy casting temperature
usually 2000°C or over so
casting usually triggered by a
direct pyrometer signal in mv.
See also: Emissivity, Induction melting, Superheat
Chasing Hammering of a design on the
face of an article with a tiny
punch or moulding in relief by
working directly on the surface
with a chasing hammer. The
piece is usually supported on a
yielding surface such as wax or
pitch.
See also: Cold-working, Embossing
Chilling FactorCooling capacity of a mould
calculated from volume
specific heat of the mould
material and the mould/melt
temperature difference. Value
for plaster, low; silica, medium;
cold copper, very high.
See also: Casting temperature, Superheat, Thermal diffusivity
Claw (Prong) SettingPrecision cast or fabricated
from wire/strip with slots to grip
the girdle or tips folded over
girdle of a stone seated in a
bezel or collett.
See also: Bezel setting, Millegrain
CoiningA stamping process where the
volume of the closed die
impression is the same as the
blank; imparts a sharp
impression with no flash at the
parting line; often a final
operation after stamping a
rough shaped blank.
See also: Pressing, Cold-worked, Work-harden
Cold-WorkedReduced in section by rolling,
forging, drawing, or worked by
bending or even embossing,
sufficiently below annealing
temperature to cause strain-
hardening. With annealing
temperature about 1000°C., Pt
"cold works" at low red heat!
See also: Annealing, Hot-worked, Springiness
CollettSmall horizontal parallel sided
ring or with a conical taper to
form a seat for the pavilion of
the stone.
See also: Bezel setting, Claw (prong) setting
Compo (sition) BarsConsumable bars applied to
load polished wheels, buffs,
etc., made from finely ground
oxides bound with wax or soap;
the colour indicates the likely
oxide and cutting power.
See also: Jewellers rouge
CorundumAlumina, A1203, (NOT
Carborundum) used both as a
refractory and, in very finely
ground (gamma phase) form,
as an abrasive/polishing
compound.
See also: Carborundum, Emery, Refractory
Glossary
Index
11.2
Coupon (RectangularBlank)A miniature sheet of metal of a
convenient (postage stamp to
visiting card) size for jewellery,
cut from conventional sheet or
strip. Lends itself to angle or
cross-rolling and various hand-
working operations.
See also: Semis
Crown (Facets)The upper parts of a facetted
gemstone above the girdle,
including the table; facets are
usually cut to maximise the
light gathering ability of highly
transparent stones and/or
maximise multiple reflections
from both clear and deeply
coloured stones.
See also: Pavilion, Baguette
CrystobaliteThe highest temperature phase
of silica, stable and with high
strength retention from
1470°C to the m.pt., 1700°C.
See also: Invest(ment), Refractory, SIlica
CuletThe small facet at the base of
the pavilion of a (usually)
brilliant cut stone parallel to
the table. Mainly to prevent
splintering but often omitted
from modern stones.
See also: Pavilion, Crown
De-AiringRemoval of bubbles from a
slurry/cream/paste of mixed
and setting investment to avoid
bubble defects on the final
castings. Assisted by vibration
and or vacuum. Easiest before
investing the mould but
desirable after investment too.
See also: Invest(ment), Lost-wax casting, Retarder
Deep-DrawingA sheet pressing operation in
which the punch pushes the
sheet through a die and cause
the rim of the sheet to be
drawn in radially under
controlled pressure, so
allowing relatively deep shapes
to be formed. Can be used to
start tube forming.
See also: Pressing, Stretch-forming, Work-harden
DiamantinePolishing powder made from
calcined alumina, NOT
diamond dust.
See also: Jewellers rouge
DomingHammering sheet or a circle
with a spherical ended punch
down into a matching
hemispherical hollow in a block
to form a domed depression.
After trimming, two matching
domes may be soldered to
form a hollow sphere. Platinum
alloys respond well.
See also: Cold-worked, Embossing, Spinning
Ductile (Ductility)Capable of being drawn
(usually cold) into wire or tube
without fracture; usually
measured by % elongation and
% reduction in area in a tensile
test.
See also: Annealing, Cold-worked, Malleable
EmbossingSimilar to, often combined with
chasing. Specifically, raising
patterns in relief up from the
surface (like the boss of a
shield) by hammering/punching
from the obverse side. Doming
is a special case of embossing
with a lot of radial drawing in.
See also: Chasing, Cold-worked, Doming
Emerald PowderPolishing composition made
from finely ground green
chromic oxide, NOT Beryl.
See also: Jewellers rouge
EmeryCheap and impure form of
natural corundum used for
centuries as a natural abrasive,
largely superceded by synthetic
alumina (corundum) for more
closely controlled grinding.
See also: Carborundum, Corundum, Wet and dry paper
Glossary
Index
11.3
EmissivityThe rate of loss of heat from
unit area in unit time at a
given temperature (usually in
the context of the surface of a
melt). Very dependent on the
principal wavelengths radiated
and the character of the
surface.
See also: Casting temperature, Superheat, White radiation
EthanolAcidified ethanol, silica and
water, hydrolyses to more or
less fluid tetra-ethyl silicate gel
which may be poured into a
mould and set. It may then be
fired to pure silica with
expansion compensating
shrinkage of most cast alloys.
See also: Gypsum-based, Phosphate-based
FeedingThe necessary process of
feeding still molten metal
through gates, sprues and into
the castings, to compensate
for contraction as castings
solidify. Can be gravity or
otherwise pressurised.
See also: Lost-wax casting, Pasty zone (shrinkage), Sprues
Final AssayAnalysis of either individual
components or of an average
sample of a piece of finished
jewellery, perhaps prior to
polishing, that may decide
whether the piece reaches a
(Hall) marking standard.
See also: Fineness, Hallmarking
FinenessPrecious metal content
expressed in parts per
thousand (ppt). In Europe
platinum is usually 950 fine; in
Japan 850, 900, 950 and
999. 14 carat Pt, where
allowed, is 585 fine (but must
also contain 365 ppt of other
PGM).
See also: Carat platinum, Final assay, Hallmarking
FlaskThe outer container of an
investment casting mould,
from the investment process
through to knock-out of the
finished casting. Usually
reusable and in standard sizes.
See also: Invest(ment), Lost-wax casting
FluidityComplex property describing
the ability of molten alloy to
run into a mould and take up
an accurate impression of the
mould. Generally increases
with superheat and freedom
from oxidation. Evaluated by a
variety of empirical testpieces.
See also: Castability, Chilling factor, Superheat
FluxInorganic mixture fusing at a
lower temperature than
melting/soldering/welding an
alloy; cleans exposed surfaces
and protects against reactions
such as oxidation that impair
the melt or joint. Pt alloys
seldom need fluxes.
See also: Induction melting, Soldering, Welding
Fraizer (Fraize orBurr)A range of small tool steel or
tungsten carbide rotors used to
cut a cavity or undercut a
seating to recess a stone.
Fraizes tend to be miniature
circular saws and burrs the
more bulbous or counter-sink
style.
See also: Claw (prong) setting, Bezel setting
Glossary
Index
11.4

Fuel Gas: OxygenRatio (Welding Torch)The volumetric flow ratio
matching the molecular ratio
for complete combustion eg
(2H2+O2=2H2O: ratio 2)
gives a neutral flame with a
sharp inner cone. A lower ratio
gives an oxidising flame;
higher, a reducing flame.
See also: Reducing flame
Grains (or Beads)A decoration medium usually
achieved by fusing scraps of
metal to form tiny spheres by
surface tension onto a surface.
See also: Granulation, Beading Back
GranulationDecoration of a surface by
attaching roundish granules by
fusion (not usually soldered) to
create relief in lines, patterns
or shapes.
See also: Beading back
Gypsum-Based(Investment)A traditional medium refractory
investment based on plaster of
Paris (selected hydrated
calcium sulphate). Not
refractory enough for platinum
alloys but OK for some of the
lower m.pt gold alloys.
See also: Hydrocal, invest(ment), Phosphate-based
HallmarkingStrictly speaking, the term is
only applicable to gold, silver
and platinum goods stamped
as good by UK assay offices
subject to the UK Hallmarking
Act but often applied
unofficially to marking in other
countries too.
See also: Final assay, Fineness
Hot ShortnessBrittleness at high temperature
during working, often
intergranular and caused by
either lower melting point or
other non-ductile grain
boundary constituents.
See also: Ductile, Hot-working, Malleable
Hydrocal A medium refractory form of
gypsum (superior to ordinary
plaster of Paris) based on
carefully controlled calcining to
calcium sulphate hemihydrate
and controlled remixing with
water, retardants or
accelerators.
See also: Gypsum-based, Phosphate - Based
Induction MeltingHeating to above the melting
point by generating eddy
currents within a conducting
material surrounded by a
water-cooled copper coil
carrying an alternating current
at medium (>150Hz) or high
(>1kHz) frequency. Also
creates a stirring effect.
See also: Casting grain, Casting temperature, Superheat, Gypsum-based
Infra-Red RadiationRadiation of longer wavelength
than the visible red (say,
750nm and above) not seen
by the eye but nevertheless felt
by the body as heat. More
easily reflected than ultra-
violet.
See also: Emissivity, Ultraviolet radiation, White radiation
Invest(ment)Pouring a fast-setting slurry of
silica flour and binder (ethyl
silicate or acid phosphate)
around a plastic or wax pattern
with detailed accuracy.
See also: Lost-wax casting, Phosphate-based, Refractory
Glossary
Index
11.5

Jewellers Rouge (andCrocus)Finely ground red to purple
ferric oxide, often bonded with
wax, polishing medium for
jewellery metals which tends to
burnish rather than cut. Often
preceded by decreasing grades
of carborundum and followed
by tripoli or fine alumina
polishes.
See also: Corundum, Tripoli, Wet and dry paper
Jigging Temporary location of adjacent
components prior to welding or
soldering with clear access for
torch and filler but preventing
sagging. Jigs can be used as
heat sinks but must not
contaminate. Most are spring
clips off universal joints.
See also: Soldering, Welding
KerfThe slit, notch or channel
made by a saw in cutting but
also refers to the width of the
cut and the volume of material
made into swarf.
See also: Machinability
LaserLight amplification by
stimulated emission of
radiation results in brilliant
beam of monochromatic light
that is highly directional and
may be focused.
Laser MarkingSome laser machines are
designed for marking. They
have relatively shallow
penetration but very precise
control of movement between
the beam and the target like a
miniature CAD-CAM machine.
Capable of reproducing fine
text, logos and background
textures. Best with flat targets.
Laser PulsingThe operating parameters of a
laser machine are effectively
controlled by the intensity,
length (duration) and frequency
of repetition of pulses.
Intensity is controlled by
energizing voltage and the area
targeted.
Laser WeldingThe light beam emitted by a
laser is focused on a small
area to generate heat at
megawatts/cm2 with rapid
pulsing. The focused energy is
sufficient to cause welding (not
necessarily needing to melt the
Pt) of thin sections.
See also: Spot welding, Stitch welding
LiquidusA line on an equilibrium or
constitutional diagram (which
plots the disposition of phases
in an alloy with temperature
and composition) above which
the only stable phase is liquid
(molten) metal.
See also: Casting temperature, Solidus, Superheat
Lost-Wax(Investment) CastingUsed many centuries ago for
sculpture: now adapted to
investment casting to make
intricate castings to close
tolerances. Wax or plastic
patterns form the cavity in the
investment and these are
melted out in the firing of the
mould.
See also: Invest(ment), Wax models
MachinabilityA qualitative term suggesting
the relative ability of a metal to
be cut in a machining
operation with minimum power,
producing a good surface
finish, clearing swarf efficiently,
all at maximum speed.
See also: Redundant Work
Malleable(Malleability)Capable of being hammered or
rolled extensively without
excessive work-hardening and
cracking. Malleability usually
increases with temperature,
except for hot-shortness.
See also: Cold-worked, Ductile, Hot-shortness
Glossary
Index
11.6
Mandrel Tube-Drawing Uses a hard straight rod or
wire to form the inside cross-
section of a tube during cold-
drawing through a die, so
reducing the wall thickness.
Used for relatively short lengths
instead of plug-drawing more
continuous lengths.
See also: Cold-worked, Section drawing, Work-harden
Millegrain (orMilgrain)A setting tool consisting of a
fine wheel used to roll a
millegrain border around the
edge of a box or bezel setting
around the stone.
See also: Bezel SettingBurnisher
Negative ToleranceUsed in the context of
standards of fineness, and
(Hall) marking, implies a small
compositional allowance below
the specified minimum that is
still acceptable in some
countries.
See also: Fineness, Hallmarking
Nozzle/Tip (WeldingTorch)Describes the type (Nozzle-
mixed or Injection-mixed) and
the size (usually the bore,
often in SWG sizes) of the
gas/oxygen mixture exit
controlling the flame diameter.
Gas velocity controls the flame
length.
See also: Fuel gas: oxygen ratio, Reducing flame
Oil-QuenchingAn alloy steel requiring
quenching to harden at a rate
intermediate between severe
water quenching and mild air-
cooling. Most alloy and tool
steels may be hardened by oil-
quenching, in medium to large
sections, to minimise cracking.
See also: Air-HardeningQuenching
Onglette GraverA short narrow engraving tool
for gouging metal using a
working face rather like a
miniature pointed finger nail;
useful for cutting side seating
in a channel setting.
See also: ScorperBurnisher
PaillonsSmall fragments of solder
clipped from foil, thin strip or
sheet, placed at intervals
across the potential joint zone
and progressively flowed by the
on-coming flame. Often
located by a spot of flux.
See also: Flux, Soldering
Pasty Zone(Shrinkage)From liquidus to solidus,
liquid/solid ratio decreases
from fluid liquid, through pasty,
to fully solid. Feeding shrinkage
with still liquid alloy under
these conditions can be
difficult. Pt alloys do not
usually show pasty zone
problems.
See also: Feeding, Liquidus, Solidus
PatternA master (usually metal) or
consumable (lost wax process)
model of a component to be
reproduced by casting. Pattern
dimensions may need to allow
for net shrinkage or expansion
over the whole casting
process.
See also: Ethanol, Gypsum-based
Glossary
Index
11.7

PavilionThe lower part of a facetted
gemstone below the girdle; the
facets are either angled to
maximise total internal
reflection in highly transparent
stones or deep cut to
maximise colour.
See also: Crown (Facets)
Phosphate-Based(Investment)Investment with acid-
phosphate and magnesia,
which first gels silica flour and
then bonds it by subsequent
dehydration. Working time
rapidly decreased by increasing
temperature.
See also: Ethanol, Gypsum-based
PlanishingSmoothing by overlapping light
blows between a polished anvil
or stake and a polished (1/2lb)
hammer face. The piece is
gradually rotated between tool
blows that cold-work the
surface rather than in depth.
Planish marks may be left in
for decoration.
See also: Cold-worked, Stake, Work-harden
Platinum GroupMetals (PGM'S) Platinum is rarely mined pure.
It usually occurs native as the
metal but often alloyed with
rhodium, osmium, palladium,
iridium, and/or ruthenium:
these collectively forming the
platinum group of metals.
See also: Carat platinum, Fineness
PressingUsing a hand operated (fly-
press) or mechanical press to
produce a batch of similar
components. May involve
stretch-forming, deep-drawing,
coining, blanking, stamping,
simple or complex bending. For
jewellery, a cold-working
operation.
See also: Cold-worked, Malleable, Work-harden
PumiceSpongy, volcanic rock used a
powder mixed with vegetable
oil and applied to a felt bob or
in lump form to remove
scratches and file marks.
Usually coarser than Water of
Ayr Stone.
Q-SwitchDevice in a laser generator
that controls the pulsing of the
laser beam. Usually a quartz
crystal activated by sound
waves through a piezoelectric
transducer attached to the
side of the crystal and fed with
radio frequency power.
QuenchingRapid cooling in a fluid which
can be a cool air blast but is
more likely to be water, for
platinum.
See also: Annealing, Flask
Reducing FlameA melting, annealing, soldering
or welding torch flame with
more gas than can combine
with the injected oxygen or air.
Platinum itself does not oxidise
even with excess oxygen but
some of its alloying
constituents do.
See also: Annealing, Fuel gas: oxygen ratio, Soldering
Redundant WorkWork done in overcoming
external friction and in
unnecessary reversals of metal
movement in the plastic
working and the machining of
metals.
See also: Machinability
Refractory(Materials)High melting point materials
used for furnace linings,
crucibles, moulds. Often need
a suitable binder to hold the
refractory particles together.
Thermal shock resistance,
acidity/basicity, surface finish
(for moulds) also important.
See also: Corundum, Invest(ment), Silica
Glossary
Index
11.8
RepousséTechnique for producing an
ornamental surface by
hammering into relief from the
reverse side while using a firm
but yielding support. Smaller
scale and more detailed than
embossing. Often used with
chasing.
See also: ChasingEmbossing
RetarderMany organics and colloids
retard the start of setting of
gypsum-based investments
because they decrease the
solubility of hemihydrate. This
increases de-airing and
working time.
See also: Accelerator, Invest(ment), De-airing
RollingThe most used cold-working
process for jewellery alloys.
Uses plain faced polished rolls
for sheet and strip: grooved
rolls for bar, rod, and simple
sections; patterned rolls for
continuous embossing. %
reduction in cross-section = %
cold-work.
See also: Cold-worked, Semis, Work-harden, Wrought
Ruby PowderPolishing powder, more likely to
be finely ground haematite
(iron oxide) than corundum
(alumina, ruby)
See also: Jewellers rouge
ScorperA short cutting tool with a
chisel face, used for cutting or
improving narrow channels in
metal: usually broader than a
graver.
See also: Onglette graverBurnisher
Section DrawingStretching out and cold
drawing the cross-section by
pulling through a die after
pointing the lead end.
Reduction in cross-sectional
area is a measure of the
degree of working. Wire and
tube drawing are the most
common examples.
See also: Annealing, Cold-worked, Ductile (ductility)
Semis (Semi-Fabricated Materials)Stock sizes of a wide range of
shapes (plate, sheet, strip, bar,
rod, wire, tube, blanks, circles)
and tempers (hardnesses),
useful for further handworking
at minimum inventory variety.
Major suppliers stock a
standard range and also make
to order.
SilicaSilicon dioxide selectively
processed to form refractory
and abrasive materials. Exists
as quartz, tridymite or
crystobalite crystalline phases
in equilibrium at increasing
temperatures.
See also: Crystobalite, Ethanol, Phosphate-based
SinkingType of tube-drawing where the
wall is allowed to find its own
thickness (as opposed to
mandrel drawing). Usually, the
actual wall thickness increases
as does the wall thickness as a
percentage of the total cross-
section.
See also: Mandrel tube-drawing, Section drawing
SolderingJoining metal or alloy
components by fusing together
with a further lower melting
point alloy known as a solder.
Often uses capillary forces to
draw the solder into the joint.
See also: Flux, Welding, Wettability
SolidusA line on an equilibrium or
constitutional diagram below
which all stable phases are
solid. Above the solidus there
is an increasing proportion of
liquid phase with rising
temperature until at the
liquidus no solid remains in
equilibrium.
See also: Casting temperature, Liquidus, Lost wax casting
Glossary
Index
11.9

SpinningForming sheet metal into cups
by pushing a smooth-ended
tool against the spinning sheet
to force it onto a former, of the
shape required. Can thin
(usually ) or thicken the
resulting wall. Requires
malleability and ductility.
See also: Cold-worked, Doming, Ductile
Spot WeldingJoining process, usually on
overlapping sheet and strip, by
a short pulse of electric current
led in through copper
electrodes with punch pressure
applied to weld a spot at the
interface heated by local
resistance to or near melting
point.
See also: Laser welding, Stitch welding
SpringinessHaving a relatively high elastic
limit and low mechanical
hysterisis, the alloy, usually
cold-worked, may be deformed
elastically (without acquiring a
permanent plastic set) and
springs back to original shape
with little loss of energy.
See also: Cold-worked, Work-harden
SprueWax "wire" feeder system.
Forms the channel for the melt
to be propelled from the gate
to the casting cavity. Should be
kept short and must not freeze
prematurely.
See also: Feeding, Pattern, Wax models
StakeSteel former, usually with
smooth curved surface, used
for raising metal from sheet to
deeper vessel form.
See also: Planishing, Spinning
Stitch (or Seam)WeldingEffectively, a sequential spot
welding operation that
produces a continuous seam
weld by overlapping spot welds
sequenced by an electronic
controller; the electrodes may
be discs, rather than rods as in
single spot welding.
See also: Spot welding
Stress RelieveLow temperature heat
treatment reducing peak
internal stresses (mainly after
cold-work); no recrystallisation
or phase changes, little change
in hardness, slight increase in
ductility; reduces distortion and
cracking in assembly.
See also: Annealing, Cold-worked, Springiness
Stretch- FormingA sheet pressing operation in
which the punch pushes the
sheet through a die but with
the rim of the sheet restrained
so that radial drawing in is
inhibited. Resultant shape is
stretched around the punch.
See also: PressingDeep-drawingDuctile
SuperheatAn extra margin of temperature
above the melting point of a
metal or the liquidus of an
alloy to impart fluidity during
casting and allow the molten
metal to fill the mould without
premature freezing.
See also: Castability, Casting temperature, Chilling factor
Swaging/SwageBlockRectangular blocks of steel
into which D-Section grooves
of varying widths and depths
are cut. Used for hammering
strip into a sharp gutter shape
when beginning to make a
tube section or for truing up
bar or rod sections.
See also: Mandrel tube drawing, Section drawing
Glossary
Index
11.10

Thermal DiffusivityRatio of thermal conductivity:
heat capacity (density specific
heat). A measure of chilling or
insulation power. High density
and specific heat, but lower
conductivity of Pt, gives its
thermal diffusivity at only about
15% that of silver.
See also: Chilling factor
ThixotropicChange in viscosity due to
alteration in shearing stress in
a fluid, slip or paste;
depending on prevailing
conditions the material
appears fluid, jelly-like or stiff
paste without apparent change
in temperature or composition.
See also: Hydrocal, Investment, Phosphate-based
TIG (tungsten inertgas) WeldingElectric arc between tungsten
electrode and weld face,
shrouded by inert gas (eg.
argon) flowing around
electrode; filler wire may be
fed into the arc. Pt itself does
not need inert gas protection
but the electrode and arc are
stabilised.
See also: Ultraviolet radiation, White radiation
TripoliA jewellery polishing compound
consisting of very fine
diatomaceous silica whose
texture is porous and
absorbtive, suspended in a
waxy medium and loaded onto
the face of a polishing wheel
for medium and fine polishing
stages.
See also: Corundum, Jewellers rouge, Wet and dry paper
Ultraviolet Radiation Radiation of shorter
wavelength than the visible
violet (say less than 400nm)
and capable of affecting the
retina of the eye without being
perceived as colour. Less easily
reflected than infra-red.
See also: Emissivity, Infrared radiation,White radiation
UpsettingEndwise compression of a bar
or wire to increase its cross-
section locally, usually at one
end as for a rivet head. The
volume of head formed in one
"stroke" is limited by the ratio
of unsupported stock length to
head diameter required.
See also: Cold-worked,Ductile, Malleable
VallorbeSwiss town noted for
production of watch, clock and
jewellery-making high grade
tools: blades, files, gravers etc.
Wax ModelsWax replicas of a master
pattern (made by injecting into
rubber moulds cured around
the master pattern) assembled
in groups on sprues and then
melted (lost) out of an
investment mould to leave
precise cavities for casting.
See also: Investment, Low-wax casting, Pattern
Water of Ayr StoneA natural soft slate for
removing scratches, file marks
and firestain from small work.
Supplied in small sticks
ranging from 2mm to 25mm
square section. DIpped in
water, used like a handfile,
often preceded by pumice and
before polishing.
See also: PumiceTripoli
WeldingJoining process in which no
solder is used and the
components are joined by
mutual fusion, with or without
a flux, or by hot solid-to-solid
pressure or hammer welding
(which works well with
platinum alloys).
See also: Flux, Hot shortness, Soldering
Glossary
Index
11.11

ComparativeWeights andMeasures
Wet and Dry PaperWaterproof paper coated with
carefully graded and oriented
silicon carbide particles
(carborundum). Used between
filing and polishing stages.
See also: Carborundum, Emery, Tripoli
Wettability Solders/weld fillers more or
less wet the joint according to
the liquid solid contact angle,
(must be less than 90º).
Mutual solubility lowers the
angle as does flux by removing
insoluble oxide, (not normally
required for platinum alloys).
See also: Flux, Soldering, Welding
White RadiationMixed wavelength radiation in
the visible light range of the
spectrum (say 400 to 750nm)
but may include certain
wavelength peaks (colour
bands) and also associated
infrared and ultraviolet
radiations.
See also: Emissivity, Infrared radiation, Ultraviolet radiation
Work-HardenThe increase in hardness which
accompanies plastic
deformation in a metal.
Alloying usually increases the
work-hardening rate of a pure
metal and increasing working
temperature decreases the
rate (to zero when hot-
working).
See also: Annealing, Cold-worked, Hot-worked
Wrought Semi-Finished (Product)Products intermediate between
cast ingot and finished
components stocked in useful
or standard sizes, typically:
plate, sheet, coiled strip,
circles, bar, rod, extruded
section; usually annealed but
may be half-hard.
See also: Annealing, Cold-worked, Hot-worked
WeightTo Convert
Pennyweights to grams Multiply by 1.55518
Grams to pennyweights '' 0.64301
Ounces troy to grams '' 31.1035
Grams to ounces troy '' 0.0321507
Ounces avoirdupois to grams '' 28.3495
Grams to ounces avoirdupois '' 0.0352740
Ounces troy to ounces avoirdupois '' 1.09714
Ounces avoirdupois to ounces troy '' 0.911458
Pounds avoirdupois to kilograms '' 0.4535924
Kilograms to pounds avoirdupois '' 2.20462
Kilograms to ounces avoirdupois '' 35.2740
Kilograms to ounces troy '' 32.1507
Troy WeightUsed in Weighing the Precious Metals
24 grains 1 pennyweight
20 pennyweights (dwt.) 1 ounce troy
12 ounces 1 pound troy
5760 grams 1 pound troy
The troy ounce is about 10% heavier than the
avoirdupois ounce.
31.1035 grams 1 ounce troy
1 gram 15.432 grains troy
1.555 grams 1 pennyweight (dwt).
Glossary
Index
11.12
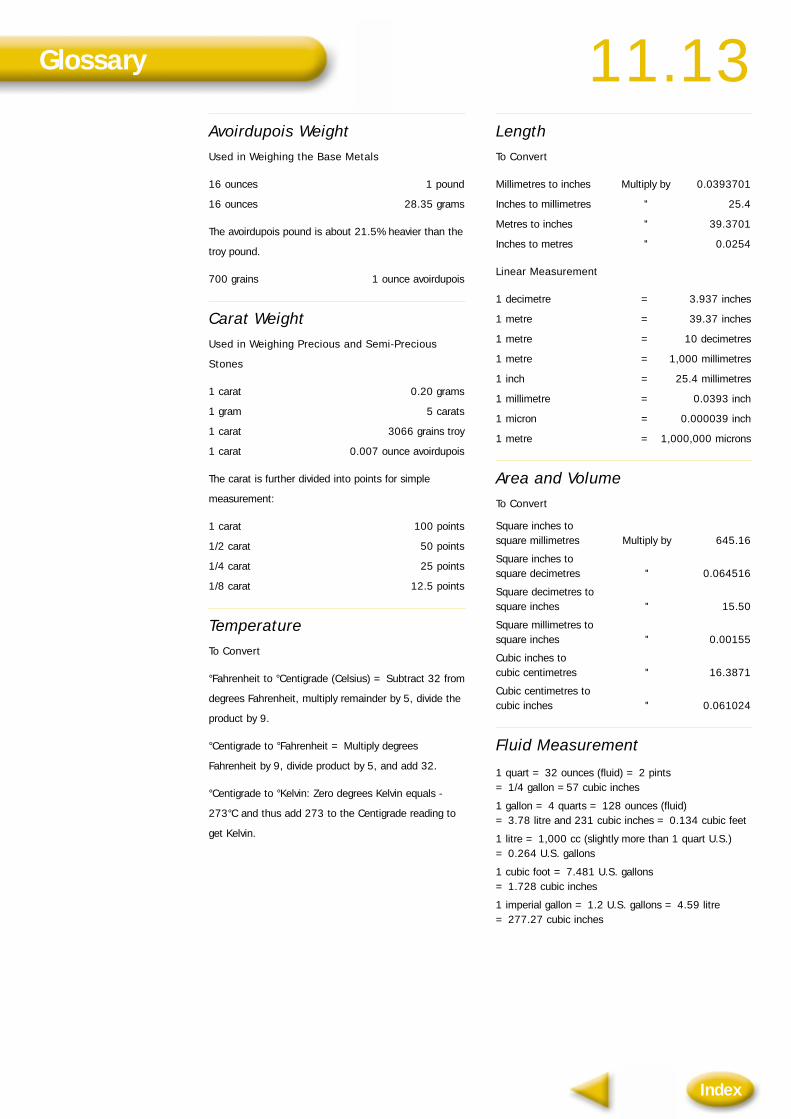
Avoirdupois WeightUsed in Weighing the Base Metals
16 ounces 1 pound
16 ounces 28.35 grams
The avoirdupois pound is about 21.5% heavier than the
troy pound.
700 grains 1 ounce avoirdupois
Carat WeightUsed in Weighing Precious and Semi-Precious
Stones
1 carat 0.20 grams
1 gram 5 carats
1 carat 3066 grains troy
1 carat 0.007 ounce avoirdupois
The carat is further divided into points for simple
measurement:
1 carat 100 points
1/2 carat 50 points
1/4 carat 25 points
1/8 carat 12.5 points
TemperatureTo Convert
°Fahrenheit to °Centigrade (Celsius) = Subtract 32 from
degrees Fahrenheit, multiply remainder by 5, divide the
product by 9.
°Centigrade to °Fahrenheit = Multiply degrees
Fahrenheit by 9, divide product by 5, and add 32.
°Centigrade to °Kelvin: Zero degrees Kelvin equals -
273°C and thus add 273 to the Centigrade reading to
get Kelvin.
LengthTo Convert
Millimetres to inches Multiply by 0.0393701
Inches to millimetres '' 25.4
Metres to inches '' 39.3701
Inches to metres '' 0.0254
Linear Measurement
1 decimetre = 3.937 inches
1 metre = 39.37 inches
1 metre = 10 decimetres
1 metre = 1,000 millimetres
1 inch = 25.4 millimetres
1 millimetre = 0.0393 inch
1 micron = 0.000039 inch
1 metre = 1,000,000 microns
Area and VolumeTo Convert
Square inches to square millimetres Multiply by 645.16
Square inches to square decimetres '' 0.064516
Square decimetres to square inches '' 15.50
Square millimetres to square inches '' 0.00155
Cubic inches to cubic centimetres '' 16.3871
Cubic centimetres to cubic inches '' 0.061024
Fluid Measurement
1 quart = 32 ounces (fluid) = 2 pints = 1/4 gallon =57 cubic inches
1 gallon = 4 quarts = 128 ounces (fluid) = 3.78 litre and 231 cubic inches = 0.134 cubic feet
1 litre = 1,000 cc (slightly more than 1 quart U.S.) = 0.264 U.S. gallons
1 cubic foot = 7.481 U.S. gallons = 1.728 cubic inches
1 imperial gallon = 1.2 U.S. gallons = 4.59 litre = 277.27 cubic inches
Glossary
Index
11.13