Embed Size (px)
Citation preview

Quick start guide:
Eltako GFVS-Safe II

Quick start guide Eltako GFVS-Safe II
2
Index 1 General ............................................................................................................................................ 3
2 Scope of delivery ............................................................................................................................. 3
3 Specifications ................................................................................................................................... 3
4 Connections of the Eltako GFVS-Safe II ........................................................................................... 4
5 First-start-up .................................................................................................................................... 5
5.1 Menu ....................................................................................................................................... 7
5.2 Eltako GFVS 3.0-Software ........................................................................................................ 7
5.3 PCT 14 ...................................................................................................................................... 7
5.4 Date/Time ................................................................................................................................ 7
5.5 Language selection .................................................................................................................. 8
5.6 Network settings ..................................................................................................................... 8
5.7 Remote settings ....................................................................................................................... 9
5.8 BSC-BAP Finder ........................................................................................................................ 9
5.9 GFVS 3.0 settings ..................................................................................................................... 9
5.10 Presets ................................................................................................................................... 10
5.10.1 License ........................................................................................................................... 10
5.10.2 Database ........................................................................................................................ 10
5.10.3 Network ......................................................................................................................... 10
5.11 GFVS-Update ......................................................................................................................... 10
6 Eltako quickcon®-technology ........................................................................................................ 11
7 System tools .................................................................................................................................. 15
7.1 GFVS-tools ............................................................................................................................. 15
7.1.1 Backup, restore or delete database .............................................................................. 16
7.1.2 System backup ............................................................................................................... 17
7.1.3 Reset license for license issues ...................................................................................... 18
7.2 Repair license ........................................................................................................................ 19
7.3 Code MeterCC ....................................................................................................................... 19
7.4 Change web password ........................................................................................................... 19
8 System settings .............................................................................................................................. 20
8.1 Techn. Support (team viewer) ............................................................................................... 20
8.2 Copy wallpapers .................................................................................................................... 20
8.3 Export log-files ....................................................................................................................... 21
9 Switch off Eltako GFVS-Safe II ....................................................................................................... 22
10 Restore system backup ............................................................................................................. 22
11 Technical support ...................................................................................................................... 24

Quick start guide Eltako GFVS-Safe II
3
1 General To ensure reliable function of the product please read this manual carefully. The liability of Eltako
GmbH for defects shall be excluded if the defects are due to usage not according to the intended
purpose or ignoring the operating instruction (incorrect installation, incorrect start-up, incorrect
operation, etc.).
The intended purpose of Eltako GFVS-Safe II with LAN, WLAN and optionally M2M communication is
the visualization of sensor-information, actuator switching states and consumption data plus the
control of actuators.
2 Scope of delivery • Eltako GFVS-Safe II
• External power supply and cables
• 2 x Ethernet connection cable 2m RJ45 (therefrom 1 x Cross-Over)
• Associated antennas
• Eltako GFVS 3.0-software package incl. license key
• Quick start guide (this manual)
3 Specifications Processor: Intel® Atom™ N2800 (2 x 1,86 GHz)
Chip set: Intel NM10 Express
Working memory: 2 GB DDR3 Fixed disk storage: 120GB SSD Graphics function: Intel® GMA
Interface: 1 x LAN RJ-45 Intel® 10/100/1000
1 x WLAN 802.11 b/g/n
4 x USB 2.0 (2 x High-Current 1.3 A)
1 x HDMI
1 x VGA
1 x Line out 1 x Mic in
Software and
Applications: Eltako GFVS 3.0
PCT 14 Software
Backup- and restore function
Quick start guide Eltako GFVS-Safe II
4
Power consumption
without GSM Modem: 11 W
with GSM-Modem: 13 W
Dimension: 199 x 180 x 39 mm
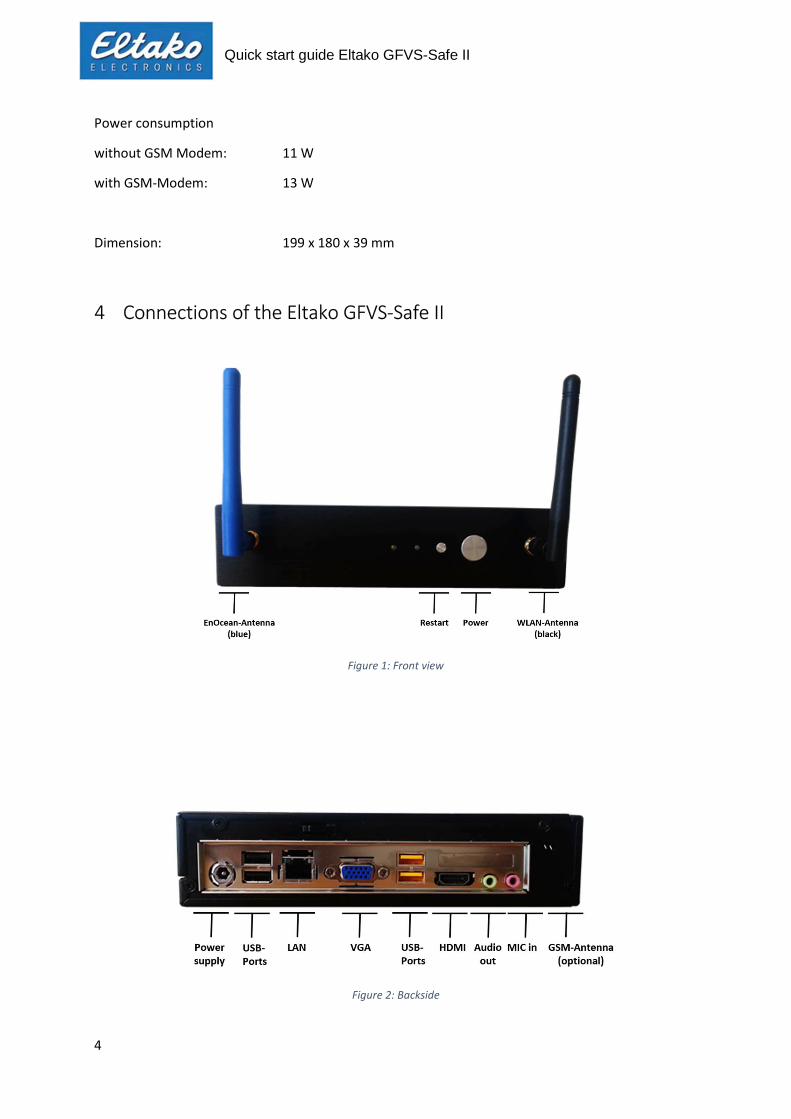
4 Connections of the Eltako GFVS-Safe II
Figure 1: Front view
Figure 2: Backside
Quick start guide Eltako GFVS-Safe II
5
Ensure an optimal cooling when mounting. One of three ventilation outlets must be faced
upwards.
5 First-start-up • Mount the blue EnOcean, the black WI-FI and the optional blue GSM-Antenna to the provided
ports (figure 1 and 2)
• Connect the external power supply to a 230V socket and the GFVS-Safe II, the blue LED shows
power supply
• To configure the software connect a monitor to the VGA or HDMI Port, keyboard and mouse to
the USB ports
• Alternatively you can connect the Eltako GFVS-Safe II with a remote controlled PC via network to
configure the system
• Using the Cross-Over-cable it is recommend to assign a fixed IP address, for details see menu item
5.7
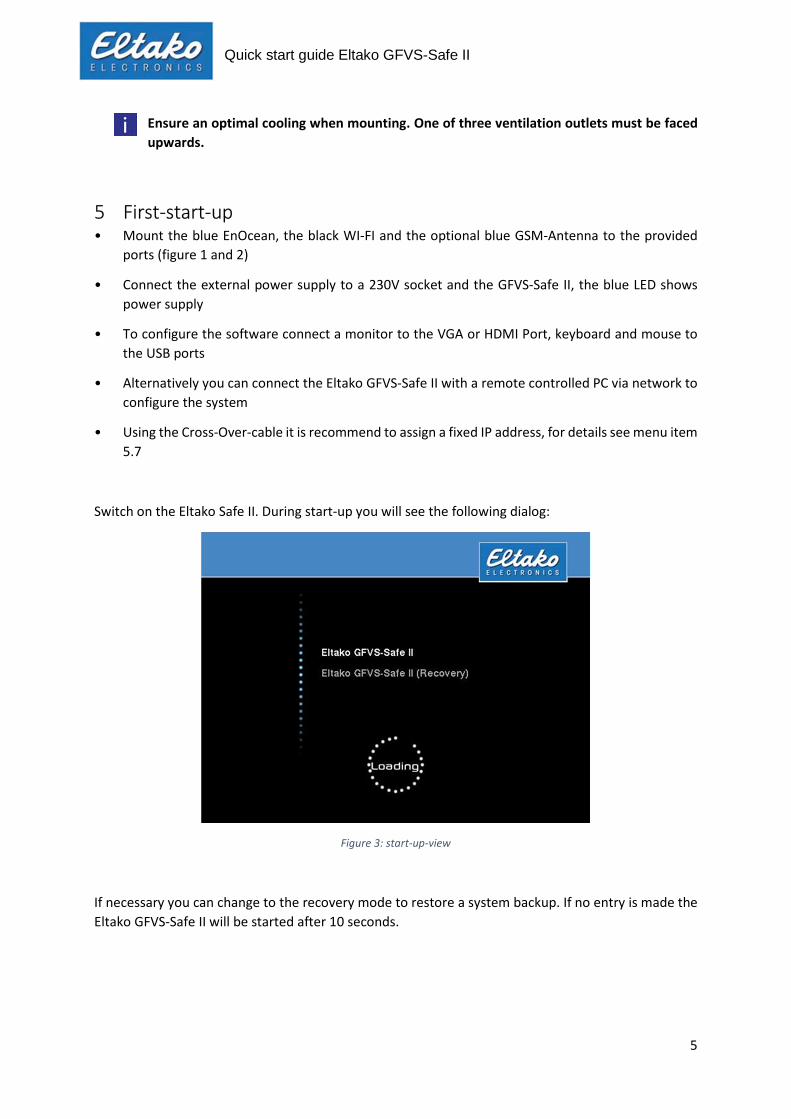
Switch on the Eltako Safe II. During start-up you will see the following dialog:
Figure 3: start-up-view
If necessary you can change to the recovery mode to restore a system backup. If no entry is made the
Eltako GFVS-Safe II will be started after 10 seconds.

Quick start guide Eltako GFVS-Safe II
6
Eltako GFVS 3.0-Software is already installed and launches automatically after switching on:
Figure 4: Start of the Eltako GFVS 3.0 software
Eltako GFVS 3.0-Software is running:
Figure 5: Eltako GFVS 3.0 software has been started
The task bar is located on the bottom of the screen. Beside date and time the icon for the network
connection is displayed.

Quick start guide Eltako GFVS-Safe II
7
5.1 Menu
The menu is invoked by a right-click on the background:
Figure 6: Menu
5.2 Eltako GFVS 3.0-Software
Eltako GFVS 3.0-Software is launched via the menu item “GFVS 3.0“. A detailed manual is available
under the menu item “manuals – Eltako GFVS 3.0 manual”.
5.3 PCT 14
Since Version 3.8.3.0 the PCT14 (Version 6) is already integrated.
5.4 Date/Time
Via the menu item “systems settings - date/time” you invoke the dialog to adjust date/time:
Figure 7: Time and date settings

Quick start guide Eltako GFVS-Safe II
8
5.5 Language selection
Via the menu item “system settings – language selection“ you invoke the dialog to change the
language.
Figure 8: Language selection
5.6 Network settings
Via the menu item “system-settings – network-settings“ the configuration of network adapter can be
adjusted.
Figure 9: Network settings
The LAN Interface is configured to operate in a network with a DHCP server.
Note: In recovery mode the LAN interface has the IP 192.168.168.100.

Quick start guide Eltako GFVS-Safe II
9
5.7 Remote settings
Via the menu item “system settings – remote-settings“ further settings for remote access can be made.
Figure 10: Remote settings
If you connect another computer via crossover cable to the network port of the Eltako GFVS-Safe II,
you can directly access with a remote client (e.g. TightVNC).
The default password is: password
The Interface is configured to operate in a network with DHCP.
Note: In recovery mode the network interface has the IP 192.168.168.100.
5.8 BSC-BAP Finder
The BSC-BAP finder is used for configuration of BAPs, BIERS and IPG170(P) and can be opened via menu
item “system-tools –BSC-BAP finder“.
A detailed manual is available via the menu point “manuals – BSC-BAP finder“.
5.9 GFVS 3.0 settings
This dialog is invoked via “System tools - GFVS settings”.
The menu item “create log files” generates log files that document possible errors and provide
solutions for the technical support.
With “size of the overview window” the size of the overview window to associated pc-Clients is
adjusted
„Team Viewer Start-up integrates the team viewer to the start-up. To accept the setting, a restart is
required.
Figure 11: Application settings

Quick start guide Eltako GFVS-Safe II
10
“Hide main window“ starts the Eltako GVFS 3.0 software with the overview window. The buttons of
the main window will be integrated into the main menu “configuration”.
Figure 12: configuration menu
5.10 Presets
5.10.1 License
The Eltako GFVS-Safe II is delivered with an activated Eltako GFVS 3.0 license. If re-activation is
required, an Eltako GFVS 3.0 license key is attached.
5.10.2 Database
For data storage a PostgreSQL database is established.
5.10.3 Network
The interface is configured to operate in a network with DHCP.
5.11 GFVS-Update
Via “system tools - GFVS-Update“ the firmware of Eltako GFVS-Safe II or GFVS 3.0-software can be
updated. The update can be installed via internet or USB stick. The file for the update has to be on the
USB stick subfolder “/hc-import/update/*.*”.
If the USB stick is not recognized, it can be mounted with a click on the USB-stick icon.
Figure 13: GFVS-Update

Quick start guide Eltako GFVS-Safe II
11
6 Eltako quickcon®-technology Permits the set-up of a simple connection between the Eltako GFVS Server and a Mobile Client without
any knowledge of changing IP addresses (e.g. DynDNS) or disable ports.
Caution: Using the app generates data traffic, which may lead to additional costs, depending on the
mobile phone contract.
Download the Eltako GFA App from the app store of your mobile radio system (iPhone->iTunes,
Android -> Google Play) and install.
Figure 14: Use encrypted connections without blocking ports or changing IP addresses
Configuring the mobile client and Eltako server
First create a profile in the Eltako GFVS 3.0 software using “configuration – profiles – profile manager”.
This defines the rights of the mobile client in the Eltako GFVS 3.0 software.
Figure 15: profile manager

Quick start guide Eltako GFVS-Safe II
12
Then create a new device in the Eltako GFVS 3.0 software using “configuration – security – client –
Eltako GFVS 3.0 mobile“.
Figure 16: create a mobile client
GFA-Client
Enter the name of the smartphone or tablet.
Figure 17: name the mobile client
Note: The device name must be identical in the app and the GFVS server. (Please pay attention
to the blanks!)

Quick start guide Eltako GFVS-Safe II
13
Then assign a profile to the device. Without a profile the device has no rights in the Eltako GFVS 3.0
software.
Figure 18: Assigning a profile to the mobile
All generated profiles are displayed in the drop-down box:
Figure 19: Assigning a profile
Click on the button “key“ in the Eltako GFVS 3.0-Software to open the dialog for entering the password.
You may enter any password without restrictions. Then also enter this password in the “password”
box of the app.
Additionally a figure in the box mobile key has to be entered (six-digit, e.g. 000000).
Quick start guide Eltako GFVS-Safe II
14
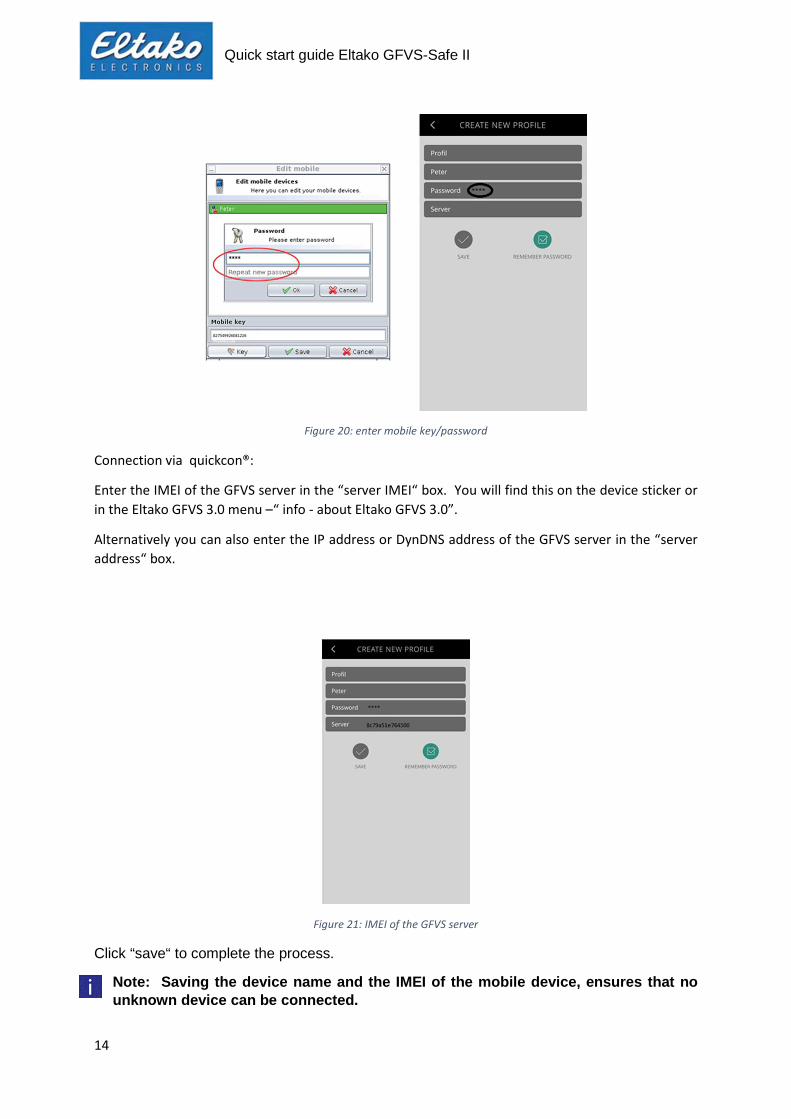
Figure 20: enter mobile key/password
Connection via quickcon®:
Enter the IMEI of the GFVS server in the “server IMEI“ box. You will find this on the device sticker or
in the Eltako GFVS 3.0 menu –“ info - about Eltako GFVS 3.0”.
Alternatively you can also enter the IP address or DynDNS address of the GFVS server in the “server
address“ box.
Figure 21: IMEI of the GFVS server
Click “save“ to complete the process.
Note: Saving the device name and the IMEI of the mobile device, ensures that no unknown device can be connected.

Quick start guide Eltako GFVS-Safe II
15
7 System tools
7.1 GFVS-tools
A right click on the background shows the menu. Via “system-tools – GFVS 3.0 tools“ you access a dialog to save or restore the system and / or database.
Figure 22: Menu "system-tools"
The following dialog appears:
Figure 23: Eltako GFVS 3.0 system tools
For a backup, absolutely make sure that the Eltako GFVS 3.0 software was finished. Otherwise, an error message appears:
Figure 24: database in use

Quick start guide Eltako GFVS-Safe II
16
7.1.1 Backup, restore or delete database
To back up your database, click on „backup database“. A gray bar appears at the bottom of the window.
Figure 25: "backup database" is executed
As soon as the backup is finished, a new dialog appears. Confirm with “ok“.
Figure 26: successful database backup
After each restart of the Eltako GFVS II, an automatic backup of the database takes place.
If you want to restore an older database select it from the drop-down box. Alternatively a database
with the delivery status of Eltako GFVS-Safe II can be selected.

Quick start guide Eltako GFVS-Safe II
17
Figure 27: restore database
Once you have selected a database, press the button “restore database“.
Figure 28: recovery successful
The successful recovery of the database is confirmed with a dialog. Click “ok“.
To delete a created database backup, select the appropriate database from the drop-down menu, then
press “delete backup database“ with a click on the button.
Figure 29: delete backup
In the following dialog you are asked, if you want to delete the database. Confirm with “yes“ to delete
the selected database or “no“ to cancel the operation.
7.1.2 System backup
Click on the button “backup system“ and a backup of your system is created.

Quick start guide Eltako GFVS-Safe II
18
Figure 30: system backup
The following dialog appears:
Figure 31: user backup
If the backup was successful, a new dialog box opens, which you confirm with “ok“.
The drop down box “maximum system backups“ specifies how many backups of your system are
stored.
7.1.3 Reset license for license issues
The button “delete license“ deletes your Eltako GFVS 3.0 license. A click opens a window for entering
the password. Password: 0000
This option should only be used in case of an emergency by the Eltako GFVS 3.0 support. Note that the
Eltako GFVS 3.0 software cannot be used without a valid license. Furthermore, an internet connection
is required to activate the new license.
Quick start guide Eltako GFVS-Safe II
19
Figure 32: reset license
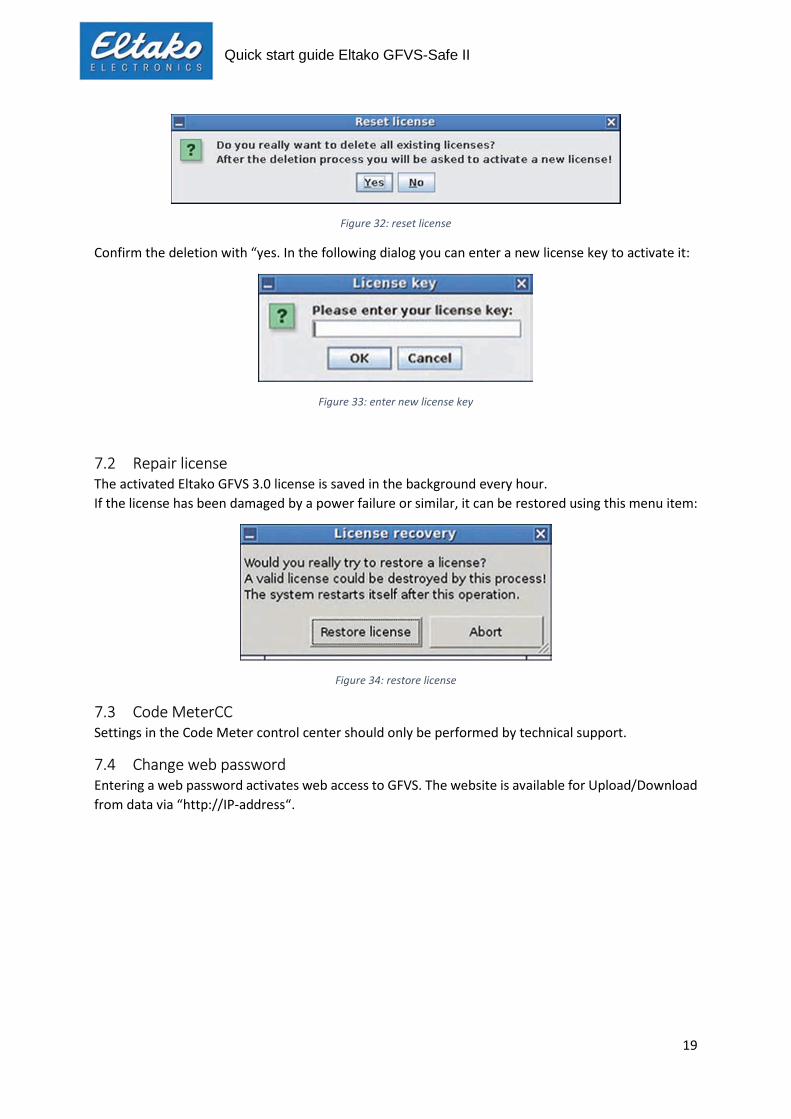
Confirm the deletion with “yes. In the following dialog you can enter a new license key to activate it:
Figure 33: enter new license key
7.2 Repair license
The activated Eltako GFVS 3.0 license is saved in the background every hour.
If the license has been damaged by a power failure or similar, it can be restored using this menu item:
Figure 34: restore license
7.3 Code MeterCC
Settings in the Code Meter control center should only be performed by technical support.
7.4 Change web password
Entering a web password activates web access to GFVS. The website is available for Upload/Download
from data via “http://IP-address“.
Quick start guide Eltako GFVS-Safe II
20
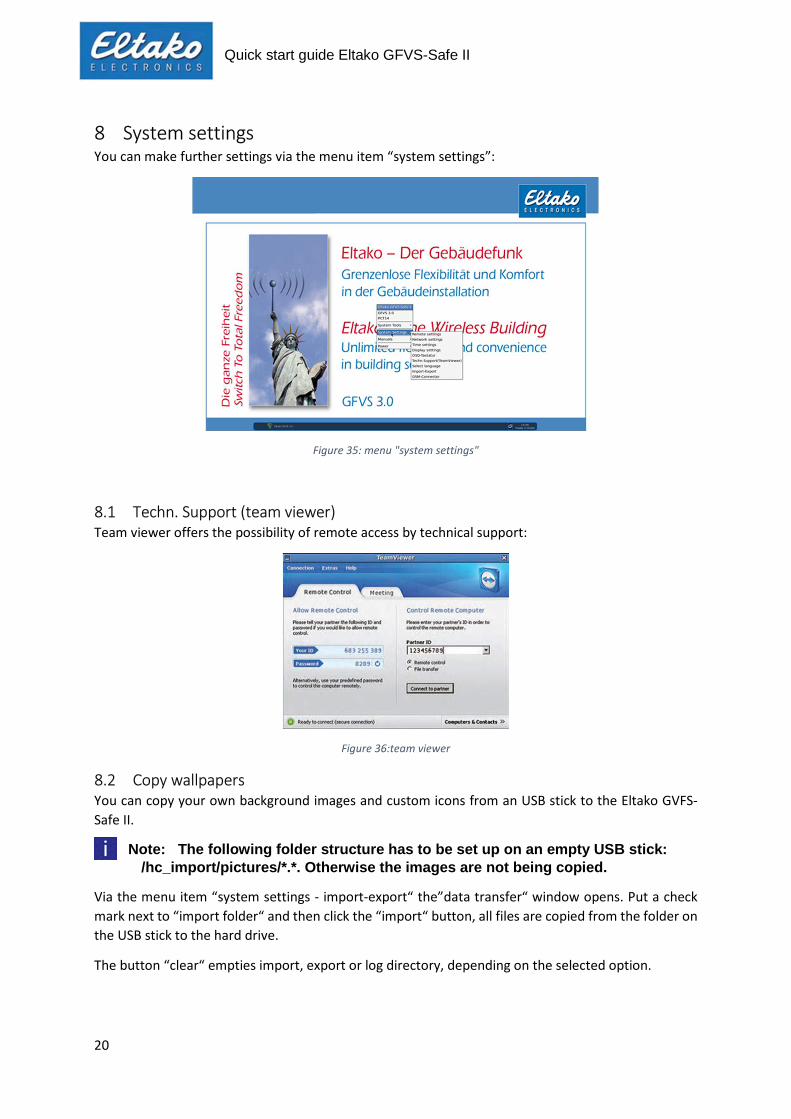
8 System settings You can make further settings via the menu item “system settings”:
Figure 35: menu "system settings"
8.1 Techn. Support (team viewer)
Team viewer offers the possibility of remote access by technical support:
Figure 36:team viewer
8.2 Copy wallpapers
You can copy your own background images and custom icons from an USB stick to the Eltako GVFS-
Safe II.
Note: The following folder structure has to be set up on an empty USB stick: /hc_import/pictures/*.*. Otherwise the images are not being copied.
Via the menu item “system settings - import-export“ the”data transfer“ window opens. Put a check
mark next to “import folder“ and then click the “import“ button, all files are copied from the folder on
the USB stick to the hard drive.
The button “clear“ empties import, export or log directory, depending on the selected option.

Quick start guide Eltako GFVS-Safe II
21
Figure 37: copy images & icons
8.3 Export log-files
System generated log files can be copied on an USB stick. Therefore put a check next to “export
directory“ and then click “export”.
Note: The following folder structure has to be set up on an empty USB stick:
/hc_export/export/*.*. Otherwise, the log files are not being copied:
Figure 38: copy images & icons
The button “clear“ empties import, export or log directory, depending on the select option.

Quick start guide Eltako GFVS-Safe II
22
9 Switch off Eltako GFVS-Safe II A right click on the background shows the “power“ menu:
Figure 39: menu "power"
Choose if you want to restart the pc in recovery mode, reboot or turn it off.
10 Restore system backup To restore a system backup, click on the menu “power – restart in recovery mode“. The Eltako GFVS II
shuts down and starts in recovery mode.
Note: in recovery mode, the network adapter has the IP 192.168.168.100
Note: saved databases are not erased during a system recovery
Figure 40: menu "power"
Alternatively, you have 10 seconds during boot time using the arrow keys to select “Eltako GFVS-Safe
II (recovery)“.

Quick start guide Eltako GFVS-Safe II
23
Figure 41: selection "Eltako GFVS Safe II (recovery)"
After booting you will see the system restore menu:
Figure 42: recovery mode
Choose between: “restore factory default backup“, “recover user backup“ or “restart system“.
Via the button “restart system“ exit the system without a system backup restore.
The button “restore factory default backup“ resets the Eltako GFVS-Safe II back to its factory condition.
In this case all data will be lost.
To restore a backup, select from the drop-down box and click on “recover user backup“. The Eltako
GFVS-Safe II will restart.
Note: Make sure the Eltako GFVS-Safe II is not disconnected from the power supply during the recovery process.

Quick start guide Eltako GFVS-Safe II
24
11 Technical support For support please contact:
ELTAKO GmbH
Hofener Straße 54
70736 Fellbach
Germany
Tel. 0162 2575-124, -125, -126, -127
Fax +49711 5183740
or via E-Mail to: