Embed Size (px)
Citation preview

E-Commerce
10-Steps for Setting up E-CommerceE-commerce OverviewE-commerce NavigationWorking with Uploading Your Product Catalog List of Fields for the Upload FilesWorking with Product LayoutsWorking with PackagesProduct Catalog Management Product Categories Items Managing Your Items Item Discount Rules Item Shipping Methods Item Shipping Rules Item Tax Rules Item Handling Charges Item Package Options Item Package Option Discounts Item Package Option Taxes Item Package Option Handling Item Package Option Shipping Item Options Item Groups Packages Package Options Package Option Groups Package Option Group Discounts Package Option Group Taxes Package Option Group Handling Package Option Group Shipping Package Discount Rules Package Shipping Methods Package Shipping Rules Package Tax Rules Package Handling Charges Origins Catalog PageProduct Catalog Rules Discount Rules Shopper Discount Rules Shipping Rules Handling Rules

Tax RulesE-commerce OptionsOrders

Ten Steps to Setting up Ecommerce
Related Links: Ecommerce Overview
The Steps | Examples
The StepsStep 1 - Plan and Organize All Product InformationStep 2 - Add ItemsStep 3 - Add Packages & Item GroupsStep 4 - Add Categories and SubcategoriesStep 5 - Add Items, Item Groups, and Packages to CategoriesStep 6 - Set up Global RulesStep 7 - Set Up Payment Methods and Ecommerce OptionsStep 8 - Create and Customize a Shopping Cart PageStep 9 - Create and Customize a Catalog PageStep 10 - Publish the Web site, and update the catalog images
Step 1. Plan and Organize All Product Information ❍ Before beginning to set up Ecommerce through the online software, plan and organize all
items, categories, subcategories, groups, and packages. Determine any special shipping methods, shipping rules, special item discounts, and item handling charges.
Step 2. Add Items ❍ Add items (upload product images and define any package options in this step ) - Add all
products and product components to be used in the catalog ❍ Select shipping options - Define shipping methods and any special shipping rules ❍ Package options - All items used in product packages must first have at least one package
option defined ■ Package options are always defined at the time an item is added, or by editing the
item.❍ Discount options - Define any special discounts associated with products ❍ Inventory - Activate inventory control and specify beginning stock on hand
Step 3. Add Packages & Item Groups ❍ Packages
■ Products and product components that will be used in packages must already exist as items with item package options defined
■ At least one option group must be created■ At least one item package option must be added to each option group created.
❍ Item Groups

■ Products to be used in Item Groups must already exist as itemsStep 4. Add Categories and Subcategories
❍ Categories and subcategories are used to organize the online catalog by product type, brand, or any other organized system which allows customers to easily find products
Step 5. Add Items, Item Groups, and Packages to Categories ❍ Add all products to be used in the catalog into their respective categories
Step 6. Set up Global Rules ❍ Shipping methods ❍ Discounts ❍ Shipping rules ❍ Handling charges ❍ Tax rules
Step 7. Set Up Payment Methods and Ecommerce Options ❍ Payment Methods ❍ Merchant Account Information - Online merchant account details, Paypal, and/or e-mail
processing ❍ Shopping Cart Check Out Options
Step 8. Create and Customize a Shopping Cart Page❍ Add a cart component to a new shopping cart Web page ❍ Edit the cart component to customize the general look of the cart
Step 9. Create and Customize a Catalog Page ❍ Add a catalog component to a new catalog page ❍ Edit the catalog component to customize the general look of the catalog ❍ Specify your "check out" shopping cart page in the catalog component options❍ Select your newly created catalog page from the Ecommerce Product Catalog Management
PageStep 10. Publish the Web site, and update the catalog images
Back to the Top of the Page
Product Examples
Item ExamplesItem Group ExamplePackage ExamplesExpress Order Form Example
Item Examples
Use items in the online catalog when the products for sale are offered as single items. Once items

are added to categories, customers will be able to browse the product catalog by category, click on the item they wish to purchase, and add it to the shopping cart.
[ Click for an example of a category that contains two items for sale ]
[ Click for an example of an item page with an add to cart button ]
Use an item to collect donations or to allow customers to pay for services. With variable pricing, donors can enter the exact amount to pay. In the example below, both the quantity and "unit" of measure have been disabled.
[ Click for an example of an item used to collect donations ]
Back to Examples
Item Group Example
An Item Group is a group of products organized for quick access. All products will be available on one page via a drop-down menu. When a customer selects a new product from the drop-down menu, the page will automatically refresh. The selected item's details will then be displayed, allowing a customer to purchase that item or select a different item from the menu.
[ Click for an example of an Item Group ]
Back to Examples
Package Examples
A package is an item with at least one subset ("package option groups") of items that are provided as purchase options. A customer can choose to purchase a package, then select which options to include. The price of the final product is calculated based on a customer's choices. For a step-by-step walkthrough on creating a package, click here for more information.
[ Click for an example of Package Options for a floral arrangement ]

[ Click for an example of the Main Package Option Area ]
[ Click for an example of the Package Options Area ]
Back to Examples
Express Order Form Example
An express order form is useful when customers often order many different items. An express order form provides a method to present any or all products on one page. A customer can then go down the list, enter the quantity to purchase for any desired products, and click the "add to cart" button at the bottom of the page. The "add to cart" button will then send all items to be purchased to the shopping cart.
[ Click for an Example of an Express Order Form ]
Back to the Top of the Page E-commerce Overview
Back to the Previous Page

Ecommerce Overview
Related Links: 10-Step Guide on Setting Up E-commerce
General Navigation | Product Catalog Management | Product Catalog Rules | Ecommerce Options | Check Orders and Order Reporting
[ Main Ecommerce Administration ]
General NavigationTo successfully navigate the Ecommerce administration pages and find the appropriate tool quickly, please read through the ecommerce navigation guide.
Product Catalog Management

[ Main Catalog Administration ]
The Product Catalog Management section is used to create, define, and manage all products and items used in the online catalog.
Product CategoriesItemsItem GroupsPackagesOriginsCatalog Page
Product Catalog Rules

[ Catalog Rules Administration ]
The Product Catalog Rules section is used to create and manage shipping methods, shipping rules, discount rules, handling charge rules, and tax rules.
Product Catalog Rules

[ Ecommerce Options Administration ]
Ecommerce OptionsThe Ecommerce Options section is used to set up or modify payment methods, merchant account information, shopping cart options and checkout descriptions. Ecommerce Options
Check Orders and Order Reporting

[ Main Order Reporting & Administration ]
The Order administration page is used to check orders, update the status of orders, and view or download detail and summary order reports. Orders
Back to the Top of the Page10-Step Guide on Setting Up Ecommerce
Back

General Ecommerce Navigation
Related Links: 10-Step Guide on Setting Up E-commerce
Update Catalog Images | View Update Status | Commerce Check | Publish | View Site | Product Catalog Management | Product Catalog Rules | Ecommerce Options | Orders
Update Catalog ImagesApplies any changes made to the images in the catalog, allowing these changes to be viewed "live" on the Web site. Use this option any time images are changed or added to the catalog.
Navigation: Click on the main "Ecommerce" link at the top of any main administration page. Click on the "Update Catalog Images" text link. The main ecommerce page will reload and display a confirmation message: "Catalog Image Thumbnails are queued". All thumbnail images used in the catalog will be generated.

Back to the Top of the Page
View Update StatusView the current status and/or progress of any pending thumbnail image updates for the product catalog.
If there are any images still pending, a progress status bar will load with a detailed list of completed and pending changes. If all operations have been completed, the message "No images in the queue" will display.
Navigation: Click on the main "Ecommerce" link at the top of any main administration page. Once the main ecommerce page loads, click on the "view update status" text link. The queue status page will load in a new browser window.

Back to the Top of the Page
Commerce CheckThe Commerce Check will run a preliminary check on your Web site's e-commerce settings.
If the system detects that something is not set up properly, it will inform you. If you are unsure what the messages mean, please contact Technical Support for further assistance or you may browse the User Guide to determine the solution to your problem.

Back to the Top of the Page
PublishAny time changes are made to the catalog or any ecommerce options, the changes must be applied by publishing the Web site. This will publish changes to any Web site pages as well as the catalog and ecommerce system. Publishing the Web site will not regenerate the thumbnail images used in the product catalog. Use the update catalog images option to apply any catalog image changes.
A complete log of all completed operations will display. All successful changes will then be viewable "live" on the Web site.
Navigation: Click on the main "Ecommerce" link at the top of any main administration page. Once the main ecommerce page loads, click on the "Publish" text link. The Publish Site page will load in a new browser window.
Back to the Top of the Page
View SiteThe "View Site" option allows quick access to the live Web site from the ecommerce administration. To see any changes made to the catalog, publish the Web site before viewing.
Navigation: Click on the main "Ecommerce" link at the top of any main administration page. Once the main ecommerce

page loads, click on the "View Site" text link. The Web site home page will load in a new browser window.
Back to the Top of the Page
Product Catalog ManagementThe product catalog management section is used to add, modify and manage all products and items used in the catalog.
Navigation: Click on the main "Ecommerce" link at the top of any main administration page. Once the main ecommerce page loads, click on the "Product Catalog Management" text link.

Back to the Top of the Page
Product Catalog RulesThe product catalog rules section is used to define and manage shipping methods, discount rules, shipping rules, handling charges, and tax rules used in the catalog.
Navigation: Click on the main "Ecommerce" link at the top of any main administration page. Once the main ecommerce page loads, click on the "Product Catalog Rules" text link.

Back to the Top of the Page
Ecommerce OptionsThe ecommerce section is used to set up payment methods, merchant account information, shopping cart options, and other ecommerce options.
Navigation: Click on the main "Ecommerce" text link at the top of any main administration page. Once the main ecommerce page loads, click on the "Ecommerce" text link. The Ecommerce Options page will load in a new browser window.
Back to the Top of the Page
OrdersThe order section is used to check orders, access order reports, and update the status of orders. Order reports can be customized and viewed online, or exported to be utilized in spreadsheet compatible software.
Navigation: Click on the main "Ecommerce" link at the top of any main administration page. Once the main ecommerce page loads, click on "Order Reporting". The order reporting summary page will load in a new browser window.

Back to the Top of the Page10-Step Guide on Setting Up E-Commerce
Back to the Previous Page

Working with Uploading and Downloading Your Product Catalog
Detailed Explanation
Related Links: 10-Step Guide on Setting Up E-Commerce | Product Catalog Management | Product Categories | Package Options for Items
Overview | Suggested Work Flow | Manage Products | Manage Package Options for Products | Manage Categories | Modify the Mass-Upload File | List of Fields for the Mass-Upload File
OverviewVersion 3.0 gives website owners the ability to manage products and categories by using any spreadsheet or database software capable of reading and writing text files in tab delimited format. This allows a website owner to:● add new products and make changes to existing products by uploading and downloading an item file ● add new categories, designate subcategories, and assign items to categories with a category file ● as well as add and make changes to package options for products.
At any time, tab-delimited files may be downloaded from your Administration. Back to the Top of the Page
Suggested Work Flow
1. Set up at least two products through the product catalog adminstration, entering all information for the items.
2. Create at least one category through the product catalog administration. Add at least two products to this category.
3. Download the tab-delimited item file and download the tab-delimited category file. 4. Edit the tab-delimited file for your items, by modifying existing items or adding new items. Save the
file as a tab-delimited text file. 5. Upload your new item file into the e-commerce system. All new items will automatically be given a
system generated Item ID number. 6. Download and open the tab-delimited item file ( items.tsv ) again. The Item ID field for your newly
added products will now be populated with a system-generated number. 7. Edit the tab-delimited file for your categories, by modifying existing categories or adding new
categories. Use the Item ID from the items.tsv file to assign items to a category. Save the file as a tab-delimited text file.
8. Upload the categories.tsv file by using the category upload tool in the ecommerce product adminstration.
9. Repeat the above steps any time new products or categories need to be added to the catalog. Item information and category information can be changed/updated, provided that the system generated

Item ID number and the system generated Category ID number are present in the tab-delimited text files.
Back to the Top of the Page
Manage Products
Downloading Items From the main menu of the E-commerce section, click on the link "Download Items" to download the tab-delimited item file.
A new window will appear:

Checkmark the boxes next to the fields that you would like to have downloaded for your items. If you want all of them selected, you may click on the blue text "Select All" above the "Download" button.
When done specifying your options, click on the button "Download". A dialog window will appear asking if you want to open or save the tab-delimited text file.

Click on the button "Save". Another dialog window will appear asking where you want to save the file and what filename you want to save the file as.

Navigate through your computer to specify a location where you would like to save the file. Enter in a filename in the field "File Name". When done, click on the button "Save" to save the tab-delimited item file to your computer.
Uploading ItemsFrom the main menu of the E-commerce section, click on the link "Upload Items" to upload your tab-delimited text file for items.
A new window will open up asking for the location of your upload file. Click on the button "Browse..."

Specify the location of your upload file by browsing through your computer directory. When you find your upload file, click on the file name and then click on the button "OK".

You will then see the following screen:
Click on the button "Upload Items" to upload the file to the E-commerce section of your Web site. The system will then display a log of the uploading process:

If the system detected any errors, it will inform you in red text.
Back to the Top of the Page
Manage Package Options for Products
Downloading Package Options for ProductsFrom the main menu of the E-commerce section, click on the link "Download Package Options" to download the tab-delimited category file.

The following screen will load:
Checkmark the boxes next to the fields that you would like to have downloaded for your package options. If you want all of them selected, you may click on the blue text "Select All" above the "Download" button. When done specifying your options, click on the button "Download". A dialog window will appear asking where you want to save the file and what filename you want to save the file as.
Navigate through your computer to specify a location where you would like to save the file. Enter in a filename in the field "File Name". When done, click on the button "Save" to save the tab-delimited category file to your computer.

Uploading Package Options for ProductsFrom the main menu of the E-commerce section, click on the link "Upload Package Options" to upload your tab-delimited text file for categories.
A new window will open up asking for the location of your upload file. Click on the button "Browse...".
Specify the location of your upload file by browsing through your computer directory. When you find your upload file, click on the file name and then click on the button "Open". When you are back at the Upload Package Options screen, click on the button "Upload Package Options" to upload the file to the E-commerce section of your Web site.
The system will then display a log of the uploading process. If the system detected any errors, it will inform you in red text.
Back to the Top of the Page
Manage Categories

Downloading CategoriesFrom the main menu of the E-commerce section, click on the link "Download Categories" to download the tab-delimited category file.
The following screen will load:
Checkmark the boxes next to the fields that you would like to have downloaded for your categories. If you want all of them selected, you may click on the blue text "Select All" above the "Download" button. When done specifying your options, click on the button "Download". A dialog window will appear asking if you want to open or save the tab-delimited category file.

Click on the button "Save". Another dialog window will appear asking where you want to save the file and what filename you want to save the file as.
Navigate through your computer to specify a location where you would like to save the file. Enter in a filename in the field "File Name". When done, click on the button "Save" to save the tab-delimited category file to your computer.

Uploading CategoriesFrom the main menu of the E-commerce section, click on the link "Upload Categories" to upload your tab-delimited text file for categories.
A new window will open up asking for the location of your upload file. Click on the button "Browse...".

Specify the location of your upload file by browsing through your computer directory. When you find your upload file, click on the file name and then click on the button "OK".
Click on the button "Upload Categories" to upload the file to the E-commerce section of your Web site. The system will then display a log of the uploading process. If the system detected any errors, it will inform you in red text.
Back to the Top of the Page
Editing the Mass-Upload FileOnce the file has been saved to your computer, you may edit the tab-delimited text file using a text editor such as Notepad, but take care not to remove any line breaks or tabs. A safer way to edit the tab-delimited text file is to open it in a spreadsheet program, such as Microsoft Excel.
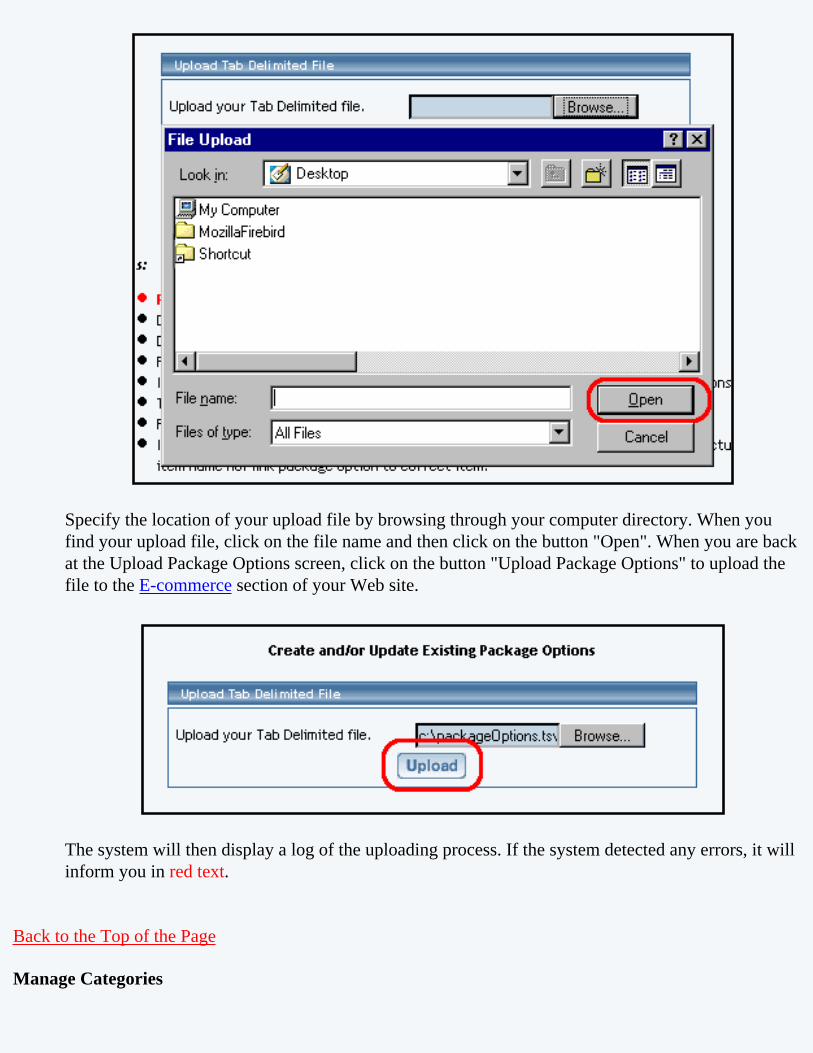
If you are using a spreadsheet program to edit the tab-delimited text file, you will see each of the downloaded fields that you selected as part of the column name. For the tab-delimited item file you will see
the following:
If you use a text-editing program to edit the tab-delimited item file, you will see the following instead:
This does look very odd, so you can see why using a spreadsheet program to edit the tab-delimited text file is very recommended. The remainder of this page will assume that you are using a spreadsheet program to edit the tab-delimited text file. Back to the Top of the Page
List of FieldsAll of the fields in the tab-delimitted text files are listed on this page. Back to the Top of the Page
Please make sure that the first line of text in the tab-delimited text files MUST NOT be changed. If you are using Microsoft Excel or a spreadsheet program, DO NOT customize the column to display for numbers or text. Once you are done with inputting information for all of your pages, you need to
save the file. The file MUST BE SAVED as a tab-delimited text file. This file must not have any spaces in the filename and this file should have the extension of ".txt" at the end of the filename.
Back to the Top of the PageProduct Catalog Management

10-Step Guide on Setting Up E-Commerce Back to Previous Page

Working with Uploading and Downloading Your Product Catalog
List of Fields
Related Links: 10-Step Guide on Setting Up E-Commerce | Product Catalog Management | Working with Uploading and Downloading Your Product Catalog | Product Categories | Package Options for Items
List of Fields for the Item File | List of Fields for the Package Option File | List of Fields for the Category File | List of Fields for the Category Item File
Below is a description of all the fields for the tab-delimitted:item file - to upload and modify Itemspackage option file - to upload and modify Package Options for Itemscategory file - to upload and modify Categoriescategory item file - to upload and modify products in Categories
Item file Item IDNamePricetaxableWeightDescriptionInventory OptionWidthHide PriceItem OptionImageShort DescriptionMeta DescriptionBarcodeManufacturerUse All Shipping MethodsWarranty InformationMSRP - Manufacturer's Suggested Retail PriceCodeLengthUse QuantityAdd IventoryHide Purchase ButtonHeight
Meta KeywordsCurrent Inventory
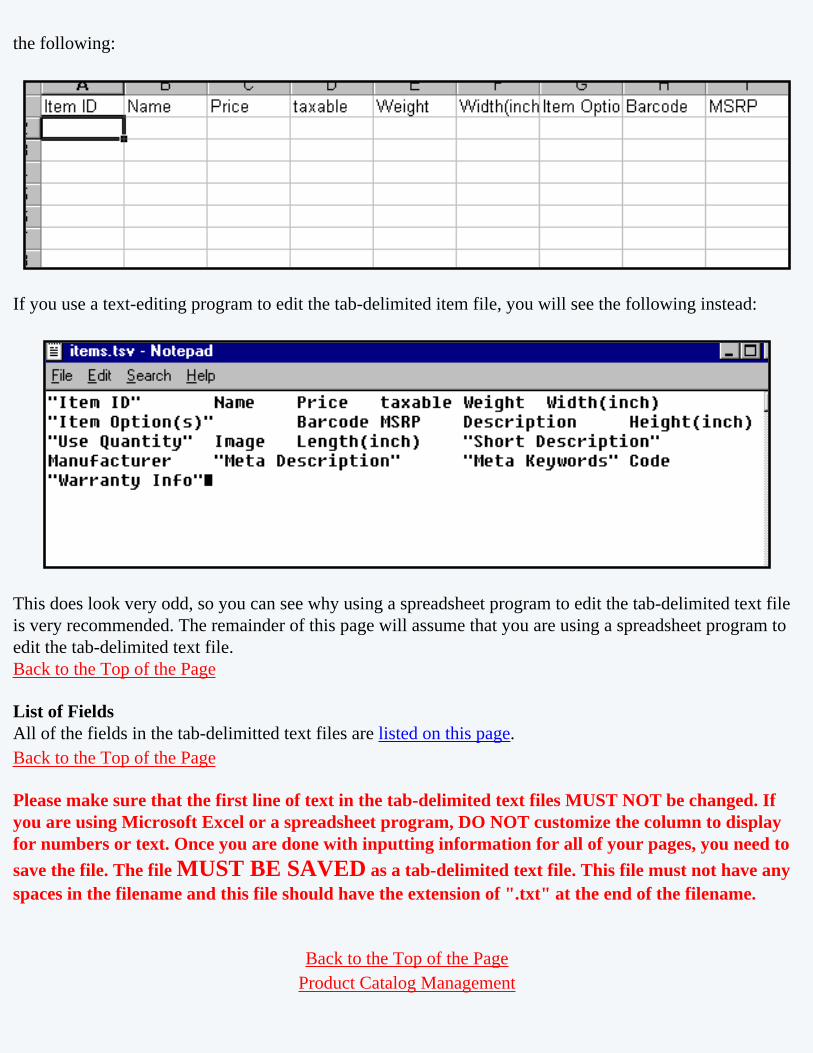
Item ID - the item identification numberIf you have existing products, the tab-delimited text file will download them so that you will see them in
the tab-delimited text file.
Edit all the fields that you desire. To replace an item with the information that you will upload, you must keep the field "Item ID" the same. So, for example (see above screenshot), if you wanted to upload the 1st product (carton of pencils) with new information, you must keep the "140"; the "140" is the system's way of identifying that product. Please do not enter item ID's in your tab-delimited text file unless you are absolutely sure that you want this automatic replacement to occur.
If the field "Item ID" is blank for an item, the system will assign an Item ID to that product and assume it is a new product. This product would then need to be assigned to a category in order to be displayed on the Web site.
Name - name of the productThe Name field must not have any line breaks in it; that is, the name of the product must be one line of
text.
Price - the price of the product in decimal formatThe price of the product must be either numbers or decimals. For example, "100.5"
Taxable - whether the item is to be considered taxableTo enable the item as taxable, enter "1" (one) in the field. Enter "0" (zero) if the item is not to be taxed.
Weight - the weight of the item, in poundsThe weight of the product must be either numbers or decimals. For example, "100.5"
Width - the width of the item, in inches.The width of the product must be either numbers or decimals. For example, "100.5"
Item OptionYou have the ability to provide a drop-down selection for your item. This drop-down selection does not
have the ability to define different prices, for that, you would need an item group.
The format of this is the name of the option, followed by the equal sign, followed by the options separated by spaces, and then ended with a semi-colon. For example, if you wanted to have a drop-down selection for t-shirts for the sizes, you would enter the following for this field:

Size=XS,S,M,L,XL,XXL,3XL;
If you wanted to have two drop-down selections for t-shirts for sizes and color, you would enter the following for this field:
Size=XS,S,M,L,XL,XXL,3XL;Color=Green,Blue,Red,Yellow;
Use All Shipping MethodsThis field allows you to set your product to use all of the global shipping methods.
BarcodeThis is the barcode of this product. This personal identification code will NOT show up on the Web site at
all and only shows in the Product Catalog Management section of your Administration.
MSRP - Manufacturer's Suggested Retail PriceThe price of the product must be either numbers or decimals. For example, "100.5"
Description - the description of the productThe text for your description CAN NOT contain a line break or carriage return. This is a limitation of tab-
delimited files; for tab-delimited files, the line break signifies the end of the entry and the next bunch of text would be read as the Item ID (the first field for an entry). You will have to edit the item after you have finished uploading to apply line breaks to the description - this will have to be done for all items that need such line breaks.
Height - the height of the item, in inches.The height of the product must be either numbers or decimals. For example, "100.5"
Hide PriceIf you want to hide the price of this item on the Web site, enter "1" (one) for this field. Otherwise, enter
"0" (zero) to display the price for this product.
Hide Purchase ButtonIf you want to hide the "Add to Cart" button of this item on the Web site, enter "1" (one) for this field.
Otherwise, enter "0" (zero) to display the the purchasing button.
Use QuantitySet the Use Quantity field to "1" (one) to allow the customer to order multiple quantities. Set the Use
Quality field to "0" (zero) if you need to prevent a customer from being able to specify the quantity to order or if a custom unit of measure is needed instead of a generic quantity.
Image - the image for this itemEnter in the exact filename of the image that you want to have applied for this item. For example, if the
image for this product is called "myImage.jpg", you would put "myImage.jpg in this field. The system will then search the "_images" directory of your Web site for this file and then assign this image to the product. This, of course, means that this image file must have already been uploaded to the _images directory.
Add InventoryThe number in this field will be added to the current inventory numbers for this product. So, for example,
if you had an iventory of 1000 for one product and you had "123" in the "Add Inventory" field for this product, after you upload the inventory number for this product will be 1123. You may also subtract from the current Web

site inventory by putting in a negative number. For example, if 1000 quantities of a product were bought from your physical store, you would add "-1000" to the "Add Inventory" field for the product.
Length - the length of the item, in inches.The length of the product must be either numbers or decimals. For example, "100.5"
Short Description - the short description of the productThe text for your short description CAN NOT contain a line break or carriage return. This is a limitation
of tab-delimited files; for tab-delimited files, the line break signifies the end of the entry and the next bunch of text would be read as the Item ID (the first field for an entry). You will have to edit the item after you have finished uploading to apply line breaks to the description - this will have to be done for all items that need such line breaks.
The short description will of the product will only show up if that setting has been enabled on the category level of the catalog component.
Manufacturer - the company that manufactures the product
Meta Description - the description of the product that is readable by search enginesUse this field to apply a description for the product. This Meta Description is read by Search Engine
companies when you promote your Web site to the internet world. Your Web site visitors will not see this meta description unless they view the HTML code of your Web page. The text for your Meta Description CAN NOT contain a line break or carriage return. This is a limitation of tab-delimited files; for tab-delimited files, the line break signifies the end of the entry and the next bunch of text would be read as the Item ID (the first field for an entry)
Meta Keywords - the keywords of the product that is readable by search enginesUse this field to apply keywords for the product. These Meta Keywords are read by Search Engine
companies when you promote your Web site to the internet world. Your Web site visitors will not see these meta keywords unless they view the HTML code of your Web page. This text CAN NOT contain a line break or carriage return. This is a limitation of tab-delimited files; for tab-delimited files, the line break signifies the end of the entry and the next bunch of text would be read as the Item ID (the first field for an entry)
CodeThis is your personal identification code for this product. This personal identification code will NOT show
up on the Web site at all and only shows in the Product Catalog Management section of your Administration.
Warranty InformationThis is warranty information on the product. Only you will see this information in the Administration. If
you want to post this information for visitors to see, input this information in to Description instead.
Inventory OptionThis field states the type of inventory option that you want to use for a product. Enter in "0" (zero) if you
will not be using inventory. Use "1" (one) if you will use inventory and you do not want the customer to backorder items. Use "2" (two) if you will use inventory and you also want the customer to be able to backorder items.
Current InventoryThis field reports the current inventory that the system has for your product. Please keep advised, that the
Web site's inventory for a product can change instantly as the products are available for visitors to purchase while you are updating the upload sheet.

Package Option file Item IDPackage Option IDPackage Option PriceItem Name
Item ID - the item identification numberFor your package option, you must supply the Item ID of the product that you want to supply the package
option for.
Package Option ID - the package option identification numberThis is the ID number for the package option. If it is an existing package option, a number will be
provided. If the package option is new for the item, leave this field blank for the entry.
Package Option Price - the price of your package option for the product.
Item NameThis field is used to help you identify the package option you are applying to an item. If you have existing
package options, these will already be filled out the same as the item. So, for example, if you have ten package options for the item "sub sandwiches", all ten of the package options will have the name "sub sandwiches".
If you are adding new package options, what this means is that the field "Item Name" is not used but is only used to help you identify the package options for the same product.
Category file Category IDNameCodeNumber of RowsImageStatusNumber of ColumnsParent Category IDItems Under this Category (sorted)Express Order FormOrder in Parent Category
Category ID - the category identification numberIf you have existing categories, the tab-delimited category file will download them so that you will see
them in the tab-delimited text file. Edit all the fields that you desire. To replace an item with the information that you will upload, you must keep the field "Category ID" the same. Please do not enter item ID's in your tab-

delimited category file unless you are absolutely sure that you want this automatic replacement to occur. If the field "Category ID" is blank for a category, the system will assign an Category ID to that category
and assume it is a new category.
Name - name of the categoryThe Name field must not have any line breaks in it; that is, the name of the category must be one line of
text.
CodeThis is your personal identification code for this category. This personal identification code will NOT
show up on the Web site at all and only shows in the Product Catalog Management section of your Administration.
Number of RowsSpecify how many rows of items that you would like the system to display on the Web site for this
category. Based on the number of rows and the number of columns, the system will display all of the items for this category in that fashion. For example, if you define 4 rows and 4 columns, you will have 16 items on the page for this category (if you have more than 16 items, the remainder will be on other pages of the category) with 4 items going from left-to-right and 4 items going from top-to-bottom.
Image - the image for this categoryEnter in the exact filename of the image that you want to have applied for this category. For example, if
the image for this category is called "myImage.jpg", you would put "myImage.jpg in this field. The system will then search the "_images" directory of your Web site for this file and then assign this image to the category. This, of course, means that this image file must have already been uploaded to the _images directory.
StatusSpecify whether the category will be active or inactive. If the category is inactive, the category and all the
items assigned to the category will not show up on the Web site. Enter "active" to enable the category and enter "inactive" to disable the category.
Number of ColumnsSpecify how many columns of items that you would like the system to display on the Web site for this
category. Based on the number of rows and the number of columns, the system will display all of the items for this category in that fashion. For example, if you define 4 rows and 4 columns, you will have 16 items on the page for this category (if you have more than 16 items, the remainder will be on other pages of the category) with 4 items going from left-to-right and 4 items going from top-to-bottom.
Parent Category IDSpecify the Category ID of the category that will be the parent of this category. For example, if you
wanted a category of Shirts (category ID 12345) to have two subcategories of Children and Adults, the Children category and the Adult Category would have the Parent Category ID of 12345.
You must still specify the order of these categories under the field Order in Parent Category.
Items Under this CategoryThe Item IDs of items that will be assigned to this category will be listed here. If you already downloaded
the tab-delimited category file, you will see numbers separated by commas:

From the tab-delimited item file, gather all of the Item IDs and enter them here. You do not need the single quotes to surround all of the numbers, but you DO need to place a comma between every Item ID. If an Item ID that is used in this field does not exist as an item, the system will not assign that item to the category.
Express Order FormIf you want the system to apply an Express Order Form for this category, specify a "1" (one) in this field.
Otherwise, specify a "0" (zero) to not use the Express Order Form for this category.
Order in Parent CategorySpecify how you would like to sort these categories under the parent category specifed under the field
Parent Category ID. So, for example, if you had categories of Men, Women, Boys, and Girls for the parent category Shirts and you wanted them in alphabetical order, the category Boys would be "1", Girls would be "2", Men would be "3", and Women would be "4".
Category Item File Category IDItem IDCategory NameItem Name
Category IDIf you have products in existing categories, the system will download your tab-delimitted text file with the
Category IDs of your existing categories. The Category ID must exist or the system will give an error.
Item IDIf you have products in existing categories, the system will download your tab-delimitted text file with the
Item IDs that are already in an existing category. The Item ID must exist or the system will give an error.
Category NameWhen the Category Item File is downloaded, this field is filled with the names of the categories. It is only
used for informational purposes, so putting in a new name for the category in this file will do nothing.
Item NameWhen the Category Item File is downloaded, this field is filled with the names of the items that are in the
category. It is only used for informational purposes, so putting in a new name for the item in this file will do nothing.

Please make sure that the first line of text in the tab-delimited text files MUST NOT be changed. If you are using Microsoft Excel or a spreadsheet program, DO NOT customize the column to display for numbers or text. Once you are done with inputting information for all of your pages, you need
to save the file. The file MUST BE SAVED as a tab-delimited text file. This file must not have any spaces in the filename and this file should have the extension of ".txt" at the end of the filename.
Back to the Top of the PageBack to Working with Uploading and Downloading Your Product Catalog
Back to Product Catalog ManagementBack to 10-Step Guide on Setting Up E-Commerce
Back to Previous Page

Working with Product Layouts
Detailed Explanation
Overview | Adding the Catalog Component | Modifying the Catalog Component | Items in the Product Catalog | Categories in the Product Catalog | Item Groups in the Product Catalog | Packages in the
Product Catalog
OverviewVersion 3.0 allows you to customize how your catalog appears to your shoppers with the use of a catalog component on a page that you specify as your catalog page. With those options, you can also set up colors and stylesheets to apply to your catalog page to get the right look for you. Back to the Previous Page
Adding the Catalog ComponentThe catalog component acts as a placeholder to instruct the 3.0 system where the product catalog will appear on the catalog page. Your catalog page can still have other components, such as a navigation component, images, text, etc... These components will appear on every page of the product catalog, in addition to the actual catalog information.
First, you must already have a catalog page already created (if not, click here for more information on creating new pages). You can name this page whatever you would like, though it must not have any spaces and you should restrict the filename to only letters. For the examples on this page, it will be assumed that "catalog.html" is the name of the catalog page.

Once you have a page to work with, you would then add a catalog component to the page. Click here for more information on adding components to a page. Below is a sample image that will appear to indicate where the catalog component was placed.
Back to the Previous Page
Modifying the Catalog ComponentEdit the catalog component by clicking on the sample image of the catalog. If you are in Simple Mode, the editing window will open; if you are in Advanced Mode, select "Edit" in the small window that popped up over the catalog component. You will see the following screen:


The Title, Category Title, and Category Description font styles may be modified by changing the default values next to each item.
The descriptions and images may be hidden or displayed by checking the appropriate box. These two selections only control the layout of the main catalog page.
Style sheets for the main catalog page may be applied. See the section on style sheets for further information.

The Catalog Title can be customized by typing a new title in the space provided. The title acts as the primary heading for the catalog page.
Before a customer can access the shopping cart, a shopping cart page must be selected. Select a page that contains a shopping cart component from the drop-down menu provided. If necessary, create a shopping cart page before proceeding.
The text that displays on the "Add to Cart" and "Update Price" buttons may be customized. Type the text to display in the fields provided.
To use a custom image for the "Add to Cart" and/or the "Update Price" button, click on the "No Image" text under the button to change. The image selection administration page will open in a new browser window.
To change an existing custom image used for the "Add to Cart" or "Update Price" button, click on the current image name. The image selection administration page will open in a new browser window.

To apply any changes made, press the "Update" button located at the bottom of the administration page.


Back to the Previous Page
ItemsThe display of the actual product items within the catalog may be customized by changing any of the available options.
Objects such as an item’s image or price can be hidden or shown by clicking on the appropriate check box.
To use the product catalog as an image gallery only, hide the "price" and the "add to cart button".

To move the description around the Add to Cart button, select in the drop-down menu for the section "Other Options".
When finished, click the "Update" button located at the bottom of the administration page.

Back to the Top of the Page
CategoriesHow actual product categories are displayed within the catalog may be customized by changing any of the available options.

Objects such as images or prices can be hidden or shown by clicking on the appropriate check box.
The image spacing and alignment can be modified by changing the selections from the drop-down menus provided. See the section on aligning images for further information.

When finished, click the "Update" button located at the bottom of the administration page.


Back to the Top of the Page
Item GroupsHow item groups are displayed within the catalog may be customized by changing any of the available options.
Objects such as an item group’s image or price can be hidden or shown by clicking on the appropriate check box.
When finished, click the "Update" button located at the bottom of the administration page.

Back to the Top of the Page
PackagesHow packages are displayed within the catalog may be customized by changing any of the available options.

Objects such as a package’s image or price can be hidden or shown by clicking on the appropriate check box.

When finished, click the "Update" button located at the bottom of the administration page.
Back to the Top of the Page Back to the Previous Page

Working with Packages
Related Links: 10-Step Guide on Setting Up E-commerce | Product Catalog Management | Package Management Page
Overview | When Should I Use a Package? | Step 1 - Define Your Choices | Step 2 - Configure Your Package | Step 3 - Configure Your Package Option Groups | Step 4 - Configure Your Package Options
OverviewPackages can be a very useful grouping of products, able to display and organize your products to your Web site visitors in a more efficient manner. A product such as a "customize your own computer" or a "sub sandwich" would be best added to the Web site as a Package.
When Should I Use a Package?Because Item Groups are similar to Packages, it can be difficult to know when to use a package. Item Groups should only be used if all you are doing is grouping a bunch of items together for your Web site visitors. For example, an Item Group can be used to present different sizes of t-shirts, assuming that each size has a different price. In general, Packages should be used if you want to present your customer with choices that will affect the price of the entire Package. Here are two examples, one product of a "customize your own computer" and one product of "sub sandwich":
customize your own computer1st choice - choose a case:
case #1case #2
2nd choice - choose a motherboard:motherboard #1motherboard #2
3rd choice - choose your processor:processor abc1000processor abc2000
4th choice - choose your graphics card:"normal" graphics cardawesome graphics card
5th choice - choose your memory256 MB RAM512 MB RAM1024 MB RAM
6th choice - choose your storage:100 GB500 GB
7th choice - choose your operating system:operating system #1
sub sandwich1st choice - choose your bread:
whitewheat
2nd choice - choose your type of sandwich:roast beefturkey and hamveggies onlyseafoodmeatballclub
3rd choice - choose your veggies:bell pepperslettuceonionspicklestomatoes
4th choice - choose your condiments:cheeseoilpeppersaltvinegar
operating system #2
8th choice - choose your display:15 inch flat panel monitor30 inch flat panel monitor
9th choice - choose your software:game #1game #2word processorspreadsheet programpresentation programhome productivity suite
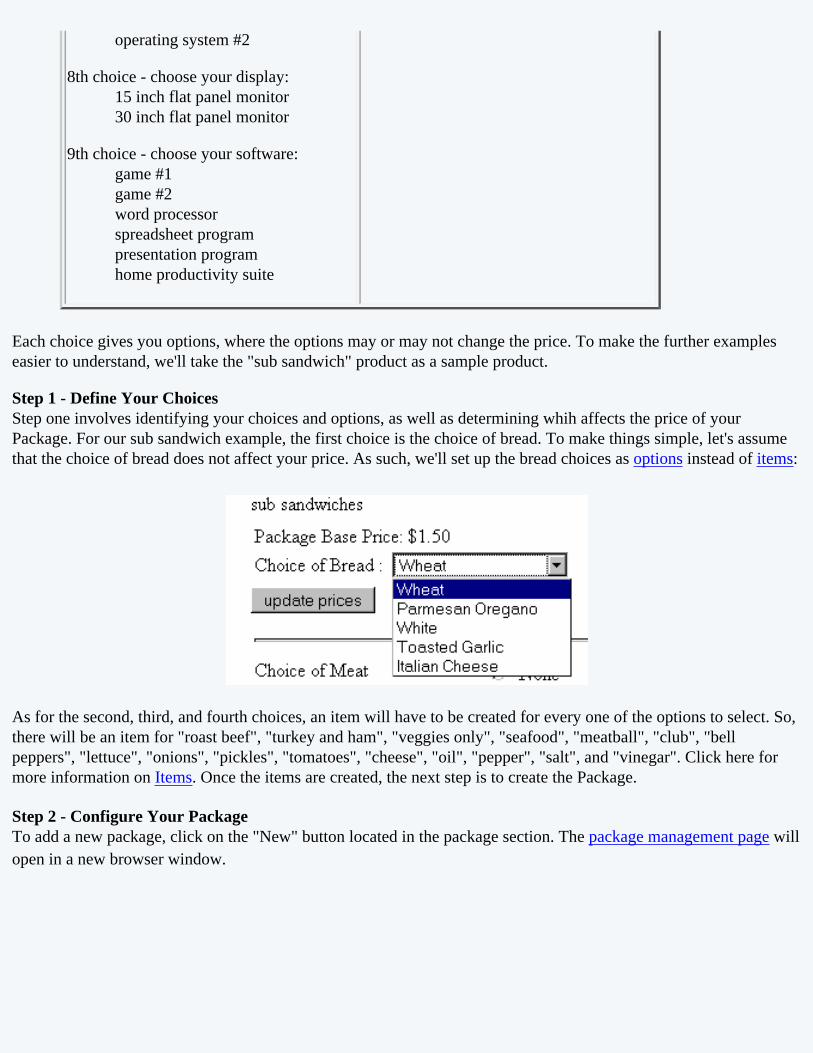
Each choice gives you options, where the options may or may not change the price. To make the further examples easier to understand, we'll take the "sub sandwich" product as a sample product.
Step 1 - Define Your ChoicesStep one involves identifying your choices and options, as well as determining whih affects the price of your Package. For our sub sandwich example, the first choice is the choice of bread. To make things simple, let's assume that the choice of bread does not affect your price. As such, we'll set up the bread choices as options instead of items:
As for the second, third, and fourth choices, an item will have to be created for every one of the options to select. So, there will be an item for "roast beef", "turkey and ham", "veggies only", "seafood", "meatball", "club", "bell peppers", "lettuce", "onions", "pickles", "tomatoes", "cheese", "oil", "pepper", "salt", and "vinegar". Click here for more information on Items. Once the items are created, the next step is to create the Package.
Step 2 - Configure Your PackageTo add a new package, click on the "New" button located in the package section. The package management page will open in a new browser window.

At the very least, enter in the name for the package in the text field "Name". For our example, our name would be "sub sandwiches"
Enter in the starting retail price in the text field "Price". This is the base price that will be displayed and charged for the main "starting" items in the package, not the final price of the complete package. If you have a manufacturer’s suggested retail price ( MSRP ), you place that price in the text filed "MSRP". If this value is greater than zero, it will be displayed above the retail price on the item page in the catalog. If no value is entered, the MSRP will not be displayed. If the MSRP is less than the retail price (other than zero), the system will display the MSRP but will put a slash through the MSRP price. For our example, the starting retail price of our sub sandwich will be "1.25".
For more information on setting up your package, click here for more information. For right now, you have already set up the basics for your package. You are now ready to create an Package Option Group.
Step 3 - Configure Your Package Option GroupAn option group is a collection of items that make up one choice in a package. A customer will be able to select one item, no items, or multiple items from the option group, depending on how the group is set up. Click on the tab

"Option Groups" when you are editing the Package.
A list of all available option groups will be listed on the left side of the administration page.

Option groups that are currently used by the package will be display to the right.

To create and define a new option group, click on the "New" button near the center of the administration page. Enter the name of the option group in the pop-up dialog box. The new option group will then be added to the "Available Option Groups" section.
For more information on setting up your package option group, click here for more information. For our example, an option group would be created for "Choose your type of sandwich", "Choose your veggies", and "Choose your condiments" - so a total of 3 package option groups would be created.
Step 4 - Configure Your Package OptionsFor this final step, we will define prices for items that will only apply for Packages. Click on one of the package option groups, then click on the button "Edit".

The box on the left displays all of the package options for items that are in the system. The box on the right displays all of the package options for items that are applied to this package. To apply an existing package option to this package, click on the package option in the "All Package Options" section. Click on the "Right" arrow button. The option will be added to the option group.

To create a new package option for an item, click on the button "Create". You will see the following screen:

In the drop-down menu next to the text "Item", choose one of the items that you want to apply a price for. This price will only apply to packages. Once you have selected an item, enter in a price in the field "Price", then click on the button "New" (Please note, that the button "New" will only appear onc eyou have selected an item).
Once a price has been added, it will appear to the box on the left. This box shows you all of the package options that have been applied to this item.

Repeat this process for all of the items. When done, click on the blue text link "close window". You will then be back at the package option group editing screen. Select all of the package options for items (to select more than one, hold down the CTRL key and click on multiple selections) the box in the left and then click on the button that looks like an arrow pointing to the right.
Please keep in mind that you are only providing options for the "choice" that is the option group. For this example, the option group "type of sandwich" will only have package options applied for the items labelled "roast beef", "turkey and ham", "veggies only", "seafood", "meatball", and "club". The option group "choice of veggies" will only have the following package options for items labelled "bell peppers", "lettuce", "onions", "pickles", and "tomatoes". The option group "choice of condiments" will only have the following package options for items labelled "cheese", "oil", "pepper", "salt", and "vinegar".
Click on the button "Update" to store your changes to the Package. You must still Publish to apply your changes to the Web site. For more information on setting up your package options for your item, click here for more information.
Once done, you'll see our example as:

Once you have a number of options selected, you would click on the button "Update Price" and then you would be able to add that Package to the shopping cart.
Related Links:
Package Option GroupsPackage Discount RulesPackage Shipping MethodsPackage Shipping RulesPackage Tax RulesPackage Handling Charges

Back to the Top of the Page Product Catalog Management
10-Step Guide on Setting Up Ecommerce Back to the Previous Page

Product Categories
Related Links: 10-Step Guide on Setting Up E-commerce | Product Catalog Management
Overview | Category Management Page | Category Layout | Category Item Management | Express Order Form
OverviewThe online catalog is organized by setting up categories within the software. Products are placed "inside" categories, and customers can browse through each category to find products of interest.
Each category is like a folder in a file cabinet which contains a list of products that customers can buy. A subcategory can also be created by adding a category inside another category.
Setting up a catalog with categories and subcategories would be like having a book with a table of contents. The table of contents itself would be the main category, and each chapter listed would be a subcategory. By accessing any "chapter" (subcategory), a customer will then have access to any products listed.
Each category and/or subcategory is like a folder that contains:
● A list of products inside● Other folders inside (subcategories)● Both a list of products and other folders inside
Like any good filing system, all information enclosed should be organized in a manner that allows easy access to all products.
The category system allows a business to display products according to product type, product brand, and/or any other classification.
This gives customers an easy way to find the product(s) they are looking for. A visitor can enter through the main catalog page, and will see links to all top-level categories (and an optional category image). A customer can then select which category to view. After clicking on one of the top-level categories, any products and/or subcategories within will be displayed.

[ An example of a main catalog page with top-level categories ]

[ An example of subcategories ]
[ An example of products within a subcategory ]
● At least one top-level category needs to be created

● Any necessary subcategories are created "under" the appropriate top-level category● All top level categories will be visible when a visitor first enters the main catalog● Subcategories will only be visible when a user clicks on the "parent" category● Items, packages, and item groups are added into the appropriate categories and/or subcategories● At least one category must be created in order to use the catalog
[ An example of an actual product/item page ]
Navigation: Click on the main "Ecommerce" link at the top of any main administration page. Click on the "Product Catalog Management" text link to load the product catalog management page.

A top-level category is a category that is visible from the main catalog page of the Web site. A subcategory is a category that is only visible once a visitor has clicked on the parent category.
Categories and subcategories are normally set up to logically arrange related products by classification. An example would be a catalog with top-level categories representing different types of products, with subcategories further classifying products by brand name.
Categories are automatically arranged alphabetically when the online catalog is generated.
To add a new top-level category, click on root directory to select it. Then, click on the "New" button located below category list. Enter the name of the new category in the prompt window, and click ok.
Enter the name of the new category in the prompt window, and click ok. The category management page

will load in a new browser window.
To add a subcategory, click on an existing category name to highlight it, and then click the "New" button. Enter the name of the new category in the prompt window, and click ok. The category management page will load in a new browser window.

To edit a category, highlight an existing category name and then click the "Edit" button. The category management page will load in a new browser window.
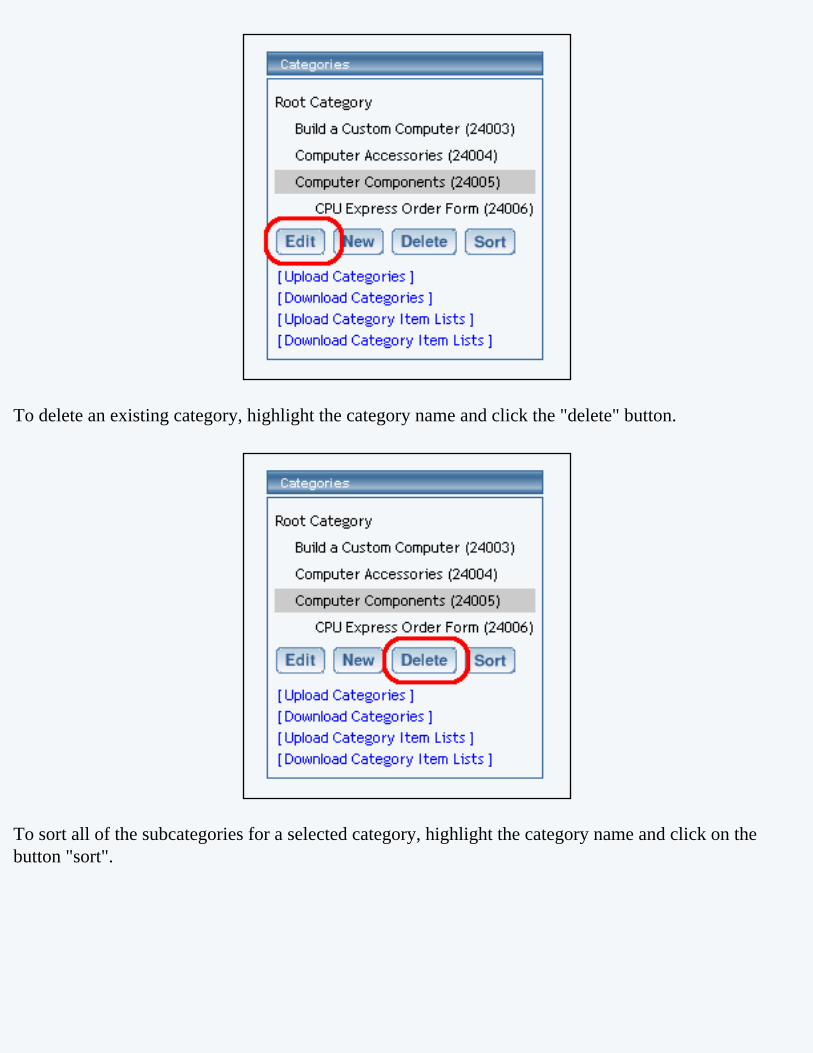
To delete an existing category, highlight the category name and click the "delete" button.
To sort all of the subcategories for a selected category, highlight the category name and click on the button "sort".
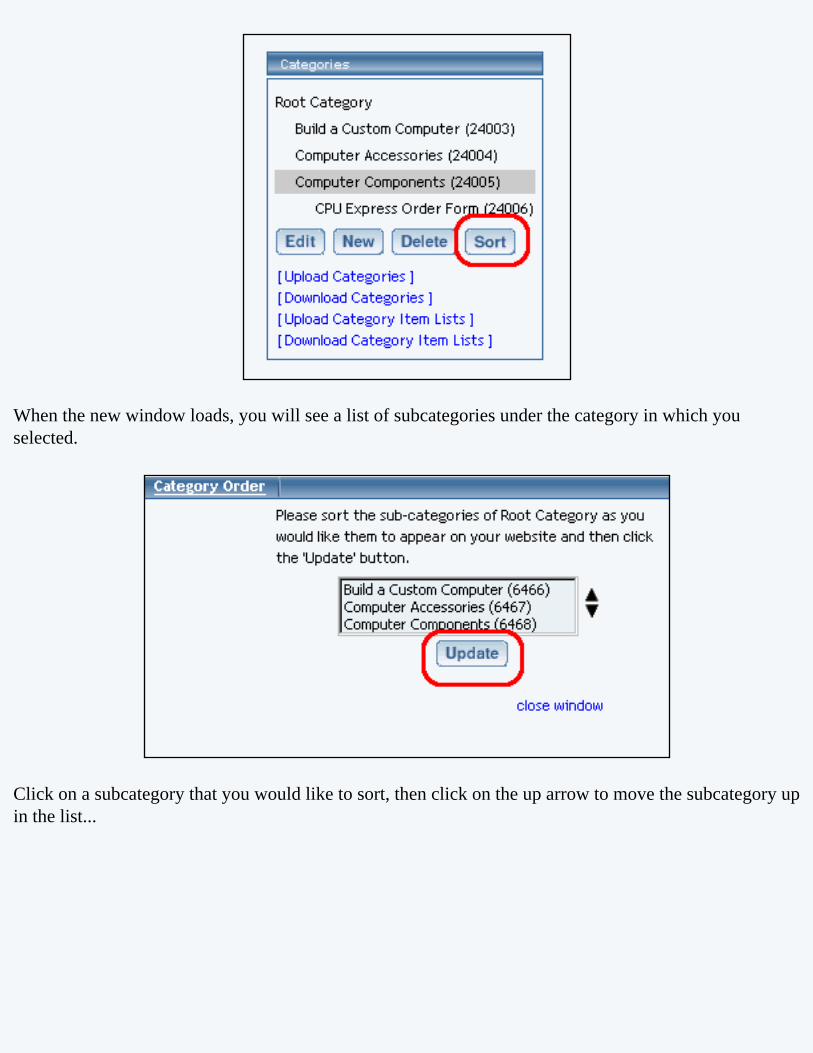
When the new window loads, you will see a list of subcategories under the category in which you selected.
Click on a subcategory that you would like to sort, then click on the up arrow to move the subcategory up in the list...

... and on the down arrow to move the subcategory down in the list.
Click on the button "Update" to save your sorting changes.
To upload and download categories, click here for more information on that topic.
Back to the Top of the Page
Category Management PageThe Category Management page is used to modify the category name, options and basic layout, as well as add or remove existing items, item groups, or product packages to categories.
Navigation: Click on the main "Ecommerce" link at the top of any main administration page. Click on the "Product Catalog Management" text link to load the product catalog management page.
Create a new product category, or click on a category or subcategory to modify in the category list. Click on the "Edit" button located at the bottom of the categories section. The category management page will open in a new browser window.

To change the name of a category, type over the existing name in the field provided.
To add or change the code of a category (optional), type the code in the field provided. A category code is a method to identify each category for reference purposes only, and has no specific function in the

catalog.
To add or change the image associated with the category, click on the image file name, or "No Image" if there is no current image applied. The image selection page will load in a new window.
Click on the "Update" button, located at the bottom of the category administration page to apply any changes. The page will reload and display a confirmation message.
Back to the Top of the Page
Category LayoutProducts can be visually arranged on a page by specifying how many columns of products/subcategories to display vertically (next to each other) and how many rows of products/subcategories to display horizontally. The category managment page is used to control the layout of all items in the category. It is also used to modify the name and details of the category.
Navigation: Click on the main "Ecommerce" link at the top of any main administration page. Click on the "Product Catalog Management" text link to load the product catalog management page.
Create a new product category, or click on a category or subcategory to modify in the category list. Click on the "Edit" button located at the bottom of the categories section. The category

management page will open in a new browser window.
The columns portion of the layout section defines how many products will display vertically (next to each other) on the page. To add a column, click on the "+" plus sign to the left of "Columns". To remove a column, click on the "-" minus sign to the right of the "Columns".
The rows portion of the layout section defines how many horizontal rows of products will display per page. To add a row, click on the "+" plus sign to the left of "Rows". To remove a row, click on the "-" minus sign to the right of "Rows".
As an example, a category set up to display two columns and two rows will display up to four products on the first page. The first two products will display side by side, the third and fourth products will display below the first two, and any remaining products will be accessible by clicking on a link to the next page. Back to the Top of the Page
Visual LayoutThe Visual Layout is the visual representation of how products will appear on the catalog page. Each black box outline represents one product. Add or Remove rows in the category layout section using the plus and minus buttons provided.

Back to the Top of the Page
Category Item ManagementCategory Item Management allows you to add, remove and/or arrange items, item groups, and packages.
Navigation: Click on the main "Ecommerce" link at the top of any main administration page. Click on the "Product Catalog Management" text link to load the product catalog management page.

Create a new product category, or click on a category or subcategory to modify in the category list. Click on the "Edit" button located at the bottom of the categories section. The category management page will open in a new browser window.
In order for products to be visible from the Web site, items must first be added to a category.
To add an item to the category, select the item by clicking on it in the main "Items" list located toward

the bottom of the administration page. Multiple items may be selected by highlighting as many items as desired. Click the "Add Item" button. The page will refresh with the chosen items now populated in the main category list.
If you see the following,...
...then you have a large product catalog. In order to present the products to you in a way that would be quick and efficient, the 3.0 system displays only a portion of your products. Click on the page numbers to browse through the different portions. To display more products for a portion, click on the appropriate number next to the text "Items Per Page". For the above example, it is currently showing 1000 products at a time; to display less, we could click on "20", "100", "500", or "1000".
To add item groups, select the desired groups from the "Item Groups" list located toward the bottom of the administration page. Click the "Add Group" button.

To add packages, select the desired packages from the "Packages" list located toward the bottom of the administration page. Click the "Add Package" button.
To order products in the category, highlight an item to move by clicking on it from the list of items in the "Category" section. Click the "up" or "down" arrow button to move the product to the desired position. Repeat this process until all products are listed in the order to be displayed in the catalog.
To remove a product from the list of items in the category, select the item and press the "Remove" button.

Press the "Update" button located at the bottom of the administration page to apply any changes made.
Back to the Top of the Page
Express Order FormThe Express Order Form lists all products in a category in a format allowing customers to add multiple items to the shopping cart in one easy step.

[ Example of an Express Order Form ]
Navigation: Click on the main "Ecommerce" link at the top of any main administration page. Click on the "Product Catalog Management" text link to load the product catalog management page.
Create a new product category, or click on a category or subcategory to modify in the category list. Click on the "Edit" button located at the bottom of the categories section. The category management page will open in a new browser window.

To enable the form for the category, click on the "Express Order Form" selection box. The page will refresh.
The Express order form can only be used with product items, and not packages or item groups.
To add or remove items to the category, use the category item management section.
Press the "Update" button to apply changes.
The Express order form will arrange all items in the category as follows:
Each item will display the item’s image (if applicable), a short description, and a quantity field. The "Add to Cart" link will submit all selected items (items where a customer has selected a quantity greater than zero) to the shopping cart with one click.
This feature allows customers to quickly purchase multiple products without having to navigate through the entire catalog, page by page, to make multiple purchases.
Back to the Top of the PageProduct Catalog Management
10-Step Guide on Setting Up E-Commerce

Back

Items
Related Links: 10-Step Guide on Setting Up E-Commerce | Product Catalog Management
Overview | Adding Items | Item Management Page | Related Products | Upload Items | Download Items | Manage Inventory
OverviewAny product that will be sold from the Web site must be added as an item within the software.
Use the Product Catalog Management Administration section to add, remove and modify items ( products and package components ) that are used in the online catalog.
The first step when creating an online catalog is to create the items that will be used as products. Items are added through the product catalog management system, and then these items are either added to categories, or used as components ( "package options" ) in packages.
An item can be:
● An actual tangible product that will be sold on the Web site● An item which allows customers to collect money for non-tangible goods
❍ To pay bills❍ To collect donations❍ To sell services
● A product component or "package option"
If something is going to be offered in the online catalog, it must always first be added as an item.
A product component, referred in the software as a package option, is an item that has been created that will be used as a part of a package. A package is a product bundle, and allows site owners to provide customers with purchase options. For more information on packages, please see the complete section on packages or the 10 Step Guide to Setting Up Ecommerce.
In some cases, a package option may also be sold independently in the catalog. In such cases, the item is added to any desired category and sold like any other product, and the package option, created by editing the item, is used within a package.
In other cases, an item may be specifically created for use in a package (with at least on package option defined for this item), and would not be available for purchase outside of the package.

All specific details for any products or services sold in the product catalog are managed by creating and/or editing items.
Please note, that if you see the following instead,...
...your product catalog is very large and has been moved to another page to make it more efficient for you to edit your products:
In this Item Management window, click on the blue numbers next to the text "Items Per Page" to increase or decrease the number of items to display in the drop-down menu. Click on the page numbers next to the text "Page" to browse between different portions of your items.

Navigation: To access the catalog management section, click on the main "Ecommerce" link at the top of any main administration page. Click on the "Product Catalog Management" text link to load the product catalog management page.
All products (and product components) that will be used in the catalog must first be added as items.
To edit an existing item, select the item to edit from the drop down menu, then click on the "Edit" button. The item management page will open in a new browser window.
To delete an existing item, select the item to delete from the drop down menu, then click on the "delete" button.
To copy an existing item, select the item to copy from the drop down menu, then click on the "Copy" button. Type the new item name in the prompt window, and click "Ok". The current page will refresh, and the item management page will open in a new browser window.
To search for items, type the item name in the empty text field located just above the item drop down menu and click the "Search" button. Once the page reloads, all matching items will be available for selection in the drop down menu.
To sort the drop-down list of all of your products, choose either "Name" or "Item ID" in the drop-down menu to the left of the word "Sort". Then click on the button "Sort".
To manage the general properties of all of your items, click here for more information.
Adding an Item
Before any products or product components can be used in the online catalog, each must be added as an item.
An item can be:
● An actual product for sale● A product or a product component that will be used in a package● Both a product and a package component
To add a new item, click on the "New" button located in the item section.
A dialog box will appear. Type in the name of the new item, and click "ok". Once the item name has been defined, the item management page will open in a new browser window.

[ Main Item Administration ]
Back to the Top of the Page
Item Management PageModify item specific information, such as descriptions, pricing, inventory, product image, and item rules.
The item management page is used to modify item-specific information. All item details are managed by accessing this page.
Use the item management page to:
● Add or modify product details such as the product descriptions, the product weight, and the product pricing● Activate, deactivate or make inventory adjustments.● Access item specific rules● Change or define an item's package options ● Modify or create an item's options
Navigation: Click on the main "Ecommerce" link at the top of any main administration page. Click on the "Product Catalog Management" text link to load the product catalog management page. The item management page is loaded in a new browser window any time a product item is added or selected for editing.
Reference the following guide when adding or changing any product/item information:
Enter the product name, item barcode identification number, product manufacturer, and product identification number (code) in the fields provided. The product name is the only required field in this area.

Check the selection box next to "active" if this item is to be available for use in the catalog. Items that are not active will not be displayed or available for purchase from the Web site.
Check the box next to "Use all available shipping methods" if this item will be shipped using all active shipping methods. If this box is not checked, then shipping methods must be manually selected by accessing the item shipping methods page.
Check the box next to "taxable" if this item is being sold as retail goods.
Check the box next to "variable pricing" only if the amount to pay is determined by the customer. Checking this box will result in a blank field appearing on the item order form, allowing customers to type in a dollar amount to pay for this item.
Variable pricing is ideal for:
● Allowing customers to pay invoices online ● Collecting donations ● Selling gift certificates
Enter the Retail Price in the field provided. This is the base-price a customer will be charged when purchasing the item.

Optionally, enter the manufacturer's suggested retail price (MSRP) in the field provided. If this value is greater than zero, it will be displayed above the retail price on the item page in the catalog. If no value is entered, the MSRP will not be displayed.
Checkmark the checkbox "Hide Price" if you only want to hide the price of this item, rather than all items. Checkmark the checkbox "Hide 'Add To Cart' button" if you want to hide the "Add to Cart" button for this item, rather than for all items. Please keep in mind that this setting is overridden by the Catalog Component's ability to hide prices and hide the "Add to Cart" button for all items.
Under inventory options, click the radio button next to desired selection. The default is "no inventory" which will deactivate the inventory control system for this item.
Selecting "Don't allow users to order items not in stock" will activate the inventory control system. The system will not allow a customer to purchase any items out of stock or that exceed the available inventory (items with zero inventory will still show up in any active categories that contain the item).
Selecting "Let users backorder items" will allow customers to purchase and pay for items regardless of quantity on hand. All products which are listed as being out of stock will automatically be placed on back-order.
When the inventory control system is activated, inventory-tracking information will appear. To modify inventory, enter the number of units in the field provided, next to "Add Inventory". To add inventory, enter a positive value. To remove inventory, enter a negative value.
A running total of inventory is kept and displayed, with the current stock and total items sold listed. To complete an inventory adjustment, click on the "update" button at the bottom of the administration page.
The "Published Inventory" section will not reflect any inventory adjustments until the Web site is published.
Enter any warranty information, a short description, a main description, Meta Keywords, Meta Description, and Instruction in the fields provided. All of these fields are optional.

The short description appears at the category level in the catalog. It is also used as the primary description if the item is used as a package option or if an item is used in an express order form.
The main description appears on the main item page. It is used to provide detailed product information and any necessary product specifications. The Meta Keywords and Meta Description are only used for search engine information, and will not be visible to Web site visitors. Enter key words that apply to this item and a short description of this item in the spaces provided.
The Instruction text area gives you the ability to place a block of text that will appear at the end of a successful order. This text will appear on the order confirmation page, on the order fax sent to the site owner, and in the e-mail confirmation sent to the customer and to the site owner.
Select a shipping origin from the drop down menu provided.
Select an image to use with this item by clicking on the current image name or on "no image" if an image has never been selected. The image selection page page will load in a new window.

The quantity and unit of measure options are located toward the upper right-hand corner of the administration page.
Uncheck the "Use Quantity" box only 1) to prevent a customer from being able to specify the quantity to order or 2) To use a custom unit of measure in place of a generic quantity.
When the "Use Quantity" box is checked, a customer is able to order multiple quantities. If the "Use Quantity" box and the "Use Units" boxes are both unchecked, a customer is not able to specify any quantity for purchase. This combination is primarily useful if non-tangible goods are being sold.
The "Unit" feature provides a method to specify custom units of measure, such as "yards", "packs", "cases", "ounces", or any desired custom unit. The unit feature can be used as a replacement for the quantity, or both quantities and units can be used. When the unit feature is active, customers can specify fractions of a unit, i.e. 1.5 cases, 3.75 yards, etc.
Specify the unit being measured in the in the field provided next to "Unit Measurement".
Examples of Measured Units:
● Bottles ● Cases ● Boxes
Specify the type of unit to be used in field provided next to "Unit Name".
Examples of Unit Names:
● Ounces ● Feet ● Yards

If quantity and units are both active, as an example, a customer could order 10 qty. of 8 ounces of the item, or 5 qty. of 12.5 feet of rope.
Entering a value for "Min units" will prevent a customer from ordering less than the value entered. Entering a value for "Max units" will prevent a customer from ordering above the specified value. If "Max Units" are not specified, a customer will be able to order an unlimited amount of the item.

[ An example of quantity and units used together ]
Enter the height, width, weight and length of the item in the fields provided. All of these fields are optional. However, the integrated shipping methods require a value for weight in order to calculate shipping charges.
Click on the "discount" text link in order to access and set up item discount rules.
Click on the "handling" text link in order to access and set up item handling charge rules.
Click on the "shipping methods" text link in order to access and set up item shipping methods.
Click on the "shipping rules" text link in order to access and set up item shipping rules.

When completed, save any changes to the item by clicking on the "update" button located at the bottom of the administration page.
If this item will be used as a package option, click on the "Package Options" link at the top of the administration page.
Click on the "Options" link at the top of the administration page to set up any item-specific options.
Related ProductsClick on the tab "Related Products" to assign products that are related to this product. For example, for a professional sports team jersey and matching cap, the baseball cap would be a related product of the jersey.
When you click on the "Related Products" tab, you will see the following screen:

The first section details the caption you would like to have on the Web site. This caption will be next to all of your assigned related products. If nothing is assigned, the default caption will be "Customers who shopped for this item also shopped for item(s) below:".
The second section details all of the related products that are currently related to this product. Order the products by clicking on the nam of the product and clicking on the "Up" or "Down" buttons. To jump to the item management window for the

related product, select the product and click on the button "Edit". To remove the product as a related product, click on the product name and click on the button "Remove".
To add a related product, you would use the third section. In each group of products (Items, Item Groups, and Packages), click on the product name and then click on the appropriate add button ("Add Item" button if you are adding an item, the "Add Group" button if you are adding an item group, and the "Add Package" button if you are adding a package). Once the product name is listed in the second section, it has been applied.
When done specifying all of your related products for this product, click on the button "Update" to save your changes. Related Links
Item Discount RulesItem Shipping MethodsItem Shipping RulesItem Tax RulesItem Handling ChargesItem Package OptionsItem Options
Back to Item Management Page Back to the Top of the Page
Upload ItemsThe upload item page is used to upload a spreadsheet that contains all item/product details in record form (a tab delimited

text file). This feature can be used to upload new items or update existing items.
Navigation: Click on the main "Ecommerce" link at the top of any main administration page. Click on the "Product Catalog Management" text link to load the product catalog management page. Click on the "Upload Items" text link located in the items section of the catalog management page.
Adding New Items:Prepare a spreadsheet which includes the details of all items (with a program such as Microsoft Excel). Save the document as a tab delimited text document: "items.tsv". In Excel, click on File, then choose "Save As". From the list, select "Text (tab delimited)".
An example of a tab delimited text file is provided. To view this document, click on the "click here" text link provided.
Updating Existing Items:To update the details of existing items, first download the tab delimited text file which will contain all current item information. Load this file into any spreadsheet software. Update any item information as necessary, and add any new items as needed. Save the file in the same tab delimited text format.
Uploading the File:
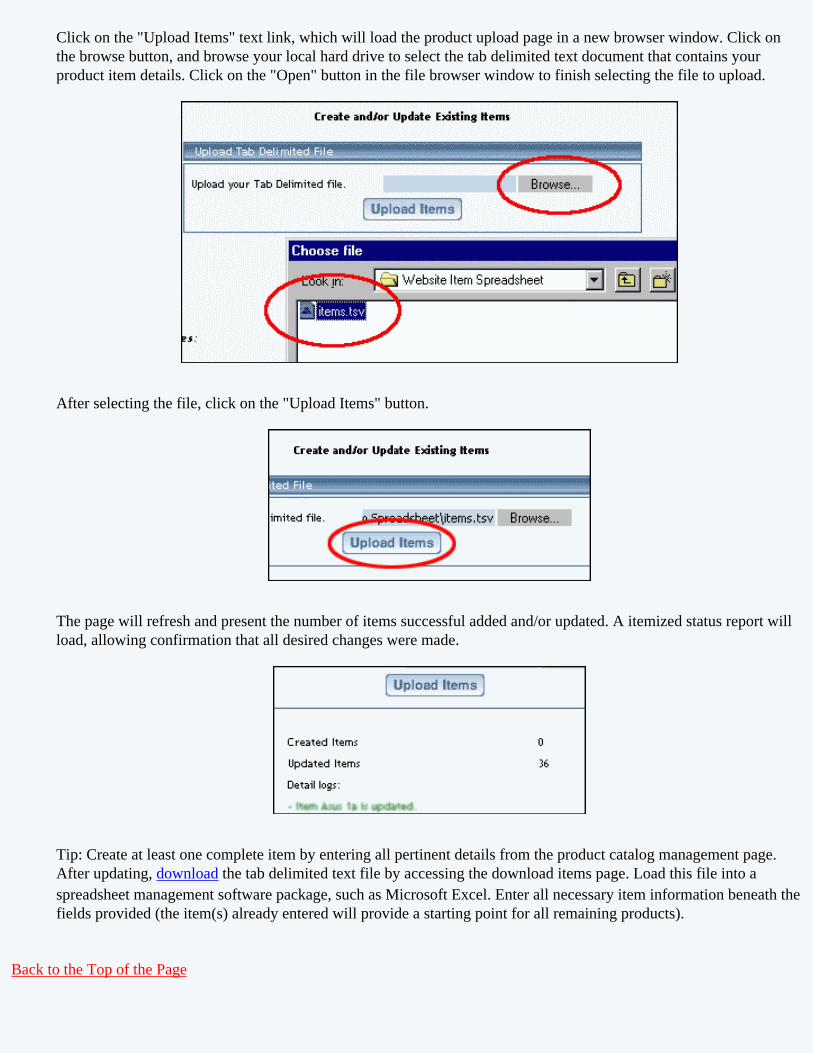
Click on the "Upload Items" text link, which will load the product upload page in a new browser window. Click on the browse button, and browse your local hard drive to select the tab delimited text document that contains your product item details. Click on the "Open" button in the file browser window to finish selecting the file to upload.
After selecting the file, click on the "Upload Items" button.
The page will refresh and present the number of items successful added and/or updated. A itemized status report will load, allowing confirmation that all desired changes were made.
Tip: Create at least one complete item by entering all pertinent details from the product catalog management page. After updating, download the tab delimited text file by accessing the download items page. Load this file into a spreadsheet management software package, such as Microsoft Excel. Enter all necessary item information beneath the fields provided (the item(s) already entered will provide a starting point for all remaining products).
Back to the Top of the Page

Download ItemsA tab delimited text file may be downloaded which includes the item details for each product/item in your catalog.
Navigation: Click on the main "Ecommerce" link at the top of any main administration page. Click on the "Product Catalog Management" text link to load the product catalog management page.
Click on the "Download Items" text link. The item download tool will open in a new browser window.
Select any desired optional fields to include by clicking in the checkbox next to the option. When finished, click the "Download" button.
A dialog box will appear, providing an option to either open or save the file.

The default file name will be "items.tsv". For best results, open the "items.tsv" file with a spreadsheet application, such as Microsoft Excel, or a software application capable of importing a tsv (tab separated values)text document.
Back to the Top of the Page
Manage InventoryFrom the Product Catalog Management window, click on "Manage Inventory".
The system will then open up a new window and display the following:

Click on the blue numbers next to the text "Items Per Page" to increase or decrease the number of items to display for iventory management. Click on the page numbers next to the text "Page" to browse between different portions of your items.
For the following header,...

...here are the explanations:
Item ID - the item ID for the productItem Name - the name of the productNo Inventory - the product will not be using inventory managementNo BO - the product will be using inventory management and the system will prevent the customer from backordering products. Allow BO - the product will be using inventory management and the system will allow the customer to backorder products. Published InventoryInventory/Sold/Availability - this column reports the published inventory that the Web site recognizes. The first number is the current inventory. The second number is the number of products sold. The third number is the number of available inventory of a product. Current Inventory - this column reports the inventory that the Web site recognizes - but not necessarily is published to the Web site. Add - put in a number to affect the inventory for a product. To add 20 of a product, you would place "20" in the available field; to subtract 20 of a product, you would place "-20" in the available field. A blue text box will appear if the product is using inventory management.
To set all of your products on the page as using a particular inventory choice, click on one of the below links to set all of the products to one choice.

When done, you must click on the button "Update" to save your changes. You must also Publish the Web site in order to apply your changes to the Web site.
Back to the Top of the PageProduct Catalog Management
10-Step Guide on Setting Up E-CommerceBack to Previous Page

Managing Items
Related Links: 10-Step Guide on Setting Up E-Commerce | Product Catalog Management | Items
Easily manage all of your items to:
set them to active or disabledhide or display pricehide or display the "Add to Cart" buttonuse global or specific shipping methodsset taxable or non-taxable optionor delete selected components
From the main menu of the Website Editor, click on the "Ecommerce" link in the secondary navigation menu. Click on "Product Catalog Management". Click on "Manage Items".
A new window will display:

In this Item Management window, click on the blue numbers next to the text "Items Per Page" to increase or decrease the number of items to display in the Item Management window. Click on the page numbers next to the text "Page" to browse between different portions of your items.
The Item Modifier window will list all of your items that you have entered in to the 3.0 system. Use the checkboxes to the left of the item name to apply a setting:

Once you have some items selected, click on one of the below links to apply a setting to your selected items:
If you are all finished managing general properties of your items, you may click on the link "Close Window" to close the window. You must Publish the site in order to apply your changes to your Web site.
Back to the Top of the Page
Product Catalog Management10-Step Guide on Setting Up E-Commerce
Back to the Previous Page

Item Discount Rules
Related Links: 10-Step Guide on Setting Up E-Commerce | Item Management Page
Overview | Discount Details For Items | Discount Rules For Shoppers
OverviewAn item-specific discount is a reduction in the retail price limited to any selected item. Discounts applied to items will always override any global discounts.
Item discounts can be used to:
● Offer Quantity or volume discounts● Offer time-limited special event sales● Offer a sale to quickly liquidate products
[ An example of a discount applied to an item ]

[ An example of a volume discount calculated based on a table of values ]
Navigation: Click on the main "Ecommerce" link at the top of any main administration page. Click on the "Product Catalog Management" text link to load the product catalog management page.
Select an existing item from the drop-down menu in the item section and click the "Edit" button, or click on the "new" button to create and name a new item. The item management page will load in a new browser window.
Click on the "Discount" text link. The Item Discount Rules page will load in a new browser window.

[ Item Discount Administration ]
To create a new item discount rule, click on the "Add Discount Rule" text link. The "add discount rule" page will load in a new browser window.
To view a selected item discount, click on the name of the desired rule, which will load the Discount Details for Items administration page in a new browser window.

To add an existing discount rule to the item, click on the name of the rule under "available rules". Click on the right arrow to add the rule to the item. The current page will refresh, and the chosen discount rule will appear under the "Current Discount Rules for Items". The new rule will then apply to all purchases that include this item.
To remove a discount rule that is currently applied to the item, click on the name of the rule under "Rules for Item". Click on the left arrow to remove the rule. The current page will refresh, and the chosen discount rule will only appear under the "Available Rules" section.
To apply the discount item rule to the item only, to the items package options only (if applicable), or to the item and package options, click on the applicable radio button next to the rule name in the "Current Discount" rules section. Click on the "Update" button to save any changes.

To activate or deactivate a discount rule, check or uncheck the applicable selection box next to the rule. Click on the "Update" button to save any changes.
Back to Item Management Page Back to the Top of the Page
Discount Details For ItemsView and manage the discount details for all items using the selected discount rule. Use this section to apply or remove discounts from items.
Navigation: Click on the main "Ecommerce" link at the top of any main administration page. Click on the "Product Catalog Management" text link to load the product catalog management page.
Select an existing item from the drop-down menu in the item section and click the "Edit" button, or click on the "new" button to create and name a new item. The item management page will load in a new browser window.
Click on the "Discount" text link. The Item Discount Rules page will load in a new browser

window. Click on the current discount rule to view the rule details. The discount details for items page will load in a new browser window.
This page is used to view and manage the discount details for all items using the selected discount rule.
All items that the rule is currently applied to will be listed under the "Discount Details for Items" section.
The current discount rule can be applied to an item, a package, or both an item and a package. To change how a rule is applied to any listed item, click on the applicable radio button next to the item. Press the "Update" button to save any changes.

The discount rule can be activated or deactivated for any item in the list. Toggle the selection box under "Active" next to the item to modify to change the status. Click the "Update" button to save changes.
To view the details of any item in the list, click on the item name. The item management page will load in a new window.
To add or remove items from the discount rule, use the "Apply or Remove Discounts for Items"

section located toward the bottom of the administration page.
To add an item to the rule, click on the name of the item under the "Available Rules" heading. Click the "right arrow" button. The page will refresh with the item now located under the "Items Using..." heading.
To remove an item from the rule, click on the name of the item under the "Items Using..." heading. Click the "left arrow" button. The page will refresh with the item now located under the "Available Items" heading.
Back to Item Management Page Back to the Top of the Page
10-Step Guide on Setting Up E-Commerce Back to the Previous Page
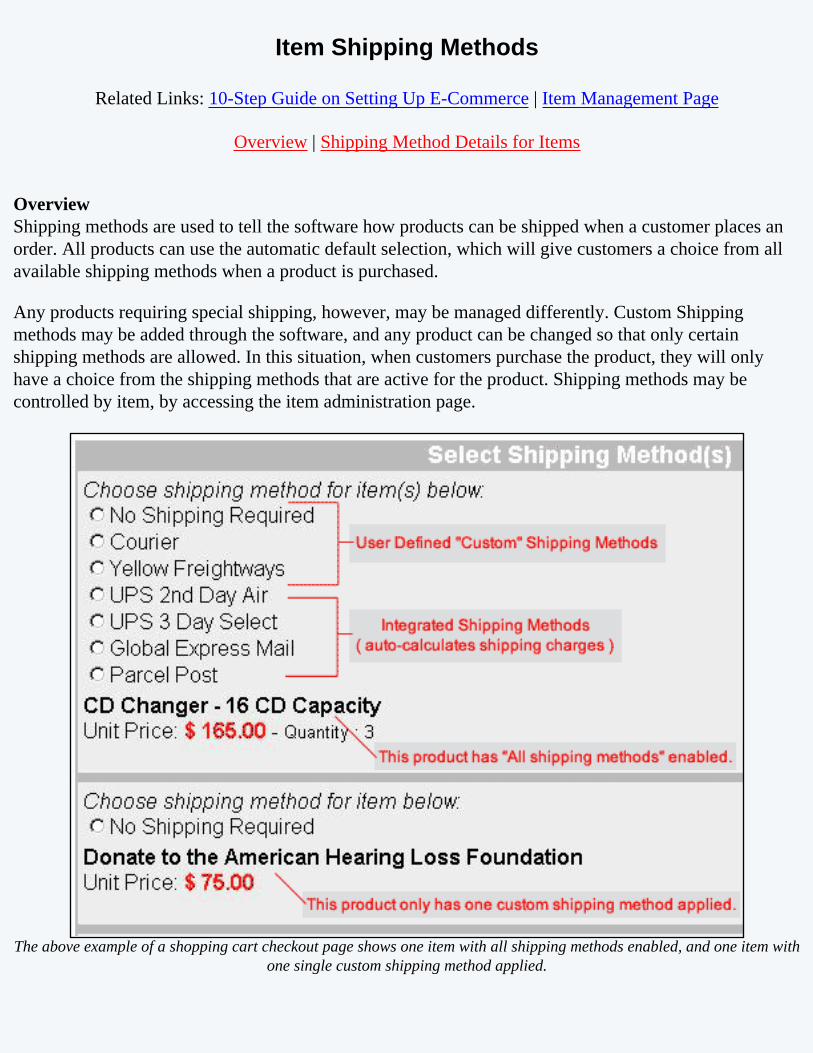
Item Shipping Methods
Related Links: 10-Step Guide on Setting Up E-Commerce | Item Management Page
Overview | Shipping Method Details for Items
OverviewShipping methods are used to tell the software how products can be shipped when a customer places an order. All products can use the automatic default selection, which will give customers a choice from all available shipping methods when a product is purchased.
Any products requiring special shipping, however, may be managed differently. Custom Shipping methods may be added through the software, and any product can be changed so that only certain shipping methods are allowed. In this situation, when customers purchase the product, they will only have a choice from the shipping methods that are active for the product. Shipping methods may be controlled by item, by accessing the item administration page.
The above example of a shopping cart checkout page shows one item with all shipping methods enabled, and one item with one single custom shipping method applied.

To learn more about shipping methods and rules,view the section on shipping methods.
Navigation: Click on the main "Ecommerce" link at the top of any main administration page. Click on the "Product Catalog Management" text link to load the product catalog management page. Access the item management page by either creating a new item or by selecting an item to edit from the item drop down menu. The item management page will load in a new browser window.
If "use all shipping methods" is selected on the main item administration page, then no custom shipping methods will be available for the item. If necessary, disable the "use all shipping methods" option before proceeding. Click on the "Shipping Methods" text link to access the item shipping rule page.
When first setting up a catalog, shipping methods must be added. To add a new shipping method, click on the "Add Shipping Method" text link, and reference the guide on adding shipping methods. The custom shipping methods administration page will load in a new browser window.
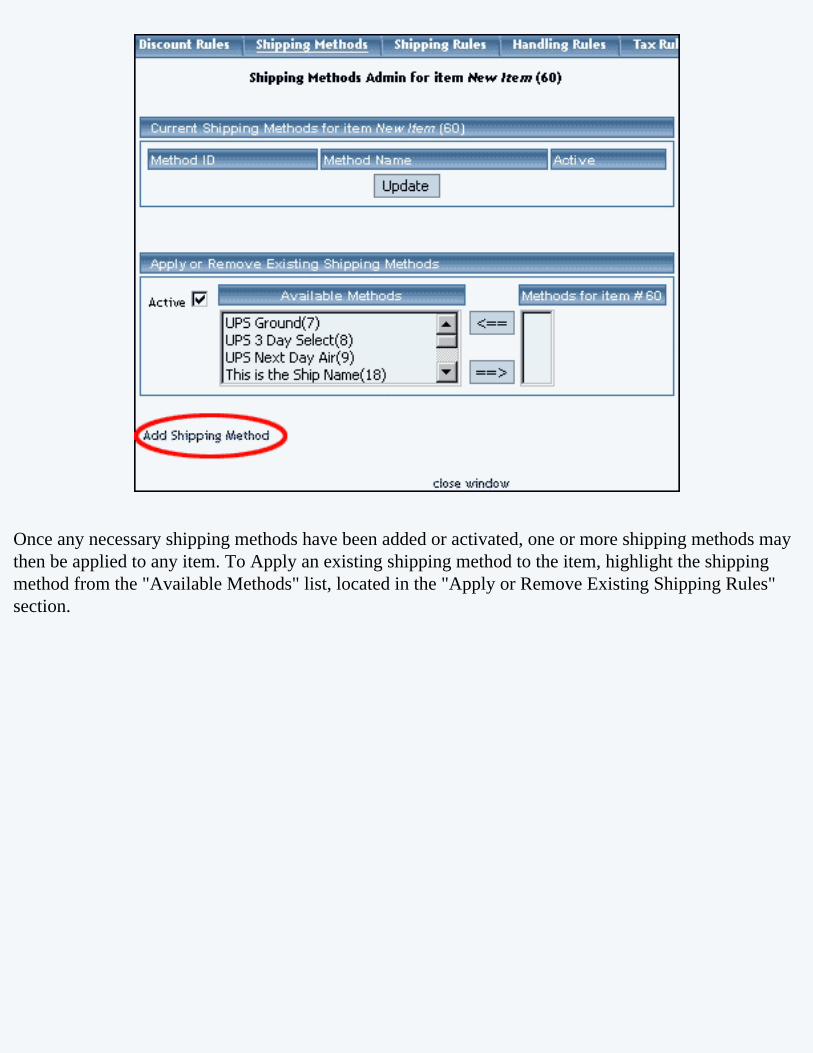
Once any necessary shipping methods have been added or activated, one or more shipping methods may then be applied to any item. To Apply an existing shipping method to the item, highlight the shipping method from the "Available Methods" list, located in the "Apply or Remove Existing Shipping Rules" section.

Click on the right arrow button. The page will refresh with the selected shipping method now populated in the "Current Shipping Methods" section. More than one shipping method may be selected by highlighting multiple methods.

To remove an existing shipping method from the item, highlight the method from the "Current Shipping Methods" list. Click on the left arrow button. The page will refresh with the selected method now populated in the "Available Methods" section. More than one method may be selected by highlighting multiple methods.
To activate or deactivate a shipping method currently applied to an item, click or unclick the selection box next to the method to change, located in the "Shipping Methods Details" section. Click the "Update" button. The current page will refresh showing the desired changes.

To view the shipping method item details of a currently applied method, click on the name of the method, located in the "Methods Details" section.
The shipping method details for items page will load in a new browser window.
Back to Item Management Page Back to the Top of the Page
Shipping Method Details for ItemsView and manage the details for all items. This page is used to apply the current shipping methods to more products, or remove the shipping method from products.
Navigation: Click on the main "Ecommerce" link at the top of any main administration page. Click on the "Product Catalog Management" text link to load the product catalog management page.
Select an existing item from the drop-down menu in the item section and click the "Edit" button, or click on the "new" button to create and name a new item. The item management page will load in a new browser window.
Click on the "Shipping Methods" text link. The shipping methods for items administration page will load in a new browser window. Click on the shipping method to view the details. The

shipping method details for items page will load in a new browser window.
This page is used to view and manage the shipping method details for all items.
All items that the method is currently applied to will be listed under the "Shipping Method Details for Items" section.
A list of items that have "use all shipping methods" enabled will also display at the bottom of the screen.
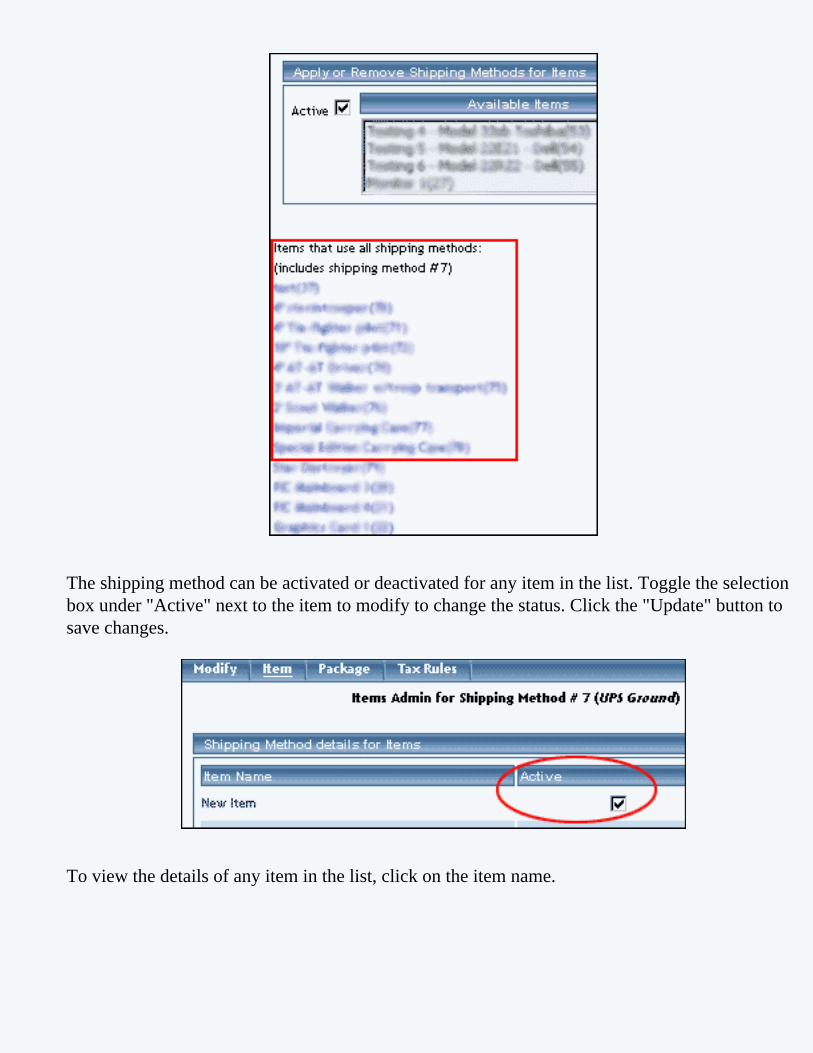
The shipping method can be activated or deactivated for any item in the list. Toggle the selection box under "Active" next to the item to modify to change the status. Click the "Update" button to save changes.
To view the details of any item in the list, click on the item name.

The item management page will load in a new window.
To add or remove a shipping method to or from an item, use the "Apply or Remove Shipping Methods for Items" section located toward the bottom of the administration page.
To add an item to the method, click on the name of the item under the "Available Methods" heading. Click the "right arrow" button. The page will refresh with the item now located under the "Items Using Methods" heading.
To remove an item from the method, click on the name of the item under the "Items Using Method" heading. Click the "left arrow" button.
The page will refresh with the item now located under the "Available Items" heading.

Back to Item Management Page Back to the Top of the Page
10-Step Guide on Setting Up E-CommerceBack

Item Shipping Rules
Related Links: 10-Step Guide on Setting Up E-Commerce | Item Management Page
Overview | Shipping Rule Details for Items
Overview
Shipping rules are used whenever a new shipping method is created in the software. While a shipping method specifies how a product can be shipped, a shipping rule tells the software how to calculate the shipping charges.
Whenever a new shipping method is created, at least one shipping rule needs to be created.
Use the item shipping rules administration to view, remove, add, activate, or deactivate shipping rules for an item. Shipping rules may be set up for custom shipping methods only. If an item only has integrated shipping methods applied, shipping rules will not be available for this item. Integrated shipping methods are those which automatically calculate shipping charges.
A shipping rule may be applied globally or limited to specific items. For further detailed information on shipping rules, view the section on shipping rules.

An example of a user-defined shipping method and shipping rule at the "finalize checkout" stage
Navigation: Click on the main "Ecommerce" link at the top of any main administration page. Click on the "Product Catalog Management" text link to load the product catalog management page. Access the item management page by either creating a new item or by selecting an item to edit from the item drop down menu. The item management page will load in a new browser window. Click on the "Shipping Rules" text link.
The shipping rules administration page will open in a new browser window.
Any global shipping rules that apply to the item will be listed at the bottom of the page. To view a global

rule, click on the rule name. The global shipping rules modification page will open in a new browser window.
Since shipping rules are actually applied to a shipping method, and not directly to an item, the specific shipping rule will override any global shipping rules associated with the shipping method.
This means that specifying a rule for any shipping method will not affect other shipping methods that may be available for this product.
A custom "user-defined" shipping method must be active for the item in order to apply a shipping rule. If necessary, activate and/or create a custom shipping method for the item before proceeding.
To add a new rule, click on the "Add Shipping Rule" text link.

The add shipping rule administration page will open in a new browser window.
To apply an existing shipping rule to the item, highlight the rule from the "Available Rules" list, located in the "Apply or Remove Existing Shipping Rules" section. Click on the right arrow button.
The page will refresh with the selected rule now populated in the "Current Shipping Rules" list. More than one shipping rule may be selected by highlighting multiple rules.

To remove an existing custom shipping rule from the item, highlight the rule from the "Current Shipping Rules" list. Click on the left arrow button.

The page will refresh with the selected rule now populated in the "Available Rules" section. More than one shipping rule may be selected by highlighting multiple rules.
To activate or deactivate a custom shipping rule currently applied to an item, click or unclick the selection box next to the rule to change, located in the "Shipping Rule Details" section. Click the "Update" button. The current page will refresh showing the desired changes.

To view a custom shipping method for a currently applied rule, click on the name of the shipping method, located in the "Shipping Details" section. The shipping method details for items page will load in a new browser window. This page is used to view and manage which items the custom shipping method is currently applied to.

To view the details of the rule itself, click on the "Rule Id" number. The
Back to Item Management Page Back to the Top of the Page
Shipping Rule Details For ItemsView and manage the shipping rule details for all items using the selected rule.
Navigation: Click on the main "Ecommerce" link at the top of any main administration page. Click on the "Product Catalog Management" text link to load the product catalog management page.
Select an existing item from the drop-down menu in the item section and click the "Edit" button, or click on the "new" button to create and name a new item. The item management page will load in a new browser window.
Click on the "Shipping Rules" text link. The "item shipping rules" page will load in a new browser window.
Click on the desired shipping rule ID Number to view the rule details. The shipping rule details for items page will load in a new browser window.

This page is used to view and manage the shipping rule details for all items using the selected rule.
All items that the rule is currently applied to will be listed under the "Shipping Rule Details for Items" section.

The current rule can be applied to an item, a package, or both an item and a package. To change how a rule is applied to any listed item, click on the applicable radio button next to the item. Press the "Update" button to save any changes.
The shipping rule can be activated or deactivated for any item in the list. Toggle the selection box under "Active" next to the item to modify to change the status. Click the "Update" button to save changes.

To view the details of any item in the list, click on the item name. The item management page will load in a new window.
To add or remove items from the shipping rule, use the "Apply or Remove Shipping Rules for Items" section located toward the bottom of the administration page.
To add an item to the rule, click on the name of the item under the "Available Rules" heading. Click the "right arrow" button.
The page will refresh with the item now located under the "Items Using..." heading.
To remove an item from the rule, click on the name of the item under the "Items Using..."

heading. Click the "left arrow" button.
The page will refresh with the item now located under the "Available Items" heading.
Back to Item Management Page Back to the Top of the Page
10-Step Guide on Setting Up E-CommerceBack

Item Tax Rules
Related Links: 10-Step Guide on Setting Up E-Commerce | Item Management Page
Overview | Tax Rule Details for Items
Overview
Tax rules may be created that apply to all items or only specific products. When an item-specific tax rule is applied to any product, any global rules previously in effect will be disabled.
The ecommerce catalog system is designed to accomodate a variety of possible tax situations. This section provides a guide to applying any tax rule to actual items that are used in the online shopping system. This would only be necessary if an item requires different tax rules than other items sold from the Web site.
The item tax rule administration page is used to view, remove, add, activate, or deactivate item specific tax rules.
Navigation: Click on the main "Ecommerce" link at the top of any main administration page. Click on the "Product Catalog Management" text link to load the product catalog management page.
Select an existing item from the drop-down menu in the item section and click the "Edit" button, or click on the "new" button to create and name a new item. The item management page will load in a new browser window.
Click on the "Taxes" text link. The tax rules for item administration page will load in a new browser window.

Any global tax rules that apply to the item will be listed at the bottom of the page. To view a global rule, click on the rule name. The tax modification administration page will open in a new browser window.
When a custom tax rule is applied to an item, it will override any global rules that were previously active for the item.
To add a new custom tax rule, click on the "Add Tax Rule" text link. The add tax rule administration page will open in a new browser window.
To Apply an existing tax rule to the item, highlight the rule from the "Available Methods" list, located in the "Apply or Remove Existing Tax Rules" section. Click on the right arrow button.

The page will refresh with the selected tax rule now populated in the "Current Tax Rules" list. More than one rule may be selected by highlighting multiple rules.
To remove an existing custom tax rule from the item, highlight the rule from the "Current Tax Rules" list. Click on the left arrow button.
The page will refresh with the selected rule now populated in the "Available Rules" section. More than one rule may be selected by highlighting multiple rules.

To activate or deactivate a custom tax rule currently applied to a item, click or unclick the selection box next to the rule to change, located in the "Tax Rule Details" section. Click the update button. The current page will refresh showing the desired changes.
To view the custom tax rule details of a currently applied rule, click on the name of the rule, located in the "Tax Details" section. The tax rule details for items page will load in a new browser window. This page is used to view and manage which items the custom rule is currently applied to.
Back to Item Management Page Back to the Top of the Page
Tax Rule Details for ItemsView and manage the tax rule details for all items using the selected rule.
Click on the desired tax rule to view the details. The tax rule details for items page will load in a new browser window.

This page is used to view and manage the tax rule details for all items using the selected rule.
All items that the rule is currently applied to will be listed under the "Tax Rule Details for Items" section.
The tax rule can be activated or deactivated for any item in the list. Toggle the selection box under "Active" next to the item to modify in order to change the status.

Click the "Update" button to save changes.
To view the details of any item in the list, click on the item name. The item management page will load in a new window.
To add or remove a tax rule to or from an item, use the "Apply or Remove Rule to or from Items" section located toward the bottom of the administration page.
To add an item to the rule, click on the name of the item under the "Available Methods" heading. Click the "right arrow" button.

The page will refresh with the item now located under the "Items Using Rules" heading.
To remove an item from the rule, click on the name of the item under the "Items Using Rule" heading. Click the "left arrow" button.
The page will refresh with the item now located under the "Available Rules" heading.

Back to Item Management Page Back to the Top of the Page
10-Step Guide on Setting Up E-CommerceBack

Item Handling Charges
Related Links: 10-Step Guide on Setting Up E-Commerce | Item Management Page
Overview | Handling Rules Details For Items
Overview
Handling charges can be applied to any item or product used in the catalog. This feature allows a site owner to apply a charge that is independent of any shipping methods and/or charges.
When a handling charge rule is applied to any item, any global handling charges that may have been in effect will be disabled for the item.
Use the item handling charges administration page to view, remove, add, activate, or deactivate item specific handling charges.
An example of a handling charge named "Hazardous Material", as it appears at checkout
Navigation: Click on the main "Ecommerce" link at the top of any main administration page. Click on the "Product Catalog Management" text link to load the product catalog management page.
Select an existing item from the drop-down menu in the item section and click the "Edit" button, or click on the "new" button to create and name a new item. The item management page will load in a new browser window.

Click on the "Handling Charges" text link. The Handling Charge Rules administration page will load in a new browser window.
Any global handling charge rules that apply to the item will be listed at the bottom of the page. To view a global rule, click on the rule name. The global handling charge rules modification page will open in a new browser window.
When a handling charge is applied to an item, it will override any global rules that were previously active for the item.
To add a new handling charge rule, click on the "Add Handling Rule" text link. The add handling charge rule administration page will open in a new browser window.

To Apply an existing handling charge rule to the item, highlight the rule from the "Available Methods" list, located in the "Apply or Remove Existing Handling charges Rules" section. Click on the right arrow button.
The page will refresh with the selected rule now populated in the "Current Handling Charge Rules" list. More than one rule may be selected by highlighting multiple rules.
To remove an existing rule from the item, highlight the rule from the "Current Handling Charge Rules" list. Click on the left arrow button.
The page will refresh with the selected rule now populated in the "Available Rules" section. More than one rule may be selected by highlighting multiple rules.

To activate or deactivate a rule currently applied to the item, click or unclick the selection box next to the rule to change, located in the "Handling Charge Rule Details" section.
Click the update button. The current page will refresh showing the desired changes.
To view the details of a currently applied rule, click the name of the rule, located in the "Handling Charge Details" section. The handling charge rule details for items page will load in a new browser window. This page is used to view and manage which items the rule is currently applied to.
Back to Item Management Page

Back to the Top of the Page
Handling Rules Details For ItemsView and manage the handling charge details for all items using the selected handling charge rule, or apply the existing rule to other items.
Navigation: Click on the main "Ecommerce" link at the top of any main administration page. Click on the "Product Catalog Management" text link to load the product catalog management page. Select an existing item from the drop-down menu in the item section and click the "Edit" button, or click on the "new" button to create and name a new item. The item management page will load in a new browser window. Click on the "Handling Rules" text link. The Item Handling Charge Rules page will load in a new browser window. Click on the rule to view the details.
The handling charge rules details for items page will load in a new browser window. This page is used to view and manage the handling charges rules details for all items using the selected rule.
All items that the rule is currently applied to will be listed under the "Handling Rule Details for Items"

section.
The current rule can be applied to an item, a package, or both an item and a package. To change how a rule is applied to any listed item, click on the applicable radio button next to the item. Press the "Update" button to save any changes.
The handling charges rule can be activated or deactivated for any item in the list. Toggle the selection box under "Active" next to the item to modify to change the status. Click the "Update" button to save changes.

To view the details of any item in the list, click on the item name. The item management page will load in a new window.
To add or remove items from the rule, use the "Apply or Remove Handling Charges to or from Items" section located toward the bottom of the administration page.
To add an item to the rule, click on the name of the item under the "Available Rules" heading. Click the "right arrow" button.

The page will refresh with the item now located under the "Items Using..." heading.
To remove an item from the rule, click on the name of the item under the "Items Using..." heading. Click the "left arrow" button.
The page will refresh with the item now located under the "Available Items" heading.
Back to Item Management Page
Back to the Top of the Page 10-Step Guide on Setting Up Ecommerce
Back to the Previous Page

Package Options
Related Links: 10-Step Guide on Setting Up Ecommerce | Item Management Page
Overview | Item Package Option Rules
Overview
The package option feature is used to tell the software that an item will be available for use in a product package, and what price this item will sell for when it is used in a package.
A package is a product that is made up from groups of items. Customers are given choices from at least one group of items, and the price of the package is automatically calculated based on the customer's selections.
This feature is ideal to offer:
● An optional warranty● Product upgrades● Customizable product bundles
In order for a product to be used in package, it must first be added as an item.
Once the item is created, at least one item package option must be defined before it can be used in a package. An item's package option is defined by specifying the retail price that the item will sell for as a part of the package.

[ An example of Item Package Options in three Option Groups ]
Navigation: Click on the main "Ecommerce" link at the top of any main administration page. Click on the "Product Catalog Management" text link to load the product catalog management page. Access the item management page by either creating a new item or by selecting an item to edit from the item drop down menu. The item management page will load in a new browser window. Click on the "Package Options" text link located at the top of the administration window.

Any item to be used in a package must have at least one package option defined. All package options are created by defining a price for each option. The system will display the package
option by its price, and a system defined identification number. Once a package option is defined, it may be used in one or more package items.
To create a new package option, click on the "new" button.
Type the retail price of the option in the pop-up dialog box, and click ok. Repeat this process to create all necessary package options.

To change the price of an existing package option, select the option from the drop down menu and click on the "change" button.
A dialog box will pop-up. Type in the new retail price and click ok.
To create, modify or view package option discounts, select the desired package option from the drop-down menu, and click on the "discount" text link. The package option discount page will load in a new browser window.

To create, modify or view package option shipping rules, select the desired package option from the drop-down menu, and click on the "Shipping Rules" text link. The package option shipping rules page will load in a new browser window.
To create, modify or view package option handling rules, select the desired package option from the drop-down menu, and click on the "Handling" text link. The package option handling rules page will load in a new browser window.

To create, modify or view package option tax rules, select the desired package option from the drop-down menu, and click on the "Taxes" text link. The package option tax rules page will load in a new browser window.
Back to the Top of the Page
Item Package Option RulesItem Package Option Discount RulesItem Package Option Tax RulesItem Package Option Handling RulesItem Package Option Shipping Rules
Back to Item Management Page Back to the Top of the Page

10-Step Guide on Setting Up Ecommerce Back

Package Option Discount Rules
Related Links: 10-Step Guide on Setting Up Ecommerce | Item Management Page | Package Options for Items | Discount Rules For Shoppers
Overview | Current Discount Details for a Package Option | Discount Details for Package Options | Applying or Removing Existing Discount Rules
OverviewA package option discount is a reduction in the retail price limited to the selected package option. Any global discount rules will be disabled once a package discount is applied.
A package option discount will not be applied to an item, only to an item's package option. This gives a Web site owner the ability to offer a discount if a customer purchases the package, rather than buying the individual item seperately.
[ In the above example, there is no discount applied to the item ]
[ However, in this example the item is discounted as a part of a "build your own stereo" package ]

Navigation: From the item management page, click on the "Package Options" text link located at the top of the administration window.
Create a new package option, or select an existing package option to use from the drop-down menu. Click on the "Discount" text link. The package option discount page will load in a new browser window.
To create a new discount rule, click on the "Add Discount Rule" text link. The add discount rule page will load in a new browser window.
Any global discount rules will be disabled once a package discount is applied. Back to Item Management Page

Back to the Top of the Page
Current Discount Details for a Package OptionTo activate, deactivate, or view discount rules currently applied to the selected package option.
To activate or deactivate a current package option discount, check or uncheck the box next to the rule, and click the "update" button. The current page will refresh and confirm any changes.
Any package discount that is applied will override global discount rules, and only the package discount will apply to the package option.
To view a selected package option discount, click on the name of the desired rule, which will load the Discount Details for Package Options administration page in a new browser window.
Back to Item Management Page Back to the Top of the Page
Discount Details for Package OptionsView and manage the discount details for all package options using the selected discount rule.
Navigation: From the package option discount page, click on the current discount rule to view the rule details. The "discount details for package options" page will load in a new browser window.
This page is used to view and manage the discount details for all package options using the selected discount rule.

All package options that the rule is currently applied to will be listed under the "Discount Details for Package Options" section.
The discount rule can be activated or deactivated for any package option in the list. Toggle the selection box under "Active" next to the item to change to change the status. Click the "Update" button to save changes.

To view the details of any package option in the list, click the applicable name. The package option management page will load in a new window.
To add or remove package options from the discount rule, use the "Apply or Remove Discounts for Items" section located toward the bottom of the administration page.
To add a package option to the rule, click on the name of the item under the "Available Rules" heading. Click the "right arrow" button.

The page will refresh with the item now located under the "Package Options Using..." heading.
To remove a package option from the rule, click on the name of the item under the "Package Options Using..." heading. Click the "left arrow" button.
The will refresh with the item now located under the "Available Package Options" heading.
Back to Item Management Page Back to the Top of the Page
Applying or Removing Existing Discount RulesApply an existing discount rule to a package option, remove a discount rule currently applied to the package option, or deactivate all discount rules applied to the current package option.

To add an existing discount rule to the package option, click on the name of the rule under "available rules". Click on the right arrow to add the rule to the package option.
The current page will refresh, and the chosen discount rule will appear under the "Rules for Package Option". The new rule will then apply to all purchases that include this package option.
Once a discount is applied to a package option, global discount rules will be disabled.
To remove a discount rule that is currently applied to the package option, click on the name of the rule under "Rules for Package Option". Click on the left arrow to remove the rule.
The current page will refresh, and the chosen discount rule will only appear under the "Available Rules"
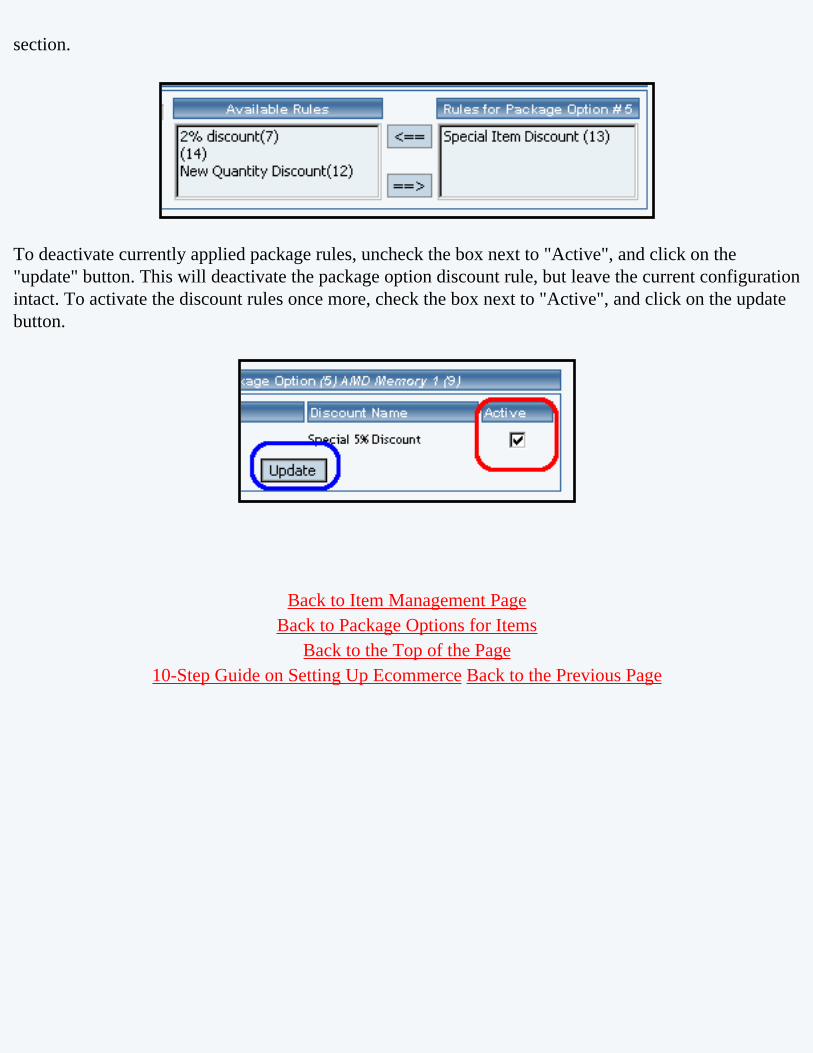
section.
To deactivate currently applied package rules, uncheck the box next to "Active", and click on the "update" button. This will deactivate the package option discount rule, but leave the current configuration intact. To activate the discount rules once more, check the box next to "Active", and click on the update button.
Back to Item Management Page Back to Package Options for Items
Back to the Top of the Page 10-Step Guide on Setting Up Ecommerce Back to the Previous Page

Package Option Tax Rules
Related Links: 10-Step Guide on Setting Up E-commerce | Item Management Page | Package Options for Items
Overview | Tax Rule Details for Package Options
OverviewTax rules may be applied to any package option. This feature would be used only if the item, sold individually, would have a different tax rate then when sold as a part of a package.
Use this section to view, remove, add, activate, or deactivate tax rules for a package option.
Navigation: From the item management , click on the "Package Options" text link located at the top of the administration window.
Create a new package option, or select an existing package option from the drop-down menu. Click on the "Taxes" text link. The package options tax administration page will open in a new browser window.
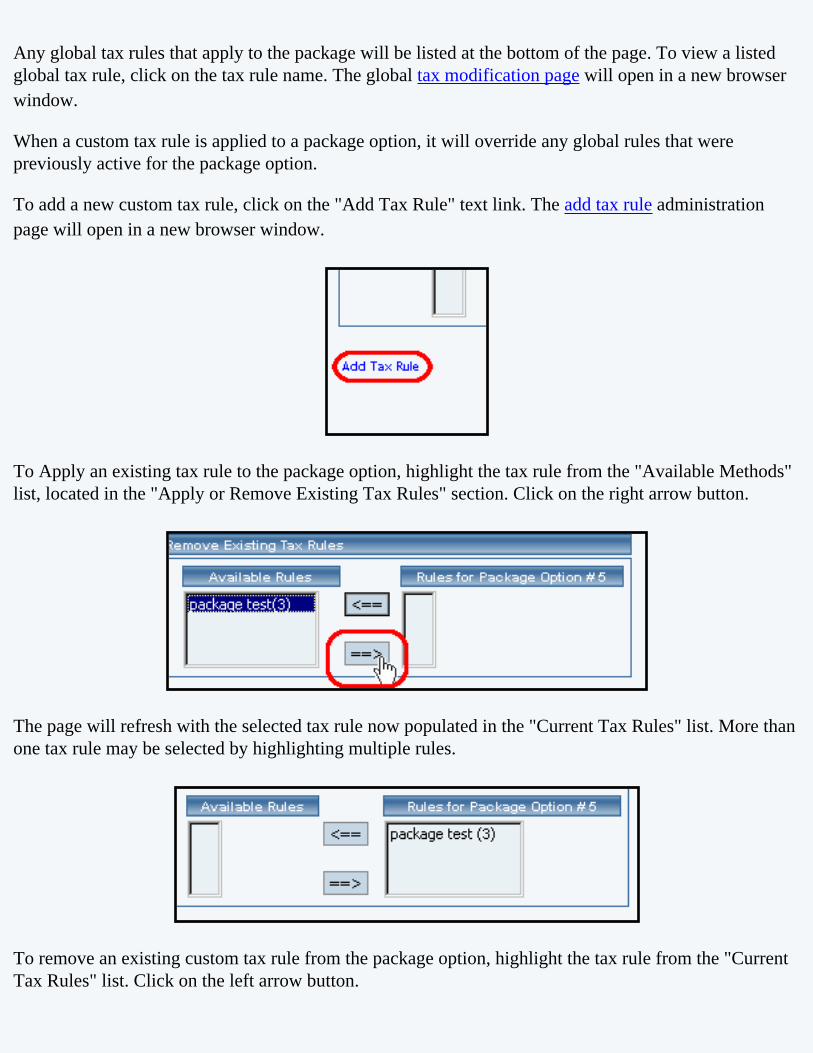
Any global tax rules that apply to the package will be listed at the bottom of the page. To view a listed global tax rule, click on the tax rule name. The global tax modification page will open in a new browser window.
When a custom tax rule is applied to a package option, it will override any global rules that were previously active for the package option.
To add a new custom tax rule, click on the "Add Tax Rule" text link. The add tax rule administration page will open in a new browser window.
To Apply an existing tax rule to the package option, highlight the tax rule from the "Available Methods" list, located in the "Apply or Remove Existing Tax Rules" section. Click on the right arrow button.
The page will refresh with the selected tax rule now populated in the "Current Tax Rules" list. More than one tax rule may be selected by highlighting multiple rules.
To remove an existing custom tax rule from the package option, highlight the tax rule from the "Current Tax Rules" list. Click on the left arrow button.

The page will refresh with the selected tax rule now populated in the "Available Rules" section. More than one tax rule may be selected by highlighting multiple rules.
To activate or deactivate a custom tax rule currently applied to a package option, click or unclick the selection box next to the tax rule to change, located in the "Tax Rule Details" section. Click the update button. The current page will refresh showing the desired changes.
To view the custom tax rule package option details of a currently applied tax rule, click on the name of the tax rule, located in the "Tax Details" section. The tax rule details for items page will load in a new browser window. This page is used to view and manage which items the custom tax rule is currently applied to.
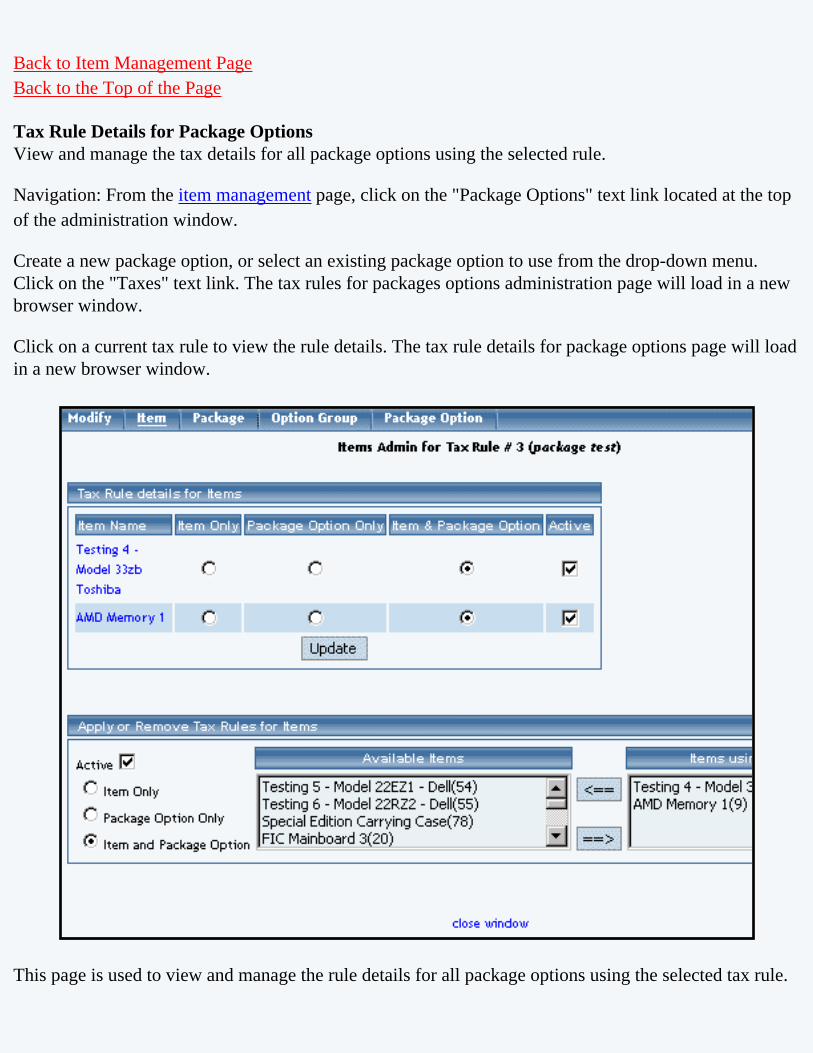
Back to Item Management Page Back to the Top of the Page
Tax Rule Details for Package OptionsView and manage the tax details for all package options using the selected rule.
Navigation: From the item management page, click on the "Package Options" text link located at the top of the administration window.
Create a new package option, or select an existing package option to use from the drop-down menu. Click on the "Taxes" text link. The tax rules for packages options administration page will load in a new browser window.
Click on a current tax rule to view the rule details. The tax rule details for package options page will load in a new browser window.
This page is used to view and manage the rule details for all package options using the selected tax rule.

All package options that the rule is currently applied to will be listed under the "Tax Rule Details for Package Options" section.
The tax rule can be activated or deactivated for any package option in the list. Toggle the selection box under "Active" next to the item to change to change the status. Click the "Update" button to save changes.
To view the details of any package option in the list, click the applicable name. The package option management page will load in a new window.
To add or remove package options from the tax rule, use the "Apply or Remove Tax Rules for Package

Options" section located toward the bottom of the administration page.
When a custom tax rule is applied to a package option, it will override any global rules that were previously active for the package option.
To add a package option to the rule, click on the name of the item under the "Available Rules" heading. Click the "right arrow" button.
The page will refresh with the item now located under the "Package Options Using..." heading.
To remove a package option from the rule, click on the name of the item under the "Package Options Using..." heading. Click the "left arrow" button.

The will refresh with the item now located under the "Available Package Options" heading.
Back to Item Management Page Back to Package Options for Items
Back to the Top of the Page 10-Step Guide on Setting Up Ecommerce Back

Package Option Handling Charges Rules
Related Links: 10-Step Guide on Setting Up Ecommerce | Item Management Page | Package Options for Items
Overview | Handling Charges Details for Package Options
OverviewHandling charges may be applied to any package option. This feature would only need to be used if special handling charges do not apply when the item is sold seperately.
Applying a package option handling charge rule will disable any handling charge applied to the item.
For example, this feature may be used to:
● Add a labor charge that wouldn't be present if the product was not a package option
● Add a packaging charge for materials that wouldn't be needed when the product was sold seperately
Use this section to view, remove, add, activate, or deactivate custom handling charges for a package option.
Navigation: From the item management page, click on the "Package Options" text link located at the top of the administration window.
Create a new package option, or select an existing package option from the drop-down menu. Click on the "Tax Rules" text link. The package options handling rules administration page will open in a new browser window.

Any global handling rules that apply to the package will be listed at the bottom of the page. To view a listed global handling rule, click on the rule name. The global handling rules modification page will open in a new browser window.
When a custom handling rule is applied to a package option, it will override any global rules that were previously active for the package option.
To add a new custom handling rule, click on the "Add Handling Rule" text link. The add handling rule administration page will open in a new browser window.

To Apply an existing handling rule to the package option, highlight the rule from the "Available Methods" list, located in the "Apply or Remove Existing Handling Rules" section. Click on the right arrow button.
The page will refresh with the selected handling rule now populated in the "Current Handling Rules" list. More than one handling rule may be selected by highlighting multiple rules.
To remove an existing custom handling rule from the package option, highlight the rule from the "Current Handling Rules" list. Click on the left arrow button.
The page will refresh with the selected rule now populated in the "Available Rules" section. More than one handling rule may be selected by highlighting multiple rules.

To activate or deactivate a custom handling rule currently applied to a package option, click or unclick the selection box next to the rule to change, located in the "Handling Rule Details" section. Click the update button. The current page will refresh showing the desired changes.
To view the custom handling rule package details of a currently applied handling rule, click on the name of the rule, located in the "Handling Details" section. The handling rule details for package options page will load in a new browser window. This page is used to view and manage which package items the custom handling rule is currently applied to.
Back to Item Management Page Back to the Top of the Page
Handling Charges Details for Package OptionsView and manage the handling charges details for all package options using the rule.
Navigation: From the item management page, click on the "Package Options" text link located at the top of the administration window.
Create a new package option, or select an existing package option to use from the drop-down menu. Click on the "Handling Rules" text link. The "package option handling charges rules details" page will load in a new browser window.

Click on the desired handling charges rule to view the rule details. The handling charges rules details for package options page will load in a new browser window.
This page is used to view and manage the handling charges details for all package options using the rule.
All package options that the rule is currently applied to will be listed under the "Handling Charges Rules Details for Package Options" section.
The handling charges can be activated or deactivated for any package option in the list. Toggle the selection box under "Active" next to the item to change to change the status. Click the "Update" button to save changes.
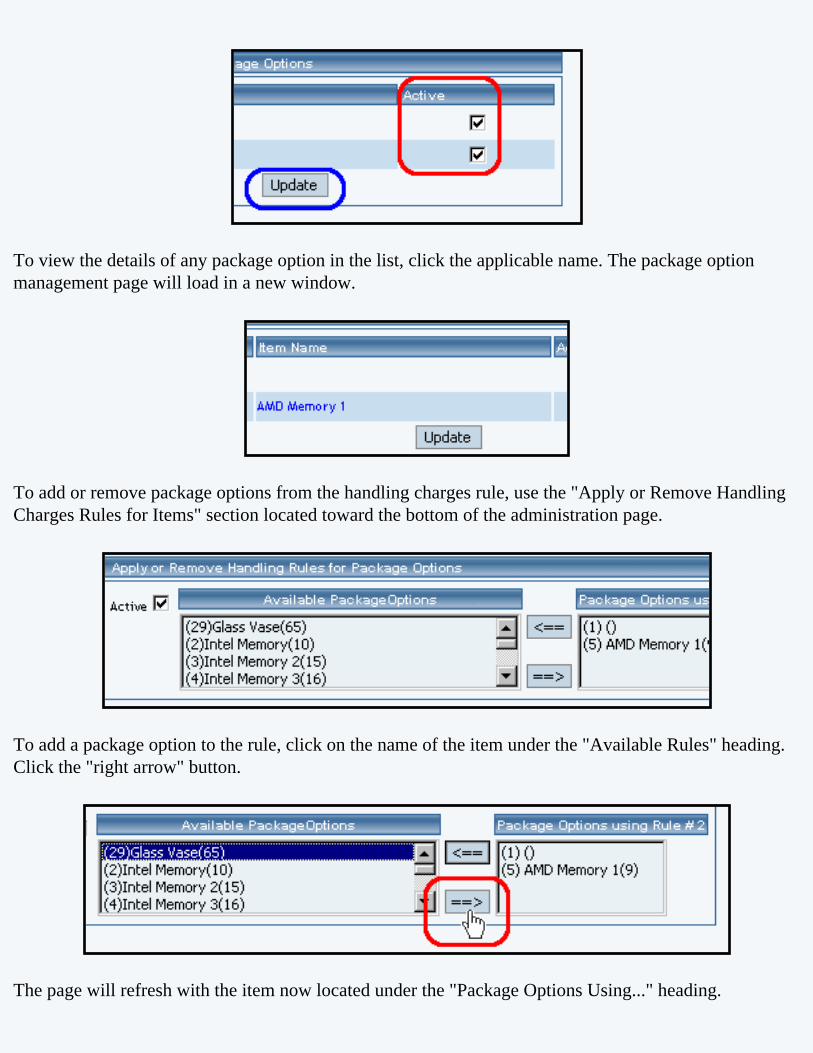
To view the details of any package option in the list, click the applicable name. The package option management page will load in a new window.
To add or remove package options from the handling charges rule, use the "Apply or Remove Handling Charges Rules for Items" section located toward the bottom of the administration page.
To add a package option to the rule, click on the name of the item under the "Available Rules" heading. Click the "right arrow" button.
The page will refresh with the item now located under the "Package Options Using..." heading.

To remove a package option from the rule, click on the name of the item under the "Package Options Using..." heading. Click the "left arrow" button.
The will refresh with the item now located under the "Available Package Options" heading.
Back to Item Management Page Back to Package Options for Items
Back to the Top of the Page 10-Step Guide on Setting Up Ecommerce
Back to the Previous Page

Package Option Shipping Rules
Related Links: 10-Step Guide on Setting Up Ecommerce | Item Management Page | Package Options for Items
Overview | Shipping Rule Details for Package Options
Overview
Shipping rules may be applied to any package option. This feature would only need to be used if the handling rules do not apply when the item is sold seperately. Shipping rules can only be applied to user-defined shipping methods.
Use this section to view, remove, add, activate, or deactivate custom shipping rules for a package option.
Navigation: From the item management page, click on the "Package Options" text link located at the top of the administration window. Create a new package option, or select an existing package option from the drop-down menu. Click on the "Shipping Rules" text link. The shipping rules for package options administration page will open in a new browser window.

Any global shipping rules that apply to the package will be listed at the bottom of the page. To view a listed global shipping rule, click on the rule name. The global shipping rules modification page will open in a new browser window.
When a custom shipping rule is applied to a package option, it will override any global rules that were previously active for the package option.
To add a new custom shipping rule, click on the "Add Shipping Rule" text link. The add shipping rule administration page will open in a new browser window.

To apply an existing shipping rule to the package option, highlight the rule from the "Available Rules" list, located in the "Apply or Remove Existing Shipping Rules" section. Click on the right arrow button.
The page will refresh with the selected rule now populated in the "Current Shipping Rules" list. More than one shipping rule may be selected by highlighting multiple rules.
To remove an existing custom shipping rule from the package option, highlight the rule from the "Current Shipping Rules" list. Click on the left arrow button.
The page will refresh with the selected rule now populated in the "Available Rules" section. More than one shipping rule may be selected by highlighting multiple rules.
To activate or deactivate a rule currently applied to a package option, click or unclick the selection box

next to the rule to change, located in the "Shipping Rule Details" section. Click the "Update" button. The current page will refresh showing the desired changes.
To view a custom shipping method for a currently applied rule, click on the name of the method, located in the "Shipping Details" section. The shipping method details for package options page will load in a new browser window. This page is used to view and manage which package options the custom shipping method is currently applied to.
To view the details of the rule itself, click on the "Rule Id" number. The shipping rule details for packages page will load in a new window. Back to Item Management Page Back to the Top of the Page
Shipping Rule Details for Package OptionsView and manage the shipping rule details for all package options using the selected rule.
Navigation: From the item management page, click on the "Package Options" text link located at the top of the administration window.
Create a new package option, or select an existing package option to use from the drop-down menu. Click on the "Shipping Rules" text link. The package option shipping rules page will load in a new browser window.

Click on the desired shipping rule to view the details. The shipping rule details for package options page

will load in a new browser window.
This page is used to view and manage the shipping rule details for all package options using the selected rule.
All package options that the rule is currently applied to will be listed under the "Shipping Rule Details for Package Options" section.
The shipping rule can be activated or deactivated for any package option in the list. Toggle the selection box under "Active" next to the item to change to change the status. Click the "Update" button to save changes.
To view the details of any package option in the list, click the applicable name. The package option management page will load in a new window.
To add or remove package options from the shipping rule, use the "Apply or Remove Discounts for Items" section located toward the bottom of the administration page.

To add a package option to the rule, click on the name of the item under the "Available Rules" heading. Click the "right arrow" button.
The page will refresh with the item now located under the "Package Options Using..." heading.
To remove a package option from the rule, click on the name of the item under the "Package Options Using..." heading. Click the "left arrow" button.
The will refresh with the item now located under the "Available Package Options" heading.

Back to Item Management Page
Back to Item Management Page Back to Package Options for Items
Back to the Top of the Page 10-Step Guide on Setting Up Ecommerce
Back

Item Options
Related Links: 10-Step Guide on Setting Up Ecommerce | Item Management Page
OverviewItem options allow a site owner to:
● Offer customers a choice from a list of selections● Add a text field which allows a customer to type in actual information needed to complete the
purchase
When purchasing product, a customer will be presented with a drop-down menu which contains a list of choices. The customer will be able to choose one option from this menu.
If the text field option is used, the customer will see a named label (such as "Special Instructions:") with an empty text area below. A customer purchasing the product will be able to type comments, special instructions, and/or specific details pertinent to the purchase.
As an example, the options feature can be used to offer customers a choice of colors or sizes, or a text field can be created which allows a customer to type in comments. Any number of options can be set up, as long as the choices do not affect the selling price of the product.

Use the item option administration page to add, delete or modify options associated with an item. This feature allows customers to select non-price dependent options from a pre-defined list of choices.
Navigation: Click on the main "Ecommerce" link at the top of any main administration page. Click on the "Product Catalog Management" text link to load the product catalog management page.
Access the item management page by either creating a new item or by selecting an item to edit from the item drop down menu. The item management page will load in a new browser window. Click on the "Options" text link located at the top of the administration window.

To add a small text area to the item, activate the feature by clicking the check box next to "Text Area Option". Enter the name to display above the text area in the space provided. Click on the "Update" button to save the changes.
If necessary, more than one text area may be added. To add another text field, click on the "New Text Area Option" button, and repeat the steps above.

To create a new option, click on the "New Option" button. Once the page reloads, replace the default option name "New" with any desired name (example: "Color"). In the empty field next to "values", type in the first value (example: "Red"), and click the "Add" button. Add as many values as desired by repeating this process.
For each option created, a new option administration area is populated on the page.
To delete an existing option set, click on the "Delete" button located beneath the option Id number.
To change the order of any option set, click on the "Up" or "Down" arrow button located beneath the "Option Id" number. Repeat this process until all option sets appear exactly as they should be displayed in the product catalog.

To change the name of any option set, type over the existing name, and click the "Update" button.
To delete an existing value within an option set, highlight the value and press the "Remove" button located to the right of the value list.
To re-order any values within an option set, highlight the value to move by clicking on it from the list of values. Use the "Up" or "Down" arrow button to move the value. Repeat this process until the value list is ordered as it should be displayed in the catalog.
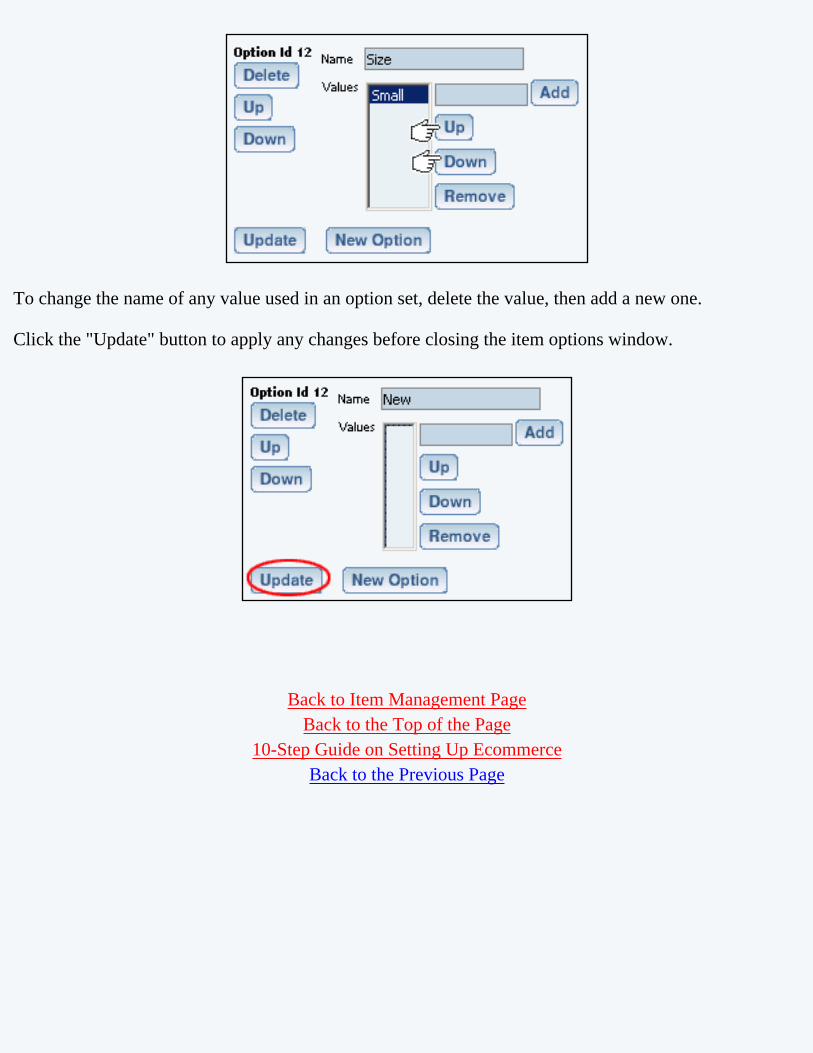
To change the name of any value used in an option set, delete the value, then add a new one.
Click the "Update" button to apply any changes before closing the item options window.
Back to Item Management Page Back to the Top of the Page
10-Step Guide on Setting Up Ecommerce Back to the Previous Page

Item Groups
Related Links: 10-Step Guide on Setting Up E-commerce | Product Catalog Management
Overview | Item Group Management Page
OverviewAn item group is a different way to display products. By creating an item group, a site owner tells the software to display items via a drop-down menu. Item groups are sets of products organized to provide an easy method to select and purchase related items.
All products in any item group appear in a drop-down menu in the online catalog, allowing customers to quickly select a desired product. When a customer selects a product from the menu, the page refreshes, displaying all of the pertinent product details. The customer can then choose to view another item from the menu, or to purchase the current product.
Click on the main "Ecommerce" link at the top of any main administration page. Click on the "Product Catalog Management" text link to load the product catalog management page.

To add a new item group, click on the "New" button located in the item group section. The item group management page will open in a new browser window.
To edit an existing item group, select the group to edit from the drop down menu, then click on the "Edit" button. The item group management page will open in a new browser window.
To delete an existing item group, select the item to delete from the drop down menu, then click on the "delete" button.
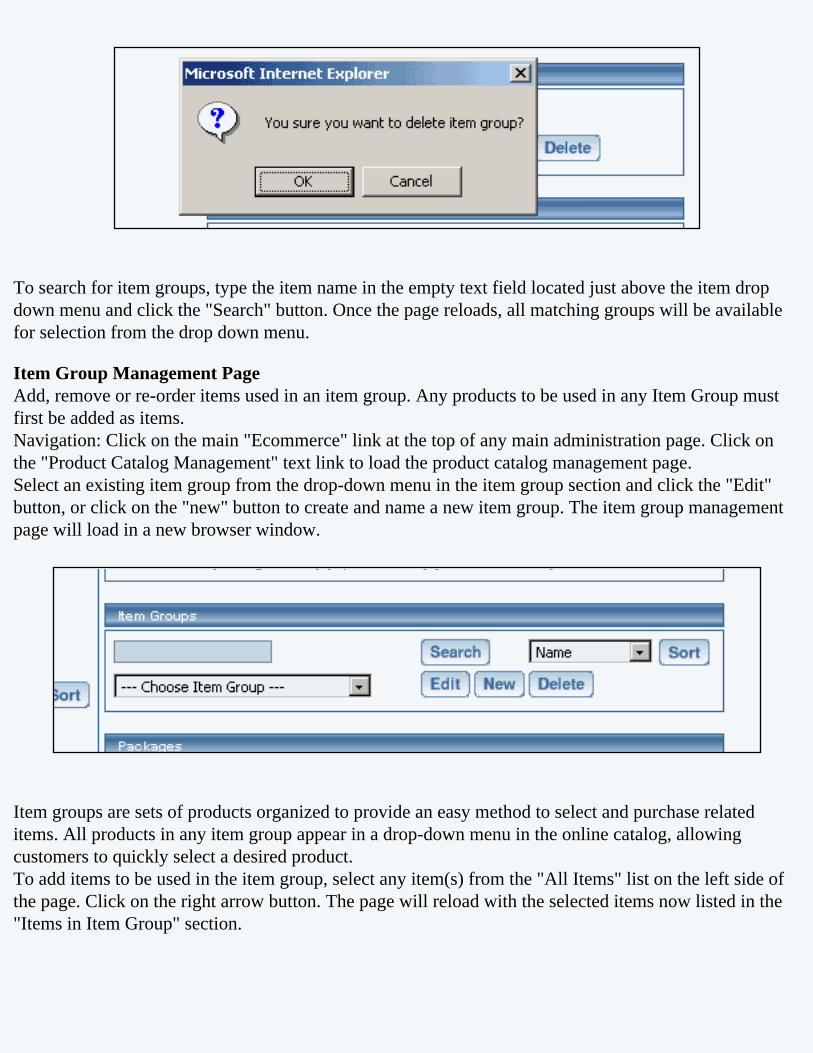
To search for item groups, type the item name in the empty text field located just above the item drop down menu and click the "Search" button. Once the page reloads, all matching groups will be available for selection from the drop down menu.
Item Group Management PageAdd, remove or re-order items used in an item group. Any products to be used in any Item Group must first be added as items. Navigation: Click on the main "Ecommerce" link at the top of any main administration page. Click on the "Product Catalog Management" text link to load the product catalog management page. Select an existing item group from the drop-down menu in the item group section and click the "Edit" button, or click on the "new" button to create and name a new item group. The item group management page will load in a new browser window.
Item groups are sets of products organized to provide an easy method to select and purchase related items. All products in any item group appear in a drop-down menu in the online catalog, allowing customers to quickly select a desired product. To add items to be used in the item group, select any item(s) from the "All Items" list on the left side of the page. Click on the right arrow button. The page will reload with the selected items now listed in the "Items in Item Group" section.

To remove items currently used in an item group, select any item(s) from the "Items in Item Group" section located on the right side of the page. Click on the left arrow button. The page will reload with the selected items now listed in the "All Items" section.

To edit items used in an item group, highlight the item in the "Items in Item Group" section, and click the edit button located to the right of the list. The item management page will load.

To change the order in which the items display in the product catalog, highlight the item to move by

clicking on it from the item list. Use the "Up" or "Down" arrow button to move the item. Repeat this process until all items are ordered as desired.
To change the name of the item group, type over the existing name in the field provided, then click the "Update" button.
Back to the Top of the PageProduct Catalog Management
10-Step Guide on Setting Up E-CommerceBack to Previous Page

Packages
Related Links: 10-Step Guide on Setting Up E-commerce | Product Catalog Management | Package Management Page
Overview | Package Management Page | Related Products OverviewA package is an purchaseable product with at least one subset ("package option groups") of items that are provided as purchase options. A customer can choose to purchase a package, then select which options to include in the final package. The end retail price of the package will be calculated based on a customer's choices.
In order to to set up a package, several steps must be completed:
● Any product that will be sold as a part of a package must first be added as an item ● At least one package option must be created through the item administration
❍ An item will not be available to use in a package unless a package option is first defined by accessing the item administration page.
● The main package must be created ( see below )● At least one package option group must be defined● At least one item ( now referred to as an item's package option ) must be added to each package option group created
❍ See the section on adding items to an option group
An Example of a Package Name, Description and Comment Text Area

An example of a package with three option groups
Navigation: Click on the main "Ecommerce" link at the top of any main administration page. Click on the "Product Catalog Management" text link to load the product catalog management page.
A main "package item" is created, and then other items are included within at least one package option group. Each package option and/or package option group can be configured independently. This allows a great deal of versatility for customizing product specifications, and provides a means to offer customers the ability to build their own products within pre-defined parameters.
To add a new package, click on the "New" button located in the package section. The package management page will open in a new browser window.

To edit an existing package, select the package to edit from the drop down menu...
...then click on the "Edit" button.
The package management page will open in a new browser window.
To delete an existing package, select the item to delete from the drop down menu, then click on the "delete" button.
To search for packages, type the package name in the empty text field located just above the package drop down menu and

click the "Search" button. Once the page reloads, all matching packages will be available for selection in the drop down menu.
Back to the Top of the Page
Package Management PageModify package-specific information, such as the name, descriptions, pricing, inventory, image, and package rules.
Navigation: Click on the main "Ecommerce" link at the top of any main administration page. Click on the "Product Catalog Management" text link to load the product catalog management page.
Select a package to edit from the drop down menu located in the "Packages" section and press the "Edit" button, or click on the "New" button to create and name a new package. The package management page will open in a new browser window.
The process of adding and managing packages is nearly identical to adding and managing items. The starting "package item" can be a tangible product with a base starting price, with each option group provided as an optional or required add-on. Alternately, the starting "package item" can be a non-tangible item with a base price of zero, with each configured option group used to build a "final" product from a pre-defined list of possible items.
Once a package is set up, access the package option groups page to configure all option groups and included items.
To set up a new package, or modify an existing package, reference the following guide:
Enter the package name, item barcode identification number, product manufacturer, and product identification number (code) in the fields provided. The package name is the only required field in this area.
Check the selection box next to "active" if this package is to be available for use in the catalog. Packages that not active will not be displayed or available for purchase from the web site catalog.

Check the box next to "Use all ship methods" if this package will be shipped using all active shipping methods. If this box is not checked, then shipping methods may be manually selected by accessing the package shipping methods page.
Check the box next to "taxable" if this package is being sold as retail goods.
Enter the starting retail price in the field provided. This is the base price that will be displayed and charged for the main "starting" item in the package, not the final price of the complete package. Optionally, enter the manufacturer’s suggested retail price ( MSRP ) in the field provided. If this value is greater than zero, it will be displayed above the retail price on the item page in the catalog. If no value is entered, the MSRP will not be displayed.
Under inventory options, click the radio button next to desired selection.
The default is "Don't use inventory" which deactivates the inventory control system for this package.
Selecting "Don’t allow users to order items not in stock" will activate the inventory control system, and will not allow a

customer to purchase any packages that are not in stock. Packages with no available inventory will still show up in any active categories that contain the package.
Selecting "Let users backorder items" will allow customers to purchase and pay for items regardless of the quantity on hand. Out of stock packages are automatically placed on back order.
When the inventory control system is activated, inventory-tracking information will appear. To modify inventory, enter the quantity in the field provided, next to "Add Inventory". To add inventory, enter a positive value. To remove inventory, enter a negative value.
A running total of inventory is kept and displayed, with the current stock and total units sold listed. To complete an inventory adjustment, click on the "update" button at the bottom of the administration page.
The "Published Inventory" section will not reflect any inventory adjustments until the web site is published.
Enter any warranty information, a short description, a main description, Meta Keywords, Meta Description, and Instruction in the fields provided. All of these fields are optional.

The short description appears at the category level in the catalog. It is also used as the primary description if the package is used in an express order form.
The main description appears on the main package page. It is used to provide detailed product information and any necessary product specifications.
The Meta Keywords and Meta Description are only used for search engine information, and will not be visible to Web site visitors. Enter key words that apply to this package and a short description of this package in the spaces provided.
The Instruction text area gives you the ability to place a block of text that will appear at the end of a successful order. This text will appear on the order confirmation page, on the order fax sent to the site owner, and in the e-mail confirmation sent to the customer and to the site owner.
Select a shipping origin from the drop down menu provided.
Select an image to use with this package by clicking on the current image name or on "no image" if an image has never been selected. The image selection page page will load in a new browser window.

Uncheck the "Use Quantity" box only 1) to prevent a customer from being able to specify the quantity to order or 2) To use a custom unit of measure in place of a generic quantity.
When the "Use Quantity" box is checked, a customer is able to order multiple quantities. If the "Use Quantity" box and the "Use Units" boxes are both unchecked, a customer is not able to specify any quantity for purchase. This combination is primarily useful if non-tangible goods are being sold.
The "Unit" feature provides a method to specify custom units of measure, such as "yards", "packs", "cases", "ounces", or any desired custom unit. The unit feature can be used as a replacement for the quantity, or both quantities and units can be used. Specify the type of unit to be used in field provided next to "Unit Name".
If quantity and units are both active, as an example, a customer could order 10 qty. of 8 ounces, or 5 qty. of 12.3 feet of rope.
Entering a value for "Max units" will prevent a customer from ordering above the specified value, in units. If "Max Units" are not specified, a customer will be able to order an unlimited amount of the package.
Enter the height, width, weight and length of the package, if applicable, in the fields provided. All of these fields are optional. However, the integrated shipping methods require a value for weight in order to calculate shipping charges.
Click on the "discount" text link in order to access and set up package discount rules.
Click on the "handling" text link in order to access and set up package handling charge rules.
Click on the "shipping methods" text link in order to access and set up package shipping methods.
Click on the "shipping rules" text link in order to access and set up package shipping rules.
Click on the "Taxes" text link in order to access and set up package tax rules.
When completed, save any changes to the item by clicking the "update" button located at the bottom of the administration page.

To set up the individual package options to be included, click on the "Option Groups" link at the top of the administration page. The package option group management page will load.
Related ProductsClick on the tab "Related Products" to assign products that are related to this product. For example, for a professional sports team jersey and matching cap, the baseball cap would be a related product of the jersey.
When you click on the "Related Products" tab, you will see the following screen:

The first section details the caption you would like to have on the Web site. This caption will be next to all of your assigned related products. If nothing is assigned, the default caption will be "Customers who shopped for this item also shopped for item(s) below:".
The second section details all of the related products that are currently related to this product. Order the products by clicking on the nam of the product and clicking on the "Up" or "Down" buttons. To jump to the item management window for the

related product, select the product and click on the button "Edit". To remove the product as a related product, click on the product name and click on the button "Remove".
To add a related product, you would use the third section. In each group of products (Items, Item Groups, and Packages), click on the product name and then click on the appropriate add button ("Add Item" button if you are adding an item, the "Add Group" button if you are adding an item group, and the "Add Package" button if you are adding a package). Once the product name is listed in the second section, it has been applied.
When done specifying all of your related products for this product, click on the button "Update" to save your changes.
Related Links:
Package OptionsPackage Option GroupsPackage Discount RulesPackage Shipping MethodsPackage Shipping RulesPackage Tax RulesPackage Handling Charges
Back to the Top of the PageProduct Catalog Management

10-Step Guide on Setting Up EcommerceBack

Package Options
Related Links: 10-Step Guide on Setting Up Ecommerce | Package Management Page
Overview | How Do I Use It? | Text Area Option | Drop-Down Option
,/A>Overview Package options allow a site owner to:
● Offer customers a choice (which does not affect the price) from a list of selections● Add a text field which allows a customer to type in actual information needed to complete the purchase
When purchasing product, a customer will be presented with a drop-down menu which contains a list of choices. The customer will be able to choose one option from this menu.
If the text field option is used, the customer will see a named label (such as "Special Instructions:") with an empty text area below. A customer purchasing the product will be able to type comments, special instructions, and/or specific details related to the purchase.
As an example, the options feature can be used to offer customers a choice of colors or sizes, or a text field can be created which allows a customer to type in comments. Any number of options can be set up, as long as the choices do not affect the selling price of the product.
Use the package option administration page to add, delete or modify options associated with an package. This feature allows customers to select options from a pre-defined list of choices.
How Do I Use It?Click on the main "Ecommerce" link at the top of any main administration page.

Click on the "Product Catalog Management" text link to load the product catalog management page. You will see the following screen:

Access the package management page by either creating a new package or by selecting a package to edit from the package drop down menu. The package management page will load in a new browser window.

Click on the "Options" text link located at the top of the administration window. You will see the following screen.

Create a Text Area option
To add a small text area to the item, activate the feature by clicking the check box next to "Text Area Option". Enter the name to display above the text area in the space provided and then click on the "Update" button to save the changes.
If necessary, more than one text area may be added. To add another text field, click on the "New Text Area Option" button, and repeat the steps above.

Create a drop-down option
To create a new option, click on the "New Option" button.
Once the page reloads, replace the default option name "New" with any desired name (for example, "Color" if you wanted to present a choice of color).

In the empty field next to "values", type in the first value (for example, "Red" if one of the options for your choice of color was red), and click the "Add" button. Add as many values as desired by repeating this process.
To delete an existing option set, click on the "Delete" button located beneath the option Id number.

To change the ordering of any option set (that is, which one will appear first, which will appear second, and so on), click on the "Up" or "Down" arrow button located beneath the "Option Id" number. Repeat this process until all option sets appear exactly as they should be displayed in the product catalog.
To change the name of any option set, type over the existing name, and click the "Update" button.

To delete an existing value within an option set, highlight the value and press the "Remove" button located to the right of the value list.
To re-order any values within an option set, highlight the value to move by clicking on it from the list of values. Use the "Up" or "Down" arrow button to move the value. Repeat this process until the value list is ordered as it should be displayed in the catalog.
To change the name of any value used in an option set, delete the value, then add a new one. Click the "Update" button to apply any changes before closing the item options window.

Back to Package Management Page Back to the Top of the Page
10-Step Guide on Setting Up Ecommerce Back to the Previous Page

Package Option Groups
Related Links: 10-Step Guide on Setting Up E-commerce | Product Catalog Management | Package Management Page
Overview | Adding Items to an Option Group | Package Option Group Details | Package Option Group Administration
Overview
A package option group is used to give customers a choice between items (package options) when purchasing a package. A group is given a name which is used to describe all of the items in the group. At least one group needs to be created in the software in order to use a package.
The package option group administration page is used to set up and manage groups of items to be used as purchase options for a package.
Once a group is defined, items (item package options) are then added to this group.
Each "item" that is added to an option group will be presented as a purchase option. Customers will be able to buy one or more of the items from this group, and then make additional selections from any other group that is a part of the package.
● Items will not be available to add to package option groups unless the item has at least one package option defined through the item's administration page.


Navigation: Click on the main "Ecommerce" link at the top of any main administration page. Click on the "Product Catalog Management" text link to load the product catalog management page.
Select a package to edit from the drop down menu located in the "Packages" section and press the "Edit" button, or click on the "New" button to create and name a new package. The package management page will open in a new browser window. Click on the "Option Groups" text link located at the top of the administration page.

An option group is a collection of items that make up one choice in a package. A customer will be able to select one item, no items, or multiple items from the option group, depending on how the group is set up.
A list of all available option groups will be listed on the left side of the administration page.

Option groups that are currently used by the package will be display to the right.

To create and define a new option group, click on the "New" button near the center of the administration page. Enter the name of the option group in the pop-up dialog box. The new option group will then be added to the "Available Option Groups" section.
To add an existing option group to this package, click on the option group name in the "Available Option Groups" section. Press the "Right" arrow button located to the left of the "Option Groups in Package" section. The option group will be removed from the available group and added to the option groups in the package.

To delete an option group, click on the name of the group from the "Available Option Groups" section. Click the "Delete" button located near the center of the administration page.
To change the display order of option groups currently used in the package, click on the name of the group to move. Use the "Up" or "Down" buttons to move the selection to the desired position. Repeat this process until all option groups appear in the order to be displayed in the catalog.

To modify an existing option group (or a newly created one), first add the option group to the package from the available group list. Then, click on the option group name under the "Option Groups in Package" section. Click on the "Edit" button. The modify package option group details administration page will load in a new browser window.

Modify Package Option Group DetailsModify or define package option group details. This section is used customize the settings for each option group used in a package.
Navigation: From the package option group administration page, select a package to edit from the drop down menu located in the "Packages" section and press the "Edit" button. The package management page will open in a new browser window. Click on the "Option Groups" text link located at the top of the administration page. Click on an option group from the "Option Groups in Package" Section. Click the "Edit" button. You will see the following screen:
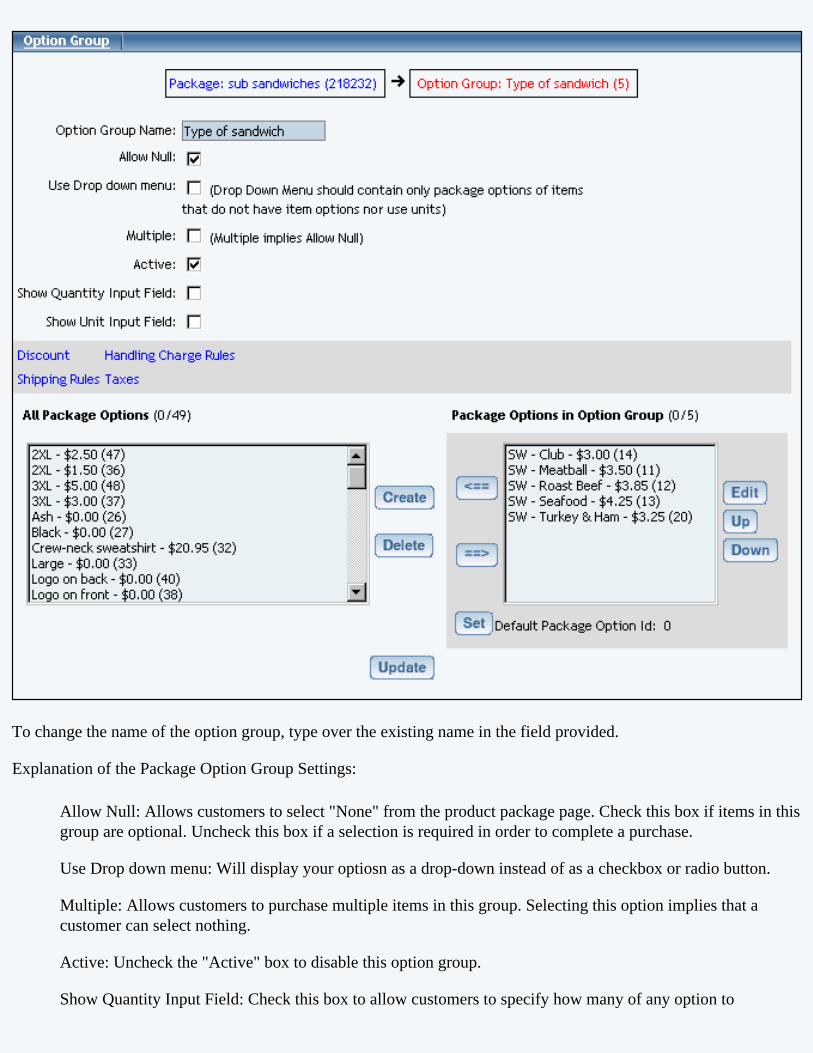
To change the name of the option group, type over the existing name in the field provided.
Explanation of the Package Option Group Settings:
Allow Null: Allows customers to select "None" from the product package page. Check this box if items in this group are optional. Uncheck this box if a selection is required in order to complete a purchase.
Use Drop down menu: Will display your optiosn as a drop-down instead of as a checkbox or radio button.
Multiple: Allows customers to purchase multiple items in this group. Selecting this option implies that a customer can select nothing.
Active: Uncheck the "Active" box to disable this option group.
Show Quantity Input Field: Check this box to allow customers to specify how many of any option to

purchase. With the quantity box unchecked, customers will not be given a choice for the quantity as it will be assumed they only wanted one of the choice.
Show Unit Input Field: Check this box to enable the custom unit of measure for all package options in the group. A custom unit of measure must be specified in the item administration for all items used in the group. See the item administration page for further information about units.
[ Example of quantity and unit used in a package option group ]
Adding Items to a Package Option GroupOnce a package option group is created, items must be added to the group. Each item added to the group will be presented as a purchase choice. A customer will be able to choose which item(s) they would like to purchase from the option group.
All items to be used in package option groups must first be defined as package options. See the section on defining item package options for further information.
To add a package option (an item) to this option group, click on the package option in the "All Package Options" section. Click on the "Right" arrow button. The option will be added to the option group.
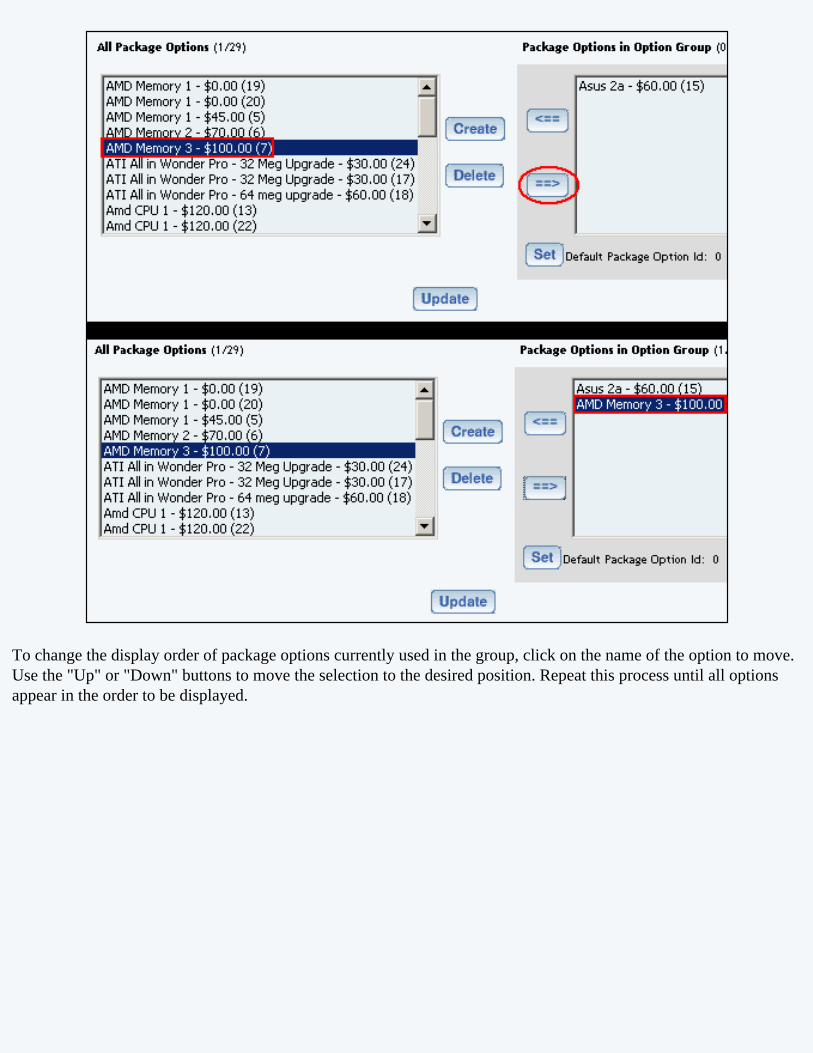
To change the display order of package options currently used in the group, click on the name of the option to move. Use the "Up" or "Down" buttons to move the selection to the desired position. Repeat this process until all options appear in the order to be displayed.

To set the default option, click on the package option, then click the "Set" button below the "Package Options in Group" section. This defines which package option will automatically be selected for purchase in this group.
To edit a package option’s details, click on the name of the option in the "Package Options in Group" section. Click the "Edit" button. The package option administration page will load in a new browser window.

To view the details of the current package, click on the package name at the top of the administration page. The package administration page will load.
Package Option AdministrationView, create, modify and manage package options by item.
AdministrationPackage Option Group DiscountsPackage Option Group TaxesPackage Option Group HandlingPackage Option Group Shipping
Click on the name of any package option currently used in a package option group. The package option administration page will load in a new browser window.
The base item for the package option will be selected by default in the "Item" drop down menu. To view package options for a different item, select the desired item from the drop-down menu.
To change the retail price of any listed package option, click on the name in the list, and type the new price over the old one in the field provided. Click the "Update" button to apply the change.

To delete a package option, click on the name in the list, and click the "Delete" button.
To create, modify, or view discounts for the selected package option, click on the "Discounts" text link located beneath the price. The package option discount administration page will load in a new browser window.
To create, modify, or view shipping rules, click on the "Shipping Rules" text link. The package option shipping rules administration page will load in a new browser window.

To create, modify, or view handling charges, click on the "Handling" text link. The package option handling charges rules administration page will load in a new window.

To create, modify, or view tax rules, click on the "Taxes" text link. The package option tax rules administration page will load in a new window.
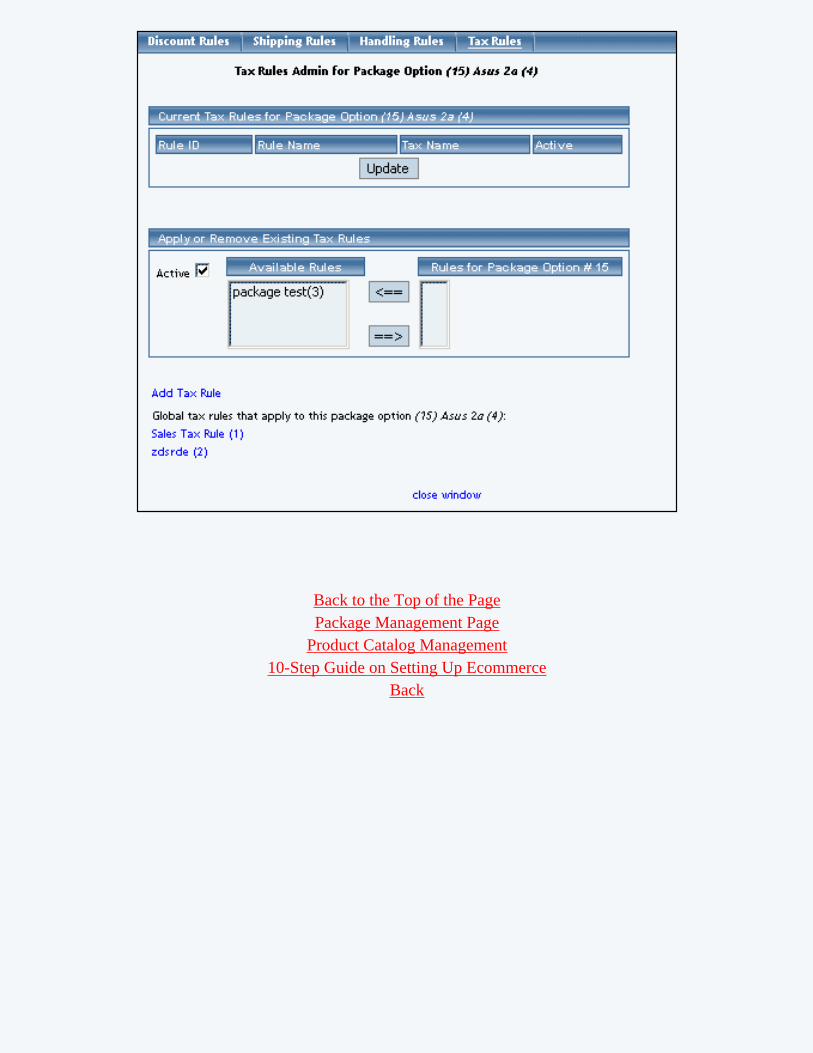
Back to the Top of the PagePackage Management Page
Product Catalog Management10-Step Guide on Setting Up Ecommerce
Back

Package Option Group Discount
Related Links: 10-Step Guide on Setting Up E-commerce | Package Option Groups
Overview | Package Option Group Discount Details | Discount Rules For Shoppers
Overview
A package option group discount is a reduction in the retail price applied to all package options in a group. Once a group discount is applied, global discount rules will be disabled. This feature would only need to be used when a discount must be applied to an entire group rather than an individual package option within the group.
Navigation: Click on the main "Ecommerce" link at the top of any main administration page. Click on the "Product Catalog Management" text link to load the product catalog management page.

Select an existing package from the drop-down menu in the package section and click the "Edit" button, or click on the "new" button to create and name a new package. The package management page will load in a new browser window.
Click on the "Option Groups" text link at the top of the administration page. The option groups administration page will load.

Select an option group from the "Option Groups in Package" list on the right-hand side of the administration page. Click on the "edit" button.
The details for option group administration page will load.
Click on the "Discount" text link located on the left-hand side of the administration page. The Option Group Discount Rules page will load in a new browser window.

To create a new discount rule, click on the "Add Discount Rule" text link. The add discount rule page will load in a new browser window.
To activate or deactivate a current option group discount, check or uncheck the box next to the rule, and click the "update" button. The current page will refresh and confirm any changes.
To view a discount rule currently applied to the option group, click on the name of the desired rule, which will load the discount details for option groups administration page in a new browser window.

To add an existing discount rule to the option group, click on the name of the rule Available Rules". Click on the right arrow to add the rule to the item. The current page will refresh, and the chosen discount rule will appear under the "Rules for Option Group" section.
To remove a discount rule that is currently applied to the option group, click on the name of the rule
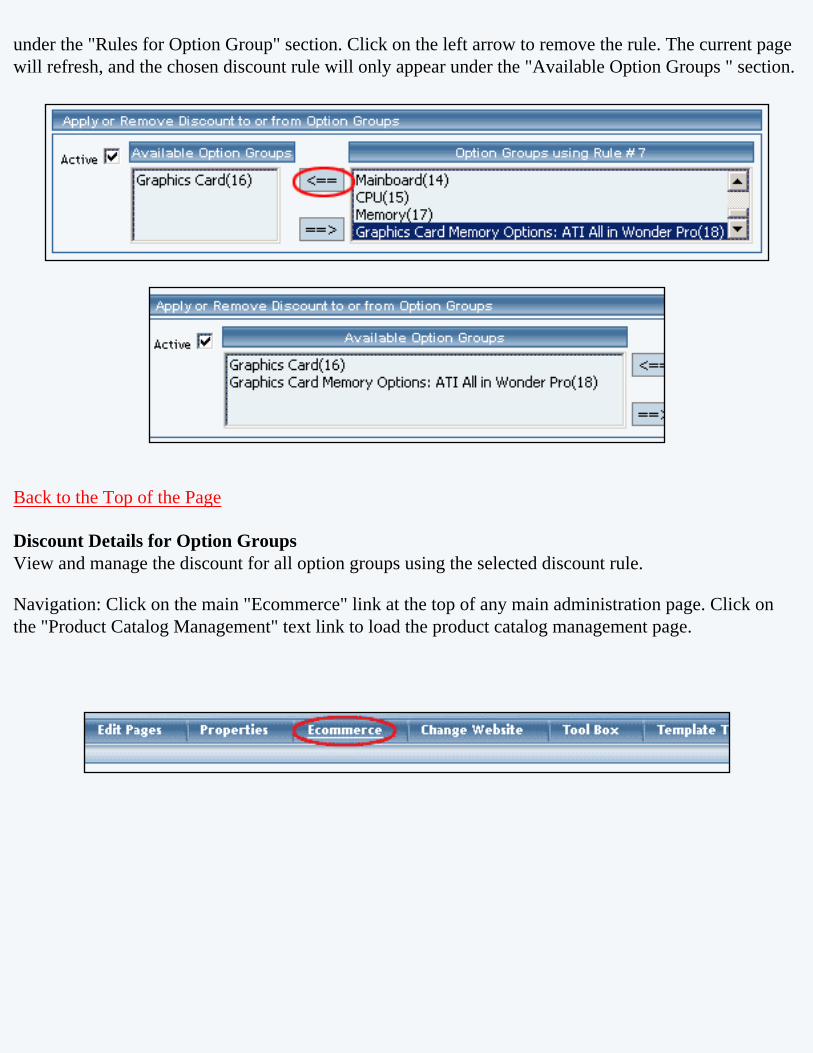
under the "Rules for Option Group" section. Click on the left arrow to remove the rule. The current page will refresh, and the chosen discount rule will only appear under the "Available Option Groups " section.
Back to the Top of the Page
Discount Details for Option GroupsView and manage the discount for all option groups using the selected discount rule.
Navigation: Click on the main "Ecommerce" link at the top of any main administration page. Click on the "Product Catalog Management" text link to load the product catalog management page.
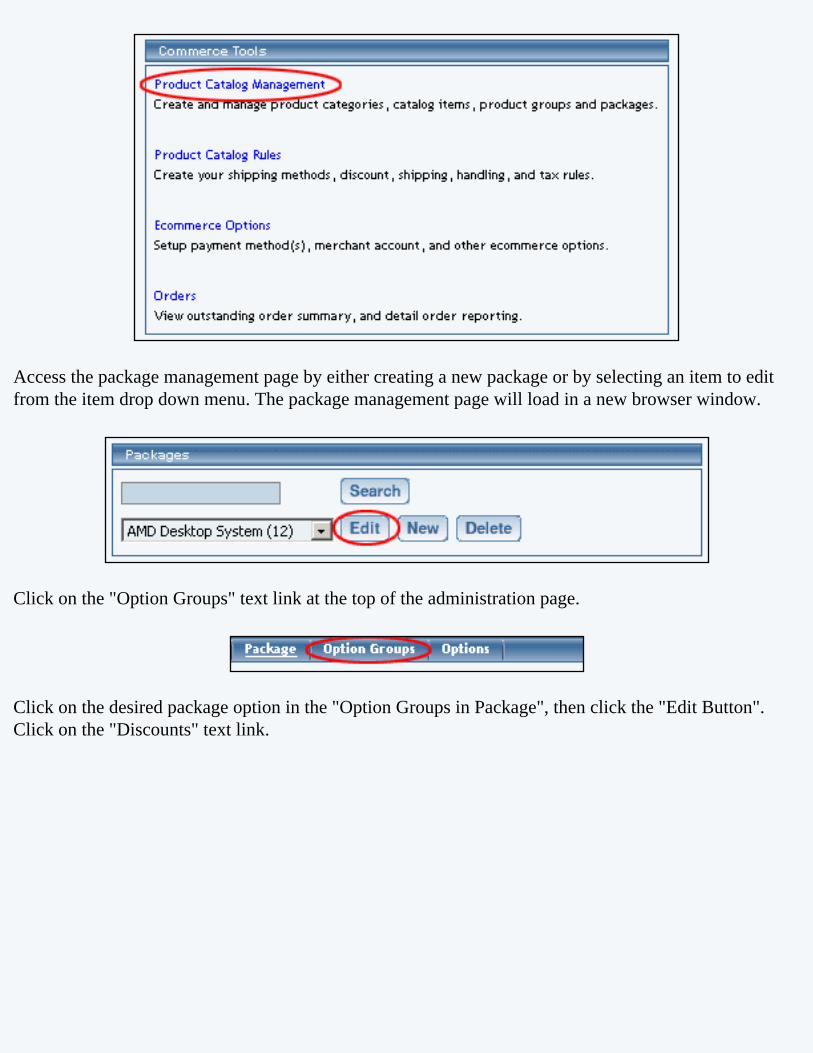
Access the package management page by either creating a new package or by selecting an item to edit from the item drop down menu. The package management page will load in a new browser window.
Click on the "Option Groups" text link at the top of the administration page.
Click on the desired package option in the "Option Groups in Package", then click the "Edit Button". Click on the "Discounts" text link.

Click on any current discount rule. The "discount details for option groups" page will load in a new window.
This page is used to view and manage the discount details for all option groups using the selected discount rule.

All option groups that the rule is currently applied to will be listed under the "Discount Details for Option Groups" section.
The discount rule can be activated or deactivated for any option group in the list. Toggle the selection box under "Active" next to the item to change to change the status. Click the "Update" button to save changes.
To view the details of any option group in the list, click the applicable name. The option group management page will load in a new window.
To add or remove option groups from the discount rule, use the "Apply or Remove Discounts for Option Groups" section located toward the bottom of the administration page.

To add a package to the rule, click on the name of the package under the "Available Option Groups" section. Click the "right arrow" button. The page will refresh with the item now located under the "Option Groups Using..." heading.
To remove an option group from the rule, click on the name of the item under the "Option Groups Using..." heading. Click the "left arrow" button. The will refresh with the item now located under the "Available Option Groups" heading.

Back to the Top of the Page Back to Package Option Groups
10-Step Guide on Setting Up Ecommerce Back

Package Option Group Tax Rules
Related Links: 10-Step Guide on Setting Up E-commerce | Package Option Groups
Overview | Package Option Group Tax Details
Overview
Tax rules may be applied to all options in any option group. This would only be necessary if a Web site owner has a tax situation where a different tax rate applies only when items are used in a package, and the tax rule applies to all products/items used in this group.
Customers will see an itemized list of any taxes at checkout.
Use this section to view, remove, add, activate, or deactivate option group specific tax rules.
Navigation: Click on the main "Ecommerce" link at the top of any main administration page. Click on the "Product Catalog Management" text link to load the product catalog management page.

Select an existing package from the drop-down menu in the package section and click the "Edit" button, or click on the "New" button to create and name a new package. The package management page will load in a new browser window.

Click on the "Option Groups" text link at the top of the administration page. The option groups administration page will load.
Select an option group from the "Option Groups in Package" list on the right-hand side of the administration page. Click on the "edit" button.

The details for option group administration page will load.
Click on the "Taxes" text link located on the left-hand side of the administration page. The option group tax rules page will load in a new browser window.

When a custom tax rule is applied to an option group, it will override any global rules that were previously active for any items in the option group.
To add a new custom tax rule, click on the "Add Tax Rule" text link. The add tax rule administration page will open in a new browser window.

To apply an existing tax rule to the option group, highlight the rule from the "Available Rules" list, located in the "Apply or Remove Existing Tax Rules" section. Click on the right arrow button. The page will refresh with the selected tax rule now populated in the "Rules for Option Group" list. More than one rule may be selected by highlighting multiple rules.


To remove an existing custom tax rule from the package, highlight the rule from Rules for Option Group" list. Click on the left arrow button. The page will refresh with the selected rule now populated in the "Available Rules" section. More than one rule may be selected by highlighting multiple rules.

To activate or deactivate a custom tax rule currently applied to an option group, click or unclick the selection box next to the rule to change, located in the "Current Tax Rules" section. Click the update button. The current page will refresh showing the desired changes.
To view the details of a currently applied rule, click on the name of the rule, located in the "Tax Details" section. The tax rule details for option groups page will load in a new browser window. This page is used to view and manage which packages the custom rule is currently applied to.

Tax Rule Details for Option GroupsView and manage tax rule details for all package option groups using the selected method.
Navigation: Click on the main "Ecommerce" link at the top of any main administration page. Click on the "Product Catalog Management" text link to load the product catalog management page.

Select an existing package from the drop-down menu in the item section and click the "Edit" button, or click on the "new" button to create and name a new package. The item management page will load in a new browser window.

Click on the "Option Group" text link located at the top of the administration page. Select any option group from the "Option Groups in Packages" section. Click the "Edit Button". The option group administration page will load.
Click on the "Taxes" text link. The tax rules for option groups administration page will load in a new browser window.

Click on the desired tax rule to view the details. The tax rule details for option groups page will load in a new browser window.

All option groups that this rule is currently applied to will be listed under the "Option Group Name" section.

The tax rule can be activated or deactivated for any option group in the list. Toggle the selection box under "Active" next to the item to modify to change the status. Click the "Update" button to save changes.
To view the details of any option group in the list, click on the name. The option group management page will load in a new window.

To add or remove a tax rule to or from a package, use the "Apply or Remove Tax Rules to or from Option Groups" section located toward the bottom of the administration page.

To add an option group to the rule, click on the name of the option group under the "Available Rules" heading. Click the "right arrow" button. The page will refresh with the option group now located under the "Option Groups Using Rules" heading.


To remove a package from the rule, click its name under the "Option Groups Using Rules" heading. Click the "left arrow" button. The page will refresh with the option group now located under the "Available Packages" heading.

Back to the Top of the Page Back to Package Option Groups
10-Step Guide on Setting Up Ecommerce Back

Package Option Group Handling Charges
Related Links: 10-Step Guide on Setting Up E-commerce | Package Option Groups
Overview | Package Option Group Handling Details
Overview
Handling charges may be applied to any package option group. This would only be necessary if special handling charges are required when the items are offered in a package, and not when a customer purchases the item seperately. A handling charge rule will apply to each item offered in the group.
When a customer purchased a package, the handling charges will be applied to any selected item from the option group, and the customer will be able to see an itemized list of any handling charges on the "finalize order" page.
Use this section to view, remove, add, activate, or deactivate option group specific handling charges. Any global handling rules for the option group will be disabled once a package group rule is added.
Navigation: Click on the main "Ecommerce" link at the top of any main administration page.

Click on the "Product Catalog Management" text link to load the product catalog management page.
Select an existing package from the drop-down menu in the item section and click the "Edit" button, or click on the "new" button to create and name a new package.
The package management page will load in a new browser window.

Click on the "Option Groups" text link at the top of the administration page.
The option groups administration page will load.
Select an option group from the "Option Groups in Package" list on the right-hand side of the administration page. Click on the "edit" button.

The details for option group administration page will load.

Click on the "Handling Charge Rules" text link.
The package option group handling charges administration page will load in a new window.

Any global handling charge rules that apply to any item or package option will be deactivated for all items in the package option group once a handling charge is applied to the option group.
To add a new handling charge rule, click on the "Add Handling Charge Rule" text link.
The "add handling charges rule" administration page will open in a new browser window.

To Apply an existing handling charges rule to the option group, highlight the rule from the "Available Methods" list, located in the "Apply or Remove Existing Handling charges Rules" section. Click on the right arrow button.
The page will refresh with the selected rule now populated in the "Rules for Option Group" list. More than one rule may be selected by highlighting multiple rules.

To remove an existing custom rule from the package, highlight the rule from the "Rules for Option Group" list. Click on the left arrow button.
The page will refresh with the selected rule now populated in the "Available Rules" section. More than one rule may be selected by highlighting multiple rules.
To activate or deactivate a rule currently applied to the option group, click or unclick the selection box next to the rule to change, located in the "Current Handling Rules for Option Group" section.
Click the update button.
The current page will refresh showing the desired changes.

To view the details of a currently applied rule, click on the name of the rule, located in the "Current Handling Rules for Option Group" section.
The handling charges rule details for option groups page will load in a new browser window. This page is used to view and manage which packages the rule is currently applied to.

Handling Rule Details for Option GroupsView and manage the handling charges details for all package option groups using the selected rule.
Navigation:
Click on the "Product Catalog Management" text link to load the product catalog management page.
Select an existing package from the drop-down menu in the item section and click the "Edit" button, or click on the "new" button to create and name a new package.
The package management page will load in a new browser window.

Click on the "Option Groups" text link at the top of the administration page.
The option groups administration page will load.

Select an option group from the "Option Groups in Package" list on the right-hand side of the administration page. Click on the "edit" button.

The details for option group administration page will load.
Click on the "Handling Charge Rules" text link.
The package option group handling charges administration page will load in a new window.

To view the details of a currently applied rule, click on the name of the rule, located in the "Current Handling Rules for Option Group" section.
The handling charges rule details for option groups page will load in a new browser window. This page is used to view and manage which packages the rule is currently applied to.

To activate or deactivate a rule currently applied to the option group, click or unclick the selection box next to the rule to change, located in the "Current Handling Rules for Option Group" section.
Click the update button.
The current page will refresh showing the desired changes. All option groups that the rule is currently applied to will be listed under the "Handling Charge Rule Details for Option Groups" section.

The page will refresh with the selected rule now populated in the "Rules for Option Group" list. More than one rule may be selected by highlighting multiple rules.
To remove an existing custom rule from the package, highlight the rule from the "Rules for Option Group" list. Click on the left arrow button.
The page will refresh with the selected rule now populated in the "Available Rules" section. More than one rule may be selected by highlighting multiple rules.
Back to the Top of the Page

Back to Package Option Groups 10-Step Guide on Setting Up Ecommerce
Back

Package Option Group Shipping Rules
Related Links: 10-Step Guide on Setting Up E-commerce | Package Option Groups
Overview | Package Option Group Shipping Details
Overview
When any user-defined shipping method is used for a package, a shipping rule may be applied, which tells the software how to calculate the shipping charges. Shipping rules applied to a package option group will not be applied to the base package, only the group.
An example of a user-defined shipping method and shipping rule at the "finalize checkout" stage
Use this section to view, remove, add, activate, or deactivate custom shipping rules for a package. Shipping rules may be set up for user-defined "custom" shipping methods only. Shipping rules for the package are based on the main package item, and once a shipping rule is applied, any global shipping rules will be deactivated for the package. View, remove, add, activate, or deactivate option group specific shipping rules.
This feature will only be available for package option groups that contain items which have the "Use all shipping methods" option selected.

Navigation: Click on the main "Ecommerce" link at the top of any main administration page. Click on the "Product Catalog Management" text link to load the product catalog management page.
Select an existing package from the drop-down menu in the item section and click the "Edit" button, or click on the "new" button to create and name a new package. The package management page will load in a new browser window.

Click on the "Option Groups" text link at the top of the administration page. The option groups administration page will load.
Select an option group from the "Option Groups in Package" list on the right-hand side of the administration page. Click on the "edit" button.

The details for option group administration page will load. Click on the "Shipping Rules" text link. The package option group shipping rules administration page will load in a new window.

To add a new shipping rule, click on the "Add Shipping Rule" text link. The add shipping rule administration page will open in a new browser window.


To Apply an existing shipping rule to the option group, highlight the rule from the "Available Methods" list, located in the "Apply or Remove Existing Shipping Rules" section. Click on the right arrow button. The page will refresh with the selected rule now populated in the "Rules for Option Group" list. More than one rule may be selected by highlighting multiple rules.

To remove an existing custom rule from the option group, highlight the rule from the "Rules for Option Group" list. Click on the left arrow button. The page will refresh with the selected rule now populated in the "Available Rules" section. More than one rule may be selected by highlighting multiple rules.

To activate or deactivate a rule currently applied to the option group, click or unclick the selection box next to the rule to change, located in the "Current Shipping Rules for Option Group" section. Click the "Update" button. The current page will refresh showing the desired changes.
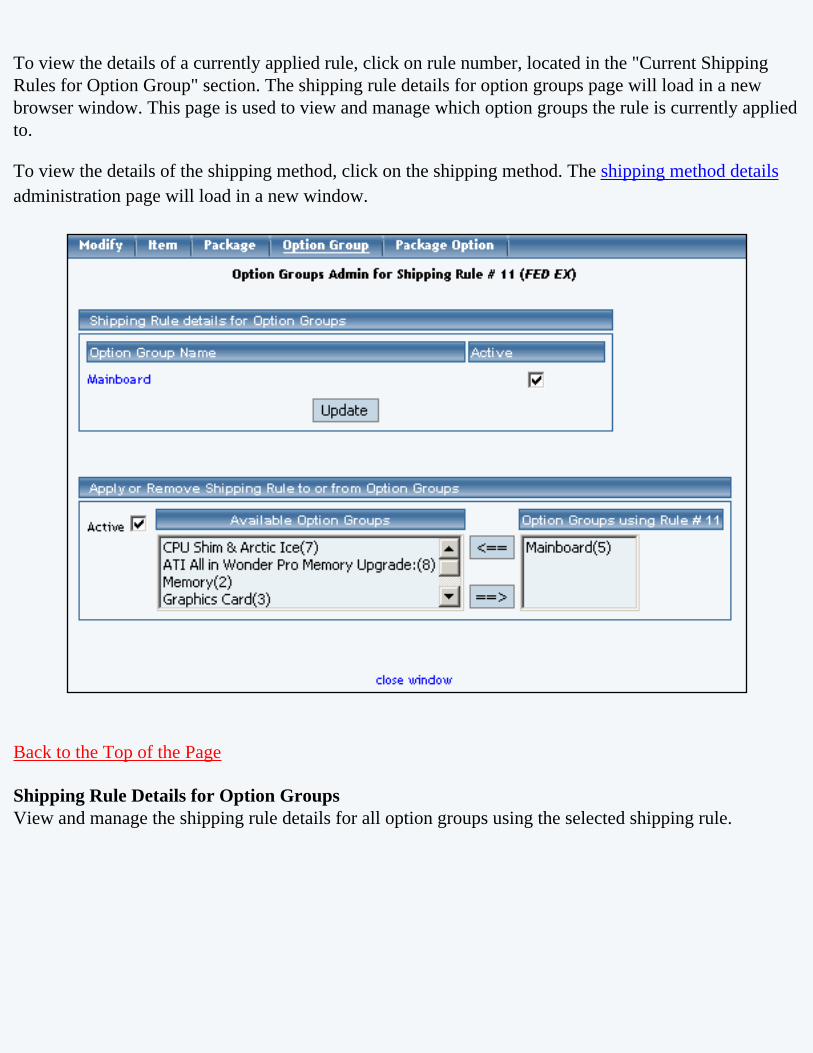
To view the details of a currently applied rule, click on rule number, located in the "Current Shipping Rules for Option Group" section. The shipping rule details for option groups page will load in a new browser window. This page is used to view and manage which option groups the rule is currently applied to.
To view the details of the shipping method, click on the shipping method. The shipping method details administration page will load in a new window.
Back to the Top of the Page
Shipping Rule Details for Option GroupsView and manage the shipping rule details for all option groups using the selected shipping rule.

Navigation: Click on the main "Ecommerce" link at the top of any main administration page. Click on the "Product Catalog Management" text link to load the product catalog management page.
Select an existing package from the drop-down menu in the item section and click the "Edit" button, or click on the "new" button to create and name a new package. The package management page will load in a new browser window.

Click on the "Option Groups" text link at the top of the administration page. The option groups administration page will load.
Select an option group from the "Option Groups in Package" list on the right-hand side of the administration page. Click on the "edit" button.

The details for option group administration page will load. Click on the "Shipping Rules" text link. The package option group shipping rules administration page will load in a new window.

To view the details of a currently applied rule, click on the name of the rule, located in the "Current Shipping Rules for Option Group" section. The shipping rule details for option groups page will load in a new browser window.

All option groups that the rule is currently applied to will be listed under the "Current Shipping Rules for Option Groups" section.

The shipping rule can be activated or deactivated for any option group in the list. Toggle the selection box under "Active" next to the item to change to change the status. Click the "Update" button to save changes.

To view the details of any option group in the list, click the applicable name. The option group management page will load in a new window.

To add or remove option groups from the shipping rule, use the "Apply or Remove Shipping Rules" section located toward the bottom of the administration page.
To add an option group to the rule, click on the name of the option group under the "Available Rules" section. Click the "right arrow" button. The page will refresh with the item now located under the "Rules for Option Group..." section.


To remove an option group from the rule, click on the name of the option group under the "Rules for Option Group..." section. Click the "left arrow" button. The page will refresh with the item now located under the "Available Rules" section.

Back to the Top of the Page Back to Package Option Groups
10-Step Guide on Setting Up Ecommerce Back

Package Discount Rules
Related Links: 10-Step Guide on Setting Up E-commerce | Product Catalog Management | Package Management Page | Discount Rules For Shoppers
A package discount is a reduction in the retail price that is applied to the package base price at check out.
This discount is used to tell the software to apply a discount to the retail price of the package itself, and not any package groups or package options.
Once a package discount is applied, global discount rules will be disabled for the base package.
The 10% package discount is listed seperately from the any discounts applied to package options. In the example above, the base price of the package is $30.00, and therefore the package discount is $3.00
Navigation: Click on the main "Ecommerce" link at the top of any main administration page. Click on the "Product Catalog Management" text link to load the product catalog management page.
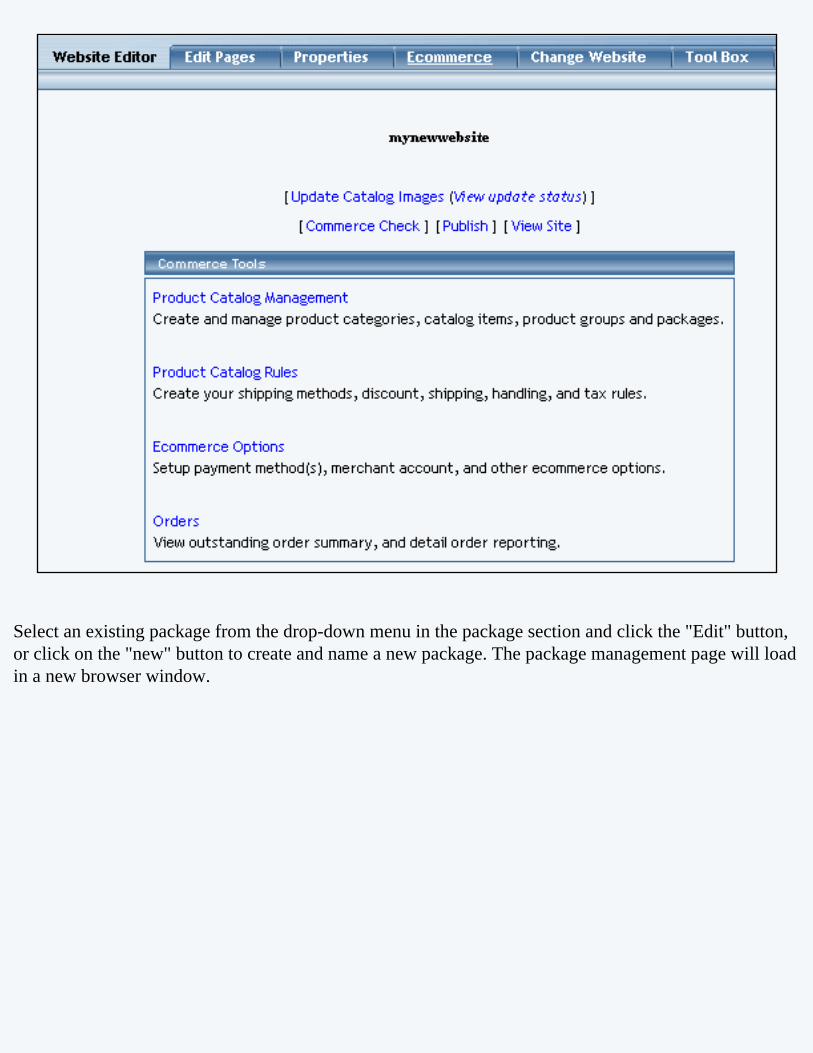
Select an existing package from the drop-down menu in the package section and click the "Edit" button, or click on the "new" button to create and name a new package. The package management page will load in a new browser window.

Click on the "Discount" text link. The Package Discount Rules page will load in a new browser window.

Discounts applied to the package item only apply to the base retail price of the main package item, and not any package options.
Once a package discount is applied, global discount rules will be disabled for the package item.
To create a new item discount rule, click on the "Add Discount Rule" text link. The add discount rule page will load in a new browser window.

To activate or deactivate a current package discount, check or uncheck the box next to the rule, and click the "update" button. The current page will refresh and confirm any changes.

To view a selected item discount, click on the name of the desired rule, which will load the Discount Details for Packages administration page in a new browser window.

To add an existing discount rule to the package, click on the name of the rule under "available rules". Click on the right arrow to add the rule to the item. The current page will refresh, and the chosen discount rule will appear under the "Current Discount Rules for Packages".

To remove a discount rule that is currently applied to the package, click on the name of the rule under "Rules for Package". Click on the left arrow to remove the rule. The current page will refresh, and the chosen discount rule will only appear under the "Available Rules" section.

To deactivate all currently applied discount rules, uncheck the box next to "Active", and click on the "update" button. This will deactivate all item discount rules, but leave the current configuration intact. To activate the discount rules once more, check the box next to "Active", and click on the update button.
Discount Details for PackagesView and manage the discount details for all packages using the selected discount rule.
Navigation: Access the package management page by either creating a new package or by selecting an package to edit from the package drop down menu. The package management page will load in a new browser window.

Click on the "Discounts" text link.

Click on any current discount rule. The discount details for packages page will load in a new window.
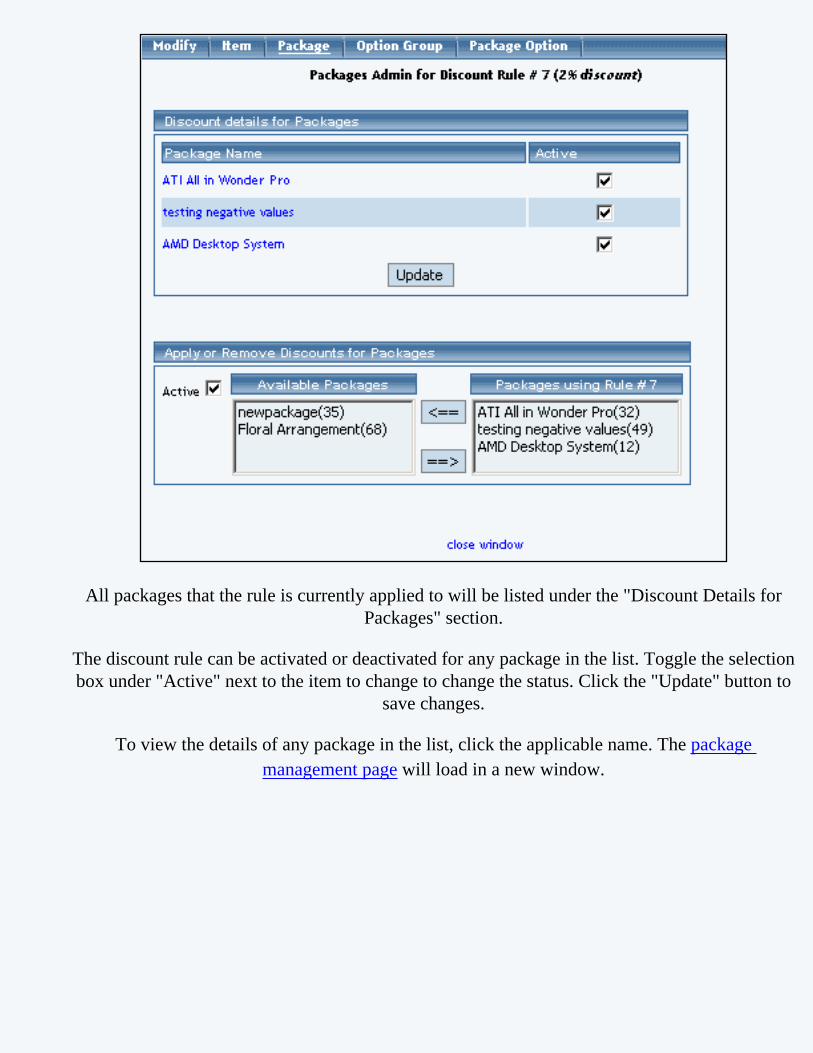
All packages that the rule is currently applied to will be listed under the "Discount Details for Packages" section.
The discount rule can be activated or deactivated for any package in the list. Toggle the selection box under "Active" next to the item to change to change the status. Click the "Update" button to
save changes.
To view the details of any package in the list, click the applicable name. The package management page will load in a new window.

To add or remove packages from the discount rule, use the "Apply or Remove Discounts for Packages" section located toward the bottom of the administration page.
To add a package to the rule, click on the name of the package under the "Available Rules" heading. Click the "right arrow" button. The page will refresh with the item now located under the "Packages Using..." heading.

To remove a package from the rule, click on the name of the item under the "Packages Using..." heading. Click the "left arrow" button. The will refresh with the item now located under the "Available Packages" heading.


To remove a package option from the group, click on the name of the group from the "Package Options in Group". Click the "Delete" button located near the center of the administration page.
Back to the Top of the PagePackage Management Page
Product Catalog Management10-Step Guide on Setting Up Ecommerce
Back

Package Shipping Methods
Related Links: 10-Step Guide on Setting Up Ecommerce | Product Catalog Management | Package Management Page
Overview
Package shipping methods are used to tell the software which choices to give a customer for shipping when purchasing a package. This would only be necessary if a Web site owner does not want to ship the package via all available methods.
Use this section to view, remove, add, activate, or deactivate custom shipping methods for a package. If "use all shipping methods" is selected on the main package administration page, then no custom shipping methods will be available.
Navigation: Click on the main "Ecommerce" link at the top of any main administration page. Click on the main "Ecommerce" link at the top of any main administration page.
Click on the "Product Catalog Management" text link to load the product catalog management page.
Select an existing package from the drop-down menu in the item section and click the "Edit" button, or click on the "new" button to create and name a new package.

The package management page will load in a new browser window.
Access the package management page by either creating a new package or by selecting an package to edit from the item drop down menu. The package management page will load in a new browser window.
If "use all shipping methods" is selected on the main item administration page, then no custom shipping methods will be available for the package. If necessary, disable the "use all shipping methods" option before proceeding.

Shipping methods applied to packages will override the shipping methods available to any items used in any option group, but only for the package options and not the original item. Shipping method combinations can be viewed or modified through the custom shipping methods administration page.

To add a new shipping method, click on the "Add Shipping Method" text link. The custom shipping methods administration page will load in a new browser window.
To Apply an existing custom shipping method to the package, highlight the shipping method from the "Available Methods" list, located in the "Apply or Remove Existing Shipping Rules" section. Click on the right arrow button.
The page will refresh with the selected shipping method now populated in the "Current Shipping Methods" section. More than one shipping method may be selected by highlighting multiple methods.
To remove an existing shipping method from the package, highlight the method from the "Current Shipping Methods" list. Click on the left arrow button.
The page will refresh with the selected method now populated in the "Available Methods" section. More

than one method may be selected by highlighting multiple methods.
To activate or deactivate a shipping method currently applied to a package, click or unclick the selection box next to the method to change, located in the "Shipping Methods Details" section.
Click the "Update" button. The current page will refresh showing the desired changes.
To view the shipping method package details of a currently applied method, click on the name, located in the "Methods Details" section. The shipping method details for packages page will load in a new browser window.
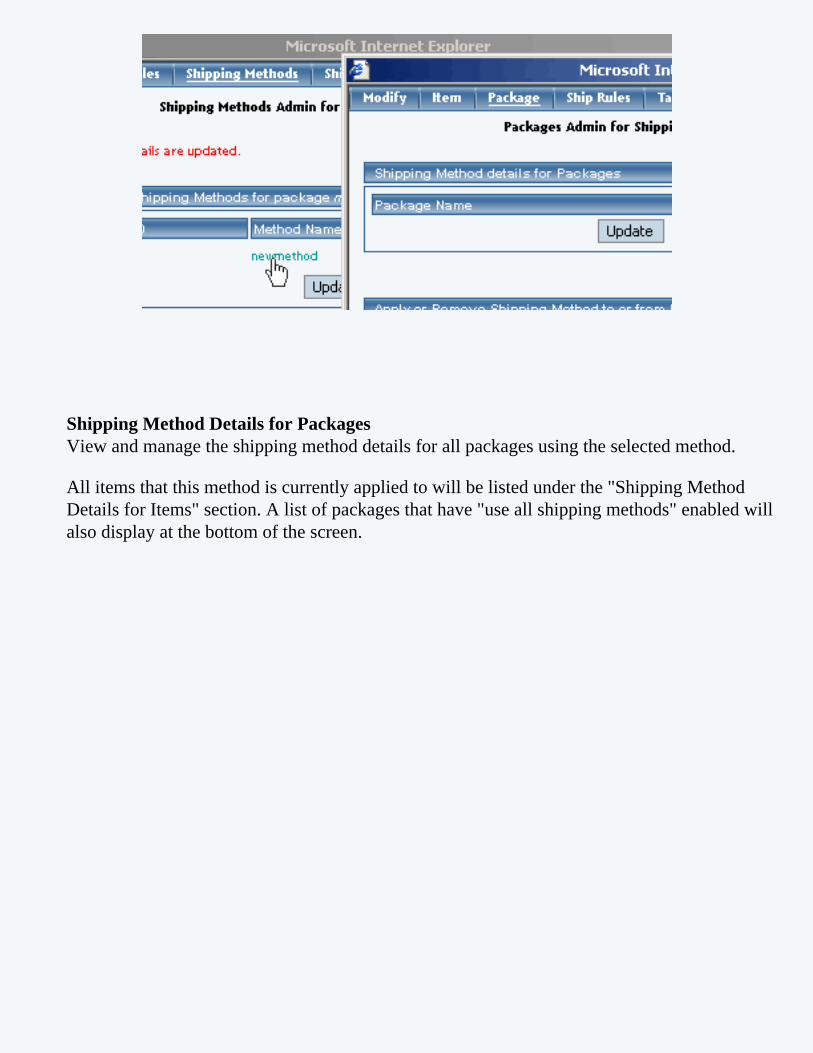
Shipping Method Details for PackagesView and manage the shipping method details for all packages using the selected method.
All items that this method is currently applied to will be listed under the "Shipping Method Details for Items" section. A list of packages that have "use all shipping methods" enabled will also display at the bottom of the screen.

The shipping method can be activated or deactivated for any package in the list. Toggle the selection box under "Active" next to the item to modify to change the status. Click the "Update" button to save changes.

To view the details of any package in the list, click on the item name. The package management page will load in a new window.
To add or remove a shipping method to or from a package, use the "Apply or Remove Methods for Packages" section located toward the bottom of the administration page.
To add a package to the method, click on the name of the package under the "Available Methods" heading. Click the "right arrow" button. The page will refresh with the package now located under the "Items Using Methods" heading.
To remove a package from the method, click its name under the "Items Using Method" heading.

Click the "left arrow" button. The page will refresh with the package now located under the "Available Packages" heading.
Back to the Top of the PagePackage Management Page
Product Catalog Management10-Step Guide on Setting Up Ecommerce
Back to the Previous Page

Package Shipping Rules
Related Links: 10-Step Guide on Setting Up Ecommerce | Product Catalog Management | Package Management Page
Overview
When any user-defined shipping method is used for a package, a shipping rule may be applied, which tells the software how to calculate the shipping charges. Shipping rules applied to the package will not be applied to any package option groups or package options.
Use this section to view, remove, add, activate, or deactivate custom shipping rules for a package. Shipping rules may be set up for user-defined "custom" shipping methods only. Shipping rules for the package are based on the main package item, and once a shipping rule is applied, any global shipping rules will be deactivated for the package.
Navigation: Click on the main "Ecommerce" link at the top of any main administration page.
Click on the "Product Catalog Management" text link to load the product catalog management page.
Select an existing package from the drop-down menu in the item section and click the "Edit" button, or click on the "new" button to create and name a new package.

The package management page will load in a new browser window.
Click on the "Shipping Rules" text link.
The shipping rules for package administration page will open in a new browser window.

Any global shipping rules that apply to the item will be listed at the bottom of the page.
To view a global rule, click on the rule name. The global shipping rules modification page will open in a new browser window.

A custom shipping method must be active for the package in order to apply a custom rule. If necessary, activate a custom shipping method for the package before proceeding.
To add a new rule, click on the "Add Shipping Rule" text link. The add shipping rule administration page will open in a new browser window.

To apply an existing shipping rule to the package, highlight the rule from the "Available Rules" list, located in the "Apply or Remove Existing Shipping Rules" section. Click on the right arrow button. The page will refresh with the selected rule now populated in the "Current Shipping Rules" list. More than one shipping rule may be selected by highlighting multiple rules.
To remove an existing custom shipping rule from the package, highlight the rule from the "Current Shipping Rules" list. Click on the left arrow button.
The page will refresh with the selected rule now populated in the "Available Rules" section. More than one shipping rule may be selected by highlighting multiple rules.

To activate or deactivate a custom shipping rule currently applied to a package, click or unclick the selection box next to the rule to change, located in the "Shipping Rule Details" section. Click the "Update" button. The current page will refresh showing the desired changes.
To view a custom shipping method for a currently applied rule, click on the name of the shipping method, located in the "Shipping Details" section. The shipping method details for packages page will load in a new browser window. This page is used to view and manage which packages the custom shipping method is currently applied to.

To view the details of the rule itself, click on the "Rule Id" number. The shipping rule details for packages page will load in a new window.
Shipping Rule Details for PackagesView and manage the discount details for all packages using the selected discount rule.
Navigation: Click on the main "Ecommerce" link at the top of any main administration page.
Click on the "Product Catalog Management" text link to load the product catalog management page.
Select an existing package from the drop-down menu in the item section and click the "Edit" button, or click on the "new" button to create and name a new package.

The package management page will load in a new browser window.
Click on the "Shipping Rules" text link.

The shipping rules for package administration page will open in a new browser window.
Click on any current shipping rule. The "shipping rule details for packages" page will load in a new window. This page is used to view and manage the discount details for all packages using the selected rule.

All packages that the rule is currently applied to will be listed under the "Shipping Rule Details for Packages" section.
The shipping rule can be activated or deactivated for any package in the list. Toggle the selection box under "Active" next to the item to change to change the status. Click the "Update" button to save changes.
To view the details of any package in the list, click the applicable name. The package management page will load in a new window.

To add or remove packages from the shipping rule, use the "Apply or Remove Shipping Rules for Packages" section located toward the bottom of the administration page.
To add a package to the rule, click on the name of the package under the "Available Rules" heading. Click the "right arrow" button. The page will refresh with the item now located under the "Packages Using..." heading.

To remove a package from the rule, click on the name of the item under the "Packages Using..." heading. Click the "left arrow" button. The will refresh with the item now located under the "Available Packages" heading.
Back to the Top of the PagePackage Management Page
Product Catalog Management10-Step Guide on Setting Up Ecommerce
Back

Package Tax Rules
Related Links: 10-Step Guide on Setting Up Ecommerce | Product Catalog Management | Package Management Page
Overview
Tax rules may be added to any package. A package tax rule would only be necessary if a site owner did not want to use global tax rules. Upon applying a tax rule, any global tax rules will be deactivated, and the software will use the package rule to calculate taxes. A package tax rule will apply only to the base price of the package, and not to any package option groups or package options.
Use this section to view, remove, add, activate, or deactivate package-specific tax rules.
Navigation: Click on the main "Ecommerce" link at the top of any main administration page.
Click on the "Product Catalog Management" text link to load the product catalog management page.
Select an existing package from the drop-down menu in the item section and click the "Edit" button, or click on the "new" button to create and name a new package.

The package management page will load in a new browser window.
Click on the "Taxes" text link.
The Tax Rules for package page will load in a new browser window.

Tax rules will not be available unless the "taxable" box is checked from the main package administration page.

Any global tax rules that apply to the item will be listed at the bottom of the page.
To view a global rule, click on the rule name.

The global tax modification page will open in a new browser window.
When a custom tax rule is applied to an item, it will override any global rules that were previously active for the item.
To add a new custom tax rule, click on the "Add Tax Rule" text link.
The add tax rule administration page will open in a new browser window.

To Apply an existing tax rule to the package, highlight the rule from the "Available Methods" list, located in the "Apply or Remove Existing Tax Rules" section.
Click on the right arrow button.

The page will refresh with the selected tax rule now populated in the "Current Tax Rules" list. More than one rule may be selected by highlighting multiple rules.
To remove an existing custom tax rule from the package, highlight the rule from the "Current Tax Rules" list.
Click on the left arrow button.
The page will refresh with the selected rule now populated in the "Available Rules" section. More than one rule may be selected by highlighting multiple rules.
To activate or deactivate a custom tax rule currently applied to a package, click or unclick the selection

box next to the rule to change, located in the "Tax Rule Details" section.
Click the update button.
The current page will refresh showing the desired changes.
To view the details of a currently applied rule, click on the name of the rule, located in the "Current Tax Rules" section.

The tax rule details for packages page will load in a new browser window. This page is used to view and manage which packages the custom rule is currently applied to.
Tax Rule Details for PackagesView and manage tax rule details for all packages using the selected method.
Navigation: From the package administration page, click on the "Taxes" text link.

The Tax Rules for package page will load in a new browser window.
Click on the desired tax rule to view the details.
The tax rule details for packages page will load in a new browser window.
All items that this rule is currently applied to will be listed under the "Tax Rule Details for Packages" section.
The tax rule can be activated or deactivated for any package in the list. Toggle the selection box under "Active" next to the item to modify to change the status. Click the "Update" button to save changes.

To view the details of any package in the list, click on the item name.
The package management page will load in a new window.

To add or remove a tax rule to or from a package, use the "Apply or Remove Tax Rules to or from Packages" section located toward the bottom of the administration page.
To add a package to the rule, click on the name of the package under the "Available Rules" heading.
Click the "right arrow" button. The page will refresh with the package now located under the "Packages Using Rules" heading.

To remove a package from the rule, click its name under the "Items Using Rule" heading.
Click the "left arrow" button.
The page will refresh with the package now located under the "Available Packages" heading.
Back to the Top of the PagePackage Management Page
Product Catalog Management10-Step Guide on Setting Up Ecommerce

Back

Package Handling Charges
Related Links: 10-Step Guide on Setting Up E-commerce | Product Catalog Management | Package Management Page
Overview
Handling charge rules can be applied to any package. A handling charge rule is used to tell the software how to calculate any desired handling charges when a customer purchases the package. This would only be necessary if the package handling charges are different from any global rules that currently exist for the entire catalog.
Use this section to view, remove, add, activate, or deactivate package-specific handling charges. Handling charges will be applied to the package base price at checkout, and any global handling charges will be deactivated for the package.
Navigation: Click on the main "Ecommerce" link at the top of any main administration page.
Click on the "Product Catalog Management" text link to load the product catalog management page.
Select an existing package from the drop-down menu in the item section and click the "Edit" button, or click on the "new" button to create and name a new package.

The package management page will load in a new browser window.
Click on the "Handling Charges" text link. The Handling Charges Rules page will load in a new browser window.
Any global handling charges rules that apply to the package will be listed at the bottom of the page. To view a global rule, click on the rule name.

The global handling charges rules modification page will open in a new browser window.
To add a new custom handling rule, click on the "Add Handling Charge Rule" text link.
The add handling charges rule administration page will open in a new browser window.

To Apply an existing handling charges rule to the package, highlight the rule from the "Available Methods" list, located in the "Apply or Remove Existing Handling charges Rules" section.
Click on the right arrow button.
The page will refresh with the selected rule now populated in the "Current Handling Charges Rules" list. More than one rule may be selected by highlighting multiple rules.

To remove an existing custom rule from the package, highlight the rule from the "Current Handling Charges Rules" list.
Click on the left arrow button.
The page will refresh with the selected rule now populated in the "Available Rules" section.More than one rule may be selected by highlighting multiple rules.
To activate or deactivate a custom rule currently applied to the package, click or unclick the selection box next to the rule to change, located in the "Handling charges Rule Details" section.
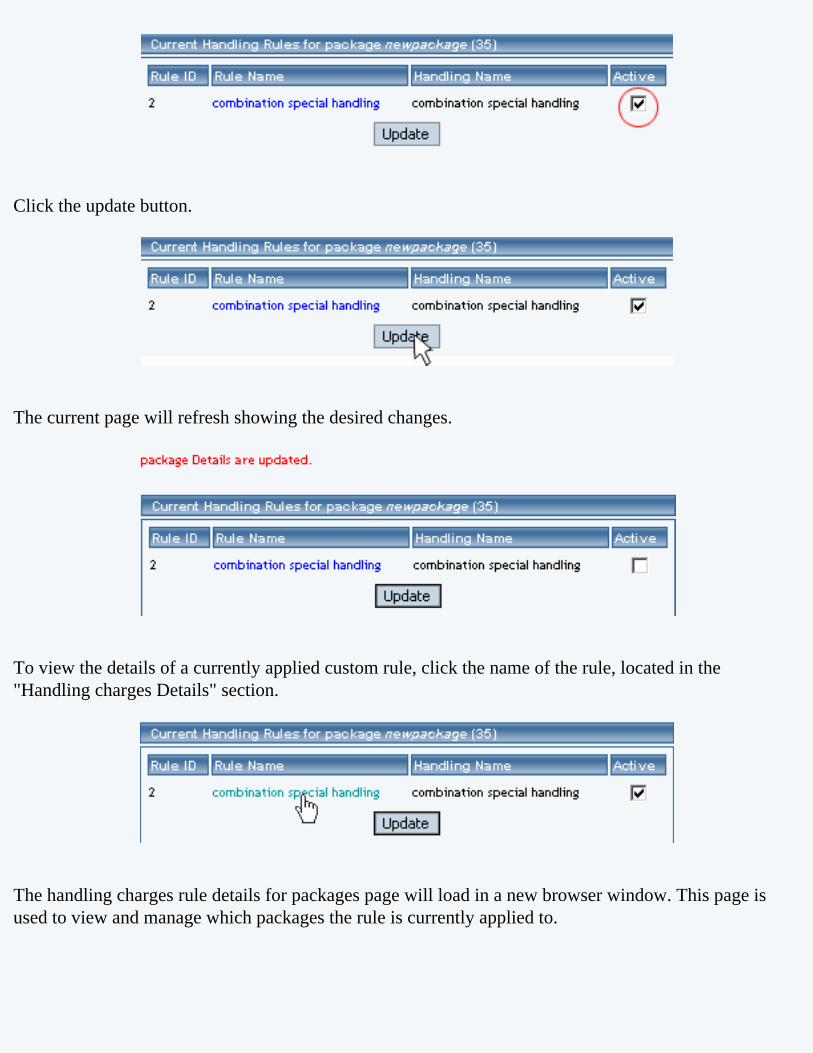
Click the update button.
The current page will refresh showing the desired changes.
To view the details of a currently applied custom rule, click the name of the rule, located in the "Handling charges Details" section.
The handling charges rule details for packages page will load in a new browser window. This page is used to view and manage which packages the rule is currently applied to.

Handling Charges Details for PackagesView and manage the handling charges details for all packages using the selected rule.
Navigation: From the main package administration page, Click on the "Handling Charges" text link. The Handling Charges Rules page will load in a new browser window. This page is used to view and manage the handling charges details for all packages using the selected rule.

All packages that the rule is currently applied to will be listed under the "Handling Charges Rules Details for Packages" section.
The Handling charges can be activated or deactivated for any package in the list. Toggle the selection box under "Active" next to the item to change to change the status.
Click the "Update" button to save changes.
To view the details of any package in the list, click the applicable name.
The package management page will load in a new window.

To add or remove packages from the rule, use the "Apply or Remove Handling Charges Rules for or from Packages" section located toward the bottom of the administration page.
To add a package to the rule, click on the name of the package under the "Available Rules" heading.
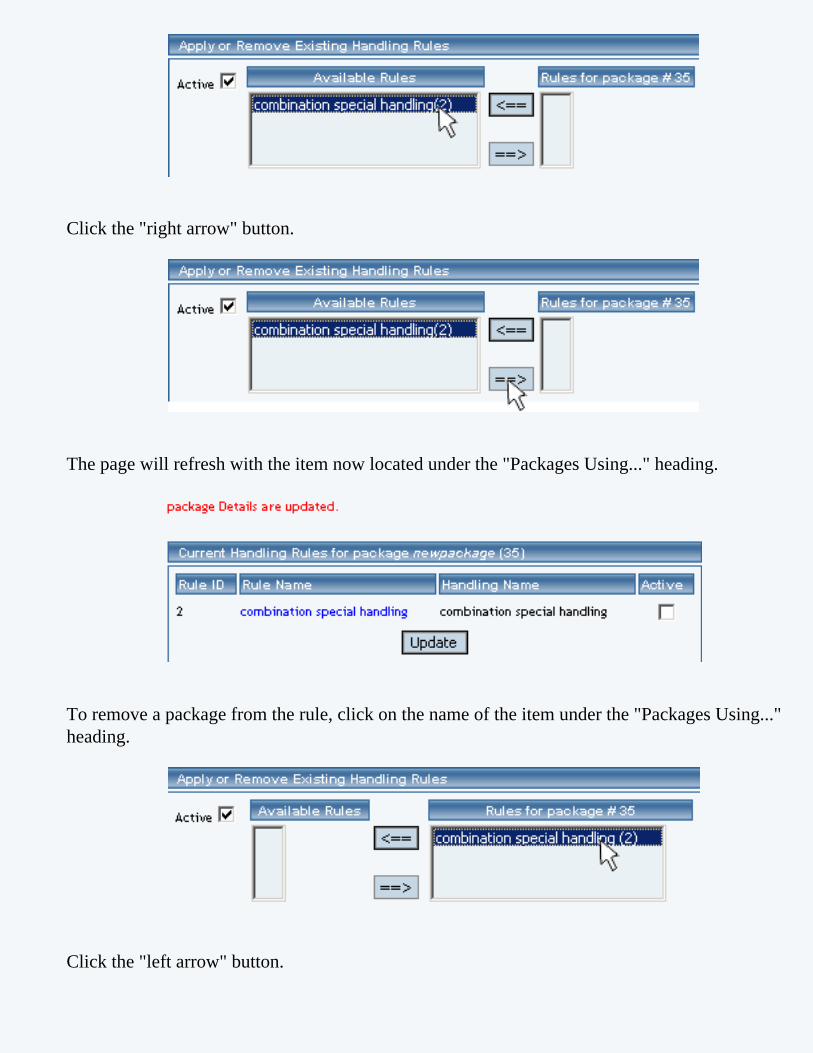
Click the "right arrow" button.
The page will refresh with the item now located under the "Packages Using..." heading.
To remove a package from the rule, click on the name of the item under the "Packages Using..." heading.
Click the "left arrow" button.
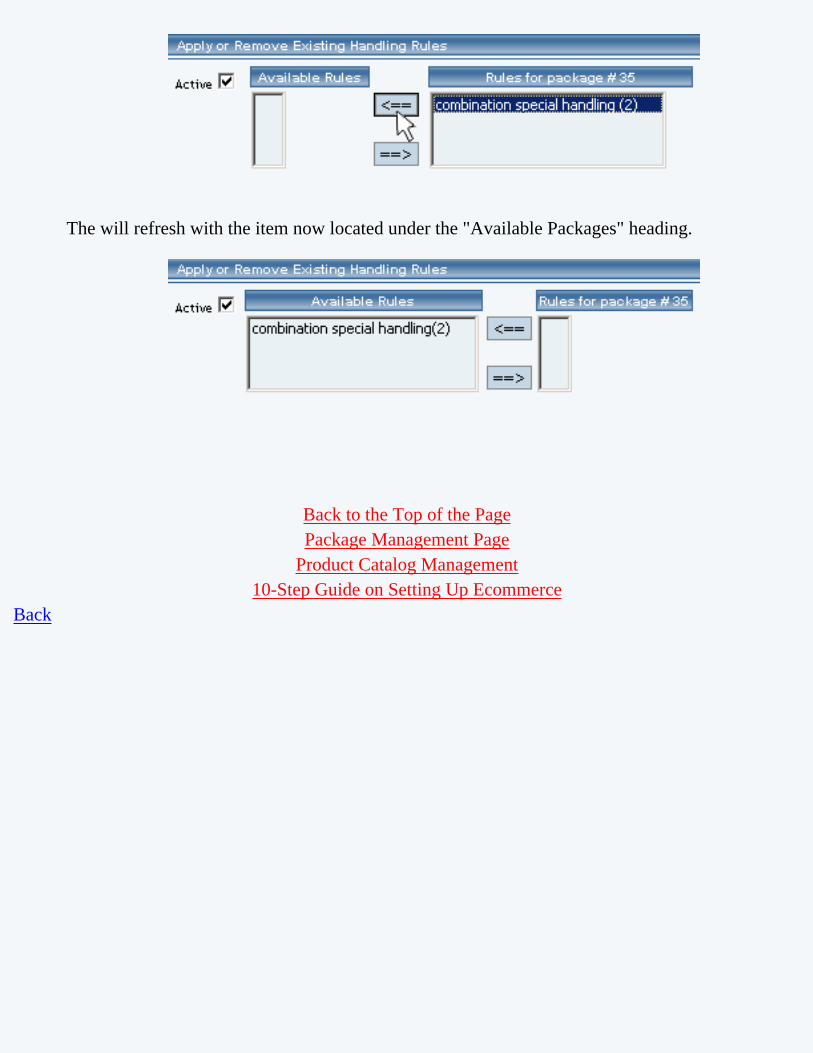
The will refresh with the item now located under the "Available Packages" heading.
Back to the Top of the PagePackage Management Page
Product Catalog Management10-Step Guide on Setting Up Ecommerce
Back

Origins
Related Links: 10-Step Guide on Setting Up E-commerce | Product Catalog Management
Overview
The origins feature is used to tell the software where products are being shipped from. By default, one origin location must be specified, and the origin management page will automatically load the first time the product catalog administration is accessed.
In many cases, only one point of origin will be necessary. However, if a web site owner has products being shipped from different areas, additional locations may be added.
Shipping origins are only critical when a web site owner is using the system-integrated shipping methods (UPS, USPS and Fed-X). These methods calculate shipping charges by looking at the shipping origin and destination. Therefore, when using integrated shipping methods, it is important that the correct origin is assigned to products.
Use the origins feature to specify different "ship from" addresses. The integrated shipping methods will then calculate shipping charges based on the zip code of the selected origin. The shipping origins is specified for each item in the online catalog.
Navigation: Click on the main "Ecommerce" link at the top of any main administration page.

Click on the "Product Catalog Management" text link to load the product catalog management page.
To add a new shipping origin, click on the "New" button located in the item section. A prompt will display asking for the name of the origin. Once a name is chosen, click ok. The origin management page will open in a new browser window.

Select the state of origin from the drop down menu, type in the zip code, and select the country. To save the changes, click on the "Update" button. After the page reloads, click on the "close window" text link.
To edit an existing origin, select the origin to edit from the drop down menu, then click on the "Edit" button. The origin management page will open in a new browser window.

To delete an existing origin, select the origin to delete from the origin drop down menu, then click the "delete" button.
To search for origins, type the origin name in the empty text field located just above the origin drop down menu and click the "Search" button. Once the page reloads, all matching origins will be available for selection in the drop down menu.
To set the origin default, select the desired origin from the drop down menu, then click the "set default" button.
Back to the Top of the PageProduct Catalog Management

10-Step Guide on Setting Up Ecommerce Back to the Previous Page

Catalog Page
Related Links: 10-Step Guide on Setting Up E-commerce | Product Catalog Management
Overview The catalog page is the entrance to the online shopping system. A customer accesses a link to the shopping cart page, and a list of all categories is presented.
Before a catalog can be utilized on the Web site, a main catalog page must be created from the website editor.
[ An example of a main catalog "entrance" page ]
The catalog page may be completely customized with a unique look, or it may be created to match the design of the rest of the Web site. Once the catalog page is created, a catalog component must be added to the page. The layout and appearance of the catalog itself may also be customized by editing the catalog component.

Navigation: Click on the main "Ecommerce" link at the top of any main administration page. Click on the "Product Catalog Management" text link to load the product catalog management page. In the "Catalog Page" section, select the page to be used as the online catalog. Click on the "Set Catalog Page".
After publishing the site, all active product information will be available by accessing the selected page from the main Web site.
Tip: A shopping cart page must also be created in the same manner as the catalog page. The catalog component must properly point to a page that contains a cart component before the online catalog will be functional. Be certain to edit the catalog component and specify the name of the cart page in the main catalog component adminstration.
For more information on setting up your Product Catalog, click here.
Back to the Top of the Page Product Catalog Management
10-Step Guide on Setting Up Ecommerce Back to the Previous Page

Product Catalog Rules
Related Links: 10-Step Guide on Setting Up E-commerce
Overview | Product Catalog Rules Management
OverviewCreate and manage shipping methods, shipping rules, discount rules, handling charge rules, and tax rules.
Navigation: Click on the "Ecommerce" text link located at the top of any main administration page. Click on the "Product Catalog Rules". Back to the Top of the Page
Product Catalog Rules Management
Discount Rules

Shipping Rules

Handling Rules

Tax Rules

Back to the Top of the Page 10-Step Guide on Setting Up Ecommerce
Product Catalog Rules Back

Discount Rules
Related Links: 10-Step Guide on Setting Up E-commerce | Product Catalog Rules
Overview | Discount Descriptions | Add a Discount Rule | Modify a Discount Rule | Discount Rules For Shoppers
OverviewApply price reductions based on custom rules. Discounts can be applied to an item, a package option, a package or globally.
Navigation: Click on the "Ecommerce" text link located at the top of any main administration page. Click on the "Product Catalog Rules" text link. The "Discount Rules Administration" page will load in a new window.
Any existing discount rules will be displayed when the administration page is accessed. Item specific rules are listed first, in the order that they were created. Global rules are listed afterward.

Back to the Top of the Page
Discount Descriptions:The heading of each discount rule includes a type indicator (SPECIFIC or GLOBAL), the rule ID Number, the rule Name, and the Basis for the rule.

The rule basis refers to how the calculation is performed. "No Basis" means that the rule has been applied as a single value, such as a percentage of the product price, or a single "Flat Rate" that is applied when a purchase is made.
When a basis is listed, this means that 1) the rule is applied based on Quantity, Unit, Weight, or Price, or 2) a table of values has been created to calculate the charge. The basis indicator is listed as "Based On" with a type identifier, such as "Units" or "Quantity". In such cases, the discount is variable based on the "price" or "unit", and is calculated from a pre-defined table of values.
Below the main heading is a status indicator (Active or Inactive) and a tax indicator (Before Tax or After Tax). These settings can be modified from the rule’s administration page.
The "Discount Name" is different from the "Rule Name". The discount name is the text that will actually display in the catalog and shopping cart whenever a discount is applied.
The starting and ending date of the discount is listed. Discounts are automatically applied and deactivated

according to the dates and times listed.
The actual discount amount is shown, as it will be applied. If a basis exists for the rule, the table of values will be listed.
To deactivate or activate a rule, click on the "Deactivate" or "Activate" text link located at the bottom of the rule. The screen will refresh with the applied change.
To delete a rule, click on the "Delete" text link.
To modify a rule, click on the "Modify" text link. The modify discount rule administration page will load in a new window. Back to the Top of the Page
Add a Discount RuleAdd and define a new product discount rule
Navigation: Click on the "Ecommerce" text link located at the top of any main administration page. Click on the "Product Catalog Rules" text link. The "Discount Rules Administration" page will load in a new window. Click on the "Add a Discount Rule" text link.


Step One: Name and define the Rule Type
From the drop-down menu, select "Specific" or "Global" for the rule type.

A global discount will apply to all products purchased. The global discount, however, will be overridden if a specific rule is used for any product in the catalog.
A specific rule is applied to individual items, package options, and/or packages. After defining a specific rule, the rule must be added to any products in order to be applied.
Type in a rule name and a discount name. The rule name identifies the rule for administrative purposes. The discount name is actually displayed in the catalog and shopping cart whenever the discount is applied.
Step Two: Defining the Rule Status
From the first drop-down menu, select whether or not the rule will be created as an active or inactive rule. The system default is active.

From the second drop-down menu, select the applicable tax-state of the discount: Before Tax or After Tax. The system default is Before tax.
Step Three: The Discount Duration
Define a starting date and time, and an ending date and time. Click on the calendar icons to select a date from a calendar-style pop-up window, or use the drop-down menus provided.

Step Four: Type of Discount and Calculation
To create a rule that will apply a single discount based on the price, click on the radio button next to "Flat Fee/Percentage (No Basis)". In the "Amount" field provided, type in the discount amount. For a flat fee, type the value in currency format i.e. 3.25 for three dollars and twenty-five cents. To apply a percentage, enter the numeric value followed by a percentage sign, such as 5%.

To create a rule that will calculate the discount based on a table of values and/or a specific basis (such as unit, quantity, or weight), click on the radio button next to "Table". Specify what the rule will be based on by selecting QUANTITY, UNIT, WEIGHT, or PRICE from the drop-down menu provided.
Type the minimum value of the rule next to the "From" field in the space provided. As an example, if the discount is to be applied only when a customer orders a quantity of 10 or more, enter "10" in the field. Enter the discount amount to the right of "Discount" in the space provided. The discount value can be entered as a dollar amount or a percentage (such as 10%).
To create a table of values, click the "Add Row" button. A second row identical to the first will appear. Type the second set of values in the space provided. Continue adding as many rows as needed to finish building the discount table.
Click the "Add Rule" button once the rule has been successfully defined. The page will refresh to the "Modify Discount Rule" administration page. Back to the Top of the Page
Modify a Discount RuleModify the details of an existing discount rule.
Click on the "Ecommerce" text link located at the top of any main administration page. Click on the "Product Catalog Rules" text link. The "Discount Rules Administration" page will load in a new window. Click on the blue text "Modify" for the Discount Rule that you would like to change.

All listed options and fields can be changed by modifying the desired option or by typing over any text/value displayed.
For a detailed description of each option, see the "add discount rule" administration page.
To convert a Global Rule to a Specific Rule, or to change a Specific Rule to a Global Rule, click on the applicable text link located at the bottom of the administration page.
To delete this rule, click on the "Delete" text link located on the bottom of the administration page.
When finished with modifications, click on the "Update Rule" button to save any changes made to the discount rule.

To view which items this rule applies to, or to add this rule to items, click on the "Item" text link located at the top of the administration page.
The discount details for items page will load in the current window.
To view which packages this rule applies to, or to add this rule to packages, click on the "Package" text link located at the top of the administration page.

The discount details for packages page will load in the current window.
To view which option groups this rule applies to, or to add this rule to an option group, click on the "Option Group" text link located at the top of the administration page.
The discount details for option groups page will load in the current window.

To view which package option groups this rule applies to, or to add this rule to package option group, click on the "Option Groups" text link located at the top of the administration page.
The discount details for package option groups page will load in the current window.

Back to the Top of the Page 10-Step Guide on Setting Up Ecommerce
Back

Discount Rules
Related Links: 10-Step Guide on Setting Up E-commerce | Product Catalog Rules | Discount Rules
Overview | Set Up Discount Rules for Specific Shoppers | Add Specific Shoppers
OverviewApply price reductions for specific products for specific shoppers. Discount rules can still be set up for items, packages, package options, and package option groups (click on the links to learn more about applying discounts for the respective sections).
Navigation: Click on the "Ecommerce" text link located at the top of any main administration page. Click on the "Product Catalog Rules" text link. The "Discount Rules Administration" page will load in a new window. Back to the Top of the Page
Set Up Discount Rules for Specific ShoppersFrom the "Discount Rules Administration" page, click on the "Add a Discount Rule" text link.
The system will then display a new window to add your new discount rule.
Step 1, Name and Label the Discount RuleFor "Rule Type", specify whether you want the discount rule to be applicable to certain shoppers (Shopper Specific) or for all shoppers (Shopper Global). For "Rule Name", enter in a name for the discount rule that will only be for your reference. For "Discount Name", enter in a name for the discount rule that will appear to your shoppers.

Step 2, Defining the Rule StatusFrom the first drop-down menu, select whether or not the rule will be created as an active or inactive rule. The system default is active. The second drop-down menu you select the applicable tax-state of the discount, "Before Tax" or "After Tax". The system default is "Before Tax".
Step 3, Discount DurationDefine a starting date and time, and an ending date and time. Click on the calendar icons to select a date from a calendar-style pop-up window, or use the drop-down menus provided. This will be the only times that the discount rule will be applied. If it is blank, the system will have it applied all the time.

Step 4, Type of Discount and CalculationTo create a rule that will apply a single discount based on the price, click on the radio button next to "Flat Fee/Percentage (No Basis)". In the "Amount" field provided, type in the discount amount. For a flat fee, type the value in currency format i.e. 3.25 for three dollars and twenty-five cents. To apply a percentage, enter the numeric value followed by a percentage sign, such as 5%.
When done specifying your options for the 4 steps, click on the button "Add Rule" to save your discount rule. If the discount rule is "Shopper Specific", you will see the following:

If the discount rule is "Shopper Global", you will see the following instead:

Whichever screen appears, click on "Shopper" in the top of the window to add shoppers to this discount rule. Back to the Top of the Page
Add Specific ShoppersThe discount rule can be applied to specific shoppers that you assign. The system will only list shoppers as customers who have already purchased something from your website.

Go in to the Discount Rules Administration screen. Click on "Modify" for any existing discount rule. Click on the white text at the top of the window labelled "Shopper".If you just added the discount rule, you will only have to click on the white text at the top of the window labelled "Shopper". You will then see the following screen
The top section will display all of the shoppers that the discount rule currently applies to.

The bottom section allows you to manage which shoppers will get the discount rule.
If you already have shoppers who have bought something from your website, click on their name and email address, then click on the button "==>" to apply the discount rule to that shopper. To select multiple shoppers, hold down the CTRL key when clicking on multiple names.
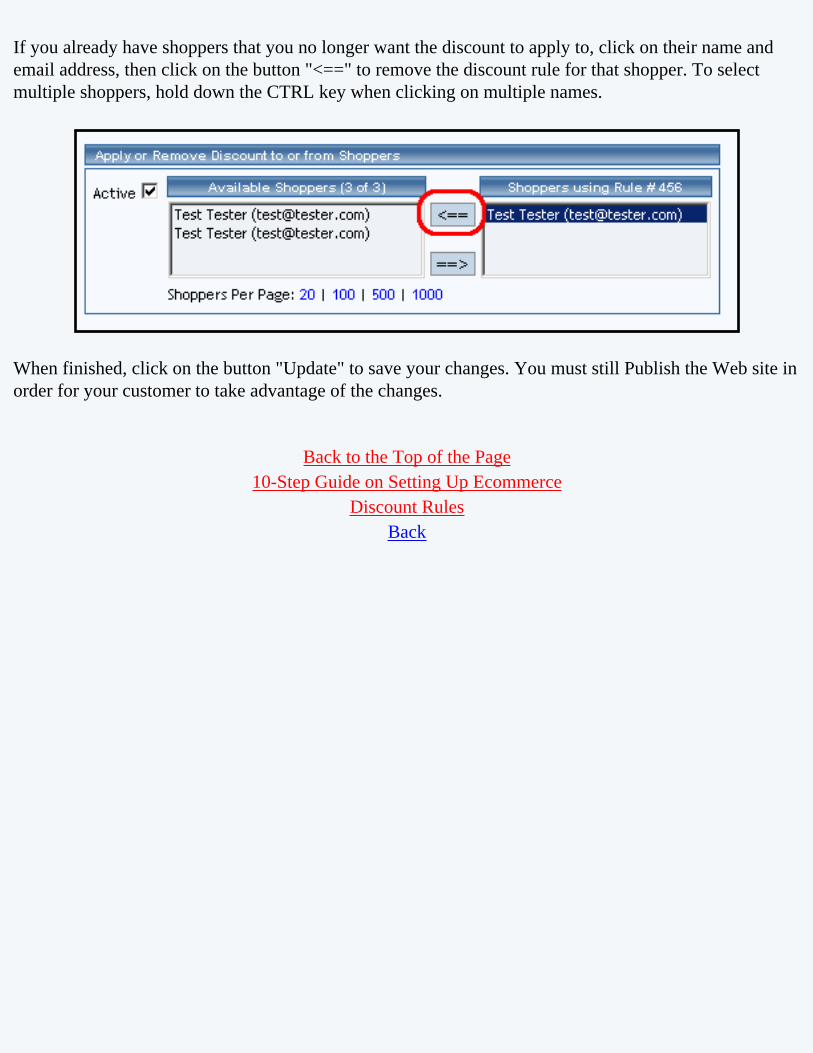
If you already have shoppers that you no longer want the discount to apply to, click on their name and email address, then click on the button "<==" to remove the discount rule for that shopper. To select multiple shoppers, hold down the CTRL key when clicking on multiple names.
When finished, click on the button "Update" to save your changes. You must still Publish the Web site in order for your customer to take advantage of the changes.
Back to the Top of the Page 10-Step Guide on Setting Up Ecommerce
Discount Rules Back

Shipping Rules
Related Links: 10-Step Guide on Setting Up E-commerce | Product Catalog Rules
Overview | Shipping Methods | Shipping Rules
OverviewAdd, view, modify, or delete shipping methods and rules.
Navigation: Click on the "Ecommerce" text link located at the top of any main administration page. Click on the "Product Catalog Rules" text link. The "Discount Rules Administration" page will load in a new window. Click on the "Shipping" text link located at the top of the administration page.
The shipping administration page lists all existing shipping methods and shipping rules.

To view only shipping methods, click on the "Shipping Methods" text link at the top of the page.
To view only shipping rules, click on the "Shipping Rules" text link.
Back to the Top of the Page
Shipping MethodsAdd, modify, or view user-defined or system integrated shipping methods.
Shipping methods are broken down into two separate groups: User Defined, and System Integrated. Any user defined, custom shipping methods are grouped together and listed first.
Shipping Method Field DescriptionsAdd a Shipping MethodModify a Shipping Method
Back to the Top of the Page
Shipping Method Field Descriptions:Heading: Displays either "User Defined" (custom shipping method) or lists the name of the system-integrated method.

ID #: System generated number unique to every method.
Code: Text name unique to each method. With user- defined, custom shipping methods, this field is defined at the method is created.

Name: The name of the shipping method that will be visible in the shopping cart.
Status: Indicates whether a shipping method is available for use or disabled.
To delete a shipping method, click on the "delete" text link next to the method.
To activate or deactivate a method, click on the applicable text link located next to the status indicator.
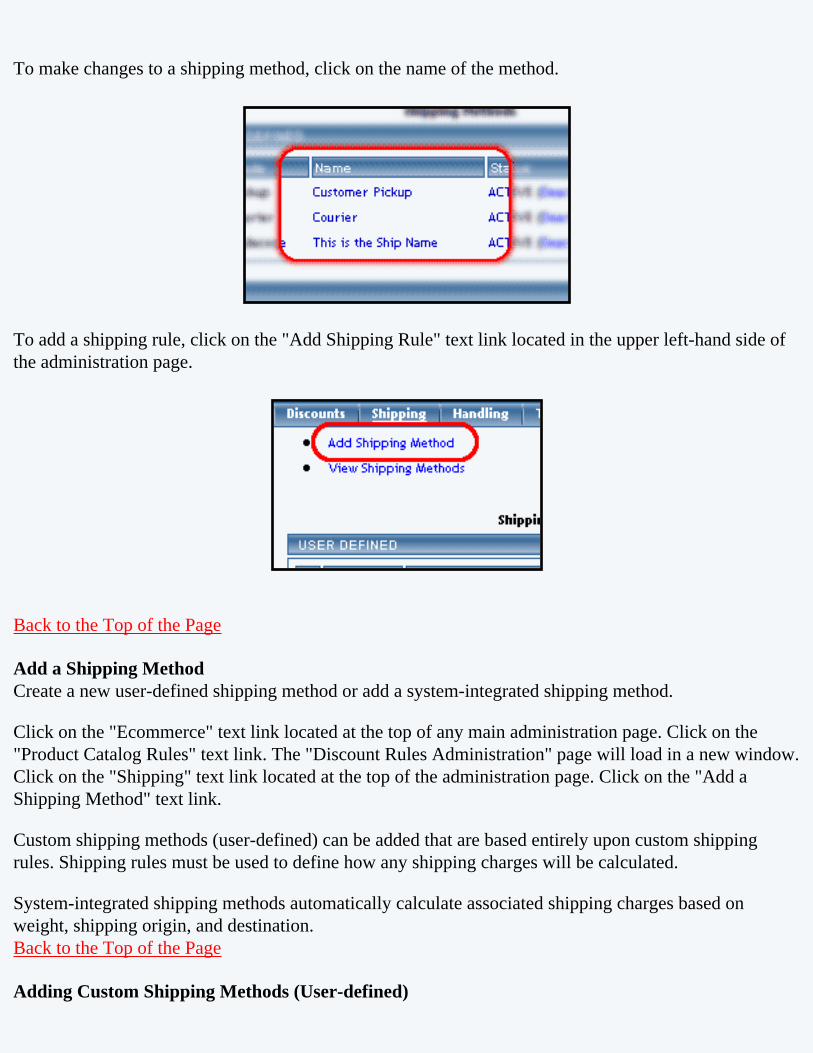
To make changes to a shipping method, click on the name of the method.
To add a shipping rule, click on the "Add Shipping Rule" text link located in the upper left-hand side of the administration page.
Back to the Top of the Page
Add a Shipping MethodCreate a new user-defined shipping method or add a system-integrated shipping method.
Click on the "Ecommerce" text link located at the top of any main administration page. Click on the "Product Catalog Rules" text link. The "Discount Rules Administration" page will load in a new window. Click on the "Shipping" text link located at the top of the administration page. Click on the "Add a Shipping Method" text link.
Custom shipping methods (user-defined) can be added that are based entirely upon custom shipping rules. Shipping rules must be used to define how any shipping charges will be calculated.
System-integrated shipping methods automatically calculate associated shipping charges based on weight, shipping origin, and destination. Back to the Top of the Page
Adding Custom Shipping Methods (User-defined)

Adding custom shipping methods that utilize shipping rules to calculate any shipping charges.
Enter the name of the shipping method to display in the field provided next to "Name".
Enter a unique code (text or numeric) in the field provided next to "Code". The code is a required field, used only for identification purposes.
Select the starting status of the shipping method by selecting "Active" or "Inactive" from the drop-down menu provided.
When finished, click the "Add" button. The screen will refresh with all fields reset, allowing additional methods to be added. Back to the Top of the Page
Adding System-integrated Shipping MethodsAdding UPS or USPS shipping methods which automatically calculate shipping charges
Adding a UPS Shipping MethodAdding integrated UPS shipping methods that automatically calculate shipping charges
Navigation: Click on the "UPS" text link located at the top of the "add a shipping method" administration page.

Back to the Top of the Page

Drop-off/Pickup:
Select the method of pickup from the drop-down menu provided, and click on the "Update" button. This option defines how packages will be delivered or picked up by UPS.
UPS Options:
Click on any domestic or international UPS shipping method to add the method. The page will refresh with the rule added. Continue to select as many shipping methods as needed. Back to the Top of the Page
Adding a USPS Shipping MethodAdding integrated USPS shipping methods that automatically calculate shipping charges
Navigation: Click on the "USPS" text link located at the top of the "add a shipping method" administration page.
Click on any listed shipping method to add the method for use. The page will refresh with the rule added. Continue to select as many shipping methods as needed. Back to the Top of the Page
Modify a Shipping MethodChange the name of a custom shipping method. Delete, activate, or deactivate shipping methods. Access shipping method item and package pages.
Navigation: Click on the "Ecommerce" text link located at the top of any main administration page. Click

on the "Product Catalog Rules" text link. The "Discount Rules Administration" page will load in a new window. Click on the "Shipping" text link located at the top of the administration page. Click on the "Name" of the method to modify.
The shipping method modification page will load in a new browser window.
To change the displayed shipping method name, type over the existing text in the field provided.
To change the status of the method, select the appropriate choice from the Status drop-down menu.
Click the "Update" button to apply any changes.
To delete the method, click on the "Delete Method" text link.

To view which items this method applies to, or to add this method to items, click on the "Item" text link located at the top of the administration page. The shipping method details for items page will load in the current window.
To view which packages this method applies to, or to add this rule to packages, click on the "Package" text link located at the top of the administration page. The shipping method details for packages page will load in the current window.
Back to the Top of the Page
Shipping RulesAdd, modify or view custom shipping rules
Navigation: Click on the "Ecommerce" text link located at the top of any main administration page. Click on the "Product Catalog Rules" text link. The "Discount Rules Administration" page will load in a new window. Click on the "Shipping" text link located at the top of the administration page.
Shipping rules are used to define shipping charges for custom shipping methods. A shipping rule cannot be applied to a system-integrated shipping method.
Shipping Rule Field DescriptionsAdd a Shipping RuleModify a Shipping Rule
Back to the Top of the Page
Shipping Rule Field Descriptions:

Heading: Each shipping rule heading specifies the status (active/inactive) and tax information (taxable/non-taxable)
Applied to Region: Specifies which shipping destinations this rule applies to.

Shipping charges: Either specifies the single charge to be applied, or displays a table of values used to calculate shipping charges.
To add a shipping rule, click on the "Add shipping rule" text link. The add shipping rule administration page will load in a new window.
To modify a shipping rule, click on the "Modify" button located beneath the rule to modify. The shipping rule modification page will load in a new browser window.

To delete a shipping rule, click on the "Delete" text link located beneath the rule.
To activate or deactivate a shipping rule, click on the "Activate" or "Deactivate" text link located beneath the rule.
Back to the Top of the Page
Add a Shipping RuleNavigation: Click on the "Ecommerce" text link located at the top of any main administration page. Click on the "Product Catalog Rules" text link. The "Discount Rules Administration" page will load in a new window. Click on the "Shipping" text link located at the top of the administration page. Click on the "Add Shipping Rule" text link. The add shipping rule administration page will load in a new browser window.

Step 1.Shipping rules may only be applied to custom shipping methods. If the desired shipping method has not

been created, add a custom shipping method before proceeding.
From the top "Shipping Method" drop-down menu, select a method that this rule will apply to.
Select either "Specific" or "Global" from the "Rule Type" drop down menu.
A global rule will apply to all products shipped using the selected shipping method. Use this option to uniformly apply this rule to all shipments. A global discount will apply to all products purchased. The global shipping rule, however, will be overridden if a specific rule is used for any product in the catalog.
Step 2:From the "Status" drop-down menu, select whether the rule will be added as "active" or "inactive".
From the "Shipping is" drop-down menu, select whether or not to include tax on the rule.
Step 3:To apply the rule to an entire country, select the country from the drop-down menu provided.

To apply the rule to a specific state, select the state from the drop-down menu provided.
To apply the rule only to a specific zip code or range of zip codes enter part or all of the zip code in the field provided.
Step 4:
To create a rule that will apply a single charge to any shipment, click on the radio button next to "Flat Fee/Percentage (No Basis)". In the "Amount" field provided, type in the amount to charge. For a flat fee, type the value in currency format i.e. 3.25 for three dollars and twenty-five cents. To apply a charge

based on a percentage of the order dollar amount, enter the numeric value followed by a percentage sign, such as 5%.
To create a rule that will calculate the shipping charge based on a table of values and/or a specific basis (such as unit, quantity, or weight), click on the radio button next to "Table". Specify what the rule will be based on by selecting QUANTITY, UNIT, WEIGHT, or PRICE from the drop-down menu provided.
Type the minimum value of the rule next to the "From" field in the space provided. As an example, if the shipping charge is to be applied only when a customer orders a quantity of 10 or more, enter "10" in the field. Enter the amount to charge to the right of "shipping" in the space provided. The charge can be entered as a dollar amount or a percentage (such as 10%).
To create a table of values, click the "Add Row" button. A second row identical to the first will appear. Type the second set of values in the space provided. Continue adding as many rows as needed to finish building the shipping charges table.
When finished, click the "Add Rule" button to add the rule. Back to the Top of the Page
Modify a Shipping RuleChange the details of a custom shipping rule. Access shipping method item and package pages.
Click on the "Ecommerce" text link located at the top of any main administration page. Click on the "Product Catalog Rules" text link. The "Discount Rules Administration" page will load in a new window. Click on the "Shipping" text link located at the top of the administration page. Click on the "modify" text link beneath the shipping rule to modify.
The modify shipping rule administration page will load in a new browser window.

Make any necessary modifications by changing any of the available fields and or options. Refer to the fields/options description on the add a shipping rule page for further details.
When finished with any modifications, click the "Update" button located beneath the rule details.
To delete the rule, click on the "Delete" text link located beneath the rule details.

To change the rule from global to specific, or specific to global, click on the "Change Rule type..." text link.
To view which items this rule applies to, or to add this rule to items, click on the "Item" text link located at the top of the administration page. The shipping rule details for items page will load in the current window.
To view which packages this rule applies to, or to add this rule to packages, click on the "Package" text link located at the top of the administration page. The shipping rule details for packages page will load in the current window.
To view which package option groups this rule applies to, or to add this rule to package option group, click on the "Option Groups" text link located at the top of the administration page. The handling rule details for option groups page will load in the current window.
Back to the Top of the Page 10-Step Guide on Setting Up Ecommerce
Product Catalog Rules

Back

Handling Rules
Related Links: 10-Step Guide on Setting Up E-commerce | Product Catalog Rules
Overview | Handling Charges Options/Field Descriptions | Add a Handling Charge Rule | Modifying a Handling Charge Rule
OverviewAdd, view, modify or delete Handling Charge Rules
Navigation: Click on the "Ecommerce" text link located at the top of any main administration page. Click on the "Product Catalog Rules" text link. The "Discount Rules Administration" page will load in a new window. Click on the "Handling" text link at the top of the administration page.
The "handling charges administration" page lists all existing rules.

Back to the Top of the Page
Handling Charge Options/Field Descriptions:
Heading: The heading of each handling charge rule includes a type indicator (SPECIFIC or GLOBAL), the rule ID Number, the rule Name, and the Basis for the rule.
The rule basis refers to how the calculation is performed. "No Basis" means that the rule has been applied as a single value, such as a percentage of the product price, or a single "Flat Rate" that is applied when a purchase is made.
When a basis is listed, this means that 1) the rule is applied based on Quantity, Unit, Weight, or Price, or 2) a table of values has been created to calculate the charge. The basis indicator is listed as "Based On" with a type identifier, such as "Units" or "Quantity". In such cases, the charge is variable based on the "price" or "unit", and is calculated from a pre-defined table of values.
Below the main heading is a status indicator (Active or Inactive) and a tax indicator (Before Tax or After Tax). These settings can be modified from the rule’s administration page.
The "Handling Charge Name" is different from the "Rule Name". The name in this section is the text that will actually display in the catalog and shopping cart whenever the charge is applied.
Applied to Region: Specifies which shipping destinations this rule applies to.
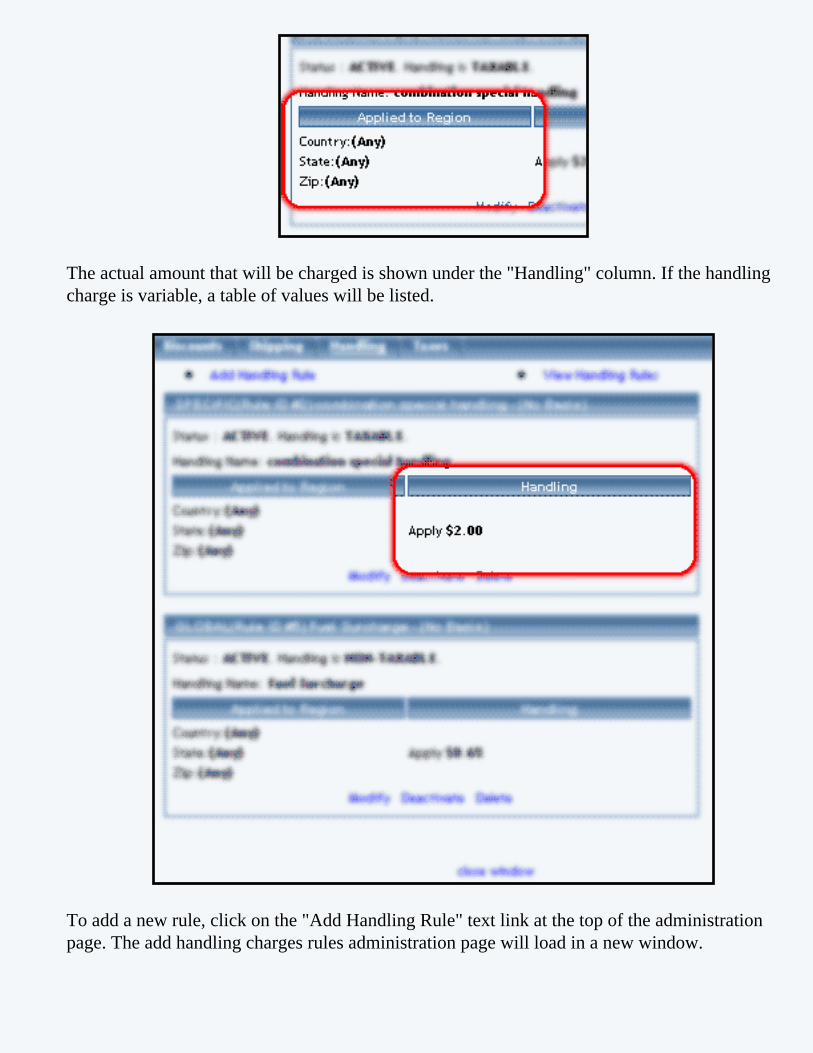
The actual amount that will be charged is shown under the "Handling" column. If the handling charge is variable, a table of values will be listed.
To add a new rule, click on the "Add Handling Rule" text link at the top of the administration page. The add handling charges rules administration page will load in a new window.

To deactivate or activate a rule, click on the "Deactivate" or "Activate" text link located at the bottom of the rule. The screen will refresh with the applied change.
To delete a rule, click on the "Delete" text link.
To modify a rule, click on the "Modify" text link. The modify handling charge rule administration page will load in a new window.
Back to the Top of the Page
Add a Handling Charge RuleAdd a new handling charge rule
Navigation: Click on the "Ecommerce" text link located at the top of any main administration page. Click on the "Product Catalog Rules" text link. The "Discount Rules Administration" page will load in a new window. Click on the "Handling" text link located at the top of the administration page. Click on the "Add Handling Rule" text link. The add handling rule administration page will load in a new browser window.


Step 1:From the top "Rule Type" drop-down menu, select "Global" or "Specific". A global rule will apply to all items. A specific rule may be applied directly to items, packages, or package options.
The global handling charge, will be overridden if a specific rule is used for any product in the catalog.
Type a rule name in field provided. The Rule Name is for reference purposes only.
Type a Handling Charge Name in the field provided. This is the text that will display in the shopping cart any time this rule is applied.
Step 2:From the "Status" drop-down menu, select whether the rule will be added as "active" or "inactive".
From the "Handling is" drop-down menu, select whether or not to include tax on the rule.
Step 3:To apply the rule to an entire country, select the country from the drop-down menu provided.

To apply the rule to a specific state, select the state from the drop-down menu provided.
To apply the rule only to a specific zip code or range of zip codes enter part or all of the zip code in the field provided.
Step 4:To create a rule that will apply a single charge to any item or shipment, click on the radio button next to "Flat Fee/Percentage (No Basis)". In the "Amount" field provided, type in the amount to charge. For a flat fee, type the value in currency format i.e. 1.25 for one dollar and twenty-five cents. To apply a charge based on a percentage of the order dollar amount, enter the numeric value followed by a percentage sign, such as 1%.
To create a rule that will calculate the handling charge based on a table of values and/or a specific

basis (such as unit, quantity, or weight), click on the radio button next to "Table". Specify what the rule will be based on by selecting QUANTITY, UNIT, WEIGHT, or PRICE from the drop-down menu provided.
Type the minimum value of the rule next to the "From" field in the space provided. As an example, if the handling charge is to be applied only when a customer orders a quantity of 10 or more, enter "10" in the field. Enter the amount to charge to the right of "handling" in the space provided. The charge can be entered as a dollar amount or a percentage (such as 10%).
To create a table of values, click the "Add Row" button. A second row identical to the first will appear. Type the second set of values in the space provided. Continue adding as many rows as needed to finish building the shipping charges table.
When finished, click the "Add Rule" button to add the rule. Back to the Top of the Page
Modify a Handling Charge RuleModify the details of a handling charge rule.
Navigation: Click on the "Ecommerce" text link located at the top of any main administration page. Click on the "Product Catalog Rules" text link. The "Discount Rules Administration" page will load in a new window. Click on the "Handling" text link located at the top of the administration page. To modify any rule, click on the "modify" text link beneath the rule.

All listed options and fields can be changed by modifying the desired option or by typing over any text/value displayed.
For a detailed description of each option, see the section above on adding a handling charge rule.
To convert a Global Rule to a Specific Rule, or to change a Specific Rule to a Global Rule, click on the applicable text link located at the bottom of the administration page.
To delete this rule, click on the "Delete" text link located on the bottom of the administration page.

When finished with modifications, click on the "Update Rule" button to save any changes.
To view which items this rule applies to, or to add this rule to items, click on the "Item" text link located at the top of the administration page. The handling charge rule details for items page will load in the current window.
To view which packages this rule applies to, or to add this rule to packages, click on the "Package" text link located at the top of the administration page. The handling charge rule details for packages page will load in the current window.
To view which option groups this rule applies to, or to add this rule to an option group, click on the "Option Group" text link located at the top of the administration page. The handling charge rule details for option groups page will load in the current window.

To view which package options this rule applies to, or to add this rule to a package option, click on the "Package Option" text link located at the top of the administration page. The handling charge rule details for option groups page will load in the current window.
Back to the Top of the Page 10-Step Guide on Setting Up Ecommerce
Product Catalog Rules
Back

Tax Rules
Related Links: 10-Step Guide on Setting Up E-commerce | Product Catalog Rules
Overview | Tax Options/Field Descriptions | Add a Tax Rule | Modify a Tax Rule
OverviewAdd, view, modify or delete Tax Rules
Navigation: Click on the "Ecommerce" text link located at the top of any main administration page. Click on the "Product Catalog Rules" text link. The "Discount Rules Administration" page will load in a new window. Click on the "Taxes" text link at the top of the administration page.
The tax administration page will list all existing rules.

Tax Options/Field Descriptions:The Heading of each tax rule includes a type indicator (SPECIFIC or GLOBAL), the rule ID Number, and the rule Name.
Below the heading, the Status (either active or inactive) and Tax Name will display.
The region(s) that tax rule applies to and the amount to be applied are listed side by side.
To add a tax rule, click on the "Add Tax Rule" text link located at the top of the administration page. The add tax rule administration page will open in a new browser window.
To deactivate or activate a rule, click on the "Deactivate" or "Activate" text link located at the

bottom of the rule details. The screen will refresh with the applied change.
To delete a rule, click on the "Delete" text link.
To modify a rule, click on the "Modify" text link. The modify tax rule administration page will load in a new window.
Back to the Top of the Page
Add a Tax RuleClick on the "Ecommerce" text link located at the top of any main administration page. Click on the "Product Catalog Rules" text link. The "Discount Rules Administration" page will load in a new window. Click on the "Taxes" text link located at the top of the administration page. Click on the "Add Tax Rule" text link. The add tax rule administration page will load in a new browser window.

Step 1:

From the top "Rule Type" drop-down menu, select the appropriate rule type:
Item Specific: Tax can be applied to any individual items.
Global: Tax will be applied to all items that do not currently have an overriding specific rule assigned.
Shipping Method Specific: Tax can only be applied to any custom (user defined) shipping method.
Shipping Method Global: Tax is applied to all shipping methods that do not have a specific rule assigned.
Type the Rule name in the space provided. The Rule Name is used for reference purposes only.
Type the Tax Name in the space provided. The Tax Name is the text that will be displayed in the shopping cart any time the tax is applied.
Step 2:From the "Status" drop-down menu, select whether the rule will be added as "active" or "inactive".
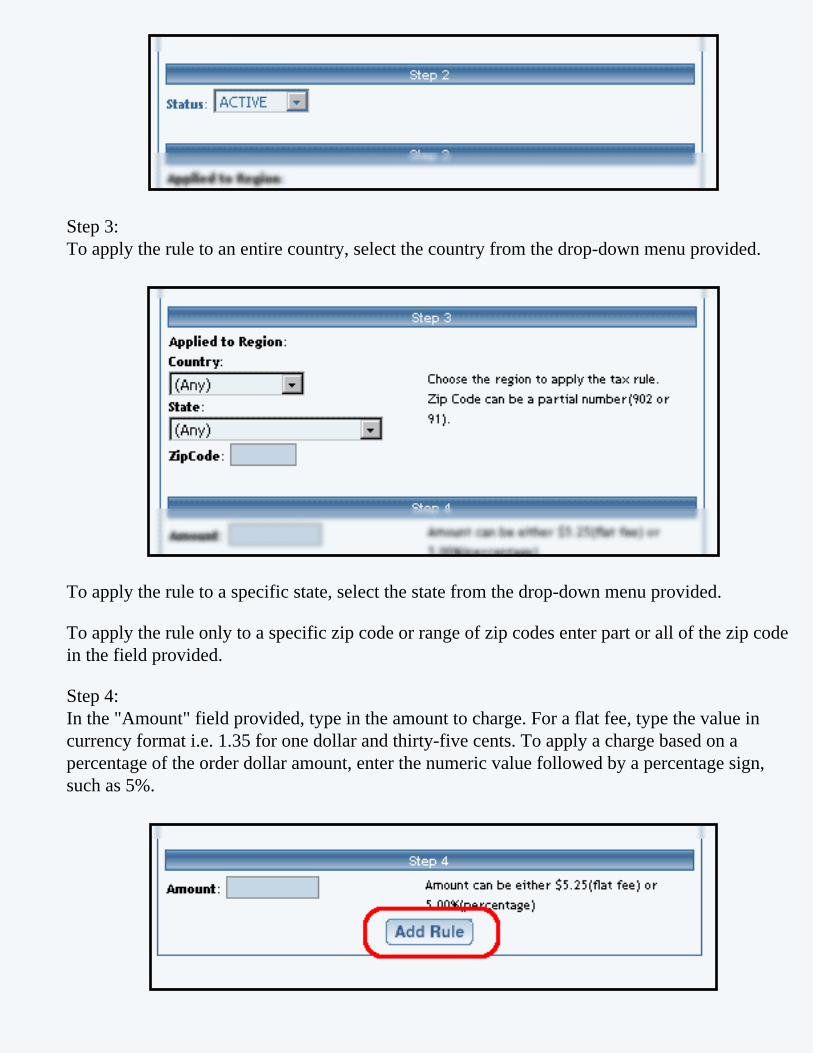
Step 3:To apply the rule to an entire country, select the country from the drop-down menu provided.
To apply the rule to a specific state, select the state from the drop-down menu provided.
To apply the rule only to a specific zip code or range of zip codes enter part or all of the zip code in the field provided.
Step 4:In the "Amount" field provided, type in the amount to charge. For a flat fee, type the value in currency format i.e. 1.35 for one dollar and thirty-five cents. To apply a charge based on a percentage of the order dollar amount, enter the numeric value followed by a percentage sign, such as 5%.

When finished, click the "Add Rule" button to add the rule. Back to the Top of the Page
Modify a Tax RuleModify the details of a tax rule.
Navigation: Click on the "Ecommerce" text link located at the top of any main administration page. Click on the "Product Catalog Rules" text link. The "Discount Rules Administration" page will load in a new window. Click on the "Taxes" text link located at the top of the administration page.
To modify any rule, click on the "modify" text link beneath the rule details.
All listed options and fields can be changed by modifying the desired option or by typing over any text/value displayed.
For a detailed description of each option, see the adding a tax rule section above.
To change the rule type click on the applicable text link located at the bottom of the

administration page.
To delete this rule, click on the "Delete" text link located on the bottom of the administration page.
When finished with modifications, click on the "Update Rule" button to save changes.
To view which items this rule applies to, or to add this rule to items, click on the "Item" text link located at the top of the administration page. The tax rule details for items page will load in the current window.
To view which packages this rule applies to, or to add this rule to packages, click on the "Package" text link located at the top of the administration page. The tax rule details for packages page will load in the current window.

To view which option groups this rule applies to, or to add this rule to an option group, click on the "Option Group" text link located at the top of the administration page. The tax rule details for option groups page will load in the current window.
To view which package options this rule applies to, or to add this rule to a package option, click on the "Package Option" text link located at the top of the administration page. The tax rule details for package options page will load in the current window.
Back to the Top of the Page 10-Step Guide on Setting Up Ecommerce
Product Catalog Rules
Back

Ecommerce Options
Related Links: 10-Step Guide on Setting Up E-Commerce
Overview | Add and Modify Payment Methods | Merchant Account Options | Checkout Descriptions | Custom Fields | Other Options
OverviewSet up or modify payment methods, merchant account information, shopping cart options and checkout descriptions.
Navigation: Click on the "Ecommerce" text link located at the top of any main administration page. Click on the "Ecommerce Options" text link to load the ecommerce administration page.
Back to the Top of the Page
Adding and Modifying Payment MethodsView, add or modify payment methods available to customers at check out.
Navigation: Click on the "Ecommerce" text link located at the top of any main administration page. Click on the

"Ecommerce Options" text link to load the ecommerce administration page.
Any available payment methods are located in the left-hand column under "Add a New Payment Method".
Currently used payment methods are located in the right-hand column under "Deactivate/Modify A Payment Method.

To activate an available payment method(s), check any applicable box next to the payment method name. Click on the "Activate" button.

The screen will refresh with the chosen payment method(s) now listed in the right-hand column.
To deactivate any payment method(s), check any applicable box next to the active payment method name. Click on the "Deactivate" button.

The screen will refresh with the chosen payment method(s) now listed in the left-hand column.
To view the information that a payment method requires, click on the name of the method. An example which including all required fields will be displayed at the bottom of the administration page.

To use a payment type not listed, modify the "Custom Payment Method" from the list of available methods. You will then see the following new window:
Back to the Top of the Page
Modify a Payment MethodModify payment method details, including sub-types and required fields.
Navigation: Click on the "Ecommerce" text link located at the top of any main administration page. Click on the "Ecommerce Options" text link to load the ecommerce administration page. Click on the "modify" text link next to any currently active payment method. The payment modification administration page will load in a new browser window.

To add a custom credit card type or a custom online check type, first click on the "modify" link next to the payment method. When the new page loads, click on the "Add New Card Type" text link.
For example, a custom checking account type or a new credit card may be defined and used in the shopping cart system. Back to the Top of the Page
Credit CardsModify credit card fields and descriptions. Add an existing card type. Create a custom card type.
To activate or deactivate any card type, click on the "Activate/Deactivate" text link located next to applicable
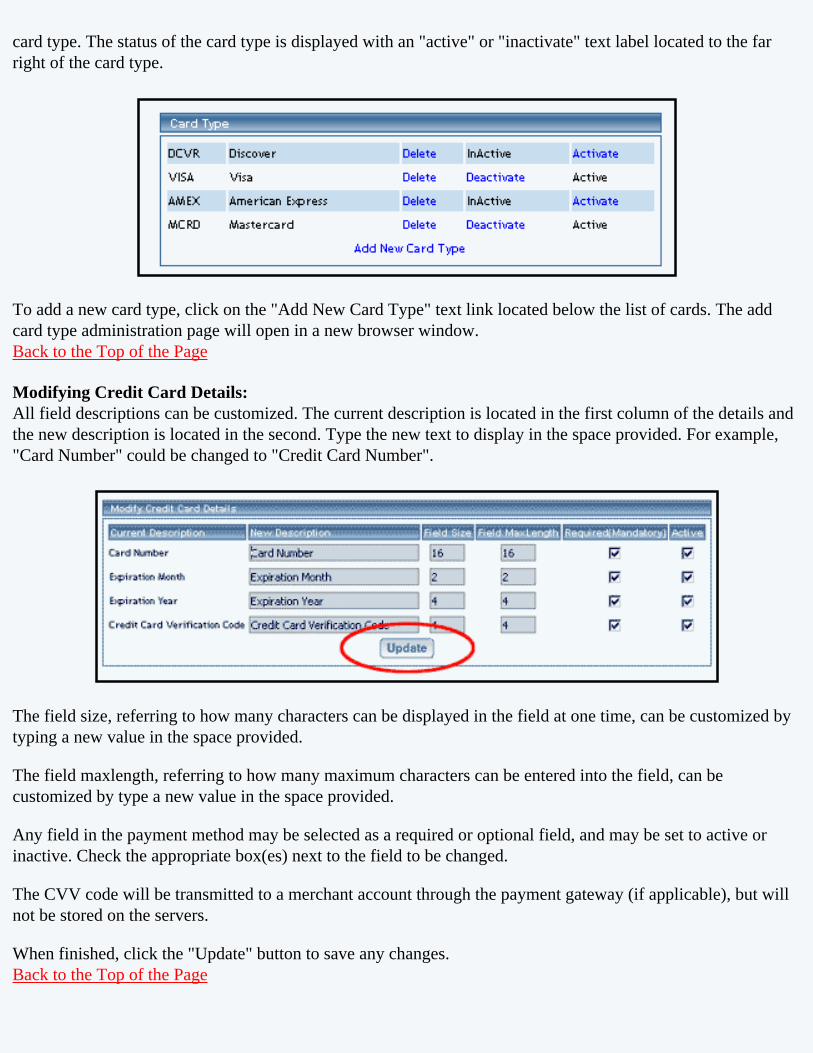
card type. The status of the card type is displayed with an "active" or "inactivate" text label located to the far right of the card type.
To add a new card type, click on the "Add New Card Type" text link located below the list of cards. The add card type administration page will open in a new browser window. Back to the Top of the Page
Modifying Credit Card Details:All field descriptions can be customized. The current description is located in the first column of the details and the new description is located in the second. Type the new text to display in the space provided. For example, "Card Number" could be changed to "Credit Card Number".
The field size, referring to how many characters can be displayed in the field at one time, can be customized by typing a new value in the space provided.
The field maxlength, referring to how many maximum characters can be entered into the field, can be customized by type a new value in the space provided.
Any field in the payment method may be selected as a required or optional field, and may be set to active or inactive. Check the appropriate box(es) next to the field to be changed.
The CVV code will be transmitted to a merchant account through the payment gateway (if applicable), but will not be stored on the servers.
When finished, click the "Update" button to save any changes. Back to the Top of the Page

Add a New Card TypeAdd a card type that has been deleted. Add and define a new custom credit card.
Navigation: Click on the "Ecommerce" text link located at the top of any main administration page. Click on the "Ecommerce Options" text link to load the ecommerce administration page. Click on the "modify" text link next to "credit cards". If necessary, activate the credit cards payment method before proceeding. The credit card payment method details administration page will load in a new browser window. Click on the "Add New Card Type" text link.
The add card type administration page will load in a new browser window.
To add one of the major credit cards as a compatible payment method, click on the card name from the list provided and then click the "Add" button.

To define a custom card type, type an identification code and card name in the spaces provided below the "Create Your Own Card Type" heading. Click the "Add" button.
The current administration window will refresh, and then the credit card payment method details (modify) administration page will focus. The new card type will display on the active cards list. Back to the Top of the Page
Online ChecksModify online check descriptions and data fields. Add an existing account type. Create a custom account type.
To activate or deactivate any account type, click on the "Activate/Deactivate" text link located next to applicable account name. The status of the account type is displayed with an "active" or "inactivate" text label located to the far right of the card type. Back to the Top of the Page

Modifying Account Details:All field descriptions can be customized.
The current description is located in the first column of the details...
...and the new description is located in the second.
Type the new text to display in the space provided. As an example, "Bank Name" could be changed to "Financial Institution".
The field size, referring to how many characters can be displayed in the field at one time, can be customized by typing a new value in the space provided.

The field maxlength, referring to how many maximum characters can be entered into the field, can be customized by type a new value in the space provided.
Any field in the payment method may be selected as a required or optional field, and may be set to active or inactive. Check the appropriate box(es) next to the field to be changed. When done with your modifications, you must click on the button "Update" to save and apply your changes. Back to the Top of the Page
Add a New Online Check Account TypeAdd an account type that has been deleted. Add and define a new custom account type.
Navigation: Click on the "Ecommerce" text link located at the top of any main administration page. Click on the "Ecommerce Options" text link to load the ecommerce administration page. Click on the "modify" text link next to "online checks". If necessary, activate the online check payment method before proceeding. The online check payment method details administration page will load in a new browser window.
Click on the "Add New Account Type" text link. The add account type administration page will load in a new browser window.
To add a currently existing account type, click on the account name from the list provided. Click the "Add" button.

To define a custom account type, type an identification code and account name in the spaces provided below the "Create Your Own Account Type" heading. Click the "Add" button.
The current administration window will refresh, and then the online check payment method details (modify) administration page will focus. The new account type will display on the active cards list. Back to the Top of the Page
Other Payment MethodsModify payment method descriptions and data fields.
Navigation: Click on the "Ecommerce" text link located at the top of any main administration page. Click on the "Ecommerce Options" text link to load the ecommerce administration page. Click on the "modify" text link next to the payment method to modify.
If necessary, activate the payment method before proceeding. The specific payment method details administration page will load in a new browser window.
All field descriptions can be customized. The current description is located in the first column of the details and the new description is located in the second. Type the new text to display in the space provided.
The field size, referring to how many characters can be displayed in the field at one time, can be customized by typing a new value in the space provided.
The field maxlength, referring to how many maximum characters can be entered into the field, can be customized by type a new value in the space provided.
Any field in the payment method may be selected as a required or optional field, and may be set to active or inactive. Check the appropriate box(es) next to the field to be changed. Back to the Top of the Page
Merchant Account OptionsNavigation: Click on the "Ecommerce" text link located at the top of any main administration page. Click on the "Ecommerce Options" text link to load the ecommerce administration page.
Click on the "Merchant Account Options" text link located at the top of the administration page.


The current default credit card processor is listed at the top of the administration page.
If "Email Processing" is listed, there is no payment gateway or merchant account currently activated as default. All orders must be manually processed.
A list of all currently active processors is listed at the top of the administration screen.

To add a processing method/merchant account, click on the "add" text link next to the name of the processor to add, located toward the bottom of the administration page in the section "List of available processor providers.
To set any listed processing method as the default, click on the "Set as Default" text link next to the name of the method.
To activate or deactivate any method, click on the "Activate" or "Deactivate" text link next to the name of the method.
To modify an existing method, used only to change processor-specific information only, click on the "modify"

link next the name of the method.
The processor modification page will load in a new window. Edit any necessary fields, and press the "update" button to save the changes.
If the desired merchant account/payment processor is not listed, the provider may not be supported. Please contact technical support for additional information.
To change the processor for a specific card type, click on the "change" text link.

The "change processor for card type" administration page will load in a new window. Select the desired processor from the list provided. Click "Update" to save the change. Back to the Top of the Page
Checkout DescriptionsAdd or change a custom text description to each page in the order checkout process
Navigation: Click on the "Ecommerce" text link located at the top of any main administration page. Click on the "Ecommerce Options" text link to load the ecommerce administration page.
Click on the "Checkout Descriptions" text link located at the top of the administration page. The checkout descriptions administration page will load in a new browser window.

Seven custom descriptions can be added/modified for use on the shopping cart checkout pages. The descriptions appear toward the top of each page.
List of Descriptions:
● Cart Page ● Shipping Address Page ● Billing Address Page ● Shipping Method Page

● Payment Page ● Finalize Order Page ● Successful Order Page Add, modify, or remove descriptions for any page, by typing in the space provided for each description.
When finished, click the "Update" button to save any changes. Back to the Top of the Page
Custom FieldsThe "Custom Fields" tab allows you to specify your own field(s) that will appear on the Payment page during the checkout ordering process. The following page loads when you click on the tab "Custom Fields":
The first section allows you to specify a text area for the customer to add their own comments or words. Checkmark the checkbox to the right of the text "Text Area Option". Enter text in the text field "Name" that you would like to have appear during the checkout process next to the text area.

For example, if you put in "Don't forget your email address..." in the field "Name", this is what will appear:
You can also give your Web site customers a drop-down menu to select from. The second section on the page allows you to specify your drop-down menus. Enter a name for the drop-down menu, whatever is in this field will appear on the Web site during the Payment page of the checkout process next to the drop-down menu. Enter your drop-down menu selections in the text field next to the button "Add". Then click on the button "Add". Click on "Update to save your changes.

For example, if you put "Where did you hear about us" in the "Name" field of the drop-down menu, you would get something like this:
Back to the Top of the Page
Other OptionsShow/hide cart content after adding item to cart, modify order faxing, format order e-mail confirmation, enable/prevent zero shipping charges, change real time processing for international credit card orders

Navigation: Click on the "Ecommerce" text link located at the top of any main administration page. Click on the "Ecommerce Options" text link to load the ecommerce administration page.
Click on the "Other Options" text link located at the top of the administration page.
All listed options have two settings. To toggle any option, click on the main description. The page will refresh and display the new setting.
Option 1:
● Show cart content after adding item to cart. ● Return to the product page after item is added.
Option 2:
● Fax Orders to Web site owner(done at 12:00 AM Pacific Time only; our fax server can only send faxes to US or Canadian phone numbers).
● Do not fax orders.
Option 3:
● Format e-mail order confirmation in HTML. ● Format e-mail order confirmation in text.

Option 4:
● Enable customers to place orders with zero shipping charges. ● Prevent customer from placing orders with zero shipping charges.
Option 5:
● International credit card orders are done via Real-Time processing. ● International credit card orders are NOT done via Real-Time processing.
Option 6:
● The system will assume that the billing and shipping addresses are the same. ● This is a default setting. Customers are prompted to provide a shipping address in addition to the billing
address.

Option 7:
● Web site shoppers will not be asked to select a shipping method. You must have one shipping method set up. If you do select this option, a new drop-down menu will appear asking you to select the default shipping method if you have more than one shipping method:
● The default setting. Your Web site shoppers will have to select a shipping method for their selected products.
Option 8:
● "Do NOT show shopper login during checkout process" means shopper account login feature is DISABLED during checkout process.
● "SHOW shopper login during checkout process" means shoppers account login feature is ENABLED during checkout process.
Option 9:

● "DO NOT show product CODE" means the checkout process will not display the product code. ● "SHOW product CODE when available" means product code will be shown at checkout process and
proof of purchase.
Option 10:
● "DO NOT block shopper from placing order based upon subtotal amount" means shopper will still be able to place order regardless of minimum subtotal amount.
● "Block Shopper from placing order unless minimum subtotal amount is satisfied" means the shopper will not be able to place order when subtotal amount is less than the minimum value set. Please set the minimum subtotal amount.
Option 11:
● "Billing Email is required (recommended)" means the shopper will have to enter an email address in order to continue with the checkout process.
● "Billing Email is optional" means the shopper will not be required to enter an email address.
Back to the Top of the Page10-Step Guide on Setting Up Ecommerce
Back to the Previous Page

Orders
Related Links: 10-Step Guide on Setting Up Ecommerce
Overview | Order Details | Order Reporting
OverviewCheck orders, update the status of orders, and view or download detail and summary order reports.
Click on the "Ecommerce" text link in the secondary navigation menu. Click on the "Orders" text link. The outstanding order summary administration page will load in a new browser window.
Where you will see the following page:

Orders may be sorted by Order number, Total, Checkout Date, First Name, Last Name, or by E-mail Address. To change the sort order, choose the desired sort field from the drop-down menu provided. Orders may be sorted in ascending or descending order by selecting the desired choice.

Outstanding orders are listed five orders per page. To change, choose either 5, 10, 20, 50, or 100 orders to display per page in the drop-down menu labelled "Records per page". Then click on the button "Change".
To view a different page, click on the page number link, located toward the top of the administration page.
To e-mail any customer, click on the e-mail address provided in the order summary.

To view or update a specific order, click on the order ID number (Order #).
The order detail page will load in a new browser window.
Click on the "View or Download Order Reports" to access the order report administration page,...

...which will launch in a new browser window.
If you have a great number of products, you can quickly close them using the "Change Order Status with date ranges" link.

When you click on that link, a new window will open up:
Click on the status of the orders that you want to affect. For example, if you want to change all "Open" orders to "Completed", you will select "Open" in the select box. To select more than one status, hold down the CTRL key on the keyboard and select additional statuses.

Specify the range of dates that the change of order status will apply to.
Specify the change in the order status that will be applied to the selected ranges:
When done specifying your options, click on the button "Change" to apply the order status change to the selected orders.

Back to the Top of the Page
Order DetailsView an order or update an order’s status.
Click on the "Ecommerce" text link located at the top of any main administration page. Click on the "Orders" text link.
The order administration page will load in a new browser window.

Click on the order ID number to view the order details.

Order Status (optional):
The order status tracking system can be used to manage orders from the time an order is placed until the order is completed.
Open: An order has been placed.

Pending: The order has been received and manually placed on hold pending further action.
Processing: The order is currently being processed.
Billed: The order has been successfully billed.
Shipped: The order or item has been successfully shipped.
Completed: The order or item has been processed, billed, shipped, and completed.
Canceled: The order or item has been canceled.
Backordered: The order or item has been placed on backorder.
The order status can be manually controlled by order and by item. Items within an order can have a different status than the order itself. This allows easy management of orders with items on backorder or orders with items using different shipping methods.
Any shipment tracking numbers may be entered in the space provided.
Upon an order status update, an e-mail can be sent to a customer by checking the box next to "To inform customer of the update above by Email, check Here" or by clicking the "Inform Customer" button.
Always click the applicable "Update" button when changing the status of order.
To view the order history of the customer, click the "Order History" button.
To view the "HTML" proof of purchase page, click the "HTML Proof of Purchase" button.
To view the text version of the proof of purchase, click the "Text Proof of Purchase" button.
To view any item within an order, click on the item ID number, located in the order details.

Back to the Top of the Page
Order ReportingFor: View or download order reports
How: Click on the "Ecommerce" text link located at the top of any main administration page.Then click on the "Orders" text link.
The outstanding order summary administration page will load in a new browser window.
Click on the "View or Download Order Reports" to access the order report administration page,...
...which will launch in a new browser window.

Select Data to Retrieve:A summary or detail report may be viewed or downloaded by clicking on the applicable radio button, located at the top of the administration page.
Uncheck the box next to "Display Orders" to download a comma delimited text file.
Upon order generation, a "download" pop-up dialog box will open, allowing the file to be downloaded and saved.

Check the box next to any listed group of information to include it in the report.
Search Criteria:
Type in a partial or full value in any field listed to view or download only orders containing the specified information or range of data.

As an example, to view or download any order containing products that start with the letter "a", type "a" in the field provided for "Product Name".
Order reports may be sorted by order number, date, or order total. Select the desired option from the included drop-down menu. Select a specific value from the "Status" drop-down menu to display or download orders with the selected status only.

Press the "Find Records" button to generate the report.
Back to the Top of the Page10-Step Guide on Setting Up Ecommerce
Back