Embed Size (px)
Citation preview

DV-HMSW4K-88 Matrix Manual
Based on firmware revision 1.20
244 Bergen Blvd Woodland Park NJ 07424 973-785-4347 www.fsrinc.com
43059 LIT1486B

2
PROPRIETARY INFORMATION
All information in this manual is proprietary to and the property of FSR Inc. This publication is protected by the Federal Copyright Law, with all rights reserved. No part of this document may be reproduced, transcribed, or transmitted, in any form or by any means, without prior explicit written permission from FSR Inc.
UNPACKING
The DV-HMSW4K-88 8x8 Matrix Switcher package includes the following items;
DV-HMSW4K-88 8x8 HDMI Switcher
Power supply: 12VDC 5A
9 IR Receivers
8 IR Transmitters
IR Remote Control
Rack Ears
CD with GUI, User’s and Protocol Manual
HDMI is a trademark of HDMI licensing, LLC.
Dolby is a trademark Dolby Laboratories
DTS is a trademark of DTS, Inc
Specifications may be changed without any notice in order to improve the function of the product.

3
LIMITED WARRANTY The DV-HMSW4K-88 Matrix is warranted against failures due to defective parts or faulty workmanship for a period of three years after delivery to the original owner. During this period, FSR will make any necessary repairs or replace the unit without charge for parts or labor. Shipping charges to the factory or repair station must be prepaid by the owner, return-shipping charges (via UPS Ground) will be paid by FSR. This warranty applies only to the original owner and is not transferable. In addition, it does not apply to repairs done by other than the FSR factory or Authorized Repair Stations. This warranty shall be cancelable by FSR at its sole discretion if the unit has been subjected to physical abuse or has been modified in any way without written authorization from FSR. FSR’s liability under this warranty is limited to repair or replacement of the defective unit. FSR will not be responsible for incidental or consequential damages resulting from the use or misuse of its products. Some states do not allow the exclusion of incidental or consequential damages, so the above limitations may not apply to you. This warranty gives you specific legal rights, and you may also have other rights which vary from state to state. Warranty claims should be accompanied by a copy of the original purchase invoice showing the purchase date (if a Warranty Registration Card was mailed in at the time of purchase, this is not necessary). Before returning any equipment for repair, please read the important information on service below. SERVICE Before returning any equipment for repair, please be sure that it is adequately packed and cushioned against damage in shipment, and that it is insured. We suggest that you save the original packaging and use it to ship the product for servicing. Also, please enclose a note giving your name, address, phone number and a description of the problem. NOTE: all equipment being returned for repair must have a Return authorization (RMA) Number. To get a RMA Number, please call the FSR Service Department (1-800-332-FSR1). Please display your RMA Number prominently on the front of all packages.
CONTACT INFORMATION
FSR INC.
244 Bergen Blvd.
Woodland Park, NJ 07424
Phone: (973) 785-4347
Order Desk Fax: (973) 785-4207
E-mail: [email protected]
Web Site: http://www.fsrinc.com

4
SURGE PROTECTION DEVICE RECOMMENDED
This product contains sensitive electrical components that may be damaged by electrical spikes, surges, electric shock, lightning strikes, etc. Use of surge protection systems is highly recommended in order to protect and extend the life of your equipment.
SAFETY
All the safety and user manual should be read before the appliance is operated.
The safety and operating instructions should be retained for future reference.
Unplug this product from the wall outlet before cleaning. Do not use liquid cleaners or aerosol cleaners. Use a damp cloth for cleaning.
Do not use this equipment near wet place.
This product should be operated only from the type of power sources indicated on the marking label. If you are not sure of the type of power supplied to your home, consult your local power company.
This equipment may be equipped with a 3 wire grounding-type plug, a plug having a third (grounding) pin. This pin will only fit in to a grounding type power outlet. This is a safety feature. If you are unable to insert the plug in to the outlet, contact your electrician to replace your obsolete outlet. Do not defeat the safety purpose of the grounding-type plug.
Openings on the case are provided for ventilation and to ensure reliable operation of the equipment and to protect it from overheating. The openings should never be blocked.
Do not use any damaged power cords or plugs, or loosed outlets, this may cause electrical shock or fire.
Do not put heavy articles such as other equipments on this product. Keep it away from liquid, magnetic and flammable substances.

5
TABLE OF CONTENTS PROPRIETARY INFORMATION ..................................................................... 2
UNPACKING ...................................................................................................................... 2
LIMITED WARRANTY ..................................................................................... 3
SAFETY ............................................................................................................................. 4
DESCRIPTION ................................................................................................ 6
APPLICATION DIAGRAM ............................................................................... 7
DIMENSIONS .................................................................................................. 8
PANEL DESCRIPTION .................................................................................... 9
FRONT PANEL .................................................................................................................. 9
BACK PANEL .................................................................................................................. 10
FRONT PANEL OPERATION ........................................................................ 11
MENU .............................................................................................................................. 11
EDID SETTING SUB-MENU .................................................................................... 11
SET THE EDID TO THE DEFAULT SETTING SUB-MENU ................................... 12
NETWORK CONFIGURATION SUB MENU ........................................................... 12
TECH SUPPORT SUB-MENU (INFORMATIONAL) ............................................... 12
FIRMWARE VERSION SUB-MENU (INFORMATIONAL) ....................................... 12
MATRIX ROUTING .......................................................................................................... 13
MANUAL ROUTING: ............................................................................................... 13
1T1 (ONE TO ONE) ROUTING: .............................................................................. 13
ALL ROUTING: ........................................................................................................ 13
IR REMOTE CONTROL ROUTING ............................................................... 14
SET EDID ........................................................................................................................ 14
COPY EDID ..................................................................................................................... 15
MATRIX ROUTING .......................................................................................................... 15
PTP (ONE TO ONE) ROUTING: ............................................................................. 15
ALL ROUTING: ........................................................................................................ 15
GRAPHICAL USER INTERFACE (GUI) ........................................................ 17
WEB INTERFACE CONTROL ....................................................................... 21
DEFAULT COMMUNICATION SETTINGS .................................................... 22
SPECIFICATIONS ......................................................................................... 22

6
DESCRIPTION
The DV-HMSW4K-88 8x8 HDMI Matrix routes eight HD sources to any eight HDTV displays. The unit supports 1080p Full HD up to 4K plus all 3D formats, along with multichannel digital audio formats such as PCM, Dolby® True HD and DTS-HD® Master Audio™. Switching and other commands can be implemented using the front-panel push buttons, IR remote control, RS-232, and via TCP/IP.
Features: Supports resolutions up to 1080p @ 60Hz, 48-bit deep color, 4k @ 30Hz
Allows any source to be displayed on multiple displays at the same time
Allows any HDMI display to view any HDMI source at any time
PCM, Dolby TrueHD and DTS-HD master audio pass through HDMI output
Multiple switching mode, Front Panel push-buttons, IR remote control, RS-232
control, and TCP/IP control
Easy installation with rack-mounting ears
Full 3D pass through
HDCP compliant
Includes 9 IR receivers, 8 IR Transmitters and a handheld IR Remote

7
APPLICATION DIAGRAM
FSR 1 2 3 4 5 6 7 8IR INPUT
1 2 3 4 5 6 7 8IR OUTPUT
1 2 3 4 5 6 7 8HDMI INPUT
1 2 3 4 5 6 7 8HDMI OUTPUT
LAN RS-232
WIREDIR
CONTROLIR 12 VDC
PC PC LAPTOP CAMERA
DVD DVD BLUE-RAY SET-TOPDVD BOX
MONITOR
MONITOR
MONITOR
MONITOR
MONITOR
MONITOR
MONITOR
MONITOR
PC
IR INPUT(RECEIVER)
IR OUTPUT(EMITTER)
WIRED IRCONTROL
INPUT
POWERSUPPLY

8
DIMENSIONS
DV-HMSW4K-88
DV PRO - HDMI 8x8 4K MATRIX SWITCHER
IR POWER
LOCK
INPUT SELECT
OUTPUT SELECT
1T1
ALL
1 2 3 4 5 6 7 8
MENU
SELECT
UP
DOWN
ESC
ENTER
FSR
FSR 1 2 3 4 5 6 7 8IR INPUT
1 2 3 4 5 6 7 8IR OUTPUT
1 2 3 4 5 6 7 8HDMI INPUT
1 2 3 4 5 6 7 8HDMI OUTPUT
LAN RS-232
WIREDIR
CONTROLIR 12 VDC
DEPTH INSIDE RACK IS APPROXIMATELY 9.25"
17.32 CHASSIS WIDTH
18.34
19.02
1.25 1.74

9
PANEL DESCRIPTION
Front Panel
1. LCD display — Shows the status of input-output selection, EDID info and other
information.
2. Power LED indicator — Blue (on), Red (off, standby). Press to turn ON. Press and
hold to turn OFF
3. IR receiver window for the Matrix IR remote control.
4. HDMI input selection buttons 1 to 8 — Press to select the input from 1 to 8.
5. 1T1 button — Press to mirror all inputs and outputs (e.g. input 1 to output 1, input 2 to
output 2 and so on).
6. MENU — Press the MENU then use the UP and DOWN buttons to scroll through the
following five sub-menus:
1. EDID Setting
2. Set EDID to default setting
3. Network Config
4 Tech Support (Informational)
5. Firmware version (Informational)
7. UP selection button
8. ESC — Press to quit menu (escape)
9. LOCK LED indicator — Panel is locked when lit.
10. LOCK button — Press and hold to lock and unlock Front Panel
11. HDMI output selection button 1 to 8 — Press to select the output from 1 to 8.
DV-HMSW4K-88
DV PRO - HDMI 8x8 4K MATRIX SWITCHER
IR POWER
LOCK
INPUT SELECT
OUTPUT SELECT
1T1
ALL
1 2 3 4 5 6 7 8
MENU
SELECT
UP
DOWN
ESC
ENTER
FSR
11
531 4
2
6
7
8
9
10
12 13
14
15

10
12. ALL button — Routes the specified input to all the outputs
13. SELECT button
14. DOWN button
15. ENTER button
Back Panel
1. 8 IR inputs 3.5mm stereo phone-jack
2. 8 IR outputs 3.5mm stereo phone-jack
3. 3.5 mm stereo phone-jack Matrix IR receiver input
4. LAN port
5. RS-232 port
6. 8 HDMI inputs
7. 8 HDMI outputs
8. Matrix remote control IR receiver window
9. Power input
10. Ground terminal screw
FSR 1 2 3 4 5 6 7 8IR INPUT
1 2 3 4 5 6 7 8IR OUTPUT
1 2 3 4 5 6 7 8HDMI INPUT
1 2 3 4 5 6 7 8HDMI OUTPUT
LAN RS-232
WIREDIR
CONTROLIR 12 VDC
1 2
3
4 5 10
76 9
8

11
FRONT PANEL OPERATION
MENU
Press the MENU and then use the UP and DOWN buttons to scroll through the following five sub-menus: 1. EDID Setting 2. Set EDID to default setting 3. Network Configuration 4. Tech Support (Informational) 5: Firmware version (Informational)
EDID Setting Sub-menu
Front panel EDID menu
Input(s) Video Audio
1, 2, 3, 4, 5, 6, 7, 8 or
ALL
1080i 60Hz
2.0Ch
5.1Ch
7.1Ch 1080p 60Hz
1080p 3D 60Hz
4Kx2K 30Hz
1024x768 60Hz
No Audio 1920x1080 60Hz
1920x1200 60Hz
COPY OUTx EDID
Copy the Output EDID to the specified input(s)
1. Press the MENU button to display "1. EDID Setting."
2. Press the SELECT button.
3. Use the UP / DOWN buttons to scroll through inputs 1 through 8 or "ALL". The "ALL" selection will set all inputs to the currently selected EDID settings.
4. Press the SELECT button to select a specific input or all inputs.
5. Scroll to the desired resolution and press SELECT.
NOTE: The EDID for an output can also be copied and used for a specified input(s) by scrolling to "COPY OUTx EDID" and selecting. The display must be connected to the DV-HMSW4K-88 prior to performing the EDID settings.
6. Scroll to the desired audio channel and press SELECT.
7. Press the ENTER button to store the settings and exit the EDID menu.

12
Set the EDID to the Default Setting Sub-Menu
1. Press the MENU button to display "1. EDID Setting"
2. Use the DOWN button to scroll to "2. Set EDID to default setting".
3. Press the SELECT button to display "Reset EDID?"
4. Press the SELECT button again to toggle and highlight "Yes"
5. Press the ENTER button to reset all the current EDID settings to the factory default (Factory default is 1080p 60Hz 2.0 channel audio)
Network Configuration Sub Menu
1. Press the MENU button to display "1. EDID Setting".
2. Use the DOWN button to scroll to "3. Network Configurations".
3. Press the SELECT button repeatedly to select either IP, Gateway (GWAY) or Subnet Mask (SMSK).
4. When the desired setting is highlighted and flashing press ENTER.
5. Set the first octet by using the UP or DOWN buttons and /or by using the input select buttons to enter a numeric value. NOTE: button "1T1" is used to set a 9 and button "ALL" is used to set a "0". Press the SELECT button to accept the setting and move to the next octet.
6. When all the network settings are completed press the ENTER button. The LCD display will prompt for a reboot. Remove power from the matrix by unplugging it to reboot and store the settings.
Tech Support Sub-Menu (Informational)
1. Press the MENU button to display "1. EDID Setting"
2. Use the DOWN button to scroll to display "4. Tech Support".
3. Press the SELECT button to display the FSR Tech support contact information.
Firmware version Sub-Menu (Informational)
1. Press the MENU button to display "1. EDID Setting"
2. Use the DOWN button to scroll to display "5: Firmware version"
3. Press the SELECT pushbutton to display the current DV-HMSW4K-88 firmware

13
version information.
MATRIX ROUTING
MANUAL ROUTING:
To select and route an input to an output press the desired INPUT SELECT button and then an OUTPUT SELECT (or vice versa) button to specify a route. The DV-HMSW4K-88 will switch and the current route status will be shown on the LCD Display.
1T1 (one to one) ROUTING:
The 1T1 button, when pressed, will automatically route each input to its respective output. IE: Input 1 to Output 1, Input 2 to Output 2 and so on.
ALL ROUTING:
The ALL button, when pressed, will automatically route a selected input to all of the outputs. To use the "ALL" function:
1. Press the ALL button. The DV-HMSW4K-88 will prompt for an INPUT 2. Select the desired INPUT to be routed to "ALL" outputs. 3. Press the ENTER button. The ALL route will be stored and displayed on
the LCD display.

14
IR REMOTE CONTROL ROUTING
Set EDID
Succession Setting the EDID with the IR remote control
1st Video 1080i 1080p 1080p 3D 4K
2nd Audio 2.0Ch 5.1Ch 7.1Ch
3rd Input 1 2 3 4 5 6 7 8 ALL
1. Press the desired resolution button on the EDID section of the remote control. 2. Press the desired Audio channel button to select audio type. 3. Select a single input (or the "ALL" button to select all inputs) to set the EDID
settings selected above.

15
Copy EDID
Succession Coping the EDID with the IR remote control
1st Output 1 2 3 4 5 6 7 8
2nd Copy
3rd Input 1 2 3 4 5 6 7 8 ALL
1. Press an output number 2. Press COPY 3. Press an input number or ALL
MATRIX ROUTING
To select and route an input to an output simply press the desired OUTPUT SELECT button and then INPUT SELECT (or vice versa) button on the remote to specify a route. The DV-HMSW4K-88 will switch and the current route status will be shown on the LCD Display.
PTP (one to one) ROUTING:
The 1T1 button, when pressed, will automatically route each input to its respective output. IE: Input 1 to Output 1, Input 2 to Output 2 and so on.
ALL ROUTING:
The ALL button (output), when pressed, will automatically route a selected input to all of the outputs. To use the "ALL" (output) function: Select the desired INPUT to be routed to "ALL" outputs. Press the ALL (output) button. The ALL route will be stored and displayed on the LCD display. NOTE: The settings will be discarded if the sequence in not performed within 5 seconds

16
MATRIX IR ROUTING EXAMPLES
17
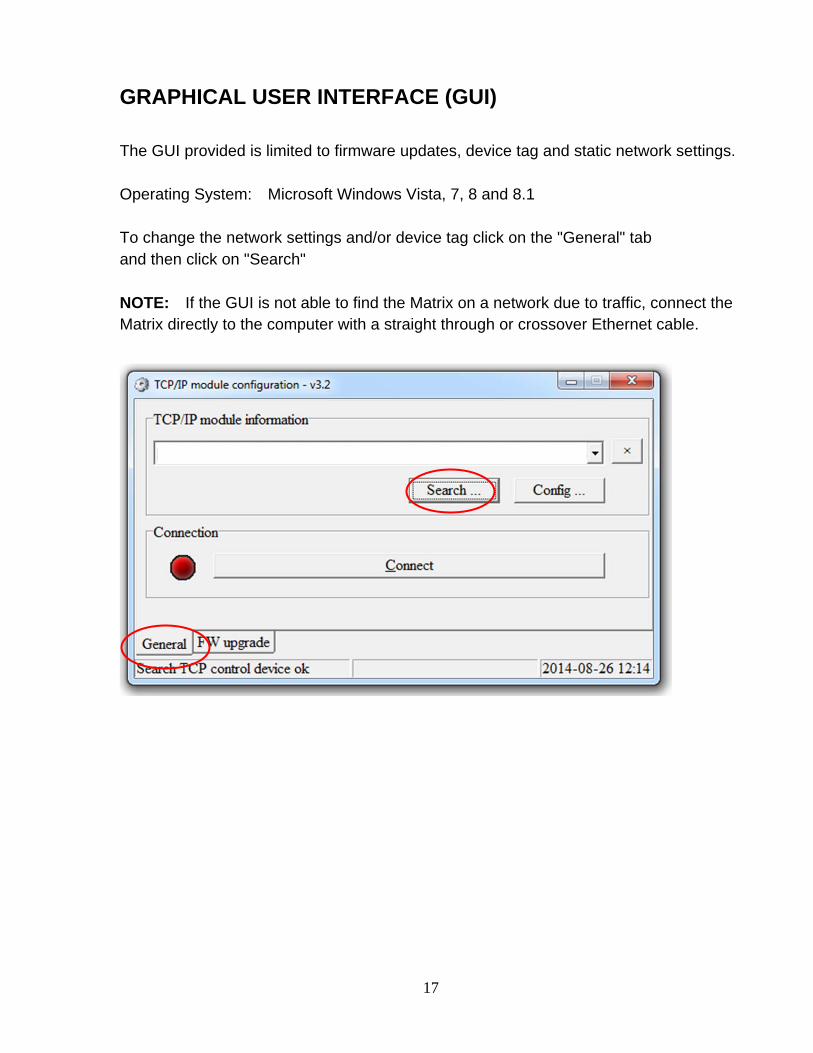
GRAPHICAL USER INTERFACE (GUI)
The GUI provided is limited to firmware updates, device tag and static network settings. Operating System: Microsoft Windows Vista, 7, 8 and 8.1 To change the network settings and/or device tag click on the "General" tab and then click on "Search" NOTE: If the GUI is not able to find the Matrix on a network due to traffic, connect the Matrix directly to the computer with a straight through or crossover Ethernet cable.

18
Select the desired matrix from the drop down menu and click on "Yes"
Click on "Configure"

19
Change the desired network settings and/or Device Tag and click on "Ok" To reset the network settings and the Device Tag, click on "Reset" and then "Ok"

20
To update the firmware, click on the "FW upgrade" tab. Click on the folder icon to locate the firmware file Click on "Upgrade" NOTE: Do not power off the matrix while updating.

21
WEB INTERFACE CONTROL
The DV-HMSW4K-88 can be control via a Web browser, open a Web browser and type the unit's IP address.
Switching and additional Matrix settings can be configured via Serial and TCP/IP (TELNET). Refer to the DV-HMSW4K-88 Serial protocol manual for additional information.

22
DEFAULT COMMUNICATION SETTINGS
Ethernet RS-232 IP: 192.168.5.71
Gateway: 192.168.5.1
Subnet mask: 255.255.255.0
Port: 23
Connection type:
Straight-through or crossover
Baud rate: 57600 bps
Data bits: 8
Parity: None
Stop bits: 1
Flow control: None
Connection type: Straight-through
DTE DB-9 DCE
PC Pin Matrix
Rx 2 Tx
Tx 3 Rx
GND 5 GND
NOTE: The Matrix can be controlled by a third party controller using a persistent or non-persistent TCP/IP connection.
SPECIFICATIONS
Bandwidth: 6.75Gbps Video Input Connectors: 8 HDMI Type A, 19-pin, female Video Output Connectors: 8 HDMI Type A, 19-pin female RS-232 serial port: DB-9 female TCP/IP Control: RJ-45 female IR control hard wired inputs and outputs: 3.5mm stereo jack Rack: 1 RU rack height, rack ears included Dimensions: (W x D x H): 17.3" x 9" x 1.75" without feet Shipping Weight: 6lbs. Operating Temperature: 32°F to 104°F Storage Temperature : -4°F to 140°F Power Supply: 12VDC 5A