Embed Size (px)
Citation preview

University Information Technology Services Kennesaw State University
Drupal A Guide for Web Editors
Last updated on March 3, 2010

Copyright © 2010 KSU Dept. of Information Technology Services This document may be downloaded, printed or copied for educational use without further permission of the Information Technology Services Department (ITS), provided the content is not modified and this statement is not removed. Any use not stated above requires the written consent of the ITS Department. The distribution of a copy of this document via the Internet or other electronic medium without the written permission of the KSU ‐ ITS Department is expressly prohibited.
Published by Kennesaw State University – ITS 2010 The publisher makes no warranties as to the accuracy of the material contained in this document and therefore is not responsible for any damages or liabilities incurred from its use.

Contents
Introduction ............................................................................................................................................................ 1
Requirements ...................................................................................................................................................... 2
Accessing the website to be edited .................................................................................................................... 2
Creating a new webpage .................................................................................................................................... 4
Text formatting ............................................................................................................................................... 7
Hyperlinks ....................................................................................................................................................... 7
Tables .............................................................................................................................................................. 8
Images ........................................................................................................................................................... 11
Pasting content into the WYSISYG editor ..................................................................................................... 15
Revision Information ..................................................................................................................................... 15
File attachments ........................................................................................................................................... 17
Authoring information .................................................................................................................................. 18
Publishing options ......................................................................................................................................... 18
Editing an existing page .................................................................................................................................... 19
Deleting an existing page .................................................................................................................................. 19
Editing the Navigation Bar Links ....................................................................................................................... 19
Editing the Left Sidebar Links ............................................................................................................................ 23
Adding to the FAQ ............................................................................................................................................. 24
Editing a FAQ ..................................................................................................................................................... 25
Deleting a FAQ .................................................................................................................................................. 25
Drupal Terms ..................................................................................................................................................... 26
Getting Help ...................................................................................................................................................... 27

Introduction
Welcome to the Drupal guide for web editors. This booklet aims at providing the stepping stone to edit a website developed in Drupal by offering detailed step‐by‐step instructions. Drupal is an online Content Management System that allows you to easily publish, manage, and organize a wide variety of content on a website such as adding pages, changing text and photos, and creating a list of FAQ’s, without the need for a web design desktop application such as Dreamweaver. Drupal is also very intuitive (for example: to edit a page, you simply navigate to that page, then click the Edit button, which only appears once you are logged in). Learning Drupal will enable you to update your own portion of the website through an easy‐to‐use “WYSIWIG” (what you see is what you get) text editor, similar to editing in Microsoft Word. You will learn how to edit and add new web pages, manage the menu options, upload an image to the content area, and upload a document with a corresponding hyperlink. With the Drupal system, you can learn to do all of these tasks without using or knowing any html!
1
Getting Started
Requirements
• The assumption is that you have been provided access to a KSU‐themed site developed for your department.
• There is no software to download or install.
• You do not need any knowledge of HTML.
• You can use either a PC or Apple Mac.
Accessing the website to be edited
1. Launch the browser of your choice: Mozilla Firefox, Apple Safari or Internet Explorer. Note that some Drupal functionality works better with certain browsers than with others. For example, Internet Explorer for Windows and Safari for Mac do not consistently display WYSIWYG (what‐you‐see‐is‐what‐you‐get) editing tools. Using Firefox is recommended when working in Drupal as this browser/CMS pair has performed well on both Windows and Mac platforms.
2. Point the browser to the website by entering the URL address followed by “/user”. For example: https://mysite.kennesaw.edu/user. This will take you to the user login screen as supposed to the actual website’s homepage.
Figure 1 ‐ Login URL
2

Figure 2 ‐ User Login Page
3. You must be logged in to edit the website. Enter your NetID and password in the login fields.
Figure 3 ‐ NetID and Password
3

4. Navigate to any page on your site. You will notice that at the top of each page there are now two tabs: View and Edit. The View option allows you to see what the site visitors see; the Edit option allows you to change the content on that page.
Figure 4 ‐ View & Edit Tabs
5. To edit a page simply click the Edit tab.
Creating a new webpage
If you wish to create a new page, click on “Create a page.” from the Manage Your Site menu on the left side of the page.
Figure 5 ‐ Create a Page The Create Page screen appears.
4

5
Figure 6 ‐ Create a Page Screen

1. Enter a title.
2. Click on Menu Settings to expand the area and see more options.
6
Figure 7 ‐ Menu Options Expandable Link
3. Enter a menu link title to appear on the links menu. (i.e.: Home) The Menu Link Title should be what you want the name of the actual link to be.
Figure 8 ‐Menu Settings
4. Parent Item The drop‐down menu shows your existing menus and their respective menu items. You can simply select the title of a menu to have your new menu item inserted at the “top level” of that menu, or you can select a menu item to make your new menu item a “child” sub‐menu of that “parent” menu item.
5. Weight The weight range is from ‐50 to 50, where “‐50” is the lightest and floats at the top and, on the contrary, “50” is the highest value and comes at the bottom.
6. Create the body of the page with the help of the formatting toolbar of the WYSIWYG1 Editor. See Figure 9
1 WYSIWYG: What You See Is What You Get

7
Text formatting
You can adjust the font size
Figure 9 ‐ Formatting Toolbar
by selecting one of the ten options available from the pull‐down menu. nge the font color by clicking on the Text Color button: You also have bold, italics,
Hyperur webpage. Links can direct users to either another web
r an email address.
1.1. you would like to link and highlight it.
s.
URL or E‐Mail.
Protocol from the ‐down menu: http://, https://, ftp://,
address in the URL field without the protocol.
open up in a new window, click on the Target tab and
ll‐
1.7. w
link.
the options to open, edit, and remove the link.
You can cha liand bullet st styling options on the toolbar.
links You can easily insert links onto the body of yopage o Type the word or sentence
1.2. Click in the Insert/Edit Link button. The Link screen appear
1.3. Select the Link Type from the drop‐down menu:
1.4. For an URL, select the dropnews://, or “other”.
1.5. Type the URL or web
1.6. If you would like the link to
select New Window (_blank) from the pudown menu.
the ne
Figure 10 ‐ Link Info
Click OK to confirm
1.8. Right‐clicking on the link will give you
Figure 11 ‐ Link Target

8
Tables
1.1. the WYSIWIG editor, place your cursor where you would like the table to appear.
on the Insert/Edit Table button. The Table Properties screen appears.
Figure 12 ‐ Table Properties
1.3. Specify the number of rows and columns for your table in the appropriate fields.
1.4. Specify the thickness of the table’s bor it to “0” (zero) to make i invisible.
percent, table will take 50 percent of the editing area’s width.
1.7. can insert spacing between cells by increasing the cell spacing. The higher the number, the further
1.8. can insert padding between the cells’ borders and their content (i.e.: text, image) by increasing
1.9. the caption field to give an optional title to your table. The title will appear above the table.
field to type an optional comment. The comment will not appear in the table. It is usage only.
efer to Figure 13 for an example of a table and its properties.
In
1.2. Click
der (in pixels) or set t
1.5. Set the alignment of your table content to left, center, or right.
1.6. Specify the width of your table in pixels or percentage. For example, if you set the width at 50 the Youapart the cells will be. Youthe cell padding. Use
1.10. Use the Summaryfor R

9
Figure 13 ‐ Table Example
Working with the table
properties:
m the menu.
table.
1.2.2. Select Delete Table from the menu.
1.1. To adjust the table
1.1.1. Right‐click on the table.
1.1.2. Select Table Properties fro 1.1.3. Make your modifications and click OK.
1.2. To delete the table:
1.2.1. Right‐click on theFigure 14 ‐ Table Context Menu

1.3. To adjust cell properties:
1.3.2. Select Cell from the menu.
1.3.3. elect Cell Properties.
Figure 16 ‐ Cell Properties
1.3.4. Cell Properties give you the following
• Width: To set the cell width in pixels or in percentage of the table width.
• Height: To set the height of the cell.
ord Wrap: To turn on/off word wrapping.
orizontal Alignment: To determine the horizontal alignment of the text in your cell. It
seline.
olumns span: To extend cells on a horizontal row (left and right).
1.3.1. Right‐click on the table.
S
The Cell Properties screen appears.
10
Figure 15 ‐ Accessing Cell Properties
options:
• W
• Hcan be set to Left, Center or Right.
• Vertical Alignment: To determine the vertical alignment of the text in your cell. It canbe set to Top, Middle, Bottom or Ba
• Rows span: To extend vertical rows.
• C

• Background color: To set the backgroc
11
und color of your cell. You can either select a olor or type it manually.
order Color: To set the color of your cells border. You can either select a color or type
1.4. 1.4.1. ‐ on the table.
1.1. In the WYSIWYG Editor, place your cursor where you would like the image to appear.
1.2. Click on the Insert/Edit Image button. The Image
Figure 18 ‐ Image Properties
• B
it manually.
To insert or delete rows, columns and cells:
Right click
1.4.2. Select Cell, Row or Column 1.4.3. Select Insert or Delete
Images
Figure 17 ‐ Adding & Deleting Cells, Rows & Columns
Properties screen appears.

1.3. Click on the Browse Server button to upload an image from your computer hard drive, USB flash drive or network. The Browse Server button is located to the right of the URL field.
1.4. On the next screen, which displays the site’s media assets directory, click on Upload.
1.5. The File: field appears. Click on the Browse… button.
1.6. Locate and select the file you want to upload and click on the Open button.
1.7. Click on the Upload button. The file has the File name list.
.8.1. If you need to delete the image file, click on the file name to select it then click on Delete.
1.8.2. If you need to image, click on the file name to select it then click on Resize. Enter a new width and a new height then click on the Resize button.
1.8.3. If you would like to create a thumbnail, click on the file name to select it then click on
then click on the Create thumbnails button.
on Send to FCKEditor to close the window and place the image on the Image Properties screen. Note that the path to the image fills the URL field pears in the Preview pane.
1.10. Enter a short image description in the Alternative Text field. This is for inputting text to display in case the image does not appear.
Figure 19 ‐Media File Manager
12
now been added to
1.8. You can manipulate the image, if necessary: 1
resize the
Thumbnails. Check one or more of the size options
1.9. Clickand that the image ap

13
Figure 20 ‐ Image URL & Alternate Text
Image positioning The default placement of an image is left aligned, with the base of the image lining up with the base of any text next to the insertion point. When an image is left aligned, any text next to that image will start at the top of the image and wrap around the right and bottom of the image. The tool for inserting the image lets you change the alignment of the image.
1.1. Select Right from the Align drop‐down list to align the image to the right. The text will then wrap around the left and bottom of the image.
The default spacing between the image and the text is narrow. You can increase both the vertical and the horizontal spaces around the image.
1.2. Enter your spacing in pixels in th ace and in the VSpace field for vertical
space. In our example, we have 50 for hspace and 15 for vspace. Refer to figures 15 and 16 to see how e affect the positioning of text around the image.
e HSpace field for horizontal sp
hspace and vspac

14
Figure 21 ‐ No Spacing
Figure 22 ‐ Spacing
1.3. By default, the image does not have a border. You can add a border around the image by entering a thickness value in the Border field. The number you input will be the width in pixels of the border. The higher the number, the thicker the border becomes.
1.4. Click on the Link tab if you need to link the image to another webpage. 1.4.1. Enter a URL to an external website or click on the Browse Server button to link the image to a
page on your site.
1.4.2. If you would like the link to open up in a new window, select New Window (_blank) from the
the edit screen.
1.6. If you need to modify these image properties, right‐click on the image and select Image Properties
pull‐down menu under Target.
1.5. Click on OK to set the image properties and return to
from the menu.

15
You n easily copy/cut content created outside Drupal into the editor.
1.1. and copy/cut the content you need to insert into your Drupal page.
depending on the web browser you are using.
1.3. Hit ctrl+V to paste the content into the window.
Revision Information
You find the Revision Information feature below the WYSIWYG editor. This tool allows you to create a
1.1. on Revision Information to expand the area.
1.2. the checkbox next to Create new Revision.
1.3. Enter an explanation for the revision in the Log Message window.
Figure 23 ‐ Revision Information Entry
You will now see a Revisions tab when viewing the page.
Figure 24 ‐ Revisions Tab
Pasting content into the WYSISYG editor
ca Select
1.2. In the WYSIWYG editor, right‐click where you want to insert content and select Paste. A Paste windowmay appear
1.4. Click Ok.
will
history of edits made to the page along with explanations of the additions and changes made. Click Select

16
1.4. Click on the Revisions tab to view the history of revisions, revert to an earlier revision, and delete
revisions.
Figure 25‐ Revisions Log
1.4.1. To delete a revision, click on de sion to be removed.
Figure 26 ‐ Delete Confirmation
1.4.2. To revert to an earlier revision, click on revert next to the revision set to replace the current version.
Figure 27 ‐ Revert Confirmation
Note that the reverting mechanism does rrent revision. Instead, it clones the earlier revision. For example,
you have 4 revisions: 1, 2, 3, current. When you decide to revert to revision 2, a copy of revision 2 is made and set as the current revision. You then have 5 revisions: 1, 2, 3, 4, current, where revision 4 is the previous current revision and the current revision is a copy of revision 2.
lete next to the revi
not delete the curevision that the page is reverted to and places that copy ahead of the replaced

17
1.4.3. Click on the Edit tab.
File attachments
1.1. Click on File attachments to expand the area.
1.2.
1.3. Click once on the file to select it then click on the Open button.
Attach button. The file uploads.
Figure 30 ‐ Attached File
Figure 28 ‐ File Attachments
Click on the Browse button to find your document. You may upload any document with the following extensions: jpg, jpeg, gif, png, txt, doc, docx, xls, xlsx, pdf, ppt, pptx, pps, ppsx, odt, ods, odp. The maximum file size is 100 Megabytes.
1.4. Click on the
Figure 29 – Attachment

1.5. The attached file is placed on the page but it will not be accessible by users unless you place a link to the document on the page.
18
1.6. a link to the document.
want to insert the link to the attached file.
1.6.2. Enter some text for the link and highlight it. (i.e.: Click here to view document) 1.6.3. Click on the Insert/Edit Link button on the toolbar. The Link window appears. 1.6.4. Click on the Browse Server button. 1.6.5. Click on the file you attached to select it. 1.6.6. Click on Send to FCKEditor. 1.6.7. Click Ok.
Authoring information This section conta user who edited the page as well as a time/date stamp.
his area lets you set the publishing options for the page. The
• Published: This option sets a flag on the content you are nce you click on
the Submit button, the content will appear on the site. If it will be stored, but it will
remain invisible to most users.
Insert
1.6.1. Place the cursor in the editor where you
ins the name of the
Figure 31 – Authoring Information
Publishing options Tdifferent options will do the following:
editing that marks it as being published. O
is not published, the content
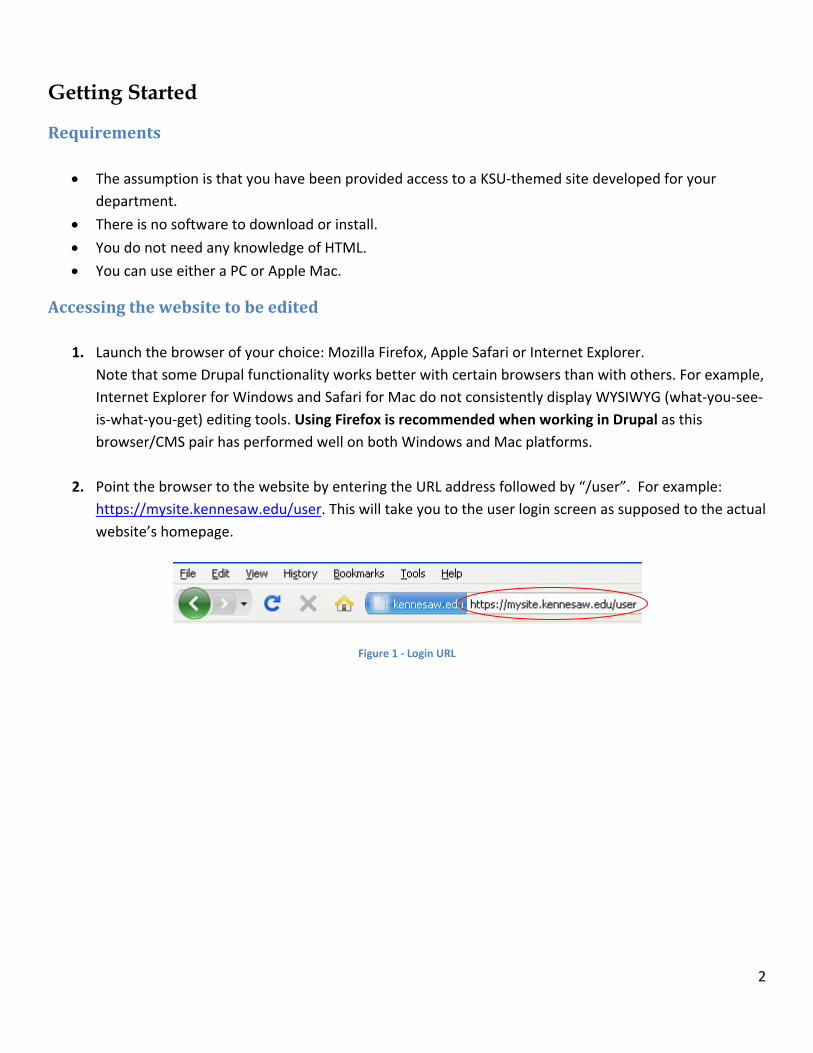
• Promoted to front page: This option will place the content on the front page of your site.
• Sticky at the top of lists: This option sets a flag on the content that tells the system that if the in a list, then this item will float at the top of the list.
1. the
content is shown
Click on the Preview button at the end of the page. The content preview appears at the top ofpage. Always preview before submission for confirmed output.
2. Click on the Submit button at the bottom of the page. A confirmation message should appear to
inform you that the page has been added and the menu link has been created.
3. Log out then click on the link to the page you just created to see how your page appears to site visitors.
4. To log back in, return to https://mysite.kennesaw.edu/user
19
.
Editing an existing page
to the page you want to modify.
2.
3.
4.
Deleting
2. Click on the Edit tab.
Editing
1. Click on the link Click on the Edit tab. Make your edits. Click on the Save button.
an existing page
1. Click on the link to the page you want to modify.
3. Click on the Delete button at the bottom of the page.
the Navigation Bar Links
Figure 32 ‐ Edit the Navigation Bar Links

20
gation Bar Links under Manage Your Site to access the Navigation Bar Menu.
screen appears.
Figure 33 ‐ Navigation Bar Menu
2. The List Items tab allows you to configure2.1. The Enabled option allows you to set the links visibility on the navigation bar.
2.3. Select its checkbox to make a menu item visible.
2.4. Drag and drop menu items to reorder them by clicking and dragging this symbol:
2.5. Select the Expanded checkbox to display any child links.
2.6. Click on edit next to the menu item you want to edit. 2.6.1. Make your changes. 2.6.2. Click on Save.
2.7. Click on delete next to the menu item you want to delete and confirm the deletion.
1. Click on Edit the Navi
The Navigation Bar Menu
your menu items.
2.2. De‐select a checkbox to render a menu item invisible.
Figure 34 ‐ Reordering Menu Items

21
Figure 35 ‐ Menu Item Deletion Confirmation
2.8. Click on the Save Configuration button to validate all of your changes. 3. The Add item tab lets you add one or more menu items to the navigation bar menu.
3.1. Enter the actual link into the Path field. 3.2. Enter a Menu Link Title to be displayed on the navigation bar. 3.3. Enter an optional descriptio when a mouse cursor hovers
3.5. Set the link as parent or place it under a Parent Item.
3.6. Set an optional weight to adjust the order of the links. 3.7. Click on the Save button.
n. This description will be displayedover the menu item. 3.4. Select the Enabled and Expanded options as needed.

22
Figure 36 ‐ Adding a Menu Item

23
4. The Edit Menu tab allows you to change the name of the navigation bar menu and its description.
Figure 37 ‐ Edit Navigation Bar Menu Title
Editing the Left Sidebar Links Click on Edit the Left Sidebar Links under Manage Your Site to access the Left Sidebar Links.
The Left Sidebar Links screen appears. Follow the same steps as for the Navigation Bar Menu.
Figure 38 ‐ Left Sidebar Links

Adding to the FAQ
24
Frequently Asked Questions or FAQ’s can be great resources for helping site visitors find information. In Drupal, you enter each question as a separate piece of content. Each question added will appear, and when clicked on, its answer will be revealed. Creating a FAQ: If you wish to create a new page, click on “Add to the FAQ.” from the Manage Your Site menu on the left side of the page.
The Create FAQ screen appears.
Figure 39 ‐ Create FAQ

25
1. Click on Menu Settings to expand the area and enter the information as you did when you created a new page.
2. Enter the question yo wish to display in the Question: text field.
3. Enter the answer to your question in the Answer: text field.
4. Scroll down to the other options and enter any information as necessary.
5. Click on the Preview button at the end of the page. The content preview appears at the top of the page.
Figure 40 ‐ Preview FAQ
6. Click on the Save button when you are done adding the content. 7. Repeat the process to add additional questions and answers to the FAQ’s.
Editing a FAQ
1. Go to the Frequently Asked Questions page, and then go to the FAQ you need to modify.
2. Click on the question. An Edit tab appears.
3. Click on the Edit tab, make your modifications, and click on Save.
Deleting a FAQ
1. Go to the Frequently Asked Questions page, and then go to the FAQ you need to delete. 2. Click on the question. An Edit tab appears. 3. Click on the Edit tab, and click on Delete at the bottom of the page.
u

26
ly of a website. By default, a page entry does not allow visitor
comments and is not featured on the site's initial home page.
the first page that site visitors see.
A story, similar in form to a page, is ideal for creating and displaying content that informs or engages website visitors. Press releases, site announcements, and informal blog‐like entries may all be created with a story entry. By default, a story entry is automatically featured on the site's initial home page, and provides the ability to post comments.
Node A node is a piece of content in Drupal, typically corresponding to a single page on the site, which has a Title, an optional Body, and perhaps additional fields. Examples of nodes are polls, stories, book pages, images, etc.
Path A path is the internal address of a node or content. (i.e.: node/15)
URL The URL (Uniform Resource Locator) is the text you type into the address bar of your web browser to access a web page. (i.e.: http://mysite.kennesaw.edu/node/15)
TeaseThis is a paragraph which only contains the first few words or sentences of a piece of content, usually with a link to the complete node.
Content Content is typically text, images, video, and downloadable files. Most of the content exists as nodes but everything placed within blocks, menus, and so forth is also content.
FCKeditor FCKeditor is a lightweight text editor to be used in web pages. It provides most of the commonly used functions from desktop editors like Word to the web. By using FCKeditor you can write text, format it, create tables, insert images, and add hyperlinks.
Hyperlink or Link A section of text or image on a web page that, when clicked, will take you to another web page.
Drupal Terms Page
A page, similar in form to a story, is a simple method for creating and displaying information that rarechanges, such as an "About us" section
Front Page This is
Story
r

27
formation Technology Services (ITS) Service Desk
If you need additional help getting familiar with the new system, you may contact the Service Desk by phone .edu
Getting Help In
at 770‐423‐6999 or by email at service@kennesaw .


![Edition 2012/13 CMS - lcprod [ CMS - Content Management System ] • Grandadam E. • LCProd CMS Content Management System Wordpress eZ Publish... Joomla ! Prestashop Jahia Typo3 Drupal](https://img.dokumen.tips/doc/110x75/60bc729d97fe2172a77bd733/edition-201213-cms-lcprod-cms-content-management-system-a-grandadam-e.jpg)