Embed Size (px)
Citation preview

Macromedia
Dreamweaver 8 Tutorial

DREAMWEAVER 8
2
Table of Contents
Accessing Dreamweaver 8 .............................................................................. 3
Introduction ..................................................................................................... 3
Start up Window ............................................................................................. 3
Defining a Site ................................................................................................. 4
Templates ........................................................................................................ 6
Using Assets panel to Create a New Template ...................................... 6
Inserting an Editable Region .................................................................. 7
Creating / Saving an HTML document based on a Template......................... 8
Work Space ..................................................................................................... 8
Page Properties .............................................................................................. 10
Tables ............................................................................................................ 11
Entering and Formatting Text ....................................................................... 12
Inserting Images ............................................................................................ 12
Links .............................................................................................................. 13
Navigation Bars ............................................................................................. 14
Adding Pages using Templates ..................................................................... 15
Named Anchors ............................................................................................. 16
Previewing in a Browser ............................................................................... 17

DREAMWEAVER 8
3
ACCESSING DREAMWEAVER 8
• To access Macromedia Dreamweaver 8 go to the Start menu >> All Programs
>> Macromedia >> Macromedia Dreamweaver 8
• OR double click on the Macromedia Dreamweaver 8 icon on your desktop.
INTRODUCTION Macromedia Dreamweaver 8 is a professional HTML editor that allows you to
easily build web pages. Visual editing features aid in creating and managing documents
for web publication. To begin creating a site, use the start up window as shown below.
START UP WINDOW
Sample Web pages
Recent Pages
Creating New Web pages

DREAMWEAVER 8
4
• Recent Pages- contains the most recently accessed documents
• Creating New Web pages- contains file types, defining a new web Site, or More
options
• Sample Web pages- contains built in designs and styles
DEFINING A SITE
Defining a site in Dreamweaver assists the developer in capturing and accessing all
relevant files relating to the web site. The process includes naming the site, placing local
files on a directory on the hard drive, and defining where those files will be published
on the Web.
• Select “Dreamweaver Site…” from the Create New column on the start up
window.
• The site definition wizard will then walk you through the steps to creating your
new web site. (NOTE: Make sure the Basic tab is displayed).

DREAMWEAVER 8
5
• Name your site and click Next.
• Select the option “No, I do not want to use a server technology” and click Next.
• Select the option “Edit local copies on my machine, then upload to server when
ready”.
• Decide where you want to store the local files. Click on the Folder icon , and
then click Select and click Next.
• Using the drop down menu, change the “How do you connect to your remote
server?” to “None”. Click Next.
• Review the options to make sure everything is correct. Click Done.
At this point you have successfully set up a site in Dreamweaver. Under the files tab
of the resource pane you should see a folder with the name of your site.

DREAMWEAVER 8
6
TEMPLATES
A template can be created from an existing document or can be created from a
new document. To create a new template:
• Select File > Open and select the existing document that you want to save as a
template.
• OR select File > New to create a template from a new, blank document. Select
Basic Page or HTML and then click Create.
• After the document opens, select File > Save as Template OR in the Common
category of the Insert bar, click on the Templates button then select Make
Template.
• The Save As Template dialog box appears.
• From the Site pop-up menu, select the site to save the template in and then enter a
name for the template in the Save As text box. Click Save.
Using the Assets panel to create a new template
• In the Assets panel (under Window > Assets) select the Templates category button
on the left side of the panel.
• The Templates category of the Assets panel appears. Click the New Template
button at the bottom of the Assets panel.

DREAMWEAVER 8
7
• A new template is added to the list of templates in the Asset panel. While the
template is still selected, enter a name for the template.
Inserting an Editable region
NOTE! The document you are working with must be saved as a template before
inserting an editable region!
An editable region can be placed anywhere within your page, however if you are
making a table there are some things to consider. An entire table or an individual table
cell can be marked as editable, but you cannot mark multiple tables as a single editable
region. The editable region includes the region around the cell if a <td> tag is selected.
If this tag is not selected, the editable region affects only content inside the cell.
To insert an editable region:
• In the Document window, select the text or content that you want to include in
your editable region OR place the cursor where you want to insert an editable
region.
• Do one of the following steps to insert an editable region at this location:
� Select Insert > Template Objects > Editable Region
� Right click then select Templates > New Editable Region
� In the common category of the Insert bar, click the down arrow on
the Templates button and then click on Editable Region.
• The editable region dialog box will then appear. In the name box, enter a name
for the region. (NOTE: You cannot use the same name for more than one editable
region). Click OK when finished.
The editable region in the template will be enclosed by a highlighted rectangular
outline. In the upper-left corner of the region there will be a tab that shows the name of
the region.

DREAMWEAVER 8
8
CREATING / SAVING AN HTML DOCUMENT BASED ON TEMPLATE
To create a new HTML document based on a template:
• From the Dreamweaver Start Up Window under the Create New web pages
column click on More then select the template tag.
• Select the template that you would like to create as an HTML document and then
click Create. The template will open as a new HTML document.
To save an HTML document:
• Go to File > Save As and save the document as a .htm file.
WORK SPACE
Dreamweaver provides an all-in-one window layout. In Dreamweaver, you can
decide between a Designer and Coder workspace layout. (You can also use Split
Window to display both the designer and coder screens. This application is found at the
top left corner of the template). The first time you start Dreamweaver, you are prompted
to select a type of workspace layout. At any time, you can switch to another type of
workspace layout. To do this select Window > Workspace Layout > and select desired
workspace layout type.
• Designer workspace- uses Multiple Document Interface (MDI) in which all
document windows and panels are integrated into one larger application window.
In this workspace the panel groups are docked on the right.
• Coder workspace- uses the same integrated workspace, however the panel
groups are docked on the left of the screen. In this layout, the document
window automatically shows the Code view by default.

DREAMWEAVER 8
9
Example of Designer Workspace
Example of Coder Workspace
Document Window Insert Bar Document Toolbar Panel Groups
Property Inspector
Tag
Selector
Panel Groups
Document Window Document Toolbar Insert Bar
Property Inspector
DREAMWEAVER 8
10
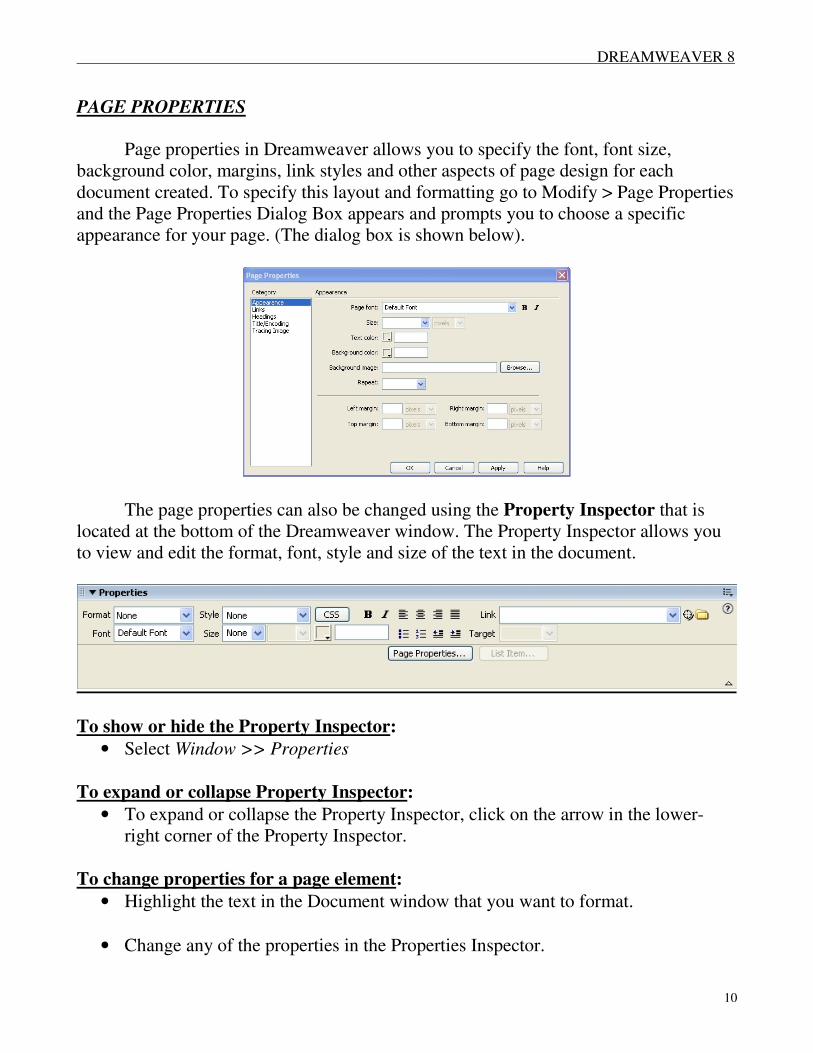
PAGE PROPERTIES
Page properties in Dreamweaver allows you to specify the font, font size,
background color, margins, link styles and other aspects of page design for each
document created. To specify this layout and formatting go to Modify > Page Properties
and the Page Properties Dialog Box appears and prompts you to choose a specific
appearance for your page. (The dialog box is shown below).
The page properties can also be changed using the Property Inspector that is
located at the bottom of the Dreamweaver window. The Property Inspector allows you
to view and edit the format, font, style and size of the text in the document.
To show or hide the Property Inspector:
• Select Window >> Properties
To expand or collapse Property Inspector:
• To expand or collapse the Property Inspector, click on the arrow in the lower-
right corner of the Property Inspector.
To change properties for a page element:
• Highlight the text in the Document window that you want to format.
• Change any of the properties in the Properties Inspector.

DREAMWEAVER 8
11
• The change should be immediately applied to the highlighted text in the
Document window. (NOTE: If the changes are not seen immediately, you can
click outside of the property-editing text field or press the ENTER key.)
TABLES
To insert a table into a Dreamweaver document:
• In the Design view of the Document window, place the cursor where you want to
table to appear.
• You can then either select Insert > Table OR in the Common category of the
Insert bar, click the Table button.
• The Insert Table dialog box then appears.
• Complete the dialog box and click OK. The table will then appear in the
document.

DREAMWEAVER 8
12
ENTERING AND FORMATTING TEXT
To enter text in your document:
• Type text directly into Dreamweaver Document window
• OR you can use the cut and paste functions (this can be done by using Edit >
Paste or Edit > Paste Special)
To format text in your document:
• Select the text you want to format. If there is no text selected, the changes that
you make will be applied to the following text you type.
• The font can then be changed by selecting a specific font type from the Property
Inspector.
• OR you can use the Text > Font drop down menu.
• OR right click on selected text and select Font from submenu.
INSERTING IMAGES
To insert an image into a Dreamweaver document:
• Place the cursor where you want the image to appear in the Document window.
• From the Common category of the Insert bar, select the Image icon.
• The type of image source must then be selected in the dialog box. Select File
System for a graphic file or Data Source to choose a dynamic image source.
• Browse to select the image that you wish to insert into the document and click
OK.
• The Image Tag Accessibility Attribute dialog box then appears (shown below).
Enter values in the Alternate Text and Long Description text boxes then click
OK.

DREAMWEAVER 8
13
LINKS
How to insert a link to an image or text in your Dreamweaver document:
• Select the text or image where to want to apply the URL link.
• From the Common category of the Insert bar, select the URL icon.
• The following dialog box appears:
• Enter the link and click OK.
NOTE: A link can also be added by selecting the desired text or image, and typing
the URL address into the Link space in the Property Inspector located at the bottom
of the window.
The highlighted text
that you selected
appears here
Insert the
URL link here
Frame or
window in
which linked
content opens Keyboard
equivalent
Title for hyperlink # for tab order

DREAMWEAVER 8
14
NAVIGATION BARS A Navigation Bar consists of an image (or of multiple images) that changes
display based on the user’s actions.
To create a Navigation Bar:
• In the Common category of the Insert bar, click the images icon and then
select the Insert Navigation Bar button. (You can also create a Navigation bar by
selecting Insert > Image Objects > Navigation Bars).
• The Insert Navigation Bar dialog box appears. (Next page).
• Enter the Element name.
• Enter the image to be inserted into the navigation bar under the Up Image, Over
Image, Down Image, or Over While Down Image. (NOTE: The images must be
saved on the Hard Drive prior to creating the Navigation bar).
A navigation bar element can have four states:
Up : The image that will appear when the user hasn’t clicked on the
element.
Over: The image that will appear when the user moves the pointer over the
Up image.
Down: The image that will appear after the element has been clicked.
Over While Down: The image that will appear when the pointer is over
the Down image, after the element has been clicked.
• Insert the URL address that you want to be displayed after the Up image is
clicked.
• Click OK.

DREAMWEAVER 8
15
NOTE: This is your only opportunity to define the page placement of the Navigation
Bar!!!! (Select whether you want the navigation bar to appear vertically or horizontally
in the document. Also select the “Use tables” checkbox if you want to insert the
navigation bar as a table.)
To modify a navigation bar:
• Select Modify > Navigation Bar and the Modify Navigation Bar dialog box
appears. Select the element you want to edit and make the desired changes.
• Click OK.
ADDING PAGES USING TEMPLATES
To add pages using templates:
• Go to File > New and the “New from
Template” box will appear.
• Click on the Template tab and then click
Create.
Add elements Promote elements Demote elements
Navigation Bar
Page placement

DREAMWEAVER 8
16
NAMED ANCHORS Creating anchors in Dreamweaver allows the user to link to a specific place in a
document. After a specific anchor is named, you can create links to these named
anchors and this will quickly take users to a specific spot on your document.
To create a named anchor in a Dreamweaver document:
• Put the cursor at the area where you want the named anchor to appear.
• Select Insert > Named Anchor OR in the Common category of the Insert bar,
click the Named Anchor button.
• The Named Anchor dialog box appears as shown below.
• Type the name for the anchor and click OK.
• The anchor should appear where you had placed your cursor.
To link to a named anchor:
• In the Link text box of the Property Inspector, type the number sign (#) along
with the name of the anchor.
• To link to an anchor named “WCU” in the document you are currently working
in, type #WCU
• To link to an anchor named “WCU” in a different document type the
filename.html#WCU
**NOTE: Anchor names are case sensitive!

DREAMWEAVER 8
17
PREVIEWING IN A BROWSER
NOTE: The Dreamweaver document MUST be saved prior to previewing in a
browser!!
To preview your Dreamweaver document in a browser:
• Click on the globe icon on the top of the Document window. Select Preview
in IExplorer. The document will display in the primary browser.
• OR press F12 to display and preview the document.
• You can also press Control+F12 to display and preview the document in a
secondary browser. (This secondary browser should be pre-defined).
NOTE: Be sure to click on all the links while your document is being previewed in the
browser to ensure that all links are working properly. When you are finished testing
these links close the page in the browser.

Copyright 2012, Software Application Training Unit, West Chester University. A member of the Pennsylvania State System of Higher Education.
No portion of this document may be reproduced without the written permission of the authors. For assistance, call x3350.