Embed Size (px)
Citation preview

Dreamer 500HD
Multimedia
500HD User Manual
Basic on NXP8735
DVB FTA/CAS Ethernet port
Smartcard LINUX OS

User Manual Dreamer500HD PVR
- 2 -
Table of contents
1. Language setting………………………………………………………………………………….3 2. The operation steps to update new software……………………………………………4 3. The operation steps to update Bootloader ………………………………………………6 4. Card sharing menu hide and show………………………………………………………… 8 5. The operation steps to import Softcam through U disk………………………………10 6. UpLoad/DownLoad Softcam through client browsere…………………………………12 7. UpLoad/DownLoad database bin file through client browsere………………….…15 8. upload and dowload channel by U disk ……………………………………………………18 9. U_M for MAC modify………………………………………………………………………………21 10. U_M for Dreamer to use USB wifi……………………………………………………………23 11. NSF sharing and samba setting for Dreamer………………………………………………25

User Manual Dreamer500HD PVR
- 3 -
K-Butten.
1. Language setting 1.1 Step by step to operate:Menu--->Settings--->Preferences--->Ok
1.2 Using Up/Down-Butten to select Language Setting.
1.3 Pressing OK-Butten brings up to the language service list. Then you can select any language you want, after that press O

User Manual Dreamer500HD PVR
2.The operation steps to update new software
2.1 Copy the “files” dir to your U disk (make sure the “files” dir is under root dir, not subdir of the disk) 2.2 Insert your U disk 2.3.Stepwise operation by remote
2.3.1 Pressing Menu-Butten brings up the service menu, then select USB Function-Butten.
2.3.2 Pressing OK-Butten brings up the USB Menu service list, then select “sda” dir.
- 4 -
2.3.3 Pressing Ok-Butten brings up service list. using Up/Down-Butten on your remote control to select “files” subdir. 2.3.4 Then pressing Ok-Butten activates the service list.

User Manual Dreamer500HD PVR
- 5 -
2.3.5 Using Left/Right-Butten to select STB/SW Upgrade 2.3.6 Using Up/Down-Butten to select the “.BIN” file.
2.3.7 Pressing OK-Butten. Then select red key-press(Update Info), after that press OK-Butten activates the service list.
2.3.8 Select Software and press OK-Butten, Then your softe will be strated to updatting.

User Manual Dreamer500HD PVR
- 6 -
3.The operation steps to update Bootloader
3.1 Copy the “ubootdir” to your U disk 3.2 Insert your U disk 3.3.Stepwise operation by remote
3.3.1 Pressing Menu-Butten brings up the service menu, then select USB Function-Butten.
3.3.2 Pressing OK-Butten brings up the USB Menu service list, then select “sda” dir.
3.3.3 Pressing Ok-Butten brings up service list. using Up/Down-Butten on your remote control to select “ubootdir” subdir.

User Manual Dreamer500HD PVR
- 7 -
3.3.4 Then pressing Ok-Butten
3.3.5When u find the new logo come out pls power off then power on again
Pay close attention: During the updating time forbid to power off, otherwise u would have to change the Flash on the board

User Manual Dreamer500HD PVR
- 8 -
4.Card sharing menu pass setting and hide&show
4.1 Pressing Menu-Butten brings up the service menu, then select Preferences-Butten. 4.2 Pressing OK-Butten brings up the Preferences Menu service list, then select SoftCam Control
4.3 Input 5000(defalt pass) at the edit box of Old PIN and input your new password at the edit box of New PIN and Verify PIN such as 5337(the new pass must bigger than5000)

User Manual Dreamer500HD PVR
- 9 -
4.4 Enter into 5337 in your remote control directly if you want to hide the card sharing menu.
4.5 You will not find the “Softcam Setep”
4.6 Enter into 5337 in your remote control if you want to show the card sharing menu.
4.7 You will find the “Softcam Setep”

User Manual Dreamer500HD PVR
5.The operation steps to import Softcam through U disk 5.1 The file which the card sharing account must be named "Softcam.cfg" and the location must be U
disk root path
5.2 The account format should be Ccccam(C: server-IP port account password u-Flag),Newcam(N: server-IP port user password u-Flag),pay attention to leave the space mark example,C: www.baidu.com 5555 hello himan yes ; N: www.test.cn 76000 test1 test1 1234567890123412345678901234 yes
5.3 connect ur Dreamer500-HD with router by network cable 5.4 Step by step to operate: Menu--->Settings--->Network setup--->Ok
5.4.1 Using Up /Down-Butten on your remote control to select “Dhcp”, then using Left/Right-Butten to select Enable and press OK-Butten . 5.4.2 .Input your U disk and enter the OSD function where the Softcam setting, (password is 0000) 5.4.3 Bring up to the service list of SoftCam Setup after passwork was confirmed. Then use Left/Right-Butten to select CCCAM at Share mode bar, and press OK-Butten
- 10 -
5.4.4 Select the red key, then import the account file .

User Manual Dreamer500HD PVR
- 11 -
Account import success!
5.4.6 Using Left/Right-Butten to Change the Server List and select one account,click blue bottom.
Now exit menu and u can enjoy the card sharing function 5.5 Mostly you can imported 16 PCS accounts. Press the green button if you want to clear current

User Manual Dreamer500HD PVR
accounts, Press the yellow button if you want to clear all accounts.
6. UpLoadDownLoad Softcam through client browsere 6.1 Connect Dreamer By Network and Power On
6.2 Enter The “Settings-Network Setup” Make Sure The IP Address Can Be Found In The Net , For Example The IP Address maybe 192.168.1.97
6.3 Open Your Internet Explorer And Print 192.168.1.94 into The URL
- 12 -
6.4 Click “Browse”which the Icon is
Then Select the Softcam.cfg

User Manual Dreamer500HD PVR
6.5 Please Click “submit” Which The
Icon Is
6.6 The Softcam.cfg will be sent to the Dreamer
U can check the Softcam from
the softcam setting menu of
Dreamer
- 13 -
6.7 Please Click “Softcam Dowload” Which the Icon is Then Select the “Save”

User Manual Dreamer500HD PVR
- 14 -
6.8 Select the path Then Click “Save”
6.9The Softcam will be dowloaded to local from Dreamer
User Manual Dreamer500HD PVR
- 15 -
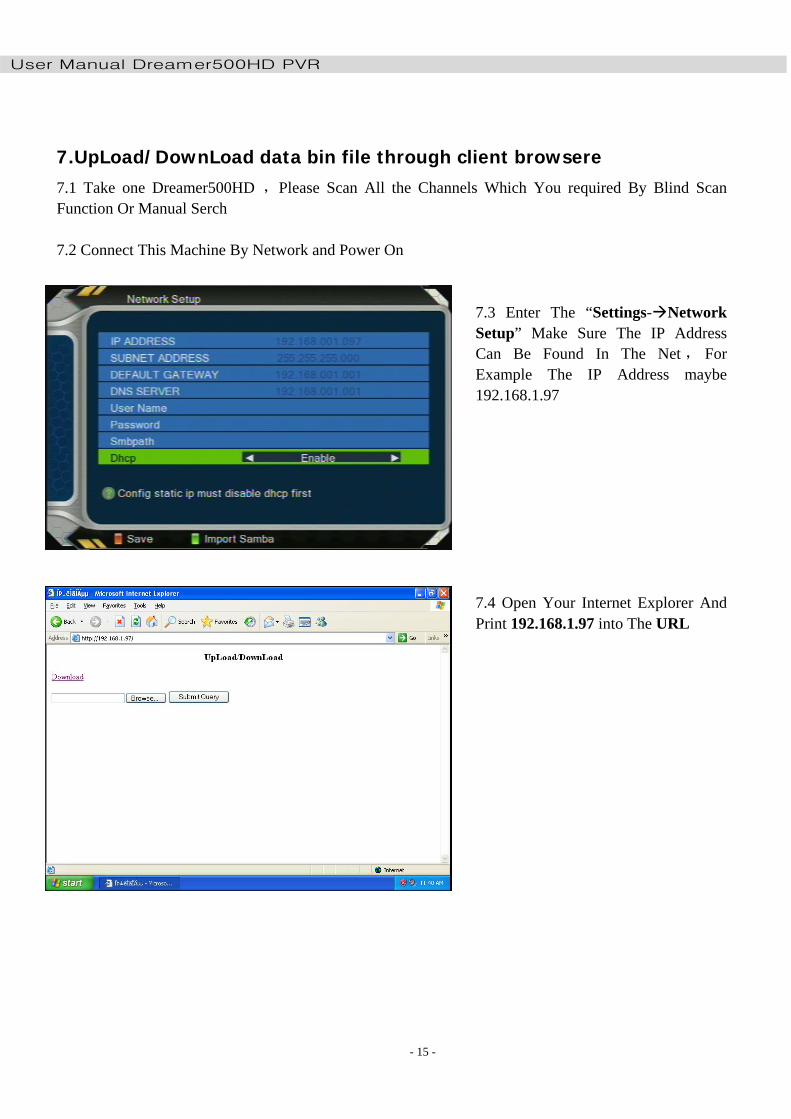
7.UpLoad/DownLoad data bin file through client browsere 7.1 Take one Dreamer500HD ,Please Scan All the Channels Which You required By Blind Scan Function Or Manual Serch 7.2 Connect This Machine By Network and Power On
7.3 Enter The “Settings-Network Setup” Make Sure The IP Address Can Be Found In The Net , For Example The IP Address maybe 192.168.1.97
7.4 Open Your Internet Explorer And Print 192.168.1.97 into The URL

User Manual Dreamer500HD PVR
- 16 -
7.5 Click “Download”, You will Save The Channel Package, The File Name Is Dreamer_1.00_256K.bin

User Manual Dreamer500HD PVR
7.6 Please send The File to your distributor or clients
7.7 Please Click “browse” Which
the Icon is Then
Select the Dreamer_1.00_256K.bin
7.8 Please Click “submit” Which The
Icon Is
- 17 -
7.9 The channel package will be uploaded , then the machine will restart later

User Manual Dreamer500HD PVR
8. upload and dowload channel by U disk
8.1Installation and Antenna Setup
8.1.1 Pressing Menu-Butten brings up the service menu, then select Installation-Butten
8.1.2 Pressing OK-Butten brings up the Instalation Menu service list, then select Antenna Setup
- 18 -
8.1.3 Here finish the device setup,Pressing Yellow-Butten

User Manual Dreamer500HD PVR
- 19 -
8.1.4 Then all the channels will be searched to your Dreamer
8.2 Insert your U disk
8.2.1 Pressing Menu-Butten brings up the service menu, then select USB Function-Butten.
8.2.2 Pressing OK-Butten brings up the USB Menu service list, then select “sda” dir.

User Manual Dreamer500HD PVR
8.2.3 Pressing Ok-Butten brings up service list. using Left/Right-Butten on your remote control to select STB/SW Upgrade
8.2.4 Pressing Yellow-Butten , the channel package will upload to your U disk
8.3.1U can open the DREAMER_1.00_256K.bin by “USERDB_CHANNEL_EDIT_NXP V1.0.1.exe” and edit the
- 20 -
8.3.2 using Up/Down-Butten to select DREAMER_1.00_256K.bin , Pressing Red-Butten and select Data , then Pressing OK-Butten U can update the channel to every Dreamer500HD

User Manual Dreamer500HD PVR
- 21 -
9.U_M for MAC modify This file will help u using V1.4_nxp_setMac.exe to modify the MAC of your Dreamer 9.1. Connect your Dreamer with PC by RS232 cable,click V1.4_nxp_setMac.exe 9.2. Setting Serial Port,such as COM8
9.3.Please input the correct MAC address at the MAC section such as 00:06:37:03:00:55
9.4Click “LINK” and V1.4_nxp_setMac.exe is waiting Dreamer Reboot

User Manual Dreamer500HD PVR
- 22 -
9.5Power on dreamer,V1.4_nxp_setMac.exe begin to modify MAC,later will pop out "set Mac success!"
9.6Power off Dreamer and click “LINK” ,then power on Dreamer again,the MAC will increase and be setted to the Dreamer

User Manual Dreamer500HD PVR
- 23 -
10. U_M for Dreamer to use USB wifi
10.1 Insert your USB wifi stick 10.2 Power on your Dreamer 10.3.Stepwise operation by remote
10.3.1 Pressing Menu-Butten brings up the service menu, then select Wlan setup.
10.3.2,using Up/Down-Butten on your remote control to selec select your wlan . Pressing OK-Butten brings up the Wlan setup service list 10.3.3 using Up/Down-Butten on your remote control to select “ Password ” , Pressing OK-Butten.

User Manual Dreamer500HD PVR
- 24 -
.
10.3.4 Input the password and pressing Ok-Butten
10.3.5 pressing RED-Butten
10.3.6 It will pop out “please waiting
connecting”

User Manual Dreamer500HD PVR
11,NSF sharing and samba setting for Dreamer
11.1. Sharing folder Setup
11.1.1 Select Tools and brings up Folser Options
- 25 -
11.1.2 Select View and Deselected Use simple file sharing,click OK

User Manual Dreamer500HD PVR
- 26 -
11.1.3 Select one folder “anonym” and change its properties,click Sharing
11.2 Dreamer Setup
11.2.1 Pls make sure Dreamer connect to Ethernet, no matter using USB wifi or innternet cable.

User Manual Dreamer500HD PVR
- 27 -
11.2.2 Call Sttings by remote
11.2.3 brings up Network Setup input Username:LZL Password:totti760912 Smbpath:192.168.1.98/anonym Pressing Red-Butten,Save
11.2.4 The Username and Password are same with here The IP is this PC’s address which provide the sharing folder

User Manual Dreamer500HD PVR
- 28 -
11.2.5 Call USB Function by remote, Pressing OK
11.2.6 Pressing OK
11.2.7 Select one file Pressing Red-Butten to play

User Manual Dreamer500HD PVR
- 29 -
1. Samba Param Setting Import from USB Disk a) input username, password, smbpath in the following format and save as "samba.cfg". copy this file to root dir of usb disk. S: <username> <password> <sambapath> yes EXAMPLE S: LZL totti760912 192.168.1.98/ anonym yes b) plug usb disk to STB, enter Network Setup menu and press GREEN key, this will import samba.cfg. then press RED key to setup SAMBA. BTW: Username and password can't be leaved blank even if they are unnecessary to access Samba; you can input anything you want, such as S: useless useless 192.168.1.98/ anonym yes 2. Access Samba When setup success, enter the USB Function Menu, the SAMBA dir name will be smb.user<username>.