Embed Size (px)
Citation preview

DRAFT: Ecce Computational Code Registration Introduction Code registration is designed to provide a mechanism for adding new computational chemistry codes to the suite of codes already supported within Ecce. Mechanisms are provided so that developers can make use of as much pre-existing functionality as possible, primarily through the use of parsing scripts written in Perl. A toolkit based on the PyQt, a Python wrapper for the Qt GUI toolkit has also been provided to allow developers to create customized input windows for their applications. Broadly speaking, the registration process can be divided into two major components: input file generation and output parsing. The input file generation process is illustrated schematically in Figure 1 below.
Builder Basis SetTool
TemplateFile
Perl Parameters .edml File Calculation
Editor Geometry ai.input
ESP
Basis SetInput Deck
Basis Set Reformatting
Script
Theory Details
RuntypeDetails
Python Perl
Figure 1. Schematic representation of the input file generation process. Blue shaded boxes represent existing Ecce modules, olive boxes are files and scripts that must be created as part of the code registration process, and unshaded boxes are files that are produced either by Ecce modules or the scripts.
The Ecce builder and basis set tool can be used to create the basic elements of an electronic structure calculation, the geometry and basis set, and these are combined in the calculation editor. The configuration of the calculation editor can also be controlled to some extent using a .edml (Ecce Data Markup Language) file that allows the developer to specify what types of basis sets, theories, and runtypes are supported by the code. The developer can also create customized details dialogs, written in

Python, which can be used to set the remaining code parameters. These typically include settings such as convergence tolerances, maximum iteration counts, different algorithm choices etc. The geometry, basis set, and parameter lists are then exported by the calculation editor as a set of standard formatted files that are used to create the input deck (the calculation editor also export a file contain a list of electrostatic charge fitting constraint setting, but this is only used by NWChem). The files containing the geometry, basis set, and parameter settings are combined together using an ai.input script, written in Perl, to generate an input deck for the calculation. It may also be necessary to write an additional script that reformats the basis set into a form suitable for the new code, although Ecce already supports a large number of basis sets formats. The codes currently registered in Ecce also make use of an auxiliary template file to generate the input decks, but this is not required and other input file generation strategies could be used. The template strategy works quite well for keyword driven input such as NWChem. The data parsing side of code registration is relatively simple compared to input file generation. The data parsing scheme for Ecce is illustrated schematically in Figure 2.
Output
Job Monitor
Parse Descriptor
Text Block 1
Text Block 2
Text Block N
.
.
.
Parse Script 1
Parse Script 2
Perl
Calculation Viewer
Ecce DataBase
.
.
.Parse Script N
Figure 2. Schematic diagram of output parsing. Color scheme is the same as Figure 1.
The output from the computational code is parsed by a job monitoring process, which employs a parse descriptor file to select blocks of text from the output file for further processing. Each of these blocks of text is then passed through a Perl script that extracts the useful data and reformats it. The reformatted data is then stored in the Ecce data base, where users can access it via the calculation viewer. Each block of text corresponding to a different type of data (energies, geometries, polarizabilities, etc.) needs its own separate Perl script, but the individual scripts themselves are relatively simple in most cases. The steps required to register a new code in Ecce consist of the following.
• Create GUIs for setting values of the setup parameters for the code. A simple set of widgets, based on the PyQt package, has been developed that allows users to create input GUIs tailored to specific

codes in a straightforward way. The GUI then writes out the values that have been set by the user to a .param file that can subsequently be used to create an input deck.
• Write scripts to take the information in the .param file, combine it with information from the basis set
tool (if appropriate) and the molecular builder and use it to create an input deck for the new code. The current model for this is to write a template file (a .tpl file) that has “slots” for the appropriate input variables, geometry, and basis set. A series of functions are then written to replace the slots with actual values from the .param file, as well as information generated by the basis set tool and the builder. Scripts also need to be developed for converting the information on geometry and basis set (available in the .geom and .basis files) into the format appropriate for the code being registered.
• After the code has run the output must be parsed and information from it is stored in the Ecce
database where it can be accessed by the calculation viewer and calculation browser. This is done by creating a parse descriptor file (a .desc file) that is used to scan the output while it is being generated during the calculation. The output that is identified using the .desc file is then parsed by a series of scripts to extract the values from the output that are written to the Ecce database. The .desc file contains lists of strings that are searched for in the output. The strings can be used to identify the beginning, and in some cases the end, of blocks of output that contain information that is to be further parsed for useable information. The names of the database variables that the information contained in the output block will be assigned to are also contained in the .desc file, along with the name of the scripts that are used to parse the output block.
There are also some minor tasks, such as creating a .edml file for the code, not covered above. Each of these steps will be described in greater detail below.

Creation of a Graphical User Interface for Input File Generation The creation of a suitable GUI for input file generation can be accomplished using a set of widgets based on the open source PyQt package. The GUI is responsible for generating key-value pairs, where the key corresponds to some input parameter in the code being registered and the value is the value set by the user. These pairs are stored in the calculation editor and are eventually exported as a .param file, which can subsequently be used to create an input deck. The keys already in use by Ecce have the form
ES.Theory.SCF.InitialGuess The ES tells the user that the key refers to an electronic structure calculation, the Theory means that this parameter refers to the theory as opposed to the runtype, SCF indicates that parameter describes an Hartree-Fock SCF calculation, and InitialGuess is the name for the actual parameter. There is no requirement that keys have this form, however, we recommend it. The values of some of the keys are also displayed in the calculation editor if they are set to non-default values. This behavior can be controlled in the .edml file. Creation of the Details Windows All GUIs for electronic structure codes can be customized by creating two details windows, one for theories and one for runtypes. These dialogs can be invoked from the main calculation editor window. The details windows are built up from a set of widgets based on the open source PyQt package. The widget set is fairly small and only requires basic Python programming skills. It should be possible for developers to begin producing usable windows within a day or so. Developers can also make use of the existing details dialogs for examples of code or to use as templates for new dialogs. A discussion of the Ecce PyQt toolkit is provided below, additional details about the toolkit are included in Appendix A. This includes a complete listing of all Ecce PyQt widgets and their attributes. The creation of the details windows follows an object oriented programming model and some familiarity with this type of programming is useful, although not essential, in understanding the following discussion. The widget set will automatically handle details such as communications with the main Ecce calculation editor, resetting values in the details window back to their defaults, enforcing limits on input values, error notification, and restoring window settings to the values from previous sessions. The developer is primarily responsible for determining which values are set in the details windows, what the constraints or other relationships between input values are, and how the layout of the window is organized. To create a details window, the developer first needs to create a Python script corresponding to the appropriate window. The theory details window for NWChem will be used in the following discussion as an example. The minimal programming unit for creating a GUI is shown below.
# file: nedtheory.py #!/usr/bin/env python

import sys from qt import * import string from templates import * import globals import templates ###################################### ######## Initialization ############## a = QApplication(sys.argv) EcceInitialization(sys.argv) ###################################### ######## Define GUI ################## main = QWidget() mainLayout = QVBoxLayout(main) ####### Main Loop #################### EcceEventLoop(a, 0, main, mainLayout,\ "ECCE NWChem Editor: Theory Details", "")
This code should be included in any Ecce details dialog and will bring up the following window
This dialog is fairly primitive and the only thing you can do with it is close itThe initial lines of code invoke the Python interpreter and import several libraries, including the Ecce widget set (templates) and a set of globally defined variables (globals). As discussed below, the globally defined variables are particular useful for controlling the layout as the user changes the theory and runtype. The two lines in the Initialization section do two things. The first line creates a Qt application. This is required by any application using the Qt library, but developers are not required to use it in any way, other than as an argument to the EcceEventLoop function. The second line initializes the Ecce widget set. This includes setting the variables in the globals library.The next two lines, in the Define GUI section create the parent widget and the parent layout. All other widgets in the window will use this widget (main) as their parent. The parent layout is the top level layout and is at the top of a tree that contains all

layouts for the window. The layout manager from the PyQt toolkit is used without modification by the Ecce widget set and will be described in more detail below. Finally, the last line, invoking the EcceEventLoop function, starts the event loop so that the dialog appears on the screen, responds to user input, and sends data back to the calculation editor. This line also sets the title of the dialog window. The Qt Layout Manager The Qt layout manager is used without modification to control the overall placement of widgets within the details dialog. It also controls the behavior of the window when it resizes, and allows the individual widgets within the window to adjust their shape and position accordingly. The layout manager works as a hierarchy of layouts, with lower level layouts attached to upper level layouts. Everything attached to a lower level layout will move as a block within the upper level layout. There are two layout managers that are used by Ecce, QVBoxLayout and QHBoxLayout. The V and H in the layout names refer to vertical and horizontal layouts. Widgets that are added consecutively to a QVBoxLayout appear above each other in the window, the widgets added first are above the widgets added later. Similarly, widgets that are added to a QHBoxLayout appear consecutively from right to left in the order in which they are added. Layouts can be added to other layouts using the addLayout function. A new layout can be added to the mainLayout defined in the example above by adding the lines
top_panel = QHBoxLayout() mainLayout.addLayout(top_panel)
The first line creates another layout, top_panel, and the second line attaches it to the first layout. In subsequent steps, another layout could be created and attached to top_panel, and additional layouts could be attached to the new layout. The final window will be a hierarchy of nested layouts of the type illustrated schematically below.

Top Level Layout (QVBoxLayout) QHBoxLayout
Widget Widget
QHBoxLayout QVBoxLayout QVBoxLayout
Widget Widget
Widget Widget
To actually get some input widgets to appear on the screen, these must first be created and then added to their layout manager using the addWidget function. To illustrate how this works, the Python script is extended to
# file: nedtheory.py #!/usr/bin/env python import sys from qt import * import string from templates import * import globals import templates ########################################## ######## Initialization ################## a = QApplication(sys.argv) EcceInitialization(sys.argv) ########################################## ######## Define GUI ###################### main = QWidget() mainLayout = QVBoxLayout(main) #----------------------------------------- top_panel = QHBoxLayout()

mainLayout.addLayout(top_panel) top1_panel = QVBoxLayout() top_panel.addLayout(top1_panel) symmetryTog = ToggleInput(main) symmetryTog.DEFAULT = 1 symmetryTog.NAME = "ES.Theory.UseSymmetry" symmetryTog.LABEL = "Use Available Symmetry " top1_panel.addWidget(symmetryTog, 0, Qt.AlignLeft) SymmetryTol = FloatInput(main) SymmetryTol.LABEL ="Sym. Tolerance:" SymmetryTol.NAME = "ES.Theory.SymmetryTol" SymmetryTol.DEFAULT = 1.0e-2 SymmetryTol.HARD_RANGE = "(0..)" SymmetryTol.UNITS = "Angstroms" top1_panel.addWidget(SymmetryTol, 0, Qt.AlignLeft) ####### Main Loop ######################## EcceEventLoop(a, 0, main, mainLayout,\ "ECCE NWChem Editor: Theory Details", "")
The corresponding dialog window now looks like
The window now contains two widgets, a toggle and an field for inputting floating point numbers. The two toggles are create using the lines
symmetryTog = ToggleInput(main) SymmetryTol = FloatInput(main)
The ToggleInput function creates a new toggle input widget, and similarly FloatInput creates a float input widget. These are the “Use Available Symmetry” toggle and “Sym. Tolerance” field appearing in the dialog window. The routines that create widgets require that a parent widget be specified, hence, main is passed as an argument to all widget creation routines. The widgets are attached to their layout manager with the addWidget functions. These are invoked in the lines

top1_panel.addWidget(symmetryTog, 0, Qt.AlignLeft) top1_panel.addWidget(SymmetryTol, 0, Qt.AlignLeft)
These two calls attach the symmetryTog and symmetryTol widgets to the top1_panel QVBoxLayout. Because symmetryTog is added before symmetryTol, it comes out on top. The first argument in addWidget is the widget, the second argument is the stretch factor, and the third argument is Qt defined parameter that controls how the widget is placed in the layout manager. The Qt.AlignLeft value forces the widget to be locate on the left hand side of the top1_panel layout. If the alignment value is set to zero, the widget will approximately occupy the entire cell. A complete list of alignment values is provided in an appendix. The stretch factor controls the behavior of the widget when the window is resized. If the stretch is set to 0, the widget size remains fixed if the window is resized, if the stretch factor is set to 1, the widget will adjust whenever the window is resized. Intermediate values mean that the widget grows at a variable rate compared to other widgets. For most purposes, a value of either 0 or 1 is sufficient. Note that the input field on widgets requiring some kind of text input will generally expand or contract if the window size is adjusted, even if the stretch factor is set to 0. The Ecce Widget Set The window above also contains two examples widgets from the Ecce widget set. Widgets have have attributes and functions associated with them. Attributes can be set when the widget is created and control the appearance and properties of the widget. Functions can be invoked to get the widget to do something or change its state. For the most part, functions are used to constrain the behavior of one widget to the values set by another widget. This will be discussed in greater detail in the section on PyQt slots and signals. To illustrate the properties and behavior of widgets, we will examine the symmetryTol widget in more detail. This widget is set up and added to the layout manager in the lines
SymmetryTol = FloatInput(main) SymmetryTol.LABEL ="Sym. Tolerance:" SymmetryTol.NAME = "ES.Theory.SymmetryTol" SymmetryTol.DEFAULT = 1.0e-2 SymmetryTol.HARD_RANGE = "(0..)" SymmetryTol.UNITS = "Angstroms" top1_panel.addWidget(SymmetryTol, 0, Qt.AlignLeft)
The first line creates the widget, and the last line adds the widget to the layout manager, as already discussed. The remaining lines assign widget attributes. The Ecce convention is that widget attributes are always in upper case and they can be assigned using conventional assignment statements. The LABEL attribute is assigned to “Sym. Tolerance” and causes that label to appear in the dialog on the left hand side of the text input field. The NAME attribute assigns a name to the widget. This name will be exported as the key when values from the widget are sent to the calculation editor as key-value pairs. The DEFAULT attribute stores the default value of the widget. This

is the value the widget takes when the dialog is invoked for the first time on a calculation and it is also the value that the widget gets reset to if the reset button on the dialog window is pressed. The input widgets are all designed to only export values if the a non-default value is selected for the widget. This is designed to support keyword driven input which typically does not require a value if the default selected. However, this behavior is sometimes undesirable, so it can be overridden by setting the REQUIRED_ON_EXPORT attribute equal to 1. The UNITS attribute is a label that is added to the upper right hand side of the text input field. The HARD_RANGE attribute supplies the range label that appears on the lower right hand side of the text input field. This label also restricts the values that can be entered into the widget. The label used in this example “(0..)” requires the value to be greater than 0. If a value less than or equal to zero is entered, a warning is given in the dialog message area and the input field is reset to the previous value. There is also a SOFT_RANGE attribute that gives a range of recommended values. Values outside this range will be accepted, provided they do not violate any restrictions set using the HARD_RANGE attribute , but they will result in a warning message. If both HARD_RANGE and SOFT_RANGE attributes have been set, the SOFT_RANGE attribute will appear on the widget. This behavior can be overridden by setting the RANGE_LABEL attribute, which will use this attribute to set the range label on the widget. Note that the RANGE_LABEL attribute has no effect on what values are accepted by the widget. The ranges themselves obey the standard notation for intervals on the line, the only difference is that the minimum and maximum values are separated by two periods. If an upper(lower) bound is not included, that limit is assumed to be plus(minus) infinity. The range “[1.0..100.0)” is all real numbers greater than or equal to 1 and less than 100. The rules for ranges also apply to the IntegerInput and ExponentialInput widgets. Another very important attribute of all input widgets is the VALUE attribute. This is the value that the widget is currently set to. This attribute should never be set inside a dialog, but it can be accessed at any time to check what the state of the widget is. This attribute is useful for creating relationships between widgets using the signals and slots mechanism discussed below. Along with the input widgets already described, the Ecce widget set contains several label-type widgets that have no behavior but just serve as labels or line separators. These can be used to organize the dialog or provide some additional documentation. An example of the use of these labels is the DFT dialog screen for NWChem, shown below

For this dialog, the LineLabelSeparator widgets have been used to break up the dialog into panels and the LabelInput class have been used to create several standalone labels that provide some additional description of portions of the dialog. The LineLabelSeparator has been used to create widgets such as the “Memory Limits” separator and the LabelInput widgets were used to create the labels “Exchange-Correlation Functionals” and “Grid Options”. The example also shows another type of input widget, the MenuInput widget, which is used to make mutually exclusive selections from a list of options. This dialog also makes extensive use of the globally defined variables to control the overall appearance of the dialog. For example, the “Theory Options – DFT” panel in the above dialog is obviously irrelevant unless a DFT calculation has been selected. The appearance of this set of widgets is conditional upon

selecting DFT as the theory category and can be controlled by checking the value of the globals.Category variable before adding these widgets to the dialog. A complete listing of the global variables is given in Appendix A. Signals and Slots Signals and slots are a mechanism used by PyQt to force a response by the program when a value is entered into a widget. The Ecce widget set already takes care of much of this behavior, forcing the widget to export a value to the calculation viewer whenever the widget is changed. However, it is still necessary to apply constraints between different widgets, where the behavior of one widget is constrained by the value of another widget. An example of this is the “Use Available Symmetry” toggle and the “Sym. Tolerance” field. If the toggle is not set, then the value of the symmetry tolerance is irrelevant and the input field should be disabled. Creating this interaction is accomplished using signals and slots. Like the layout managers, the signals and slots mechanism has been adopted without modification from PyQt. The signal and slots mechanism is based on the idea that each widget can potentially emit a “signal” whenever its state is altered by the user. This signal can then be picked up be a “slot” on some other widget and cause it to execute some action. The slots are basically functions associated with a widget. The signal and slot are connected via the “connect” function, which is a function that acts on QObjects. The syntax of the connect function, when used with the Ecce widget set is
widget.connect(send_widget,PYSIGNAL(“Signal”),slot_function)
The widget at the start of this call can actually be just about any widget, usually it is either the object sending the signal or the object responding to the signal. Alternatively, the developer can just use QObject at this location. The send_widget is the widget that emits the signal and the slot_function is the function that is excuted whenever the signal is emitted. The PYSIGNAL is the particular signal emitted by the widget whenever it is changed. It is possible for some widgets to have several types of signals, but the Ecce widgets only emit one. The example code above can be extended to include a slot an signal. It now looks like
# file: nedtheory.py #!/usr/bin/env python import sys from qt import * import string from templates import * import globals import templates ########################################## ######## Initialization ################## a = QApplication(sys.argv)

EcceInitialization(sys.argv) ########################################## ######## Define Slots Connections ######## def slotSymmetry(): if (symmetryTog.isChecked()): SymmetryTol.set_active() else: SymmetryTol.set_inactive() ########################################## ######## Define GUI ###################### main = QWidget() mainLayout = QVBoxLayout(main) #----------------------------------------- top_panel = QHBoxLayout() mainLayout.addLayout(top_panel) top1_panel = QVBoxLayout() top_panel.addLayout(top1_panel) symmetryTog = ToggleInput(main) symmetryTog.DEFAULT = 1 symmetryTog.NAME = "ES.Theory.UseSymmetry" symmetryTog.LABEL = "Use Available Symmetry " top1_panel.addWidget(symmetryTog, 0, Qt.AlignLeft) SymmetryTol = FloatInput(main) SymmetryTol.LABEL ="Sym. Tolerance:" SymmetryTol.NAME = "ES.Theory.SymmetryTol" SymmetryTol.DEFAULT = 1.0e-2 SymmetryTol.HARD_RANGE = "(0..)" SymmetryTol.UNITS = "Angstroms" top1_panel.addWidget(SymmetryTol, 0, Qt.AlignLeft) symmetryTog.connect(symmetryTog,\ PYSIGNAL("Clicked"),slotSymmetry) ####### Main Loop ######################## EcceEventLoop(a, 0, main, mainLayout,\ "ECCE NWChem Editor: Theory Details", "")
The slot function, slotSymmetry, is executed whenever the toggle, symmetryTog, is clicked. The signal emitted in this case is called “Clicked”. For this case, the slot function checks the current state the toggle using the function isChecked(). If it is checked, then it executes the function set_active() on the FloatInput widget SymmetryTol. This function causes the widget to switch to the active mode, where it will accept input. If the isChecked() function returns false, then the slot function executes the

set_inactive() function on the SymmetryTol widget. This causes the input field to become grayed out and the widget no longer accepts input. The addition of the slot and signal does not change the appearance of the dialog, but it does affect it behavior. Switching on the “Use Available Symmetry” toggle activates the “Sym. Tolerance” and allows the user to modify the value of the tolerance. Turning off the “Use Available Symmetry” toggle deactivates the symmetry tolerance. This behavior reflects the logical connection that if symmetry is not being used, there is no point in setting the symmetry tolerance. Slots are also a good place to insert messages to the user. These are typically used to warn the user about unfavorable combinations of parameters, but they may serve other purposes. The message will appear in the message area of the dialog window, accompanied by a red flash. After a short period of time, the message will disappear from the message area. To send a message to the message area, the slot function first needs to set the globals.message variable with the string that is to be displayed and then call the send_new_message function, e.g.
globals.message = “African or European swallow?” send_new_message()
.edml file The $ECCE_HOME/data/client/cap/CODE.edml file, where CODE is an identifying label for the code, contains miscellaneous information about the particular code being registered. This information is primarily used by the calculation editor to configure it behavior so that it reflect the particular capabilities of the code being registered. This includes specifying the allowable theory-runtype combinations, the ordering of angular momentum functions inside molecular orbital vectors, what setup fields are displayed in the calculation editor, and various code-specific restrictions such as the maximum allowable angular momentum value, whether the code supports the use of ECPs, etc. It is recommended that the user examine some of the existing .edml files for codes such as NWChem and Gaussian 98 and use these as a template for creating a new .edml file. The .edml file is written in XML (extensible markup language) format. Each entry in this format has the form
<Element attribute=“attribute_value”>Element_value</Element> The basic unit is an element, each element can have and arbitrary number of attributes, each of which can be assigned values, and the element itself can have a value. Elements can also be nested hierarchically so that some elements can have additional elements as their element values. It is also possible to insert comment lines into the .edml file. These are included as <!-- Comment line or lines --> The basic .edml file has the form

<?xml version=“1.0” encoding=“utf-8” ?> <appdescriptor> : </appdescriptor> Several additional elements are included within the appdescriptor element, and these elements contain several sub-elements in turn. These are enumerated below. <GaussianBasisSetRules> This element and its sub-elements establish restrictions on the basis set and some of the calculations performed by the code. This element has no attributes. The sub-elements contained within this element are listed below, along with a description of the behavior they control.
• <MaxLValue>: The element value is an integer corresponding to the maximum value of the angular momentum in the basis set supported by the code.
• <ECPS>: The element value is “True” or “False” and indicates whether the code supports the use of
ECPs. • <GeneralContractions>: The element value is “True” or “False” and indicates whether the code
supports generally contracted basis sets.
• <PreferOptimization>: The element value is “True” or “False” and indicates (TO BE DONE)
• <MaxPrimitives>: (TO BE DONE)
• <MaxSharedExponent>: The element value is an integer and indicates (TO BE DONE)
• <SphericalCoordinates>: The element value is “True” or “False” and indicates (TO BE DONE)
• <DFTFitting>: The element value is “True” or “False” and indicates (TO BE DONE)
• <RecommendDFTCharge>: The element value is “True” or “False” and indicates (TO BE DONE)
• <RequireFullDFT>: The element value is “True” or “False” and indicates (TO BE DONE)
• <MaxTotalFunctions>: The element value is an integer and indicates (TO BE DONE)
• <MaxTotalPrimitives>: The element value is an integer and indicates (TO BE DONE)
• <MultipleOrbitals>: The element value is “True” or “False” and indicates (TO BE DONE)
• <MOOrdering>

This function determines the order that the angular momentum functions are listed in the molecular orbital coefficient vector. It has one attribute, type that takes the value “cartesian” or “spherical”. This element has one sub-element, <lshell>. The <lshell> element has no value, but it takes on an arbitrary number of attributes. The first of these is the attribute lval whose value corresponds to the angular momentum quantum number of the shell. The remaining attributes have the names a1, a2, a3,..,aN, where N is the maximum number of functions in this shell. The attribute values for these shells are strings corresponding to the cartesian monomial representation of the angular momentum function. As an example, the element corresponding to the “d” shell for NWChem is written as <lshell lval=“2” a1=“xx” a2=“yy” a3=“zz” a4=“xy” a5=“xz” a6=“yz”></lshell> The strings are the angular momentum functions and can be written as combinations of the characters “x”, “y”, and “z”. The ordering of these functions should be the same as their order in the molecular orbital coefficient vector. For the “d” shells and beyond, this order is generally code dependent. An integer following one of the characters x, y, or z is interpreted as an exponent, so the string “xx” is equivalent to “x2”. Similarly, strings for higher order angular momentum functions such as “xxxy” can also be written as “x3y”, etc. Specifying spherical functions is a bit more complicated. Unlike the Cartesian functions, spherical functions beyond the “p” shell cannot be written as a single monomial. To handle this, spherical coefficients can be written as polynomials with rational coefficients (both numerator and denominator must be expressed as integers). The spherical harmonic function from the “f” shell, 3x2y/2-y3/2 can be written as the string “3xxy/2-yyy/2”. It could also be written as “3x2y/2-y3/2”. For each term in spherical harmonic, the numerator of the coefficient is written first, then the monomial expression. If the denominator of the coefficient is not one, the monomial is followed by a slash and the denominator.

<Editor> This element has two attributes theorydialog and runtypedialog. The attribute values are the names of the executables that bring up the theory and runtype dialog boxes from calculation editor. The <Editor> element has one sub-element, the <Theory> element. This element has two attributes, called category and name. The values of these two attributes correspond to the theory category and the theory name of the theory. An example of a theory element is <Theory category=“SCF” name=“ROHF”> The theory names are listed under the theory category in the calculation editor. The <Theory> element has one sub-element, the <runtype> element. This element has no attributes and its value corresponds to one of the supported runtypes for the corresponding theory. A complete theory listing looks like <Theory category=“SCF” name=“ROHF”> <runtype>Energy</runtype> <runtype>Gradient</runtype> <runtype>Geometry</runtype> <runtype>Vibration</runtype> <runtype>GeoVib</runtype> </Theory> A listing of this type for each individual theory needs to be included under the <Editor> element. <TheorySummary> This element can be used to determine which summary fields appear in the calculation editor. Each summary field has its own <TheorySummary> element. The <TheorySummary> element has the attribute topLabel which can be used to provide a label for the theory summary field. This attribute is generally only used when it is desirable to have several theory parameters appearing in a list. The <TheorySummary> element has the sub-elements <item> that can be used to specify the actual theory parameters that appear in the summary field. The <item> element has two attributes, key and label. The key attribute is a character string corresponding to one of the key names assigned by the theory details window described above, the label attribute is a character string corresponding to the label that should appear before the key in the summary field. An example of a few theory summary fields for the NWChem program are shown below. <TheorySummary topLabel=“SCF Convergence-”> <item key=“ES.Theory.SCF.ConvergenceGradient.Value” label=“Gradient”></item> <item key=“ES.Theory.SCF.ConvergenceDensity.Value” label=“Density”></item> <item key=“ES.Theory.SCF.ConvergenceEnergy.Value”

label=“Energy”></item> </TheorySummary> <TheorySummary> <item key=“ES.Theory.SCF.ConvergenceIterations” label=“SCF Max. Iterations:”></item> </TheorySummary> <RuntypeSummary> This element works in exactly the same way as the <TheorySummary> element, except that the summary fields are associated with runtype instead of the theory. <DataFiles> (TO BE DONE) <IntegrationFiles> This element has several sub-elements that specify the programs or scripts used to create input files, import calculations, translate basis set functions into the correct format, etc. The sub-elements are listed below.
• <Template> The template file used for creating input decks, assuming the template model of input file generation is being used (see below).
• <InputGenerator> The script or program used to generate the input file.
• <Importer> The script or program used to import calculations run outside Ecce.
• <ParseSpecification> The .desc file (see below) used to parse the program output.
• <LaunchPreprocessor>
• <BasisTranslationScript> The script or program used to translate the standard basis set format
output from the basis set tool into the format of the code being registered. Creation of a Script for Input File Generation\ The input file generation part of code registration currently consists of two components. The first component is the creation of a template file (a .tpl file located in the $ECCE_HOME/scripts/parsers directory) that is used as a model for setting up input decks. The second component is the creation of an appropriate scripting program, written in Perl, that can take data from the GUI and combine it with the template file to produce a valid input deck to run the target code. Thus far, all codes registered in Ecce have keyword driven input for which the template model of input generation is appropriate. For codes that use a formated numerical input, another model for input file generation may work better.

An example of a .tpl file is the g98.tpl file used to generate input files for running Gaussian 98. The file has the form $ RunGauss %Mem=##MemorySize##000000 ##G98Route## ##title## ##ChargeAndMultiplicity## ! charge and multiplicity ##chemsys## ! cartesian (or zmatrix) geometry listing ##basis## ##OrbitalsToCorrelate## The input file generation script will read in this file and then replace all the keywords delimited by the double # sign with the values set in the calculation setup GUI. The Perl script that actually writes out the input file is invoked by Ecce as
ai.gauss98 calc.param calc.frag calc.basis calc.tpl The input file generation script used in this example is for the Gaussian 98 code and is called ai.gauss98. It is also located in $ECCE_HOME/scripts/parsers directory. The prefix “calc” is a name that has been assigned to the calculation by the GUI. The calc.param file contains a list of keys that have been set in the GUI along with their values, the calc.frag file contains the molecular geometry, the calc.basis contains the basis functions to be used in the calculation and the calc.tpl file contains a copy of the g98.tpl file. The ai.gauss98 script must then take the information contained in these files and use them to generate an input file for the Gaussian 98 code. The script ai.gauss98 is listed below, followed by a detailed description. It has the basic form #!/usr/bin/env perl { # # package for command-line options like -v # require “getopts.pl”; # # Add parser directory to list of directories that are searched # for by the require command. # my $sysdir = `sysdir`; chop $sysdir; push(@INC,”$ENV{ECCE_HOME}/platform/$sysdir/scripts/parsers”); # # Construct several useful arrays containing the symbols, names,

# and atomic numbers of the elements, as well as several arrays for # converting between them. # require “pertab.pl”; &loadPT; # # Turn off system variable that enables buffering of output, force # output to be flushed. # $| = 1; # # Handle the options that were specified when ai.gauss98 # was invoked. This does not do much except print out a message. # &Getopts(‘:hvt’); &handle_options; # # Setup dates and such. Currently not used for anything. # ($sec,$min,$hour,$mday,$mon,$year,$wday,$yday,$isdst) =
localtime(time); $month = (January, February, March, April, May, June, July, August, September, October, November, December)[$mon]; # # Dictionary to be parsed from specified input file. Start by creating # the associative array %AbiDict # %AbiDict = (); # # Check to see if enough files were passed to ai.gauss98 when it was # invoked. ($#ARGV is the index of the last element in @ARGV.) # if ($#ARGV != 3) { &usage; } # # Main Routine. Start by verifying that .param and .frag files exist # and assign them the internal file names ABIDICT and CHEMSYS. # &verifyAbiFile; &verifyFragFile; # # Read in contents of .param file and assign them to the associative # array %AbiDict. # &readDict; # # If calculation requires a basis set, check to see if .basis file # exists and assign it the internal file name GBS.

# if ( $AbiDict{“Category”} ne “SE”) { &verifyGBSFile; } # # Read in molecular geometry from .frag file and assign to internal # Perl arrays. # &readChemSys; # # This is the major part of the input file generation script. This # subroutine scans through the .tpl file and uses it to construct # an input file using the information collected from the .param, # .frag, and .basis files. # &modifyInputFile; # # Close the input file and copy it to the appropriate location. # &cleanup; } The more important subroutines in this script are described in detail below. The first significant subroutine in the script ai.gauss98 is the readDict subroutine. This subroutine scans through the calc.param file and creates the associative array %AbiDict. The argument of %AbiDict is a key name and the corresponding array element is the key value. A typical .param file looks like ES.Theory.SCF.ConvergenceIterations: 70 title: Calc parseFile: g98.out Category: SCF Theory: RHF RunType: Energy ChemSys.Multiplicity: 1 The maximum number of SCF iterations was increased from its default value, so the corresponding key appears in the .param file. A number of other keys that are always exported to the calc.param file are also present. The readDict subroutine parses each line in this file and splits them at the colon “:”. The left hand side of the split is an index in %AbiDict and the right hand side is the corresponding value. The current input generation scripts go somewhat further and break up each of the keys by chopping off everything to the left of each “.” in the key name and assigning the new key name and the value as another pair in the associative array. Thus, the key ES.Theory.SCF.ConvergenceIterations will end up generating four entries in %AbiDict. The indices ES.Theory.SCF.ConvergenceIterations Theory.SCF.ConvergenceIterations

SCF.ConvergenceIterations ConvergenceIterations will all be assigned the value 70 in %AbiDict. Thus, the number of convergence interations can be accessed by using any of the following references $AbiDict{“ES.Theory.SCF.ConvergenceIterations”} $AbiDict{“Theory.SCF.ConvergenceIterations”} $AbiDict{“SCF.ConvergenceIterations”} $AbiDict{“ConvergenceIterations”} This is done so that the keys can be refered to using a shorthand notation. This can cause problems if there is another key with the same final name, because the shorthand reference will contain the value of whatever key was read in last. For cases where this is likely to occur, a longer portion of the key name should be used. Because use of the full key name is unambiguous, this is the preferred mode for referencing elements in the %AbiDict file and should be used in writing all future input generation scripts. The input file generation routine now has all the information in the calc.param and calc.frag files. It next checks the theory category to see if the theory requires a basis set. If it does, then it verifies that the .basis file exists and assigns it the internal name GBS. The molecular structure is read in from the .frag file using the readChemSys subroutine. The total number of atoms is assigned to $chemsys_atoms, the system name is assigned to $chemsys_name, and the atom labels and coordinates are assigned to the arrays @tags{i} and @coords{i,j}, where i runs over the total number of atoms and j goes from 0 to 2 and represents the spatial coordinates. These arrays can be accessed from any other subroutine in the input generation script. The call to modifyInputFile is the most important remaining subroutine call. This routine scans the calc.tpl file and replaces all the keywords with appropriate strings constructed using the contents of the calc.param, calc.frag, and calc.basis files. The modifyInputFile subroutine has the form sub modifyInputFile { local($keysave, $key, $subname, $prefix, $postfix, $finished); $inputFile = $ARGV[3]; # # Open .tpl file and assign it the name TEMPLATE, open # file to contain program input and assign it the name # NEWFILE. # open(TEMPLATE, $inputFile); open(NEWFILE, “>tmpfile”); while (< TEMPLATE>) { # # Read successive lines from TEMPLATE. Parse each line # to find keyword that is delimited by the double # signs # and assign the keyword to the variables $keysave and # $key. If there are any prefixes and postfixes beyond

# the ## delimeters, assign these to $prefix and $postfix. # if (/([^#]*)##([^#]*)##(.*)/) { ## Locate Tag $prefix = $1; $postfix = $3; $keysave = $key = $2; $finished = 0; while ($finished == 0) { $subname = $key; # # Replace and “.” in keyword with underscore characters “_”. # $subname =~ s/\./_/g; # # Keyword is in the dictionary # if (defined($AbiDict{$key})) { $finished = 1; # # Construct subroutine function call using the value in # $AbiDict{$key} as subroutine argument. # $value = $AbiDict{$key}; $fct = “&$subname(‘$value’)”; $result = eval $fct; if (!(defined $result)) { # # Subroutine doesn’t exist so just replace keyword with the # value in $AbiDict{$key}. # s/##$keysave##/$value/; } elsif ($result ne ““) { # # Subroutine returns a string in $result. Replace $keyword # with $result. # $_ = $prefix . $result . $postfix . “\n”; } # # Keyword is not in dictionary. # } else { # # Check to see if keyword corresponds to a subroutine. # $finished = 1; $fct = “&$subname”; $result = eval $fct; if (!(defined $result)) {

# # Subroutine does not exist. Check to see if viable # subroutine can be found by reducing keyword at the “.”. # Check to see if the number of characters before getting # to the first “.” is greater than or equal to the value # of the first array subscript “$[“. (“$[“ has the value 0.) # If no “.” is found, index function will return the # value -1. # if (index($key, “.”) >= $[) { # # Remove all characters after and including the final “.”. # $key =~ s/\.[^\.]*$//; $finished = 0; } else { # # No value found for keyword. Remove line from input file. # $_ = ““; } } elsif ($result ne ““) { # # Subroutine returns a string in $result. Replace $keyword # with $result. # $_ = $prefix . $result . $postfix . “\n”; } } } } # # Print contents of $_ to NEWFILE. # print(NEWFILE); } } This subroutine will try a number of different things when it hits a keyword in the calc.tpl file. The first is to see if the keyword corresponds to a subroutine call. For the Gaussian 98.tpl file given above, the G98Route, ChargeAndMultiplicity, chemsys, basis, and OrbitalsToCorrelate all correspond to subroutine names. If there is anything in the %AbiDict array corresponding to these keywords, then this is passed along as the subroutine argument. If no subroutine is found, then the keyword is replaced by the corresponding value in the %AbiDict array. If there is nothing in the %AbiDict array, then the whole line is eliminated in the input file. The only remaining part writing the input file generation routine is creating the subroutines that are used to replace the keywords in the calc.tpl file with the appropriate strings for the input file. These are usually

fairly simple and can make use of all the available information that is now residing in the input file generation script. An exception is the G98Route subroutine which is actually quite complicated and is used for generating the route card used in Gaussian 98 input files. As an example, the subroutine corresponding to the ChargeAndMultiplicity keyword is fairly simple and has the form sub ChargeAndMultiplicity { local($charge,$value); if ( $AbiDict{“Charge”} eq ““) { $charge = 0; } else { $charge = $AbiDict{“Charge”}; } $value = $charge.” “.&Multiplicity; return $value; } # # Multiplicity is now just a number signifying the number # of open shells # sub Multiplicity { local($multiplicity); if ( $AbiDict{“ChemSys.Multiplicity”} =~ /(\d+)/) { $multiplicity = $1; } else { $multiplicity = 1; } return $multiplicity; } This set of subroutines just returns a pair of space-separated integers representing the charge and multiplicity. Note that it gets all the information it needs to construct the pair directly from the %AbiDict file, it does not need any additional arguments. The remainder of the input file is generated from information in the calc.frag and calc.basis files. Subroutines are constructed to replace the keywords chemsys and basis with the molecular geometry and basis functions in the appropriate format. The final subroutine in the ai.gauss98 script, cleanup, just closes the files NEWFILE and ABIDICT replaces the contents of the original calc.tpl file with the contents of NEWFILE. Output File Descriptors and Parsing Scripts The remaining task in registering a new code in Ecce is creating a parse descriptor file for the program output and writing a collection of Perl scripts that can be used to scan blocks of output for useable information. The model that Ecce uses to parse the output is the following: as data is written out to the output file, the output parsing routines scan it looking for keywords or single line keyword phrases that

delimit output blocks refering to a particular data item (e.g., the total system energy). Once one of the keywords is identified, Ecce then finds the end of the output block by either skipping down a prespecified number of lines or by searching for another keyword phrase that delimits the end of the output block. The whole block of output is then passed to a Perl script that is used to extract the appropriate data quantities and assign them to variables in the Ecce database. This data can be examined using the Ecce calculation viewer. It is also possible to read in entire data files of numerical data using the data parsing model. The parse descriptor files and the parse scripts are all located in the $ECCE_HOME/scripts/parsers directory. The Parse Descriptor File The parse descriptor file contains a series entries having the form [DATALABEL1][DATALABEL2]...[DATALABELN] Script=perl-script.name Begin=Output keyword phrase Prefix=Output keyword phrase used in calculation imports Files=Name of output file Frequency=first,last,firstlast,all Skip=number of lines in output Line=number of lines in output End=Output keyword phrase [END] Each entry in the .desc file is delimited by a set of database labels, DATALABEL1 etc., and the keyword [END]. The database labels are currently ignored and only serve to mark the beginning of a parse descriptor field. The Perl script that parses this information is defined using Script keyword. The remaining keywords provide information on how to identify subsets of the program output for further processing. These keywords are described in more detail below.
• Script: The name of the Perl script used for processing the output block. Once a block of text has been extracted from the output file, the Perl script extracts the numerical values or text strings corresponding to the data items represented by DATALABEL1 etc., and assigns them to the database.
• Begin: This is a keyword or key phrase that appears in the output file and is used to identify the
block of output containing the information being sought. For example, when NWCHEM is run under Ecce it produces a file named ecce.out that is parsed for the quantities that are eventually assigned to the Ecce database. The entry in the .desc file that is used for parsing the Mulliken partial charges is
[MULLIKEN] Script=nwchem.mulliken
Begin=begin%total mulliken atomic Prefix=task Frequency=last End=task [END]

The key phrase defined by the Begin keyword is “begin%total mulliken atomic”. The Ecce parser searches through the ecce.out file and compares each line in the output file with the keyword or key phrase defined by all the Begin statements in the .desc file. If there is a match, in this case with the fragment “begin%total mulliken atomic”, then Ecce extracts a block of text from the output starting with the line containing the key phrase. The end of the text block is determined by the Line or End keyword. If the output is being read from a file specified by the File keyword (see below), then the Begin keyword is set equal to the file name.
• Prefix: This is a performance enhancement and is only used for importing calculations into Ecce.
The parse descriptor checks the beginning of each line against the key phrase specified by the Prefix keyword. If there is a match, then the rest of the line is checked to see if it contains the key phrase specified using the Begin keyword. The key phrase specified using the Prefix keyword must exactly match the beginning of the line containing the key phrase specified using the Begin keyword. This includes white space. For the example listed above, the line containing the phrase “begin%total mulliken atomic” always begins with the word “task”. The output parser checks each line during an import to see if it begins with the word “task”. If it does, then it checks the rest of the line for the phrase “begin%total mulliken atomic”, if the line does not begin with “task”, the parser goes to the next line.
• File: This keyword is used to identify numerical output that is stored in a file other than the
designated output file. For example, Ecce needs the molecular orbital coefficients in order to construct visual representations of the molecular orbitals using the calculation viewer. For the Gaussian 9X programs, these are listed in a separate file, fort.7. The entry in the parse descriptor file for reading this file is
[MO][ORBENG]
Script=gaussian-98.mo File=fort.7 Begin=fort.7 [END] This entry tells the output parser that when the file fort.7 appears, the contents are fed to the Perl script gaussian-98.mo which will assign the contents to the database items MO and ORBENG. The Begin keyword is set to the file name in this case.
• Frequency: This keyword is used to control which occurrences of the keyword phrase are actually stored in the data base. If this is set to “first”, then only the data that is parsed the first time the key phrase appears in the output is saved to the database, if it is set to “last”, then only the data that is parsed on the last occurrence of the key phrase is saved to the database. If Frequency is set to “firstlast”, then the first and last occurrences of the key phrase are saved to the database and if it is set to “all”, then all occurrences of the key phrase are saved to the database.

• Skip: This keyword is used to specify how many lines should be skipped after the appearance of the key phrase in the output before sending text to the Perl script. This can be used when the first useable data does not occur until several lines after the key phrase appears in the output. This is particularly true when the key phrase is part of a header in the output.
• Lines: This keyword is used to specify how many lines of text should be included in the text block
that is sent to the Perl script for parsing. The counting starts with the first line that is actually parsed. For most cases this is the line specified by the Begin keyword, but if the Skip keyword is used the counting begins after the number of lines specified by the Skip keyword have been read. The Skip keyword can be used when the needed data always occurs within a fixed number of lines of the key phrase. The end of the text block can also be specified using the End keyword.
• End: This keyword is used to identify a second key phrase that marks the end of the text block in the
output file. This can be used instead of the Line keyword for text blocks where the number of lines is not fixed.
Output Parsing Scripts Once a block of text in the output file is identified using the parse descriptor file, it is passed to the Perl script specified in the parse descriptor file. The invocation of the script has the form
perl.script key runtype ucCategory theory < INPUT > OUTPUT The extra arguments can be used by the Perl script to help parse the text block and assign the appropriate values to the database variables. The argument “key” has been set to the process ID number of the parent calling process and can be used to create utility files that are stored in the /tmp directory. The “runtype”, “ucCategory”, and “theory” arguments are just the same as the RunType, Category, and Theory variables exported to the .param file. (See the description in the input file generation section.) These can be used to help correctly parse the text block stored in INPUT. The output parsing script must do two things: 1) it must identify and extract the appropriate numerical values and/or text strings from the text block and 2) it must write these into the file OUTPUT in a format appropriate for transmission to the database. The standard formats, which are based on the dimensionality of the data, are described in more detail below. An example of how a parsing script works is the script for finding the gradients in a Gaussian-98 force calculation. The entry in the .desc file for extracting this information has the form [EGRADVEC] Script=gaussian-98.egradvec Begin= Forces Prefix= Center Frequency=last Skip=3 End=-------------------------------------- [END]
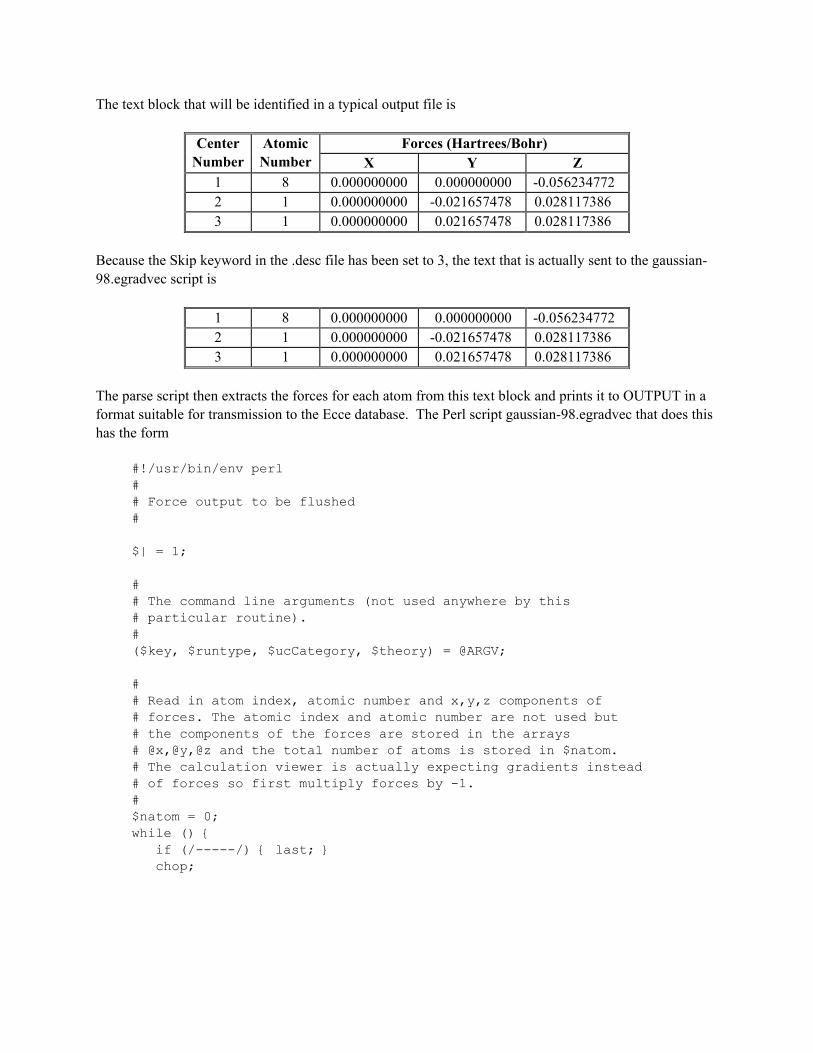
The text block that will be identified in a typical output file is
Forces (Hartrees/Bohr) Center Number
Atomic Number X Y Z
1 8 0.000000000 0.000000000 -0.056234772 2 1 0.000000000 -0.021657478 0.028117386 3 1 0.000000000 0.021657478 0.028117386
Because the Skip keyword in the .desc file has been set to 3, the text that is actually sent to the gaussian-98.egradvec script is
1 8 0.000000000 0.000000000 -0.056234772 2 1 0.000000000 -0.021657478 0.028117386 3 1 0.000000000 0.021657478 0.028117386
The parse script then extracts the forces for each atom from this text block and prints it to OUTPUT in a format suitable for transmission to the Ecce database. The Perl script gaussian-98.egradvec that does this has the form #!/usr/bin/env perl # # Force output to be flushed # $| = 1; # # The command line arguments (not used anywhere by this # particular routine). # ($key, $runtype, $ucCategory, $theory) = @ARGV; # # Read in atom index, atomic number and x,y,z components of # forces. The atomic index and atomic number are not used but # the components of the forces are stored in the arrays # @x,@y,@z and the total number of atoms is stored in $natom. # The calculation viewer is actually expecting gradients instead # of forces so first multiply forces by -1. # $natom = 0; while () { if (/-----/) { last; } chop;

s/^\s*//; ($cnt,$atom,$x,$y,$z) = split(/ +/); push (@x,$x==0?$x:$x*-1.); push (@y,$y==0?$y:$y*-1.); push (@z,$z==0?$z:$z*-1.); $natom += 1; } # # Print out the data in standard format. # print “key: EGRADVEC\n”; print “size:\n”; print “$natom 3\n”; print “rowlabels:\n”; for ($i=1;$i<=$natom;$i++) { print “$i “; } print “\ncolumnlabels:\nX Y Z\n”; print “values:\n”; for ($i=0; $i<= $#x; $i++) { print “$x[$i] $y[$i] $z[$i]”; print “\n”; } print “END\n”; The action of the script gaussian-98.egradvec on the text block is to produce the output key: EGRADVEC size: 3 3 rowlabels: 1 2 3 columnlabels: X Y Z values: 0.000000000 0.000000000 0.056234772 0.000000000 0.021657478 -0.028117386 0.000000000 -0.021657478 -0.028117386 END The data can now be sent to the database in a format where it can read as a table by the calculation viewer. There are currently four formats for writing out data to OUTPUT so that it can be picked up by the Ecce database. These are Scalar, Vector, Table, and Vector of Tables. The database elements listed for each entry in the .desc file must also be declared in the $ECCE_HOME/data/admin/refload/props file. This

file determines whether a database element is a Scalar, Vector, etc., by setting the dbclass variable. The dbclass values, DBValue, DBVector, DBTable, and DBVecTable correspond to the Scalar, Vector, Table, and Vector of Tables formats, respectively, described below. Each of the formats begins with the word “key: “ followed by the database label. It is important that there is a space between the colon and the database label, otherwise the property will not be picked up. The four currently supported database formats are:
• Scalar key: size: values: END
• Vector key: size: columnlabels: values: END
• Table key: size: rowlabels: columnlabels: values: END
• Vector of Tables key: size: vectorlabels: rowlabels: columnlabels: values: END All formats contain the keywords “key” and “size”. The keyword “key” refers to the database label listed in the entry in the .desc file. For the example above, “key” is set equal to EGRADVEC.

The keyword “size” determines the number of data points in the entry. The size is specified as a sequence of positive integers, one for each dimension associated with the data format. For a scalar quantity, the size is always set to 1. For a vector quantity, the size is a single positive integer representing the dimension of the vector. If the size is set to 1 for a vector, then this is understood to mean that the value printed out is to be appended to previous values already in the data base to construct the vector. As an example, this option is used to construct a vector of energies in geometry optimizations. For tables, like the one in the example above, the size is specified by two space-delimited integers. The first integer is the number of rows, the second is the number of columns. Finally, for vectors of tables, three positive integers need to be specified. The first is the number elements in the vector, the second is the number of rows in an individual table, and the third is the number of columns. If the number of elements in the vector is set to 1, then the table is appended to an existing vector of tables. The “rowlabels”, “columnlabels”, and “vectorlabels” keywords are used to provide labels for the corresponding elements in the data structure. The labels themselves are white-space delimited lists of strings. The number of elements in the list must be the same as the dimension specified using the “size” keyword. The label keywords and their associated lists can be omitted. The database still requires the labels and in this case the C++ code will automatically supply labels that are a series of integers between 1 and the dimension of the labeled quantity. This option is useful when constructing vectors by appending new data to an existing vector. Finally, the values of the database entry must be printed out using the “values” keyword. The values are a space delimited list of numbers that are written out in the order scan over vector elements (i) scan over row elements (j) scan over column elements (k) print value(i,j,k) end scan end scan end scan For lower dimensional formats, the appropriate number of outer loops are eliminated. The list of values can be broken up into lines in any convenient way. To complete the database entry, the keyword “END” is included as the last line. Many of the entries in the .desc file assign values to more than one database element. When this occurs, the parse script can write several entries in the OUTPUT file. Each entry begins with the keyword “key”, followed by whatever additional keywords and numerical values are appropriate, and is terminated by the keyword “END”. To complete the registration of a new property in the database, an entry corresponding to the database name must be made in the $ECCE_HOME/data/admin/refload/props file. Each entry is a tab-delimited list of entries corresponding to one line in the props file. The two most important entries are the short_name and dbclass elements. The short_name is the database name that appears in the .desc file and is used as the key when the parsed data is written to the OUTPUT file. The dbclass has the values

DBScalar, DBVector, DBTable, and DBVecTable and corresponds to the data formats described above. A complete entry in the props files is
Derived Energy Gradient Vector EGRADVEC\\ Gradient DBTable noviceUser secondaryProperty Y
(Note that in an actual props file entry, this is all one line.) Additional documentation is available in the props file itself. For the present, it is advisable to find a similar entry in the props file and simply copy and edit it. The two most important parts of this entry are the database label EGRADVEC and the database class specification DBTable. The arguments to the DBTable specification provide column and row labels for this entry. Appendix A: Ecce PyQt Toolkit The Ecce PyQt toolkit has two major components. The first is a list of global constants that are initialized based on information available in the Ecce calculation editor, the second is a set of widgets that can be used to create dialogs. This appendix provides a complete description of both of these components. Global variables The following is a list of the globally available variables that can be used to control the behavior of details dialogs. These variables can all be accessed using the syntax globals.variable.
globals.Category: a string containing the theory category selected in the calculation editor (e.g. SCF, DFT, CC, etc.). globals.Theory: a string containing the theory selected in the calculation editor (e.g. RHF, UDFT, etc.). globals.RunType: a string containing the runtype selected in the calculation editor (e.g. Geometry, Vibration, GeoVib, etc.). globals.SymmetryGroup: a string containing the symmetry group chosen in the builder and appearing in the calculation editor summary field (e.g. C1, C2v, D2h, etc.). globals.NumElectrons: an integer containing the number of electrons in the system. globals.SpinMultiplicity: an integer representing the spin multiplicity of the system. globals.NumFrozenOrbs: an integer representing the default number of frozen core orbitals for the system. globals.NumOccupiedOrbs: an integer representing the number of occupied orbitals in the system

globals.NumVirtualOrbs: an integer representing the number of virtual orbitals in the system. globals.NumNormalModes: an integer representing the number of normal modes in the system.
Ecce PyQt Widgets A complete listing of all Ecce PyQt widgets, their attributes, and their associated functions is given below. A complete specification of all attributes and functions is given below, the attributes and functions that apply to specific widgets are listed in the description of individual widgets. Attributes
LABEL: All Ecce widgets have a label attribute, except the LineSeparator widget. The label attribute is used to assign a text string to the label that appears with the widget in the dialog. NAME: All input widgets have a name attribute which must be assigned a unique character string (see the description of these names in the text above). These names are a unique identifier that are used internally to return the dialog to its state from a previous session and are also exported to the .param file as the key in a key-value pair. DEFAULT: All input widgets have a default attribute that represents the default value for the parameter that the widget is assigning. This is the value that the widget takes when the dialog is first invoked. If the REQUIRED_ON_EXPORT attribute is not set equal to 1, then the widget does not export a value to the .param file if the widget value is equal to the default. VALUE: All input widgets have a value attribute which represents the current value of the widget (i.e. the value that appears on the screen). The VALUE attribute should not be set in the dialog script, if at all possible, but can be accessed to control the behavior of parts of the dialog. If it needs to be set in the dialog script, then it should be used in conjunction with the init_widget() function so that the contents of the VALUE attribute is actually transmitted to the display widget itself. Comparing the values of floating point numbers can occasionally be tricky, since typically the contents of VALUE are actually strings. This can lead to problems since different string representations of floating point numbers are actually equivalent, e.g. 0.1 and 0.10. This problem can be solved by first converting the values from strings to floating point numbers using the syntax
rval = string.atof(str(widget.VALUE)) These comments also apply to the DEFAULT attribute.

ACTIVE: All input attributes have an active attribute which determines if the widget is currently receiving input. Widgets that are inactive do not respond to the cursor or the keyboard and are typically greyed out. This attribute is occasionally set when the widget is created, but in most cases the ACTIVE attribute can be controlled with the set_active() and set_inactive() methods. REQUIRED_ON_EXPORT: This attribute is used to control whether values get exported to the .params file that is used to create the input deck. Most keyword driven input is defaulted so that unless a parameter is set to a non-default value, it is not included in the input deck. The current Ecce input file generation scripts implement this by making use of the fact that parameters that are set to their default values do not get exported to the .params file as key value pairs. This behavior is overridden by setting the REQUIRE_ON_EXPORT attribute equal to 1. WIDTH: This attribute is only used for the numerical and text input widgets. The width of the input field is normally elastic and will stretch or contract to fill all the space made available to it by the layout manager. This can be behavior can be overridden by setting the WIDTH attribute to a finite value. The width of the input field is then fixed at the number of pixels assigned to WIDTH. UNITS: This attribute is only used for numerical input widgets. The text string assigned to units is placed as a label on the upper right hand side of the input field. HARD_RANGE: This attribute is only used for numerical input widgets. It is used to specify a set of rigorous bounds on the values entered into the widget. Values falling outside this range are rejected and the widget is reset to its previous value. A warning message also appears in the message area. The HARD_RANGE attribute is assigned a text string as described above. This text string also appears to the lower right of the input field, unless it is overridden by the SOFT_RANGE or RANGE_LABEL attributes. SOFT_RANGE: This attribute is only used for numerical input widgets. It is used to specify a set of recommded bounds on the values entered into the widget. Values falling outside this range are still accepted but a warning message appears in the message area. The SOFT_RANGE attribute does not override the HARD_RANGE attribute, so if a value is entered that is outside the limits set using the HARD_RANGE attribute, it will be rejected. The SOFT_RANGE attribute is assigned a text string as described above. This text string also appears to the lower right of the input field, unless it is overridden by the RANGE_LABEL attribute. RANGE_LABEL: This attribute is only used for numerical input widgets. It is used to override the text label appearing to the lower right of the input field that would otherwise be set by the text fields in the HARD_RANGE or SOFT_RANGE attributes. It has no effect on the behavior of the widget.

Ecce Widget Functions Below is a complete listing of functions that can be called on widgets in the Ecce PyQt widget set. Most of these functions can be called on all widgets, the few exceptions are noted in the function description. The syntax for invoking these functions is widget.function().
init_widget(): The only instance when this function should be called is if the developer sets the VALUE attribute by hand in a dialog. To transmit this value to the widget appearing in the dialog it is necessary to invoke this method. Setting the VALUE attribute by hand should be avoided, if at all possible. set_active(): This method sets the ACTIVE attribute to 1 and activates the widget so that it will receive input. This method is only invoked for input widgets. set_inactive(): This method sets the ACTIVE attribute to 0 and deactivates the widget so that it will not receive input. As a sign that the widget is deactivated, the input fields and text labels associated with the widget become greyed out. This method is only invoked for input widgets. isChecked(): This method is only invoked for the ToggleInput widgets. It returns 1 if the toggle is checked, 0 otherwise. insertItem(“option”): This method is only invoked for the MenuInput widgets. It is used to add items to the menu options list when the menu item is created. When insertItem(“option”) is invoked the string “option” appears in the menu list exactly as written in the argument (be careful with white space). The order that options appear is the same as the order in which they are added.
Ecce PyQt Widgets Below is a complete listing of the Ecce PyQt widgets and a description of there behavior and appearance. The label-type widgets are listed first, followed by the input widgets.
LabelInput: This widget produces a simple text label. The text in the label is set by the LABEL attribute. LineSeparator: This widget produces a horizontal line across the dialog window. It is used for creating unlabeled “panels” of logically related input fields. LineLabelSeparator: This widget produces a horizontal line across the dialog window that is broken by a string of text. The text is determined by setting the LABEL attribute. This widget is used for breaking the dialog up into “panels” of logically related input fields.

ToggleInput: This widget produces a labeled toggle in the dialog. The toggle label is set with the LABEL attribute. Unlike the other input widgets, the label for toggle inputs appears to the right of the widget. Because this input widget is frequently used to constraint other input fields, the label is often suppressed by setting the LABEL attribute equal to a null string, “”. The toggle widget returns values of 0 and 1. The value can also be determined with the isChecked() function. The toggle input emits the PYSIGNAL “Checked”. MenuInput: This widget produces a pull-down list of mutually exclusive options. Options are added to the menu using the insertItem(“option”) function and the label is set with the LABEL attribute. The label appears to the left of the menu. The menu input emits the PYSIGNAL “ItemSelected” . TextInput: This widget produces a labeled input field that can be used enter any unrestricted text. The label is set with the LABEL attribute and appears to the left of the input field. The text input emits the PYSIGNAL signal “SetValue” whenever any text is entered in the field. FloatInput: This widget produces a labeled input field that can be used to enter a real number. The label, which appears on the left hand side of the input field, is set with the LABEL attribute. The float input has two other labels. The first is a units label, which is set with the UNITS attribute, and appears to the upper right of the input field. The other is a range label, appearing to the lower right of the input field, and can be set by either the HARD_RANGE, SOFT_RANGE, or RANGE_LABEL attributes. The range of allowed values accepted by the widget can be controlled with either the HARD_RANGE and SOFT_RANGE attributes. Violations of the limits set by the HARD_RANGE attribute result in setting the value of the widget back to its previous value and a warning message appearing in the dialog message area, violations of the limits set by the SOFT_RANGE attribute results in only a warning. The float input emits the PYSIGNAL “SetValue” whenever any text in entered in the field. IntegerInput: This widget is almost identical to the FloatInput widget. The only significant difference is that this widget will only allow integers to be entered in the input field. ExponentialInput: This widget is almost identical to the FloatInput widget. The only significant difference is that this widget will only allow floating point numbers that are an integer power of 10 to be entered in the input field.