Embed Size (px)
Citation preview

Arm ForgeUser Guide
Version 18.0.2
Arm Forge 18.0.2
Contents
Contents 1
I Arm Forge 12
1 Introduction 121.1 Arm DDT . . . . . . . . . . . . . . . . . . . . . . . . . . . . . . . . . . . . . . . . . . 121.2 Arm MAP . . . . . . . . . . . . . . . . . . . . . . . . . . . . . . . . . . . . . . . . . . 131.3 Online resources . . . . . . . . . . . . . . . . . . . . . . . . . . . . . . . . . . . . . . 13
2 Installation 142.1 Linux installation . . . . . . . . . . . . . . . . . . . . . . . . . . . . . . . . . . . . . . 14
2.1.1 Graphical install . . . . . . . . . . . . . . . . . . . . . . . . . . . . . . . . . . 142.1.2 Text-mode install . . . . . . . . . . . . . . . . . . . . . . . . . . . . . . . . . . 15
2.2 Mac installation . . . . . . . . . . . . . . . . . . . . . . . . . . . . . . . . . . . . . . . 162.3 Windows installation . . . . . . . . . . . . . . . . . . . . . . . . . . . . . . . . . . . . 162.4 License files . . . . . . . . . . . . . . . . . . . . . . . . . . . . . . . . . . . . . . . . . 172.5 Workstation and evaluation licenses . . . . . . . . . . . . . . . . . . . . . . . . . . . . 172.6 Supercomputing and other floating licenses . . . . . . . . . . . . . . . . . . . . . . . . 182.7 Architecture licensing . . . . . . . . . . . . . . . . . . . . . . . . . . . . . . . . . . . . 18
2.7.1 Using multiple architecture licenses . . . . . . . . . . . . . . . . . . . . . . . . 18
3 Connecting to a remote system 193.1 Remote connections dialog . . . . . . . . . . . . . . . . . . . . . . . . . . . . . . . . . 193.2 Remote launch settings . . . . . . . . . . . . . . . . . . . . . . . . . . . . . . . . . . . 20
3.2.1 Remote script . . . . . . . . . . . . . . . . . . . . . . . . . . . . . . . . . . . . 213.3 Reverse Connect . . . . . . . . . . . . . . . . . . . . . . . . . . . . . . . . . . . . . . 21
3.3.1 Overview . . . . . . . . . . . . . . . . . . . . . . . . . . . . . . . . . . . . . . 213.3.2 Usage . . . . . . . . . . . . . . . . . . . . . . . . . . . . . . . . . . . . . . . . 223.3.3 Connection details . . . . . . . . . . . . . . . . . . . . . . . . . . . . . . . . . 22
3.4 Using X forwarding or VNC . . . . . . . . . . . . . . . . . . . . . . . . . . . . . . . . 23
4 Starting 25
II DDT 27
5 Getting started 275.1 Running a program . . . . . . . . . . . . . . . . . . . . . . . . . . . . . . . . . . . . . 28
5.1.1 Application . . . . . . . . . . . . . . . . . . . . . . . . . . . . . . . . . . . . . 285.1.2 MPI . . . . . . . . . . . . . . . . . . . . . . . . . . . . . . . . . . . . . . . . . 295.1.3 OpenMP . . . . . . . . . . . . . . . . . . . . . . . . . . . . . . . . . . . . . . 295.1.4 CUDA . . . . . . . . . . . . . . . . . . . . . . . . . . . . . . . . . . . . . . . 295.1.5 UPC . . . . . . . . . . . . . . . . . . . . . . . . . . . . . . . . . . . . . . . . . 30
5.1.5.1 GCC UPC . . . . . . . . . . . . . . . . . . . . . . . . . . . . . . . . 305.1.5.2 Berkeley UPC . . . . . . . . . . . . . . . . . . . . . . . . . . . . . . 30
5.1.6 Python . . . . . . . . . . . . . . . . . . . . . . . . . . . . . . . . . . . . . . . 305.1.6.1 Overview . . . . . . . . . . . . . . . . . . . . . . . . . . . . . . . . 305.1.6.2 Prerequisites . . . . . . . . . . . . . . . . . . . . . . . . . . . . . . . 305.1.6.3 Running . . . . . . . . . . . . . . . . . . . . . . . . . . . . . . . . . 31
Copyright c© 2002-2018 Arm Limited (or its affiliates). All rights reserved. 1
Arm Forge 18.0.2
5.1.7 Memory debugging . . . . . . . . . . . . . . . . . . . . . . . . . . . . . . . . . 315.1.8 Environment variables . . . . . . . . . . . . . . . . . . . . . . . . . . . . . . . 315.1.9 Plugins . . . . . . . . . . . . . . . . . . . . . . . . . . . . . . . . . . . . . . . 31
5.2 Express Launch . . . . . . . . . . . . . . . . . . . . . . . . . . . . . . . . . . . . . . . 325.2.1 Run dialog box . . . . . . . . . . . . . . . . . . . . . . . . . . . . . . . . . . . 33
5.3 remote-exec required by some MPIs . . . . . . . . . . . . . . . . . . . . . . . . . . 335.4 Debugging single-process programs . . . . . . . . . . . . . . . . . . . . . . . . . . . . 345.5 Debugging OpenMP programs . . . . . . . . . . . . . . . . . . . . . . . . . . . . . . . 355.6 Manual launching of multi-process non-MPI programs . . . . . . . . . . . . . . . . . . 365.7 Debugging MPMD programs . . . . . . . . . . . . . . . . . . . . . . . . . . . . . . . . 37
5.7.1 Debugging MPMD programs without Express Launch . . . . . . . . . . . . . . 375.7.2 Debugging MPMD programs in Compatibility mode . . . . . . . . . . . . . . . 38
5.8 Opening core files . . . . . . . . . . . . . . . . . . . . . . . . . . . . . . . . . . . . . . 385.9 Attaching to running programs . . . . . . . . . . . . . . . . . . . . . . . . . . . . . . . 38
5.9.1 Automatically detected MPI jobs . . . . . . . . . . . . . . . . . . . . . . . . . . 395.9.2 Attaching to a subset of an MPI job . . . . . . . . . . . . . . . . . . . . . . . . 395.9.3 Manual process selection . . . . . . . . . . . . . . . . . . . . . . . . . . . . . . 395.9.4 Configuring attaching to remote hosts . . . . . . . . . . . . . . . . . . . . . . . 415.9.5 Using DDT command-line arguments . . . . . . . . . . . . . . . . . . . . . . . 41
5.10 Starting a job in a queue . . . . . . . . . . . . . . . . . . . . . . . . . . . . . . . . . . 425.11 Using custom MPI scripts . . . . . . . . . . . . . . . . . . . . . . . . . . . . . . . . . . 425.12 Starting DDT from a job script . . . . . . . . . . . . . . . . . . . . . . . . . . . . . . . 455.13 Attaching via gdbserver . . . . . . . . . . . . . . . . . . . . . . . . . . . . . . . . . . . 45
6 Overview 476.1 Saving and loading sessions . . . . . . . . . . . . . . . . . . . . . . . . . . . . . . . . 486.2 Source code . . . . . . . . . . . . . . . . . . . . . . . . . . . . . . . . . . . . . . . . . 48
6.2.1 Viewing . . . . . . . . . . . . . . . . . . . . . . . . . . . . . . . . . . . . . . . 486.2.2 Editing . . . . . . . . . . . . . . . . . . . . . . . . . . . . . . . . . . . . . . . 496.2.3 Rebuilding and restarting . . . . . . . . . . . . . . . . . . . . . . . . . . . . . . 496.2.4 Committing changes . . . . . . . . . . . . . . . . . . . . . . . . . . . . . . . . 49
6.3 Project Files . . . . . . . . . . . . . . . . . . . . . . . . . . . . . . . . . . . . . . . . . 496.3.1 Application and external code . . . . . . . . . . . . . . . . . . . . . . . . . . . 50
6.4 Finding lost source files . . . . . . . . . . . . . . . . . . . . . . . . . . . . . . . . . . . 506.5 Finding code or variables . . . . . . . . . . . . . . . . . . . . . . . . . . . . . . . . . . 51
6.5.1 Find Files or Functions . . . . . . . . . . . . . . . . . . . . . . . . . . . . . . . 516.5.2 Find . . . . . . . . . . . . . . . . . . . . . . . . . . . . . . . . . . . . . . . . . 516.5.3 Find in Files . . . . . . . . . . . . . . . . . . . . . . . . . . . . . . . . . . . . 51
6.6 Jump To Line . . . . . . . . . . . . . . . . . . . . . . . . . . . . . . . . . . . . . . . . 526.7 Navigating through source code history . . . . . . . . . . . . . . . . . . . . . . . . . . 526.8 Static analysis . . . . . . . . . . . . . . . . . . . . . . . . . . . . . . . . . . . . . . . . 536.9 Version control information . . . . . . . . . . . . . . . . . . . . . . . . . . . . . . . . . 53
7 Controlling program execution 567.1 Process control and process groups . . . . . . . . . . . . . . . . . . . . . . . . . . . . . 56
7.1.1 Detailed view . . . . . . . . . . . . . . . . . . . . . . . . . . . . . . . . . . . . 567.1.2 Summary view . . . . . . . . . . . . . . . . . . . . . . . . . . . . . . . . . . . 57
7.2 Focus control . . . . . . . . . . . . . . . . . . . . . . . . . . . . . . . . . . . . . . . . 577.2.1 Overview of changing focus . . . . . . . . . . . . . . . . . . . . . . . . . . . . 587.2.2 Process group viewer . . . . . . . . . . . . . . . . . . . . . . . . . . . . . . . . 587.2.3 Breakpoints . . . . . . . . . . . . . . . . . . . . . . . . . . . . . . . . . . . . . 587.2.4 Code viewer . . . . . . . . . . . . . . . . . . . . . . . . . . . . . . . . . . . . 58
Copyright c© 2002-2018 Arm Limited (or its affiliates). All rights reserved. 2
Arm Forge 18.0.2
7.2.5 Parallel stack view . . . . . . . . . . . . . . . . . . . . . . . . . . . . . . . . . 597.2.6 Playing and stepping . . . . . . . . . . . . . . . . . . . . . . . . . . . . . . . . 597.2.7 Step threads together . . . . . . . . . . . . . . . . . . . . . . . . . . . . . . . . 597.2.8 Stepping threads window . . . . . . . . . . . . . . . . . . . . . . . . . . . . . . 59
7.3 Starting, stopping and restarting a program . . . . . . . . . . . . . . . . . . . . . . . . . 607.4 Stepping through a program . . . . . . . . . . . . . . . . . . . . . . . . . . . . . . . . 617.5 Stop messages . . . . . . . . . . . . . . . . . . . . . . . . . . . . . . . . . . . . . . . . 617.6 Setting breakpoints . . . . . . . . . . . . . . . . . . . . . . . . . . . . . . . . . . . . . 61
7.6.1 Using the source code viewer . . . . . . . . . . . . . . . . . . . . . . . . . . . 617.6.2 Using the Add Breakpoint window . . . . . . . . . . . . . . . . . . . . . . . . . 627.6.3 Pending breakpoints . . . . . . . . . . . . . . . . . . . . . . . . . . . . . . . . 627.6.4 Conditional breakpoints . . . . . . . . . . . . . . . . . . . . . . . . . . . . . . 63
7.7 Suspending breakpoints . . . . . . . . . . . . . . . . . . . . . . . . . . . . . . . . . . . 637.8 Deleting a breakpoint . . . . . . . . . . . . . . . . . . . . . . . . . . . . . . . . . . . . 637.9 Loading and saving breakpoints . . . . . . . . . . . . . . . . . . . . . . . . . . . . . . 647.10 Default breakpoints . . . . . . . . . . . . . . . . . . . . . . . . . . . . . . . . . . . . . 647.11 Synchronizing processes . . . . . . . . . . . . . . . . . . . . . . . . . . . . . . . . . . 647.12 Setting a watchpoint . . . . . . . . . . . . . . . . . . . . . . . . . . . . . . . . . . . . 657.13 Tracepoints . . . . . . . . . . . . . . . . . . . . . . . . . . . . . . . . . . . . . . . . . 66
7.13.1 Setting a tracepoint . . . . . . . . . . . . . . . . . . . . . . . . . . . . . . . . . 667.13.2 Tracepoint output . . . . . . . . . . . . . . . . . . . . . . . . . . . . . . . . . . 67
7.14 Version control breakpoints and tracepoints . . . . . . . . . . . . . . . . . . . . . . . . 687.15 Examining the stack frame . . . . . . . . . . . . . . . . . . . . . . . . . . . . . . . . . 697.16 Align stacks . . . . . . . . . . . . . . . . . . . . . . . . . . . . . . . . . . . . . . . . . 697.17 Viewing stacks in parallel . . . . . . . . . . . . . . . . . . . . . . . . . . . . . . . . . . 70
7.17.1 Overview . . . . . . . . . . . . . . . . . . . . . . . . . . . . . . . . . . . . . . 707.17.2 The Parallel Stack View in detail . . . . . . . . . . . . . . . . . . . . . . . . . . 70
7.18 Browsing source code . . . . . . . . . . . . . . . . . . . . . . . . . . . . . . . . . . . . 727.19 Simultaneously viewing multiple files . . . . . . . . . . . . . . . . . . . . . . . . . . . 737.20 Signal handling . . . . . . . . . . . . . . . . . . . . . . . . . . . . . . . . . . . . . . . 73
7.20.1 Custom signal handling (signal dispositions) . . . . . . . . . . . . . . . . . . . 747.20.2 Sending signals . . . . . . . . . . . . . . . . . . . . . . . . . . . . . . . . . . . 74
8 Viewing variables and data 768.1 Sparklines . . . . . . . . . . . . . . . . . . . . . . . . . . . . . . . . . . . . . . . . . . 768.2 Current line . . . . . . . . . . . . . . . . . . . . . . . . . . . . . . . . . . . . . . . . . 768.3 Local variables . . . . . . . . . . . . . . . . . . . . . . . . . . . . . . . . . . . . . . . 778.4 Arbitrary expressions and global variables . . . . . . . . . . . . . . . . . . . . . . . . . 77
8.4.1 Fortran intrinsics . . . . . . . . . . . . . . . . . . . . . . . . . . . . . . . . . . 798.4.2 Changing the language of an expression . . . . . . . . . . . . . . . . . . . . . . 798.4.3 Macros and #defined constants . . . . . . . . . . . . . . . . . . . . . . . . . . . 79
8.5 Help with Fortran modules . . . . . . . . . . . . . . . . . . . . . . . . . . . . . . . . . 798.6 Viewing complex numbers in Fortran . . . . . . . . . . . . . . . . . . . . . . . . . . . 808.7 C++ STL support . . . . . . . . . . . . . . . . . . . . . . . . . . . . . . . . . . . . . . 818.8 Custom pretty printers . . . . . . . . . . . . . . . . . . . . . . . . . . . . . . . . . . . 81
8.8.1 Example . . . . . . . . . . . . . . . . . . . . . . . . . . . . . . . . . . . . . . 818.9 Viewing array data . . . . . . . . . . . . . . . . . . . . . . . . . . . . . . . . . . . . . 828.10 UPC support . . . . . . . . . . . . . . . . . . . . . . . . . . . . . . . . . . . . . . . . . 828.11 Changing data values . . . . . . . . . . . . . . . . . . . . . . . . . . . . . . . . . . . . 838.12 Viewing numbers in different bases . . . . . . . . . . . . . . . . . . . . . . . . . . . . . 838.13 Examining pointers . . . . . . . . . . . . . . . . . . . . . . . . . . . . . . . . . . . . . 838.14 Multi-dimensional arrays in the Variable View . . . . . . . . . . . . . . . . . . . . . . . 83
Copyright c© 2002-2018 Arm Limited (or its affiliates). All rights reserved. 3
Arm Forge 18.0.2
8.15 Multi-dimensional array viewer (MDA) . . . . . . . . . . . . . . . . . . . . . . . . . . 848.15.1 Array expression . . . . . . . . . . . . . . . . . . . . . . . . . . . . . . . . . . 858.15.2 Filtering by value . . . . . . . . . . . . . . . . . . . . . . . . . . . . . . . . . . 868.15.3 Distributed arrays . . . . . . . . . . . . . . . . . . . . . . . . . . . . . . . . . . 868.15.4 Advanced: how arrays are laid out in the data table . . . . . . . . . . . . . . . . 868.15.5 Auto Update . . . . . . . . . . . . . . . . . . . . . . . . . . . . . . . . . . . . 898.15.6 Comparing elements across processes . . . . . . . . . . . . . . . . . . . . . . . 898.15.7 Statistics . . . . . . . . . . . . . . . . . . . . . . . . . . . . . . . . . . . . . . 898.15.8 Export . . . . . . . . . . . . . . . . . . . . . . . . . . . . . . . . . . . . . . . . 898.15.9 Visualization . . . . . . . . . . . . . . . . . . . . . . . . . . . . . . . . . . . . 90
8.16 Cross-process and cross-thread comparison . . . . . . . . . . . . . . . . . . . . . . . . 918.17 Assigning MPI ranks . . . . . . . . . . . . . . . . . . . . . . . . . . . . . . . . . . . . 928.18 Viewing registers . . . . . . . . . . . . . . . . . . . . . . . . . . . . . . . . . . . . . . 938.19 Process details . . . . . . . . . . . . . . . . . . . . . . . . . . . . . . . . . . . . . . . . 938.20 Disassembler . . . . . . . . . . . . . . . . . . . . . . . . . . . . . . . . . . . . . . . . 938.21 Interacting directly with the debugger . . . . . . . . . . . . . . . . . . . . . . . . . . . 94
9 Program input and output 959.1 Viewing standard output and error . . . . . . . . . . . . . . . . . . . . . . . . . . . . . 959.2 Saving output . . . . . . . . . . . . . . . . . . . . . . . . . . . . . . . . . . . . . . . . 959.3 Sending standard input . . . . . . . . . . . . . . . . . . . . . . . . . . . . . . . . . . . 95
10 Logbook 9710.1 Usage . . . . . . . . . . . . . . . . . . . . . . . . . . . . . . . . . . . . . . . . . . . . 9710.2 Annotation . . . . . . . . . . . . . . . . . . . . . . . . . . . . . . . . . . . . . . . . . 9810.3 Comparison window . . . . . . . . . . . . . . . . . . . . . . . . . . . . . . . . . . . . 98
11 Message queues 9911.1 Viewing the message queues . . . . . . . . . . . . . . . . . . . . . . . . . . . . . . . . 9911.2 Interpreting the message queues . . . . . . . . . . . . . . . . . . . . . . . . . . . . . . 10011.3 Deadlock . . . . . . . . . . . . . . . . . . . . . . . . . . . . . . . . . . . . . . . . . . 101
12 Memory debugging 10212.1 Enabling memory debugging . . . . . . . . . . . . . . . . . . . . . . . . . . . . . . . . 10212.2 CUDA memory debugging . . . . . . . . . . . . . . . . . . . . . . . . . . . . . . . . . 10212.3 Configuration . . . . . . . . . . . . . . . . . . . . . . . . . . . . . . . . . . . . . . . . 103
12.3.1 Static linking . . . . . . . . . . . . . . . . . . . . . . . . . . . . . . . . . . . . 10412.3.2 Available checks . . . . . . . . . . . . . . . . . . . . . . . . . . . . . . . . . . 10512.3.3 Changing settings at run time . . . . . . . . . . . . . . . . . . . . . . . . . . . 105
12.4 Pointer error detection and validity checking . . . . . . . . . . . . . . . . . . . . . . . . 10612.4.1 Library usage errors . . . . . . . . . . . . . . . . . . . . . . . . . . . . . . . . 10612.4.2 View pointer details . . . . . . . . . . . . . . . . . . . . . . . . . . . . . . . . 10612.4.3 Cross-process comparison of pointers . . . . . . . . . . . . . . . . . . . . . . . 10812.4.4 Writing beyond an allocated area . . . . . . . . . . . . . . . . . . . . . . . . . . 10812.4.5 Fencepost checking . . . . . . . . . . . . . . . . . . . . . . . . . . . . . . . . . 10912.4.6 Suppressing an error . . . . . . . . . . . . . . . . . . . . . . . . . . . . . . . . 109
12.5 Current memory usage . . . . . . . . . . . . . . . . . . . . . . . . . . . . . . . . . . . 10912.5.1 Detecting leaks when using custom allocators/memory wrappers . . . . . . . . . 111
12.6 Memory Statistics . . . . . . . . . . . . . . . . . . . . . . . . . . . . . . . . . . . . . . 111
13 Checkpointing 11313.1 Overview . . . . . . . . . . . . . . . . . . . . . . . . . . . . . . . . . . . . . . . . . . 113
Copyright c© 2002-2018 Arm Limited (or its affiliates). All rights reserved. 4

Arm Forge 18.0.2
13.2 How to checkpoint . . . . . . . . . . . . . . . . . . . . . . . . . . . . . . . . . . . . . 11313.3 Restoring a checkpoint . . . . . . . . . . . . . . . . . . . . . . . . . . . . . . . . . . . 113
14 Using and writing plugins 11414.1 Supported plugins . . . . . . . . . . . . . . . . . . . . . . . . . . . . . . . . . . . . . . 11414.2 Installing a plugin . . . . . . . . . . . . . . . . . . . . . . . . . . . . . . . . . . . . . . 11414.3 Using a plugin . . . . . . . . . . . . . . . . . . . . . . . . . . . . . . . . . . . . . . . . 11414.4 Writing a plugin . . . . . . . . . . . . . . . . . . . . . . . . . . . . . . . . . . . . . . . 11614.5 Plugin reference . . . . . . . . . . . . . . . . . . . . . . . . . . . . . . . . . . . . . . . 116
15 CUDA GPU debugging 11815.1 Licensing . . . . . . . . . . . . . . . . . . . . . . . . . . . . . . . . . . . . . . . . . . 11815.2 Preparing to debug GPU code . . . . . . . . . . . . . . . . . . . . . . . . . . . . . . . 11815.3 Launching the application . . . . . . . . . . . . . . . . . . . . . . . . . . . . . . . . . . 11815.4 Controlling GPU threads . . . . . . . . . . . . . . . . . . . . . . . . . . . . . . . . . . 119
15.4.1 Breakpoints . . . . . . . . . . . . . . . . . . . . . . . . . . . . . . . . . . . . . 11915.4.2 Stepping . . . . . . . . . . . . . . . . . . . . . . . . . . . . . . . . . . . . . . 11915.4.3 Running and pausing . . . . . . . . . . . . . . . . . . . . . . . . . . . . . . . . 120
15.5 Examining GPU threads and data . . . . . . . . . . . . . . . . . . . . . . . . . . . . . . 12015.5.1 Selecting GPU threads . . . . . . . . . . . . . . . . . . . . . . . . . . . . . . . 12015.5.2 Viewing GPU thread locations . . . . . . . . . . . . . . . . . . . . . . . . . . . 12015.5.3 Understanding kernel progress . . . . . . . . . . . . . . . . . . . . . . . . . . . 12115.5.4 Source code viewer . . . . . . . . . . . . . . . . . . . . . . . . . . . . . . . . . 122
15.6 GPU devices information . . . . . . . . . . . . . . . . . . . . . . . . . . . . . . . . . . 12215.7 Attaching to running GPU applications . . . . . . . . . . . . . . . . . . . . . . . . . . . 12215.8 Opening GPU core files . . . . . . . . . . . . . . . . . . . . . . . . . . . . . . . . . . . 12215.9 Known issues / limitations . . . . . . . . . . . . . . . . . . . . . . . . . . . . . . . . . 123
15.9.1 Debugging multiple GPU processes . . . . . . . . . . . . . . . . . . . . . . . . 12315.9.2 Thread control . . . . . . . . . . . . . . . . . . . . . . . . . . . . . . . . . . . 12315.9.3 General . . . . . . . . . . . . . . . . . . . . . . . . . . . . . . . . . . . . . . . 12315.9.4 Pre sm 20 GPUs . . . . . . . . . . . . . . . . . . . . . . . . . . . . . . . . . . 12415.9.5 Debugging multiple GPU processes on Cray limitations . . . . . . . . . . . . . 124
15.10GPU language support . . . . . . . . . . . . . . . . . . . . . . . . . . . . . . . . . . . 12415.10.1 Cray OpenACC . . . . . . . . . . . . . . . . . . . . . . . . . . . . . . . . . . . 12415.10.2 PGI Accelerators and CUDA Fortran . . . . . . . . . . . . . . . . . . . . . . . 125
16 Offline debugging 12616.1 Using offline debugging . . . . . . . . . . . . . . . . . . . . . . . . . . . . . . . . . . 126
16.1.1 Reading a file for standard input . . . . . . . . . . . . . . . . . . . . . . . . . . 12716.1.2 Writing a file from standard output . . . . . . . . . . . . . . . . . . . . . . . . . 127
16.2 Offline report output (HTML) . . . . . . . . . . . . . . . . . . . . . . . . . . . . . . . 12816.3 Offline report output (plain text) . . . . . . . . . . . . . . . . . . . . . . . . . . . . . . 13116.4 Run-time job progress reporting . . . . . . . . . . . . . . . . . . . . . . . . . . . . . . 131
16.4.1 Periodic snapshots . . . . . . . . . . . . . . . . . . . . . . . . . . . . . . . . . 13116.4.2 Signal-triggered snapshots . . . . . . . . . . . . . . . . . . . . . . . . . . . . . 131
III MAP 133
17 Getting started 13317.1 Express Launch . . . . . . . . . . . . . . . . . . . . . . . . . . . . . . . . . . . . . . . 134
17.1.1 Run dialog box . . . . . . . . . . . . . . . . . . . . . . . . . . . . . . . . . . . 135
Copyright c© 2002-2018 Arm Limited (or its affiliates). All rights reserved. 5

Arm Forge 18.0.2
17.2 Preparing a program for profiling . . . . . . . . . . . . . . . . . . . . . . . . . . . . . . 13617.2.1 Debugging symbols . . . . . . . . . . . . . . . . . . . . . . . . . . . . . . . . 13617.2.2 Linking . . . . . . . . . . . . . . . . . . . . . . . . . . . . . . . . . . . . . . . 13617.2.3 Dynamic linking on Cray X-Series systems . . . . . . . . . . . . . . . . . . . . 13717.2.4 Static linking . . . . . . . . . . . . . . . . . . . . . . . . . . . . . . . . . . . . 13817.2.5 Static linking on Cray X-Series systems . . . . . . . . . . . . . . . . . . . . . . 14017.2.6 Dynamic and static linking on Cray X-Series systems using the modules envi-
ronment . . . . . . . . . . . . . . . . . . . . . . . . . . . . . . . . . . . . . . . 14117.2.7 map-link modules installation on Cray X-Series . . . . . . . . . . . . . . . . . . 141
17.3 Profiling a program . . . . . . . . . . . . . . . . . . . . . . . . . . . . . . . . . . . . . 14217.3.1 Application . . . . . . . . . . . . . . . . . . . . . . . . . . . . . . . . . . . . . 14217.3.2 Duration . . . . . . . . . . . . . . . . . . . . . . . . . . . . . . . . . . . . . . 14317.3.3 MPI . . . . . . . . . . . . . . . . . . . . . . . . . . . . . . . . . . . . . . . . . 14317.3.4 OpenMP . . . . . . . . . . . . . . . . . . . . . . . . . . . . . . . . . . . . . . 14317.3.5 Environment variables . . . . . . . . . . . . . . . . . . . . . . . . . . . . . . . 14417.3.6 Profiling . . . . . . . . . . . . . . . . . . . . . . . . . . . . . . . . . . . . . . 14417.3.7 Profiling only part of a program . . . . . . . . . . . . . . . . . . . . . . . . . . 144
17.3.7.1 C . . . . . . . . . . . . . . . . . . . . . . . . . . . . . . . . . . . . . 14517.3.7.2 Fortran . . . . . . . . . . . . . . . . . . . . . . . . . . . . . . . . . . 145
17.4 remote-exec required by some MPIs . . . . . . . . . . . . . . . . . . . . . . . . . . 14517.5 Profiling a single-process program . . . . . . . . . . . . . . . . . . . . . . . . . . . . . 14617.6 Sending standard input . . . . . . . . . . . . . . . . . . . . . . . . . . . . . . . . . . . 14617.7 Starting a job in a queue . . . . . . . . . . . . . . . . . . . . . . . . . . . . . . . . . . 14717.8 Using custom MPI scripts . . . . . . . . . . . . . . . . . . . . . . . . . . . . . . . . . . 14817.9 Starting MAP from a job script . . . . . . . . . . . . . . . . . . . . . . . . . . . . . . . 15017.10MAP environment variables . . . . . . . . . . . . . . . . . . . . . . . . . . . . . . . . 151
18 Program output 15418.1 Viewing standard output and error . . . . . . . . . . . . . . . . . . . . . . . . . . . . . 15418.2 Displaying selected processes . . . . . . . . . . . . . . . . . . . . . . . . . . . . . . . . 15418.3 Restricting output . . . . . . . . . . . . . . . . . . . . . . . . . . . . . . . . . . . . . . 15418.4 Saving output . . . . . . . . . . . . . . . . . . . . . . . . . . . . . . . . . . . . . . . . 155
19 Source code 15619.1 Viewing . . . . . . . . . . . . . . . . . . . . . . . . . . . . . . . . . . . . . . . . . . . 15619.2 OpenMP programs . . . . . . . . . . . . . . . . . . . . . . . . . . . . . . . . . . . . . 15819.3 GPU programs . . . . . . . . . . . . . . . . . . . . . . . . . . . . . . . . . . . . . . . 15919.4 Dealing with complexity: code folding . . . . . . . . . . . . . . . . . . . . . . . . . . . 16019.5 Editing . . . . . . . . . . . . . . . . . . . . . . . . . . . . . . . . . . . . . . . . . . . . 16019.6 Rebuilding and restarting . . . . . . . . . . . . . . . . . . . . . . . . . . . . . . . . . . 16119.7 Committing changes . . . . . . . . . . . . . . . . . . . . . . . . . . . . . . . . . . . . 161
20 Selected lines view 16220.1 Limitations . . . . . . . . . . . . . . . . . . . . . . . . . . . . . . . . . . . . . . . . . 16320.2 GPU profiling . . . . . . . . . . . . . . . . . . . . . . . . . . . . . . . . . . . . . . . . 164
21 Stacks view 165
22 OpenMP Regions view 166
23 Functions view 168
24 Project Files view 169
Copyright c© 2002-2018 Arm Limited (or its affiliates). All rights reserved. 6

Arm Forge 18.0.2
25 Metrics View 17025.1 CPU instructions . . . . . . . . . . . . . . . . . . . . . . . . . . . . . . . . . . . . . . 171
25.1.1 Per-line CPU instructions . . . . . . . . . . . . . . . . . . . . . . . . . . . . . 17225.2 CPU time . . . . . . . . . . . . . . . . . . . . . . . . . . . . . . . . . . . . . . . . . . 17225.3 I/O . . . . . . . . . . . . . . . . . . . . . . . . . . . . . . . . . . . . . . . . . . . . . . 17325.4 Memory . . . . . . . . . . . . . . . . . . . . . . . . . . . . . . . . . . . . . . . . . . . 17325.5 MPI . . . . . . . . . . . . . . . . . . . . . . . . . . . . . . . . . . . . . . . . . . . . . 17325.6 Detecting MPI imbalance . . . . . . . . . . . . . . . . . . . . . . . . . . . . . . . . . . 17425.7 Accelerator . . . . . . . . . . . . . . . . . . . . . . . . . . . . . . . . . . . . . . . . . 17525.8 Energy . . . . . . . . . . . . . . . . . . . . . . . . . . . . . . . . . . . . . . . . . . . . 175
25.8.1 Requirements . . . . . . . . . . . . . . . . . . . . . . . . . . . . . . . . . . . . 17525.9 Lustre . . . . . . . . . . . . . . . . . . . . . . . . . . . . . . . . . . . . . . . . . . . . 17625.10Zooming . . . . . . . . . . . . . . . . . . . . . . . . . . . . . . . . . . . . . . . . . . . 17625.11Viewing totals across processes and nodes . . . . . . . . . . . . . . . . . . . . . . . . . 17825.12Custom metrics . . . . . . . . . . . . . . . . . . . . . . . . . . . . . . . . . . . . . . . 178
26 PAPI metrics 18026.1 Installation . . . . . . . . . . . . . . . . . . . . . . . . . . . . . . . . . . . . . . . . . 18026.2 PAPI config file . . . . . . . . . . . . . . . . . . . . . . . . . . . . . . . . . . . . . . . 18026.3 PAPI overview metrics . . . . . . . . . . . . . . . . . . . . . . . . . . . . . . . . . . . 18026.4 PAPI cache misses . . . . . . . . . . . . . . . . . . . . . . . . . . . . . . . . . . . . . 18126.5 PAPI branch prediction . . . . . . . . . . . . . . . . . . . . . . . . . . . . . . . . . . . 18126.6 PAPI floating-point . . . . . . . . . . . . . . . . . . . . . . . . . . . . . . . . . . . . . 181
27 Main-thread, OpenMP and Pthread view modes 18327.1 Main thread only mode . . . . . . . . . . . . . . . . . . . . . . . . . . . . . . . . . . . 18327.2 OpenMP mode . . . . . . . . . . . . . . . . . . . . . . . . . . . . . . . . . . . . . . . 18327.3 Pthread mode . . . . . . . . . . . . . . . . . . . . . . . . . . . . . . . . . . . . . . . . 183
28 Processes and cores view 185
29 Running MAP from the command line 18629.1 Profiling MPMD programs . . . . . . . . . . . . . . . . . . . . . . . . . . . . . . . . . 187
29.1.1 Profiling MPMD programs without Express Launch . . . . . . . . . . . . . . . 187
30 Exporting profiler data in JSON format 18830.1 JSON format . . . . . . . . . . . . . . . . . . . . . . . . . . . . . . . . . . . . . . . . 18830.2 Activities . . . . . . . . . . . . . . . . . . . . . . . . . . . . . . . . . . . . . . . . . . 189
30.2.1 Description of categories . . . . . . . . . . . . . . . . . . . . . . . . . . . . . . 18930.2.2 Categories available in main thread activity . . . . . . . . . . . . . . . . . . 19030.2.3 Categories available in openmp and pthreads activities . . . . . . . . . . . . 191
30.3 Metrics . . . . . . . . . . . . . . . . . . . . . . . . . . . . . . . . . . . . . . . . . . . 19130.4 Example JSON output . . . . . . . . . . . . . . . . . . . . . . . . . . . . . . . . . . . 193
31 GPU profiling 19531.1 Kernel analysis . . . . . . . . . . . . . . . . . . . . . . . . . . . . . . . . . . . . . . . 19531.2 Compilation . . . . . . . . . . . . . . . . . . . . . . . . . . . . . . . . . . . . . . . . . 19731.3 Performance impact . . . . . . . . . . . . . . . . . . . . . . . . . . . . . . . . . . . . . 19731.4 Customizing GPU profiling behavior . . . . . . . . . . . . . . . . . . . . . . . . . . . . 19831.5 Known issues . . . . . . . . . . . . . . . . . . . . . . . . . . . . . . . . . . . . . . . . 198
IV Appendix 199
Copyright c© 2002-2018 Arm Limited (or its affiliates). All rights reserved. 7
Arm Forge 18.0.2
A Configuration 199A.1 Configuration files . . . . . . . . . . . . . . . . . . . . . . . . . . . . . . . . . . . . . 199
A.1.1 Sitewide configuration . . . . . . . . . . . . . . . . . . . . . . . . . . . . . . . 199A.1.2 Startup scripts . . . . . . . . . . . . . . . . . . . . . . . . . . . . . . . . . . . . 200A.1.3 Importing legacy configuration . . . . . . . . . . . . . . . . . . . . . . . . . . . 200A.1.4 Converting legacy sitewide configuration files . . . . . . . . . . . . . . . . . . 200A.1.5 Using shared home directories on multiple systems . . . . . . . . . . . . . . . . 200A.1.6 Using a shared installation on multiple systems . . . . . . . . . . . . . . . . . . 201
A.2 Integration with queuing systems . . . . . . . . . . . . . . . . . . . . . . . . . . . . . . 201A.3 Template tutorial . . . . . . . . . . . . . . . . . . . . . . . . . . . . . . . . . . . . . . 202
A.3.1 The template script . . . . . . . . . . . . . . . . . . . . . . . . . . . . . . . . . 203A.3.2 Configuring queue commands . . . . . . . . . . . . . . . . . . . . . . . . . . . 203A.3.3 Configuring how job size is chosen . . . . . . . . . . . . . . . . . . . . . . . . 203A.3.4 Quick restart . . . . . . . . . . . . . . . . . . . . . . . . . . . . . . . . . . . . 203
A.4 Connecting to remote programs (remote-exec) . . . . . . . . . . . . . . . . . . . . . . . 204A.5 Optional configuration . . . . . . . . . . . . . . . . . . . . . . . . . . . . . . . . . . . 204
A.5.1 System . . . . . . . . . . . . . . . . . . . . . . . . . . . . . . . . . . . . . . . 204A.5.2 Job submission . . . . . . . . . . . . . . . . . . . . . . . . . . . . . . . . . . . 206A.5.3 Code viewer settings . . . . . . . . . . . . . . . . . . . . . . . . . . . . . . . . 206A.5.4 Appearance . . . . . . . . . . . . . . . . . . . . . . . . . . . . . . . . . . . . . 206
B Getting support 207
C Supported platforms 208C.1 DDT . . . . . . . . . . . . . . . . . . . . . . . . . . . . . . . . . . . . . . . . . . . . . 208C.2 MAP . . . . . . . . . . . . . . . . . . . . . . . . . . . . . . . . . . . . . . . . . . . . . 209
D Known issues 211D.1 MAP . . . . . . . . . . . . . . . . . . . . . . . . . . . . . . . . . . . . . . . . . . . . . 211D.2 MPICH 3 . . . . . . . . . . . . . . . . . . . . . . . . . . . . . . . . . . . . . . . . . . 211D.3 Open MPI . . . . . . . . . . . . . . . . . . . . . . . . . . . . . . . . . . . . . . . . . . 211D.4 CUDA . . . . . . . . . . . . . . . . . . . . . . . . . . . . . . . . . . . . . . . . . . . . 211D.5 SLURM . . . . . . . . . . . . . . . . . . . . . . . . . . . . . . . . . . . . . . . . . . . 211D.6 PGI compilers . . . . . . . . . . . . . . . . . . . . . . . . . . . . . . . . . . . . . . . . 212D.7 64-bit Arm/Power platforms . . . . . . . . . . . . . . . . . . . . . . . . . . . . . . . . 212D.8 F1 user guide . . . . . . . . . . . . . . . . . . . . . . . . . . . . . . . . . . . . . . . . 212D.9 See also . . . . . . . . . . . . . . . . . . . . . . . . . . . . . . . . . . . . . . . . . . . 212
E MPI distribution notes and known issues 213E.1 Berkeley UPC . . . . . . . . . . . . . . . . . . . . . . . . . . . . . . . . . . . . . . . . 213E.2 Bull MPI . . . . . . . . . . . . . . . . . . . . . . . . . . . . . . . . . . . . . . . . . . 213E.3 Cray MPT . . . . . . . . . . . . . . . . . . . . . . . . . . . . . . . . . . . . . . . . . . 213E.4 HP MPI . . . . . . . . . . . . . . . . . . . . . . . . . . . . . . . . . . . . . . . . . . . 214E.5 IBM PE . . . . . . . . . . . . . . . . . . . . . . . . . . . . . . . . . . . . . . . . . . . 214E.6 Intel MPI . . . . . . . . . . . . . . . . . . . . . . . . . . . . . . . . . . . . . . . . . . 214E.7 MPC . . . . . . . . . . . . . . . . . . . . . . . . . . . . . . . . . . . . . . . . . . . . . 215
E.7.1 MPC in the Run window . . . . . . . . . . . . . . . . . . . . . . . . . . . . . . 215E.7.2 MPC on the command line . . . . . . . . . . . . . . . . . . . . . . . . . . . . . 216
E.8 MPICH 1 p4 . . . . . . . . . . . . . . . . . . . . . . . . . . . . . . . . . . . . . . . . . 216E.9 MPICH 1 p4 mpd . . . . . . . . . . . . . . . . . . . . . . . . . . . . . . . . . . . . . . 216E.10 MPICH 2 . . . . . . . . . . . . . . . . . . . . . . . . . . . . . . . . . . . . . . . . . . 216E.11 MPICH 3 . . . . . . . . . . . . . . . . . . . . . . . . . . . . . . . . . . . . . . . . . . 217
Copyright c© 2002-2018 Arm Limited (or its affiliates). All rights reserved. 8

Arm Forge 18.0.2
E.12 MVAPICH 2 . . . . . . . . . . . . . . . . . . . . . . . . . . . . . . . . . . . . . . . . 217E.13 Open MPI . . . . . . . . . . . . . . . . . . . . . . . . . . . . . . . . . . . . . . . . . . 217E.14 Platform MPI . . . . . . . . . . . . . . . . . . . . . . . . . . . . . . . . . . . . . . . . 218E.15 SGI MPT / SGI Altix . . . . . . . . . . . . . . . . . . . . . . . . . . . . . . . . . . . . 218
E.15.1 Using DDT with Cray ATP (the Abnormal Termination Process) . . . . . . . . . 219E.16 SLURM . . . . . . . . . . . . . . . . . . . . . . . . . . . . . . . . . . . . . . . . . . . 219E.17 Spectrum MPI . . . . . . . . . . . . . . . . . . . . . . . . . . . . . . . . . . . . . . . . 220
F Compiler notes and known issues 221F.1 AMD OpenCL compiler . . . . . . . . . . . . . . . . . . . . . . . . . . . . . . . . . . 221F.2 Arm Fortran compiler . . . . . . . . . . . . . . . . . . . . . . . . . . . . . . . . . . . . 221F.3 Berkeley UPC compiler . . . . . . . . . . . . . . . . . . . . . . . . . . . . . . . . . . . 221F.4 Cray compiler environment . . . . . . . . . . . . . . . . . . . . . . . . . . . . . . . . . 221
F.4.1 Compile serial programs on Cray . . . . . . . . . . . . . . . . . . . . . . . . . 222F.5 GNU . . . . . . . . . . . . . . . . . . . . . . . . . . . . . . . . . . . . . . . . . . . . . 222
F.5.1 GNU UPC . . . . . . . . . . . . . . . . . . . . . . . . . . . . . . . . . . . . . 222F.6 IBM XLC/XLF . . . . . . . . . . . . . . . . . . . . . . . . . . . . . . . . . . . . . . . 223F.7 Intel compilers . . . . . . . . . . . . . . . . . . . . . . . . . . . . . . . . . . . . . . . 223F.8 Pathscale EKO compilers . . . . . . . . . . . . . . . . . . . . . . . . . . . . . . . . . . 224F.9 Portland Group compilers . . . . . . . . . . . . . . . . . . . . . . . . . . . . . . . . . . 225
G Platform notes and known issues 227G.1 CRAY . . . . . . . . . . . . . . . . . . . . . . . . . . . . . . . . . . . . . . . . . . . . 227G.2 GNU/Linux systems . . . . . . . . . . . . . . . . . . . . . . . . . . . . . . . . . . . . 228
G.2.1 General . . . . . . . . . . . . . . . . . . . . . . . . . . . . . . . . . . . . . . . 228G.2.2 SUSE Linux . . . . . . . . . . . . . . . . . . . . . . . . . . . . . . . . . . . . 228
G.3 IBM Blue Gene/Q . . . . . . . . . . . . . . . . . . . . . . . . . . . . . . . . . . . . . . 229G.3.1 Attaching . . . . . . . . . . . . . . . . . . . . . . . . . . . . . . . . . . . . . . 229
G.4 Intel Xeon . . . . . . . . . . . . . . . . . . . . . . . . . . . . . . . . . . . . . . . . . . 229G.4.1 Enabling RAPL energy and power counters when profiling . . . . . . . . . . . . 229
G.5 Intel Xeon Phi (Knight’s Landing) . . . . . . . . . . . . . . . . . . . . . . . . . . . . . 230G.6 NVIDIA CUDA . . . . . . . . . . . . . . . . . . . . . . . . . . . . . . . . . . . . . . . 230
G.6.1 CUDA known issues . . . . . . . . . . . . . . . . . . . . . . . . . . . . . . . . 230G.7 Arm . . . . . . . . . . . . . . . . . . . . . . . . . . . . . . . . . . . . . . . . . . . . . 230
G.7.1 Arm R©v8 (AArch64) known issues . . . . . . . . . . . . . . . . . . . . . . . . . 230G.8 POWER . . . . . . . . . . . . . . . . . . . . . . . . . . . . . . . . . . . . . . . . . . . 231
G.8.1 POWER8 (POWER 64-bit) known issues . . . . . . . . . . . . . . . . . . . . . 231
H General troubleshooting and known issues 232H.1 General troubleshooting . . . . . . . . . . . . . . . . . . . . . . . . . . . . . . . . . . . 232
H.1.1 Problems starting the GUI . . . . . . . . . . . . . . . . . . . . . . . . . . . . . 232H.1.2 Problems reading this document . . . . . . . . . . . . . . . . . . . . . . . . . . 232
H.2 Starting a program . . . . . . . . . . . . . . . . . . . . . . . . . . . . . . . . . . . . . 232H.2.1 Problems starting scalar programs . . . . . . . . . . . . . . . . . . . . . . . . . 232H.2.2 Problems starting multi-process programs . . . . . . . . . . . . . . . . . . . . . 233H.2.3 No shared home directory . . . . . . . . . . . . . . . . . . . . . . . . . . . . . 233H.2.4 DDT or MAP cannot find your hosts or the executable . . . . . . . . . . . . . . 234H.2.5 The progress bar does not move and Arm Forge times out . . . . . . . . . . . . 234
H.3 Attaching . . . . . . . . . . . . . . . . . . . . . . . . . . . . . . . . . . . . . . . . . . 234H.3.1 The system does not allow connecting debuggers to processes (Fedora, Ubuntu) . 234H.3.2 The system does not allow connecting debuggers to processes (Fedora, Red Hat) 235H.3.3 Running processes do not show up in the attach window . . . . . . . . . . . . . 235
Copyright c© 2002-2018 Arm Limited (or its affiliates). All rights reserved. 9
Arm Forge 18.0.2
H.4 Source Viewer . . . . . . . . . . . . . . . . . . . . . . . . . . . . . . . . . . . . . . . . 235H.4.1 No variables or line number information . . . . . . . . . . . . . . . . . . . . . . 235H.4.2 Source code does not appear when you start Arm Forge . . . . . . . . . . . . . . 235H.4.3 Code folding does not work for OpenACC/OpenMP pragmas . . . . . . . . . . 236
H.5 Input/Output . . . . . . . . . . . . . . . . . . . . . . . . . . . . . . . . . . . . . . . . . 236H.5.1 Output to stderr is not displayed . . . . . . . . . . . . . . . . . . . . . . . . . . 236H.5.2 Unwind errors . . . . . . . . . . . . . . . . . . . . . . . . . . . . . . . . . . . 236
H.6 Controlling a program . . . . . . . . . . . . . . . . . . . . . . . . . . . . . . . . . . . . 236H.6.1 Program jumps forwards and backwards when stepping through it . . . . . . . . 236H.6.2 DDT may stop responding when using the Step Threads Together option . . . . 237
H.7 Evaluating variables . . . . . . . . . . . . . . . . . . . . . . . . . . . . . . . . . . . . . 237H.7.1 Some variables cannot be viewed when the program is at the start of a function . 237H.7.2 Incorrect values printed for Fortran array . . . . . . . . . . . . . . . . . . . . . 237H.7.3 Evaluating an array of derived types, containing multiple-dimension arrays . . . 237H.7.4 C++ STL types are not pretty printed . . . . . . . . . . . . . . . . . . . . . . . 237
H.8 Memory debugging . . . . . . . . . . . . . . . . . . . . . . . . . . . . . . . . . . . . . 238H.8.1 The View Pointer Details window says a pointer is valid but does not show you
which line of code it was allocated on . . . . . . . . . . . . . . . . . . . . . . . 238H.8.2 mprotect fails error when using memory debugging with guard pages . . 238H.8.3 Allocations made before or during MPI Init show up in Current Memory Us-
age but have no associated stack back trace . . . . . . . . . . . . . . . . . . . . 238H.8.4 Deadlock when calling printf or malloc from a signal handler . . . . . . . 238H.8.5 Program runs more slowly with Memory Debugging enabled . . . . . . . . . . . 239
H.9 MAP specific issues . . . . . . . . . . . . . . . . . . . . . . . . . . . . . . . . . . . . . 239H.9.1 My compiler is inlining functions . . . . . . . . . . . . . . . . . . . . . . . . . 239H.9.2 Tail call optimization . . . . . . . . . . . . . . . . . . . . . . . . . . . . . . . . 239H.9.3 MPI wrapper libraries . . . . . . . . . . . . . . . . . . . . . . . . . . . . . . . 240H.9.4 Thread support limitations . . . . . . . . . . . . . . . . . . . . . . . . . . . . . 240H.9.5 No thread activity while blocking on an MPI call . . . . . . . . . . . . . . . . . 241H.9.6 I am not getting enough samples . . . . . . . . . . . . . . . . . . . . . . . . . . 241H.9.7 I just see main (external code) and nothing else . . . . . . . . . . . . . . . . . . 241H.9.8 MAPis reporting time spent in a function definition . . . . . . . . . . . . . . . . 241H.9.9 MAP is not correctly identifying vectorized instructions . . . . . . . . . . . . . 241H.9.10 Linking with the static MAP sampler library fails with an undefined reference to
real dlopen . . . . . . . . . . . . . . . . . . . . . . . . . . . . . . . . . . 242H.9.11 Linking with the static MAP sampler library fails with FDE overlap errors . . . . 242H.9.12 MAP adds unexpected overhead to my program . . . . . . . . . . . . . . . . . . 243H.9.13 MAP takes an extremely long time to gather and analyze my OpenBLAS-linked
application . . . . . . . . . . . . . . . . . . . . . . . . . . . . . . . . . . . . . 243H.9.14 MAP over-reports MPI, Input/Output, accelerator or synchronization time . . . . 244H.9.15 MAP collects very deep stack traces with boost::coroutine . . . . . . . . . . . . 244
H.10 Obtaining support . . . . . . . . . . . . . . . . . . . . . . . . . . . . . . . . . . . . . . 245
I Queue template script syntax 247I.1 Queue template tags . . . . . . . . . . . . . . . . . . . . . . . . . . . . . . . . . . . . . 247I.2 Defining new tags . . . . . . . . . . . . . . . . . . . . . . . . . . . . . . . . . . . . . . 248I.3 Specifying default options . . . . . . . . . . . . . . . . . . . . . . . . . . . . . . . . . 250I.4 Launching . . . . . . . . . . . . . . . . . . . . . . . . . . . . . . . . . . . . . . . . . . 250
I.4.1 Using AUTO LAUNCH TAG . . . . . . . . . . . . . . . . . . . . . . . . . . . 250I.4.2 Using ddt-mpirun . . . . . . . . . . . . . . . . . . . . . . . . . . . . . . . . . . 251I.4.3 MPICH 1 based MPI . . . . . . . . . . . . . . . . . . . . . . . . . . . . . . . . 251I.4.4 Scalar programs . . . . . . . . . . . . . . . . . . . . . . . . . . . . . . . . . . 252
Copyright c© 2002-2018 Arm Limited (or its affiliates). All rights reserved. 10

Arm Forge 18.0.2
I.5 Using PROCS PER NODE TAG . . . . . . . . . . . . . . . . . . . . . . . . . . . . . 252I.6 Job ID regular expression . . . . . . . . . . . . . . . . . . . . . . . . . . . . . . . . . . 252I.7 Arm IPMI Energy Agent . . . . . . . . . . . . . . . . . . . . . . . . . . . . . . . . . . 253
I.7.1 Requirements . . . . . . . . . . . . . . . . . . . . . . . . . . . . . . . . . . . . 253
Copyright c© 2002-2018 Arm Limited (or its affiliates). All rights reserved. 11

Arm Forge 18.0.2
Part I
Arm Forge
1 Introduction
Welcome to the Arm Forge user guide, covering Arm DDT and Arm MAP.
Arm DDT is our industry-leading parallel debugger supporting a wide range of parallel architectures andmodels, including MPI, UPC, CUDA and OpenMP. Arm MAP is our low-overhead line-level profilerfor MPI, OpenMP and scalar programs. Both these tools are part of one common environment: ArmForge.
One installation provides you with everything you need to debug, fix and profile programs at any scale,limited only by your current license. This simplifies your installation and maintenance overheads andprovides one common, familiar interface for all development tools, making it easy to move betweenthem while working on a piece of code. You may start Forge with ddt or map and can easily switch tothe other tool with a single click while working.
Arm Forge has native remote clients for Windows, Mac OS X and Linux that can connect via SSH toany server or cluster using your existing login process and then run, debug, profile, edit and compilefiles directly on the remote machine. The native remote client experience is superior to X forwarding orVNC-based solutions.
1.1 Arm DDT
ArmDDT is a powerful, easy-to-use graphical debugger capable of debugging a wide variety of scenariosfound in modern development environments. With Arm DDT, it is possible to debug:
• Single process and multithreaded software.
• OpenMP.
• Parallel (MPI) software.
• Heterogeneous software such as that written to use GPUs.
• Hybrid codes mixing paradigms such as MPI + OpenMP, or MPI + CUDA.
• Multi-process software of any form, including client-server applications.
Arm DDT is designed to make you and your team more productive. It includes static analysis that high-lights potential problems in the source code, integrated memory debugging that can catch reads and writesoutside of array bounds, integration with MPI message queues and much more. It provides a completesolution for finding and fixing problems whether on a single thread or hundreds of thousands.
Arm DDT supports all of the compiled languages that are found in mainstream and high-performancecomputing including:
• C, C++, and all derivatives of Fortran, including Fortran 90.
Copyright c© 2002-2018 Arm Limited (or its affiliates). All rights reserved. 12

Arm Forge 18.0.2
• Limited support for Python (CPython 2.7).
• Parallel languages/models including MPI, UPC, and Fortran 2008 Co-arrays.
• GPU languages such as HMPP, OpenMP Accelerators, CUDA and CUDA Fortran.
While many users choose Arm DDT for desktop development or for debugging on small departmentalparallel machines, it is also scalable and fast to beyond Petascale and is depended upon to debug hundredsof thousands of processes simultaneously by leadership class facilities around the world.
Chapters 5 to 16 of this manual describe Arm DDT in more detail.
1.2 Arm MAP
Arm MAP is a parallel profiler that shows you which lines of code took the most time and why, withoutrequiring careful configuration or prior experience with profiling tools. It features:
• Support for MPI, OpenMP and single-threaded programs.
• Small data files. All data is aggregated on the cluster and only a few megabytes written to disk,regardless of the size or duration of the run.
• Syntax-highlighted source code with performance annotations, allowing you to collapse blocks ofcode and functions or drill down to the performance of a single line.
• Just 5% application slowdown even with thousands of MPI processes.
• Both interactive and batch modes for gathering profile data.
• A rich set of zero-configuration metrics, showing memory usage, floating-point calculations andMPI usage across processes, including:
– The percentage of vectorized instructions, including AVX extensions, used in each part of thecode.
– The amount of time spent in memory operations varies over time and processes. Is there acache bottleneck?
– Click and drag to zoom in to specific regions of computation and explore them in detail.
– A display that enlightens you instead of drowning you in data. Everything is visually scalable,using aggregation across processes and cores to deliver an immediate overview that highlightsregions of imbalance in the code.
Chapters 17 to 31 of this user guide describe Arm MAP in more detail.
1.3 Online resources
You can find links to tutorials, training material, webinars and white papers in the online knowledgecenter:
Knowledge Center Arm help and tutorials
Known issues and the latest version of this user guide may be found on the support web pages:
Support Arm support
Copyright c© 2002-2018 Arm Limited (or its affiliates). All rights reserved. 13
Arm Forge 18.0.2
2 Installation
A release of Arm Forge, containing Arm DDT and Arm MAP may be downloaded from the Arm Devel-oper website.
Both a graphical and text-based installer are provided. See the following sections for further details.
2.1 Linux installation
2.1.1 Graphical install
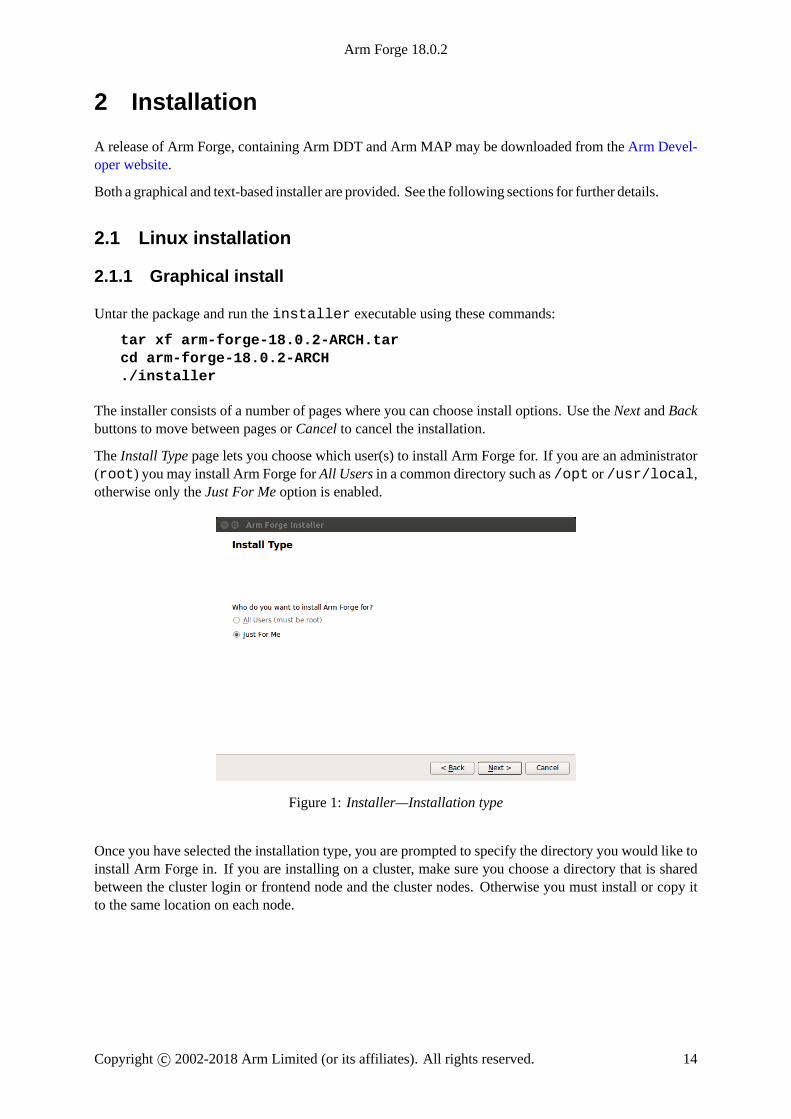
Untar the package and run the installer executable using these commands:
tar xf arm-forge-18.0.2-ARCH.tarcd arm-forge-18.0.2-ARCH./installer
The installer consists of a number of pages where you can choose install options. Use the Next and Backbuttons to move between pages or Cancel to cancel the installation.
The Install Type page lets you choose which user(s) to install Arm Forge for. If you are an administrator(root) you may install Arm Forge for All Users in a common directory such as /opt or /usr/local,otherwise only the Just For Me option is enabled.
Figure 1: Installer—Installation type
Once you have selected the installation type, you are prompted to specify the directory you would like toinstall Arm Forge in. If you are installing on a cluster, make sure you choose a directory that is sharedbetween the cluster login or frontend node and the cluster nodes. Otherwise you must install or copy itto the same location on each node.
Copyright c© 2002-2018 Arm Limited (or its affiliates). All rights reserved. 14

Arm Forge 18.0.2
Figure 2: Installer—Installation directory
You will be shown the progress of the installation on the Install page.
Figure 3: Install in progress
Icons for DDT and MAP will be added to your desktop environment’s Development menu.
It is important to follow the instructions in the README file that is contained in the tar file. In particular,you need a valid license file. Use the following link to obtain an evaluation license: Get software.
Due to the vast number of different site configurations and MPI distributions that are supported by ArmForge, it is inevitable that sometimes you may need to take additional steps to get everything fully inte-grated into your environment. For example, it may be necessary to ensure that environment variables arepropagated to remote nodes, and ensure that the tool libraries and executables are available on the remotenodes.
2.1.2 Text-mode install
The text-mode install script textinstall.sh is useful if you are installing remotely. This can beused as follows:
Copyright c© 2002-2018 Arm Limited (or its affiliates). All rights reserved. 15

Arm Forge 18.0.2
tar xf arm-forge-18.0.2-ARCH.tarcd arm-forge-18.0.2-ARCH./text-install.sh
Press Return to read the license when prompted and then input the directory where you would like toinstall Arm Forge. The directory must be accessible on all the nodes in your cluster.
2.2 Mac installation
The Arm Forge client for Mac OS X is supplied as an Apple Disk Image (*.dmg) file. This includes thedocumentation folder, which contains a copy of this user guide and the release notes. It also contains theArm Forge client application bundle icon, which should be drag and dropped into the Applicationsdirectory.
Figure 4: Mac Installer—Installation Folder
2.3 Windows installation
The Arm Forge client for Windows is installed using a graphical installer. This is a familiar Windowsset-up executable, although care needs to be taken with the choice of a destination folder for the installa-tion.
Copyright c© 2002-2018 Arm Limited (or its affiliates). All rights reserved. 16

Arm Forge 18.0.2
Figure 5: Windows Installer—Installation Folder
If the user performing the installation has administrative rights, then the default installation folder isC:\Program Files\Arm Forge. If administrative rights have not been granted, then the default isC:\Users\<user>\AppData\Local.
2.4 License files
Arm Forge products require a license file for their operation. If you are using the Remote Client you donot need a license file on the machine running the Remote Client, but on the machine you are connectingto instead.
If you do not have a license file, the GUI will show this in the lower-left corner and you will not be ableto run, debug or profile new programs.
Time-limited evaluation licenses are available from the Arm website: Get software.
2.5 Workstation and evaluation licenses
Workstation and Evaluation license files for Arm Forge do not require Licence Server and should becopied directly to {installation-directory}/licences. For example, /home/user/arm/forge/licences/Licence.ddt. Do not edit the files as this will prevent them fromworking.
If you have separate license files for Arm DDT and Arm MAP you do not need separate installations ofArmForge. Youmay instead copy the individual license files to {installation-directory}/licences.When Arm Forge is started you may choose between Arm DDT and Arm MAP on the Welcome page. Ifyou have multiple licenses for the same product the license with the most tokens is preferred.
Youmay specify an alternative location of the license directory using the environment variableALLINEA_LICENCE_DIR. For example:
export ALLINEA_LICENCE_DIR=${HOME}/SomeOtherLicenceDir
ALLINEA_LICENSE_DIR is an alias for ALLINEA_LICENCE_DIR.
Copyright c© 2002-2018 Arm Limited (or its affiliates). All rights reserved. 17
Arm Forge 18.0.2
2.6 Supercomputing and other floating licenses
For users with Supercomputing and other floating licenses, the Arm Licence Server must be running onthe designated license server machine prior to running Arm Forge.
The Arm Licence Server and instructions for its installation and usage may be downloaded from ArmDeveloper website.
The license server download is on the Arm Forge download page.
A floating license consists of two files: the server license (a file named Licence.xxxx) and a client li-cense file namedLicence. The client file should be copied to {installation-directory}/licences.For example, /home/user/arm/forge/licences/Licence. You will need to edit the host-name line to contain the host name or IP address of the machine running the Licence Server. See theLicence Server user guide for instructions on how to install the server license.
2.7 Architecture licensing
Licenses issued after the release of Arm Forge 6.1 specify the compute node architectures that they maybe used with. Licenses issued prior to this release will enable the x86 64 architecture by default. Existingusers for other architectures will be supplied with new licenses that will enable their architectures.
If there is any problem then contact Arm support at [email protected] .
2.7.1 Using multiple architecture licenses
If you are using multiple license files to specify multiple architectures, it is recommended that you leavethe default licenses directory empty. Instead, create a directory for each architecture, and when you targeta specific architecture set ALLINEA_LICENSE_DIR to the relevant directory. Alternatively, you canset ALLINEA_LICENSE_FILE in order to specify the license file.
By way of example, consider a site where there are two target architectures, x86 64 and aarch64. Createtwo directories, licenses_x86_64 and licenses_aarch64. Then, if you want to target aarch64,you would set the license directory as follows:
export ALLINEA_LICENSE_DIR=/path/to/licenses_aarch64
Copyright c© 2002-2018 Arm Limited (or its affiliates). All rights reserved. 18

Arm Forge 18.0.2
3 Connecting to a remote system
Often you will need to login to a remote system in order to run a job. For example you may use SSH tologin from your desktop machine mydesktop to the login node mycluster-login and then start a job usingthe queue submission command qsub.
Figure 6: Connecting to a Remote System
The Arm Forge GUI can connect to remote systems using SSH, typically to a login node. It can alsoconnect using Reverse Connect, typically to a batch compute node. See 3.3 Reverse Connect for moreinformation on Reverse Connect. The remote client allows you to run the user interface on your localmachine without the need for X forwarding. Native remote clients are available for Windows, Mac OS Xand Linux.
No license file is required by a remote client. The license of the remote system will be used once con-nected.
Note: The same versions of Arm Forge must be installed on the local and remote systems in order to useDDT or MAP remotely.
Figure 7: Remote Launch—Configure
To connect to a remote system click on theRemote Launch drop down list and selectConfigure. . . The Re-mote connections dialog will open where you can edit the necessary settings.
3.1 Remote connections dialog
TheRemote ConnectionsDialog allows you to add, remove and edit connections to remote systems.
Copyright c© 2002-2018 Arm Limited (or its affiliates). All rights reserved. 19

Arm Forge 18.0.2
Figure 8: Remote Connections Dialog
When adding or editing a host, you are presented with the Remote launch settings for that host.
You may also remove a remote host from the list by clicking the Remove button, or duplicate an existinghost using the Duplicate button.
You can also change the ordering of the hosts using theMove Up or Move Down buttons.
3.2 Remote launch settings
Figure 9: Remote Launch Options
Connection Name: An optional name for this connection. If no name is specified, the Host Name isused.
Host Name: The host name of the remote system you wish to connect to.
The syntax of the host name field is:
[username]@hostname[:port]...
username is an optional user name to use on the remote system. If not specified your local user nameis used instead.
hostname is the host name of the remote system.
port is the optional port number that the remote host’s SSH daemon is listening on. If not specified thedefault of 22 is used.
To login via one or more intermediate hosts (for example, a gateway) enter the host names in order,separated by spaces, for example, gateway.arm.com cluster.lan
Copyright c© 2002-2018 Arm Limited (or its affiliates). All rights reserved. 20

Arm Forge 18.0.2
Note: You must be able to login to the third and subsequent hosts without a password.
Additional SSH options may be specified in the remote-exec script covered in section A.4 Connectingto remote programs (remote-exec).
Remote Installation Directory: The full path to the Arm Forge installation on the remote system.
Remote Script: This optional script will be run before starting the remote daemon on the remote system.You may use this script to load the required modules for DDT and MAP, your MPI and compiler. Seethe following sections for more details. The script is usually not necessary when using Reverse Con-nect.
Always look for source files locally: Check this box to use the source files on the local system insteadof the remote system.
3.2.1 Remote script
The script may load modules using the module command or otherwise set environment variables. ArmForge will source this script before running its remote daemon (your script does not need to start theremote daemon itself).
The script will be run using /bin/sh (usually a Bourne-compatible shell). If this is not your usual loginshell, make allowances for the different syntax it might require.
You may install a site-wide script that will be sourced for all users at/path/to/arm/forge/remote-init.
You may also install a user-wide script that will be sourced for all of your connections at$ALLINEA_CONFIG_DIR/remote-init.
Note: $ALLINEA_CONFIG_DIR will default to $HOME/.allinea if not set.
Example Script
Note: This script file should be created on the remote system and the full path to the file entered in theRemote Script field box.
module load allinea-forgemodule load mympimodule load mycompiler
3.3 Reverse Connect
3.3.1 Overview
The Reverse Connect feature allows you to submit your job from a shell terminal as you already doand with a small tweak to your mpirun (or equivalent) allow that job to connect back to Arm ForgeGUI.
Reverse Connect makes it easy to debug and profile jobs with the right environment. You can easily loadthe required modules and prepare all setup steps necessary before launching your job.
Please note that node-locked licenses such as workstation or Arm DDT Cluster licenses do not includethe Reverse Connect feature.
Copyright c© 2002-2018 Arm Limited (or its affiliates). All rights reserved. 21
Arm Forge 18.0.2
3.3.2 Usage
1. Start Arm Forge and let it connect to your remote system (typically a login node) with SSH.
2. Modify your current mpirun (or equivalent) command line inside your interactive queue alloca-tion or queue submission script to enable Reverse Connect. In most of the cases it is sufficient toprefix it with ddt/map --connect. Almost all Arm Forge arguments beside --offline and--profile are supported by Reverse Connect.
Example:
$ mpirun -n 512 ./examples/wave_f
To debug the job using Reverse Connect and 5.2 Express Launch run:
$ ddt --connect mpirun -n 512 ./examples/wave_f
To profile the job using Reverse Connect and 17.1 Express Launch run:
$ map --connect mpirun -n 512 ./examples/wave_f
If your MPI is not yet supported by Express Launch mode you can use Compatibility Mode.
Debug:
$ ddt --connect -n 512 ./examples/wave_f
Profile:
$ map --connect -n 512 ./examples/wave_f
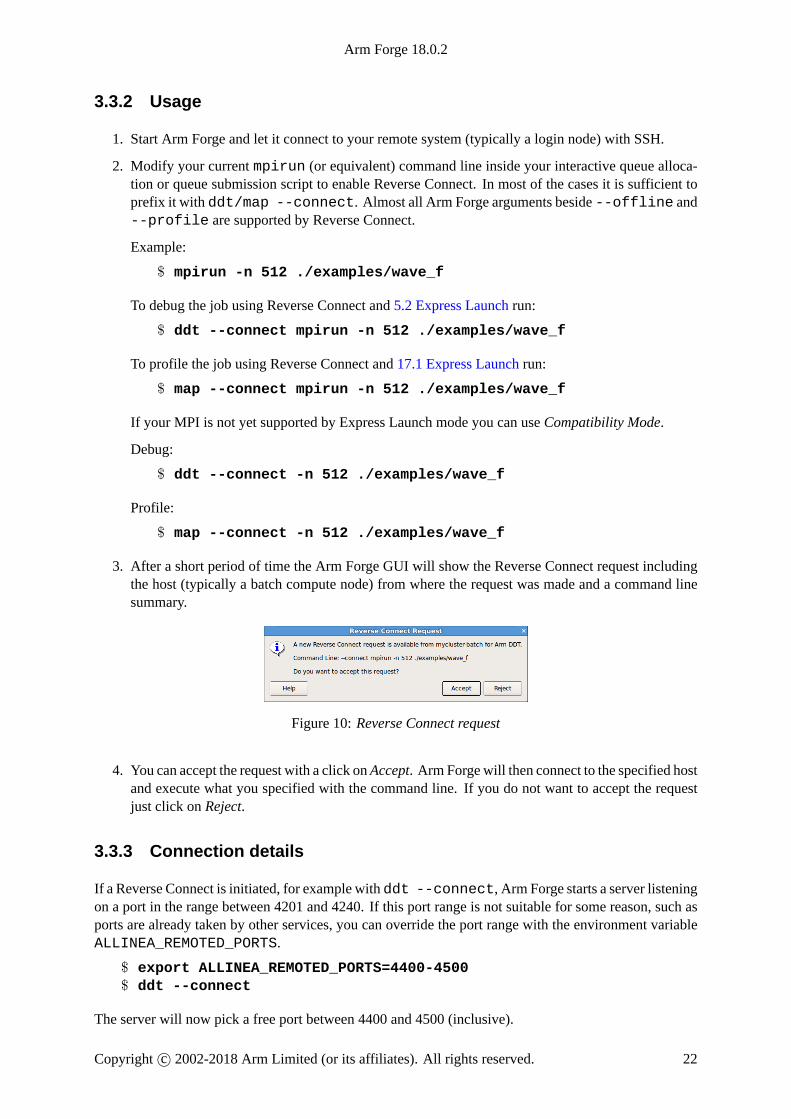
3. After a short period of time the Arm Forge GUI will show the Reverse Connect request includingthe host (typically a batch compute node) from where the request was made and a command linesummary.
Figure 10: Reverse Connect request
4. You can accept the request with a click onAccept. Arm Forge will then connect to the specified hostand execute what you specified with the command line. If you do not want to accept the requestjust click on Reject.
3.3.3 Connection details
If a Reverse Connect is initiated, for example with ddt --connect, Arm Forge starts a server listeningon a port in the range between 4201 and 4240. If this port range is not suitable for some reason, such asports are already taken by other services, you can override the port range with the environment variableALLINEA_REMOTED_PORTS.
$ export ALLINEA_REMOTED_PORTS=4400-4500$ ddt --connect
The server will now pick a free port between 4400 and 4500 (inclusive).
Copyright c© 2002-2018 Arm Limited (or its affiliates). All rights reserved. 22

Arm Forge 18.0.2
3.4 Using X forwarding or VNC
If you do not want to use the Remote Launch feature there are two other methods for running DDT orMAP on a remote system:
1. X forwarding is effective when the network connection is low latency, such as when the networkspans a single physical site.
2. VNC (or similar Unix-supporting remote desktop software) is strongly recommended when thenetwork connection is moderate or slow.
• MacOSX users accessing a Linux or other Unixmachine while using a single-buttonmouse shouldbe advised that pressing the Command key and the single mouse button will have the same effectas right clicking on a two button mouse. Right-clicking allows access to some important featuresin DDT and MAP.
You can use X forwarding to access the Arm Forge instance running on a remote Linux/Unix systemfrom a Mac OS X system:
– Start the X11 server (available in the X11User.pkg).
– Set the display variable correctly to allow X applications to display by opening a terminal inMac OS X and typing:
export DISPLAY=:0
– Then ssh to the remote system from that terminal, with ssh options -X and -C (X forwardingand compression). For example:
ssh -CX [email protected]
– Now start DDT orMAP on the remote system and the windowwill be displayed on yourMac.
• Windows users can use any one of a number of commercial and open source X servers, but may findVNC a viable alternative (http://www.realvnc.com/) which is available under free and commerciallicensing options.
• VNC allows users to access a desktop running on a remote server (for example, a cluster login nodeor front end) and is more suitable than X forwarding for medium to high latency links. By settingup an SSH ‘tunnel’ users are usually able to securely access this remote desktop from anywhere.To use VNC and Arm Forge:
– Log in to the remote system and set up a tunnel for port 5901 and 5801. On Mac OS X or anyLinux/Unix systems use the ssh command. If you are using Putty on Windows use the GUIto setup the tunnel.
ssh -L 5901:localhost:5901 -L 5801:localhost:5801 \[email protected]
– At the remote prompt, start vncserver. If this is the first time you have used VNC it asksyou to set an access password.
vncserver
The output from vncserver will tell you which ports VNC has started on—5800+n and5900+n, where n is the number given as hostname:n in the output. If this number, n, is not1, then another user is already using VNC on that system, and you should set a new tunnelto these ports by logging in to the same host again and changing the settings to the new ports(or use SSH escape codes to add a tunnel, see the SSH manual pages for details).
Copyright c© 2002-2018 Arm Limited (or its affiliates). All rights reserved. 23

Arm Forge 18.0.2
– Now, on the local desktop or laptop, either use a browser and access the desktop within thebrowser by entering the URL http://localhost:5801/, or you may use a separateVNC client such as krdc or vncviewer.
krdc localhost:1
or
vncviewer localhost:1
If n is not 1, as described above, use :2, :3 etc. as appropriate instead.
• Note: A bug in the browser-based access method means the Tab key does not work correctly inVNC, but krdc or vncviewer users are not affected by this problem.
• VNC frequently defaults to an old X windowmanager (twm) which requires you to manually placewindows. This behavior can be changed by editing the ~/.vnc/xstartup file to use KDE orGNOME and restarting the VNC server.
Copyright c© 2002-2018 Arm Limited (or its affiliates). All rights reserved. 24

Arm Forge 18.0.2
4 Starting
To start Arm Forge simply type one of the following commands into a terminal window:
forgeforge program_name [arguments]
To start Arm Forge on Mac OS X , use the Arm Forge icon or type in the terminal window:
open /Applications/Arm\ Forge/Arm Forge.app [--args program_name [arguments]]
To launch additional instances of the Arm Forge application, right-click the Dock icon of a runninginstance of Arm Forge, and choose “Launch a new instance of Arm Forge”. Alternatively, you can usethe following command in a terminal:
open -n /Applications/Arm\ Forge/Arm Forge.app [--argsprogram_name [arguments]]
Note: Unless in Express Launch mode, you should not attempt to pipe input directly to the Arm Forgeprogram. For information about how to achieve the effect of sending input to your program, please readsection 9 Program input and output (DDT) or 29 Running MAP from the command line (MAP).
Once Arm Forge has started it will display the Welcome Page.
Note: In Express Launch mode (see 5.2 Express Launch (DDT) or 17.1 Express Launch (MAP)) theWelcome Page is not shown and the user is brought directly to the Run Dialog instead. If no valid licenseis found, the program is exited and the appropriate message is shown in the console output.
Copyright c© 2002-2018 Arm Limited (or its affiliates). All rights reserved. 25

Arm Forge 18.0.2
Figure 11: DDT Welcome Page
TheWelcome Page allows you to choose what tool you would like to use (DDT or MAP). Click the iconson the left hand side to switch tools.
Once you have selected the tool you want to use, click the buttons in the menu to select a debugging orprofiling activity.
Copyright c© 2002-2018 Arm Limited (or its affiliates). All rights reserved. 26
Arm Forge 18.0.2
Part II
DDT
5 Getting started
When compiling the program that you wish to debug, you must add the debug flag to your compilecommand. For most compilers this is -g.
It is also advisable to turn off compiler optimizations as these can make debugging appear strange andunpredictable. If your program is already compiled without debug information you will need to make thefiles that you are interested in again.
The Welcome Page allows you to choose what kind of debugging you want to do, for example youcan:
• Run a program from DDT and debug it.
• Debug a program you launch manually (for example, on the command line).
• Attach to an already running program.
• Open core files generated by a program that crashed.
• Connect to a remote system and accept a Reverse Connect request.
Copyright c© 2002-2018 Arm Limited (or its affiliates). All rights reserved. 27

Arm Forge 18.0.2
5.1 Running a program
Figure 12: Run Window
If you click the Run button on the Welcome Page you see the window above. The settings are groupedinto sections. Click the Details. . . button to expand a section. The settings in each section are describedbelow.
5.1.1 Application
Application: The full path name to your application. If you specified one on the command line, this isfilled in. You may browse for an application by clicking on the Browse button.
Note: Many MPIs have problems working with directory and program names containing spaces. You areadvised to avoid the use of spaces in directory and file names.
Arguments: (optional) The arguments passed to your application. These are automatically filled if youentered some on the command line.
Note: Avoid using quote characters such as ' and ", as these may be interpreted differently by DDT andyour command shell. If you must use these and cannot get them to work as expected, please contact Armsupport at [email protected] .
stdin file: (optional) This allows you to choose a file to be used as the standard input (stdin) for yourprogram. DDT automatically adds arguments to mpirun to ensure your input file is used.
Copyright c© 2002-2018 Arm Limited (or its affiliates). All rights reserved. 28

Arm Forge 18.0.2
Working Directory: (optional) The working directory to use when debugging your application. If thisis blank then DDT’s working directory is used instead.
5.1.2 MPI
Note: If you only have a single process license or have selected none as yourMPI Implementation theMPI options will be missing. The MPI options are not available when DDT is in single process mode.See section 5.4 Debugging single-process programs for more details about using DDT with a singleprocess.
Number of processes: The number of processes that you wish to debug. DDT supports hundreds ofthousands of processes but this is limited by your license.
Number of nodes: This is the number of compute nodes that you wish to use to run your program.
Processes per node: This is the number of MPI processes to run on each compute node.
Implementation: The MPI implementation to use. If you are submitting a job to a queue the queuesettings will also be summarized here. You may change the MPI implementation by clicking on theChange. . . button.
Note: The choice of MPI implementation is critical to correctly starting DDT. Your system will nor-mally use one particular MPI implementation. If you are unsure as to which to pick, try generic, consultyour system administrator or Arm support. A list of settings for common implementations is provided inAppendix E MPI distribution notes and known issues.
Note: If your desired MPI command is not in your PATH, or you wish to use an MPI run command that isnot your default one, you can configure this using the Options window (See section A.5.1 System).
mpirun arguments: (optional): The arguments that are passed to mpirun or your equivalent, usuallyprior to your executable name in normal mpirun usage. You can place machine file arguments, ifnecessary, here. For most users this box can be left empty. You can also specify mpirun arguments onthe command line (using the --mpiargs command line argument) or using the ALLINEA_MPIRUN_ARGUMENTS environment variable if this is more convenient.
Note: You should not enter the -np argument as DDT will do this for you.
Note: You should not enter the --task-nb or --process-nb arguments as DDT will do this foryou.
5.1.3 OpenMP
Number of OpenMP threads: The number of OpenMP threads to run your application with. The OMP_NUM_THREADS environment variable is set to this value.
5.1.4 CUDA
If your license supports it, you may also debug GPU programs by enabling CUDA support. For moreinformation on debugging CUDA programs, please see section 15 CUDA GPU debugging.
Track GPU Allocations: Tracks CUDA memory allocations made using cudaMalloc, and similarmethods. See 12.2 CUDA memory debugging for more information.
Detect invalid accesses (memcheck): Turns on the CUDA-MEMCHECK error detection tool. See 12.2CUDA memory debugging for more information.
Copyright c© 2002-2018 Arm Limited (or its affiliates). All rights reserved. 29

Arm Forge 18.0.2
5.1.5 UPC
The DDT configuration depends on the UPC compiler used.
5.1.5.1 GCC UPC
DDTcan debug applications compiledwithGCCUPC4.8with TLS disabled. See section F.5GNU.
To run a UPC program in DDT you have to select the MPI implementation “GCC libupc SMP (noTLS)”
5.1.5.2 Berkeley UPC
To run a Berkeley UPC program in DDT you have to compile the program using -tv flag and then selectthe same MPI implementation used in the Berkeley compiler build configuration.
The Berkeley compiler must be build using the MPI transport.
See section F.3 Berkeley UPC compiler.
5.1.6 Python
5.1.6.1 Overview
Python debugging in DDT has the following limited support:
• Debugging Python scripts running under the CPython interpreter (version 2.7 only).
• Decoding the stack to show Python frames, function names and line numbers.
• Displaying Python local and global variables when a Python frame is selected.
• Stopping on breakpoints and exceptions in native libraries that were invoked from Python code.
• Debugging MPI programs written in Python using mpi4py.
The main use case that this feature is intended for, is debugging a mixed C, C++, Fortran and Pythonprogram that crashes somewhere in native code. If this native code was invoked from a Python func-tion, then you can examine the Python stack and local variables that led to the crash. Everything elseis not supported, for example breakpoints, stepping, evaluating Python variables and the current linewindow.
5.1.6.2 Prerequisites
You must have the debug symbols for Python available to DDT on your system. One way to do this isto install the Python debug symbols package. You may need to enable additional debug respositories inyour package manager.
On Ubuntu:
$ sudo apt-get install python2.7-dbg
On Redhat:
$ sudo yum install python-debug
On SuSE:
Copyright c© 2002-2018 Arm Limited (or its affiliates). All rights reserved. 30

Arm Forge 18.0.2
$ sudo zypper install python-base-debug
Python debugging depends on GDB 7.12.1, so if GDB 7.6.2 is the selected debugger this will need to bechanged: Go to File→Options→ System and set the Debugger field toAutomatic (recommended).
5.1.6.3 Running
To debug Python scripts, start the Python interpreter that will execute the script under DDT. To getline level resolution, rather than function level resolution, you must also insert %allinea_python_debug% before your script when passing arguments to Python. To run the demo in the examples folder,first change into theexamples folder, and then run the following steps. The demo requires thatmpi4pyis installed.
1. $ make -f python.makefile
2. $ ../bin/ddt --start -np 4 /usr/bin/python %allinea_python_debug%python-debugging.py
3. Press Play/Continue
4. Open the ’Stacks’ view and select a Python frame to see the Python local variables
Note: DDT does not search in your PATH when launching executables, so you must specify the full pathto Python.
5.1.7 Memory debugging
Clicking the Details. . . button will open theMemory Debugging Settings window.
See section 12.3 Configuration for full details of the available Memory Debugging settings.
5.1.8 Environment variables
The optional Environment Variables section should contain additional environment variables that shouldbe passed to mpirun or its equivalent. These environment variables may also be passed to your pro-gram, depending on which MPI implementation your system uses. Most users will not need to use thisbox.
Note: on some systems it may be necessary to set environment variables for the DDT backend itself. Forexample: if /tmp is unusable on the compute nodes you may wish to set TMPDIR to a different directory.You can specify such environment variables in/path/to/ddt/lib/environment. Enter one vari-able per line and separate the variable name and value with =, for example, TMPDIR=/work/user.
5.1.9 Plugins
The optional Plugins section allows you to enable plugins for various third-party libraries, such as theIntel Message Checker orMarmot. See section 14 Using and writing plugins for more information.
Click Run to start your program, or Submit if working through a queue. See section A.2 Integration withqueuing systems. This runs your program through the debug interface you selected and allows your MPIimplementation to determine which nodes to start which processes on.
Copyright c© 2002-2018 Arm Limited (or its affiliates). All rights reserved. 31

Arm Forge 18.0.2
Note: If you have a program compiled with Intel ifort or GNU g77 you may not see your code andhighlight line whenDDT starts. This is because those compilers create a pseudoMAIN function, above thetop level of your code. To fix this you can either open your Source Code window and add a breakpoint inyour code, then run to that breakpoint, or you can use the Step into function to step into your code.
When your program starts, DDT attempts to determine the MPI world rank of each process. If this fails,the following error message is displayed:
Figure 13: MPI rank error
This means that the number DDT shows for each process may not be the MPI rank of the process. Tocorrect this you can tell DDT to use a variable from your program as the rank for each process.
See section 8.17 Assigning MPI ranks for details.
To end your current debugging session select the End Session menu option from the File menu. Thiscloses all processes and stops any running code. If any processes remain you may have to clean them upmanually using the kill command, or a command provided with your MPI implementation.
5.2 Express Launch
Each of the Arm Forge products can be launched by typing its name in front of an existing mpiexeccommand:
$ ddt mpiexec -n 128 examples/hello memcrash
This startup method is called Express Launch and is the simplest way to get started. If your MPI is notyet supported in this mode, you will see a error message like this:
$ 'MPICH 1 standard' programs cannot be started using ExpressLaunch syntax (launching with an mpirun command).
Try this instead:ddt --np=256 ./wave_c 20
Type ddt --help for more information.
This is referred to as Compatibility Mode, in which the mpiexec command is not included and thearguments to mpiexec are passed via a --mpiargs="args here" parameter.
One advantage of Express Launch mode is that it is easy to modify existing queue submission scripts torun your program under one of the Arm Forge products. This works best for Arm DDT with ReverseConnect, ddt --connect, for interactive debugging or in offline mode (ddt --offline). See 3.3Reverse Connect for more details.
Copyright c© 2002-2018 Arm Limited (or its affiliates). All rights reserved. 32

Arm Forge 18.0.2
If you can not use Reverse Connect and wish to use interactive debugging from a queue you may needto configure DDT to generate job submission scripts for you. More details on this can be found in 5.10Starting a job in a queue and A.2 Integration with queuing systems.
The following lists the MPI implementations currently supported by Express Launch:
• BlueGene/Q
• bullx MPI
• Cray X-Series (MPI/SHMEM/CAF)
• Intel MPI
• MPICH 2
• MPICH 3
• Open MPI (MPI/SHMEM)
• Oracle MPT
• Open MPI (Cray XT/XE/XK)
• Cray XT/XE/XK (UPC)
5.2.1 Run dialog box
In Express Launch mode, the Run dialog has a restricted number of options:
Figure 14: Express Launch DDT Run dialog box
5.3 remote-exec required by some MPIs
When using SGI MPT, MPICH 1 Standard or the MPMD variants of MPICH 2, MPICH 3 or IntelMPI, DDT will allow mpirun to start all the processes, then attach to them while they’re inside MPI_Init.
This method is often faster than the generic method, but requires the remote-exec facility in DDT tobe correctly configured if processes are being launched on a remote machine. For more information onremote-exec, please see section A.4 Connecting to remote programs (remote-exec).
Copyright c© 2002-2018 Arm Limited (or its affiliates). All rights reserved. 33

Arm Forge 18.0.2
Note: If DDT is running in the background (for example, ddt &) then this process may get stuck (someSSH versions cause this behavior when asking for a password). If this happens to you, go to the terminaland use the fg or similar command to make DDT a foreground process, or run DDT again, without using“&”.
If DDT cannot find a password-free way to access the cluster nodes then you will not be able to usethe specialized startup options. Instead, You can use generic, although startup may be slower for largenumbers of processes.
In addition to the listed MPI implementations above, all MPI implementations except for Bluegene/Qand Cray MPT DDT requires password-free access to the compute nodes when explicitly starting byattaching.
5.4 Debugging single-process programs
Figure 15: Single-Process Run dialog
Users with single-process licenses will immediately see the Run dialog that is appropriate for single-process applications.
Users with multi-process licenses can uncheck theMPI check box to run a single process program.
Select the application, either by typing the file name in, or selecting using the browser by clicking thebrowse button. Arguments can be typed into the supplied box.
Click Run to start your program.
Note: If you have a program compiled with Intel ifort or GNU g77 you may not see your code andhighlight line when DDTstarts. This is because those compilers create a pseudo MAIN function, abovethe top level of your code. To fix this you can either open your Source Code window and add a breakpoint
Copyright c© 2002-2018 Arm Limited (or its affiliates). All rights reserved. 34
Arm Forge 18.0.2
in your code and then play to that breakpoint, or you can use the Step Into function to step into yourcode.
To end your current debugging session select the End Session menu option from the File menu. This willclose all processes and stop any running code.
5.5 Debugging OpenMP programs
When running an OpenMP program, set the Number of OpenMP threads value to the number of threadsyou require. DDT will run your program with the OMP_NUM_THREADS environment variable set to theappropriate value.
There are several important points to keep in mind while debugging OpenMP programs:
1. Parallel regions created with #pragma omp parallel (C) or !$OMP PARALLEL (For-tran) will usually not be nested in the Parallel Stack View under the function that contained the#pragma. Instead they will appear under a different top-level item. The top-level item is often inthe OpenMP runtime code, and the parallel region appears several levels down in the tree.
2. Some OpenMP libraries only create the threads when the first parallel region is reached. It ispossible you may only see one thread at the start of the program.
3. You cannot step into a parallel region. Instead, check the Step threads together box and use theRun to here command to synchronize the threads at a point inside the region. These controls arediscussed in more detail in their own sections of this document.
4. You cannot step out of a parallel region. Instead, useRun to here to leave it. Most OpenMP librarieswork best if you keep the Step threads together box ticked until you have left the parallel region.With the Intel OpenMP library, this means you will see the Stepping Threadswindow and will haveto click Skip All once.
5. Leave Step threads together off when you are outside a parallel region, as OpenMP worker threadsusually do not follow the same program flow as the main thread.
6. To control threads individually, use the Focus on Thread control. This allows you to step and playone thread without affecting the rest. This is helpful when you want to work through a lockingsituation or to bring a stray thread back to a common point. The Focus controls are discussed inmore detail in their own section of this document.
7. Shared OpenMP variables may appear twice in the Locals window. This is one of the many un-fortunate side-effects of the complex way OpenMP libraries interfere with your code to produceparallelism. One copy of the variable may have a nonsense value, this is usually easy to recognize.The correct values are shown in the Evaluate and Current Line windows.
8. Parallel regions may be displayed as a new function in the stack views. Many OpenMP librariesimplement parallel regions as automatically-generated “outline” functions, and DDT shows youthis. To view the value of variables that are not used in the parallel region, you may need to switchto thread 0 and change the stack frame to the function you wrote, rather than the outline function.
9. Stepping often behaves unexpectedly inside parallel regions. Reduction variables usually requiresome sort of locking between threads, and may even appear to make the current line jump back tothe start of the parallel region. If this happens step over several times and you will see the currentline comes back to the correct location.
10. Some compilers optimize parallel loops regardless of the options you specified on the commandline. This has many strange effects, including code that appears to move backwards as well as
Copyright c© 2002-2018 Arm Limited (or its affiliates). All rights reserved. 35

Arm Forge 18.0.2
forwards, and variables that have nonsense values because they have been optimized out by thecompiler.
11. The thread IDs displayed in the Process Group Viewer and Cross-Thread Comparison window willmatch the value returned by omp get thread num() for each thread, but only if your OpenMPimplementation exposes this data to DDT. GCC’s support for OpenMP (GOMP) needs to be builtwith TLS enabled with our thread IDs to match the return omp get thread num(), whereasyour system GCC most likely has this option disabled. The same thread IDs will be displayed astooltips for the threads in the thread viewer, but only your OpenMP implementation exposes thisdata.
If you are using DDT with OpenMP and would like to tell us about your experiences, please contact Armsupport at [email protected] , with the subject title OpenMP feedback.
5.6 Manual launching of multi-process non-MPI programs
DDT can only launch MPI programs and scalar (single process) programs itself. The Manual Launch(Advanced) button on the Welcome Page allows you to debug multi-process and multi-executable pro-grams. These programs do not necessarily need to be MPI programs. You can debug programs that useother parallel frameworks, or both the client and the server from a client/server application in the sameDDT session.
You must run each program you want to debug manually using the ddt-client command, similarto debugging with a scalar debugger like the GNU debugger (gdb). However, unlike a scalar debugger,you can debug more than one process at the same time in the same DDT session, as long as your licensepermits it. Each program you run will show up as a new process in the DDT window.
For example to debug both client and server in the same DDT session:
1. Click the Manual Launch (Advanced) button.
2. Select 2 processes
Figure 16: Manual Launch Window
3. Click the Listen button.
4. At the command line run:
ddt-client server &ddt-client client &
Copyright c© 2002-2018 Arm Limited (or its affiliates). All rights reserved. 36

Arm Forge 18.0.2
The server process appears as process 0 and the client as process 1 in the DDT window.
Figure 17: Manual Launch Process Groups
After you have run the initial programs you may add extra processes to the DDT session, for exampleextra clients could be added, using ddt-client in the same way.
ddt-client client2 &
If you check Start debugging after the first process connects you do not need to specify how many pro-cesses you want to launch in advance. You can start debugging after the first process connects and addextra processes later as above.
5.7 Debugging MPMD programs
The easiest way to debug MPMD programs is by using Express Launch to start your application.
To use Express Launch, simply prefix your normal MPMD launch line with ddt, for example:
ddt mpirun -n 1 ./master : -n 2 ./worker
For more information on Express Launch, and compatible MPI implementations, see section 5.2.
5.7.1 Debugging MPMD programs without Express Launch
If you are using Open MPI, MPICH 2, MPICH 3 or Intel MPI, DDT can be used to debug multipleprogram, multiple data (MPMD) programs. To start an MPMD program in DDT:
1. MPICH 2 and Intel MPI only: Select the MPMD variant of the MPI Implementation on the Systempage of the Options window, for example, for MPICH 2 select MPICH 2 (MPMD).
2. Click the Run button on theWelcome Page.
3. Select one of the MPMD programs in the Application box, it does not matter what executable youchoose.
4. Enter the total amount of processes for the MPMD job in the Number of processes box.
5. Enter an MPMD style command line in the mpirun Arguments box in the MPI section of the Runwindow, for example:
-np 4 hello : -np 4 program2
or:
--app /path/to/my_app_file
6. Click the Run button.
Note: be sure that the sum of processes in step 5 is equal to the number of processes set in step 4.
Copyright c© 2002-2018 Arm Limited (or its affiliates). All rights reserved. 37

Arm Forge 18.0.2
5.7.2 Debugging MPMD programs in Compatibility mode
If you are using Open MPI in Compatibility mode, for example, because you do not have SSH access tothe compute nodes, then replace:
-np 2 ./progc.exe : -np 4 ./progf90.exe
in the mpirun Arguments / appfile with this:
-np 2 /path/to/ddt/bin/ddt-client ./progc.exe : -np 4/path/to/ddt/bin/ddt-client ./progf90.exe
5.8 Opening core files
Figure 18: The Open Core Files Window
DDT allows you to open one or more core files generated by your application.
To debug using core files, click the Open Core Files button on the Welcome Page. This opens the OpenCore Files window, which allows you to select an executable and a set of core files. Click OK to openthe core files and start debugging them.
While DDT is in this mode, you cannot play, pause or step, because there is no process active. Youare, however, able to evaluate expressions and browse the variables and stack frames saved in the corefiles.
The End Session menu option will return DDT to its normal mode of operation.
5.9 Attaching to running programs
DDT can attach to running processes on any machine you have access to, whether they are from MPIor scalar jobs, even if they have different executables and source pathnames. Clicking the Attach to aRunning Program button on the Welcome Page shows DDT’s Attach Window:
Copyright c© 2002-2018 Arm Limited (or its affiliates). All rights reserved. 38

Arm Forge 18.0.2
Figure 19: Attach Window
There are two ways to select the processes you want to attach to: you can either choose from a list ofautomatically detected MPI jobs (for supported MPI implementations) or manually select from a list ofprocesses.
5.9.1 Automatically detected MPI jobs
DDT can automatically detect MPI jobs started on the local host for selected MPI implementations. Thisalso applies to other hosts you have access to, if an Attach Hosts File is configured. See section A.5.1System for more details.
The list of detected MPI jobs is shown on the Automatically-detected MPI jobs tab of the Attach Window.Click the header for a particular job to see more information about that job. Once you have found the jobyou want to attach to simply click the Attach button to attach to it.
5.9.2 Attaching to a subset of an MPI job
You may want to attach only to a subset of ranks from your MPI job. You can choose this subset using theAttach to ranks box on the Automatically-detected MPI jobs tab of the Attach Window. You may changethe subset later by selecting the File→ Change Attached Processes. . . menu item.
5.9.3 Manual process selection
You canmanually select which processes to attach to from a list of processes using the List of all processestab of the Attach Window. If you want to attach to a process on a remote host see section A.4 Connectingto remote programs (remote-exec) first.
Initially the list of processes is blank while DDT scans the nodes, provided in your node list file, forrunning processes. When all the nodes have been scanned (or have timed out) the window appears as
Copyright c© 2002-2018 Arm Limited (or its affiliates). All rights reserved. 39

Arm Forge 18.0.2
shown above. Use the Filter box to find the processes you want to attach to. On non-Linux platformsyou also need to select the application executable you want to attach to. Ensure that the list shows allthe processes you wish to debug in your job, and no extra/unnecessary processes. You may modify thelist by selecting and removing unwanted processes, or alternatively selecting the processes you wish toattach to and clicking on Attach to Selected Processes. If no processes are selected, DDT uses the wholevisible list.
On Linux you may use DDT to attach to multiple processes running different executables. When youselect processes with different executables the application box changes to read Multiple applicationsselected. DDT creates a process group for each distinct executable.
With some supported MPI implementations (for example, OpenMPI) DDT showsMPI processes as chil-dren of the mpirun (or equivalent) command, as shown in the following figure. Clicking the mpiruncommand automatically selects all the MPI child processes.
Figure 20: Attaching with Open MPI
Some MPI implementations (such as MPICH 1) create forked (child) processes that are used for com-munication, but are not part of your job. To avoid displaying and attaching to these, make sure the HideForked Children box is ticked. DDT’s definition of a forked child is a child process that shares the par-ent’s name. Some MPI implementations create your processes as children of each other. If you cannotsee all the processes in your job, try clearing this checkbox and selecting specific processes from thelist.
Once you click on the Attach to Selected/Listed Processes button, DDT uses remote-exec to attacha debugger to each process you selected and proceeds to debug your application as if you had started itwith DDT. When you end the debug session, DDT detaches from the processes rather than terminatingthem, this allows you to attach again later if you wish.
DDT examines the processes it attaches to and tries to discover the MPI_COMM_WORLD rank of each pro-cess. If you have attached to two MPI programs, or a non-MPI program, then you may see the followingmessage:
Figure 21: MPI rank error
If there is no rank, for example, if you have attached to a non-MPI program, then you can ignore thismessage and use DDT as normal. If there is, then you can easily tell DDT what the correct rank for eachprocess via the Use as MPI Rank button in the Cross-Process Comparison Window. See section 8.17Assigning MPI ranks for details.
Note that the stdin, stderr and stdout (standard input, error and output) are not captured by DDTif used in attaching mode. Any input/output continues to work as it did before DDT attached to the
Copyright c© 2002-2018 Arm Limited (or its affiliates). All rights reserved. 40

Arm Forge 18.0.2
program, for example, from the terminal or perhaps from a file.
5.9.4 Configuring attaching to remote hosts
To attach to remote hosts in DDT, click the Choose Hosts button in the attach dialog. This displays thelist of hosts to be used for attaching.
Figure 22: Choose Hosts Window
From here you can add and remove hosts, as well as unchecking hosts that you wish to temporarilyexclude.
You can also import a list of hosts from a file by clicking the Import button.
The hosts list is initially populated from the attach Hosts File, which can be configured from the Optionswindow: File→ Options (Arm Forge→ Preferences on Mac OS X) .
Each remote host is then scanned for processes, and the result displayed in the attach window. If youhave trouble connected to remote hosts, please see section A.4 Connecting to remote programs (remote-exec).
5.9.5 Using DDT command-line arguments
As an alternative to starting DDT and using the Welcome Page, DDT can instead be instructed to attachto running processes from the command-line.
To do so, you need to specify a list of hostnames and process identifiers (PIDs). If a hostname is omittedthen localhost is assumed.
The list of hostnames and PIDs can be given on the command-line using the --attach option:
Copyright c© 2002-2018 Arm Limited (or its affiliates). All rights reserved. 41

Arm Forge 18.0.2
mark@holly:∼$ ddt --attach=11057,node5:11352
Another command-line possibility is to specify the list of hostnames and PIDs in a file and use the --attach-file option:
mark@holly:∼$ cat /home/mark/ddt/examples/hello.list
node1:11057node1:11094node2:11352node2:11362node3:12357
mark@holly:∼$ ddt --attach-file=/home/mark/ddt/examples/hello.list
In both cases, if just a number is specified for ahostname:PID pair, thenlocalhost: is assumed.
These command-line options work for both single- and multi-process attaching.
5.10 Starting a job in a queue
In most cases you can debug a job simply by putting ddt --connect in front of the existing mpiexecor equivalent command in your job script. If a GUI is running on the login node or it is connected to itvia the remote client, then a message is displayed prompting you with the option to debug the job whenit starts.
See 5.2 Express Launch and 3.3 Reverse Connect for more details.
If DDT has been configured to be integrated with a queue/batch environment, as described in section A.2Integration with queuing systems then you may use DDT to submit your job directly from the GUI. Inthis case, a Submit button is presented on the Run Window, instead of the ordinary Run button. ClickingSubmit from the Run Window will display the queue status until your job starts. DDT will execute thedisplay command every second and show you the standard output. If your queue display is graphical orinteractive then you cannot use it here.
If your job does not start or you decide not to run it, click on Cancel Job. If the regular expression youentered for getting the job id is invalid or if an error is reported then DDT will not be able to remove yourjob from the queue. In this case it is strongly recommended that you check the job has been removedbefore submitting another as it is possible for a forgotten job to execute on the cluster and either wasteresources or interfere with other debug sessions.
Once your job is running, it connects to DDT and you can debug it.
5.11 Using custom MPI scripts
On some systems a custom ‘mpirun’ replacement is used to start jobs, such asmpiexec. DDT normallyuses whatever the default for your MPI implementation is, so for MPICH 1 it would look for mpirunand not mpiexec. This section explains how to configure DDT to use a custom mpirun command forjob start up.
There are typically two ways you might want to start jobs using a custom script, and DDT supports themboth. Firstly, you might pass all the arguments on the command-line, like this:
mpiexec -n 4 /home/mark/program/chains.exe /tmp/mydata
Copyright c© 2002-2018 Arm Limited (or its affiliates). All rights reserved. 42

Arm Forge 18.0.2
There are several key variables in this line that DDT can fill in for you:
1. The number of processes (4 in the above example).
2. The name of your program (/home/mark/program/chains.exe).
3. One or more arguments passed to your program (/tmp/mydata).
Everything else, like the name of the command and the format of its arguments remains constant. To usea command like this in DDT, you adapt the queue submission system described in the previous section.For this mpiexec example, the settings are as shown here:
Figure 23: DDT Using Custom MPI Scripts
As you can see, most of the settings are left blank. There are some differences between the SubmitCommand in DDT and what you would type at the command-line:
1. The number of processes is replaced with NUM_PROCS_TAG.
2. The name of the program is replaced by the full path to ddt-debugger.
3. The program arguments are replaced by PROGRAM_ARGUMENTS_TAG.
Note, it is not necessary to specify the program name here. DDT takes care of that during its own startupprocess. The important thing is to make sure your MPI implementation starts ddt-debugger insteadof your program, but with the same options.
The second way you might start a job using a custom mpirun replacement is with a settings file:
mpiexec -config /home/mark/myapp.nodespec
Copyright c© 2002-2018 Arm Limited (or its affiliates). All rights reserved. 43
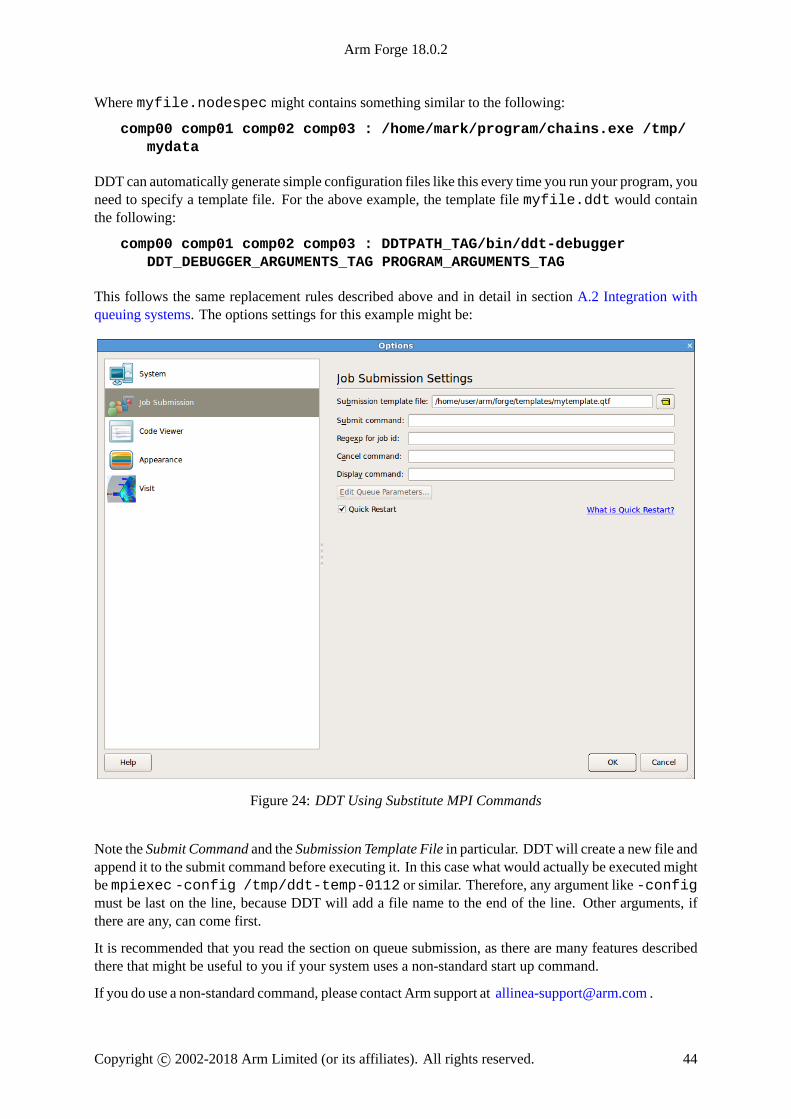
Arm Forge 18.0.2
Where myfile.nodespec might contains something similar to the following:
comp00 comp01 comp02 comp03 : /home/mark/program/chains.exe /tmp/mydata
DDT can automatically generate simple configuration files like this every time you run your program, youneed to specify a template file. For the above example, the template file myfile.ddt would containthe following:
comp00 comp01 comp02 comp03 : DDTPATH_TAG/bin/ddt-debuggerDDT_DEBUGGER_ARGUMENTS_TAG PROGRAM_ARGUMENTS_TAG
This follows the same replacement rules described above and in detail in section A.2 Integration withqueuing systems. The options settings for this example might be:
Figure 24: DDT Using Substitute MPI Commands
Note the Submit Command and the Submission Template File in particular. DDTwill create a new file andappend it to the submit command before executing it. In this case what would actually be executed mightbe mpiexec -config /tmp/ddt-temp-0112 or similar. Therefore, any argument like -configmust be last on the line, because DDT will add a file name to the end of the line. Other arguments, ifthere are any, can come first.
It is recommended that you read the section on queue submission, as there are many features describedthere that might be useful to you if your system uses a non-standard start up command.
If you do use a non-standard command, please contact Arm support at [email protected] .
Copyright c© 2002-2018 Arm Limited (or its affiliates). All rights reserved. 44

Arm Forge 18.0.2
5.12 Starting DDT from a job script
The usual way of debugging a program with Arm DDT in a queue/batch environment is with ReverseConnect and let it connect back from inside the queue to the GUI. See 3.3 Reverse Connect for moredetails on Reverse Connect.
To do this replace your usual program invocation with a Arm DDT --connect command such as thefollowing:
ddt --connect --start MPIEXEC -n NPROCS PROGRAM [ARGUMENTS]
The following could also be used:
ddt --connect --start --once --np=NPROCS -- PROGRAM [ARGUMENTS]
In these examples MPIEXEC is the MPI launch command, NPROCS is the number of processes to start,PROGRAM is the program to run, and ARGUMENTS are the arguments to the program.
The --once argument tells Arm DDT to exit when the session ends.
The alternative to Reverse Connect for debugging a program in a queue/batch environment is to configureArm DDT to submit the program to the queue for you. See section 5.10 Starting a job in a queue.
Some users may wish to start Arm DDT itself from a job script that is submitted to the queue/batchenvironment. To do this:
1. Configure Arm DDT with the correct MPI implementation.
2. Disable queue submission in the Arm DDT options.
3. Create a job script that starts Arm DDT using a command such as:
ddt --start MPIEXEC -n NPROCS PROGRAM [ARGUMENTS]
Or the following:
ddt --start --no-queue --once --np=NPROCS -- PROGRAM [ARGUMENTS]
In these examples MPIEXEC is the MPI launch command, NPROCS is the number of processes tostart, PROGRAM is the program to run, and ARGUMENTS are the arguments to the program.
4. Submit the job script to the queue. The --once argument tells DDT to exit when the session ends.
5.13 Attaching via gdbserver
DDT can attach to debugging sessions that have been started by gdbserver.
This is typically used for debugging embedded devices only. This should be considered as an expertmode and would not normally be used to debug an application running on a server or workstation.
To prepare for using this mode, you must first start a gdbserver on the target device. Please see https://sourceware.org/gdb/onlinedocs/gdb/Server.html for further details as invocation may be system depen-dent.
You may then attach to a running application either via the command line or the user interface.
To attach via the command line use:
ddt --attach-gdbserver=host:port target-executable
Copyright c© 2002-2018 Arm Limited (or its affiliates). All rights reserved. 45

Arm Forge 18.0.2
Note that the arguments are not optional.
To attach via the user interface, select the Attach dialog on DDT’s welcome page. Select the GDB Servertab and substitute the appropriate settings.
If the gdbserver has been used to launch an application, then it will have been stopped before starting theuser code. In this case, add a breakpoint in the main function using the Add Breakpoint button, and thenplay until this is reached. After this point is reached, source code will be displayed.
Copyright c© 2002-2018 Arm Limited (or its affiliates). All rights reserved. 46
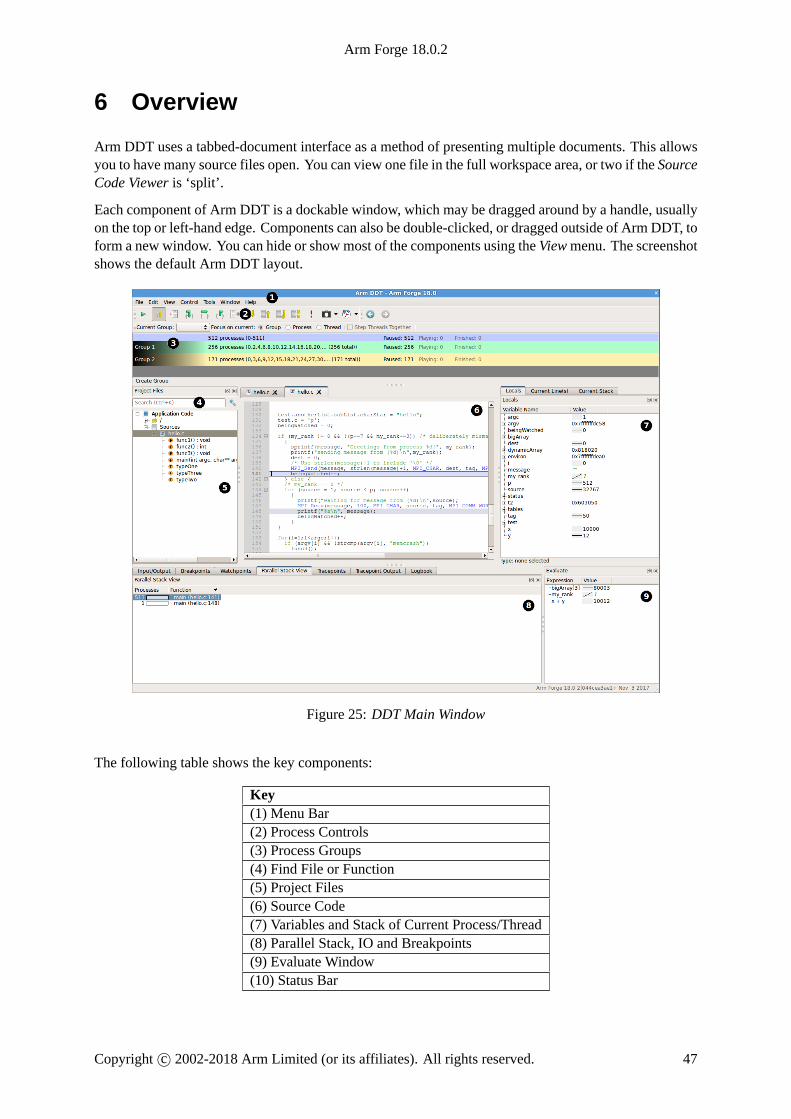
Arm Forge 18.0.2
6 Overview
Arm DDT uses a tabbed-document interface as a method of presenting multiple documents. This allowsyou to have many source files open. You can view one file in the full workspace area, or two if the SourceCode Viewer is ‘split’.
Each component of Arm DDT is a dockable window, which may be dragged around by a handle, usuallyon the top or left-hand edge. Components can also be double-clicked, or dragged outside of Arm DDT, toform a new window. You can hide or show most of the components using the Viewmenu. The screenshotshows the default Arm DDT layout.
Figure 25: DDT Main Window
The following table shows the key components:
Key(1) Menu Bar(2) Process Controls(3) Process Groups(4) Find File or Function(5) Project Files(6) Source Code(7) Variables and Stack of Current Process/Thread(8) Parallel Stack, IO and Breakpoints(9) Evaluate Window(10) Status Bar
Copyright c© 2002-2018 Arm Limited (or its affiliates). All rights reserved. 47
Arm Forge 18.0.2
Note: On some platforms, the default screen size can be insufficient to display the status bar. If thisoccurs, you should expand the Arm DDT window until it is completely visible.
6.1 Saving and loading sessions
Most of the user-modified parameters and windows are saved by right-clicking and selecting a save optionin the corresponding window.
However, Arm DDT also has the ability to load and save all these options concurrently to minimizethe inconvenience in restarting sessions. Saving the session stores such things as Process Groups, thecontents of the Evaluate window and more. This ability makes it easy to debug code with the sameparameters set time and time again.
To save a session simply use the Save Session option from the File menu. Enter a file name (or selectan existing file) for the save file and click OK. To load a session again simply choose the Load Sessionoption from the File menu, choose the correct file and click OK.
6.2 Source code
Arm Forge provides code viewing, editing and rebuilding features. It also integrates with the Git, Sub-version and Mercurial version control systems and provides static analysis to automatically detect manyclasses of common errors.
The code editing and rebuilding capabilities are not designed for developing applications from scratch,but they are designed to fit into existing debugging or profiling sessions that are running on a currentexecutable.
The same capabilities are available for source code whether running remotely (using the remote client)or whether connected directly to your system.
6.2.1 Viewing
When Arm DDT begins a session, source code is automatically found from the information compiled inthe executable.
Source and header files found in the executable are reconciled with the files present on the front-endserver, and displayed in a simple tree view within the Project Files tab of the Project Navigator window.Source files can be loaded for viewing by clicking on the file name.
Whenever a selected process is stopped, the Source Code Viewer will automatically leap to the correctfile and line, if the source is available.
The source code viewer supports automatic color syntax highlighting for C and Fortran.
You can hide functions or subroutines you are not interested in by clicking the ’-’ glyph next to the firstline of the function. This will collapse the function. Simply click the ’+’ glyph to expand the functionagain.
Copyright c© 2002-2018 Arm Limited (or its affiliates). All rights reserved. 48

Arm Forge 18.0.2
6.2.2 Editing
Source code may be edited in the code viewer windows of DDT. The actions Undo, Redo, Cut, Copy,Paste, Select all, Go to line, Find, Find next, Find previous, and Find in files are available from the Editmenu. Files may be opened, saved, reverted and closed from the File menu.
Note: Information from Arm DDT will not match edited source files until the changes are saved, thebinary is rebuilt, and the session restarted.
If the currently selected file has an associated header or source code file, it can be opened by right-clickingin the editor and choosing Open <filename>.<extension>. There is a global shortcut on function keyF4, available in the Edit menu as Switch Header/Source option.
To edit a source file in an external editor, right-click the editor for the file and choose Open in externaleditor. To change the editor used, or if the file does not open with the default settings, open the Optionswindow by selecting File → Options (Arm Forge → Preferences on Mac OS X) and enter the path tothe preferred editor in the Editor box, for example /usr/bin/gedit.
If a file is edited the following warning will be displayed at the top of the editor:
Figure 26: File Edited Warning
This is to warn that the source code shown is not the source that was used to produced the currentlyexecuting binary, so the source code and line numbers may not match the executing code.
6.2.3 Rebuilding and restarting
If source files are edited, the changes will not take effect until the binary is rebuilt and the session restarted.To configure the build command choose File→ Configure Build. . . , enter a build command and a direc-tory in which to run the command, and click Apply.
To issue the build command choose File → Build, or press Ctrl+B (Cmd+B on Mac OS X ). When abuild is issued the Build Output view is shown. Once a rebuild succeeds it is recommended to restart thesession with the new build by choosing File→ Restart Session.
6.2.4 Committing changes
Changes to source files may be committed using one of Git, Mercurial, and Subversion. To commitchanges choose File→ Commit. . . , enter a commit message to the resulting dialog and click the commitbutton.
6.3 Project Files
The Project Files tree shows a list of source files for your program. Click on a file in the tree to open itin the Code Viewer. You may also expand a source file to see a list of classes, functions, defined in thatsource file (C / C++ / Fortran only).
Copyright c© 2002-2018 Arm Limited (or its affiliates). All rights reserved. 49

Arm Forge 18.0.2
Figure 27: Function Listing
Clicking on any source code element (class, function, and so on) will display it in the Source Codeviewer.
6.3.1 Application and external code
Arm DDT automatically splits your source code into Application Code, which is source code from yourapplication and External Code, which is code from third party libraries. This allows you to quicklydistinguish between your own code and third party libraries.
You can control exactly which directories are considered to contain Application Code using the Applica-tion / External Directories window. Right-click on the Project Files tree to open the window.
The checked directories are the directories containing Application Code. Once you have configured themto your satisfaction click Ok to update the Project Files tree.
6.4 Finding lost source files
In some situations, not all source files are found automatically. This can also occur, for example, if theexecutable or source files have been moved since compilation. Extra directories to search for source filescan be added by right-clicking while in the Project Files tab, and selecting Add/view Source Directory(s).You can also specify extra source directories on the command line using the--source-dirs commandline argument (separate each directory with a colon).
It is also possible to add an individual file, if this file has moved since compilation, or is on a different (butvisible) file system. To do this right-click in the Project Files tab and select the Add File option.
Any directories or files you have added are saved and restored when you use the Save Session and LoadSession commands inside the File menu. If DDT does not find the sources for your project, you mightfind these commands save you a lot of unnecessary clicking.
Copyright c© 2002-2018 Arm Limited (or its affiliates). All rights reserved. 50

Arm Forge 18.0.2
6.5 Finding code or variables
6.5.1 Find Files or Functions
The Find Files Or Functions box appears above the source file tree in the Project Files view.
You can type the name of a file, function, or other source code element (such as classes, Fortran modules,and so on) in this box to search for that item in the source tree. You can also type just part of a name tosee all the items whose name contains the text you typed.
Double-click on a result to jump to the corresponding source code location for that item.
Figure 28: Find Files Or Functions dialog
6.5.2 Find
The Findmenu item can be found in the Edit menu, and can be used to find occurrences of an expressionin the currently visible source file.
DDT will search from the current cursor position for the next or previous occurrence of the search term.Click on the magnifying glass icon for more search options.
Case Sensitive: When checked, DDT will perform a case sensitive search. For example, Hello willnot match hello.
Whole Words Only: When checked, DDT will only match your search term against whole ‘words’ inthe source file. For example Hello would not match HelloWorld while searching for whole wordsonly.
UseRegularExpressions: When this is checked, your searchmay use Perl-style regular expressions.
6.5.3 Find in Files
The Find In Files window can be found in the Edit menu, and can be used to search all source and headerfiles associated with your program. The search results are listed and can be clicked to display the file andline number in the main Source Code Viewer; this can be of particular use for setting a breakpoint at afunction.
Copyright c© 2002-2018 Arm Limited (or its affiliates). All rights reserved. 51

Arm Forge 18.0.2
Figure 29: Find in Files dialog
Case sensitive: When checked, DDT will perform a case sensitive search. For example, Hello will notmatch hello.
Whole words only: When checked, DDT will only match your search term against whole ‘words’ inthe source file. For example Hello would not match HelloWorld while searching for whole wordsonly.
Regular Expression: When checked, DDT will interpret the search term as a regular expression ratherthan a fixed string. The syntax of the regular expression is identical to that described in the appendix I.6Job ID regular expression.
6.6 Jump To Line
DDT has a jump to line function which enables the user to go directly to a line of code. This is found inthe Edit menu. A window will be displayed in the centre of your screen. Enter the line number you wishto see and click OK. This will take you to the correct line providing that you entered a line that exists.You can use the hotkey CTRL-G to access this function quickly.
6.7 Navigating through source code history
After jumping to a source code location or opening a new file, it is possible to return to the previouslocation using the ”Navigate backwards in source code history” button on the toolbar or item in the”Edit” menu. This can be done several times to revisit previous locations in the source code.
After navigating backwards, you can also use the ”Navigate forwards in source code history” toolbarbutton or ”Edit” menu item to return to the previous location.
Copyright c© 2002-2018 Arm Limited (or its affiliates). All rights reserved. 52

Arm Forge 18.0.2
6.8 Static analysis
Static analysis is a powerful companion to debugging. Arm DDT enables the user to discover errors bycode and state inspection along with automatic error detection components such as memory debugging.Static analysis inspects the source code and attempts to identify errors that can be detected from the sourcealone, independently of the compiler and actual process state.
Arm DDT includes the static analysis tools cppcheck and ftnchek. These will by default automati-cally examines source files as they are loaded and display a warning symbol if errors are detected. Typicalerrors include:
• Buffer overflows. Accessing beyond the bounds of heap or stack arrays.
• Memory leaks. Allocating memory within a function and there being a path through the functionwhich does not deallocate the memory and the pointer is not assigned to any externally visiblevariable, nor returned.
• Unused variables, and also use of variables without initialization in some cases.
Figure 30: Static Analysis Error Annotation
Static analysis is not guaranteed to detect all, or any, errors, and an absence of warning triangles shouldnot be considered to be an absence of bugs.
6.9 Version control information
The version control integration in DDT and MAP allows users to see line-by-line information from Git,Mercurial or Subversion next to source files. Information is color-coded to indicate the age of the sourceline.
Copyright c© 2002-2018 Arm Limited (or its affiliates). All rights reserved. 53

Arm Forge 18.0.2
Figure 31: DDT running with Version Control Information enabled
To enable select the Version Control Information option from the View menu. When enabled columnsto left of source code viewers are shown. In these columns are displayed how long ago the line wasadded/modified. Each line in the information column is highlighted in a color to indicate its age. Thelines changed in the current revision are highlighted in red.
Where available lines with changes not committed are highlighted in purple. All other lines are high-lightedwith a blend of transparent blue and opaque greenwhere blue indicates old and green young.
Currently uncommitted changes are only supported for Git. Arm Forge will not show any version controlinformation for files with uncommitted changes when using Mercurial or Subversion.
Figure 32: Version Control Information—Tooltips
A folded block of code displays the annotation for the most recently modified line in the block.
Hovering the cursor over the information column reveals a tool-tip containing a preview of the commitmessage for the commit that last changed the line.
Figure 33: Version Control Information—Context Menu
Copyright c© 2002-2018 Arm Limited (or its affiliates). All rights reserved. 54

Arm Forge 18.0.2
To copy the commit message right-click the column on the desired row and from the menu select CopyCommit Message.
See also Version control breakpoints and tracepoints.
Copyright c© 2002-2018 Arm Limited (or its affiliates). All rights reserved. 55

Arm Forge 18.0.2
7 Controlling program execution
Whether debugging a multi-process or a single process code, the mechanisms for controlling programexecution are very similar.
In multi-process mode, most of the features described in this section are applied using Process Groups,which are described in the following sections.
For single process mode, the commands and behaviors are identical, but apply to only a single process,freeing the user from concerns about process groups.
7.1 Process control and process groups
MPI programs are designed to run as more than one process and can span many machines. Arm DDTallows you to group these processes so that actions can be performed on more than one process at a time.The status of processes can be seen at a glance by looking at the Process Group Viewer.
The Process Group Viewer is (by default) at the top of the screen with multi-colored rows. Each rowrelates to a group of processes and operations can be performed on the currently highlighted group (forexample, playing, pausing and stepping) by clicking on the toolbar buttons. Switch between groups byclicking on them or their processes. The highlighted group is indicated by a lighter shade. Groups can becreated, deleted, or modified by the user at any time, with the exception of the All group, which cannotbe modified.
Groups are added by clicking on the Create Group button or from a context-sensitive menu that appearswhen you right-click on the process group widget. This menu can also be used to rename groups, deleteindividual processes from a group and jump to the current position of a process in the code viewer. Youcan load and save the current groups to a file, and you can create sub-groups from the processes currentlyplaying, paused or finished. You can even create a sub-group excluding the members of another group.For example, to take the complement of the Workers group, select the All group and choose Copy, butwithout Workers.
You can also use the context menu to switch between the two different methods of viewing the list ofgroups in Arm DDT. These methods are the detailed view and the summary view.
7.1.1 Detailed view
The detailed view is ideal for working with smaller numbers of processes. If your program has less than32 processes, Arm DDT defaults to the detailed view. You can switch to this view using the context menuif you wish.
Figure 34: The Detailed Process Group View
In the detailed view, each process is represented by a square containing its MPI rank (0 through n-1). Thesquares are color-coded; red for a paused process, green for a playing process and gray for a finished/deadprocess. Selected processes are highlighted with a lighter shade of their color and the current process alsohas a dashed border.
Copyright c© 2002-2018 Arm Limited (or its affiliates). All rights reserved. 56

Arm Forge 18.0.2
When a single process is selected the local variables are displayed in the Variable Viewer and displayedexpressions are evaluated. You can make the Source Code Viewer jump to the file and line for the currentstack frame (if available) by double-clicking on a process.
To copy processes from one group to another, simply click and drag the processes. To delete a process,press the delete key. When modifying groups it is useful to select more than one process by holding downone or more of the following:
Key DescriptionControl Click to add/remove process from selectionShift Click to select a range of processesAlt Click to select an area of processes
Note: Some window managers (such as KDE) use Alt and drag to move a window. You must disable thisfeature in your window manager if you wish to use the Arm DDT’s area select.
7.1.2 Summary view
The summary view is ideal for working with moderate to huge numbers of processes. If your programhas 32 processes or more, Arm DDT defaults to this view. You can switch to this view using the contextmenu if you wish.
Figure 35: The Summary Process Group View
In the summary view, individual processes are not shown. Instead, for each group, ArmDDT shows:
• The number of processes in the group.
• The processes belonging that group. Here 1–2048 means processes 1 through 2048 inclusive, and1–10, 12–1024 means processes 1–10 and processes 12–1024 (but not process 11). If this listbecomes too long, it is truncated with a ‘. . . ’. Hovering the mouse over the list shows more details.
• The number of processes in each state (playing, paused or finished). Hovering the mouse over eachstate shows a list of the processes currently in that state.
• The rank of the currently selected process. You can change the current process by clicking here,typing a new rank and pressing Enter. Only ranks belonging to the current group will be accepted.
The Show processes toggle button allows you to switch a single group into the detailed view and backagain. This is useful if you are debugging a 2048 process program, but have narrowed the problem downto just 12 processes, which you have put in a group.
7.2 Focus control
The focus control allows you to focus on individual processes or threads as well as process groups. Whenfocused on a particular process or thread, actions such as stepping, playing/pausing, adding breakpoints,
Copyright c© 2002-2018 Arm Limited (or its affiliates). All rights reserved. 57

Arm Forge 18.0.2
will only apply to that process or thread rather than the entire group.
In addition, the Arm DDT GUI will change depending on whether you are focused on group, processor thread. This allows Arm DDT to display more relevant information about your currently focusedobject.
Figure 36: Focus options
7.2.1 Overview of changing focus
Focusing in Arm DDT affects a number of different controls in the Arm DDT main window. These aredescribed here:
Note: Focus controls do not affect Arm DDT windows such as the Multi-Dimensional Array Viewer,Memory Debugger, Cross-Process Comparison.
7.2.2 Process group viewer
The changes to the process group viewer amongst the most obvious changes to the ArmDDTGUI. Whenfocus on current group is selected you see your currently created process groups. When switching to focuson current process or thread you see the view change to show the processes in the currently selected group,with their corresponding threads.
Figure 37: The Detailed Process Group View Focused on a Process
If there are 32 threads or more, Arm DDT defaults to showing the threads using a summary view (as inthe Process Group View). The view mode can also be changed using the context menu.
During focus on process, a tooltip is shown that identifies the OpenMP thread ID of each thread, if thevalue exists.
7.2.3 Breakpoints
The breakpoints tab in Arm DDT is filtered to only display breakpoints relevant to your current group,process, thread. When focused on a process, the breakpoint tab displays which thread the breakpointbelongs to. If you are focused on a group, the tab displays both the process and the thread the breakpointbelongs to.
7.2.4 Code viewer
The code viewer in Arm DDT shows a stack back trace of where each thread is in the call stack. This isalso filtered by the currently focused item, for example when focused on a particular process, you onlysee the back trace for the threads in that process.
Copyright c© 2002-2018 Arm Limited (or its affiliates). All rights reserved. 58

Arm Forge 18.0.2
Also, when adding breakpoints using the code viewer, they are added for the group, process or threadthat is currently focused.
7.2.5 Parallel stack view
The parallel stack view can also be filtered by focusing on a particular process group, process or thread.
7.2.6 Playing and stepping
The behavior of playing, stepping and the Run to here feature are also affected by your currently focuseditem. When focused on a process group, the entire group is affected, whereas focusing on a thread meansthat only current thread is executed. The same goes for processes, but with an additional option which isexplained below.
7.2.7 Step threads together
The step threads together feature in Arm DDT is only available when focused on process. If this optionis enabled then Arm DDT attempts to synchronize the threads in the current process when performingactions such as stepping, pausing and using Run to here.
For example, if you have a process with two threads and you choose Run to here, Arm DDT pauses yourprogram when either of the threads reaches the specified line. If Step threads together is selected ArmDDT attempts to play both of the threads to the specified line before pausing the program.
Note: You should always use Step threads together and Run to here to enter or move within OpenMPparallel regions. With many compilers it is also advisable to use Step threads together when leaving aparallel region, otherwise threads can get ‘left behind’ inside system-specific locking libraries and maynot enter the next parallel region on the first attempt.
7.2.8 Stepping threads window
When using the step threads together feature it is not always possible for all threads to synchronize attheir target. There are two main reasons for this:
1. One or more threads may branch into a different section of code (and hence never reach the target).This is especially common in OpenMP codes, where worker threads are created and remain inholding functions during sequential regions.
2. Asmost of ArmDDT’s supported debug interfaces cannot play arbitrary groups of threads together,Arm DDT simulates this behavior by playing each thread in turn. This is usually not a problem, butcan be if, for example, thread 1 is playing, but waiting for thread 2 (which is not currently playing).Arm DDT attempts to resolve this automatically but cannot always do so.
If either of these conditions occur, the Stepping Threads Window appears, displaying the threads whichhave not yet reached their target.
Copyright c© 2002-2018 Arm Limited (or its affiliates). All rights reserved. 59
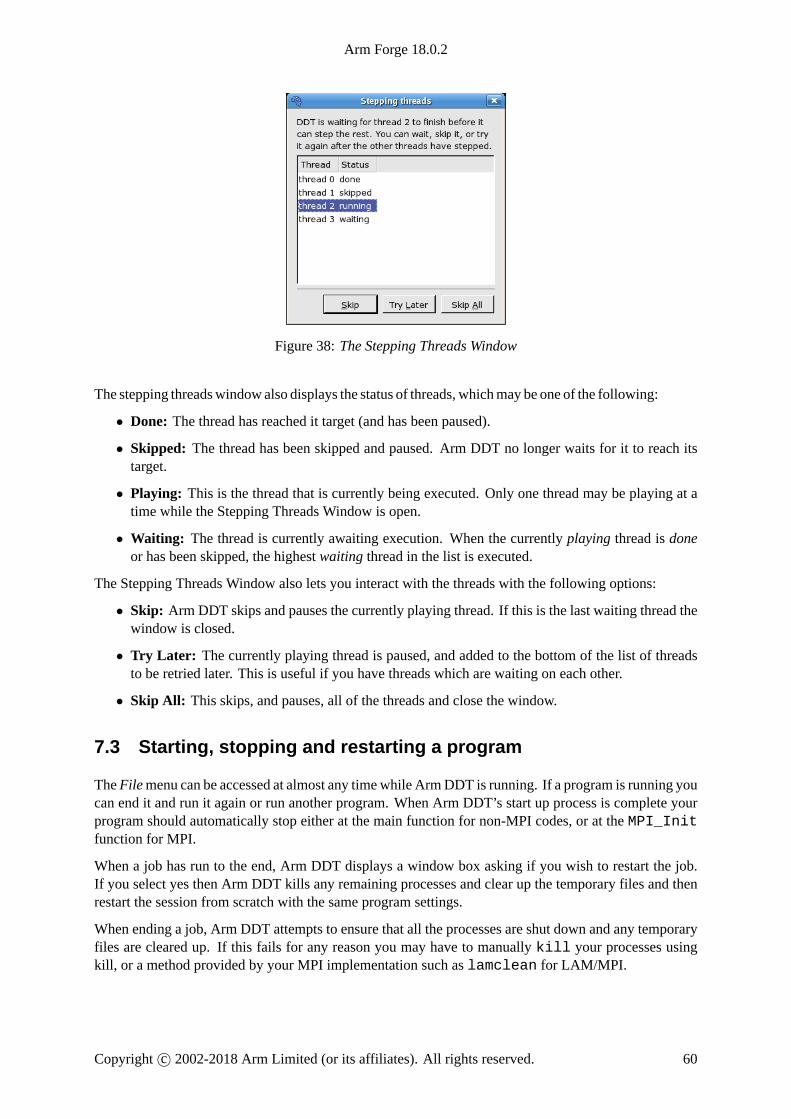
Arm Forge 18.0.2
Figure 38: The Stepping Threads Window
The stepping threadswindow also displays the status of threads, whichmay be one of the following:
• Done: The thread has reached it target (and has been paused).
• Skipped: The thread has been skipped and paused. Arm DDT no longer waits for it to reach itstarget.
• Playing: This is the thread that is currently being executed. Only one thread may be playing at atime while the Stepping Threads Window is open.
• Waiting: The thread is currently awaiting execution. When the currently playing thread is doneor has been skipped, the highest waiting thread in the list is executed.
The Stepping Threads Window also lets you interact with the threads with the following options:
• Skip: Arm DDT skips and pauses the currently playing thread. If this is the last waiting thread thewindow is closed.
• Try Later: The currently playing thread is paused, and added to the bottom of the list of threadsto be retried later. This is useful if you have threads which are waiting on each other.
• Skip All: This skips, and pauses, all of the threads and close the window.
7.3 Starting, stopping and restarting a program
The Filemenu can be accessed at almost any time while ArmDDT is running. If a program is running youcan end it and run it again or run another program. When Arm DDT’s start up process is complete yourprogram should automatically stop either at the main function for non-MPI codes, or at the MPI_Initfunction for MPI.
When a job has run to the end, Arm DDT displays a window box asking if you wish to restart the job.If you select yes then Arm DDT kills any remaining processes and clear up the temporary files and thenrestart the session from scratch with the same program settings.
When ending a job, Arm DDT attempts to ensure that all the processes are shut down and any temporaryfiles are cleared up. If this fails for any reason you may have to manually kill your processes usingkill, or a method provided by your MPI implementation such as lamclean for LAM/MPI.
Copyright c© 2002-2018 Arm Limited (or its affiliates). All rights reserved. 60

Arm Forge 18.0.2
7.4 Stepping through a program
To continue the program playing click Play/Continue and to stop it at any time click Pause .
For multi-process Arm DDT these start/stop all the processes in the current group (see Process Controland Process Groups).
Like many other debuggers there are three different types of step available. These are enumeratedhere:
1. Step Into moves to the next line of source code unless there is a function call in which case it stepsto the first line of that function.
2. Step Over moves to the next line of source code in the bottom stack frame.
3. Step Out executes the rest of the function and then stop on the next line in the stack frame above.The return value of the function is displayed in the Locals view. When using Step Out be carefulnot to try and step out of the main function, as doing this ends your program.
7.5 Stop messages
In certain circumstances your program may be automatically paused by the debugger. There are fivereasons your program may be paused in this way:
1. It hit one of Arm DDT’s default breakpoints, for example, exit or abort. See section 7.10Default breakpoints for more information on default breakpoints.
2. It hit a user-defined breakpoint, that is a breakpoint shown in the Breakpoints view.
3. The value of a watched variable changed.
4. It was sent a signal. See section 7.20 Signal handling for more information on signals.
5. It encountered a Memory Debugging error. See section 12.4 Pointer error detection and validitychecking for more information on Memory Debugging errors.
Arm DDT displays a message telling you exactly why the program was paused. To copy the messagetext to the clipboard select it with the mouse cursor, then right-click and select Copy.
You may want to suppress these messages in certain circumstances, for example if you are playing fromone breakpoint to another. Use theControl→Messagesmenu to enable or disable stop messages.
7.6 Setting breakpoints
7.6.1 Using the source code viewer
First locate the position in your code where you want to place a breakpoint. If you have numerous sourcecode files and wish to search for a particular function you can use the Find/Find In Files window.
Right-clicking in the Source Code Viewer displays a menu showing several options, including one to addor remove a breakpoint.
In multi-process mode this sets the breakpoint for every member of the current group. Breakpoints mayalso be added by left-clicking the margin to the left of the line number.
Every breakpoint is listed under the breakpoints tab towards the bottom of Arm DDT’s window.
Copyright c© 2002-2018 Arm Limited (or its affiliates). All rights reserved. 61
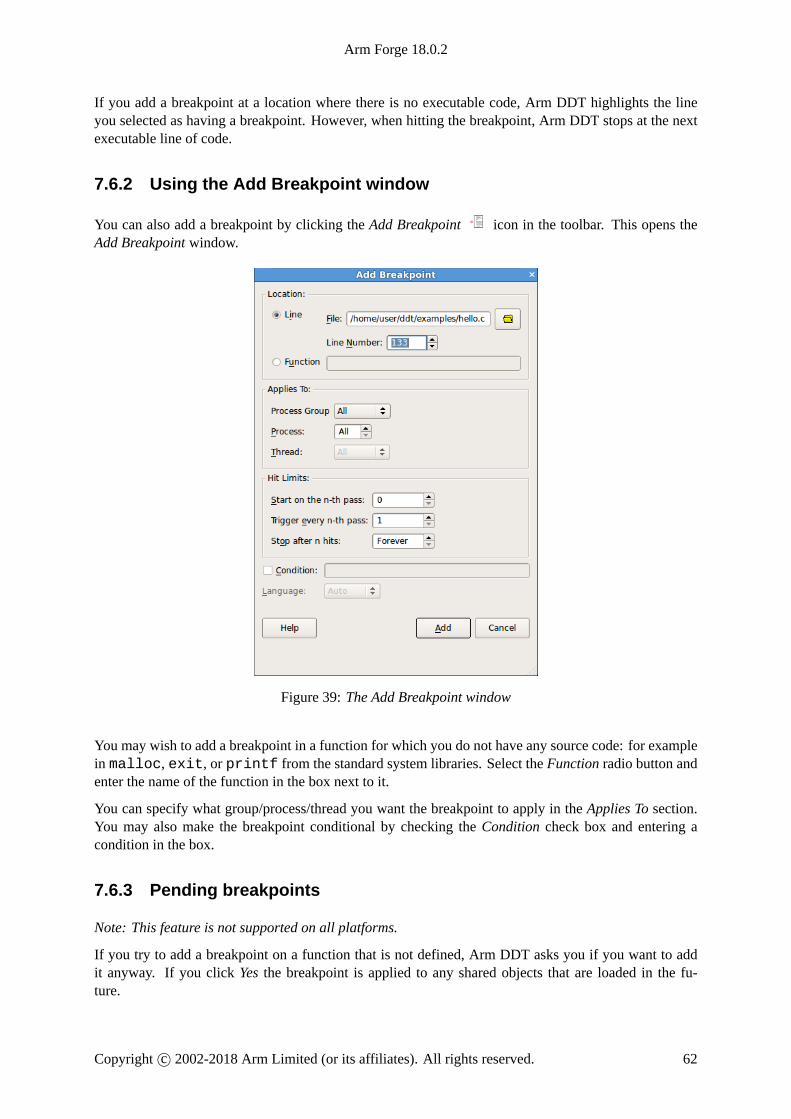
Arm Forge 18.0.2
If you add a breakpoint at a location where there is no executable code, Arm DDT highlights the lineyou selected as having a breakpoint. However, when hitting the breakpoint, Arm DDT stops at the nextexecutable line of code.
7.6.2 Using the Add Breakpoint window
You can also add a breakpoint by clicking the Add Breakpoint icon in the toolbar. This opens theAdd Breakpoint window.
Figure 39: The Add Breakpoint window
You may wish to add a breakpoint in a function for which you do not have any source code: for examplein malloc, exit, or printf from the standard system libraries. Select the Function radio button andenter the name of the function in the box next to it.
You can specify what group/process/thread you want the breakpoint to apply in the Applies To section.You may also make the breakpoint conditional by checking the Condition check box and entering acondition in the box.
7.6.3 Pending breakpoints
Note: This feature is not supported on all platforms.
If you try to add a breakpoint on a function that is not defined, Arm DDT asks you if you want to addit anyway. If you click Yes the breakpoint is applied to any shared objects that are loaded in the fu-ture.
Copyright c© 2002-2018 Arm Limited (or its affiliates). All rights reserved. 62

Arm Forge 18.0.2
7.6.4 Conditional breakpoints
Figure 40: The Breakpoints Table
Select the breakpoints tab to view all the breakpoints in your program. You may add a condition to anyof them by clicking on the condition cell in the breakpoint table and entering an expression that evaluatesto true or false.
Each time a process (in the group the breakpoint is set for) passes this breakpoint it evaluates the condi-tion and breaks only if it returns true (typically any non-zero value). You can drag an expression fromthe Evaluate window into the condition cell for the breakpoint and this is set as the condition automati-cally.
Figure 41: Conditional Breakpoints In Fortran
Conditions may be any valid expression for the language of the file containing the breakpoint. Thisincludes other variables in your program and function calls.
You may want to avoid using functions with side effects as these will be executed every time the break-point is reached.
The expression evaluation may be more pedantic than your compiler. To ensure the correct interpre-tation of, for example, boolean operations, it is advisable to use brackets explicitly, to ensure correctevaluation.
7.7 Suspending breakpoints
A breakpoint can be temporarily deactivated and reactivated by checking/unchecking the activated col-umn in the breakpoints panel.
7.8 Deleting a breakpoint
Breakpoints may be deleted by right-clicking on the breakpoint in the breakpoints panel.
They can also be deleted by right-clicking in the file/line of the breakpoint, while in the correct processgroup, and right-clicking and selecting delete breakpoint.
Copyright c© 2002-2018 Arm Limited (or its affiliates). All rights reserved. 63

Arm Forge 18.0.2
They may also be deleted by left-clicking the breakpoint icon in the margin, situated to the left of the linenumber in the code viewer.
7.9 Loading and saving breakpoints
To load or save the breakpoints in a session right-click in the breakpoint panel and select the load/saveoption. Breakpoints are also loaded and saved as part of the load/save session.
7.10 Default breakpoints
Arm DDT has a number of default breakpoints that stop your program under certain conditions whichare described below. You may enable/disable these while your program is running using the Control→Default Breakpoints menu.
• Stop at exit/ exit
When enabled, Arm DDT pauses your program as it is about to end under normal exit conditions.ArmDDT pauses both before and after any exit handlers have been executed. (Disabled by default.)
• Stop at abort/fatal MPI Error
When enabled, Arm DDT pauses your program as it about to end after an error has been triggered.This includes MPI and non-MPI errors. (Enabled by default.)
• Stop on throw (C++ exceptions)
When enabled, Arm DDT pauses your program whenever an exception is thrown (regardless ofwhether or not it will be caught). Due to the nature of C++ exception handling, you may not beable to step your program properly at this point. Instead, you should play your program or use theRun to here feature in DDT. (Disabled by default.)
• Stop on catch (C++ exceptions)
As above, but triggered when your program catches a thrown exception. Again, you may havetrouble stepping your program. (Disabled by default.)
• Stop at fork
Arm DDT stops whenever your program forks (that is, calls the fork system call to create a copyof the current process). The new process is added to your existing Arm DDT session and can bedebugged along with the original process.
• Stop at exec
When your program calls the exec system call, Arm DDT stops at the main function (or programbody for Fortran) of the new executable.
• Stop on CUDA kernel launch
When debugging CUDA GPU code, this pauses your program at the entry point of each kernellaunch.
7.11 Synchronizing processes
If the processes in a process group are stopped at different points in the code and youwish to resynchronizethem to a particular line of code this can be done by right-clicking on the line at which you wish to
Copyright c© 2002-2018 Arm Limited (or its affiliates). All rights reserved. 64

Arm Forge 18.0.2
synchronize them to and selecting Run To Here. This effectively plays all the processes in the selectedgroup and puts a break point at the line at which you choose to synchronize the processes at, ignoring anybreakpoints that the processes may encounter before they have synchronized at the specified line.
If you choose to synchronize your code at a point where all processes do not reach then the processes thatcannot get to this point will play to the end.
Note: Though this ignores breakpoints while synchronizing the groups it will not actually remove thebreakpoints.
Note: If a process is already at the line which you choose to synchronize at, the process will still be set toplay. Be sure that your process will revisit the line, or alternatively synchronize to the line immediatelyafter the current line.
7.12 Setting a watchpoint
Figure 42: The Watchpoints Table
A watchpoint is a variable or expression that will be monitored by the debugger such that when it ischanged or accessed the debugger pauses the application.
Figure 43: Program Stopped At Watchpoint being watched
Unlike breakpoints, watchpoints are not displayed in the Source Code Viewer. Instead they are createdby right-clicking on theWatchpoints view and selecting the Add Watchpoint menu item.
It is also possible to add watchpoints automatically dragging a variable to theWatchpoints view from theLocal Variables, Current Line and Evaluate views, or right-clicking over the variable in the Source CodeViewer and then selecting Add Watchpoint.
The automatic watchpoints are write-only by default.
Upon adding a watchpoint the Add Watchpoint dialog appears allowing you to apply restrictions to thewatchpoint:
• Process Group restricts the watch point to the chosen process group (see 7.1 Process control andprocess groups).
• Process restricts the watchpoint to the chosen process.
Copyright c© 2002-2018 Arm Limited (or its affiliates). All rights reserved. 65
Arm Forge 18.0.2
• Expression is the variable name in the program to be watched.
• Language is the language of the portion of the program containing the expression.
• Trigger On allows you to select whether the watchpoint will trigger when the expression is read,written or both.
You can set a watchpoint for either a single process, or every process in a process group.
Arm DDT automatically removes a watchpoint once the target variable goes out of scope. If you arewatching the value pointed to by a variable, that is, *p, you may want to continue watching the value atthat address even after p goes out of scope. You can do this by right-clicking on *p in the Watchpointsview and selecting the Pin to address menu item. This replaces the variable p with its address so thewatch is not removed when p goes out of scope.
Modern processors have hardware support for a handful of watchpoints that are set towatch the contents ofa memory location. Consequently, watchpoints can normally be used with no performance penalty.
Where the number of watchpoints used is over this quantity, or the expression being watched is toocomplex to tie to a fixed memory address, the implementation is through software monitoring, whichimposes significant performance slowdown on the application being debugged.
The number of hardware watchpoints available depends on the system. The read watchpoints are onlyavailable as hardware watchpoints.
Consequently, watchpoints should, where possible, be a single value that is stored in a single memorylocation. While it is possible to watch the whole contents of non-trivial user defined structures or anentire array simultaneously, or complex statements involving multiple addresses, these can cause extremeapplication slow down during debugging.
7.13 Tracepoints
Tracepoints allow you to see what lines of code your program is executing, and the variables, withoutstopping it. Whenever a thread reaches a tracepoint it will print the file and line number of the tracepointto the Input/Output view. You can also capture the value of any number of variables or expressions atthat point.
Examples of situations in which this feature will prove invaluable include:
• Recording entry values in a function that is called many times, but crashes only occasionally. Set-ting a tracepoint makes it easier to correlate the circumstances that cause a crash.
• Recording entry to multiple functions in a library, enabling the user or library developer to checkwhich functions are being called, and in which order. An example of this is theMPI History Plugin,which records MPI usage. See section 14.3 Using a plugin.
• Observing progress of an application and variation of values across processes without having tointerrupt the application.
7.13.1 Setting a tracepoint
Tracepoints are added by either right-clicking on a line in the Source Code Viewer and selecting the AddTracepoint menu item, or by right-clicking in the Tracepoints view and selecting Add Tracepoint. If youright-click in the Source Code Viewer a number of variables based on the current line of code are capturedby default.
Copyright c© 2002-2018 Arm Limited (or its affiliates). All rights reserved. 66

Arm Forge 18.0.2
Tracepoints can lead to considerable resource consumption by the user interface if placed in areas likelyto generate a lot of passing. For example, if a tracepoint is placed inside of a loop with N iterations, thenN separate tracepoint passings will be recorded.
While Arm DDT attempts to merge such data in a scalable manner, when alike tracepoints are passedin order between processes, where process behavior is likely to be divergent and unmergeable then aconsiderable load would result.
If it is necessary to place a tracepoint inside a loop, set a condition on the tracepoint to ensure you only logwhat is of use to you. Conditions may be any valid expression in the language of the file the tracepointis placed in and may include function calls, although you may want to be careful to avoid functions withside effects as these will be evaluated every time the tracepoint is reached.
Tracepoints also momentarily stop processes at the tracepoint location in order to evaluate the expressionsand record their values. This means if they are placed inside (for example) a loop with a very large numberof iterations, or a function executed many times per second, then a slowdown in your application will benoticed.
7.13.2 Tracepoint output
The output from the tracepoints can be found in the Tracepoint Output view.
Figure 44: Output from Tracepoints in a Fortran application
Where tracepoints are passed by multiple processes within a short interval, the outputs will be merged.Sparklines of the values recorded are shown for numeric values, along with the range of values obtained,showing the variation across processes.
As alike tracepoints are merged then this can lose the order/causality between different processes in trace-point output. For example, if process 0 passes a tracepoint at time T, and process 1 passes the tracepointat T + 0.001, then this will be shown as one passing of both process 0 and process 1, with no orderinginferred.
Sequential consistency is preserved during merging, in that for any process, the sequence of tracepointsfor that process will be in order.
To find particular values or interesting patterns, use the Only show lines containing box at the bottom ofthe panel. Tracepoint lines matching the text entered here will be shown, the rest will be hidden. To searchfor a particular value, for example, try “my var: 34”. In this case the space at the end helps distinguishbetween my var: 34 and my var: 345.
For more detailed analysis you may wish to export the tracepoints. To do this, right-click and chooseExport from the pop-up menu. An HTML tracepoint log will be written using the same format as ArmDDT’s offline mode.
Copyright c© 2002-2018 Arm Limited (or its affiliates). All rights reserved. 67
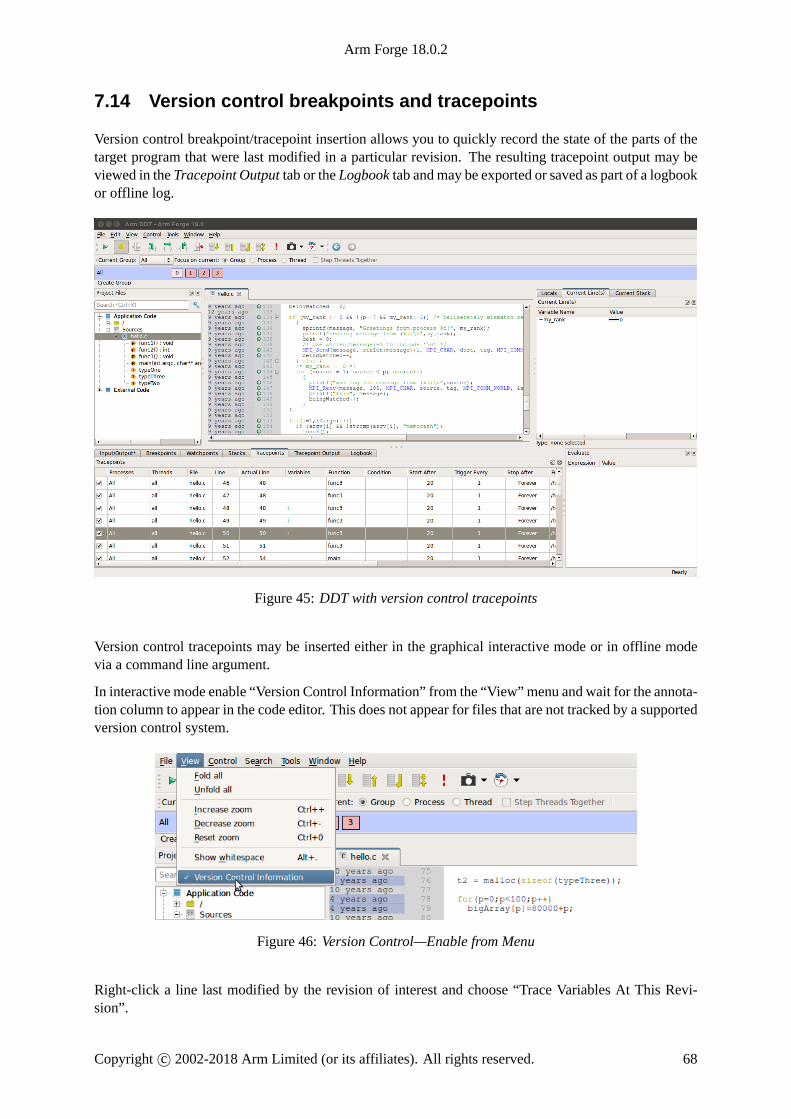
Arm Forge 18.0.2
7.14 Version control breakpoints and tracepoints
Version control breakpoint/tracepoint insertion allows you to quickly record the state of the parts of thetarget program that were last modified in a particular revision. The resulting tracepoint output may beviewed in the Tracepoint Output tab or the Logbook tab and may be exported or saved as part of a logbookor offline log.
Figure 45: DDT with version control tracepoints
Version control tracepoints may be inserted either in the graphical interactive mode or in offline modevia a command line argument.
In interactive mode enable “Version Control Information” from the “View” menu and wait for the annota-tion column to appear in the code editor. This does not appear for files that are not tracked by a supportedversion control system.
Figure 46: Version Control—Enable from Menu
Right-click a line last modified by the revision of interest and choose “Trace Variables At This Revi-sion”.
Copyright c© 2002-2018 Arm Limited (or its affiliates). All rights reserved. 68

Arm Forge 18.0.2
Figure 47: Version Control—Trace at this revision
Arm DDT will find all the source files modified in the revision, detect the variables on the lines modifiedin the revision and insert tracepoints (pending if necessary). A progress dialog may be shown for lengthytasks.
Both the tracepoints and the tracepoint output in the Tracepoints, Tracepoint Output, and Logbook tabsmay be double-clicked during a session to jump to the corresponding line of source in the code viewer.
In offline mode supply the additional argument --trace-changes and Arm DDT applies the sameprocess as in interactive mode using the current revision of the repository.
By default version control tracepoints are removed after 20 hits. To change this hit limit set the environ-ment variable ALLINEA_VCS_TRACEPOINT_HIT_LIMIT to an integer greater than or equal to 0.To configure version control tracepoints to have no hit limit set this to 0.
See also Version control information.
7.15 Examining the stack frame
Figure 48: The Stack Tab
The stack back trace for the current process and thread are displayed under the Stack tab of the VariablesWindow. When you select a stack frame Arm DDT jumps to that position in the code, if it is available,and will display the local variables for that frame. The toolbar can also be used to step up or down thestack, or jump straight to the bottom-most frame.
7.16 Align stacks
The align stacks button, or CTRL-A hotkey, sets the stack of the current thread on every process in agroup to the same level as the current process, where it is possible to do so.
This feature is particularly useful where processes are interrupted, by the pause button, and are at differentstages of computation. This enables tools such as the Cross-Process Comparison window to compareequivalent local variables, and also simplifies casual browsing of values.
Copyright c© 2002-2018 Arm Limited (or its affiliates). All rights reserved. 69

Arm Forge 18.0.2
7.17 Viewing stacks in parallel
7.17.1 Overview
To find out where your program is, in one single view, you can use the Parallel Stack View. It is foundin the bottom area of Arm DDT’s GUI, tabbed alongside Input/Output, Breakpoints andWatches:
Figure 49: DDT Parallel Stack View
If you want to knowwhere a group’s processes are, click on the group and look at the Parallel Stack View.This shows a tree of functions, merged from every process in the group (by default). If there is only onebranch in this tree, one list of functions, then all your processes are at the same place.
If there are several different branches, then your group has split up and is in different parts of the code.Click on any branch to see its location in the Source Code Viewer, or hover your mouse over it and a littlepopup will list the processes at that location. Right-click on any function in the list and select New Groupto automatically gather the processes at that function together in a new group, labelled by the function’sown name.
The best way to learn about the Parallel Stack View is to simply use it to explore your program. Click on itand see what happens. Create groups with it, and watch what happens to it as you step processes throughyour code. The Parallel Stack View’s ability to display and select large numbers of processes based ontheir location in your code is invaluable when dealing with moderate to large numbers of processes.
7.17.2 The Parallel Stack View in detail
The Parallel Stack View takes over much of the work of the Stack display, but instead of just showingthe current process, this view combines the call trees (commonly called stacks) from many processesand displays them together. The call tree of a process is the list of functions (strictly speaking frames orlocations within a function) that lead to the current position in the source code.
For example, if main() calls read input(), and read input() calls open file(), and youstop the program inside open file(), then the call tree looks like the following:
main()read_input()open_file()
If a function was compiled with debug information (usually -g) then Arm DDT adds extra information,displaying the exact source file and line number that your code is on.
Any functions without debug information are grayed-out and are not shown by default. Functions withoutdebug information are typically library calls or memory allocation subroutines and are not generally of
Copyright c© 2002-2018 Arm Limited (or its affiliates). All rights reserved. 70

Arm Forge 18.0.2
interest. To see the entire list of functions, right-click on one and choose Show Children from the pop-upmenu.
You can click on any function to select it as the ‘current’ function in Arm DDT. If it was compiledwith debug information, then Arm DDT also displays its source code in the main window, and its localvariables and so on in the other windows.
One of the most important features of the Parallel Stack View is its ability to show the position of manyprocesses at once. Right-click on the view to toggle between:
1. Viewing all the processes in your program at once.
2. Viewing all the processes in the current group at once (default).
3. Viewing only the current process.
The function that Arm DDT is currently displaying and using for the variable views is highlighted in darkblue. Clicking on another function in the Parallel Stack View selects another frame for the source codeand variable views. It also updates the Stack display, since these two controls are complementary. If theprocesses are at several different locations, then only the current process’ location is displayed in darkblue. The other processes’ locations are displayed in a light blue:
Figure 50: Current Frame Highlighting in Parallel Stack View
In the example above, the program’s processes are at two different locations. 1 process is in the mainfunction, at line 85 of hello.c. The other 15 processes are inside a function called func2, at line34 of hello.c. The 15 processes reached func2 in the same way, main called func1 on line 123 ofhello.c, then func1 called func2 on line 40 of hello.c. Clicking on any of these functions takesyou to the appropriate line of source code, and displays any local variables in that stack frame.
There are two optional columns in the Parallel Stack View. The first, Processes shows the number ofprocesses at each location. The second, Threads, shows the number of threads at each location. Bydefault, only the number of processes is shown. Right-click to turn these columns on and off. Note thatin a normal, single-threaded MPI application, each process has one thread and these two columns willshow identical information.
Hovering the mouse over any function in the Parallel Stack View displays the full path of the filename,and a list of the process ranks that are at that location in the code:
Figure 51: Parallel Stack View tool tip
Arm DDT is at its most intuitive when each process group is a collection of processes doing a similartask. The Parallel Stack View is invaluable in creating and managing these groups.
Right-click on any function in the combined call tree and choose the New Group option. This creates anew process group that contains only the processes sharing that location in code. By default Arm DDT
Copyright c© 2002-2018 Arm Limited (or its affiliates). All rights reserved. 71

Arm Forge 18.0.2
uses the name of the function for the group, or the name of the function with the file and line number ifit is necessary to distinguish the group further.
7.18 Browsing source code
Source code is automatically displayed when a process is stopped, when you select a process, or positionin the stack changed. If the source file cannot be found you are prompted for its location.
Arm DDT highlights lines of the source code to show the current location of your program’s execution.Lines that contain processes from the current group are shaded in that group’s color. Lines only containingprocesses from other groups are shaded in gray.
This pattern is repeated in the focus on process and thread modes. For example, when you focus on aprocess, Arm DDT highlights lines containing that process in the group color, and other processes fromthat group in gray.
Arm DDT also highlights lines of code that are on the stack, functions that your program will return towhen it has finished executing the current one. These are drawn with a faded look to distinguish themfrom the currently-executing lines.
You can hover the mouse over any highlighted line to see which processes/threads are currently on thatline. This information is presented in a variety of ways, depending on the current focus setting:
Focus on Group
A list of groups that are on the selected line, along with the processes in them on this line, and a list ofthreads from the current process on the selected line.
Focus on Process
A list of the processes from the current group that are on this line, along with the threads from the currentprocess on the selected line.
Focus on Thread
A list of threads from the current process on the selected line.
The tool tip distinguishes between processes and threads that are currently executing that line, and onesthat are on the stack by grouping them under the headings On the stack and On this line.
Variables and Functions
Right-clicking on a variable or function name in the Source Code Viewer causes Arm DDT to checkwhether there is a matching variable or function, and then to display extra information and options in asub-menu.
In the case of a variable, the type and value are displayed, along with options to view the variable in theCross-Process Comparison Window (CPC) or the Multi-Dimensional Array Viewer (MDA), or to dropthe variable into the Evaluate Window, each of which are described in the next chapter.
Figure 52: Right-Click Menu—Variable Options
Copyright c© 2002-2018 Arm Limited (or its affiliates). All rights reserved. 72

Arm Forge 18.0.2
In the case of a function, it is also possible to add a breakpoint in the function, or to the source code ofthe function when available.
Figure 53: Right-Click Menu—Function Options
7.19 Simultaneously viewing multiple files
Arm DDT presents a tabbed pane view of source files. Occasionally it may be useful to view two filessimultaneously, such as when tracking two different processes.
Inside the code viewing panel, right-click to split the view. This displays a second tabbed pane whichcan be viewed beneath the first one. When viewing additional files, the currently ‘active’ panel displaysthe file. Click on one of the views to make it active.
The split view can be reset to a single view by right-clicking in the code panel and deselecting the splitview option.
Figure 54: Horizontal Alignment Of Multiple Source Files
7.20 Signal handling
By default Arm DDT will stop a process if it encounters one of the standard signals. See section 7.20.1Custom signal handling (signal dispositions). The standard signals include:
• SIGSEGV – Segmentation fault
The process has attempted to access memory that is not valid for that process. Often this will becaused by reading beyond the bounds of an array, or from a pointer that has not been allocated yet.The DDT Memory Debugging feature may help to resolve this problem.
Copyright c© 2002-2018 Arm Limited (or its affiliates). All rights reserved. 73

Arm Forge 18.0.2
• SIGFPE – Floating Point Exception
This is raised typically for integer division by zero, or dividing the most negative number by -1.Whether or not this occurs is Operating System dependent, and not part of the POSIX standard.Linux platforms will raise this.
Note that floating point division by zero will not necessarily cause this exception to be raised,behavior is compiler dependent. The special value Inf or -Inf may be generated for the data,and the process would not be stopped.
• SIGPIPE – Broken Pipe
A broken pipe has been detected while writing.
• SIGILL – Illegal Instruction
SIGUSR1, SIGUSR2, SIGCHLD, SIG63 and SIG64 are passed directly through to the user processwithout being intercepted by DDT.
7.20.1 Custom signal handling (signal dispositions)
You can change the way individual signals are handled using the Signal Handling window. To open thewindow select the Control→ Signal Handling. . . menu item.
Figure 55: Signal Handling dialog
Set a signal’s action to Stop to stop a process whenever it encounters the given signal, or Ignore to let theprocess receive the signal and continue playing without being stopped by the debugger.
7.20.2 Sending signals
The Send Signalwindow allows a signal to be sent to the debugged processes. Select the Control→ SendSignal. . . menu item. Select the signal you want to send from the drop-down list and click the Send to
Copyright c© 2002-2018 Arm Limited (or its affiliates). All rights reserved. 74

Arm Forge 18.0.2
process button.
Copyright c© 2002-2018 Arm Limited (or its affiliates). All rights reserved. 75

Arm Forge 18.0.2
8 Viewing variables and data
The Variables Window contains two tabs that provide different ways to list your variables. The Localstab contains all the variables for the current stack frame, while the Current Line(s) tab displays all thevariables referenced on the currently selected lines. Please note that several compilers and libraries (suchas Cray Fortran, OpenMP and others) generate extra code, including variables that are visible in ArmDDT’s windows.
Right-clicking in these windows brings up additional options, including the ability to edit values (in theEvaluations window), to change the display base, or to compare data across processes and threads. Theright-click menu also allows you to choose whether the fields in structures (classes or derived types)should be displayed alphabetically by element name or not, which is useful for when structures have verymany different fields.
Figure 56: Displaying Variables
8.1 Sparklines
Numerical values may have sparklines displayed next to them. A sparkline is a line graph of process rankor thread index against value of the related expression. The exact behavior is determined by the focuscontrol. See section 7.2 Focus control.
If focussed on process groups, then process ranks are used. Otherwise, thread indices are used. The graphis bound by the minimum and maximum values found, or in the case that all values are equal the lineis drawn across the vertical center of the highlighted region. Erroneous values such as Nan and Inf arerepresented as red, vertical bars. If focus is on process groups, then clicking on a sparkline displays theCross-Process Comparison window for closer analysis. Otherwise, clicking on a sparkline displays theCross-Thread Comparison window.
8.2 Current line
You can select a single line by clicking on it in the code viewer, or multiple lines by clicking and dragging.The variables are displayed in a tree view so that user-defined classes or structures can be expanded toview the variables contained within them. You can drag a variable from this window into the EvaluateWindow. It is then evaluated in whichever stack frame, thread or process you select.
Copyright c© 2002-2018 Arm Limited (or its affiliates). All rights reserved. 76

Arm Forge 18.0.2
8.3 Local variables
TheLocals tab contains local variables for the current process’s currently active thread and stack frame.
For Fortran codes the amount of data reported as local can be substantial, as this can include many globalor common block arrays. Should this prove problematic, it is best to conceal this tab underneath theCurrent Line(s) tab, as this will not then update after every step.
It is worth noting that variables defined within common blocks may not appear in the local variables tabwith some compilers, this is because they are considered to be global variables when defined in a commonmemory space.
The Locals view compares the value of scalar variables against other processes. If a value varies acrossprocesses in the current group the value is highlighted in green.
When stepping or switching processes if the value of a variable is different from the previous position orprocess it is highlighted in blue.
After stepping out of function the return value is displayed at the top of the Locals view (for selecteddebuggers).
8.4 Arbitrary expressions and global variables
Figure 57: Evaluating Expressions
Since the global variables and arbitrary expressions do not get displayed with the local variables, youmay wish to use the Current Line(s) tab in the Variables window and click on the line in the Source CodeViewer containing a reference to the global variable.
Alternatively, the Evaluate panel can be used to view the value of any arbitrary expression. Right-click onthe Evaluate window, click on Add Expression, and type in the expression required in the current sourcefile language. This value of the expression is displayed for the current process and stack/thread, and isupdated after every step.
Note: At the time of writing Arm DDT does not apply the usual rules of precedence to logical Fortranexpressions, such as x .ge. 32 .and. x .le. 45.. For now, please bracket such expressionsthoroughly: (x .ge. 32) .and. (x .le. 45).
Note: Although the Fortran syntax allows you to use keywords as variable names, ArmDDT is not be ableto evaluate such variables on most platforms. Please contact Arm support at [email protected] this is a problem for you.
Copyright c© 2002-2018 Arm Limited (or its affiliates). All rights reserved. 77

Arm Forge 18.0.2
Expressions containing function calls are only evaluated for the current process/thread and sparklines arenot displayed for those expressions, because of possible side effects caused by calling functions. UseCross-Process or Cross-Thread Comparison for functions instead. See section 8.16 Cross-process andcross-thread comparison.
Copyright c© 2002-2018 Arm Limited (or its affiliates). All rights reserved. 78

Arm Forge 18.0.2
8.4.1 Fortran intrinsics
The following Fortran intrinsics are supported by the default GNUdebugger includedwithArmDDT:
ABS AIMAG CEILING CMPLXFLOOR IEEE IS FINITE IEEE IS INF IEEE IS NANIEEE IS NORMAL ISFINITE ISINF ISNANISNORMAL MOD MODULO REALPART
Support in other debuggers, including the CUDA debugger variants, may vary.
8.4.2 Changing the language of an expression
Ordinarily, expressions in the Evaluate window and Locals/Current windows are evaluated in the lan-guage of the current stack frame. This may not always be appropriate. For example, a pointer to userdefined structure may be passed as value within a Fortran section of code, and you may wish to view thefields of the C structure. Alternatively, you may wish to view a global value in a C++ class while yourprocess is in a Fortran subroutine.
You can change the language that ArmDDT uses for your expressions by right-clicking on the expression,and clicking Change Type/Language, selecting the appropriate language for the expression. To restorethe default behavior, change this back to Auto.
8.4.3 Macros and #defined constants
By default, many compilers do not output sufficient information to allow the debugger to display thevalues of “#defined” constants or macros, as including this information can greatly increase executablesizes.
With the GNU compiler, adding the “-g3” option to the command line options generates extra definitioninformation which Arm DDT will then be able to display.
8.5 Help with Fortran modules
An executable containing Fortran modules presents a special set of problems for developers:
• If there are many modules, each of which contains many procedures and variables (each of whichcan have the same name as something else in a separate Fortran module), keeping track of whichname refers to which entity can become difficult.
• When the Locals or Current Line(s) tabs (within the Variables window) display one of these vari-ables, to which Fortran module does the variable belong?
• How do you refer to a particular module variable in the Evaluate window?
• How do you quickly jump to the source code for a particular Fortran module procedure?
To help with this, Arm DDT provides a Fortran Modules tab in the Project Navigator window.
When Arm DDT begins a session, Fortran module membership is automatically found from the informa-tion compiled into the executable.
Copyright c© 2002-2018 Arm Limited (or its affiliates). All rights reserved. 79

Arm Forge 18.0.2
A list of Fortran modules found is displayed in a simple tree view within the Fortran Modules tab of theProject Navigator window.
Each of these modules can be ‘expanded’ (by clicking on the + symbol to the left of the module name)to display the list of member procedures, member variables and the current values of those membervariables.
Clicking on one of the displayed procedure names causes the Source Code Viewer to jump to that proce-dure’s location in the source code. In addition, the return type of the procedure is displayed at the bottomof the Fortran Modules tab. Fortran subroutines will have a return type of VOID ().
Similarly, clicking on one of the displayed variable names causes the type of that variable to be displayedat the bottom of the Fortran Modules tab.
A module variable can be dragged and dropped into the Evaluatewindow. Here, all of the usual Evaluatewindow functionality applies to the module variable. To help with variable identification in the Evaluatewindow, module variable names are prefixed with the Fortran module name and two colons ::.
Right-clicking within the Fortran Modules tab brings up a context menu. For variables, choices on thismenu includes sending the variable to the Evaluatewindow, theMulti-Dimensional Array Viewer and theCross-Process Comparison Viewer.
Some caveats apply to the information displayed within the Fortran Modules tab:
1. The Fortran Modules tab is not displayed if the underlying debugger does not support the retrievaland manipulation of Fortran module data.
2. The Fortran Modules tab displays an empty module list if the Fortran modules debug data is notpresent or in a format understood by Arm DDT.
One limitation of the Fortran Modules tab is that the modules debug data compiled into the executabledoes not include any indication of the module USE hierarchy. For example, if module A USEs module B,the inherited members of module B are not shown under the data displayed for module A. Consequently,the Fortran Modules tab shows the module USE hierarchy in a flattened form, one level deep.
8.6 Viewing complex numbers in Fortran
When working with complex numbers, you may wish to view only the real or imaginary elements of thenumber. This can be useful when evaluating expressions, or viewing an array in the Multi-DimensionalArray Viewer See section 8.15 Multi-dimensional array viewer (MDA).
You can use the Fortran intrinsic functions REALPART and AIMAG to get the real or imaginary parts ofa number, or their C99 counterparts creal and cimag.
Complex numbers in Fortran can also be accessed as an array, where element 1 is the real part, and element2 is the imaginary part.
Copyright c© 2002-2018 Arm Limited (or its affiliates). All rights reserved. 80
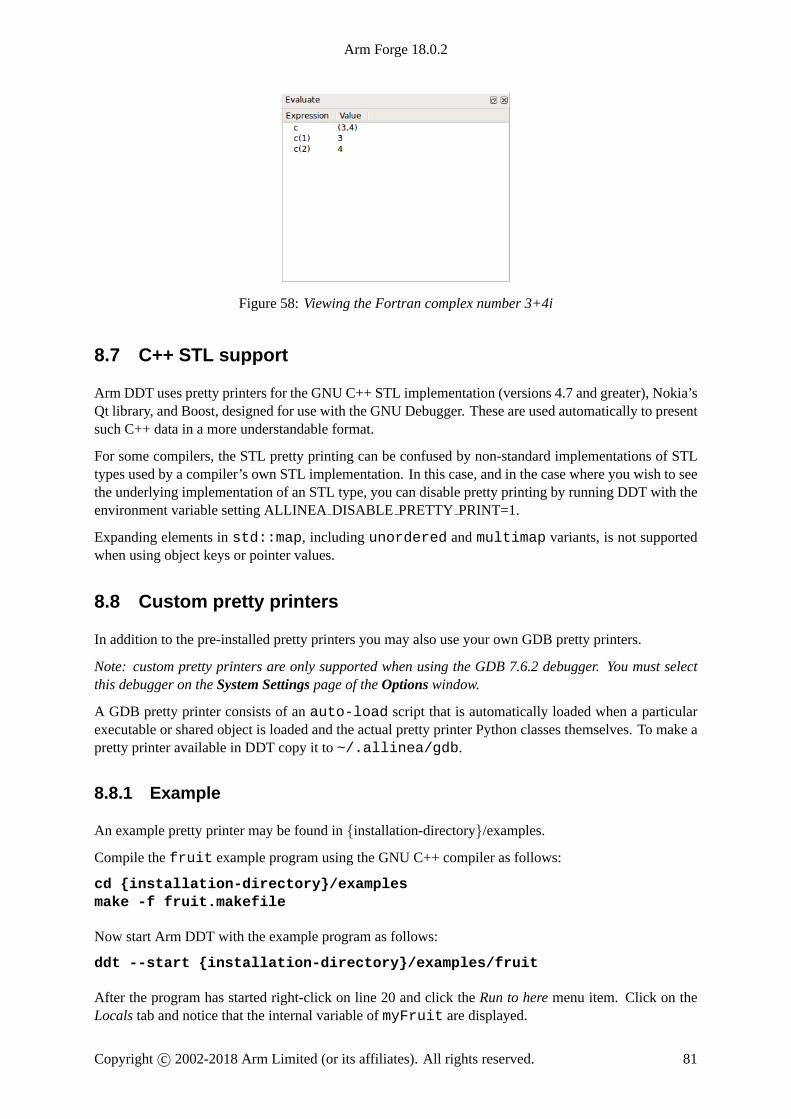
Arm Forge 18.0.2
Figure 58: Viewing the Fortran complex number 3+4i
8.7 C++ STL support
Arm DDT uses pretty printers for the GNU C++ STL implementation (versions 4.7 and greater), Nokia’sQt library, and Boost, designed for use with the GNU Debugger. These are used automatically to presentsuch C++ data in a more understandable format.
For some compilers, the STL pretty printing can be confused by non-standard implementations of STLtypes used by a compiler’s own STL implementation. In this case, and in the case where you wish to seethe underlying implementation of an STL type, you can disable pretty printing by running DDT with theenvironment variable setting ALLINEA DISABLE PRETTY PRINT=1.
Expanding elements in std::map, including unordered and multimap variants, is not supportedwhen using object keys or pointer values.
8.8 Custom pretty printers
In addition to the pre-installed pretty printers you may also use your own GDB pretty printers.
Note: custom pretty printers are only supported when using the GDB 7.6.2 debugger. You must selectthis debugger on the System Settings page of the Options window.
A GDB pretty printer consists of an auto-load script that is automatically loaded when a particularexecutable or shared object is loaded and the actual pretty printer Python classes themselves. To make apretty printer available in DDT copy it to ~/.allinea/gdb.
8.8.1 Example
An example pretty printer may be found in {installation-directory}/examples.
Compile the fruit example program using the GNU C++ compiler as follows:
cd {installation-directory}/examplesmake -f fruit.makefile
Now start Arm DDT with the example program as follows:
ddt --start {installation-directory}/examples/fruit
After the program has started right-click on line 20 and click the Run to here menu item. Click on theLocals tab and notice that the internal variable of myFruit are displayed.
Copyright c© 2002-2018 Arm Limited (or its affiliates). All rights reserved. 81

Arm Forge 18.0.2
Now install the fruit pretty printer by copying the files to ~/.allinea/gdb as follows:
cp -r {installation-directory}/examples/fruit-pretty-printer/* ∼/.allinea/gdb/
Re-run the program in Arm DDT and run to line 20, as before. Click on the Locals tab and notice thatnow, instead of the internal variable of myFruit, the type of fruit is displayed instead.
8.9 Viewing array data
Fortran users may find that it is not possible to view the upper bounds of an array. This is due to a lackof information from the compiler. In these circumstances Arm DDT displays the array with a size of 0,or simply <unknown bounds>. It is still possible to view the contents of the array using the Evaluatewindow to view array(1), array(2), and so on, as separate entries.
To tell Arm DDT the size of the array right-click on the array and select the Edit Type. . . menu option.This opens a window similar to the one below. Enter the real type of the array in theNew Type box.
Figure 59: Edit Type window
Alternatively the MDA can be used to view the entire array.
8.10 UPC support
ArmDDT supports many different UPC compilers, including the GNUUPC compiler, the Berkeley UPCcompiler and those provided by Cray.
Note: In order to enable UPC support, you may need to select the appropriate MPI/UPC implementationfrom DDT’s Options/System menu. See Section 5.1.5 UPC
Debugging UPC applications introduces a small number of changes to the user interface.
• Processes will be identified as UPC Threads, this is purely a terminology change for consistencywith the UPC language terminology. UPC Threads will have behavior identical to that of separateprocesses: groups, process control and cross-process data comparison for examplewill apply acrossUPC Threads.
• The type qualifier shared is given for shared arrays or pointers to shared.
• Shared pointers are printed as a triple (address, thread, phase). For indefinitely blocked pointersthe phase is omitted.
• Referencing shared items will yield a shared pointer and pointer arithmetic may be performed onshared pointers.
• Dereferencing a shared pointer (for example, dereferencing *(&x[n] + 1])) will correctlyevaluate and fetch remote data where required.
Copyright c© 2002-2018 Arm Limited (or its affiliates). All rights reserved. 82

Arm Forge 18.0.2
• Values in shared arrays are not automatically compared across processes: the value of x[i] isby definition identical across all processes. It is not possible to identify pending read/write toremote data. Non-shared data types such as local data or local array elements will still be comparedautomatically.
• Distributed arrays are handled implicitly by the debugger. There is no need to use the explicitdistributed dimensions feature in the MDA.
All other components of Arm DDT will be identical to debugging any multi-process code.
8.11 Changing data values
In the Evaluate window, the value of an expression may be set by right-clicking and selecting Edit Value.This allows you to change the value of the expression for the current process, current group, or for allprocesses.
Note: The variable must exist in the current stack frame for each process you wish to assign the valueto.
8.12 Viewing numbers in different bases
When you are viewing an integer numerical expression you may right-click on the value and use the ViewAs sub menu to change which base the value is displayed in. The View As→ Default option displays thevalue in its original (default) base.
8.13 Examining pointers
You can examine pointer contents by clicking the + next to the variable or expression. This expands theitem and dereference the pointer.
In theEvaluatewindow, you can also use theViewAs Vector, Reference, andDereferencemenu items.
See also Multi-dimensional array viewer (MDA).
8.14 Multi-dimensional arrays in the Variable View
When viewing a multi-dimensional array in either the Locals, Current Line(s) or Evaluate windows it ispossible to expand the array to view the contents of each cell.
In C/C++ the array expands from left to right, x, y, z will be seen with the x column first, then undereach x cell a y column, whereas in Fortran the opposite will be seen with arrays being displayed fromright to left as you read it so x, y, z would have z as the first column with y under each z cell.
The first million elements in an array are shown in the Locals or Current Line(s) view. Larger arraysare truncated, but elements past the millionth can be viewed by evaluating an expression or using themulti-dimensional array viewer.
Copyright c© 2002-2018 Arm Limited (or its affiliates). All rights reserved. 83

Arm Forge 18.0.2
Figure 60: 2D Array in C: type of array is int[4][3]
Figure 61: 2D Array in Fortran: type of twodee is integer(3,5)
8.15 Multi-dimensional array viewer (MDA)
Arm DDT provides a Multi-Dimensional Array (MDA) Viewer (fig. 62) for viewing multi-dimensionalarrays.
To open theMulti-Dimensional Array Viewer, right-click on a variable in the Source Code, Locals, Cur-rent Line(s) or Evaluate views and select the View Array (MDA) context menu option. You can alsoopen the MDA directly by selecting the Multi-Dimensional Array Viewer menu item from the Viewmenu.
Copyright c© 2002-2018 Arm Limited (or its affiliates). All rights reserved. 84

Arm Forge 18.0.2
Figure 62: Multi-Dimensional Array Viewer
If you open the MDA by right clicking on a variable, Arm DDT will automatically set the Array Expres-sion and other parameters based on the type of the variable. Click the Evaluate button to see the contentsof the array in the Data Table.
The Full Window button hides the settings at the top of the window so the table of values occupies thefull window, allowing you to make full use of your screen space. Click the button again to reveal thesettings.
8.15.1 Array expression
TheArray Expression is an expression containing a number of subscript metavariables that are substitutedwith the subscripts of the array. For example, the expressionmyArray($i, $j) has twometavariables,$i and $j. The metavariables are unrelated to the variables in your program.
The range of each metavariable is defined in the boxes below the expression, for example Range of $i.The Array Expression is evaluated for each combination of $i, $j, and so on, and the results shown inthe Data Table. You can also control whether each metavariable is shown in the Data Table using Rowsor Columns.
By default, the ranges for these metavariables are integer constants entered using spin boxes. However,the MDA also supports specifying these ranges as expressions in terms of program variables. These ex-pressions are then evaluated in the debugger. To allow the entry of these expressions, check the StaggeredArray check box. This will convert all the range entry fields from spin boxes to line edits allowing theentry of freeform text.
Copyright c© 2002-2018 Arm Limited (or its affiliates). All rights reserved. 85

Arm Forge 18.0.2
The metavariables may be reordered by dragging and dropping them. For C/C++ expressions the majordimension is on the left and theminor dimension on the right, for Fortran expressions the major dimensionis on the right and the minor dimension on the left. Distributed dimensions may not be reordered, theymust always be the most major dimensions.
8.15.2 Filtering by value
You may want the Data Table to only show elements that fit a certain criteria, for example elements thatare zero.
If the Only show if box is checked then only elements that match the boolean expression in the box aredisplayed in the Data Table, for example, $value == 0. The special metavariable $value in theexpression is replaced by the actual value of each element. The Data Table automatically hides rows orcolumns in the table where no elements match the expression.
Any valid expression for the current language may be used here, including references to variables inscope and function calls. You may want to be careful to avoid functions with side effects as these will beevaluated many times over.
8.15.3 Distributed arrays
A distributed array is an array that is distributed across one or more processes as local arrays.
The Multi-Dimensional Array Viewer can display certain types of distributed arrays, namely UPC sharedarrays (for supported UPC implementations), and general arrays where the distributed dimensions arethe most major, that is, the distributed dimensions change the most slowly, and are independent from thenon-distributed dimensions.
UPC shared arrays are treated the same as local arrays, simply right-click on the array variable and selectView Array (MDA).
To view a non-UPC distributed array first create a process group containing all the processes that thearray is distributed over.
If the array is distributed over all processes in your job then you can simply select the All group in-stead. Right-click on the local array variable in the Source Code, Locals, Current Line(s) or Evaluateviews.
TheMulti-Dimensional Array Viewerwindowwill openwith theArray Expression already filled in.
Enter the number of distributed array dimensions in the corresponding box. A new subscript metavariable(such as $p, $q) will be automatically added for each distributed dimension.
Enter the ranges of the distributed dimensions so that the product is equal to the number of processes inthe current process group, then click the Evaluate button.
8.15.4 Advanced: how arrays are laid out in the data table
The Data Table is two dimensional, but the Multi-Dimensional Array Viewer may be used to view arrayswith any number of dimensions, as the name implies. This section describes how multi-dimensionalarrays are displayed in the two dimensional table.
Each subscript metavariable (such as $i, $j, $p, $q) maps to a separate dimension on a hypercube.Usually the number of metavariables is equal to the number of dimensions in a given array, but this
Copyright c© 2002-2018 Arm Limited (or its affiliates). All rights reserved. 86

Arm Forge 18.0.2
does not necessarily need to be the case. For example myArray($i, $j) * $k introduces an extradimension, $k, as well as the two dimensions corresponding to the two dimensions of myArray.
The figure below corresponds to the expression myArray($i, $j) with $i = 0..3 and $j =0..4.
Figure 63: myArray($i, $j) with $i = 0..3 and $j = 0..4.
If, by way of example, imagine that myArray is part of a three dimensional array distributed across threeprocesses. The figure below shows what the local arrays look like for each process.
Figure 64: The local array myArray($i, $j) with $i = 0..3 and $j = 0..4 on ranks 0–2
And as a three dimensional distributed array with $p the distributed dimension:
Copyright c© 2002-2018 Arm Limited (or its affiliates). All rights reserved. 87

Arm Forge 18.0.2
Figure 65: A three dimensional distributed array comprised of the local array myArray($i, $j) with $i =0..3 and $j = 0..4 on ranks 0–2 with $p the distributed dimension
This cube is projected (just like 3D projection) onto the two dimensional Data Table. Dimensions markedDisplay as Rows are shown in rows, and dimensions marked Display as Columns are shown in columns,as you would expect.
More than one dimension may viewed as Rows, or more than one dimension viewed as Columns.
The dimension that changes fastest depends on the language your program is written in. For C/C++programs the leftmost metavariable (usually $i for local arrays or $p for distributed arrays) changes themost slowly (just like with C array subscripts). The rightmost dimension changes the most quickly. ForFortran programs the order is reversed, that is the rightmost is most major, the leftmost most minor.
The figure below shows how the three dimensional distributed array above is projected onto the twodimensional Data Table:
Copyright c© 2002-2018 Arm Limited (or its affiliates). All rights reserved. 88

Arm Forge 18.0.2
Figure 66: A three dimensional distributed array comprised of the local array myArray($i, $j) with $i =0..3 and $j = 0..4 on ranks 0–2 projected onto the Data Table with $p (the distributed dimension) and $jdisplayed as Columns and $i displayed as Rows.
8.15.5 Auto Update
If you check the Auto Update check box the Data Table will be automatically updated as you switchbetween processes/threads and step through the code.
8.15.6 Comparing elements across processes
When viewing an array in the Data Table, you may double-click or choose Compare Element AcrossProcesses from the context menu for a particular element.
This displays the Cross-Process Comparison dialog for the specified element.
See 8.16 Cross-process and cross-thread comparison for more information.
8.15.7 Statistics
The Statistics tab displays information which may be of interest, such as the range of the values in thetable, and the number of special numerical values, such as nan or inf.
8.15.8 Export
You may export the contents of the results table to a file in the Comma Separated Values (CSV) or HDF5format that can be plotted or analysed in your favourite spreadsheet or mathematics program.
There are two CSV export options: List (one row per value) and Table (same layout as the on screentable).
Note: If you export a Fortran array fromArmDDT inHDF5 format the contents of the array are written incolumn major order. This is the order expected by most Fortran code, but the arrays will be transposed ifread with the default settings by C-based HDF5 tools. Most HDF5 tools have an option to switch betweenrow major and column major order.
Copyright c© 2002-2018 Arm Limited (or its affiliates). All rights reserved. 89

Arm Forge 18.0.2
8.15.9 Visualization
If your system is OpenGL-capable then a 2-D slice of an array, or table of expressions, may be displayedas a surface in 3-D space through the Multi-Dimensional Array (MDA) Viewer.
You can only plot one or two dimensions at a time. If your table has more than two dimensions theVisualise button will be disabled.
After filling the table of theMDA Viewerwith values (see previous section), click Visualise to open a 3-Dview of the surface.
To display surfaces from two or more different processes on the same plot simply select another processin the main process group window and click Evaluate in the MDA window, and when the values areready, click Visualise again.
The surfaces displayed on the graph may be hidden and shown using the check boxes on the right-handside of the window.
The graph may be moved and rotated using the mouse and a number of extra options are available fromthe window toolbar.
The mouse controls are:
• Hold down the left button and drag the mouse to rotate the graph.
• Hold down the right button to zoom. Drag the mouse forwards to zoom in and backwards to zoomout.
• Hold the middle button and drag the mouse to move the graph.
Note: Arm DDT requires OpenGL to run. If your machine does not have hardware OpenGL support,software emulation libraries such as MesaGL are also supported.
Note: In some configurations OpenGL is known to crash. A work-around if the 3D visualization crashesis to set the environment variable LIBGL ALWAYS INDIRECT to 1. The precise configuration whichtriggers this problem is not known.
Figure 67: DDT Visualization
The toolbar and menu offer options to configure lighting and other effects, including the ability to save animage of the surface as it currently appears. There is even a stereo vision mode that works with red-blue
Copyright c© 2002-2018 Arm Limited (or its affiliates). All rights reserved. 90
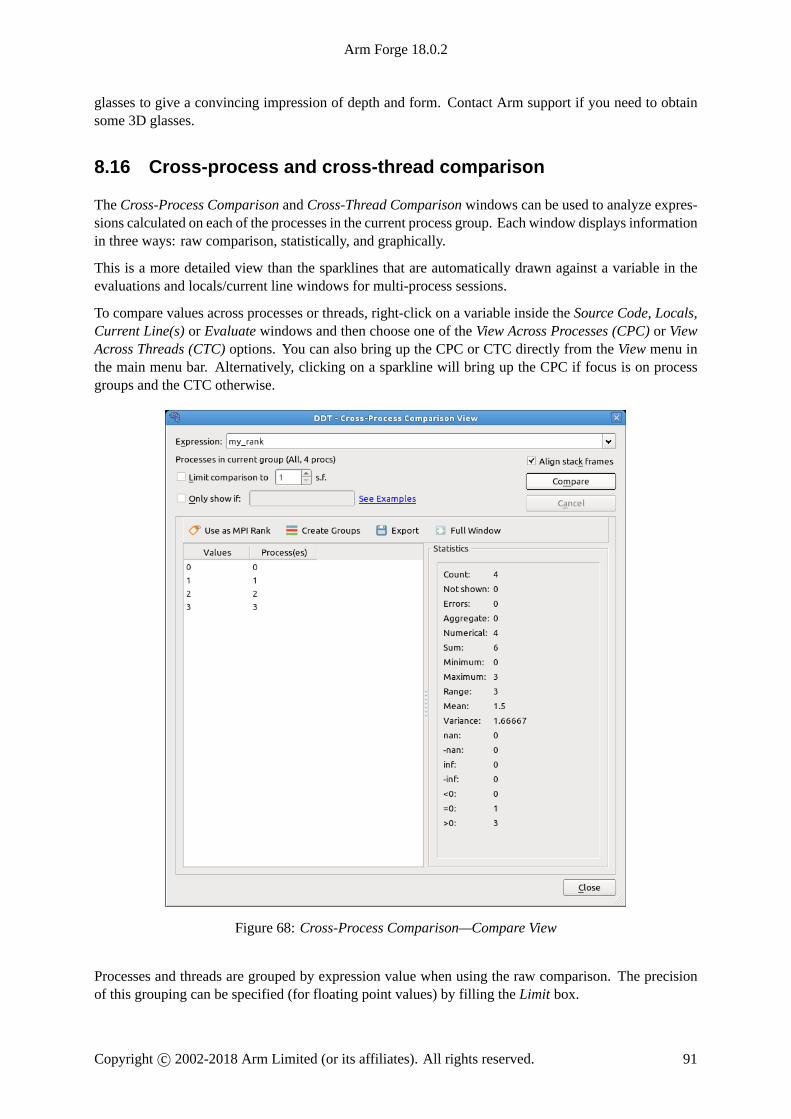
Arm Forge 18.0.2
glasses to give a convincing impression of depth and form. Contact Arm support if you need to obtainsome 3D glasses.
8.16 Cross-process and cross-thread comparison
The Cross-Process Comparison and Cross-Thread Comparison windows can be used to analyze expres-sions calculated on each of the processes in the current process group. Each window displays informationin three ways: raw comparison, statistically, and graphically.
This is a more detailed view than the sparklines that are automatically drawn against a variable in theevaluations and locals/current line windows for multi-process sessions.
To compare values across processes or threads, right-click on a variable inside the Source Code, Locals,Current Line(s) or Evaluate windows and then choose one of the View Across Processes (CPC) or ViewAcross Threads (CTC) options. You can also bring up the CPC or CTC directly from the View menu inthe main menu bar. Alternatively, clicking on a sparkline will bring up the CPC if focus is on processgroups and the CTC otherwise.
Figure 68: Cross-Process Comparison—Compare View
Processes and threads are grouped by expression value when using the raw comparison. The precisionof this grouping can be specified (for floating point values) by filling the Limit box.
Copyright c© 2002-2018 Arm Limited (or its affiliates). All rights reserved. 91
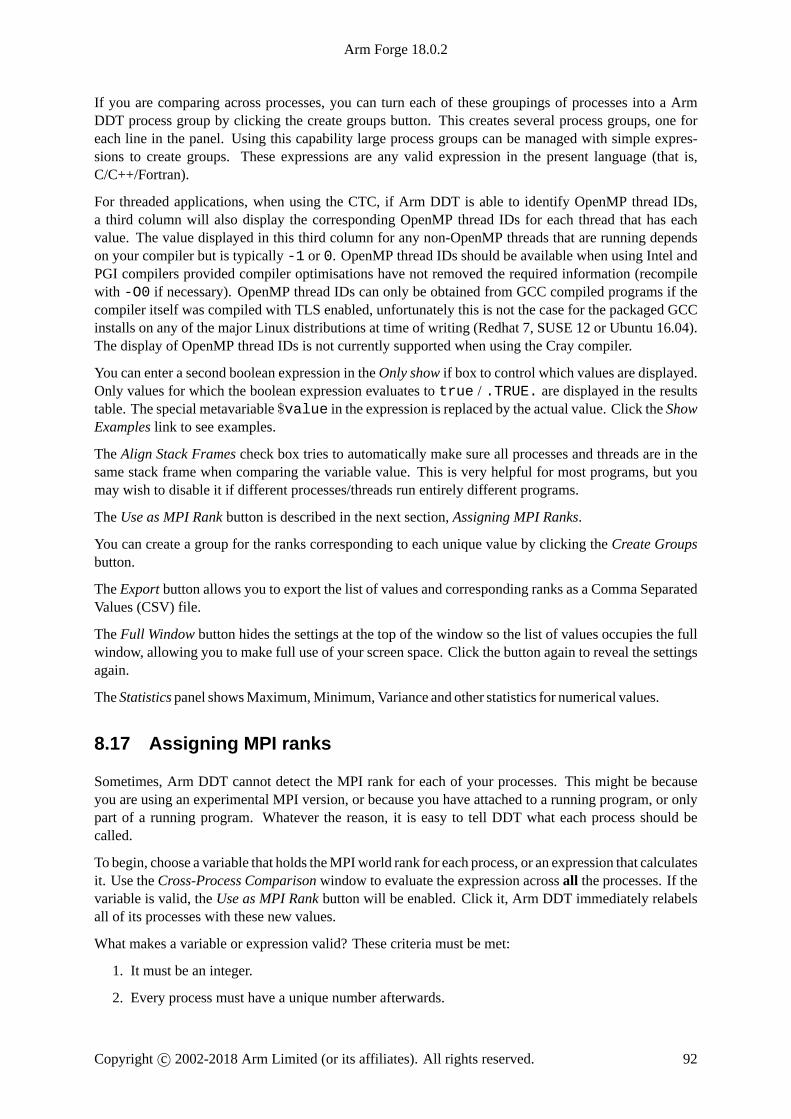
Arm Forge 18.0.2
If you are comparing across processes, you can turn each of these groupings of processes into a ArmDDT process group by clicking the create groups button. This creates several process groups, one foreach line in the panel. Using this capability large process groups can be managed with simple expres-sions to create groups. These expressions are any valid expression in the present language (that is,C/C++/Fortran).
For threaded applications, when using the CTC, if Arm DDT is able to identify OpenMP thread IDs,a third column will also display the corresponding OpenMP thread IDs for each thread that has eachvalue. The value displayed in this third column for any non-OpenMP threads that are running dependson your compiler but is typically -1 or 0. OpenMP thread IDs should be available when using Intel andPGI compilers provided compiler optimisations have not removed the required information (recompilewith -O0 if necessary). OpenMP thread IDs can only be obtained from GCC compiled programs if thecompiler itself was compiled with TLS enabled, unfortunately this is not the case for the packaged GCCinstalls on any of the major Linux distributions at time of writing (Redhat 7, SUSE 12 or Ubuntu 16.04).The display of OpenMP thread IDs is not currently supported when using the Cray compiler.
You can enter a second boolean expression in theOnly show if box to control which values are displayed.Only values for which the boolean expression evaluates to true / .TRUE. are displayed in the resultstable. The special metavariable $value in the expression is replaced by the actual value. Click the ShowExamples link to see examples.
The Align Stack Frames check box tries to automatically make sure all processes and threads are in thesame stack frame when comparing the variable value. This is very helpful for most programs, but youmay wish to disable it if different processes/threads run entirely different programs.
The Use as MPI Rank button is described in the next section, Assigning MPI Ranks.
You can create a group for the ranks corresponding to each unique value by clicking the Create Groupsbutton.
The Export button allows you to export the list of values and corresponding ranks as a Comma SeparatedValues (CSV) file.
The Full Window button hides the settings at the top of the window so the list of values occupies the fullwindow, allowing you to make full use of your screen space. Click the button again to reveal the settingsagain.
The Statistics panel showsMaximum,Minimum, Variance and other statistics for numerical values.
8.17 Assigning MPI ranks
Sometimes, Arm DDT cannot detect the MPI rank for each of your processes. This might be becauseyou are using an experimental MPI version, or because you have attached to a running program, or onlypart of a running program. Whatever the reason, it is easy to tell DDT what each process should becalled.
To begin, choose a variable that holds theMPIworld rank for each process, or an expression that calculatesit. Use the Cross-Process Comparison window to evaluate the expression across all the processes. If thevariable is valid, the Use as MPI Rank button will be enabled. Click it, Arm DDT immediately relabelsall of its processes with these new values.
What makes a variable or expression valid? These criteria must be met:
1. It must be an integer.
2. Every process must have a unique number afterwards.
Copyright c© 2002-2018 Arm Limited (or its affiliates). All rights reserved. 92
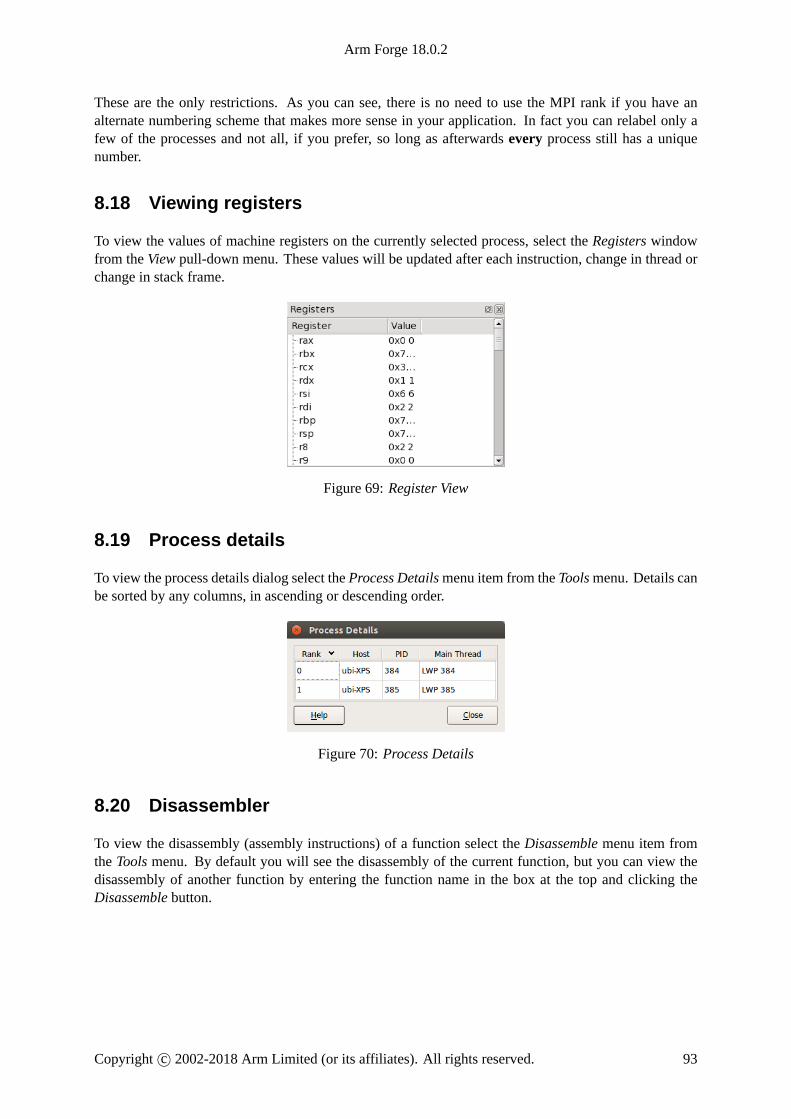
Arm Forge 18.0.2
These are the only restrictions. As you can see, there is no need to use the MPI rank if you have analternate numbering scheme that makes more sense in your application. In fact you can relabel only afew of the processes and not all, if you prefer, so long as afterwards every process still has a uniquenumber.
8.18 Viewing registers
To view the values of machine registers on the currently selected process, select the Registers windowfrom the View pull-down menu. These values will be updated after each instruction, change in thread orchange in stack frame.
Figure 69: Register View
8.19 Process details
To view the process details dialog select the Process Detailsmenu item from the Toolsmenu. Details canbe sorted by any columns, in ascending or descending order.
Figure 70: Process Details
8.20 Disassembler
To view the disassembly (assembly instructions) of a function select the Disassemble menu item fromthe Tools menu. By default you will see the disassembly of the current function, but you can view thedisassembly of another function by entering the function name in the box at the top and clicking theDisassemble button.
Copyright c© 2002-2018 Arm Limited (or its affiliates). All rights reserved. 93
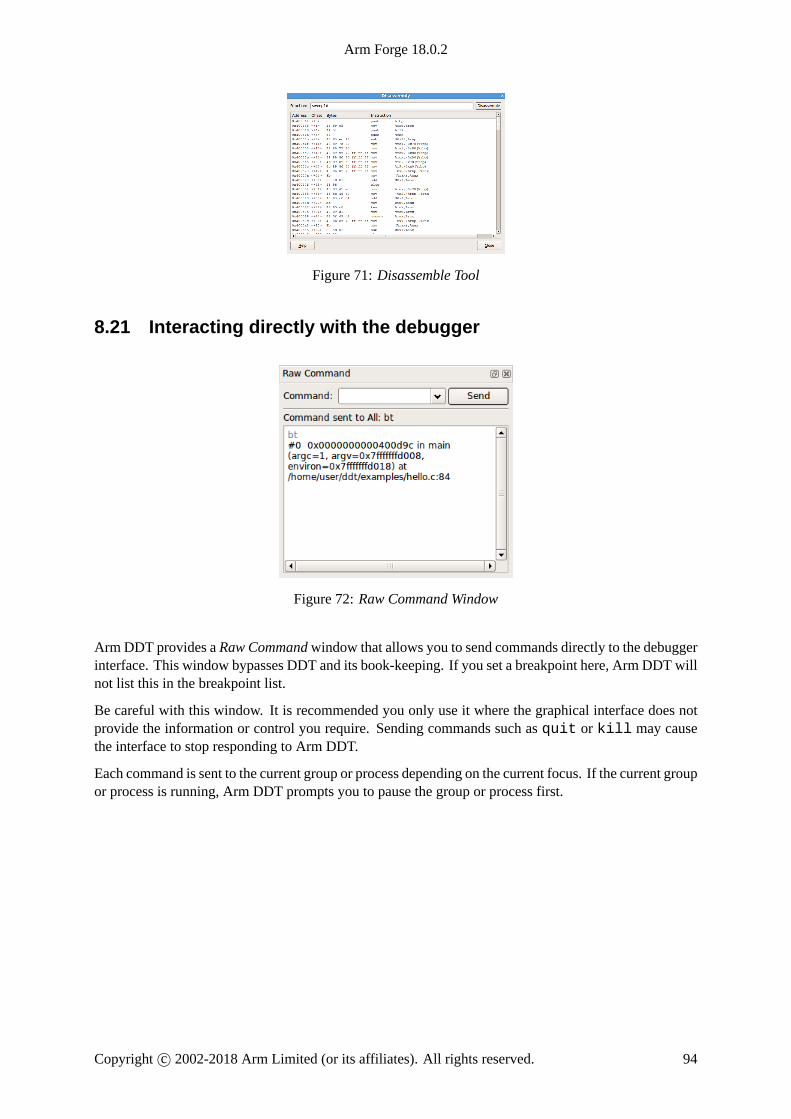
Arm Forge 18.0.2
Figure 71: Disassemble Tool
8.21 Interacting directly with the debugger
Figure 72: Raw Command Window
Arm DDT provides a Raw Commandwindow that allows you to send commands directly to the debuggerinterface. This window bypasses DDT and its book-keeping. If you set a breakpoint here, Arm DDT willnot list this in the breakpoint list.
Be careful with this window. It is recommended you only use it where the graphical interface does notprovide the information or control you require. Sending commands such as quit or kill may causethe interface to stop responding to Arm DDT.
Each command is sent to the current group or process depending on the current focus. If the current groupor process is running, Arm DDT prompts you to pause the group or process first.
Copyright c© 2002-2018 Arm Limited (or its affiliates). All rights reserved. 94

Arm Forge 18.0.2
9 Program input and output
Arm DDT collects and displays output from all processes under the Input/Output tab. Both standardoutput and error are shown, although on most MPI implementations, error is not buffered but output isand consequently can be delayed.
9.1 Viewing standard output and error
Figure 73: DDT Standard Output Window
The Input/Output tab is at the bottom of the screen (by default).
The output may be selected and copied to the clipboard.
MPI users should note that most MPI implementations place their own restrictions on program output.Some buffer it all until MPI Finalize is called, and others may ignore it. If your program needs toemit output as it runs, try writing to a file.
All users should note that many systems bufferstdout but not stderr. If you do not see your stdoutappearing immediately, try adding fflush(stdout) or equivalent to your code.
9.2 Saving output
By right-clicking on the text it is possible to save it to a file. You also have the option to copy a selectionto the clipboard.
9.3 Sending standard input
Arm DDT provides an stdin file box in the Run window. This allows you to choose a file to be used asthe standard input (stdin) for your program. Arm DDT will automatically add arguments to mpirun toensure your input file is used.
Alternatively, you may enter the arguments directly in the mpirun Arguments box. For example, if usingMPI directly from the command-line you would normally use an option to the mpirun such as -stdinfilename, then you may add the same options to the mpirun Arguments box when starting your DDTsession in the Run window.
It is also possible to enter input during a session. Start your program as normal, then switch to theInput/Output panel. Here you can see the output from your program and type input you wish to send.You may also use theMore button to send input from a file, or send an EOF character.
Copyright c© 2002-2018 Arm Limited (or its affiliates). All rights reserved. 95

Arm Forge 18.0.2
Note: Although input can be sent while your program is paused, the program must then be played to readthe input and act upon it.
The input you type will be sent to all processes.
Figure 74: DDT Sending Input
Note: If Arm DDT is running on a fork-based system such as Scyld, or a -comm=shared compiledMPICH 1, your program may not receive an EOF correctly from the input file. If your program seems tohang while waiting for the last line or byte of input, this is likely to be the problem. See the H Generaltroubleshooting and known issues or contact Arm support at [email protected] for a list ofpossible fixes.
Copyright c© 2002-2018 Arm Limited (or its affiliates). All rights reserved. 96

Arm Forge 18.0.2
10 Logbook
The logbook automatically generates a log of the user’s interaction with Arm DDT, for example, settinga breakpoint or playing the program. For each stop of the program, the reason and location is recordedtogether with the parallel stacks and local variables for one process.
Tracepoint values and output are logged as well.
Figure 75: Logbook example of a debug session
The user can export the current logbook as HTML or compare it to a previously exported one.
This enables comparative debugging and repeatability. It is always clear how a certain situation in thedebugger was caused as the previous steps are visible.
10.1 Usage
The logbook is always on and does not require any additional configuration. It is integrated as Logbooktab at the bottom of the main window beside the Tracepoint Output tab.
To export the logbook click on file icon on RHS and choose a filename. A previously saved logbook canbe opened using a Tools menu option.
Copyright c© 2002-2018 Arm Limited (or its affiliates). All rights reserved. 97
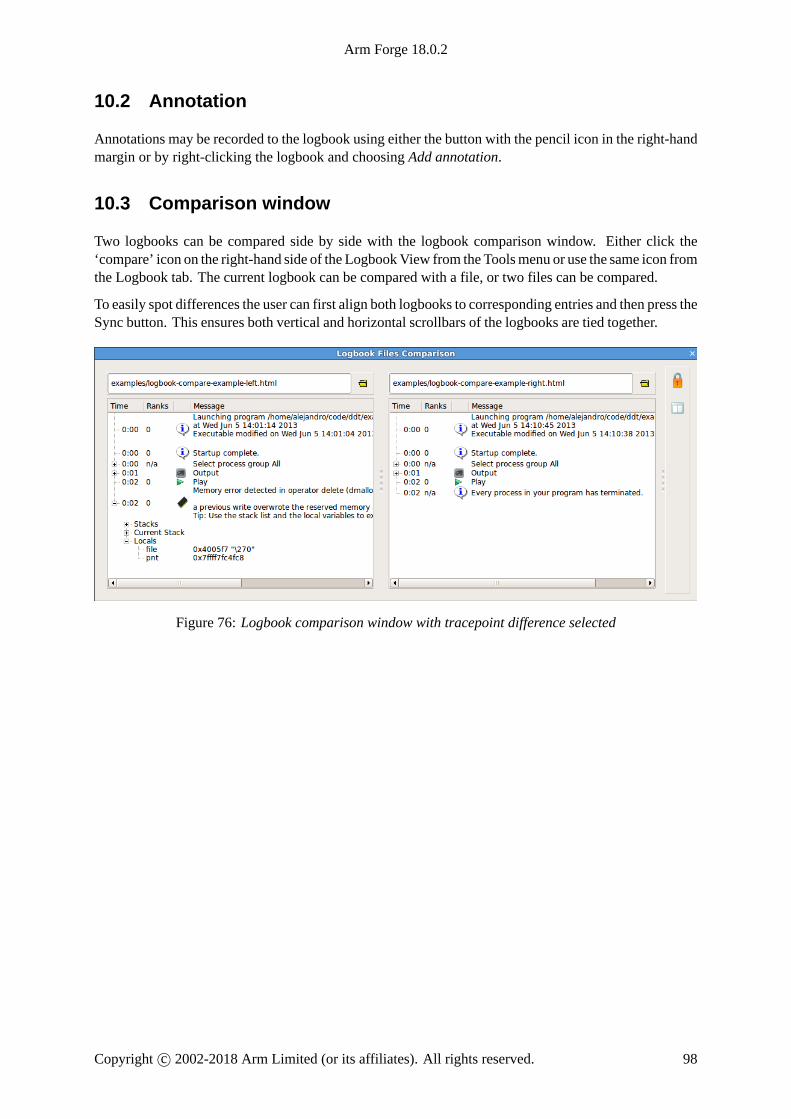
Arm Forge 18.0.2
10.2 Annotation
Annotations may be recorded to the logbook using either the button with the pencil icon in the right-handmargin or by right-clicking the logbook and choosing Add annotation.
10.3 Comparison window
Two logbooks can be compared side by side with the logbook comparison window. Either click the‘compare’ icon on the right-hand side of the LogbookView from the Toolsmenu or use the same icon fromthe Logbook tab. The current logbook can be compared with a file, or two files can be compared.
To easily spot differences the user can first align both logbooks to corresponding entries and then press theSync button. This ensures both vertical and horizontal scrollbars of the logbooks are tied together.
Figure 76: Logbook comparison window with tracepoint difference selected
Copyright c© 2002-2018 Arm Limited (or its affiliates). All rights reserved. 98

Arm Forge 18.0.2
11 Message queues
Arm DDT’s Message Queue debugging feature shows the status of the message buffers of MPI. Forexample, it shows the messages that have been sent by a process but not yet received by the target.
You can use DDT to detect common errors such as deadlock. This is where all processes are waiting foreach other. You can also use it for detecting when messages are present that are unexpected, which cancorrespond to two processes disagreeing about the state of progress through a program.
This capability relies on the MPI implementation supporting this via a debugging support library: themajority of MPIs provide this. Furthermore, not all implementations support the capability to the samedegree, and a variance between the information provided by each implementation is to be expected.
11.1 Viewing the message queues
Open the Message Queues window by selecting Message Queues from the Tools menu. The MessageQueues window will query the MPI processes for information about the state of the queues.
While the window is open, you can click Update to refresh the current queue information. Please notethat this will stop all playing processes. While DDT is gathering the data a “Please Wait” dialog may bedisplayed and you can cancel the request at any time.
DDTwill automatically load the message queue support library from yourMPI implementation (providedone exists). If it fails, an error message will be shown. Common reasons for failure to load include:
• The support library does not exist, or its use must be explicitly enabled.
Most MPIs will build the library by default, without additional configuration flags. MPICH 2 andMPICH 3 must be configured with the --enable-debuginfo argument. MPICH 1.2.x mustbe configured with the --enable-debug argument. MVAPICH 2 must be configured with the--enable-debug and --enable-sharedlib arguments. SomeMPIs, notably Cray’s MPI,do not support message queue debugging at all.
Intel MPI includes the library, but debug mode must be enabled. See E.6 Intel MPI for details.
LAM and Open MPI automatically compile the library.
• The support library is not available on the compute nodes where the MPI processes are running.
Please ensure the library is available, and set ALLINEA\_QUEUE\_DLL if necessary to forceusing the library in its new location.
• The support library has moved from its original installation location.
Please ensure the proper procedure for the MPI configuration is used. This may require you tospecify the installation directory as a configuration option.
Alternatively, you can specifically include the path to the support library in the LD_LIBRARY_PATH, or if this is not convenient you can set the environment variable, ALLINEA_QUEUE_DLL,to the absolute path of the library itself (for example, /usr/local/mpich-1.2.7/lib/libtvmpich.so).
• The MPI is built to a different bit-size to the debugger.
In the unlikely case that theMPI is not built to the bit-size of the operating system, then the debuggermay not be able to find a support library that is the correct size. This is unsupported.
Copyright c© 2002-2018 Arm Limited (or its affiliates). All rights reserved. 99

Arm Forge 18.0.2
11.2 Interpreting the message queues
Figure 77: Message Queue Window
To see the messages, you must select a communicator to see the messages in that group. The ranksdisplayed in the diagram are the ranks within the communicator (not MPI_COMM_WORLD), if the ShowLocal Ranks option is selected. To see the ‘usual’ ranks, select Show Global Ranks. The messagesdisplayed can be restricted to particular processes or groups of processes. To restrict the display in thegrid to a single process, select Individual Processes in the Display mode selector, and select the rankof the process. To select a group of processes, select Process Groups in the Display mode selector andselect the ring arc corresponding to the required group. Both of these display modes support multipleselections.
There are three different types of message queues about which there is information. Different colors areused to display messages from each type of queue.
Label DescriptionSend Queue Calls to MPI send functions that have not yet completed.Receive Queue Calls to MPI receive functions that have not yet completed.Unexpected Message Queue Represents messages received by the system but the correspond-
ing receive function call has not yet been made.
Copyright c© 2002-2018 Arm Limited (or its affiliates). All rights reserved. 100
Arm Forge 18.0.2
Messages in the Send queue are represented by a red arrow, pointing from the sender to the recipient.The line is solid on the sender side, but dashed on the received side (to represent a message that has beenSent but not yet been Received).
Messages in the Receive queue are represented by a green arrow, pointing from the sender to the recipient.The line is dashed on the sender side, but solid on the recipient side, to represent the recipient being readyto receive a message that has not yet been sent.
Messages in the Unexpected queue are represented by a dashed blue arrow, pointing from sender of theunexpected message to the recipient.
A message to self is indicated by a line with one end at the centre of the diagram.
Please note that the quality and availability of message queue data can vary considerably between MPIimplementations. Sometimes the data can therefore be incomplete.
11.3 Deadlock
A loop in the graph can indicate deadlock. This is where every process is waiting to receive from thepreceding process in the loop.
For synchronous communications, such as with MPI\_Ssend, this is invariably a problem.
For other types of communication it can be the case, for example, with varMPI Send that messages are‘in the ether’, or in some O/S buffer, and the send part of the communication is complete but the receivehas not started. If the loop persists after playing the processes and interrupting them again, this indicatesa likely deadlock.
Copyright c© 2002-2018 Arm Limited (or its affiliates). All rights reserved. 101

Arm Forge 18.0.2
12 Memory debugging
Arm DDT has a powerful parallel memory debugging capability. This feature intercepts calls to thesystem memory allocation library, recording memory usage and confirming correct usage of the libraryby performing heap and bounds checking.
Typical problemswhich can be resolved by usingArmDDTwithmemory debugging enabled include:
• Memory exhaustion due to memory leaks can be prevented by examining the Current MemoryUsage display, which groups and quantifies memory according to the location at which blockshave been allocated.
• Persistent but random crashes caused by access of memory beyond the bounds of an allocationblock can be resolved by using the Guard Pages feature
• Crashing due to deallocation of the same memory block twice, deallocation via invalid pointers,and other invalid deallocations, for example deallocating a pointer that is not at the start of anallocation.
12.1 Enabling memory debugging
To enable memory debugging within Arm DDT, from the Run window click on the Memory Debuggingcheckbox.
The default options are usually sufficient, but you may need to configure extra options (described in thefollowing sections) if you have a multithreaded application or multithreaded MPI, such as that found onsystems using Open MPI with Infiniband, or a Cray XE6 system.
With the Memory Debugging setting enabled, start your application as normal. Arm DDT will take careof ensuring that the settings are propagated through your MPI or batch system when your applicationstarts.
If it is not possible to load the memory debugging library, a message will be displayed, and you shouldrefer to the Configuration section in this chapter for possible solutions.
12.2 CUDA memory debugging
Arm DDT provides two options for debugging memory errors in CUDA programs, which are found inthe CUDA section of the Run window.
When the Track GPU allocations option is enabled Arm DDT tracks CUDA memory allocations madeby the host, that is, allocations made using functions such as cudaMalloc). You can find out howmuchmemory is allocated and where it was allocated from in the Current Memory Usage window.
Allocations are tracked separately for each GPU and the host (enabling Track GPU allocations will au-tomatically track host-only memory allocations made using functions such as malloc as well). You canselect between GPUs using the drop-down list in the top-right corner of theMemory Usage andMemoryStatistics windows.
The Detect invalid accesses (memcheck) option turns on the CUDA-MEMCHECK error detection tool,which can detect problems such as out-of-bounds and misaligned global memory accesses, and syscallerrors, such as calling free() in a kernel on an already free’d pointer.
The other CUDA hardware exceptions (such as a stack overflow) are detected regardless of whether thisoption is checked or not.
Copyright c© 2002-2018 Arm Limited (or its affiliates). All rights reserved. 102

Arm Forge 18.0.2
For further details about CUDAhardware exceptions, you should refer toNVIDIA’s documentation.
See section 15.2 Preparing to debug GPU code before starting Arm DDT.
Known issue: It is not possible to track GPU allocations created by the Cray OpenACC compiler as itdoes not directly call cudaMalloc.
12.3 Configuration
While manual configuration is often unnecessary, it can be used to adjust the memory checks and pro-tection, or to alter the information which is gathered. A summary of the settings is displayed on the Rundialog in theMemory Debugging section.
To examine or change the options, select theDetails button adjacent to theMemory Debugging checkboxin the Run dialog, which then displays theMemory Debugging Options window.
Figure 78: Memory Debugging Options
The two most significant options are:
1. Preload the memory debugging library. When this is checked, Arm DDT will automatically loadthe memory debugging library. Arm DDT can only preload the memory debugging library whenyou start a program in Arm DDT and it uses shared libraries.
Preloading is not possible with statically-linked programs or when attaching to a running process.See section 12.3.1 Static linking for more information on static linking.
When attaching, you can set the DMALLOC_OPTIONS environment variable before running yourprogram, or see section 12.3.3 Changing settings at run time below.
Copyright c© 2002-2018 Arm Limited (or its affiliates). All rights reserved. 103

Arm Forge 18.0.2
2. The box showing C/Fortran, No Threads in the screen shot. You should choose the option thatbest matches your program. It is often sufficient to leave this set to C++/Threaded rather thancontinually changing this setting.
TheHeap Debugging section allows you to trade speed for thoroughness. The two most important thingsto remember are:
1. Even the fastest (leftmost) setting will catch trivial memory errors such as deallocating memorytwice.
2. The further right you go, the more slowly your program will execute. In practice, the Balancedsetting is still fast enough to use and will catch almost all errors. If you come across a memoryerror that is difficult to pin down, choosing Thoroughmight expose the problem earlier, but you willneed to be very patient for large, memory intensive programs. See also 12.3.3 Changing settingsat run time.
You can see exactly which checks are enabled for each setting in the Enabled Checks box. See section12.3.2 Available checks for a complete list of available checks.
You can turn on Heap Overflow/Underflow Detection to detect out-of-bounds heap access. See section12.4.4 Writing beyond an allocated area for more details.
Almost all users can leave the heap check interval at its default setting. It determines how often thememory debugging library will check the entire heap for consistency. This is a slow operation, so it isnormally performed every 100 memory allocations. This figure can be changed manually. A higher set-ting (1000 or above) is recommended if your program allocates and deallocates memory very frequently,for example, inside a computation loop.
If your program runs particularly slowly with Memory Debugging enabled you may be able to get amodest speed increase by disabling the Store backtraces for memory allocations option. This disablesstack backtraces in the View Pointer Details and Current Memory Usage windows, support for customallocators and cumulative allocation totals.
It is possible to enable Memory Debugging for only selected MPI ranks by checking the Only enable forthese processes option and entering the ranks which you want to it for.
Note: The Memory Debugging library will still be loaded into the other processes, but no errors will bereported.
Click on OK to save these settings, or Cancel to undo your changes.
Note: Choosing the wrong library to preload or the wrong number of bits may prevent Arm DDT fromstarting your job, or may make memory debugging unreliable. You should check these settings if youexperience problems when memory debugging is enabled.
12.3.1 Static linking
If your program is statically linked then you must explicitly link the memory debugging library with yourprogram in order to use theMemory Debugging feature in Arm DDT.
To link with the memory debugging library you must add the appropriate flags from the table below atthe very beginning of the link command. This ensures that all instances of allocators in both user codeand libraries are wrapped. Any definition of a memory allocator preceding the memory debugging linkflags can cause partial wrapping and unexpected runtime errors.
--undefined=malloc has the side effect of pulling in all libc style allocator symbols from the library.--undefinedworks on a per object file level, rather than a per symbol level, and the c++ and c allocator
Copyright c© 2002-2018 Arm Limited (or its affiliates). All rights reserved. 104

Arm Forge 18.0.2
symbols reside in different object files within the library archive. Therefore, specifying only one allocatoris sufficient.
--undefined= ZdaPv has the side effect of pulling in all c++ style allocator symbols. It is the c++mangled name of operator delete[].
Note: if in doubt use the -ldmallocthcxx library.
Multi-thread C++ Bits Linker Flagsno no 64 -L/path/to/ddt/lib/64 -Wl,--allow-multiple-
definition,--undefined=malloc -ldmallocyes no 64 -L/path/to/ddt/lib/64 -Wl,--allow-multiple-
definition,--undefined=malloc -ldmallocthno yes 64 -L/path/to/ddt/lib/64 -Wl,--allow-
multiple-definition,--undefined=malloc,--undefined= ZdaPv -ldmallocxx
yes yes 64 -L/path/to/ddt/lib/64 -Wl,--allow-multiple-definition,--undefined=malloc,--undefined= ZdaPv -ldmallocthcxx
See section F.7 Intel compilers and section F.9 Portland Group compilers for compiler-specific informa-tion.
12.3.2 Available checks
The following heap checks are available and may be enabled in the Enable Checks box:
Name Descriptionbasic Detect invalid pointers passed to memory functions (malloc, free, ALLOCATE,
DEALLOCATE, etc.)check-funcs Check the arguments of addition functions (mostly string operations) for invalid point-
ers.check-heap Check for heap corruption, for example, due to writes to invalid memory addresses.check-fence Check the end of an allocation has not been overwritten when it is freed.alloc-blank Initialize the bytes of new allocations with a known value.free-blank Overwrite the bytes of freed memory with a known value.check-blank Check to see if space that was blanked when a pointer was allocated or when it was
freed has been overwritten. Enables alloc-blank and free-blank.realloc-copy Always copy data to a new pointer when reallocating a memory allocation (for exam-
ple, due to realloc).free-protect Protect freed memory where possible (using hardware memory protection) so subse-
quent read/writes cause a fatal error.
12.3.3 Changing settings at run time
You can changemostMemory Debugging settings while your program is running by selecting theControl→ Memory Debugging Options menu item. In this way you can enable Memory Debugging with a
Copyright c© 2002-2018 Arm Limited (or its affiliates). All rights reserved. 105

Arm Forge 18.0.2
minimal set of options when your program starts, set a breakpoint at a place you want to investigate formemory errors, then turn on more options when the breakpoint is hit.
12.4 Pointer error detection and validity checking
Once you have enabled memory debugging and started debugging, all calls to the allocation and deal-location routines of heap memory will be intercepted and monitored. This allows both for automaticmonitoring for errors, and for user driven inspection of pointers.
12.4.1 Library usage errors
If the memory debugging library reports an error, Arm DDT will display a window similar to the oneshown below. This briefly reports the type of error detected and gives the option of continuing to playthe program, or pausing execution.
Figure 79: Memory Error Message
If you choose to pause the program then Arm DDT will highlight the line of your code which was beingexecuted when the error was reported.
Often this is enough to debug simple memory errors, such as freeing or dereferencing an unallocatedvariable, iterating past the end of an array and so on, as the local variables and variables on the currentline will provide insight into what is happening.
If the cause of the issue is still not clear, then it is possible to examine some of the pointers referencedto see whether they are valid and which line they were allocated on, as is explained in the followingsections.
12.4.2 View pointer details
Any of the variables or expressions in the Evaluate window can be right-clicked on to bring up a menu.If memory debugging is enabled, View Pointer Details will be available. This will display the amountof memory allocated to the pointer and which part of your code originally allocated and deallocated thatmemory:
Copyright c© 2002-2018 Arm Limited (or its affiliates). All rights reserved. 106

Arm Forge 18.0.2
Figure 80: Pointer details
Clicking on any of the stack frames displays the relevant section of your code, so that you can see wherethe variable was allocated or deallocated.
Note: Only a single stack frame will be displayed if the Store stack backtraces for memory allocationsoption is disabled.
This feature can also be used to check the validity of heap-allocated memory.
Note: Memory allocated on the heap refers to memory allocated by malloc, ALLOCATE, new and soon. A pointer may also point to a local variable, in which case Arm DDT will tell you it does not pointto data on the heap. This can be useful, since a common error is taking a pointer to a local variable thatlater goes out of scope.
Figure 81: Invalid memory message
This is particularly useful for checking function arguments, and key variables when things seem to begoing awry. Of course, just because memory is valid does not mean it is the same type as you wereexpecting, or of the same size and dimensions, and so on.
Memory Type/Location
As well as invalid addresses, Arm DDT can often indicate the type and location of the memory beingpointed to. The different types are listed here:
• Null pointer.
• Valid heap allocation.
• Fence-post area before the beginning of an allocation.
• Fence-post area beyond the end of an allocation.
• Freed heap allocation.
Copyright c© 2002-2018 Arm Limited (or its affiliates). All rights reserved. 107

Arm Forge 18.0.2
• Fence-post area before the beginning of a freed allocation.
• Fence-post area beyond the end a freed allocation.
• A valid GPU heap allocation.
• An address on the stack.
• The program’s code section (or a shared library).
• The program’s data section (or a shared library).
• The program’s bss section or Fortran COMMON block (or a shared library).
• The program’s executable (or a shared library).
• A memory mapped file.
• High Bandwidth Memory.
Note: Arm DDT may only be able to identify certain memory types with higher levels of memory debug-ging enabled. See 12.3 Configuration for more information.
For more information on fence post checking, see 12.4.5 Fencepost checking
12.4.3 Cross-process comparison of pointers
Enabling memory debugging has an impact on the Cross-Process Comparison and Cross-Thread Com-parison windows, see 8.16 Cross-process and cross-thread comparison.
If you are evaluating a pointer variable then theCross-Process Comparisonwindow shows a column withthe location of the pointer.
Pointers to locations in heap memory are highlighted in green. Dangling pointers, that is pointers tolocations in heap memory that have been deallocated, are shown in red.
The Cross-Process Comparison of pointers helps you to identify:
• Processes with different addresses for the same pointer.
• The location of a pointer (heap, stack, .bss, .data, .text or other locations).
• Processes that have freed a pointer while other processes have not, null pointers, and so on.
If the Cross-Process Comparison shows the value of what is being pointed at when the value of thepointer itself is wanted, then modify the pointer expression. For example, if you see the string that achar* pointer is pointing at when you actually want information concerning the pointer itself, then add(void *) to the beginning of the pointer expression.
12.4.4 Writing beyond an allocated area
Use the Heap Overflow / Underflow Detection option to detect reads and writes beyond or before anallocated block. Any attempts to read or write to the specified number of pages before or after the blockwill cause a segmentation violation which stops your program.
Add the guard pages after the block to detect heap overflows, or before to detect heap underflows. Thedefault value of one page will catch most heap overflow errors, but if this does not work a good rule ofthumb is to set the number of guard pages according to the size of a row in your largest array.
Copyright c© 2002-2018 Arm Limited (or its affiliates). All rights reserved. 108

Arm Forge 18.0.2
The exact size of a memory page depends on your operating system, but a typical size is 4 kilobytes. Inthis case, if a row of your largest array is 64 KiB, then set the number of pages to 64/4 = 16. Note thatsmall overflows/underflows (for example, of less than 16 bytes) may not be detected. This is a resultof maintaining correct memory alignment and without this vectorized code may crash or generate falsepositives.
On systems with larger page sizes (e.g. 2MB, 1GB) guard pages should be disabled or used with care asat least two pages will used per allocation. On most systems you can check the page size with getconfPAGESIZE.
12.4.5 Fencepost checking
DDTwill also perform ‘Fence Post’ checkingwhenever theHeapDebugging setting is not set toFast.
In this mode, an extra portion of memory is allocated at the start and/or end of your allocated block, anda pattern is written into this area.
If your program attempts to write beyond your data, say by a few elements, then this will be noticed byArm DDT. However, your program will not be stopped at the exact location at which your program wrotebeyond the allocated data, it will only be stopped at the next heap consistency check.
12.4.6 Suppressing an error
If Arm DDT stops at an error but you wish to ignore it (for example, it may be in a third party librarywhich you cannot fix) then you may check Suppress memory errors from this line in future. This willopen the Suppress Memory Errors window. Here you may select which function you want to suppresserrors from.
12.5 Current memory usage
Memory leaks can be a significant problem for software developers. If your application’s memory usagegrows faster than expected, or continues to grow through its execution, then it is possible that memory isbeing allocated which is not being freed when it is no longer required.
This type of problem is typically difficult to diagnose, and particularly so in a parallel environment, butis able to make this task simple.
At any point in your program you can go to View → Current Memory Usage and Arm DDT will thendisplay the currently allocated memory in your program for the currently selected group. For largerprocess groups, the processes displayed will be the ones that are using the most memory across thatprocess group.
Copyright c© 2002-2018 Arm Limited (or its affiliates). All rights reserved. 109
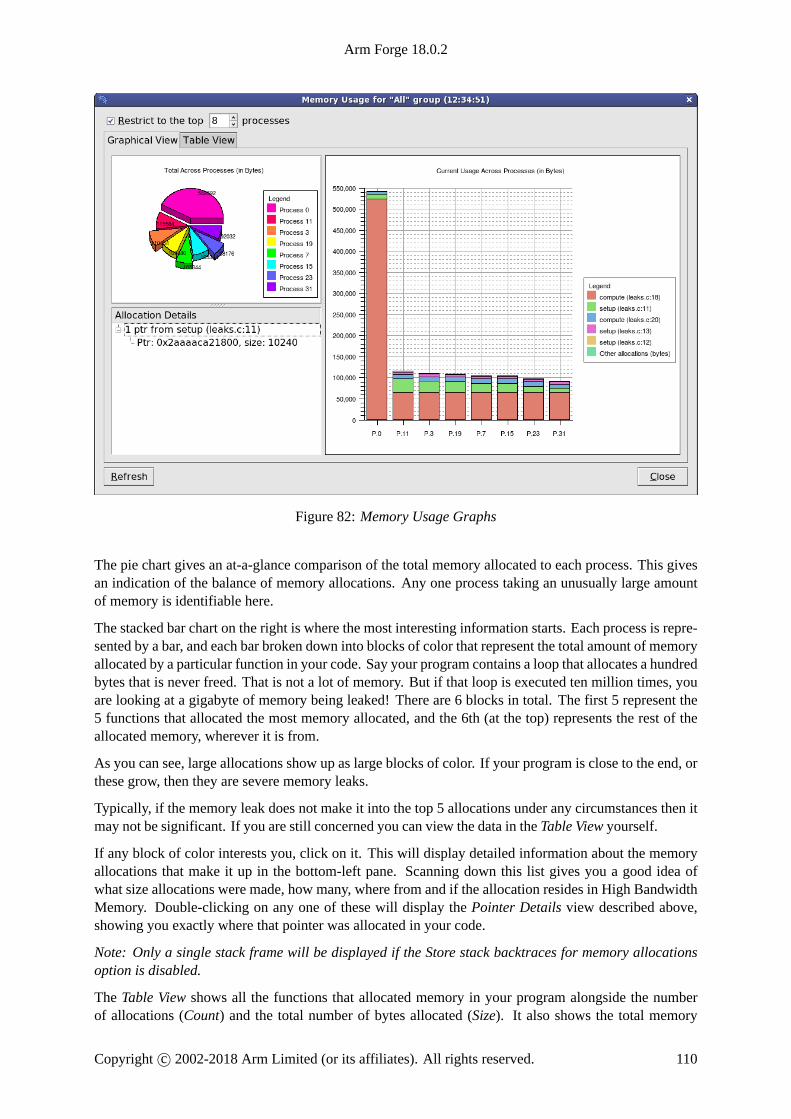
Arm Forge 18.0.2
Figure 82: Memory Usage Graphs
The pie chart gives an at-a-glance comparison of the total memory allocated to each process. This givesan indication of the balance of memory allocations. Any one process taking an unusually large amountof memory is identifiable here.
The stacked bar chart on the right is where the most interesting information starts. Each process is repre-sented by a bar, and each bar broken down into blocks of color that represent the total amount of memoryallocated by a particular function in your code. Say your program contains a loop that allocates a hundredbytes that is never freed. That is not a lot of memory. But if that loop is executed ten million times, youare looking at a gigabyte of memory being leaked! There are 6 blocks in total. The first 5 represent the5 functions that allocated the most memory allocated, and the 6th (at the top) represents the rest of theallocated memory, wherever it is from.
As you can see, large allocations show up as large blocks of color. If your program is close to the end, orthese grow, then they are severe memory leaks.
Typically, if the memory leak does not make it into the top 5 allocations under any circumstances then itmay not be significant. If you are still concerned you can view the data in the Table View yourself.
If any block of color interests you, click on it. This will display detailed information about the memoryallocations that make it up in the bottom-left pane. Scanning down this list gives you a good idea ofwhat size allocations were made, how many, where from and if the allocation resides in High BandwidthMemory. Double-clicking on any one of these will display the Pointer Details view described above,showing you exactly where that pointer was allocated in your code.
Note: Only a single stack frame will be displayed if the Store stack backtraces for memory allocationsoption is disabled.
The Table View shows all the functions that allocated memory in your program alongside the numberof allocations (Count) and the total number of bytes allocated (Size). It also shows the total memory
Copyright c© 2002-2018 Arm Limited (or its affiliates). All rights reserved. 110
Arm Forge 18.0.2
allocated by each function’s callees in the Cumulative Count and Cumulative Size columns.
For example: func1 calls func2 which calls malloc to allocate 50 bytes. Arm DDT will report anallocation of 50 bytes against func2 in the Size column of the Current Memory Usage table. Arm DDTwill also record a cumulative allocation of 50 bytes against both functions func1 and func2 in theCumulative Size column of the table.
Another valuable use of this feature is to play the program for a while, refresh the window, play it for a bitlonger, refresh the window and so on. If you pick the points at which to refresh, for example, after unitsof work are complete, you can watch as the memory load of the different processes in your job fluctuatesand you will see any areas which continue to grow. These are problematic leaks.
12.5.1 Detecting leakswhen using customallocators/memorywrappers
Some compilers wrap memory allocations inside many other functions. In this case Arm DDT may find,for example, that all Fortran 90 allocations are inside the same routine. This can also happen if you havewritten your own wrapper for memory allocation functions.
In these circumstances you will see one large block in the Current Memory Usage view. You can marksuch functions as Custom Allocators to exclude them from the bar chart and table by right-clicking on thefunction and selecting the Add Custom Allocator menu item. Memory allocated by a custom allocator isrecorded against its caller instead.
For example, if myfunc calls mymalloc and mymalloc is marked as a custom allocator, then theallocation will be recorded against myfunc instead. You can edit the list of custom allocators by clickingthe “Edit Custom Allocators. . .” button at the bottom of the window.
12.6 Memory Statistics
The Memory Statistics view (Tools→ Overall memory Statistics) shows a total of memory usage acrossthe processes in an application. The processes using the most memory are displayed, along with the meanacross all processes in the current group, which is useful for larger process counts.
Copyright c© 2002-2018 Arm Limited (or its affiliates). All rights reserved. 111

Arm Forge 18.0.2
Figure 83: Memory Statistics
The contents and location of the memory allocations themselves are not repeated here. Instead this win-dow displays the total amount of memory allocated and freed since the program began, the current numberof allocated bytes and the number of calls to allocation and free routines.
These can help show if your application is unbalanced, if particular processes are allocating or failing tofree memory and so on. At the end of program execution you can usually expect the total number of callsper process to be similar (depending on how your program divides up work), and memory allocation callsshould always be greater than deallocation calls. Anything else indicates serious problems.
If your application is using High Bandwidth Memory, the charts and tables in this dialog will be brokendown into each type of memory in use.
Copyright c© 2002-2018 Arm Limited (or its affiliates). All rights reserved. 112

Arm Forge 18.0.2
13 Checkpointing
13.1 Overview
A program’s entire state, or a subset of it, can be recorded to memory as a checkpoint. The program canbe restored from the checkpoint and it then resumes execution from the recorded state.
Sometimes you are not sure what information you need to diagnose a bug until it is too late to get it.For example, a program may crash because a variable has a particular unexpected value. You want toknow where the variable was set to that value but it is too late to set a watch on it. However, if you havean earlier checkpoint of the program you can restore the checkpoint, set the watch, and then let it failagain.
Checkpoints in DDT are stored in memory. They are valid for the life time of a session but are lost whenthe session is ended.
13.2 How to checkpoint
To checkpoint your program, click the Checkpoint button on the tool bar . The first time you clickthe button you are asked to select a checkpoint provider. If no checkpoint providers support the currentMPI and debugger an error message is displayed instead.
When the checkpoint has completed a newwindow opens displaying the name of the new checkpoint.
13.3 Restoring a checkpoint
To restore a checkpoint, click the Restore Checkpoint button on the tool bar . A new window openswith a list of available checkpoints. Select a checkpoint then click the OK button. The program state willbe restored to the checkpoint. The Parallel Stack View, Locals View, and so on, are all updated with thenew program state.
Copyright c© 2002-2018 Arm Limited (or its affiliates). All rights reserved. 113
Arm Forge 18.0.2
14 Using and writing plugins
Plugins are a quick and easy way to preload a library into your application and define some breakpointsand tracepoints during its use. They consist of an XML file which instructs DDT what to do and whereto set breakpoints or tracepoints.
Examples are MPI correctness checking libraries, or you could also define a library that is preloaded withyour application that could perform your own monitoring of the application. It also enables a message tobe displayed to the user when breakpoints are hit, displaying, for example, an error message where themessage is provided by the library in a variable.
14.1 Supported plugins
Arm DDT supports plugins for two MPI correctness-checking libraries:
• Intel Message Checker, part of the Intel Trace Analyser and Collector (Commercial with free eval-uation: http://software.intel.com/en-us/intel-trace-analyzer/) version 7.1
• Marmot (Open source: http://www.hlrs.de/organization/amt/projects/marmot), support expectedin version 2.2 and above.
14.2 Installing a plugin
To install a plugin, locate the XML Arm DDT plugin file provided by your application vendor and copyit to:
{allinea-forge installation directory}/plugins/
It will then appear in Arm DDT’s list of available plugins on the DDT—Run dialog.
Each plugin takes the form of an XML file in this directory. These files are usually provided by third-partyvendors to enable their application to integrate with Arm DDT. A plugin for the Intel Message Checker(part of the Intel Trace Analyser and Collector) is included with the DDT distribution.
14.3 Using a plugin
To activate a plugin in Arm DDT, simply click on the checkbox next to it in the window, then run yourapplication. Plugins may automatically perform one or more of the following actions:
• Load a particular dynamic library into your program
• Pause your program and show a message when a certain event such as a warning or error occurs
• Start extra, optionally hidden MPI processes. See the Writing Plugins section for more details onthis.
• Set tracepoints which log the variables during an execution.
If ArmDDT says it cannot load one of the plugins you have selected, check that the application is correctlyinstalled, and that the paths inside the XML plugin file match the installation path of the application.Example Plugin: MPI History Library
Arm DDT’s plugin directory contains a small set of files that make a plugin to log MPI communica-tion.
Copyright c© 2002-2018 Arm Limited (or its affiliates). All rights reserved. 114

Arm Forge 18.0.2
• Makefile – Builds the library and the configuration file for the plugin.
• README.wrapper – Details the installation, usage and limitations
• wrapper-config – Used to create the plugin XML config file, used by DDT to preload thelibrary and set tracepoints which will log the correct variables.
• wrapper-source – Used to automatically generate the source code for the library which willwrap the original MPI calls.
The plugin is designed to wrap around many of the core MPI functions and seamlessly intercept calls tolog information which is then displayed in Arm DDT. It is targeted at MPI implementations which usedynamic linking, as this can be supported without relinking the debugged application.
Static MPI implementations can be made to work also, but this is outside the scope of this version.
This package must be compiled before first use, in order to be compatible with your MPI version. It willnot appear in Arm DDT’s GUI until this is done.
To install as a non-root user in your local ~/.allinea/plugins directory, type the following com-mand:
make local
To install as root in the DDT plugins directory, type the following command:
make
Once you have run the above, start Arm DDT and to enable the plugin, click the Details. . . button toexpand the Plugins section of the Run window. Select History v1.0, and start your job as normal.DDT will take care of preloading the library and setting default tracepoints.
This plugin records call counts, total sent byte counts, and the arguments used in MPI function calls.Function calls and arguments are displayed (in blue) in the Input/Output panel.
The function counts are available in the form of a variable:
MPIHistoryCount {function}
The sent bytes counters are accumulated for most functions, but specifically they are not added for thevector operations such as MPI Gatherv.
These count variables within the processes are available for use within Arm DDT, in components suchas the cross-process comparison window, enabling a check that, for example, the count of MPI Barriersis consistent, or primitive MPI bytes sent profiling information to be discovered.
The library does not record the received bytes, as most MPI receive calls in isolation only contain amaximum number of bytes allowed, rather than bytes received. The MPI status is logged, the SOURCEtag therein enables the sending process to be identified.
There is no per-communicator logging in this version.
This version is for demonstration purposes for the tracepoints and plugin features. It could generateexcessive logged information, or cause your application to run slowly if it is a heavy communicator.
This library can be easily extended, or its logging can be reduced, by removing the tracepoints fromthe generated history.xml file (stored in ALLINEA_FORGE_PATH or ~/.allinea/plugins).This would make execution considerably faster, but still retain the byte and function counts for the MPIfunctions.
Copyright c© 2002-2018 Arm Limited (or its affiliates). All rights reserved. 115
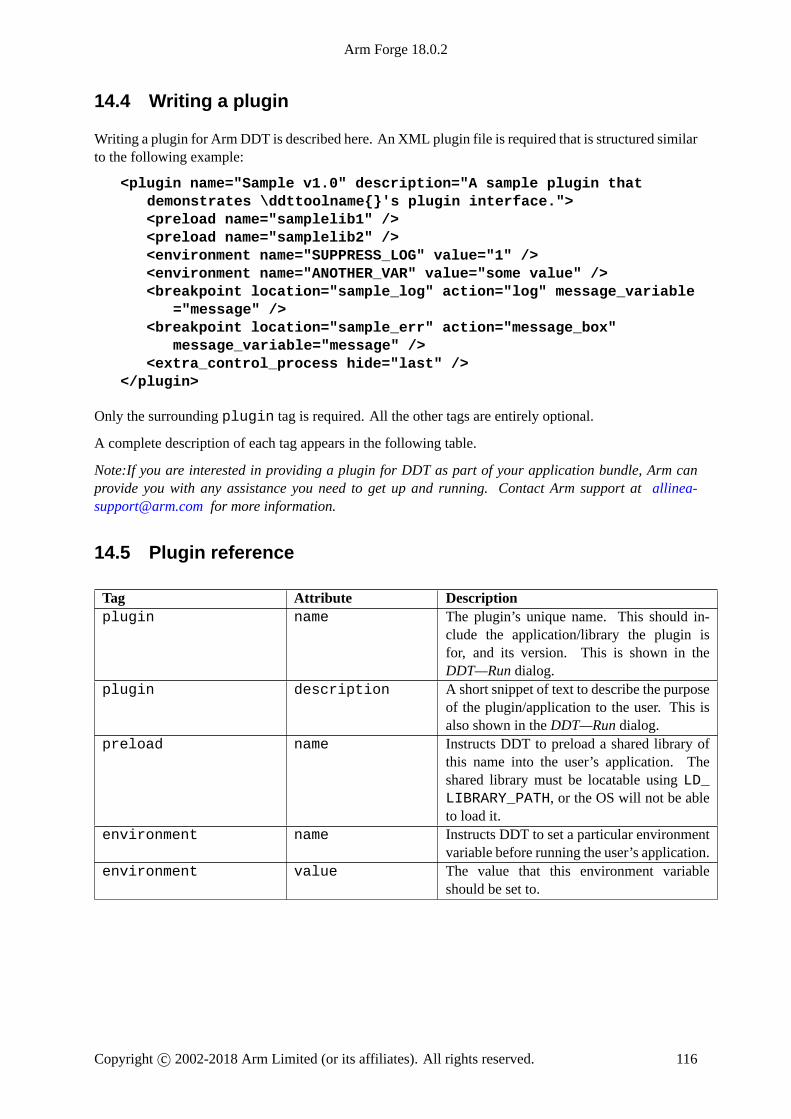
Arm Forge 18.0.2
14.4 Writing a plugin
Writing a plugin for Arm DDT is described here. An XML plugin file is required that is structured similarto the following example:
<plugin name="Sample v1.0" description="A sample plugin thatdemonstrates \ddttoolname{}'s plugin interface."><preload name="samplelib1" /><preload name="samplelib2" /><environment name="SUPPRESS_LOG" value="1" /><environment name="ANOTHER_VAR" value="some value" /><breakpoint location="sample_log" action="log" message_variable
="message" /><breakpoint location="sample_err" action="message_box"
message_variable="message" /><extra_control_process hide="last" />
</plugin>
Only the surrounding plugin tag is required. All the other tags are entirely optional.
A complete description of each tag appears in the following table.
Note:If you are interested in providing a plugin for DDT as part of your application bundle, Arm canprovide you with any assistance you need to get up and running. Contact Arm support at [email protected] for more information.
14.5 Plugin reference
Tag Attribute Descriptionplugin name The plugin’s unique name. This should in-
clude the application/library the plugin isfor, and its version. This is shown in theDDT—Run dialog.
plugin description A short snippet of text to describe the purposeof the plugin/application to the user. This isalso shown in the DDT—Run dialog.
preload name Instructs DDT to preload a shared library ofthis name into the user’s application. Theshared library must be locatable using LD_LIBRARY_PATH, or the OS will not be ableto load it.
environment name Instructs DDT to set a particular environmentvariable before running the user’s application.
environment value The value that this environment variableshould be set to.
Copyright c© 2002-2018 Arm Limited (or its affiliates). All rights reserved. 116

Arm Forge 18.0.2
breakpoint location Instructs DDT to add a breakpoint atthis location in the code. The locationmay be in a preloaded shared library (seeabove). Typically this will be a functionname, or a fully-qualified C++ names-pace and class name. C++ class membersmust include their signature and be en-closed in single quotes, for example,‘MyNamespace::DebugServer::breakpointOnError(char*)’
breakpoint action Only message box is supported in this re-lease. Other settings will cause DDT to stopat the breakpoint but take no action.
breakpoint message variable A char* or const char* variable thatcontains a message to be shown to the user.DDT will group identical messages from dif-ferent processes together before displayingthem to the user in a message box.
extra control process hide Instructs ArmDDT to start onemoreMPI pro-cess than the user requested. The optionalhide attribute can be first or last, and willcause Arm DDT to hide the first or lastprocess in MPI_COMM_WORLD from the user.This process will be allowed to execute when-ever at least one other MPI process is execut-ing, and messages or breakpoints (see above)occurring in this process will appear to comefrom all processes at once. This is only nec-essary for tools such as Marmot that use anextra MPI process to perform various runtimechecks on the rest of the MPI program.
tracepoint location See breakpoint location.tracepoint variables A comma-separated list of variables to log on
every passing of the tracepoint location.
Copyright c© 2002-2018 Arm Limited (or its affiliates). All rights reserved. 117

Arm Forge 18.0.2
15 CUDA GPU debugging
Arm DDT is able to debug applications that use NVIDIA CUDA devices, with actual debugging of thecode running on the GPU, simultaneously while debugging the host CPU code.
Arm supports a number of GPU compilers that target CUDA devices.
• NVCC—the NVIDIA CUDA compilers
• Cray OpenACC
• PGI CUDA Fortran and the PGI Accelerator Model
The CUDA toolkits and their drivers for toolkits version 6.0 and above are supported by ArmDDT.
15.1 Licensing
In order to debug CUDA programs with Arm DDT, a CUDA-enabled license key is required, which isan additional option to default licenses. If CUDA is not included with a license, the CUDA options willbe grayed-out on the run dialog of Arm DDT.
While debugging a CUDA program, an additional process from your license is used for each GPU. Anexception to this is that single process licenses will still allow the debugging of a single GPU.
Note: In order to serve a floating CUDA license you will need to use the Licence Servershipped with ArmDDT 2.6 or later.
15.2 Preparing to debug GPU code
In order to debug your GPU program, you may need to add additional compiler command line options toenable GPU debugging.
ForNVIDIA’snvcc compiler, kernelsmust be compiledwith the “-g -G” flags. This enables generationof information for debuggers in the kernels, and also disables some optimisations that would hinderdebugging. To use memory debugging in DDT with CUDA “--cudart shared” must also be passedto nvcc.
For other compilers, please refer to 15.10 GPU language support of this guide and F Compiler notes andknown issues and your vendor’s own documentation.
Note: At this point OpenCL debugging of GPUs is not supported.
15.3 Launching the application
To launch a CUDA job, tick the CUDA box on the run dialog before clicking run/submit. You mayalso enable memory debugging for CUDA programs from the CUDA section. See section 12.2 CUDAmemory debugging for details.
Attaching to running CUDA applications is not possible if the application has already initialized the driverin some way, for example through having executed any kernel or called any functions from the CUDAlibrary.
For MPI applications it is essential to place all CUDA initialization after the MPI_Init call.
Copyright c© 2002-2018 Arm Limited (or its affiliates). All rights reserved. 118

Arm Forge 18.0.2
15.4 Controlling GPU threads
Controlling GPU threads is integrated with the standard Arm DDT controls, so that the usual play, pause,and breakpoints are all applicable to GPU kernels.
As GPUs have different execution models to CPUs, there are some behavioral differences that are de-scribed in the following sections.
15.4.1 Breakpoints
CUDA Breakpoints can be set in the same manner as other breakpoints in Arm DDT. See section 7.6Setting breakpoints.
Breakpoints affect all GPU threads, and cause the application to stop whenever a thread reaches thebreakpoint. Where kernels have similar workload across blocks and grids, then threads tend to reach thebreakpoint together and the kernel pauses once per set of blocks that are scheduled, that is, the set ofthreads that fit on the GPU at any one time.
Where kernels have divergent distributions of work across threads, timingmay be such that threads withina running kernel hit a breakpoint and pause the kernel. After continuing, more threads within the currentlyscheduled set of blocks will hit the breakpoint and pause the application again.
In order to apply breakpoints to individual blocks, warps or threads, conditional breakpoints can be used.For example using the built-in variables threadIdx.x (and threadIdx.y or threadIdx.z as appropriate) forthread indexes and setting the condition appropriately.
Where a kernel pauses at a breakpoint, the currently selected GPU thread will be changed if the previouslyselected thread is no longer “alive”.
15.4.2 Stepping
The GPU execution model is noticeably different from that of the host CPU. In the context of steppingoperations, that is step in, step over or step out, there are critical differences to note.
The smallest execution unit on a GPU is a warp, which on current NVIDIA GPUs is 32 threads. Stepoperations can operate on warps but nothing smaller.
Arm DDT also makes it possible to step whole blocks, whole kernels or whole devices. The steppingmode is selected using the drop down list in the CUDA Thread Selector.
Figure 84: Selection of GPU Stepping Mode
Note: GPU execution under the control of a debugger is not as fast as running without a debugger. Whenstepping blocks and kernels these are sequentialized into warps and hence stepping of units larger than awarp may be slow. It is not unusual for a step operation to take 60 seconds on a large kernel, particularlyon newer devices where a step could involve stepping over a function call.
It is not currently possible to “step over” or “step out” of inlined GPU functions.
Note: GPU functions are often inlined by the compiler. This can be avoided (dependent on hardware) byspecifying the noinline keyword in your function declaration, and by compiling your code for alater GPU profile. For example, by adding -arch=sm 20 to your compile line.
Copyright c© 2002-2018 Arm Limited (or its affiliates). All rights reserved. 119

Arm Forge 18.0.2
15.4.3 Running and pausing
Clicking the “Play/Continue” button in DDT runs all GPU threads. It is not possible to run individualblocks, warps or threads.
The pause button pauses a running kernel, although it should be noted that the pause operation is not asquick for GPUs as for regular CPUs.
15.5 Examining GPU threads and data
Much of the user interface when working with GPUs is unchanged from regular MPI or multithreadeddebugging. However, there are a number of enhancements and additional features that have been addedto help understand the state of GPU applications.
These changes are summarized in the following section.
15.5.1 Selecting GPU threads
Figure 85: GPU Thread Selector
The Thread Selector allows you to select your current GPU thread. The current thread is used for thevariable evaluation windows in DDT, along with the various GPU stepping operations.
The first entries represent the block index, and the subsequent entries represent the 3D thread index insidethat block.
Changing the current thread updates the local variables, the evaluations, and the current line displays andsource code displays to reflect the change.
The thread selector is also updated to display the current GPU thread if it changes as a result of any otheroperation. For example if:
• The user changes threads by selecting an item in the Parallel Stack View.
• A memory error is detected and is attributed to a particular thread.
• The kernel has progressed, and the previously selected thread is no longer present in the device.
The GPU Thread Selector also displays the dimensions of the grid and blocks in your program.
It is only possible to inspect/control threads in the set of blocks that are actually loaded in to the GPU. Ifyou try to select a thread that is not currently loaded, a message is displayed.
Note: The thread selector is only displayed when there is a GPU kernel active.
15.5.2 Viewing GPU thread locations
The Parallel Stack View has been updated to display the location and number of GPU threads.
Copyright c© 2002-2018 Arm Limited (or its affiliates). All rights reserved. 120

Arm Forge 18.0.2
Figure 86: CUDA threads in the parallel stack view
Clicking an item in the Parallel Stack View selects the appropriate GPU thread, updating the variabledisplay components accordingly and moving the source code viewer to the appropriate location.
Hovering over an item in the Parallel Stack view also allows you to see which individual GPU threadranges are at a location, as well as the size of each range.
15.5.3 Understanding kernel progress
Given a simple kernel that is to calculate an output value for each index in an array, it is not easy to checkwhether the value at position x in an array has been calculated, or whether the calculating thread has yetto be scheduled.
This contrasts sharply with scalar programming, where if the counter of a (up-)loop exceeds x then thevalue of index x can be taken as being the final value. If it is difficult to decide whether array data is freshor stale, then clearly this will be a major issue during debugging.
Arm DDT includes a component that makes this easy, the Kernel Progress display, which appears at thebottom of the user interface by default when a kernel is in progress.
Figure 87: Kernel Progress Display
This view identifies the kernels that are in progress. The number of kernels are identified and groupedby different kernel identifiers across processes. The identifier is the kernel name.
A colored progress bar is used to identify which GPU threads are in progress. The progress bar is aprojection onto a straight line of the (potentially) 6-dimensional GPU block and thread indexing systemand is tailored to the sizes of the kernels operating in the application.
By clicking within the color highlighted sections of this progress bar, a GPU thread will be selectedthat matches the click location as closely as possible. Selected GPU threads are colored blue. For de-selected GPU threads, the ones that are scheduled are colored green whereas the unscheduled ones arewhite.
Copyright c© 2002-2018 Arm Limited (or its affiliates). All rights reserved. 121

Arm Forge 18.0.2
15.5.4 Source code viewer
The source code viewer allows you to visualize the program flow through your source code by highlight-ing lines in the current stack trace. When debugging GPU kernels, it will color highlight lines with GPUthreads present and display the GPU threads in a similar manner to that of regular CPU threads and pro-cesses. Hovering over a highlighted line in the code viewer will display a summary of the GPU threadson that line.
15.6 GPU devices information
One of the challenges of GPU programming is in discovering device parameters, such as the number ofregisters or the device type, and whether a device is present.
In order to assist in this, Arm DDT includes a GPU Devices display. This display examines the GPUsthat are present and in use across an application, and groups the information together scalably for multi-process systems.
Figure 88: GPU Devices
Note: GPU devices are only listed after initialization.
15.7 Attaching to running GPU applications
Attaching to a running GPU application and then debugging the GPU threads is only supported for Fermiclass cards and their successors. This includes Tesla C2050/2070, K10, and K20.
To attach to a running job, please see the section 5.9 Attaching to running programs and select the DebugCUDA button on the attach window.
15.8 Opening GPU core files
In CUDA 7.0, NVIDIA introduced support for GPU code to generate core files. These can be openedin DDT in exactly the same way as core files generated by CPU code. See 5.8 Opening core files fordetails.
Copyright c© 2002-2018 Arm Limited (or its affiliates). All rights reserved. 122

Arm Forge 18.0.2
15.9 Known issues / limitations
15.9.1 Debugging multiple GPU processes
CUDA allows debugging of multiple CUDA processes on the same node. However, each process willstill attempt to reserve all of the available GPUs for debugging.
This works for the case where a single process debugs all GPUs on a node, but not for multiple processesdebugging a single GPU.
A temporary workaround when using Open MPI is to export the following environment variable beforestarting DDT:
ALLINEA_CUDA_DEVICE_VAR=OMPI_COMM_WORLD_LOCAL_RANK
This will assign a single device (based on local rank) to each process. In addition:
• You must have Open MPI (Compatibility) selected in the File→ Options (Arm Forge→ Prefer-ences on Mac OS X) . (Not Open MPI).
• The device selected for each process will be the only device visible when enumerating GPUs. Thiscause manual GPU selection code to stop working (due to changing device IDs, and so on).
15.9.2 Thread control
The focus on thread feature in DDT is not supported, as it can lock up the GPU. This means that it is notcurrently possible to control multiple GPUs in the same process individually.
15.9.3 General
• DDT supports versions 6.0 onwards of the NVIDIA CUDA toolkit. In all cases, the most recentCUDA toolkit and driver versions is recommended.
• X11 cannot be running on any GPU used for debugging. (Any GPU running X11 will be excludedfrom device enumeration.)
• You must compile with -g -G to enable GPU debugging otherwise your program will run throughthe contents of kernels without stopping.
• Debugging 32-bit CUDA code on a 64-bit host system is not supported.
• It is not yet possible to spot unsuccessful kernel launches or failures. An error code is provided bygetCudaLastError() in the SDK which you can call in your code to detect this. Currentlythe debugger cannot check this without resetting it, which is not desirable behavior.
• Device memory allocated via cudaMalloc() is not visible outside of the kernel function.
• Not all illegal program behavior can be caught in the debugger, for example, divide-by-zero.
• Device allocations larger than 100 MB on Tesla GPUs, and larger than 32 MB on Fermi GPUs,may not be accessible.
• Breakpoints in divergent code may not behave as expected.
• Debugging applications with multiple CUDA contexts running on the same GPU is not supported.
Copyright c© 2002-2018 Arm Limited (or its affiliates). All rights reserved. 123

Arm Forge 18.0.2
• If CUDA environment variable CUDA_VISIBLE_DEVICES <index> is used to target a partic-ular GPU, then make sure no X server is running on any of the GPUs. Also note that any GPUrunning X will be excluded from enumeration, with may affect the device Ids.
• CUDA drivers requires that applications be debugged in a mode matching their version. If yoursystem is runningwith a toolkit version lower than the CUDAdriver version, you should force DDTto use the correct CUDA version by setting the ALLINEA_FORCE_CUDA_VERSION enviromentvariable. For example, if you are using the CUDA 7.5 driver, set ALLINEA_FORCE_CUDA_VERSION=7.5. Alternatively, you should consider upgrading your CUDA toolkit to match theCUDA driver.
• If memory debugging and CUDA support are enabled in Arm DDT then only threaded memorypreloads are available.
15.9.4 Pre sm 20 GPUs
For GPUs that have SM type less than sm 20 (or when code is compiled targeting SM type less thansm 20), the following issues may apply.
• GPU code targeting less than SM typesm 20will inline all function calls. This can lead to behaviorsuch as not being able to step over/out of subroutines.
• Debugging applications using textures is not supported on GPUs with SM type less than sm 20.
• If you are debugging code in device functions that get called by multiple kernels, then setting abreakpoint in the device function will insert the breakpoint in only one of the kernels.
15.9.5 Debugging multiple GPU processes on Cray limitations
It is not possible to debug multiple CUDA processes on a single node on a Cray machine, you must runwith 1 process per node.
15.10 GPU language support
In addition to the native nvcc compiler, a number of other compilers are supported.
At this point in time, debugging of OpenCL is not supported on the device.
15.10.1 Cray OpenACC
Cray OpenACC is fully supported by ArmDDT. Code pragmas are highlighted, most variables are visiblewithin the device, and stepping and breakpoints in the GPU code is supported. The compiler flag -g isrequired for enabling device (GPU-based) debugging; -O0 should not be used, as this disables use of theGPU and runs the accelerated regions on the CPU.
You should be aware of the following known issues:
• It is not possible to track GPU allocations created by the Cray OpenACC compiler as it does notdirectly call cudaMalloc.
• Pointers in accelerator code cannot be dereferenced in CCE 8.0.
Copyright c© 2002-2018 Arm Limited (or its affiliates). All rights reserved. 124

Arm Forge 18.0.2
• Memory consumption in debugging mode can be considerably higher than regular mode, if issueswith memory exhaustion arise, consider using the environment variable CRAY_ACC_MALLOC_HEAPSIZE to set total heap size (bytes) used on the device, which can make more memory avail-able to the application.
15.10.2 PGI Accelerators and CUDA Fortran
Arm DDT supports debugging both the host and CUDA parts of PGI Accelerator and CUDA Fortranprograms compiled with version 14.4 or later of the PGI compiler. Older versions of the PGI compilersupport debugging only on the host.
Copyright c© 2002-2018 Arm Limited (or its affiliates). All rights reserved. 125

Arm Forge 18.0.2
16 Offline debugging
Offline debugging is a mode of running Arm DDT in which an application is run, under the control ofthe debugger, but without user intervention and without a user interface.
There are many situations where running under this scenario will be useful, for example when access to amachine is not immediately available and may not be available during the working day. The applicationcan run with features such as tracepoints and memory debugging enabled, and will produce a report atthe end of the execution.
16.1 Using offline debugging
To launch ArmDDT in this mode, the --offline argument is specified. Optionally, an output filenamecan be supplied with the –output=<filename> argument. A filename with a .html or .htm extensionwill cause an HTML version of the output to be produced, in other cases a plain text report is generated.If the –output argument is not used, DDT generates an HTML output file in the current working directoryand reports the name of that file upon completion.
ddt --offline mpiexec -n 4 myprog arg1 arg2ddt --offline -o myjob.html mpiexec -n 4 myprog arg1 arg2ddt --offline -o myjob.txt mpiexec -n 4 myprog arg1 arg2ddt --offline -o myjob.html --np=4 myprog arg1 arg2ddt --offline -o myjob.txt --np=4 myprog arg1 arg2
Additional arguments can be used to set breakpoints, at which the stack of the stopping processes will berecorded before they are continued. You can also set tracepoints at which variable values will be recorded.Additionally, expressions can be set to be evaluated on every program pause.
Settings from your current ArmDDT configuration file will be taken, unless over-ridden on the commandline.
Command line options that are of the most significance for this mode of running are:
• --session=SESSIONFILE – run in offline mode using settings saved using the Save Sessionoption from the Arm DDT File menu.
• --processes=NUMPROCS or -n NUMPROCS – run with NUMPROCS processes
• --mem-debug[=(fast|balanced|thorough|off)] – enable and configurememory de-bugging
• --snapshot-interval=MINUTES – write a snapshot of the program’s stack and variables tothe offline log file everyMINUTES minutes.
See section 16.4 below.
• --trace-at=LOCATION[,N:M:P],VAR1,VAR2,...] [if CONDITION] – set a tra-cepoint at location, beginning recording after the N’th visit of each process to the location, andrecording every M’th subsequent pass until it has been triggered P times. Record the value ofvariable VAR1, VAR2. The if clause allows you to specify a boolean CONDITION that must besatisfied for the tracepoint to trigger.
Example:
main.c:22,-:2:-,x
This will record x every 2nd passage of line 22.
Copyright c© 2002-2018 Arm Limited (or its affiliates). All rights reserved. 126
Arm Forge 18.0.2
• --break-at=LOCATION[,N:M:P][if CONDITION] – set a breakpoint at LOCATION (ei-ther file:line or function), optionally starting after the N’th pass, triggering every M passesand stopping after it has been triggered P times. The if clause allows you to specify a booleanCONDITION that must be satisfied for the breakpoint to trigger. When using the if clause thevalue of this argument should be quoted.
The stack traces of paused processes will be recorded, before the processes are then made to con-tinue, and will contain the variables of one of the processes in the set of processes that have paused.
Examples:
--break-at=main--break-at=main.c:22--break-at=main.c:22 --break-at=main.c:34
• --evaluate=EXPRESSION[;EXPRESSION2][;...] – set one or more expressions to beevaluated on every program pause. Multiple expressions should be separated by a semicolon andenclosed in quotes. If shell special characters are present the value of this argument should also bequoted.
Examples:
--evaluate=i--evaluate="i; (*addr) / x"--evaluate=i --evaluate="i * x"
• --offline-frames=(all|none|n) – specify how many frames to collect variables for,where n is a positive integer. The default value is all.
Examples:
--offline-frames=all--offline-frames=none--offline-frames=1337
The application will run to completion, or to the end of the job.
When errors occur, for example an application crash, the stack back trace of crashing processes is recordedto the offline output file. In offline mode, Arm DDT always acts as if the user had clicked Continue ifthe continue option was available in an equivalent “online” debugging session.
16.1.1 Reading a file for standard input
In offline mode, normal redirection syntax can be used to read data from a file as a source for the exe-cutable’s standard input.
Examples:
cat <input-file> | ddt --offline -o myjob.html ...ddt --offline -o myjob.html ... < <input-file>
16.1.2 Writing a file from standard output
Normal redirection can also be used to write data to a file from the executable’s standard output:
ddt --offline -o myjob.html ... > <output-file>
Copyright c© 2002-2018 Arm Limited (or its affiliates). All rights reserved. 127

Arm Forge 18.0.2
16.2 Offline report output (HTML)
The output file is broken into four sections, Messages, Tracepoints, Memory Leak Report, and Output.At the end of a job, Arm DDT merges the four sections of the log output (tracepoint data, error messages,memory leak data, and program output) into one file. If the Arm DDT process is terminated abruptly,for example by the job scheduler, then these separate files will remain and the final single HTML reportmay not be created. Note that a memory leak report section is only created when memory debugging isenabled.
Figure 89: Offline Mode HTML output
Timestamps are recorded with the contents in the offline log, and even though the file is neatly organizedinto four sections, it remains possible to identify ordering of events from the time stamp.
The Messages section contains the following:
• Error messages: for example if Arm DDT’s Memory Debugging detects an error then the messageand the stack trace at the time of the error will be recorded from each offending processes.
• Breakpoints: a message with the stopped processes and another one with the Stacks, Current Stackand Locals at this point.
• Additional Information: after an error or a breakpoint has stopped execution, then an additionalinformation message is recorded. This message could contain the stacks, current stack and localvariables for the stopped processes at this point of the execution.
– The Stacks table displays the parallel stacks from all paused processes. Additionally, for everytop-most frame the variables (locals and arguments) will be displayed by default. You canuse the --offline-frames command line option to display the variables for more framesor none. If --offline-frames=none is specified no variables at all will be displayed,instead a Locals table will show the variables for the current process. Clicking on a functionexpands the code snippet and variables in one go. If the stop was caused by an error or crash,the stack of the responsible thread or process is listed first.
Copyright c© 2002-2018 Arm Limited (or its affiliates). All rights reserved. 128
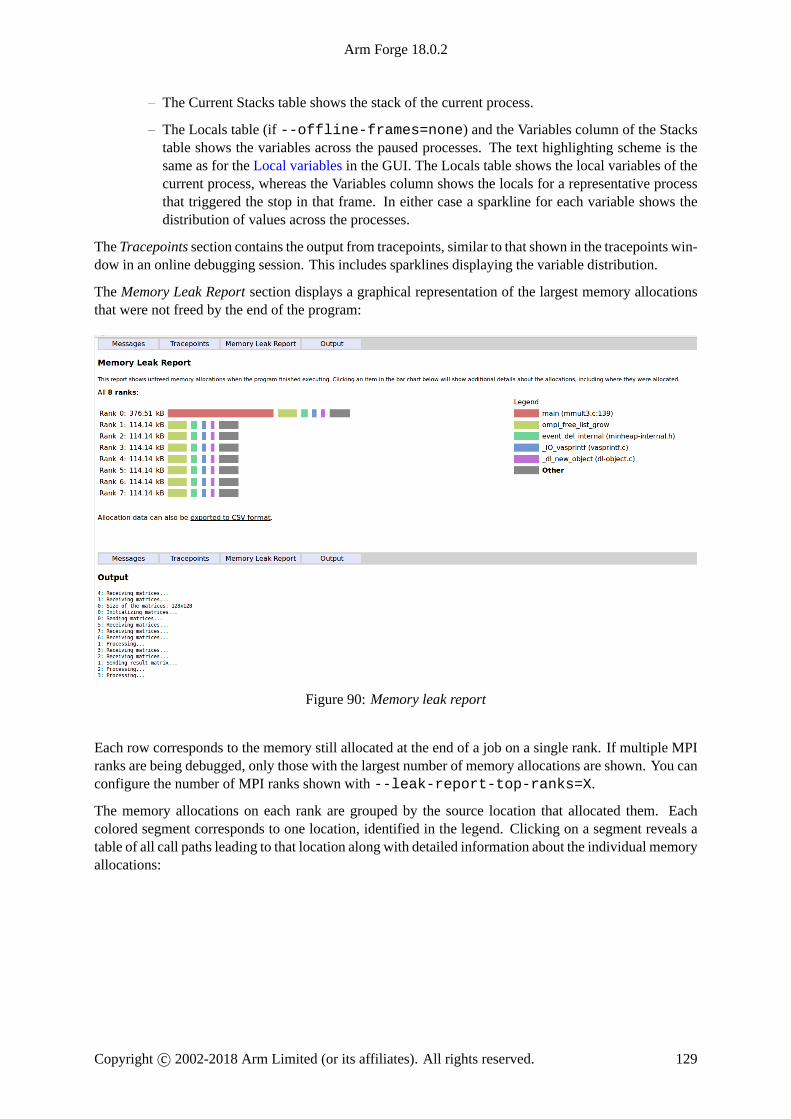
Arm Forge 18.0.2
– The Current Stacks table shows the stack of the current process.
– The Locals table (if --offline-frames=none) and the Variables column of the Stackstable shows the variables across the paused processes. The text highlighting scheme is thesame as for the Local variables in the GUI. The Locals table shows the local variables of thecurrent process, whereas the Variables column shows the locals for a representative processthat triggered the stop in that frame. In either case a sparkline for each variable shows thedistribution of values across the processes.
The Tracepoints section contains the output from tracepoints, similar to that shown in the tracepoints win-dow in an online debugging session. This includes sparklines displaying the variable distribution.
The Memory Leak Report section displays a graphical representation of the largest memory allocationsthat were not freed by the end of the program:
Figure 90: Memory leak report
Each row corresponds to the memory still allocated at the end of a job on a single rank. If multiple MPIranks are being debugged, only those with the largest number of memory allocations are shown. You canconfigure the number of MPI ranks shown with --leak-report-top-ranks=X.
The memory allocations on each rank are grouped by the source location that allocated them. Eachcolored segment corresponds to one location, identified in the legend. Clicking on a segment reveals atable of all call paths leading to that location along with detailed information about the individual memoryallocations:
Copyright c© 2002-2018 Arm Limited (or its affiliates). All rights reserved. 129
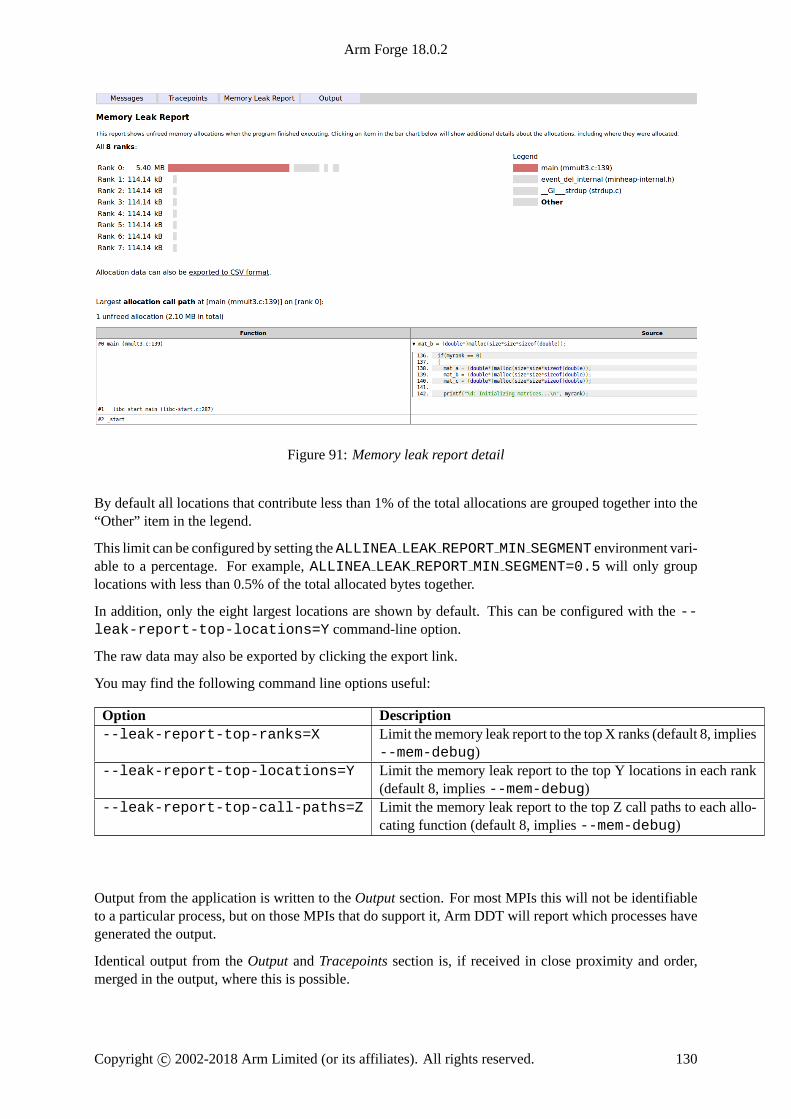
Arm Forge 18.0.2
Figure 91: Memory leak report detail
By default all locations that contribute less than 1% of the total allocations are grouped together into the“Other” item in the legend.
This limit can be configured by setting theALLINEA LEAK REPORT MIN SEGMENT environment vari-able to a percentage. For example, ALLINEA LEAK REPORT MIN SEGMENT=0.5 will only grouplocations with less than 0.5% of the total allocated bytes together.
In addition, only the eight largest locations are shown by default. This can be configured with the --leak-report-top-locations=Y command-line option.
The raw data may also be exported by clicking the export link.
You may find the following command line options useful:
Option Description--leak-report-top-ranks=X Limit the memory leak report to the top X ranks (default 8, implies
--mem-debug)--leak-report-top-locations=Y Limit the memory leak report to the top Y locations in each rank
(default 8, implies --mem-debug)--leak-report-top-call-paths=Z Limit the memory leak report to the top Z call paths to each allo-
cating function (default 8, implies --mem-debug)
Output from the application is written to the Output section. For most MPIs this will not be identifiableto a particular process, but on those MPIs that do support it, Arm DDT will report which processes havegenerated the output.
Identical output from the Output and Tracepoints section is, if received in close proximity and order,merged in the output, where this is possible.
Copyright c© 2002-2018 Arm Limited (or its affiliates). All rights reserved. 130

Arm Forge 18.0.2
16.3 Offline report output (plain text)
Unlike the offline report in HTMLmode, the plain text mode does not separate the tracepoint, breakpoint,memory leak, and application output into separate sections.
Lines in the offline plain text report are identified as messages, standard output, error output, and trace-points, as detailed in the Offline Report Output (HTML) section previously.
For example, a simple report could look like the following:
message (0-3): Process stopped at breakpoint in main (hello.c:97).message (0-3): Stacksmessage (0-3): Processes Functionmessage (0-3): 0-3 main (hello.c:97)message (0-3): Stack for process 0message (0-3): #0 main (argc=1, argv=0x7fffffffd378, \
environ=0x7fffffffd388) at /home/ddt/examples/hello.c:97message (0-3): Local variables for process 0 \
(ranges shown for 0-3)message (0-3): argc: 1 argv: 0x7fffffffd378 beingWatched: 0 \
dest: 7 environ: 0x7fffffffd388 i: 0 message: ",!\312\t" \my_r ank: 0 (0-3) p: 4 source: 0 status: t2: 0x7ffff7ff7fc0 \tables: tag: 50 test: x: 10000 y: 12
16.4 Run-time job progress reporting
In offline mode, Arm DDT can be instructed to compile a snapshot of a job, including its stacks andvariables, and update the session log with that information. This includes writing the HTML log file,which otherwise is only written once the session has completed.
Snapshots can be triggered periodically via a command-line option, or at any point in the session bysending a signal to the Arm DDT front-end.
16.4.1 Periodic snapshots
Snapshots can be triggered periodically throughout a debugging session with the command-line option--snapshot-interval=MINUTES. For example, to log a snapshot every three minutes:
ddt --offline -o log.html --snapshot-interval=3 \mpiexec -n 8 ./myprog
16.4.2 Signal-triggered snapshots
Snapshots can also be triggered by sending a SIGUSR1 signal to the DDT front-end process (calledddt.bin in process lists), regardless of whether or not the --snapshot-interval command-lineoption was specified. For example, after running the following:
ddt --offline -o log.html mpiexec -n 8 ./myprog
A snapshot can be triggered by running (in another terminal):
Copyright c© 2002-2018 Arm Limited (or its affiliates). All rights reserved. 131

Arm Forge 18.0.2
# Find PID of DDT front-end:pgrep ddt.bin> 18032> 18039
# Use pstree to identify the parent if there are multiple PIDs:pstree -p
# Trigger the snapshot:kill -SIGUSR1 18032
Copyright c© 2002-2018 Arm Limited (or its affiliates). All rights reserved. 132

Arm Forge 18.0.2
Part III
MAP
17 Getting started
Arm MAP is a source-level profiler and can show how much time was spent on each line of code. Tosee the source code in MAP, compile your program with the debug flag, which for the most compilersthis is -g. Do not use a debug build as you should always keep optimization flags turned on whenprofiling.
You can also use MAP on programs without debug information. In this case inlined functions are notshown and the source code cannot be shown but other features should work as expected.
To start MAP simply type one of the following shell commands into a terminal window:
mapmap program_name [arguments]map <profile-file>
Where <profile-file> is a profile file generated by a MAP profiling run. It contains the programname and has a ’.map’ extension.
Note: When starting MAP for examining an existing profile file, a valid license is not needed.
Note: Unless you are using Express Launch mode (see 17.1 Express Launch), you should not attemptto pipe input directly to MAP. For information about how to achieve the effect of sending input to yourprogram, please read section 9 Program input and output.
It is also recommended you add the--profile argument toMAP. This runswithout the interactiveGUIand saves a .map file to the current directory and is ideal for profiling jobs submitted to a queue.
Once started in interactive mode, MAP displays the Welcome Page:
Copyright c© 2002-2018 Arm Limited (or its affiliates). All rights reserved. 133

Arm Forge 18.0.2
Figure 92: MAP Welcome Page
Note: In Express Launch mode (see 17.1 Express Launch) the Welcome Page is not shown and the useris brought directly to the Run Dialog instead. If no valid license is found, the program is exited and theappropriate message is shown in the console output.
The Welcome Page allows you to choose what kind of profiling you want to do. You can choose fromthe following:
• Profile a program.
• Load a Profile from a previous run.
• Connect to a remote system and accept a Reverse Connect request.
17.1 Express Launch
Each of the Arm Forge products can be launched by typing its name in front of an existing mpiexeccommand:
$ map mpiexec -n 256 examples/wave_c 30
This startup method is called Express Launch and is the simplest way to get started. If your MPI is notyet supported in this mode, you will see a error message similar to the following:
$ 'MPICH 1 standard' programs cannot be started using ExpressLaunch syntax (launching with an mpirun command).
Copyright c© 2002-2018 Arm Limited (or its affiliates). All rights reserved. 134

Arm Forge 18.0.2
Try this instead:map --np=256 ./wave_c 20
Type map --help for more information.
This is referred to as Compatibility Mode, in which the mpiexec command is not included and thearguments to mpiexec are passed via a --mpiargs="args here" parameter.
One advantage of Express Launch mode is that it is easy to modify existing queue submission scriptsto run your program under one of the Arm Forge products. This works best for MAP, which gathersdata without an interactive GUI (map --profile) or Reverse Connect (map --connect, see 3.3Reverse Connect for more details) for interactive profiling.
If you can not use Reverse Connect and wish to use interactive profiling from a queue you may needto configure MAPto generate job submission scripts for you. More details on this can be found in 17.7Starting a job in a queue and A.2 Integration with queuing systems.
The following lists the MPI implementations supported by Express Launch:
• BlueGene/Q
• bullx MPI
• Cray X-Series (MPI/SHMEM/CAF)
• Intel MPI
• MPICH 2
• MPICH 3
• Open MPI (MPI/SHMEM)
• Oracle MPT
• Open MPI (Cray XT/XE/XK)
• Cray XT/XE/XK (UPC)
17.1.1 Run dialog box
In Express Launch mode, the Run dialog has a restricted number of options:
Figure 93: Express Launch MAP Run dialog box
Copyright c© 2002-2018 Arm Limited (or its affiliates). All rights reserved. 135

Arm Forge 18.0.2
17.2 Preparing a program for profiling
In most cases, if your program is already compiled with debugging symbols then you do not need to re-compile your program to use it with MAP, although in some cases it may need to be relinked, as explainedin section 17.2.2 Linking.
17.2.1 Debugging symbols
ArmMAP is a source-level profiler and can show how much time was spent on each line of code. To seethe source code in MAP, compile your program with the debug flag, for example:
mpicc hello.c -o hello -g -O3
Do not just use a debug build. You should always keep optimization flags turned onwhen profiling.
You can also use MAP on programs without debug information. In this case inlined functions are notshown and the source code cannot be shown but other features will work as expected.
Cray compiler
For the Cray compiler Arm recommends using the -G2 option with MAP.
CUDA programs
When compilingCUDAkernels do not generate debug information for device code (the-G or--device-debug flag) as this can significantly impair runtime performance. Use -lineinfo instead, for exam-ple:
nvcc device.cu -c -o device.o -g -lineinfo -O3
Arm R©v8 (AArch64) machines
Unwind information is not always compiled in by default on this platform. This may result in partialtrace nodes being displayed in the the MAP parallel stack view. To avoid this, programs that arenot compiled with debug information (-g) should at least be compiled with the -fasynchronous-unwind-tables flag or the -funwind-tables flag, preferably the former.
17.2.2 Linking
To collect data from your program, MAP uses two small profiler libraries, map-sampler and map-sampler-pmpi. These must be linked with your program. On most systems MAP can do this auto-matically without any action by you. This is done via the system’s LD_PRELOAD mechanism, whichallows an extra library into your program when starting it.
Note: Although these libraries contain the word ‘map’ they are used for both Arm Performance Reportsand Arm MAP.
This automatic linking when starting your program only works if your program is dynamically-linked.Programs may be dynamically-linked or statically-linked, and for MPI programs this is normally deter-mined by your MPI library. Most MPI libraries are configured with --enable-dynamic by default,and mpicc/mpif90 produce dynamically-linked executables that MAP can automatically collect datafrom.
The map-sampler-pmpi library is a temporary file that is precompiled and copied or compiled atruntime in the directory ~/.allinea/wrapper.
Copyright c© 2002-2018 Arm Limited (or its affiliates). All rights reserved. 136

Arm Forge 18.0.2
If your home directory will not be accessible by all nodes in your cluster you can change where the map-sampler-pmpi library will be created by altering the shared directory as described in H.2.3No shared home directory.
The temporary library will be created in the .allinea/wrapper subdirectory to this shared di-rectory.
For Cray X-Series Systems the shared directory is not applicable, instead map-sampler-pmpiis copied into a hidden .allinea sub-directory of the current working directory.
If MAP warns you that it could not pre-load the sampler libraries, this often means that your MPI librarywas not configured with --enable-dynamic, or that the LD_PRELOADmechanism is not supportedon your platform. You now have three options:
1. Try compiling and linking your code dynamically. On most platforms this allows MAP to use theLD_PRELOAD mechanism to automatically insert its libraries into your application at runtime.
2. Link MAP’s map-sampler and map-sampler-pmpi libraries with your program at link timemanually.
See 17.2.3 Dynamic linking on Cray X-Series systems, or 17.2.4 Static linking and 17.2.5 Staticlinking on Cray X-Series systems.
3. Finally, it may be that your system supports dynamic linking but you have a statically-linkedMPI. You can try to recompile the MPI implementation with --enable-dynamic, or find adynamically-linked version on your system and recompile your program using that version. Thiswill produce a dynamically-linked program that MAP can automatically collect data from.
17.2.3 Dynamic linking on Cray X-Series systems
If the LD_PRELOAD mechanism is not supported on your Cray X-Series system, you can try to dynami-cally link your program explicitly with the MAP sampling libraries.
Compiling the Arm MPI Wrapper Library
First you must compile the Arm MPI wrapper library for your system using the make-profiler-libraries --platform=cray --lib-type=shared command.
Note: Performance Reports also uses this library.
user@login:∼/myprogram$ make-profiler-libraries --platform=cray--lib-type=shared
Created the libraries in /home/user/myprogram:libmap-sampler.so (and .so.1, .so.1.0, .so.1.0.0)libmap-sampler-pmpi.so (and .so.1, .so.1.0, .so.1.0.0)
To instrument a program, add these compiler options:compilation for use with MAP - not required for Performance
Reports:-g (or '-G2' for native Cray Fortran) (and -O3 etc.)
linking (both MAP and Performance Reports):-dynamic -L/home/user/myprogram -lmap-sampler-pmpi -lmap-
sampler -Wl,--eh-frame-hdr
Copyright c© 2002-2018 Arm Limited (or its affiliates). All rights reserved. 137

Arm Forge 18.0.2
Note: These libraries must be on the same NFS/Lustre/GPFSfilesystem as your
program.
Before running your program (interactively or from a queue), setLD_LIBRARY_PATH:export LD_LIBRARY_PATH=/home/user/myprogram:$LD_LIBRARY_PATHmap ...or add -Wl,-rpath=/home/user/myprogram when linking your program.
Linking with the Arm MPI Wrapper Library
mpicc -G2 -o hello hello.c -dynamic -L/home/user/myprogram \-lmap-sampler-pmpi -lmap-sampler -Wl,--eh-frame-hdr
PGI Compiler
When linkingOpenMP programs youmust pass the-Bdynamic command line argument to the compilerwhen linking dynamically.
When linking C++ programs you must pass the -pgc++libs command line argument to the compilerwhen linking.
17.2.4 Static linking
If you compile your program statically, that is your MPI uses a static library or you pass the -staticoption to the compiler, then youmust explicitly link your programwith the Arm sampler andMPIwrapperlibraries.
Compiling the Arm MPI Wrapper Library
First you must compile the Arm MPI wrapper library for your system using the make-profiler-libraries --lib-type=static command.
Note: Performance Reports also uses this library.
user@login:∼/myprogram$ make-profiler-libraries --lib-type=static
Created the libraries in /home/user/myprogram:libmap-sampler.alibmap-sampler-pmpi.a
To instrument a program, add these compiler options:compilation for use with MAP - not required for Performance
Reports:-g (and -O3 etc.)
linking (both MAP and Performance Reports):-Wl,@/home/user/myprogram/allinea-profiler.ld ...
EXISTING_MPI_LIBRARIESIf your link line specifies EXISTING_MPI_LIBRARIES (e.g. -lmpi)
, thenthese must appear *after* the Arm sampler and MPI wrapper
libraries inthe link line. There's a comprehensive description of the link
ordering
Copyright c© 2002-2018 Arm Limited (or its affiliates). All rights reserved. 138
Arm Forge 18.0.2
requirements in the 'Preparing a Program for Profiling' sectionof either
userguide-forge.pdf or userguide-reports.pdf, located in/opt/arm/forge/doc/.
Linking with the Arm MPI Wrapper Library
The -Wl,@/home/user/myprogram/allinea-profiler.ld syntax tells the compiler to lookin /home/user/myprogram/allinea-profiler.ld for instructions on how to link with theArm sampler. Usually this is sufficient, but not in all cases. The rest of this section explains how tomanually add the Arm sampler to your link line.
PGI Compiler
When linking C++ programs you must pass the -pgc++libs command line argument to the compilerwhen linking.
The PGI compiler must be 14.9 or later. Using earlier versions of the PGI compiler will fail with anerror such as “Error: symbol 'MPI F MPI IN PLACE' can not be both weak andcommon” due to a bug in the PGI compiler’s weak object support.
If you do not have access to PGI compiler 14.9 or later try compiling and the linking Arm MPI wrapperas a shared library as described in 17.2.3 Dynamic linking on Cray X-Series systems Ommit the option--platform=cray if you are not on a Cray.
Cray
When linking C++ programs you may encounter a conflict between the Cray C++ runtime and the GNUC++ runtime used by the MAP libraries with an error similar to the one below:
/opt/cray/cce/8.2.5/CC/x86-64/lib/x86-64/libcray-c++-rts.a(rtti.o): In function `__cxa_bad_typeid':
/ptmp/ulib/buildslaves/cfe-82-edition-build/tbs/cfe/lib_src/rtti.c:1062: multiple definition of `__cxa_bad_typeid'
/opt/gcc/4.4.4/snos/lib64/libstdc++.a(eh_aux_runtime.o):/tmp/peint/gcc/repackage/4.4.4c/BUILD/snos_objdir/x86_64-suse-linux/libstdc++-v3/libsupc++/../../../../xt-gcc-4.4.4/libstdc++-v3/libsupc++/eh_aux_runtime.cc:46: first defined here
You can resolve this conflict by removing-lstdc++ and-lgcc eh fromallinea-profiler.ld.
-lpthread
When linking -Wl,@allinea-profiler.ldmust go before the -lpthread command line argu-ment if present.
Manual Linking
When linking your program you must add the path to the profiler libraries (-L/path/to/profiler-libraries), and the libraries themselves (-lmap-sampler-pmpi, -lmap-sampler).
The MPI wrapper library (-lmap-sampler-pmpi) must go:
1. After your program’s object (.o) files.
2. After your program’s own static libraries, for example -lmylibrary.
3. After the path to the profiler libraries (-L/path/to/profiler-libraries).
4. Before the MPI’s Fortran wrapper library, if any. For example -lmpichf.
Copyright c© 2002-2018 Arm Limited (or its affiliates). All rights reserved. 139

Arm Forge 18.0.2
5. Before the MPI’s implementation library usually -lmpi.
6. Before the Arm sampler library -lmap-sampler.
The sampler library -lmap-sampler must go:
1. After the Arm MPI wrapper library.
2. After your program’s object (.o) files.
3. After your program’s own static libraries, for example -lmylibrary.
4. After -Wl,--undefined,allinea init sampler now.
5. After the path to the profiler libraries -L/path/to/profiler-libraries.
6. Before -lstdc++, -lgcc eh, -lrt, -lpthread, -ldl, -lm and -lc.
For example:
mpicc hello.c -o hello -g -L/users/ddt/allinea \-lmap-sampler-pmpi \-Wl,--undefined,allinea_init_sampler_now \-lmap-sampler -lstdc++ -lgcc_eh -lrt \-Wl,--whole-archive -lpthread \-Wl,--no-whole-archive \-Wl,--eh-frame-hdr \-ldl \-lm
mpif90 hello.f90 -o hello -g -L/users/ddt/allinea \-lmap-sampler-pmpi \-Wl,--undefined,allinea_init_sampler_now \-lmap-sampler -lstdc++ -lgcc_eh -lrt \-Wl,--whole-archive -lpthread \-Wl,--no-whole-archive \-Wl,--eh-frame-hdr \-ldl \-lm
17.2.5 Static linking on Cray X-Series systems
Compiling the MPI Wrapper Library
OnCrayX-Series systems usemake-profiler-libraries --platform=cray --lib-type=staticinstead:
Created the libraries in /home/user/myprogram:libmap-sampler.alibmap-sampler-pmpi.a
To instrument a program, add these compiler options:compilation for use with MAP - not required for Performance
Reports:-g (or -G2 for native Cray Fortran) (and -O3 etc.)
linking (both MAP and Performance Reports):
Copyright c© 2002-2018 Arm Limited (or its affiliates). All rights reserved. 140

Arm Forge 18.0.2
-Wl,@/home/user/myprogram/allinea-profiler.ld ...EXISTING_MPI_LIBRARIES
If your link line specifies EXISTING_MPI_LIBRARIES (e.g. -lmpi), then
these must appear *after* the Arm sampler and MPI wrapperlibraries in
the link line. There's a comprehensive description of the linkordering
requirements in the 'Preparing a Program for Profiling' sectionof either
userguide-forge.pdf or userguide-reports.pdf, located in/opt/arm/forge/doc/.
Linking with the MPI Wrapper Library
cc hello.c -o hello -g -Wl,@allinea-profiler.ld
ftn hello.f90 -o hello -g -Wl,@allinea-profiler.ld
17.2.6 Dynamic and static linking on Cray X-Series systems using themodules environment
If your system has the Arm module files installed, you can load them and build your application as usual.See section 17.2.7.
1. module load forge or ensure that make-profiler-libraries is in your PATH.
2. module load map-link-static or module load map-link-dynamic.
3. Recompile your program.
17.2.7 map-link modules installation on Cray X-Series
To facilitate dynamic and static linking of user programs with the Arm MPI Wrapper and Sampler li-braries Cray X-Series System Administrators can integrate the map-link-dynamic and map-link-staticmodules into their module system. Templates for these modules are supplied as part of the Arm Forgepackage.
Copy files share/modules/cray/map-link-* into a dedicated directory on the system.
For each of the two module files copied:
1. Find the line starting with conflict and correct the prefix to refer to the location the module fileswere installed, for example, arm/map-link-static. The correct prefix depends on the sub-directory (if any) under the module search path the map-link-* modules were installed.
2. Find the line starting with set MAP LIBRARIES DIRECTORY ”NONE” and replace ”NONE”with a user writable directory accessible from the login and compute nodes.
After installed you can verify whether or not the prefix has been set correctly with ‘module avail’, theprefix shown by this command for the map-link-* modules should match the prefix set in the ‘conflict’line of the module sources.
Copyright c© 2002-2018 Arm Limited (or its affiliates). All rights reserved. 141

Arm Forge 18.0.2
17.3 Profiling a program
Figure 94: Run window
If you click the Profile button on the MAP Welcome Page you will see the window above. The settingsare grouped into sections. Click the Details. . . button to expand a section. The settings in each sectionare described below.
17.3.1 Application
Application: The full path name to your application. If you specified one on the command line, this willalready be filled in. You may browse for an application by clicking on the Browse button.
Note: Many MPIs have problems working with directory and program names containing spaces. Armrecommends avoiding the use of spaces in directory and file names.
Arguments: (optional) The arguments passed to your application. These will be automatically filled ifyou entered some on the command line.
Note: Avoid using quote characters such as ' and ", as these may be interpreted differently by MAP andyour command shell. If you must use these and cannot get them to work as expected, please contact Armsupport at [email protected] .
stdin file: (optional) This allows you to choose a file to be used as the standard input (stdin) for yourprogram. MAP will automatically add arguments to mpirun to ensure your input file is used.
Working Directory: (optional) The working directory to use when running your application. If this isblank then MAP’s working directory will be used instead.
Copyright c© 2002-2018 Arm Limited (or its affiliates). All rights reserved. 142

Arm Forge 18.0.2
17.3.2 Duration
Start profiling after: (optional) This allows you to delay profiling by a number of seconds into the runof your program.
Stop profiling after: (optional) This allows you to specify a number of seconds after which the profilerwill terminate your program.
17.3.3 MPI
Note: If you only have a single process license or have selected none as your MPI Implementation theMPI options will be missing. TheMPI options are not available when in single process mode. See section17.5 Profiling a single-process program for more details about using a single process.
Number of processes: The number of processes that you wish to profile. MAP supports hundreds ofthousands of processes but this is limited by your license. This option may not be displayed if disabledon the Job Submission options page.
Number of nodes: This is the number of compute nodes that you wish to use to run your program. Thisoption is only displayed for certain MPI implementations or if it is enabled on the Job Submission optionspage.
Processes per node: This is the number of MPI processes to run on each compute node. This op-tion is only displayed for certain MPI implementations or if it is enabled on the Job Submission optionspage.
Implementation: The MPI implementation to use, for example, Open MPI, MPICH 2. Normally theAuto setting will detect the currently loaded MPI module correctly. If you are submitting a job to a queuethe queue settings will also be summarized here. You may change the MPI implementation by clickingon the Change. . . button.
Note: The choice of MPI implementation is critical to correctly starting MAP. Your system will normallyuse one particular MPI implementation. If you are unsure as to which to pick, try generic, consult yoursystem administrator or Arm support. A list of settings for common implementations is provided in EMPI distribution notes and known issues.
Note: If your desired MPI command is not in your PATH, or you wish to use an MPI run command that isnot your default one, you can configure this using the Options window. See section A.5.1 System.
mpirun arguments: (optional) The arguments that are passed to mpirun or your equivalent, usuallyprior to your executable name in normal mpirun usage. You can place machine file arguments, ifnecessary, here. For most users this box can be left empty.
Note: You should not enter the -np argument as MAP will do this for you.
Profile selected ranks: (optional) If you do not want to profile all the ranks, you can specify a set of ranksto profile. The ranks should be separated by commas and intervals are accepted. Example: 5,6-10.
17.3.4 OpenMP
Number of OpenMP threads: The number of OpenMP threads to run your program with. This ensuresthe OMP_NUM_THREADS environment variable is set, but your program may override this by callingOpenMP-specific functions.
Copyright c© 2002-2018 Arm Limited (or its affiliates). All rights reserved. 143

Arm Forge 18.0.2
17.3.5 Environment variables
The optional Environment Variables section should contain additional environment variables that shouldbe passed to mpirun or its equivalent. These environment variables may also be passed to your pro-gram, depending on which MPI implementation your system uses. Most users will not need to use thisbox.
17.3.6 Profiling
Click Run to start your program, or Submit if working through a queue. See section A.2 Integration withqueuing systems. This will compile up aMPI wrapper library on the fly that can intercept the MPI_INITcall and gather statistics about MPI use in your program. If this has problems see H.9.3 MPI wrapperlibraries. Then MAP brings up the Running window and starts to connect to your processes.
The program runs inside MAP which starts collecting stats on your program through the MPI interfaceyou selected and will allow your MPI implementation to determine which nodes to start which processeson.
MAP collects data for the entire program run by default. Arm’s sampling algorithms ensure only a fewtens of megabytes are collected even for very long-running jobs. You can stop your program at any timeby using the Stop and Analyze button. MAP will then collect the data recorded so far, stop your programand end the MPI session before showing you the results. If any processes remain you may have to cleanthem up manually using the kill command, or a command provided with your MPI implementation,but this should not be necessary.
Figure 95: Running window
17.3.7 Profiling only part of a program
You may choose not to start the MAP sampler when the job starts, but instead start it programmatically ata later point. To do this you must set the ALLINEA SAMPLER DELAY START=1 environment variable
Copyright c© 2002-2018 Arm Limited (or its affiliates). All rights reserved. 144

Arm Forge 18.0.2
before starting your program. For MPI programs it is important that this variable is set in the environmentof all the MPI processes. It is not necessarily sufficient to simply set the variable in the environment ofthe MPI command itself. You must arrange for the variable to be set or exported by your MPI commandfor all the MPI processes.
You may call allinea start sampling and allinea stop sampling once each. That is tosay there must be one and only one contiguous sampling region. It is not possible to start, stop, start,stop. You cannot pause or resume sampling using the allinea suspend traces and allinea -resume traces functions. This will not have the desired effect. You may only delay the start ofsampling and stop sampling early.
17.3.7.1 C
To start sampling programmatically you should #include "mapsampler api.h" and call theallinea start sampling function. You will need to point your C compiler at the MAP includedirectory, by passing the arguments -I <install root>/map/wrapper and also link with theMAP sampler library, by passing the arguments -L <install root>/lib/64 -lmap-sampler.To stop sampling progammatically call the allinea stop sampling function.
17.3.7.2 Fortran
To start sampling programmatically you should call the ALLINEA START SAMPLING subroutine. Youwill also need to linkwith theMAP sampler library, for example by passing the arguments-L <installroot>/lib/64 -lmap-sampler. To stop sampling programmatically call the ALLINEA STOP -SAMPLING subroutine.
17.4 remote-exec required by some MPIs
When using SGI MPT, MPICH 1 Standard or the MPMD variants of MPICH 2, MPICH 3 or IntelMPI, MAP will allow mpirun to start all the processes, then attach to them while they’re inside MPI_Init.
This method is often faster than the generic method, but requires the remote-exec facility in MAP tobe correctly configured if processes are being launched on a remote machine. For more information onremote-exec, please see section A.4 Connecting to remote programs (remote-exec).
Note: If MAP is running in the background, for example using map &, then this process may get stuck.Some SSH versions cause this behavior when asking for a password. If this happens to you, go to theterminal and use the fg or similar command to make MAP a foreground process, or run MAP again,without using “&”.
If MAP cannot find a password-free way to access the cluster nodes then you will not be able to usethe specialized startup options. Instead, You can use generic, although startup may be slower for largenumbers of processes.
Copyright c© 2002-2018 Arm Limited (or its affiliates). All rights reserved. 145

Arm Forge 18.0.2
17.5 Profiling a single-process program
Figure 96: Single-Process Run Window
1. If you have a single-process license you will immediately see the Run Window that is appropriatefor single-process applications. If your license supports multiple processes you can simply cleartheMPI checkbox to run a single-process program.
2. Select the application, either by typing the file name in, or selecting it using the browser displayedby clicking the browse button.
3. Arguments can be typed into the supplied box.
4. If appropriate, tick the OpenMP box and select the Number of OpenMP threads to start your pro-gram with.
5. Click Run to start your program.
17.6 Sending standard input
MAP provides a stdin file box in the Run window. This allows you to choose a file to be used as thestandard input (stdin) for your program. MAP will automatically add arguments to mpirun to ensure yourinput file is used.
Alternatively, you may enter the arguments directly in the mpirun Arguments box. For example, if usingMPI directly from the command-line you would normally use an option to the mpirun such as -stdinfilename, then you may add the same options to the mpirun Arguments box when starting your MAPsession in the Run window.
Copyright c© 2002-2018 Arm Limited (or its affiliates). All rights reserved. 146

Arm Forge 18.0.2
It is also possible to enter input during a session. Start your program as normal, then switch to theInput/Output panel. Here you can see the output from your program and type input you wish to send.You may also use theMore button to send input from a file, or send an EOF character.
Figure 97: MAP Sending Input
Note: If MAP is running on a fork-based system such as Scyld, or a-comm=shared compiledMPICH 1,your program may not receive an EOF correctly from the input file. If your program seems to hang whilewaiting for the last line or byte of input, this is likely to be the problem. See H General troubleshootingand known issues or contact Arm support at [email protected] for a list of possible fixes.
17.7 Starting a job in a queue
If MAP has been configured to be integrated with a queue/batch environment, as described in section A.2Integration with queuing systems then you may use it to launch your job.
In this case, a Submit button is presented on the RunWindow, instead of the ordinaryRun button. ClickingSubmit from the Run Window will display the queue status until your job starts. MAP will execute thedisplay command every second and show you the standard output. If your queue display is graphical orinteractive then you cannot use it here.
If your job does not start or you decide not to run it, click on Cancel Job. If the regular expression youentered for getting the job ID is invalid or if an error is reported then MAP will not be able to removeyour job from the queue.
It is strongly recommended you check the job has been removed before submitting another as it is possiblefor a forgotten job to execute on the cluster and either waste resources or interfere with other profilingsessions.
After the sampling (program run) phase is complete, MAP will start the analysis phase, collecting andprocessing the distinct samples. This could be a lengthy process depending on the size of the program.For very large programs it could be as much as 10 or 20 minutes.
Copyright c© 2002-2018 Arm Limited (or its affiliates). All rights reserved. 147
Arm Forge 18.0.2
You should ensure that your job does not hit its queue limits during the analysis process, setting the jobtime large enough to cover both the sampling and the analysis phases.
MAP will also require extra memory both in the sampling and in the analysis phases. If these fail andyour application alone approaches one of these limits then you may need to run with fewer processes pernode or a smaller data set in order to generate a complete set of data.
Once your job is running, it will connect to MAP and you will be able to profile it.
17.8 Using custom MPI scripts
On some systems a custom mpirun replacement is used to start jobs, such as mpiexec. MAP willnormally use whatever the default for your MPI implementation is, so for MPICH 1 it would look formpirun and not mpiexec, for SLURM it would use srun and so on. This section explains how toconfigure MAP to use a custom mpirun command for job start up.
There are typically two ways you might want to start jobs using a custom script, and MAP supports themboth.
The first way is to pass all the arguments on the command-line, as in the following example:
mpiexec -n 4 /home/mark/program/chains.exe /tmp/mydata
There are several key variables in this line that MAP can fill in for you:
1. The number of processes (4 in the above example).
2. The name of your program (/home/mark/program/chains.exe).
3. One or more arguments passed to your program (/tmp/mydata).
Everything else, like the name of the command and the format of its arguments remains constant.
To use a command like this in MAP, the queue submission system is adpated as described in the previoussection. For this mpiexec example, the settings would be as shown here:
Copyright c© 2002-2018 Arm Limited (or its affiliates). All rights reserved. 148

Arm Forge 18.0.2
Figure 98: MAP Using Custom MPI Scripts
As you can see, most of the settings are left blank.
There are some differences between the Submit Command in MAP and what you would type at thecommand-line:
1. The number of processes is replaced with NUM_PROCS_TAG.
2. The name of the program is replaced by the full path to ddt-debugger, used by both DDT andMAP.
3. The program arguments are replaced by PROGRAM_ARGUMENTS_TAG.
Note: it is not necessary to specify the program name here. MAP takes care of that during its own startupprocess. The important thing is to make sure your MPI implementation starts ddt-debugger insteadof your program, but with the same options.
The second way you might start a job using a custom mpirun replacement is with a settings file:
mpiexec -config /home/mark/myapp.nodespec
Where myfile.nodespec might contains something like the following:
comp00 comp01 comp02 comp03 : /home/mark/program/chains.exe /tmp/mydata
MAP can automatically generate simple configuration files like this every time you run your programif you specify a template file. For the above example, the template file myfile.template wouldcontain the following:
Copyright c© 2002-2018 Arm Limited (or its affiliates). All rights reserved. 149
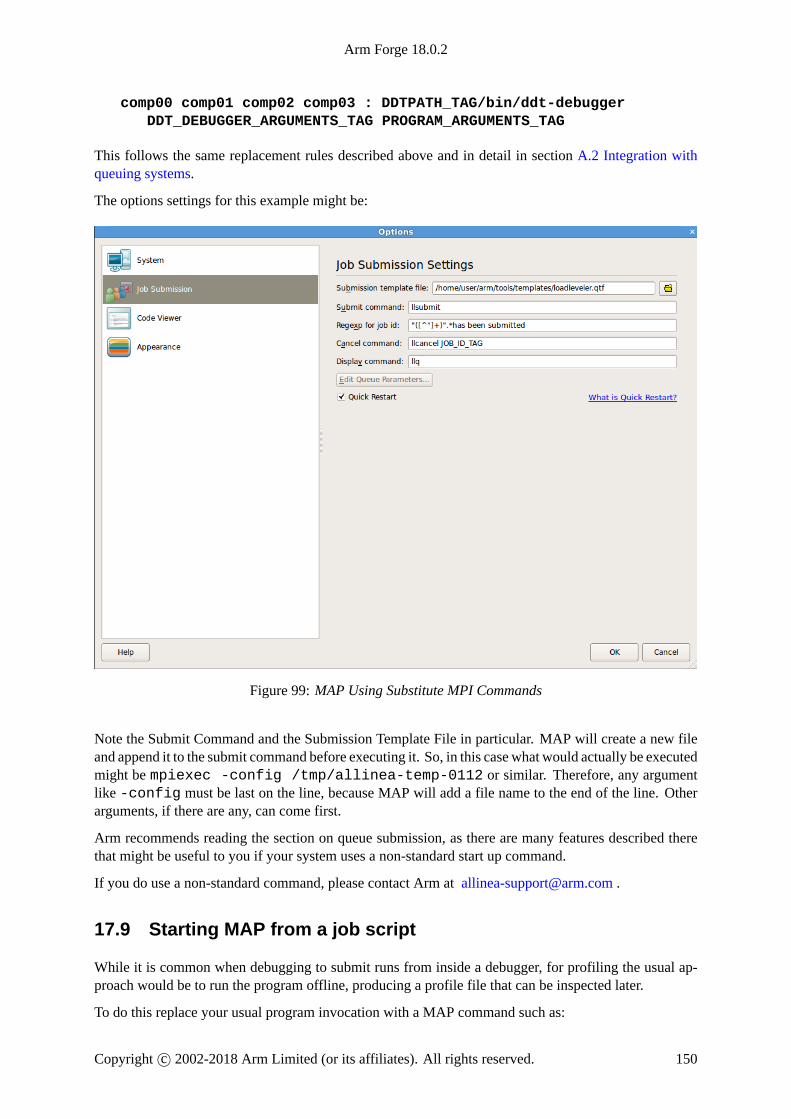
Arm Forge 18.0.2
comp00 comp01 comp02 comp03 : DDTPATH_TAG/bin/ddt-debuggerDDT_DEBUGGER_ARGUMENTS_TAG PROGRAM_ARGUMENTS_TAG
This follows the same replacement rules described above and in detail in section A.2 Integration withqueuing systems.
The options settings for this example might be:
Figure 99: MAP Using Substitute MPI Commands
Note the Submit Command and the Submission Template File in particular. MAP will create a new fileand append it to the submit command before executing it. So, in this case what would actually be executedmight be mpiexec -config /tmp/allinea-temp-0112 or similar. Therefore, any argumentlike -config must be last on the line, because MAP will add a file name to the end of the line. Otherarguments, if there are any, can come first.
Arm recommends reading the section on queue submission, as there are many features described therethat might be useful to you if your system uses a non-standard start up command.
If you do use a non-standard command, please contact Arm at [email protected] .
17.9 Starting MAP from a job script
While it is common when debugging to submit runs from inside a debugger, for profiling the usual ap-proach would be to run the program offline, producing a profile file that can be inspected later.
To do this replace your usual program invocation with a MAP command such as:
Copyright c© 2002-2018 Arm Limited (or its affiliates). All rights reserved. 150

Arm Forge 18.0.2
mpirun -n 4 PROGRAM [ARGUMENTS]...
With either of the following examples:
map --profile mpirun -n 4 PROGRAM [ARGUMENTS]...
map --profile --np=4 PROGRAM [ARGUMENTS]...
MAPwill run without a GUI, gathering data to a .map profile file. Its filename is based on a combinationof program name, process count and timestamp, like program 2p 2012-12-19 10-51.map.
If using OpenMP, the value of OMP NUM THREADS is also included in the name after the process count,like program 2p 8t 2014-10-21 12-45.map.
This default name may be changed with the --output argument. To examine this file, either run MAPand select the Load Profile Data File option, or access it directly with the command:
map program_2p_2012-12-19_10-51.map
Note: When starting MAP for examining an existing profile file, a valid license is not needed.
When running without a GUI, MAP prints a short header and footer to stderr with your program’s outputin between. The --silent argument suppresses this additional output so that your program’s output isintact.
As an alternative to --profile you can use Reverse Connect (see 3.3 Reverse Connect) to connectback to the GUI if you wish to use interactive profiling from inside the queue. So the above examplebecomes either:
map --connect mpirun -n 4 PROGRAM [ARGUMENTS]...
Or:
map --connect --np=4 PROGRAM [ARGUMENTS]...
17.10 MAP environment variables
ALLINEA SAMPLER INTERVAL
MAP takes a sample in each 20ms period, giving it a default sampling rate of 50Hz. This will beautomatically decreased as the run proceeds to ensure a constant number of samples are taken. SeeALLINEA_SAMPLER_NUM_SAMPLES.
If your program runs for a very short period of time, you may benefit by decreasing the initial samplinginterval. For example, ALLINEA_SAMPLER_INTERVAL=1 sets an initial sampling rate of 1000Hz, oronce per millisecond. Higher sampling rates are not supported.
Increasing the sampling frequency from the default is not recommended if there are lots of threads and/orvery deep stacks in the target program as this may not leave sufficient time to complete one sample beforethe next sample is started.
ALLINEA SAMPLER INTERVAL PER THREAD
To keep overhead low, MAP imposes a minimum sampling interval based on the number of threads. Bydefault this is 2ms per thread, thus for eleven or more threads MAP will increase the initial samplinginterval to more than 20ms.
Copyright c© 2002-2018 Arm Limited (or its affiliates). All rights reserved. 151
Arm Forge 18.0.2
You can adjust this behavior by setting ALLINEA_SAMPLER_INTERVAL_PER_THREAD to the mini-mum per-thread sample time in milliseconds.
Lowering this value from the default is not recommended if there are lots of threads as this may not leavesufficient time to complete one sample before the next sample is started.
ALLINEA MPI WRAPPER
To directMAP to use a specific wrapper library setALLINEA_MPI_WRAPPER=<pathofsharedobject>.
MAP ships with a number of precompiled wrappers, when yourMPI is supportedMAPwill automaticallyselect and use the appropriate wrapper.
To manually compile a wrapper specifically for your system, set ALLINEA_WRAPPER_COMPILE=1andMPICC and run<path to MAP installation>/map/wrapper/build_wrapper.
This will generate thewrapper library~/.allinea/wrapper/libmap-sampler-pmpi-<hostname>.so with symlinks to the following files:
• ~/.allinea/wrapper/libmap-sampler-pmpi-<hostname>.so.1
• ~/.allinea/wrapper/libmap-sampler-pmpi-<hostname>.so.1.0
• ~/.allinea/wrapper/libmap-sampler-pmpi-<hostname>.so.1.0.0.
ALLINEA WRAPPER COMPILE
To direct MAP to fall back to creating and compiling a just-in-time wrapper, set ALLINEA_WRAPPER_COMPILE=1.
In order to be able to generate a just-in-time wrapper an appropriate compiler must be available on themachine where MAP is running, or on the remote host when using remote connect.
MAP will attempt to auto detect your MPI compiler, however, setting the MPICC environment variableto the path to the correct compiler is recommended.
ALLINEA MPIRUN
The path of mpirun, mpiexec or equivalent.
If this is set it has higher priority than that set in the GUI and the mpirun found in PATH.
ALLINEA SAMPLER NUM SAMPLES
MAP collects 1000 samples per process by default. To avoid generating too much data on long runs, thesampling rate will be automatically decreased as the run progresses to ensure only 1000 evenly spacedsamples are stored.
Youmay adjust this by settingALLINEA_SAMPLER_NUM_SAMPLES=<positiveinteger>.
Note: It is strongly recommended that you leave this value at the default setting. Higher values arenot generally beneficial and add extra memory overheads while running your code. Bear in mind thatwith 512 processes, the default setting already collects half a million samples over the job, the effectivesampling rate can be very high indeed.
ALLINEA KEEP OUTPUT LINES
Specifies the number of lines of program output to record in .map files. Setting to 0will remove the linelimit restriction, although this is not recommended as it may result in very large .map files if the profiledprogram produces lots of output.
See 18.3 Restricting output.
Copyright c© 2002-2018 Arm Limited (or its affiliates). All rights reserved. 152
Arm Forge 18.0.2
ALLINEA KEEP OUTPUT LINE LENGTH
The maximum line length for program output that will be recorded in .map files - lines containing morecharacters than this limit will be truncated. Setting to 0 will remove the line length restriction, althoughthis is not recommended as it may result in very large .map files if the profiled program produces lotsof output per line.
See 18.3 Restricting output.
ALLINEA PRESERVE WRAPPER
To gather data from MPI calls MAP generates a wrapper to the chosen MPI implementation. See 17.2Preparing a program for profiling.
By default the generated code and shared objects are deleted when MAP no longer needs them.
To prevent MAP from deleting these files set ALLINEA_PRESERVE_WRAPPER=1.
Please note that if you are using remote launch then this variable must be exported in the remote script.See 3.2.1 Remote script.
ALLINEA SAMPLER NO TIME MPI CALLS
Set this to prevent MAP from timing the time spent in MPI calls.
ALLINEA SAMPLER TRY USE SMAPS
Set this to allow MAP to use /proc/[pid]/smaps to gather memory usage data. This is not recom-mended since it slows down sampling significantly.
MPICC
To create theMPIwrapperMAPwill try to useMPICC, then if that fails search for a suitableMPI compilercommand in PATH. If the MPI compiler used to compile the target binary is not in PATH (or if there aremultiple MPI compilers in PATH) then MPICC should be set.
Copyright c© 2002-2018 Arm Limited (or its affiliates). All rights reserved. 153

Arm Forge 18.0.2
18 Program output
MAP collects and displays output from all processes under the Input/Output tab. Both standard outputand error are shown. As the output is shown after the program has completed, there are not the problemswith buffering that occur with DDT.
18.1 Viewing standard output and error
Figure 100: MAP Standard Output Window
The Input/Output tab is at the bottom of the screen (by default).
The output may be selected and copied to the X-clipboard.
18.2 Displaying selected processes
You can choose whether to view the output for all processes, or just a single process.
Note: Some MPI implementations pipe stdin, stdout and stderr from every process through mpirun orrank 0.
18.3 Restricting output
To keep file sizes within reasonable limits .map files will contain a summary of the program outputlimited to the first and last 500 lines (by default).
To change this number, profile with the environment variable ALLINEA KEEP OUTPUT LINES set tothe preferred total line limit (ALLINEA KEEP OUTPUT LINES=20 will restrict recorded output to thefirst 10 lines and last 10 lines).
Setting this to 0 will remove the line limit restriction, although this is not recommended as it may resultin very large .map files if the profiled program produces lots of output.
Copyright c© 2002-2018 Arm Limited (or its affiliates). All rights reserved. 154
Arm Forge 18.0.2
The length of each line is similarly restricted to 2048 characters. This can be changed with the environ-ment variable ALLINEA KEEP OUTPUT LINE LENGTH.
As before setting this to a value of 0 will remove the restriction, although this is not recommended as itrisks a large .map file if the profiled program emits binary data or very long lines.
18.4 Saving output
By right-clicking on the text it is possible to save it to a file. You also have the option to copy a selectionto the clipboard.
Copyright c© 2002-2018 Arm Limited (or its affiliates). All rights reserved. 155

Arm Forge 18.0.2
19 Source code
Arm MAP provides code viewing, editing and rebuilding features. It also integrates with most majorversion control systems and provides static analysis to automatically detect many classes of commonerrors.
The code editing and rebuilding capabilities are not designed for developing applications from scratch,but they are designed to fit into existing profiling sessions that are running on a current executable.
The same capabilities are available for source code whether running remotely (using the remote client)or whether connected directly to your system.
19.1 Viewing
Source and header files found in the executable are reconciled with the files present on the front-endserver, and displayed in a simple tree view within the Project Files tab of the Project Navigator window.Source files can be loaded for viewing by clicking on the file name.
The source code viewer supports automatic color syntax highlighting for C and Fortran.
You can hide functions or subroutines you are not interested in by clicking the ‘−’ glyph next to the firstline of the function. This will collapse the function. Simply click the ‘+’ glyph to expand the functionagain.
Figure 101: Source Code View
The centre pane shows your source code, annotated with performance information. All the charts youwill see in MAP share a common horizontal time axis. The start of your job is at the left and the end atthe right. The sparkline charts next to each line of source code shows how the number of cores executingthat line of code varies over time.
What does it mean to say a core is executing a particular line of code? In the source code view, MAPuses inclusive time, that is time spent on this line of code or inside functions called by this line. So themain() function of a single-threaded C or MPI program is typically at 100% for the entire run.
Only ‘interesting’ lines get charts, that is, lines in which at least 0.1% of the selected time range wasspent. In the previous figure you can see three different lines meet this criteria. The other lines wereexecuted as well, but a negligible amount of time was spent on them.
The first line is a function call to imbalance, which was running for 18.1% of the wall-clock time.If you look closely, you will see that as well as a large block of green there is a sawtooth pattern inblue. Color is used to identify different kinds of time. In this single-threaded MPI code there are threecolors:
• Dark green Single-threaded computation time. For an MPI program, this is all computation time.For an OpenMP or multi-threaded program, this is the time the main thread was active and noworker threads were active.
Copyright c© 2002-2018 Arm Limited (or its affiliates). All rights reserved. 156

Arm Forge 18.0.2
• BlueMPI communication and waiting time. All time spent inside MPI calls is blue, regardless ofwhether that is in MPI_Send or MPI_Barrier. Typically you want to minimize this, becausethe purpose of most codes is parallel computation, not communication for its own sake.
• Orange I/O time. All time spent inside known I/O functions such as reading and writing to thelocal or networked filesystem is shown in orange. You definitely want to minimize time spent inI/O and on many systems the complex data storage hierarchy can cause unexpected bottlenecks tooccur when scaling a code up. MAP always shows the time from the application’s point of view,so all the underlying complexity is captured and represented as simply as possible.
• Dark purpleAccelerator. All the time the CPU is waiting the accelerator to return the control to theCPU. Typically you want to minimize this, making the CPU work in parallel with the acceleratorusing accelerator asynchronous calls.
In the above screenshot you can see the following:
• First a function called imbalance is called. This function spends most of its time in computation(dark green) and around 15–20% of it in MPI calls (blue). Hovering the mouse over any graphshows an exact breakdown of the time spent in it. There is a sawtooth pattern to the time spent inMPI calls that will be investigated later.
• Next the application moves on to a function called stride, which spends all of its time com-puting. You will see how to tell whether this time is well spent or not. You can also see an MPIsynchronization at the end. The triangle shape is typical of ranks finishing their work at differenttimes and spending varying amounts of time waiting at a barrier. Where you see triangles in thesecharts that indicates imbalance.
• Finally, a function called overlap is called, which spends almost all of its time in MPI calls.
• The other functions in this snippet of source code were active for <0.1% of the total runtime andcan be ignored from a profiling point of view.
As this was anMPI program, the height of each block of color represents the percentage of MPI processesthat were running each particular line at any moment in time. So the sawtooth pattern of MPI usageactually tells us that:
• The imbalance function goes through several iterations.
• In each iteration all processes start out computing, there is more green than blue.
• As execution continues more and more processes finish computing and transition to waiting in anMPI call, causing the distinctive triangular pattern showing workload imbalance.
• As each triangle ends all ranks finish communicating and the pattern begins again with the nextiteration.
This is a classic sign of MPI imbalance. In fact, any triangular patterns in MAP’s graphs show thatfirst a few processes are changing to a different state of execution, then more, then more until they allsynchronize and move on to another state together. These areas should be investigated.
You can explore this situation in more detail by opening the examples/slow.map file and lookingat the imbalance function yourself. Can you see why some processes take longer to finish computingthan others?
Copyright c© 2002-2018 Arm Limited (or its affiliates). All rights reserved. 157

Arm Forge 18.0.2
19.2 OpenMP programs
Figure 102: OpenMP Source Code View
In an OpenMP or multi-threaded program (or a mixed-mode MPI+OpenMP program) you will also seethese colors used:
• Light greenMulti-threaded computation time. For anOpenMPprogram this is time insideOpenMPregions. When profiling an OpenMP program you want to see as much light green as possible, be-cause that is the only time you are using all available cores. Time spent in dark green is a potentialbottleneck because it is serial code outside an OpenMP region.
• Light blue Multi-threaded MPI communication time. This is MPI time spent waiting for MPIcommunication while inside an OpenMP region or on a pthread. As with the normal blue MPItime you will want to minimize this, but also maximize the amount of multi-threaded computation(light green) that is occurring on the other threads while this MPI communication is taking place.
• Dark Gray Time inside an OpenMP region in which a core is idle or waiting to synchronize withthe other OpenMP threads. In theory, during anOpenMP region all threads are active all of the time.In practice there are significant synchronization overheads involved in setting up parallel regionsand synchronizing at barriers. These will be seen as dark gray holes in the otherwise happy lightgreen of optimal parallel computation. If you see these there may be an opportunity to improveperformance with better loop scheduling or division of the work to be done.
• Pale blue Thread synchronization time. Time spent waiting for synchronization between non-OpenMP threads (for example, a pthread join). Whether this time can be reduced depends onthe purpose of the threads in question.
In the screenshot above you can see that 11.1% of the time is spent calling neighbor.build(atom)and 78.4% of the time is spent callingforce->compute(atom, neighbor, comm, comm.me).The graphs show a mixture of light green indicating an OpenMP region and dark gray indicatingOpenMP overhead. OpenMP overhead is the time spent in OpenMP that is not the contents of an OpenMPregion (user code). Hovering the mouse over a line will show the exact percentage of time spent in over-head, but visually you can already see that it is significant but not dominant here.
Increasingly, programs use both MPI and OpenMP to parallelize their workloads efficiently. MAP fullyand transparently supports this model of working. It is important to note that the graphs are a reflectionof the application activity over time:
• A large section of blue in a mixed-mode MPI code means that all the processes in the applicationwere inside MPI calls during this period. Try to reduce these, especially if they have a triangularshape suggesting that some processes were waiting inside MPI while others were still computing.
Copyright c© 2002-2018 Arm Limited (or its affiliates). All rights reserved. 158

Arm Forge 18.0.2
• A large section of dark green means that all the processes were running single-threaded computa-tions during that period. Avoid this in an MPI+OpenMP code, or you might as well leave out theOpenMP sections altogether.
• Ideally you want to achieve large sections of light green, showing OpenMP regions being effec-tively used across all processes simultaneously.
• It is possible to call MPI functions from within an OpenMP region. MAP only supports this if themain thread (the OpenMP master thread) is the one that makes the MPI calls. In this case, the blueblock of MPI time will be smaller, reflecting that one OpenMP thread is in an MPI function whilethe rest are doing something else such as useful computation.
19.3 GPU programs
In a program using NVIDIA CUDA CPU, time spent waiting for GPU kernels to complete is shown inPurple.
When CUDA kernel analysis mode is enabled (see Section 31) MAP will display also display data forlines inside CUDA kernels. These graphs show when GPU kernels were active, and for each kernel abreakdown of the different types of warp stalls that occurred on that line. The different types of warpstalls are listed in Section 31.1. Refer to the tooltip or selected line display (Section 20.2) to get the exactbreakdown, but in general:
• Purple Selected. Instructions on this line were being executed on the GPU.
• Dark Purple Not selected. This means warps on this line were ready to execute but that there wasno available SM to do the executing.
• Red (various shades)Memory operations. Warps on this line were stalled waiting for somememorydependency to be satisfied. Shade of red indicates the type of memory operation.
• Blue (various shades) Execution dependency. Warps on this line were stalled until some otheraction completes. Shade of blue indicates the type of execution dependency.
Note that warp stalls are only reported per-kernel, so it is not possible to obtain the times within a kernelinvocation at which different categories of warp stalls occurred. As function calls in CUDA kernels arealso automatically fully inlined it is not possible to see warp stalls for ’time spent inside function(s) online’ for GPU kernel code.
Figure 103: Source Code View (GPU Kernel)
In this screenshot a CUDA kernel involving this line was running on this line 13.1% of the time, withmost of the warps waiting for a memory access to complete. The colored horizontal range indicateswhen any kernel observed to be using this source line was on the GPU. The height of the colored re-gion indicates the proportion of sampled warps that were observed to be on this line. See the NVIDIACUPTI documentation at http://docs.nvidia.com/cuda/cupti/r_main.html#r_pc_sampling for more infor-mation on how warps are sampling.
Copyright c© 2002-2018 Arm Limited (or its affiliates). All rights reserved. 159

Arm Forge 18.0.2
19.4 Dealing with complexity: code folding
Real-world scientific codes do not look much like the examples above. They tend to look more like thefollowing:
Figure 104: Typical Fortran Code in MAP
Here, small amounts of processing are distributed over many lines, and it is difficult to see which partsof the program are responsible for the majority of the resource usage.
To understand the performance of complex blocks of code like this, MAP allows supports code folding.Each logical block of code such as an if-statement or a function call has a small [–] next to it. Clickingthis folds those lines of code into one and shows one single sparkline for the entire block:
Figure 105: Folded Fortran Code in MAP
Now you can clearly see that most of the processing occurs within the conditional block starting online 122.
When exploring a new source file, a good way to understand its performance is to use the View->FoldAll menu item to collapse all the functions in the file to single lines, then scroll through it looking forfunctions that take an unusual amount of time or show an unusual pattern of I/O or MPI overhead. Thesecan then be expanded to show their most basic blocks, and the largest of these can be expanded again andso on.
19.5 Editing
Source code may be edited in the code viewer windows of MAP. The actions Undo, Redo, Cut, Copy,Paste, Select all, Go to line, Find, Find next, Find previous, and Find in files are available from the Edit
Copyright c© 2002-2018 Arm Limited (or its affiliates). All rights reserved. 160

Arm Forge 18.0.2
menu.
Files may be opened, saved, reverted and closed from the File menu.
Note that information fromMAPwill not match edited source files until the changes are saved, the binaryis rebuilt, and a new profile is recreated.
If the currently selected file has an associated header or source code file, it can be opened by right-clickingin the editor and choosing Open <filename>.<extension>. There is a global shortcut on function keyF4, available in the Edit menu as Switch Header/Source option.
To edit a source file in an external editor, right-click the editor for the file and choose Open in externaleditor. To change the editor used, or if the file does not open with the default settings, open the Optionswindow by selecting File → Options (Arm Forge → Preferences on Mac OS X) and enter the path tothe preferred editor in the Editor box, for example /usr/bin/gedit.
If a file is edited the following warning is displayed at the top of the editor.
Figure 106: File Edited Warning
This is to warn you that the source code shown is not the source that was used to produced the currentlyexecuting binary, so the source code and line numbers may not match the executing code.
19.6 Rebuilding and restarting
To configure the build command choose File→ Configure Build. . . , enter a build command and a direc-tory in which to run the command, and click Apply.
To issue the build command choose File→ Build, or press Ctrl+B (Cmd+B onMac OS X ). When a buildis issued the Build Output view is shown.
19.7 Committing changes
Changes to source files may be committed using one of Git, Mercurial, and Subversion. To commitchanges choose File→ Commit. . . , enter a commit message to the resulting dialog and click the commitbutton.
Copyright c© 2002-2018 Arm Limited (or its affiliates). All rights reserved. 161
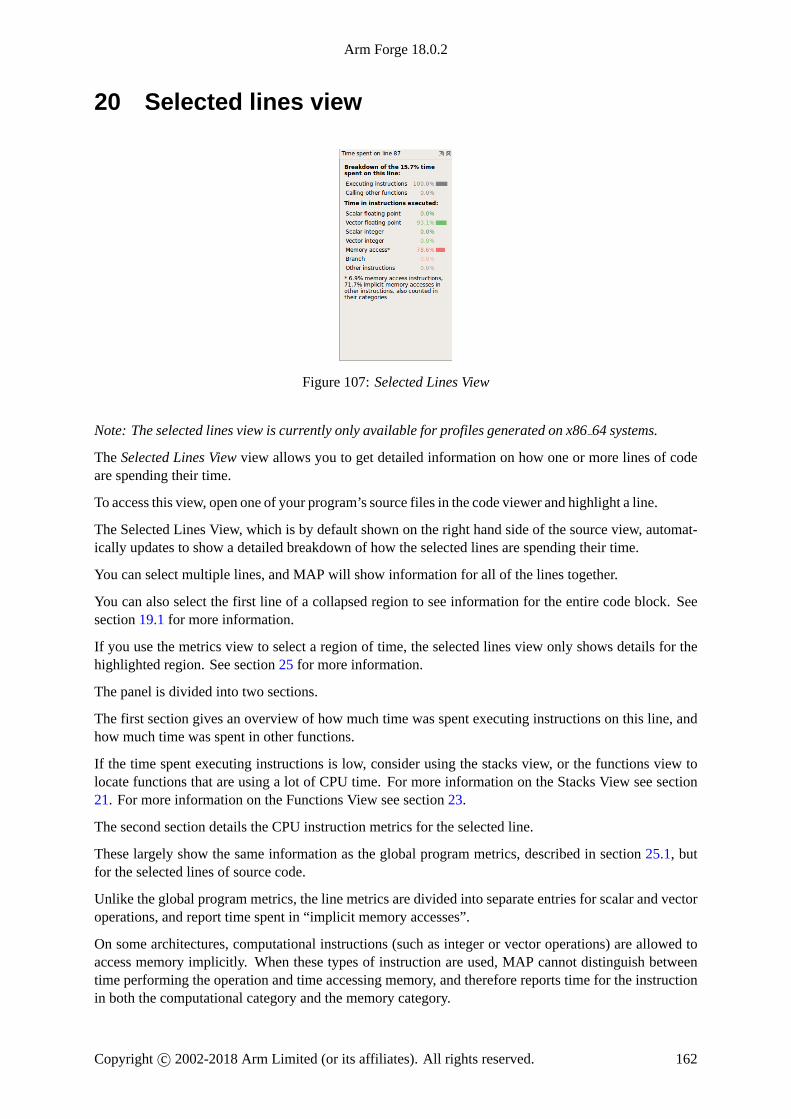
Arm Forge 18.0.2
20 Selected lines view
Figure 107: Selected Lines View
Note: The selected lines view is currently only available for profiles generated on x86 64 systems.
The Selected Lines View view allows you to get detailed information on how one or more lines of codeare spending their time.
To access this view, open one of your program’s source files in the code viewer and highlight a line.
The Selected Lines View, which is by default shown on the right hand side of the source view, automat-ically updates to show a detailed breakdown of how the selected lines are spending their time.
You can select multiple lines, and MAP will show information for all of the lines together.
You can also select the first line of a collapsed region to see information for the entire code block. Seesection 19.1 for more information.
If you use the metrics view to select a region of time, the selected lines view only shows details for thehighlighted region. See section 25 for more information.
The panel is divided into two sections.
The first section gives an overview of how much time was spent executing instructions on this line, andhow much time was spent in other functions.
If the time spent executing instructions is low, consider using the stacks view, or the functions view tolocate functions that are using a lot of CPU time. For more information on the Stacks View see section21. For more information on the Functions View see section 23.
The second section details the CPU instruction metrics for the selected line.
These largely show the same information as the global program metrics, described in section 25.1, butfor the selected lines of source code.
Unlike the global program metrics, the line metrics are divided into separate entries for scalar and vectoroperations, and report time spent in “implicit memory accesses”.
On some architectures, computational instructions (such as integer or vector operations) are allowed toaccess memory implicitly. When these types of instruction are used, MAP cannot distinguish betweentime performing the operation and time accessing memory, and therefore reports time for the instructionin both the computational category and the memory category.
Copyright c© 2002-2018 Arm Limited (or its affiliates). All rights reserved. 162

Arm Forge 18.0.2
The amount of time spent in “explicit” and “implicit” memory accesses is reported as a footnote to thetime spent executing instructions.
Some guidelines are listed here:
• In general, aim for a large proportion of time in vector operations.
• If you see a high proportion of time in scalar operations, try checking to see if your compiler iscorrectly optimising for your processor’s SIMD instructions.
• If you see a large amount of time in memory operations then look for ways to more efficientlyaccess memory in order to improve cache performance.
• If you see a large amount of time in branch operations then look for ways to avoid using conditionallogic in your inner loops.
Section 25.1 offers detailed advice on what to look for when optimizing the types of instruction yourprogram is executing.
20.1 Limitations
Modern superscalar processors use instruction-level parallelism to decode and execute multiple opera-tions in a single cycle, if internal CPU resources are free, and will retire multiple instructions at once,making it appear as if the program counter “jumps” several instructions per cycle.
Current architectures do not allow profilers such as MAP (or Intel VTune, Linux perftools and others)to efficiently measure which instructions were “invisibly” executed by this instruction-level parallelism.This time is typically allocated to the last instruction executed in the cycle.
Most MAP users will not be affected by this for the following reasons:
1. Hot lines in a HPC code typically contain rather more than a single instruction such as nop. Thismakes it unlikely that an entire source line will be executed invisibly via the CPU’s instruction-levelparallelism.
2. Any such lines executed “for free” in parallel with another line by a CPU core will clearly showup as a “gap” in the source code view (but this is unusual).
3. Loops with stalls and mispredicted branches still show up highlighting the line containing the prob-lem in all but the most extreme cases.
To summarize key points:
• Experts users: those wanting to use MAP’s per-line instruction metrics to investigate detailed CPUperformance of a loop or kernel (even down to the assembly level) should be aware that instructionsexecuted in parallel by the CPU will show up with time only assigned to the last one in the batchexecuted.
• Other users: MAP’s statistical instruction-based metrics correlate well with where time is spent inthe application and help to find areas for optimization. Feel free to use them as such. If you seelines with very few operations on them (such as a single add or multiply) and no time assigned tothem inside your hot loops then these are probably being executed “for free” by the CPU usinginstruction-level parallelism. The time for each batch of such is assigned to the last instructioncompleted in the cycle instead.
Copyright c© 2002-2018 Arm Limited (or its affiliates). All rights reserved. 163

Arm Forge 18.0.2
20.2 GPU profiling
Figure 108: Selected lines view (GPU kernel)
When CUDA kernel analysis is enabled (see section 31) and the selected line is executed on the GPUthen a breakdown of warp stall reasons on this line will be shown in this view. For a description of eachof these warp stall reasons, refer to the tooltip for each of the entries or section 31.1.
Copyright c© 2002-2018 Arm Limited (or its affiliates). All rights reserved. 164

Arm Forge 18.0.2
21 Stacks view
Figure 109: MAP Stacks View
The Stacks view offers a good top-down view of your program. It is easy to follow down from the mainfunction to see which code paths took the most time. Each line of the Stacks view shows the performanceof one line of your source code, including all the functions called by that line.
The sparkline graphs are described in detail in section 19.
You can read the above figure as follows:
1. The first line, slow, represents the entire program run. Collapsing this node The first line, pro-gram slow, represents the entire program.
2. Beneath it, you see a call to the stride function, almost all of which was in single-threadedcompute (dark green). 1.4% of the time was spent in MPI.
3. The next major function called from program slow is the overlap function, seen at the bottom ofthis figure. A more detailed breakdown is described in section 25. The stride function itselfspent most of that time on the line a(i,j)=x*j at slow.f90 line 107. In fact, 43.2% of the entirerun was spent executing this line of code.
4. The 1% MPI time inside stride comes from an MPI Barrier on line 124.
5. The next major function called fromprogram slow is the overlap function, seen at the bottomof this figure. This function ran for 24.8% of the total time, almost all of which was runtime. Thisline of code was executed at the start of the overlap function, and other calls which are not visiblein the figure accounted for the rest.
Clicking on any line of the Stacks view jumps the Source Code view to show that line of code. Thismakes it a very easy way to navigate and understand the performance of even complex codes.
The percentage MPI time gives an idea as to how well your program is scaling and shows the locationof any communication bottlenecks. As you discussed in section 19, any sloping blue edges representimbalance between processes or cores.
In the above example you can see that the MPI Send call inside the overlap function has a slopingtrailing edge. This means that some processes took significantly longer to finish the call than others,perhaps because they were waiting longer for their receiver to become ready.
Stacks view shows which lines of code spend the most time running, computing or waiting. As with mostplaces in the GUI you can hover over a line or chart for a more detailed breakdown.
Copyright c© 2002-2018 Arm Limited (or its affiliates). All rights reserved. 165

Arm Forge 18.0.2
22 OpenMP Regions view
Figure 110: OpenMP Regions View
The OpenMP Regions view gives insight into the performance of every significant OpenMP region inyour program. Each region can be expanded just as in the Stacks view to see the performance of every linebeneath it across every core in your job. The sparkline graphs are described in detail in section 19.
Note: If you are using MPI and OpenMP, this view summarizes all cores across all nodes and not justone node.
You can read the above figure as follows:
1. The most time-consuming parallel region is in the update function at line 207. Clicking on thisshows the region in the Source Code view.
2. This region spends most of its time in the do math function. Hovering on the line or clicking onthe [–] symbol collapses the view down to show the figures for how much time.
3. Of the lines of code inside do math, the (sqtau * (values[i-1] ...) one takes longestwith 13.7% of the total core hours across all cores used in the job.
4. Calculating sqtau = tau * tau is the next most expensive line, taking 10.5% of the totalcore hours.
5. Only 0.6% of the time in this region is spent on OpenMP overhead, such as starting/synchronizingthreads.
From this you can see that the region is optimized for OpenMP usage, that is, it has very low overhead. Ifyou want to improve performance you can look at the calculations on the lines highlighted in conjunctionwith the CPU instruction metrics, in order to answer the following questions:
• Is the current algorithm is bound by computation speed or memory accesses? If the latter, you maybe able to improve cache locality with a change to the data structure layout.
• Has the compiler generated optimal vectorized instructions for this routine? Small things can pre-vent the compiler doing this and you can look at the vectorization report for the routine to under-stand why.
• Is there another way to do this calculation more efficiently now that you know which parts of it arethe most expensive to run?
See section 25 for more information on CPU instruction metrics.
Clicking on any line of the OpenMP Regions view jumps the Source Code view to show that line ofcode.
The percentage OpenMP synchronization time gives an idea as to how well your program is scaling tomultiple cores and highlights the OpenMP regions that are causing the greatest overhead. Examples of
Copyright c© 2002-2018 Arm Limited (or its affiliates). All rights reserved. 166
Arm Forge 18.0.2
things that cause OpenMP synchronization include:
• Poor load balancing, for example, some threads have more work to do or take longer to do it thanothers. The amount of synchronization time is the amount of time the fastest-finishing threads waitfor the slowest before leaving the region. Modifying the OpenMP chunk size can help with this.
• Too many barriers. All time at an OpenMP barrier is counted as synchronization time. However,omp atomic does not appear as synchronization time. This is generally implemented as a lockingmodifier to CPU instructions. Overuse of the atomic operator shows up as large amounts of timespent in memory accesses and on lines immediately following an atomic pragma.
• Overly fine-grained parallelization. By default OpenMP synchronizes threads at the start and endof each parallel region. There is also some overhead involved in setting up each region. In general,the best performance is achieved when outer loops are parallelized rather than inner loops. Thiscan also be alleviated by using the no barrier OpenMP keyword if appropriate.
When parallelizing with OpenMP it is extremely important to achieve good single-core performancefirst. If a single CPU core is already bottlenecked on memory bandwidth, splitting the computationsacross additional cores rarely solves the problem.
Copyright c© 2002-2018 Arm Limited (or its affiliates). All rights reserved. 167

Arm Forge 18.0.2
23 Functions view
Figure 111: Functions View
The Functions view shows a flat profile of the functions in your program. The first three columns showdifferent measures of the time spent in a given function:
1. Self shows the time spent in code in the given function itself, but not its callees, that is, not in theother functions called by that function.
2. Total shows the time spent in code in the given function itself, and all its callees.
3. Child shows the time spent in the given functions’s callees only.
You can use the Functions view to find costly functions that are called frommany different places.
Copyright c© 2002-2018 Arm Limited (or its affiliates). All rights reserved. 168

Arm Forge 18.0.2
24 Project Files view
Figure 112: Project files view
The Project Files view offers an effective way to browse around and navigate through a large, unfamiliarcode base.
The project files view distinguishes between Application Code and External Code. You can choose whichfolders count as application code by right-clicking. External Code is typically system libraries that arehidden away at startup.
Copyright c© 2002-2018 Arm Limited (or its affiliates). All rights reserved. 169
Arm Forge 18.0.2
25 Metrics View
Figure 113: Metrics view
Now that you are familiar with the source code, the stacks and the project files view, you will now seehow the metrics view works with all of these to help you identify, focus on and understand performanceproblems.
As with all graphs in MAP, the horizontal axis is wall clock time. By default three metric graphs areshown. The top-most is the main thread activity chart, which uses the same colors and scales as theper-line sparkline graphs described in section 19. To understand the main thread activity chart, read thatsection first.
For CUDA programs profiled with CUDA kernel analysis mode enabled a “warp stall reasons” graphis also displayed. This shows the warp stalls for all CUDA kernels detected in the program, using thesame colors and scales as the GPU kernel graphs described in section 31.1). To understand the warp stallreason chart, read that section first.
All of the other metric graphs show how single numerical measurements vary across processes and time.Initially, two frequently used ones are shown: CPU floating-point andmemory usage. However, there aremany other metric graphs available, and they can all be read in the sameway. Each vertical slice of a graphshows the distribution of values across processes for that moment in time. The minimum and maximumare clear, and shading is used to display the mean and standard deviation of the distribution.
A thin line means all processes had very similar values. A ‘fat’ shaded region means there is significantimbalance between the processes. Extra details about each moment in time appear below the metricgraphs as you move the mouse over them.
The metrics view is at the top of the GUI as it ties all the other views together. Move your mouse acrossone of the graphs, and a black vertical line appears on every other graph in MAP, showing what washappening at that moment in time.
You can also click and drag to select a region of time within it. All the other views and graphs now redrawthemselves to show just what happened during the selected period of time, ignoring everything else. Thisis a useful way to isolate interesting parts of your application’s execution. To reselect the entire timerange just double-click or use the Select All button.
Copyright c© 2002-2018 Arm Limited (or its affiliates). All rights reserved. 170

Arm Forge 18.0.2
Figure 114: Map with a region of time selected
In the above screenshot a short region of time has been selected around an interesting sawtooth in timein MPI_BARRIER because PE 1 is causing delays. The first block accepts data in PE order, so is badlydelayed, the second block is more flexible, accepting data from any PE, so PE 1 can compute in paral-lel. The Code View shows how compute and comms are serialized in the first block, but overlap in thesecond.
There are many more metrics other than those displayed by default. Click the Metrics button or right-click on the metric graphs and you can choose one of the following presets or any combination of themetrics beneath them. You can return to the default set of metrics at any time by choosing the Preset:Default option.
25.1 CPU instructions
Note: All of the metrics described in this section are only available on x86 64 systems.
All of these metrics show the percentage of time active cores spent executing different classes of instruc-tion. They are most useful for optimizing single-core and OpenMP performance:
CPU floating-point: The percentage of time each rank spends in floating-point CPU instructions. Thisincludes vectorized instructions and standard x87 floating-point. High values here suggest CPU-boundareas of the code that are probably functioning as expected.
CPU integer: The percentage of time each rank spends in integer CPU instructions. This includes vec-torized instructions and standard integer operations. High values here suggest CPU-bound areas of thecode that are probably functioning as expected.
CPU memory access: The percentage of time each rank spends in memory access CPU instructions,such as move, load and store. This also includes vectorized memory access functions. High valueshere may indicate inefficiently-structured code. Extremely high values (98% and above) almost alwaysindicate cache problems. Typical cache problems include cache misses due to incorrect loop orderingsbut may also include more subtle features such as false sharing or cache line collisions.
Copyright c© 2002-2018 Arm Limited (or its affiliates). All rights reserved. 171

Arm Forge 18.0.2
CPU floating-point vector: The percentage of time each rank spends in vectorized floating-point instruc-tions. Optimized floating-point-based HPC code should spend most of its time running these operations.This metric provides a good check to see whether your compiler is correctly vectorizing hotspots. Seesection H.6 for a list of the instructions considered vectorized.
CPU integer vector: The percentage of time each rank spends in vectorized and integer instructions.Optimized integer-based HPC code should spend most of its time running these operations. This metricprovides a good check to see whether your compiler is correctly vectorizing hotspots. See section H.6for a list of the instructions considered vectorized.
CPU branch: The percentage of time each rank spends in test and branch-related instructions such astest, cmp and je. An optimized HPC code should not spend much time in branch-related instructions.Typically the only branch hotspots are during MPI calls, in which the MPI layer is checking whether amessage has been fully-received or not.
25.1.1 Per-line CPU instructions
When you select one or more lines of code in the code view, MAP will show a breakdown of the CPUInstructions used on those lines. Section 20 describes this view in more detail.
25.2 CPU time
These metrics are particularly useful for detecting and diagnosing the impact of other system daemonson your program’s run.
CPU time This is the percentage of time that each thread of your program was able to spend on a core.Together with Involuntary context switches, this is a key indicator of oversubscription or interferencefrom system daemons. If this graph is consistently less than 100%, check your core count and CPUaffinity settings to make sure one or more cores are not being oversubscribed. If there are regular spikesin this graph, show it to your system administrator and ask for their help in diagnosing the issue.
User-mode CPU time The percentage of time spent executing instructions in user-mode. This should beclose to 100%. Lower values or spikes indicate times in which the program was waiting for a system callto return.
Kernel-mode CPU time Complements the above graph and shows the percentage of time spent insidesystem calls to the kernel. This should be very low for most HPC runs. If it is high, show the graph toyour system administrator and ask for their help in diagnosing the issue.
Voluntary context switches The number of times per second that a thread voluntarily slept, for examplewhile waiting for an I/O call to complete. This is normally very low for a HPC code.
Involuntary context switches The number of times per second that a thread was interrupted while com-puting and switched out for another one. This will happen if the cores are oversubscribed, or if othersystem processes and daemons start running and take CPU resources away from your program. If thisgraph is consistently high, check your core count and CPU affinity settings to make sure one or morecores are not being oversubscribed. If there are regular spikes in this graph, show it to your systemadministrator and ask for their help in diagnosing the issue.
System loadThe number of active (running or runnable) threads as a percentage of the number of physicalCPU cores present in the compute node. This value may exceed 100% if you are using hyperthreading,if the cores are oversubscribed, or if other system processes and daemons start running and take CPUresources away from your program. A value consistently less than 100% may indicate your program isnot taking full advantage of the CPU resources available on a compute node.
Copyright c© 2002-2018 Arm Limited (or its affiliates). All rights reserved. 172

Arm Forge 18.0.2
25.3 I/O
These metrics show the performance of the I/O subsystem from the application’s point of view. Corre-lating these with the I/O time in the Application Activity chart helps to diagnose I/O bottlenecks.
POSIX I/O read rate: The total I/O read rate of the application. This may be greater than Disk readtransfer if data is read from the cache instead of the storage layer.
POSIX I/O write rate: The total I/O write rate of the application. This may be greater than Disk writetransfer if data is written to the cache instead of the storage layer.
Disk read transfer: The rate at which the application reads data from disk, in bytes per second. Thisincludes data read from network filesystems (such as NFS), but may not include all local I/O due to pagecaching.
Disk write transfer: The rate at which the application writes data to disk, in bytes per second. Thisincludes data written to network filesystems.
POSIX read syscall rate: The rate at which the application invokes the read system call. Measured incalls per second, not the amount of data transferred.
POSIX write syscall rate: The rate at which the application invokes the write system call. Measuredin calls per second, not the amount of data transferred.
Note: Disk transfer and I/O metrics are not available on Cray X-series systems as the necessary Linuxkernel support is not enabled.
25.4 Memory
Here the memory usage of your application is shown in both a per-process and per-node view. Perfor-mance degrades severely once all the node memory has been allocated and swap is required. Some HPCsystems, notably Crays, will terminate a job that tries to use more than the total node memory avail-able.
Memory usage: The current RAM usage of each process. Memory that is allocated and never used isgenerally not shown. Only pages actively swapped into RAM by the OS count are displayed. This meansthat you will often see memory usage ramp up as arrays are initialized. The slopes of these ramps can beinteresting in themselves.
Note: this means if you malloc or ALLOCATE a large amount of memory but do not actually use it theMemory Usage metric will not increase.
Node memory usage: The percentage of each node’s memory that is in use at any one time. If this is farbelow 100% then your code may run more efficiently using fewer processes or a larger problem size. If itis close to or reaches 100% then the combination of your code and other system daemons are exhaustingthe physical memory of at least one node.
25.5 MPI
A detailed range of metrics offering insight into the performance of the MPI calls in your application.These are all per-process metrics and any imbalance here, as shown by large blocks with sloped means,has serious implications for scalability.
Use these metrics to understand whether the blue areas of the Application Activity chart are problematic orare transferring data in an optimal manner. These are all seen from the application’s point of view.
Copyright c© 2002-2018 Arm Limited (or its affiliates). All rights reserved. 173

Arm Forge 18.0.2
An asynchronous call that receives data in the background and completes within a few milliseconds willhave a much higher effective transfer rate than the network bandwidth. Making good use of asynchronouscalls is a key tool to improve communication performance.
In multithreaded applications, MAP only reports MPI metrics for MPI calls from main threads. If anapplication uses MPI THREAD SERIALIZED or MPI THREAD MULTIPLE, the Application Activitychart will show MPI activity, but some regions of the MPI metrics may be empty if the MPI calls arefrom non-main threads.
MPI call duration: This metric tracks the time spent in an MPI call so far. PEs waiting at a barrier (MPIblocking sends, reductions, waits and barriers themselves) will ramp up time until finally they escape.Large areas show lots of wasted time and are prime targets for investigation. The PE with no time spentin calls is likely to be the last one to arrive, so should be the focus for any imbalance reduction.
MPI sent/received: This pair of metrics tracks the number of bytes passed to MPI send/receive func-tions per second. This is not the same as the speed with which data is transmitted over the network, asthat information is not available. This means that an MPI call that receives a large amount of data andcompletes almost instantly will have an unusually high instantaneous rate.
MPI point-to-point and collective operations: This pair of metrics tracks the number of point-to-pointand collective calls per second. A long shallow period followed by a sudden spike is typical of a latesender. Most processes are spending a long time in one MPI call (very low #calls per second) while onecomputes. When that one reaches the matchingMPI call it completes much faster, causing a sudden spikein the graph.
MPI point-to-point and collective bytes: This pair of metrics tracks the number of bytes passed to MPIsend and receive functions per second. This is not the same as the speed with which data is transmittedover the network, as that information is not available. This means that an MPI call that receives a largeamount of data and completes almost instantly will have an unusually high instantaneous rate.
Note: (for SHMEM users) MAP shows calls to shmem barrier all in MPI collectives, MPI callsandMPI call duration. Metrics for other SHMEM functions are not collected.
25.6 Detecting MPI imbalance
The metrics view shows the distribution of their value across all processes against time, so any ‘fat’regions are showing an area of imbalance in this metric. Analyzing imbalance in MAP works likethis:
1. Look at the metrics view for any ‘fat’ regions. These represent imbalance in that metric during thatregion of time. This tells us (A) that there is an imbalance, and (B) which metrics are affected.
2. Click and drag on the metrics view to select the ‘fat’ region, zooming the rest of the controls in tojust this period of imbalance.
3. Now the stacks view and the source code views show which functions and lines of code werebeing executed during this imbalance. Are the processes executing different lines of code? Arethey executing the same one, but with differing efficiencies? This tells us (C) which lines of codeand execution paths are part of the imbalance.
4. Hover the mouse over the fattest areas on the metric graph and watch the minimum and maximumprocess ranks. This tells us (D) which ranks are most affected by the imbalance.
Now you know (A) whether there is an imbalance and (B) which metrics (CPU, memory, FPU, I/O) itaffects. You also know (C) which lines of code and (D) which ranks to look at in more detail.
Copyright c© 2002-2018 Arm Limited (or its affiliates). All rights reserved. 174

Arm Forge 18.0.2
Often this is more than enough information to understand the immediate cause of the imbalance (forexample, late sender, workload imbalance) but for a deeper view you can now switch to DDT and rerunthe program with a breakpoint in the affected region of code. Examining the two ranks highlighted asthe minimum and maximum by MAP with the full power of an interactive debugger helps get to the rootcause of the imbalance behavior.
25.7 Accelerator
The NVIDIA CUDA accelerator metrics are enabled if you have Arm Forge Professional. Please contactArm Sales at [email protected] for information on how to upgrade.
Note: Accelerator metrics are not available when linking to the static MAP sampler library.
GPU temperature: The temperature of the GPU as measured by the on-board sensor.
GPU utilization: Percent of time that the GPU card was in use, that is, one or more kernels are executingon the GPU card. If multiple cards are present in a compute node this value is the mean across all the cardsin a compute node. Adversely affected if CUDAkernel analysis mode is enabled (see section 31.1).
Time in global memory accesses: Percent of time that the global (device) memory was being read orwritten. If multiple cards are present in a compute node this value is the mean across all the cards in acompute node.
GPUmemory usage: The memory allocated from the GPU frame buffer memory as a percentage of thetotal available GPU frame buffer memory.
25.8 Energy
The energy metrics are enabled if you have the Advanced Metrics Pack add-on for Arm MAP. All themetrics are measured per node. If you are running our job in more than one node, MAP shows theminimum, mean and maximum power consumption of the nodes.
Note: energy metrics are not available when linking to the static MAP sampler library.
GPU power usage: The cumulative power consumption of all GPUs on the node, as measured by theNVIDIA on-board sensor. This metric is available if the Accelerator metrics are present.
CPU power usage: The cumulative power consumption of all CPUs on the node, as measured by theIntel on-board sensor (Intel RAPL).
System power usage: The power consumption of the node as measured by the Intel Energy Checker orthe Cray metrics.
25.8.1 Requirements
CPU power measurement requires an Intel CPUwith RAPL support, for example Sandy Bridge or newer,and the intel rapl powercap kernel module to be loaded.
Node power monitoring is implemented via one of two methods: the Arm IPMI energy agent which canread IPMI power sensors, or the Cray HSS energy counters.
Formore information on how to install theArm IPMI energy agent please see I.7 Arm IPMI EnergyAgent.The Cray HSS energy counters are known to be available on Cray XK6 and XC30 machines.
Copyright c© 2002-2018 Arm Limited (or its affiliates). All rights reserved. 175

Arm Forge 18.0.2
Accelerator power measurement requires a NVIDIA GPU that supports power monitoring. This can bechecked on the command-line with nvidia-smi -q -d power. If the reported power values arereported as “N/A”, power monitoring is not supported.
25.9 Lustre
The Lustre metrics are enabled if your compute nodes have one or more Lustre filesystems mounted. Allthe metrics are measured per node. The metadata metrics are only available if you have the AdvancedMetrics Pack add-on for Arm MAP.
If you are running your job on more than one node the values are not summed across the nodes, ratheryou will see the mean across the nodes. If you have more than one Lustre filesystem mounted on thecompute nodes the values are summed across all Lustre filesystems.
Lustre read transfer: The number of bytes read per second from Lustre.
Lustre write transfer: The number of bytes written per second to Lustre.
Lustre file opens: The number of file open operations per second on a Lustre filesystem.
Lustre metadata operations: The number of metadata operations per second on a Lustre filesystem.Metadata operations include file open, close and create as well as operations such as readdir, rename,unlink.
Note: depending on the circumstances and implementation ‘file open’ may count as multiple operations,for example, when it creates a new file or truncates an existing one.
25.10 Zooming
To examine a small time range in more detail you can horizontally zoom in the metric graphs by selectingthe time-range you wish to see then left-clicking inside that selected region.
All the metric graphs will then resize to display that selection in greater detail. This only effects the metricgraphs, as the graphs in all the other views, such as the code editor, will already have redrawn to displayonly the selected region when that selection was made.
A right-click on the metric graph zooms the metric graphs out again.
This horizontal zoom is limited by the number of samples that were taken and stored in the MAP file.The more you zoom in the more ‘blocky’ the graph becomes.
While you can increase the resolution by instructingMAP to storemore samples (seeALLINEA_SAMPLER_NUM_SAMPLES and ALLINEA_SAMPLER_INTERVAL in 17.10 MAP environment variables) this isnot recommended as it may significantly impact performance of both the program being profiled and ofMAP when displaying the resulting .map file.
You can also zoom in vertically to better see fine-grained variations in a specific metric’s values. Theauto-zoom button beneath the metric graphs will cause the graphs to automatically zoom in verticallyto fit the data shown in the currently selected time range. As you select new time ranges the graphsautomatically zoom again so that you see only the relevant data.
If the automatic zoom is insufficient you can take manual control of the vertical zoom applied to eachindividual metric graph. Holding down the CTRL key (or the CMD key on Mac OS X ), while eitherdragging on a metric graph or using the mouse-wheel while hovering over one, will zoom that graphvertically in or out, centered on the current position of the mouse.
Copyright c© 2002-2018 Arm Limited (or its affiliates). All rights reserved. 176

Arm Forge 18.0.2
A vertically-zoomedmetric graph can be panned up or down by either holding down the SHIFT key whiledragging on a metric graph or just using the mouse-wheel while hovering over it. Manually adjustingeither the pan or zoom will disable auto-zoom mode for that graph, click the auto-zoom button again toreapply it.
Copyright c© 2002-2018 Arm Limited (or its affiliates). All rights reserved. 177

Arm Forge 18.0.2
Action Usage DescriptionSelect Drag a range in a metric
graph.Selects a time range to examine. Manycomponents (but not the metric graphs) willrescale to display data for this time range only.
Reset Click the Reset icon (underthe metric graphs).
Selects the entire time range. All components(including the metric graphs) will rescale todisplay the entire set of data. All metricgraphs will be zoomed out.
Horizontalzoom in
Left click a selection in amet-ric graph.
Zoom in (horizontally) on the selected timerange.
Horizontalzoom out
Right-click a metric graph. Undo the last horizontal zoom in action.
Verticalzoom in/out
Ctrl + mouse scroll wheel orCtrl +Drag on ametric graph.
Zoom a single metric graph in or out.
Vertical pan Mouse scroll wheel orShift+Drag on a metricgraph.
Pan a single metric graph up or down.
Automaticverticalzoom
Toggle the Automatic Ver-tical Zoom icon (under themetric graphs).
Automatically change the zoom of each met-ric graph to best fit the range of values eachgraph contains in the selected time range.Manually panning or zooming a graph willdisable auto vertical zoom for that graph only.
25.11 Viewing totals across processes and nodes
Themetric graphs show the statistical distribution of themetric across ranks or compute nodes (dependingon the metric). So, for example, the Nodes power usagemetric graph shows the statistical distribution ofpower usage of the compute nodes.
If you hover the mouse over the name of a metric to the left hand side of the graph MAP will display atool tip with additional summary information. The tool tip will show you the Minimum, Maximum, andMean of the metric across time and ranks or nodes.
For metrics which are not percentages the tool tip will also show the peak sum across ranks / nodes. Forexample, the Maximum (
∑all nodes) line in the tool tip for Nodes power usage shows the peak power
usage summed across all compute nodes. This does not include power used by other components, forexample, network switches.
For some metrics which are rates (for example, Lustre read transfer) MAP will also show the cumulativetotal across all ranks / nodes in the tool tip, for example, Lustre bytes read (
∑all nodes).
25.12 Custom metrics
Custom metrics can be written to collect and expose additional data (for example, PAPI counters) in themetrics view.
User custom metrics should be installed under the appropriate path in your home directory, for exam-ple, /home/your user/.allinea/map/metrics. Custom metrics can also be installed for all
Copyright c© 2002-2018 Arm Limited (or its affiliates). All rights reserved. 178

Arm Forge 18.0.2
users by placing them in the MAP installation directory, for example, /arm installation direc-tory/map/metrics. If a metric is installed in both locations, the user installation will take prior-ity.
Detailed information on how to write custom metrics can be found in supplementary documentationbundled with the Arm Forge installation in allinea-metric-plugin-interface.pdf.
Copyright c© 2002-2018 Arm Limited (or its affiliates). All rights reserved. 179

Arm Forge 18.0.2
26 PAPI metrics
Note: Arm Forge Professional is required to make use of this feature. Please contact Arm Sales [email protected] for details on how to upgrade.
The PAPI metrics are additional metrics available for MAP which use the Performance Application Pro-gramming Interface (PAPI). They can be used on any system supported by PAPI.
Note: In this release PAPI metrics will be collected from the main thread only.
Due to the limitations of PAPI, some metrics may be unavailable on your system. MAP displays allavailable metrics and where metrics are not available error messages are displayed.
As there is a limit on the type and number of events that can be counted together, PAPI metrics have beensplit up into small groups of compatible events, so that the user can choose which events to view.
To change which group of metrics MAP uses, navigate to the directory indicated on completion of theinstallation process and modify the PAPI.config file.
26.1 Installation
To use these metrics, download and install PAPI from http://icl.cs.utk.edu/papi/index.html. Then run themetrics installer papi install.sh from the Arm Forge directory.
26.2 PAPI config file
By default there is a templatePAPI.config file located in your installation directory at/arm_installation_directory/map/metrics. You can edit this file to set your configuration.
The PAPI.config file can alternatively be located inside your configuration directory as set by theALLINEA CONFIG DIR environment variable. By default your configuration directory is $HOME/.allinea.
If youwish to use aPAPI.config file located elsewhere youwill need to set and export theALLINEA -PAPI CONFIG environment variable. This should be set to point to your PAPI.config file, for exam-ple, export ALLINEA PAPI CONFIG=/opt/arm/map/metrics/PAPI.config. This needsto be set before running MAP.
In case of using a queuing system, be sure that the ALLINEA PAPI CONFIG variable is set and exportedto all the compute nodes, for example adding the ALLINEA PAPI CONFIG export line in the job scriptbefore the MAP command line.
The PAPI config file contains all the metrics sets that can be used and the location of it has been indicatedat the end of the installation process. The default metric set is Overview. If you want to use anotherPAPI metrics set, modify the value of the variable called set to the desired PAPI metrics set of eitherCacheMisses, BranchPrediction or FloatingPoint.
26.3 PAPI overview metrics
This group of metrics gives a basic overview of the program which has been profiled.
DP FLOPS: The number of double precision floating-point operations performed per second. This usesthe PAPI DP OPS (double precision floating-point operations) event. What it actually counts differs
Copyright c© 2002-2018 Arm Limited (or its affiliates). All rights reserved. 180

Arm Forge 18.0.2
across architectures. Additionally, there are many caveats surrounding this PAPI preset on Intel architec-tures. See http://icl.cs.utk.edu/projects/papi/wiki/PAPITopics:SandyFlops for more details.
Cycles per instruction: The number of CPU cycles per instruction executed. This uses the PAPI TOT CYC(total cycles) and PAPI TOT INS (total instructions) events.
L2 data cachemisses: The number of L2 data cachemisses per second. This uses the PAPI L2 DCM (L2data cache misses) event. This metric is only available in this preset if the system has enough hardwarecounters (5 at least) to collect the required events.
26.4 PAPI cache misses
This group of metrics focuses on cache misses at various levels of cache.
L1 cache misses: The number of L1 cache misses per second. This uses the PAPI L1 TCM (L1 totalcache misses) event, although if this event is unavailable the L1 data cache misses metric (using thePAPI L1 DCM event) will be displayed instead.
L2 cache misses: The number of L2 cache misses per second. This uses the PAPI L2 TCM (L2 totalcache misses) event, although if this event is unavailable the L2 data cache misses metric (using thePAPI L2 DCM event) will be displayed instead.
L3 cache misses: The number of L3 cache misses per second. This uses the PAPI L3 TCM (L3 totalcache misses) event, although if this event is unavailable the L3 data cache misses metric (using thePAPI L3 DCM event) will be displayed instead.
26.5 PAPI branch prediction
This group of metrics focuses on branch prediction instructions.
Branch instructions: The number of branch instructions per second. This uses the PAPI BR INS(branch instructions) event.
Mispredicted branch instructions: The number of conditional branch instructions that are mispredictedeach second. This uses the PAPI BR MSP (mispredicted branch instructions) event.
Completed instructions: The number completed instructions per second. This uses the PAPI TOT INSevent, and is included to provide context for the above other metrics in this group.
26.6 PAPI floating-point
This group of metrics focuses on floating-point instructions.
Floating-point scalar instructions: The number of scalar floating-point instructions per second. Thisuses the PAPI FP INS event.
Floating-point vector instructions: The number of vector floating-point instructions per second. Thisuses the PAPI VEC SP (single-precision vectorized instructions) and PAPI VEC DP (double-precisionvectorized instructions) events, although if those events are unavailable the Vector Instructions metricwill be displayed instead.
Vector instructions: The number of vector instructions (floating-point and integer) per second. Thisuses the PAPI VEC INS event, but is only displayed if the events needed for the Floating-point vectorinstructions metric are not available.
Copyright c© 2002-2018 Arm Limited (or its affiliates). All rights reserved. 181

Arm Forge 18.0.2
Completed instructions: The number completed instructions per second. This uses the PAPI TOT INSevent, and is included to provide context for the above other metrics in this group.
Copyright c© 2002-2018 Arm Limited (or its affiliates). All rights reserved. 182

Arm Forge 18.0.2
27 Main-thread, OpenMPandPthread viewmodes
The percentage values and activity graphs shown alongside the source code and in the Stacks, OpenMPRegions and Functions views can present information for multithreaded programs in a variety of differentways.
MAP will initially choose the most appropriate view mode for your program. However, in some cases,for example such as when you have written a program to use raw pthreads rather than OpenMP, you maywish to change the mode to get a different perspective on how your program is executing multiple threadsand using multiple cores. You can switch between view modes from the View menu.
27.1 Main thread only mode
In this view mode only the main thread from each process is displayed; the presence of any other threadis ignored. A value of 100% for a function or line means that all the processes’ main threads are at thatlocation. This is the best mode to use when exploring single-threaded programs and programs that areunintentionally/indirectly multithreaded (that is, recent implementations of both Open MPI and CUDAwill start their own thread).
This is the default mode for all non-OpenMP programs. The OpenMP Regions tab is not displayed inthis mode.
Note that the CPU instruction metric graphs (showing the proportion of time in various classes of CPUinstructions: such as integer, floating-point, and vector) are not restricted to the main thread when in theMain thread only view mode. These metric graphs always represent the data gathered from all the CPUcores.
27.2 OpenMP mode
This view mode is optimized for interpreting programs where OpenMP is the primary source of mul-tithreaded activity. Percentage values and activity graphs for a line or function indicate the proportionof the available resources that are being used on that line. For serial code on a main thread this is theproportion of processes at that location, for OpenMP code the contribution from each process is furtherbroken down by the proportion of CPU cores running threads that are at that location in the code.
For example, a timeslice of an activity graph showing 50% dark green (serial, main-thread computation)and 50% light green (computation in an OpenMP region) means that half the processes were in serialcode and half the processes were in an OpenMP region. Of the processes in an OpenMP region 100% ofthe available cores (as determined by the cores per process value, see 28 Processes and cores view) werebeing used for OpenMP.
This is the default mode for OpenMP programs. It is only available for programs where MAP detectedan OpenMP region.
27.3 Pthread mode
This view mode is optimized for interpreting programs that make explicit use of pthreads. Percentagevalues and activity graphs reflect the proportion of CPU cores that are being used out of the maximumnumber of expected cores per process, see 28 Processes and cores view.
Copyright c© 2002-2018 Arm Limited (or its affiliates). All rights reserved. 183

Arm Forge 18.0.2
A value of 100% for a function or line means that 100% of the expected number of CPU cores per processwere working at that location. The main thread’s contribution gets no special attention so activity on themain thread(s) will appear the same height as activity from any other thread.
The advantage of this is that it makes it obvious when the program is not making full use of all theCPU cores available to it. But it has the downside of it being harder to analyze the performance of theintentionally serial sections of code performed by each process. This is because activity occurring onlyon one thread per process will be restricted to at most 1/nth of a percentage value or height on an activitygraph, where n is the number of cores per process.
This mode is not used by default so must be explicitly selected. It is only available for multithreadedprograms.
The OpenMP Regions tab is not displayed in this mode.
Copyright c© 2002-2018 Arm Limited (or its affiliates). All rights reserved. 184

Arm Forge 18.0.2
28 Processes and cores view
Figure 115: Process and Cores Window
Most modern CPUs support hyperthreading and report multiple logical cores for each physical core.Some programs run faster when scheduling threads or processes to use these hyperthreaded cores, whilemost HPC codes run more slowly. Rather than show all of the sparklines at half-height simply becausethe hyperthreaded cores are (wisely) not being used, MAP tries to detect this situation and will rescale itsexpectations to the number of physical cores used by your program.
If this heuristic goes wrong for any reason you will see large portions of unusual colors in your sparklinesand the application activity chart (for example, bright red). When that happens, open this dialog andincrease the cores per process setting.
You can find this dialog via the Window → Processes and Cores menu or by clicking on the Xcores (Y per process) hyperlinked text in the application details section above the metric graphs.
Copyright c© 2002-2018 Arm Limited (or its affiliates). All rights reserved. 185

Arm Forge 18.0.2
29 Running MAP from the command line
MAP can be run from the command line with the following arguments:
--no-mpi
Run MAP with 1 process and without invoking mpirun, mpiexec, or equivalent.
--queue
Force MAP to submit the job to the queueing system.
--no-queue
Run MAP without submitting the job to the queueing system.
--view=VIEW
Start MAP using VIEW as the default view. VIEW must be one of (main|pthread|openmp). If theselected view is not available, the main view will be displayed.
--export=OUTPUT.json PROFILEDATA.map
Export PROFILEDATA.map to OUTPUT.json in JSON format, without user interaction. For the for-mat specification see 30.1 JSON format.
--profile
Generate a MAP profile but without user interaction. This will not display the MAP GUI. Messagesare printed to the standard output and error. The job is not run using the queueing system unless used inconjunction with --queue. When the job finishes a map file is written and its name is printed.
--export-functions=FILE
Export all the profiled functions to FILE. Use this in conjunction with --profile. The output shouldbe CSV file name. Examples:
map --profile --export-functions=foo.csv ...
--start-after=TIME
Start profiling TIME seconds after the start of your program. Use this in conjunction with --stop-after=TIME to focus MAP on a particular time interval of the run of your program.
--stop-after=TIME
Stop profiling TIME seconds after the start of your program. This will terminate your program andproceed to gather the samples taken after the time given has elapsed.
When running without the GUI, normal redirection syntax can be used to read data from a file as a sourcefor the executable’s standard input. Examples:
cat <input-file> | map --profile ...map --profile ... < <input-file>
Normal redirection can also be used to write data to a file from the executable’s standard output:
map --profile ... > <output-file>
For OpenMP jobs, simply use the OMP_NUM_THREADS environment variable (or leave it blank) exactlyas you usually would when running your application. There is no need to pass the number of threads toMAP as an argument.
Copyright c© 2002-2018 Arm Limited (or its affiliates). All rights reserved. 186

Arm Forge 18.0.2
OMP_NUM_THREADS=8 map --profile ... > <output-file>
--enable-metrics=METRICS--disable-metrics=METRICS
Allows you to specify comma-separated lists which explicitly enable or disable metrics for which data isto be collected. If the metrics specified cannot be found, an error message is displayed and MAP exits.Metrics which are always enabled or disabled cannot be explicitly disabled or enabled. A metrics sourcelibrary which has all its metrics disabled, either in the XML definition or via --disable-metrics,will not be loaded. Metrics which can be explicitly enabled or disabled can be listed using the --list-metrics option.
--cuda-kernel-analysis
Enables CUDA kernel analysis mode, providing line level profiling information on CUDA kernels run-ning on a GPU at the cost of potentially significant overhead. See section 31.
29.1 Profiling MPMD programs
The easiest way to profile MPMD programs is by using Express Launch to start your application.
To use Express Launch, simply prefix your normal MPMD launch line with map. For example, to profilean MPMD application without user interaction you can use:
map --profile mpirun -n 1 ./master : -n 2 ./worker
For more information on Express Launch, and compatible MPI implementations, see section 17.1.
29.1.1 Profiling MPMD programs without Express Launch
The command to create a profile from an MPMD program using MAP is:
map <map mode> --np=<#processes> --mpiargs=<MPMD command> <oneMPMD program>
This example shows how to run MAP without user interaction using the flag --profile:
map --profile --np=16 --mpiargs="-n 8 ./exe1 : -n 8 ./exe2" ./exe1
First the number of processes used by the MPMD programs is set, in this case 8+8=16. Then an MPMDstyle command as an mpi argument is specified, followed by one of the MPMD programs.
Copyright c© 2002-2018 Arm Limited (or its affiliates). All rights reserved. 187

Arm Forge 18.0.2
30 Exporting profiler data in JSON format
MAP provides an option to export the profiler data in machine readable JSON format.
To export as JSON, first you need to open a .map file in MAP. Then the profile data can be exported byclicking File and selecting the Export Profile Data as JSON option.
For a command line option, see 29 Running MAP from the command line.
30.1 JSON format
The JSON document contains a single JSON object containing two object members, info containinggeneral information about the profiled program, and samples with the sampled information. An exam-ple of profile data exported to a JSON file is given in Section 30.4.
• info (Object): If some information is not available, the value is null instead.
– command_line (String): Command line call used to run the profiled application (for ex-ample aprun -N 24 -n 256 -d 1 ./my exe).
– machine (String): Hostname of the node on which the executable was launched.
– number_of_nodes (Number): Number of nodes run on.
– number_of_processes (Number): Number of processes run on.
– runtime (Number): Runtime in milliseconds.
– start_time (String): Date and time of run in ISO 8601 format.
– create_version (String): Version of MAP used to create the map file.
– metrics (Object): Attributes about the overall run, reported once per process, each repre-sented by an object with max, min, mean, var and sums fields, or null, when the metricis not available. The sums series contains the sum of the metric across all processes / nodesfor each sample. In many cases the values over all nodes will be the same, that is the max, minand mean values are the same, with variance zero. For example, in homogeneous systemsnum_cores_per_node is the same over all nodes.
∗ wchar_total (Object): The number of bytes written in total by I/O operation systemcalls (see wchar in the Linux Programmer’s Manual page ‘proc’: man 5 proc).
∗ rchar_total (Object): The number of bytes read in total by I/O operation systemcalls (see rchar in the Linux Programmer’s Manual page ‘proc’: man 5 proc).
∗ num_cores_per_node (Object): Number of cores available per node.
∗ memory_per_node (Object): RAM installed per node.
∗ nvidia_gpus_count (Object): Number of GPUs per node.
∗ nvidia_total_memory (Object): GPU frame buffer size per node.
∗ num_omp_threads_per_process (Object): Number of OpenMP worker threadsused per process.
• samples (Object)
– count (Number): Number of samples recorded.
Copyright c© 2002-2018 Arm Limited (or its affiliates). All rights reserved. 188

Arm Forge 18.0.2
– window_start_offset (Array of Numbers): Offset of the beginning of each samplingwindow, starting from zero. The actual sample might have been taken anywhere in betweenthis offset and the start of the next window, that is the window offsets wi and wi+1 define asemi-open set (wi, wi+1] in which the sample was taken.
– activity (Object): Contains information about the proportion of different types of activityperformed during execution, according to different view modes. The types of view modespossibly shown are OpenMP, PThreads and Main Thread, described in Section 27. Onlyavailable view modes are exported, for example, a program without OpenMP sections willnot have an OpenMP activity entry.
Note: The sum of the proportions in an activity might not add up to 1, this can happen whenthere are fewer threads running than MAP has expected. Occasionally the sum of the propor-tions shown for a sample in PThreads or OpenMP threads mode might exceed 1. When thishappens, the profiled application uses more cores than MAP assumes the maximum numberof cores per process can be. This can be due to middleware services launching helper threadswhich, unexpectedly to MAP, contribute to the activity of the profiled program. In this case,the proportions for that sample should not be compared with the rest of proportions for thatactivity in the sample set.
– metrics (Object): Contains an object for each metric that was recorded. These objectscontain four lists each, with the minimum, maximum, average and variance of that metric ineach sample. The format of a metrics entry is given in Section 30.3. All metrics recordedin a run are present in the JSON, including custom metrics. The names and descriptions ofall core MAP metrics are given in Section 30.3. It is assumed that a user including a custommetrics library is aware of what the custom metric is reporting. See the Arm Metric PluginInterface documentation.
30.2 Activities
Each exported object in an activity is presented as a list of fractional percentages (0.0 – 1.0) of sampletime recorded for a particular activity during each sample window. Therefore, there are as many entriesin these list as there are samples.
30.2.1 Description of categories
The following is the list of all of the categories. Only available categories are exported, see sections30.2.2 and 30.2.3.
• normal_compute: Proportion of time spent on the CPU which is not categorized as any of thefollowing activities. The computation can be, for example, floating point scalar (vector) addition,multiplication or division.
• point_to_point_mpi: Proportion of time spent in point-to-pointMPI calls on the main threadand not inside an OpenMP region.
• collective_mpi: Proportion of time spent in collective MPI calls on the main thread and notinside an OpenMP region.
• point_to_point_mpi_openmp: Proportion of time spent in point-to-point MPI calls madefrom any thread within an OpenMP region.
• collective_mpi_openmp: Proportion of time spent in collective MPI calls made from anythread within an OpenMP region.
Copyright c© 2002-2018 Arm Limited (or its affiliates). All rights reserved. 189

Arm Forge 18.0.2
• point_to_point_mpi_non_main_thread: Proportion of time spent in point-to-pointMPIcalls on a pthread, but not on the main thread nor within an OpenMP region.
• collective_mpi_non_main_thread: Proportion of time spent in collective MPI calls ona pthread, but not on the main thread nor within an OpenMP region.
• openmp: Proportion of time spent in an OpenMP region, that is compiler-inserted calls used toimplement the contents of a OpenMP loop.
• accelerator: Proportion of time spent in calls to accelerators, that is, blocking calls waitingfor a CUDA kernel to return.
• pthreads: Proportion of compute time on a non-main (worker) pthread.
• openmp_overhead_in_region: Proportion of time spent setting up OpenMP structures,waiting for threads to finish and so on.
• openmp_overhead_no_region: Proportion of time spent in calls to the OpenMP runtimefrom an OpenMP region.
• synchronisation: Proportion of time spent in thread synchronization calls, such as pthread -mutex lock.
• io_reads: Proportion of time spent in I/O read operations, such as ‘read’.
• io_writes: Proportion of time spent in I/O write operations. Also includes file open and closetime as these are typically only significant when writing.
• io_reads_openmp: Proportion of time spent in I/O read operations from within an OpenMPregion.
• io_writes_openmp: Proportion of time spent in I/O write operations from within an OpenMPregion.
• mpi_worker: Proportion of time spent in the MPI implementation on a worker thread.
• mpi_monitor: Proportion of time spent in the MPI monitor thread.
• openmp_monitor: Proportion of time spent in the OpenMP monitor thread.
• sleep: Proportion of time spent in sleeping threads and processes.
30.2.2 Categories available in main thread activity
• normal_compute
• point_to_point_mpi
• collective_mpi
• point_to_point_mpi_openmp
• collective_mpi_openmp
• openmp
• accelerator
• openmp_overhead_in_region
• openmp_overhead_no_region
• synchronisation
Copyright c© 2002-2018 Arm Limited (or its affiliates). All rights reserved. 190

Arm Forge 18.0.2
• io_reads
• io_writes
• io_reads_openmp
• io_writes_openmp
• sleep
30.2.3 Categories available in openmp and pthreads activities
• normal_compute
• point_to_point_mpi
• collective_mpi
• point_to_point_mpi_openmp
• collective_mpi_openmp
• point_to_point_mpi_non_main_thread
• collective_mpi_non_main_thread
• openmp
• accelerator
• pthreads
• openmp_overhead_in_region
• openmp_overhead_no_region
• synchronisation
• io_reads
• io_writes
• io_reads_openmp
• io_writes_openmp
• mpi_worker
• mpi_monitor
• openmp_monitor
• sleep
30.3 Metrics
The following list contains the core metrics reported by MAP.
Only available metrics are exported to JSON. For example, if there is no Lustre filesystem then the Lustremetrics will not be included. If any custom metrics are loaded, they will be included in the JSON, but arenot documented here.
For more information on the metrics see 25 Metrics View.
Copyright c© 2002-2018 Arm Limited (or its affiliates). All rights reserved. 191

Arm Forge 18.0.2
• CPU Instructions: see 25.1 CPU instructions
– instr_fp: See CPU floating-point (percentage)
– instr_int: See CPU integer (percentage)
– instr_mem: See CPU memory access (percentage)
– instr_vector_fp: See CPU floating-point vector (percentage)
– instr_vector_int: See CPU floating-point vector (percentage)
– instr_branch: See CPU branch (percentage)
– instr_scalar_fp: The percentage of time each rank spends in standard x87 floating-point operations.
– instr_scalar_int: The percentage of time each rank spends in standard integer opera-tions.
– instr_implicit_mem: Implicit memory accesses. The percentage of time spent execut-ing instructions with implicit memory accesses.
– instr_other: The percentage of time each rank spends in instructions which cannot becategorized as any of the ones given above.
• CPU Time: see 25.2 CPU time
– cpu_time_percentage: See CPU time
– user_time_percentage: See User-mode CPU time
– system_time_percentage: See Kernel-mode CPU time
– voluntary_context_switches: See Voluntary context switches (1/s)
– involuntary_context_switches: See Involuntary context switches (1/s)
– loadavg: See System load (percentage)
• I/O: see 25.3 I/O
– rchar_rate: See POSIX I/O read rate (B/s)
– wchar_rate: See POSIX I/O write rate (B/s)
– bytes_read: See Disk read transfer (B/s)
– bytes_written: See Disk write transfer (B/s)
– syscr: See POSIX read syscall rate (calls/s)
– syscw: See POSIX write syscall rate (calls/s)
• Lustre
– lustre_bytes_read: Lustre read transfer (B/s)
– lustre_bytes_written: Lustre write transfer (B/s)
– lustre_rchar_total: Lustre bytes read
– lustre_wchar_total: Lustre bytes written
• Memory: see 25.4 Memory
– rss: See Memory usage in bytes (Resident Set Size)
Copyright c© 2002-2018 Arm Limited (or its affiliates). All rights reserved. 192

Arm Forge 18.0.2
– node_mem_percent: See Node memory usage (percentage)
• MPI: see 25.5 MPI
– mpi_call_time: See MPI call duration (ns)
– mpi_sent: See MPI sent (B/s)
– mpi_recv: See MPI received (B/s)
– mpi_calls: Number of MPI calls per second per process
– mpi_p2p: See MPI P2P (calls/s).
– mpi_collect: See MPI collectives (calls/s)
– mpi_p2p_bytes: See MPI point-to-point bytes
– mpi_collect_bytes: See MPI collect bytes
• Accelerator: see 25.7 Accelerator
– nvidia_temp: See GPU temperature (Celsius)
– nvidia_gpu_usage: See GPU utilization (percentage)
– nvidia_memory_sys_usage: See Time in global memory accesses (percentage)
– nvidia_memory_used_percent: See GPU memory usage (percentage)
– nvidia_memory_used: GPU memory usage in bytes
• Energy: see 25.8 Energy
– nvidia_power: See GPU power usage (mW/node)
– rapl_power: See CPU power usage (W/node)
– system_power: See System power usage (W/node)
– rapl_energy: CPU energy, integral of rapl_power (J)
– system_energy: CPU energy, integral of system_power (J)
30.4 Example JSON output
In this section an example is given of the format of the JSON that is generated from a MAP file. Thisillustrates the description that has been given in the previous sections. This is not a full file, but shouldbe used as an indication of how the information looks after export.{"info" : {
"command_line" : "mpirun -np 4 ./exec","machine" : "hal9000","number_of_nodes" : 30,"number_of_processes" : 240,"runtime" : 8300,"start_time" : "2016-05-13T11:36:31","create_version" : "6.0.4""metrics": {
wchar_total: {max: 384605588, min: 132, mean: 24075798, var: 546823},rchar_total: {max: 6123987, min: 63, mean: 9873, var: 19287},num_cores_per_node: {max: 4, min: 4, mean: 4, var: 0},memory_per_node: {max: 4096, min: 4096, mean: 4096, var: 0},nvidia_gpus_count: {max: 0, min: 0, mean: 0, var: 0},
Copyright c© 2002-2018 Arm Limited (or its affiliates). All rights reserved. 193

Arm Forge 18.0.2
nvidia_total_memory: {max: 0, min: 0, mean: 0, var: 0},num_omp_threads_per_process: {max: 6, min: 6, mean: 6, var: 0},
}},"samples" : {
"count" : 4,"window_start_offsets" : [ 0, 0.2, 0.4, 0.6 ],"activity" : {
"main_thread" : {"normal_compute" : [ 0.762, 0.996, 1, 0.971 ],"io_reads" : [ 0.00416, 0.00416, 0, 0.00416 ],"io_writes" : [ 0.233, 0, 0, 0 ],"openmp" : [ 0, 0, 0, 0.01667 ],"openmp_overhead_in_region" : [ 0, 0, 0, 0.1 ],"openmp_overhead_no_region" : [ 0, 0, 0, 0.00417 ],"sleep" : [ 0, 0, 0, 0 ]
},"openmp" : {
"normal_compute" : [ 0.762, 0.996, 1, 0.971 ],"io_reads" : [ 0.00416, 0.00416, 0, 0.00416 ],"io_writes" : [ 0.233, 0, 0, 0 ],"openmp" : [ 0, 0, 0, 0.01319 ],"openmp_overhead_in_region" : [ 0, 0, 0, 0 ],"openmp_overhead_no_region" : [ 0, 0, 0, 0 ],"sleep" : [ 0, 0, 0, 0 ]
},"pthreads" : {
"io_reads" : [ 0.00069, 0.00069, 0, 0.00069 ],"io_writes" : [ 0.0389, 0, 0, 0 ],"normal_compute" : [ 0.1270, 0.1659, 0.1666, 0.1652 ],"openmp" : [ 0, 0, 0, 0.01319 ],"openmp_overhead_in_region" : [ 0, 0, 0, 0.02153 ],"openmp_overhead_no_region" : [ 0, 0, 0, 0.00069 ],"sleep" : [ 0, 0, 0, 0 ]
}},"metrics" : {
"wchar_total" : {"mins" : [ 3957, 3957, 3958, 4959 ],"maxs" : [ 4504, 4959, 5788, 10059 ],"means" : [ 3965.375, 4112.112, 4579.149, 6503.496 ],"vars" : [ 2159.809, 49522.783, 169602.769, 2314522.699 ],"sums" : [ 15860, 16448, 18316, 26012 ]
},"bytes_read" : {
"mins" : [ 0, 0, 0, 0 ],"maxs" : [ 34647.255020415301, 0, 0, 0 ],"means" : [ 645.12988722358205, 0, 0, 0 ],"vars" : [ 9014087.0327749606, 0, 0, 0 ],"sums" : [ 2580, 0, 0, 0]
},"bytes_written" : {
"mins" : [ 0, 0, 0, 0 ],"maxs" : [ 123, 0, 0, 0 ],"means" : [ 32, 0, 0, 0 ],"vars" : [ 12, 0, 0, 0 ],"sums" : [ 128, 0, 0, 0]
}}
} }
Copyright c© 2002-2018 Arm Limited (or its affiliates). All rights reserved. 194

Arm Forge 18.0.2
31 GPU profiling
When profiling applications that use CUDA 8.0, GPU kernels that can be tracked by NVIDIA’s CUDAProfiling Tools Interface (CUPTI) will be displayed in a new “GPU Kernels” tab.
Figure 116: GPU Kernels View
This lists the CUDA kernels that were detected in the program alongside graphs indicating when thosekernels were active. If multiple kernels were identified in a process within a particular sample they willhave equal weighting in this graph.
Note that:
• CUDA kernels generated by OpenACC or CUDA Fortran are not yet supported by MAP.
• GPU profiling is only supported with CUDA 8.0.
• GPU profiling is not supported if the CUDA driver and toolkit versions do not match (for example,profiling a CUDA 8.0 program with a CUDA 9.0 driver is not supported).
• GPU profiling is not supported when statically linking the MAP sampler library.
31.1 Kernel analysis
CUDA kernel analysis mode is an advanced feature that provides insight into the activity within CUDAkernels. This mode can be enabled from the MAP run dialog or from the command line with --cuda-kernel-analysis.
Copyright c© 2002-2018 Arm Limited (or its affiliates). All rights reserved. 195
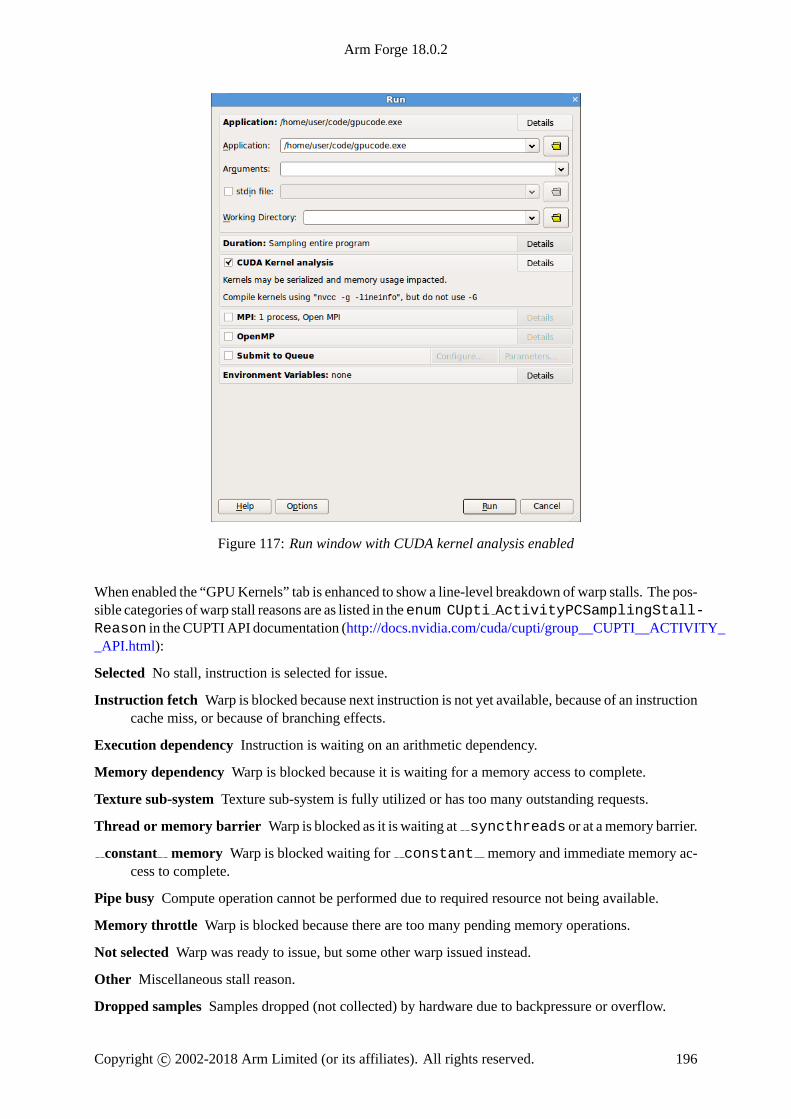
Arm Forge 18.0.2
Figure 117: Run window with CUDA kernel analysis enabled
When enabled the “GPUKernels” tab is enhanced to show a line-level breakdown of warp stalls. The pos-sible categories of warp stall reasons are as listed in theenum CUpti ActivityPCSamplingStall-Reason in the CUPTIAPI documentation (http://docs.nvidia.com/cuda/cupti/group__CUPTI__ACTIVITY__API.html):
Selected No stall, instruction is selected for issue.
Instruction fetch Warp is blocked because next instruction is not yet available, because of an instructioncache miss, or because of branching effects.
Execution dependency Instruction is waiting on an arithmetic dependency.
Memory dependency Warp is blocked because it is waiting for a memory access to complete.
Texture sub-system Texture sub-system is fully utilized or has too many outstanding requests.
Thread or memory barrier Warp is blocked as it is waiting at syncthreads or at a memory barrier.
constant memory Warp is blocked waiting for constant memory and immediate memory ac-cess to complete.
Pipe busy Compute operation cannot be performed due to required resource not being available.
Memory throttle Warp is blocked because there are too many pending memory operations.
Not selected Warp was ready to issue, but some other warp issued instead.
Other Miscellaneous stall reason.
Dropped samples Samples dropped (not collected) by hardware due to backpressure or overflow.
Copyright c© 2002-2018 Arm Limited (or its affiliates). All rights reserved. 196
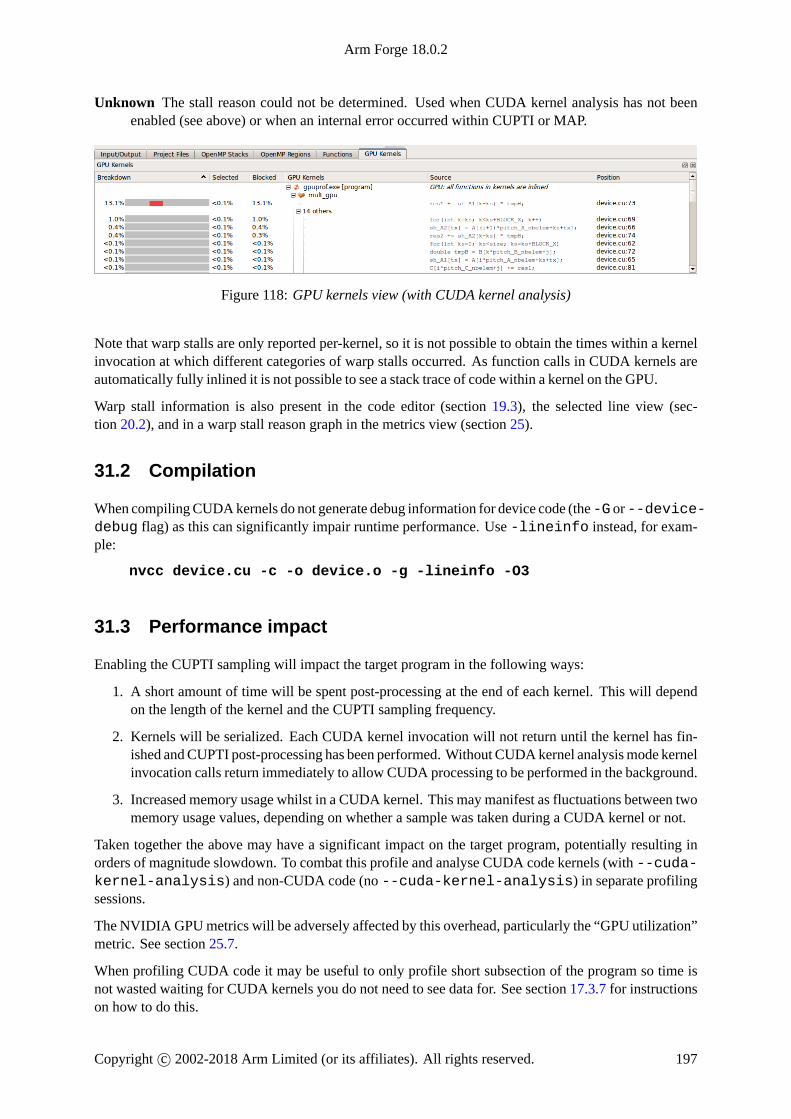
Arm Forge 18.0.2
Unknown The stall reason could not be determined. Used when CUDA kernel analysis has not beenenabled (see above) or when an internal error occurred within CUPTI or MAP.
Figure 118: GPU kernels view (with CUDA kernel analysis)
Note that warp stalls are only reported per-kernel, so it is not possible to obtain the times within a kernelinvocation at which different categories of warp stalls occurred. As function calls in CUDA kernels areautomatically fully inlined it is not possible to see a stack trace of code within a kernel on the GPU.
Warp stall information is also present in the code editor (section 19.3), the selected line view (sec-tion 20.2), and in a warp stall reason graph in the metrics view (section 25).
31.2 Compilation
When compilingCUDAkernels do not generate debug information for device code (the-G or--device-debug flag) as this can significantly impair runtime performance. Use -lineinfo instead, for exam-ple:
nvcc device.cu -c -o device.o -g -lineinfo -O3
31.3 Performance impact
Enabling the CUPTI sampling will impact the target program in the following ways:
1. A short amount of time will be spent post-processing at the end of each kernel. This will dependon the length of the kernel and the CUPTI sampling frequency.
2. Kernels will be serialized. Each CUDA kernel invocation will not return until the kernel has fin-ished andCUPTI post-processing has been performed. Without CUDAkernel analysis mode kernelinvocation calls return immediately to allow CUDA processing to be performed in the background.
3. Increased memory usage whilst in a CUDA kernel. This may manifest as fluctuations between twomemory usage values, depending on whether a sample was taken during a CUDA kernel or not.
Taken together the above may have a significant impact on the target program, potentially resulting inorders of magnitude slowdown. To combat this profile and analyse CUDA code kernels (with --cuda-kernel-analysis) and non-CUDA code (no --cuda-kernel-analysis) in separate profilingsessions.
The NVIDIA GPUmetrics will be adversely affected by this overhead, particularly the “GPU utilization”metric. See section 25.7.
When profiling CUDA code it may be useful to only profile short subsection of the program so time isnot wasted waiting for CUDA kernels you do not need to see data for. See section 17.3.7 for instructionson how to do this.
Copyright c© 2002-2018 Arm Limited (or its affiliates). All rights reserved. 197

Arm Forge 18.0.2
31.4 Customizing GPU profiling behavior
The interval at whichCUPTI samplesGPUwarps can bemodified by the environment variableALLINEA -SAMPLER GPU INTERVAL. Accepted values are max, high, mid, low, and min, with the defaultvalue being high. These correspond to the values in the enum CUpti ActivityPCSamplingPe-riod in the CUPTIAPI documentation (http://docs.nvidia.com/cuda/cupti/group__CUPTI__ACTIVITY__API.html).
Reducing the sampling interval means warp samples are takenmore frequently. While this may be neededfor very short-lived kernels, setting the interval too low can result in a very large number of warp samplesbeing taken which then require significant post-processing time once the kernel completes. Overheadsof twice as long as the kernel’s normal runtime have been observed. It is recommended that the CUPTIsampling interval is not reduced.
31.5 Known issues
• GPU profiling is only supported using CUDA 8.0.
• GPU profiling is not supported if the CUDA driver and toolkit versions do not match (for example,profiling a CUDA 8 program with a CUDA 9 driver is not supported).
• When preparing your program for profiling, it is advised to match the version of the CUDA toolkitto that of the CUDA driver.
• CUDA kernels generated by OpenACC or CUDA Fortran are not yet supported by MAP.
• The graphs are scaled on the assumption that there is a 1:1 relationship between processes andGPUs, each process having exclusive use of its own CUDA card. The graphs may be of an un-expected height if some processes do not have a GPU, or if multiple processes share the use of acommon GPU.
• Enabling CUDA kernel analysis mode can have a significant performance impact as described insection 31.3.
• GPU profiling is not supported when statically linking the MAP sampler library.
Copyright c© 2002-2018 Arm Limited (or its affiliates). All rights reserved. 198

Arm Forge 18.0.2
Part IV
Appendix
A Configuration
Arm Forge shares a common configuration file between Arm DDT and Arm MAP. This makes it easyfor users to switch between tools without reconfiguring their environment each time.
A.1 Configuration files
ArmForge uses two configuration files: the systemwidesystem.config and the user specificuser.config.The system wide configuration file specifies properties such as MPI implementation. The user specificconfiguration file describes user’s preferences such as font size. The files are controlled by environmentvariables:
Environment Variable DefaultALLINEA_USER_CONFIG ${ALLINEA_CONFIG_DIR}/user.configALLINEA_SYSTEM_CONFIG ${ALLINEA_CONFIG_DIR}/system.configALLINEA_CONFIG_DIR ${HOME}/.allinea
A.1.1 Sitewide configuration
If you are the system administrator, or have write-access to the installation directory, you can provide aconfiguration file which other users are automatically given a copy of the first time that they start ArmForge. In this case users no longer need to provide configuration for site-specific aspects such as queuetemplates and job submission.
First configure Arm Forge normally and run a test program to make sure all the settings are correct. Whenyou are satisfied with your configuration execute one of the following commands:
forge --clean-config
This will remove any user-specific settings from your system configuration file and will create a sys-tem.config file that can provide the default settings for all users on your system. Instructions on howto do this are printed when --clean-config completes. Note that only the system.config fileis generated. Arm Forge also uses a user-specific user.config which is not affected.
If you want to use DDT to attach to running jobs you also need to create a file called nodes in theinstallation directory with a list of compute nodes you want to attach to. See section 5.9 Attaching torunning programs for details.
Copyright c© 2002-2018 Arm Limited (or its affiliates). All rights reserved. 199

Arm Forge 18.0.2
A.1.2 Startup scripts
When Arm Forge is started it searches for a sitewide startup script called allinearc in the root of theinstallation directory. If this file exists it is sourced before starting the tool. When using the remote clientthis startup script is sourced before any sitewide remote-init remote daemon startup script.
Similarly, you can also provide a user-specific startup script in ˜/.allinea/allinearc.
Note: If theALLINEA_CONFIG_DIR environment variable is set then the softwarewill look in$ALLINEA_CONFIG_DIR/allinearc instead. When using the remote client the user-specific startup script willbe sourced before the user-specific ˜/.allinea/remote-init remote daemon startup script.
A.1.3 Importing legacy configuration
If you have used a version of ArmDDT prior to 4.0 your existing configuration will be imported automat-ically. If the DDTCONFIG environment variable is set, or you use the --config command-line argu-ment, the existing configuration will be imported. However, the legacy configuration file will not bemod-ified, and subsequent configuration changes will be saved as described in the previous sections.
A.1.4 Converting legacy sitewide configuration files
If you have existing sitewide configuration files from a version of Arm DDT prior to 4.0 you will need toconvert them to the new 4.0 format. This can easily be done using the following command line:
forge --config=oldconfig.ddt --system-config=newconfig.ddt --clean-config
Note: newconfig.ddt must not exist beforehand.
A.1.5 Using shared home directories on multiple systems
If your site uses the same home directory for multiple systems you may want to use a different configu-ration directory for each system.
You can do this by specifying the ALLINEA_CONFIG_DIR environment variable before starting ArmForge. If you use the module system you may choose to set ALLINEA_CONFIG_DIR according towhich system the module was loaded on.
For example, say you have two systems: harvester with login nodesharvester-login1 andharvester-login2 and sandworm with login nodes sandworm-login1 and sandworm-login2. You mayadd something similar to the following code to your module file:
case $(hostname) inharvester-login*)ALLINEA_CONFIG_DIR=$HOME/.allinea/harvester;;
sandworm-login*)ALLINEA_CONFIG_DIR=$HOME/.allinea/sandworm;;
esac
Copyright c© 2002-2018 Arm Limited (or its affiliates). All rights reserved. 200
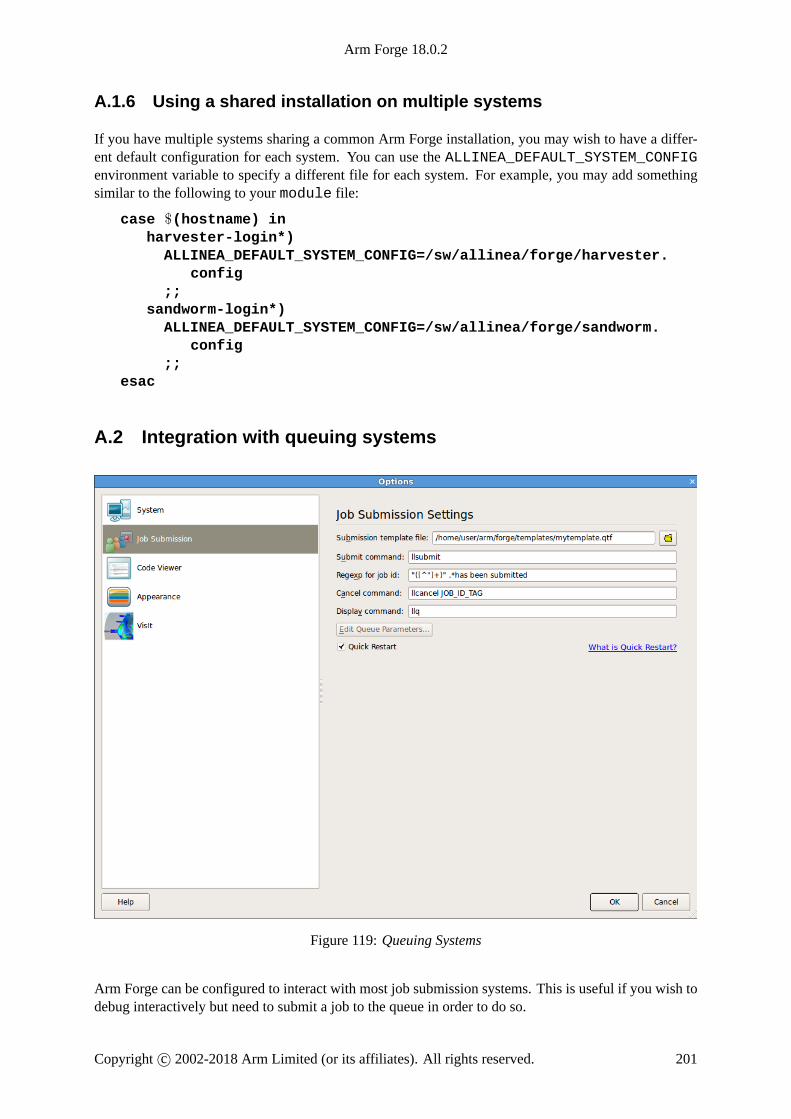
Arm Forge 18.0.2
A.1.6 Using a shared installation on multiple systems
If you have multiple systems sharing a common Arm Forge installation, you may wish to have a differ-ent default configuration for each system. You can use the ALLINEA_DEFAULT_SYSTEM_CONFIGenvironment variable to specify a different file for each system. For example, you may add somethingsimilar to the following to your module file:
case $(hostname) inharvester-login*)ALLINEA_DEFAULT_SYSTEM_CONFIG=/sw/allinea/forge/harvester.
config;;
sandworm-login*)ALLINEA_DEFAULT_SYSTEM_CONFIG=/sw/allinea/forge/sandworm.
config;;
esac
A.2 Integration with queuing systems
Figure 119: Queuing Systems
Arm Forge can be configured to interact with most job submission systems. This is useful if you wish todebug interactively but need to submit a job to the queue in order to do so.
Copyright c© 2002-2018 Arm Limited (or its affiliates). All rights reserved. 201

Arm Forge 18.0.2
MAP is usually run as a wrapper around mpirun or mpiexec, via the map --profile argument.Arm recommends using this to generate .map files instead of configuring MAP to submit jobs to thequeue, but both usage patterns are fully-supported.
In the Options window (Preferences on Mac OS X ), you should choose Submit job through queue. Thisdisplays extra options and switches the GUI into queue submission mode.
The basic stages in configuring to work with a queue are:
1. Making a template script.
2. Setting the commands used to submit, cancel, and list queue jobs.
Your system administratormaywish to provide a configuration file containing the correct settings, therebyremoving the need for individual users to configure their own settings and scripts.
In this mode Arm Forge can use a template script to interact with your queuing system. The templatessubdirectory contains some example scripts that can bemodified tomeet your needs. {installation-directory}/templates/sample.qtf, demonstrates the process of creating a template file insome detail.
A.3 Template tutorial
Ordinarily, your queue script will probably end in a line that starts mpirun with your target executable.In most cases you can simply replace that line with AUTO_LAUNCH_TAG. For example, if your scriptcurrently has the line:
mpirun -np 16 program_name myarg1 myarg2
Then create a copy of it and replace that line with:
AUTO_LAUNCH_TAG
Select this file as the Submission template file on the Job Submission Settings page of theOptions. Noticethat you are no longer explicitly specifying the number of processes, and so on. You instead specify thenumber of processes, program name and arguments in the Run window.
Fill in Submit command with the command you usually use to submit your job, for example qsub orsbatch, Cancel command with the command you usually use to cancel a job, for example qdel orscancel and Display command with the command you usually use to display the current queue status,for example qstat or squeue.
You can usually use (d+) as the Regexp for job id. This just scans for a number in the output from your Submit com-mand.
Once you have a simple template working you can go on to make more things configurable from theGUI. For example, to be able to specify the number of nodes from the GUI you would replace an explicitnumber of nodes with the NUM NODES TAG. In this case replace:
#SBATCH --nodes=100
With:
#SBATCH --nodes=NUM_NODE_TAG
See appendix I.1 Queue template tags for a full list of tags.
Copyright c© 2002-2018 Arm Limited (or its affiliates). All rights reserved. 202

Arm Forge 18.0.2
A.3.1 The template script
The template script is based on the file you would normally use to submit your job. This is typically ashell script that specifies the resources needed such as number of processes, output files, and executesmpirun, vmirun, poe or similar with your application.
Themost important difference is that job-specific variables, such as number of processes, number of nodesand program arguments, are replaced by capitalized keyword tags, such as NUM_PROCS_TAG.
When Arm Forge prepares your job, it replaces each of these keywords with its value and then submitsthe new file to your queue.
To refer to tags in comments without Arm Forge detecting them as a required field the comment line mustbegin with ##.
A.3.2 Configuring queue commands
Once you have selected a queue template file, enter submit, display and cancel commands.
When you start a session Arm Forge will generate a submission file and append its file name to the submitcommand you give.
For example, if you normally submit a job by typing job submit -u myusername -f myfilethen you should enter job submit -u myusername -f as the submit command.
To cancel a job, Arm Forge will use a regular expression you provide to get a value for JOB_ID_TAG.This tag is found by using regular expression matching on the output from your submit command. Seeappendix I.6 Job ID regular expression for details.
A.3.3 Configuring how job size is chosen
Arm Forge offers a number of flexible ways to specify the size of a job. You may choose whetherNumberof Processes andNumber of Nodes options appear in theRunwindow orwhether these should be implicitlycalculated. Similarly you may choose to display Processes per node in the Runwindow or set it to a Fixedvalue.
Note: if you choose to display Processes per node in the Run window and PROCS_PER_NODE_TAG isspecified in the queue template file then the tag will always be replaced by the Processes per node valuefrom the Run dialog, even if the option is unchecked there.
A.3.4 Quick restart
DDT allows you reuse an existing queued job to quickly restart a run without resubmitting it to the queue,provided that your MPI implementation supports doing this. Simply check the Quick Restart check boxon the Job Submission Options page.
In order to use quick restart, your queue template file must use AUTO_LAUNCH_TAG to execute yourjob.
For more information on AUTO_LAUNCH_TAG, see I.4.1 Using AUTO LAUNCH TAG.
Copyright c© 2002-2018 Arm Limited (or its affiliates). All rights reserved. 203

Arm Forge 18.0.2
A.4 Connecting to remote programs (remote-exec)
When Arm Forge needs to access another machine for remote launch or as part of starting some MPIs, itwill attempt to use the secure shell, ssh, by default.
However, this may not always be appropriate, ssh may be disabled or be running on a different port tothe normal port 22. In this case, you can create a file called remote-exec which is placed in your~/.allinea directory and DDT will use this instead.
Arm Forge will use look for the script at ~/.allinea/remote-exec, and it will be executed asfollows:
remote-exec HOSTNAME APPNAME [ARG1] [ARG2] ...
The script should start APPNAME on HOSTNAME with the arguments ARG1 ARG2 without further in-put (no password prompts). Standard output from APPNAME should appear on the standard output ofremote-exec. An example is shown here:
SSH based remote-exec
A remote-exec script using ssh running on a non-standard port might look as follows:
#!/bin/shssh -P {port-number} $*
In order for this to work without prompting for a password, you should generate a public and privateSSH key, and ensure that the public key has been added to the ~/.ssh/authorized_keys file onmachines you wish to use. See the ssh-keygen manual page for more information.
Testing
Once you have set up your remote-exec script, it is recommended that you test it from the commandline. For example:
∼/.allinea/remote-exec TESTHOST uname -n
Should return the output of uname -n on TESTHOST, without prompting for a password.
If you are having trouble setting upremote-exec, please contact Arm support at [email protected] assistance.
Windows The functionality described previously is also provided by the Windows remote client. Thereare however two differences:
1. The script is named remote-exec.cmd rather than remote-exec.
2. The default implementation uses the plink.exe executable supplied with Arm Forge.
A.5 Optional configuration
Arm Forge providess an Options window (Preferences on Mac OS X ), which allows you to quickly editthe settings outlined below.
A.5.1 System
MPI Implementation: Allows you to tell Arm Forge which MPI implementation you are using.
Note: If you are not using Arm Forge to work with MPI programs select none.
Copyright c© 2002-2018 Arm Limited (or its affiliates). All rights reserved. 204

Arm Forge 18.0.2
Override default mpirun path: Allows you to override the path to the mpirun (or equivalent) com-mand.
Select Debugger: Tells Arm Forge which underlying debugger it should use. This should almost alwaysbe left as Automatic.
On Linux systems Arm Forge ships with four versions of the GNUGDB debugger: GDB 7.2, GDB 7.6.2,GDB 7.10.1 and GDB 7.12.1. GDB 7.2 is the same version as shipped with DDT 4.2 and is provided forbackwards compatibility. GDB 7.6.2 is the recommended debugger for MAP. GDB 7.12.1 is the newestdebugger shipped with Arm Forge and is the recommended debugger for DDT. These recommendeddefaults are selected automatically when Automatic (recommended) is selected from the System Settingspage on the Options window.
Create Root and Workers groups automatically: If this option is checked DDT will automaticallycreate aRoot group for rank 0 and aWorkers group for ranks 1–nwhen you start a newMPI session.
Use Shared Symbol Cache: The shared symbol cache is a file that contains all the symbols in your pro-gram in a format that can be used directly by the debugger. Rather than loading and converting the sym-bols itself, every debugger shares the same cache file. This significantly reduces the amount of memoryused on each node by the debuggers. For large programs theremay be a delay starting a jobwhile the cachefile is created as it may be quite large. The cache files are stored in $HOME/.allinea/symbols. Armrecommends you only turn this option on if you are running out of memory on compute nodes when de-bugging programs with DDT.
Heterogeneous system support: DDT has support for running heterogeneous MPMDMPI applicationswhere some nodes use one architecture and other nodes use another architecture. This requires a littlepreparation of your Arm Forge installation. You must have a separate installation of DDT for each archi-tecture. The architecture of the machine running the Arm Forge GUI is called the host architecture. Youmust create symbolic links from the host architecture installation of Arm Forge to the other installationsfor the other architectures. For example with a 64-bit x86 64 host architecture (running the GUI) andsome compute nodes running the 32-bit i686 architecture:
ln -s /path/to/arm-forge-i686/bin/ddt-debugger \/path/to/arm-forge-x86_64/bin/ddt-debugger.i686
Enable CUDA software pre-emption: Allows debugging of CUDA kernels on a workstation with asingle GPU.
Copy files to compute nodes
• Bluegene: Copy the Arm Forge daemon files to the Bluegene I/O nodes. This may offer betterdebugging performance, but comes at the expense of consuming more RAM on the I/O nodes. Touse this option approximately 50% of the I/O node RAM should be free during normal operation,otherwise you risk exhausting the RAM on the I/O nodes.
Default groups file: Entering a file here allows you to customize the groups displayed by DDT whenstarting an MPI job. If you do not specify a file DDT will create the default Root and Workers groups ifthe previous option is checked.
Note: A groups file can be created by right clicking the process groups panel and selecting Save groups. . .while running your program.
Attach hosts file: When attaching, DDT will fetch a list of processes for each of the hosts listed in thisfile. See section 5.9 Attaching to running programs for more details.
Copyright c© 2002-2018 Arm Limited (or its affiliates). All rights reserved. 205
Arm Forge 18.0.2
A.5.2 Job submission
This section allows you to configureArmForge to use a custommpirun command, or submit your jobs toa queuing system. For more information on this, see section A.2 Integration with queuing systems.
A.5.3 Code viewer settings
This allows you to configure the appearance of the Arm Forge code viewer, which is used to display yoursource code while debugging.
Tab size: Sets the width of a tab character in the source code display. A width of 8 means that a tabcharacter will have the same width as 8 space characters.
Font name: The name of the font used to display your source code. It is recommended that you use afixed width font.
Font size: The size of the font used to display your source code.
External Editor: This is the program Arm Forge will execute if you right click in the code viewer andchoose Open file in external editor. This command should launch a graphical editor. If no editor isspecified, Arm Forge will attempt to launch the default editor as configured in your desktop environ-ment.
Colour Scheme: Color palette to use for the code viewer’s background, text and syntax highlighting.Defined in Kate syntax definition format in the resource/styles directory of the Arm Forge in-stall.
Visualize Whitespace: Enables or disables this display of symbols to represent whitespace. Useful fordistinguishing between space and tab characters.
Warn about potential programming errors: This setting enables or disables the use of static analysistools that are included with the Arm Forge installation. These tools support F77, C and C++, and analyzethe source code of viewed source files to discover common errors, but can cause heavy CPU usage onthe system running the Arm Forge user interface. You can disable this by unchecking this option.
A.5.4 Appearance
This section allows you to configure the graphical style of Arm Forge, as well as fonts and tab settingsfor the code viewer.
Look and Feel: This determines the general graphical style of Arm Forge. This includes the appearanceof buttons, context menus.
Override System Font Settings: This setting can be used to change the font and size of all componentsin Arm Forge (except the code viewer).
Copyright c© 2002-2018 Arm Limited (or its affiliates). All rights reserved. 206

Arm Forge 18.0.2
B Getting support
While this user guide attempts to cover as many parts of the installation, features and uses of our tool aspossible, there will be scenarios or configurations that are not covered, or are only briefly mentioned, oryou may on occasion experience a problem using the product. If the solution to your problem is not inthis guide then please contact Arm support at [email protected] .
Please provide as much detail as you can about the scenario in hand, such as:
• Version number of Arm Forge. For example, forge --version and your operating system andthe distribution, such as Red Hat Enterprise Linux 6.4. This information is all available by usingthe --version option on the command line of any Arm tool:
bash$ forge --version
Arm DDTPart of Arm Forge.Copyright (c) 2002-2017 Arm Limited (or its affiliates). All
rights reserved.
Version: 18.0Build: Ubuntu 14.04 x86_64Build Date: Nov 10 2017
Licence Serial Number: see About window
Frontend OS: Ubuntu 16.04 x86_64Nodes' OS: unknown
Last connected ddt-debugger: unknown
• The compiler used and its version number.
• The MPI library and CUDA toolkit version if appropriate.
• A description of the issue : what you expected to happen and what actually happened.
• An exact copy of any warning or error messages that you may have encountered.
Copyright c© 2002-2018 Arm Limited (or its affiliates). All rights reserved. 207

Arm Forge 18.0.2
C Supported platforms
A full list of supported platforms and configurations is maintained on the Arm Developer website.
C.1 DDT
See Supported platforms.
Platform Operating Systems MPI Compilersx86 and x86 64 Red Hat Enterprise
Linux and derivatives6 and 7, SUSE LinuxEnterprise Server 11and 12, Ubuntu 14.04and 16.04
Blue Gene/Q, BullxMPI 1.2.7 and 1.2.8,Cray MPT (MPI/SH-MEM), IBM PE, IntelMPI 4.1.x and 5.0.x,MPICH 2.x.x and3.x.x, MVAPICH 2.0and 2.1, Open MPI1.6.x, 1.8.x (MPI/SH-MEM), 1.10.x and2.0.x, Platform MPI9.x, SGI MPT 2.08,2.10 and 2.11, andSpectrum MPI 10.1.0
Cray, GNU 4.3.2+, In-tel 13+, PGI 14+
Intel Xeon Phi(Knight’s Landing)
Red Hat EnterpriseLinux 7.2 and SUSELinux EnterpriseServer 12
x86 64 platform MPIsupport
Intel, GNU
IBM Power (PPC64big-endian)
Red Hat EnterpriseLinux 6
IBM PE, MPICH 2.x.xand 3.x.x, Open MPI1.6.x, 1.8.x and 1.10.x
IBM XLC, IBM XLF,GNU
IBM Power (PPC64lelittle-endian,POWER8)
Red Hat EnterpriseLinux 7.2
IBM PE, MPICH 3.x.x,Open MPI 1.8.x and1.10.x, and SpectrumMPI 10.1.x
GNU
Blue Gene/Q Red Hat EnterpriseLinux 6
Native GNU and IBM
Arm R©v8 (AArch64) Ubuntu 16.04, SUSELinux EnterpriseServer 12.2, and RedHat Enterprise Linux7.4
Open MPI 1.8.x, 1.10.xand 2.0.x
GNU
NVIDIA CUDAToolkit 7.0/7.5/8.0
Linux - Cray OpenACC,NVCC, PGI OpenACC(14.4 and above), PGICUDA Fortran (14.1and above)
Notes:
Copyright c© 2002-2018 Arm Limited (or its affiliates). All rights reserved. 208

Arm Forge 18.0.2
• Pretty printing of C++ types is supported for GNU and Intel compilers.
• Message queue debugging is supported for Bullx MPI, IBM PE, Intel MPI 4.1.x, MPICH, MVA-PICH, and Open MPI.
• Version control integration is supported for Git 1.7+, Mercurial 2.1+ and Subversion 1.6+.
Batch schedulers supported:
• SLURM 2.6.3+ and 14.03+
• PBS
• TORQUE
• Moab
• Oracle Grid Engine
• Loadleveler
• Cobalt.
Batch scheduling systems are supported through Queue Templates.
See section A.2 Integration with queuing systems for more information.
See section E.16 SLURM for more details about SLURM support.
C.2 MAP
See Supported platforms.
Platform Operating Systems MPI Compilersx86 64 Red Hat Enterprise
Linux and derivatives6 and 7, SUSE LinuxEnterprise Server 11and 12, Ubuntu 14.04and 16.04
Bullx MPI 1.2.7 and1.2.8, Cray MPT, IntelMPI 4.1.x and 5.0.x,MPICH 2.x.x and3.x.x, MVAPICH 2.0and 2.1, Open MPI1.6.x, 1.8.x, 1.10.x and2.0.x, Platform MPI9.x, SGI MPT 2.10 and2.11
Cray, GNU 4.3.2+, In-tel 13+, PGI 14+
Intel Xeon Phi(Knight’s Landing)
Red Hat EnterpriseLinux 7.2 and SUSELinux EnterpriseServer 12
x86 64 MPI platformsupport
Intel, GNU
IBM Power (PPC64lelittle-endian,POWER8)
Red Hat EnterpriseLinux 7.2
IBM PE, MPICH 3.x.x,Open MPI 1.8.x and1.10.x, and SpectrumMPI 10.1.0
GNU
Arm R©v8 (AArch64) Ubuntu 16.04, SUSELinux EnterpriseServer 12.2, and RedHat Enterprise Linux7.4
Open MPI 1.8.x, 1.10.xand 2.0.x
GNU
Copyright c© 2002-2018 Arm Limited (or its affiliates). All rights reserved. 209

Arm Forge 18.0.2
NVIDIA CUDAToolkit 7.0/7.5/8.0
Linux - Cray OpenACC,NVCC, PGI OpenACC(14.4 and above), PGICUDA Fortran (14.1and above)
The followingMPIs are also covered by our precompiledwrappers: OpenMPI 1.6.x-1.10.x, MPICH2.x.xand 3.x.x, Intel MPI 4.x.x and 5.x.x, Cray MPT, Bullx MPI 1.2.7 and 1.2.8, MVAPICH 2.x.x.
Version control integration is supported for Git 1.7+, Mercurial 2.1+ and Subversion 1.6+.
The Arm profiling libraries must be explicitly linked with statically linked programs whichmostly appliesto the Cray X-Series.
Batch schedulers supported:
• SLURM 2.6.3+ and 14.03+
• PBS
• TORQUE
• Moab
• Oracle Grid Engine
• Loadleveler
• Cobalt.
Batch scheduling systems are supported through Queue Templates.
See section A.2 Integration with queuing systems for more information.
See section E.16 SLURM for more details about SLURM support.
Copyright c© 2002-2018 Arm Limited (or its affiliates). All rights reserved. 210

Arm Forge 18.0.2
D Known issues
The most significant known issues for the latest release are summarized here:
D.1 MAP
The following known issues affect MAP.
• I/O metrics are not available on some systems, including Cray systems.
• CPU instruction metrics are only available on x86 64 systems.
• Thread activity is not sampled whilst a process is inside an MPI call with a duration spanningmultiple samples.
D.2 MPICH 3
MPICH 3.0.3 and 3.0.4 do not work with the Arm Forge due to an MPICH defect. MPICH 3.1 is fullysupported.
D.3 Open MPI
Message queue debugging does not work in Open MPI 1.8.1 to 1.8.5. This issue is fixed in Open MPI1.8.6.
Open MPI 2.1.x does not work with Arm Forge due to a bug in the Open MPI debug interface.
D.4 CUDA
The following known issues affect CUDA:
• To debug or profile a CUDA program, compile the program with a version of the CUDA toolkitthat matches the version of the installed CUDA driver. For example, if the CUDA 7.5 driver isinstalled, then you must use the CUDA 7.5 toolkit to compile your program.
Note: Compiling with mismatched CUDA toolkit and CUDA driver versions will cause errors whendebugging or profiling.
Note: To force DDT to use a particular version of the CUDA debugger, set the ALLINEA_FORCE_CUDA_VERSION environment variable to a version number. For example, ALLINEA_FORCE_CUDA_VERSION=7.5 for CUDA 7.5. This may cause issues due to CUDA version incompatibil-ities.
• GPU profiling is only supported when using a CUDA 8.0 toolkit with a CUDA 8.0 driver.
• Cray CCE 8.1.2 OpenACC and previous releases will fail to generate debug information for localvariables in accelerated regions. Please install CCE 8.1.3.
D.5 SLURM
On Cray X-series systems only native SLURM is suported, hybrid mode is not supported.
Copyright c© 2002-2018 Arm Limited (or its affiliates). All rights reserved. 211

Arm Forge 18.0.2
D.6 PGI compilers
Version 14.9 or later of the PGI compilers is required to compile the Arm MAP MPI wrappers as a staticlibrary.
D.7 64-bit Arm/Power platforms
For best operation, DDT and MAP require debug symbols for the runtime libraries to be installed inaddition to debug symbols for the program itself.
D.8 F1 user guide
Sometimes on pressing “F1” the user guide may not display correctly. Some stale files appear to be ableto corrupt the document browser. If “F1” leads to invisible documents, please remove these cached filesby typing:
rm -r ∼/.local/share/data/Arm
D.9 See also
See also additional known issues here:
Category Known IssuesMPI Distribution E MPI distribution notes and known issuesCompiler F Compiler notes and known issuesPlatform G Platform notes and known issuesGeneral H General troubleshooting and known issues
Copyright c© 2002-2018 Arm Limited (or its affiliates). All rights reserved. 212

Arm Forge 18.0.2
E MPI distribution notes and known issues
This appendix has brief notes onmany of theMPI distributions supported byArmDDT andArmMAP.
Advice on settings and problems particular to a distribution are given here. Note that MAP supportsfewer MPI distributions than DDT. See C Supported platforms for more details.
E.1 Berkeley UPC
Only the MPI transport is supported. Programs must be compiled with the -tv flag, for example:
upcc hello.c -o hello -g -tv
E.2 Bull MPI
Bull MPI 1, MPI 2 and Bull X-MPI are supported. For Bull X-MPI select the Open MPI or Open MPI(Compatibility) MPIs, depending on whether ssh is allowed. If ssh is allowed choose Open MPI, or ifnot choose Open MPI Compatibility mode.
SelectBullMPI or BullMPI 1 forBullMPI 1, or BullMPI 2 for BullMPI 2 from theMPI implementationslist. In the mpirun arguments box of the Run window you may also wish to specify the partition that youwish to use by adding the following:
-p partition_name
You should ensure thatprun, the command used to launch jobs, is in yourPATH before startingDDT.
E.3 Cray MPT
This section only applies when using aprun. For srun (‘Native’ SLURM mode) see section E.16SLURM.
DDT and MAP have been tested with Cray XT 5/6, XE6, XK6/7, and XC30 systems. DDT is able tolaunch and support debugging jobs in excess of 700,000 cores.
A number of template files for launching applications from within the queue, using Arm’s job submissioninterface, are included in the distribution. These may require some minor editing to cope with localdifferences on your batch system.
To attach to a running job on a Cray system the MOM nodes, that is those nodes where aprun is launched,must be reachable via ssh from the node where DDT is running, for example on a login node. DDTmust connect to these nodes in order to launch debugging daemons on the compute nodes. Users caneither specify the aprun-host manually in the attach dialog when scanning for jobs, or configure a hostslist containing all MOM nodes.
If the program is dynamically linked, DDT supports preloading of C/Fortran (no threads / threads) onXK6/7 (requires aprun/ALPS 4.1 or later). Preloading of C++ (no threads / threads) is not supported atthis time.
If the program is dynamically linked,MAP supports preloading of the sampling libraries (requires aprun/ALPS4.1 or later), else MAP requires Arm’s sampling libraries to be linked with the application before runningon this platform. See 17.2.2 Linking for a set-by-step guide.
Copyright c© 2002-2018 Arm Limited (or its affiliates). All rights reserved. 213

Arm Forge 18.0.2
E.4 HP MPI
Select HP MPI as the MPI implementation.
A number of HP MPI users have reported a preference to using mpirun -f jobconfigfile insteadof mpirun -np 10 a.out for their particular system. It is possible to configure DDT to support thisconfiguration using the support for batch (queuing) systems.
The role of the queue template file is analogous to the -f jobconfigfile.
If your job config file normally contains:
-h node01 -np 2 a.out-h node02 -np 2 a.out
Then your template file should contain:
-h node01 -np PROCS_PER_NODE_TAG /usr/local/ddt/bin/ddt-debugger-h node02 -np PROCS_PER_NODE_TAG /usr/local/ddt/bin/ddt-debugger
Also the Submit Command box should be filled with the following:
mpirun -f
Select the Template uses NUM_NODES_TAG and PROCS_PER_NODE_TAG radio button. After this hasbeen configured by clicking OK, you will be able to start jobs. Note that the Run button is replaced withSubmit, and that the number of processes box is replaced by Number of Nodes.
E.5 IBM PE
Ensure that poe is in your path, and select IBM PE as the MPI implementation.
A sample Loadleveler script, which starts debugging jobs on POE systems, is included in the {installation-directory}/templates directory.
To attach to already running POE jobs, SSH access to the compute nodes is required. Without SSH, DDThas no way to connect to the ranks running on the nodes.
Known issue: IBM PE 2.1 and newer currently do not provide the debugging interface required for MPImessage queue debugging.
E.6 Intel MPI
Select Intel MPI from the MPI implementation list. DDT and MAP have been tested with Intel MPI4.1.x, 5.0.x and later.
Make sure to pay attention to the changes in the mpivars.sh script with Intel MPI 5.0. You can passit an argument to say whether you want to use the debug or release version of the MPI libraries. Thedefault, if you omit the argument, is the release version, but message queue debugging will not work ifyou use this version. The debug version must be explicitly used.
DDT also supports the Intel Message Checker tool that is included in the Intel Trace Analyser and Col-lector software. A plugin for the Intel Trace Analyser and Collector version 7.1 is provided in DDT’splugins directory. Once you have installed the Intel Trace Analyser and Collector, you should make surethat the following directories are in your LD_LIBRARY_PATH:
Copyright c© 2002-2018 Arm Limited (or its affiliates). All rights reserved. 214
Arm Forge 18.0.2
{path to intel install directory}/itac/7.1/lib{path to intel install directory}/itac/7.1/slib
The Intel Message Checker only works if you are using the Intel MPI. Make sure Intel’s mpiexec is inyour path, and that your application was compiled against Intel’s MPI, then launch DDT, check the plugincheckbox and debug your application as usual. If one of the above steps has been missed out, DDT mayreport an error and say that the plugin could not be loaded.
Once you are debugging with the plugin loaded, DDT will automatically pause the application wheneverIntel Message Checker detects an error. The Intel Message Checker log can be seen in the standard error(stderr) window.
Note that the Intel Message Checker will abort the job after 1 error by default. You can modify this byadding -genv VT_CHECK_MAX_ERRORS0 to thempiun arguments box in the Runwindow. See Intel’sdocumentation for more details on this and other environment variable modifiers.
Attach dialog: DDT cannot automatically discover existing running MPI jobs that use Intel MPI if theprocesses are started using the mpiexec command (which uses the MPD process starting daemon). Toattach to an existing job you will need to list all potential compute nodes individually in the dialog.
Please note thempiexecmethod of startingMPI processes is deprecated by Intel and you are encouragedto use mpirun or mpiexec.hydra (which use the newer scalable Hydra process starting daemon).All processes that are started by either mpirun and mpiexec.hydra are discovered automatically byArm DDT.
If you use Spectrum LSF as workload manager in combination with Intel MPI and you get for exampleone of the following errors:
• <target program> exited before it finished starting up. One or more processes were killed or diedwithout warning
• <target program> encountered an error before it initialised the MPI environment. Thread 0 termi-nated with signal SIGKILL
or the job is killed otherwise during launching/attaching then you may need to set/export I_MPI_LSF_USE_COLLECTIVE_LAUNCH=1 before executing the job. See Using IntelMPI under LSF quick guideand Resolve the problem of the Intel MPI job . . . hang in the cluster for more details.
E.7 MPC
DDT supports MPC version 2.5.0 and upwards. MPC is not supported by MAP.
In order to debug an MPC program, a script needs adding to the MPC installation. This script is obtainedfrom DownloadMPC script and should be saved into the bin/mpcrun_opt subdirectory of your MPCframework installation.
E.7.1 MPC in the Run window
When the MPC framework is selected as the MPI implementation, there is an additional field in the MPIconfiguration within the Run window:
Number of MPC Tasks: The number of tasks that you wish to debug. MPC uses threads to split thesetasks over the number of processes specified.
Also, the mpirun arguments field is replaced with the field:
Copyright c© 2002-2018 Arm Limited (or its affiliates). All rights reserved. 215

Arm Forge 18.0.2
mpcrun arguments: (optional): The arguments that are passed to mpcrun. This should be used forarguments to mpcrun not covered by the number of MPC tasks and number of processes fields.
An example usage is to override default threadingmodel specified in theMPC configuration by entering--multithreading=pthreads for POSIX threads or --multithreading=ethreads for user-level threads.
The documentation for these arguments can be found at http://mpc.paratools.com/UsersGuide/Running.This field is only displayed if the selected MPI implementation is the MPC framework.
Note: The OpenMP options are not available in the Run window, as MPC uses the number of tasks todetermine the number of OpenMP threads rather than OMP_NUM_THREADS.
E.7.2 MPC on the command line
There are two additional command-line arguments to DDT when using MPC that can be used as analternative to configuration in the GUI.
--mpc-task-nb The total number of MPC tasks to be created.
--mpc-process-nb The total number of processes to be started by mpcrun.
E.8 MPICH 1 p4
ChooseMPICH 1 Standard as the MPI implementation.
E.9 MPICH 1 p4 mpd
This daemon based distribution passes a limited set of arguments and environments to the job programs.If the daemons do not start with the correct environment for DDT to start, then the environment passedto the ddt-debugger backend daemons will be insufficient to start.
It should be possible to avoid these problems if .bashrc or .tcshrc/.cshrc are correct.
However, if unable to resolve these problems, you can pass HOME and LD_LIBRARY_PATH, plus anyother environment variables that you need.
This is achieved by adding -MPDENV -HOME={homedir} LD LIBRARY PATH= {ld-library-path} to the Arguments area of the Run window.
Alternatively from the command-line you may simply write:
ddt {program-name} -MPDENV- HOME=$HOME LD_LIBRARY_PATH=$LD_LIBRARY_PATH
Your shell will then fill in these values for you.
ChooseMPICH 1 Standard as the MPI implementation.
E.10 MPICH 2
If you see the error undefined reference to MPI Status c2f while building the MAP li-braries then you need to rebuild MPICH 2 with Fortran support. See 17.2.2 Linking for more informationon linking.
Copyright c© 2002-2018 Arm Limited (or its affiliates). All rights reserved. 216

Arm Forge 18.0.2
E.11 MPICH 3
MPICH 3.0.3 and 3.0.4 do not work with Arm Forge due to an MPICH. MPICH 3.1 addresses this andis supported.
There are twoMPICH 3 modes: Standard and Compatibility. If the standard mode does not work on yoursystem select MPICH 3 (Compatibility) as the MPI Implementation on the System Settings page of theOptions window.
E.12 MVAPICH 2
Known issue: If memory debugging is enabled in DDT, this will interfere with the on-demand con-nection system used by MVAPICH2 above a threshold process count and applications will fail to start.This threshold default value is 64. To work around this issue, set the environment variable MV2_ON_DEMAND_THRESHOLD to the maximum job size you expect on your system and then DDT will workwith memory debugging enabled for all jobs. This setting should not be a system wide default as it mayincrease startup times for jobs and memory consumption.
MVAPICH 2 now offers mpirun rsh instead of mpirun as a scalable launcher binary. To use thiswith DDT, from File→Options (Arm Forge→ Preferences on Mac OS X) go to the System page, checkOverride default mpirun path and enter mpirun rsh. You should also add -hostfile <hosts>,where <hosts> is the name of your hosts file, within the mpirun rsh arguments field in the Run win-dow.
To enable message Queue Support MVAPICH 2 must be compiled with the flags --enable-debug--enable-sharedlib. These are not set by default.
E.13 Open MPI
Arm Forge has been tested with Open MPI 1.6.x, 1.8.x, 1.10.x and 2.0.x. Select Open MPI from the listof MPI implementations.
Open MPI 2.1.x does not work with Arm Forge due to a bug in the Open MPI debug interface.
There are three different Open MPI choices in the list of MPI implementations to choose from in ArmForge when debugging or profiling for Open MPI.
• Open MPI – the job is launched with a custom ‘launch agent’ that, in turn, launches the Armdaemons.
• Open MPI (Compatibility) – mpirun launches the Arm daemons directly. This startup method doesnot take advantage of Arm’s scalable tree.
• Open MPI for Cray XT/XE/XK/XC – for OpenMPI running on Cray XT/XE/XK/XC systems. Thismethod is fully able to use Arm’s scalable tree infrastructure.
To launch with aprun (instead of mpirun) simply type the following on the command line:
ddt --mpi="OpenMPI (Cray XT/XE/XK)" --mpiexec aprun [arguments]# ormap --mpi="OpenMPI (Cray XT/XE/XK)" --mpiexec aprun [arguments]
The following section lists some known issues:
• Early versions of Open MPI 1.8 do not properly support message queue debugging. This is fixedin Open MPI 1.8.6.
Copyright c© 2002-2018 Arm Limited (or its affiliates). All rights reserved. 217

Arm Forge 18.0.2
• If you are using the 1.6.x series of OpenMPI configuredwith the--enable-orterun-prefix-by-default flag then DDT requires patch release 1.6.3 or later due to a defect in earlier versionsof the 1.6.x series.
• The version of Open MPI packaged with Ubuntu has the Open MPI debug libraries stripped. Thisprevents the Message Queues feature of DDT from working.
• With Open MPI 1.3.4 and Intel Compiler v11, the default build will optimize away a vital callduring the startup protocol which means the default Open MPI start up will not work. If this isyour combination, either update your Open MPI, or select Open MPI (Compatibility) instead asthe DDT MPI Implementation.
• On Infiniband systems, Open MPI and CUDA can conflict in a manner that results in failure tostart processes, or a failure for processes to be debuggable. To enable CUDA interoperability withInfiniband, set the CUDA environment variable CUDA_NIC_INTEROP to 1.
E.14 Platform MPI
Platform MPI 9.x is supported, but only with the mpirun command. Currently mpiexec is not sup-ported.
E.15 SGI MPT / SGI Altix
For SGI use one of the following configurations:
• If using SGI MPT 2.10+, select SGI MPT (2.10+, batch) as the MPI implementation.
• If using SGI MPT 2.08+, select SGI MPT (2.08+, batch) as the MPI implementation.
• If using an older version of SGI MPT (2.07 or before) select SGI MPT as the MPI implementation.
If you are using SGI MPT with PBS or SLURM and would normally use mpiexec mpt to launchyour program you will need to use the pbs-sgi-mpt.qtf queue template file and select SGI MPT(Batch) as the MPI implementation.
If you are using SGIMPT with SLURM and would normally use mpiexec mpt to launch your programyou will need to use srun --mpi=pmi2 directly.
mpiexec mpt from versions of SGIMPT prior to 2.10may preventMAP from starting when preloadingthe Arm profiler and MPI wrapper libraries. Arm recommends you explicitly link your programs againstthese libraries to work around this problem.
Preloading the Arm profiler and MPI wrapper libraries is not supported in express launch mode. Armrecommends you explicitly link your programs against these libraries to work around this problem.
Some SGI systems cannot compile programs on the batch nodes (one reason might be because the gccpackage is not installed). If this applies to your system you must explicitly compile the ArmMPI wrapperlibrary using the make-profiler-libraries command and then explicitly link your programsagainst the Arm profiler and MPI wrapper libraries.
The mpio.h header file shipped with SGI MPT 2.09 and SGI MPT 2.10 contains a mismatch betweenthe declaration of MPI File set view and some other similar functions and their PMPI equivalents,for example PMPI File set view. This prevents MAP from generating the MPI wrapper library.Please contact SGI for a fix.
SGI MPT 2.09 requires the MPI_SUPPORT_DDT environment variable to be set to 1 to avoid startupissues when debugging with DDT, or profiling with MAP.
Copyright c© 2002-2018 Arm Limited (or its affiliates). All rights reserved. 218

Arm Forge 18.0.2
E.15.1 UsingDDTwithCrayATP (theAbnormal Termination Process)
DDT is compatible with the Cray ATP system, which will be default on some XE systems. This runtimeaddition to applications automatically gathers crashing process stacks, and can be used to let DDT attachto a job before it is cleaned up during a crash.
To be able to debug after a crash when an application is run with ATP but without a debugger, theATP_HOLD_TIME environment variable should be initialized before launching the job. A value of 5is sufficient, even on a large Petascale system, giving 5 minutes for the attach to complete.
The following example shows the typical output of an ATP session.
n10888@kaibab:∼> aprun -n 1200 ./atploopApplication 1110443 is crashing. ATP analysis proceeding...Stack walkback for Rank 23 starting:[email protected]:[email protected]:[email protected]:48__kill@0x4b5be7Stack walkback for Rank 23 doneProcess died with signal 11: 'Segmentation fault'View application merged backtrace tree file 'atpMergedBT.dot'with 'statview'
You may need to 'module load stat'.
atpFrontend: Waiting 5 minutes for debugger to attach...
At this point, DDT can be launched to debug the application.
DDT can attach using the Attaching dialogs described in Section 5.9 Attaching to running programs, orgiven the PID of the aprun process, the debugging set can be specified from the command line.
For example, to attach to the entire job:
ddt --attach-mpi=12772
If a particular subset of processes are required, then the subset notation could also be used to selectparticular ranks.
ddt --attach-mpi=12772 --subset=23,100-112,782,1199
E.16 SLURM
To start MPI programs using the srun command instead of your MPI’s usual mpirun command (orequivalent) select SLURM (MPMD) as the MPI Implementation on the System Settings page of the Op-tions.
While this option will work with most MPIs, it will not work with all. See the following list for someexceptions:
• On the Cray, ‘Hybrid’ SLURMmode (that is, sbatch + aprun) is not supported. You must startyour program with Cray’s aprun instead. See Section E.3 Cray MPT.
• Bluegene/Q users should select Bluegene/Q (SLURM) as the MPI Implementation instead.
Copyright c© 2002-2018 Arm Limited (or its affiliates). All rights reserved. 219
Arm Forge 18.0.2
SLURM may be used as a job scheduler with DDT and MAP through the use of a queue template file.See templates/slurm.qtf in the Arm Forge installation for an example and section A.2 Integrationwith queuing systems for more information on how to customize the template.
E.17 Spectrum MPI
Spectrum MPI 10.1.0 is supported for IBM Power (PPC64le little-endian, POWER8) with the mpirunand mpiexec commands. SpectrumMPI 10.1.1 is additionally supported with the jsrun (PMIx mode)command. For x86-64 platforms mpirun and mpiexec commands are supported.
Message queue information is currently not available with Spectrum MPI.
Copyright c© 2002-2018 Arm Limited (or its affiliates). All rights reserved. 220
Arm Forge 18.0.2
F Compiler notes and known issues
When compiling for a DDT debugging session, always compile with a minimal amount of optimization,or no optimization. Some compilers reorder instruction execution and omit debug information whencompiled with optimization turned on.
F.1 AMD OpenCL compiler
Not supported by MAP.
The AMD OpenCL compiler can produce debuggable OpenCL binaries. However, the target must bethe CPU rather than the GPU device. The build flags -g -O0 must be used when building the OpenCLkernel, typically by setting the environment variable:
AMD_OCL_BUILD_OPTIONS_APPEND="-g -O0"
The example codes in the AMD OpenCL toolkit are able to run on the CPU by adding a parameter --device cpu and will result, with the above environment variable set, in debuggable OpenCL.
F.2 Arm Fortran compiler
Debugging of Fortran code may be incomplete or inaccurate. For more information, check the knownissues section in the ARM HPC Compiler release notes.
F.3 Berkeley UPC compiler
Not supported by MAP.
The Berkeley UPC compiler is fully supported by Arm DDT, but only when using the MPI conduit (otherconduits are not supported).
Warning: If you do not compile the program fixing the number of threads (using the -fupc-threads-<numberOfThreads> flag), a known issue arises at the end of the program execution.
Note: Source files must end with the extension .upc in order for UPC support to be enabled.
F.4 Cray compiler environment
DDT supports Cray Fast Track Debugging. In DDT 5.0 it is only supported when using GDB 7.2 and notwhen using GDB 7.6.2. You can select GDB 7.2 on the System Settings page of the Options window. Toenable Fast Track Debugging compile your program with -Gfast instead of -g.
See the Using Cray Fast-track Debugging section of the Cray Programming Environment User’s Guidefor more information.
Call-frame information can also be incorrectly recorded, which can sometimes lead to DDT stepping intoa function instead of stepping over it. This may also result in time being allocated to incorrect functionsin MAP.
C++ pretty printing of the STL is not supported by DDT for the Cray compiler.
Known Issue: If compiling static binaries then linking in the DDT memory debugging library is notstraightforward for F90 applications. You will need to do the following:
Copyright c© 2002-2018 Arm Limited (or its affiliates). All rights reserved. 221

Arm Forge 18.0.2
1. Manually rerun the compiler command with the -v (verbose) option to get the linker commandline. It is assumed that the object files are already created.
2. Run ld manually to produce the final statically linked executable. For this, the following pathmodifications will be needed in the previous ld command: Add -L{ddt-path}/lib/64 -ldmalloc immediately prior to where -lc is located. For multi-threaded programs you have toadd -ldmallocth -lpthread before the -lc option.
See CUDA/GPU debugging notes for details of Cray OpenMP Accelerator support.
Arm DDT fully supports the Cray UPC compiler. Not supported by MAP.
F.4.1 Compile serial programs on Cray
To debug serial (non-MPI) code with DDT on Cray, first you have to load the PMI module and thencompile your code using the Cray compiler adding the flags -Wl,-u,PMI Init to link against theCray PMI.
When you launch DDT with your serial program, the run dialog will automatically detect the Cray MPIeven though it is a serial program and you just have to set one process and press run.
Additionally, the following environment variables should be exported in your job submission script:
DDT_MPI_INIT=mainDDT_HOLD_MPI_INIT=1
F.5 GNU
The compiler flag -fomit-frame-pointer should never be used in an application which you intendto debug or profile. Doing so can mean Arm Forge cannot properly discover your stack frames and youwill be unable to see which lines of code your program has stopped at.
For GNU C++, large projects can often result in vast debug information size, which can lead to largememory usage by DDT’s back end debuggers. For example, each instance of an STL class used indifferent object files will result in the compiler generating the same information in each object file.
The -foptimize-sibling-calls optimization (used in -O2, -O3 and -Os) interfere with thedetection of some OpenMP regions. If your code is affected with this issue add -fno-optimize-sibling-calls to disable it and allow MAP to detect all the OpenMP regions in your code.
Using the -dwarf-2 flag together with the -strict-dwarf flag may cause problems in stack un-winding, resulting in a “cannot find the frame base” error. DWARF 2 does not provide all the informationneceesary for unwinding the call stack, so many compilers add DWARF 3 extensions with the missinginformation. Using the -strict-dwarf flag prevents compilers from doing so, resulting in the afore-mentioned message. Removing -strict-dwarf should fix this problem.
F.5.1 GNU UPC
DDT also supports the GCC-UPC compiler (upc_threads_model_process only; the pthread-tls threads model is not supported). MAP does not support this.
To compile and install GCC UPC 4.8 without TLS it is necessary to modify the configuration file path/to/upc/source/code/directory/libgupc/configure, replacing all the entries upc cv -gcc tls supported=“yes” to upc cv gcc tls supported=“no”.
Copyright c© 2002-2018 Arm Limited (or its affiliates). All rights reserved. 222

Arm Forge 18.0.2
To run a UPC program in DDT you have to select the MPI implementation “GCC libupc SMP (noTLS)”
F.6 IBM XLC/XLF
It is advisable to use the -qfullpath option to the IBM compilers (XLC/XLF) in order for source filesto be found automatically when they are in directories other than that containing the executable. Thisflag has been known to fail for mpxlf95, and so there may be circumstances when you must right clickin the project navigator and add additional paths to scan for source files.
Module data items behave differently between 32 and 64 bit mode, with 32-bit mode generally enablingaccess to more module variables than 64-bit mode.
Missing debug information in the binaries produced by XLF can prevent DDT from showing the values inFortran pointers and allocatable arrays correctly, and assumed-size arrays cannot be shown at all. Pleaseupdate to the latest compiler version before reporting this to Arm support at [email protected].
Sometimes, when a process is paused inside a system or library call, DDT will be unable to display thestack, or the position of the program in the Code view. To get around this, it is sometimes necessary toselect a known line of code and choose Run to here. If this bug affects you, please contact Arm supportat [email protected] .
OpenMP loop variables are often optimized away and not present when debugging.
DDT has been tested against the C compiler xlc version 10.0 and Fortran/Fortran 90 version 12.1 onLinux.
To view Fortran assumed size arrays in DDT you must first right click on the variable, select Edit Type..,and enter the type of the variable with its bounds, for example integer arr(5).
MAP only supports xlc and xlf on Linux.
F.7 Intel compilers
DDT and MAP have been tested with versions 13 and 14.
If you experience problems with missing or incomplete stack traces (for example [partial trace]entries in MAP or no stack traces for allocations in DDT’s View Pointer Detailswindow) try recompilingyour program with the -fno-omit-frame-pointer argument. The Intel compiler may omit framepointers by default which can mean Arm Forge cannot properly discover your stack frames and you willbe unable to see which lines of code your program has stopped at.
Some optimizations performed when -ax options are specified to IFC/ICC can result in programs whichcannot be debugged. This is due to the reuse by the compiler of the frame-pointer, which makes DDTunable to obtain a stack trace.
Some optimizations performed using Interprocedural Optimization (IPO), which is implicitly enabled bythe-O3 flag, can interfere withMAP’s ability to display call stacks, making it more difficult to understandwhat the program is doing. To prevent this, it is recommended that IPO inlining be disabled by using the-ip-no-inlining compiler flag.
The Intel compiler does not always provide enough information to correctly determine the bounds ofsome Fortran arrays when they are passed as parameters, in particular the lower-bound of assumed-shapearrays.
Copyright c© 2002-2018 Arm Limited (or its affiliates). All rights reserved. 223

Arm Forge 18.0.2
The Intel OpenMP compiler will always optimize parallel regions, regardless of any -O0 settings. Thismeans that your code may jump around unexpectedly while stepping inside such regions, and that anyvariables which may have been optimized out by the compiler may be shownwith nonsense values. Therehave also been problems reported in viewing thread-private data structures and arrays. If these affect you,please contact Arm support at [email protected] .
Files with a .F or .F90 extension are automatically preprocessed by the Intel compiler. This can alsobe turned on with the -fpp command-line option. Unfortunately, the Intel compiler does not include thecorrect location of the source file in the executable produced when preprocessing is used. If your Fortranfile does not make use of macros and does not need preprocessing, you can simply rename its extensionto .f or .f90 and/or remove the -fpp flag from the compile line instead. Alternatively, you can helpDDT discover the source file by right clicking in the Project Files window and then selecting Add/viewsource directory and adding the correct directory.
Some versions of the compiler emit incorrect debug information for OpenMP programs which may causesome OpenMP variables to show as <not allocated>.
By default Fortran PARAMETERS are not included in the debug information output by the Intel com-piler. You can force them to be included by passing the -debug-parameters all option to thecompiler.
Known Issue: If compiling static binaries, for example on a Cray XT/XE machine, then linking in theDDT memory debugging library is not straightforward for F90 applications. You need to manually rerunthe last ld command (as seen with ifort -v) to include -L{ddt-path}/lib/64-ldmalloc intwo locations:
1. Immediately prior to where -lc is located.
2. Include the -zmuldefs option at the start of the ld line.
STL sets, maps and multi-maps cannot be fully explored as only the total number of items is displayed.Other data types are unaffected.
To disable pretty printing set the environment variable ALLINEA_DISABLE_PRETTY_PRINTING to1 before starting DDT. This will enable you to manually inspect the variable in the case of, for example,the incomplete std::set implementations.
F.8 Pathscale EKO compilers
Not supported by MAP.
There are some known issues as shown in the following list:
• The default Fortran compiler options may not generate enough information for DDT to showwherememory was allocated from. View Pointer Detailswill not showwhich line of source code memorywas allocated from. To enable this, compile and link with the following flags:
-Wl,--export-dynamic -TENV:frame_pointer=ON -funwind-tables
• For C programs, simply compiling with -g is sufficient.
• When using the Fortran compiler, you may have to place breakpoints in myfile.i instead ofmyfile.f90 or myfile.F90. Arm is currently investigating this. Please contact Arm supportat [email protected] if this applies to your code.
• Procedure names in modules often have extra information appended to them. This does not other-wise affect the operation of DDT with the Pathscale compiler.
Copyright c© 2002-2018 Arm Limited (or its affiliates). All rights reserved. 224

Arm Forge 18.0.2
• The Pathscale 3.1 OpenMP library has an issue which makes it incompatible with programs thatcall the fork system call on some machines.
• Some versions of the Pathscale compiler (for example, 3.1) do not emit complete DWARF de-bugging information for typedef’ed structures. These may show up in DDT with a void typeinstead of the expected type.
• Multi-dimensional allocatable arrays can also be given incorrect dimension upper or lower bounds.This has only been reproduced for large arrays, small arrays seem to be unaffected. This has beenobserved with version 3.2 of the compiler, newer and older versions may also exhibit the sameissue.
F.9 Portland Group compilers
DDT has been tested with Portland Tools 9 onwards.
MAP has been tested with version 14 of the PGI compilers. Older versions are not supported as they donot allow line level profiling. Always compile with -Meh frame to provide sufficient information forprofiling.
If you experience problems with missing or incomplete stack traces (that is [partial trace] entriesin MAP or no stack traces for allocations in DDT’s View Pointer Details window) try recompiling yourprogram with the -Mframe argument. The PGI compiler may omit frame pointers by default which canmean Arm Forge cannot properly discover your stack frames and you will be unable to see which linesof code your program has stopped at.
Some known issues are listed here:
• Included files in Fortran 90 generate incorrect debug information with respect to file and line in-formation. The information gives line numbers which refer to line numbers from the included filebut give the including file as the file.
• The PGI compiler may emit incorrect line number information for templated C++ functions or omitit entirely. This may cause DDT to show your program on a different line to the one expected, andalso mean that breakpoints may not function as expected.
• The PGI compiler does not emit the correct debugging tags for proper support of inheritance inC++, which prevents viewing of base class members.
• When using memory debugging with statically linked PGI executables (-Bstatic) because ofthe in-built ordering of library linkage for F77/F90, you will need to add a localrc file to yourPGI installation which defines the correct linkage when using DDT and (static) memory debugging.To your {pgi-path}/bin/localrc append the following:
switch -Bstaticddt ishelp(Link for DDT memory debugging with static binding)helpgroup(linker)append(LDARGS=--eh-frame-hdr -z muldefs)append(LDARGS=-Bstatic)append(LDARGS=-L{DDT-Install-Path}/lib/64)set(CRTL=$if(-Bstaticddt,-ldmallocthcxx -lc -lns$(PREFIX)c-l$(PREFIX)c, -lc -lns$(PREFIX)c -l$(PREFIX)c))
set(LC=$if(-Bstaticddt,-ldmallocthcxx -lgcc -lgcc_eh -lc -lgcc
-lgcc_eh -lc, -lgcc -lc -lgcc));
Copyright c© 2002-2018 Arm Limited (or its affiliates). All rights reserved. 225

Arm Forge 18.0.2
pgf90 -help will now list -Bstaticddt as a compilation flag. You should now use that flagfor memory debugging with static linking.
This does not affect the default method of using PGI and memory debugging, which is to usedynamic libraries.
Note that some versions of ld (notably in SLES 9 and 10) silently ignore the --eh-frame-hdrargument in the above configuration, and a full stack for F90 allocated memory will not be shownin DDT. You can work around this limitation by replacing the system ld, or by including a morerecent ld earlier in your path. This does not affect memory debugging in C/C++.
• When you pass an array splice as an argument to a subroutine that has an assumed shape arrayargument, the offset of the array splice is currently ignored by DDT. Please contact Arm supportat [email protected] if this affects you.
• DDT may show extra symbols for pointers to arrays and some other types. For example if yourprogram uses the variable ialloc2d then the symbol ialloc2d$sd may also be displayed.The extra symbols are added by the compiler and may be ignored.
• The Portland compiler also wraps F90 allocations in a compiler-handled allocation area, rather thandirectly using the systems memory allocation libraries directly for each allocate statement. Thismeans that bounds protection (Guard Pages) cannot function correctly with this compiler.
• DDT passes on all variables that the compiler has told gdb to be in scope for a routine. For thePGI compiler this can include internal variables and variables from Fortran modules even when theonly clause has been used to restrict access. DDT is unable to restrict the list to variables actuallyused in application code.
• Versions of the PGI compiler prior to 14.9 are unable to compile a static version of the Arm MPIwrapper library, attempting to do so will result in messages such as “Error: symbol 'MPI -F MPI IN PLACE' can not be both weak and common”. This is due to a bug in thePGI compiler’s weak object support.
For information concerning the Portland Accelerator model and debugging this with DDT, pleasesee the 15 CUDA GPU debugging of this userguide.
Copyright c© 2002-2018 Arm Limited (or its affiliates). All rights reserved. 226

Arm Forge 18.0.2
G Platform notes and known issues
This chapter notes any particular issues affecting platforms. If a supported machine is not listed in thischapter, it is because there is no known issue.
G.1 CRAY
There are a number of issues you should be aware of:
• For ‘Native’ SLURM mode systems GDB 7.6.2 must be selected as the debugger or the job mightnot start properly. See section A.5.1 System for more information on selecting the debugger.
• MAP users on Cray need to read 17.2.1 Debugging symbols and 17.2.5 Static linking on CrayX-Series systems. Arm supplies module files in FORGE INSTALLATION PATH/share/mod-ules/cray.
See 17.2.6 Dynamic and static linking on Cray X-Series systems using the modules environment.
• Note that the default mode for compilers on this platform is to link statically. Section F.9 PortlandGroup compilers describes how to ensure that DDT’s memory debugging capabilities will workwith the PGI compilers in this mode.
• Message queue debugging is not provided by the XT/XE/XK environment.
• Cray XK6/7 GPU debugging requires the CUDA Toolkit 5 or above to be installed.
• Cray XK6/7 GPU debugging requires a working TMPDIR to be available, if /tmp is not available.It is important that this directory is not a shared filesystem such as NFS or Lustre. To set TMPDIRfor the compute nodes only use the DDT_BACKEND_TMPDIR environment variable instead. DDTwill automatically propagate this environment variable to the compute nodes.
• Running single process scalar codes, that is non-MPI/SHMEM/UPC applications, on the computenodes requires an extra step, as these are required to be executed by aprun but aprun will notexecute these via the ordinary debug-supporting protocols.
The preferred and simpleworkaround is to use the.qtf templates, for examplecray-slurm.qtfor cray-pbs.qtf, which handle this automatically by (for non-MPI codes) ensuring that an al-ternative protocol is followed. To use these qtf files, select File → Options (Arm Forge →Preferences on Mac OS X) , go to the Job Submission page and enable submission via the queue,and ensure that the Also submit scalar jobs via the queue setting is enabled. The change is toexplicitly use aprun for non-MPI processes and this can be seen in the provided queue templatefiles:
if [ "MPI_TAG" == "none" ]; thenaprun -n 1 env AUTO_LAUNCH_TAG
elseAUTO_LAUNCH_TAG
fi
• Running a dynamically-linked single process non-MPI program that will run on a compute node,that is non-MPI CUDA or OpenACC code, will require an additional flag to the compiler: -target=native. This prevents the compiler linking in the MPI job launch routines that willotherwise interfere with debuggers on this platform. Alternatively, convert the program to an MPIone by adding MPI Init and MPI Finalize statements and run it as a one-process MPI job.
Copyright c© 2002-2018 Arm Limited (or its affiliates). All rights reserved. 227

Arm Forge 18.0.2
G.2 GNU/Linux systems
G.2.1 General
There are a number of items you should be aware of:
• When using a 64-bit Linux please note that it is essential to use the 64-bit version of Arm Forge onthis platform. This applies regardless of whether the debugged program is 32-bit or 64-bit.
• POSIX thread cancellation does not work when running under a debugger. This is because the‘signal info’ associated with a signal is lost when the signal is intercepted and sent again by thedebugger, causing the cancellation request to be ignored by the receiving thread. More generallythe ‘signal info’ associated with a signal is not available when running under a debugger.
• Some 64-bit GNU/Linux systemswhich have a bug in theGNUC library, specificallylibthread -db.so.1. This can crash the debugger when debugging multi-threaded programs. Check withyour Linux distribution for a fix. As a workaround you can try compiling your program as a stati-cally linked executable using the -static compiler flag.
• For the Arm architecture breakpoints can be unreliable and will randomly be passed without stop-ping for some multicore processors (including the NVIDIA Tegra 2) unless a kernel option (fix) isbuilt-in. The required kernel option is:
CONFIG_ARM_ERRATA_720789=y
This option is not present by default in many kernel builds.
G.2.2 SUSE Linux
There are a number of known issues you should be aware of:
• There is a known issue with SUSE 11 which may cause you to experience a crash similar to thefollowing:
Other: *** glibc detected *** /home/user/wave_c: free(): invalidpointer: 0x00007ffff7e02a80 ***
Other: ======= Backtrace: =========Other: /lib64/libc.so.6[0x7fffeef81118]Other: /lib64/libc.so.6(cfree+0x76)[0x7fffeef82c76]Other: /lib64/libnss_nis.so.2(_nss_nis_getpwuid_r+0xe9)[0
x7fffecd4f089]Other: /lib64/libnss_compat.so.2[0x7fffed125ab8]
The implementation of libnss nis.so.2 attempts to resolve symbol names using its directdependencies before using the global namespace. This causes the libc implementation of, for ex-ample, free to be linked instead of the intended libdmalloc implementation.
If you encounter this crash, then the only solution is to disable memory debugging and contactSUSE about the availability of a fix.
• There is a known issue with SUSE 11 using the 2.6 kernel where some small fraction of samplesmay have invalid or incorrect stack traces. This has been observed on the 2.6.27.19-5 kernel andtypically affected<1% of samples. This is caused by some bad unwind information in the kernel’svdso, the Virtual Dynamic Shared Object. The solution is to upgrade to a newer version of thekernel (>3).
Copyright c© 2002-2018 Arm Limited (or its affiliates). All rights reserved. 228

Arm Forge 18.0.2
G.3 IBM Blue Gene/Q
There are a number of issues you should be aware of:
• MAPis not supported on Blue Gene/Q.
• Express Launch mode is not supported on Bluegene/Q.
• DDT must be installed in a directory that is visible from the front end node(s), the service nodesand the I/O nodes.
• Message queues are not currently supported on this platform.
• Memory Debugging Guard Page are not supported on this platform due to lack of support formemory protection in CNK.
• Sparklines are not shown on Bluegene/Q.
G.3.1 Attaching
To attach to a running job:
1. Open the Attach window by clicking on the Attach button on the Welcome page.
2. DDT needs to know which login / batch node runjob is running on. Click the Choose Hosts. . .button to add the necessary login / batch node if not already present. You must be able to SSH intothe login / batch node without a password.
3. Select the Automatically-detected jobs tab. Do not use the List of processes tab.
4. Optionally specify a subset of ranks to attach to in the Attach to processes box.
5. Click the Attach to. . . button.
The following caveats apply:
• Reattaching to a job is not supported. You may only attach to a job once.
• No other tool must be attached, or have been attached, to the job.
• It is possible to attach to a subset of ranks. However, because reattaching is not supported, it is notpossible to subsequently change the subset.
• It may take a little time for a job to show up in the Attach window after you submit it. If a newlystarted job does not show up wait a while then click Rescan nodes.
G.4 Intel Xeon
Intel Xeon processors starting with Sandy Bridge include Running Average Power Limit (RAPL) coun-ters. MAP can use the RAPL counters to provide energy and power consumption information for yourprograms.
G.4.1 Enabling RAPL energy and power counters when profiling
To enable the RAPL counters to be read by MAP you must load the intel rapl kernel module.
Copyright c© 2002-2018 Arm Limited (or its affiliates). All rights reserved. 229

Arm Forge 18.0.2
The intel rapl module is included in Linux kernel releases 3.13 and later. For testing purposesArm have backported the powercap and intel rapl modules for older kernel releases. You maydownload the backported modules from:
Download backported modules
Note: These backported modules are unsupported and should be used for testing purposes only. No sup-port is provided by Arm, your system vendor or the Linux kernel team for the backported modules.
G.5 Intel Xeon Phi (Knight’s Landing)
The Intel Xeon Phi Knight’s Landing platform is only supported in self-hosted mode, like an x86 64platform.
You may experience higher than normal overhead when using MAP on this platform.
See section H.9.12 for more information.
G.6 NVIDIA CUDA
G.6.1 CUDA known issues
There are a number of issues you should be aware of:
• DDT’s memory leak reports do not track GPU memory leaks.
• Debugging paired CPU/GPU core files is possible but is not yet fully supported.
• CUDA metrics in MAP are not available for statically-linked programs.
• CUDA metrics in MAP are measured at the node level, not the card level.
G.7 Arm
G.7.1 Arm R©v8 (AArch64) known issues
There are a number of issues you should be aware of:
• For best operation, DDT requires debug symbols for the runtime libraries to be installed in additionto debug symbols for the program itself. In particular, DDT may show the incorrect values forlocal variables in program code if the program is currently stopped inside a runtime library. At aminimum Arm recommends the glibc and OpenMP (if applicable) debug symbols are installed.
• For best operation, MAP requires debug symbols for the runtime libraries to be installed in additionto debug symbols for the program itself. In particular, MAP may report time in partial tracesor unknown locations without debug symbols. At a minimum Arm recommends the glibc andOpenMP (if applicable) debug symbols are installed.
• Unwind information is not always compiled in by default on this platform. This may result inpartial trace nodes being displayed in the the MAP parallel stack view. To avoid this,programs that are not compiled with debug information (-g) should at least be compiled with eitherthe -fasynchronous-unwind-tables flag or the -funwind-tables flag, preferablythe former.
• MAP does not support CPU instruction metrics on this platform.
Copyright c© 2002-2018 Arm Limited (or its affiliates). All rights reserved. 230
Arm Forge 18.0.2
• MAPmay fail to finalize a profiling session if the cores are oversubscribed on AArch64 platforms.This issue is likely to occur when attempting to profile a 64 process MPI program on a machinewith only 8 cores, for example. This issue will appear as a hang after finishing a profile or afterpressing the ‘Stop and analyze’ button.
G.8 POWER
G.8.1 POWER8 (POWER 64-bit) known issues
There are a number of issues you should be aware of:
• For best operation, DDT requires debug symbols for the runtime libraries to be installed in additionto debug symbols for the program itself. In particular, DDT may show the incorrect values forlocal variables in program code if the program is currently stopped inside a runtime library. At aminimum Arm recommends the glibc and OpenMP (if applicable) debug symbols are installed.
• For best operation, MAP requires debug symbols for the runtime libraries to be installed in additionto debug symbols for the program itself. In particular, MAP may report time in partial tracesor unknown locations without debug symbols. At a minimum Arm recommends the glibc andOpenMP (if applicable) debug symbols are installed.
• MAP does not support CPU instruction metrics on this platform.
Copyright c© 2002-2018 Arm Limited (or its affiliates). All rights reserved. 231

Arm Forge 18.0.2
H General troubleshooting and known issues
If you have problems with any of the Arm Forge products, please take a look at the topics in this sec-tion.
Additionally, check the support pages on the Arm Developer website, and make sure you have the latestversion of the product.
H.1 General troubleshooting
H.1.1 Problems starting the GUI
If the GUI is unable to start, this is usually due to one of the following reasons:
1. Cannot connect to an X server. If you are running on a remote machine, make sure that yourDISPLAY variable is set appropriately and that you can run simple X applications such as xtermfrom the same command-line.
2. The license file is invalid. In this case the software will issue an error message. You should verifythat you have a license file for the correct product in the license directory and check that the dateinside it is still valid. If the program still refuses to start, please contact Arm support at [email protected] .
3. You are using Licence Server, but the Arm Forge products cannot connect to it. See the LicenceServer user guide for more information on troubleshooting these problems.
H.1.2 Problems reading this document
If when pressing F1 a blank screen appears instead of this document, there may be corrupt files that arepreventing the documentation system (Qt Assistant) from starting. You can resolve this by removing thestale files, which are found in $HOME/.local/share/data/Allinea.
H.2 Starting a program
H.2.1 Problems starting scalar programs
There are a number of possible sources for problems. The most common is, for users with a multi-process license, that the Run Without MPI Support check box has not been checked. If the softwarereports a problem with MPI and you know your program is not using MPI, then this is usually the cause.If you have checked this box and the software still mentions MPI then please contact Arm support [email protected] .
Other potential problems are:
• A previous Arm session is still running, or has not released resources required for the new session.Usually this can be resolved by killing stale processes. The most obvious symptom of this is adelay of approximately 60 seconds and a message stating that not all processes connected. Youmay also see, in the terminal, a QServerSocket message.
• The target program does not exist or is not executable.
Copyright c© 2002-2018 Arm Limited (or its affiliates). All rights reserved. 232
Arm Forge 18.0.2
• Arm Forge products’ backend daemon, ddt-debugger, is missing from the bin directory. Inthis case you should check your installation, and contact Arm support at [email protected].
H.2.2 Problems starting multi-process programs
If you encounter problems while starting an MPI program, the first step is to establish that it is possibleto run a single-process (non-MPI) program such as a trivial “Hello, World!”, and resolve such issues thatmay arise. After this, attempt to run a multi-process job, and the symptoms will often allow a reasonablediagnosis to be made.
In the first instance verify that MPI is working correctly by running a job, without any of Arm Forgeproducts applied, such as the example in the examples directory.
mpirun -np 8 ./a.out
Verify that mpirun is in the PATH, or the environment variable ALLINEA_MPIRUN is set to the fullpathname of mpirun.
If the progress bar does not report that at least process 0 has connected, then the remote ddt-debuggerdaemons cannot be started or cannot connect to the GUI.
Sometimes problems are caused by environment variables not propagating to the remote nodes whilestarting a job. To a large extent, the solution to these problems depends on the MPI implementation thatis being used.
In the simplest case, for rsh based systems such as a default MPICH 1 installation, correct configurationcan be verified by rsh-ing to a node and examining the environment. It is worthwhile rsh-ing with the envcommand to the node as this will not see any environment variables set inside the .profile command.For example if your nodes use a .profile instead of a .bashrc for each user then you may see adifferent output when running rsh node env than when you run rsh node and then run env insidethe new shell.
If only one, or very few, processes connect, it may be because you have not chosen the correct MPIimplementation. Please examine the list and look carefully at the options. Should no other suitable MPIbe found, please contact Arm support for advice at [email protected] .
If a large number of processes are reported by the status bar to have connected, then it is possible thatsome have failed to start due to resource exhaustion, timing out, or, unusually, an unexplained crash. Youshould verify again that MPI is still working, as some MPI distributions do not release all semaphoreresources correctly, for example MPICH 1 on Redhat with SMP support built in.
To check for time-out problems, set the ALLINEA_NO_TIMEOUT environment variable to 1 beforelaunching the GUI and see if further progress is made. This is not a solution, but aids the diagnosis. Ifall processes now start, please contact Arm for support at [email protected] .
H.2.3 No shared home directory
If your home directory is not accessible to all the nodes in your cluster then your jobs may fail tostart.
To resolve the problem open the file ~/.allinea/system.config in a text editor. Change theshared directory option in the [startup] section so it points to a directory that is available andshared by all the nodes. If no such directory exists, change the use session cookies option to noinstead.
Copyright c© 2002-2018 Arm Limited (or its affiliates). All rights reserved. 233

Arm Forge 18.0.2
H.2.4 DDT or MAP cannot find your hosts or the executable
This can happen when attempting to attach to a process running on other machines. Ensure that the hostname(s) that DDT complains about are reachable using ping.
If DDT fails to find the executable, ensure that it is available in the same directory on everymachine.
See section A.4 Connecting to remote programs (remote-exec) for more information on configuring ac-cess to remote machines.
H.2.5 The progress bar does not move and Arm Forge times out
It is possible that the program ddt-debugger has not been started by mpirun or has aborted. Youcan log onto your nodes and confirm this by looking at the process list before clicking Ok when ArmForge times out. Ensure ddt-debugger has all the libraries it needs and that it can run successfullyon the nodes using mpirun.
Alternatively, there may be one or more processes (ddt-debugger, mpirun, rsh) which could notbe terminated. This can happen if Arm Forge is killed during its startup or due to MPI implementationissues. You will have to kill the processes manually, using ps x to get the process ids and then kill orkill -9 to terminate them.
This issue can also arise formpich-p4mpd, and the solution is explained inAppendix EMPI distributionnotes and known issues.
If your intended mpirun command is not in your PATH, you may either add it to your PATH or set theenvironment variable ALLINEA_MPIRUN to contain the full pathname of the correct mpirun.
If your home directory is not accessible by all the nodes in your cluster then your jobs may fail to start inthis fashion.
See section H.2.3 No shared home directory.
H.3 Attaching
H.3.1 The system does not allow connecting debuggers to processes (Fe-dora, Ubuntu)
The Ubuntu ptrace scope control feature does not allow a process to attach to other processes it did notlaunch directly.
See http://wiki.ubuntu.com/Security/Features#ptrace for details.
To disable this feature until the next reboot run the following command:
echo 0 | sudo tee /proc/sys/kernel/yama/ptrace_scope
To disable it permanently, add this line to/etc/sysctl.d/10-ptrace.conf (or/etc/sysctl.conf):
kernel.yama.ptrace_scope = 0
This will take effect after the next reboot.
On Fedora, ptrace may be blocked by SELinux in addition to Yama. See section H.3.2.
Copyright c© 2002-2018 Arm Limited (or its affiliates). All rights reserved. 234
Arm Forge 18.0.2
H.3.2 The system does not allow connecting debuggers to processes (Fe-dora, Red Hat)
The deny ptrace boolean in SELinux (used by Fedora and Red Hat) does not allow a process to attachto other processes it did not launch directly.
See http://fedoraproject.org/wiki/Features/SELinuxDenyPtrace for details.
To disable this feature until the next reboot run the following command:
setsebool deny_ptrace 0
To disable it permanently run this command:
setsebool -P deny_ptrace 0
As of Fedora 22, ptracemay be blocked byYama in addition to the SELinux boolean. See sectionH.3.1.
H.3.3 Running processes do not show up in the attach window
Running processes that do not show up in the attach window is usually a problem with either yourremote-exec script or your node list file.
First check that the entry in your node list file corresponds with either localhost (if you are running onyour local machine) or with the output of hostname on the desired machine.
Secondly try running /path/to/arm/forge/libexec/remote-exec manually.
For example, /path/to/arm/forge/libexec/remote-exec<hostname>ls. Then checkthe output of this.
If this fails then there is a problem with your remote-exec script. If rsh is still being used in yourscript check that you can rsh to the desired machine. Otherwise check that you can attach to your machinein the way specified in the remote-exec script.
See also A.4 Connecting to remote programs (remote-exec).
If you still experience problems with your script then contact Arm support for assistance at [email protected] .
H.4 Source Viewer
H.4.1 No variables or line number information
You should compile your programs with debug information included, this flag is usually -g.
H.4.2 Source code does not appear when you start Arm Forge
If you cannot see any text at all, perhaps the default selected font is not installed on your system. Go toFile→Options (Arm Forge→ Preferences on Mac OS X) and choose a fixed width font such as Courierand you should now be able to see the code.
If you see a screen of text telling you that Arm Forge could not find your source files, follow the instruc-tions given. If you still cannot see your source code, check that the code is available on the same machine
Copyright c© 2002-2018 Arm Limited (or its affiliates). All rights reserved. 235

Arm Forge 18.0.2
as you are running the software on, and that the correct file and directory permissions are set. If some filesare missing, and others found, try adding source directories and rescanning for further instruction.
If the problem persists, contact Arm support at [email protected] .
H.4.3 Code folding does not work for OpenACC/OpenMP pragmas
This is a known issue. If an OpenACC or OpenMP pragma is associated with a multi-line loop, then theloop block may be folded instead.
H.5 Input/Output
H.5.1 Output to stderr is not displayed
Arm Forge automatically captures anything written to stdout / stderr and display it.
Some shells, such as csh, do not support this feature in which case you may see your stderr mixedwith stdout, or you may not see it at all.
In any case Arm strongly recommends writing program output to files instead, since theMPI specificationdoes not cover stdout / stderr behavior.
H.5.2 Unwind errors
When using MAP you may see errors reported in the output of the form:
Arm Sampler: 3 libunwind: Unspecified (general) error (4/172 samples)Arm Sampler: 3 Maximum backtrace size in sampler exceeded, stack too
deep. (1/172 samples)
These indicate that MAP was only able to obtain a partial stack trace for the sample. If the proportion ofsamples that generate such errors is low, then they can safely be ignored.
If a large proportion of samples exhibit these errors, then consult the advice on partial traces in F.7 Intelcompilers or F.9 Portland Group compilers if you are using these compilers.
If this does not help, then please contact Arm support at [email protected] .
H.6 Controlling a program
H.6.1 Program jumps forwards and backwards when stepping throughit
If you have compiled with any sort of optimisations, the compiler will shuffle your programs instructionsinto a more efficient order. This is what you are seeing. Arm recommends compiling with -O0 whendebugging, which disables this behavior and other optimisations.
If you are using the Intel OpenMP compiler, then the compiler will generate code that appears to jump inand out of the parallel blocks regardless of your -O0 setting. Stepping inside parallel blocks is thereforenot recommended.
Copyright c© 2002-2018 Arm Limited (or its affiliates). All rights reserved. 236

Arm Forge 18.0.2
H.6.2 DDT may stop responding when using the Step Threads Togetheroption
DDT may stop responding if a thread exits when the Step Threads Together option is enabled. This ismost likely to occur on Linux platforms using NPTL threads. This might happen if you tried to Play tohere to a line that was never reached, in which case your program ran all the way to the end and thenexited.
A workaround is to set a breakpoint at the last statement executed by the thread and turn off Step ThreadsTogether when the thread stops at the breakpoint.
If this problem affects you please contact Arm support at [email protected] .
H.7 Evaluating variables
H.7.1 Some variables cannot be viewed when the program is at the startof a function
Some compilers produce faulty debug information, forcing DDT to enter a function during the prologueor the variable may not yet be in scope.
In this region, which appears to be the first line of the function, some variables have not been initializedyet. To view all the variables with their correct values, it may be necessary to play or step to the next lineof the function.
H.7.2 Incorrect values printed for Fortran array
Pointers to non-contiguous array blocks, allocatable arrays using strides, are not supported.
If this issue affects you, please contact Arm support at [email protected] for a workaround orfix.
There are also many compiler limitations that can cause this. See Appendix F for details.
H.7.3 Evaluating an array of derived types, containingmultiple-dimensionarrays
The Locals, Current Line and Evaluate views may not show the contents of these multi-dimensionalarrays inside an array of derived types.
However, you can view the contents of the array by clicking on its name and dragging it into the evaluatewindow as an item on its own, or by using the MDA.
H.7.4 C++ STL types are not pretty printed
The pretty printers provided with DDT are compatible with GNU compilers version 4.7 and above, andIntel C++ version 12 and above.
Copyright c© 2002-2018 Arm Limited (or its affiliates). All rights reserved. 237

Arm Forge 18.0.2
H.8 Memory debugging
H.8.1 The View Pointer Details window says a pointer is valid but doesnot show you which line of code it was allocated on
The Pathscale compilers have known issues that can cause this.
Please see the compiler notes in section C of this appendix for more details.
The Intel compiler may need the -fp argument to allow you to see stack traces on some machines.
If this happens with another compiler, please contact Arm support at [email protected] with thevendor and version number of your compiler.
H.8.2 mprotect fails error when using memory debugging with guardpages
This can happen if your program makes more than 32768 allocations; a limit in the kernel prevents DDTfrom allocating more protected regions than this. Your options are:
• Running echo 123456 >/proc/sys/vm/max map count (requires root) will increase thelimit to 61728 (123456 / 2, as some allocations use multiple maps).
• Disable guard pages completely. This will hinder DDT’s ability to detect heap over/underflows.
• Disable guard pages temporarily. You can disable them at program start, add a breakpoint beforethe allocations you wish to add guard pages for, and then reenable the feature.
See 12.3 Configuration for information on how to disable guard pages.
H.8.3 Allocations made before or during MPI Init show up in CurrentMemory Usage but have no associated stack back trace
Memory allocations that are made before or during MPI_Init appear in Current Memory Usage alongwith any allocations made afterwards.
However, the call stack at the time of the allocation is not recorded for these allocations and will not showup in the Current Memory Usage window.
H.8.4 Deadlockwhen calling printf or malloc froma signal handler
The memory allocation library calls (for example, malloc) provided by the memory debugging libraryare not async-signal-safe unlike the implementations in recent versions of the GNU C library.
POSIX does not require malloc to be async-signal-safe but some programs may expect this behav-ior.
For example, a program that calls printf from a signal handler may deadlock when memory debuggingis enabled in DDT since the C library implementation of printf may call malloc.
The web page below has a table of the functions that may be safely called from an asynchronous signalhandler:
http://www.opengroup.org/onlinepubs/009695399/functions/xsh_chap02_04.html#tag_02_04_03/
Copyright c© 2002-2018 Arm Limited (or its affiliates). All rights reserved. 238

Arm Forge 18.0.2
H.8.5 Program runs more slowly with Memory Debugging enabled
The Memory Debugging library performs more checks than the normal runtime’s memory allocationroutines.
However, those checks also makes the library slower.
If your program is running too slow when Memory Debugging is enabled there are a number of optionsyou can change to speed it up.
Firstly try reducing theHeap Debugging option to a lower setting. For example, if it is currently onHigh,try changing it toMedium or Low.
You can increase the heap check interval from the default of 100 to a higher value. The heap checkinterval controls how many allocations may occur between full checks of the heap, which may take sometime.
A higher setting (1000 or above) is recommended if your program allocates and deallocates memory veryfrequently, for example from inside a computation loop.
You can disable the Store backtraces for memory allocations option, at the expense of losing backtracesin the View Pointer Details and Current Memory Usage windows.
H.9 MAP specific issues
H.9.1 My compiler is inlining functions
Compilers often inline functions.
A compiler’s ability to include sufficient information to reconstruct the original call tree can vary betweenvendors.
Arm has found that the following flags work best:
• Intel: -g -O3 -fno-inline-functions
• Intel 17+: -g -fno-inline -no-ip -no-ipo -fno-omit-frame-pointer -O3
• PGI: -g -O3 -Meh frame
• GNU: -g -O3 -fno-inline
• Cray: -G2 -O3 -h ipa0
Be aware that some compilers may still inline functions even when explicitly asked not to.
There is typically some small performance penalty for disabling function inlining or enabling profilinginformation.
Alternatively, you can let the compiler inline the functions and just compile with -g -O3. Or -g -O5or whatever your preferred performance flags are.
MAP will work fine, but you will often see time inside an inlined function being attributed to its parentin the Stacks view. The Source Code view should be largely unaffected.
H.9.2 Tail call optimization
A function may return the result of calling another function, for example:
Copyright c© 2002-2018 Arm Limited (or its affiliates). All rights reserved. 239

Arm Forge 18.0.2
int someFunction(){
...return otherFunction();
}
In this case the compiler may change the call to otherFunction into a jump. This means that, wheninside otherFunction, the calling function, someFunction, no longer appears on the stack.
This optimization is called tail recursion optimization. It may be disabled for the GNU C compiler bypassing the -fno-optimize-sibling-calls argument to gcc.
H.9.3 MPI wrapper libraries
Unlike DDT, MAP wraps MPI calls in a custom shared library. A precompiled wrapper is copied that iscompatible with your system, or one is built for your system each time you run MAP.
See section C.2 MAP for the list of supported MPIs.
You can also try setting ALLINEA_WRAPPER_COMPILE=1 and MPICC directly:
$ MPICC=my-mpicc-command bin/map -n 16 ./wave_c
If you have problems please contact Arm support at [email protected] .
H.9.4 Thread support limitations
MAPprovides limited support for programswhen threading support is set toMPI_THREAD_SERIALIZEDor MPI_THREAD_MULTIPLE in the call to MPI_Init_thread.
MPI activity on non-main threads will contribute towards the MPI-time of the program, but not the MPImetric graphs.
Additionally, MPI activity on a non-main thread may result in additional profiling overhead due to themechanism employed by MAP for detecting MPI activity.
It is recommended that the pthread viewmode is used for interpretingMPI activity instead of the OpenMPviewmode, since OpenMP viewmode will scale MPI-time depending on the resources requested. Hence,non-main thread MPI activity may provide nonintuitive results when detected outside of OpenMP re-gions.
Warnings are displayed when the user initiates and completes profiling a program which sets MPI_THREAD_SERIALIZED or MPI_THREAD_MULTIPLE as the required thread support.
MAP does fully support calling MPI_Init_thread with either MPI_THREAD_SINGLE or MPI_THREAD_FUNNELED specified as the required thread support.
It should be noted that the requirements that the MPI specification make on programs using MPI_THREAD_FUNNELED are the same as made by MAP: all MPI calls must be made on the thread thatcalled MPI_Init_thread.
In many cases, multi-threaded MPI programs can be refactored such that they comply with this restric-tion.
Copyright c© 2002-2018 Arm Limited (or its affiliates). All rights reserved. 240

Arm Forge 18.0.2
H.9.5 No thread activity while blocking on an MPI call
Unfortunately MAP is currently unable to record thread activity on a process where a long-duration MPIcall is in progress.
If you have an MPI call that takes a significant amount of time to complete, as indicated by a sawtoothon theMPI call durationmetric graph, MAP will display no thread activity for the process executing thatcall for most of that MPI call’s duration.
See also section 25.5.
H.9.6 I am not getting enough samples
By default starting sampling interval is every 20ms, but if you get warnings about too few samples on afast run, or want more detail in the results, you can change the sampling rate.
To increase the interval to every 10ms set environment variable ALLINEA_SAMPLER_INTERVAL=10.
Note that the sampling frequency is automatically decreased over time to ensure a manageable amountof data is collected whatever the length of the run.
Increasing the sampling frequency is not recommended if there are lots of threads and/or very deep stacksin the target program as this may not leave sufficient time to complete one sample before the next sampleis started.
H.9.7 I just see main (external code) and nothing else
This can happen if you compile without -g. It can also happen if you move the executable out of thedirectory it was compiled in.
Check your compile line includes -g and try right-clicking on the Project Files panel in MAP and choos-ing Add Source Directory. . . .
Contact Arm support at [email protected] if you have any further issues.
H.9.8 MAPis reporting time spent in a function definition
Any overheads involved in setting up a function call (pushing arguments to the stack and so on) areusually assigned to the function definition. Some compilers may assign them to the opening brace ‘{’and closing brace ‘}’ instead.
If this function has been inlined, the situation becomes further complicated and any setup time, such asfor allocating space for arrays, is often assigned to the definition line of the enclosing function.
H.9.9 MAP is not correctly identifying vectorized instructions
The instructions identified as vectorized (packed) are listed here:
• Packed floating-point instructions: addpd addps addsubpd addsubps andnpd and-nps andpd andps divpd divps dppd dpps haddpd haddps hsubpd hsubpsmaxpd maxps minpd minps mulpd mulps rcpps rsqrtps sqrtpd sqrtpssubpd subps
Copyright c© 2002-2018 Arm Limited (or its affiliates). All rights reserved. 241
Arm Forge 18.0.2
• Packed integer instructions: mpsadbw pabsb pabsd pabsw paddb paddd paddqpaddsb paddsw paddusb paddusw paddw palignr pavgb pavgw phadddphaddsw phaddw phminposuw phsubd phsubsw phsubw pmaddubsw pmaddwdpmaxsb pmaxsd pmaxsw pmaxub pmaxud pmaxuw pminsb pminsd pminswpminub pminud pminuw pmuldq pmulhrsw pmulhuw pmulhw pmulld pmullwpmuludq pshufb pshufw psignb psignd psignw pslld psllq psllw psradpsraw psrld psrlq psrlw psubb psubd psubq psubsb psubsw psubusbpsubusw psubw
Arm also identifies the AVX-2 variants of these instructions, with a “v” prefix.
Contact Arm support at [email protected] if you believe your code contains vectorized in-structions that have not been listed and are not being identified in the CPU floating-point/integer vectormetrics.
H.9.10 Linking with the static MAP sampler library fails with an undefinedreference to real dlopen
When linking with the static MAP sampler library you may get undefined reference errors similar to thefollowing:
../lib/64/libmap-sampler.a(dl.o): In function `__wrap_dlopen':/build/overnight/ddt-2015-01-28-12322/code/ddt/map/sampler/build64-
static/../src/dl.c:21: undefined reference to `__real_dlopen'../lib/64/libmap-sampler.a(dl.o): In function `__wrap_dlclose':/build/overnight/ddt-2015-01-28-12322/code/ddt/map/sampler/build64-
static/../src/dl.c:28: undefined reference to `__real_dlclose'collect2: ld returned 1 exit status
To avoid these errors follow the instructions in section 17.2.4 Static linking.
Note the use of the -Wl,@/home/user/myprogram/allinea-profiler.ld syntax.
H.9.11 Linking with the static MAP sampler library fails with FDE overlaperrors
When linking with the static MAP sampler library you may get FDE overlap errors similar to:
ld: .eh_frame_hdr table[791] FDE at 0000000000822830 overlaps table[792] FDE at 0000000000825788
This can occur when the version of binutils on a system has been upgraded to 2.25 or later and is mostcommon seen on Cray machines using CCE 8.5.0 or higher.
To fix this issue rerun make-profiler-libraries --lib-type=static and use the freshlygenerated static libraries and allinea-profiler.ld to link these with your program.
See section 17.2.4 Static linking for more details.
If you are not using a Cray or SUSE build of Arm Forge and you require a binutils 2.25 compatible staticlibrary please contact Arm support at [email protected] .
The error message occurs because the version of libmap-sampler.a you attempted to link was notcompatible with the version of ld in binutils versions ≥ 2.25.
Copyright c© 2002-2018 Arm Limited (or its affiliates). All rights reserved. 242

Arm Forge 18.0.2
For Cray machines there is a separate library libmap-sampler-binutils-2.25.a provided foruse with this updated linker.
Themake-profiler-libraries script will automatically select the appropriate library to use basedon the version of ld found in your PATH.
If you erroneously attempt to link libmap-sampler-binutils-2.25.a with your program usinga version of ld prior to 2.25 you will get errors such as:
/usr/bin/ld.x: libmap-sampler.a(dl.o): invalid relocation type 42
If this happens check that the correct version of ld is in your PATH and rerun make-profiler-libraries --lib-type=static.
H.9.12 MAP adds unexpected overhead to my program
MAP’s sampler library will add a little overhead to the execution of your program. Usually this is lessthan 5% of the wall clock execution time.
Under some circumstances, however, the overhead may exceed this, especially for short runs. This is par-ticularly likely if your program has high OpenMP overhead, for example, if it is greater than 40%.
In this case the measurements reported by MAP will be affected by this overhead and therefore lessreliable. Increasing the run time of your program for example, by changing the size of the input, decreasesthe overall overhead, although the initial few minutes still incurs the higher overhead.
At high per-process thread counts, for example on the Intel Xeon Phi (Knight’s Landing), MAP’s samplerlibrary may incur a more significant overhead.
By default, whenMAP detects a large number of threads it will automatically reduce the sampling intervalin order to limit the performance impact.
The behavior can be modified by setting the ALLINEA_SAMPLER_INTERVAL_PER_THREAD envi-ronment variable.
See section 17.10.
H.9.13 MAP takes an extremely long time to gather and analyzemyOpenBLAS-linked application
OpenBLAS versions 0.2.8 and earlier incorrectly stripped symbols from the .symtab section of thelibrary, causing binary analysis tools such as MAP and objdump to see invalid function lengths andaddresses.
This causes MAP to take an extremely long time disassembling and analyzing apparently overlappingfunctions containing millions of instructions.
A fix for this was accepted into the OpenBLAS codebase on October 8th 2013 and versions 0.2.9 andabove should not be affected.
To work around this problem without updating OpenBLAS, simply run strip libopenblas*.so,this removes the incomplete.symtab sectionwithout affecting the operation or linkage of the library.
Copyright c© 2002-2018 Arm Limited (or its affiliates). All rights reserved. 243
Arm Forge 18.0.2
H.9.14 MAP over-reports MPI, Input/Output, accelerator or synchroniza-tion time
MAPemploys a heuristic to determinewhich function calls should be considered asMPI operations.
If your code defines any function that starts with MPI (case insensitive) those functions will be treated aspart of the MPI library resulting in the time spent in MPI calls to be over-reported by the activity graphsand the internals of those functions to be omitted from the Parallel Stack View.
Starting your functions names with the prefix MPI should be avoided and is in fact explicitly forbiddenby the MPI specification. This is described on page 19 sections 2.6.2 and 2.6.3 of the MPI 3 specificationdocument http://www.mpi-forum.org/docs/mpi-3.0/mpi30-report.pdf#page=49:
All MPI names have an MPI prefix, and all characters are capitals. Programs must notdeclare names, for example, for variables, subroutines, functions, parameters, derived types,abstract interfaces, or modules, beginning with the prefix MPI .
Similarly MAP categorizes I/O functions and accelerator functions by name.
Other prefixes to avoid starting your function names with include PMPI , PMI , OMPI , omp , GOMP ,shmem , cuda , cuda, cu[A-Z][a-z] and allinea .
All of these prefixes are case-insensitive.
Also avoid naming a function start pes or any name also used by a standard I/O or synchronizationfunction, write, open, pthread join, sem wait and so on.
H.9.15 MAP collects very deep stack traces with boost::coroutine
A known bug in Boost (https://svn.boost.org/trac/boost/ticket/12400) prevents MAP from unwinding thecall stack correctly.
This can be worked around by applying the patch attached to the bug report to your boost installation, orby specifying a manual stack allocator that correctly initializes the stack frame.
First add the following custom stack allocator:
#include <boost/coroutine/coroutine.hpp>#include <boost/coroutine/stack_context.hpp>
struct custom_stack_allocator {void allocate(
boost::coroutines::stack_context & ctx,std::size_t size ) {
void * limit = std::malloc( size);if ( ! limit)
throw std::bad_alloc();
//Fix. RBP in the 1st frame of the stack will contain 0const int fill=0;
std::size_t stack_hdr_size=0x100;if (size<stack_hdr_size)
stack_hdr_size=size;memset(static_cast< char * >(limit)+size-stack_hdr_size,
Copyright c© 2002-2018 Arm Limited (or its affiliates). All rights reserved. 244

Arm Forge 18.0.2
fill,stack_hdr_size);
ctx.size = size;ctx.sp = static_cast< char * >( limit) + ctx.size;
}
void deallocate( boost::coroutines::stack_context & ctx) {void * limit = static_cast< char * >( ctx.sp) - ctx.size;std::free( limit);
}};
Then modify your program to use the custom allocator whenever a coroutine is created:
boost::coroutines::coroutine<int()> my_coroutine(<func>,boost::coroutines::attributes(),custom_stack_allocator());
For more information, see the boost::coroutine documentation on stack allocators for your versionof Boost.
H.10 Obtaining support
If this guide has not helped you, then the most effective way to get support is to email Arm with a detailedreport.
If possible, you should obtain a log file for the problem and email Arm support at [email protected].
You can generate a log file by checking theHelp→ Logging→ Automaticmenu item or by starting Forgewith the --debug and --log arguments:
$ ddt --debug --log=<log>$ map --debug --log=<log>
Where <log> is the name of the log file to generate.
Then simply reproduce the problem using as few processors and commands as possible and close theprogram as usual.
On some systems this file might be quite large. If this is the case, please compress it using a programsuch as gzip or bzip2 before attaching it to your email.
If your problem can only be replicated on large process counts, then please do not use theHelp→ Logging→ Debug menu item or --debug argument as this will generate very large log files. Instead use theHelp→ Logging→ Standard menu option or just the --log argument.
If you are connecting to a remote system, then the log file is generated on the remote host and copied backto the client when the connection is closed. The copy will not happen if the target application crashes orthe network connection is lost.
In these cases, the remote copy of the log file can be found in the tmp subdirectory of the Arm configu-ration directory for the remote user account. The directory is is ~/.allinea, unless overridden by theALLINEA_CONFIG_DIR environment variable.
Copyright c© 2002-2018 Arm Limited (or its affiliates). All rights reserved. 245

Arm Forge 18.0.2
Sometimes it may be helpful to illustrate your problemwith a screenshot of ArmForge’smainwindow. Totake a screenshot, choose the Take Screenshot. . . option under the Window menu. You will be promptedfor a file name to save the screenshot to.
Copyright c© 2002-2018 Arm Limited (or its affiliates). All rights reserved. 246

Arm Forge 18.0.2
I Queue template script syntax
I.1 Queue template tags
Each of the tags that will be replaced is listed in the following table, and an example of the text that willbe generated when Arm Forge submits your job is given for each.
Note: It is often sufficient to simply use AUTO_LAUNCH_TAG. See section A.3.1 The template script foran example.
Tag Description After Submission ExampleAUTO_LAUNCH_TAG This tag expands to the entire
replacement for your ‘mpirun’command line.
ddt-mpirun -np 4 myex-ample.bin
DDTPATH_TAG The path to the Arm Forge instal-lation
/opt/arm/forge
WORKING_DIRECTORY_TAG The working directory ArmForge was launched in
/users/ned
NUM_PROCS_TAG Total number of processes 16NUM_PROCS_PLUS_ONE_TAG
Total number of processes + 1 17
NUM_NODES_TAG Number of compute nodes 8NUM_NODES_PLUS_ONE_TAG
Number of compute nodes + 1 9
PROCS_PER_NODE_TAG Processes per node 2PROCS_PER_NODE_PLUS_ONE_TAG
Processes per node + 1 3
NUM_THREADS_TAG Number of OpenMP threads pernode (empty if OpenMP if “off”)
4
OMP_NUM_THREADS_TAG Number of OpenMP threads pernode (empty if OpenMP is “off”)
4
MPIRUN_TAG mpirun binary (can vary withMPI implementation)
/usr/bin/mpirun
AUTO_MPI_ARGUMENTS_TAG
Required command line flags formpirun (can vary with MPI im-plementation)
-np 4
EXTRA_MPI_ARGUMENTS_TAG
Additional mpirun argumentsspecified in the Run window
-partition DEBUG
PROGRAM_TAG Target path and filename /users/ned/a.outPROGRAM_ARGUMENTS_TAG Arguments to target program -myarg myvalINPUT_FILE_TAG The stdin file specified in the
Run window/users/ned/input.dat
Additionally, any environment variables in the GUI environment ending in TAG are replaced throughoutthe script by the value of those variables.
Copyright c© 2002-2018 Arm Limited (or its affiliates). All rights reserved. 247

Arm Forge 18.0.2
I.2 Defining new tags
As well as the pre-defined tags listed in the table above you can also define new tags in your templatescript whose values can be specified in the GUI.
Tag definitions have the following format:
EXAMPLE_TAG: { key1=value1, key2=value2, ... }
Where key1, key2, are attribute names and value1, value2, are the corresponding values.
The tag will be replaced wherever it occurs with the value specified in the GUI, for example:
#PBS -option EXAMPLE_TAG
The following attributes are supported:
Attribute Purpose Exampletype text: General text input.
select: Select from two or more options.check: Boolean.file: File name.number: Real number.integer: Integer number.
type=text
label The label for the user interface widget. label="Account"default Default value for this tag default="interactive"
text typemask Input mask:
0: ASCII digit permitted but not required.9: ASCII digit required. 0–9.N: ASCII alphanumeric character required.A–Z, a–z, 0–9.n: ASCII alphanumeric character permittedbut not required.
mask="09:09:09"
options typeoptions Options to use, separated by the | character options="not -
shared|shared"check type
checked Value of a check tag if checked. checked="enabled"unchecked Value of a check tag if unchecked. unchecked="enabled"
integer and number typesmin Minimum value. min="0"max Maximum value. max="100"step Amount to step by when the up or down ar-
rows are clicked.step="1"
decimals Number of decimal places. decimals="2"suffix Display only suffix (will not be included in tag
value).suffix="s"
prefix Display only prefix (will not be included intag value).
prefix="$"
file type
Copyright c© 2002-2018 Arm Limited (or its affiliates). All rights reserved. 248
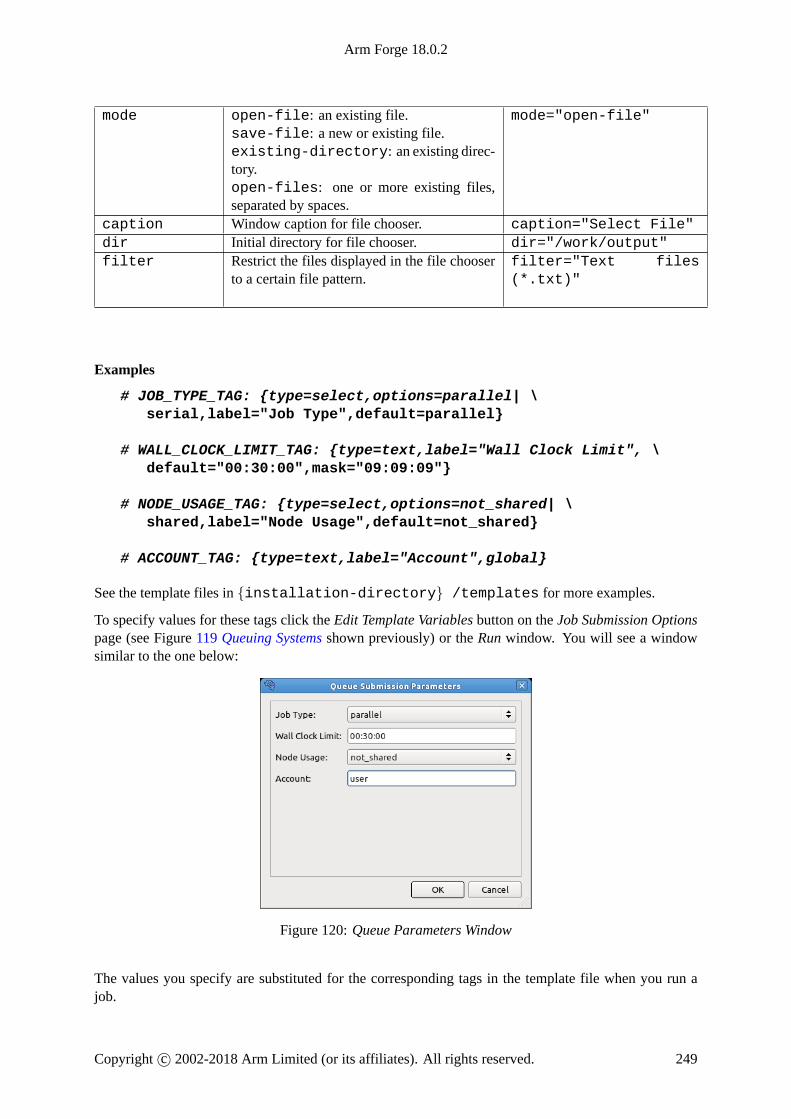
Arm Forge 18.0.2
mode open-file: an existing file.save-file: a new or existing file.existing-directory: an existing direc-tory.open-files: one or more existing files,separated by spaces.
mode="open-file"
caption Window caption for file chooser. caption="Select File"dir Initial directory for file chooser. dir="/work/output"filter Restrict the files displayed in the file chooser
to a certain file pattern.filter="Text files(*.txt)"
Examples
# JOB_TYPE_TAG: {type=select,options=parallel| \serial,label="Job Type",default=parallel}
# WALL_CLOCK_LIMIT_TAG: {type=text,label="Wall Clock Limit", \default="00:30:00",mask="09:09:09"}
# NODE_USAGE_TAG: {type=select,options=not_shared| \shared,label="Node Usage",default=not_shared}
# ACCOUNT_TAG: {type=text,label="Account",global}
See the template files in {installation-directory} /templates for more examples.
To specify values for these tags click the Edit Template Variables button on the Job Submission Optionspage (see Figure 119 Queuing Systems shown previously) or the Run window. You will see a windowsimilar to the one below:
Figure 120: Queue Parameters Window
The values you specify are substituted for the corresponding tags in the template file when you run ajob.
Copyright c© 2002-2018 Arm Limited (or its affiliates). All rights reserved. 249
Arm Forge 18.0.2
I.3 Specifying default options
A queue template file may specify defaults for the options on the Job Submission page so that when auser selects the template file these options are automatically filled in.
Name Job Submission Setting Examplesubmit Submit command
Note: the command mayinclude tags.
qsub -n NUM NODES TAG-t WALL CLOCK LIMIT -TAG --mode script -APROJECT TAG
display Display command The outputfrom this command is shownwhile waiting for a job to start.
qstat
job regexp Job regexp (\d+)cancel Cancel command qdel JOB ID TAGsubmit scalar Also submit scalar jobs through
the queueyes
show num procs Number of processes: Specify inRun window
yes
show num nodes Number of nodes: Specify inRun Window
yes
show procs per node Processes per node: Specify inRun window
yes
procs per node Processes per node: Fixed 16
Example
# submit: qsub -n NUM_NODES_TAG -t WALL_CLOCK_LIMIT_TAG \--mode script -A PROJECT_TAG
# display: qstat# job regexp: (\d+)# cancel: qdel JOB_ID_TAG
I.4 Launching
Usually, your queue script will end in a line that starts mpirun with your target executable.
In a template file, this needs to bemodified to run a command that will also launch the Arm Forge backendagents.
Some methods to do this are mentioned in this section.
I.4.1 Using AUTO LAUNCH TAG
This is the easiest method, and caters for the majority of cases. Simply replace your mpirun com-mand line with AUTO_LAUNCH_TAG. Arm Forge will replace this with a command appropriate for yourconfiguration (one command on a single line).
For example an mpirun line that looks like this:
Copyright c© 2002-2018 Arm Limited (or its affiliates). All rights reserved. 250

Arm Forge 18.0.2
mpirun -np 16 program_name myarg1 myarg2
Becomes:
AUTO_LAUNCH_TAG
AUTO_LAUNCH_TAG is roughly equivalent to:
DDT_MPIRUN_TAG DDT_DEBUGGER_ARGUMENTS_TAG \MPI_ARGUMENTS_TAG PROGRAM_TAG ARGS_TAG
A typical expansion is:
/opt/arm/forge/bin/ddt-mpirun --ddthost login1,192.168.0.191 \--ddtport 4242 --ddtsession 1 \--ddtsessionfile /home/user/.allinea/session/login1-1 \--ddtshareddirectory /home/user --np 64 \--npernode 4 myprogram arg1 arg2 arg3
I.4.2 Using ddt-mpirun
If you needmore control than is available usingAUTO_LAUNCH_TAG, Arm Forge also provides a drop-inmpirun replacement that can be used to launch your job.
Note: this is only suitable for use in a queue template file when Arm Forge is submitting to the queueitself.
You should replace mpirun with DDTPATH_TAG/bin/ddt-mpirun.
For example, if your script currently has the line:
mpirun -np 16 program_name myarg1 myarg2
Then (for illustration only) the equivalent that Arm Forge needs to use would be:
DDTPATH_TAG/bin/ddt-mpirun -np 16 program_name myarg1 myarg2
For a template script you use tags in place of the program name, arguments and so on, so they can bespecified in the GUI rather than editing the queue script each time:
DDTPATH_TAG/bin/ddt-mpirun -np NUM_PROCS_TAG \EXTRA_MPI_ARGUMENTS_TAG DDTPATH_TAG/bin/ddt-debugger \DDT_DEBUGGER_ARGUMENTS_TAG PROGRAM_TAG PROGRAM_ARGUMENTS_TAG
See I.1 Queue template tags for more information on template tags.
I.4.3 MPICH 1 based MPI
If AUTO_LAUNCH_TAG or ddt-mpirun are not suitable, you can also use the following method forMPICH 1 based MPIs.
If your mpirun command line looks like:
mpirun -np 16 program_name myarg1 myarg2
You need to export theTOTALVIEW environment variable, and add the-tv parameter tompirun.
For example:
Copyright c© 2002-2018 Arm Limited (or its affiliates). All rights reserved. 251
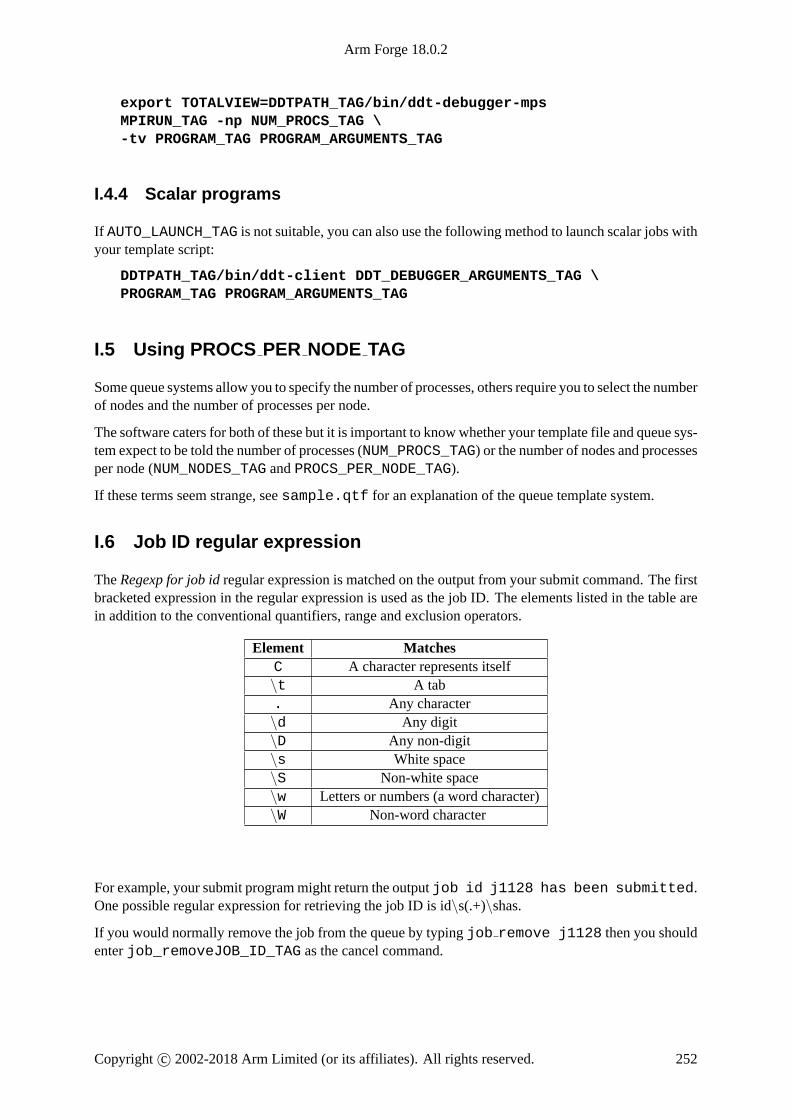
Arm Forge 18.0.2
export TOTALVIEW=DDTPATH_TAG/bin/ddt-debugger-mpsMPIRUN_TAG -np NUM_PROCS_TAG \-tv PROGRAM_TAG PROGRAM_ARGUMENTS_TAG
I.4.4 Scalar programs
If AUTO_LAUNCH_TAG is not suitable, you can also use the following method to launch scalar jobs withyour template script:
DDTPATH_TAG/bin/ddt-client DDT_DEBUGGER_ARGUMENTS_TAG \PROGRAM_TAG PROGRAM_ARGUMENTS_TAG
I.5 Using PROCS PER NODE TAG
Some queue systems allow you to specify the number of processes, others require you to select the numberof nodes and the number of processes per node.
The software caters for both of these but it is important to knowwhether your template file and queue sys-tem expect to be told the number of processes (NUM_PROCS_TAG) or the number of nodes and processesper node (NUM_NODES_TAG and PROCS_PER_NODE_TAG).
If these terms seem strange, see sample.qtf for an explanation of the queue template system.
I.6 Job ID regular expression
The Regexp for job id regular expression is matched on the output from your submit command. The firstbracketed expression in the regular expression is used as the job ID. The elements listed in the table arein addition to the conventional quantifiers, range and exclusion operators.
Element MatchesC A character represents itself\t A tab. Any character\d Any digit\D Any non-digit\s White space\S Non-white space\w Letters or numbers (a word character)\W Non-word character
For example, your submit programmight return the output job id j1128 has been submitted.One possible regular expression for retrieving the job ID is id\s(.+)\shas.
If you would normally remove the job from the queue by typing job remove j1128 then you shouldenter job_removeJOB_ID_TAG as the cancel command.
Copyright c© 2002-2018 Arm Limited (or its affiliates). All rights reserved. 252
Arm Forge 18.0.2
I.7 Arm IPMI Energy Agent
The Arm IPMI Energy Agent allows Arm MAP and Arm Performance Reports to measure the totalenergy consumed by the compute nodes in a job in conjunction with the Arm Advanced Metrics Packadd-on.
The IPMI Energy Agent is a separate download from our website: IPMI Energy Agent.
I.7.1 Requirements
• The compute nodes must support IPMI.
• The compute nodes must have an IPMI exposed power sensor.
• The compute nodes must have an OpenIPMI compatible kernel module installed, such as ipmi -devintf.
• The compute nodesmust have the corresponding device node in/dev, for example/dev/ipmi0.
• The compute nodes must run a supported operating system.
• The IPMI Energy Agent must be run as root.
To list the names of possible IPMI power sensors on a compute node use the following command:
ipmitool sdr | grep 'Watts'
Copyright c© 2002-2018 Arm Limited (or its affiliates). All rights reserved. 253

IndexArm DDT
Getting started, 27Introduction, 12Online resources, 13Starting a program, 60
Arm IPMI Energy Agent, 253Requirements, 253
Arm MAPIntroduction, 13Online resources, 13
DDTControlling program execution, 56Getting Support, 207Installation, 14StartingFrom a job script, 45
Mac OS X , 25MAP
Getting Support, 207Installation, 14
Accelerator, 157Align stacks, 69Altix, 208AMD
OpenCL, 221Apple
Mac OS X , 23Application, 28, 142Arbitrary expressions and global variables, 77Architecture licensing, 18
Multiple architectures, 18Arm, 208, 209, 228, 230
Known issues, 230Array
Distributed, 86Expression, 85Filtering, 86Multi-dimensionalViewing, 84
Array dataViewing, 82
ArraysAuto Update, 89Comparing elements across processes, 89Export, 89LayoutData table, 86
Multi-dimensional, 83Statistics, 89
Visualization, 90Attaching, 38, 41, 122
Choose hosts, 41Command line, 41ConfiguringRemote hosts, 41
Hosts file, 41Attaching to running programs, 38AUTO LAUNCH TAG, 250
Backtrace, 69Batch schedulers, 210Berkeley UPC, 213Blue Gene/Q, 229Bounds checking, 102Branch instructions, 181Breakpoints, 61
Conditional, 63CUDA, 64Default, 64Deleting, 63Focus, 58Loading, 64Saving, 64Setting, 61Pending, 62Using source code viewer, 61Using theAddBreakpoint window, 62
Buffer overflow, 53Building applications, 49, 161Bull MPI, 213
C++ STL, 237C++ STL support, 81Checkpointing, 113
How to checkpoint, 113Overview, 113Restoring a checkpoint, 113
Cobalt, 209, 210Colour Scheme, 206Compile serial programs on Cray, 222Compilers
AMD, 221Cray, 221GNU, 222IBM XLC/XLF, 223Intel, 223Known issues, 221OpenCL, 221Pathscale EKO compilers, 224
254

Arm Forge 18.0.2
Portland Group, 225Completed instructions, 181Complex numbers, 80Configuration, 35, 199
Appearance, 206Code viewer, 206Configuration files, 199Connecting to remote programs, 204Converting legacy sitewide configuration files,
200Importing legacy, 200Job size, 203Job submission, 206Optional, 204Queue commands, 203Queuing systems, 201Quick restart, 203Sitewide, 199Startup scripts, 200System, 204Template script, 203Template tutorial, 202Using a shared installation onmultiple systems,
201Using shared home directories onmultiple sys-
tems, 200Connecting to a remote system, 19Consistency checking
Heap, 104Core Files, 122Core files, 38CPU branch, 172CPU floating-point, 171CPU floating-point vector, 171CPU instructions, 171CPU integer, 171CPU integer vector, 172CPU memory access, 171CPU power usage, 175CPU time, 172Cray, 124, 227
Compiling serial programs, 222Cray ATP, 219Cray compiler environment, 221Cray MPT, 213Cray Native SLURM, 219, 227Cray X, 213Cray X-Series, 137, 140, 141Cray XK6, 227Cross-process comparison, 91, 108Cross-thread comparison, 91
CUDABreakpoints, 64, 119Controlling GPU threads, 119CUDA Fortran, 125DDT: CUDA, 118DebuggingmultipleGPUprocesses, 123Examining GPU threads and data, 120GPU Debugging, 118GPU device information, 122Launching, 118Licensing, 118Memory debugging, 102NVIDIA, 118Preparing to debug, 118Running, 29Running and pausing, 120Selecting GPU threads, 120Source code viewer, 122Stepping, 119Thread control, 123Understanding kernel progress, 121Viewing GPU thread locations, 120
CUDA profiling, 195Current line, 76Custom MPI scripts, 148Cycles per instruction, 181
DataChanging, 83
DDTLogbook, 97
Deadlock, 101Debugging
Scalar, 34Debugging symbols, 136Detecting leaks, 111Disassembler, 93Disk read transfer, 173Disk write transfer, 173DP FLOPS, 180Duration, 143Dynamic linking
Cray X-Series, 137
Editing source code, 49, 160End Session, 32Energy metrics
Requirements, 175Environment variables, 31, 144Express Launch, 32, 134
Run dialog box, 33Expression
Copyright c© 2002-2018 Arm Limited (or its affiliates). All rights reserved. 255

Arm Forge 18.0.2
Changing language, 79External Editor, 206
Fencepost checking, 109Files
Viewing multiple, 73Find in Files, 51Floating-point scalar instructions, 181Floating-point vector instructions, 181Focus
Breakpoints, 58Changing, 58Code viewer, 58Parallel stack view, 59Playing, 59Process group viewer, 58Step threads together, 59Stepping, 59Stepping threads window, 59
Focus control, 57Font, 206Fortran intrinsics, 79Fortran Modules, 79Function Listing, 50Functions view, 168
gdbserver, 45Attaching, 45
General troubleshooting, 232GNU compiler, 222GNU UPC, 222GNU/Linux systems, 228GPU, 118
Attaching, 122Device information, 122GPU Language support, 124
GPU kernels tab, 195GPU memory usage, 175GPU power usage, 175GPU profiling, 195GPU temperature, 175GPU utilization, 175
Heap Overflow, 108HP MPI, 214
I/O, 173I/O time, 157IBM XLC/XLF, 223Inf, 73Installation, 14
Mac OS X , 16Linux, 14
Graphical, 14Text-mode install, 15
Windows, 16Intel Compiler, 32, 218Intel compiler, 223Intel Message Checker, 214Intel MPI, 214
MPMD, 37remote-exec, 33
Intel Xeon, 229Intel Xeon RAPL, 229Introduction, 12Involuntary context switches, 172IPMI, 253
Job ID regular expression, 252Job Submission
Regular Expression, 252Job submission, 42, 147
Cancelling, 42, 147Custom, 42Regular expression, 42, 147
JSON, 188Jump To Line, 52
Double clicking, 56
Kernel-mode CPU time, 172Known issues
Arm Forge times out, 234MAPspecific issues, 239MAP adds unexpected overhead, 243MAP collects very deep stack traceswith boost::coroutine,
244MAP not correctly identifying vectorized in-
structions, 241MAP over-reports MPI time, 244MAP reporting time spent in function defini-
tion, 241MAP takes long time to analyze OpenBLAS
app, 243Attaching, 234Cannot find executable, 234Cannot find hosts, 234Compiler, 221Compiler inlining functions, 239Controlling a program, 236DDT stops responding, 237Program jumps while stepping, 236
Deadlock callings printf or malloc from a sig-nal handler, 238
Evaluating variables, 237C++ STL are not pretty printed, 237
Copyright c© 2002-2018 Arm Limited (or its affiliates). All rights reserved. 256

Arm Forge 18.0.2
Evaluating an array of derived types, 237Incorrect values printed for Fortran array, 237Variables cannot be viewed, 237
F1 Help, 232General, 232Input/Output, 236Output to stderr not displayed, 236Unwind errors, 236
Linking with static MAP sampler library fails,242
Memory debugging, 238MPI, 213MPI wrapper libraries, 240mprotect fails, 238No shared home directory, 233Not enough samples, 241Only main code visible, 241Platform, 227Programs run slowly, 239Progress bar does not move, 234Running processes do not show up in the attach
window, 235Source code, 235No variables or line number information, 235Source code does not appear, 235Source code folding does not work, 236
Starting multi-process programs, 233Starting scalar programs, 232Starting the GUI, 232System does not allow debuggers to connect to
processes, 234, 235Tail call optimization, 239Thread support limitations, 240
L1 cache misses, 181L2 cache misses, 181L2 data cache misses, 181L3 cache misses, 181Licensing
Architecture licensing, 18Multiple architectures, 18
Floating licenses, 18License files, 17Single process license, 34Single-process license, 146Supercomputing and other floating licenses, 18Workstation and evaluation licenses, 17
Linking, 136DynamicOn Cray X-Series using modules environ-ment, 141
Static, 138
On Cray X-Series using modules environ-ment, 141
Loadleveler, 209, 210Local variables, 77Log file, 245Logbook
Annotation, 98Comparison window, 98DDT, 97Usage, 97
Lustre file opens, 176Lustre metadata operations, 176Lustre read transfer, 176Lustre write transfer, 176
Macros, 79Main Window
Overview, 47Manual launch
ddt-client, 36Debugging multi-process non-MPI programs,
36Manual process selection, 39MAP
Custom metrics, 178Displaying selected processes, 154Environment variables, 151Functions view, 168Getting started, 133JSON, 188Activities, 189Categories, 189Example, 193Metrics, 191
Metrics view, 170Program output, 154Project files view, 169Restricting output, 154Running from the command line, 186Saving output, 155Standard error, 154Standard output, 154Starting from job script, 150View modes, 183Main thread only, 183OpenMP mode, 183Pthread mode, 183
Viewing totals, 178Map-link modules, 141
InstallationCray X-Series, 141
Memory debugging, 102, 238
Copyright c© 2002-2018 Arm Limited (or its affiliates). All rights reserved. 257

Arm Forge 18.0.2
Available checks, 105Changing settings at run time, 105Configuration, 102, 103Detecting leaks, 111Enabling, 31Library usage errors, 106Memory Statistics, 111mprotect fails, 238Pointer error detection, 106Static linking, 104Suppressing an error, 109Validity checking, 106Writing beyond an allocated area, 108
Memory leak, 53Memory leak report, 129Memory usage, 109, 173Message Queues, 214Message queues, 99
Deadlock, 101Interpreting, 100Viewing, 99
MetricsAccelerator, 157, 175CPU branch, 172CPU floating-point, 171CPU floating-point vector, 171CPU instructions, 171CPU integer, 171CPU integer vector, 172CPU memory access, 171CPU power usage, 175CPU time, 172Detecting MPI imbalance, 174Disk read transfer, 173Disk write transfer, 173Energy, 175GPU memory usage, 175GPU power usage, 175GPU temperature, 175GPU utilization, 175I/O, 173I/O time, 157Involuntary context switches, 172Kernel-mode CPU time, 172Lustre, 176Lustre file opens, 176Lustre metadata operations, 176Lustre read transfer, 176Lustre write transfer, 176Memory, 173Memory usage, 173
MPI, 173MPI call duration, 174MPI communication andwaiting time, 157MPI point-to-point and collective bytes, 174MPI point-to-point and collective operations,
174MPI sent and received, 174Node memory usage, 173OpenMPMulti-threaded computation time, 158Multi-threadedMPI computation time, 158Overhead, 158Thread synchronization time, 158Time inside an OpenMP region, 158
OpenMP Overhead, 158POSIX I/O read rate, 173POSIX I/O write rate, 173POSIX read syscall rate, 173POSIX write syscall rate, 173Single-threaded computation time, 156System load, 172System power usage, 175Time in global memory accesses, 175User-mode CPU time, 172Voluntary context switches, 172Zooming, 176
Metrics view, 170Mispredicted branch instructions, 181Moab, 209, 210MOM nodes, 213MPC, 215
mpirun, 216MPI, 143
Distributions, 213Function Counters, 115History/Logging, 114MPI rank, 56MPI Ranks, 92mpirun, 29Running, 29Troubleshooting, 233
MPI call duration, 174MPI communication and waiting time, 157MPI job
Attaching to a subset, 39Automatic detection, 39
MPI point-to-point and collective bytes, 174MPI point-to-point and collective operations, 174MPI sent and received, 174MPI wrapper libraries, 240MPI Init
Copyright c© 2002-2018 Arm Limited (or its affiliates). All rights reserved. 258

Arm Forge 18.0.2
remote-exec, 33MPICH, 145
p4, 216p4 mpd, 216
MPICH 1remote-exec, 33
MPICH 1 based MPI, 251MPICH 2, 216
MPMD, 37remote-exec, 33
MPICH 3, 217MPMD, 37remote-exec, 33
mpirunremote-exec, 33
mpirun rsh, 217MPMD
Compatibility mode, 38Intel MPI, 37MPICH 2, 37MPICH 3, 37remote-exec, 145Running, 37, 187
MPMD programsDebugging, 37Compatibility mode, 38Without Express Launch, 37
Multi-dimensional array viewer (MDA), 84Multi-threaded computation time, 158Multi-threaded MPI computation time, 158MVAPICH 2, 217
Navigating through source code history, 52Node memory usage, 173Number bases
Viewing, 83nvcc, 118Nvidia CUDA, 230
Known issues, 230NVIDIA Tegra 2, 228
Obtaining Help, 207Obtaining support, 245Offline debugging, 126
HTML report, 128Periodic snapshots, 131Plain text report, 131Reading a file for standard input, 127Run-time job progress reporting, 131Signal-triggered snapshots, 131Using, 126Writing a file from standard output, 127
Online resources, 13Open MPI, 217
MPMD, 37Compatibility mode, 38
OpenACC, 124OpenCL, 118OpenGL, 90OpenMP, 143
Debugging, 35OMP NUM THREADS, 35Regions, 166Running, 29, 35
OpenMP overhead, 158OpenMP Regions view, 166Oracle Grid Engine, 209, 210
PAPI, 180Branch instructions, 181Branch prediction, 181Cache misses, 181Completed instructions, 181Config file, 180Cycles per instruction, 181DP FLOPS, 180Floating-point, 181Floating-point scalar instructions, 181Floating-point vector instructions, 181Install, 180L1 cache misses, 181L2 cache misses, 181L2 data cache misses, 181L3 cache misses, 181Metrics, 180Mispredicted branch instructions, 181Overview metrics, 180Vector instructions, 181
Parallel Stack View, 70Pathscale EKO compilers, 224PBS, 209, 210Pending breakpoints, 62PGI Accelerators, 125Platform MPI, 218Plugins, 114
Enabling, 31Installing, 114Reference, 116Supported, 114Using, 114Writing, 116
Pointer details, 106, 108Pointer error detection, 106Pointers, 83
Copyright c© 2002-2018 Arm Limited (or its affiliates). All rights reserved. 259

Arm Forge 18.0.2
Portland Group, 225POSIX I/O read rate, 173POSIX I/O write rate, 173POSIX read syscall rate, 173POSIX write syscall rate, 173POWER8, 231
Known issues, 231Pretty printers, 81Process details, 93Process Group Viewer, 56Process groups, 56
Deleting, 56Detailed view, 56Summary view, 57
Processes and cores view, 185PROCS PER NODE TAG, 252Profiling, 142, 144
Preparing a program, 136Program part, 144
Programming errors, 206Python
Running, 30
Queue submission, 42Cancelling, 42
Queue submission via Express Launch, 42Queue template syntax, 247
Environment variablesPROCS PER NODE TAG, 252
Queue template tags, 247Defining new tags, 248Environment variableAUTO LAUNCH TAG, 250
Launching, 250Specifying default options, 250Using ddt-mpirun, 251
Raw command, 94Raw Command Window, 94Rebuilding applications, 49, 161Receive queue, 101Registers
Viewing, 93Remote Client
InstallationMac OS X , 16Windows, 16
Remote client, 19Configuration, 19Multiple hops, 20Remote launch, 20Remote script, 21
Using X forwarding or VNC, 23remote-exec
Required, 33Requirements
Energy metrics, 175Restarting, 60Reverse Connect, 21Run-time
Job progress reporting, 131Running
MPMD, 37, 187Scalar, 34
Running a program, 28Running programs
Attaching, 38Manual process selection, 39
Saving output, 95Scalar
Debugging, 34Running, 34
Scalar programs, 252Search, 51Selected Lines View, 162Send queue, 101Send signal, 74Sending signals, 74Session
Saving, 48Session menu, 60
SGI, 218SGI MPT
remote-exec, 33Shared arrays, 83Signal Handling
Divisions by zero, 73Floating Point Exception, 73Segmentation fault, 73SIGFPE, 73SIGILL, 73SIGPIPE, 73SIGSEGV, 73SIGUSR1, 74SIGUSR2, 74
Signal handling, 73Custom, 74Sending signals, 74
Single stepping, 61Single-threaded computation time, 156SLURM, 209, 210, 219SMP
Performance, 232
Copyright c© 2002-2018 Arm Limited (or its affiliates). All rights reserved. 260

Arm Forge 18.0.2
Source Code, 48Source code, 72, 156
Application and external code split, 50Commiting, 49Committing, 161Editing, 49, 160Find in Files, 51Missing files, 50Project files, 49Rebuilding, 49, 161Searching, 51Viewing, 48, 156
Sparkline, 91Sparklines, 76Spectrum MPI, 220Stack frame, 69Stacks table, 128Stacks view, 165Standard error, 95Standard input, 95, 146Standard output, 95Starting, 25Starting MAP, 133Static analysis, 53Static checking, 206Static linking, 138
On Cray X-Series, 140Step threads together, 59Stop messages, 61Stopping, 60Supported platforms, 208
DDT, 208MAP, 209Batch schedulers, 210
Suspending breakpoints, 63Synchronizing processes, 64System load, 172System power usage, 175
Tab size, 206Tail call optimization, 239Thread synchronization time, 158Time in global memory accesses, 175Time inside an OpenMP region, 158Time spent on selected lines, 162TORQUE, 209, 210Tracepoints, 66
Setting, 66Tracepoint output, 67
Unexpected queue, 101Unified Parallel C, 221, 222
Unwind errors, 236UPC, 82
Berkeley, 221GNU, 222
User-mode CPU time, 172Using custom MPI scripts, 42
Validity checking, 106Variables, 76
Searching, 51Unused variables, 53
Vector instructions, 181Version control
Breakpoints and tracepoints, 68Version control information, 53Viewing multiple files, 73Viewing stacks, 70
Overview, 70Parallel Stack View, 70
Viewing stacks in parallel, 70Visualize Whitespace, 206VNC, 23Voluntary context switches, 172
Warning Symbols, 53Watchpoints, 65Welcome Page, 25Welcome Screen, 134
X forwarding, 23X11, 232XK6, 227
Zooming, 176
Copyright c© 2002-2018 Arm Limited (or its affiliates). All rights reserved. 261