Embed Size (px)
Citation preview

Microsoft Azure
1
About the Tutorial
Windows Azure, which was later renamed as Microsoft Azure in 2014, is a cloud computing
platform, designed by Microsoft to successfully build, deploy, and manage applications and
services through a global network of datacenters. This tutorial explains various features
of this flexible platform and provides a step-by-step description of how to use the same.
Audience
This tutorial has been designed for software developers who are keen on developing best-
in-class applications using this open and advanced platform of Windows Azure.
Prerequisites
To learn Windows Azure, you need to be familiar with the Windows environment and have
a basic knowledge of cloud computing.
Disclaimer & Copyright
Copyright 2015 by Tutorials Point (I) Pvt. Ltd.
All the content and graphics published in this e-book are the property of Tutorials Point (I)
Pvt. Ltd. The user of this e-book is prohibited to reuse, retain, copy, distribute or republish
any contents or a part of contents of this e-book in any manner without written consent
of the publisher.
We strive to update the contents of our website and tutorials as timely and as precisely as
possible, however, the contents may contain inaccuracies or errors. Tutorials Point (I) Pvt.
Ltd. provides no guarantee regarding the accuracy, timeliness or completeness of our
website or its contents including this tutorial. If you discover any errors on our website or
in this tutorial, please notify us at [email protected].

Microsoft Azure
2
Table of Contents
About the Tutorial ............................................................................................................................................ i Audience ........................................................................................................................................................... i Prerequisites ..................................................................................................................................................... i Disclaimer & Copyright ..................................................................................................................................... i Table of Contents ............................................................................................................................................ ii
PART 1 – AZURE BASICS ................................................................................................................ 1
1. Cloud Computing – Overview .................................................................................................................... 2 Architecture of Cloud Computing .................................................................................................................... 2 Types of Cloud ................................................................................................................................................. 3 Benefits of Cloud ............................................................................................................................................. 4 SPI .................................................................................................................................................................... 4
2. Windows Azure ......................................................................................................................................... 6 Azure as PaaS (Platform as a Service) .............................................................................................................. 6 Azure as IaaS (Infrastructure as a Service) ...................................................................................................... 6 Azure Management Portal .............................................................................................................................. 7
3. Azure – Components ................................................................................................................................. 9 Compute / Execution Models .......................................................................................................................... 9 Data Management ........................................................................................................................................... 9 Networking .................................................................................................................................................... 10 Big Data and Big Compute ............................................................................................................................. 11 Messaging ...................................................................................................................................................... 11 Caching .......................................................................................................................................................... 12 Identity and Access ........................................................................................................................................ 12 Mobile Service ............................................................................................................................................... 13 Backup ........................................................................................................................................................... 14 Media............................................................................................................................................................. 14 Commerce ..................................................................................................................................................... 14 Software Development Kit (SDK) ................................................................................................................... 14
4. Compute Module .................................................................................................................................... 15 Create a Web App ......................................................................................................................................... 15 Create a Virtual Machine ............................................................................................................................... 18 Creating a Mobile Service .............................................................................................................................. 22 Creating Batch Service ................................................................................................................................... 22
5. Fabric Controller ..................................................................................................................................... 24
6. Storage ................................................................................................................................................... 26 Creating Azure Storage Account .................................................................................................................... 26 Storage Account Endpoints ........................................................................................................................... 28 Generating an Access Key .............................................................................................................................. 28 Managing Data to Azure Storage................................................................................................................... 29
Microsoft Azure
3
7. Blobs ....................................................................................................................................................... 31 Create a Container ......................................................................................................................................... 31 Upload a Blob using PowerShell .................................................................................................................... 32 Download a Blob ........................................................................................................................................... 33 Manage Blobs using Azure Storage Explorer ................................................................................................. 33
8. Queues ................................................................................................................................................... 34 Managing Queues using PowerShell ............................................................................................................. 34 Managing Queues using Azure Storage Explorer .......................................................................................... 37
9. Tables ..................................................................................................................................................... 39 How to Manage Tables Using PowerShell ..................................................................................................... 39 How to Manage Table using Azure Storage Explorer .................................................................................... 44
10. CDN......................................................................................................................................................... 48 Create a CDN ................................................................................................................................................. 48 Create CDN for Custom Origin Links .............................................................................................................. 49 Manage CDN .................................................................................................................................................. 50 Map a Custom Domain Name ....................................................................................................................... 53
11. Applications ............................................................................................................................................ 55
12. Security ................................................................................................................................................... 56 Creating an Active Directory .......................................................................................................................... 56 Mapping a Custom Domain ........................................................................................................................... 58 Creating Users ............................................................................................................................................... 59 Integrating with Azure Active Directory ........................................................................................................ 61 Integrating On-Premise Active Directory ...................................................................................................... 63 Reports .......................................................................................................................................................... 64
13. Datacenters ............................................................................................................................................ 65 How to Choose the Right Data Center for Your Application ......................................................................... 66
14. Scenarios ................................................................................................................................................ 67 Software Development.................................................................................................................................. 67 Enterprise Process Offloading ....................................................................................................................... 67 Enterprise Application Integration ................................................................................................................ 67
PART 2: AZURE ADVANCED ....................................................................................................... 69
15. Management Portal ................................................................................................................................ 70 Create a New Application .............................................................................................................................. 71 Check Credit and Subscriptions ..................................................................................................................... 72 Add a New Subscription ................................................................................................................................ 74 Azure Preview Portal ..................................................................................................................................... 76
16. Create Virtual Network ........................................................................................................................... 78 Creating a Virtual Network in Clouds Only .................................................................................................... 78 Creating a Virtual Network in Cloud Only (Advanced Settings)..................................................................... 79
Microsoft Azure
4
17. Deploying Virtual Machines .................................................................................................................... 81 Quick Create .................................................................................................................................................. 81 Create Virtual Machine with Advanced Settings ........................................................................................... 82 Connecting with a Virtual Network ............................................................................................................... 86 Accessing the Virtual Machine ...................................................................................................................... 87
18. Endpoint Configuration ........................................................................................................................... 88 Access Control of Endpoint ........................................................................................................................... 90
19. Point-to-Site Connectivity ....................................................................................................................... 93 Enabling Point-to-Site Connectivity on Existing Virtual Network .................................................................. 93 Create a New Virtual Network with Point-to-site Connectivity .................................................................... 95 Generate Certificates..................................................................................................................................... 98
20. Site-to-Site Connectivity ....................................................................................................................... 105 Creating a Site-to-Site Connectivity Network .............................................................................................. 105
21. Traffic Manager .................................................................................................................................... 109 Create Traffic Manager ................................................................................................................................ 109 Create Endpoints to be Monitored via Traffic Manager.............................................................................. 110 Configure the Policy .................................................................................................................................... 112
22. PowerShell ............................................................................................................................................ 114 Installing Azure PowerShell ......................................................................................................................... 114 Connecting to Your Subscription ................................................................................................................. 115 Connect to Your Azure Account .................................................................................................................. 117 Remove Azure Account ............................................................................................................................... 118 Get Help ....................................................................................................................................................... 119
23. Monitoring Virtual Machines ................................................................................................................ 120 Monitor VM in Azure Management Portal .................................................................................................. 120 Enable Diagnostics ....................................................................................................................................... 123
24. Setting Up Alert Rules ........................................................................................................................... 126
25. Application Deployment ....................................................................................................................... 130 Deploying a Web App from PowerShell ...................................................................................................... 130 Create a Deployment Package..................................................................................................................... 130 Create a Website in Azure using PowerShell ............................................................................................... 132 Deploy Website using Deployment Package ............................................................................................... 133
26. Backup & Recovery ............................................................................................................................... 135 Create Backup Vault .................................................................................................................................... 135 Schedule a Backup ....................................................................................................................................... 138
27. Self-Service Capabilities ........................................................................................................................ 141 Group Management .................................................................................................................................... 141 Password Management ............................................................................................................................... 141

Microsoft Azure
5
28. Multi-Factor Authentication ................................................................................................................. 142 Create a Multi-Factor Authentication Provider ........................................................................................... 142 Enable the Multi-Factor Authentication for Existing Directory ................................................................... 146 Enable Multi-Factor Authentication for On-premises Applications ............................................................ 147
29. Forefront Identity Manager .................................................................................................................. 149
30. Data Import and Export Job .................................................................................................................. 152 Data Export Job ........................................................................................................................................... 152 Create an Export Job ................................................................................................................................... 152 Create Import job ........................................................................................................................................ 156
31. Websites ............................................................................................................................................... 159 Create a Website in Azure Management Portal .......................................................................................... 159 Deploying Azure Website from Visual Studio .............................................................................................. 160 Monitoring the Website .............................................................................................................................. 167 Staged Publishing ........................................................................................................................................ 168
32. Scalability ............................................................................................................................................. 170
33. Disk Configuration ................................................................................................................................ 174 Virtual Machine and Disks ........................................................................................................................... 174 Create/Attach a Disk in Virtual Machine ..................................................................................................... 174 Configure the Disk in Virtual Machine ......................................................................................................... 176 Delete the Disk ............................................................................................................................................ 179 Image Disks .................................................................................................................................................. 180
34. Disk Caching .......................................................................................................................................... 184
35. Personalize Azure Access ...................................................................................................................... 186
36. Personalize Company Branding ............................................................................................................. 192 Active Free Trial of Azure Active Directory (ADD) Premium Edition ........................................................... 192 Customize Branding ..................................................................................................................................... 193 Login with Customized Sign-in Page ............................................................................................................ 197
37. Self-Service Password Reset .................................................................................................................. 199
38. Self-Service Group Management .......................................................................................................... 202 Policy Setup for Self-service Group Management ....................................................................................... 202
39. Create a Group ...................................................................................................................................... 204
40. Security Reports and Alerts ................................................................................................................... 208 Anomalies Reports ...................................................................................................................................... 208 Activity Reports ........................................................................................................................................... 208 Integrated Application ................................................................................................................................. 209 Search Activity of a Particular User ............................................................................................................. 210

Microsoft Azure
6
41. Orchestrated Recovery ......................................................................................................................... 213 Create a Site Recovery Vault ....................................................................................................................... 213 Between On-premises VMM Site and Azure ............................................................................................... 214 Between On-premises Hyper-V Site and Azure ........................................................................................... 215 Between On-premises Site with VMWare / Physical Server and Azure ...................................................... 216 Between Two On-premises VMWare Sites ................................................................................................. 217 Between Two On-premises VMM Sites and SAN Array Application ........................................................... 218 Create a Recovery Plan ................................................................................................................................ 219
42. Health Monitoring ................................................................................................................................ 220
43. Upgrades .............................................................................................................................................. 221 Update a Cloud Service ............................................................................................................................... 221 VIP (Virtual IP) Swap .................................................................................................................................... 222

Microsoft Azure
1
Part 1 – Azure Basics

Microsoft Azure
2
The popular trend in today's technology driven world is ‘Cloud Computing’. Cloud
computing can be referred to as the storing and accessing of data over the internet rather
than your computer's hard drive. This means you don't access the data from either your
computer's hard drive or over a dedicated computer network (home or office network).
Cloud computing means data is stored at a remote place and is synchronized with other
web information.
One prominent example of cloud computing is Office 365 which allows users to store,
access, edit their MS Office documents online (in browser) without installing the actual
program on their device.
Architecture of Cloud Computing
The architecture of cloud computing comprises of the following components:
Front-end device
Back-end platform
Cloud-based delivery
Network
1. Cloud Computing – Overview

Microsoft Azure
3
Front-end Devices: These are basically the devices that are used by clients to access the
data or program using the browser or special applications.
Back-end Platform: There are various computers, servers, virtual machines, etc. that
combine to become a back-end platform.
Types of Cloud
The storage options on cloud is in 3 forms:
Public
Private
Hybrid
Public Cloud: A service provider makes the clouds available to the general public which
is termed as a public cloud. These clouds are accessed through internet by users. These
are open to public and their infrastructure is owned and operated by service providers as
in case of Google and Microsoft.
Private Cloud: These clouds are dedicated to a particular organization. That particular
organization can use the cloud for storing the company's data, hosting business
application, etc. The data stored on public cloud can't be shared with other organizations.
The cloud is managed either by the organization itself or by the third party.

Microsoft Azure
4
Hybrid Cloud: When two or more clouds are bound together to offer the advantage of
both public and private clouds, they are termed as Hybrid Cloud. Organizations can use
private clouds for sensitive application, while public clouds for non-sensitive applications.
The hybrid clouds provide flexible, scalable and cost-effective solutions to the
organizations.
Benefits of Cloud
There are many benefits of clouds. Some of them are listed below.
Cloud service offers scalability. Allocation and de-allocation of resources is
dynamically as per demand.
It saves on cost by reducing capital infrastructure.
It allows the user to access the application independent of their location and
hardware configuration.
It simplifies the network and lets the client access the application without buying
license for individual machine.
Storing data on clouds is more reliable as it is not lost easily.
SPI
Next comes how cloud services are categorized. S stand for Software, P stands for Platform
and I for Infrastructure in SPI. SaaS is Software as a service; PaaS is Platform as a service
and IaaS is Infrastructure as a Service.

Microsoft Azure
5
Following are the live examples of these models.
SAAS Model: E-mail (Gmail, Yahoo, etc.)
PASS Model: Microsoft Azure
IAAS Model: Amazon S3

Microsoft Azure
6
There are many cloud computing platforms offered by different organizations. Windows
Azure is one of them, which is provided by Microsoft. Azure can be described as the
managed data centers that are used to build, deploy, manage the applications and provide
services through a global network. The services provided by Microsoft Azure are PaaS and
IaaS. Many programming languages and frameworks are supported by it.
Azure as PaaS (Platform as a Service)
As the name suggests, a platform is provided to clients to develop and deploy software.
The clients can focus on the application development rather than having to worry about
hardware and infrastructure. It also takes care of most of the operating systems, servers
and networking issues.
Pros
The overall cost is low as the resources are allocated on demand and servers are
automatically updated.
It is less vulnerable as servers are automatically updated and being checked for all
known security issues. The whole process is not visible to developer and thus does
not pose a risk of data breach.
Since new versions of development tools are tested by the Azure team, it becomes
easy for developers to move on to new tools. This also helps the developers to
meet the customer’s demand by quickly adapting to new versions.
Cons
There are portability issues with using PaaS. There can be a different environment
at Azure, thus the application might have to be adapted accordingly.
Azure as IaaS (Infrastructure as a Service)
It is a managed compute service that gives complete control of the operating systems and
the application platform stack to the application developers. It lets the user to access,
manage and monitor the data centers by themselves.
Pros
This is ideal for the application where complete control is required. The virtual
machine can be completely adapted to the requirements of the organization or
business.
IaaS facilitates very efficient design time portability. This means application can be
migrated to Windows Azure without rework. All the application dependencies such
as database can also be migrated to Azure.
2. Windows Azure
Microsoft Azure
7
IaaS allows quick transition of services to clouds, which helps the vendors to offer
services to their clients easily. This also helps the vendors to expand their business
by selling the existing software or services in new markets.
Cons
Since users are given complete control they are tempted to stick to a particular
version for the dependencies of applications. It might become difficult for them to
migrate the application to future versions.
There are many factors which increases the cost of its operation. For example,
higher server maintenance for patching and upgrading software.
There are lots of security risks from unpatched servers. Some companies have well-
defined processes for testing and updating on-premise servers for security
vulnerabilities. These processes need to be extended to the cloud-hosted IaaS VMs
to mitigate hacking risks.
The unpatched servers pose a great security risk. Unlike PaaS, there is no provision
of automatic server patching in IaaS. An unpatched server with sensitive
information can be very vulnerable affecting the entire business of an organization.
It is difficult to maintain legacy apps in Iaas. It can be stuck with the older version
of the operating systems and application stacks. Thus, resulting in applications that
are difficult to maintain and add new functionality over the period of time.
It becomes necessary to understand the pros and cons of both services in order to choose
the right one according your requirements. In conclusion it can be said that, PaaS has
definite economic advantages for operations over IaaS for commodity applications. In
PaaS, the cost of operations breaks the business model. Whereas, IaaS gives complete
control of the OS and application platform stack.
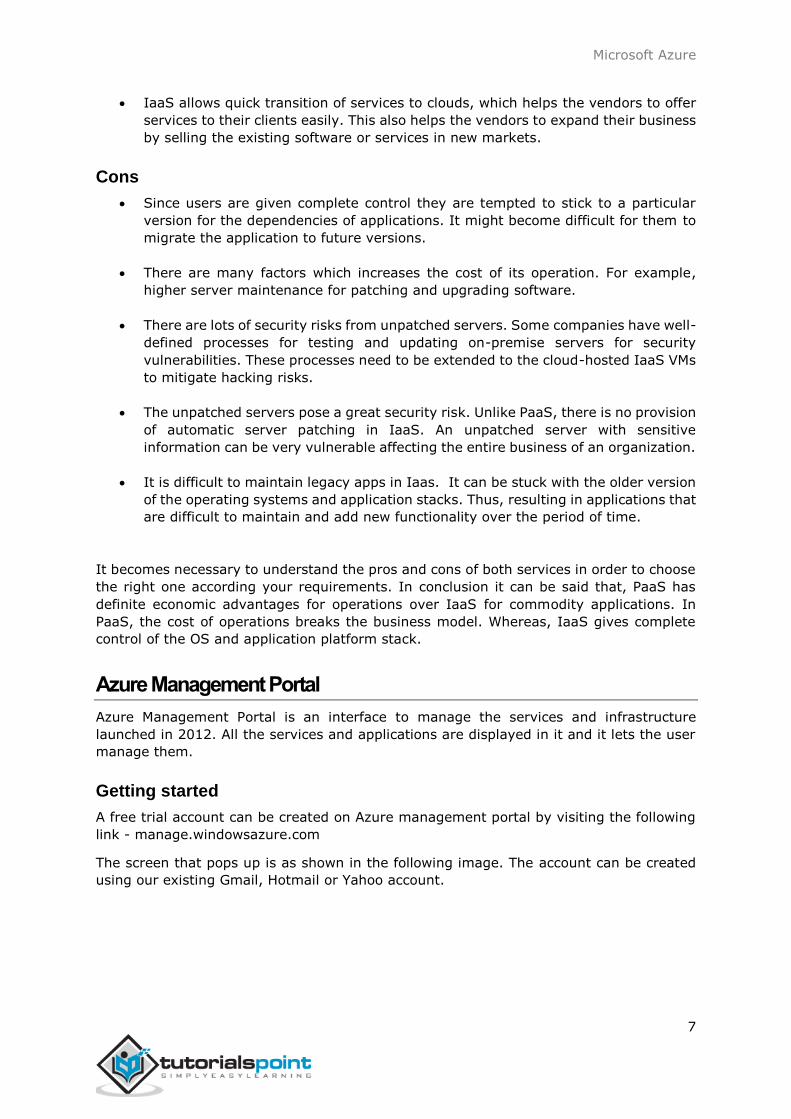
Azure Management Portal
Azure Management Portal is an interface to manage the services and infrastructure
launched in 2012. All the services and applications are displayed in it and it lets the user
manage them.
Getting started
A free trial account can be created on Azure management portal by visiting the following
link - manage.windowsazure.com
The screen that pops up is as shown in the following image. The account can be created
using our existing Gmail, Hotmail or Yahoo account.

Microsoft Azure
8
Once logged in, you will be redirected to the following screen, where there is a list of
services and applications on the left panel.
When you click on a category, its details are displayed on the screen. You can see the
number of applications, virtual machine, mobile services and so on by clicking on the menu
item.
The next chapter contains a detailed explanation of how to use this portal to manage Azure
services.

Microsoft Azure
9
Categorizing the services would help you understand Azure better. These categories are
termed as ‘Components’ in this tutorial. The Individual components are explained with
detailed pictures in subsequent chapters.
Compute / Execution Models
This is the interface for executing the application, which is one of the basic functions of
Azure.
As seen in the above image, there are different models such as Web App, Virtual Machine,
Mobile Service, Cloud Service, and Batch Service. These models can be used either
separately or in combination as per the requirement.
Data Management
Data management can be done by using SQL server Database component or the simple
data storage module offered by Windows Azure. SQL server database can be used for
relational database. The storage module can store unrelated tables (without foreign key
or any relation) and blobs. Blobs include binary data in the form of images, audio, video,
and text files.
3. Azure – Components

Microsoft Azure
10
Networking
Azure traffic manager routes the requests of a user intelligently to an available datacenter.
The process involves finding the nearest datacenter to the user who makes the request
for web application, and if the nearest datacenter is not available due to various reasons,
the traffic manager deviates the request to another datacenter. However, rules are set by
the owner of the application as to how a traffic manager should behave.
The virtual network is another feature that is part of networking in services offered by
Windows Azure. The virtual network allows a network between local machines at your
premise and virtual machine in Azure Datacenter. IPs to virtual machines can be assigned
in a way that makes them appear to be residing in your own premise. The virtual network
is set up using a Virtual Private Network (VPN) device.
The following image shows how these two features actually look in Azure portal.

Microsoft Azure
11
Big Data and Big Compute
The large amount of data can be stored and managed using Windows Azure. Azure offers
HDInsight which is Hadoop-based service. Organizations often need to manage large
amount of data which is necessarily not relational database management. Hadoop is a
prominent technology used these days. Thus, Azure offers Hadoop service on their
platform for clients.
The term ‘Big Compute’ refers to high performing computations. This is achieved by
executing code on many machines at the same time.
Messaging
Windows Azure offers two options for handling the interactions between two apps. One
falls under storage component of the service and is called ‘Message Queues’. The other
one comes under the app service and is called ‘Service Bus’. The messages can be sent
to initiate communication among different components of an application or among different
applications using these two options.

Microsoft Azure
12
Caching
Microsoft Azure offers two kinds of caching which are in-memory Caching and Content
Delivery Network (CDN) for caching frequently accessed data and improves the application
performance. CDN is used to cache the blob data that will be accessed faster by users
around the world.
Identity and Access
This component is about management of users, authentication and authorization. Active
directory stores the information of users accessing the application and also the
organization’s information. It can synchronize with the related information on local
machines residing on premises. Multifactor Access (MFA) service is built to address the
security concerns such as only the right user can access the application.

Microsoft Azure
13
Mobile Service
Windows Azure offers a very easy platform to develop mobile application. You can simply
start using mobile development tools after logging into your account. You don’t have to
write big custom codes for the mobile application if you use this service. The push
notifications can be sent, data can be stored and users can be authenticated in very less
time.

Microsoft Azure
14
Backup
The site recovery service replicates the data at secondary location as well as automates
the process of recovery of data in case of data outage. Similarly Azure backup can be used
to backing up the on premise data in clouds. Data is stored in encrypted mode in both the
cases. Windows Azure offers a very effective and reliable backup service to clients and
ensures they don’t face inconvenience in case of hardware failures.
Media
This service addresses multiple concerns related to uploading media and making it
available to end users easily. Users can manage tasks related to the media like encoding,
ad insertion, streaming, etc. easily.
Commerce
Windows Azure offers the opportunity to users to buy or sell applications and data through
their platform. The applications are put in the marketplace or Azure store from where they
can be accessed and bought by other users.
Software Development Kit (SDK)
Azure applications can be produced by the developers in various programming languages.
Microsoft currently provides language-specific SDKs for Java, .NET, PHP, Node.js, Ruby,
and Python. There is also a general Windows Azure SDK that supports language, such as
C++.

Microsoft Azure
15
In the last chapter, we explained how to create an Azure account. In this chapter, you will
find step by step explanation of each component:
Step 1: First, login in to your Azure account.
Step 2: Click ‘New’ at the left bottom corner and drag your cursor to ‘Compute‘.
Now you will see a list of models under Compute Model as shown in the following image.
Create a Web App
Step 1: Click Web App.
Step 2: Click Quick Create and enter the URL and choose a service plan from the dropdown
list as shown in the following image.
4. Compute Module

Microsoft Azure
16
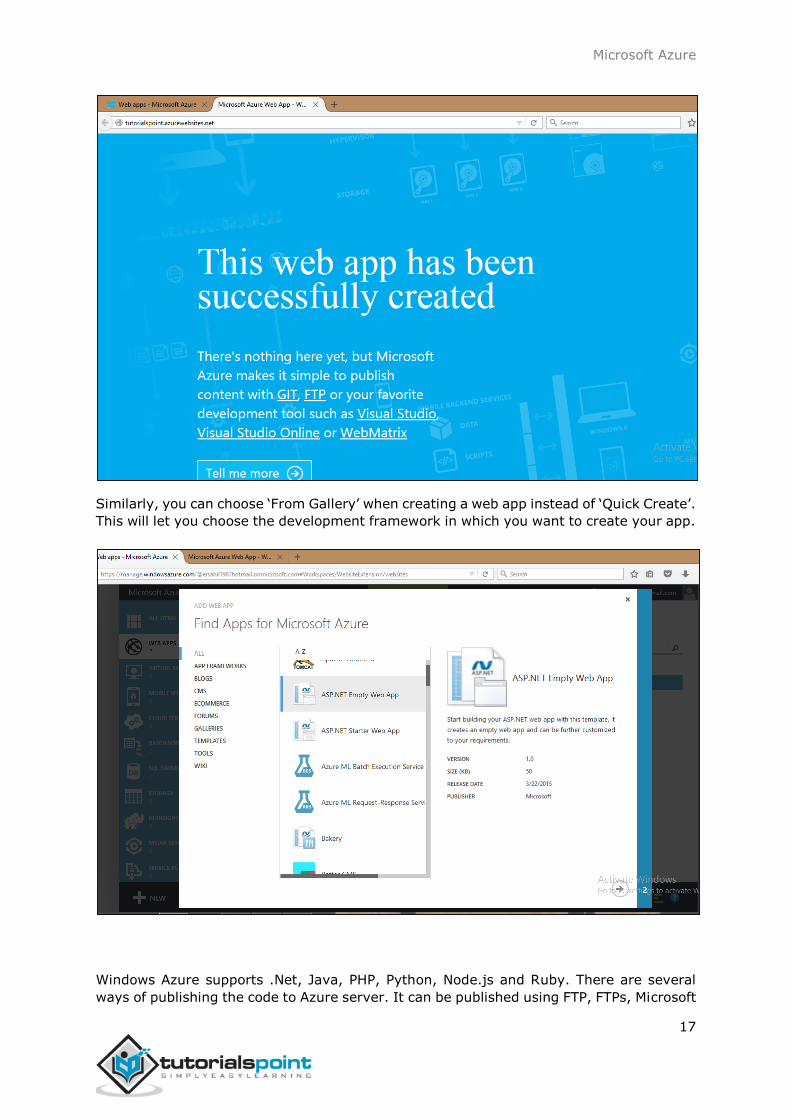
When you go back to the main screen, it will show the website just created. And when you
click the website URL, it will take you to the website.
The following image shows how your website will look when you click the URL.
Microsoft Azure
17
Similarly, you can choose ‘From Gallery’ when creating a web app instead of ‘Quick Create’.
This will let you choose the development framework in which you want to create your app.
Windows Azure supports .Net, Java, PHP, Python, Node.js and Ruby. There are several
ways of publishing the code to Azure server. It can be published using FTP, FTPs, Microsoft

Microsoft Azure
18
Web Deploy technology. Various source control tools such as GitHub, Dropbox and
Codeplex can also be used to publish the code. It provides a very interactive interface to
keep track of changes that have been published already and also unpublished changes.
Create a Virtual Machine
Step 1: Click on ‘Virtual Machine’ from the list.
Step 2: Then click ‘From Gallery’.
Step 3: Choose the Operating System or Program you want to run.
Microsoft Azure
19
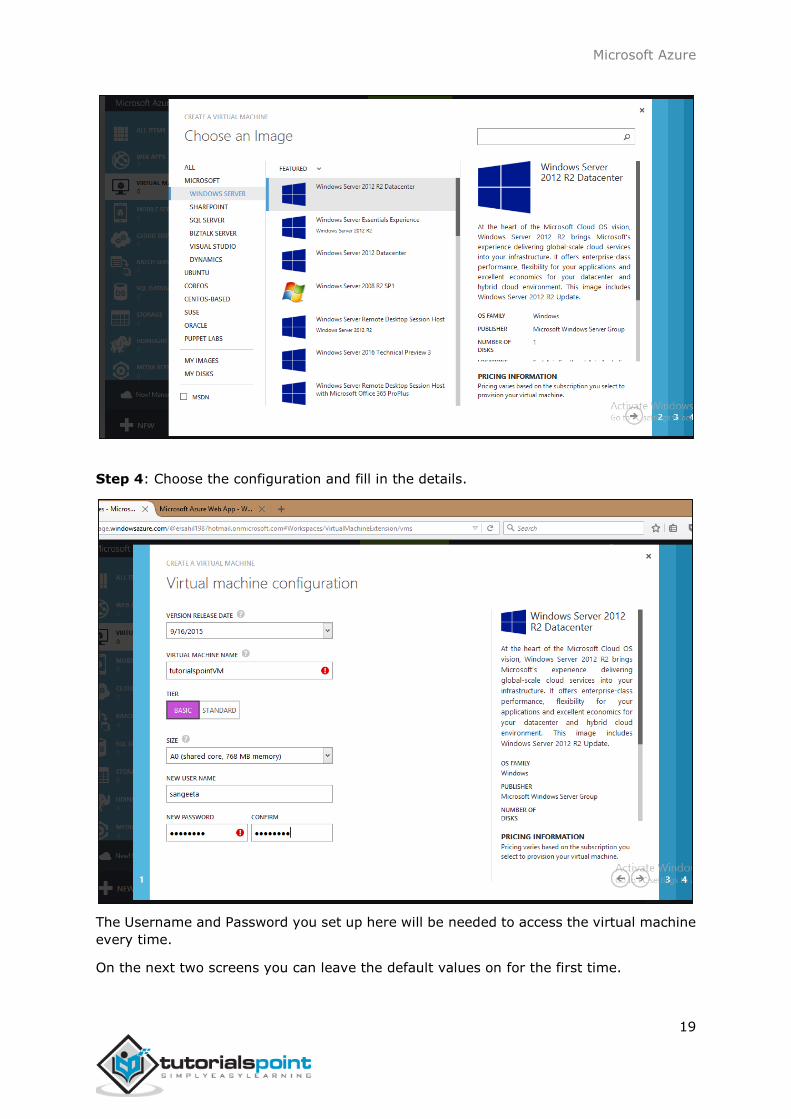
Step 4: Choose the configuration and fill in the details.
The Username and Password you set up here will be needed to access the virtual machine
every time.
On the next two screens you can leave the default values on for the first time.

Microsoft Azure
20
Step 5: The virtual machine just created will be displayed when you click on ‘Virtual
Machine’ on the left panel as shown in following image. It might take a few minutes to
show up.

Microsoft Azure
21
Step 6: Once the machine is created you can connect to it by clicking on the connect icon
displayed at the bottom of the screen. It will save a .rpd file on your machine as shown in
the following image. Chose ‘save file’ on the screen and it will save in ‘downloads’ or the
in the set location on your machine.
Step 7: Open that .rpd file and you can connect to the VM by filling in the credentials into
the following screen.
You can also use your own image by capturing the image of an existing virtual machine or
virtual hard drive. Virtual machines are beneficial in several ways.

Microsoft Azure
22
A user can try new operating system without actually installing them.
A VM can be deleted when you are done with the operating system.
New versions of an operating system can be tried and tested before the user installs
them on the machine.
VM provides a very economical and hassle free way of using a development
framework or a tool that runs on specific version of OS.
Creating a Mobile Service
Mobile services compute hosting model is optimized to provide a cloud backend for
applications that run on mobile devices. For creating a mobile service:
Step 1: Select Mobile services under Compute and click on create. A new window will be
open as shown in the following image.
Step 2: Fill in the URL. Select the database, region and backend.
Step 3: Tick the check box if you want to configure the advance push settings. This option
allows us to configure our Mobile Service to use an existing notification hub or specify the
name of a new one. If you leave this checkbox unmarked, a new hub will be created in a
new namespace with a default name.
Creating Batch Service
Batch service is needed when a large scale application is run and a parallel high performing
computing is required. The developers can create batches to run a task parallel that eases
the workload at no extra cost. Azure charges for only the virtual machines which are being

Microsoft Azure
23
used. They can schedule a task, put them in queues and manage the workload in cloud.
Batch creation does not involve setting up a separate VM, cluster or job scheduling.
To creating a batch service follow the similar steps for creating other services under
Compute model. The following image shows how a batch service can be created quickly.
Once you have created a batch service, you can see the details by selecting it from the
left panel. The following image pops up on the screen.

Microsoft Azure
24
Fabric Controller is a significant part of Windows Azure architecture. When thinking of the
components or services provided by Windows Azure, we wonder how all this works and
what is happening in clouds. It seems very complex from our end. Let us look into the
physical architecture of these services to have a better understanding of Fabric Controller.
Inside the datacenter, there are many machines or servers aggregated by a switch. We
can say that fabric controller is a brain of the azure service that analyses the processes
and makes decisions. Fabrics are group of machines in Microsoft’s datacenter which are
aggregated by a switch. The group of these machines is called cluster. Each cluster is
managed and owned by a fabric controller. They are replicated along with these machines.
It manages everything inside those machines, for e.g., load balancers, switches, etc. Each
machine has a fabric agent running inside it and fabric controller can communicate with
each fabric agent.
5. Fabric Controller

Microsoft Azure
25
When selecting a virtual machine offered by Windows Azure services, there are five options
to choose from. The configuration is as follows:
Memory CPU Instance Storage
Extra Small 768 MB Single core 1.0 GHz 20 GB
Small 1.75 GB Single core 1.6 GHz 225 GB
Medium 3.5 GB Dual core 1.6 GHz 490 GB
Large 7 GB Four core 1.6 GHz 1,000 GB
Extra Large 14 GB Eight core 1.6 GHz 2,040 GB
When a user chooses one of the virtual machine, the operating system, patch updates and
software updates are performed by fabric controller. It decides where the new application
should run which is one of the most important functions of Fabric Controller. It also selects
the physical server to optimize hardware utilization.
When a new application is published in Azure, an application configuration file written in
XML is also attached. The fabric controller reads those files in Microsoft datacenter and
makes the setting accordingly.
In addition to managing the allocation of resources to a specific application, it also monitors
the health of compute and storage services. It also makes the failure recoveries for a
system.
Imagine a situation where four instances of web role are running, and one of them dies.
The fabric controller will initiate a new instance to replace the dead one immediately.
Similarly, in case any virtual machine fails, a new one is assigned by the fabric controller.
It also resets the load balancers after assigning the new machine, so that it points to the
new machine instantaneously. Thus, all the intelligent tasks are performed by the Fabric
Controller in Windows Azure architecture.
Microsoft Azure
26
The Storage component of Windows Azure represents a durable store in the cloud.
Windows Azure allows developers to store tables, blobs, and message queues. The storage
can be accessed through HTTP. You can also create our own client; although Windows
Azure SDK provides a client library for accessing the Storage.
In this chapter, we will learn how to create a Windows Azure Storage account and use it
for storing data.
Creating Azure Storage Account
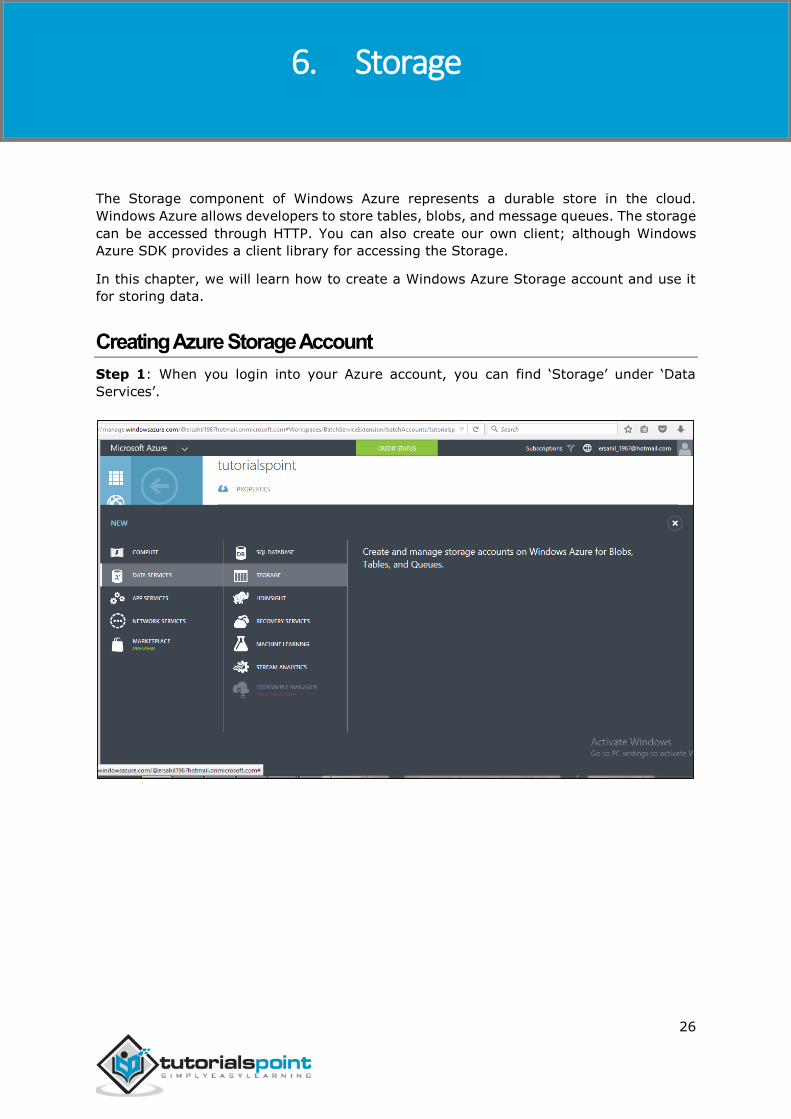
Step 1: When you login into your Azure account, you can find ‘Storage’ under ‘Data
Services’.
6. Storage
Microsoft Azure
27
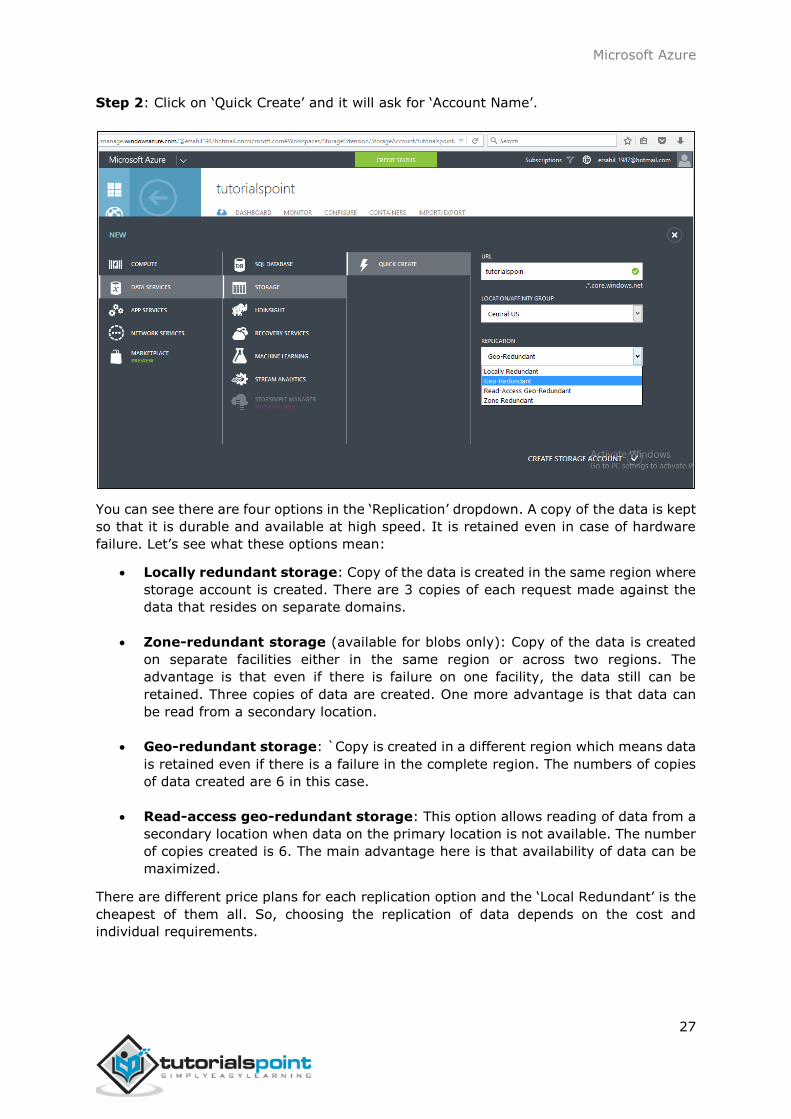
Step 2: Click on ‘Quick Create’ and it will ask for ‘Account Name’.
You can see there are four options in the ‘Replication’ dropdown. A copy of the data is kept
so that it is durable and available at high speed. It is retained even in case of hardware
failure. Let’s see what these options mean:
Locally redundant storage: Copy of the data is created in the same region where
storage account is created. There are 3 copies of each request made against the
data that resides on separate domains.
Zone-redundant storage (available for blobs only): Copy of the data is created
on separate facilities either in the same region or across two regions. The
advantage is that even if there is failure on one facility, the data still can be
retained. Three copies of data are created. One more advantage is that data can
be read from a secondary location.
Geo-redundant storage: `Copy is created in a different region which means data
is retained even if there is a failure in the complete region. The numbers of copies
of data created are 6 in this case.
Read-access geo-redundant storage: This option allows reading of data from a
secondary location when data on the primary location is not available. The number
of copies created is 6. The main advantage here is that availability of data can be
maximized.
There are different price plans for each replication option and the ‘Local Redundant’ is the
cheapest of them all. So, choosing the replication of data depends on the cost and
individual requirements.

Microsoft Azure
28
Storage Account Endpoints
Step 1: Click on the ‘Storage Account’ it will take you to the next screen.
Step 2: Click on ‘Dashboard’ from top horizontal menu.
Here you can see four items under services. You can create blobs, tables, queues and files
in this storage account.
There will a unique URL for each object. For example, here account name is ‘tutorialspoint’
then the default URL for blob is https://tutorialspoint.blob.core.windows.net. Similarly,
replace blob with table, queue and file in the URL to get the respective URLs. To access an
object in the location is appended in the URL. For example,
http://tutorialspoint.blob.core.windows.net/container1/blob1.
Generating an Access Key
Access key is used to authenticate the access to the storage account. Two access keys are
provided in order to access the account without interrupting it, in case, one key has to be
regenerated.
To get the Access Keys, click on ‘Manage Access Keys’ in your storage account. The
following screen will come up.

Microsoft Azure
29
Regenerating the key at regular intervals is advised for security reasons.
Managing Data to Azure Storage
How can you upload or download data to Azure store? There are many ways to do it, but
it can’t be done within the Azure portal itself. You will have to either create your own
application or use an already built tool.
There are many tools available for accessing the data in an explorer that can be accessed
by clicking on ‘Storage Explorer’ under ‘Get the Tools’ in your Azure storage account.
Alternatively, an application can also be built using Software Development Kit (SDK)
available in Windows Azure Portal. Using the PowerShell commands is also an option to
upload data. PowerShell is a command line application that facilitates administering and
managing the Azure storage. Preset commands are used for different tasks to manage the
storage.

Microsoft Azure
30
You can install PowerShell by going to ‘Downloads’ on the following screen in your account.
You will find it under Command-Line tools.
There are specific commands for each task. You can manage you storage account, create
a new account, and create a container. Additionally, blobs, tables, queues messages can
also be managed using PowerShell.

Microsoft Azure
31
Let us first understand what a Blob is. The word ‘Blob’ expands to Binary Large OBject.
Blobs include images, text files, videos and audios. There are three types of blobs in the
service offered by Windows Azure namely block, append and page blobs. Block blobs are collection of individual blocks with unique block ID. The block
blobs allow the users to upload large amount of data.
Append blobs are optimized blocks that helps in making the operations efficient.
Page blobs are compilation of pages. They allow random read and write
operations. While creating a blob, if the type is not specified they are set to block
type by default.
All the blobs must be inside a container in your storage. Here is how to create a container
in Azure storage.
Create a Container
Step 1: Go to Azure portal and then in your storage account.
Step 2: Create a container by clicking ‘Create new container’ as shown in following image.
There are three options in the Access dropdown which sets the permission of who can
access the blobs. ‘Private’ option will let only the account owner to access it. ‘Public
Container’ will allow anonymous access to all the contents of that container. ‘Public blob’
option will set open access to blob but won’t allow access to the container.
7. Blobs

Microsoft Azure
32
Upload a Blob using PowerShell
Step 1: Go to ‘Windows PowerShell’ in the taskbar and right-click. Choose ‘Run ISE as
Administrator’.
Step 2: Following command will let you access your account. You have to change the
fields highlighted in all the commands.
$context = New-AzureStorageContext -StorageAccountName tutorialspoint -StorageAccountKey iUZNeeJD+ChFHt9XHL6D5rkKFWjzyW4FhV0iLyvweDi+Xtzfy76juPzJ+mWtDmbqCWjsu/nr+1pqBJjrdOO2+A==
Step 3: Run the following command. This will get you the details of you Azure account.
This will make sure that your subscription is all set.
Get-AzureSubscription
Step 4: Run the following command to upload your file.
Set-AzureStorageBlobContent -Blob Montiorlog.png -Container images -File "E:\MyPictures\MonitorLog.png" -Context $context -Force
Step 5: To check if the file is uploaded, run the following command.

Microsoft Azure
33
Get-AzureStorageBlob -Container $ContainerName -Context $ctx | Select Name
Download a Blob
Step 1: Set the directory where you want to download the file.
$localTargetDirectory = "C:\Users\Sahil\Downloads"
Step 2: Download it.
$BlobName = "Montiorlog.png" Get-AzureStorageBlobContent -Blob $BlobName -Container $ContainerName -Destination $localTargetDirectory -Context $ctx
Remember the following:
* All command names and file names are case sensitive.
* Commands should be in one line or should be continued in the next line by appending `
in the preceding line (`is continuation character in PowerShell)
Manage Blobs using Azure Storage Explorer
Managing blobs is pretty simple using ‘Azure Storage Explorer’ interface as it is just like
Windows files and folder explorer. You can create a new container, upload blobs, see them
in a listed format, and download them. Moreover, you can copy them to a secondary
location in a very simple manner with this interface. The following image makes the
process clear. As can be seen, once an account is added, we can select it from the
dropdown and get going. It makes operating Azure storage very easy.

Microsoft Azure
34
In the common language used by developers, a queue is a data structure used to store
data which follows First in-First out rule. A data item can be inserted from back of the
queue while it is retrieved from front. Azure queues are a very similar concept that is used
to store the messages in a queue. A sender sends the message and a client receives and
processes them. A message has few attributes attached to it, for example expiry time.
A client usually processes and deletes the message. Windows Azure service lets the
message to be stored for 7 days and later it gets deleted automatically, if it is not deleted
by the client. There can be one sender and one client or one sender and many clients or
many sender and many clients.
There are two services offered by Windows Azure for message queues. This chapter covers
Windows Azure queue. The other service is called ‘Service Bus queue’.
Decoupling the components is one of the advantages of message queue services. It runs
in an asynchronous environment where messages can be sent among the different
components of an application. Thus, it provides an efficient solution for managing
workflows and tasks. For example, a message to complete a task is sent from the front-
end of the application and is received by a backend worker, who then completes the task
and deletes the message.
Considerations
The messages in the storage queue are not replicated anywhere, that means there is only
one copy of your message. The maximum number of messages that can be processed are
20,000. The maximum size of a message can be 40 kb.
Managing Queues using PowerShell
Create a Queue
Step 1: Right-click on Windows PowerShell in the taskbar. Choose ‘Run ISE as
administrator’.
Step 2: Run the following command to access your account. Please replace the highlighted
part for your account.
$context = New-AzureStorageContext -StorageAccountName tutorialspoint -StorageAccountKey iUZNeeJD+ChFHt9XHL6D5rkKFWjzyW4FhV0iLyvweDi+Xtzfy76juPzJ+mWtDmbqCWjsu/nr+1pqBJjrdOO2+A==
Step 3: Specify the storage account in which you want to create a queue.
Set-AzureSubscription –SubscriptionName "BizSpark" -CurrentStorageAccount tutorialspoint
8. Queues

Microsoft Azure
35
Step 4: Create a Queue.
$QueueName = "thisisaqueue"
$Queue = New-AzureStorageQueue –Name $QueueName -Context $Ctx
Retrieve a Queue
$QueueName = "thisisaqueue"
$Queue = Get-AzureStorageQueue –Name $QueueName –Context $Ctx
Delete a Queue
$QueueName = "thisisaqueue"
Remove-AzureStorageQueue –Name $QueueName –Context $Ctx

Microsoft Azure
36
Insert a Message into a Queue
Step 1: Login to your account.
$context = New-AzureStorageContext -StorageAccountName tutorialspoint -StorageAccountKey iUZNeeJD+ChFHt9XHL6D5rkKFWjzyW4FhV0iLyvweDi+Xtzfy76juPzJ+mWtDmbqCWjsu/nr+1pqBJjrdOO2+A==
Step 2: Specify the storage account you want to use.
Set-AzureSubscription –SubscriptionName "BizSpark" -CurrentStorageAccount tutorialspoint
Step 3: Retrieve the queue and then insert the message.
$QueueName = "myqueue"
$Queue = Get-AzureStorageQueue -Name $QueueName -Context $ctx
if ($Queue -ne $null) {
$QueueMessage = New-Object -TypeName Microsoft.WindowsAzure.Storage.Queue.CloudQueueMessage -ArgumentList "my message is this"
$Queue.CloudQueue.AddMessage($QueueMessage)
}

Microsoft Azure
37
The ‘if’ condition in the script above checks if the queue specified exists or not.
Dequeue Next Message from Queue
Step 1: First connect to your account and specify the storage account, by running the
commands as shown in the above steps.
Step 2: Retrieve the queue.
$QueueName = "myqueue"
$Queue = Get-AzureStorageQueue -Name $QueueName -Context $ctx
$InvisibleTimeout = [System.TimeSpan]::FromSeconds(10)
Step 3: Dequeue the next message.
$QueueMessage = $Queue.CloudQueue.GetMessage($InvisibleTimeout)
Step 4: Delete the dequeued message.
$Queue.CloudQueue.DeleteMessage($QueueMessage)
Managing Queues using Azure Storage Explorer
Step 1: Select the storage account from the dropdown at the top right. Accounts will be
displayed if you have added them during your previous use. If not, you can add account
and it will ask for your credentials. After signing in, you will be logged into your account
in Azure Storage Explorer.
Step 2: You can add a new queue by selecting ‘Queues’ from the left panel and clicking
‘New’ as shown in the following image.

Microsoft Azure
38
Step 3: Enter the name of Queue and it is created in your storage account.
Step 4: Add and delete the messages by selecting the queue in the left panel.

Microsoft Azure
39
Storing a table does not mean relational database here. Azure Storage can store just a
table without any foreign keys or any other kind of relation. These tables are highly
scalable and ideal for handling large amount of data. Tables can be stored and queried for
large amount of data. The relational database can be stored using SQL Data Services,
which is a separate service.
The three main parts of service are:
Tables
Entities
Properties
For example, if ‘Book’ is an entity, its properties will be Id, Title, Publisher, Author etc.
Table will be created for a collection of entities. There can be 252 custom properties and
3 system properties. An entity will always have system properties which are PartitionKey,
RowKey and Timestamp. Timestamp is system generated but you will have to specify the
PartitionKey and RowKey while inserting data into the table. The example below will make
it clearer. Table name and Property name is case sensitive which should always be
considered while creating a table.
How to Manage Tables Using PowerShell
Step 1: Download and install Windows PowerShell as discussed previously in the tutorial.
Step 2: Right-click on ‘Windows PowerShell’, choose ‘Pin to Taskbar’ to pin it on the
taskbar of your computer.
Step 3: Choose ‘Run ISE as Administrator’.
Creating a Table
Step 1: Copy the following commands and paste into the screen. Replace the highlighted
text with your account.
Step 2: Login into your account.
$StorageAccountName = "mystorageaccount"
$StorageAccountKey = "mystoragekey"
$Ctx = New-AzureStorageContext $StorageAccountName -StorageAccountKey $StorageAccountKey
Step 3: Create a new table.
9. Tables

Microsoft Azure
40
$tabName = "Mytablename"
New-AzureStorageTable –Name $tabName –Context $Ctx
The following image shows a table being created by the name of ‘book’.
You can see that it has given the following end point as a result.
https://tutorialspoint.table.core.windows.net/Book
Similarly, you can retrieve, delete and insert data into the table using preset commands
in PowerShell.
Retrieve Table
$tabName = "Book"
Get-AzureStorageTable –Name $tabName –Context $Ctx
Delete Table
$tabName = "Book"
Remove-AzureStorageTable –Name $tabName –Context $Ctx
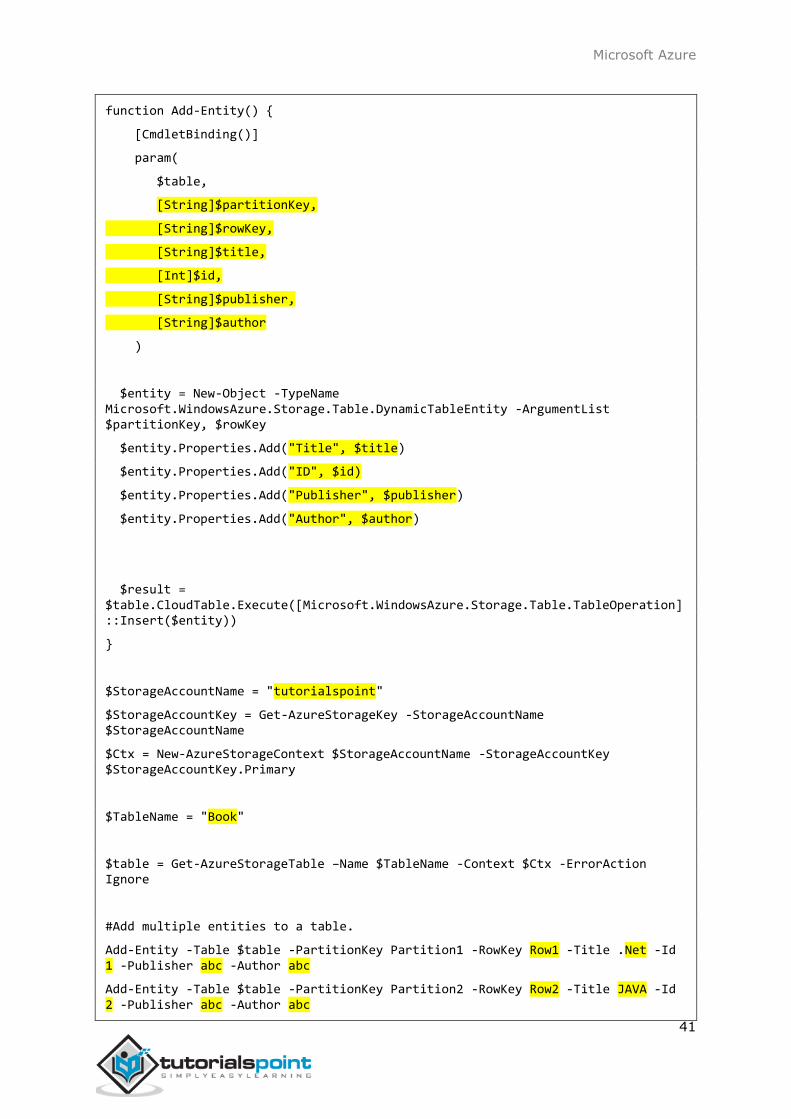
Insert rows into Table
Microsoft Azure
41
function Add-Entity() {
[CmdletBinding()]
param(
$table,
[String]$partitionKey,
[String]$rowKey,
[String]$title,
[Int]$id,
[String]$publisher,
[String]$author
)
$entity = New-Object -TypeName Microsoft.WindowsAzure.Storage.Table.DynamicTableEntity -ArgumentList $partitionKey, $rowKey
$entity.Properties.Add("Title", $title)
$entity.Properties.Add("ID", $id)
$entity.Properties.Add("Publisher", $publisher)
$entity.Properties.Add("Author", $author)
$result = $table.CloudTable.Execute([Microsoft.WindowsAzure.Storage.Table.TableOperation]::Insert($entity))
}
$StorageAccountName = "tutorialspoint"
$StorageAccountKey = Get-AzureStorageKey -StorageAccountName $StorageAccountName
$Ctx = New-AzureStorageContext $StorageAccountName -StorageAccountKey $StorageAccountKey.Primary
$TableName = "Book"
$table = Get-AzureStorageTable –Name $TableName -Context $Ctx -ErrorAction Ignore
#Add multiple entities to a table.
Add-Entity -Table $table -PartitionKey Partition1 -RowKey Row1 -Title .Net -Id 1 -Publisher abc -Author abc
Add-Entity -Table $table -PartitionKey Partition2 -RowKey Row2 -Title JAVA -Id 2 -Publisher abc -Author abc
Microsoft Azure
42
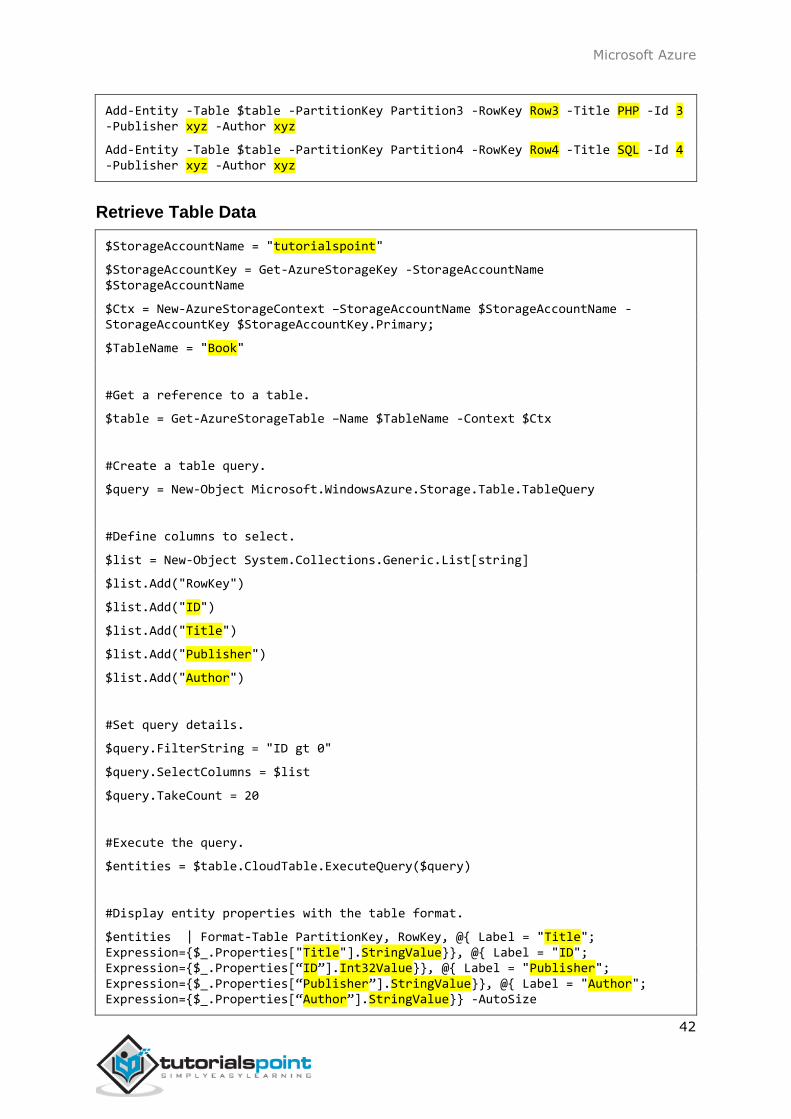
Add-Entity -Table $table -PartitionKey Partition3 -RowKey Row3 -Title PHP -Id 3 -Publisher xyz -Author xyz
Add-Entity -Table $table -PartitionKey Partition4 -RowKey Row4 -Title SQL -Id 4 -Publisher xyz -Author xyz
Retrieve Table Data
$StorageAccountName = "tutorialspoint"
$StorageAccountKey = Get-AzureStorageKey -StorageAccountName $StorageAccountName
$Ctx = New-AzureStorageContext –StorageAccountName $StorageAccountName -StorageAccountKey $StorageAccountKey.Primary;
$TableName = "Book"
#Get a reference to a table.
$table = Get-AzureStorageTable –Name $TableName -Context $Ctx
#Create a table query.
$query = New-Object Microsoft.WindowsAzure.Storage.Table.TableQuery
#Define columns to select.
$list = New-Object System.Collections.Generic.List[string]
$list.Add("RowKey")
$list.Add("ID")
$list.Add("Title")
$list.Add("Publisher")
$list.Add("Author")
#Set query details.
$query.FilterString = "ID gt 0"
$query.SelectColumns = $list
$query.TakeCount = 20
#Execute the query.
$entities = $table.CloudTable.ExecuteQuery($query)
#Display entity properties with the table format.
$entities | Format-Table PartitionKey, RowKey, @{ Label = "Title"; Expression={$_.Properties["Title"].StringValue}}, @{ Label = "ID"; Expression={$_.Properties[“ID”].Int32Value}}, @{ Label = "Publisher"; Expression={$_.Properties[“Publisher”].StringValue}}, @{ Label = "Author"; Expression={$_.Properties[“Author”].StringValue}} -AutoSize
Microsoft Azure
43
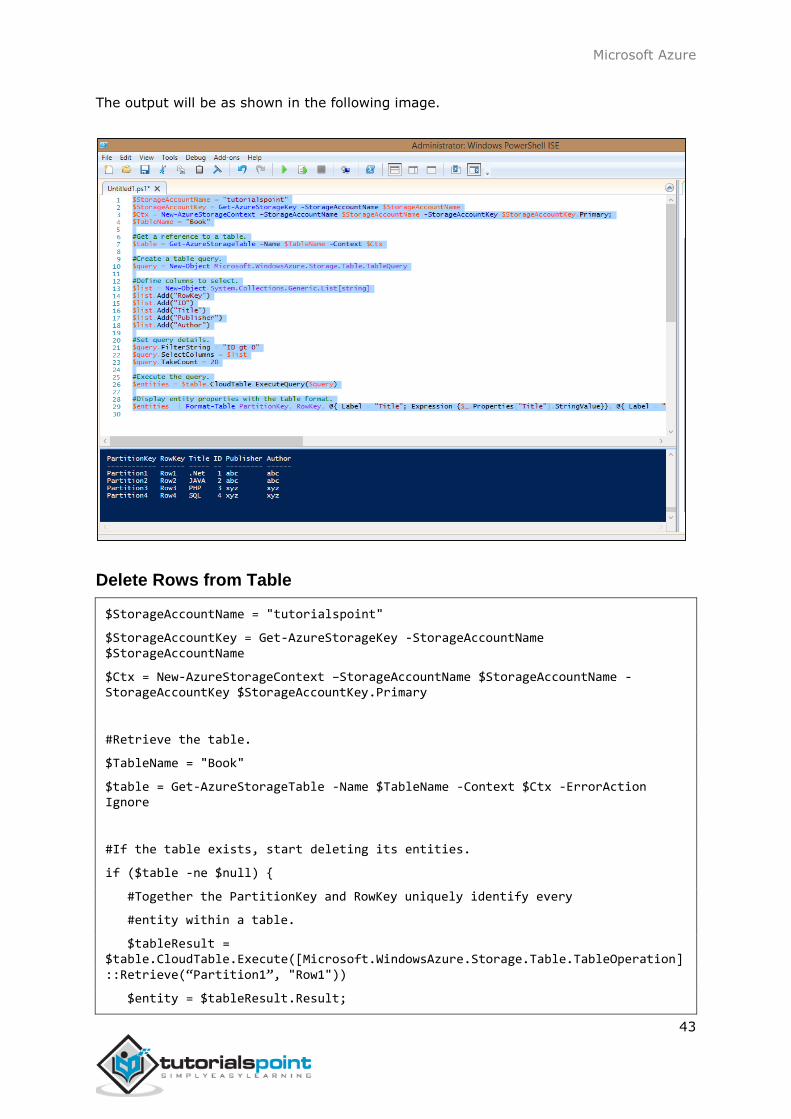
The output will be as shown in the following image.
Delete Rows from Table
$StorageAccountName = "tutorialspoint"
$StorageAccountKey = Get-AzureStorageKey -StorageAccountName $StorageAccountName
$Ctx = New-AzureStorageContext –StorageAccountName $StorageAccountName -StorageAccountKey $StorageAccountKey.Primary
#Retrieve the table.
$TableName = "Book"
$table = Get-AzureStorageTable -Name $TableName -Context $Ctx -ErrorAction Ignore
#If the table exists, start deleting its entities.
if ($table -ne $null) {
#Together the PartitionKey and RowKey uniquely identify every
#entity within a table.
$tableResult = $table.CloudTable.Execute([Microsoft.WindowsAzure.Storage.Table.TableOperation]::Retrieve(“Partition1”, "Row1"))
$entity = $tableResult.Result;

Microsoft Azure
44
if ($entity -ne $null)
{
$table.CloudTable.Execute([Microsoft.WindowsAzure.Storage.Table.TableOperation]::Delete($entity))
}
}
The above script will delete the first row from the table, as you can see that we have
specified Partition1 and Row1 in the script. After you are done with deleting the row, you
can check the result by running the script for retrieving rows. There you will see that the
first row is deleted.
While running these commands please ensure that you have replaced the accountname
with your account name, accountkey with your account key.
How to Manage Table using Azure Storage Explorer
Step 1: Login in to your Azure account and go to your storage account.
Step 2: Click on the link ‘Storage explorer’ as shown in purple circle in the following image.
Step 3: Choose ‘Azure Storage Explorer for Windows’ from the list. It is a free tool that
you can download and install on your computer.
Step 4: Run this program on your computer and click ‘Add Account’ button at the top.
Step 5: Enter ‘Storage Account Name’ and ‘Storage account Key’ and click ‘Test Access.
The buttons are encircled in following image.

Microsoft Azure
45
Step 6: If you already have any tables in storage you will see in the left panel under
‘Tables’. You can see the rows by clicking on them.
Create a Table
Step 1: Click on ‘New’ and enter the table name as shown in the following image.

Microsoft Azure
46
Insert Row into Table
Step 1: Click on ‘New’.
Step 2: Enter Field Name.

Microsoft Azure
47
Step 3: Select data type from dropdown and enter field value.
Step 4: To see the rows created click on the table name in the left panel.
Azure Storage Explorer is very basic and easy interface to manage tables. You can easily
create, delete, upload, and download tables using this interface. This makes the tasks very
easy for developers as compared to writing lengthy scripts in Windows PowerShell.

Microsoft Azure
48
Caching is one of the ways for performance improvement. Windows Azure uses caching to
increase the speed of cloud services. Content Delivery Management (CDN) puts stuff like
blobs and other static content in a cache. The process involves placing the data at
strategically chosen locations and caching it. As a result, it provides maximum bandwidth
for its delivery to users. Let’s assume an application’s source is far away from the end user
and many tours are taken over the internet to fetch data; the CDN offers a very competent
solution to improve performance in this case. Additionally, it scales the instant high load
in a very efficient manner.
Create a CDN
Step 1: Login in to your Azure Management Portal.
Step 2: Click on 'New' at bottom left corner.
Step 3: Select ‘APP Services’ then ‘CDN’.
Step 4: Click on ‘Quick Create’. The following screen will come up.
You will see three fields in the pop up:
Subscription: There will be a list of subscriptions you have subscribed to and you
can choose from one of them. In this demo, only one option was there in the
subscription dropdown, which was ‘BizSpark’, the current subscription.
10. CDN

Microsoft Azure
49
Origin Type: This dropdown will ask to select an origin type. The integrated service
will have an option of Web Apps, Cloud Services, Storage and Media Services.
Origin URL: This will show the URLs based on the chosen origin type in the
dropdown.
Step 5: Choose one of the options from each dropdown as needed and click ‘Create’. CDN
endpoint is created as show in the following image.
Create CDN for Custom Origin Links
In June 2015, CDN was updated with one more feature where users can specify a custom
origin. Earlier only Azure services could be linked to CDN, but now any website can be
linked to it using this service.
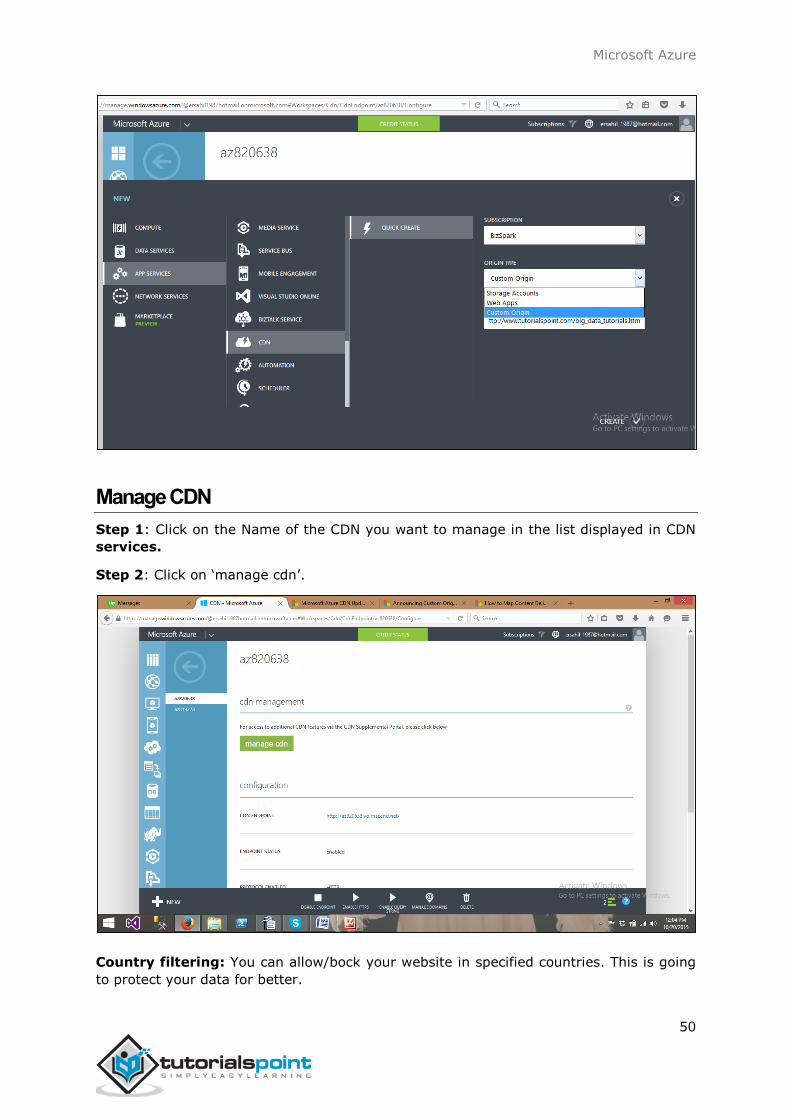
When we are create a CDN service, in the ‘Origin Type’ dropdown, there is an option
‘Custom Origin’ as shown in the following image, and then you can specify the link in the
URL field.
Microsoft Azure
50
Manage CDN
Step 1: Click on the Name of the CDN you want to manage in the list displayed in CDN
services.
Step 2: Click on ‘manage cdn’.
Country filtering: You can allow/bock your website in specified countries. This is going
to protect your data for better.

Microsoft Azure
51
Step 3: When you click on ‘manage cdn’ you will be taken to the following page in a new
tab of your browser.
Step 4: Click on ‘Country Filtering’ from menu items at the top of screen. Click on ‘Add
Country Filter’ button as shown in the following image.
Step 5: Specify the directory and select Allow/block.
Step 6: Select the country in the next screen and you are done.
Microsoft Azure
52
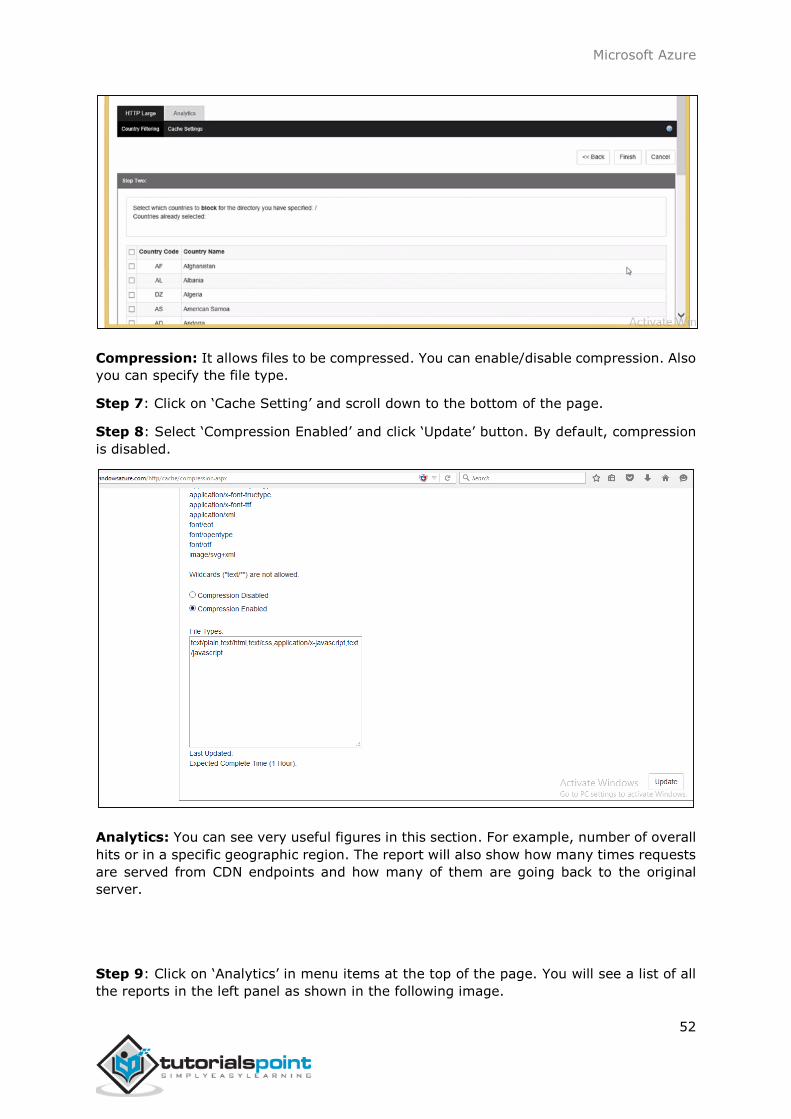
Compression: It allows files to be compressed. You can enable/disable compression. Also
you can specify the file type.
Step 7: Click on ‘Cache Setting’ and scroll down to the bottom of the page.
Step 8: Select ‘Compression Enabled’ and click ‘Update’ button. By default, compression
is disabled.
Analytics: You can see very useful figures in this section. For example, number of overall
hits or in a specific geographic region. The report will also show how many times requests
are served from CDN endpoints and how many of them are going back to the original
server.
Step 9: Click on ‘Analytics’ in menu items at the top of the page. You will see a list of all
the reports in the left panel as shown in the following image.

Microsoft Azure
53
Step 10: Additionally, you can download the report as an excel file by clicking on the excel
icon at the top right corner.
Map a Custom Domain Name
You might want to use a custom domain name instead of CDN endpoint that is auto-
generated by Azure service. Windows Azure has provided a new feature that allows you
to map a custom domain name to his application’s CDN endpoint. Let’s see how it is done
in Azure Portal.

Microsoft Azure
54
Step 1: Click on ‘Manage Domain’ Button on the bottom horizontal menu.
Step 2: Enter the custom URL in the text box and its done.

Microsoft Azure
55
Windows Azure is usually misinterpreted as just a hosting solution, but there is a lot more
that can be done using Windows Azure. It provides a platform to develop applications
using a range of available technologies and programming languages. It offers to create
and deploy applications using .net platform, which is Microsoft’s own application
development technology. In addition to .net, there are many more technologies and
languages supported. For example, Java, PHP, Ruby, Oracle, Linux, MySQL, Python.
Windows Azure applications are scaled by creating multiple instances of the application.
The number of instances needed by the application is specified by the developer while
hosting the applications. If traffic is increased or decreased on the website or web
application it can be managed easily by logging in to Windows Azure management portal
and specifying the instances. Load balancing can also be automated which would allow
Azure to make the decision itself as when to assign more resources to application.
Web applications support .net, java, python, php and node.js. Tasks such as scaling and
backups can be easily automated. A new feature called ‘webjobs’ is available, which is a
kind of batch processing service. Webjobs can also be scaled and scheduled. The mobile
application platforms supported are Xamarin iOS, Xamarin Android and IOS.
Azure platform is developed in such a way that developers need to concentrate on only
the development part and need not worry about other technical stuff outside their domain.
Thus most of the administrative work is done by Azure itself.
A marketplace is also set by Azure where its customers can buy applications and services.
It is a platform where customers can search applications and deploy them in an easier
way. Azure marketplace is available in 88 countries at present. An application purchased
from the marketplace can be easily connected to the local development environment by
the application developers. The pricing is done using 5 different models, which includes
usage-based and monthly fee. Some of the applications are even free of charge.
11. Applications

Microsoft Azure
56
Security is about managing the access of users to the organization’s applications,
platforms and portals. Active directory is used to manage the database of users in a
protected manner. The same kind of service is provided by Windows Azure to keep the
users and their password safe. Active directory is a feature that lets you create users,
manage their roles, grant access and delete them.
Creating an Active Directory
Step 1: Sign in to Azure Management Portal.
Step 2: Click ‘New’ and then click ‘App Services’.
Step 3: Click ‘Active Directory’ and then ‘Directory’.
Step 4: Click ‘Custom Create’.
12. Security

Microsoft Azure
57
Step 5: Enter the details and you are done. In the following image, ‘tutpoint’ is the domain
name. Enter a domain name which is a temporary DNS. Once its directory is created, you
can map it to your own domain.

Microsoft Azure
58
Mapping a Custom Domain
Since you have provided a temporary domain name, when creating a directory in Windows
Azure, you can map it to your own domain using this functionality.
Step 1: Click on the directory name in the list of your directory.
Step 2: Click on ‘Domains’ from the top menu items.
Step 3: Click ‘Add a Custom Domain’.

Microsoft Azure
59
Step 4: In the screen that pops up, enter the details. You can choose for ‘single sign in
option’ if needed.
Creating Users
Step 1: Click on ‘Add User’ button at the bottom of the screen.

Microsoft Azure
60
Step 2: The following screen pops up. You can create a new user or link an existing
Microsoft account. You can even import a user from other directory in Azure. Let’s choose
‘Create a new user’ here.
Step 3: Enter the user name in the following screen.
Step 4: Enter other details and choose the role for the user.
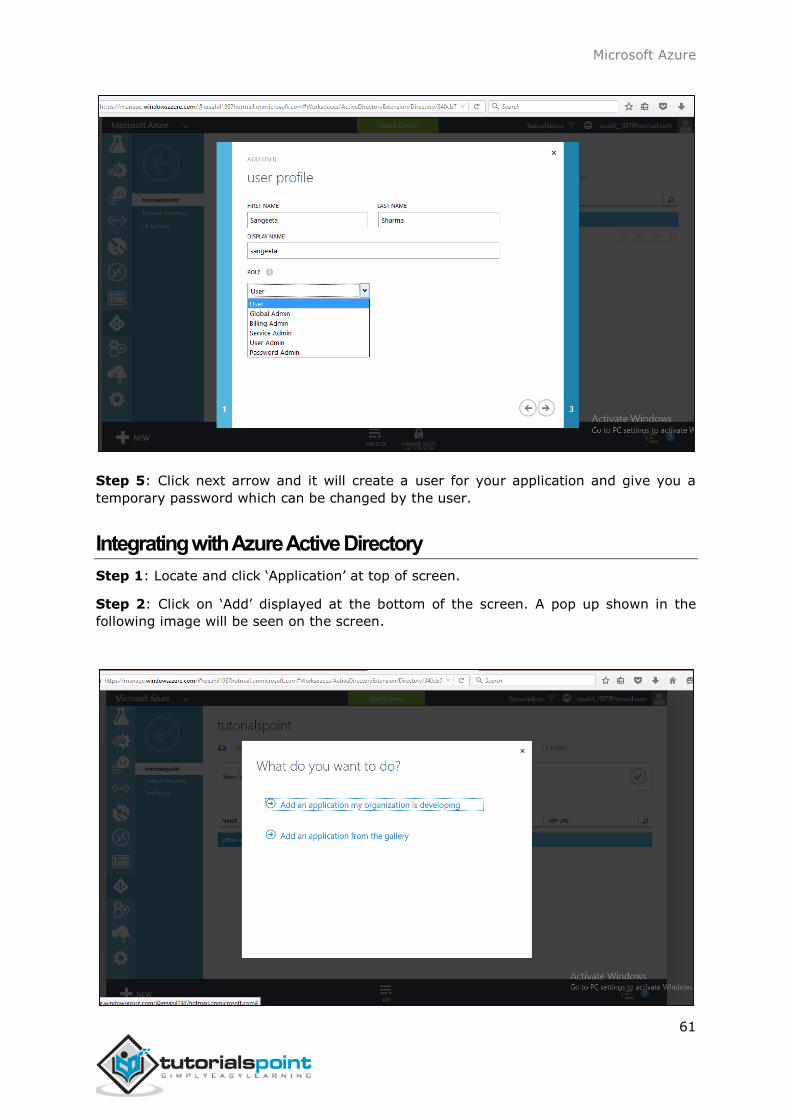
Microsoft Azure
61
Step 5: Click next arrow and it will create a user for your application and give you a
temporary password which can be changed by the user.
Integrating with Azure Active Directory
Step 1: Locate and click ‘Application’ at top of screen.
Step 2: Click on ‘Add’ displayed at the bottom of the screen. A pop up shown in the
following image will be seen on the screen.

Microsoft Azure
62
Step 3: If you click the first option, it will take you to the following screen. You can enter
the name of the application and follow the wizard.
Step 4: Similarly, if you choose the second option in ‘What do you want to do’ pop up, it
will let you choose an application from the gallery as shown in the following screen.

Microsoft Azure
63
Integrating On-Premise Active Directory
Azure active directory lets you run an active directory in cloud and also lets you connect
it to your on-premise active directory. Basically, it will replicate your user database
residing on your on-premise machine in cloud. It will also automatically synchronize
whenever changes are made on-premise.
Click on the ‘Directory Integration’ from the top menu. An on-premise directory can be
connected using the three steps as shown in the following image.

Microsoft Azure
64
Reports
This is a very useful feature of Active Directory as it shows different reports such as
number of times a user is signing in, or signing in from an unknown device can be seen
here.
Microsoft Azure
65
When we think of cloud, we imagine a place with large number of machines in big rooms.
There must be a place where all the data is stored. Microsoft has datacenters all over the
world from where Windows Azure services are managed. Datacenters are divided in
regions. The exact location of these datacenters is not revealed by Microsoft for obvious
security reasons.
Following are the 20 listed regions as can also be seen in the image.
Central US
East US
East US 2
US Gov Iowa
US Gov Virginia
North Central US
South Central US
West US
North Europe
West Europe
East Asia
Southeast Asia
Japan East
Japan West
Brazil South
Australia East
Australia Southeast
Central India
South India
13. Datacenters

Microsoft Azure
66
How to Choose the Right Data Center for Your Application
When creating Windows Azure application, whether it is mobile application, web application
or database storage it asks to specify the region. Region here specifies a regional
datacenter.
Performance: You should select the nearest datacenter to the users of your application.
The performance can be affected by the relative location of the users who want to access
the application. If a user is closer to the datacenter, the performance will be better.
Cost: The price of hosting the application may also increase or decrease depending upon
the datacenter you choose. Price actually can vary according to the database hosting
location or any other service being used by the application. You should choose the same
location for all the services that are being used by your application. For example, database
or any media service. If they are kept in separate datacenter there will be charges per
transaction, but anything extra won’t be charged if they are kept at the same datacenter.
Legal Aspect: Laws vary from country to country and restrictions could be enforced in
some regions on what information can be shared and what cannot.

Microsoft Azure
67
Understanding the basic scenarios of Windows Azure will help us understand its use.
Additionally, it will help us understand the services offered. Three basic scenarios are
discussed here. In addition to the following scenarios, there can be many more ways of
using Azure services based on the needs of clients, but all the basic uses are covered in
this chapter.
Software Development
Software development is the most popular scenario of Windows Azure. The software is
developed and tested on local development fabric and then deployed in cloud of Windows
Azure. Azure hosts the web application and also the supporting processes, communicating
with other web services.
Testing of application in software development phase usually becomes too long for
developers, if they need to change the configurations of environment being used to host
the application. In Windows Azure, this is the not a problem as resources are absolutely
in their control and can be modified as needed by the application. Once a web application
is hosted in cloud of Windows Azure, it is ready to be used by the end users and
organizations.
Moreover, deploying the application is very easy in Windows Azure using the tools provided
by them. These tools are MS deploy, PowerShell, integration with Team Foundation Server
(TFS). The Visual Studio cloud project is also an easy option to deploy the application.
An application is tested in the staging environment and then it is deployed in the
production environment for end users to use it.
Enterprise Process Offloading
There are situations for an organization where they need to reduce loads from their on-
premise systems for a certain period of time or on a regular basis. This could be easily
achieved by using Windows Azure services at a very low cost. Clients have to pay for only
those transactions made on their application instead of paying for entire hardware and
software.
This is an extremely cost-efficient way of using new resources for the organization. Azure
in this context offers quite quick growth to businesses by extending resources on cloud
when needed.
Enterprise Application Integration
This is commonly called as EAI scenario. Let us think of a scenario, when there is need for
two different organizations to send and receive data between applications which is further
processed by those applications. The cross-enterprise application integration can be done
using Windows Azure. The service is called BizTalk service, which facilitates B2B messaging
between on-premise or on-cloud applications of different organizations.
14. Scenarios

Microsoft Azure
68
This service enables a connection between applications even if they are following different
transport protocols. The process also includes validating and extracting the properties as
required by the application at the receiving end. In a normal scenario, where
communication is needed between applications of two organizations, the interaction will
have to bypass the firewall by completing the due process. However, in the service offered
by Windows Azure, the communication between applications does not need to bypass the
organization’s firewall.
Microsoft Azure
69
Part 2: Azure Advanced

Microsoft Azure
70
As the name suggests this is a portal to manage Azure services, which was released in
2012. This is a platform provided by Microsoft for its Azure clients where they can see,
manage and buy the services offered by Azure. A different portal called ‘Azure Preview
Portal’ was released by Azure team in 2014, which makes it easier to access the platform
on mobiles and tablets. However, features are more or less same in both the portals.
To access the management portal:
Step 1: Go to https://manage.windowsazure.com
Step 2: Sign in with your Hotmail or live ID. If you don’t have Azure accounts, sign up for
one. You will get a free trial and you can explore, learn and create your own applications
using Windows Azure.
15. Management Portal

Microsoft Azure
71
The following screen will appear.
Since here we have an application already running, you can see a list of them. Your account
will be empty for the first time. Left panel categorizes the application and the middle part
lists all the application in the account.
Create a New Application
Step 1: Click on the ‘New’ left bottom corner.

Microsoft Azure
72
Step 2: Following screen will come up and you can choose what you want to create.
Check Credit and Subscriptions
Step 1: Click on ‘Credit’ in the green block at the top of the screen.

Microsoft Azure
73
Step 2: Click on ‘View more details’. It will take you to the following screen. This screen
will show you all the details of your subscription, spending, and data usage.
As the spending limit is set here, it says ‘Remove Spending Limit’. If the limit would not
have been set, it would have said ‘Set Spending Limit’. This way you can set a spending
limit for you. Your services will be stopped once you reach the spending limit.
If you scroll down on the page in the above image, you can see all that is available with
your subscription and see the details on the right side.

Microsoft Azure
74
You are absolutely in control of your spending. The green block in which ‘Credit’ button is
displayed will change color if you are about to fall short of your credit. This is calculated
by your average per day spending and it would tell you in how many days your credit is
going to get over.
Add a New Subscription
Step 1: Click on your account e-mail id or on the picture at the top right corner.
Step 2: Click on ‘View my bill’ in the list.

Microsoft Azure
75
Step 3: It will take you the following screen. Click on ‘add subscription’.

Microsoft Azure
76
Step 4: Choose the subscription from the list in the following screen.
Azure Preview Portal
Step 1: Click on your account e-mail at the top right corner.

Microsoft Azure
77
Step 2: Select ‘Switch to Azure Preview Portal’.
Step 3: The following screen will appear. All the functionalities are same. ‘Azure Preview
Portal’ is built for mobile and tablet screen with a responsive design.

Microsoft Azure
78
You can create virtual network on cloud or you can also connect to the on-premise local
network to the cloud network in Windows Azure. This tutorial will first explain how to create
a cloud only network.
Creating a Virtual Network in Clouds Only
Step 1: Login in to Azure Management Portal.
Step 2: Click on ‘New’ at the bottom left corner.
Step 3: Click on ‘Network Services’ and then ‘Virtual Network’.
Step 4: Click on ‘Quick Create’.
Step 5: Enter the name and leave all other fields as they are except location. You don’t
need to specify anything in this case since everything will be decided by Azure itself.
Step 6: Click on ‘Create a Virtual Network’ and it is done.
16. Create Virtual Network

Microsoft Azure
79
Creating a Virtual Network in Cloud Only (Advanced Settings)
Step 1: Click on ‘custom create’ instead of ‘quick create’ when creating a new virtual
network and the following screen will appear.
Step 2: Enter the name of the ‘Network’ and choose a location. You will see that it will
draw an image at the bottom.

Microsoft Azure
80
DNS Server Name is optional to enter as we are creating a cloud only network. Also, leave
the options ‘Point to Site connectivity’ and ‘Site to Site connectivity’ as they are. The
subsequent chapters will have a demo on configuration of these two options.
Step 3: Click next and leave the default values on the following screen.
Step 4: Click the next arrow and a virtual network is created.
You can add DNS servers and local network even after creating a virtual network.

Microsoft Azure
81
A quick process of creating a virtual machine was included in the chapter ‘Compute
Module’. This chapter contains the detailed process including how to configure virtual
machines.
Quick Create
Step 1: Login to Azure Management Portal.
Step 2: Locate and click on ‘Virtual Machines’ in the left panel and then click on ‘Create a
Virtual Machine’.
17. Deploying Virtual Machines
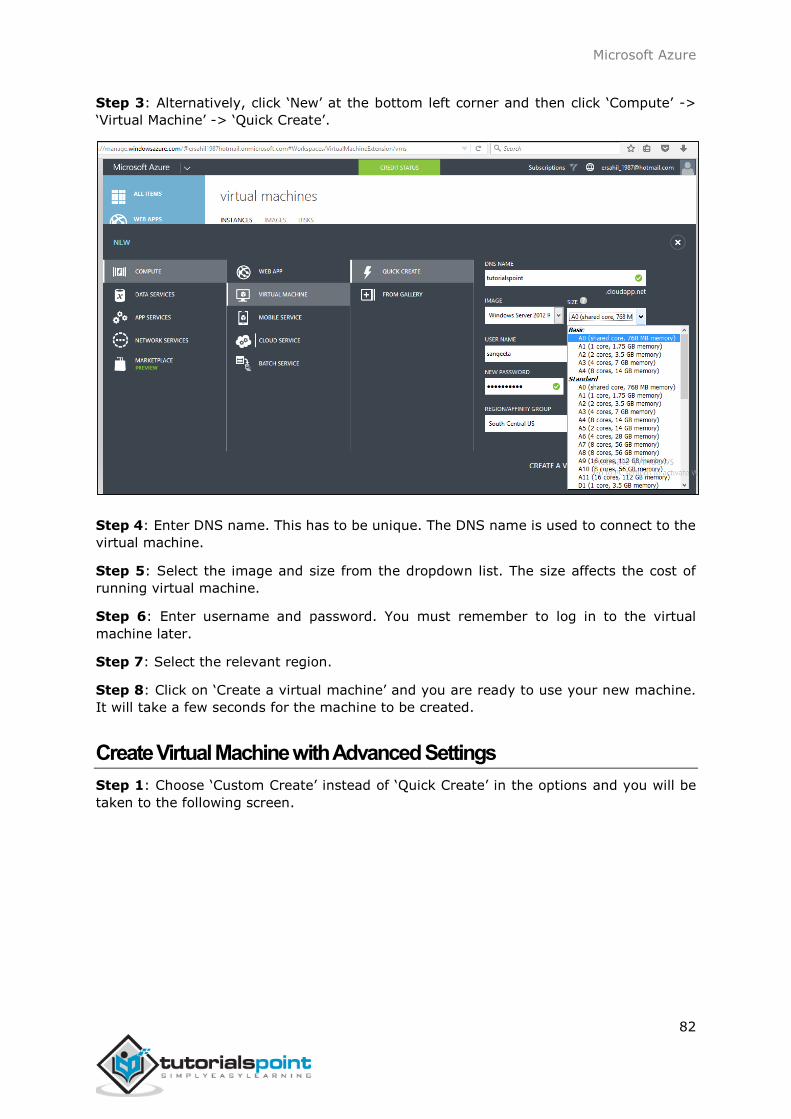
Microsoft Azure
82
Step 3: Alternatively, click ‘New’ at the bottom left corner and then click ‘Compute’ ->
‘Virtual Machine’ -> ‘Quick Create’.
Step 4: Enter DNS name. This has to be unique. The DNS name is used to connect to the
virtual machine.
Step 5: Select the image and size from the dropdown list. The size affects the cost of
running virtual machine.
Step 6: Enter username and password. You must remember to log in to the virtual
machine later.
Step 7: Select the relevant region.
Step 8: Click on ‘Create a virtual machine’ and you are ready to use your new machine.
It will take a few seconds for the machine to be created.
Create Virtual Machine with Advanced Settings
Step 1: Choose ‘Custom Create’ instead of ‘Quick Create’ in the options and you will be
taken to the following screen.
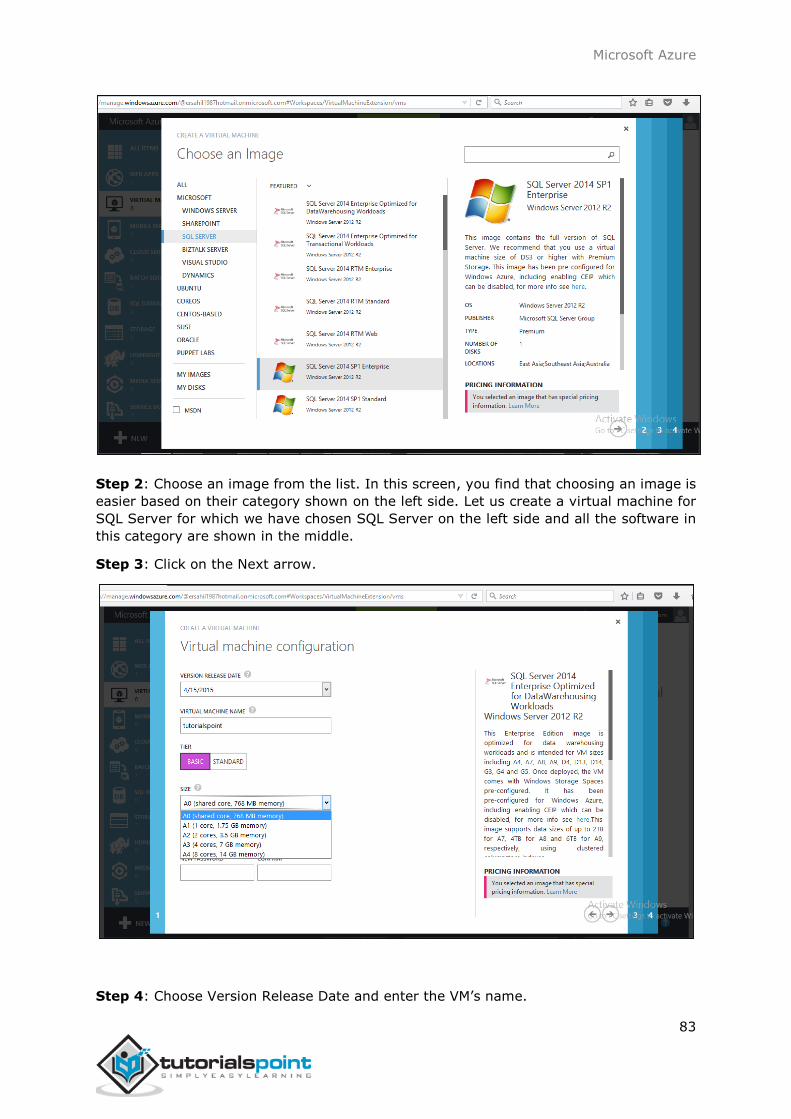
Microsoft Azure
83
Step 2: Choose an image from the list. In this screen, you find that choosing an image is
easier based on their category shown on the left side. Let us create a virtual machine for
SQL Server for which we have chosen SQL Server on the left side and all the software in
this category are shown in the middle.
Step 3: Click on the Next arrow.
Step 4: Choose Version Release Date and enter the VM’s name.

Microsoft Azure
84
Step 5: Select the Tier. The size dropdown would change items according to tier. In the
basic version, you will get only first 5 options, while in the standard version you will get
more options. It should be according to you and you image’s requirements. For example,
in this case let’s choose SQL server. It requires minimum A4 machine with 8 cores and
14GB memory.
Step 6: Enter the username and password and click Next arrow.
Step 7: Enter DNS name which should be unique as mentioned earlier and select the
region.
Under the storage account, it will display the storage accounts that you have already
created. As seen in the following screen, an account name is shown in the dropdown which
is a storage account created earlier. You can choose an already created account or even
use an automatically generated account.

Microsoft Azure
85
Step 8: Next is Availability set. This option lets you create a set of virtual machines that
will ensure that if a single point fails, it doesn’t affect your machine and keeps the work
going on. Let’s choose the option ‘none’ here.
The last option is End Points. End points are used to communicate with virtual machines
by other resources you can leave. In a subsequent chapter, we will provide a detailed
illustration to configure endpoints.
Step 9: Click on Next and the virtual machine will be created in a few seconds for you.
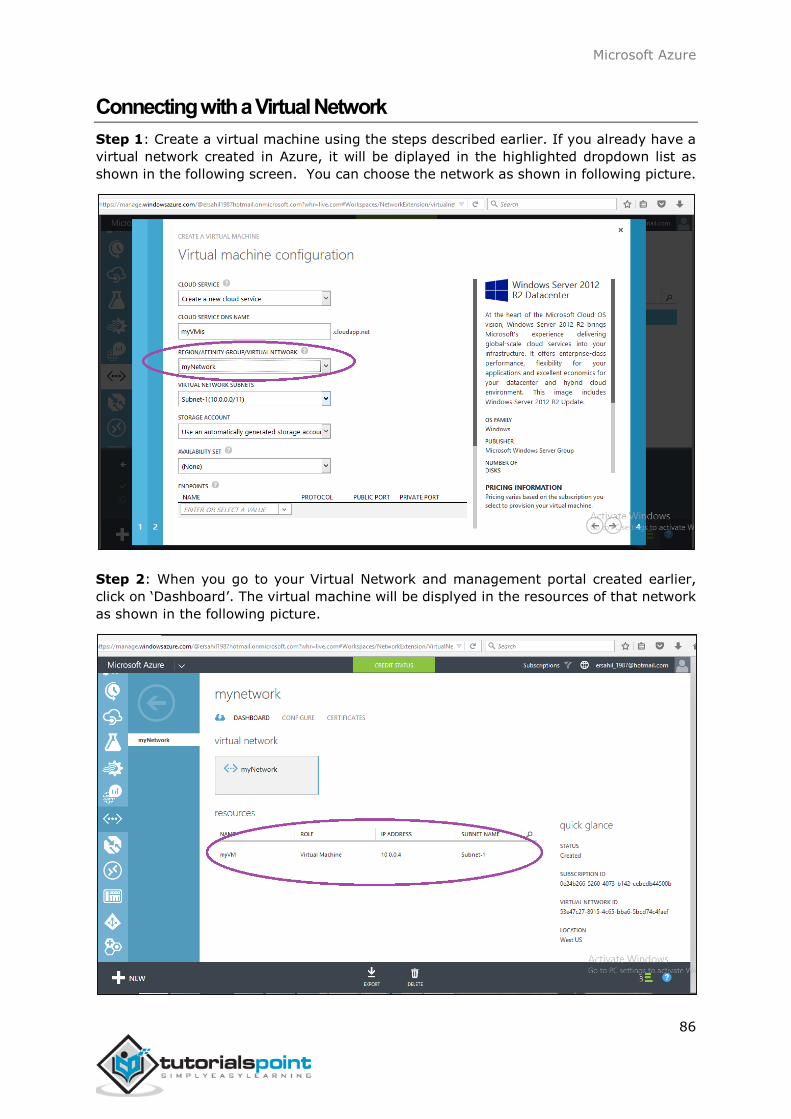
Microsoft Azure
86
Connecting with a Virtual Network
Step 1: Create a virtual machine using the steps described earlier. If you already have a
virtual network created in Azure, it will be diplayed in the highlighted dropdown list as
shown in the following screen. You can choose the network as shown in following picture.
Step 2: When you go to your Virtual Network and management portal created earlier,
click on ‘Dashboard’. The virtual machine will be displyed in the resources of that network
as shown in the following picture.

Microsoft Azure
87
Accessing the Virtual Machine
There is a step by step guide on connecting to VM in ‘Compute Module’ chapter earlier in
this tutorial. Please refer to it.
Considerations
While creating a virtual machine following considerations should be made:
Choose the location according to the user’s location to avoid any latency issues. It
is best to choose the region nearest to the physical location of end users.
You must go through the costs that will be incurred based on the size you choose
for the virtual machine beforehand, to make sure it is in control.
If you use the already created storage account you will be able to manage things
better.
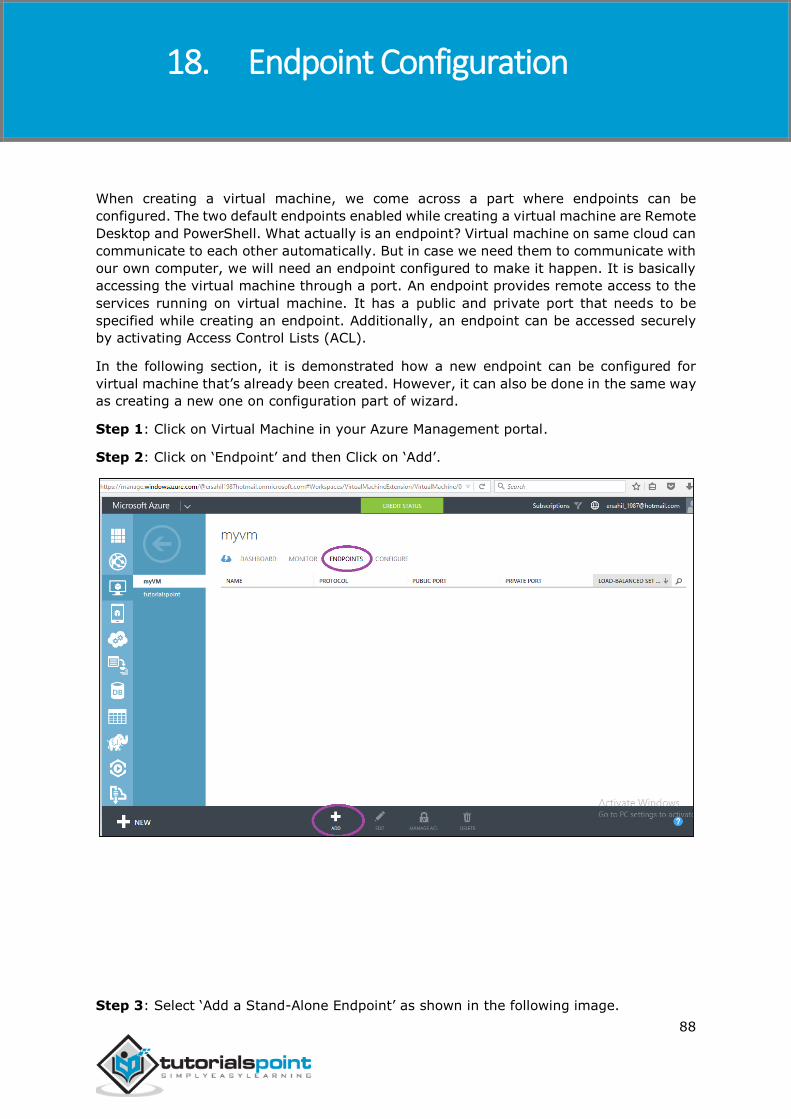
Microsoft Azure
88
When creating a virtual machine, we come across a part where endpoints can be
configured. The two default endpoints enabled while creating a virtual machine are Remote
Desktop and PowerShell. What actually is an endpoint? Virtual machine on same cloud can
communicate to each other automatically. But in case we need them to communicate with
our own computer, we will need an endpoint configured to make it happen. It is basically
accessing the virtual machine through a port. An endpoint provides remote access to the
services running on virtual machine. It has a public and private port that needs to be
specified while creating an endpoint. Additionally, an endpoint can be accessed securely
by activating Access Control Lists (ACL).
In the following section, it is demonstrated how a new endpoint can be configured for
virtual machine that’s already been created. However, it can also be done in the same way
as creating a new one on configuration part of wizard.
Step 1: Click on Virtual Machine in your Azure Management portal.
Step 2: Click on ‘Endpoint’ and then Click on ‘Add’.
Step 3: Select ‘Add a Stand-Alone Endpoint’ as shown in the following image.
18. Endpoint Configuration

Microsoft Azure
89
Step 4: Select the name from dropdown. Alternatively, you can enter a custom name.
Here let’s select Http from options. It will assign unused ports automatically. Or you can
enter it manually.
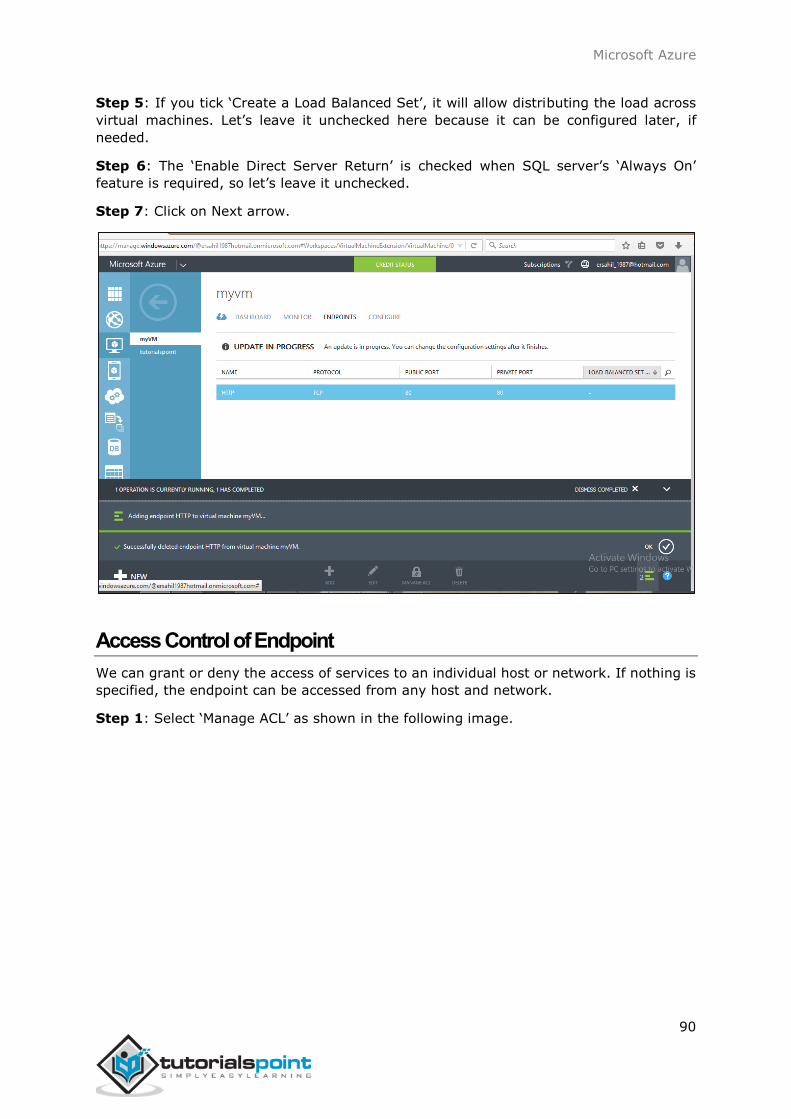
Microsoft Azure
90
Step 5: If you tick ‘Create a Load Balanced Set’, it will allow distributing the load across
virtual machines. Let’s leave it unchecked here because it can be configured later, if
needed.
Step 6: The ‘Enable Direct Server Return’ is checked when SQL server’s ‘Always On’
feature is required, so let’s leave it unchecked.
Step 7: Click on Next arrow.
Access Control of Endpoint
We can grant or deny the access of services to an individual host or network. If nothing is
specified, the endpoint can be accessed from any host and network.
Step 1: Select ‘Manage ACL’ as shown in the following image.

Microsoft Azure
91
Step 2: Enter access description.
Step 3: Enter Subnet Mask.
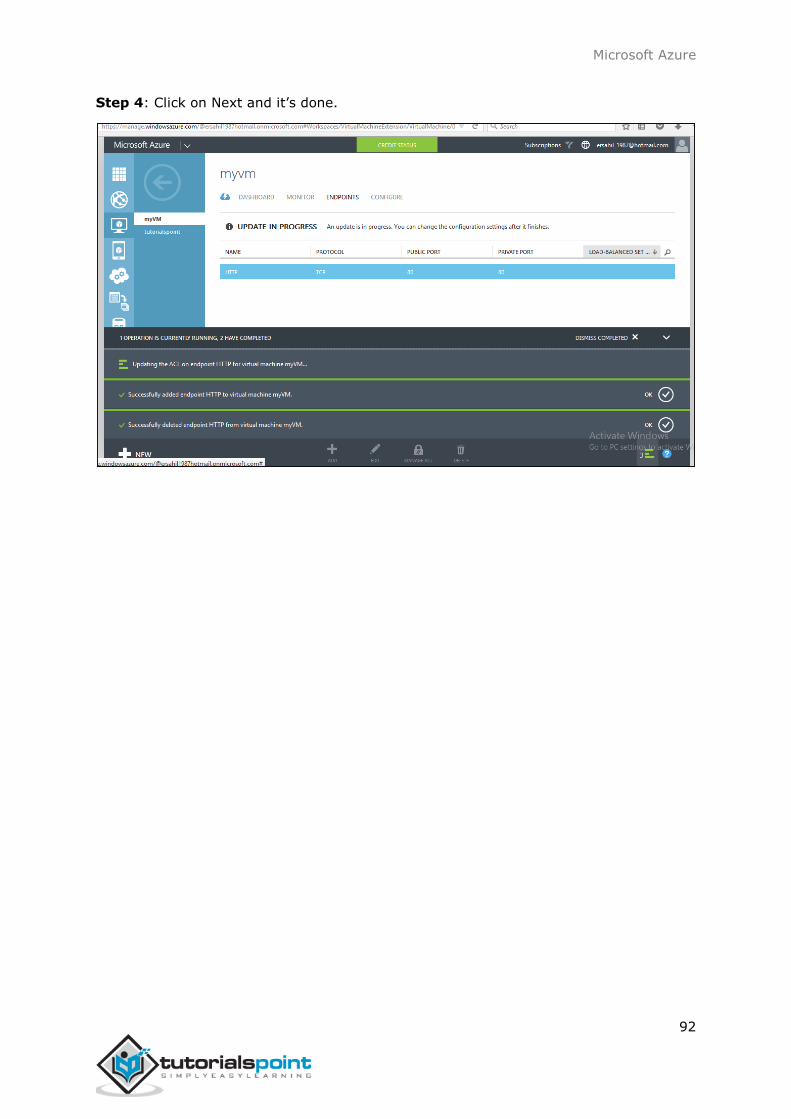
Microsoft Azure
92
Step 4: Click on Next and it’s done.

Microsoft Azure
93
In the last chapter, we saw how an endpoint can be created to access a virtual machine;
this is quite a tedious task. If a virtual machine in virtual network needs to be connected
with on-premise machine, the point-to-site connectivity is needed. Point-to-site
connectivity makes it very productive to work with remote virtual machines.
Basically, a machine on-premise is connected to virtual network using point-to-site
connectivity. However, we can connect up to 128 on-premise machines to virtual network
in Azure. The access to the virtual network in cloud is granted through a certificate. The
certificate has to be installed on each local machine that needs to be connected to the
virtual network.
Enabling Point-to-Site Connectivity on Existing Virtual Network
If you have already created a virtual network in Azure, you can access it in management
portal.
Step 1: Log in to Azure management portal.
Step 2: Click on ‘Networks’ in the left panel and select the network you want to work with.
Step 3: Click on ‘Configure’ as shown in the following image.
19. Point-to-Site Connectivity
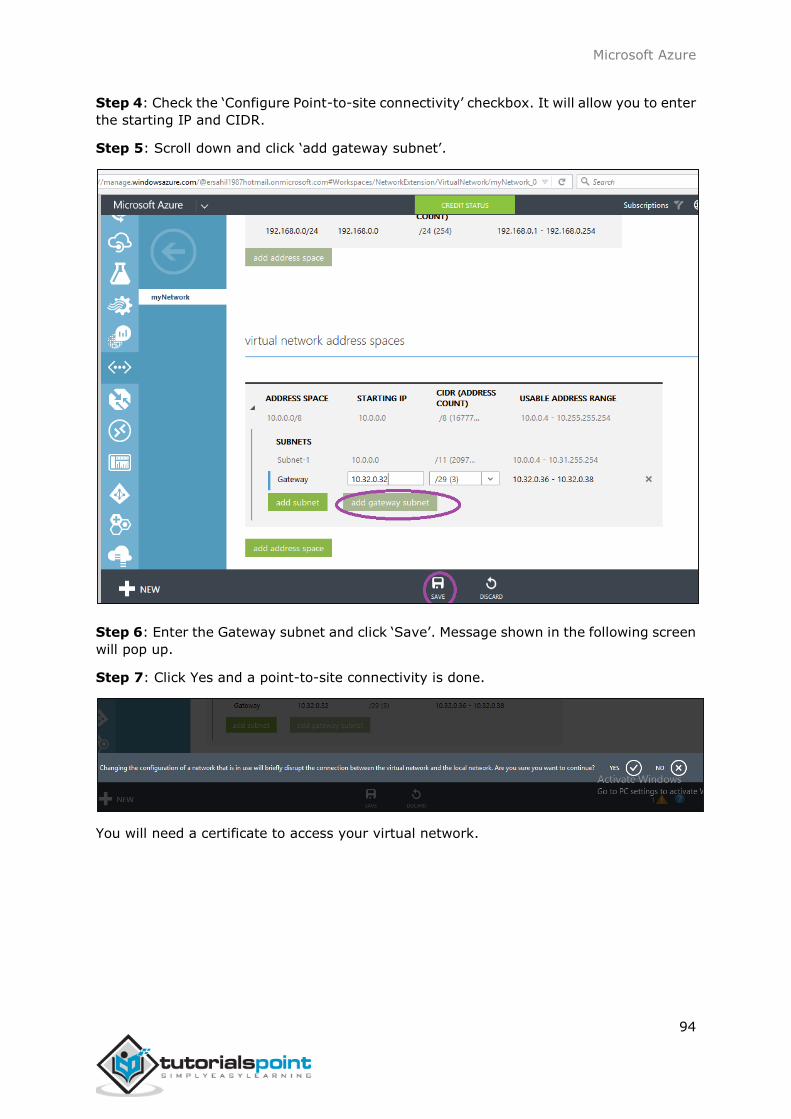
Microsoft Azure
94
Step 4: Check the ‘Configure Point-to-site connectivity’ checkbox. It will allow you to enter
the starting IP and CIDR.
Step 5: Scroll down and click ‘add gateway subnet’.
Step 6: Enter the Gateway subnet and click ‘Save’. Message shown in the following screen
will pop up.
Step 7: Click Yes and a point-to-site connectivity is done.
You will need a certificate to access your virtual network.

Microsoft Azure
95
Create a New Virtual Network with Point-to-site Connectivity
Step 1: Click New -> Network Services - > Virtual Network -> Custom Create.
Step 2: Enter Network’s name, select location and click on Next.

Microsoft Azure
96
Step 3: On the next screen, Select ‘Configure a point-to-site VPN’ and click next.
Step 4: You can select or enter starting IP and select CIDR.

Microsoft Azure
97
Step 5: Enter Subnet and click ‘Add Gateway Subnet’ as done earlier and enter the
required information.
Step 6: Point-to-Site connectivity is done.
Step 7: Click on the name of the network, as it is ‘MyNet’ in the above image.

Microsoft Azure
98
Step 8: Click on ‘Dashboard’ as shown in the following screen.
You will see that the gateway is not created yet. For it to happen, you will have to generate
a certificate first.
Generate Certificates
The point-to-site VPN supports only self-signed certificate.
Create a Certificate
Step 1: Go to the link ‘https://msdn.microsoft.com/en-
us/windows/desktop/bg162891.aspx’ or google ‘windows SDK for 8.1’. Then go to msdn
link or the version of Windows for which you want the tool.
Step 2: Download the encircled file as shown in the following image. It will be saved as
.exe file named sdksetup on your machine.

Microsoft Azure
99
Step 3: Run the file. While running the installation wizard, when you reach the following
screen uncheck the encircled part. By default they are checked.

Microsoft Azure
100
Step 4: After installation is complete, run Command Prompt as Administrator on your
computer.
Step 5: Enter the following commands one by one for creating root certificate
cd C:\Program Files (x86)\Windows Kits\8.1\bin\x64
makecert -sky exchange -r -n "CN=MyNet" -pe -a sha1 -len 2048 -ss My
First command will change the directory in command prompt. In the above command
change the highlighted part to the name of your network.
Step 6: Next enter the following command for creating client certificate.
makecert -n "CN=MyNetClient" -pe -sky exchange -m 96 -ss My -in "MyNet" -is my -a sha1
Step 7: Look for ‘mmc’ on your computer and run it.

Microsoft Azure
101
Step 8: Click ‘File’ and ‘Add/Remove Snap-in’.
Step 9: In the screen that pops up, click ‘Certificate’ and then on ‘add’.
Step 10: Select ‘My User Account’ and click on ‘Finish’.

Microsoft Azure
102
Step 11: Expand ‘Current User’ in the left panel, then ‘Personal’ and then ‘Certificates’.
You can see the certificates here.
Step 12: Right click on certificate and click ‘All Tasks’ and then ‘Export’.
Step 13: Follow the wizard. You will have to name the certificate and select a location to
save it.
Upload the Certificate
Step 1: Login to Azure management portal.
Step 2: Go to the network and click ‘Certificate’ and then click ‘Upload Root Certificate’.
Step 3: Click browse and select the location of the certificate you just created.

Microsoft Azure
103
Download the Client VPN Package
Client VPN Package will connect you to the network.
Step 1: Go to network’s dashboard in azure management portal.
Step 2: Scroll down and locate the following options at the right side of the screen.
Step 3: Select the suitable option and download it. You will see a similar file on your
computer. Run and install it.

Microsoft Azure
104
Step 4: When you’ll install it, Windows might try to prevent it. Choose ‘Run Anyway’ if
this happens.
Step 5: Go to ‘Networks’ on your machine and you will see a VPN connection available as
shown in the following image.
Step 6: Click on that network as in this example ‘MyNet’ and connect. You will be
connected to the network.

Microsoft Azure
105
Most organizations already have a network on their premises and would want to connect
it to Windows Azure rather than putting everything on cloud. It is also called hybrid
network connectivity. It is connecting virtual net in Azure to on-premises network. Setting
up a site-to-site connectivity network is quite easy for someone who knows the basics of
networking like IPs, subnetting and default gateways.
The things that are required before configuring the network in this case are:
A VPN device that can be configured.
Externally facing IP address for that VPN device.
Creating a Site-to-Site Connectivity Network
Step 1: Select New -> Network Services -> Virtual Network -> Custom Create
20. Site-to-Site Connectivity

Microsoft Azure
106
Step 2: Enter the name of the network and select the region.
Step 3: Enter the DNS name for name resolution if you want, otherwise you can leave it
empty if you want it to be automatically done by Azure.
Step 4: Check the ‘Configure site-to-site VPN’ option.
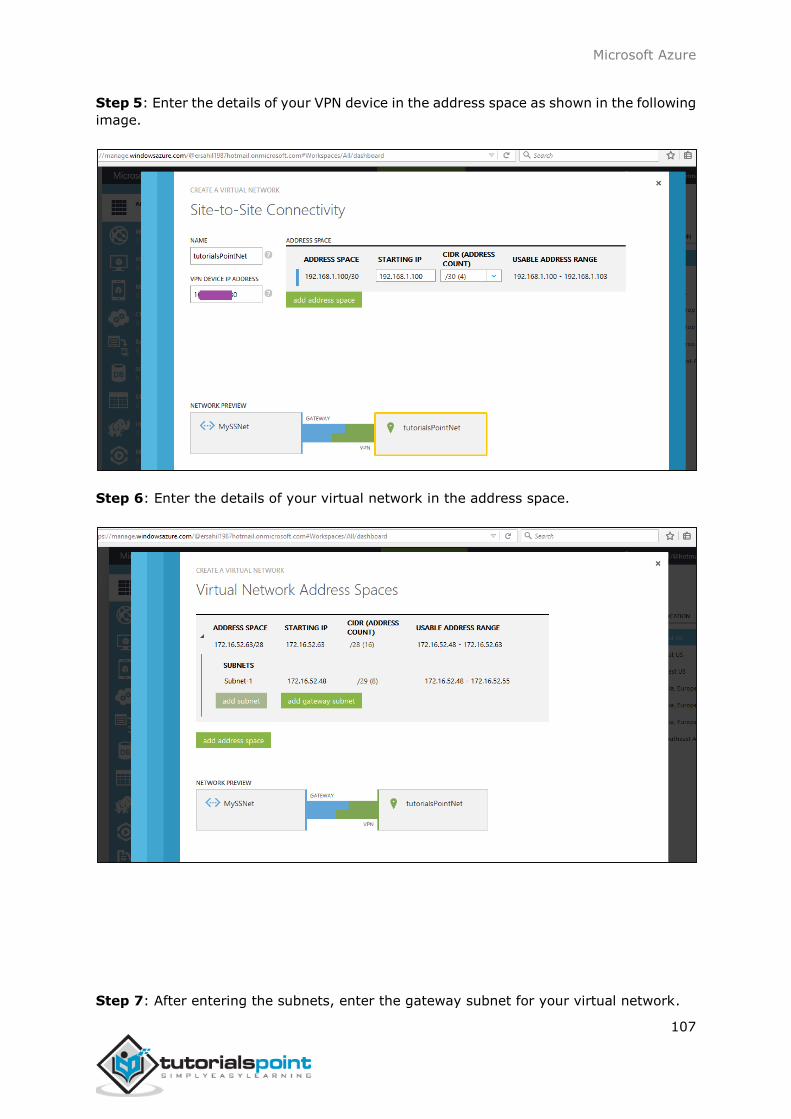
Microsoft Azure
107
Step 5: Enter the details of your VPN device in the address space as shown in the following
image.
Step 6: Enter the details of your virtual network in the address space.
Step 7: After entering the subnets, enter the gateway subnet for your virtual network.

Microsoft Azure
108
Step 8: Click next and the network is created.
Step 9: Select the network and go to its ‘Dashboard’. You will have to create a gateway
for it.
Step 10: Click ‘Create Gateway’ at the bottom of the screen. Once gateway is created
‘Gateway IP address’ is displayed on the following screen.
You can configure the VPN device now using the information.
Site-to-site connectivity is faster than the point-to-site connectivity. It makes transferring
of data easier. You just need a shared key to access the network. Unlike point-to-site
connectivity, you don’t have to install certificates on each machine you want to connect
with the virtual machine. In fact, the same shared key works for each machine.

Microsoft Azure
109
Let us first understand what is the service provided by Azure traffic manager. Basically,
this service balances the traffic load of services hosted in Azure. The routing policy is
defined by the client and traffic to the services hosted in Azure is redirected according to
set policies. Traffic manager is a DNS-based service. Thus, it will improve the availability
and performance applications.
Let’s see how to create and configure traffic manager in Azure.
Create Traffic Manager
Step 1: Login to Azure management portal and click ‘New’ at the bottom left corner.
Step 2: Select Network Services -> Traffic Manager -> Quick Create.
Step 3: Enter the DNS prefix and select the Load Balancing Method.
There are three options in this dropdown.
Performance: This option is ideal when you have endpoints in two different
locations. When a DNS is requested, it is redirected to the region closest to the
user.
Round Robin: This option is ideal when you want to distribute the traffic among
multiple endpoints. Traffic is distributed in round robin fashion by selecting a
healthy endpoint.
21. Traffic Manager

Microsoft Azure
110
Failover: In this option, a primary access point is set up, but in case of failure
alternate endpoints are made available as backup.
Step 4: Based on your needs you can choose a load balancing method. Let’s choose
performance here.
Step 5: Click create.
You will see the traffic manager created and displayed in your management portal. Its
status will be inactive until it is configured.
Create Endpoints to be Monitored via Traffic Manager
Step 1: Select the ‘Traffic Manager’ from the left panel in the management portal that
you want to work on.
Step 2: Select ‘Endpoints’ from the top horizontal menu as shown in the following image.
Then select ‘Add Endpoints’.

Microsoft Azure
111
Step 3: The screen shown in the following image will appear. Choose the service type and
items under that service will be listed.
Step 4: Select the service endpoints and proceed.
Step 5: The service endpoints will be provisioned.
You can see that in this case, the service ‘tutorialsPointVM’ created in Azure will now be
monitored by the traffic manager and its traffic will be redirected according to the specified
policy.

Microsoft Azure
112
Configure the Policy
Step 1: Click on ‘Configure’ in the top menu bar as shown in the following image.
Step 2: Enter the DNS Time to Live (TIL). It is the amount of time for which a client/user
will continue to use a particular endpoint. For example, if you enter 40 seconds the traffic
manager will be queried after every 40 seconds for the changes in the traffic management
system.

Microsoft Azure
113
Step 3: You can change the load balancing method here by choosing a desired method
from the dropdown. Here, let’s choose ‘Performance’ as chosen earlier.
Step 4: If you scroll down, you will see heading ‘Monitoring Setting’. You can choose the
protocol; enter port number and relative path for a service to be monitored.

Microsoft Azure
114
PowerShell is a framework or you can say an interface built by Azure team that lets the
user to automate and manage Windows Azure services. It is a command line tool that uses
the scripts or cmdlets to perform tasks such as creating and managing storage accounts
or Virtual Machines that can easily be done using the preset commands.
Installing Azure PowerShell
Step 1: Login into Azure Management Portal.
Step 2: Click ‘Downloads’.
22. PowerShell

Microsoft Azure
115
Step 3: In the following screen, locate ‘command-line tools’ and then ‘Windows Azure
PowerShell’. Click ‘Install’ listed under it to download the setup and install it.
Alternatively, you can visit the link
http://www.windowsazure.com/en-us/manage/downloads/
Connecting to Your Subscription
Once you have installed Azure PowerShell, you will have to connect it to your Azure
subscription.
Step 1: Locate Microsoft ‘Azure PowerShell’ in your programs.

Microsoft Azure
116
Step 2: Pin it to the taskbar. You can run it as ISE by pinning it to the taskbar in Windows
8. Somehow, if it doesn’t show the option of ‘Run ISE as Administrator’ it is in programs.
ISE lets copy paste commands easily.
Step 3: Right-click on ‘Microsoft Azure PowerShell’ and select ‘Run ISE as Administrator’.

Microsoft Azure
117
Connect to Your Azure Account
Using Active Directory
To get started with Azure tasks, you will have to first add your Azure account to
PowerShell. You just have to perform this step once on your computer and every time you
run Azure PowerShell, it will connect to the account automatically.
Step 1: Enter the following cmdlet in PowerShell.
Add-AzureAccount
Step 2: The screen shown in the following image will pop up and ask for credentials of
your account. Enter the credentials and sign in.
Step 3: Now you are ready to perform tasks in Azure using Azure PowerShell.
Using Certificate
In this method, you can download a certificate on your machine and login to our account
using that certificate.
Step 1: Enter the following cmdlet in PowerShell. You will be prompted to save a file and
the file will be downloaded on your computer with the extension. publishsettings
Get-AzurePublishSettingsFile
You will see a similar file on your computer.
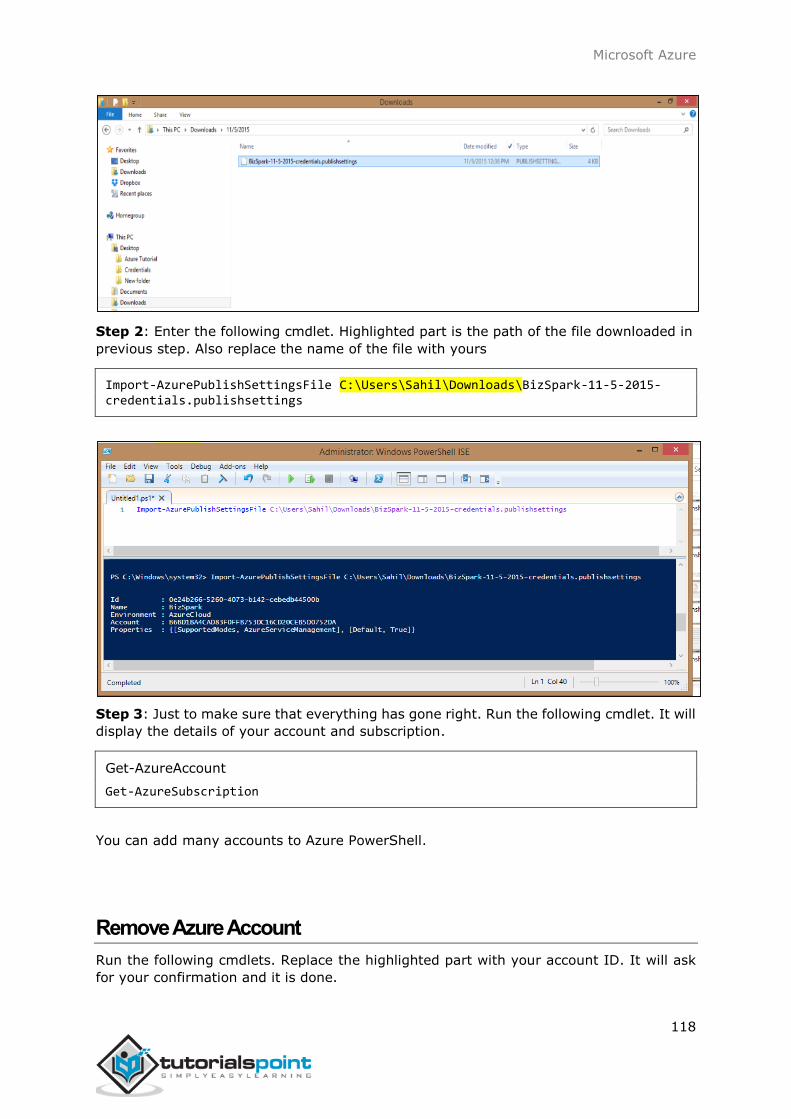
Microsoft Azure
118
Step 2: Enter the following cmdlet. Highlighted part is the path of the file downloaded in
previous step. Also replace the name of the file with yours
Import-AzurePublishSettingsFile C:\Users\Sahil\Downloads\BizSpark-11-5-2015-credentials.publishsettings
Step 3: Just to make sure that everything has gone right. Run the following cmdlet. It will
display the details of your account and subscription.
Get-AzureAccount
Get-AzureSubscription
You can add many accounts to Azure PowerShell.
Remove Azure Account
Run the following cmdlets. Replace the highlighted part with your account ID. It will ask
for your confirmation and it is done.

Microsoft Azure
119
Remove-AzureAccount -Name [email protected]
Get Help
The following cmdlet will list all the commands available for Azure tasks.
Get-Help Azure
There are lots of tasks that can be managed using PowerShell such as creating and
managing web applications, storage accounts, virtual machines, etc. In fact, many users
find it quicker and better as compared to Azure Management Portal. To manage the Azure
Storage using PowerShell refer to Table, Blobs and Queues chapter in this tutorial.
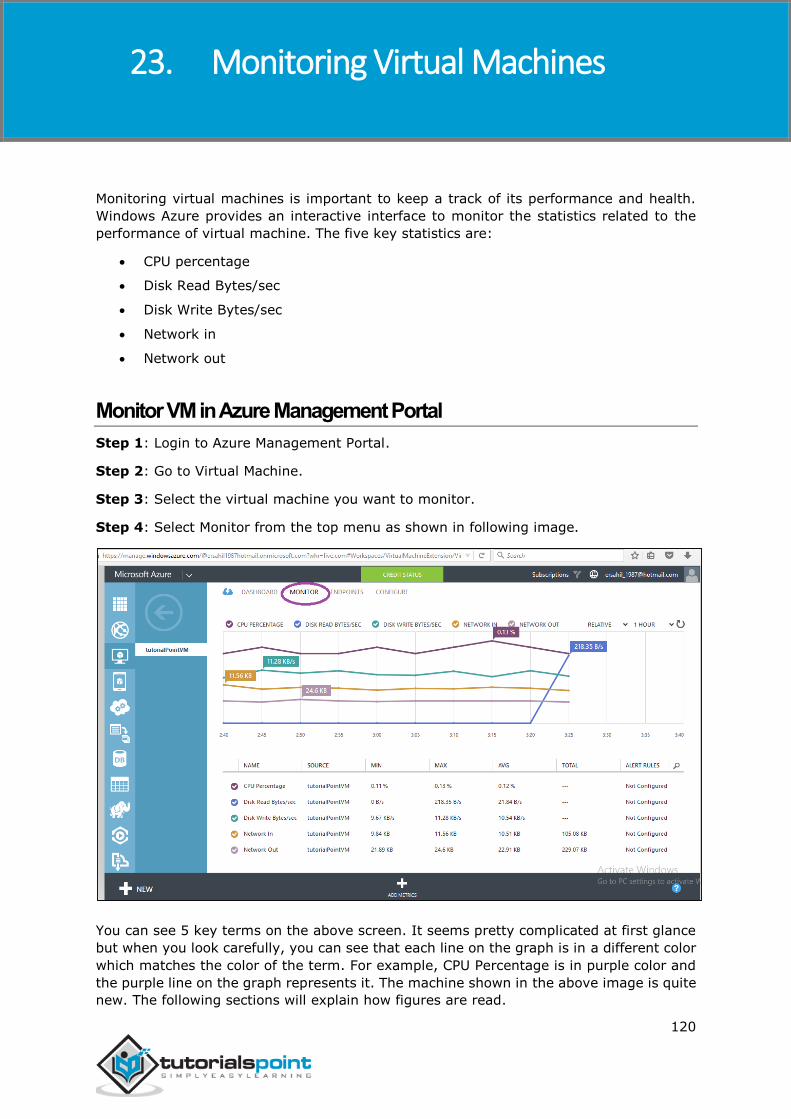
Microsoft Azure
120
Monitoring virtual machines is important to keep a track of its performance and health.
Windows Azure provides an interactive interface to monitor the statistics related to the
performance of virtual machine. The five key statistics are:
CPU percentage
Disk Read Bytes/sec
Disk Write Bytes/sec
Network in
Network out
Monitor VM in Azure Management Portal
Step 1: Login to Azure Management Portal.
Step 2: Go to Virtual Machine.
Step 3: Select the virtual machine you want to monitor.
Step 4: Select Monitor from the top menu as shown in following image.
You can see 5 key terms on the above screen. It seems pretty complicated at first glance
but when you look carefully, you can see that each line on the graph is in a different color
which matches the color of the term. For example, CPU Percentage is in purple color and
the purple line on the graph represents it. The machine shown in the above image is quite
new. The following sections will explain how figures are read.
23. Monitoring Virtual Machines
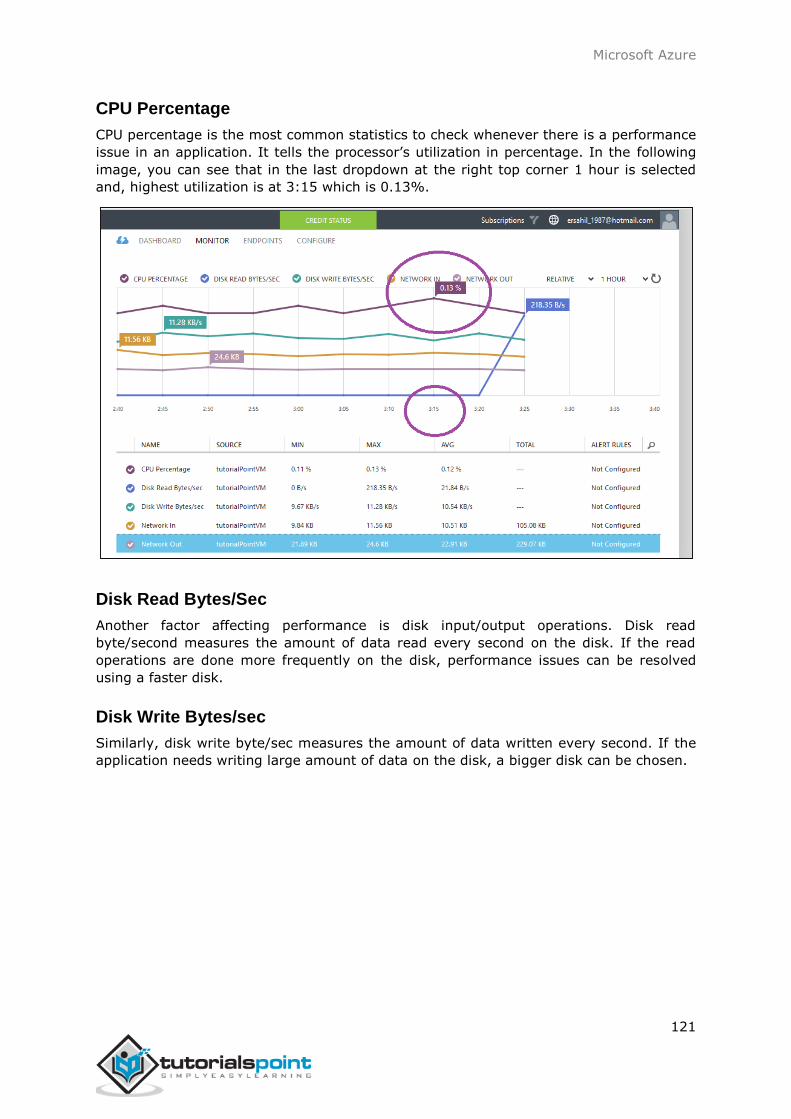
Microsoft Azure
121
CPU Percentage
CPU percentage is the most common statistics to check whenever there is a performance
issue in an application. It tells the processor’s utilization in percentage. In the following
image, you can see that in the last dropdown at the right top corner 1 hour is selected
and, highest utilization is at 3:15 which is 0.13%.
Disk Read Bytes/Sec
Another factor affecting performance is disk input/output operations. Disk read
byte/second measures the amount of data read every second on the disk. If the read
operations are done more frequently on the disk, performance issues can be resolved
using a faster disk.
Disk Write Bytes/sec
Similarly, disk write byte/sec measures the amount of data written every second. If the
application needs writing large amount of data on the disk, a bigger disk can be chosen.

Microsoft Azure
122
In the image above, you can see the highest point in disk read is 218.35 byte/sec at 3:25.
You can see the last hour’s data because ‘1 Hour’ is selected in the dropdown. You can
also see data for last 24 hours and 7 days.
Network In
Monitoring the network traffic can be done by looking at the ‘network in’ figures in the
‘Monitor’ section. The network-in statistics can be in bytes or TCP segments received.
Network Out
Network-out statics tells about TCP segments sent per second. You can also see relative
or absolute statistics by selecting an option from dropdown encircled in the following
image.

Microsoft Azure
123
Similarly, you can choose the duration from the dropdown highlighted in the following
image.
You can also choose particular metrics, by clicking on ‘Add Metrics’ at the bottom of the
screen. The following screen will appear, in which you can check the desired metrics.
Enable Diagnostics
Enabling diagnostics allows you to collect logs. Azure will collect logs and store in a storage
account you specified. We can enable diagnostics by switching to the ‘Preview Portal’.
Diagnostic figures help in troubleshooting as the logs for errors can be tracked in the
storage account.
Step 1: Switch to the ‘preview portal’.

Microsoft Azure
124
Step 2: Locate the ‘Virtual Machine (classic)’ in the left panel.
Step 3: Select the Machine and ‘All Settings’.
Step 4: Scroll down and locate ‘Diagnostics’. Select ‘Diagnostic’ as shown in the following
image.
Step 5: Select ‘On’ in the next panel displayed on the right side. By default it will be set
off.
Step 6: Since it uses a storage account to store the logs you will have to configure the
setting for the storage account by clicking on the encircled part in the following image.

Microsoft Azure
125
Step 7: You can also select or deselect the type of logs you want to keep.
You will also see a panel at the bottom with the heading ‘Monitoring’. This section displays
the same metrics that we discussed in the section above.
These figures help users to identify the causes of performance slide of an application. They
can also generate alerts for these features; they go above the set limits.
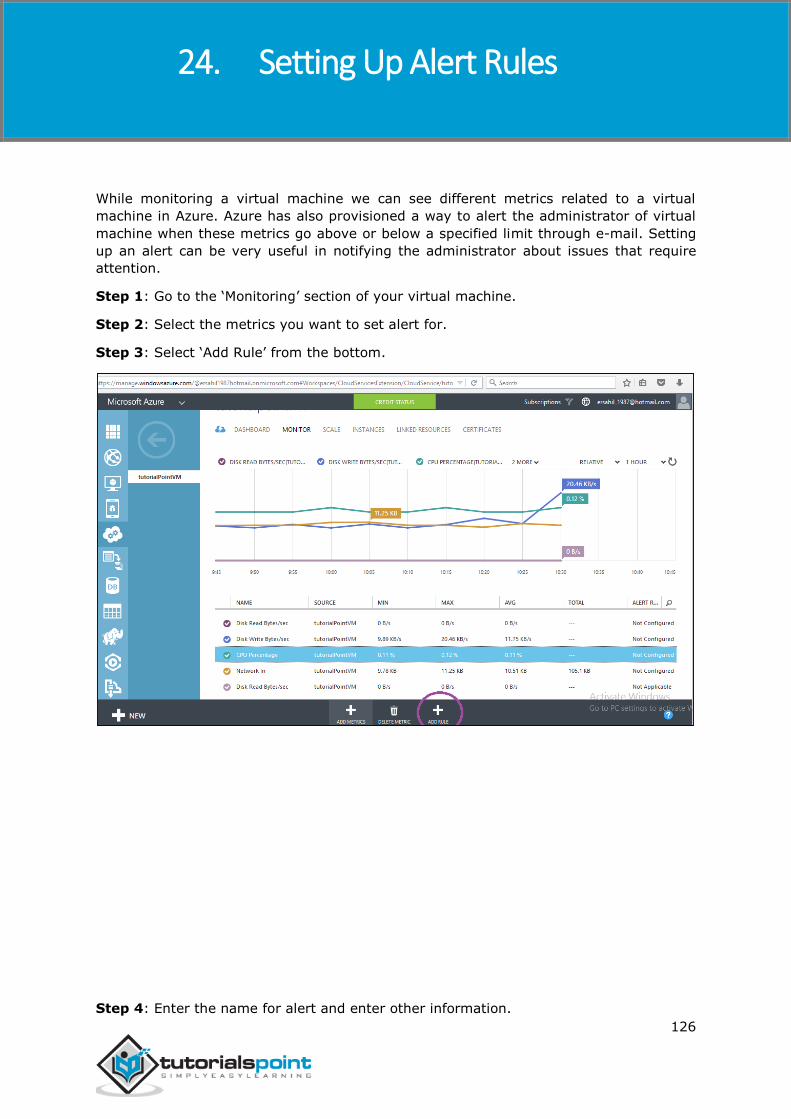
Microsoft Azure
126
While monitoring a virtual machine we can see different metrics related to a virtual
machine in Azure. Azure has also provisioned a way to alert the administrator of virtual
machine when these metrics go above or below a specified limit through e-mail. Setting
up an alert can be very useful in notifying the administrator about issues that require
attention.
Step 1: Go to the ‘Monitoring’ section of your virtual machine.
Step 2: Select the metrics you want to set alert for.
Step 3: Select ‘Add Rule’ from the bottom.
Step 4: Enter the name for alert and enter other information.
24. Setting Up Alert Rules
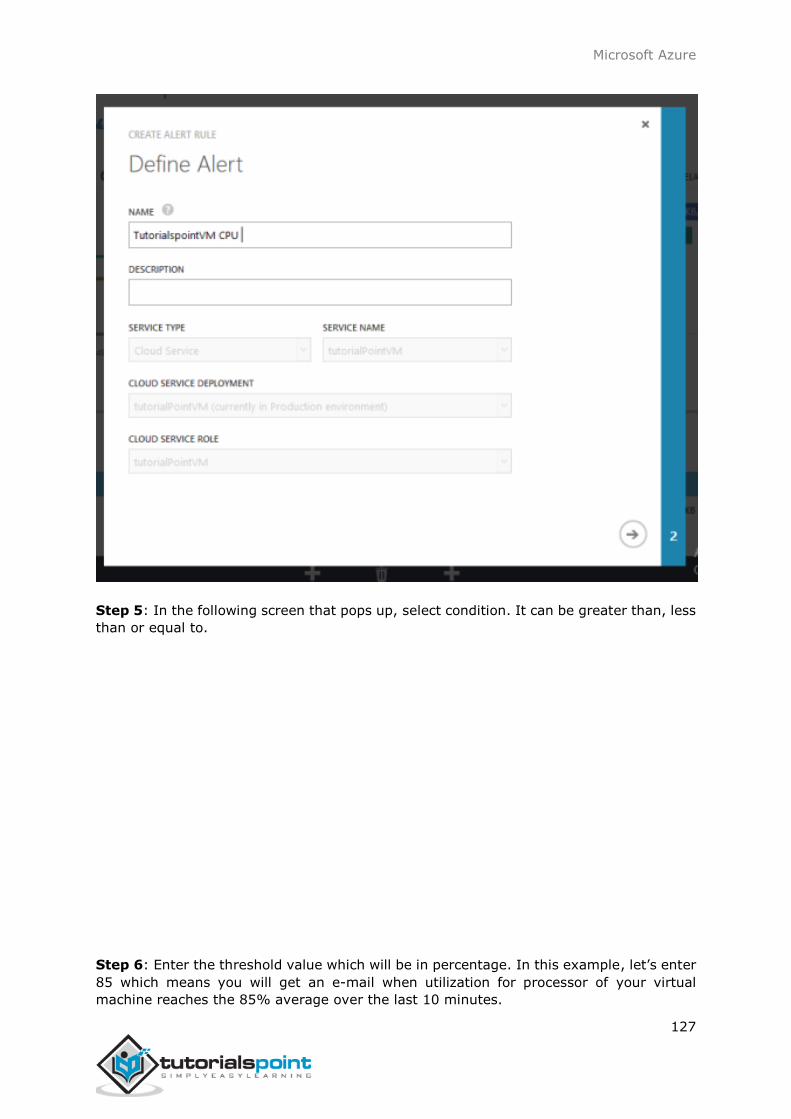
Microsoft Azure
127
Step 5: In the following screen that pops up, select condition. It can be greater than, less
than or equal to.
Step 6: Enter the threshold value which will be in percentage. In this example, let’s enter
85 which means you will get an e-mail when utilization for processor of your virtual machine reaches the 85% average over the last 10 minutes.

Microsoft Azure
128
In addition to sending the alert e-mail to service administrator and co-administrators, you
can receive alert in one more e-mail.
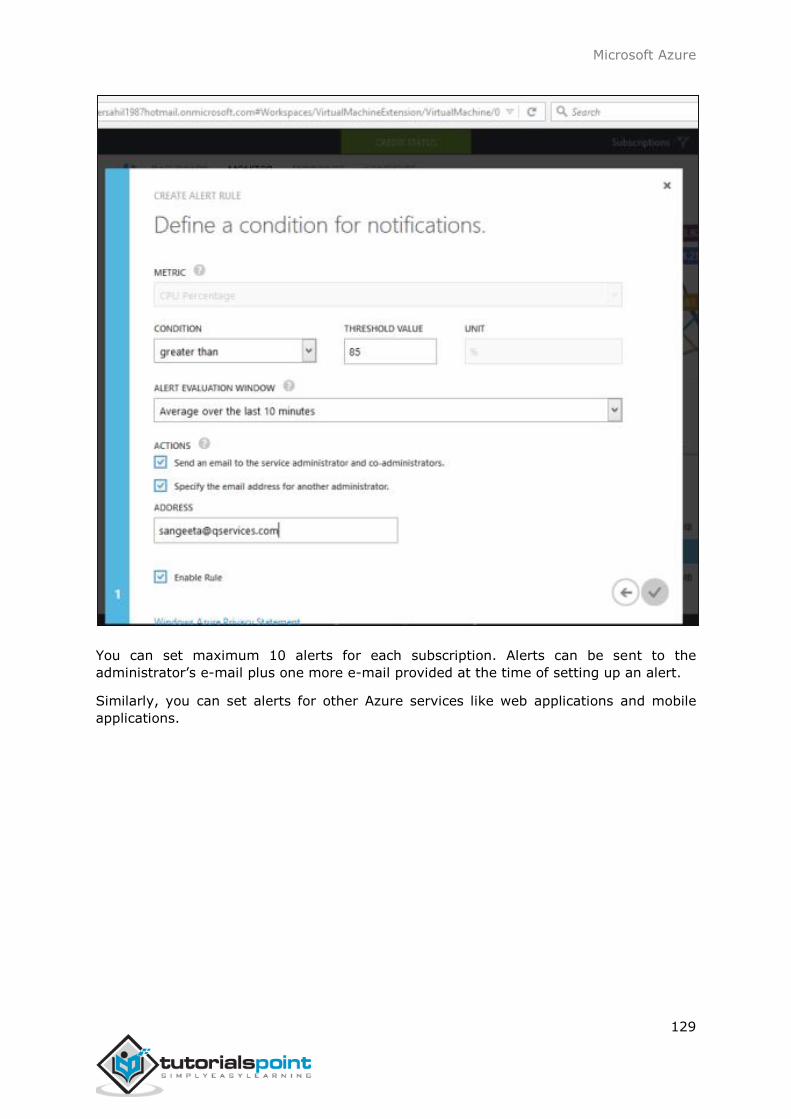
Microsoft Azure
129
You can set maximum 10 alerts for each subscription. Alerts can be sent to the
administrator’s e-mail plus one more e-mail provided at the time of setting up an alert.
Similarly, you can set alerts for other Azure services like web applications and mobile
applications.

Microsoft Azure
130
In this chapter, we will discuss different ways of deploying an application on Windows
Azure. When we say application, it can be a web application or a mobile application. Earlier
web apps were called websites, but now everywhere they are referred as web applications.
We will be discussing how to deploy applications from Visual Studio and management
portal in the chapter ‘Websites’.
Deploying a Web App from PowerShell
To get started with the PowerShell, refer to ‘PowerShell’ chapter in the tutorial. In order
to deploy a website from PowerShell you will need the deployment package. You can get
this from your website developers or you if you are into web deployment you would know
about creating a deployment package. In the following sections, first you will learn how to
create a deployment package in Visual Studio and then using PowerShell cmdlets, you will
deploy the package on Azure.
Create a Deployment Package
Step 1: Go to your website in Visual Studio.
Step 2: Right-click on the name of the application in the solution explorer. Select ‘Publish’.
Step 3: Create a new profile by selecting ‘New Profile’ from the dropdown. Enter the name
of the profile. There might be different options in dropdown depending on if the websites
are published before from the same computer.
25. Application Deployment

Microsoft Azure
131
Step 4: On the next screen, choose ‘Web Deploy Package’ in Publish Method.

Microsoft Azure
132
Step 5: Choose a path to store the deployment package. Enter the name of site and click
Next.
Step 6: On the next screen, leave the defaults on and select ‘publish’.
After it’s done, inside the folder in your chosen location, you will find a zip file which is
what you need during deployment.
Create a Website in Azure using PowerShell
Step 1: Enter the following cmdlets to create a website. Replace the highlighted part. This
command is going to create a website in free subscription. You can change the subscription
after the website is created.
New-AzureWebsite -name "mydeploymentdemo" -location "East US"

Microsoft Azure
133
If cmdlet is successful, you will see all the information as shown in the above image. You
can see the URL of your website as in this example it is
mydeploymentdemo.azurewebsites.net.
Step 2: You can visit the URL to make sure everything has gone right.
Deploy Website using Deployment Package
Once the website is created in Azure, you just need to copy your website’s code. Create
the zip folder (deployment package) in your local computer.
Step 1: Enter the following cmdlets to deploy your website.
Publish-AzureWebsiteProject -name "mydeploymentdemo" -package "C:\Users\Sahil\Desktop\deploymentDemo\MyWebsiteOnAzure.zip"
Here in above commandlet, the name of the website just created is given and the path of
the zip file on the computer.

Microsoft Azure
134
Step 2: Go to your website’s URL. You can see the website as shown in the following
image.

Microsoft Azure
135
Azure backup can be used to backing up on-premise data in cloud. Data is stored in an
encrypted mode. The following sections provide a detailed illustration of how to do it using
Azure. In this process, we will first create a backup vault where our data will be stored
and then see how data can be backed up from our on-premise computer. The backup
agent which is installed on the computer, first encrypts the data and then sends it over
the network to the storage place in Azure. Your data is completely safe and secure.
Create Backup Vault
Step 1: Login into your management portal.
Step 2: At the bottom right corner, select New -> Data Services -> Recovery Services
-> Backup Vault -> Quick Create.
Step 3: Enter the name of vault and select the region. It will be created and displayed in
your management portal.
Step 4: Select the vault and click ‘Download Vault Credentials’ as shown in the following
image.
26. Backup & Recovery

Microsoft Azure
136
Step 5: It will save a credential file on your computer.
Step 6: Now scroll down the same page in Azure and you will see three options under
‘Download Agent’. Select a suitable option. Let’s choose the third option in the list in this
example.
Step 7: Agent’s setup will be saved on your computer. You will have to install it by
following the wizard. There is nothing very specific in the installation process.
Step 8: At the end of the installation, you will see a button at the bottom of pop-up
window ‘Proceed to Registration’. Click that button and the following screen will appear.
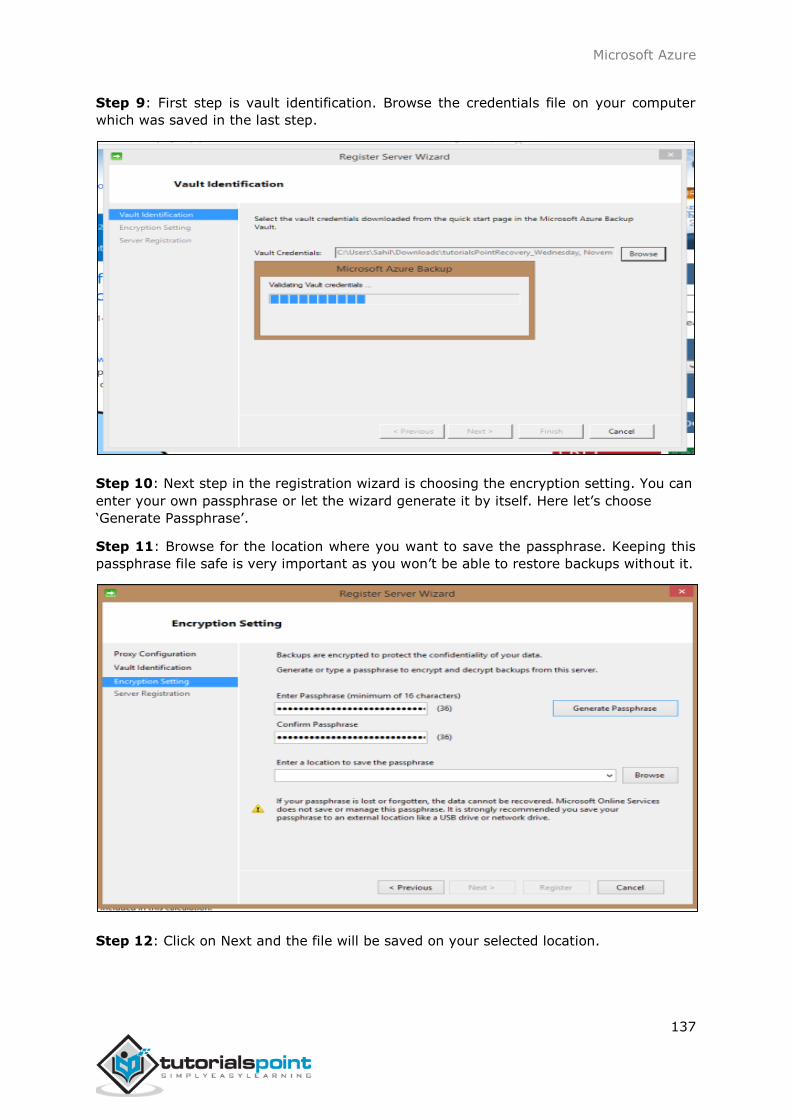
Microsoft Azure
137
Step 9: First step is vault identification. Browse the credentials file on your computer
which was saved in the last step.
Step 10: Next step in the registration wizard is choosing the encryption setting. You can
enter your own passphrase or let the wizard generate it by itself. Here let’s choose
‘Generate Passphrase’.
Step 11: Browse for the location where you want to save the passphrase. Keeping this
passphrase file safe is very important as you won’t be able to restore backups without it.
Step 12: Click on Next and the file will be saved on your selected location.

Microsoft Azure
138
Schedule a Backup
After the wizard in the above section is finished, you will see the following program that
was installed in the previous step, running on your computer. You will come across
selecting the data folder from your computer you want to back up on Azure and the
frequency of backup in this wizard.
Step 1: Click ‘Schedule Backup’ from the right panel.
In this example, let’s select the data folder named ‘QServicesManagementSystem’.

Microsoft Azure
139
Follow the steps as pop up on the screen and are quite understandable. You are allowed
to back up 3 times maximum and you can choose from daily and weekly frequency.
Step 2: In the following step, select how long you want to keep the backup in your online
storage. Set it according to your need.
Step 3: You can choose the ‘Backup Now’ in the left panel of backup agent. It will save a
copy of your data that very moment. Then you can see it in your management portal by
selecting the backup vault and going to its dashboard.
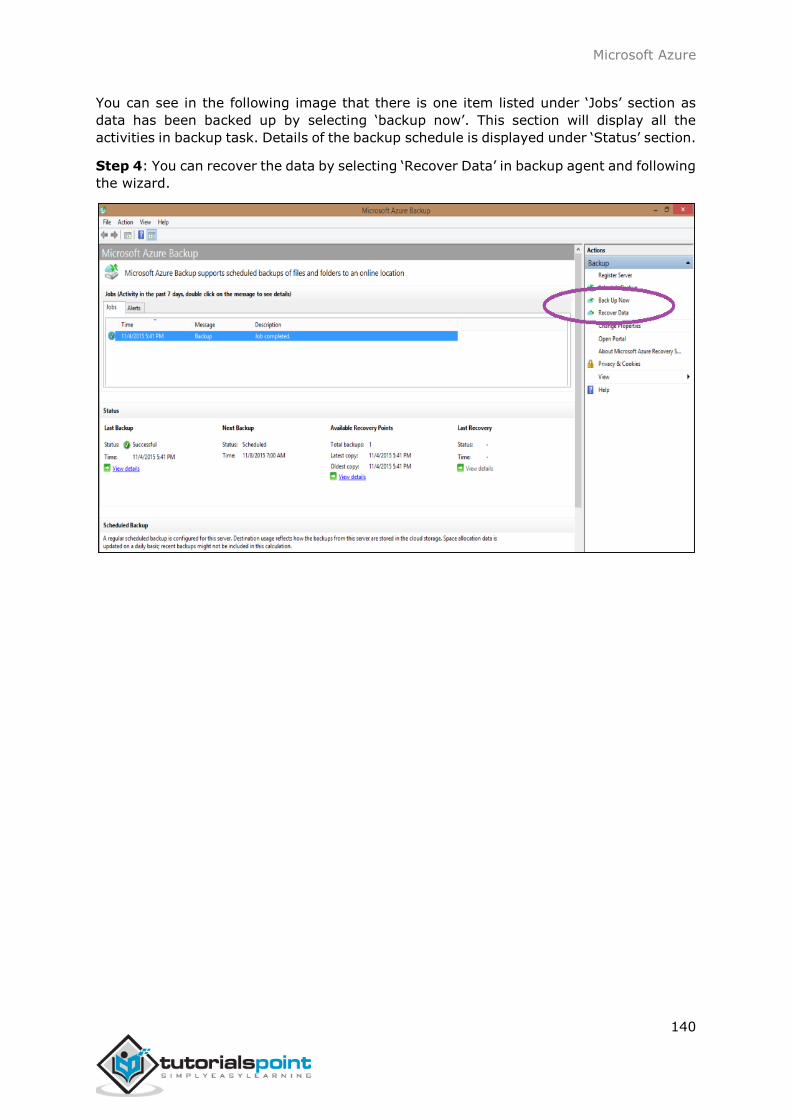
Microsoft Azure
140
You can see in the following image that there is one item listed under ‘Jobs’ section as
data has been backed up by selecting ‘backup now’. This section will display all the
activities in backup task. Details of the backup schedule is displayed under ‘Status’ section.
Step 4: You can recover the data by selecting ‘Recover Data’ in backup agent and following
the wizard.
Microsoft Azure
141
The self-service capabilities here refer to the ability to manage group, users profile and
passwords. These capabilities are helpful in reducing the cost and labor of the IT
departments. It enhances the user experience and removes the unnecessary hassle of
asking for permissions of the administrator. Self-service capabilities enable the users to
manage the mentioned services without compromising the security of the systems.
Everything happens within the policies set by the organization.
Group Management
Let us say few people in an organization want to create one group where they can connect
with each other for certain period of time. Usually, they will have to ask for the
administrator to create a group for them. But in Azure active directory, one person can
create a group and others can join the group without having to ask the administrator. Also,
the group owner can handover the ownership of the group to someone else by himself.
Password Management
Azure Active directory offers the services that lets the users (client’s employees or
application users) to manage their password on their own. The end users can make a self-
registration for password reset. Additionally, this service includes the resetting and
changing the password by the end users.
Self-service capability policies are completely controlled by the administrators of Azure
Active directory. They can configure the policies in accordance with their organizations
policy. They can view the reports on end user password resets, change, etc. This way
administrators can monitor the user’s activities for their account management, even after
making them capable of self-service.
In order to use this service, organizations must subscribe to basic or premium version of
Azure active directory. There is a detailed demonstration of self-service password reset
and group management using Azure Active Directory in a separate chapter of this tutorial.
27. Self-Service Capabilities

Microsoft Azure
142
All of us at some point have encountered multi-factor authentication. For example,
customers of some banks receive a call or one-time password as text message on their
mobile phones while signing in to their bank account online. The multi-factor
authentication refers to the system in which more than one system authenticates the user
to access an application. The multi-factor authentication offers better security for Azure
clients. It lets the client choose if they want to use more than one system of credentials
to allow the users to access the applications. Multi-factor authentication can be used to
protect both on-premise and on-cloud directories.
In this process, the user first signs in with the username and password in a normal way.
The credentials are verified and then if the automated call authentication is activated, the
user receives a call and is asked to confirm the sign-in attempt.
Mobile App: Mobile apps for all platforms (Android, iOS and Windows) are
available. This app pushes a notification when a sign-in attempt is made and then
the user can choose to authenticate, if it is genuine attempt.
Text Message: This method sends a one-time password to the registered mobile
phone of the user. They either reply from their phone or enter the one-time
password into their sign-in page.
Automated Call: The automated call asks for the user to validate the sign-in
attempt by pressing a key on their phone’s dial pad.
Create a Multi-Factor Authentication Provider
Step 1: Click ‘New’ at the left bottom corner -> App Services -> Active Directory -> Multi
Factor Auth Provider -> Quick Create.
28. Multi-Factor Authentication

Microsoft Azure
143
Step 2: Enter the name for the provider.
Step 3: Select Usage model. Let’s choose ‘Per Authentication’ for this example. Please
note that you won’t be able to change the usage model once multi-authentication provider
is created. So please take your needs in consideration before choosing it.
Step 4: Next, there is an option, if you wish to link the existing directory or not. Here,
let’s link an existing directory name ‘tutorialspoint’ that was previously created to this
multi-factor provider.
Step 5: After you click ‘Create’, it will be listed in your services list. Select the multi-factor
provider you just created and you will the following screen.

Microsoft Azure
144
Step 6: Select ‘Manage’ at the bottom of the screen and you will be taken to a new page
as shown in the following image.
Step 7: Select ‘Configure’ to choose the authentication.

Microsoft Azure
145
Step 8: You can set the number of attempts, change the phone number from where the
call is made (default number is already there), two-way message timeout (default is 60
seconds), one-time password’s timeout (default is 300 seconds) under general settings.
You can also provide an e-mail address where you can be notified if one-time password is
bypassed.
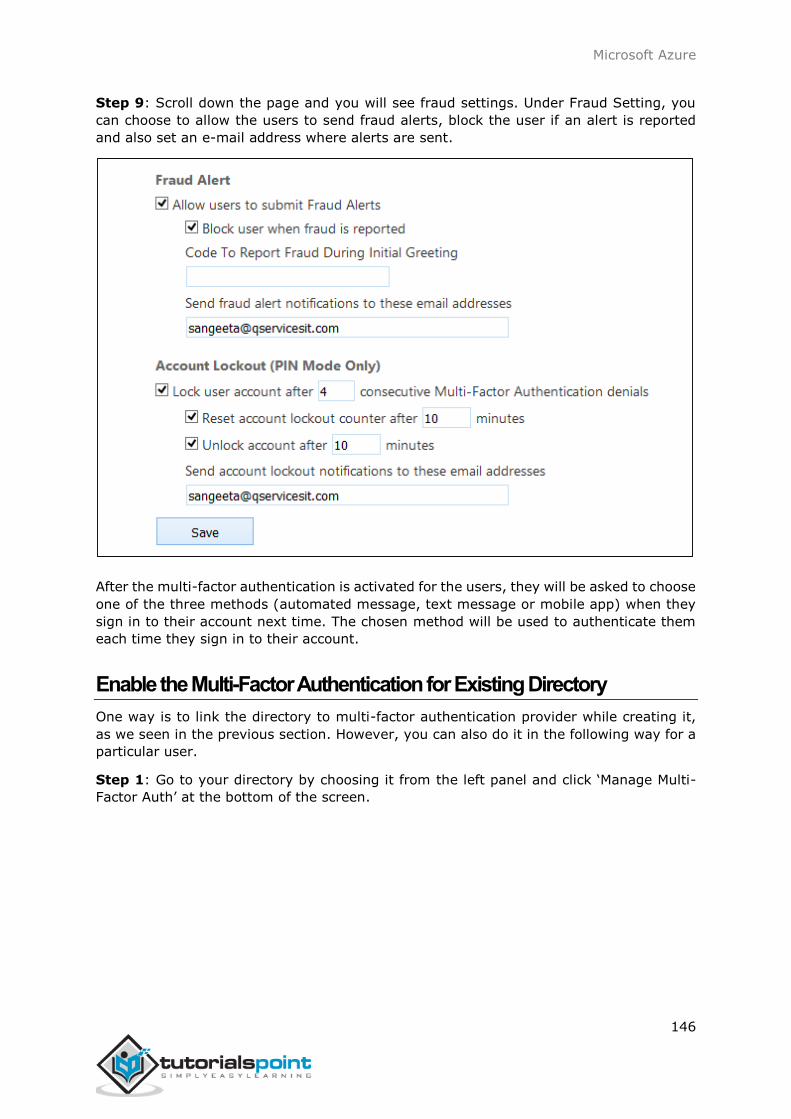
Microsoft Azure
146
Step 9: Scroll down the page and you will see fraud settings. Under Fraud Setting, you
can choose to allow the users to send fraud alerts, block the user if an alert is reported
and also set an e-mail address where alerts are sent.
After the multi-factor authentication is activated for the users, they will be asked to choose
one of the three methods (automated message, text message or mobile app) when they
sign in to their account next time. The chosen method will be used to authenticate them
each time they sign in to their account.
Enable the Multi-Factor Authentication for Existing Directory
One way is to link the directory to multi-factor authentication provider while creating it,
as we seen in the previous section. However, you can also do it in the following way for a
particular user.
Step 1: Go to your directory by choosing it from the left panel and click ‘Manage Multi-
Factor Auth’ at the bottom of the screen.

Microsoft Azure
147
Step 2: It will take you to the following screen. Here you can select the user and enable
or disable the multi-factor authentication for the user.
Enable Multi-Factor Authentication for On-premises Applications
When you create a new multi-authentication provider using the management portal and
select to manage it, you are taken to the page as was shown in the first section of this
chapter. If you want to enable the multi-factor authentication for your on-premise
application, you have to install the authentication server by clicking the highlighted link.
Then you can configure the setting as desired.
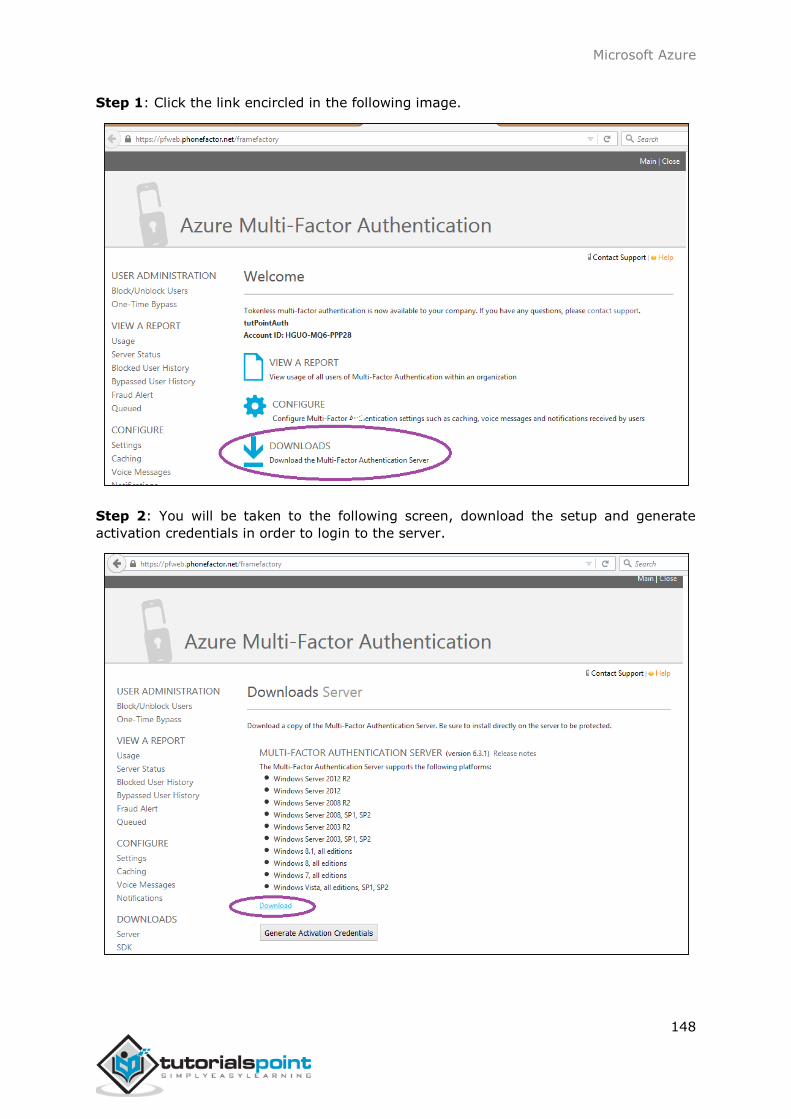
Microsoft Azure
148
Step 1: Click the link encircled in the following image.
Step 2: You will be taken to the following screen, download the setup and generate
activation credentials in order to login to the server.
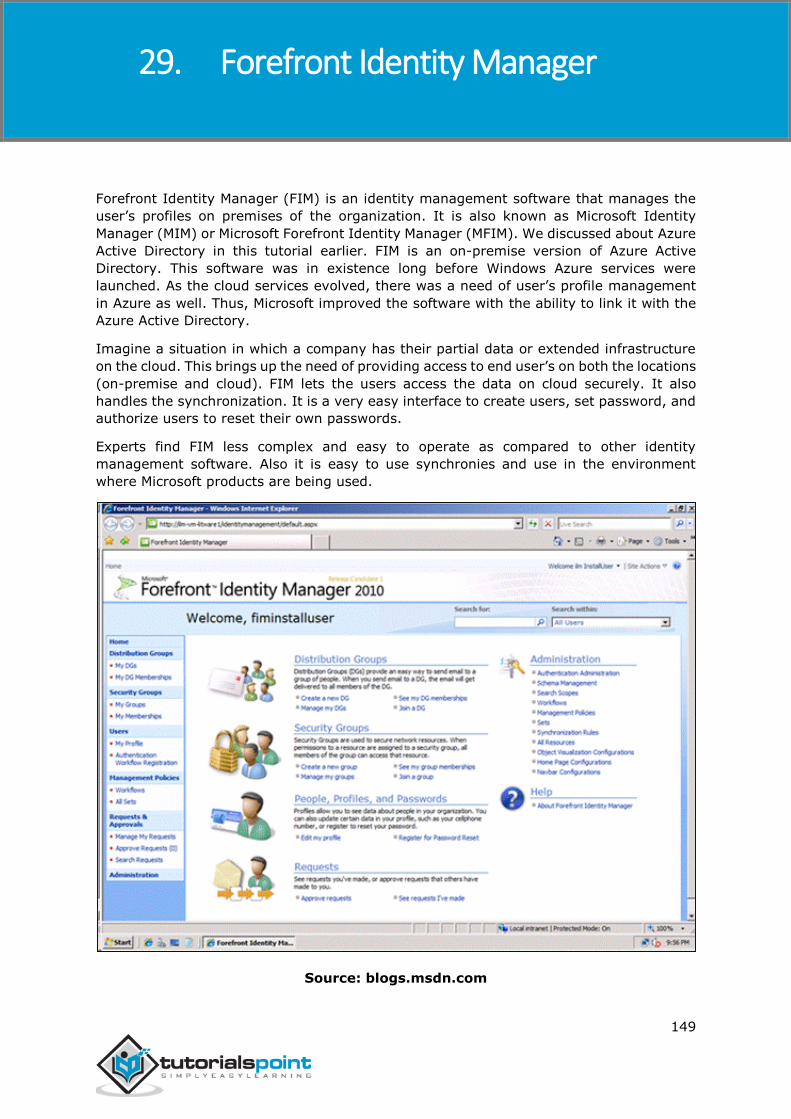
Microsoft Azure
149
Forefront Identity Manager (FIM) is an identity management software that manages the
user’s profiles on premises of the organization. It is also known as Microsoft Identity
Manager (MIM) or Microsoft Forefront Identity Manager (MFIM). We discussed about Azure
Active Directory in this tutorial earlier. FIM is an on-premise version of Azure Active
Directory. This software was in existence long before Windows Azure services were
launched. As the cloud services evolved, there was a need of user’s profile management
in Azure as well. Thus, Microsoft improved the software with the ability to link it with the
Azure Active Directory.
Imagine a situation in which a company has their partial data or extended infrastructure
on the cloud. This brings up the need of providing access to end user’s on both the locations
(on-premise and cloud). FIM lets the users access the data on cloud securely. It also
handles the synchronization. It is a very easy interface to create users, set password, and
authorize users to reset their own passwords.
Experts find FIM less complex and easy to operate as compared to other identity
management software. Also it is easy to use synchronies and use in the environment
where Microsoft products are being used.
Source: blogs.msdn.com
29. Forefront Identity Manager

Microsoft Azure
150
FIM can be connected to Azure Active Directory using the tool Forefront Identity Manager
Connector for Windows Azure Active Directory. This tool helps to synchronize the data on-
premise in FIM to the Azure Active Directory.
Source: blogs.msdn.com

Microsoft Azure
151
Once you have downloaded and installed the tool, you have to simply follow the wizard,
in order to connect your FIM information with on-cloud Azure Active Directory.
Source: blogs.msdn.com

Microsoft Azure
152
This is very useful service for the clients in case a large amount of data cannot be accessed
over the network from their storage account. Azure gives an option to its clients that they
can put their data on a hard drive and ship them to Azure datacenters. That data is then
uploaded to their storage account. Similarly, if data is needed to be downloaded by the
client that is not viable to do over the network, they can ship an empty hard drive to the
datacenter and Azure team will copy the data to that drive and ship it back to the client.
In both cases, the data is encrypted.
Data Export Job
Let’s assume you have a large amount data in your Azure storage account and you want
a copy of that data.
Create an Export Job
In this process, you will be given a shipping address, to where the empty hard drives
needs to be shipped.
Step 1: Login to Azure management portal and select the ‘Storage’ from the left panel.
Step 2: Select the storage account.
Step 3: Click ‘Import/Export’ from the top menu.
Step 4: Create ‘Export Job’.
30. Data Import and Export Job
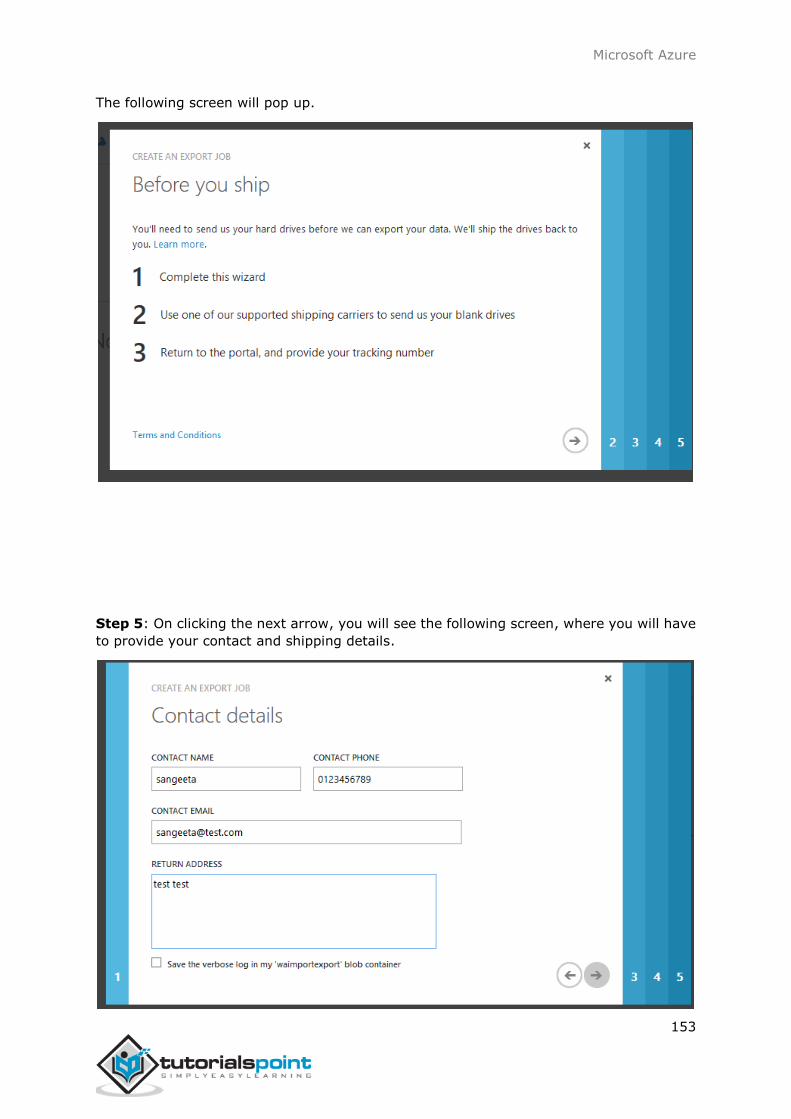
Microsoft Azure
153
The following screen will pop up.
Step 5: On clicking the next arrow, you will see the following screen, where you will have
to provide your contact and shipping details.

Microsoft Azure
154
Step 6: In the next screen, you will have to select the Blob Data you want to export. You
can specify the path or choose to export all blob data from the storage account.
Step 7: Enter a name for job in lower case letters. Address you can see here is the address
where the hard drives is to be shipped. This address is based on the location of my storage
account.
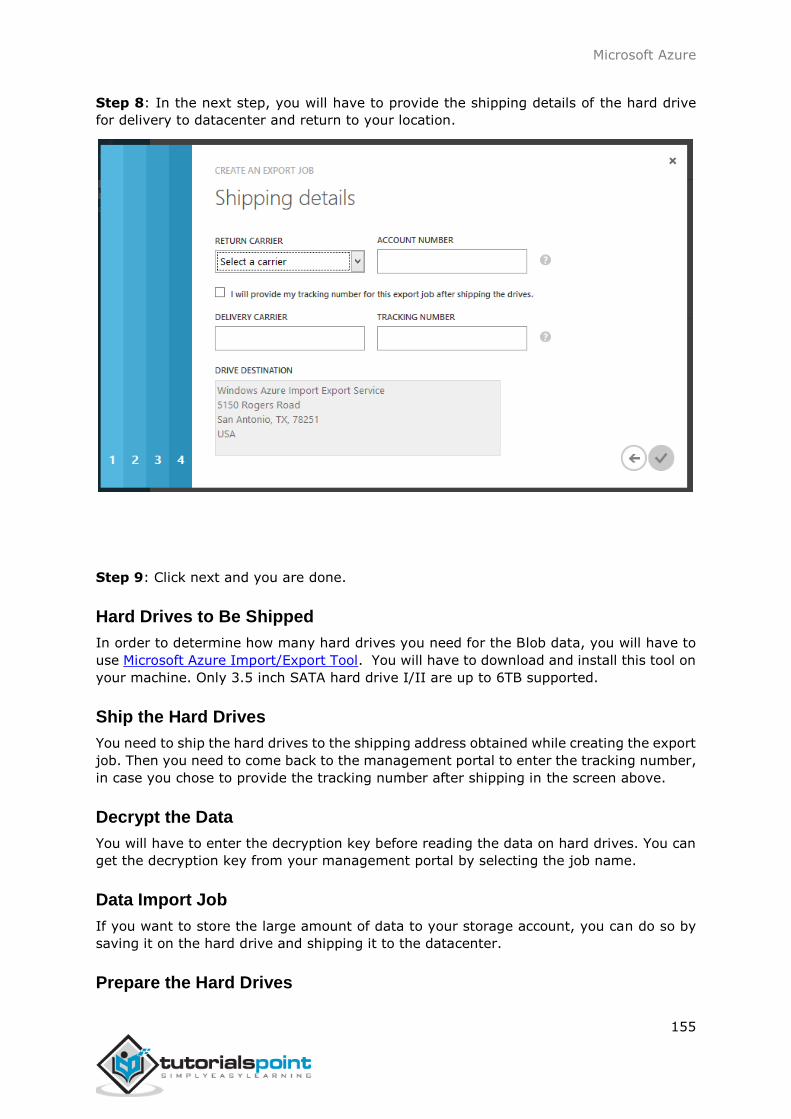
Microsoft Azure
155
Step 8: In the next step, you will have to provide the shipping details of the hard drive
for delivery to datacenter and return to your location.
Step 9: Click next and you are done.
Hard Drives to Be Shipped
In order to determine how many hard drives you need for the Blob data, you will have to
use Microsoft Azure Import/Export Tool. You will have to download and install this tool on
your machine. Only 3.5 inch SATA hard drive I/II are up to 6TB supported.
Ship the Hard Drives
You need to ship the hard drives to the shipping address obtained while creating the export
job. Then you need to come back to the management portal to enter the tracking number,
in case you chose to provide the tracking number after shipping in the screen above.
Decrypt the Data
You will have to enter the decryption key before reading the data on hard drives. You can
get the decryption key from your management portal by selecting the job name.
Data Import Job
If you want to store the large amount of data to your storage account, you can do so by
saving it on the hard drive and shipping it to the datacenter.
Prepare the Hard Drives
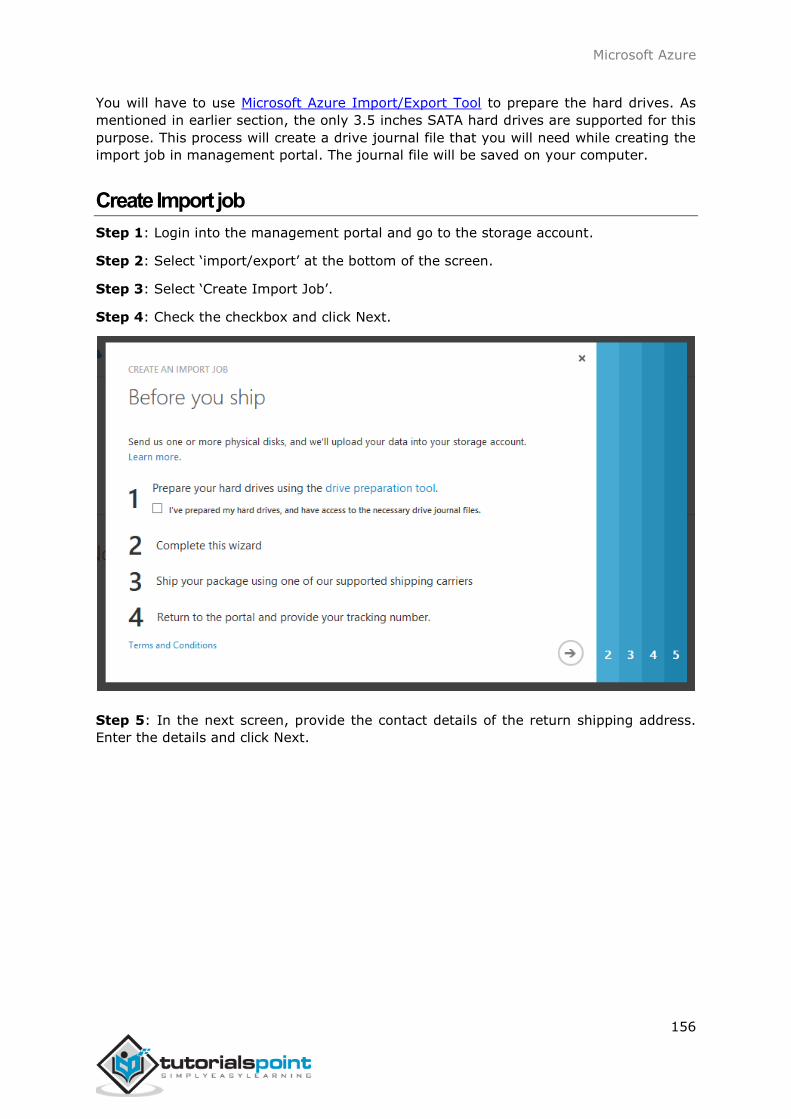
Microsoft Azure
156
You will have to use Microsoft Azure Import/Export Tool to prepare the hard drives. As
mentioned in earlier section, the only 3.5 inches SATA hard drives are supported for this
purpose. This process will create a drive journal file that you will need while creating the
import job in management portal. The journal file will be saved on your computer.
Create Import job
Step 1: Login into the management portal and go to the storage account.
Step 2: Select ‘import/export’ at the bottom of the screen.
Step 3: Select ‘Create Import Job’.
Step 4: Check the checkbox and click Next.
Step 5: In the next screen, provide the contact details of the return shipping address.
Enter the details and click Next.
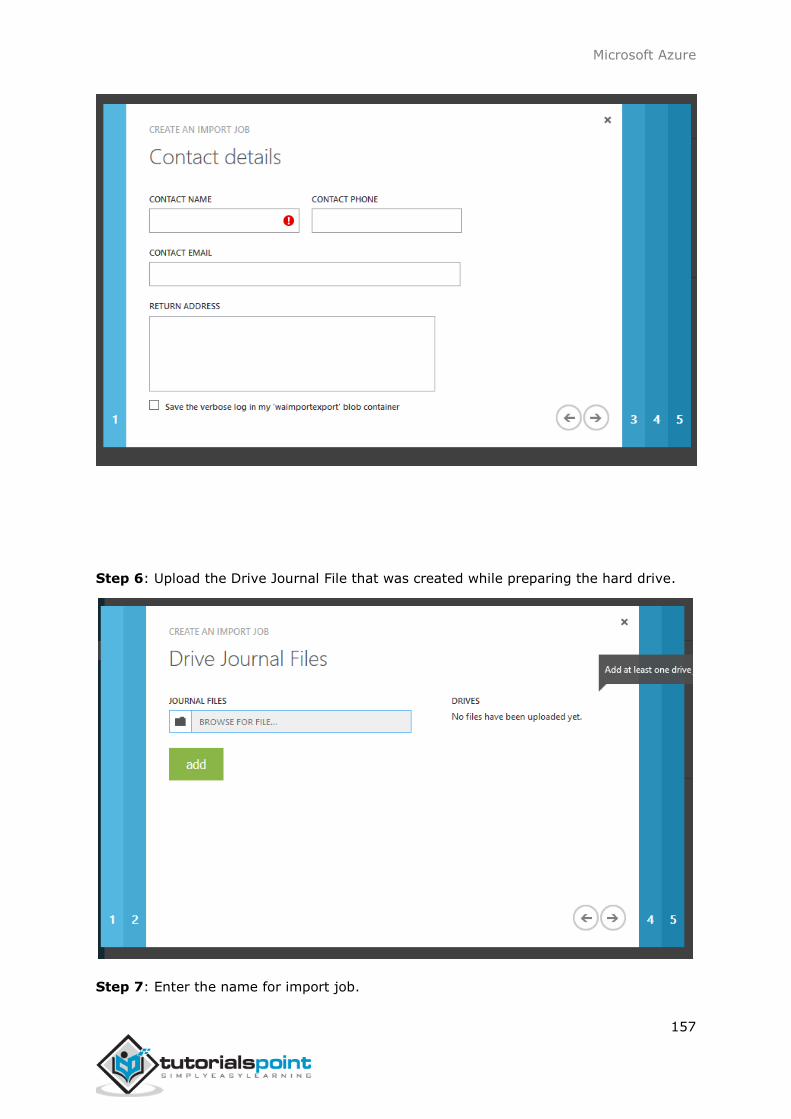
Microsoft Azure
157
Step 6: Upload the Drive Journal File that was created while preparing the hard drive.
Step 7: Enter the name for import job.

Microsoft Azure
158
Step 8: Enter the shipping details for the delivery of hard drives to the datacenter and
return to your location.
Ship the Hard Drives to the Datacenter
Ship the hard drive to the address obtained while creating import job in the management
portal. Enter the shipping tracking number for the job in the management portal in order
to complete the job.
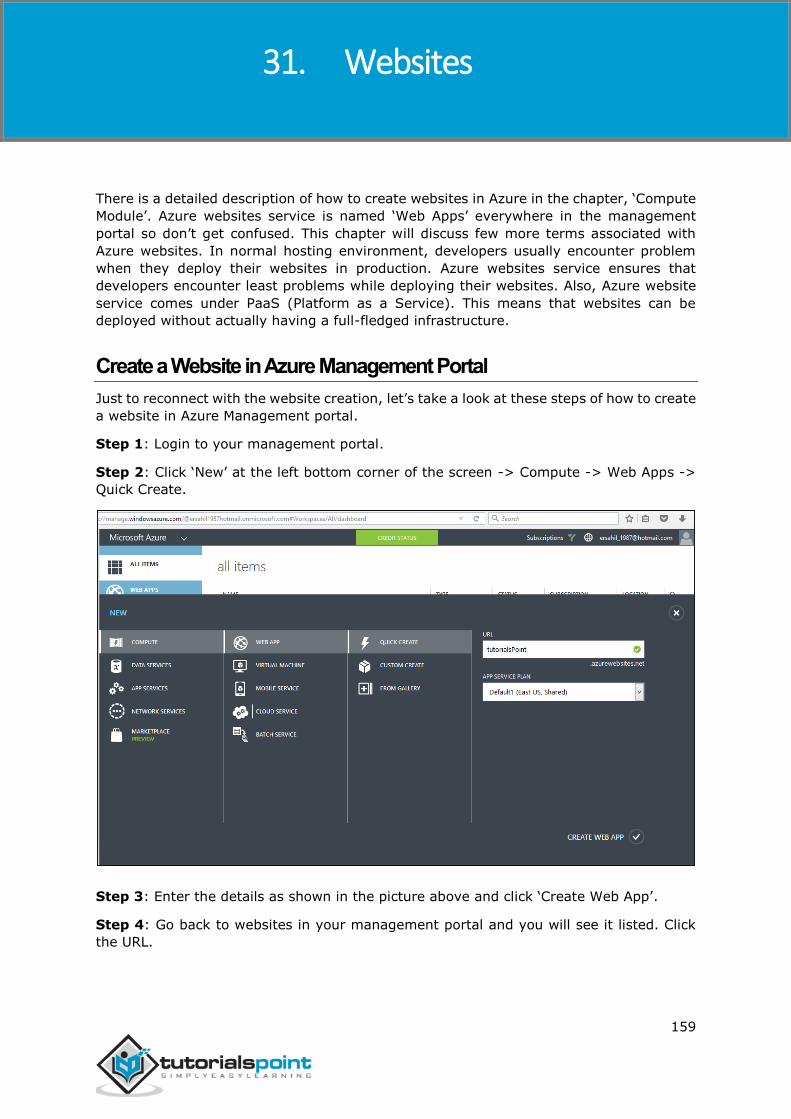
Microsoft Azure
159
There is a detailed description of how to create websites in Azure in the chapter, ‘Compute
Module’. Azure websites service is named ‘Web Apps’ everywhere in the management
portal so don’t get confused. This chapter will discuss few more terms associated with
Azure websites. In normal hosting environment, developers usually encounter problem
when they deploy their websites in production. Azure websites service ensures that
developers encounter least problems while deploying their websites. Also, Azure website
service comes under PaaS (Platform as a Service). This means that websites can be
deployed without actually having a full-fledged infrastructure.
Create a Website in Azure Management Portal
Just to reconnect with the website creation, let’s take a look at these steps of how to create
a website in Azure Management portal.
Step 1: Login to your management portal.
Step 2: Click ‘New’ at the left bottom corner of the screen -> Compute -> Web Apps ->
Quick Create.
Step 3: Enter the details as shown in the picture above and click ‘Create Web App’.
Step 4: Go back to websites in your management portal and you will see it listed. Click
the URL.
31. Websites

Microsoft Azure
160
You will be taken to the website that you just created.
Deploying Azure Website from Visual Studio
Let’s publish our website from Visual Studio in the domain name we just created. After a
website or web application is created in Visual Studio.
Step 1: Go to Solution Explorer and right click on the website/webapp name.
Step 2: Choose ‘publish’.

Microsoft Azure
161
Step 3: In this step, you need to connect to Azure subscription account in order. Click
‘Import’.
Step 4: Click ‘Add Azure Subscription’.

Microsoft Azure
162
Step 5: For the first time, you will have to ‘Download Subscription file’.

Microsoft Azure
163
Step 6: The above step will download a file with extension .publishsetting on your
computer (if you are not logged in, it will ask you to login before downloading).
Step 7: Come back to the same pop-up and now browse for the file that was just
downloaded.

Microsoft Azure
164
Step 8: Now expand the dropdown and you will see the websites available in your
subscription. As in the picture below you can see two websites. Let’s select ‘tutorialsPoint’.

Microsoft Azure
165
Step 9: On the following screen, leave the defaults on. There are many options for public
methods. We need ‘Web Deploy’ method here. Click ‘Validate Connection’.
Step 10: On the next screen, again the leave the defaults on.
Step 11: Finally on the last screen, click publish.

Microsoft Azure
166
Step 12: Go to the URL of website and you will see your content.
You can see how easy it is to deploy a website in Azure using Visual Studio. You can make
changes in Visual Studio and publish it from there itself. This makes testing of applications
very easy.

Microsoft Azure
167
Monitoring the Website
In the management portal, if you go to the website’s dashboard you can see the figures
related to the website. You can control lots of things related to your website from this
section of your management portal. You can see the website metrics, create backup,
configure setting, and scale the website.
Step 1: To see the website metric, select monitor from top menu and you will see the
following screen.
Step 2: Go to the website and select ‘Dashboard’ from the top menu.
Step 3: Scroll down and you will see the following information.

Microsoft Azure
168
Staged Publishing
Windows Azure enables the deployment of a website in stages. You can create the
deployment slots.
Add a Deployment Slot for Testing Before Production

Microsoft Azure
169
Basically, this feature allows you to deploy your website in a separate slot for testing
purpose and then switch the slot. If anything goes wrong, you can simply go back to the
previous version by changing the slot. Sometimes, applications don’t behave well as they
are expected to at a large scale, this feature comes handy in such situations. This makes
deployment tasks very easy for developers and organizations.

Microsoft Azure
170
Scaling is adaptability of the system to the changed amount of workload or traffic to the
web application. One of the great features of Azure service is its ability to auto scale
according to the demands of the application usage.
Basically, increasing or decreasing the resources for application is called scaling. Instance
is created each time a web app is deployed. Creating the instance means assigning a
server to that application. Increasing the instance means adding up the servers assigned
to that application. The scaling is done by creating more instances which is called scaling
out. Another way of achieving the scaling is provisioning the larger role instances, also
called scaling up.
Configuring scaling is easier in Azure as compared to traditional hosting. The primary
server does not need to be taken down. It also eliminates the physical constraints of adding
resources.
Scaling features depend on the app service plan you opt for in Azure. There are five App
service plans in Azure:
Maximum Instances Auto-scaling Supported
Free 1 No
Shared 1 No
Basic 3 No
Standard 10 Yes
Premium 50 Yes
In free and shared service plan, you cannot scale the application as only one instance is
available. In basic plan, you can scale the application manually. This means you have to
check the metrics manually to see if more instances are needed and then can increase or
decrease them from your Azure management portal. In standard and premium plan, you
can choose to auto scale based on few parameters.
32. Scalability

Microsoft Azure
171
To see the all options available in different plans:
Step 1: Go to your web app in the management portal and select ‘scale’ from the top
menu. You can see under free service plan only 1 instance is created.
Step 2: Under shared plan, you can create 1 instance but you don’t have the option of
auto scaling.

Microsoft Azure
172
Step 3: Under basic service plan, you can create up to 3 instances but do have option to
auto scale. That means you can increase instances manually when you need to. Moreover,
you can choose the size of the instance.
Step 4: Under standard service plan, you can chose auto-scaling based on:
CPU percentage: You can choose to increase the instances depending upon the average
CPU percentage over a specified period of time. In the following image, you can see we
have chosen to increase the instances up to 3 if average CPU usage gets between 60%
and 80%.

Microsoft Azure
173
Schedule: You can set the number of instances that should run for a particular day of the
week or for a particular time in a day. Additionally, you can specify the dates when you
need to increase the instances.
Here premium option for this application is not discussed. You might see different options
based on your subscription for service plans. But the concept will remain the same.
Things to Consider
You can change the service plan even after creating it.
All the instances are from the same service plan. You cannot have one instance
from shared and another from standard for the same application. Thus, you cannot
mix and match instances from different service plans for the same application.
Even if you have opted for auto-scaling, you should keep a check on metrics and
performance of your application for the best out of Azure. This way you would be
able to save money as well as optimize the performance of the applications.

Microsoft Azure
174
You would have noticed that we can attach a disk to a virtual machine that we create in
Azure. We will be discussing those disks in this chapter. Disk here is referred to the data
disks that can be stored on Azure. All kinds of disks are virtual hard drives with .vhd
extensions. Vhds are the image file that stores the contents of physical hard drive. So they
are images of the files, which we usually find on our computer’s hard drive. There are two
types of virtual hard disks:
Operating system VHDs and Data Disks
Image VHDs
On the basis of the extendibility, there are two types of VHDs:
Fixed Size
Dynamically Expanding
Azure supports only fixed sized VHDs. If you have to upload expandable VHD you will have
to first convert it to fixed size VHDs. Maximum size supported by Azure is 1 terabyte for a
disk.
Virtual Machine and Disks
When we create a virtual machine, it always resides in a storage account in Azure account.
If there is no existing storage account in Azure, while attempting to create a virtual
machine, Azure will automatically create one. If you already have a storage account, it will
ask you to choose the storage account while creating a virtual machine. There is a detailed
how-to on creating a virtual machine in this tutorial.
Create/Attach a Disk in Virtual Machine
Step 1: Go to the virtual machine.
Step 2: Select ‘Dashboard’ from the top menu.
Step 3: Click ‘Attach disk’ -> Attach empty disk at the bottom of the screen.
33. Disk Configuration

Microsoft Azure
175
Step 4: Enter the details in the following screen that pops up.

Microsoft Azure
176
It will take few seconds to attach the disk to the virtual machine.
Configure the Disk in Virtual Machine
Step 1: Connect to the virtual machine through .rpd file downloaded on your local
machine.
Step 2: In the virtual machine, right-click the windows icon at the left bottom corner and
select ‘Disk Management’.
Step 3: You will see a message saying Disk is available on the screen. This is the same
disk that you attached in the previous step.

Microsoft Azure
177
Step 4: Before you can use it, you need to allocate it. You will see that it is still unallocated.
Scroll down on the same screen and locate the disk as shown in the following image, it is
Disk 2. Right-click on it and select ‘New Simple Volume’.

Microsoft Azure
178
Step 5: Follow the wizard. It will ask very general things, like naming the drive and file
system. In the last screen, make sure to keep the quick format option checked.
Step 6: After the wizard’s job is over, you will be ready to use the disk. In this example,
we have created the ‘F’ drive. You can create the folder and files or copy your data in the
F drive.

Microsoft Azure
179
Delete the Disk
You will have to first locate the disk in order to delete. Locating the right disk is very
important. When you create a virtual machine you select the storage account for it. Disks
reside in the storage account.
Step 1: Go to the storage account of the virtual machine.
Step 2: Click ‘Containers’ from the top menu.
Step 3: Click vhd.
Step 4: All the vhds in that storage account will be listed. This list will also contain the
vhds from other virtual machines so be very careful while selecting the vhd.
Step 5: Select the vhd you want to delete. You must know the name of the disk in order
to identify it among the several vhds in the list (when you attach the disk you are prompted
to enter the name of the disk).

Microsoft Azure
180
Image Disks
Create an image from Virtual Machine
Step 1: Go to the management portal.
Step 2: Select the virtual machine you want to create an image of.
Step 3: Click ‘Dashboard’ from the top menu.
Step 4: Click the ‘Capture’ icon at the bottom of the window.
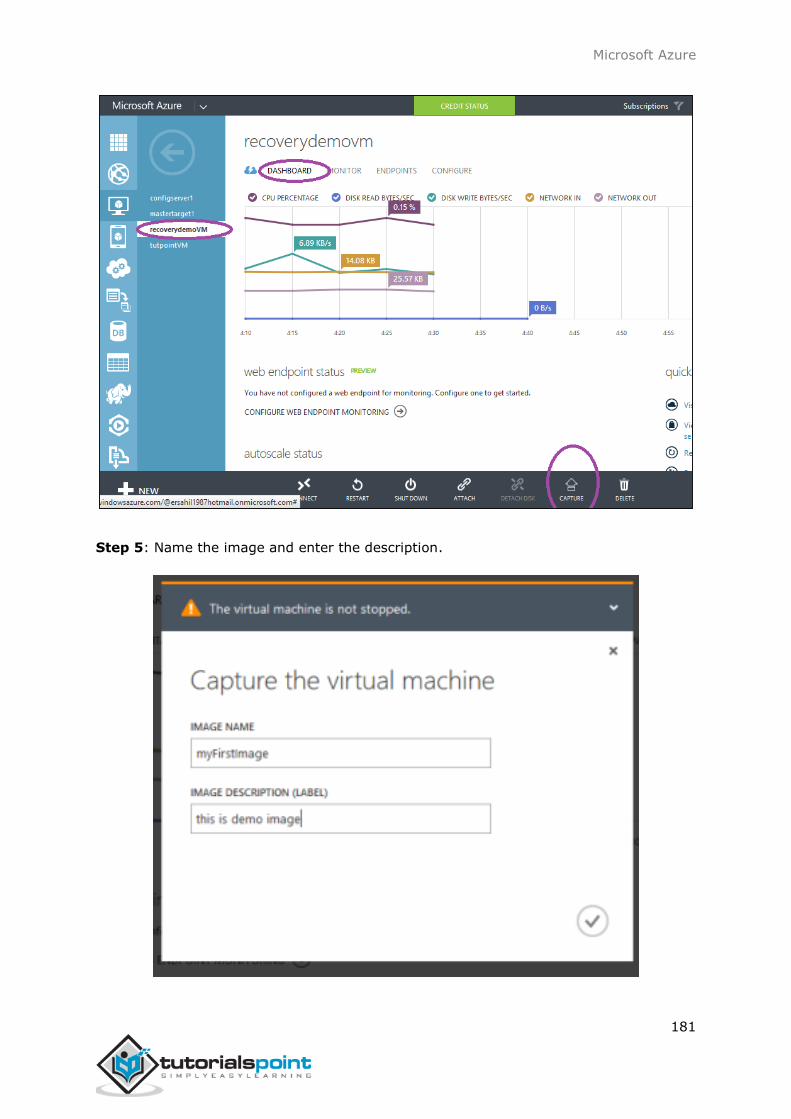
Microsoft Azure
181
Step 5: Name the image and enter the description.

Microsoft Azure
182
Step 6: Once capturing is done, to find the image, follow the points given below:
o Select Virtual Machines from the panel. All the virtual machines in your account will
be listed there.
o Click ‘Images’ from the top menu.
Create an Image from Your Computer
This is done through sysprep tool available in all modern Windows operating system.
Step 1: Go C drive -> Windows -> System32 -> Sysprep
Step 2: Alternatively copy the following path in the address bar
C:\Windows\System32\Sysprep
Step 3: Run ‘sysprep’ application. This will create a VHD file on your computer which is
the image of your machine.

Microsoft Azure
183
Considerations
You might get confused with the names of vhds, when you have multiple virtual machines
under the same storage account. A way of knowing the name of the vhds associated with
a particular machine is running ‘Get-AzureDisk’ cmdlet in Windows PowerShell. This cmdlet
will get you all the details of disks in each virtual machine.
Step 1: Run the following command
Get-AzureDisk
Step 2: Locate your virtual machine name in the list. Under that virtual machine, check
the diskname and medialink for your vhd name and link.

Microsoft Azure
184
We saw in the previous chapter ‘Disk Configuration’, how we had to choose cache
preference for the disk we attached. By default it is ‘none’. We can choose read-only or
read/write as per our requirements. This chapter will discuss how this setting affects the
performance of input/output operations.
Normally, cache settings make considerable improvement when read-write operations with
large amount of data are done. However, if lot of random I/O operations are done, turning
the cache off is preferable as operations on cache incur charges on the basis of number of
34. Disk Caching

Microsoft Azure
185
transactions. Random operations will not make any signification improvement in
performance.
Read cache improves the performance, when data is read before, during input-output
operations, and stored into cache. Also cache should be big enough to store all the data
For all the OS disks, in-memory caching is done by default unless it is turned off manually
by the user. If lots of random I/O operations on files are done in OS disks, it is better to
move them in a data disk where by default cache is turned off. Cache settings can be
manipulated using PowerShell command lets, APIs and Azure management portal. We can
set the cache from the management portal while creating virtual machines and data disks.

Microsoft Azure
186
We have two portals to access and manage our Azure service by logging in to our Azure
account. Azure management portal has some issues with responsiveness, thus a second
portal named preview portal was designed. The preview portal was launched later to
improve the user experience on tablets and mobile devices.
Clients, who are managing their services through Azure portal, often come here and Azure
team has provisioned the personalization of the look of Azure preview portal. Users can
choose the color and features to be displayed on the dashboard, which makes it easy for
them to navigate through the services in the portal. Let us see what can be personalized
in Azure preview portal.
You can directly login to the preview portal by visiting https://portal.azure.com/ and
using your Azure account or you can switch to it from Azure management portal. Azure
team keeps making little changes but the overall concept remains the same. So when you
try to customize your portal, it might look a little different but the basic features will remain
the same.
Step 1: Login to Azure management portal.
Step 2: Switch to Azure preview portal by clicking on your photo and choosing ‘Switch to
Azure Preview Portal’.
Step 3: You will see the following screen which is the dashboard of your Azure account.
The tiles in the middle of the screen are some of the common tasks performed by Azure
preview portal. To personalize these tiles click the ‘Settings Icon’ encircled.
35. Personalize Azure Access

Microsoft Azure
187
Step 4: It will take you to the following screen. You can maximize the screen by clicking
on the button encircled. You can choose from the available themes which will change the
background color of the screen. On the same screen, you can choose to show/hide the
command labels that display the name of the command. Similarly, you can enable/disable
the animations.

Microsoft Azure
188
Step 5: If you scroll down, you will see an option to change the language.
Step 6: You can also change the size of the tile. You can make it bigger or smaller. For
example, on the following screen if you want my resource groups bigger:
Right-click on the tile and choose customize.

Microsoft Azure
189
Alternatively, choose ‘customize’ from the top strip of the tile. It will appear when you
hoover your cursor over it.
Choose the size of the tile. Click ‘Done’ on the top of the screen.

Microsoft Azure
190
Step 7: You can also customize your dashboard by moving the tiles as per your choice.
You just have to drag and drop the tile to a different location on the screen.
Step 8: You can pin any of your resources to the dashboard.
Go to the resource. Right-click on it or click the three dots.

Microsoft Azure
191
Click on the ‘Pin to Dashboard’.
When you come back to the dashboard by clicking on the ‘Microsoft Azure’ at the top left
corner, you will see the resource there as shown in following image.

Microsoft Azure
192
When a company has many applications, they might want to have the company’s look and
feel on the sign-in page of those applications. There could be several objectives behind
this, including marketing. Companies that use Azure Active Directory for identity
management can do it by customizing the appearance of the sign-in page.
This feature is available for basic and premium editions of Azure Active Directory. You
won’t find this in free edition.
If you don’t have subscription to basic or premium edition you can have a free trial of
premium edition.
Active Free Trial of Azure Active Directory (ADD) Premium Edition
Step 1: Login to your Azure Management Portal.
Step 2: Go to Azure Active Directory you want to work with.
Step 3: Click on ‘Licenses’ tab from the top menu as shown in the following image.
36. Personalize Company Branding

Microsoft Azure
193
Step 4: Click ‘Try Azure Active Directory Premium Now’ and it will be activated for that
directory.
Refresh your page as it might take a few seconds to update and show up on your portal.
Once it is activated, you will see the plan under ‘Licenses’ tab.
Customize Branding
Before moving ahead, make sure that the images (logo, background, square background)
you want to display on the sign-in page are of correct sizes and dimensions. If you don’t
take care of this, you would waste your time uploading images and then ultimately you
will find that branding changes are not done. Here are certain specifications:
Image Size in kb Recommended
Dimensions
Maximum
Dimensions
Supported
Format
Logo 5-10 60-280 60-300 png/jpeg
Square Logo 5-10 240-240 240-240 png/jpeg
Square Logo
Dark Theme 5-10 240-240 240-240 png/jpeg
Sign-in page
illustration
500 (300
recommended) 1420-1200 1420-1200 Png/jpeg/gif

Microsoft Azure
194
Step 1: Go to the directory you want to work with.
Step 2: Click on ‘Configure’ tab from the top menu.
Step 3: Click ‘Customize Branding’ button. The following pop-up will appear.

Microsoft Azure
195
Step 4: Enter the details and upload the images.
Step 5: Click Next and enter the details.

Microsoft Azure
196
After you are done, do look for the notifications at the bottom of the window to make sure
that changes are accepted. In the following image, you can see a notification in red outline
which shows that it wasn’t successful in a previous attempt and threw an error. If the
changes are not accepted and an error occurs, click ‘Details’ button to find the cause.
Usually this occurs when the size and dimension of images to be uploaded are not correct.
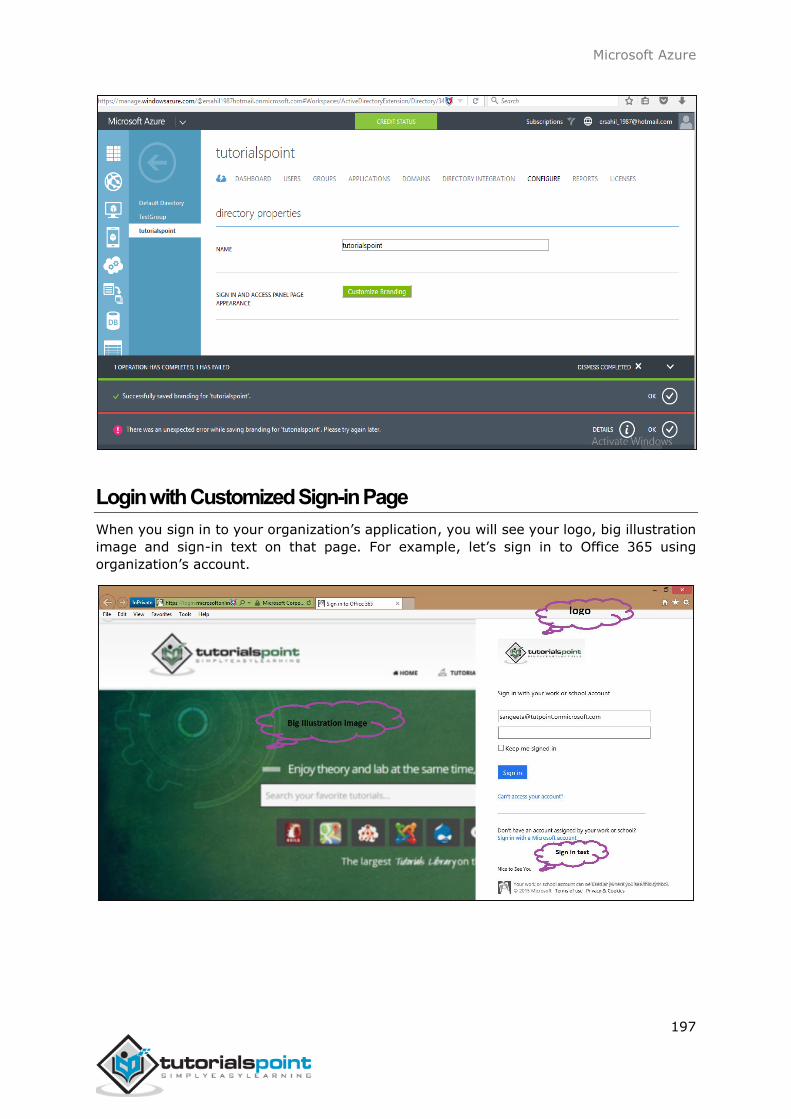
Microsoft Azure
197
Login with Customized Sign-in Page
When you sign in to your organization’s application, you will see your logo, big illustration
image and sign-in text on that page. For example, let’s sign in to Office 365 using
organization’s account.
Microsoft Azure
198
Things to Consider
Domain name should be active.
It might take up to an hour for changes to appear on the sign-in page.
To test, choose ‘in-private’ session of internet explorer (or corresponding session
in other browser where cookies don’t affect your browsing).
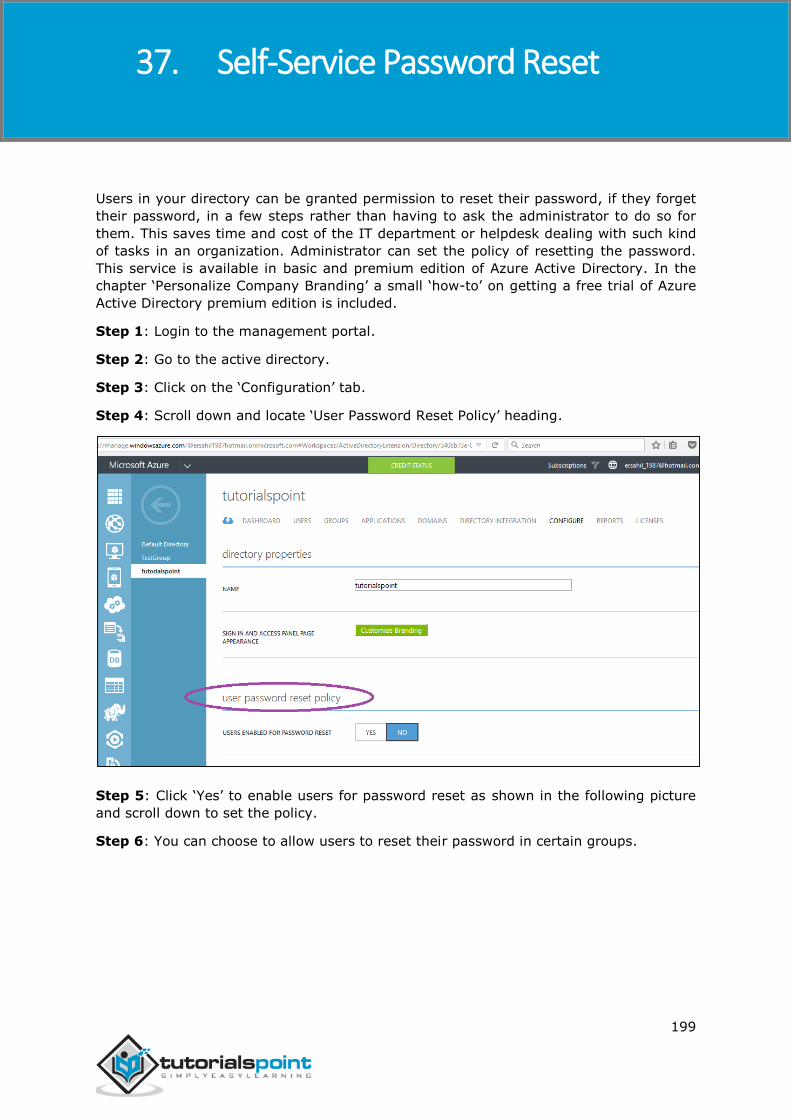
Microsoft Azure
199
Users in your directory can be granted permission to reset their password, if they forget
their password, in a few steps rather than having to ask the administrator to do so for
them. This saves time and cost of the IT department or helpdesk dealing with such kind
of tasks in an organization. Administrator can set the policy of resetting the password.
This service is available in basic and premium edition of Azure Active Directory. In the
chapter ‘Personalize Company Branding’ a small ‘how-to’ on getting a free trial of Azure
Active Directory premium edition is included.
Step 1: Login to the management portal.
Step 2: Go to the active directory.
Step 3: Click on the ‘Configuration’ tab.
Step 4: Scroll down and locate ‘User Password Reset Policy’ heading.
Step 5: Click ‘Yes’ to enable users for password reset as shown in the following picture
and scroll down to set the policy.
Step 6: You can choose to allow users to reset their password in certain groups.
37. Self-Service Password Reset

Microsoft Azure
200
Step 7: Refer to the image above; you have four options to choose from to authenticate
the password reset. For example, let’s choose two of them here. Users in this case will be
able to use their mobile phone or alternate e-mail address to verify the password reset.

Microsoft Azure
201
Step 8: In ‘Number of Authentication Methods Required’ dropdown, if you choose 2 than
users will have to provide two identification information (e.g. mobile phone and office
phone). In this example, let’s leave it as one.
Step 9: Next option is whether you want them to register for self-password reset or not.
If you choose ‘No’, the administrator will have to do it for each user individually.
Step 10: ‘Customize "Contact Your Administrator" link. You can give a specific webpage
link or an e-mail id where the user can contact when he encounters a problem while
resetting his password.
Step 11: Click ‘Save’ at the bottom of the screen.
Next time when users login to access their account, they will be asked to register for
password reset service where they can feed in their phone number or e-mail address. This
information will be used when they forget/lose their password. In this example, as the
policy set, they can choose from one of the options for verification code, through a call on
their mobile phone, a text on their mobile phone or through an e-mail to an alternate e-
mail address.

Microsoft Azure
202
Users can themselves create groups in the access panel. Let us see how to enable users
to create and join groups.
Policy Setup for Self-service Group Management
Step 1: Login into the management portal.
Step 2: Go to the Active Directory.
Step 3: Click ‘Configure’ tab from the top menu.
Step 4: Scroll down and locate ‘group management’ heading. Here you can choose to let
users create and manage their own group. There are 6 things that you need to set under
this heading. Azure team keeps adding the features.
Step 5: First option is ‘Delegated Group Management enabled’. If you choose yes, it will
allow you to handover authority to manage the groups to users through the access panel
which is the main purpose.
38. Self-Service Group Management
Microsoft Azure
203
Step 6: Second option is whether users can create security groups.
Step 7: Third option is you can choose either to allow all users to manage groups or some
of them. If you choose ‘Some’ you will have to specify the group.
Step 8: Fourth option is, it lets you enable/disable the users to create groups in Office
365.
Step 9: Fifth option is, if you want to allow some of the users to create and manage groups
for Office 365, you will have to specify them.
Step 10: Last option, is to enable dedicated group. If you choose to enable them you will
be asked to add the group members.
After you have made changes, a ‘Save’ button will appear at the bottom of the screen to
save changes.

Microsoft Azure
204
In this section, we are creating a group. The user who creates the group is the owner of
the group and he can add or delete members in the group. Since we granted permissions
to users to create their own group in the previous step, any user in this directory can
create and manage a group.
Step 1: Go to the Access Panel by visiting https://myapps.microsoft.com
Step 2: Login to your azure Account.
Step 3: At the top, you will see ‘Groups’. Click on it to create a new group.
Step 4: Choose ‘My groups/All’ from the dropdown at the top.
Step 5: Click on ‘Create new Group’.
Step 6: The following screen will pop up. Enter the name and description of the group.
39. Create a Group

Microsoft Azure
205
Step 7: You can let all users to join the group or choose them to ask for the group owner’s
approval before joining the group. I have chosen the first option in which approval of the
owner is required. This means users who want to join the group other than users added,
will have to ask for approval.
Step 8: Choose the desired option and click ‘Create’.
Step 9: Come back to the ‘Groups’ page. To add members to the group, select the group.
In this case, let’s select ‘Developers Group’.

Microsoft Azure
206
Step 10: Click ‘Add Members’.
Step 11: The following pop-up will list all the users in the directory. You can add the
members by clicking on their name.

Microsoft Azure
207
Step 12: You can add/delete member, edit group’s description, and delete group on this
page. Also you can make someone else the owner of this group.
If someone wants to join the group, he will ask for the owner’s approval. The owner will
get a notification and will see the request in ‘approvals’ tab of the access panel as shown
in the image above. Also, if someone has requested to join a group that is owned by
someone else, he will see his requests here.
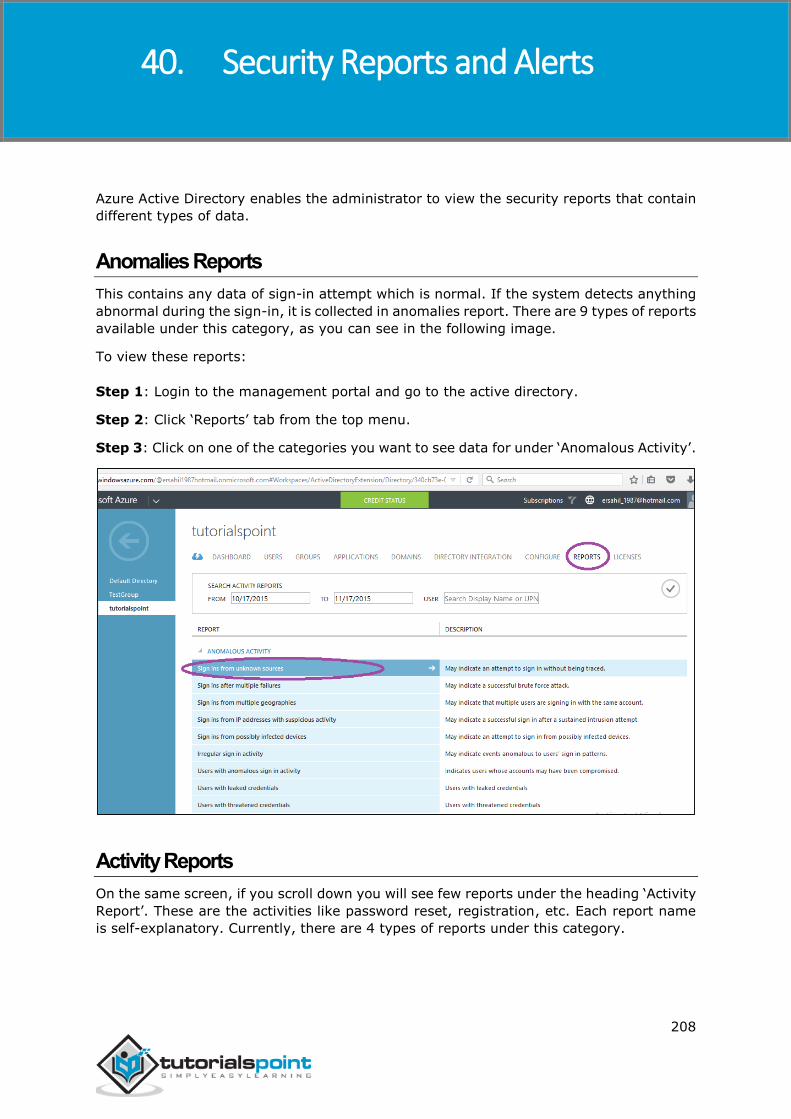
Microsoft Azure
208
Azure Active Directory enables the administrator to view the security reports that contain
different types of data.
Anomalies Reports
This contains any data of sign-in attempt which is normal. If the system detects anything
abnormal during the sign-in, it is collected in anomalies report. There are 9 types of reports
available under this category, as you can see in the following image.
To view these reports:
Step 1: Login to the management portal and go to the active directory.
Step 2: Click ‘Reports’ tab from the top menu.
Step 3: Click on one of the categories you want to see data for under ‘Anomalous Activity’.
Activity Reports
On the same screen, if you scroll down you will see few reports under the heading ‘Activity
Report’. These are the activities like password reset, registration, etc. Each report name
is self-explanatory. Currently, there are 4 types of reports under this category.
40. Security Reports and Alerts
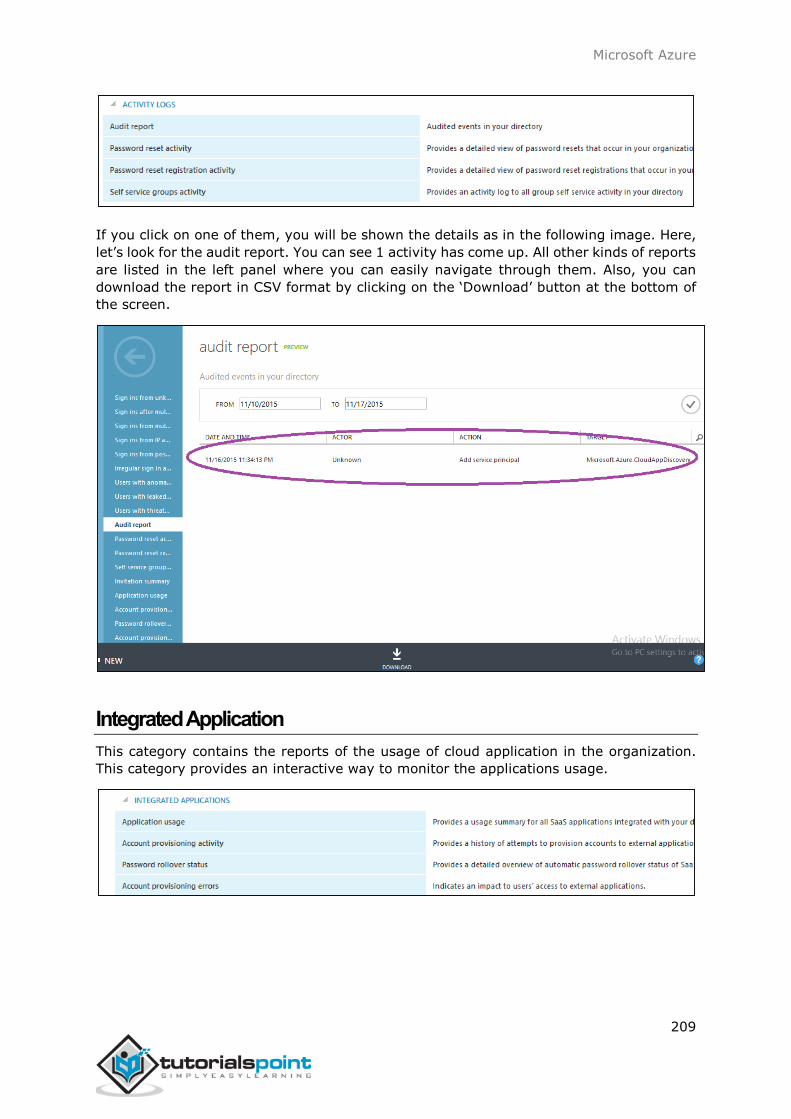
Microsoft Azure
209
If you click on one of them, you will be shown the details as in the following image. Here,
let’s look for the audit report. You can see 1 activity has come up. All other kinds of reports
are listed in the left panel where you can easily navigate through them. Also, you can
download the report in CSV format by clicking on the ‘Download’ button at the bottom of
the screen.
Integrated Application
This category contains the reports of the usage of cloud application in the organization.
This category provides an interactive way to monitor the applications usage.
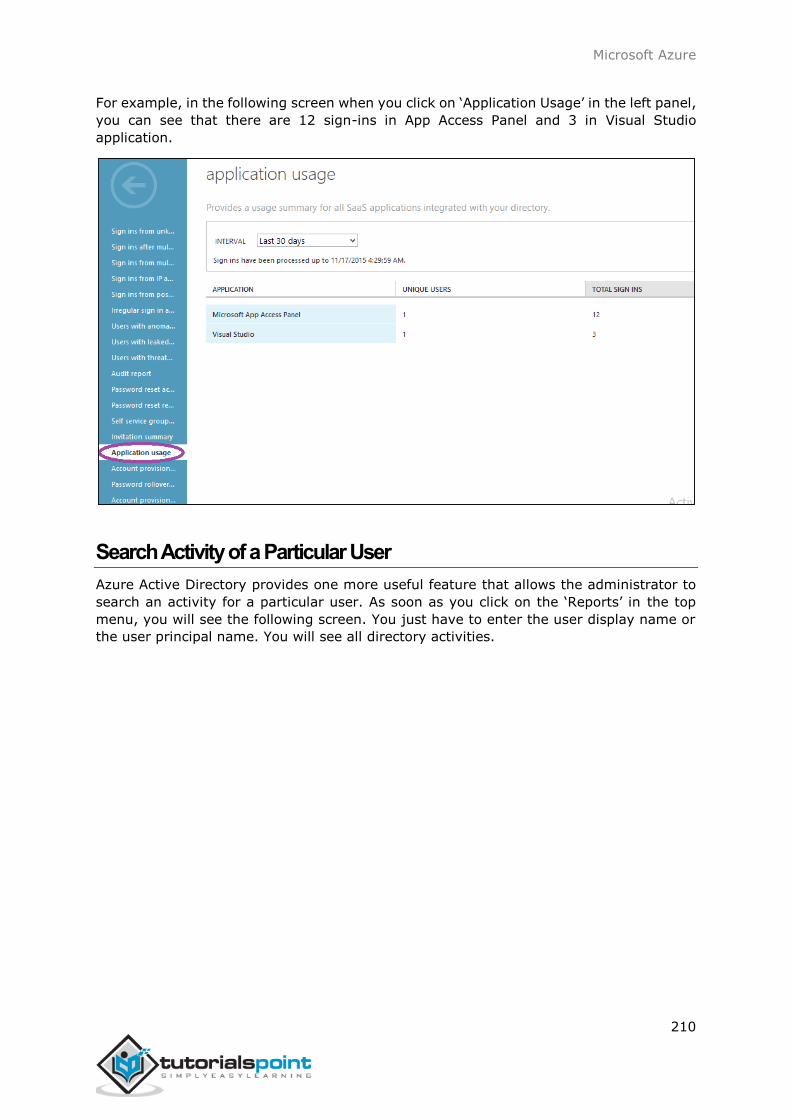
Microsoft Azure
210
For example, in the following screen when you click on ‘Application Usage’ in the left panel,
you can see that there are 12 sign-ins in App Access Panel and 3 in Visual Studio
application.
Search Activity of a Particular User
Azure Active Directory provides one more useful feature that allows the administrator to
search an activity for a particular user. As soon as you click on the ‘Reports’ in the top
menu, you will see the following screen. You just have to enter the user display name or
the user principal name. You will see all directory activities.

Microsoft Azure
211
In the above screen, we have searched by entering the display name of the user and the
user’s activity details with time and date are listed on the screen.
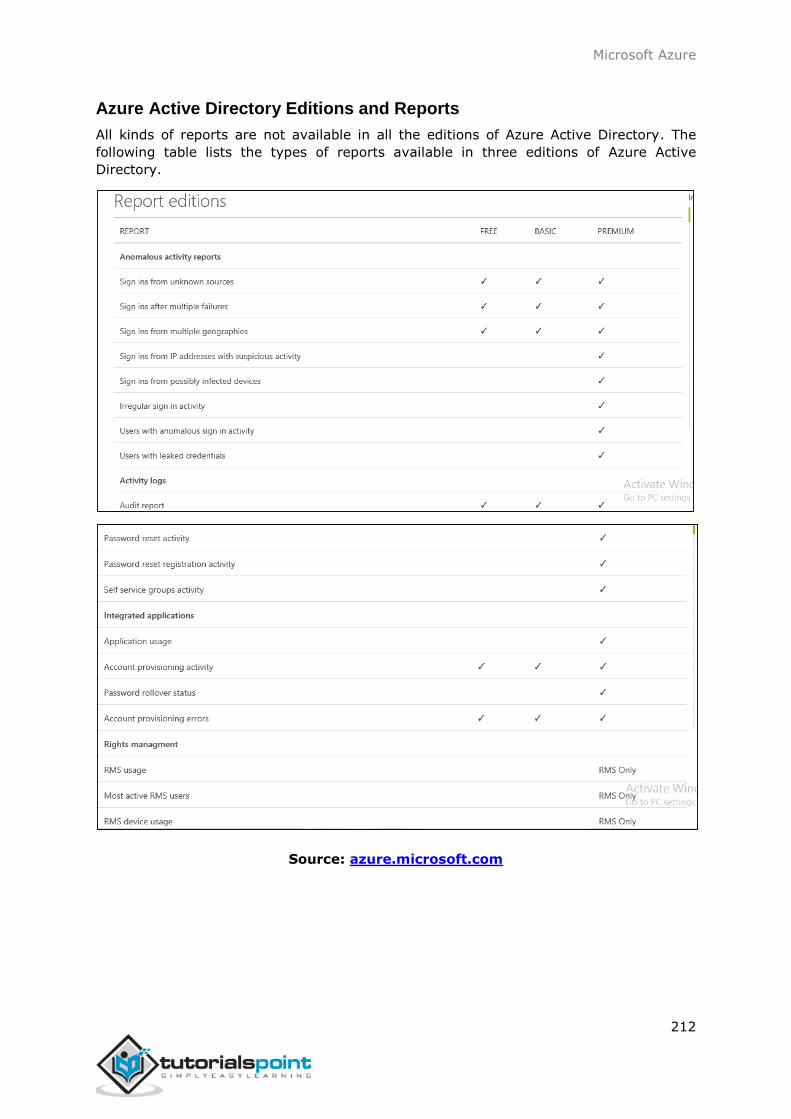
Microsoft Azure
212
Azure Active Directory Editions and Reports
All kinds of reports are not available in all the editions of Azure Active Directory. The
following table lists the types of reports available in three editions of Azure Active
Directory.
Source: azure.microsoft.com

Microsoft Azure
213
Orchestrated recovery is one of the features in Azure Site Recovery service. Azure Site
Recovery automates the recovery of applications in case of failover at the primary site.
This recovery is done in a coordinated way to restore the applications even if they have
multi-tier workload. With multitier applications a coordinated recovery is essential to
restore the service quickly, which is a challenging part of IT disaster and recovery tasks.
However with the cloud technology, this has become very a simple and easy task.
In order to activate orchestrated site recovery you have to create a recovery plan. This
can be done in Azure Management portal. The plans created for disaster recovery can be
tested without interrupting the service.
Create a Site Recovery Vault
Step 1: Login to your Azure management portal.
Step 2: Click ‘New’ at the left bottom corner.
Step 3: Click Data Services -> Recovery Services -> Site Recovery Vault -> Quick Create.
Step 4: Enter the name and select the region. Make sure this vault is in the same region
where virtual machines and networks are residing.
Step 5: You will be redirected to the following screen. On the following screen, you can
see a dropdown. If you expand the dropdown, you will see the different scenarios in which
recovery can be configured.
41. Orchestrated Recovery

Microsoft Azure
214
Here you have to choose the recovery scenario according to the organization’s
requirements. Let’s discuss each scenario in detail:
Between On-premises VMM Site and Azure
In this scenario, on-premises virtual machines are replicated to Azure. There are few
prerequisite for this on-premise resources.
Virtual machine server running on Windows server 2012 R2.
Virtual machine server should have at least one cloud to be protected.
Cloud should have at least one VMM host group and Hyper-V host server, or cluster
and virtual machine on Hyper-V host server.
Setting up site recovery is a very methodological task. If you are not ready with all the
prerequisites mentioned above, after going through few steps in the task you might have
to revert back.
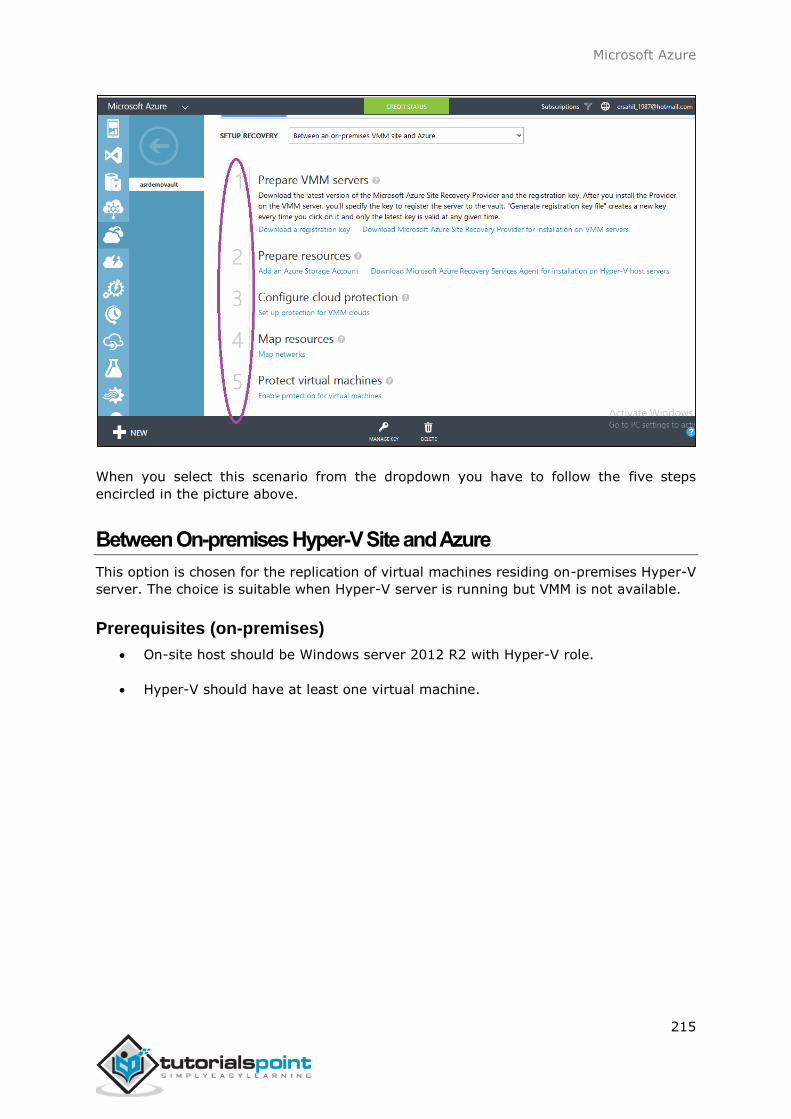
Microsoft Azure
215
When you select this scenario from the dropdown you have to follow the five steps
encircled in the picture above.
Between On-premises Hyper-V Site and Azure
This option is chosen for the replication of virtual machines residing on-premises Hyper-V
server. The choice is suitable when Hyper-V server is running but VMM is not available.
Prerequisites (on-premises)
On-site host should be Windows server 2012 R2 with Hyper-V role.
Hyper-V should have at least one virtual machine.
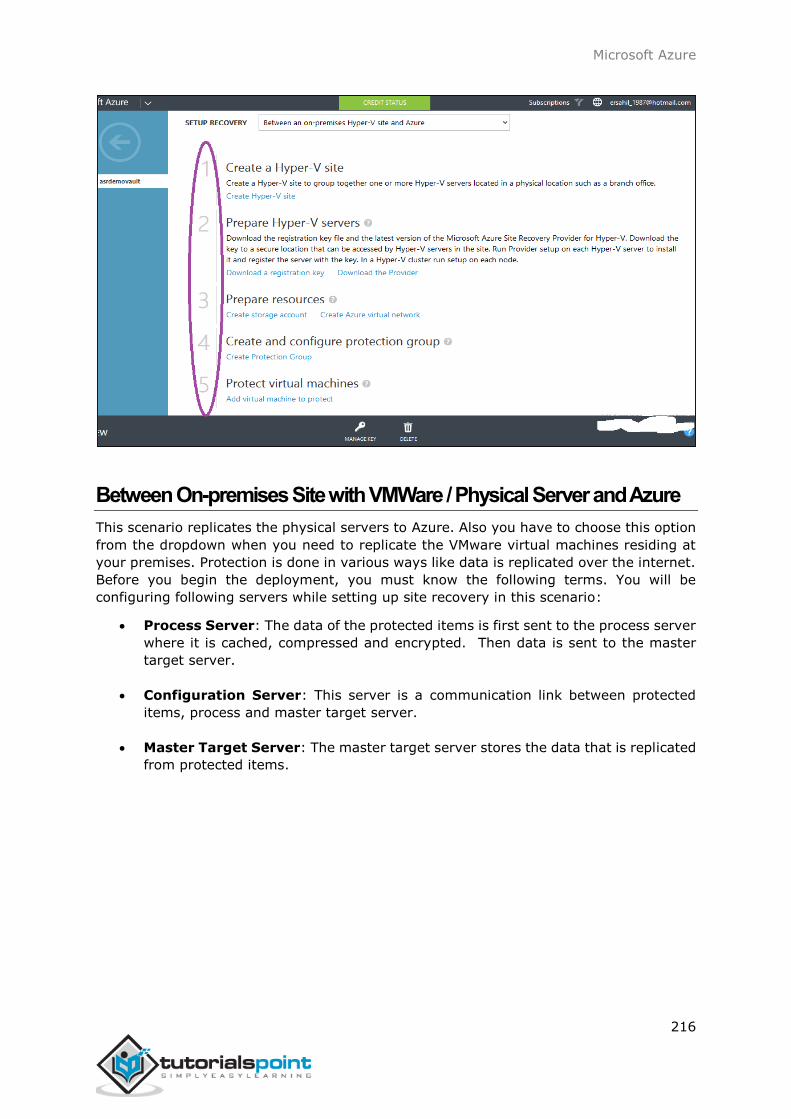
Microsoft Azure
216
Between On-premises Site with VMWare / Physical Server and Azure
This scenario replicates the physical servers to Azure. Also you have to choose this option
from the dropdown when you need to replicate the VMware virtual machines residing at
your premises. Protection is done in various ways like data is replicated over the internet.
Before you begin the deployment, you must know the following terms. You will be
configuring following servers while setting up site recovery in this scenario:
Process Server: The data of the protected items is first sent to the process server
where it is cached, compressed and encrypted. Then data is sent to the master
target server.
Configuration Server: This server is a communication link between protected
items, process and master target server.
Master Target Server: The master target server stores the data that is replicated
from protected items.

Microsoft Azure
217
Between Two On-premises VMWare Sites

Microsoft Azure
218
Between Two On-premises VMM Sites and SAN Array Application
In this scenario, the on-premises VMM site is replicated to another site. The Hyper-V virtual
machines on this site are protected through Storage Array Based (SAN) replication. An
organization can take benefit from this option if it has an existing SAN infrastructure.
Prerequisites
The following image describes the prerequisite for this scenario to be deployed.

Microsoft Azure
219
Source: https://azure.microsoft.com/en-us/documentation
Create a Recovery Plan
When you are done setting up site recovery for one of your chosen scenario, in your
management portal you will have to create a recovery plan to orchestrate your recovery.
Step 1: In the management portal, go to Azure Site Recovery vault you are working with.
Step 2: Select ‘Recovery Plans’ from the top menu. You will see different options based
on your choice of scenario and resources registered in the recovery vault.
Step 3: You can create the recovery plan for site recovery as desired. It will also tell you
any prerequisite task, in case you have missed any step in the process.
Step 4: The customized plan created here can be executed in case of failover to
orchestrate recovery. The services can be made available at a secondary site.

Microsoft Azure
220
Continuous health monitoring is one of the features of Azure Site Recovery. You don’t have
to subscribe to this feature exclusively. In the previous chapter, we saw how Azure Site
Recovery can be configured for different scenarios. Once all the configurations are done,
the Hyper-V recovery manager monitors the health of the protected resource instances
continuously. It is done by Hyper-V recovery manager remotely from Azure. This
procedure consists of collecting the metadata of virtual machines which is used for
recovery.
What is happening in Azure Site Recovery is, the metadata is continuously collected for
recovery purpose. Every time when data is transferred as a function of continuous health
monitoring, it is always encrypted, thus it is safe and secure.
The data is replicated at the secondary site. The secondary site is made available in case
of failover. In order to ensure that everything is working fine, test failover can be carried
out. Planned and unplanned failovers are two circumstances in which the secondary site
is to be made available. The planned failover is usually done for testing, maintenance, etc.
while unplanned failover happens when a disaster occurs. No matter what kind of failover,
the virtual machines on the primary site are continuously monitored and the metadata is
collected. Thus, continuous health monitoring is a feature that keeps the data at the
secondary site always available.
In addition to the back-up and orchestrated recovery, Azure Site Recovery continuously
monitors the health of all its resource instances.
42. Health Monitoring
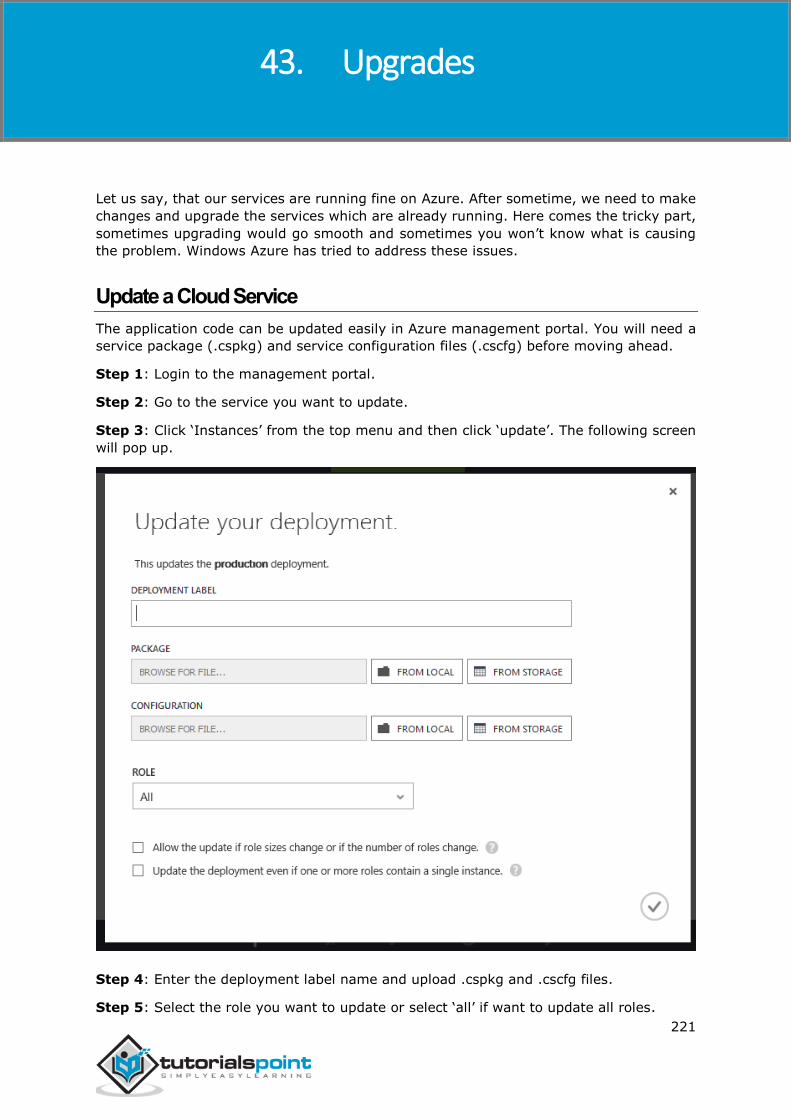
Microsoft Azure
221
Let us say, that our services are running fine on Azure. After sometime, we need to make
changes and upgrade the services which are already running. Here comes the tricky part,
sometimes upgrading would go smooth and sometimes you won’t know what is causing
the problem. Windows Azure has tried to address these issues.
Update a Cloud Service
The application code can be updated easily in Azure management portal. You will need a
service package (.cspkg) and service configuration files (.cscfg) before moving ahead.
Step 1: Login to the management portal.
Step 2: Go to the service you want to update.
Step 3: Click ‘Instances’ from the top menu and then click ‘update’. The following screen
will pop up.
Step 4: Enter the deployment label name and upload .cspkg and .cscfg files.
Step 5: Select the role you want to update or select ‘all’ if want to update all roles.
43. Upgrades

Microsoft Azure
222
Step 6: Check the checkbox as required and click the ‘Arrow’ on the right side.
VIP (Virtual IP) Swap
You might come across a scenario, when you need to make changes to the architecture of
service. Azure provisions a way which can handle the upgrading easily. There are two
deployment environments - production and staging. Let’s assume that your service is at
production, but you can deploy the new version in the staging environment. After that you
just test it and if everything is fine, you swap it with the production deployment. Behind
the scene, the virtual IPs of production and staging deployment are swapped, hence
staging becomes production and production becomes staging. While the swapping
happens, the service is not interrupted. All this is done with no downtime for service. It
also makes it easy to rollback to older production version in case you need to do it.
Step 1: Login to the management portal.
Step 2: Go to the service. Select ‘Instances’ from the top menu. You can see in the
following screen, two instances are there for this service.
Step 3: When you have deployed the service in staging and production you will see that
‘Swap’ at that bottom of the screen is activated. You just have to click that Swap icon and
it will be done.
Considerations
You can’t swap if you have different number of endpoints for each deployment.
It does not change the IP address of your service.