Embed Size (px)
Citation preview

2. Valley fold the bill at the “r” in federal.
Dollar Bill Enterpri$eBy Perry Bailey Copyright 1999
1. Fold up the bill into eighths so that the words “Federalreserve note” are visible on one side. Then unfold tillonly the two outer 1/8ths are folded in. Turn over.
3. Collapse the bill back together while making thefolds shown on the top layer. This should result in a90 degree turn, when collapsed
4. The bill should look like this. Now turnthe bill so that the long bottom part faces awayfrom you and open the center two layers.
7. This should resembleat least a little the threedimension object younow hold, if you ignoreevery thing but the veryback end of it.
6. Now this is a little more difficult.What you do is you fold the top partforward toward the long part of the billwhile bringing the bottom of the modeltogether. Note this will not close thebottom of the model completely - seenext diagram.
5. Now ignore thelong piece facingaway from you.Grasp the outer threelayers of the bill andpull them out so thatyou can see 4 eighthsof the bill.
8. Fold the sides out one moreeighth on each side whilefolding the flap downwards.
F E D E R A L R E S E R V E N O T E
F E D E R A L R E S E R V E N O T E

10. This is easy just foldunder on both sides.
9. Easily the most confusing move ofthis model is this one. What you do is toslide a little of the paper (1st layer)forward a bit mainly towards the centerof the model. Later this will be used tocreate domes at the front of the nacelles.
12. Fold up a sixteenth whilefolding the sides down to a point.
13. An unlucky step this if you were lucky on the 1st go then you can fold down about a sixteenth at the front of the nacelles while only folding a part of the paper from step 9 back in while folding the sides up to form the nacelles
14. Now you get to see the whole modelagain for a bit, hurrah! Now if we are alldone with the back patting and what not,pull out the trapped layers as shown tomake it look all nice and tidy!
16. Well this one is another of the fewdead easy bits that make putting up withthe parts you have to fudge up a littleeasier! Mountain-fold part of the bottomof the nacelle up behind. This finishesshaping the nacelle and gives us anotherbit to help lock the model together.
15. Now here the dollar bill gives usa bit of help by giving a reference ofthe folding the white part of the billover to keep it all in trim.
17. Fold down and flatten the front of the model using the second E and R in the word “RESERVE” as the reference for this fold.
Editors note: Don’t ask me!... I didn’t have theheart nor the know-how to edit this step. A goldenexample of when it’s easier to just look at the diagram.
R A L R E S E R V E N O T E
11. Now you have to fold the paperunderneath or else there will be lessnacelle and too much body.
R A L R E S E
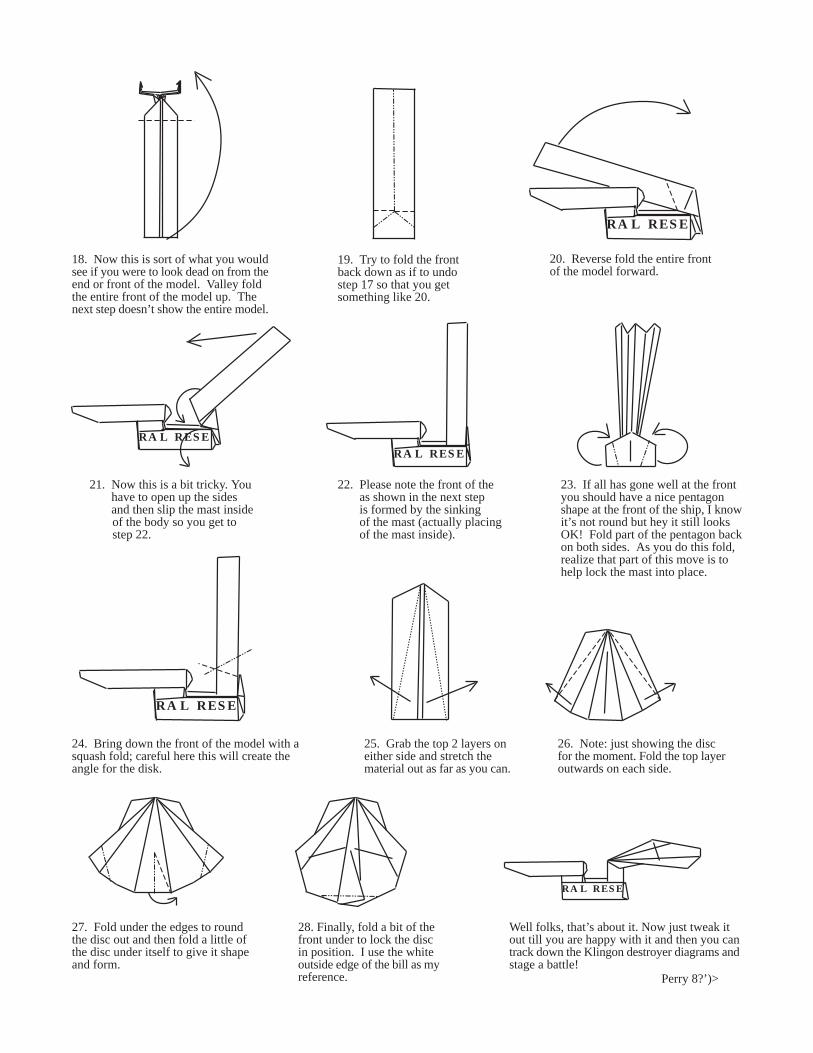
19. Try to fold the frontback down as if to undostep 17 so that you getsomething like 20.
20. Reverse fold the entire frontof the model forward.
R A L R E S E
18. Now this is sort of what you wouldsee if you were to look dead on from theend or front of the model. Valley foldthe entire front of the model up. Thenext step doesn’t show the entire model.
21. Now this is a bit tricky. You have to open up the sides and then slip the mast inside
of the body so you get tostep 22.
22. Please note the front of the as shown in the next step is formed by the sinking of the mast (actually placing of the mast inside).
23. If all has gone well at the frontyou should have a nice pentagonshape at the front of the ship, I knowit’s not round but hey it still looksOK! Fold part of the pentagon backon both sides. As you do this fold,realize that part of this move is tohelp lock the mast into place.
24. Bring down the front of the model with asquash fold; careful here this will create theangle for the disk.
25. Grab the top 2 layers oneither side and stretch thematerial out as far as you can.
R A L R E S E
26. Note: just showing the discfor the moment. Fold the top layeroutwards on each side.
28. Finally, fold a bit of thefront under to lock the discin position. I use the whiteoutside edge of the bill as myreference.
27. Fold under the edges to roundthe disc out and then fold a little ofthe disc under itself to give it shapeand form.
Well folks, that’s about it. Now just tweak itout till you are happy with it and then you cantrack down the Klingon destroyer diagrams andstage a battle!
Perry 8?’)>
R A L R E S ER A L R E S E

![DiVA portal1179243/... · 2018. 2. 14. · [Ir(cod)Cl]2 KOtBu, THF 71% yield Ph NN Cl PPh2 Ph NN Ph2P BArF 39% yield 70% yield 8 5 9 6 2 2 N Ir P Ph BArF Catalyst 10 N Ph 1) EtOH,80](https://img.dokumen.tips/doc/110x75/609d183f6a762936fa5630b5/diva-portal-1179243-2018-2-14-ircodcl2-kotbu-thf-71-yield-ph-nn.jpg)