Embed Size (px)
Citation preview

DocVerify Document Library
www.docverify.com

www.docverify.com – Document Library
www.docverify.com P a g e | 2
Table of Contents
Step 1 – Create a New PDF Document OR Existing PDF: .......................................................... 4
Step 2 – Click “Add New”: ...................................................................................................... 4
Step 3 – Add New Library Document Button: ......................................................................... 5
Step 4 – Select PDF File: ......................................................................................................... 6
Step 5 – Access Library Document: ......................................................................................... 7
Step 6 – Select From List: ....................................................................................................... 8
Step 7 – Add or Edit Elements: ............................................................................................... 9
Appendix A – Document Library Features: ........................................................................... 10
Appendix B – Detect Fields: ................................................................................................. 11
Reference A – Easy Sign System Add-on: .............................................................................. 12
Reference B – External Connectors: ..................................................................................... 13
Reference C – Viewing PDF Text Fields: ................................................................................ 14
Reference D – InstaForm: .................................................................................................... 15

www.docverify.com – Document Library
www.docverify.com P a g e | 3
What is DocVerify’s Document Library?
The document library allows you to save frequently used documents to your library in order to avoid
having to upload them or creating signature elements every time. Library documents can be quickly
accessed through the web portal, the Easy Sign System, and DocVerify API’s. Please refer to the
DocVerify Developer Portal for more information about the Easy Sign System and API’s.
How it Works?
The following document will walk you through the steps necessary to add a document to the library, and
some of the features found in the Document Library system.
DocVerify Smart Tags
When adding new template documents to the library you can also utilize Smart Tags. DocVerify Smart
Tags allow you to directly place signature elements onto the PDF document either as PDF text fields or
as embedded text. For more information about Smart Tags, please refer to our Smart Tags
documentation located at the DocVerify Developers Portal.
Requirements
Please remember that the file must be a PDF and under 1MB in size.
Online Help
Please always refer to DocVerify’s online help for more help information about this and other features.

www.docverify.com – Document Library
www.docverify.com P a g e | 4
Step 1 – Create a New PDF Document OR Existing PDF:
First, you must create a PDF document that you wish to upload into the system OR have an existing PDF
document. You can easily convert any of your Word files as PDF’s or create a new PDF document using
Adobe Acrobat or other PDF based tools.
Step 2 – Click “Add New”:
Now that you’ve created a new PDF document or have one you want to use, sign in to the DocVerify
portal, and click “Add New” as shown below.

www.docverify.com – Document Library
www.docverify.com P a g e | 5
Step 3 – Add New Library Document Button:
Now click “Add New Document to Library” as shown below.
www.docverify.com – Document Library
www.docverify.com P a g e | 6
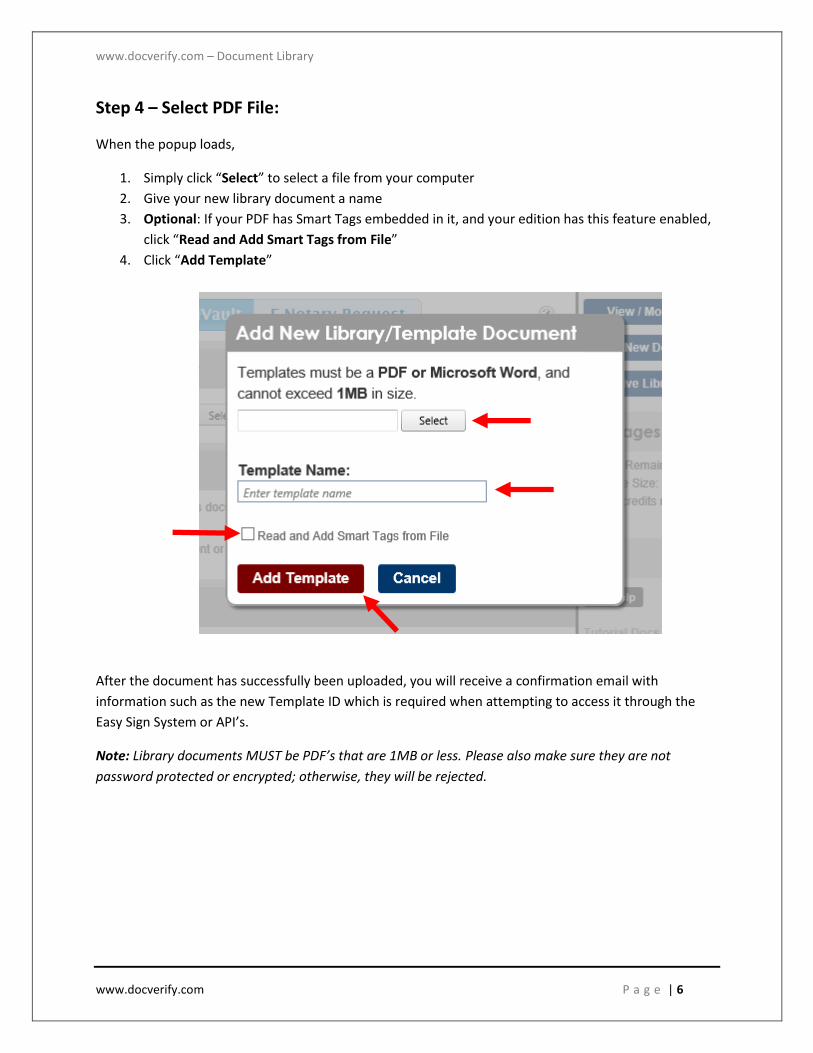
Step 4 – Select PDF File:
When the popup loads,
1. Simply click “Select” to select a file from your computer
2. Give your new library document a name
3. Optional: If your PDF has Smart Tags embedded in it, and your edition has this feature enabled,
click “Read and Add Smart Tags from File”
4. Click “Add Template”
After the document has successfully been uploaded, you will receive a confirmation email with
information such as the new Template ID which is required when attempting to access it through the
Easy Sign System or API’s.
Note: Library documents MUST be PDF’s that are 1MB or less. Please also make sure they are not
password protected or encrypted; otherwise, they will be rejected.

www.docverify.com – Document Library
www.docverify.com P a g e | 7
Step 5 – Access Library Document:
Once you have successfully uploaded the new library document, let’s go ahead and access it in order to
set the signature elements, get Easy Sign access information, get access information for external
connectors such as Wufoo, or get the InstaForm information if your edition supports these features.
Click on the “View/Modify Library Docs” button to go to the Document Library page, and when the
page loads select the document you want from the list.

www.docverify.com – Document Library
www.docverify.com P a g e | 8
Step 6 – Select From List:
The Document Library allows you to view which documents you’ve currently uploaded into DocVerify, if
your edition supports the sharing feature from here you will be able to share documents with others in
your group, and you will also be able to access the document itself to edit the signature elements.
If elements have already been set for any Library document it will have a “Signers 1”, “Signers 2”, etc.
next to it, and if the elements have not been set it will state “Elements Not Set”
To Share or Unshare a document, simply click the “Share” or “Unshare” button as shown below.
Lets go ahead and access the document in order to add or edit the signature elements by clicking the
“Edit / Get Info” button of the resepective library document we wish to access.

www.docverify.com – Document Library
www.docverify.com P a g e | 9
Step 7 – Add or Edit Elements:
This step will cover how to add or edit elements onto the document, but it will not cover some of the
other features found on the page. Please refer to the appendix for more information about the other
features. At anytime you can switch to another template by click “Switch Templates” or click on the
instructions for more step by step information.
1. Select a signer
2. To add new elements
o Select the page you want the elements to appear on
o Click on the desired element such as “Signature”, click and hold it with your left mouse
button
o Drag and drop the desired elements directly onto the page
3. When finished, click “Save” at the top when you’re done and you want to exit the page.
1
2
3

www.docverify.com – Document Library
www.docverify.com P a g e | 10
Appendix A – Document Library Features:
The Library system has basic features available to most documents as described below.
Template ID – The Template ID is the ID you need in order to be able to access this library document
using the Easy Sign system add-on, external connectors such as Wufoo, or with InstaForm.
Template Name – This box allows you to set the name of your library document. This can be changed at
any time.
Download Template – At any time you can download any of your library documents from DocVerify by
clicking this button.
Replace Template – At any time you can replace any one library document by clicking this button;
however, this should be used with caution if the document is being accessed from Easy Sign, external
connectors, InstaForm, or any other API function as it can cause those systems not to function properly
as a result.
Copy to another template – This feature allows you to copy the elements you’ve created in the library
document you’ve opened to another library document in your list.
Start Over – At any time you can use this button to clear all the elements you have set in your library
document to start over.
Detect Fields – This powerful feature will detect the PDF text fields that may be in the PDF, and it will
automatically create the form fields for you in order for the receiving party to be able to fill out. Please
refer to Appendix B for more information about this feature.

www.docverify.com – Document Library
www.docverify.com P a g e | 11
Appendix B – Detect Fields:
The detect fields feature is a powerful feature that will automatically locate PDF text fields and create
DocVerify form fields allowing the signer to fill in the information during the signing process. Upon
signing, all the information entered by the signer will be used to populate the actual PDF text fields in
the PDF itself.
In the example below, we are going to upload the IRS I9 form, and use the “Detect Fields” feature to
locate and place the form fields for us within the document.
1. Load a document library. Please refer to the steps of this guide on how to add a new library
document, and how to access it.
2. Click the “Detect Fields” button
3. Click “Ok” on the alert box.
4. If the document has PDF text fields and they conform to the standards, the library document will
now load with the fields as shown below. By default, all located fields are set to Signer 1.
The signer will now be able to fill in this I9 form at time of signing.

www.docverify.com – Document Library
www.docverify.com P a g e | 12
Reference A – Easy Sign System Add-on:
After you have successfully uploaded any document template into your library, you can easily access
that document through the Easy Sign System. The Easy Sign will allow you to place the DocVerify
Signature System directly onto your own website, allowing the first signer to sign the document without
being redirected to DocVerify or additional email requests.
As a convenience, we’ve included the Easy Sign URL’s you will need. To get to the document library
please follow the steps found in this guide. The Easy Sign Iframe information can be found by scrolling
down the page as shown below.
Note: The Easy Sign System may require additional activation, please contact DocVerify sales for more
information [email protected].
Note: This feature is not supported with all editions.

www.docverify.com – Document Library
www.docverify.com P a g e | 13
Reference B – External Connectors:
After you have successfully uploaded any document template into your library, you can easily access
that document through other external systems in addition to the Easy Sign System. DocVerify is always
adding new connectors such as Wufoo an online form builder.
As a convenience, the external connector system has URL builders for these services such as Wufoo.
To get the external connector, please follow the steps below:
1. Load the document library. To get to the document library please follow the steps found in this
guide.
2. Click “Create External Connectors”.
3. When the pop-up opens, select the provider.
Note: This feature is not supported with all editions.

www.docverify.com – Document Library
www.docverify.com P a g e | 14
Reference C – Viewing PDF Text Fields:
As a convenience the document library system will automatically locate the non-Smart Tags based PDF
text fields for you, and present them to you in a list so that you can reference them as well as creating
the required XML for each PDF text field needed when accessing the document from the DocVerify API.
To get the PDF text fields, please follow the steps below:
1. Load the document library. To get to the document library please follow the steps found in this
guide.
2. Click “View Text Fields / Get XML”.
3. When the pop-up opens, copy and paste the information needed.

www.docverify.com – Document Library
www.docverify.com P a g e | 15
Reference D – InstaForm:
DocVerify InstaForm’s is another powerful feature which will allow you to place any of your document
library files on either your website or placed as a link in your emails in order to have the person sign a
document.
How it works:
When a person clicks on the link, they will be redirected to a page where they will need to provide their
name and email address. Once they enter that information, they will receive a PIN code to the email
address they provided. After they enter the correct PIN, they will then sign the library document
instantly.
To get to Instaform, please follow the steps below:
1. Load the document library. To get to the document library please follow the steps found in this
guide.
2. Scroll down to the InstaForm section.
3. Copy and paste the link from the box.
4. If you also need to sign the document, you can select the option from the list.
Note: This feature is not supported with all editions.