Embed Size (px)
Citation preview
SureSelectXT Automated Target Enrichment for Illumina Paired-End Sequencing Library
Document No.: MCCRD-SOP0005 Version: 1.2
Effective Date: 12/01/2014 Page No.: Page 1 of 33
Table of Contents
1.0 PURPOSE/SCOPE .........................................................................................................................................1
2.0 REFERENCE DOCUMENTATION .............................................................................................................1
3.0 BACKGROUND ............................................................................................................................................2
4.0 EQUIPMENT* ...............................................................................................................................................2
5.0 REAGENTS/MATERIALS* .........................................................................................................................3
6.0 AUTOMATION METHODS .........................................................................................................................4
7.0 SAFETY .........................................................................................................................................................4
8.0 PROCEDURE ................................................................................................................................................4
9.0 ATTACHMENTS: APPENDIX 1: DETAILED SCICLONE AUTOMATION STEPS. ............................26
10.0 REVISION HISTORY .................................................................................................................................33
1.0 PURPOSE/SCOPE
This Standing Operating Procedure (SOP) describes Automated DNA Library Preparation for Agilent SureSelect XT Target Enrichment System used/performed by the Molecular Characterization and Clinical Assay Development Laboratory (MoCha) at the Frederick National Laboratory for Cancer Research. This SOP applies to the Patient-Derived Models Repository effort. This SOP is for research purposes only and no clinical samples will be processed using this SOP. Any deviation from this SOP will be noted but will not be formally documented.
2.0 REFERENCE DOCUMENTATION
Document Number Title
G7530-90000 SureSelectXT Target Enrichment System for Illumina Paired-End Multiplexed Sequencing Library Protocol
http://www.agilent.com/cs/library/usermanuals/Public/G7530-90000.pdf
N/A Fragment Analyzer Automated CE System Quick Start Guide—96 Capillary DNF-473 Standard Sensitivity NGS Fragment Analysis Kit, (1 bp-6000 bp)
http://www.aati-us.com/sites/default/files/DNF-473%20Quick%20Start%20Guide_96Capillary_2015NOV03.pdf
N/A User’s Guide: Agilent SureSelectXT Target Enrichment on the Sciclone NGS Workstation
N/A Fragment Analyzer™ Automated CE System Quick Start Guide –96 Capillary DNF-474 High Sensitivity NGS Fragment Analysis Kit, (1 bp - 6,000 bp)
SureSelectXT Automated Target Enrichment for Illumina Paired-End Sequencing Library
Document No.: MCCRD-SOP0005 Version: 1.2
Effective Date: 12/01/2014 Page No.: Page 2 of 33
Document Number Title
http://www.aati-us.com/documents/quick-start-guides/dnf-474/dnf-474-quick-start-guide-96-capillary-11-03-2015.pdf
4375799 Rev. E Applied Biosystems Veriti Thermal Cycler User Guide
https://tools.thermofisher.com/content/sfs/manuals/cms_042832.pdf
3.0 BACKGROUND
This procedure is to be used to prepare whole exome libraries from DNA samples for use on the Illumina HiSeq Sequencing platform. The resulting DNA libraries are suitable for paired-end, multiplexed sequencing applications.
4.0 EQUIPMENT*
Description Model #
Vendor Multi-Channel Pipettes (LTS 20,200,1000)
Variable Rainin
Vortex 58816-121 VWR
MiniFuge 93000-196 VWR
Plate Centrifuge 022628203 Eppendorf
Veriti 96 well thermal cycler 4375786 ABI
Covaris Ultrasonicator E220 Covaris
PCR Workstation AC648LFUVC AirClean Systems
Fragment Analyzer, 96 capillary electrophoresis system
Fragment Analyzer Advanced Analytical
Vacuum concentrator SpeedVac Savant
Sciclone G3 Automated Workstation
Sciclone G3 Perkin Elmer
Argos Technologies Omega Single-Channel Pipet Controller
03-391-253 Fisher Scientific
Zephyr Automated Workstation Zephyr Perkin Elmer
*Or comparable/equivalent (include unless must use listed)
SureSelectXT Automated Target Enrichment for Illumina Paired-End Sequencing Library
Document No.: MCCRD-SOP0005 Version: 1.2
Effective Date: 12/01/2014 Page No.: Page 3 of 33
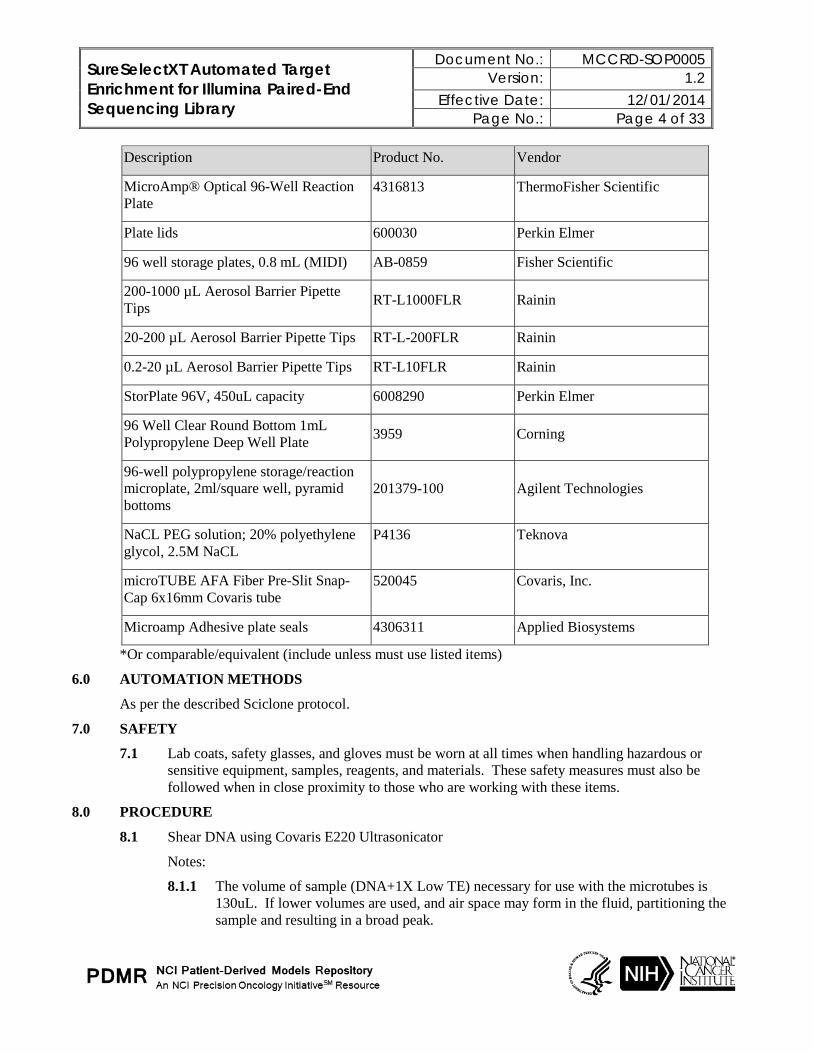
5.0 REAGENTS/MATERIALS*
Description Product No. Vendor
Standard Sensitivity NGS Fragment Analysis Kit (1 bp - 6,000 bp)
DNF-473-0500 Advanced Analytical
Herculase II Fusion DNA Polymerase 600679 Agilent
High Sensitivity NGS Fragment Analysis Kit (1 bp- 6000 bp)
DNF-474 Advanced Analytical
Nuclease-free Water various various
Agencourt AMPure XP Kit A63881 Beckman Coulter
1X Low TE Buffer 12090-015 Life Technologies
Ethanol, 100% for molecular biology E7023 Sigma-Aldrich
Elution Buffer (EB) 19086 Qiagen
SureSelectXT Reagent Kit, HSQ G9611B Agilent
SureSelectXT Human All Exon V5 5190-6209 Agilent
Dynabeads MyOne Streptavidin T1 65602 Life Technologies
1.5-mL LoBind Tube 022431021 Eppendorf
Fisherbrand 96 DeepWell 1 mL plate 12-566-120 Fisher Scientific
Eppendorf™ 96-Well twin.tec™ PCR Plates
E951020346 Fisher Scientific
Disposable Standard Serological Pipets, 25 mL capacity
13-678-14B Fisher Scientific
Disposable Standard Serological Pipets, 10 mL capacity
13-678-12E Fisher Scientific
384 well U bottom plate 3672 Corning
Hard-Shell 96 well PCR plate HSP9631 Bio-Rad
150 uL Barrier Sterile 96 Rack tips for Sciclone
111426 Perkin Elmer
Seahorse polypropylene reservoir, 170ml, 12 column
201250-100 Agilent Technologies
SureSelectXT Automated Target Enrichment for Illumina Paired-End Sequencing Library
Document No.: MCCRD-SOP0005 Version: 1.2
Effective Date: 12/01/2014 Page No.: Page 4 of 33
Description Product No. Vendor
MicroAmp® Optical 96-Well Reaction Plate
4316813 ThermoFisher Scientific
Plate lids 600030 Perkin Elmer
96 well storage plates, 0.8 mL (MIDI) AB-0859 Fisher Scientific
200-1000 µL Aerosol Barrier Pipette Tips RT-L1000FLR Rainin
20-200 µL Aerosol Barrier Pipette Tips RT-L-200FLR Rainin
0.2-20 µL Aerosol Barrier Pipette Tips RT-L10FLR Rainin
StorPlate 96V, 450uL capacity 6008290 Perkin Elmer
96 Well Clear Round Bottom 1mL Polypropylene Deep Well Plate 3959 Corning
96-well polypropylene storage/reaction microplate, 2ml/square well, pyramid bottoms
201379-100 Agilent Technologies
NaCL PEG solution; 20% polyethylene glycol, 2.5M NaCL
P4136 Teknova
microTUBE AFA Fiber Pre-Slit Snap-Cap 6x16mm Covaris tube
520045 Covaris, Inc.
Microamp Adhesive plate seals 4306311 Applied Biosystems
*Or comparable/equivalent (include unless must use listed items)
6.0 AUTOMATION METHODS
As per the described Sciclone protocol.
7.0 SAFETY
7.1 Lab coats, safety glasses, and gloves must be worn at all times when handling hazardous or sensitive equipment, samples, reagents, and materials. These safety measures must also be followed when in close proximity to those who are working with these items.
8.0 PROCEDURE
8.1 Shear DNA using Covaris E220 Ultrasonicator
Notes:
8.1.1 The volume of sample (DNA+1X Low TE) necessary for use with the microtubes is 130uL. If lower volumes are used, and air space may form in the fluid, partitioning the sample and resulting in a broad peak.
SureSelectXT Automated Target Enrichment for Illumina Paired-End Sequencing Library
Document No.: MCCRD-SOP0005 Version: 1.2
Effective Date: 12/01/2014 Page No.: Page 5 of 33
8.1.2 Fragment size generation is affected by treatment duration. A longer duration will produce smaller fragments.
8.1.3 Bath water should be clean distilled, deionized water as foreign materials such as algae and particulates may scatter the high frequency focused acoustic beam, resulting in a shift to larger mean fragment size.
8.1.4 Insufficient degas levels within the bath may result in poor acoustic coupling and thereby shift the mean fragment size. System degas pumps should be run at least 60 minutes in advance of, as well as during, treatments.
8.1.5 Warmer temperatures will cause a shift toward larger mean fragment size. Bath temperature should be closely monitored.
8.2 Attention should be paid to maintaining a consistent water level.
8.2.1 Do not remove the snap-cap of the microTUBE prior to sample processing.
8.2.2 Prepare the Covaris for shearing
8.2.2.1 Open the Sonolab E220 program on the desktop of the computer attached to the E220 in 433 room 13.
8.2.2.2 Set the chiller to the correct temperature. When set at 3⁰C, the software temperature display should settle near 7⁰C.
8.2.2.3 Push the green door button and pull the handle to access the chamber of the E220.
8.2.2.4 Fill the water tank of the E220 to level 6 on the graduated fill line level with fresh deionized, distilled water. The microTUBE should be partially immersed in the water during shearing.
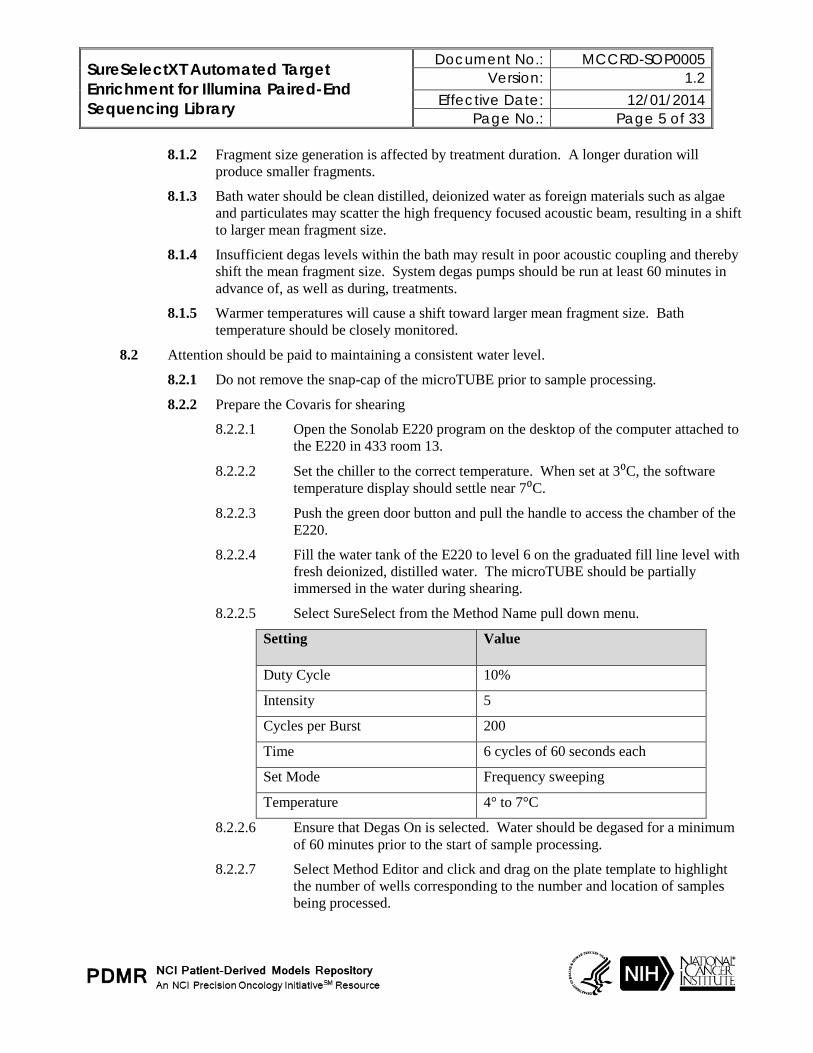
8.2.2.5 Select SureSelect from the Method Name pull down menu.
Setting Value
Duty Cycle 10%
Intensity 5
Cycles per Burst 200
Time 6 cycles of 60 seconds each
Set Mode Frequency sweeping
Temperature 4° to 7°C
8.2.2.6 Ensure that Degas On is selected. Water should be degased for a minimum of 60 minutes prior to the start of sample processing.
8.2.2.7 Select Method Editor and click and drag on the plate template to highlight the number of wells corresponding to the number and location of samples being processed.
SureSelectXT Automated Target Enrichment for Illumina Paired-End Sequencing Library
Document No.: MCCRD-SOP0005 Version: 1.2
Effective Date: 12/01/2014 Page No.: Page 6 of 33
8.2.3 Prepare DNA samples for shearing
8.2.3.1 Prepare all samples to shear 600 ng total DNA in 130ul total volume. Use 1X Low TE to normalize DNA volumes. Use 1.5 mL Lobind tubes to prepare samples.
8.2.3.2 Label one Covaris microTUBE for each DNA sample to be sheared. Label with a lab marker on the side of the lip of the snap cap portion of the tube.
8.2.3.3 Vortex sample tubes to mix.
8.2.3.4 Briefly centrifuge the sample tubes to remove drops from the walls of the tubes and insides of the lids.
8.2.3.5 Use a pipet tip to transfer each 130ul DNA+TE sample to the appropriately labeled microTUBE by inserting the pipette tip through the pre-split septa. With the pipette tip approximately halfway down the interior of the tube and alongside the interior wall, slowly discharge the fluid into the tube. Be careful not to introduce a bubble into the bottom of the tube. This may happen if the sample is loaded too quickly.
8.2.4 Load DNA samples on the Covaris and perform shearing
8.2.4.1 Load the microTUBES in the microTUBE rack. Attach the flat top portion of the tube rack.
8.2.4.2 Select Load Plate in the Sonolab E220 software.
8.2.4.3 Press the green door button and pull the handle to access the chamber of the E220. Load the plate onto the black plate holder in the chamber. Close the door.
8.2.4.4 Select Start in the Sonolab E220 software.
8.2.4.5 When processing is complete remove plate with samples from the E220.
8.3 Perform post-shearing cleanup on the Sciclone
8.3.1 Open Maestro software on the SciClone.
8.3.2 Open “SureSelect XT Workbook” worksheet in Excel.
8.3.3 Enter number of columns to be processed in each tab of the “SureSelect XT Workbook”, then save the file.
8.3.4 Open “SSXT Initial SPRI Cleanup” method within the Maestro software.
8.3.5 Let the AMPure XP beads come to room temperature for at least 30 minutes.
8.3.6 Mix the AMPure beads well so that the reagent appears homogeneous and consistent in color. Do not freeze.
8.3.7 Transfer sheared DNA from microTUBEs to plate and purify using Agencourt AMPureXP beads on the SciClone G3.
8.3.7.1 Add the sheared DNA library (~130 μL) to the 450ul/well sample plate, and place the plate onto the SciClone deck according to the deck layout.
SureSelectXT Automated Target Enrichment for Illumina Paired-End Sequencing Library
Document No.: MCCRD-SOP0005 Version: 1.2
Effective Date: 12/01/2014 Page No.: Page 7 of 33
8.3.8 Set up the Sciclone according to reagent layouts listed on the workbook file and the prompts when the start button is pushing within the method.
8.3.8.1 Add 180 μL of homogeneous AMPure XP beads to each well of a 96 well BioRad hard shell plate, and place the plate onto the SciClone deck according to the deck layout.
8.3.8.2 Add 80% Ethanol to appropriate labware and place on the SciClone deck according to the deck layout.
8.3.8.3 Add Qiagen EB buffer to appropriate labware and place on the SciClone deck according to the deck layout.
8.3.8.4 Add tip boxes and additional labware to the SciClone deck according to the deck layout.
8.3.9 Press start to begin procedure.
8.3.10 When “SSXT Initial SPRI Cleanup” program is complete, cover sample plate with lid and place plate on ice while setting up for quality assessment.
8.3.11 Note: Stopping Point - If you do not continue to the next step, store the samples at -20°C.
8.4 Assess quality of sheared post-cleanup DNA samples using the Fragment Analyzer
8.4.1 Dilute 1 µl of sample with 1 µl Qiagen EB and load on an Advanced Analytical Fragment Analyzer using Standard Sensitivity NGS Fragment Analysis Kit.
8.4.2 Allow Inlet Buffer, Capillary Conditioning Solution, Gel, and Intercalating Dye to come to room temperature prior to mixing.
8.4.3 Allow standard sensitivity marker and ladder to come to room temperature
8.4.4 Mix appropriate volumes of Intercalating Dye and Separation Gel necessary for one day of operation. Use the supplied 50 mL conical centrifuge tube to allow a small minimum working volume. For larger volumes, use a 250 mL conical centrifuge tube and remove the collar of the tube holder in the instrument reagent compartment.
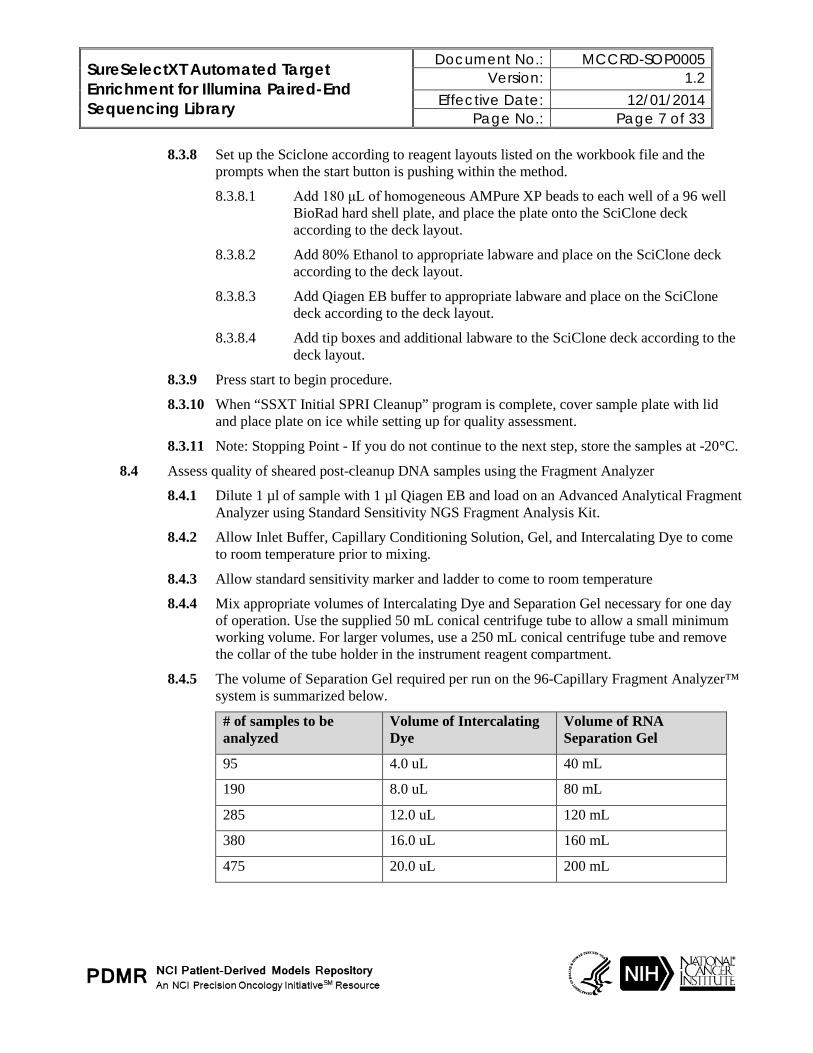
8.4.5 The volume of Separation Gel required per run on the 96-Capillary Fragment Analyzer™ system is summarized below.
# of samples to be analyzed
Volume of Intercalating Dye
Volume of RNA Separation Gel
95 4.0 uL 40 mL
190 8.0 uL 80 mL
285 12.0 uL 120 mL
380 16.0 uL 160 mL
475 20.0 uL 200 mL

SureSelectXT Automated Target Enrichment for Illumina Paired-End Sequencing Library
Document No.: MCCRD-SOP0005 Version: 1.2
Effective Date: 12/01/2014 Page No.: Page 8 of 33
8.4.6 Place the Separation Gel/ Intercalating Dye mixture onto the instrument and insert into the desired gel fluid line (Gel 1 or Gel 2 pump position). Ensure the fluid line is positioned at the bottom of the conical tube to avoid introducing air bubbles, which can cause pressurization errors.
8.4.7 When adding Separation Gel to the instrument, update the solution levels in the Fragment Analyzer instrument control software. From the Main Menu, select Utilities ― Solution Levels. A menu will be displayed to enter in the updated fluid levels.
8.4.8 When switching applications (e.g., between NGS and RNA kits), prime the appropriate
gel fluid line after loading fresh gel/dye mixture. From the Main Menu of the Fragment Analyzer instrumental control software, select Utilities ― Prime… Select the desired fluid line(s) (Conditioning, Gel 1, or Gel 2) and press OK to purge the fluid line with fresh gel.
8.4.9 In a clean container, add 20 mL of the 5X 930 dsDNA Inlet Buffer per 80 mL of
deionized sub-micron filtered water. Agitate to mix. The entire bottle can be mixed to 1X concentration and stored at 4°C if desired.
8.4.10 In a clean container (e.g. 50 mL or 250 mL conical centrifuge tube), add 20 mL of the 5X Capillary Conditioning Solution per 80 mL of deionized sub-micron filtered water. Agitate to mix. The entire bottle can be mixed to 1X concentration and stored at room temperature if desired.
8.4.11 Once mixed, place the 1X Capillary Conditioning Solution onto the instrument and insert the CONDITIONING fluid line (Conditioning Solution pump position). Ensure the fluid line is positioned at the bottom of the conical tube to avoid introducing air bubbles, which can cause pressurization errors. Update the solutions levels in the Utilities section of the Fragment Analyzer software.

SureSelectXT Automated Target Enrichment for Illumina Paired-End Sequencing Library
Document No.: MCCRD-SOP0005 Version: 1.2
Effective Date: 12/01/2014 Page No.: Page 9 of 33
8.4.12 Check the fluid level of the waste bottle and waste tray daily and empty as needed.
8.4.13 Prepare a fresh 96 DeepWell 1mL Plate filled with 1.0 mL/well of 1X 930 dsDNA Inlet Buffer daily. Do NOT overfill the wells of the inlet buffer plate. Place buffer plate in Drawer “B”.
8.4.14 Prepare a fresh sample plate filled with 200 µL/well of 0.6X TE Rinse Buffer daily. Place rinse plate in Drawer “M”
8.4.15 Using a fresh half-skirted 96-well sample plate, pipette 22 µL of the Standard Sensitivity NGS Diluent Marker to each well in a row that is to contain sample or NGS Ladder. Fill any unused wells within the row of the sample plate with 24 µL/well of BF-1 Blank Solution.
8.4.16 Pipette 2 µL of each diluted sample into the respective wells of the sample plate; mix the contents of the well using the pipette by aspiration/expulsion in the pipette tip.
8.4.17 After mixing sample/NGS Ladder and Diluent Marker in each well, centrifuge the plate to remove any air bubbles. Check the wells of the sample plate to ensure there are no air bubbles trapped in the bottom of the wells. The presence of trapped air bubbles can lead to injection failures.
8.4.18 For best results, run the plate as soon as possible. If the sample plate will not be used immediately, cover the sample plate with foil/seal, store at 4°C and use within the same day. Spin the plate again if any bubbles developed in the sample wells. Be sure to remove the cover film before placing the plate into the instrument.
8.4.19 In the Separation Setup pop-up form, left click the dropdown and select the appropriate preloaded experimental Method file. The available methods are sorted by kit number and are linked to the directory containing methods for the currently installed capillary array length (e.g., 22cm, 33cm or 55cm). Select DNF-473-(33 or 55) - SS NGS Fragment 1-6000bp.mthds.
8.4.20 Select the appropriate Gel line being used for the experiment (Gel 1 or Gel 2) using the dropdown menu.
8.4.21 Prior to starting the experiment, verify all trays (buffer/storage, rinse, waste, sample, etc.) have been loaded into their respective drawer locations.
8.4.22 Press the Play icon ( ) to start the sequence loaded into the queue. To Pause the queue
after the currently running experiment is completed, press the pause icon ( ). To Clear the run queue of all loaded runs, press the clear ( ) button.
8.4.23 Using ProSize 2.0, perform a smear analysis to quantify the amount of amplified library.
8.4.23.1 Click Option
8.4.23.2 Click Set Global Configuration
8.4.23.3 Click on the Smear Analysis Tab
8.4.23.4 Enter the Start size as 40 bp
8.4.23.5 Enter the End size as 2000 bp

SureSelectXT Automated Target Enrichment for Illumina Paired-End Sequencing Library
Document No.: MCCRD-SOP0005 Version: 1.2
Effective Date: 12/01/2014 Page No.: Page 10 of 33
8.4.23.6 Click Apply
8.4.23.7 Click File
8.4.23.8 Click Export Data
• Click Smear Analysis radio button
8.4.23.9 Click Export
• Open the exported smear analysis csv file. The column labeled ng/uL contains the concentration information
8.4.24 Inspect the fragment analyzer traces to ensure that sheared samples have a peak size of 150 to 200 bp.
8.5 Library preparation using the SciClone
8.5.1 Open “SSXT Library Prep” program in Maestro software.
8.5.2 Prepare End Repair, A-Tailing, and Ligation reaction mixes (prepare on ice):
8.5.2.1 Prepare the reaction mixes according to the “SureSelect XT Workbook”, using tables found under the “SS XT Lib Prep” tab or see tables below. Mix well on a vortex mixer.
End Repair Mix 1 Sample
10x End Repair Buffer 5
dNTP Mix 0.8
T4 DNA Polymerase 1
Klenow DNA Polymerase 2
T4 Polynucleotide Kinase 2.2
Water 10
Total 21
A-tailing Mix 1 Sample
10x Klenow DNA Polymerase Buffer 5
dATP 1
Exo(-) Klenow DNA Polymerase 3
Water 11
Total 20

SureSelectXT Automated Target Enrichment for Illumina Paired-End Sequencing Library
Document No.: MCCRD-SOP0005 Version: 1.2
Effective Date: 12/01/2014 Page No.: Page 11 of 33
Adapter Ligation Mix 1 Sample
5x T4 DNA Ligase Buffer 10
InPE Adapter oligo mix 10
T4 DNA Ligase 1.5
Water 15.5
Total 37
8.5.2.2 Add appropriate amounts of each master mix to the Master Mix plate, according to the “SureSelect XT Workbook”.
8.5.3 Set up the Sciclone for library preparation
8.5.3.1 Add appropriate amount of PEG solution to plate, according to the “SureSelect XT Workbook” and place on the SciClone deck according to the deck layout.
8.5.3.2 Add appropriate amount of SureSelect Adaptor Oligos to plate, according to the “SureSelect XT Workbook” and place on the SciClone deck according to the deck layout.
8.5.3.3 Add appropriate amount of AMPure XP beads to plate, according to the “SureSelect XT Workbook” and place on the SciClone deck according to the deck layout.
8.5.3.4 Place DNA sample plate (containing sheared, SPRI-purified samples from “SSXT Initial SPRI Cleanup” procedure) onto the SciClone deck according to the deck layout.
8.5.3.5 Place all additional labware onto SciClone deck according to the deck layout.
8.5.4 Press start to begin procedure.
8.5.5 During Ligation step, prepare PCR Enrichment Master Mix, according to the “SureSelect XT Workbook”, using tables found under the “SS XT Lib Prep” tab.
PCR Enrichment Mix 1 Sample
InPE Primer (Forward) 1.25
SureSelect Indexing Pre-Capture PCR (Reverse) 1.25
Herculase II 5x Reaction Buffer 10
dNTP Mix 0.5
Herculase II Polymerase 1
Water 21
Total 35
8.5.6 When prompted by the software, add appropriate amounts of each master mix to the Master Mix plate, according to the “SureSelect XT Workbook”.
SureSelectXT Automated Target Enrichment for Illumina Paired-End Sequencing Library
Document No.: MCCRD-SOP0005 Version: 1.2
Effective Date: 12/01/2014 Page No.: Page 12 of 33
8.5.7 After Ligation and SPRI cleanup, the software will prompt user to replace Master Mix plate, and a new PCR plate onto the deck. Resume procedure by clicking through the prompts.
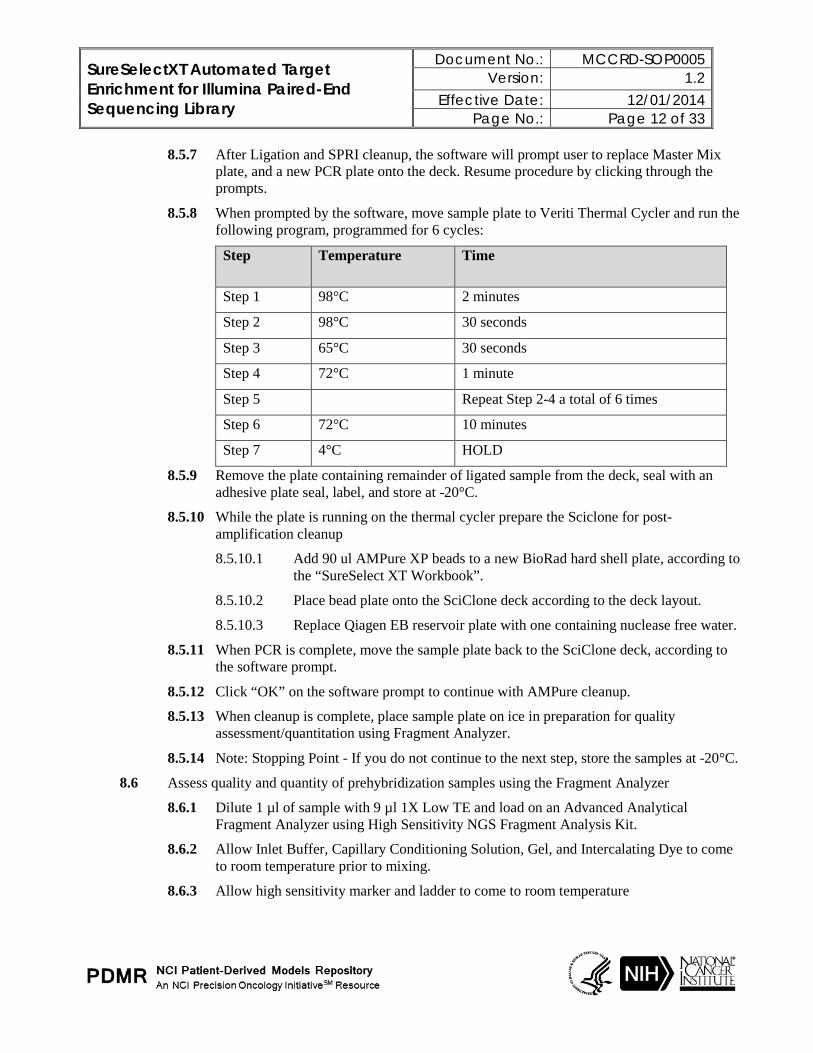
8.5.8 When prompted by the software, move sample plate to Veriti Thermal Cycler and run the following program, programmed for 6 cycles:
Step Temperature Time
Step 1 98°C 2 minutes
Step 2 98°C 30 seconds
Step 3 65°C 30 seconds
Step 4 72°C 1 minute
Step 5 Repeat Step 2-4 a total of 6 times
Step 6 72°C 10 minutes
Step 7 4°C HOLD
8.5.9 Remove the plate containing remainder of ligated sample from the deck, seal with an adhesive plate seal, label, and store at -20°C.
8.5.10 While the plate is running on the thermal cycler prepare the Sciclone for post-amplification cleanup
8.5.10.1 Add 90 ul AMPure XP beads to a new BioRad hard shell plate, according to the “SureSelect XT Workbook”.
8.5.10.2 Place bead plate onto the SciClone deck according to the deck layout.
8.5.10.3 Replace Qiagen EB reservoir plate with one containing nuclease free water.
8.5.11 When PCR is complete, move the sample plate back to the SciClone deck, according to the software prompt.
8.5.12 Click “OK” on the software prompt to continue with AMPure cleanup.
8.5.13 When cleanup is complete, place sample plate on ice in preparation for quality assessment/quantitation using Fragment Analyzer.
8.5.14 Note: Stopping Point - If you do not continue to the next step, store the samples at -20°C.
8.6 Assess quality and quantity of prehybridization samples using the Fragment Analyzer
8.6.1 Dilute 1 µl of sample with 9 µl 1X Low TE and load on an Advanced Analytical Fragment Analyzer using High Sensitivity NGS Fragment Analysis Kit.
8.6.2 Allow Inlet Buffer, Capillary Conditioning Solution, Gel, and Intercalating Dye to come to room temperature prior to mixing.
8.6.3 Allow high sensitivity marker and ladder to come to room temperature
SureSelectXT Automated Target Enrichment for Illumina Paired-End Sequencing Library
Document No.: MCCRD-SOP0005 Version: 1.2
Effective Date: 12/01/2014 Page No.: Page 13 of 33
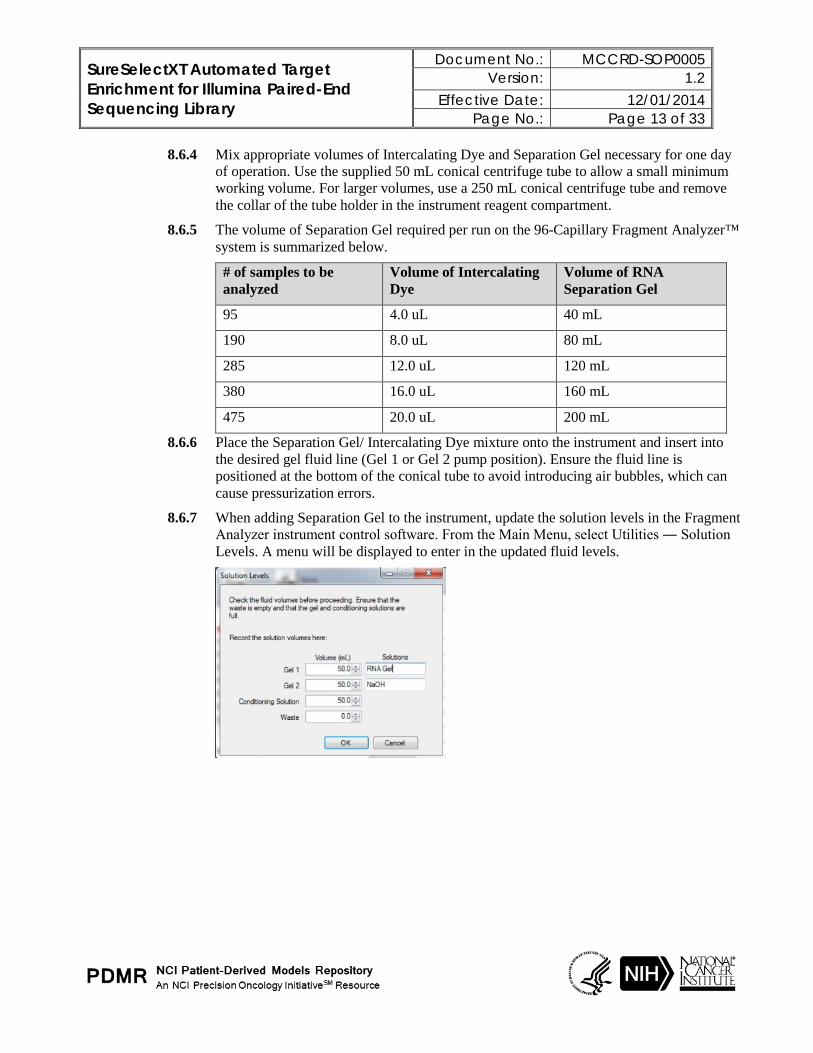
8.6.4 Mix appropriate volumes of Intercalating Dye and Separation Gel necessary for one day of operation. Use the supplied 50 mL conical centrifuge tube to allow a small minimum working volume. For larger volumes, use a 250 mL conical centrifuge tube and remove the collar of the tube holder in the instrument reagent compartment.
8.6.5 The volume of Separation Gel required per run on the 96-Capillary Fragment Analyzer™ system is summarized below.
# of samples to be analyzed
Volume of Intercalating Dye
Volume of RNA Separation Gel
95 4.0 uL 40 mL
190 8.0 uL 80 mL
285 12.0 uL 120 mL
380 16.0 uL 160 mL
475 20.0 uL 200 mL
8.6.6 Place the Separation Gel/ Intercalating Dye mixture onto the instrument and insert into the desired gel fluid line (Gel 1 or Gel 2 pump position). Ensure the fluid line is positioned at the bottom of the conical tube to avoid introducing air bubbles, which can cause pressurization errors.
8.6.7 When adding Separation Gel to the instrument, update the solution levels in the Fragment Analyzer instrument control software. From the Main Menu, select Utilities ― Solution Levels. A menu will be displayed to enter in the updated fluid levels.

SureSelectXT Automated Target Enrichment for Illumina Paired-End Sequencing Library
Document No.: MCCRD-SOP0005 Version: 1.2
Effective Date: 12/01/2014 Page No.: Page 14 of 33
8.6.8 When switching applications (e.g., between NGS and RNA kits), prime the appropriate gel fluid line after loading fresh gel/dye mixture. From the Main Menu of the Fragment Analyzer instrumental control software, select Utilities ― Prime… Select the desired fluid line(s) (Conditioning, Gel 1, or Gel 2) and press OK to purge the fluid line with fresh gel.
8.6.9 In a clean container, add 20 mL of the 5X 930 dsDNA Inlet Buffer per 80 mL of deionized sub-micron filtered water. Agitate to mix. The entire bottle can be mixed to 1X concentration and stored at 4°C if desired.
8.6.10 In a clean container (e.g. 50 mL or 250 mL conical centrifuge tube), add 20 mL of the 5X Capillary Conditioning Solution per 80 mL of deionized sub-micron filtered water. Agitate to mix. The entire bottle can be mixed to 1X concentration and stored at room temperature if desired.
8.6.11 Once mixed, place the 1X Capillary Conditioning Solution onto the instrument and insert the CONDITIONING fluid line (Conditioning Solution pump position). Ensure the fluid line is positioned at the bottom of the conical tube to avoid introducing air bubbles, which can cause pressurization errors. Update the solutions levels in the Utilities section of the Fragment Analyzer software.
8.6.12 Check the fluid level of the waste bottle and waste tray daily and empty as needed.
8.6.13 Prepare a fresh 96 DeepWell 1mL Plate filled with 1.0 mL/well of 1X 930 dsDNA Inlet Buffer daily. Do NOT overfill the wells of the inlet buffer plate. Place buffer plate in Drawer “B”.
8.6.14 Prepare a fresh sample plate filled with 100 µL/well of 0.25X TE Rinse Buffer daily. Place rinse plate in Drawer “M”
8.6.15 Using a fresh half-skirted 96-well sample plate, pipette 22 µL of the High Sensitivity NGS Diluent Marker to each well in a row that is to contain sample or NGS Ladder. Fill any unused wells within the row of the sample plate with 24 µL/well of BF-25 Blank Solution.
8.6.16 Pipette 2 µL of each diluted sample into the respective wells of the sample plate; mix the contents of the well using the pipette by aspiration/expulsion in the pipette tip.
8.6.17 After mixing sample/NGS Ladder and Diluent Marker in each well, centrifuge the plate to remove any air bubbles. Check the wells of the sample plate to ensure there are no air bubbles trapped in the bottom of the wells. The presence of trapped air bubbles can lead to injection failures.
SureSelectXT Automated Target Enrichment for Illumina Paired-End Sequencing Library
Document No.: MCCRD-SOP0005 Version: 1.2
Effective Date: 12/01/2014 Page No.: Page 15 of 33
8.6.18 For best results, run the plate as soon as possible. If the sample plate will not be used immediately, cover the sample plate with foil/seal, store at 4°C and use within the same day. Spin the plate again if any bubbles developed in the sample wells. Be sure to remove the cover film before placing the plate into the instrument.
8.6.19 In the Separation Setup pop-up form, left click the dropdown and select the appropriate preloaded experimental Method file. The available methods are sorted by kit number and are linked to the directory containing methods for the currently installed capillary array length (e.g., 22cm, 33cm or 55cm). Select DNF-474-033 - HS NGS Fragment 1-6000bp.mthds.
8.6.20 Select the appropriate Gel line being used for the experiment (Gel 1 or Gel 2) using the dropdown menu.
8.6.21 Prior to starting the experiment, verify all trays (buffer/storage, rinse, waste, sample, etc.) have been loaded into their respective drawer locations.
8.6.22 Press the Play icon ( ) to start the sequence loaded into the queue. To Pause the queue
after the currently running experiment is completed, press the pause icon ( ). To Clear the run queue of all loaded runs, press the clear ( ) button.
8.6.23 Using ProSize 2.0, perform a smear analysis to quantify the amount of amplified library.
8.6.23.1 Click Option
8.6.23.1.1 Click Set Global Configuration
8.6.23.2 Click on the Smear Analysis Tab
8.6.23.2.1 Enter the Start size as 40 bp
8.6.23.2.2 Enter the End size as 2000 bp
8.6.23.2.3 Click Apply
8.6.23.3 Click File
8.6.23.3.1 Click Export Data
Click Smear Analysis radio button
8.6.23.3.2 Click Export
Open the exported smear analysis csv file. The column labeled ng/uL contains the concentration information. The data will be used to calculate normalization prior to hybridization.
8.6.24 Check that the Fragment Analyzer traces show a distribution with a peak height between 225 to 275 bp.
8.6.25 Note: Stopping Point - If you do not continue to the next step, seal the ligated DNA library sample plate and store at 4°C overnight or at –20°C for prolonged storage.
8.7 Normalization of samples for hybridization
8.7.1 Open the “Normalization_for_Hyb_Setup” excel spreadsheet on the Sciclone computer. Enter quantitation values from Fragment Analyzer run smear analysis.
SureSelectXT Automated Target Enrichment for Illumina Paired-End Sequencing Library
Document No.: MCCRD-SOP0005 Version: 1.2
Effective Date: 12/01/2014 Page No.: Page 16 of 33
8.7.2 Save the spreadsheet and close the file.
8.7.3 Open “SSXT Normalization for PreCapture Same Day Hyb” program in the Maestro control software.
8.7.4 Begin the procedure by clicking start button.
8.7.5 Software will prompt user to enter number of columns to be processed. Enter this number and click OK to continue.
8.7.6 Software will prompt user to select quantitation file. Select “Normalization_for_Hyb_Setup”file from the “Workbooks” Folder on the Desktop. Select file and click OK to continue.
8.7.7 Place a deep well reservoir containing nuclease-free water onto the SciClone deck according to the deck layout.
8.7.8 Place DNA sample plate (containing amplified, ligated, SPRI-purified samples from “SSXT Library Prep” procedure) onto the SciClone deck according to the deck layout.
8.7.9 Place all additional labware onto SciClone deck according to the deck layout.
8.7.10 Press start to begin procedure.
8.7.11 When complete, the software will prompt user to place normalized DNA library sample plate on ice in preparation for hybridization procedure; it will also prompt user to seal the and store at -20 the sample plate containing the remaining DNA library.
SureSelectXT Automated Target Enrichment for Illumina Paired-End Sequencing Library
Document No.: MCCRD-SOP0005 Version: 1.2
Effective Date: 12/01/2014 Page No.: Page 17 of 33
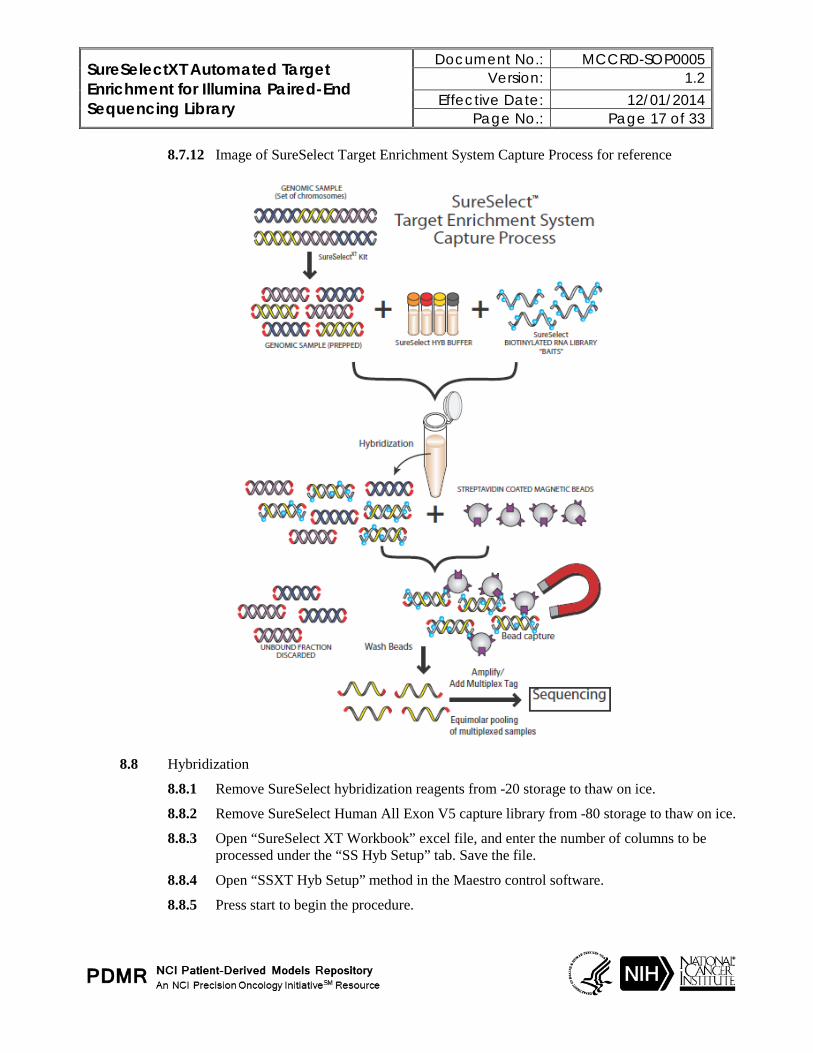
8.7.12 Image of SureSelect Target Enrichment System Capture Process for reference
8.8 Hybridization
8.8.1 Remove SureSelect hybridization reagents from -20 storage to thaw on ice.
8.8.2 Remove SureSelect Human All Exon V5 capture library from -80 storage to thaw on ice.
8.8.3 Open “SureSelect XT Workbook” excel file, and enter the number of columns to be processed under the “SS Hyb Setup” tab. Save the file.
8.8.4 Open “SSXT Hyb Setup” method in the Maestro control software.
8.8.5 Press start to begin the procedure.

SureSelectXT Automated Target Enrichment for Illumina Paired-End Sequencing Library
Document No.: MCCRD-SOP0005 Version: 1.2
Effective Date: 12/01/2014 Page No.: Page 18 of 33
8.8.6 Note: There will be a 30-minute wait time to allow the heat blocks to come to the correct temperature. Use this time to prepare hyb reagent mixes.
8.8.7 Prepare SureSelect Block Mix, RNAse Block Mix, Hybridization Buffer, SureSelect Capture Library mixes.
8.8.7.1 Prepare all mixes according to the “SureSelect XT Workbook”, using tables found under the “SSXT Hyb Setup” tab.
SureSelect Block Mix
SureSelect Indexing Block #1 (green cap) 33.8
SureSelect Indexing Block #2 (blue cap) 33.8
SureSelect Indexing Block #3 (brown cap) 8.1
Total 75.7
Hybridization Buffer
SureSelect Hyb #1 61.0
SureSelect Hyb #2 (red cap) 2.4
SureSelect Hyb #3 (yellow cap) 24.4
SureSelect Hyb #4 31.7
Total 119.6
RNAse Block Mix
Nuclease Free Water 13.8
RNAse Block (purple cap) 4.6
Total 18.4
SureSelect Capture Library
SureSelect V5 Library 46.0
RNAse Block Mix (1:3) 18.4
Total 64.4

SureSelectXT Automated Target Enrichment for Illumina Paired-End Sequencing Library
Document No.: MCCRD-SOP0005 Version: 1.2
Effective Date: 12/01/2014 Page No.: Page 19 of 33
8.8.8 Prepare Capture Probes in Hyb Buffer.
Capture Probes in Hyb Buffer
Hybridization Buffer 119.6
SureSelect Capture Library 64.4
Total 184
8.8.9 Load the Block Mix and Hybridization Probe Plate with the SureSelect Block Mix and the Capture Probes in Hyb Buffer, according to the worksheet.
8.8.9.1 Place plate onto the SciClone deck according to the deck layout.
8.8.10 Place plate containing the Normalized DNA samples onto the SciClone deck according to the deck layout.
8.8.11 Click Start to begin procedure.
8.8.12 While the hybridization setup is proceeding, begin Veriti Thermal Cycler program set to 65 degrees, infinite hold, with a lid temperature of 105 degrees.
8.8.13 When prompted seal the hybridization plate using two plate seals, forming a double layer of seals.
8.8.14 Quickly move the hybridization plate onto the Veriti Thermal Cycler.
8.8.15 Incubate the hybridization mixture for 16 to 24 hours at 65°C with a heated lid at 105°C.
8.8.16 Return reagents to proper freezers. Be sure to store V5 Capture library at -80 degrees.
8.9 Post Hybridization Target Selection
8.9.1 Remove AMPure XP beads and Dynabeads MyOne Streptavidin T1 beads from refrigerator and allow to equilibrate to room temperature.
8.9.2 Load the following capture buffer reservoirs according to “SSXT Target Selection” tab of “SureSelect XT Workbook” excel spreadsheet:
8.9.2.1 Binding Buffer
8.9.2.2 Wash Buffer 1
8.9.2.3 Wash Buffer 2
8.9.2.4 Dynabead/10 mM Tris
8.9.3 Open “SSXT Target Selection” method using Maestro control software.
8.9.4 Load all reagent plates and additional labware onto the SciClone deck according to the deck layout.
8.9.5 Click Start to begin procedure.
8.9.6 When the Dynabead washing is complete, the software will prompt user to remove the hybridization plate from the thermal cycler, remove seals, and place onto the SciClone deck according to the prompt.
SureSelectXT Automated Target Enrichment for Illumina Paired-End Sequencing Library
Document No.: MCCRD-SOP0005 Version: 1.2
Effective Date: 12/01/2014 Page No.: Page 20 of 33
8.9.7 During the fifth and final Wash 2 Buffer cleanup, prepare PCR Master Mix and load a PCR plate according to the “SSXT Target Selection” tab of “SureSelect XT Workbook” excel spreadsheet.
PCR Enrichment Mix 1 Sample 10% Extra
SureSelect Indexing Post-Capture PCR (Forward) 1 1.1
Herculase II 5x Reaction Buffer 10 11
dNTP Mix 0.5 0.55
Herculase II Polymerase 1 1.1
Water 7.5 8.25
Total 20 22
8.9.8 When prompted, place the PCR Master Mix plate, and the Index plate (found in the SureSelect Library Reagent Kit), onto the SciClone deck according to the deck layout.
NOTE: Captured DNA is retained on the streptavidin beads during the post-capture amplification step.
8.9.9 Click OK to continue PCR setup.
8.9.10 Program a Veriti Thermal Cycler with the following program for 6 cycles:
Step Temperature Time
Step 1 98°C 2 minutes
Step 2 98°C 30 seconds
Step 3 57°C 30 seconds
Step 4 72°C 1 minute
Step 5 Repeat Step 2-4 a total of 11 times
Step 6 72°C 10 minutes
Step 7 4°C HOLD
8.9.11 When washing is complete the Maestro software will prompt the user to seal the PCR plate and move it to the thermal cycler.
8.9.12 When the PCR program is complete, remove the PCR plate and place on ice in preparation for final AMPure cleanup on the Perkin Elmer Zephyr automated liquid handler.
8.10 Final Library AMPure cleanup on the Zephyr
8.10.1 Turn on SciClone Zephyr, Heating controller, and open Maestro software.
8.10.2 Open “Post_SPRI_Cleanup” method using the Maestro control software.
8.10.3 Click start to begin program.
8.10.4 Software will prompt user to enter the following:
SureSelectXT Automated Target Enrichment for Illumina Paired-End Sequencing Library
Document No.: MCCRD-SOP0005 Version: 1.2
Effective Date: 12/01/2014 Page No.: Page 21 of 33
8.10.4.1 Number of columns ___
8.10.4.2 Volume of starting sample: Enter “50”
8.10.4.3 Volume of AMPure beads: Enter “90”
8.10.4.4 Final volume upon elution: Enter “30”
8.10.5 Prepare all reagent plates/reservoirs according to the software prompts.
8.10.6 Place all reagents plates and additional labware onto the Zephyr deck according to the deck layout.
8.10.7 Place PCR Sample plate onto the Zephyr deck
8.10.8 Press Start to begin the procedure.
8.10.9 Software will prompt user to remove PCR Sample Plate when it has removed sample.
8.10.10 Click OK to proceed.
8.10.11 When process is completed, software will prompt user to remove Final Library Plate.
8.10.12 Proceed to Final Library Quality Assessment.
Note: Stopping Point - If you do not continue to the next step, store the samples at 4°C for up to a week, or at -20°C for longer periods.
8.11 Final Library Quality Assessment using the Fragment Analyzer
8.11.1 Dilute 1 µl of final library sample with 19 µl 1X Low TE and load on an Advanced Analytical Fragment Analyzer using High Sensitivity NGS Fragment Analysis Kit.
8.11.2 Allow Inlet Buffer, Capillary Conditioning Solution, Gel, and Intercalating Dye to come to room temperature prior to mixing.
8.11.3 Allow high sensitivity marker and ladder to come to room temperature
8.11.4 Mix appropriate volumes of Intercalating Dye and Separation Gel necessary for one day of operation. Use the supplied 50 mL conical centrifuge tube to allow a small minimum working volume. For larger volumes, use a 250 mL conical centrifuge tube and remove the collar of the tube holder in the instrument reagent compartment.

SureSelectXT Automated Target Enrichment for Illumina Paired-End Sequencing Library
Document No.: MCCRD-SOP0005 Version: 1.2
Effective Date: 12/01/2014 Page No.: Page 22 of 33
8.11.5 The volume of Separation Gel required per run on the 96-Capillary Fragment Analyzer™ system is summarized below.
# of samples to be analyzed
Volume of Intercalating Dye
Volume of RNA Separation Gel
95 4.0 uL 40 mL
190 8.0 uL 80 mL
285 12.0 uL 120 mL
380 16.0 uL 160 mL
475 20.0 uL 200 mL
8.11.6 Place the Separation Gel/ Intercalating Dye mixture onto the instrument and insert into the desired gel fluid line (Gel 1 or Gel 2 pump position). Ensure the fluid line is positioned at the bottom of the conical tube to avoid introducing air bubbles, which can cause pressurization errors.
8.11.7 When adding Separation Gel to the instrument, update the solution levels in the Fragment Analyzer instrument control software. From the Main Menu, select Utilities ― Solution Levels. A menu will be displayed to enter in the updated fluid levels.

SureSelectXT Automated Target Enrichment for Illumina Paired-End Sequencing Library
Document No.: MCCRD-SOP0005 Version: 1.2
Effective Date: 12/01/2014 Page No.: Page 23 of 33
8.11.8 When switching applications (e.g., between NGS and RNA kits), prime the appropriate gel fluid line after loading fresh gel/dye mixture. From the Main Menu of the Fragment Analyzer instrumental control software, select Utilities ― Prime… Select the desired fluid line(s) (Conditioning, Gel 1, or Gel 2) and press OK to purge the fluid line with fresh gel.
8.11.9 In a clean container, add 20 mL of the 5X 930 dsDNA Inlet Buffer per 80 mL of
deionized sub-micron filtered water. Agitate to mix. The entire bottle can be mixed to 1X concentration and stored at 4°C if desired.
8.11.10 In a clean container (e.g. 50 mL or 250 mL conical centrifuge tube), add 20 mL of the 5X Capillary Conditioning Solution per 80 mL of deionized sub-micron filtered water. Agitate to mix. The entire bottle can be mixed to 1X concentration and stored at room temperature if desired.
8.11.11 Once mixed, place the 1X Capillary Conditioning Solution onto the instrument and insert the CONDITIONING fluid line (Conditioning Solution pump position). Ensure the fluid line is positioned at the bottom of the conical tube to avoid introducing air bubbles, which can cause pressurization errors. Update the solutions levels in the Utilities section of the Fragment Analyzer software.
8.11.12 Check the fluid level of the waste bottle and waste tray daily and empty as needed.
8.11.13 Prepare a fresh 96 DeepWell 1mL Plate filled with 1.0 mL/well of 1X 930 dsDNA Inlet Buffer daily. Do NOT overfill the wells of the inlet buffer plate. Place buffer plate in Drawer “B”.
8.11.14 Prepare a fresh sample plate filled with 100 µL/well of 0.25X TE Rinse Buffer daily. Place rinse plate in Drawer “M”
8.11.15 Using a fresh half-skirted 96-well sample plate, pipette 22 µL of the High Sensitivity NGS Diluent Marker to each well in a row that is to contain sample or NGS Ladder. Fill any unused wells within the row of the sample plate with 24 µL/well of BF-25 Blank Solution.
8.11.16 Pipette 2 µL of each 1:20 diluted sample into the respective wells of the sample plate; mix the contents of the well using the pipette by aspiration/expulsion in the pipette tip.
8.11.17 After mixing sample/NGS Ladder and Diluent Marker in each well, centrifuge the plate to remove any air bubbles. Check the wells of the sample plate to ensure there are no air bubbles trapped in the bottom of the wells. The presence of trapped air bubbles can lead to injection failures.

SureSelectXT Automated Target Enrichment for Illumina Paired-End Sequencing Library
Document No.: MCCRD-SOP0005 Version: 1.2
Effective Date: 12/01/2014 Page No.: Page 24 of 33
8.11.18 For best results, run the plate as soon as possible. If the sample plate will not be used immediately, cover the sample plate with foil/seal, store at 4°C and use within the same day. Spin the plate again if any bubbles developed in the sample wells. Be sure to remove the cover film before placing the plate into the instrument.
8.11.19 In the Separation Setup pop-up form, left click the dropdown and select the appropriate preloaded experimental Method file. The available methods are sorted by kit number and are linked to the directory containing methods for the currently installed capillary array length (e.g., 22cm, 33cm or 55cm). Select DNF-474-033 - HS NGS Fragment 1-6000bp.mthds.
8.11.20 Select the appropriate Gel line being used for the experiment (Gel 1 or Gel 2) using the dropdown menu.
8.11.21 Prior to starting the experiment, verify all trays (buffer/storage, rinse, waste, sample, etc.) have been loaded into their respective drawer locations.
8.11.22 Press the Play icon ( ) to start the sequence loaded into the queue. To Pause the queue
after the currently running experiment is completed, press the pause icon ( ). To Clear the run queue of all loaded runs, press the clear ( ) button.
8.11.23 Using ProSize 2.0, perform a smear analysis to quantify the amount of amplified library.
8.11.23.1 Click Option
8.11.23.2 Click Set Global Configuration
8.11.23.3 Click on the Smear Analysis Tab
8.11.23.4 Enter the Start size as 50 bp
8.11.23.5 Enter the End size as 1000 bp
8.11.23.6 Click Apply
8.11.23.7 Click File
8.11.23.8 Click Export Data
• Click Smear Analysis radio button
8.11.23.9 Click Export
• Open the exported smear analysis csv file. The column labeled nM/L indicates the concentration of the diluted final library that was loaded onto the Fragment Analyzer. The smear analysis data will be used to calculate dilutions required for digital PCR quantification.
8.11.24 Check that the Fragment Analyzer traces show a distribution with a peak size between 250 to 350 bp.
8.11.25 Using nuclease-free water, dilute the final libraries to a target concentration of ~6nM.
SureSelectXT Automated Target Enrichment for Illumina Paired-End Sequencing Library
Document No.: MCCRD-SOP0005 Version: 1.2
Effective Date: 12/01/2014 Page No.: Page 25 of 33
8.12 Quantify the individual Final Libraries using ddPCR
8.12.1 Refer to SOP titled PDX ddPCR Library Quantification, SOP document number MCCRD-SOP0007.
8.13 Pool the libraries
8.13.1 Once all libraries have been quantified using digital PCR, pool samples into pools of 3 using quantitation data and Barcode Index ID information.
8.13.1.1 Samples should be pooled such that pools contain libraries with similar starting concentrations and unique indexes
8.13.1.2 Calculate the volumes of each library and EBT necessary to create a pool of 3 samples at a total target concentration of 3nM
8.14 Quantify the pooled libraries using ddPCR
8.14.1 Refer to SOP titled PDX ddPCR Library Quantification, SOP document number MCCRD-SOP0007.
8.15 Dilute final pools
8.15.1 Final dilutions of each pool, prior to denaturing and clustering, should be diluted to a final concentration of 1.326 nM using EBT.
8.16 Dilute, Denature, and Cluster Final Pools for Sequencing
8.16.1 Refer to SOP titled Sequencing Library dilute_denature_cluster, SOP document number MCCRD-SOP0008.
8.16.1.1 Pools should be clustered at a concentration of 13.26 pM with a 1% phiX spike-in for each sample.
8.16.1.2 Each pool of 3 samples is sequenced in a single flow cell lane.
SureSelectXT Automated Target Enrichment for Illumina Paired-End Sequencing Library
Document No.: MCCRD-SOP0005 Version: 1.2
Effective Date: 12/01/2014 Page No.: Page 26 of 33
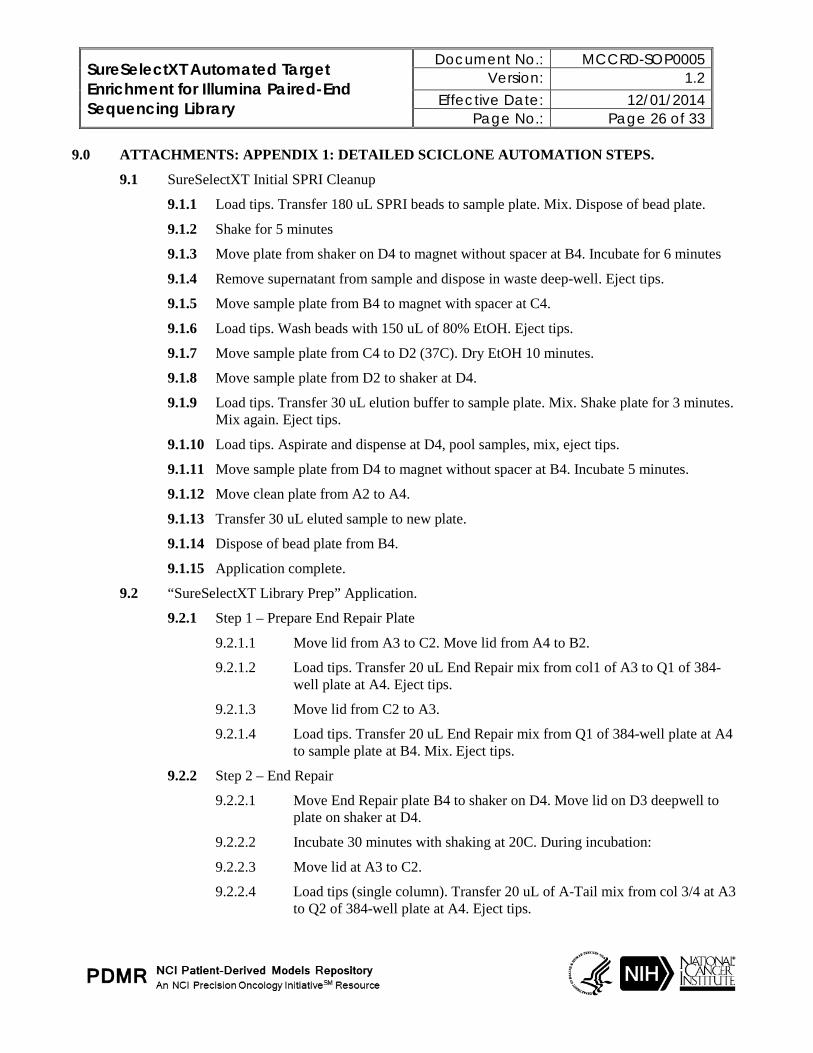
9.0 ATTACHMENTS: APPENDIX 1: DETAILED SCICLONE AUTOMATION STEPS.
9.1 SureSelectXT Initial SPRI Cleanup
9.1.1 Load tips. Transfer 180 uL SPRI beads to sample plate. Mix. Dispose of bead plate.
9.1.2 Shake for 5 minutes
9.1.3 Move plate from shaker on D4 to magnet without spacer at B4. Incubate for 6 minutes
9.1.4 Remove supernatant from sample and dispose in waste deep-well. Eject tips.
9.1.5 Move sample plate from B4 to magnet with spacer at C4.
9.1.6 Load tips. Wash beads with 150 uL of 80% EtOH. Eject tips.
9.1.7 Move sample plate from C4 to D2 (37C). Dry EtOH 10 minutes.
9.1.8 Move sample plate from D2 to shaker at D4.
9.1.9 Load tips. Transfer 30 uL elution buffer to sample plate. Mix. Shake plate for 3 minutes. Mix again. Eject tips.
9.1.10 Load tips. Aspirate and dispense at D4, pool samples, mix, eject tips.
9.1.11 Move sample plate from D4 to magnet without spacer at B4. Incubate 5 minutes.
9.1.12 Move clean plate from A2 to A4.
9.1.13 Transfer 30 uL eluted sample to new plate.
9.1.14 Dispose of bead plate from B4.
9.1.15 Application complete.
9.2 “SureSelectXT Library Prep” Application.
9.2.1 Step 1 – Prepare End Repair Plate
9.2.1.1 Move lid from A3 to C2. Move lid from A4 to B2.
9.2.1.2 Load tips. Transfer 20 uL End Repair mix from col1 of A3 to Q1 of 384-well plate at A4. Eject tips.
9.2.1.3 Move lid from C2 to A3.
9.2.1.4 Load tips. Transfer 20 uL End Repair mix from Q1 of 384-well plate at A4 to sample plate at B4. Mix. Eject tips.
9.2.2 Step 2 – End Repair
9.2.2.1 Move End Repair plate B4 to shaker on D4. Move lid on D3 deepwell to plate on shaker at D4.
9.2.2.2 Incubate 30 minutes with shaking at 20C. During incubation:
9.2.2.3 Move lid at A3 to C2.
9.2.2.4 Load tips (single column). Transfer 20 uL of A-Tail mix from col 3/4 at A3 to Q2 of 384-well plate at A4. Eject tips.

SureSelectXT Automated Target Enrichment for Illumina Paired-End Sequencing Library
Document No.: MCCRD-SOP0005 Version: 1.2
Effective Date: 12/01/2014 Page No.: Page 27 of 33
9.2.2.5 Load tips (single column). Transfer 27 uL of ligation mix from col 5/6 at A3 to Q3 of 384-well plate at A4. Eject tips.
9.2.2.6 Move lid from C2 to A3. Move lid from B2 to A4.
9.2.2.7 Move lid from D4 to D3. Move bead plate from C2 to D2.
9.2.2.8 Load tips. Mix beads at D2.
9.2.2.9 Transfer 90 uL beads from D2 to End Repair reaction on shaker at D4.
9.2.2.10 Move bead plate from D2 to C2.
9.2.2.11 Mix beads and sample at D4. Shake for 5 minutes.
9.2.2.12 Move sample/bead plate from D4 to the magnet at B4. Incubate 5 minutes.
9.2.2.13 Remove SN from beads at B4 to waste at A5. Eject tips.
9.2.2.14 Move beads from B4 to magnet with spacer at C4. Move lid B5 to C5.
9.2.2.15 Load tips. Wash beads with 150 uL of 80% EtOH. Eject tips. Repeat.
9.2.2.16 Move lid from C5 to B5. Move plate from C4 to D2 CPAC at 37C. Incubate 5 minutes to dry EtOH.
9.2.2.17 Move plate from D2 to D4. Move lid from D3 deepwell to C2.
9.2.2.18 Load tips. Transfer 30 uL elution buffer from D3 deepwell to beads at D4.
9.2.2.19 Move lid from C2 to D3.
9.2.2.20 Mix at D4 to resuspend beads. Shake for 3 minutes. Eject tips.
9.2.2.21 Wait for temp at D2 (20C). Move plate from D4 to D2
9.2.3 Step 3 – A-Tailing
9.2.3.1 Move lid from A4 to C2.
9.2.3.2 Load tips. Transfer 20 uL A-Tail mix from Q2 384 at A4 to samples on D2. Mix. Eject tips
9.2.3.3 Move samples from D2 to D4 at 37C for A-Tailing incubation. Move lid from D3 to D4.
9.2.3.4 Move lid from A2 to D3. Move Adapter Oligo plate from A2 to D2.
9.2.3.5 Incubate A-Tailing reaction for 30 minutes at 37C with shaking. During incubation:
9.2.3.6 Load tips (single column). Broadcast 10 uL of adapter oligos from plate at D2 to Q4 of 384-well plate at A4. Eject tips.
9.2.3.7 Dispose of plate at D2. Move lid from C2 to A4.
9.2.3.8 Move lid from D3 to A2. Move lid from D4 to D3.
9.2.3.9 Move lid from B2 to C2. Move PEG plate from B2 to D2.
SureSelectXT Automated Target Enrichment for Illumina Paired-End Sequencing Library
Document No.: MCCRD-SOP0005 Version: 1.2
Effective Date: 12/01/2014 Page No.: Page 28 of 33
9.2.3.10 Load tips. Transfer 90 uL PEG from D2 to D4. Move peg plate from D2 to B2.
9.2.3.11 Move lid from C2 to B2.
9.2.3.12 Mix samples/PEG at D4. Shake for 5 minutes.
9.2.3.13 Move samples/beads from D4 to magnet without spacer at B4, incubate 5 min.
9.2.3.14 Remove SN from B4 to waste at B5, eject tips.
9.2.3.15 Move beads B4 to magnet with spacer C4. Move lid from B5 to C5.
9.2.3.16 Load tips. Wash beads with 150 uL of 80% EtOH. Eject tips. Repeat.
9.2.3.17 Move lid from C5 to B5. Move plate from C4 to D2 at 37C. Incubate for 5 minutes.
9.2.3.18 Move plate from D2 to D4. Move lid from D3 deepwell to C2.
9.2.3.19 Load tips. Transfer 15 uL elution buffer from D3 deepwell to beads at D4.
9.2.3.20 Move lid from C2 to D3.
9.2.3.21 Mix at D4 to resuspend beads. Shake for 3 minutes. Eject tips.
9.2.4 Step 4 – Adapter Ligation
9.2.4.1 Dispose of lid from 384 at A4.
9.2.4.2 Load tips. Transfer 27 uL of ligation mix from Q3 and 10 uL adapter Q4 from A4 to D4. Mix. Eject tips.
9.2.4.3 Move lid from D3 to D4. Incubate for 15 minutes at 20C. During incubation:
9.2.4.4 Dispose of 384 plate from A4
9.2.4.5 Move lid from B2 to C2. Move PEG plate from B2 to D2. Move lid from D4 to D3.
9.2.4.6 Load tips. Transfer 90 uL PEG from D2 to D4.
9.2.4.7 Move plate from D2 to B2. Move lid from C2 to B2.
9.2.4.8 Mix at D4, shake for 5 minutes
9.2.4.9 Transfer to magnet without spacer at B4. Incubate for 5 minutes.
9.2.4.10 Remove SN from B4 to waste at B5, eject tips.
9.2.4.11 Move beads B4 to magnet with spacer C4. Move lid from B5 to C5.
9.2.4.12 Load tips. Wash beads with 150 uL of 80% EtOH. Eject tips. Repeat.
9.2.4.13 Move lid from C5 to B5. Move plate from C4 to D2 at 37C. Incubate for 5 minutes.
9.2.4.14 Move plate from D2 to D4. Move lid from D3 deepwell to C2.

SureSelectXT Automated Target Enrichment for Illumina Paired-End Sequencing Library
Document No.: MCCRD-SOP0005 Version: 1.2
Effective Date: 12/01/2014 Page No.: Page 29 of 33
9.2.4.15 Load tips. Transfer 30 uL elution buffer from D3 deepwell to beads at D4.
9.2.4.16 Move lid from C2 to D3.
9.2.4.17 Mix at D4 to resuspend beads. Shake for 3 minutes. Eject tips.
9.2.5 Step 5 – PCR Setup
9.2.5.1 Move plate from D4 to magnet without spacer at B4. Incubate for 5 min.
9.2.5.2 Prompt user to add PCR MM to col 7/8 of PCR plate on A3, re-lid, place again at A3.
9.2.5.3 Prompt user to place empty PCR plate on D2 CPAC at 4C.
9.2.5.4 Dispose of lid from A3.
9.2.5.5 Load tips (single column). Transfer 35 uL PCR mix from col 7/8 of A3 to clean plate on D2, eject tips.
9.2.5.6 Move bead plate from C2 to waste. Move clean plate from C2 to D4.
9.2.5.7 Load tips. Aspirate 30 uL sample from B4. Dispense 15 uL to clean plate at D4, 15 uL to PCR plate at D2. Mix at D2. Eject tips.
9.2.5.8 Dispose of plate from B4.
9.2.5.9 Prompt user to seal PCR plate, spin down, and run enrichment protocol on thermocycler.
9.2.5.10 Prompt user to remove plate from D4, seal, spin down, and store at -20C for future use.
9.2.6 Step 6 – Post PCR
9.2.6.1 Prompt user to replace 10 mM Tris Elution buffer in deepwell A3 with water in deepwell at A3. Ensure clean, lidded plate on A2.
9.2.6.2 Prompt user to place PCR/library plate at B4 and plate with beads at D4.
9.2.6.3 Dispose of lid at B2. Move plate from B2 to C2.
9.2.6.4 Transfer 50 uL PCR reactions from B4 to beads at D4.
9.2.6.5 Mix sample and beads at D4. Incubate 5 minutes.
9.2.6.6 Transfer to samples to magnet without spacer at B4. Incubate for 5 minutes.
9.2.6.7 Remove SN from B4 to waste at B5, eject tips.
9.2.6.8 Move beads B4 to magnet with spacer C4. Move lid from B5 to C5.
9.2.6.9 Load tips. Wash beads with 150 uL of 80% EtOH. Eject tips. Repeat.
9.2.6.10 Move lid from C5 to B5. Move plate from C4 to D2 at 37C. Incubate for 5 minutes.
9.2.6.11 Move plate from D2 to D4. Move lid from D3 deepwell to C2.
9.2.6.12 Load tips. Transfer 30 uL water from D3 deepwell to beads at D4.
SureSelectXT Automated Target Enrichment for Illumina Paired-End Sequencing Library
Document No.: MCCRD-SOP0005 Version: 1.2
Effective Date: 12/01/2014 Page No.: Page 30 of 33
9.2.6.13 Move lid from C2 to D3.
9.2.6.14 Mix at D4 to resuspend beads. Shake for 3 minutes. Eject tips.
9.2.6.15 Dispose of plate from B4. Move lid from C2 to D4.
9.2.6.16 Prompt user to remove final library plate from D4.
9.2.6.17 Application complete.
9.3 “SureSelectXT Normalization” Application
9.3.1 Load tips (single column). Eject tips to empty tip box at C5.
9.3.2 Load single tip from C5.
9.3.3 Aspirate water (sample-specific volume) from A2 deepwell. Aspirate sample (sample specific volume) from A3 source plate.
9.3.4 Dispense water and sample to destination plate at A4. Eject tip.
9.3.5 Repeat steps 2-4 for remaining samples in column.
9.3.6 Repeat steps 1-5 for remaining columns of samples.
9.3.7 Prompt user to remove starting sample plate from A3 and seal for long-term storage.
9.3.8 Prompt user to remove the normalized library plate from A4 and seal for short-term storage in preparation for hybridization setup.
9.3.9 Prompt user to remove and discard the reservoir containing water from A2.
9.3.10 Application complete.
9.4 “SureSelectXT Hyb Setup” Application
9.4.1 Set temperatures for INHECO blocks and equilibrate for 30 minutes.
9.4.2 Load tips (single column). Transfer 5.6 uL of block mix from C4 column 1 to library plate at B4. Mix. Eject tips. Repeat for additional columns.
9.4.3 Move library plate from B4 to CPAC on A3 (95C). Incubate for 5 minutes without lid. During incubation:
9.4.4 Load tips (single column). Transfer 20 uL Capture Library in Hyb Buffer from C4 column 2/3 to plate on D4 (65C).
9.4.5 Repeat for number of columns processed. Eject tips.
9.4.6 Move denatured library plate from A3 to B4.
9.4.7 Load tips. Transfer remaining volume denatured library to plate at D4. Mix. Eject tips.
9.4.8 Prompt user to double seal the hybridization plate while on D4, then quickly transfer to pre-warmed thermocycler set to 65C for hybridization.
9.4.9 Application complete.
9.5 “SureSelectXT Target Selection” Application
9.5.1 Step 1 – Prepare Magnetic Beads
SureSelectXT Automated Target Enrichment for Illumina Paired-End Sequencing Library
Document No.: MCCRD-SOP0005 Version: 1.2
Effective Date: 12/01/2014 Page No.: Page 31 of 33
9.5.1.1 Move lid from C3 to B4 (This is to position lid correctly on B4).
9.5.1.2 Move empty bead washing plate from A2 to D4. Move lid from A4 to A2.
9.5.1.3 Load tips (single column). Transfer 50 uL of Streptavidin beads from A4 column 1 to plate at D4. Repeat for number of columns processed. Eject tips.
9.5.1.4 Move lid from A2 to A4. Move lid B5 to C5.
9.5.1.5 Load tips. Transfer 100 uL binding buffer from B5 reservoir to beads at D4. Mix. Shake for 2 minutes.
9.5.1.6 Move beads from D4 to magnet with spacer at C2. Incubate for 3 minutes.
9.5.1.7 Remove SN from beads on magnet at C2 to waste deep-well at A5.
9.5.1.8 Move bead plate from C2 to D4. Eject tips.
9.5.1.9 Load tips. Transfer 150 uL of Binding Buffer from B5 to the bead plate at D4. Mix. Shake for 2 min.
9.5.1.10 Move beads from D4 to the magnet at C2. Incubate for 3 minutes.
9.5.1.11 Remove SN from beads on magnet at C2 to waste deep-well at A5.
9.5.1.12 Move beads from C2 to D4. Eject tips.
9.5.1.13 Repeat steps 9-12 two more times.
9.5.1.14 Load tips. Transfer 125 uL of Binding Buffer to bead plate at D4. Mix. Eject tips. Shake for 2 minutes.
9.5.1.15 Move lid from C5 to B5.
9.5.1.16 Move head out of way.
9.5.2 Step 2 – Capture DNA
9.5.2.1 Prompt user to place hybridized samples plate on magnet at C4.
9.5.2.2 Load tips. Transfer samples from C4 to bead plate at D4. Mix. Shake for 10 minutes at 22C. Repeat mix and shake.
9.5.2.3 Dispose of sample plate from C4.
9.5.2.4 Move sample/bead plate from D4 to magnet C2. Incubate for 2 minutes.
9.5.2.5 During incubation on magnet, move lid B4 to C3. Move Wash Buffer II deepwell plate B4 to A3 to warm at 65C. Move lid C3 to A3.
9.5.2.6 Remove SN from beads at C2 to waste deep-well at A5. Eject tips.
9.5.3 Step 3 – Wash Buffer 1
9.5.3.1 Move lid from D3 to B2.
9.5.3.2 Load tips. Transfer 150 uL of Wash Buffer 1 from D3 to samples at D4. Mix. Shake at 22C for 10 min.
9.5.3.3 Move sample plate from D4 to magnet at C2. Incubate 1 min.
SureSelectXT Automated Target Enrichment for Illumina Paired-End Sequencing Library
Document No.: MCCRD-SOP0005 Version: 1.2
Effective Date: 12/01/2014 Page No.: Page 32 of 33
9.5.3.4 Remove SN from beads at C2 to waste deep-well at A5. Move plate from C2 to D4. Eject tips.
9.5.3.5 Repeat wash (steps 2-4).
9.5.3.6 Move lid from B2 to Wash Buffer 1 at D3.
9.5.3.7 Move samples from D4 to A2.
9.5.4 Step 4 – Wash Buffer 2
9.5.4.1 Load tips. Pick lid from A3. Aspirate 150 uL of Wash Buffer 2 from A3 deep-well. Place lid at A3.
9.5.4.2 Dispense 150 uL Wash Buffer 2 to sample plate at A2. Mix at A2.
9.5.4.3 Move sample plate from A2 to D2 CPAC at 65C. Mix.
9.5.4.4 Move lid from D3 to D2. Incubate for 5 minutes.
9.5.4.5 Move lid from D2 to D3.
9.5.4.6 Move plate to magnet at C2. Incubate for 1 minute.
9.5.4.7 Remove SN from beads at C2 to waste at A5
9.5.4.8 Move sample plate from C2 to A2. Eject tips.
9.5.4.9 Repeat wash 5 times (steps 1-8)
9.5.4.10 Move sample plate from A2 to D4.
9.5.5 Step 5 – PCR Set-up
9.5.5.1 Load tips (single column). Transfer 50 uL of TE Buffer from col 6 of deep-well A4 to sample plate at D4. Eject tips. Repeat for all sample columns.
9.5.5.2 Wait for temp 4C for Inheco at D2.
9.5.5.3 Prompt user to place PCR Master Mix plate at D2 and Pre-Arrayed Indexing Primers at C4.
9.5.5.4 Load tips (single column). Broadcast 20 uL PCR MM across plate at D2. Eject tips.
9.5.5.5 Load tips. Transfer indexed primers from C4 to D2 (total volume, 5 uL). Mix. Eject tips.
9.5.5.6 Dispose of primer plate from C4.
9.5.5.7 Load tips. Mix samples/beads at D4. Shake for 2 minutes. Mix again.
9.5.5.8 Transfer 25 uL of sample/beads from D4 to PCR MM plate at D2. Mix. Eject tips.
9.5.5.9 Prompt user to seal plate at D2 and place on thermocycler for Post-Capture PCR.
9.5.5.10 Prompt user to store the remaining sample in plate at D4 for future use.
SureSelectXT Automated Target Enrichment for Illumina Paired-End Sequencing Library
Document No.: MCCRD-SOP0005 Version: 1.2
Effective Date: 12/01/2014 Page No.: Page 33 of 33
10.0 REVISION HISTORY
Document Number Version Description of Revision Effective Date MCCRD-SOP0005 1.0 Original Release
Note: 7/14/2017: formatting of bullets and headers and alt text description updated for 508c compliance. Content is unchanged
12/1/2014