Embed Size (px)
Citation preview

DLPKKICH3Ignition interface and RF
transponder bypass module for Chrysler vehicles
D I G I T A L O E M I N T E G R A T I O N
INSTALLATION GUIDEOWNER GUIDE
© 2009 Directed Electronics. All rights reserved.www.xpresskit.com
Rev: 20090817
Update Alert: Firmware updates are posted to the web on a regular basis. We recommend you check for firmware and/or install guide updates prior to installation of this product.

Ignition interface and RF transponder bypass module for Chrysler bypass vehicles
WHO IS XPRESSKIT?
TECHNICAL SUPPORT / INFORMATION
web resources:www.xpresskit.com
www.xpressvip.com
www.directechs.comP.1
WHO IS XPRESSKIT?
Discovery, knowledge, and the relentless pursuit of excellence are what define XPRESSKIT. As the leader in OEM integration it’s our mission to innovate and provide our customers with the most advanced and comprehensive data integration solutions available. We understand the ever changing dynamics of technology and are leveraged at staying one step ahead of it.
With R&D centers in the United States, Canada and Europe it’s evident that our objective is to develop innovative and easy to install products for our customers. At XPRESSKIT our engineers understand the complicated communication protocols such as CANBUS and FLEXRAY technology present on all late model vehicles and work tirelessly at developing solutions that truly define OEM integration.
OEM integration has become a game of catch up that requires tenacity and conviction for those who chose to lead. Directed has chosen to lead and as such has positioned XPRESSKIT to be the pioneer in this channel. From our award winning CANMAX400 to our new line of self-configuring modules that don’t require any programming it’s evident that XPRESSKIT is the only choice for digital vehicle integration.
Looking towards the future XPRESSKIT will continue to reset the bar with the adoption and integration of technologies such as WI-FI, MOST and Bluetooth and for good cement its position as the dominant leader in OEM integration.
XPRESSKIT, interfacing the Past, Present and Future.

Please note: The vehicle will not remote start if a door is open.
VEHICLE APPLICATION GUIDE
Legend:K = Key InterfaceM = Multiplex ignition switchJ = J1850
¤ = Available in Wire to Wire & Data to Data modeD = Available in Data to Data mode onlyW = Available in Wire to Wire mode only
PK = Transponder & Immobilizer OverrideDL = OE Door Lock & Alarm ControlsSS = Entry Point Status -SecurityRS = Engine Start & StatusNKR = No Key Required P.2
Ignition interface and RF transponder bypass module for Chrysler bypass vehicles
20
09
20
08
20
07
20
06
20
05
20
04
20
03
CHRYSLER
300|300C ¤ ¤ ¤ ¤ ¤ ¤ ¤ D D D D D D D D D ¤ ¤ ¤
¤ ¤ ¤ ¤ ¤ ¤ ¤ D D D D D D D D D ¤ ¤ ¤
Aspen M2 M2 M2 ¤ ¤ ¤ ¤ ¤ ¤ ¤ D D D D D D D D D ¤ ¤ ¤Pacifica J
PT Cruiser M2* M2* M2* M2* ¤ ¤ ¤ ¤ ¤ ¤ D D D D D D D D D ¤ ¤ ¤Sebring Convertible M2 M2 M2
M2*
M1* M1*
M2*M2*
M2* M2*
M2*
M2*
M2*
†K1
†K1
†K1
†K1
†K1
†K1
†K1
†K1
†K1
†K1
†K1
†K1
†K1
†K1
†K1
†K1
†K1
†K1
†K1
†K1
¤ ¤ ¤ ¤ ¤ ¤ ¤ D D D D D D D D D ¤ ¤ ¤Sebring Sedan M2 M2 M2 ¤ ¤ ¤ ¤ ¤ ¤ ¤ D D D D D D D D D ¤ ¤ ¤Town and Country J J J J ¤ ¤ ¤ ¤ ¤ ¤ ¤ ¤ D D D D D D D D D ¤ ¤DODGE
Avenger M2 M2 M2 ¤ ¤ ¤ ¤ ¤ ¤ ¤ D D D D D D D D D ¤ ¤ ¤Caliber M2 M2 M**
Caravan
Charger
J J J J
Dakota Pickup M2 M2 M2 ¤ ¤ ¤ ¤ ¤ ¤ D D D D D D D D ¤ ¤ ¤Durango M2 M2 M2 ¤ ¤ ¤ ¤ ¤ ¤ D D D D D D D D D ¤ ¤ ¤Grand Caravan J J J J
¤ ¤ ¤ ¤ ¤ ¤ ¤
¤ ¤ ¤ ¤ ¤ ¤ ¤
¤ ¤ ¤ ¤ ¤ ¤ ¤
D D D D D D D D D ¤ ¤
D D D D D D D D D ¤ ¤
D D D D D D D D D ¤ ¤
Journey ¤ ¤ ¤ ¤ ¤ D D D D D D D D D ¤ ¤
¤ ¤ ¤ ¤ ¤ D D D D D D D D D ¤ ¤
Magnum M2* M2* M2* ¤ ¤ ¤ ¤ D D D D D D D D D ¤ ¤ ¤Nitro M2 M2 M2 ¤ ¤ ¤ ¤ ¤ D D D D D D D D D ¤ ¤Ram 1500 pickup M2* M2* M2* ¤ ¤ ¤ ¤ ¤ ¤ ¤ D D D ¤ D D D D ¤Ram 2500,3500 Pickup M1 M1 M1 M1 ¤ ¤ ¤ ¤ ¤ ¤ ¤ D D D ¤ D D D D ¤Ram 4500 Chassis Cab M1 M1 ¤ ¤ ¤ ¤ ¤ ¤ ¤ D D D ¤ D D D D ¤Ram 5500 Chassis Cab M1 M1 ¤ ¤ ¤ ¤ ¤ ¤ ¤ D D D ¤ D D D D ¤JEEP
VOLKSWAGEN
Commander
Routan
M2* M2* ¤ ¤ ¤ ¤ ¤ ¤ ¤ ¤ D ¤ ¤ D ¤ ¤ D D D ¤Compass M2 M2 M** ¤ ¤ ¤ ¤ ¤ ¤ ¤ ¤ D ¤ ¤ D ¤ ¤ D D D ¤Grand Cherokee
Liberty M2 M2 J J J ¤ ¤ ¤ ¤ ¤ ¤ D ¤ D D D D D DPatriot M2 M2 M2 ¤ ¤ ¤ ¤ ¤ ¤ ¤ ¤ D ¤ ¤ D ¤ ¤ D D D ¤Wrangler M2 M2 M2 ¤ ¤ ¤ ¤ ¤ ¤ D ¤ D D D D D D
* Requires (+) start output analog with MUX.
** In 2007, both version were available (M1 & M2)
FO
B A
larm
(A
dd
-On)
Arm
/Dis
arm
SS
- E
ntr
y S
tatu
s D
rive
rs D
oo
r P
in
SS
- E
ntr
y S
tatu
s H
oo
d P
in
RS
- C
ran
k (
Sta
rt)
Activation
RS
- I
gn
itio
n A
ctiva
tio
n
RS
- I
gn
itio
n S
tatu
s
RS
- 2
nd
Sta
rt W
ire
Activa
tio
n (
Mu
x)
RS
- B
rake
Sta
tus
PK
- B
yp
ass
Tra
nsp
on
der
RF
: R
FL
OO
P is
req
uir
ed
fo
r th
e in
sta
llati
on
PK
-Byp
ass T
ran
sp
on
de
r R
FL
CH
GM
In
clu
de
d
RS
- Ta
ch
Ou
tpu
t
MC
- K
eyse
nse
Sta
tus
MC
- R
AP
Sh
ut
Off
SS
- E
ntr
y S
tatu
s T
run
k/H
atc
h P
in
SS
- E
ntr
y S
tatu
s A
LL D
oo
r P
ins
DL
- D
oo
r U
nlo
ck A
LL d
oo
rs
DL
- D
oo
r L
ock C
on
tro
l
DL
- S
lidin
g D
oo
r C
on
tro
l D
rive
r
DL
- S
lidin
g D
oo
r C
on
tro
l P
asse
ng
er
DL
- T
run
k /
Ha
tch
Re
lea
se
DL
- D
isa
rm F
acto
ry S
ecuri
ty
DL
- A
rm F
acto
ry S
ecu
rity
DL-
Door
Unlo
ck D
river
Priori
ty
PANIC
Vehicle Years and Installation type
K = Key Interface J = J1850
PANIC
M = Multiplex (MUX)
Identifying Vehicle Interface Type
¤
¤
¤¤¤
¤ ¤¤ ¤ ¤ ¤¤ ¤¤ ¤
¤ ¤
J J
D D D D
† On these vehicles, some signals can’t be detected depending on where the CAN wires are connected. If this installation (K1) doesn’t work, please try install M1.

K1 CHWFR INSTALL
models with wireless ignition node
Installing key interface (CHWFR) into
K1PANIC
Doorlock and transponder bypass module for Chrysler, Dodge, Jeep
STEP 5
STEP 4STEP 1 STEP 2
Remove the ignition module from the
dashboard. (Disassemble the dash to access the
ignition module)
STEP 8
STEP 6 STEP 7
Slide open the cover of the wireless ignition node.
Cut the lip off the cover.
Insert the CHWFR circuit board as shown.
Ensure the board is well aligned.
CHWFR circuit
Align the circuit board with the 6 pins on the wireless ignition node.
CHWFR
Using supplied screw ONLY, apply LOCTITE to screw and secure* wafer into PCB as per
diagram. Reassemble key module and install back into the vehicle.
Use a flat screw driver to lift out the 2 tabs on each side of the cover.
STEP 3
* Be sure not to over tighten the screw as damage to the factory circuit board
may occur.
P.3
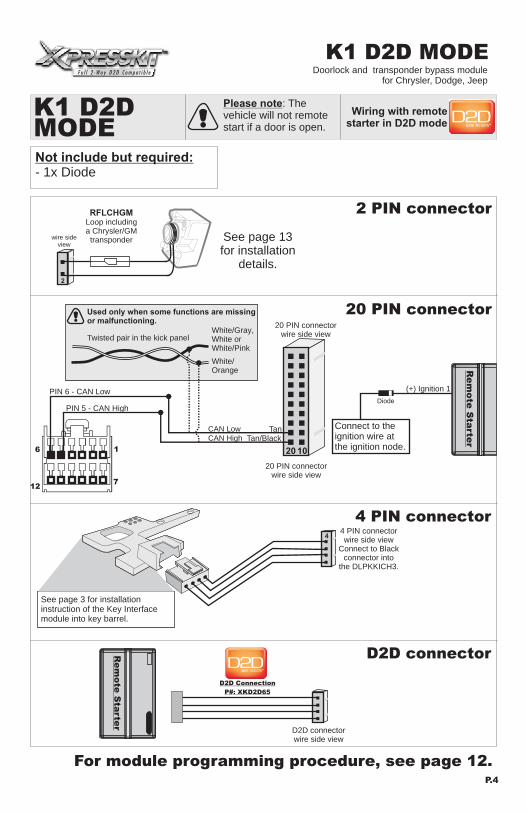
K1 D2D MODE
K1 D2DMODE
Doorlock and transponder bypass module for Chrysler, Dodge, Jeep
Rem
ote
Sta
rter
D2D Connection
P#: XKD2D65
2
RFLCHGMLoop including a Chrysler/GMtransponder See page 13
for installationdetails.
1020
20 PIN connectorwire side view
wire sideview
D2D connectorwire side view
2 PIN connector
20 PIN connector
D2D connector
For module programming procedure, see page 12.P.4
starter in D2D mode Wiring with remote
Please note: The vehicle will not remote start if a door is open.
4 PIN connector
See page 3 for installation instruction of the Key Interface module into key barrel.
44 PIN connectorwire side view
Connect to Blackconnector into
the DLPKKICH3.
(+) Ignition 1
Connect to the ignition wire at the ignition node.
Diode
Not include but required:- 1x Diode
TanTan/Black
16
127
PIN 6 - CAN Low
PIN 5 - CAN High
CAN LowCAN High
Twisted pair in the kick panel
Used only when some functions are missing or malfunctioning.
White/Gray,White or White/Pink
White/Orange
20 PIN connectorwire side view

K1 W2W MODEDoorlock and transponder bypass module
for Chrysler, Dodge, Jeep
starter in W2W mode Wiring with remote
2
TanTan/Black
16
127
PIN 6 - CAN Low
PIN 5 - CAN High
CAN LowCAN High
RFLCHGMLoop including a Chrysler/GMtransponder See page 13
for installationdetails.
1020
20 PIN connectorwire side view
wire sideview
2 PIN connector
20 PIN connector
4 PIN connector
Light Green (-) Lock
Blue/White(-) Ground when running (status)
Violet/Black (-) Aux 2
White/Violet (-) Aux 1BlueRed/White (-) Trunk
(-) Unlock
Violet(+) Ignition 2(+) Batt +12v
Pink
(+) Starter
(-)GroundBlackRed
P.5
Please note: The vehicle will not remote start if a door is open.
K1 W2WMODE
See page 3 for installation instruction of the Key Interface module into key barrel.
4
(+) Ignition 1
Diode
Connect to the ignition wire at the ignition node.
For module programming procedure, see page 12.
Not include but required:- 1x Diode
4 PIN connectorwire side view
Connect to Blackconnector into
the DLPKKICH3.
Twisted pair in the kick panel
Used only when some functions are missing or malfunctioning.
White/Gray,White or White/Pink
White/Orange

M1 D2D MODEDoorlock and transponder bypass module
for Chrysler, Dodge, Jeep
Rem
ote
Sta
rter
D2D Connection
P#: XKD2D65
2
Tan
Violet/Brown
Tan/BlackCAN LowPIN 7
Multiplex Output
CAN HighPIN 6
RFLCHGMLoop including a Chrysler/GMtransponder See page 13
for installationdetails.
1020
20 PIN connectorwire side view
wire sideview
D2D connectorwire side view
2 PIN connector
20 PIN connector
D2D connector
5 1
1 8
Front view
Front view
P.6
starter in D2D mode Wiring with remoteM1 D2D
MODEPlease note: The vehicle will not remote start if a door is open.
(+) Ignition 1PIN 3
For module programming procedure, see page 12.
PIN 4 (+) StartConnect the start (+) wire
output from remote starter to pin 4 of key switch connector.
May be required.

Blue
PinkRed
1020
M1 W2W MODEDoorlock and transponder bypass module
for Chrysler, Dodge, Jeep
2
RFLCHGMLoop including a Chrysler/GMtransponder See page 13
for installationdetails.
wire sideview
2 PIN connector
Light Green (-) Lock
Blue/White(-) Ground when running (status)
Violet/Black (-) Aux 2
White/Violet (-) Aux 1
Red/White (-) Trunk(-) Unlock
Violet(+) Ignition 2(+) Batt +12v
(+) Starter
(-)GroundBlack
P.7
Tan
Violet/Brown
(+) Ignition 1PIN 3
Tan/BlackCAN LowPIN 7
Multiplex Output
CAN HighPIN 6
20 PIN connectorwire side view
20 PIN connector
5 1
1 8
Front view
Front view
starter in W2W mode Wiring with remote M1 W2W
MODEPlease note: The vehicle will not remote start if a door is open.
For module programming procedure, see page 12.
PIN 4 (+) StartConnect the start (+) wire
output from remote starter to pin 4 of key switch connector.
May be required.

CAN LowPIN 7
CAN HighPIN 6
1 8
Front view
M2 D2D MODEDoorlock and transponder bypass module
for Chrysler, Dodge, Jeep
Rem
ote
Sta
rter
D2D Connection
P#: XKD2D65
2
Tan
Violet/Brown
Tan/Black
CAN Low
Multiplex Output
CAN High
RFLCHGMLoop including a Chrysler/GMtransponder See page 13
for installationdetails.
1020
20 PIN connectorwire side view
wire sideview
D2D connectorwire side view
2 PIN connector
20 PIN connector
D2D connector
5 1
Front view
Twisted pair in the kick panelWhite, White/Gray or White/Pink
White/Orange
Connect the start (+) wire output from remote starter to pin 4 of key switch connector.
P.8
(+) Ignition 1PIN 3
PIN 4 (+) Start
starter in D2D mode Wiring with remoteM2 D2D
MODEPlease note: The vehicle will not remote start if a door is open.
For module programming procedure, see page 12.
May be required.
Can be found at the steering column in some vehicles.

CAN LowPIN 7
CAN HighPIN 6
1 8
Front view
Can be found at the steering column in some vehicles.
M2 W2W MODEDoorlock and transponder bypass module
for Chrysler, Dodge, Jeep
2
RFLCHGMLoop including a Chrysler/GMtransponder See page 13
for installationdetails.
wire sideview
2 PIN connector
Violet/BrownMultiplex Output
1020
20 PIN connectorwire side view
20 PIN connector
5 1
Front view
Light Green (-) Lock
Blue/White(-) Ground when running (status)
Violet/Black (-) Aux 2
White/Violet (-) Aux 1BlueRed/White (-) Trunk
(-) Unlock
Violet(+) Ignition 2(+) Batt +12v
Pink
(+) Starter
(-)GroundBlackRed
P.9
(+) Ignition 1
PIN 4
PIN 3
(+) Start
starter in W2W mode Wiring with remoteM2 W2W
MODEPlease note: The vehicle will not remote start if a door is open.
For module programming procedure, see page 12.
May be required.Connect the start (+) wire
output from remote starter to pin 4 of key switch connector.
TanTan/Black
CAN LowCAN High
Twisted pair in the kick panelWhite, White/Gray or White/Pink
White/Orange

1 8
169
J D2D MODEDoorlock and transponder bypass module
for Chrysler, Dodge, Jeep
Rem
ote
Sta
rter
D2D Connection
P#: XKD2D65
2
Violet/Brown
Green
Multiplex Output
J1850
RFLCHGMLoop including a Chrysler/GMtransponder See page 13
for installationdetails.
1020
20 PIN connectorwire side view
wire sideview
D2D connectorwire side view
2 PIN connector
20 PIN connector
D2D connector
5 1
Front view
Diagnostic connector (Face view) Under dash driver side Position 2
P.10
(+) Ignition 1PIN 3
starter in D2D mode Wiring with remote
Connect the start (+) wire output from remote starter to pin 4 of key switch connector. If no wire to pin 4,
do not connect the start (+) wire.PIN 4 (+) Start
J D2DMODE
Please note: The vehicle will not remote start if a door is open.
For module programming procedure, see page 12.
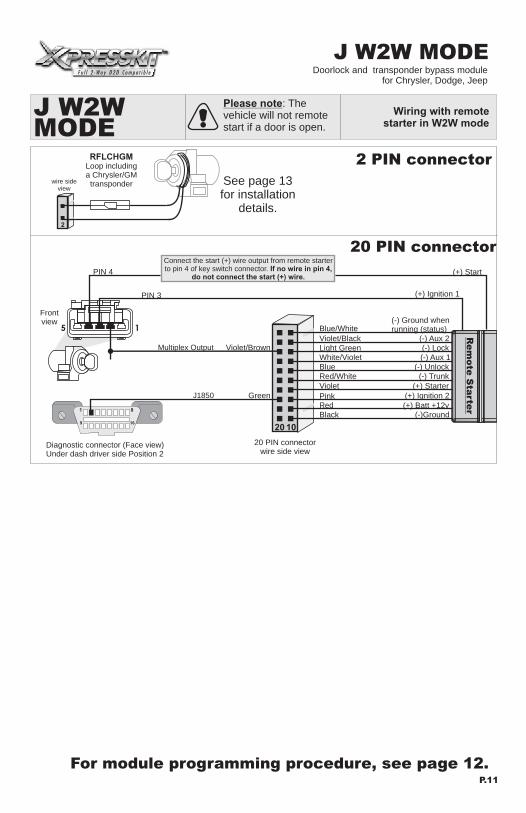
J W2W MODEDoorlock and transponder bypass module
for Chrysler, Dodge, Jeep
1 8
169
2
Violet/Brown
Green
Multiplex Output
J1850
RFLCHGMLoop including a Chrysler/GMtransponder See page 13
for installationdetails.
1020
20 PIN connectorwire side view
wire sideview
2 PIN connector
20 PIN connector
5 1
Frontview
Diagnostic connector (Face view) Under dash driver side Position 2
Light Green (-) Lock
Blue/White(-) Ground when running (status)
Violet/Black (-) Aux 2
White/Violet (-) Aux 1BlueRed/White (-) Trunk
(-) Unlock
Violet(+) Ignition 2(+) Batt +12v
Pink
(+) Starter
(-)GroundBlackRed
P.11
(+) Ignition 1PIN 3
starter in W2W mode Wiring with remote
Connect the start (+) wire output from remote starter to pin 4 of key switch connector. If no wire in pin 4,
do not connect the start (+) wire.PIN 4 (+) Start
J W2WMODE
Please note: The vehicle will not remote start if a door is open.
For module programming procedure, see page 12.

Ignition interface and RF transponder bypass module for Chrysler bypass vehicles
WHAT’S INCLUDED
1
1
2
2
3
3
For vehicles WITH keyless.
For vehicles WITHOUT keyless.
When all connections are correctly done, the LED will turn ON.
When all connections are correctly done, the LED will turn ON.
IGN
IGN
IGN
START
START
START
OF
FO
FF
OF
F
KEY
KEY
KEY
Start the vehicle with the key and then turn off.
Turn the key at ignition and press programming button.
Press LOCK or UNLOCK on the factory transmitter and the LED shuts off.
Relase the programming button and the LED turns off.
&
&
or( (
MODULE PROGRAMMING PROCEDURE
P.12

RFLCHGM: TRANSPONDER PROGRAMMINGIMPORTANT NOTE: Once the transponder has been programmed to the vehicle, it can not be used on any other vehicle.
RFLCHGM INSTALL
RFLCHGMLoop including a
Chrysler/GM transponder
A) P ound the vehicle's ignition cylinder as shown.
B) Plug the 2 pin loop antenna ring connector into the 2 pin connector of the module.
lace the loop antenna ring ar
You will need 2 valid ignition keys to program. Proceed as follows:
The RFLCHGM for Chrysler vehicle is now programmed.
IGN
IGN
IGN
IGN
ON
ON
ON
ON
OF
FO
FF
OF
FO
FF
KEY#1
KEY#1
KEY#2
KEY#2
Insert the first valid key into the ignition switch and turn it ON for at least 5 seconds, but no longer than 15 seconds.
Make sure the DLPKKICH3 module has been programmed before proceeding with the RFLCHGM transponder programming.Refer to the Module Programming Procedure described on page 13 for more information.
Turn the ignition switch OFF and remove the first key.
Within 5 seconds insert the second valid key and turn the ignition switch ON.
After 10 seconds a chime will sound and the security light will begin to flash. Turn the ignition switch OFF and remove the second key.
Within 60 seconds, put the transponder part of the RFLCHGM close to ignition and power-up the ignition wire with a jumper wire.
For type J:
For type K1, M1 or M2:
After 10 seconds, a chime will sound then the security light will stop flashing and turn itself ON for 3 seconds.
To complete the installation, install the RFLCHGM around the ignition.
Ignition
Jumper wirePower
Security
Security
ON 3 secondsFlashing
&Security
2
1
3
4
5
6A6B
7
8
DLP
KK
ICH
3
NoteMove antenna loop as close to the front of the ignition cylinder (factory receiver ring) as possible.
Within 60 seconds, put the transponder part of the RFLCHGM close to ignition and press the remote start button and the remote starter will turn the ignition ON.
Doorlock and transponder bypass module for Chrysler, Dodge, Jeep
P.13

OWNER’S GUIDEThank you for purchasing the DLPKKICH3.
This module is a revolution in integration technology which can control the factory door locks and factory security as well as perform the override of the OEM immobilizer. Before using the system we recommend that you read this guide to fully understand the special operating features of this system.
Anti-theft protectionYour remote starter is equipped with an anti-theft system. If you need to open the hood, a door or the trunk while the vehicle is running by remote starter, you will need to unlock the system with the OEM or aftermarket remote. If the doors are unlocked with the key, the engine will stop automatically and the remote start will not function until you start the vehicle with the key.
Pit-Stop ModeThe Pit-Stop feature allows the vehicle to remain running after the key has been removed. This feature is useful for occasions when you wish to exit and lock the vehicle for short periods of time, but would like to leave the motor running and the climate controls on. To activate, with engine running press the “start” button on the remote of your remote starter, the doors will unlock and you can remove the key from the ignition. When you exit the vehicle and close all the doors, press lock, and the motor will run for 15 minutes.
When the vehicle is running by remote starterTo enter the vehicle while remote started you must unlock the doors with either the factory or aftermarket remote or the engine will shut down.
Viper™ Python™ Clifford™Installed with a DLPKKICH3
P.14

LIMITED ONE-YEAR CONSUMER WARRANTY
This Interface kit / Data Bus Interface part has been tested on the listed vehicles. Other vehicles will be added to the select vehicle list upon completion of compatibility testing. Visit website for latest vehicle application guide. DISCLAIMER: Under no circumstances shall the manufacturer or the distributors of the bypass kit / data bus interface part(s) be held liable for any consequential damages sustained in connection with the part(s) installation. The manufacturer and it’s distributors will not, nor will they authorize any representative or any other individual to assume obligation or liability in relation to the interface kit / data bus interface part(s) other than its replacement. N.B.:Under no circumstances shall the manufacturer and distributors of this product be liable for consequential damages sustained in connection with this product and neither assumes nor authorizes any representative or other person to assume for it any obligation or liability other than the replacement of this product only.
For a period of ONE YEAR from the date of purchase of a Directed Electronics remote start or security product, Directed Electronics. (“DIRECTED”) promises to the original purchaser, to repair or replace with a comparable reconditioned piece, the security or remote start accessory piece (hereinafter the “Part”), which proves to be defective in workmanship or material under normal use, provided the following conditions are met: the Part was purchased from an authorized DIRECTED dealer; and the Part is returned to DIRECTED, postage prepaid, along with a clear, legible copy of the receipt or bill of sale bearing the following information: consumer’s name, address, telephone number, the authorized licensed dealer’s name and complete product and Part description.
This warranty is nontransferable and is automatically void if the Part has been modified or used in a manner contrary to its intended purpose or the Part has been damaged by accident, unreasonable use, neglect, improper service, installation or other causes not arising out of defect in materials or construction.
TO THE MAXIMUM EXTENT ALLOWED BY LAW, ALL WARRANTIES, INCLUDING BUT NOT LIMITED TO EXPRESS WARRANTY, IMPLIED WARRANTY, WARRANTY OF MERCHANTABILITY, FITNESS FOR PARTICULAR PURPOSE AND WARRANTY OF NON INFRINGEMENT OF INTELLECTUAL PROPERTY, ARE EXPRESSLY EXCLUDED; AND DIRECTED NEITHER ASSUMES NOR AUTHORIZES ANY PERSON OR ENTITY TO ASSUME FOR IT ANY DUTY, OBLIGATION OR LIABILITY IN CONNECTION WITH ITS PRODUCTS. DIRECTED HEREBY DISCLAIMS AND HAS ABSOLUTELY NO LIABILITY FOR ANY AND ALL ACTS OF THIRD PARTIES INCLUDING DEALERS OR INSTALLERS. IN THE EVENT OF A CLAIM OR A DISPUTE INVOLVING DIRECTED OR ITS SUBSIDIARY, THE PROPER VENUE SHALL BE SAN DIEGO COUNTY IN THE STATE OF CALIFORNIA. CALIFORNIA STATE LAWS AND APPLICABLE FEDERAL LAWS SHALL APPLY AND GOVERN THE DISPUTE. THE MAXIMUM RECOVERY UNDER ANY CLAIM AGAINST DIRECTED SHALL BE STRICTLY LIMITED TO THE AUTHORIZED DIRECTED DEALER’S PURCHASE PRICE OF THE PART. DIRECTED SHALL NOT BE RESPONSIBLE FOR ANY DAMAGES WHATSOEVER, INCLUDING BUT NOT LIMITED TO, ANY CONSEQUENTIAL DAMAGES, INCIDENTAL DAMAGES, DAMAGES FOR THE LOSS OF TIME, LOSS OF EARNINGS, COMMERCIAL LOSS, LOSS OF ECONOMIC OPPORTUNITY AND THE LIKE. NOTWITHSTANDING THE ABOVE, THE MANUFACTURER DOES OFFER A LIMITED WARRANTY TO REPLACE OR REPAIR AT DIRECTED’S OPTION THE PART AS DESCRIBED ABOVE.
Some states do not allow limitations on how long an implied warranty will last or the exclusion or limitation of incidental or consequential damages. This warranty gives you specific legal rights and you may also have other rights that vary from State to State. DIRECTED does not and has not authorized any person or entity to create for it any other obligation, promise, duty or obligation in connection with this Part.920-0007 07-06
PROTECTED BY U.S. PATENTS: 5,719,551; 6,011,460 B1 *;6,243,004 B1; 6,249,216 B1; 6,275,147 B1; 6,297,731 B1; 6,346,876 B1; 6,392,534 B1; 6,529,124 B2; 6,696,927 B2; 6,756,885 B1; 6 , 7 5 6 , 8 8 6 B2; 6,771,167 B1; 6,812,829 B1; 6,924,750 B1; 7,010,402 B1; 7,015,830 B1; 7,031,826 B1; 7,046,126 B1; 7,061,137 B1; 7,068,153 B1; 7,205,679 B1; CDN. PATENT: 2,320,248; 2,414,991; 2,415,011; 2,415,023; 2,415,027; 2,415,038; 2,415,041; 2,420,947; 2,426,670; 2,454,089 EUROPEAN PATENT:1,053,128 PAT. PENDING: 2,291,306; MADE IN CANADA
© 2009 Directed Electronics. All rights reserved.www.xpresskit.com
DLPKKICH3Doorlock and transponder bypass module
for Chrysler, Dodge, Jeep


![W2W[Seniors] Guys Guide](https://img.dokumen.tips/doc/110x75/568caa771a28ab186da1b219/w2wseniors-guys-guide.jpg)


![Remote sensing [compatibility mode]](https://img.dokumen.tips/doc/110x75/54944157b479595b4d8b4a83/remote-sensing-compatibility-mode.jpg)


![W2W [Couples] 2015](https://img.dokumen.tips/doc/110x75/568cad141a28ab186daa334c/w2w-couples-2015.jpg)

