Embed Size (px)
Citation preview

DIY Doghouse
Thanks for downloading the DIY Doghouse Plans!
The complete project tutorial with detailed photos to go along with these plans can be found at https://www.ryobitools.com/nation/projects/7069 I invite you to make changes to the plans as you find necessary to best fit your needs. I’ve provided the measurements for the frame of the house. I’d recommend measuring and cutting your sheathing, metal roof, and trim using your own measurements, as they may differ slightly. Good luck with the project and have fun building it! Please post project photos on the Facebook page at www.facebook.com/DIYPROJECTSWITHPETE or elsewhere tagged with #DIYPETE
1 https://www.ryobitools.com/nation/projects/7069 Copyright 2016 DIY PETE, LLC

Tools Needed *Please note By using these links to purchase tools you are helping support DIYPete.com. Miter Saw– I’d recommend a 12 inch sliding, miter saw. Drill– I use Ryobi drills. Orbital Sander– Ryobi makes a nice one. Kreg Jig (Optional) Circular Saw – Could be used in place of a miter saw Table Saw To rip the pickets and siding Speed Square Aviator Snips (to cut metal) Tape Measure, Ruler, Pencil or Sharpie Marker Eye and Ear protection, Rubber Gloves, Mask, Work gloves Clamps– Clamps are helpful for any project. Supplies Needed Qty: 3 2x4x8 pressure treated boards (for platform) $6/board Qty: 5 2x4x8 boards (I used cedar, redwood is another good choice) $8/board Qty: 2 1x6x6 fence pickets (front deck) $2.65/board Qty: 3 1x4x8 boards (Corner trim) $7.75/board Qty: 3 2x2x8 boards (framing and roof) $6.00 Qty: 2 4x8 x ½ inch thick plywood (or similar thickness) $17/board Siding (I used Cedar) (t111 and other options would work) Approx $40 Qty: 1 Roofing Material (I used corrugated metal) 3x8 foot sheet $24 Qty: 2 J channel (10 foot 6 inch pieces) $11/piece Wood finish (deck stain works great) 3” wood screws $10 Wood Glue 2 ½” pocket hole screws (if using to connect any of the framing) 1 ½” screws or nails to attach siding $7 1 inch metal roof screws: $8
Total Approximate Cost for supplies: $275 *Does not include things like glue, sandpaper, stain
2 https://www.ryobitools.com/nation/projects/7069 Copyright 2016 DIY PETE, LLC

Overall Dimensions: 36” tall x 63” deep x 32 ½” wide
3 https://www.ryobitools.com/nation/projects/7069 Copyright 2016 DIY PETE, LLC

Create the Platform Platform Qty 2 3 ½” wide x 1 ½ inch x 60” long (pressure treated) Qty 2 3 ½” wide x 1 ½ inch x 30” long (pressure treated) Qty 2 3 ½” wide x 1 ½ inch x 27” long (pressure treated) Qty 1 3 ½” wide x 1 ½ inch x 16 1/2” long (pressure treated) Qty 1 30” wide x 45” long x ½ inch plywood (top of platform) I would recommend using pressure treated wood for the base of the platform which will rest against the ground.
4 https://www.ryobitools.com/nation/projects/7069 Copyright 2016 DIY PETE, LLC

Cut the plywood for the top of the platform.
5 https://www.ryobitools.com/nation/projects/7069 Copyright 2016 DIY PETE, LLC

Create the sidewalls. The bottom is constructed of a 1 ½” by 1 ½” board. Connect the bottom board to vertical boards from the underside using 2 ½ inch wood screws. The other boards can be connected using longer screws or pocket holes and screws. The boards should be cut at about an 11 degree angle. I’d recommend test fitting the pieces while cut a bit long, and then shortening as needed to make sure you get the perfect fit. Cuts: Qty 2: 1 ½” by 1 ½” by 45” (bottom horizontal board) Qty 2: 3 ½” by 1 ½” by 25” (front board) 11 degree angle on one side Qty 2: 3 ½” by 1 ½” by 17 7/16” (middle board) 11 degree angle on one side Qty 2: 3 ½” x 1 ½” by 17” (back) 11 degree angle on one side Qty 2: 3 ½” x 1 ½” by 38 11/16” 11 degree angle both sides
6 https://www.ryobitools.com/nation/projects/7069 Copyright 2016 DIY PETE, LLC

Attach the sidewalls to the platform from the top side using 3 inch screws.
7 https://www.ryobitools.com/nation/projects/7069 Copyright 2016 DIY PETE, LLC

Add a board to the rear side of the platform and 2 shorter boards to the front side. Cuts: Qty 1: 1 ½” by 1 ½” by 27” long Qty 2: 1 ½” by 1 ½” by 6 ½” long
8 https://www.ryobitools.com/nation/projects/7069 Copyright 2016 DIY PETE, LLC
Connect the sidewalls to each other. These are 27” long. See the diagrams below for placement. Connect from the outside using 3 inch wood screws. Cuts: Qty 1: 3 ½” by 1 ½” by 27” (front of doghouse) Qty 1: 3 ½” by 1 ½” by 27” (back of doghouse)
9 https://www.ryobitools.com/nation/projects/7069 Copyright 2016 DIY PETE, LLC

Up close diagram (front of doghouse)
Diagram below (back of doghouse)
10 https://www.ryobitools.com/nation/projects/7069 Copyright 2016 DIY PETE, LLC

Construct the roof. Cuts: Qty 3: 3 ½” by 1 ½” by 57” long Qty 2: 1 ½” by 1 ½” by 34” long
11 https://www.ryobitools.com/nation/projects/7069 Copyright 2016 DIY PETE, LLC

Cut the top of the roof using a circular saw. Qty 1: 60” by 34” by ½” thick
Attach the roof from the top using wood screws. The backside will overhang approximately 4 inches.
12 https://www.ryobitools.com/nation/projects/7069 Copyright 2016 DIY PETE, LLC

Add the sheathing (plywood sidewalls). I’d recommend measuring your frame to get a perfect fit instead of using my exact measurements for the sheathing. Use a circular saw. Attach to the studs using 1 ½” screws.
13 https://www.ryobitools.com/nation/projects/7069 Copyright 2016 DIY PETE, LLC

Add sheathing to the front.
14 https://www.ryobitools.com/nation/projects/7069 Copyright 2016 DIY PETE, LLC
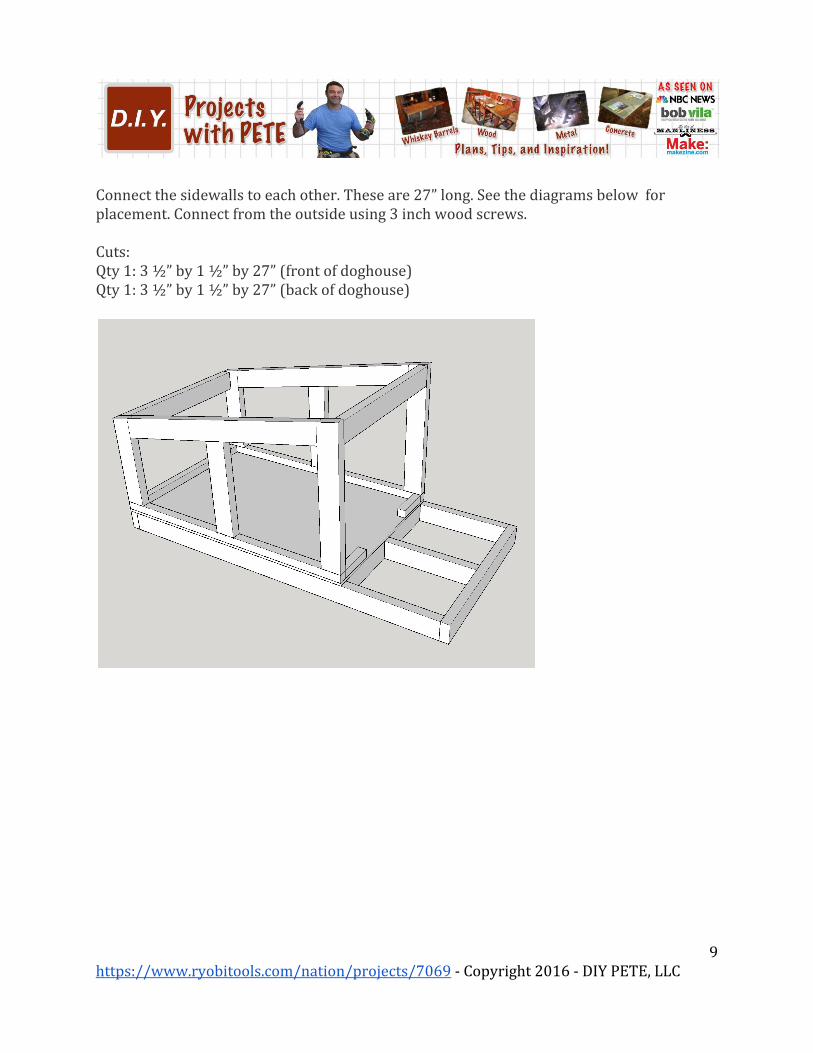
Add sheathing to the backside of the doghouse.
15 https://www.ryobitools.com/nation/projects/7069 Copyright 2016 DIY PETE, LLC

Cut 1x4 boards to size for each corner trim piece. Cut an angle on the top side of side boards and then attach.
16 https://www.ryobitools.com/nation/projects/7069 Copyright 2016 DIY PETE, LLC
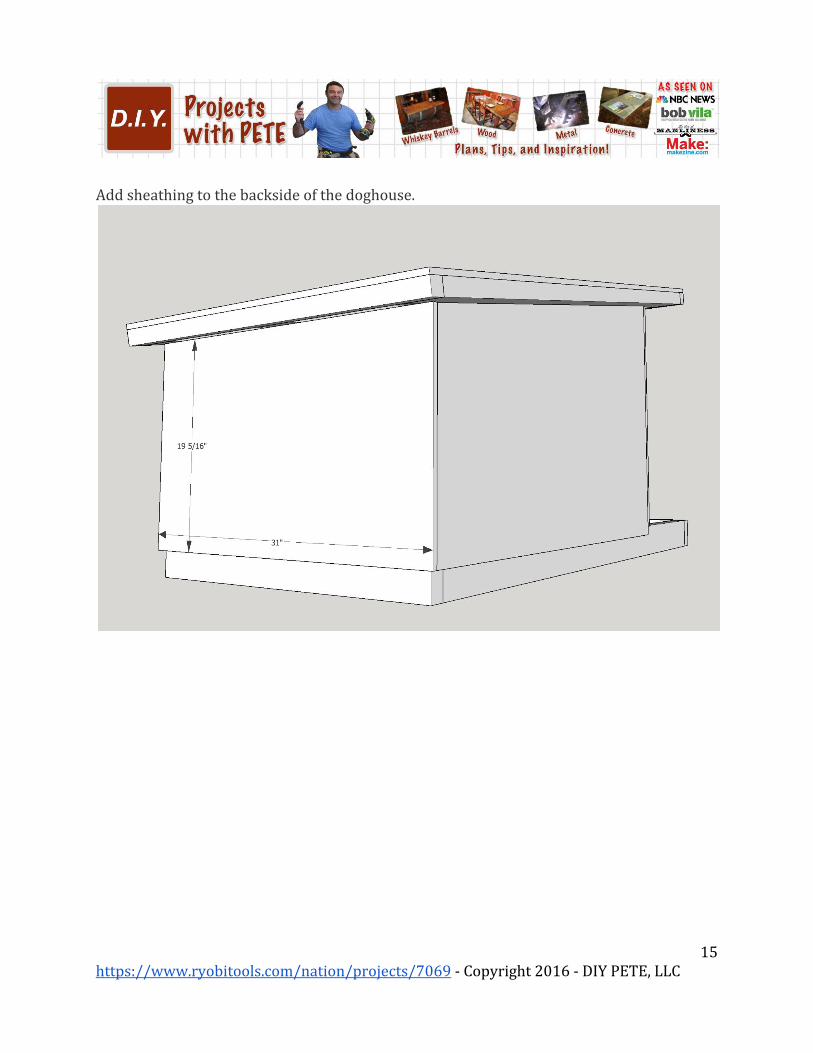
The front trim will be notched on the bottom side to accommodate for the deck. Use a jigsaw to make the notch.
17 https://www.ryobitools.com/nation/projects/7069 Copyright 2016 DIY PETE, LLC

Approximate size for trim boards.
18 https://www.ryobitools.com/nation/projects/7069 Copyright 2016 DIY PETE, LLC

A look at the trim on all four sides.
19 https://www.ryobitools.com/nation/projects/7069 Copyright 2016 DIY PETE, LLC

Now it is time to choose your siding. I used cedar siding. Start at the bottom and work your way up. Cut angles as needed to match the angle of the roof.
20 https://www.ryobitools.com/nation/projects/7069 Copyright 2016 DIY PETE, LLC

Add siding to the front and all sides.
21 https://www.ryobitools.com/nation/projects/7069 Copyright 2016 DIY PETE, LLC

Use a jig saw to cut out a door. My door is 13 ½” wide and the top of the arc is 20 inches. I started the arc about 17 inches up. First drill a hole in the center so you have a place to start cutting with the blade.
22 https://www.ryobitools.com/nation/projects/7069 Copyright 2016 DIY PETE, LLC

Cut the decking (30 inches long). You’ll likely need to make one of the boards a bit narrower using a table saw. I used cedar pickets for the decking.
23 https://www.ryobitools.com/nation/projects/7069 Copyright 2016 DIY PETE, LLC

Add a roof. I chose to use metal, but shingles would work well if you’d prefer. Because metal is sharp, I used J channel around the front and 2 sides to cover up the sharp ends. The channel was screwed to the top and then the panel slid in from the backside. The metal was cut to 34” by 60” (same as roof). The J channel will need to be cut to fit around it. You can find more detailed photos at Ryobi Nation. Secure the metal using 1 inch metal roofing screws into the studs.
24 https://www.ryobitools.com/nation/projects/7069 Copyright 2016 DIY PETE, LLC

Add a wood or metal plaque on the front with your dog’s name if you’d like. This doghouse works perfect for Nala, who is a 40 pound Golden Retriever.
Enjoy! You’ve done the work, now let your dog enjoy his or her new home! Modify your build as needed and share this project with your friends. Thanks for following along and be sure to check out the free blog post and video tutorial at https://www.ryobitools.com/nation/projects/7069.
Cheers! Thanks so much for checking out the DIY Doghouse plans and I’d love to hear how your project goes! Please post photos on Facebook at www.facebook.com/diyprojectswithpete and subscribe to my Youtube channel at www.youtube.com/diyprojectswithpete.
25 https://www.ryobitools.com/nation/projects/7069 Copyright 2016 DIY PETE, LLC

Cheers from Montana,
* Please refer to the post at https://www.ryobitools.com/nation/projects/7069 and check out the video tutorial for more information, instructions, and tips.
26 https://www.ryobitools.com/nation/projects/7069 Copyright 2016 DIY PETE, LLC