Embed Size (px)
Citation preview

DIVISION TRAINING ON THE UTILIZATION AND
MANAGEMENT OF THE SCHOOL BIOMETRICS SYSTEM
Department of Education
Region IIIDIVISION OF BATAAN
City of Balanga

TOPICS TO DISCUSS:
A. Biometrics Machine Operations- Parts-Proper Position of Finger-Enroll User-Delete User-Admin Setup-Time Adjustment-Sensor Calibration-Downloading Logs

B. Employees Management (MGC Work)- Creating Masterlist-Importing Masterlist-Editing Information on Masterlist-Deleting/Transferring Employees

C. DTR Generation-Managing Log Files- Renaming Logs-Archiving Logs-Importing Logs-Generating Logs-Exporting DTR to PDF File-Printing DTR
D. REMINDERS

Centralized
• Masterlist not updated properly
• Late submission or incomplete number of Logs submitted.
• Biometrics ID duplication• DTR generation overlapping• Swapped Bio ID
School/District Based• Masterlist can easily updated.
School Biometrics Coordinator holds the Masterlist.
• Collection of Logs are within the school.
• School Bio Coordinator holds the available ID number.
• Since duplication of ID lessen, few duplication of DTR can occur.

A. Biometrics Machine OperationsBiometrics Machine Parts
1
2 3
4
5 6
7
8
9
10
11
1. LCD2. State Key IN (previous )
3. State Key OUT (next)
4. 0-9 Number Key5. FN Key6. Menu Key7. Delete/Exit Key8. Confirm/Power Key9. LED10.Fingerprint Sensor11.Loudspeaker

Placing FingerCorrect Method
Place finger in the center of the Sensor
Place finger flat on the sensor surface

Placing FingerIncorrect Method
Do not remove finger during the
enrollment process
Using the tip of yourFinger.
Sliding, Rolling or Moving finger during
the enrollment process.

Enrolling User
Press M (menu) to access the menu setup
Select User and Press OK
Select Enroll and Press OK
Enter ID and Press OK

Press OK to enroll fingerprint
Place finger to sensor
Place finger to sensor
Press OK to save the user data

Deleting User
Press M (menu) to access the menu setup
Select Delete and Press OK
Select User and Press OK

Enter the ID of the user to be deleted.
Press OK to confirm.

Admin Setup
Press M (menu) to access the menu setup
Press OK to add Admin
Select User and Press OK
Select Admin Setup and Press OK

Enter ID to be set as Admin and press OK
Press OK to confirm
Display shows Admin ID. Press C to
escape.

Time Adjustment
Press M (menu) to access the menu setup
*if Admin is enrolled, scan finger to access Menu
Select SETUP and press OK
Select SYSTEM and press OK
Select TIME and press OK

Place the Upward arrow to where the date or time to be adjust by pressing OK.
Press M (menu) to access the menu setup
When arrow is placed. Type the correct date/time.
Press C to save the changes.
Press C until it exit the Menu Setup
Note: Time is in 24 hours format

Sensor Calibration
Press M (menu) to access the menu setup
*if Admin is enrolled, scan finger to access Menu
Select SETUP and press OK
Select HARDWARE TEST and
press OK
Select SENSOR and press OK

The Value of the Luminance is dependent to the lighting condition where the machine is located.
Press OK to adopt.
Press C to escape
Press C until it exit the Menu Setup

Downloading Logs
Press M (menu) to access the menu setup
*if Admin is enrolled, scan finger to access Menu
Select USB FLASH and press OK
Select All Logs Backup and press OK
Press C to escape
Insert FLASHDRIVE to USB Port
Repeat the process TWICE to ensure
download
The FLASHDRIVE must be empty before inserting to
the machine. If possible, format first the drive.

B. Employees Management (MGC Work)Creating MASTERLIST of Employees Enrolled in the Biometrics Machine
REMINDER: Be sure to secure a Masterlist file of all Personnel enrolled in the
machine to avoid duplication of the use of BIO ID Number.
MASTERLIST filename: Employees OK location: PMIC Folder at Drive C:/

USER ID: Biometrics ID unique to every employee
NAME: Full name of employee : LASTNAME, FIRST NAME, MIDDLE INITIAL
DeptID: Name of School. List of schools are provided in a drop down list box.
IMPORTANT DETAILS
Position : Refers to POSITION/DESIGNATION.

MGC WORK Software
No Password, just click OK.

MGC WORK Workspace

Importing Employees
Press EMPLOYEES icon to access the EMPLOYEE MAINTENANCE window
Importing Employees
Select the School where to import the employees information
Click IMPORT button and locate the MSExcel file where the list are saved.

Importing Employees
locate the MSExcel file where the list are saved.Then press the Browse icon to find the location of the file
Change the file type to be open to Microsoft excel. (right click and refresh)
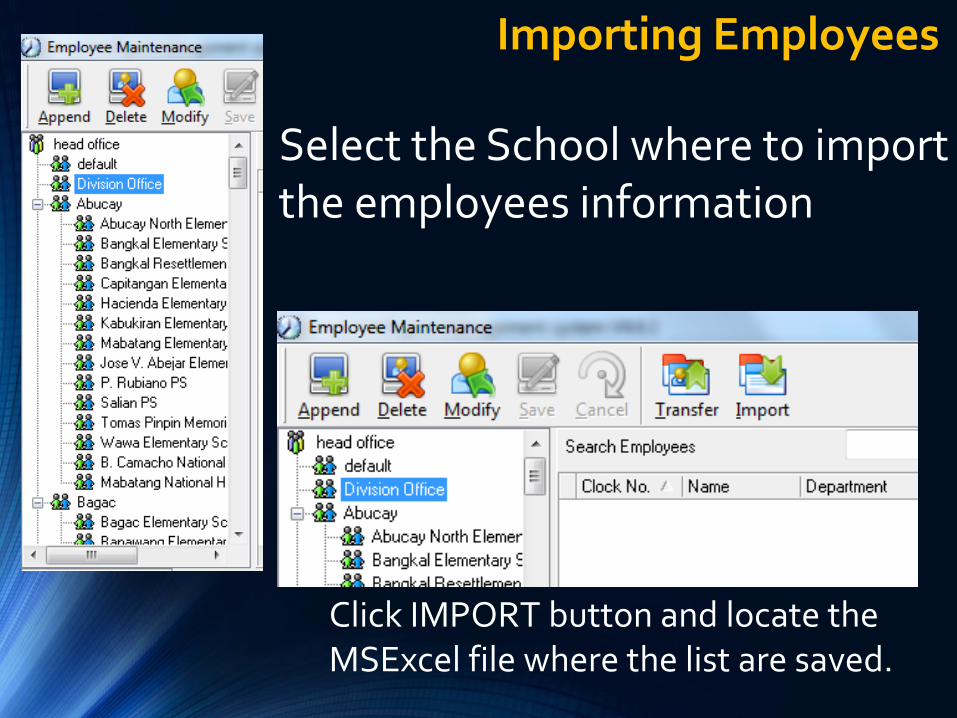
Importing Employees
The file to be import showed.
Press OK to initialize importation.
Dialogue box show how many employees are successfully imported.

Editing Employee Information
Locate and select the employee name and press MODIFY.
Then edit information listed below the window. When finished,
press SAVE.

Deleting Employee
Locate and select the employee name and press DELETE.
press OK to confirm.

Transferring Employee to other School
Locate and select the employee name and press TRANSFER.
Locate and select the school where the employee transfer and press OK.

Managing LOG Files
Create Folder Named: Biometrics
Biometrics
Logs
DTR
Logs Folder contains RENAMED Log files
DTR Folder contains generated DTR per month.

Renaming LOG File
Reminder: Rename LOG file of school on the FLASHDRIVE before copying to be folder created for that month. To avoid overwriting files with different school because it has the same default filename
of LOG file that is bak.kq
Rename each file by Biometrics Machine Number_Year_Month
e.g. Division Office – 109501
109501_2014_01.kq

Rename each file by Biometrics Machine Number_Year_Month
e.g. Division Office - 109501
Right click on the file and select RENAME

Rename each file by Biometrics Machine Number_Year_Month
e.g. Division Office - 109501
Type the corresponding Biometrics Machine Number_ YEAR _ MONTH separated by
underscore ( _ )
Be sure that the “.KQ” extension name
is not deleted or altered.
Copy the file to the corresponding Month folder.

Importing Logs to the systemPre-requisite:Browse the LOG folder of the system in the Drive C:/
LocationC:/Anviz/Logs/2014/01
Create folders 01 to 12

C. DTR GenerationImporting LOGS to the System
PMIC DTR Report

Note: Be sure that you properly renamed and place the LOG File on the
Anviz Logs Folder.
• Click the File>Import Logs
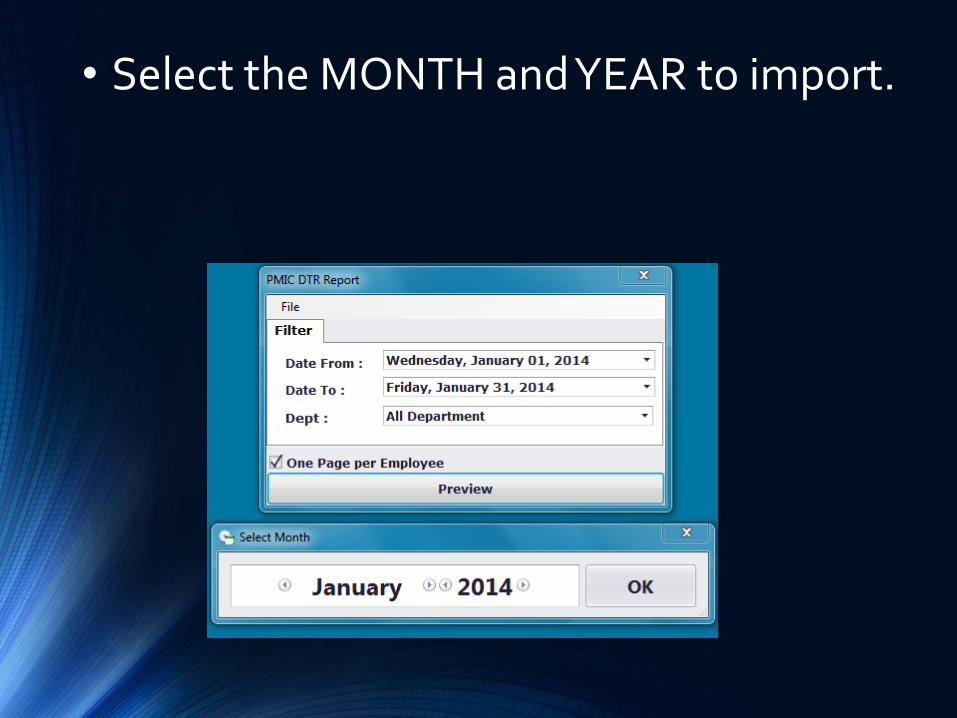
• Select the MONTH and YEAR to import.

Import window will appear. The checkbox shows that the File you placed is accepted or not. If not, no check will appear.
Click START IMPORTING to begin importing and processing data.
When done, close the program

C. DTR GenerationPMIC DTR Report - DepEd
Open the PMIC DTR Report-DepEd located at PMIC Folder at Local Disk C:

Once the importing is done. We will now generate the DTR.
Select the Name of your School
Click the PREVIEW Button to start generating DTR
Check the Range of the DTR to show (date from-date to)
Check SORT BY EMPLOYEE ID


After the DTR is generated, inspect if the DTR have data.
We will export the DTR to PDF file.
To export, click the Export Document button.

PDF Export Options
Click OK

SAVE AS window will appear. You can locate where to save the DTR in PDF form.
File name should be the School Name and the MonthYou can create folder where to save the DTR.

DTR Printing

Open the generated DTR in PDF format.
To print the DTR, Select FILE>Print

D. REMINDERS1. Always keep your masterlist updated to avoid duplication on the
use of BIO ID.2. Import/Add the newly enrolled employee to the MGC Work
Software.3. Always have a updated backup copy of the whole System. (PMIC
and Anviz Folder).4. Never change any setting nor click buttons that not mentioned in
this manual. 5. Never delete, change location of any files in the PMIC folder.6. Keep the software/system away from any unauthorized
personnel.7. Keep your antivirus software updated to avoid virus or computer
bag down.