Embed Size (px)
Citation preview

DIVERSIFIEDHEALTHOCCUPATIONSSeventh Edition
Louise Simmers, MEd, RNKaren Simmers-Nartker, BSN, RNSharon Simmers-Kobelak, BBA
Australia • Brazil • Japan • Korea • Mexico • Singapore • Spain • United Kingdom • United States
30216_00_FM_i-xxix.indd i30216_00_FM_i-xxix.indd i 1/31/08 12:29:47 PM1/31/08 12:29:47 PM
Copyright 2009 Cengage Learning, Inc. All Rights Reserved. May not be copied, scanned, or duplicated, in whole or in part.
Diversifi ed Health Occupations, Seventh
Edition
Louise SimmersKaren Simmers-NartkerSharon Simmers-Kobelak
Vice President, Career and Professional Editorial: Dave Garza
Director of Learning Solutions: Matthew Kane
Managing Editor: Marah Bellegarde
Acquisitions Editor: Matthew Seeley
Senior Product Manager: Juliet Steiner
Editorial Assistant: Megan Tarquinio
Vice President, Marketing, Career and Professional: Jennifer McAvey
Marketing Manager: Michele McTighe
Technology Project Manager: Ben Knapp
Production Director: Carolyn Miller
Senior Art Director: Jack Pendleton
Content Project Manager: Anne Sherman
© 2009 Delmar, Cengage Learning
ALL RIGHTS RESERVED. No part of this work covered by the copyright herein may be reproduced, transmitted, stored, or used in any form or by any means, graphic, electronic, or mechanical, including but not limited to photocopying, recording, scanning, digitizing, taping, Web distribution, information networks, or information storage and retrieval systems, except as permitted under Section 107 or 108 of the 1976 United States Copyright Act, without the prior written permission of the publisher.
For product information and technology assistance, contact us atCengage Learning Academic Resource Center, 1-800-423-0563
For permission to use material from this text or product, submit all requests online at www.cengage.com/permissions
Further permissions questions can be emailed to [email protected]
ExamView® and ExamView Pro® are registered trademarks of FSCreations, Inc. Windows is a registered trademark of the Microsoft Corporation used herein under license. Macintosh and Power Macintosh are registered trademarks of Apple Computer, Inc. Used herein under license.
© 2009 Cengage Learning. All Rights Reserved. Cengage Learning WebTutor™ is a trademark of Cengage Learning.
Library of Congress Control Number: 2007941692
ISBN-13: 978-1-4180-3021-6
ISBN-10: 1-4180-3021-X
Delmar Cengage Learning
5 Maxwell DriveClifton Park, NY 12065-2919USA
Cengage Learning products are represented in Canada by Nelson Education, Ltd.
For your lifelong learning solutions, visit delmar.cengage.com
Visit our corporate website at www.cengage.com
Printed in Canada1 2 3 4 5 6 7 12 11 10 09 08
Notice to the Reader
Publisher does not warrant or guarantee any of the products described herein or perform any independent analysis in connection with any of the product information contained herein. Publisher does not assume, and expressly disclaims, any obligation to obtain and include information other than that provided to it by the manufacturer. The reader is expressly warned to consider and adopt all safety precautions that might be indicated by the activities described herein and to avoid all potential hazards. By following the instructions contained herein, the reader willingly assumes all risks in connection with such instructions. The publisher makes no representations or warranties of any kind, including but not limited to, the warranties of fi tness for particular purpose or merchantability, nor are any such representations implied with respect to the material set forth herein, and the publisher takes no responsibility with respect to such material. The publisher shall not be liable for any special, consequential, or exemplary damages resulting, in whole or part, from the readers’ use of, or reliance upon, this material.
30216_00_FM_i-xxix.indd ii30216_00_FM_i-xxix.indd ii 2/1/08 1:54:56 PM2/1/08 1:54:56 PM
Copyright 2009 Cengage Learning, Inc. All Rights Reserved. May not be copied, scanned, or duplicated, in whole or in part.

CHAPTER 22 Physical Therapy Skills
Observe Standard Precautions
Instructor’s Check—Call Instructor at This Point
Safety—Proceed with Caution
OBRA Requirement—Based on Federal Law
Math Skill
Legal Responsibility
Science Skill
Career Information
Communications Skill
Technology
Chapter ObjectivesAfter completing this chapter, you should be able to:
◆ Perform range-of-motion (ROM) exercises on all body joints, observing all safety precautions
◆ Ambulate a patient using a transfer (gait) belt
◆ Check the correct measurements of patients for canes, crutches, and walkers
◆ Ambulate a patient using the following crutch gaits: four point, three point, two point, swing to, and swing through
◆ Ambulate a patient using a cane
◆ Ambulate a patient using a walker
◆ Apply an ice bag or ice collar, observing all safety precautions
◆ Apply a warm-water bag, observing all safety precautions
◆ Apply an aquamatic pad, observing all safety precautions
◆ Apply a moist compress, observing all safety precautions
◆ Administer a sitz bath
◆ Defi ne, pronounce, and spell all key terms
30216_22_Ch22_930-968.indd 93030216_22_Ch22_930-968.indd 930 1/16/08 1:51:57 PM1/16/08 1:51:57 PM
Copyright 2009 Cengage Learning, Inc. All Rights Reserved. May not be copied, scanned, or duplicated, in whole or in part.

931Physical Therapy Skills
KEY TERMS
aquathermia pads (ak�-wah-thur�-me-ah)
canecompresses (cahm�-press-ez)contracture
(kun-track�-shure)crutchescryotherapydry colddry heat
hydrocollator packshypothermia blanket
(high�-poh-thur�-me-ah)ice bagsice collarsmoist coldmoist heatparaffi n wax treatmentrange of motion (ROM)sitz bath
thermal blanketsthermotherapytransfer (gait) beltvasoconstriction (vay�-zow�-
kon-strik�-shun)vasodilation
(vay�-zow�-di-lay�-shun)walkerwarm-water bags
Physical therapist assistants provide treatment to improve mobility and prevent or limit permanent disability of patients with disabling injuries or disease. They are important mem-bers of the health care team. They work under the supervision of a physical therapist who has a master’s degree from an accredited program and is licensed (required in all states). Most physical therapist assistants have an associate’s degree from an accredited program and an internship. Licensure is required in most states.
The duties of physical therapist assistants vary but usually include performing exercises; providing ultrasound or electrical stimulation treatments; administering heat, cold, or moist applications; ambulating patients with assistive devices; and informing the physical therapist of patient’s response and progress. In addition to the knowledge and skills presented in this chapter, physical therapist assistants must also learn and master skills such as:
CAREER HIGHLIGHTS
◆ Presenting a professional appearance and attitude
◆ Obtaining knowledge regarding health care delivery systems, organizational structure, and teamwork
◆ Meeting all legal responsibilities
◆ Communicating effectively
◆ Being sensitive to and respecting cultural diversity
◆ Learning medical terminology
◆ Comprehending anatomy, physiology, and pathophysiology with an emphasis on the skeletal, muscular, nervous, and circulatory systems
◆ Observing all safety precautions
◆ Practicing all principles of infection control
◆ Administering fi rst aid and cardiopulmonary resuscitation
◆ Promoting good nutrition and a healthy lifestyle to maintain health
◆ Utilizing computer skills
◆ Cleaning and maintaining equipment
◆ Ordering and maintaining supplies and materials
◆ Performing administrative duties such as answering the telephone, scheduling appointments, completing insurance forms, and maintaining patient records
30216_22_Ch22_930-968.indd 93130216_22_Ch22_930-968.indd 931 1/16/08 1:52:17 PM1/16/08 1:52:17 PM
Copyright 2009 Cengage Learning, Inc. All Rights Reserved. May not be copied, scanned, or duplicated, in whole or in part.

CHAPTER 22932
22:1 INFORMATIONPerforming Range-of-Motion (ROM) Exercises
Activity and exercise are important for all individuals. When patients have limited
ability to move, range-of-motion exercises help keep muscles and joints functioning.
Range-of-motion (ROM) exercises are done to maintain the health of the musculoskel-etal system. Each joint and muscle in the body is moved through its full range of motion. Range-of-motion exercises are frequently ordered by physicians for patients with limited ability to move. These exercises are administered by a physical therapist, nurse, health care assistant, or other authorized person. Range-of-motion exer-cises can be done during the daily bath or at other times during the day.
Range-of-motion exercises are done to pre-vent the problems caused by lack of movement and by inactivity (fi gure 22-1). Some of these problems include:
♦ Contracture: Contracture is a tightening and shortening of a muscle, resulting in a perma-nent fl exing of a joint. Foot drop is a common
contracture, but contractures can also affect the knees, hips, elbows, and hands.
♦ Muscle and joint function: Muscles atrophy (shrink) and become weak. Joints become stiff and diffi cult to move.
♦ Circulatory impairment: The circulation of blood is affected, and blood clots and pressure ulcers (pressure sores) can develop.
♦ Mineral loss: Inactivity causes mineral loss, especially of calcium from the bones. The bones become brittle, and fractures occur. As the blood calcium level increases, renal calculi (kidney stones) are more likely to form.
♦ Other problems: Lack of exercise can also cause poor appetite, constipation, urinary infections, respiratory problems, and hypo-static pneumonia.
There are four main types of ROM exercises:
♦ Active ROM exercises: performed by patients who are able to move each joint without assis-tance (fi gure 22-2). This type of ROM exercise strengthens muscles, maintains joint function and movement, and helps prevent deformities.
♦ Active assistive ROM exercises: The patient actively moves the joints but receives assis-
FIGURE 22-1 Range-of-motion (ROM) exercises are done to prevent problems caused by lack of movement and by inactivity.
FIGURE 22-2 Patients who are able to move each joint without assistance perform active range of motion (ROM) exercises.
30216_22_Ch22_930-968.indd 93230216_22_Ch22_930-968.indd 932 1/16/08 1:52:21 PM1/16/08 1:52:21 PM
Copyright 2009 Cengage Learning, Inc. All Rights Reserved. May not be copied, scanned, or duplicated, in whole or in part.
933Physical Therapy Skills
tance to complete the entire ROM. This type of ROM strengthens muscles, maintains joint function and movement, and helps prevent deformities. At times, equipment, such as a pulley, is used to complete the ROM.
♦ Passive ROM exercises: Another person moves each joint for a patient who is not able to exer-cise. This type of ROM maintains joint func-tion and movement, and helps to prevent deformities. However, it does not strengthen muscles.
♦ Resistive ROM exercises: Administered by a therapist, these exercises are performed against resistance provided by the therapist. This type of ROM helps the patient develop increased strength and endurance.
The health care worker should fi nd out what type of ROM exercises are to be performed
and determine whether any limitations to the exercises exist before administering or assisting the patient with the exercises. In some states and health care facilities, only physical therapists or registered nurses may perform ROM exercises to the head and neck, especially if stretching is involved. After hip or knee replacement surger-ies, some ROM exercises may be restricted or lim-ited. Patients with osteoporosis, a condition in which the bones become porous and are prone to fracture, may have limitations on ROMs. It is your responsibility to check legal requirements regard-ing ROM exercises.
Various movements are used when per-forming ROM exercises. The health care
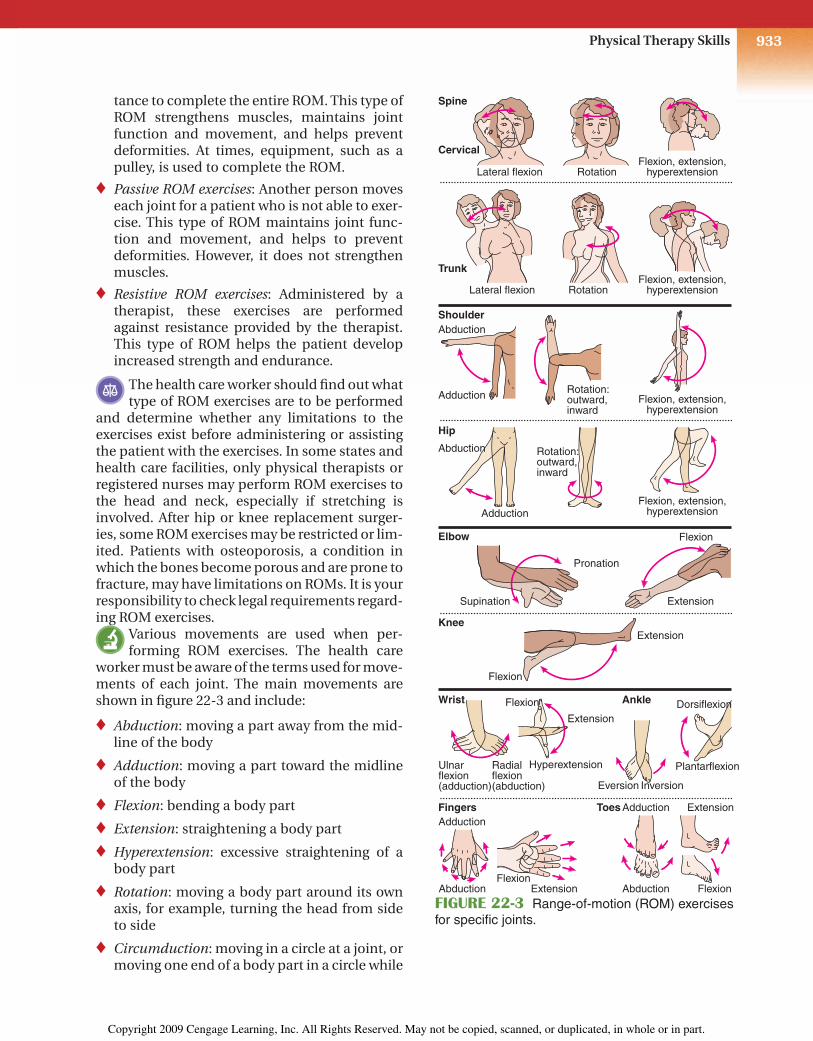
worker must be aware of the terms used for move-ments of each joint. The main movements are shown in fi gure 22-3 and include:
♦ Abduction: moving a part away from the mid-line of the body
♦ Adduction: moving a part toward the midline of the body
♦ Flexion: bending a body part
♦ Extension: straightening a body part
♦ Hyperextension: excessive straightening of a body part
♦ Rotation: moving a body part around its own axis, for example, turning the head from side to side
♦ Circumduction: moving in a circle at a joint, or moving one end of a body part in a circle while
Spine
Shoulder
Hip
Elbow
Knee
Wrist
Fingers Toes
Ankle
Cervical
Lateral flexion RotationFlexion, extension,
hyperextension
Lateral flexion RotationFlexion, extension,
hyperextension
Flexion, extension,hyperextension
Trunk
Adduction
Abduction
Rotation:outward,inward
Flexion, extension,hyperextensionAdduction
Abduction
Supination
Pronation
Extension
Extension
Flexion
Flexion
Ulnarflexion(adduction)
Adduction
Abduction Abduction
Adduction Extension
FlexionFlexion
Extension
Radialflexion(abduction)
Flexion
Extension
Hyperextension
Eversion Inversion
Dorsiflexion
Plantarflexion
Rotation:outward,inward
FIGURE 22-3 Range-of-motion (ROM) exercises for specifi c joints.
30216_22_Ch22_930-968.indd 93330216_22_Ch22_930-968.indd 933 1/16/08 1:52:34 PM1/16/08 1:52:34 PM
Copyright 2009 Cengage Learning, Inc. All Rights Reserved. May not be copied, scanned, or duplicated, in whole or in part.

CHAPTER 22934
the other end remains stationary, such as swinging the arm in a circle; involves all the movements of fl exion, extension, abduction, adduction, and rotation
♦ Pronation: turning a body part downward (turning palm down)
♦ Supination: turning a body part upward (turn-ing palm up)
♦ Opposition: touching each of the fi ngers with the tip of the thumb
♦ Inversion: turning a body part inward
♦ Eversion: turning a body part outward
♦ Dorsifl exion: bending backward (bending the foot toward the knee)
♦ Plantar fl exion: bending forward (straighten-ing the foot away from the knee)
♦ Radial deviation: moving toward the thumb side of the hand
♦ Ulnar deviation: moving toward the little fi n-ger side of the hand
Certain principles must be observed at all times when performing ROM exercises:
♦ Movements should be slow, smooth, and gen-tle to prevent injury.
♦ Support should be provided to the parts above and below the joint being exercised.
♦ A joint should never be forced beyond its ROM or exercised to the point of pain, resistance, or extreme fatigue.
♦ If a patient complains of pain, stop the exer-cise and report this fact to your immediate supervisor.
♦ Watch the patient closely. If you notice the patient is in pain, has shortness of breath, is perspiring profusely (diaphoresis), or is pale, stop the exercise and notify your supervisor.
♦ Each movement should be performed three to fi ve times or as ordered.
♦ The patient should be encouraged to assist as much as possible.
♦ Prevent unnecessary exposure of the patient. Only the body part being exercised should be exposed.
♦ The door should be closed and the unit screened to provide privacy.
♦ Use correct body mechanics at all times to prevent injury.
STUDENT: Go to the workbook and complete the assignment sheet for 22:1, Performing Range-of-Motion (ROM) Exercises. Then return and con-tinue with the procedure.
Performing Range-of-Motion (ROM) ExercisesEquipment and SuppliesBath blanket, pen or pencil
Procedure 1. Obtain proper authorization. Deter-
mine the type of ROM exercises and any limitations to movement.
CAUTION: Remember it is your respon-sibility to check legal requirements regarding ROMs.
PROCEDURE 22:1 2. Assemble supplies.
3. Knock on the door and pause before entering. Introduce yourself. Identify the patient. Explain the procedure.
4. Close the door and screen the unit. Lock the wheels of the bed to prevent move-ment.
5. Wash hands.
6. Elevate the bed to a comfortable work-ing height. Lower the siderail on the side where you are working.
7. Position the patient in the supine posi-tion (on the back) and in good body alignment.
30216_22_Ch22_930-968.indd 93430216_22_Ch22_930-968.indd 934 1/16/08 1:52:40 PM1/16/08 1:52:40 PM
Copyright 2009 Cengage Learning, Inc. All Rights Reserved. May not be copied, scanned, or duplicated, in whole or in part.

935Physical Therapy Skills
NOTE: Some ROM exercises can be done while patient is sitting in a chair.
8. Use the bath blanket to drape the patient. Fanfold the top bed linens to the foot of the bed.
9. Administer the exercises in an organized manner. Start at the head and move to the feet. Complete one side of the body fi rst and then work on the opposite side of the body. Perform each movement three to fi ve times or as ordered. Provide support for the body parts above and below the joint being exercised. Never force any joint beyond its ROM or cause pain while exercising a joint.
CAUTION: Use proper body mechanics when administering ROM exercises. Get close to the patient by bending at your hips and knees and keeping your back straight. Stand with your feet apart and one foot slightly forward to provide a good base of support.
CAUTION: If the patient complains of pain or discomfort, begins to perspire profusely, or has diffi culty breathing during any exercise, stop the exercise and report the fact to your immediate supervisor.
10. Exercise the neck, if you have specifi c orders to do so:
CAUTION: In some states and health care facilities, only physical therapists or registered nurses may perform ROMs to the head and neck. Check your legal responsibilities.
a. Support the patient’s head by placing one hand under the chin and the other hand on the top-back part of the head.
NOTE: Hands can also be placed on either side of the patient’s head.
b. Rotate the neck by turning the head gently from side to side.
c. Flex the neck by moving the chin toward the chest (fi gure 22-4).
PROCEDURE 22:1
d. Extend the neck by returning the head to the upright position.
e. Hyperextend the neck by tilting the head backward.
f. Laterally fl ex or rotate the neck by moving the head fi rst toward the right shoulder and then toward the left shoulder.
11. Exercise the shoulder joint nearest you:
a. Support the patient’s arm by placing one hand at the elbow and the other at the wrist.
b. Abduct the shoulder by bringing the arm straight out at a right angle to the body (fi gure 22-5A).
FIGURE 22-4 Flex the neck by moving the chin toward the chest.
FIGURE 22-5A Abduct the shoulder by bringing the arm straight out at a right angle to the body.
30216_22_Ch22_930-968.indd 93530216_22_Ch22_930-968.indd 935 1/16/08 1:52:47 PM1/16/08 1:52:47 PM
Copyright 2009 Cengage Learning, Inc. All Rights Reserved. May not be copied, scanned, or duplicated, in whole or in part.

CHAPTER 22936
c. Adduct the shoulder by moving the arm straight in to the side (fi gure 22-5B).
d. Flex the shoulder by raising the arm in front of the body and then above the head (fi gure 22-6).
e. Extend the shoulder by bringing the arm back down to the side from above the head.
12. Exercise the elbow joint nearest you:
a. Support the patient’s arm by placing one hand on the elbow and the other hand on the wrist.
PROCEDURE 22:1 b. Flex the elbow by bending the fore-
arm and hand up to the shoulder (fi gure 22-7A).
c. Extend the elbow by moving the fore-arm and hand down to the side, or straightening the arm (fi gure 22-7B).
d. Pronate by turning the forearm and hand so that the palm of the hand is down.
e. Supinate by turning the forearm and hand so that the palm of the hand is up.
FIGURE 22-5B Adduct the shoulder by moving the arm straight in to the body.
FIGURE 22-6 Flex the shoulder by raising the arm in front of the body and then above the head.
FIGURE 22-7A Flex the elbow by bending the forearm and hand up to the shoulder.
FIGURE 22-7B Extend the elbow by moving the forearm and hand down to the side.
30216_22_Ch22_930-968.indd 93630216_22_Ch22_930-968.indd 936 1/16/08 1:52:55 PM1/16/08 1:52:55 PM
Copyright 2009 Cengage Learning, Inc. All Rights Reserved. May not be copied, scanned, or duplicated, in whole or in part.

937Physical Therapy Skills
13. Exercise the wrist nearest you:
a. Support the patient’s wrist by placing one hand above it and the other hand below it.
b. Flex the wrist by bending the hand down toward the forearm (fi gure 22-8A).
c. Extend the wrist by straightening the hand (fi gure 22-8B).
d. Hyperextend the wrist by bending the top of the hand back toward the forearm.
e. Deviate the wrist in an ulnar direc-tion by moving the hand toward the little fi nger side (fi gure 22-9).
PROCEDURE 22:1
f. Deviate the wrist in a radial direction by moving the hand toward the thumb side.
14. Exercise the fi ngers and thumb on the hand nearest you:
a. Support the patient’s hand by placing one hand at the wrist.
b. Flex the thumb and fi ngers by bend-ing them toward the palm (fi gure 22-10A).
c. Extend the thumb and fi ngers by straightening them (fi gure 22-10B).
d. Abduct the thumb and fi ngers by spreading them apart (fi gure 22-11A).
e. Adduct the thumb and fi ngers by mov-ing them together (fi gure 22-11B).
FIGURE 22-8A Flex the wrist by bending the hand down toward the forearm.
FIGURE 22-8B Extend the wrist by straight-ening the hand.
FIGURE 22-9 Deviate the wrist in an ulnar direction by moving the hand toward the little fi nger side and in a radial direction by moving it toward the thumb side.
FIGURE 22-10A Flex the thumb and fi ngers by bending them toward the palm.
30216_22_Ch22_930-968.indd 93730216_22_Ch22_930-968.indd 937 1/16/08 1:53:10 PM1/16/08 1:53:10 PM
Copyright 2009 Cengage Learning, Inc. All Rights Reserved. May not be copied, scanned, or duplicated, in whole or in part.

CHAPTER 22938
f. Perform opposition by touching the thumb to the tip of each fi nger (fi g-ure 22-11C).
g. Circumduct the thumb by moving it in a circular motion.
15. Uncover the leg nearest you and exer-cise the hip:
CAUTION: If the patient had hip or knee replacement surgery, check fi rst for any limitations or restrictions to ROMs.
PROCEDURE 22:1 a. Support the patient’s leg by placing
one hand under the knee and the other hand under the ankle.
b. Abduct the hip by moving the entire leg out to the side (fi gure 22-12A).
c. Adduct the hip by moving the entire leg back toward the body (fi gure 22-12B).
d. Flex the hip by bending the knee and moving the thigh up toward the abdomen (fi gure 22-13A).
e. Extend the hip by straightening the knee and moving the leg away from the abdomen (fi gure 22-13B).
f. Medially rotate the hip by bending the knee and turning the leg in toward the midline.
FIGURE 22-10B Extend the thumb and fi ngers by straightening them.
FIGURE 22-11 (A) Abduct the thumb and fi ngers by spreading them apart. (B) Adduct the thumb and fi ngers by moving them together. (C) Perform opposition by touching the thumb to the tip of each fi nger.
FIGURE 22-12A Abduct the hip by moving the entire leg out to the side.
FIGURE 22-12B Adduct the hip by moving the entire leg back toward the body.
A B
C
30216_22_Ch22_930-968.indd 93830216_22_Ch22_930-968.indd 938 1/16/08 1:53:20 PM1/16/08 1:53:20 PM
Copyright 2009 Cengage Learning, Inc. All Rights Reserved. May not be copied, scanned, or duplicated, in whole or in part.

939Physical Therapy Skills
g. Laterally rotate the hip by bending the knee and turning the leg out away from the midline.
16. Exercise the knee nearest you:
CAUTION: If the patient had hip or knee replacement surgery, check fi rst for any limitations or restrictions to ROM exer-cises.
a. Support the patient’s leg by placing one hand under the knee and the other hand under the ankle.
b. Flex the knee by bending the lower leg back toward the thigh.
c. Extend the knee by straightening the leg.
17. Exercise the ankle nearest you:
a. Support the patient’s foot by placing one hand under the foot and the other hand behind the ankle.
PROCEDURE 22:1 b. Dorsifl ex the ankle by moving the
toes and foot up toward the knee (fi g-ure 22-14A).
c. Plantar fl ex the ankle by moving the toes and foot down away from the knee (fi gure 22-14B).
d. Invert the foot by gently turning it inward.
e. Evert the foot by gently turning it outward.
18. Exercise the toes on the foot nearest you:
a. Rest the patient’s leg and foot on the bed for support.
b. Abduct the toes by separating them, or moving them away from each other.
c. Adduct the toes by moving them together.
d. Flex the toes by bending them down toward the bottom of the foot.
FIGURE 22-13A Flex the hip by bending the knee and moving the thigh up toward the abdomen.
FIGURE 22-13B Extend the hip by straight-ening the knee and moving the leg away from the abdomen.
FIGURE 22-14A Dorsifl ex the ankle by moving the toes and foot up toward the knee.
FIGURE 22-14B Plantar fl ex the ankle by moving the toes and foot down away from the knee.
30216_22_Ch22_930-968.indd 93930216_22_Ch22_930-968.indd 939 1/16/08 1:53:34 PM1/16/08 1:53:34 PM
Copyright 2009 Cengage Learning, Inc. All Rights Reserved. May not be copied, scanned, or duplicated, in whole or in part.

CHAPTER 22940
22:2 INFORMATIONAmbulating Patients Who Use Transfer (Gait) Belts, Crutches, Canes, or Walkers
Many patients require aids, or assistive devices, when ambulating. The type used
depends on the injury and the patient’s condi-tion. However, certain points must be observed when a patient uses crutches, canes, or a walker.
TRANSFER (GAIT) BELTA transfer (gait) belt is a band of fabric or leather that is positioned around the patient’s waist. During transfers or ambulation, the health care worker can grasp the transfer belt to provide additional support for the patient (fi gure 22-15). The transfer belt helps provide the patient with a sense of security and helps to stabilize the patient’s center of balance. Some important facts to remember when ambulating a patient with a transfer belt include the following:
PracticeGo to the workbook and use the evaluation sheet for 22:1, Performing Range-of-Motion (ROM) Exercises, to practice this procedure. When you believe you have mastered this skill, sign the sheet and give it to your instructor for further action.
e. Extend the toes by straightening them.
19. Use the bath blanket to cover the patient. Raise the siderail and move to the oppo-site side of the bed. Lower the siderail.
20. Repeat steps 11–18.
21. When ROM exercises are complete, comfortably position the patient in good body alignment. Replace the top bed linens and remove the bath blanket.
22. Observe all checkpoints before leaving the patient: elevate the siderails (if indi-cated), lower the bed to its lowest level, place the call signal and supplies within easy reach of the patient, and leave the area neat and clean.
23. Wash hands.
24. Report and/or record all required infor-mation on the patient’s chart or the
PROCEDURE 22:1agency form; for example, date; time; ROM exercises performed on all joints, patient assisted with movements of arms and hands; and your signature and title. Report any unusual observations immediately.
Final Checkpoint Using the criteria listed on the evaluation sheet, your instructor will grade your performance.
FIGURE 22-15 A transfer belt can provide support for the patient during transfers or ambulation.
30216_22_Ch22_930-968.indd 94030216_22_Ch22_930-968.indd 940 1/16/08 1:53:45 PM1/16/08 1:53:45 PM
Copyright 2009 Cengage Learning, Inc. All Rights Reserved. May not be copied, scanned, or duplicated, in whole or in part.
941Physical Therapy Skills
♦ The transfer belt must be the proper size. It should fi t securely around the waist for sup-port but must not be too tight for comfort.
♦ Some transfer belts contain loops that are grasped when ambulating the patient. If loops are not present, an underhand grasp should be used to hold on to the belt during ambula-tion. The underhand grasp is more secure than grasping the belt from the top, because the hands are less likely to slip off the belt.
♦ The belt should be grasped at the back during ambulation, and the health care worker should walk slightly behind the patient. When assist-ing a patient to stand, or during transfers such as transferring a patient to a wheelchair, grasp the belt on both sides while facing the patient.
♦ The transfer belt is applied over the patient’s clothing. It should not be applied over bare skin because it can irritate the skin.
The use of a transfer belt is contraindicated in patients who have an ostomy, gastrostomy tube, abdominal pacemaker, severe cardiac or respira-tory disease, fractured ribs, or recent surgery on the lower chest or abdominal area. It is also con-traindicated for pregnant women.
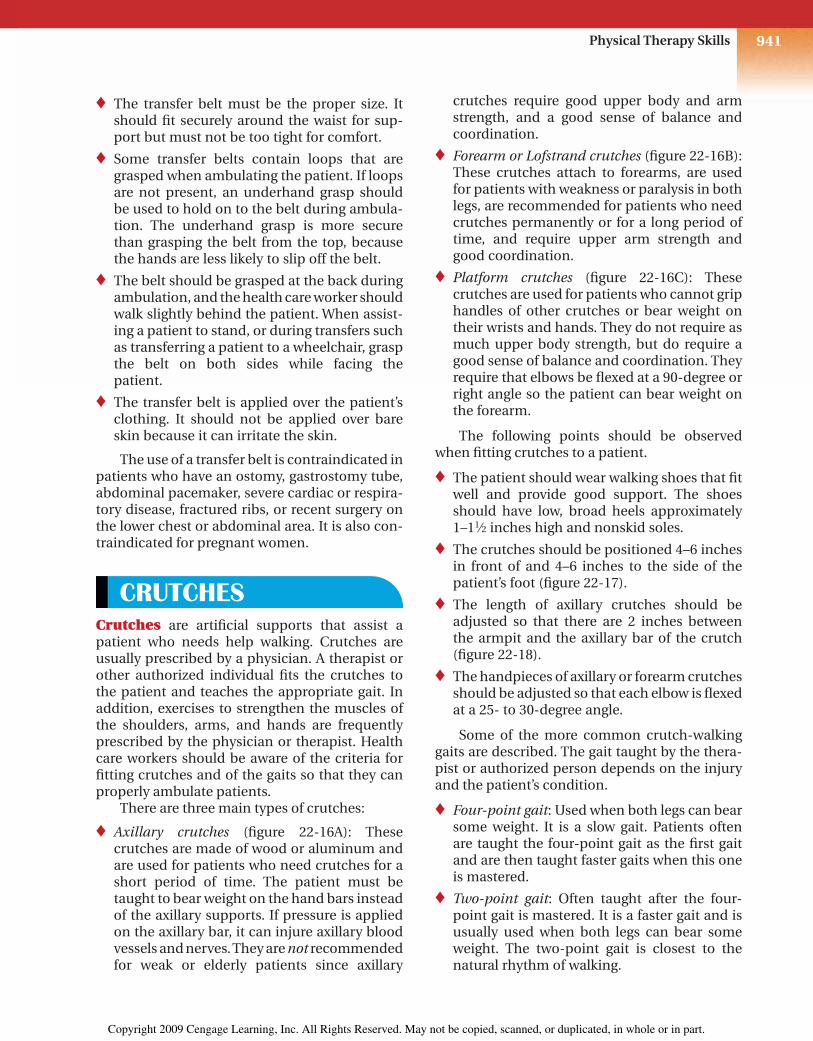
CRUTCHESCrutches are artifi cial supports that assist a patient who needs help walking. Crutches are usually prescribed by a physician. A therapist or other authorized individual fi ts the crutches to the patient and teaches the appropriate gait. In addition, exercises to strengthen the muscles of the shoulders, arms, and hands are frequently prescribed by the physician or therapist. Health care workers should be aware of the criteria for fi tting crutches and of the gaits so that they can properly ambulate patients.
There are three main types of crutches:
♦ Axillary crutches (fi gure 22-16A): These crutches are made of wood or aluminum and are used for patients who need crutches for a short period of time. The patient must be taught to bear weight on the hand bars instead of the axillary supports. If pressure is applied on the axillary bar, it can injure axillary blood vessels and nerves. They are not recommended for weak or elderly patients since axillary
crutches require good upper body and arm strength, and a good sense of balance and coordination.
♦ Forearm or Lofstrand crutches (fi gure 22-16B): These crutches attach to forearms, are used for patients with weakness or paralysis in both legs, are recommended for patients who need crutches permanently or for a long period of time, and require upper arm strength and good coordination.
♦ Platform crutches (fi gure 22-16C): These crutches are used for patients who cannot grip handles of other crutches or bear weight on their wrists and hands. They do not require as much upper body strength, but do require a good sense of balance and coordination. They require that elbows be fl exed at a 90-degree or right angle so the patient can bear weight on the forearm.
The following points should be observed when fi tting crutches to a patient.
♦ The patient should wear walking shoes that fi t well and provide good support. The shoes should have low, broad heels approximately 1–11⁄2 inches high and nonskid soles.
♦ The crutches should be positioned 4–6 inches in front of and 4–6 inches to the side of the patient’s foot (fi gure 22-17).
♦ The length of axillary crutches should be adjusted so that there are 2 inches between the armpit and the axillary bar of the crutch (fi gure 22-18).
♦ The handpieces of axillary or forearm crutches should be adjusted so that each elbow is fl exed at a 25- to 30-degree angle.
Some of the more common crutch-walking gaits are described. The gait taught by the thera-pist or authorized person depends on the injury and the patient’s condition.
♦ Four-point gait: Used when both legs can bear some weight. It is a slow gait. Patients often are taught the four-point gait as the fi rst gait and are then taught faster gaits when this one is mastered.
♦ Two-point gait: Often taught after the four-point gait is mastered. It is a faster gait and is usually used when both legs can bear some weight. The two-point gait is closest to the natural rhythm of walking.
30216_22_Ch22_930-968.indd 94130216_22_Ch22_930-968.indd 941 1/16/08 1:53:54 PM1/16/08 1:53:54 PM
Copyright 2009 Cengage Learning, Inc. All Rights Reserved. May not be copied, scanned, or duplicated, in whole or in part.

CHAPTER 22942
FIGURE 22-16A A patient using an axillary crutch must be taught to bear weight on the hand bars instead of on the axillary supports.
FIGURE 22-16B Forearm or Lofstrand crutches are recom-mended for patients who need crutches permanently or for a long period of time.
FIGURE 22-16C Platform crutches are used by patients who cannot grip the handles of other crutches or bear weight on the wrists and hands.
6"
4"
FIGURE 22-17 Crutches should be positioned 4–6 inches in front of and 4–6 inches to the side of the patient’s foot.
FIGURE 22-18 The length of axillary crutches should be adjusted so that there are 2 inches between the axillary area and the top of the crutches.
30216_22_Ch22_930-968.indd 94230216_22_Ch22_930-968.indd 942 1/16/08 1:54:00 PM1/16/08 1:54:00 PM
Copyright 2009 Cengage Learning, Inc. All Rights Reserved. May not be copied, scanned, or duplicated, in whole or in part.

943Physical Therapy Skills
♦ Three-point gait: Used when only one leg can bear weight. It too is a gait taught initially.
♦ Swing-to gait: This is a more rapid gait. It is taught after other gaits are mastered, in most cases. It requires that the patient have more shoulder and arm strength.
♦ Swing-through gait: This is the most rapid gait. However, it requires the most strength and skill. It is usually taught as a more advanced method of crutch walking.
CANEA cane is an assistive device that provides bal-ance and support. There are several different types of canes (fi gure 22-19A). Standard canes are single-tipped canes. They can have curved handles, T-handles, or J-handles with a handgrip. Tripod canes with three tips and quad canes with four tips provide a wider base of support and more stability for the patient. A walkcane, also called a Hemiwalker, has four legs and a handle-bar that the patient can grip (fi gure 22-19B). It is used with patients who have hemiplegia, or paralysis on one side of the body. The bottom tip(s) of all canes should be fi tted with a 1-inch rubber-suction tip to provide traction and pre-vent slipping. Basic principles for using canes include:
♦ A cane is used on the unaffected (good) side (fi gure 22-19C). In this way, a wider base of support is provided to increase stability. This prevents the patient from leaning toward the
FIGURE 22-19A Different types of canes: (A) quad canes; (B) single-tipped canes.
FIGURE 22-19B A walkcane has four legs and a handlebar that the patient can grip. (Courtesy of Sunrise Medical)
FIGURE 22-19C A cane is used on the unaf-fected (good) side to provide a wider base of support.
30216_22_Ch22_930-968.indd 94330216_22_Ch22_930-968.indd 943 1/16/08 1:54:18 PM1/16/08 1:54:18 PM
Copyright 2009 Cengage Learning, Inc. All Rights Reserved. May not be copied, scanned, or duplicated, in whole or in part.
CHAPTER 22944
cane and falling because of the weak or injured leg. In addition, in normal walking, the leg and opposite arm move together, so the cane and leg will follow the same pattern.
♦ Canes must be correctly fi tted. The bottom tip of the cane should be positioned approxi-mately 6–8 inches from the side of the unaf-fected foot. The cane handle should be level with the top of the femur at the hip joint. The patient’s elbow should be fl exed at a 25- to 30-degree angle.
♦ Several gaits for cane walking can be taught. In a two-point gait, the patient is taught to move the cane and affected leg together, and then move the unaffected leg. In a three-point gait, the patient is taught to move the cane, then the affected or involved leg, and fi nally the unaffected leg. The therapist or other authorized person determines the correct gait.
WALKERA walker is a four-legged device that provides support. Walkers are available in several styles, including standard, folding, rolling, and platform. Rolling walkers have wheels and are easily pushed by a patient who uses a walker primarily for bal-ance. However, if a patient leans on the walker for support, the wheels can be dangerous because the walker may move away from the patient, causing the patient to fall. Some rolling walkers have breaks on the wheels that lock automatically when weight is placed downward on the walker. The patient must be evaluated carefully before a rolling walker is used.
Walkers often are used for weak patients who have a poor sense of balance even though no leg injuries may be present. To use a walker, patients must be strong enough to hold themselves upright while leaning on the walker. Basic prin-ciples for using a walker include:
♦ The walker should be fi tted to the patient. The handles should be level with the top of the femurs at the hip joints. Each elbow should be fl exed at a 25- to 30-degree angle.
♦ The patient must be taught to lift the walker and place it in front of the body. It should be positioned so that the back legs of the walker are even with the toes of the patient. The patient then walks “into” the walker.
♦ All legs of the walker should be fi tted with rub-ber tips to prevent slipping.
CAUTION: The patient should be cautioned against sliding the walker. A sliding tech-nique may be dangerous because it can eas-ily tip over the walker. Most walkers are made of lightweight aluminum, so most patients are capable of lifting them.
CAUTION: Patients must also be cautioned against using the walker as a transfer device. If they try to hold on to the walker while get-ting out of bed or up from a chair, the walker can tip forward, causing the patient to fall. Patients should be taught how to use their arms to push against the bed or arms of a chair to rise to a standing position.
AMBULATION PRECAUTIONS
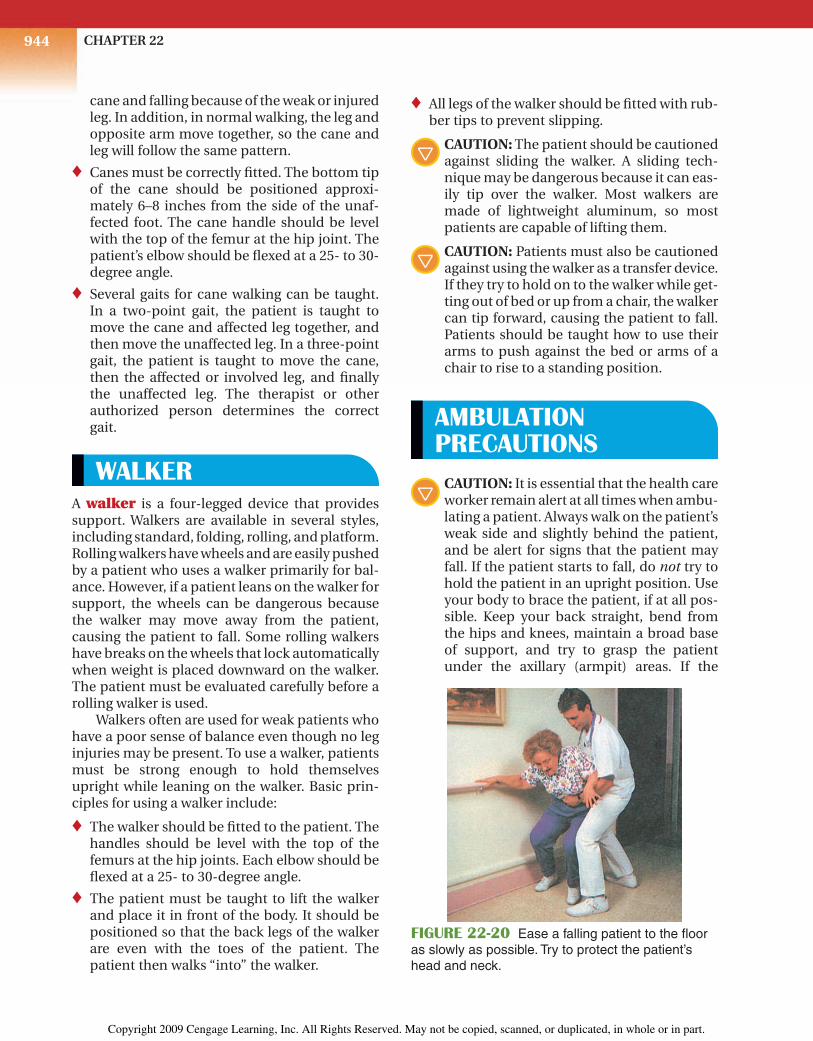
CAUTION: It is essential that the health care worker remain alert at all times when ambu-lating a patient. Always walk on the patient’s weak side and slightly behind the patient, and be alert for signs that the patient may fall. If the patient starts to fall, do not try to hold the patient in an upright position. Use your body to brace the patient, if at all pos-sible. Keep your back straight, bend from the hips and knees, maintain a broad base of support, and try to grasp the patient under the axillary (armpit) areas. If the
FIGURE 22-20 Ease a falling patient to the fl oor as slowly as possible. Try to protect the patient’s head and neck.
30216_22_Ch22_930-968.indd 94430216_22_Ch22_930-968.indd 944 1/16/08 1:54:32 PM1/16/08 1:54:32 PM
Copyright 2009 Cengage Learning, Inc. All Rights Reserved. May not be copied, scanned, or duplicated, in whole or in part.

945Physical Therapy Skills
Ambulating a Patient with a Transfer (Gait) BeltEquipment and SuppliesTransfer or gait belt, pen or pencil
Procedure 1. Check orders or obtain authorization
from your immediate supervisor for ambulating the patient.
2. Assemble supplies.
3. Knock on the door and pause before entering. Introduce yourself. Identify the patient and explain the procedure.
4. Close the door and screen the unit to provide privacy.
5. Wash hands.
6. Lock the wheels on the bed to prevent movement. Lower the siderail on the side where you are working.
7. Assist the patient into a sitting position. If the patient is wearing bedclothes, put a robe on the patient.
8. Check to be sure the transfer belt is the correct size. Position the belt around the patient’s waist and on top of the cloth-ing (fi gure 22-21A). Position the buckle or clasp so that it is slightly off center in the front. Make sure the belt is smooth and free of wrinkles.
PROCEDURE 22:2A
9. Tighten the belt so that it fi ts snugly; secure the clasp or buckle. Place three to four fi ngers under the belt to make sure it is not too tight (fi gure 22-21B). Make sure the belt is comfortable and does not interfere with breathing. On a female patient, make sure the breasts are not under the belt.
10. Put shoes or slippers on the patient. For the most security, shoes should be worn. The shoes should have low, broad heels approximately 1–11⁄2 inches high and nonskid soles. Make sure the patient’s feet are on the fl oor. If the patient’s feet are not on the fl oor, move the patient closer to the side of the bed or edge of a chair.
FIGURE 22-21A Position the transfer belt around the patient’s waist and on top of the clothing.
patient is wearing a transfer belt, keep a fi rm hold on the belt. The patient should be eased to the fl oor as slowly as possible (fi g-ure 22-20). The patient’s head and neck should be protected, and the head should be prevented from striking the fl oor. Stay with the patient and call for help. Patients should not be moved until they have been examined for injuries. After a fall has
occurred, most agencies require a written incident report. Follow agency policy for correct documentation of the incident.
STUDENT: Go to the workbook and complete the assignment sheet for 22:2, Ambulating Patients Who Use Transfer (Gait) Belts, Crutches, Canes, or Walkers. Then return and continue with the pro-cedures.
30216_22_Ch22_930-968.indd 94530216_22_Ch22_930-968.indd 945 1/16/08 1:54:41 PM1/16/08 1:54:41 PM
Copyright 2009 Cengage Learning, Inc. All Rights Reserved. May not be copied, scanned, or duplicated, in whole or in part.

CHAPTER 22946
11. Assist the patient to a standing position. Face the patient and get a broad base of support. Grasp the loops on the side of the belt or place your hands under the sides of the belt. Ask the patient to assist by pushing against the bed with his/her hands at a given signal, such as “one, two, three, stand.” Bend at your knees and give the signal for the patient to stand. Keep your back straight and straighten your knees as the patient stands (fi gure 22-21C).
PROCEDURE 22:2A 12. To ambulate the patient, support the
patient in a standing position. Keep one hand on one side of the belt while mov-ing the other hand to the loops or the back of the belt. Then, move the second hand from the side to the loops or the back of the belt while you move behind the patient.
CAUTION: Keep one hand fi rmly on the belt at all times when changing posi-tion.
13. Ambulate the patient. Encourage the patient to walk slowly and use handrails, if available. Walk slightly behind the patient at all times and keep a fi rm, underhand grip on the belt or keep your hands fi rmly in the loops.
NOTE: If the patient has a weak side, position yourself on the patient’s weak side.
14. If the patient starts to fall, keep a fi rm grip on the belt. Use your body to brace the patient; Keep your back straight (fi g-ure 22-22). Gently ease the patient to
FIGURE 22-21B Check the transfer belt to make sure it is not too tight.
FIGURE 22-21C Place your hands under the sides of the belt and use proper body mechan-ics as you help the patient to a standing posi-tion.
FIGURE 22-22 Keep your back straight and use your body to brace the patient if the patient starts to fall.
30216_22_Ch22_930-968.indd 94630216_22_Ch22_930-968.indd 946 1/16/08 1:54:49 PM1/16/08 1:54:49 PM
Copyright 2009 Cengage Learning, Inc. All Rights Reserved. May not be copied, scanned, or duplicated, in whole or in part.

947Physical Therapy Skills
the fl oor, taking care to protect his or her head. Stay with the patient and call for help. Do not try to stand the patient up until help arrives and the patient has been examined for injuries.
15. When ambulation is complete, assist the patient in returning to bed. Remove the transfer belt.
16. Observe all checkpoints before leaving the patient. Make sure the patient is comfortable and in good body align-ment. Elevate the siderails (if indicated), lower the bed to its lowest level, place the call signal and supplies within easy reach of the patient, and leave the area neat and clean.
17. Replace all equipment.
18. Wash hands.
PROCEDURE 22:2A 19. Report and/or record all required infor-
mation on the patient’s chart or the agency form, for example, date; time; ambulated with a transfer belt, walked down to lounge and back; and your sig-nature and title. Report any problems immediately.
PracticeGo to the workbook and use the evaluation sheet for 22:2A, Ambulating a Patient with a Transfer (Gait) Belt, to practice this procedure. When you believe you have mastered this skill, sign the sheet and give it to your instructor for further action.
Final Checkpoint Using the criteria listed on the evaluation sheet, your instructor will grade your performance.
Ambulating a Patient Who Uses CrutchesEquipment and SuppliesAdjustable crutches, pen or pencil
Procedure 1. Check orders or obtain authorization
from your immediate supervisor. Ascer-tain which gait the therapist taught the patient.
2. Assemble equipment.
3. Check the crutches. Make sure there are rubber-suction tips on the bottom ends
PROCEDURE 22:2Band that the tips are not worn down or torn. Check to be sure the axillary bars and hand rests are covered with pad-ding.
NOTE: Foam-rubber pads are usually placed on crutches.
4. Knock on the door and pause before entering. Introduce yourself. Identify the patient. Explain the procedure.
5. Wash hands.
6. Help the patient put on good walking shoes. The shoes should have low, broad heels approximately 1–11⁄2 inches high and nonskid soles.
7. Place a transfer (gait) belt on the patient. Use an underhand grasp on the belt and
30216_22_Ch22_930-968.indd 94730216_22_Ch22_930-968.indd 947 1/16/08 1:55:00 PM1/16/08 1:55:00 PM
Copyright 2009 Cengage Learning, Inc. All Rights Reserved. May not be copied, scanned, or duplicated, in whole or in part.

CHAPTER 22948
assist the patient to a standing position. Advise the patient to bear his or her weight on the unaffected leg. Position the crutches correctly.
8. Check the fi t of the crutches.
a. Position the crutches 4–6 inches in front of the patient’s feet.
b. Move the crutches 4–6 inches to the sides of the feet.
c. Make sure there is a 2-inch gap between the axilla (armpit) and the axillary bar or rest. If the length must be adjusted, check with your imme-diate supervisor.
d. Each elbow must be fl exed at a 25- to 30-degree angle. If the hand rests must be adjusted to achieve this angle, check with your immediate supervisor.
NOTE: In some agencies, the trained health care worker is permitted to adjust the crutches as necessary. The adjust-ments are then checked by the therapist or other authorized person. Follow your agency’s policy.
9. Assist the patient with the required gait. The gait used depends on the patient’s injury and condition, and is determined by the therapist or other authorized per-son.
CAUTION: Remain alert at all times. Be ready to catch the patient if there are any signs of falling.
10. Four-point gait (fi gure 22-23):
a. The patient can bear weight on both legs. Start the patient in a standing position, with crutches at the sides.
b. Move the right crutch forward.
c. Move the left foot forward.
d. Move the left crutch forward.
e. Move the right foot forward.
PROCEDURE 22:2B
NOTE: This is a slow gait taught initially when both legs can bear weight.
11. Three-point gait (fi gure 22-24):
a. The patient can bear weight on one leg only. Start the patient in a stand-ing position, with crutches at the sides.
b. Advance both crutches and the weak or affected foot.
Move right crutch.
Move rightfoot.
Move leftcrutch.
Move leftfoot.
FIGURE 22-23 Four-point gait for crutches.
Stand with both feet together.
Move both crutchestogether with affected leg.
Move unaffectedleg.
Affected leg
FIGURE 22-24 Three-point gait for crutches.
30216_22_Ch22_930-968.indd 94830216_22_Ch22_930-968.indd 948 1/16/08 1:55:07 PM1/16/08 1:55:07 PM
Copyright 2009 Cengage Learning, Inc. All Rights Reserved. May not be copied, scanned, or duplicated, in whole or in part.
949Physical Therapy Skills
c. Transfer the patient’s body weight forward to the crutches.
d. Advance the unaffected, or good, foot forward.
NOTE: This is a slow gait taught initially when only one leg can bear weight.
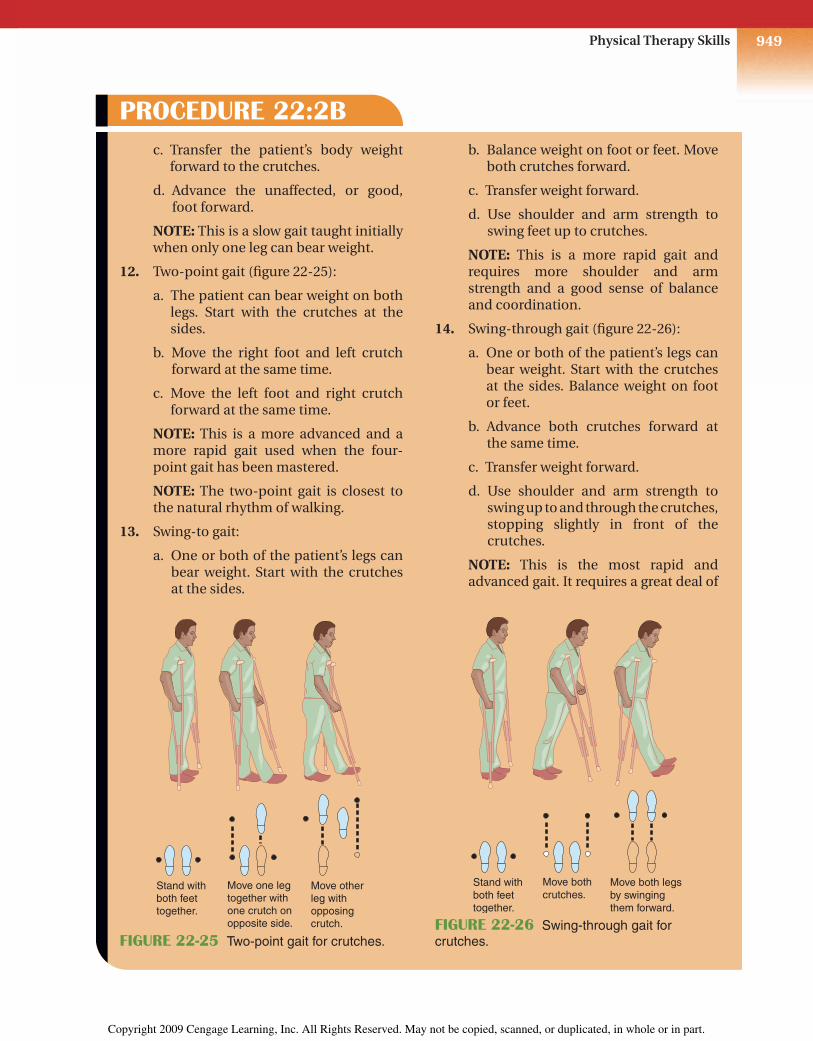
12. Two-point gait (fi gure 22-25):
a. The patient can bear weight on both legs. Start with the crutches at the sides.
b. Move the right foot and left crutch forward at the same time.
c. Move the left foot and right crutch forward at the same time.
NOTE: This is a more advanced and a more rapid gait used when the four-point gait has been mastered.
NOTE: The two-point gait is closest to the natural rhythm of walking.
13. Swing-to gait:
a. One or both of the patient’s legs can bear weight. Start with the crutches at the sides.
PROCEDURE 22:2B b. Balance weight on foot or feet. Move
both crutches forward.
c. Transfer weight forward.
d. Use shoulder and arm strength to swing feet up to crutches.
NOTE: This is a more rapid gait and requires more shoulder and arm strength and a good sense of balance and coordination.
14. Swing-through gait (fi gure 22-26):
a. One or both of the patient’s legs can bear weight. Start with the crutches at the sides. Balance weight on foot or feet.
b. Advance both crutches forward at the same time.
c. Transfer weight forward.
d. Use shoulder and arm strength to swing up to and through the crutches, stopping slightly in front of the crutches.
NOTE: This is the most rapid and advanced gait. It requires a great deal of
Stand with both feet together.
Move one legtogether with one crutch on opposite side.
Move other leg with opposing crutch.
FIGURE 22-25 Two-point gait for crutches.
Stand with both feet together.
Move both crutches.
Move both legsby swinging them forward.
FIGURE 22-26 Swing-through gait for crutches.
30216_22_Ch22_930-968.indd 94930216_22_Ch22_930-968.indd 949 1/16/08 1:55:13 PM1/16/08 1:55:13 PM
Copyright 2009 Cengage Learning, Inc. All Rights Reserved. May not be copied, scanned, or duplicated, in whole or in part.

CHAPTER 22950
shoulder and arm strength. It also requires an excellent sense of balance because at one point only the crutches are in contact with the ground.
15. When using crutches, the patient must not rest his or her body weight on the axillary rests. Shoulder and arm strength should provide movement on the crutches.
CAUTION: Warn the patient that nerve damage can occur if weight is supported constantly on the axillary rest.
16. Check to make sure that the patient is not moving too far forward at one time. Distances should be limited. If the patient attempts to move the crutches too far forward, he or she can very easily lose balance and fall forward.
17. Check the patient’s progress. Report the progress to the therapist or your imme-diate supervisor. The therapist will determine when to teach the patient more advanced gaits.
18. When the patient is fi nished using the crutches, replace all equipment.
19. Assist the patient back to bed or posi-tion the patient in a chair. Remove the transfer belt. Observe all checkpoints before leaving the patient. Make sure the patient is comfortable and in good body alignment. If the patient is in bed,
PROCEDURE 22:2Belevate the siderails (if indicated), lower the bed to its lowest level, place the call signal and other supplies within easy reach of the patient, and leave the area neat and clean.
20. Wash hands.
21. Report and/or record all required infor-mation on the patient’s chart or the agency form; for example, date; time; ambulated with crutches, walked down the hall two times using two-point gait, no problems noted; and your signature and title. Report any problems immedi-ately.
PracticeGo to the workbook and use the evaluation sheet for 22:2B, Ambulating a Patient Who Uses Crutches, to practice this procedure. When you believe you have mastered this skill, sign the sheet and give it to your instructor for further action.
Final Checkpoint Using the criteria listed on the evaluation sheet, your instructor will grade your performance.
Ambulating a Patient Who Uses a CaneEquipment and SuppliesAdjustable cane, pen or pencil
PROCEDURE 22:2C
Procedure 1. Check orders or obtain authorization
from your immediate supervisor. Ascer-tain which gait the therapist taught the patient.
2. Assemble equipment.
30216_22_Ch22_930-968.indd 95030216_22_Ch22_930-968.indd 950 1/16/08 1:55:19 PM1/16/08 1:55:19 PM
Copyright 2009 Cengage Learning, Inc. All Rights Reserved. May not be copied, scanned, or duplicated, in whole or in part.

951Physical Therapy Skills
3. Check the cane. Make sure the bottom has a rubber-suction tip. If the patient needs extra stability, use a tripod (three-legged) or quad (four-legged) cane.
4. Knock on the door and pause before entering. Introduce yourself. Identify the patient. Explain the procedure.
5. Wash hands.
6. Help the patient put on good walking shoes. The shoes should have low, broad heels approximately 1–11⁄2 inches high and nonskid soles.
7. Place a transfer (gait) belt on the patient. Use an underhand grasp on the belt and assist the patient to a standing position. Advise the patient to bear his or her weight on the unaffected leg.
8. Check the height of the cane:
a. Position the cane on the unaffected (good) side and approximately 6–8 inches from the side of the foot.
b. The top of the cane should be level with the top of the femur at the hip joint.
c. The patient’s elbow should be fl exed at a 25- to 30-degree angle.
NOTE: If the height of the cane needs adjustment, follow agency policy. In some agencies, only the therapist adjusts canes. In other agencies, the trained health care worker can adjust canes.
9. Instruct the patient to use the cane on the good, or unaffected, side.
NOTE: This prevents leaning toward the weak or affected side and provides a broader base of support.
10. Assist the patient with the gait ordered. For a three-point gait (fi gure 22-27A):
a. Balance the body weight on the strong or unaffected foot. Move the cane forward approximately 12–18 inches.
PROCEDURE 22:2C
b. Move the weak or affected foot for-ward.
c. Transfer the weight to the affected foot and cane. Bring the unaffected foot forward.
For a two-point gait (fi gure 22-27B):
a. Balance the weight on the strong or unaffected foot.
b. Move the cane and the weak or affected foot forward. Keep the cane fairly close to the body to prevent leaning.
c. Transfer body weight forward to the cane.
d. Move the good, or unaffected, foot forward.
CAUTION: Remain alert at all times. Be ready to catch the patient if there are any signs of falling.
Three-point gait
KEY
walker or cane
unaffected leg
affected leg
When no affected leg is shown,weight bearing is equal on both legs
13
2
FIGURE 22-27A Three-point gait for canes.
30216_22_Ch22_930-968.indd 95130216_22_Ch22_930-968.indd 951 1/16/08 1:55:26 PM1/16/08 1:55:26 PM
Copyright 2009 Cengage Learning, Inc. All Rights Reserved. May not be copied, scanned, or duplicated, in whole or in part.

CHAPTER 22952
NOTE: Maintain an underhand grasp on the transfer belt if the patient is not steady.
11. A common sequence to follow when assisting the patient up and down stairs is that of always starting with the good (unaffected) leg:
a. Step up with the unaffected leg.
b. Bring the cane and weak or affected leg up.
c. To go down steps, reverse this proce-dure. Step down on the good leg and follow with the cane and affected or weak foot.
NOTE: Remember this sequence by say-ing, “Good Guys Go First.”
12. When walking with a cane, the patient should take small steps. Smaller steps
PROCEDURE 22:2Care recommended to prevent leaning and/or loss of balance.
13. Note the patient’s progress. Pay particu-lar attention to any problems the patient experiences during ambulation. Report this information to your immediate supervisor or the therapist.
14. Assist the patient back to bed or posi-tion the patient in a chair. Remove the transfer belt.
15. Observe all checkpoints before leaving the patient. Make sure the patient is comfortable and in good body align-ment. If the patient is in bed, elevate the siderails (if indicated), lower the bed to its lowest level, place the call signal and other supplies within easy reach of the patient, and leave the area neat and clean.
16. Replace all equipment.
17. Wash hands.
18. Report and/or record all required infor-mation on the patient’s chart or the agency form; for example, date; time; ambulated with tripod cane, walked to visitor’s lounge and back to room, no problems noted; and your signature and title. Report any problems immediately.
PracticeGo to the workbook and use the evaluation sheet for 22:2C, Ambulating a Patient Who Uses a Cane, to practice this procedure. When you believe you have mastered this skill, sign the sheet and give it to your instructor for further action.
Final Checkpoint Using the criteria listed on the evaluation sheet, your instructor will grade your performance.
Two-point gait
KEY
walker or cane
unaffected leg
affected leg
When no affected leg is shown,weight bearing is equal on both legs
1 12
FIGURE 22-27B Two-point gait for canes.
30216_22_Ch22_930-968.indd 95230216_22_Ch22_930-968.indd 952 1/16/08 1:55:32 PM1/16/08 1:55:32 PM
Copyright 2009 Cengage Learning, Inc. All Rights Reserved. May not be copied, scanned, or duplicated, in whole or in part.

953Physical Therapy Skills
Ambulating a Patient Who Uses a WalkerEquipment and SuppliesAdjustable walker, pen or pencil
Procedure 1. Check orders or obtain authorization
from your immediate supervisor for ambulating the patient.
2. Assemble equipment.
3. Check the walker. Make sure rubber-suction tips are secure on all of the legs. Check for rough or damaged edges on the hand rests.
4. Knock on the door and pause before entering. Introduce yourself. Identify the patient. Explain the procedure.
5. Wash hands.
6. Help the patient put on good walking shoes. The shoes should have low, broad heels approximately 1–11⁄2 inches high and nonskid soles.
7. Place a transfer (gait) belt on the patient. Use an underhand grasp on the belt and assist the patient to a standing position. Position the walker correctly and ask the patient to grasp the hand rests securely.
8. Check the height of the walker to see whether the following requirements are met:
a. The hand rests are level with the tops of the femurs at the hip joints.
b. The elbows are fl exed at 25- to 30-degree angles.
NOTE: If the height of the walker needs adjustment, follow agency policy. In some agencies, only the therapist makes such adjustments. In other agencies, a trained health care worker may adjust walkers.
PROCEDURE 22:2D 9. Start with the walker in position. The
patient should be standing “inside” the walker.
10. Tell the patient to lift the walker and place it forward so that the back legs of the walker are even with the patient’s toes.
CAUTION: Tell the patient to avoid slid-ing the walker. The walker could fall for-ward and cause the patient to fall.
11. Instruct the patient to transfer his or her weight forward slightly to the walker.
12. Instruct the patient to use the walker for support and to walk “into” the walker. Do not allow the patient to “shuffl e” his or her feet (fi gure 22-28).
FIGURE 22-28 Instruct the patient to use the walker for support while walking “into” the walker.
30216_22_Ch22_930-968.indd 95330216_22_Ch22_930-968.indd 953 1/16/08 1:55:38 PM1/16/08 1:55:38 PM
Copyright 2009 Cengage Learning, Inc. All Rights Reserved. May not be copied, scanned, or duplicated, in whole or in part.

CHAPTER 22954
22:3 INFORMATIONAdministering Heat/Cold ApplicationsAs a health care worker, you may be responsible for administering a variety of heat and cold appli-cations. Some of the main principles involved are described in this section.
Cryotherapy is the use of cold for treatment. Cold applications are administered to relieve pain, reduce swelling, reduce body temperature, and control bleeding.
♦ Moist cold applications are cold and moist or wet against the skin. Examples are cold com-
presses, packs, and soaks. These applications are more penetrating than are dry cold appli-cations.
♦ Dry cold applications are cold and dry against the skin. Examples are ice bags, ice collars, hypothermia blankets, and similar devices.
♦ Ice bags or collars are special containers fi lled with ice. Most health care facilities use disposable bags to prevent the spread of infec-tion. A hypothermia blanket, also called a thermal blanket, contains coils that are fi lled with cool fl uid. It is used to reduce high body temperatures. A rectal probe is usually used to monitor the patient’s temperature. When the patient’s temperature reaches a preset level,
13. Repeat steps 10–12. While the patient is using the walker, walk to the side and slightly behind the patient. Be alert at all times. Be ready to catch the patient if there are any signs of falling.
NOTE: If the patient has a weak side, position yourself on the patient’s weak side.
14. Check constantly to make sure the patient is lifting the walker to move it forward. Also make sure the patient is placing the walker forward just to his or her toes and not attempting too large a step.
15. Note the patient’s progress. Pay particu-lar attention to any problems the patient experiences during ambulation. Report this information to your immediate supervisor or the therapist.
16. Assist the patient back to bed or posi-tion the patient in a chair. Remove the transfer belt.
17. Observe all checkpoints before leaving the patient. Make sure the patient is comfortable and in good body align-ment. If the patient is in bed, elevate the siderails (if indicated), lower the bed to its lowest level, place the call signal and other supplies within easy reach of the
PROCEDURE 22:2Dpatient, and leave the area neat and clean.
18. Replace all equipment.
19. Wash hands.
20. Report and/or record all required infor-mation on the patient’s chart or the agency form; for example, date; time; ambulated with walker, walked down the hall and back two times, needs encouragement to pick up walker and not slide it; and your signature and title. Report any problems immediately.
PracticeGo to the workbook and use the evaluation sheet for 22:2D, Ambulating a Patient Who Uses a Walker, to practice this procedure. When you believe you have mastered this skill, sign the sheet and give it to your instructor for further action.
Final Checkpoint Using the criteria listed on the evaluation sheet, your instructor will grade your performance.
30216_22_Ch22_930-968.indd 95430216_22_Ch22_930-968.indd 954 1/16/08 1:55:46 PM1/16/08 1:55:46 PM
Copyright 2009 Cengage Learning, Inc. All Rights Reserved. May not be copied, scanned, or duplicated, in whole or in part.
955Physical Therapy Skills
the blanket decreases the circulation of the cooling fl uid.
Thermotherapy is the use of heat for treat-ment. Heat applications are administered to relieve pain, increase drainage from an infected area, stimulate healing, increase circulation to an area, combat infection, and relieve muscle spasms or increase muscle mobility before exer-cise.
♦ Moist heat applications are warm and wet against the skin. These applications are more penetrating and more effective in relieving pain in deeper tissues than are dry heat appli-cations. Examples are the sitz bath, hot soaks, compresses, hydrocollator packs, and paraffi n wax treatments.
♦ Sitz baths provide warm moist heat to the perineal and rectal area. They are used post-partum (after birth) and after rectal surgery to provide comfort and promote healing.
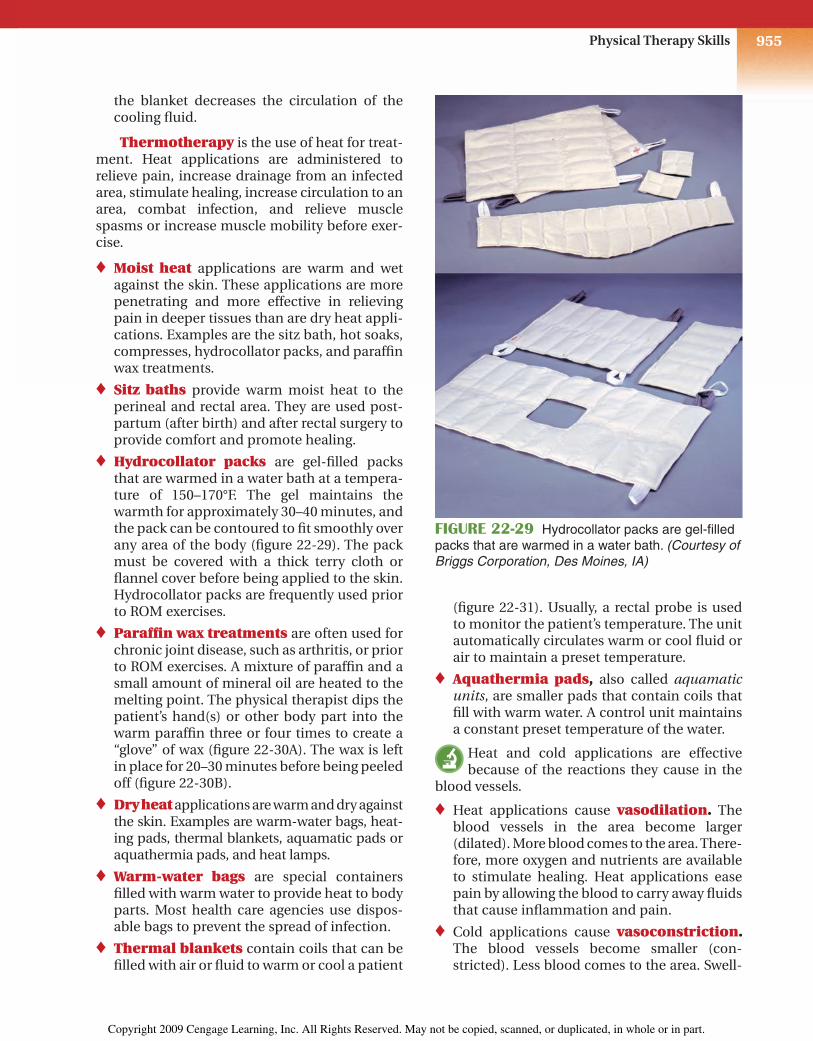
♦ Hydrocollator packs are gel-fi lled packs that are warmed in a water bath at a tempera-ture of 150–170°F. The gel maintains the warmth for approximately 30–40 minutes, and the pack can be contoured to fi t smoothly over any area of the body (fi gure 22-29). The pack must be covered with a thick terry cloth or fl annel cover before being applied to the skin. Hydrocollator packs are frequently used prior to ROM exercises.
♦ Paraffi n wax treatments are often used for chronic joint disease, such as arthritis, or prior to ROM exercises. A mixture of paraffi n and a small amount of mineral oil are heated to the melting point. The physical therapist dips the patient’s hand(s) or other body part into the warm paraffi n three or four times to create a “glove” of wax (fi gure 22-30A). The wax is left in place for 20–30 minutes before being peeled off (fi gure 22-30B).
♦ Dry heat applications are warm and dry against the skin. Examples are warm-water bags, heat-ing pads, thermal blankets, aquamatic pads or aquathermia pads, and heat lamps.
♦ Warm-water bags are special containers fi lled with warm water to provide heat to body parts. Most health care agencies use dispos-able bags to prevent the spread of infection.
♦ Thermal blankets contain coils that can be fi lled with air or fl uid to warm or cool a patient
(fi gure 22-31). Usually, a rectal probe is used to monitor the patient’s temperature. The unit automatically circulates warm or cool fl uid or air to maintain a preset temperature.
♦ Aquathermia pads, also called aquamatic units, are smaller pads that contain coils that fi ll with warm water. A control unit maintains a constant preset temperature of the water.
Heat and cold applications are effective because of the reactions they cause in the
blood vessels.
♦ Heat applications cause vasodilation. The blood vessels in the area become larger (dilated). More blood comes to the area. There-fore, more oxygen and nutrients are available to stimulate healing. Heat applications ease pain by allowing the blood to carry away fl uids that cause infl ammation and pain.
♦ Cold applications cause vasoconstriction. The blood vessels become smaller (con-stricted). Less blood comes to the area. Swell-
FIGURE 22-29 Hydrocollator packs are gel-fi lled packs that are warmed in a water bath. (Courtesy of Briggs Corporation, Des Moines, IA)
30216_22_Ch22_930-968.indd 95530216_22_Ch22_930-968.indd 955 1/16/08 1:55:53 PM1/16/08 1:55:53 PM
Copyright 2009 Cengage Learning, Inc. All Rights Reserved. May not be copied, scanned, or duplicated, in whole or in part.

CHAPTER 22956
ing decreases because fewer fl uids are present. The cold also has a numbing effect, which decreases local pain.
A physician’s order is required for a heat or cold application. The order should state the
type of application, duration of treatment, tem-perature (if not standard), and area of applica-tion. In some states and agencies, health care assistants are not allowed to administer heat or cold applications. It is important to check your agency’s policy and be aware of your legal respon-sibilities.
CAUTION: The patient must be checked frequently when an application is in place.
Color and temperature of the skin, amount of pain and bleeding, effect on circulation, and other signs and symptoms must be noted. Spe-cial attention must be given to infants, young children, and elderly patients, because the skin of these patients is less resistant and burns or inju-ries can occur rapidly. Metal objects, such as rings, bracelets, necklaces, watches, and zippers, readily conduct heat or cold. Patients should be asked to remove all metal objects in the treated area before a heat or cold application is adminis-tered. When administering heat or cold applica-tions, the rubber or plastic should never come in contact with the skin. All rubber or plastic appli-cations should be covered with a towel or special cloth cover. If any abnormal symptoms are noted, the application should be discontinued and the immediate supervisor notifi ed. The health care worker must be alert at all times and observe all safety precautions when administering heat and cold applications.
Standard precautions (discussed in Chapter 14:4) must be observed if any contact with
blood, body fl uids, secretions, or excretions is possible. An example is a moist heat application placed on a draining wound. Gloves must be worn. Hands must be washed frequently and are always washed immediately after removing gloves. A mask and eye protection must be worn if splashing or spraying of body fl uids is possible. A health care worker must always use proper pre-cautions to prevent the spread of infection.
STUDENT: Go to the workbook and complete the assignment sheet for 22:3, Administering Heat/Cold Applications. Then return and continue with the procedures.
FIGURE 22-30A A body part is dipped into the paraffi n bath three or four times to create a layer of warm wax on the skin. (Courtesy of Briggs Corpora-tion, Des Moines, IA)
FIGURE 22-30B After the wax has been in place for 20–30 minutes, it is peeled off and discarded.
FIGURE 22-31 A thermal blanket contains coils that are fi lled with water or air to warm or cool the body.
30216_22_Ch22_930-968.indd 95630216_22_Ch22_930-968.indd 956 1/16/08 1:56:02 PM1/16/08 1:56:02 PM
Copyright 2009 Cengage Learning, Inc. All Rights Reserved. May not be copied, scanned, or duplicated, in whole or in part.

957Physical Therapy Skills
Applying an Ice Bag or Ice CollarEquipment and SuppliesIce collar or ice bag and cap, cover or towel, tape, ice in basin, scoop or paper cup, pen or pencil
Procedure 1. Check physician’s orders or obtain
authorization from your immediate supervisor for the application.
2. Assemble equipment.
3. Wash hands.
4. Fill the ice bag or collar with water. Check for leaks. Empty if no leaks are present.
NOTE: Ice bags come in various sizes for different parts of the body. An ice collar is narrow and is used on the throat.
5. Use the scoop to fi ll the ice bag or collar half full (fi gure 22-32A). To assist in fi ll-ing, a paper cup with the bottom cut out can be placed in the neck of the bag and used as a funnel. Ice can then be scooped into the bag.
NOTE: If ice cubes are used, rinse them with water to remove sharp edges.
NOTE: In some agencies, disposable cold packs are used. To activate the chemicals in the cold pack, squeeze the pack or strike it against a solid surface. It does not need to be fi lled with ice. A cover must still be placed on the dispos-able cold pack because the plastic and cold can injure the skin.
CAUTION: Chemical ice packs are not recommended for use on the face or head because of the danger of leaking chemicals.
6. Place the bag on a table or fl at surface. Push gently on the bag to expel all air (fi gure 22-32B). Tighten the cap.
PROCEDURE 22:3A
FIGURE 22-32A Fill the ice bag half full.
FIGURE 22-32B Push gently on the bag to expel all air before tightening the cap.
30216_22_Ch22_930-968.indd 95730216_22_Ch22_930-968.indd 957 1/16/08 1:56:13 PM1/16/08 1:56:13 PM
Copyright 2009 Cengage Learning, Inc. All Rights Reserved. May not be copied, scanned, or duplicated, in whole or in part.

CHAPTER 22958
NOTE: If a rubber ring is present on the cap, make sure the ring is secure; it pre-vents leakage.
7. Wipe the outside of the bag dry.
8. Place a cover on the bag. If an ice bag or ice collar cover is not available, use a towel. Tape the towel in place.
CAUTION: The bag must be covered. The rubber or plastic and the extreme cold can injure the skin.
9. Knock on the door and pause before entering. Introduce yourself. Identify the patient. Explain the procedure.
10. Wash hands. Put on gloves if necessary.
CAUTION: Wear gloves and observe standard precautions if the area to be treated has any drainage of blood, body fl uids, secretions, or excretions.
11. Place the ice bag gently on the affected area as ordered. If the cap is metal, make sure it is not on the patient’s skin.
NOTE: Metal will intensify the cold. If the cold metal cap rests on the patient’s skin, an injury can occur.
12. Make sure the patient is comfortable and the ice application is positioned correctly before leaving. Place the call signal within easy reach of the patient. Remove gloves, if worn, and wash hands before leaving the room.
13. Recheck the patient at least every 10 minutes. Make sure the bag is cold and refi ll it as needed. Check the condition of the skin. Check for pale or white skin, cyanosis (bluish color), or a mottled appearance. Ask the patient about numbness and pain.
CAUTION: If the skin is mottled or very discolored, or the patient complains of pain, remove the bag immediately and inform your immediate supervisor.
14. Leave the ice application in place for the length of time ordered. In some cases,
PROCEDURE 22:3Acontinuous application is ordered; in others, a specifi c time period, such as 20 minutes, is ordered. Remove the bag when the designated time has elapsed.
15. Carefully check the condition of the patient’s skin. Note any comments the patient makes about the treatment. Report these to your supervisor.
16. Observe all checkpoints before leaving the patient: position the patient in cor-rect body alignment, elevate the side-rails (if indicated), lower the bed to its lowest level, place the call signal and supplies within easy reach of the patient, and leave the area neat and clean.
17. If the ice bag is disposable, discard it. If the ice bag is not disposable, empty it and clean it thoroughly. Wipe it with a disinfectant, rinse, and dry. Infl ate it with air before storing. This prevents the sides from sticking. Replace all equipment.
18. Remove gloves if worn. Wash hands.
19. Report and/or record all required infor-mation on the patient’s chart or the agency form; for example, date; time; ice bag applied to right forearm for 20 minutes, patient states arm feels better; and your signature and title. Report any unusual observations immediately.
PracticeGo to the workbook and use the evaluation sheet for 22:3A, Applying an Ice Bag or Ice Collar, to practice this procedure. When you believe you have mastered this skill, sign the sheet and give it to your instructor for further action.
Final Checkpoint Using the criteria listed on the evaluation sheet, your instructor will grade your performance.
30216_22_Ch22_930-968.indd 95830216_22_Ch22_930-968.indd 958 1/16/08 1:56:25 PM1/16/08 1:56:25 PM
Copyright 2009 Cengage Learning, Inc. All Rights Reserved. May not be copied, scanned, or duplicated, in whole or in part.

959Physical Therapy Skills
Applying a Warm-Water BagEquipment and SuppliesWarm-water bag, cover or towel for bag, tape, measuring graduate or pitcher, bath ther-mometer, pen or pencil
Procedure 1. Check physician’s orders or obtain
authorization from your immediate supervisor for the application.
2. Assemble equipment.
3. Wash hands.
4. Check for leaks by fi lling the warm-water bag with tap water or air. Expel the water or air if no leaks are present.
5. Fill the pitcher with water at a tempera-ture of 110–120°F, or 43–49°C. Use the bath thermometer to check the temper-ature (fi gure 22-33A).
CAUTION: The temperature should not exceed 120°F, or 49°C.
PROCEDURE 22:3B NOTE: Temperatures may vary. Follow
agency policy.
NOTE: In some agencies, disposable heat packs are used. To activate the chemicals in the heat pack, squeeze the pack or strike it against a solid surface. It does not need to be fi lled with hot water. A cover must still be placed on the dis-posable heat pack because the plastic and heat can injure the skin.
CAUTION: Chemical heat packs are not recommended for use on the face or head because of the danger of leaking chemicals.
6. Pour the measured hot water into the warm-water bag. Fill the bag one-third to one-half full (fi gure 22-33B).
7. Expel remaining air by placing the warm-water bag on a fl at surface, lifting and holding the neck portion of the bag upright, and pushing gently on the bag until the water reaches the neck (fi gure 22-33C). Apply the screw cap or fold over the end.
NOTE: If the bag has a fold end, note the letters A, B, and C. Fold A to B, B to C, and C to seal.
8. Wipe the outside of the bag dry. Check again for any signs of leaks.
FIGURE 22-33A Use a bath thermometer to verify that the temperature of the water is 110–120°F.
FIGURE 22-33B Fill the warm-water bag one-third to one-half full.
30216_22_Ch22_930-968.indd 95930216_22_Ch22_930-968.indd 959 1/16/08 1:56:31 PM1/16/08 1:56:31 PM
Copyright 2009 Cengage Learning, Inc. All Rights Reserved. May not be copied, scanned, or duplicated, in whole or in part.

CHAPTER 22960
PROCEDURE 22:3B 10. Knock on the door and pause before
entering. Introduce yourself. Identify the patient. Explain the procedure.
11. Wash hands. Put on gloves if necessary.
CAUTION: Wear gloves and observe standard precautions if the area to be treated has any drainage of blood, body fl uids, secretions, or excretions.
12. Apply the bag gently to the affected area as ordered. Make sure it is placed on top of the area. Never place heat under the body.
CAUTION: Do not allow any part of the patient’s body to lie on top of the warm-water bag. Weight of the body part could intensify the heat.
13. Before leaving, check to be sure the patient is comfortable and the bag is properly positioned. Place the call sig-nal within easy reach of the patient. Remove gloves, if worn, and wash hands before leaving the room.
14. Recheck the patient at least every 10 minutes. Refi ll the bag as needed to maintain warm temperature. Note any pain, extreme redness, or other condi-tions.
CAUTION: If signs of a burn are noted, remove the application immediately and report to your immediate supervi-sor.
15. Remove the heat application when the time ordered has elapsed. Closely check the patient’s skin.
16. Observe all checkpoints before leaving the patient: position the patient in cor-rect body alignment, elevate the side-rails (if indicated), lower the bed to its lowest level, place the call signal and supplies within easy reach of the patient, and leave the area neat and clean.
17. Discard a disposable heat pack. If the warm-water bag is not disposable, empty the warm-water bag and clean
FIGURE 22-33C Expel air from the warm-water bag by placing it on a fl at surface and gently pressing it until the water reaches the neck of the bag.
CAUTION: Never use a warm-water bag or cap that leaks. The patient can be scalded.
9. Place a cover on the warm-water bag (fi gure 22-33D). Use a standard cover, if available. If not, use a towel and tape the towel in place. The towel should be smooth and should completely cover the warm-water bag.
CAUTION: The warm-water bag must be covered to prevent injury to the skin.
FIGURE 22-33D Cover the warm-water bag with a towel or standard cover.
30216_22_Ch22_930-968.indd 96030216_22_Ch22_930-968.indd 960 1/16/08 1:56:41 PM1/16/08 1:56:41 PM
Copyright 2009 Cengage Learning, Inc. All Rights Reserved. May not be copied, scanned, or duplicated, in whole or in part.
961Physical Therapy Skills
PracticeGo to the workbook and use the evaluation sheet for 22:3B, Applying a Warm-Water Bag, to practice this procedure. When you believe you have mastered this skill, sign the sheet and give it to your instructor for further action.
Final Checkpoint Using the criteria listed on the evaluation sheet, your instructor will grade your performance.
PROCEDURE 22:3Bthoroughly. Wipe it with a disinfectant, rinse, and dry. Fill it with air before stor-ing. This keeps the sides from sticking together. Replace all equipment.
18. Remove gloves if worn. Wash hands.
19. Report and/or record all required infor-mation on the patient’s chart or the agency form; for example, date; time; warm-water bag applied to right knee for 20 minutes, patient stated pain relieved in knee; and your signature and title. Report any unusual observations immediately.
Applying an Aquathermia PadNOTE: Aquathermia or aquamatic pads can vary. Read the manufacturer’s instructions before using.
Equipment and SuppliesAquathermia unit and pad, cover, distilled water, pen or pencil
Procedure 1. Check physician’s orders or obtain
authorization from your immediate supervisor for the application.
2. Assemble equipment.
3. Knock on the door and pause before entering. Introduce yourself. Identify the patient. Explain the procedure to the patient.
4. Wash hands. Put on gloves if necessary.
CAUTION: Wear gloves and observe standard precautions if the area to be
PROCEDURE 22:3Ctreated has any drainage of blood, body fl uids, secretions, or excretions.
5. Place the aquathermia control unit on a solid table or stand. Check the cord. Attach the tubing to the main unit and aquathermia pad, if necessary.
NOTE: Follow specifi c manufacturer’s instructions. Some agencies use dispos-able pads. Tubing must be attached to these pads.
6. Unscrew the reservoir cap on the top of the unit. Use distilled water to fi ll the unit to the fi ll line.
NOTE: Distilled water prevents forma-tion of mineral deposits.
7. Screw the cap in place and then loosen it one-quarter turn. This allows for over-fl ow of water and escape of steam.
8. Plug in the cord. Set the desired temper-ature by inserting the special key into the center of the dial or follow manufac-turer’s instructions. Temperature is usu-ally set at 95–105°F, or 35–41°C. Turn the unit on.
30216_22_Ch22_930-968.indd 96130216_22_Ch22_930-968.indd 961 1/16/08 1:56:51 PM1/16/08 1:56:51 PM
Copyright 2009 Cengage Learning, Inc. All Rights Reserved. May not be copied, scanned, or duplicated, in whole or in part.

CHAPTER 22962
PROCEDURE 22:3Cthe patient is comfortable. Place the call signal within easy reach of the patient. Remove gloves, if worn, and wash hands before leaving the room.
12. Recheck the patient at least every 10 minutes. Note the condition of the skin. If the skin is red or shows evidence of burns, or the patient complains of pain, remove the pad and inform your imme-diate supervisor.
13. Refi ll the water unit with distilled water as necessary.
14. When the ordered time has elapsed, remove the pad from the patient. Note the condition of the skin. Note the patient’s comments to determine whether the application was effective.
NOTE: The physician’s orders may pre-scribe continuous application of the pad. If so, check the patient periodi-cally.
15. Observe all checkpoints before leaving the patient: position the patient in cor-rect body alignment, elevate the side-rails (if indicated), lower the bed to its lowest level, place the call signal and supplies within easy reach of the patient, and leave the area neat and clean.
16. Empty the pad. Empty the control unit. Clean all equipment thoroughly. Disin-fect the pad and unit according to agency policy or discard if disposable. Replace all equipment.
CAUTION: Do not put the electric con-trol unit in water.
17. Remove gloves, if worn. Wash hands.
18. Report and/or record all required infor-mation on the patient’s chart or the agency form; for example, date; time; aquathermia pad applied to left elbow and forearm for 20 minutes, patient stated pain relieved; and your signature and title. Report any unusual observa-tions immediately.
NOTE: Set the temperature according to physician’s orders or agency policy.
CAUTION: After setting the tempera-ture, remove the key and store it in a safe area. Do not leave the key in position on the unit. Others could change or alter the temperature.
9. Check the pad for leaks. Also check that the unit is getting warm. Make sure the tubing is not bent or kinked. Recheck the level of water in the reservoir. A large amount of water is used when the pad is fi lled with water.
10. Cover the pad (fi gure 22-34). If a custom cover is not available, a pillowcase or towel can be used. Use tape to hold the cover in place. (Pins could puncture the pad.)
CAUTION: The pad must never be placed directly on the patient’s skin. It can cause burns.
11. Place the pad on the correct area as ordered. Coil the tubing on the bed to facilitate the fl ow of water through the tubing. Do not allow the tubing to hang below the level of the bed. Check that
FIGURE 22-34 Cover the aquathermia pad before applying it to the patient.
30216_22_Ch22_930-968.indd 96230216_22_Ch22_930-968.indd 962 1/16/08 1:56:58 PM1/16/08 1:56:58 PM
Copyright 2009 Cengage Learning, Inc. All Rights Reserved. May not be copied, scanned, or duplicated, in whole or in part.
963Physical Therapy Skills
PROCEDURE 22:3C
PracticeGo to the workbook and use the evaluation sheet for 22:3C, Applying an Aquathermia Pad, to practice this procedure. When you believe you have mastered this skill, sign the sheet and give it to your instructor for further action.
Final Checkpoint Using the criteria listed on the evaluation sheet, your instructor will grade your performance.
Applying a Moist CompressEquipment and SuppliesBasin; bath thermometer; underpads or bed protectors; washcloth, towel, or gauze pads (for compress); bath towel; plastic sheet; pen or pencil
Procedure 1. Check physician’s orders or obtain
authorization from your immediate supervisor for the application.
2. Assemble equipment.
3. Knock on the door and pause before entering. Introduce yourself. Identify the patient. Explain the procedure to the patient.
4. Wash hands. Put on gloves.
CAUTION: Observe standard precau-tions if any contact with blood or body fl uids is likely, such as when a compress is applied to a draining wound.
5. Screen the unit. Elevate the bed to a comfortable working height. Fold the sheets back to expose the area to be treated.
PROCEDURE 22:3D NOTE: A bath blanket can be used to
drape the patient during the procedure.
6. Position an underpad or bed protector near the area to be treated. This will keep the patient’s bedclothes and bed linens dry.
7. Fill the basin with water at the correct temperature. Use the bath thermometer to check the temperature.
a. If a cold compress is to be applied, fi ll the basin with cold water. Ice cubes are sometimes added to the water. Do not add ice cubes unless you are told to do so.
b. If a hot compress is to be applied, fi ll the basin with water at a temperature of 100–105°F, or 37.8–41°C.
NOTE: Temperatures may vary. Follow physician’s orders or agency policy.
8. Put the compress (washcloth, towel, or gauze pad) in the water. Wring out the compress to remove excess liquid (fi g-ure 22-35A).
9. Apply the compress to the correct area (fi gure 22-35B). Use a plastic sheet to cover the area. Then wrap a bath towel around the treated area.
NOTE: The plastic sheet helps keep the compress moist and hot or cold.
30216_22_Ch22_930-968.indd 96330216_22_Ch22_930-968.indd 963 1/16/08 1:57:06 PM1/16/08 1:57:06 PM
Copyright 2009 Cengage Learning, Inc. All Rights Reserved. May not be copied, scanned, or duplicated, in whole or in part.

CHAPTER 22964
PROCEDURE 22:3Dcompress immediately and inform your immediate supervisor.
12. Continue the treatment for the required period of time as ordered by the physician or per agency policy. Most compresses are left in place for 15–20 minutes.
13. When the ordered time has elapsed, remove the compress from the patient. Note the condition of the skin. Note the patient’s comments to determine whether the application was effective.
14. Observe all checkpoints before leaving the patient: position the patient in cor-rect body alignment, elevate the side-rails (if indicated), lower the bed to its lowest level, place the call signal and supplies within easy reach of the patient, and leave the area neat and clean.
15. Clean and replace all equipment used. Discard gauze pads used as compresses. Place linen in a hamper or the laundry area.
16. Remove gloves. Wash hands.
17. Report and/or record all required infor-mation on the patient’s chart or the agency form; for example, date; time; cold moist compresses applied to right knee for 20 minutes, no change in skin color noted, patient states knee still hurts; and your signature and title. Report any unusual observations immediately.
NOTE: An underpad or bed protector is sometimes used instead of a plastic sheet.
10. An ice bag or aquamatic pad is some-times placed over the compress to help maintain the temperature. Follow agency policy or physician’s orders.
11. Check the compress at frequent inter-vals. Change the compress and remoisten it as necessary. Check the condition of the skin under the com-press. If the skin is discolored or the patient complains of pain, remove the
FIGURE 22-35A After putting the compress in the water, wring it out to remove excess liquid.
FIGURE 22-35B Apply the compress to the correct area.
PracticeGo to the workbook and use the evaluation sheet for 22:3D, Applying a Moist Compress, to practice this procedure. When you believe you have mastered this skill, sign the sheet and give it to your instructor for further action.
Final Checkpoint Using the criteria listed on the evaluation sheet, your instructor will grade your performance.
30216_22_Ch22_930-968.indd 96430216_22_Ch22_930-968.indd 964 1/16/08 1:57:12 PM1/16/08 1:57:12 PM
Copyright 2009 Cengage Learning, Inc. All Rights Reserved. May not be copied, scanned, or duplicated, in whole or in part.

965Physical Therapy Skills
Administering a Sitz Bath
Equipment and SuppliesSitz-bath chair, disposable unit, or tub; one to two bath blankets; towels; gown; robe; slip-pers; bath thermometer; pen or pencil
Procedure 1. Check physician’s orders or obtain
authorization from your immediate supervisor for the treatment.
2. Assemble equipment.
3. Knock on the door and pause before entering. Introduce yourself. Identify the patient. Explain the procedure. Ask the patient to put on a hospital gown. Assist as necessary.
4. Wash hands.
5. Prepare the sitz-bath unit:
a. A sitz chair has an automatic temper-ature control, set at 105°F, or 41°C (fi gure 22-36A). Fill the chair with water. Plug in the cord. Drape the bottom with a towel or bath blanket.
b. Fill a tub or sitz tub to the correct level with water at 105°F, or 41°C (fi g-ure 22-36B). Place a towel or bath blanket in the bottom of the tub.
PROCEDURE 22:3E
c. Fill the container on a portable unit with water at 105°F, or 41°C. Place the container on a commode chair or toilet (lift the seat before position-ing), (fi gure 22-36C). Connect the tubing to the container. Make sure the holes on the tubing are facing the
FIGURE 22-36A The sitz chair has an automatic control to maintain the correct temperature while the patient is seated in the chair.
FIGURE 22-36B Stationary sitz-bath tubs are available in many health care facilities.
FIGURE 22-36C A portable sitz-bath unit is positioned on the base of the toilet after the seat is elevated.
30216_22_Ch22_930-968.indd 96530216_22_Ch22_930-968.indd 965 1/16/08 1:57:23 PM1/16/08 1:57:23 PM
Copyright 2009 Cengage Learning, Inc. All Rights Reserved. May not be copied, scanned, or duplicated, in whole or in part.

CHAPTER 22966
sides of the container. Clamp the tub-ing with its clamp. Fill the bag with water at 110–115°F, or 43–46°C.
NOTE: Temperatures may vary. Follow physician’s orders or agency policy.
6. Position the patient in the sitz bath. Raise the patient’s gown above the water level. Make sure the perineal area is in the water. Use bath blankets to cover the patient’s legs and/or shoulders (fi gure 22-37).
NOTE: The gown can be removed if the patient is in a tub. Drape the patient with a bath blanket to prevent expo-sure.
7. Observe the patient closely for signs of weakness or dizziness.
CAUTION: If excessive weakness or diz-ziness is noted, discontinue the treat-ment and inform your immediate supervisor.
8. If a portable unit is used, add water from the bag when the water in the container gets cool. In a tub, drain some water and then add additional water as necessary
PROCEDURE 22:3Eto maintain the temperature at 105°F, or 41°C.
9. If the patient tolerates the procedure, leave the patient in the sitz bath for 20 minutes or the length of time ordered by the physician.
10. When the treatment is complete, assist the patient out of the chair, tub, or unit. Dry the patient with a towel. Put clean, dry clothing on the patient.
11. Assist the patient in returning to bed.
12. Observe all checkpoints before leaving the patient: position the patient in cor-rect body alignment, elevate the side-rails (if indicated), lower the bed to its lowest level, position the call signal and supplies within easy reach of the patient, and leave the area neat and clean.
13. Clean and replace all equipment used. Wear gloves to disinfect the tub, sitz tub, or sitz chair according to agency policy. Portable units are usually charged to the patient and kept in the patient’s unit.
14. Remove gloves. Wash hands.
15. Report and/or record all required infor-mation on the patient’s chart or the agency form; for example, date; time; sitz bath taken in sitz tub for 20 minutes, patient states she feels much better; and your signature and title. Report any unusual observations immediately.
PracticeGo to the workbook and use the evaluation sheet for 22:3E, Administering a Sitz Bath, to practice this procedure. When you believe you have mastered this skill, sign the sheet and give it to your instructor for further action.
Final Checkpoint Using the criteria listed on the evaluation sheet, your instructor will grade your performance.
FIGURE 22-37 After the patient is seated in the sitz bath, cover the patient’s legs and shoulders with a bath blanket.
30216_22_Ch22_930-968.indd 96630216_22_Ch22_930-968.indd 966 1/16/08 1:57:35 PM1/16/08 1:57:35 PM
Copyright 2009 Cengage Learning, Inc. All Rights Reserved. May not be copied, scanned, or duplicated, in whole or in part.

967Physical Therapy Skills
CHAPTER 22 SUMMARY
Physical therapy techniques are utilized by a wide variety of health care workers. Physical therapy involves using physical means to treat the patient.
Range-of-motion (ROM) exercises are done to maintain the health of the muscles and skel-etal system. They are frequently ordered for pa-tients with limited ability to move. Each joint and muscle in the body is moved through its full ROM. By following the correct procedures and using proper body mechanics, the health care worker can help the patient maintain as much mobility as possible.
Proper techniques must also be used when ambulating patients using transfer (gait) belts, crutches, canes, or walkers. By understanding the different gaits, proper ways of fi tting the devices to patients, and safety precautions, the health care worker can provide support and guidance for patients relying on these aids.
Heat and cold applications are administered for a wide variety of conditions. Careful observa-tion of temperature and condition of the skin is essential to prevent injury to the patient. Again, correct techniques must be used at all times when these applications are administered.
Physical therapy is frequently an important part of the patient’s treatment. By learning and understanding basic principles, the health care worker can help provide this part of the patient’s care.
INTERNET SEARCHESUse the suggested search engines in Chapter 12:4 of this textbook to search the Internet for addi-tional information on the following topics:
1. Organizations: research physical therapy careers, educational requirements, and duties at sites such as the American Athletic Trainer’s Association, American Physical Therapy
TODAY’S RESEARCH: TOMORROW’S HEALTH CARE
A Jacuzzi bath to treat breast cancer?Every year, more than 200,000 women are diagnosed with breast cancer. Options for
treatment include chemotherapy, radiation, and/or surgery. In addition to experiencing stress and anxiety from dealing with the cancer, women usually experience side effects such as nausea, vomiting, hair loss, and severe pain while undergoing treatment.
Scientists at Duke Comprehensive Cancer Center have developed a treatment method that is less traumatic than standard treatments. Drugs used to treat cancer are placed inside a liposome, a tiny fat bubble that creates a protective coating around the drugs. The woman receiving treatment lies on her stomach on a massage type table with an opening that allows the affected breast to rest in a pool of water. Radiofrequency energy warms the water and breast tissue, similar to a Jacuzzi bath. The chemotherapy agent is injected by an intrave-nous solution and the liposomes are drawn directly to the site of the tumor because the heat tends to make the blood vessels by the tumor much more porous. This method allows scien-tists to deliver much larger doses of chemotherapy directly to the tumor. In addition, it decreases the amount of the drug that enters the heart, nerves, liver, and other body tissues because these tissues are cooler than the warmed breast tissue. This helps prevent the nau-sea, vomiting, and hair loss that results when cancer treatment drugs invade body tissues.
Early trials have shown that this method appears to be effective in reducing, and in some cases even eliminating, breast tumors. Many women who took part in initial trials were able to have a lumpectomy (surgical removal of the tumor) instead of a mastectomy (surgical removal of the breast). Researchers are currently developing liposomes that are more heat sensitive, so treatment can be restricted to the tumor site. Additional studies are also being done with different types of breast cancers. Imagine a future when the treatment for breast cancer is not only effective but easier to tolerate.
30216_22_Ch22_930-968.indd 96730216_22_Ch22_930-968.indd 967 1/16/08 1:57:43 PM1/16/08 1:57:43 PM
Copyright 2009 Cengage Learning, Inc. All Rights Reserved. May not be copied, scanned, or duplicated, in whole or in part.

CHAPTER 22968
Association, and the American Massage Therapy Association
2. Physical therapy: research range-of-motion exercises, massage therapy, ultrasound therapy, cryotherapy, thermotherapy, and physical therapy
3. Suppliers: fi nd suppliers of physical therapy equipment to compare the different types of equipment available
REVIEW QUESTIONS
1. What are the four (4) main types of range-of-motion (ROM) exercises? How is each type performed?
2. List eight (8) different types of joint move-ments and briefl y describe each movement.
3. What are the basic rules that must be followed while measuring a patient for crutches?
4. You are ambulating a patient with a transfer belt. The patient starts to fall. What do you do?
5. Differentiate between a three-point and a two-point gait for canes.
6. What is the difference between moist heat and dry heat? Give two (2) examples for each type of application.
7. Defi ne each of the following: a. vasodilation b. vasoconstriction
8. Identify fi ve (5) safety measures or checkpoints that must be observed whenever a heat or cold application is applied to a patient.
For additional information on physical ther-apy careers, contact the following:
♦ American Physical Therapy Association111 North Fairfax StreetAlexandria, VA 22314Internet address: www.apta.org
30216_22_Ch22_930-968.indd 96830216_22_Ch22_930-968.indd 968 1/16/08 1:57:56 PM1/16/08 1:57:56 PM
Copyright 2009 Cengage Learning, Inc. All Rights Reserved. May not be copied, scanned, or duplicated, in whole or in part.