Embed Size (px)
Citation preview

CaHOH
DigitalVideoCamcorder
InstructionManual
Cam6scopenumerique
Manueld'instruction
Videocamaradigital
Manualde Instrucciones
PUB. DIM-0915-000
Z:960
¢
¢
Minilr_,'T DigitalVideoCassette

Cleaningthe VideoHeadsDigital video camcorders record video signals onto the tape in very thin lines (as thinas 1/8 the width of a hair). The following anomalies may appear if the video heads areeven slightly dirty.
* Mosaic or other blocky video artifacts (Fig. 1) or banding(Fig. 2) appear on the picture during playback.
* Sound becomes distorted, or there is no sound duringplayback.
* The message [HEADS DIRTY, USE CLEANING CASSETTE]appears.
If such symptoms appear, clean the video heads with theCanon DVM-CL Digital Video Head Cleaning Cassette* or acommercially available dry cleaning cassette.If the symptoms reappear shortly after cleaning, thevideocassette may be defective. Stop using it.* Availability differs from area to area.
Video heads may become dirty under the following conditions:
* Using the camcorder in humid or hot places.* Using cassettes with damaged or dirty tapes.* Using the camcorder in dusty places.* Using the video heads for a long time without cleaning them.
Fig. 1
Fig. 2
_ NOTES
• Before you make important recordings, clean the video heads and make a test recording
in advance, We also recommend cleaning the video heads after use, before storing thecamcorder.
• Do not use wet type cleaning cassettes as this may damage the camcorder.
• Even after cleaning the video heads you may not be able to correctly play back tapes
that were recorded with dirty video heads,
2 • Introduction

ImportantUsageInstructionsWARNING!
TO REDUCE THE RISK OF FIRE OR ELECTRIC SHOCK, DO NOT EXPOSE THISAPPARATUS TO RAIN OR MOISTURE.
For Canada only:TO REDUCE THE RISK OF ELECTRIC SHOCK, DO NOT EXPOSE THISPRODUCT TO DRIPPING OR SPLASHING.
WARNING!TO REDUCE THE RISK OF ELECTRIC SHOCK AND TO REDUCE ANNOYING
INTERFERENCE, USE THE RECOMMENDED ACCESSORIES ONLY.
COPYRIGHT WARNING:
Unauthorized recording of copyrighted materials may infringe on the rights of copyrightowners and be contrary to copyright laws.
Digital Video Camcorder, ZR960A systems
Thisdevice complies with Part 15 of the FCCRules. Operation is subject to the following two conditions: (1) This device may not causeharmful interference, and (2} this device must accept any interference received, including interferencethat maycause undesiredoperation.
Note: This equipment has been tested and found to comply with the limits for class Bdigital device, pursuant to Part 15 of the FCCRules. These limits are designed to provide reasonable protection against harmful interference in a residential installation. Thisequipment generates, uses andcan radiate radio frequency energy and, if not installed anduse in accordance with the instructions,may causeharmful interferenceto radio communications. However,there is no guaranteethat interference will not occur in a particularinstallation. If this equipmentdoes cause harmful interferenceto radio or television reception, which can be determined by turning theequipment off and on, the user is encouragedto try to correct the interference by one or moreof the following measures:• Reorientor relocate the receiving antenna.• Increase the separation between the equipment and receiver.• Connectthe equipment into an outlet on a circuit different from that to which the receiver is connected.• Consultthe dealer or an experienced radio/W technician for help.
Useof shielded cable is required to comply with classB limits in Subparf Bof Part 15 of FCCRules.Do not make any changes or modifications to the equipment unless otherwise specified in the manual.If such changes or modifications should be made,you could be required to stop operation of the equipment.
CanonU.S.A., Inc.OneCanon Plaza,Lake Success, NY11042, U.S.A.Tel No.(516)328-5600
TheMains plug is used as the disconnectdevice. The Mains plug shall remain readily operableto disconnecttheplug in case of an accident.
Important Warning
CAUTION:
TO REDUCE THE RISK OF ELECTRIC
SHOCK, DO NOT REMOVE COVER (OR
BACK). NO USER-SERVICEABLE PARTS
INSIDE. REFER SERVICING TO QUALIFIED
SERVICE PERSONNEL.
The lightning flash with arrowhead symbol,within an equilateral triangle, is intended toalert the user to the presence of uninsulated"dangerous voltage" within the product'senclosure, that may be of sufficient magnitudeto constitute a risk of electric shock to
persons.
The exclamation point, within an equilateraltriangle, is intended to alert the user to thepresence of important operating andmaintenance (servicing) instructions in theliterature accompanying the product.
Introduction • 3

In these safety instructions theword "apparatus" or"product" refers to the CanonDigital VideoCamcorderZR960A and all its accessories.
1 Readthese instructions.
2 Keeptheseinstructions.
3 Heedallwarnings.
4 Followall instructions.
5 Do not usethis apparatus near water.
6 Cleanonlywith dry cloth.
7 Do not install near any heatsources such asradiators, heat registers, stoves, or otherapparatus (includingamplifiers) that produceheat.
8 Protect the power cordfrom beingwalked onorpinched particularly at plugs, conveniencereceptacles,and the point where they exit fromthe apparatus.
9 Unplug this apparatusduring lightning storms orwhen unusedfor long periodsof time.
10 Readinstructions--All the safety and operatinginstructions should be read beforethe product isoperated.
11 Retain instructions -- The safety and operatinginstructions shouldbe retained for futurereference.
12 HeedWarnings--All warnings onthe productand in the operatinginstructions should beadheredto.
13 Followinstructions --All operating andmaintenanceinstructions should befollowed.
1 4 Cleaning-- Unplugthis product from the walloutlet before cleaning. Do not use liquid oraerosolcleaners.The product should be cleanedonly as recommendedin this manual.
1 5 Avoid magneticor electric fields -- Do not usethe camera close to TVtransmitters, portablecommunicationdevices or othersources ofelectric or magneticradiation. They maycausepicture interference,or permanently damagethecamera.
1 6 Water and Moisture -- Hazardof electric shock
-- Donot use this product near water or in rainy/moist situations.
1 7 Placingor Moving-- Donotplaceon an unstablecart, stand, tripod, bracket or table. The productmayfall, causing serious injury to achild or adult,and serious damageto the product. A productand cart combination shouldbe movedwith care.Quickstops, excessiveforce, and unevensurfaces maycause the product and cartcombinationto overturn.
18 Power Sources-- Theproduct should beoperated only from thetype of powersourceindicated on the marking label. Ifyou are notsureof the type of power supply to your home, consultyour product dealeror local powercompany.Regardingother power sources such asbatterypower, refer to instructions inthis manual.
19 Overloading-- Do not overloadwall outletsandextension cordsas this can result in a risk of fireor electric shock.
20 Objectsand Liquid Entry -- Never push objectsof any kind into this product through openingsasthey maytouch dangerousvoltage points orshortout parts that could result in afire orelectricshock. Becareful not to spill liquid of any kindonto the product.
21 Servicing -- Donot attempt to service thisproduct yourself asopeningor removing coversmay exposeyouto dangerousvoltageor otherhazards. Referall servicing to qualified servicepersonnel.
22 Power Sources-- The0A-590 CompactPowerAdapter should beoperated only from thetype ofpower source indicated on the marking label. Ifyou are not sure of the type of power supply toyour home, consult your product dealeror localpower company. Regardingother powersourcessuch asbattery power, refer to instructions in thismanual.
23 Lightning-- For added protectionof this product
during a lightning storm, or when it is leftunattended and unused for longperiods of time,disconnect it from the wall outlet and disconnect
the antenna.Thiswill prevent damage to theproduct due to lightning and power-line surges.
24 Damage RequiringService-- Disconnectthis
product from the wall outlet and all powersources including battery, and refer servicing toqualified service personnelunder the followingconditions:
a. When the plug is damaged.b. If any liquid has beenspilled onto,or objects
have fallen into, the product.c. If the product has beenexposedto rain or
water.
d. Ifthe product does not operatenormally evenif you follow the operating instructions. Adjustonly those controls that are coveredbytheoperationinstructions. Improper adjustmentofother controls may result in damage and willoften requireextensivework by aqualifiedtechnician to restore the product to its normaloperation.
4 • Introduction

e. If the product has beendroppedor thecabinethas beendamaged.
f. Whenthe product exhibits adistinct change inperformance.This indicates a needforservice.
25 ReplacementParts-- When replacementpartsare required, be sure the service technician hasused replacement parts that are specified byCanonor that have the same characteristicsas
the original part. Unauthorizedsubstitutions mayresult in fire, electric shock or other hazards.
26 Safety Check -- Uponcompletion of any serviceor repairs to this product, ask the servicetechnician to perform safety checks to determinethat the product is in safe operating order.
Whenreplacement of the power supply isrequired, pleasereturn it to the responsiblenearest CanonService Centerand please replaceit with the sametype number 0A-590.
Theadapter can be used with a power supply between 100 and 240 V AC. Forareas where 120 V ACpower is notused,you will needa special plug adapter.Contact your nearest CanonService Center for further information.Theadapter is not intended to be serviced. Shouldthe product cease to function in its intended manner,it should bereturnedto the manufactureror be discarded.
ThisClass B digital apparatus complies with CanadianICES-003. J
Introduction ,, 5

Tableof contents
Introduction9 About this Manual
10 Getting to Know the Camcorder10 Supplied Accessories11 Names of Parts
13 Screen Displays
Preparations15 Getting Started15 Charging the Battery Pack17 Installing the Backup Battery17 Preparing the Accessories
18 Basic Operation of the Camcorder18 Joystick and Joystick Guide
18 Using the Menus
19 First Time Settings19 Changing the Language20 Changing the Time Zone20 Setting the Date and Time
20 Getting Ready to Start Recording20 Opening the Lens Cover and Adjusting the LCD Screen21 Inserting and Removing a Tape
Video
23 Basic Recording23 Shooting Video
24 Changing the Aspect Ratio of the Recordings 0Nidescreen / 4:3)25 Zooming: Optical, Advanced and Digital Zoom25 Quick Start Function
26 Reviewing the Last Scene Recorded
27 Basic Playback27 Playing Back Video
28 Locating the End of the Last Scene28 On-Screen Displays (Data Code)
6 • Table of contents
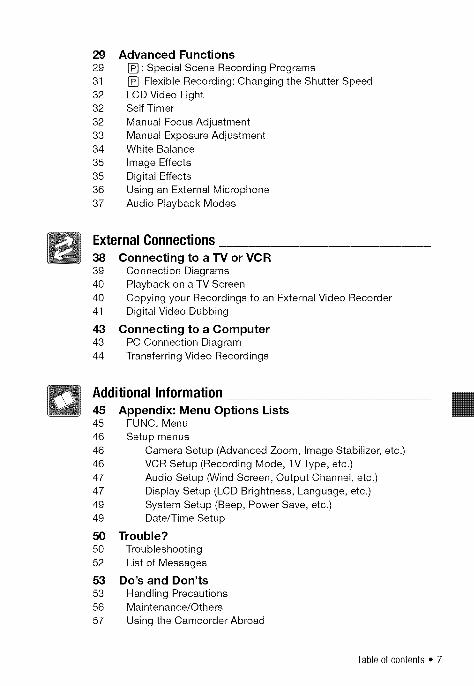
29 Advanced Functions
29 [] : Special Scene Recording Programs31 [] Flexible Recording: Changing the Shutter Speed
32 LCD Video Light32 Self Timer
32 Manual Focus Adjustment33 Manual Exposure Adjustment34 White Balance
35 Image Effects35 Digital Effects36 Using an External Microphone37 Audio Playback Modes
External Connections
38 Connecting to a TV or VCR39 Connection Diagrams40 Playback on a TV Screen40 Copying your Recordings to an External Video Recorder41 Digital Video Dubbing
43 Connecting to a Computer43 PC Connection Diagram44 Transferring Video Recordings
Additional Information
45 Appendix: Menu Options Lists45 FUNC. Menu
46 Setup menus46 Camera Setup (Advanced Zoom, Image Stabilizer, etc.)46 VCR Setup (Recording Mode, TV Type, etc.)47 Audio Setup (Wind Screen, Output Channel, etc.)47 Display Setup (LCD Brightness, Language, etc.)
49 System Setup (Beep, Power Save, etc.)49 Date/Time Setup
50 Trouble?
50 Troubleshooting52 List of Messages
53 Do's and Don'ts
53 Handling Precautions56 Maintenance/Others
57 Using the Camcorder Abroad
Tableof contents • 7

58 General Information
58 System Diagram59 Optional Accessories62 Product Codes
63 Specifications65 Index
8 • Table of contents

ThankyouforpurchasingtheCanonZR960.Pleasereadthismanualcarefullybeforeyouusethecamcorderandretainitforfuturereference.Shouldyourcamcorderfailtooperatecorrectly,refertoTroubleshooting (C1350).
Conventions Used in this Manual• O IMPORTANT: Precautions related to the camcorder's operation.• (_) NOTES: Additional topics that complement the basic operating procedures.• _ POINTS TO CHECK: Restrictions that apply if the function described is not
available in all operating modes (the operating mode to which the camcordershould be set, etc.).
• _ : Reference page number.• "Screen" refers to the LCD and the viewfinder screen.
• The terms "photo" and "still image" are used interchangeably with the samemeaning.
• The photos included in the manual are simulated pictures taken with a still camera.
The camcorder's operating mode is determined by the
switch. In this manual, indicates that afunction is available and : indicates that thefunction is not available.
Brackets [] are used to refer to menu options and other
displays, exactly as they appear on the screen.
Names of buttons and switches other than the joystickare indicated within a "button" frame.
For example #Jf_Cii"
_1: Special Scene Recording Programs
Reootding in a very bright ,_ki resort or
capturing the full colors of a surlset or a
fireworks display beoomes as easy as
............................ e recording
progfatY For details ab ul the availab]e
options, refer to the sid bar on
page 33
Mode 8witoh:
_©
In this manual, the O arrow is usedto abbreviate menu selections. For a
detailed explanation refer to Usingthe Menus ([._._ 18).
Introduction • 9

SuppliedAccessories
CA-590ComoactPowerAdaoter" BP-2L5 Battery _ack
uTnlum Button Battery _ STV-250N Stereo Video
CRt 616_ _ Cable
* CA-590E including power cord, in Asia.
Online product registration for USA Customers only.
Register your product online at www.registercanon.com
Protect your productWe will keep the model number and date of purchase of your new Canon product on file to help you
refer to this information in the event of an insurance claim such as loss or theft.
Receive information on new products and promotions
Upon your request, we will send you information on Canon new products and promotions.
Theserialnumberof this productcanbefoundat the batteryattachmentunitof the camcorder.Writedownthe numberandother informationhereand retainthis bookasa permanentrecordof yourpurchaseto aididentificationincaseof theft.Dateof Purchase: ModelName:ZR960APurchasedFrom: SerialNo.:DealerAddress:Deaer PhoneNo.:
10 • Introduction

Left side view _} Lens cover switch ([_ 23)
((_ open, @ closed)
{2_Speaker ([-Z..]27)
_ CHG (charge) indicator (C@ 15)
@} DV terminal ([Z.] 39, 43)
{5_MIC (microphone) terminal (red) (L_ 36)
@}AV terminal (C[:3 39)
_7}Lock button
{8_ _ switch
6} Mode switch (EZ3 24)
Easy recording[] Recording programs
_0_Grip belt ([._ 17)
_1_Stereo microphone
Right side view
@@@@
Frontview
@
Introduction° 11
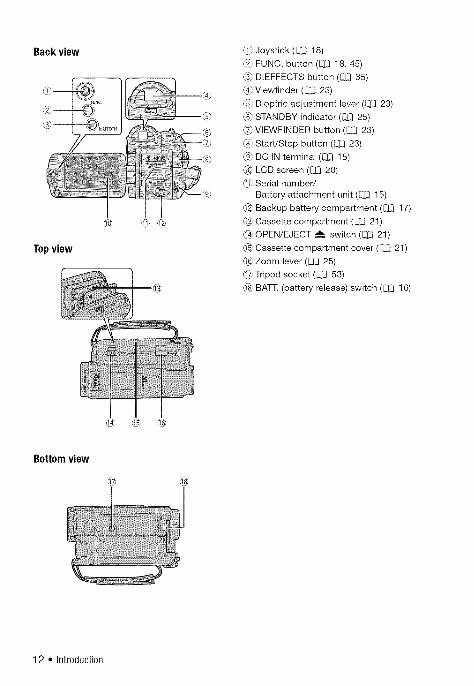
Back view
Topview
@ @@
0_ Joystick (C'_ 18)
_2_FUNC. button (_ 18, 45)
(3_D.EFFECTS button (CL] 35)
(4_Viewfinder (_ 23)
_ Dioptric adjustment lever (_ 23)
(67STANDBY indicator (L,_ 25)
(7_VlEWFINDER button (C_ 23)
_ Start/Stop button (C[_ 23)
(9_DC IN terminal (E_ 15)
_ LCD screen ([Z3 20)
_# Serial number/
Battery attachment unit (L,_l 15)
_ Backup battery compartment (C[_ 17)
&_ Cassette compartment (C]_J21)
_4_OPEN/EJECT A switch (LT] 21)
_ Cassette compartment cover (C[3 21)
@ Zoom lever (CC) 25)
_ Tripod socket (C'_ 53)
_8_BATT. (battery release) switch (CJ_316)
Bottomview
@
12 • Introduction
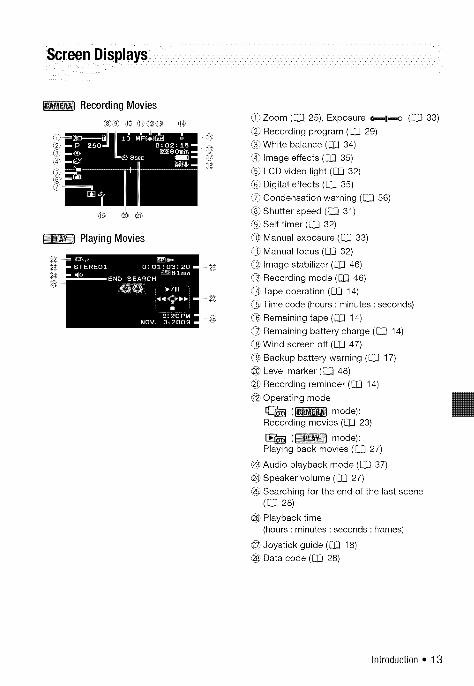
RecordingMovies
PlayingMovies
@®
®
(0 Zoom (C[3 25), Exposure o_ll_o (C[3 33)
C2_Recording program ([._ 29)
@ White balance (G1 34)
_) Image effects (i_ 35)
C5_LCD video light (CC] 32)
_6) Digital effects (L_ 35)
_ Condensation warning (CC] 56)
_8_Shutter speed (_ 31)
@ Self timer (C_[.332)
_ Manual exposure (_ 33)
_ Manual focus (_ 32)
_ Image stabilizer (L_ 46)
_ Recording mode ([_ 46)
_Tape operation (L._ 14)
_ Time code (hours : minutes : seconds)
_6_Remaining tape (E]_J14)
_ Remaining battery charge (_ 14)
@ Wind screen off ([_ 47)
_ Backup battery warning (C_ 17)
_0_Level marker (C]_148)
_ Recording reminder (_ 14)
___Operating mode
( mode):Recording movies (C]_] 23)
[]E_ ( mode):Playing back movies (C[3 27)
_ Audio playback mode (i_J 37)
@ Speaker volume (_ 27)
@ Searching for the end of the last scene
(L_ 28)
_.6_Playback time
(hours : minutes : seconds : frames)
@1_Joystick guide ([.'_.-118)
_8_Data code (L_ 28)
introduction • 13

14• Introduction

PreparationsThis chapter describes basic operations, such as navigating themenus, and first time settings to help you learn more about yourcamcorder.
Getting Started
Chargingthe BatteryPack
The camcorder can be powered with abattery pack or directly using thecompact power adapter. Charge thebattery pack before use.For approximate charging times andrecording/playback times with a fullbattery pack, refer to the tables onpages 59, 60.
Remove the batteryterminal cover before
attaching the battery
1 Plug the compact power adapterinto a power outlet.
Depending on the region ofpurchase, a power cord for thecompact power adapter may havebeen supplied as well. In that case,connect the power cord to thecompact power adapter beforeplugging it into the power outlet.
2 Connect the compact poweradapter to the camcorder's DC INterminal.
CHG (charge) indicator
DC IN terminal 3 Attach the battery pack to thecamcorder.
Press the battery pack lightly andslide it up until it clicks.
4 Charging will start when theswitch is turned to _ (CHG).
The CHG (charge) indicator startsflashing. The indicator goes outwhen charging is completed.
Preparations• 15

!iiilT0"E°0VE'HE"A"E"'PACK
BATT. switch
1 Slide _BATI_ in the direction of thearrow and hold it pressed down.
2 Slide the battery pack down andthen pull it out
0 II_IPORTANT
• We recommend charging the battery
pack in temperatures between 10 °C
and 30 °C (50 °F and 86 °F). Outside the
temperature range of 0 °C to 40 °C
(32 °F to 104 °F), charging will not start.• Do not connect to the camcorder's DC
IN terminal or to the compact power
adapter any electrical equipment that is
not expressly recommended for usewith this camcorder.
• To prevent equipment breakdowns and
excessive heating, do not connect the
supplied compact power adapter to
voltage converters for overseas travels
or special power sources such as those
on aircraft and ships, DC-AC inverters,etc.
• The battery pack will be charged onlywhen the camcorder is off.
• If remaining battery time is an issue, you
can power the camcorder using the
compact power adapter so the battery
pack will not be consumed.
• The CHG (charge) indicator also serves
as a rough estimate of the battery
charge status.
Two quick flashes at 1-second intervals:
Battery pack at least 50% charged. If
the indicator flashes quickly but not
exactly in this pattern, refer to
Troubleshooting (L_ 50).
One flash at 1-second intervals: Battery
pack less than 50% charged.
• Charged battery packs continue to
discharge naturally. Therefore, charge
them on the day of use, or the day
before, to ensure a full charge.
• We recommend that you prepare battery
packs 2 to 3 times longer than you think
you might need.
• USAand 0anada 0nly: TheLithium ion/polymer battery
that powers the product is
recyclable. Please call1-800-8-BA]q-ERY for
information on how to recycle this battery.
16 • Preparations

I
Installingthe BackupBattery Preparing theAccessories
The backup battery (CR1616 lithium
button battery) allows the camcorder to
retain the date, time (CCJ20) and other
camcorder settings while the power
source is disconnected. Connect a power
source to the camcorder when replacing
the backup battery to retain the settings.
1 Remove the battery pack, if one isattached.
2 Open the backup battery cover.
3 Insert the backup battery with the+ side facing out.
+(L........J
4 Close the cover.
The battery life of the backup battery is
about one year. _'t7 flashes in red when
the lithium button battery is not installed,
or when it needs to be replaced.
Fasten the grip belt.
Adjust the grip belt so that you canreach the zoom lever with your indexfinger, and the 'S{art/Stopl button withyour thumb.
I To ATTACHA SHOULDERSTRAP
Pass the ends of the optionalshoulder strap through the strapmount on the grip belt and adjust thelength of the strap.
Preparations• 17

Camc0rder
Joystick andJoystick Guide
Use the joystick to operate thecamcorder's menus.
Push the joystick up, down, left
or right ( _ky, 411_- ) to select an
item or change settings.
Press the joystick itself ( @ ) tosave the settings or confirm anaction. On menu screens, this is
indicated by the icon _.
Press _ to display/hide the joystickguide (when recording, the joystickguide will appear only when the modeswitch is set to [_). The functions thatappear on the joystick guide willchange depending on the operatingmode.
Usingthe Menus
Many of the camcorder's functions canbe adjusted from the menus that openafter pressing iFUNC.i.
For details about the available menu
options and settings, refer to theappendix Menu Options Lists (CL345).
Selecting an Option from the FUNC. Menu
S_2_j-
1 Press _.
2 Select (AY) the icon of thefunction you want to change fromthe left side column.
Menu items not available will appeargrayed out.
3 Select (41_) the desired settingfrom the available options at thebottom bar.
* The selected option will behighlighted in light blue.
• With some settings you will needto make further selections and/or
press _. Follow the additionaloperation guides that will appearon the screen (such as the joystickicon _, small arrows, etc.).
4 Press _ to save the settingsand close the menu.
You can press '._Nc- to close themenu at any time.
18 • Preparations
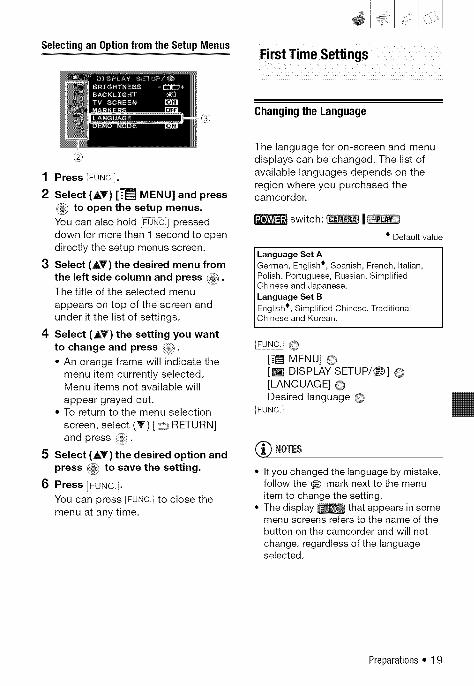
Selecting an Optionfrom the Setup Menus
1 Press FUN©:/.
2 Select (AT) [.=_ MENU] and press
_ to open the setup menus.You can also hold '_Ofi_J presseddown for more than 1 second to opendirectly the setup menus screen,
3 Select (AV) the desired menu from
the left side column and press _.The title of the selected menu
appears on top of the screen andunder it the list of settings.
4 Select (AV) the setting you want
to change and press _.* An orange frame will indicate the
menu item currently selected.Menu items not available will
appear grayed out.* To return to the menu selection
screen, select (Y) [ _i_RETURN]and press _.
5 Select (AV) the desired option and
press _ to save the setting.
6 Press _.
You can press [F_:i to close themenu at any time.
Changingthe Language
The language for on-screen and menudisplays can be changed. The list ofavailable languages depends on theregion where you purchased thecamcorder.
switch: _ I
• Default value
Language Set A
German, English • , Spanish, French, Italian,
Polish, Portuguese, Russian, SimplifiedChinese and Japanese.
Language Set B
English • , Simplified Chinese, TraditionalChinese and Korean.
_0_c ©[.--'_ MENU] ©[_ DISPLAY SETUP/_] ©[LANGUAGE] ©Desired language ©
_NC:
• If you changed the language by mistake,
follow the _) mark next to the menu
item to change the setting.
• The display _ that appears in somemenu screens refers to the name of the
button on the camcorder and will not
change, regardless of the languageselected.
Preparations• 19

ChangingtheTime Zone
Change the time zone to match yourlocation. The default setting is NewYork or Singapore, depending on theregion of purchase.
switch: _ I
LF?UN_.)©[T_ MENU] ©[_ DATE/TIME SETUP] O[T.ZO NE/DSTJ ©Desired time zone* ©
[FUNC.j
* Toadjust for daylight saving time, select thearea name marked with a "€'-.
Settingthe DateandTime
switch: _ I
1 Open the date and time setupscreen.
i_)N_i © [--'_ MENU] O[@ DATE/TIME SETUP] ©[DATE/TIME]Blinking arrows will be displayedaround the first field of the date.
2 Change each field of the date andtime with the joystick (_,Y) andmove (1_) to the next field.
3 Press _ to start the clock.
4 Press _ to close the menu.
"i_ NOTES
You can also change the date format
(C]_J49).
GettingReadyto StartRecording
Openingthe Lens Coverand Adjustingthe LCDScreen
Before you start recording, open thelens cover.
Move the lens cover switch down to
(_ to open the lens cover.
Rotating the LCD Panel
Open the LCD panel 90 degrees.You can rotate the panel 90 degreesdownward.
180 °
90 °
You can rotate the panel 180 degreestoward the lens (allowing the subject tomonitor the LCD screen while you usethe viewfinder (EZ323)). Rotating theLCD panel 180 degrees can be usefulalso when you wish to include yourselfin the picture when recording with theself timer.
20 ° Preparations

I
Subject can monitor theLCD screen
About the LCD and viewfinder screen: The
screens are produced using extremely
high-precision manufacturing techniques,
with more than 99.99% of the pixels
operating to specification, Less than
0.01% of the pixels may occasionally
misfire or appear as black, red, blue or
green dots. This has no effect on the
recorded image and does not constitute amalfunction.
LCD Backlight
You can set the brightness of the LCDscreen to normal or bright.
switch: _ I
!FUNCi C)
[.-_ MENU] O
[! DISPLAY SETUP/S] 0
[BACKLIGHTJ 0 Desired option 0
FUNC]
• This setting does not affect the
brightness of the recordings or theviewfinder screen.
• Using the [BRIGHT] setting will shorten
the effective usage time of the battery
pack.
Insertingand Removinga Tape
Use only videocassettes marked withthe M,,,,_.logo.
,3
1 Slide OPEN/EJECT_" fully in the
direction of the arrow and open
the cassette compartment cover.
The cassette compartment opens
automatically.
2 Insert the cassette.
• Insert the cassette with the window
facing the grip belt.
• To remove a cassette pull it straight
out.
Preparations• 21

3 Press the _ mark on the
cassette compartment until itclicks.
4 Wait for the cassette compartment
to retract automatically and close
the cassette compartment cover.
0 II_IPOBTANT
• Do not interfere with the cassette
compartment while it is opening or
closing automatically, or attempt toclose the cover before the cassette
compartment has fully retracted.• Be careful not to get your fingers caught
in the cassette compartment cover.
If the camcorder is connected to a powersource, cassettes can be inserted/
removed even if the _ switch is setto _ (CHG).
22 ° Preparations

A
VideoThis chapter covers functions related to shooting and playing backmovies - from basic recording and zooming to more advanced manualpicture adjustments.
3 Press _ to beginrecording.
Press _J again to pause therecording.
ShootingVideo
Before You Begin Recording
Make a test recording first to check if the
camcorder operates correctly. If
necessary, clean the video heads (CZ32).
switch: _ I_ili!ii_
1 Move the lens cover switch down
to (_ to open the lens cover.
2 Holding the lock button pressed
down, set the _ switch to
CAMERA.
WHENYOUHAVEFINISHEDRECORDING
1 Close the lens cover and the LCD
panel.2 Turn off the camcorder.
3 Remove the tape.
4 Disconnect the power source andremove the battery pack.
Using the Viewfinder
When recording in bright places it
may be difficult to use the LCD
screen. In such case. change the
brightness of the LCD screen
(C[_ 21,48) or use the viewfinder
instead. Press j to
activate the viewfinder along with the
LCD panel. Close the LCD panel to
use only the viewfinder.
Adjust the viewfinder as necessarywith the dioptric adjustment lever.
Video * 23

(_NOTES
• About the recording time: By changing the
recording mode you can change the
video quality and as a result, also theavailable recording time (L_ 46).
• Previous recordings overwritten by a
new recording cannot be recovered.
Before you start recording, search forthe end of the last recording (L_ 28).
• To protect the tape and video heads, thecamcorder will enter the stop mode (m)
if _eft in record pause (Q ||) mode for4 minutes 30 seconds. To resume
recording press _.• About the Power Save mode: If [POWER
SAVE] is set to [E_I ON] (Ci_ 49), thecamcorder will shut off automatically to
save power when it is powered by a
battery pack and is left without any
operation for 5 minutes. To restore the
power, turn the camcorder off and then
on again.
• When recording in very loud places
(such as fireworks shows or concerts),
sound may become distorted or it maynot be recorded at the actual levels. This
is not a malfunction.
ChangingtheAspectRatiooftheRecordings(Widescreen/ 4:3)
The default aspect ratio of movies is16:9 (widescreen). Follow the procedurebelow to change it to 4:3.
switch: _ I
_O[TI_ MENU] ©
[_ CAMERA SETUP] O
[WIDESCREEN] © [_ OFF] O
(_ NOTES
• Playing back a widescreen recording: TV
sets compatible with the Video ID-1
system will switch automatically to 16:9mode. Otherwise, change the aspect
ratio of the TV manually.
• To play back on a TV with normal aspect
ratio (4:3) change the [TV TYPE] setting
accordingly (CC] 47).
Aboutthe mode switch and recording programsSet the mode switch to _ to let thecamcorder adjust all the sett ngs for you,allowing you to just point the camcorder andstart shooting.
Set the mode switch to [] to select one of the recording programs.
The Special Scene record ng programs (L_ 29) offer a convenient , ,_way to select the optimal settings to match special recording @conditions. The [P PROGRAM AE] recording program (LZ331), onthe other hand, allows you to set the shutter speed manually and
enjoy the f ex b ty to change other sett ngs.
24 " Video

Zooming:Optical, Advancedand DigitalZoom
UsingtheZoom
;_ii!_iiii!ii!;!i_i;iii¸i¸¸¸I_ ;i;iiiii!!ilIi ¸I¸¸¸¸¸¸¸SI
The camcorder offers three types ofzoom: optical, advanced and digitalzoom. You can also change the zoomspeed.
switch: _ I_i!!_i;i!_i!_
SelectingtheZoomType
Options • Default value
Thezoomrangeis limitedto the opticalmagnificationratioofthe lens.
When recording movies with a 16:9 aspect ratio,
in addition to the optical zoom range, the
camcorder processes the image digitally to
obtain a larger zoom range without any
deterioration in image quality. Note that the angle
of view will be wider at both full telephoto and
full wide-angle.
Whenthis optionis selected,the camcorderwillswitchto digitalzoom(lightblueareaon thezoomindicator)whenyouzoomin beyondtheopticalzoomrange(whiteareaon thezoomindicator).Withthe digitalzoom,the imageisprocesseddigitallyso imagequalitywilldeterioratethe moreyouzoomin.
FUN©-/ _
[_ MENU] O[t_ CAMERA SETUP] O[ZOOM TYPE] O Desired option O
"_ NOTES
The advanced zoom cannot be selected if[WIDESCREEN] is set to [_ OFF].
WZoom out
0w-'r Zoom in
Move the zoom lever toward W tozoom out (wide-angle). Move ittoward T to zoom in (telephoto).
Press gently for slower zooms; pressharder for faster zooms. You can also
set [ZOOM SPEED] (EC!46) to one ofthree constant speeds (3 is the fastest,1 the slowest).
_) NOTES
• Keep at least 1 m (3.3 ft.) to the subject.
At full wide-angle, you can focus on a
subject as close as 1 cm (0.39 in.).
• When [ZOOM SPEED] is set to [_
VARIABLE], the zoom speed will be
faster in record pause mode than when
actually recording.
Quick Start Function
When you close the LCD panel inmode, the camcorder enters
the standby mode. In standby mode thecamcorder consumes only about halfthe power used when recording, savingenergy when you are using a batterypack. Additionally, when you open theLCD panel, the camcorder is ready tostart recording in approximately 1
Video • 25

second*,ensuringyoudonotmissimportantshootingopportunities.*Theactualtimerequiredvariesdependingontheshootingconditions.
switch:_ I1 Withthecamcorderon,closethe
LCDpanel., Ifyouareusingtheviewfinderand
theLCDpanelisclosed,press<ViEWFiNDER i to enter the standbymode.
, A beep will sound and the orangeSTANDBY indicator will turn on toindicate the camcorder entered
standby mode.
2 When you wish to resume
recording, open the LCD panel., STANDBY indicator goes out and
the camcorder is ready to record.° You can also press i_iE_;i#!_ii_E_to
resume recording using theviewfinder with the LCD panelclosed.
IMPORTANT
Do not disconnect the power source while
the camcorder is in standby mode
(STANDBY indicator is lit in orange).
• If you close the LCD panel under some
circumstances (for example, while a
menu is being displayed), the
camcorder may not enter standby
mode. Check that the orange STANDBYindicator turns on.
• The camcorder will shut off if left in
standby mode for 10 minutes,
regardless of the [POWER SAVE] setting
(Ci3 49). To restore the power if the
camcorder shut off, turn the camcorder
off and then on again.
• You can select the length of time untilshut-off or turn off the Quick Start
function altogether with the [QUICK
START] setting (L:]2149).
• Opening the cassette compartment
cover while the camcorder is in standby
mode will reactivate the camcorder.
Reviewingthe LastScene Recorded
switch: _ I
qJ
1 Set the mode switch to [].
2 Press _ to display the joystickguide,
3 Push the joystick (4) momentarilytoward _ and release it,
° The camcorder will play back a fewseconds of the last recording madeand return to record pause mode.
° You can also hold the joystickpressed down (4) toward _ or(_) toward _ to play back the tape(backward or forward respectively) inorder to locate the point where youwant to start recording.
26 ',Video

Playing BackVideo
switch: ili!iiiii!iiii_i!i!_iiii!!ii!il
1 Holding the lock button presseddown, set the F_ switch toPLAY.
2 Press _ to display the joystickguide.
3 Locate the point where you wantto begin the playback.Push the joystick (4) toward 414 torewind the tape or (_) towardto fast forward.
4 Push the joystick (&) toward _/| |to begin the playback.
• Push the joystick ( A ) toward_/|| again to pause the playback.
° Push the joystick (Y) toward m tostop the playback.
i To ADJUSTTHEVOLUME
During the playback of a scene:
[l_>))SPEAKER VOLUME] OAdjust (_) the volume O
i#o_.
I FASTPLAYBACK
Press _ to display the joystick guide.Push the joystick (4) toward _1 or(_) toward _, and hold it presseddown to play back while rewinding orfast forwarding the tape, respectively.During fast playback you may noticesome anomalies (blocky video,artifacts, banding, etc.) in the playbackpicture.
_'_ NOTES
• You can display the date and time of therecording (1::_28).
• To protect the tape and video heads, thecamcorder will enter the stop mode (111)if left in playback pause (_ Ill) mode for4 minutes 30 seconds. To resume the
playback push the joystick (A) toward1_/11|.
• Sound from the speaker will be mutedwhen the LCD panel is closed in orderto use the viewfinder for playback.
Video',27

Locating the Endof theLast Scene On-Screen Displays(DataCode)
After playing back a tape, use thisfunction to locate the end of the lastscene recorded in order to continue
recording from that point.
switch: I
_ PO(NTSTOCHECK
Stop the playback before using thisfunction.
_O[_,|END SEARCH] O [EXECUTE]
• [END SEARCH] appears.• The camcorder rewinds/fast forwards
the tape, plays back the last fewseconds of the recording and stopsthe tape.
• To cancel the end search push thejoystick (Y) toward II.
• End search cannot be used once youremove the cassette.
• If there are blank sections between
recordings, the end search may not
work correctly.
The camcorder keeps a data codecontaining the date and time ofrecording. You can select the data to bedisplayed.
switch: I
Options * Default value
No data code display.
Displaysthedateor timewhenthescenewasrecorded.
Displays both the date and time of the recording.
iFUNCi C_
[--_1_MENU] O[_ DISPLAY SETUP/(_)] O[DATA CODE] O Desired option O
iFUNC:
28 ° Video

Advanced Functions
[]: SpecialSceneRecordingPrograms
Recording in a very bright ski resort orcapturing the full colors of a sunset or afireworks display becomes as easy asselecting a Special Scene recordingprogram. For details about the availableoptions, refer to the sidebar onpage 30.
switch: _ : ,
_!_;iii:!il!;!i_i_iii¸i¸¸¸I_ ;;;i;:i?I;i ¸¸¸I¸¸¸¸¸¸¸I
- Autofocus may not work as well as in
other modes. In such case, adjust the
focus manually.
• [[]SNOW]/[[] BEACH]
- The subject may become
overexposed on cloudy days or inshaded places. Check the image on
the screen.
• [[]FIREWORKS]
- To avoid camcorder blur (blur due to
the camcorder moving), werecommend using a tripod.
Mode switch: []
FUNC-/ _
[P PROGRAM AE] O
Desired recording program O
FUNC./
• DO not set the mode switch to
during the actual recording of a scene;
the brightness of the picture may
change abruptly.
• [[] PORTRAIT]/[[] SPORTS]/
[_'_ BEACH]/[_'_ SNOW]
- The picture may not appear smooth
during playback.
• [El PORTRAIT]
- The blur effect of the background
increases the more you zoom in (1").
• [[] NIGHT]
- Moving subjects may leave a trailing
afterimage.
- Picture quality may not be as good asin other modes,
- White points may appear on thescreen.
Video • 29
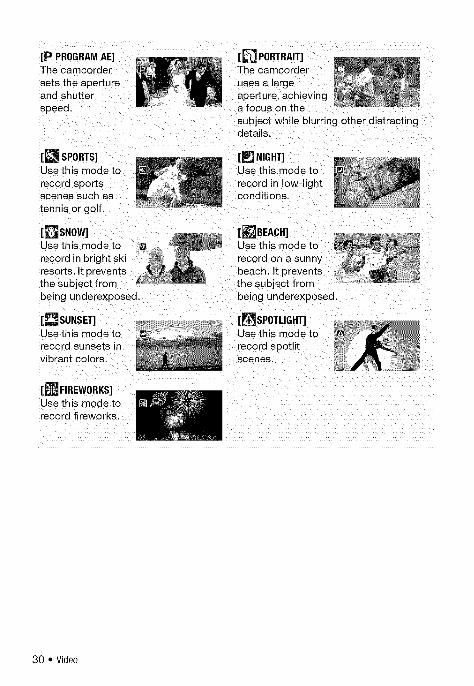
[P PROGRAMAE]The camcorder
sets the apertureand shutterspeed.
[_:e_SPORTS]Use this mode to
record sportsscenes such as
tennis or golf.
[[_ PORTRAIT]The camcorder
uses a largeaperture, achievinga focus on the
subject while blurring other distractingdetails.
[L_ NIGHT]Use this mode to
record in low-lightconditions.
[_SNOW] [_'_BEACH]Use this mode to mode to
record on a sunnyresorts. It prevents beach. It preventsthe subject from the subject frombeing underexposed, being underexposed.
[_SUNSET] [L_sPOTLIGHT]Use this mode to Use this mode to
record sunsets in record spotlitvibrant colors, scenes.
[_ FIREWORKS]Use this mode torecord fireworks.
30 • Video

[] FlexibleRecording:ChangingtheShutterSpeed
Use the automatic exposure (AE)program to use functions like the whitebalance or image effects, or to selectthe shutter speed.Use faster shutter speeds to recordsubjects moving quickly. Use slowershutter speeds to add motion blur,emphasizing the feel of movement.
switch: _ I_
Mode switch: []
1 Press/FuNClI/.2 Select the [P PROGRAM AE]
recording program (_ 29).
[P PROGRAM AE] is the default
value; proceed directly to step 3 if
you have not changed the recording
program.
3 Select the shutter speed from the
setup menus.
[FUNc O [.-7_ MENU] O
[I_ CAMERA SETUP] O
[SHUTTER] O Desired shutter
speed © [FUNC:
Shutter speed guidelines
Note that on screen only the
denominator is displayed - [P 250]
indicates a shutter speed of 1/250
second, etc.
To record from within a moving car or train or to
shoot fast-moving subjects such as roller
coasters.
Torecordoutdoorsportssceneson sunnydays.
_'_ NOTES
• Do not set the mode switch to
during the actual recording of a scene;the brightness of the picture may
change abruptly.• [P PROGRAM AE]
- When setting the shutter speed, thenumber displayed will flash if the value
selected is not appropriate for therecording conditions. In such case,
select a different value.
- If you use a slow shutter speed in dark
places, you can obtain a brighterimage, but the image quality may be
lower, and the autofocus may not workwell.
- The image may flicker when recordingwith high shutter speeds.
- Recording movies under fluorescent lights:
If the screen starts to flicker, select
[P PROGRAM AE] and set the shutterspeed to 1/100.
- The shutter speed resets to [IBI AUTO]when you set the mode switch to
or change the recording program.
To record under most ordinary conditions.
To record indoor sports scenes.
Video • 31

LCDVideoLight Self Timer
You can use the brightness of the LCDscreen (LCD video light) to record incompletely dark places. For a brighterpicture, we recommend keeping adistance of about 20 cm - 60 cm (8 in. -2 ft.) from the subject and/or using the[L_ NIGH3] recording program.
switch: _ I :
1 Turn on the LCD video light.
[_ LCD LIGHT OFF] 0
[_ LOD LIGHT ON] 0Press _ Q
2 Rotate the LCD panel toward thelens and point it in the direction ofthe subject.
3 Press IVIEWF!ND_RJ to turn on theviewfinder.
Use the viewfinder to continuerecording.
!iiilT0,0..0FF,.E,C0v.0E0,.0,,1 Using the viewfinder, repeat step 1
above, selecting [_ LCD LIGHTOFF] instead.Closing the LCD panel will also turnoff the LCD video light.
2 Press IVIEWFINDERJ to turn off theviewfinder's display.
switch: _ I
1 Activate the self timer.
',_O_c: 0 [_ MENU] O[_ CAMERA SETUP] O[SELETIMER] O [r_P_ ON Q]
2 Press _ to close the menu.
_.Pappears.
3 Press _i!_?!!_!_:1_1to start recording.
The camcorder starts recording aftera 10-second countdown. The
countdown appears on the screen.
_ NOTES
Once the countdown has begun, you can
press [start/stop again or turn off thecamcorder to cancel the self timer.
Manual FocusAdjustment
Autofocus may not work well on thefollowing subjects. In such case, focusmanually.
* Reflective surfaces
• Subjects with low contrast or withoutvertical lines
• Fast moving subjects• Through wet windows• Night scenes
i_ switch: _ I
_ POINTS TO CHECK
Adjust the zoom before you start theprocedure.
Mode switch: []
32 • Video

A
v
1 Press _ to display the joystickguide.
2 Push the joystick (_') toward[FOCUS] to activate the manualfocus.
[FOCUS] on the joystick guide will bedisplayed in light blue and [MF]appears on the screen.
3 Adjust (4_) the focus as
necessary.• Push the joystick (1_) toward _.
for a farther focal distance or pushit (4) toward _ for a closer focaldistance.
• Pushing the joystick (Y) toward[FOCUS] again will return thecamcorder to autofocus.
4 Push the joystick (A) toward[BACK] to save the focusadjustment.
Infinity Focus
Use this function when you wish tofocus on faraway subjects such asmountains or fireworks.
Adjust the zoom before you start the
procedure.Mode switch: []
A
V
1 Keep the joystick pushed (Y)toward [FOCUS] for more than2 seconds.
• [MF] changes to co.
i!!!_;iii;!ii!;!iii_iii¸i¸¸¸I_ ;;il;?I; ¸I¸¸¸¸¸¸¸¸¸¸¸I¸¸¸¸¸¸¸I
• Pushing the joystick (Y) toward[FOCUS] again will return thecamcorder to autofocus.
• If you operate the zoom or thejoystick (4_), co changes backto [MF] and the camcorder returnsto manual focusing mode.
2 Push the joystick (A) toward[BACK] to save the focusadjustment.
The camcorder will automatically return to
autofocus when you set the mode switchto _.
Manual ExposureAdjustment
At times, backlit subjects may appeartoo dark (underexposed) or subjectsunder very strong lights may appear toobright or glaring (overexposed). Tocorrect this, you can manually adjustthe exposure.
switch: _ I ;
_ POINTSTO CHECK
Mode switch: [] (except for the[_FIREWORKS] recording program).
A
1 Press _ to display the joystickguide.
2 Push the joystick (A) toward[EXP].
[EXP] on the joystick guide changesto light blue and the exposureadjustment indicator OmlmO and the
Video',33

neutralvalue"_+0"appearonthescreen.
3 Adjust (4_) the brightness of theimage as required.
• The adjustment range and thelength of the exposure adjustmentindicator will vary depending onthe initial brightness of the picture.
• Pushing the joystick (A) toward[EXP] again will return thecamcorder to automatic exposure.
4 Push the joystick (Y) toward[BACK] to lock and save theexposure setting.
If you operate the zoom duringexposure lock, the brightness of theimage may change.
White Balance
The white balance function helps youaccurately reproduce colors underdifferent lighting conditions so thatwhite objects will always look trulywhite in your recordings.
|switch: _ I_j_!jj!:
_ POINTSTOCHECK
Recording program: [P PROGRAM AE]
Options * Default value
The camc0rder automatically sets the white
balance for natural looking colors.
Forrecordingoutdoorson a brightday.
Forrecordingundertungstenandtungstentype(3-wavelength)fluorescentlighting,
Use the custom white balance setting to make
white objects appear white under colored
lighting.
FON_}'i@[AWBAUTO] @ Desired option* ©
,FUN_:}* When you select [_.__.SET], do not press
[FONC} and continue instead with theprocedure below.
I To SETTHECUSTOMWHITEBALANCE
1 Point the camcorder at a white
object, zoom in until it fills thewhole screen and press _.When the adjustment is completed,_z, stops flashing and stays on.
2 Press to save the settingand close the menu.The camcorder retains the custom
setting even if you turn off thecamcorder.
_ NOTES
• When you select the custom white balance:- Set the custom white balance in a
sufficiently illuminated place.
- Select a zoom type other than
[1_11I_I_DIGITAL] (LT3 25).- Reset the white balance when the
lighting conditions change.
- Depending on the light source, ,_z,
may keep flashing. The result will still
be better than with [ AWt_AUTO].
34 ° Video
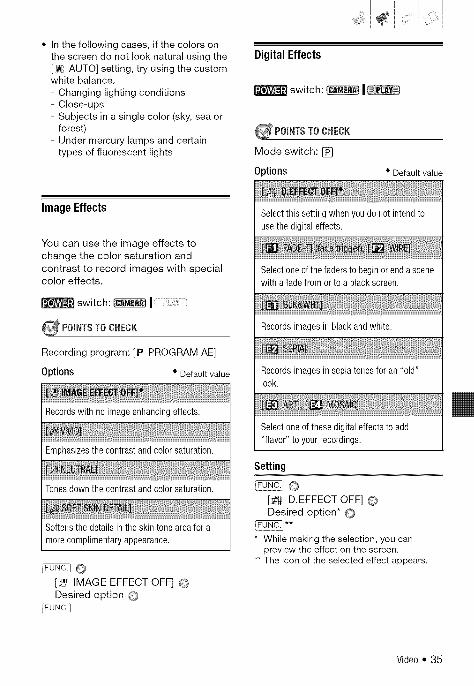
• In the following cases, if the colors on
the screen do not look natural using the
[A_ AUTO] setting, try using the customwhite balance.
- Changing lighting conditions
- Close-ups
- Subjects in a single color (sky, sea or
forest)
- Under mercury lamps and certain
types of fluorescent lights
DigitalEffects
switch: _ I
_ P01NTS TO CN_:CK
Mode switch: [_
Options * Default value
ImageEffects
You can use the image effects tochange the color saturation andcontrast to record images with specialcolor effects.
switch: _ I_iiii!!_iii!ii
Recording program: [P PROGRAM AE]
Options * Default value
Records with no image enhancing effects.
Emphasizesthecontrastandcolorsaturation.
Tonesdownthecontrastandcolorsaturation.
Softens the details in the skin tone area for a
more complimentary appearance.
FUNC.I (!_
[_ IMAGE EFFECT OFF] O
Desired option O
FUNC.J
Select this setting when you do not intend to
use the digital effects.
Select one of the faders to begin or end a scene
with a fade from or to a black screen.
Recordsimagesin blackandwhite.
Recordsimagesin sepiatonesfor an "old"look.
Select one of these digital effects to add
"flavor" to your recordings.
Setting
iFUNc" C_
[_ D.EFFECT OFF] 0
Desired option* 0
:FUNC. **
* While making the selection, you canpreview the effect on the screen.
** The icon of the selected effect appears.
Video ° 35

Applying
Press /D.EFFECTS_ to activate thefader/effect.
* The icon of the selected digital effectturns green.
* Press ib_E##_% i again to deactivatethe digital effect.
!iiilT0FA°E'"Press ...
: ...in record pause mode, then
press [s_;_op_ to start recording with afade in.
: ...in playback pause mode,
then push the joystick (A) toward
_/|111 to fade in and start the playback.
To FADEOUT
Press ...
: ...while recording, then presssta_/s!o_ to fade out and pause therecording.
: ...during playback, then pushthe joystick (A) toward _/|| to fadeout and pause the playback.
To ACTIVATE AN EFFECT
Press{:__E_t/Sl ...
: ...while recording or in recordpause mode.
: ...during playback.
• When you apply a fader, not only the
picture but also the sound will fade in or
out. When you apply an effect, the
sound will be recorded normally.
• The camcorder retains the last setting
used even if you turn off the digital
effects or change the recording
program.• The digital effects are not available
when [i-V TYPE] is set to [NORMAL TV]and the stereo video cable is connected
to the AV terminal.
UsinganExternalMicrophone
You can use a commercially availablemicrophone, for example to recordaudio more accurately.
[_ switch: _ I
Connect the external microphone tothe MIC terminal.
• Use commercially available condenser
microphones with their own power
supply. You can connect almost any
stereo microphone with a ® 3.5 mm
plug but audio recording levels may
vary.
36 • Video

• Whenanexternalmicrophoneisconnectedtothecamcorder,[WINDSCREEN]willautomaticallybesetto[1'_1OFFoJ_].
AudioPlayback Modes
Selecting the Audio Channel
You can select what audio channel to
play back when playing back a tapewith audio recorded on two channels
(either stereo sound or bilingual audiosignals).
switch: I
Options * Default value
Leftand rightchannels(stereo)/ Mainandsubsignals(bilingual).
Leftchannelonly(stereo)/ Mainsignalonly(bilingual).
Rightchannel0nly(stereo)/ Subsignalonly(bilingual).
_FU,C.JO[T_ MENU] O[((_ AUDIO SETUP] ©[OUTPUT CH] O Desired option O
Fu.c:I
SelectingtheAudioTrackona TapewithDubbedAudio
You can select the audio track to playback when playing back a tape that hasa dubbed audio track (Stereo 2) in
(_iiii!ii!;!iil;iii¸i¸¸¸I_ ;i;iJii!!i'iIi ¸I¸¸¸¸¸¸¸]¸¸¸¸¸¸I
addition to the original recorded audio(Stereo 1).
switch: i I
0 _tions * Default value
Original sound only.
Dubbedaudioonly.
Mixed audio with the original sound and the
dubbed audio at the same level.
Mixedaudiowherethe balancebetweenthe
originalsound(ST-1)andthe dubbedaudioST-2) canbeadjusted.
[ENN_:]0[T_I MENU] O[((_ AUDIO SETUP] O[12bit AUDIO] O Desired option* O
'FUNC.'
* When you select [1]_1MIX/VAR.],adjust themix balance with the [MIXBALANCE]setting (Lq_]47).
Video • 37
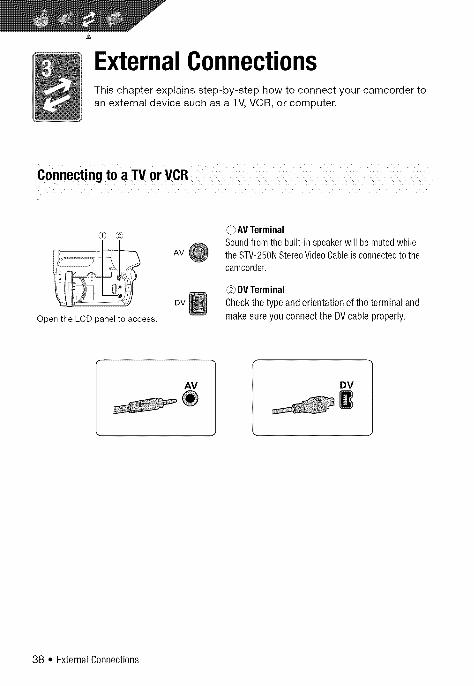
ExternalConnectionsThis chapter explains step-by-step how to connect your camcorder toan external device such as a TV, VCR, or computer.
Connecting to a TV or VCR
Open the LCD oanel to access.
Av@
DV
1 AV Terminal
Sound from the built-in soeaker wfl be muted while
the STV-250N Stereo Video Cable is connected to me
camcoroer.
2_DVTerminal
Checkthe typeand orientationof the terminal andmakesure you connectthe DVcable 3roperly.
AV
38 • ExternalConnections

ConnectionDiagramsTurn off all the devices when making the connections and refer also to the instructionmanual of the connected device.
Terminalonthe .. _, ..., TerminalontheL;onnec_lng uaDleCamcorder ConnectedDevice
[] Outputconnection(signalflow ,,_) to a TVorVCRwith AVTerminals.
AV @
e,,ow I
Red
[] Outputconnection(signalflow ,_ ) to a high-definitionTVwitha DV(IEEE1394)terminal.Inputconnection(signalflow 4,.)from a TVorotherdigitalvideosourcewith a DV(IEEE1394)output.
DV cable
(commercially available)
4-pin
* Be careful to correctly insert the 6-pin plug into the DV terminal. Inserting it in the wrong direction
can result in damage to the camcorder.
ExternalConnections° 39

Playbackon a TVScreen
The quality of the playback picture willvary depending on the connected TVand the type of connection used.
switch:
_ POINTS TO CHECK
Before making the connections, select the
[TV TYPE] setting according to the TV set
to which you will connect the camcorder
([:Z347).
Connecting
Connect the camcorder to the TV
following one of the connectiondiagrams shown in ConnectionDiagrams (LT_J39).
Playback
1 Turn on the camcorder and theconnected TV or VCR.
On a TV: Select as the video inputthe same terminal to which youconnected the camcorder.
On a VCR: Set the input selector tothe external video input (usuallylabeled LINE IN).
2 Start the playback (L_ 27).
• Turn off all the devices before startingthe connections.
• We recommend powering the
camcorder using the compact power
adapter.
CopyingyourRecordingsto an ExternalVideoRecorder
You can copy your recordings byconnecting the camcorder to a VCR ora digital video device. When recordingto a digital video recorder using the DVterminal, you can copy recordings withvirtually no generation loss in video andsound quality.
switch: I
Connecting
Connect the camcorder to a VCR orother analog device using connectiontype Igl, or to a DVD recorder or otherdigital recording device usingconnection type I_11,as shown inConnection Diagrams (CY.339).
Recording
This camcorder: Load therecorded cassette.
1
2 Connected device: Load a blankcassette or disc and set the device
to record pause mode.
3 This camcorder: Locate the scene
you wish to copy and pause theplayback shortly before the scene.
4 This camcorder: Resume the
movie playback.
When using an analog connectionyou can include in the copy also thedate/time of the original recording(1_ 28).
5 Connected device: Beginrecording when the scene youwish to copy appears. Stoprecording when copying iscomplete.
6 This camcorder: Stop playback.
40 • ExternalConnections

• We recommend powering thecamcorder using the compact power
adapter.• When recording to a VCR using an
analog connection -connection type [](r_ 39)-, the quality of the edited tape
will be lower than the original.• When recording to a digital video
recorder using the DV terminal-connection type [] (L.T.J39)-:
- If the picture does not appear,disconnect the DV cable and restore
the connection after a short while orturn the camcorder off and then on
again.- Proper operation cannot be
guaranteed for all digital devicesequipped with a DV terminal. If the
operation does not work, use the AVterminal.
DigitalVideoDubbing
You can input video from other digitalvideo devices and record the inputvideo on the tape in the camcorder.
| switch: J
Connecting
Connect the camcorder to the video
input source using the digitalconnection -connection type [](q3 39)- shown in ConnectionDiagrams.
Dubbing
1 Load a blank tape in thecamcorder and load the recorded
(source) tape or disc in theconnected device.
2 Set the camcorder in record pause
mode.
FUNC CL'_[_|| REC PAUSE] O
]EXECUTE]
3 Connected device: Start the
playback.
In record pause mode and while
recording you can check the pictureon the camcorder's screen.
v
4 When the scene you wish torecord appears, push the joystick(A) toward •/|| to beginrecording.
Recording starts.
5 While recording, push the joystick(A) toward •/|| to record pause.
In record pause mode, push thejoystick (A) toward •/Ill again toresume recording.
6 Push the joystick (Y) toward _ tostop recording.
7 Connected device: Stop theplayback.
@ II_IPORTANT
• Blank sections may be recorded as
anomalous picture.
• If the picture does not appear,disconnect the DV cable and restore the
connection after a short while or turn the
camcorder off and then on again.
• You can only record video signals in DV
standard (standard definition, SP or LP
mode) from devices carrying the 1__r
logo. Note that signals from identically
shaped DV (IEEE1394) terminals may bein different video standards.
ExternalConnections° 41

'_ NOTES
We recommend powering the camcorderusing the compact power adapter.
CopyrightSignal
Certain software tapes are copyright
protected. If you attempt to play back
such tape, [COPYRIGHT PROTECTED
PLAYBACK IS RESTRICTED] appears and
you will not be able to view the contents of
the tape. If you attempt to record from
such tape via the DV terminal,
[COPYRIGHT PROTECTED DUBBING
RESTRICTED] appears and you will not be
able to record the contents of the tape.
42 ,,ExternalConnections
iiiiii;i_i;ii!ii!il¸ _iiiii!iii;iiii!!ill_ i(il ¸¸¸¸¸¸
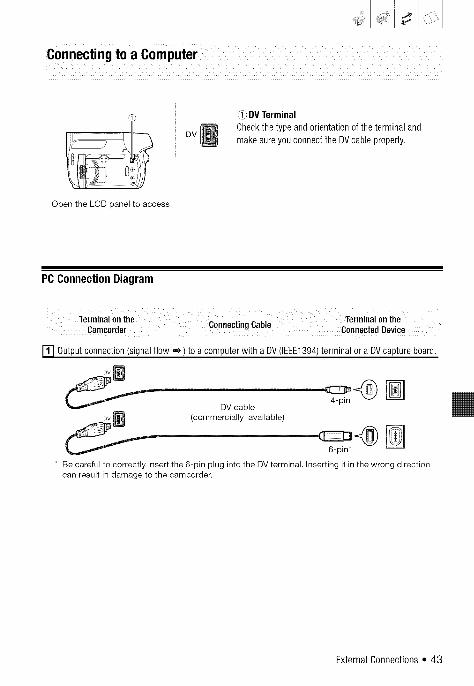
_md) DVTerminalCheck the type and orientation of the terminal and
make sure you connect the DV cable properly.
Open the LCD panel to access
PCConnectionDiagram
Terminal on the _i .,.i Terminal on theCamcorder uonnec[!ng Uan!e C°nnected Device
Ill outputconnection(signalflow _, ) to a computerwith a DV(IEEE1394)terminalora DVcaptureboard.
DV cable
DVm (commercially available)
6-pin*
* Be careful to correctly insert the 6-pin plug into the DV terminal. Inserting it in the wrong direction
can result in damage to the camcorder.
ExternalConnections° 43

TransferringVideoRecordings
You can transfer recordings to acomputer using the DV terminal.
Equipment and System Requirements
• A computer equipped with anIEEE1394 (DV) terminal or anIEEE1394 (DV)capturing board.
• A DV cable (commercially available).• Video editing software.• The appropriate driver.A driver is preinstalled on Windowsoperating systems later than Windows98 Second Edition and Mac operating
systems later than Mac OS 9, and willbe installed automatically.
Connecting
1 Start the computer.
2 Connect the camcorder to thecomputer using the DV connection-connection type [] (_ 43)-shown in PC Connection Diagram.
3 Set the camcorder tomode.
4 Start the video editing software.
Refer to the instruction manual of theediting software.
_ _Tv_POBTANT
• The video transfer may not work
correctly depending on the software and
the specifications/settings of your
computer.• If the computer freezes while the
camcorder is connected to it,
disconnect the DV cable and turn off the
camcorder and the computer. After ashort while, turn them on again, set the
camcorder to mode and restorethe connection.
• Before connecting the camcorder to the
computer using a DV cable, make surethat no other IEEE1394 device is
connected to the computer.
• Depending on the video editing
software, you may need to set the
switch on the camcorder to amode other than PLAY. Refer to the
instruction manual of the editing
software.
_ _OTES
• We recommend powering the
camcorder using the compact power
adapter.• Refer also to the instruction manual of
the computer.
44 ° ExternalConnections

AdditionalInformationThis chapter contains troubleshooting advice, screen messages,handling and maintenance tips, and other information.
Menu items not available appear grayed out. For details about how to select an item,refer to Using the Menus (_ 18). For details about each function, see the referencepage. Menu options without a reference page are explained after the tables.
FUNC.Menu
Recordingprograms1 [P PROGRAMAE],[_ PORTRAIT], • 29, 31[_ SPORTS],[L_NIGHT],[_[_SNOW],[!_'_BEACH],[m_.SUNSET],[P'_SPOTLIGHT],[[]FIREWORKS]
Whitebalance1 [ A_AUTO],[-:_DAYLIGHT], • 34[_ TUNGSTEN],[..-=SET]
imageeffecis_...... [biMAGE EFFECTOFF]I[__YviViDi.............. • _ 35
[ _NNEUTRAL],[_ SOFTSKINDETAIL]
: LCDvideolight [0 LCDLIGHTOFF], • 32
Digitaleffects [_f O.EFFEGTOFF],[F-JIIFADE-T], •1 • 35[F'_I WIPE],[l_i] BLK&WHT],[[] SEPIA],[!_} ART],[1_] MOSAIC]
SPEAKERVOLUME] --...mnm||ll|÷ - • 27
[RECPAUSE] Press _ to enter the recordpause - • 41mode.
: [ENDSEARCH] press_ to search. - • 28
1 Option available only when the mode switch is set to [_].
AdditionalInformation • 45

CAMERASETUP
[SHUTTER]1 [Ir_l AUTO], [1/60], [1/100], [1/250], • 31
[1/500], [1/1000], [1/2000]
[A.SL SHUTTER]2 : • -[ _ ON], [ !_ OFF]
[ZOOM TYPE] [1_ OPTICAL],[Lm[_l ADVANCED], [E[_[[_ DIGITAL] • 25
[ZOOM SPEED] [_ VARIABLE], [_ SPEED3], [_ SPEED2], • 25
[J_i SPEED1]
[IMG STAB]3 [_ ON], [[_ OFF] • -
[WIDESCREEN] [1"_3_11ON], [1_ OFF] • 24
[SELFTIMER] [[_]1 ON _ ], [ l'_r_ OFF] • 32
1 Option available only when the recording program is set to [P PROGRAM AE].2 Option available when the mode switch is set to _ or [] (only when the recording program is
set to [P PROGRAM AE]).3 Option available only when the mode switch is set to [].
[A.SL SHUTTER]: The camcorder automatically uses slow shutter speeds to obtainbrighter recordings in places with insufficient lighting.
• The camcorder uses shutter speeds down to 1/30.• If a trailing afterimage appears, set the slow shutter to [ [_'-J OFF].
[IMG STAB]: The image stabilizer compensates for camcorder shake even at full
telephoto.
• The image stabilizer is designed to compensate for a normal degree of camcorder
shake. The image stabilizer may also not be able to compensate for all movement when
recording moving subjects.
• The image stabilizer may not be effective when recording in dark places with
[A.SL SHUTTER] set to [_ ON] or using the [[1_ NIGHT] recording program.
• The image stabilizer may not work well on subjects with low contrast, with a recurring,
repetitive pattern or without vertical lines.
• The image stabilizer cannot be turned off when the mode switch is set to _.
• We recommend setting the image stabilizer to [_ OFF] when using a tripod.
VCRSETUP
[RECMODE] [[_9 STD PLAY], [_ LONGPLAY] • • -
iTVT PEi...............................................NORMA T IE w'oET ..............' ......................;.............................
[REC MODE]: Select the video recording mode.
• Recording in LP mode extends the available recording time on the tape 1.5 times.
• Depending on the condition of the tape (long usage, imperfections, etc.) you may notice
some video anomalies (blocky video artifacts, banding, etc.) in the playback picture
when playing back recordings made in LP mode. We recommend using the SP mode for
important recordings.
46 • AdditionalInformation
!_!i!_;i;!_i!_!i_i_ii;¸i¸¸¸1_ii;ii!!iIiii¸!!¸!!ii¸i;;;iii¸¸:i'ii_
• If you make recordings in both SP and LP modes on the same tape, during playback you
may notice some video anomalies in the picture at the point where the recording mode
changes.
• When playing back in this camcorder tapes recorded in LP mode with other devices or
vice versa, you may notice some anomalies in the playback picture or the sound may
stop briefly.
[TV TYPE]: In order to display the picture in full and in the correct aspect ratio, select the
setting according to the type of television to which you will connect the camcorder.
[NORMAL TV]: TV sets with 4:3 aspect ratio.
[WIDE TV]: TV sets with 16:9 aspect ratio.
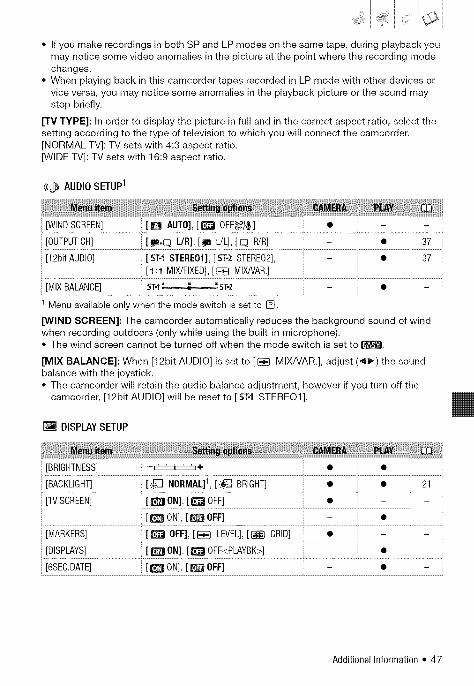
((_ AUDIOSETUP1
[WIND SCREEN] [Q AUTO], [_ OFF_/¢] • - -
[OUTPUTCH] [ _.q L/R], [ m L!L], [ E_ R!R] - • 37
[12bit AUDIO] [ 5T-1 STERE01], [ 51-2 STEREO2], - • 37
[ 1:1 MIX/FIXED], [ _ MIX/VAR.]
[MIX BALANCE] ST-l" " "ST-2 - • -
Menu available only when the mode switch is set to [_.
[WIND SCREEN]: The camcorder automatically reduces the background sound of wind
when recording outdoors (only while using the built-in microphone).
• The wind screen cannot be turned off when the mode switch is set to _.
[MIX BALANCE]: When [12bit AUDIO] is set to [I_E} MIX/VAR.], adjust (41_) the soundbalance with the joystick.
• The camcorder will retain the audio balance adjustment, however if you turn off thecamcorder, [12bit AUDIO] will be reset to [ST-1 STERE01].
DISPLAYSETUP
[BRIGHTNESS] -_-_'-_h + • • _
[TV SCREEN] [_ ON], [_ OFF] • - -
[_ ON], [ _ OFF] - •
[MARKERS] [t_'-_ OFF], [lEVI LEVEL],[_ GRID] • - -
[DISPLAYS] [ I['_ ON], [_ OFF<PLAYBK>] - • -
[6SEC.DATE] [_ ON], [_ OFF] - • -
AdditionalInformation • 47

[DATACODE] [ _ OFF], [[] DATE], [ ® TIME], - • 28
[_@ DATE& TIME]
[LANGUAGE]2 Language Set A: • • 19
[DEUTSCH],[ENGLISH], [ESPANOL],
[FRANOAIS],[ITAUAN0],[POLSKI],
[PORTUGUES],[PYCCK!4_l],[_$_],
Language Set B:
[ENGLISH], [_:], [_], [a_0_]
[DEMO MODE] [1_3 ON] [_ OFF] •
1 The default setting is [-:#_ BRIGHT] when you power the camcorder using the compact )ower
adapter.2 The list of languages available depends on the region of purchase.
[BRIGHTNESS]: Adjust (_11_) the brightness of the LCD display with the joystick.• Changing the brightness of the LCD display does not affect that of the viewfinder or the
recordings.
[rv SCREEN]: When set to [_ ON], the camcorder's on-screen displays will appear alsoon the screen of a connected TV or monitor.
When the date and time are displayed on the camcorder's screen they will also appear on
a connected TV regardless of the [TV SCREEN] setting. Turn off the date/time display with
the [DATA CODE] setting ([3;3 28).
[MARKERS]: You can display a grid or a horizontal line at the center of the screen. Use themarkers as a reference to make sure your subject is framed correctly (vertically and/or
horizontally).• Using the markers will not affect the recordings on the tape.
[DISPLAYS]: You can hide the on-screen displays to show only the playback picture on thefull screen.
• Tape operation displays appear for 2 seconds.
• Warning messages and the data code (if activated) will appear, even when set to
[_] OFF<PLAYBK>].
• All on-screen displays will appear while a digital effect is activated.
[6SEC.DATE]: When you start playing back a tape or when the date of the recording
changes, the date and time will be displayed for 6 seconds.
[DEMO MODE]: The demonstration mode displays the camcorder's main features. It starts
automatically when the camcorder is powered with the power adapter if you leave it turned
on without loading a recording media for more than 5 minutes.
• To cancel the demo mode once it started, press any button, turn off the camcorder orinsert a videocassette.
48 • AdditionalInformation

'B'IJ'SYSTEMSETUP
Ii
[BEEP] [ ,m_))HIGH VOLUME], • • -
[,B, LOW VOLUME],[i_ OFF]
[POWERSAVE] [1_] ON], [_ OFF] • - -
[QUICKSTART] [_ OFF], [_ 10 rain], • - -
[_ 20 min], [E_:_ 30 min]
[BEEP]: A beep will accompany some operations like turning on the camcorder, the self-
timer countdown, etc. It also serves as a warning beep under unusual conditions.
[POWER SAVE]: In order to save power when the camcorder is powered by a battery
pack, it will automatically shut off if left without any operation for 5 minutes. Approximately
30 seconds before the camcorder shuts off, the message "_AUTO POWER OFF" will
appear.
[QUICK START]: Select whether to activate the Quick Start function when you close the
LCD panel in mode (1212125) and the length of time after which the camcorder willend the standby mode and shut off automatically.
DATE/TIMESETUP
[T.ZONEDST] List of world time zones. • • 20
[DATE/TIME] • • 20
[DATEFORMAT] [Y.M.D(2009.1.1 AM 12:00)], • • -
[M.D,Y (JAN. 1,200912:00 AM)],
[DM.Y (1.JAN.2009 12:00 AM)]
[DATE FORMAT]: Changes the date format for on-screen displays.
AdditionalInformation ° 49
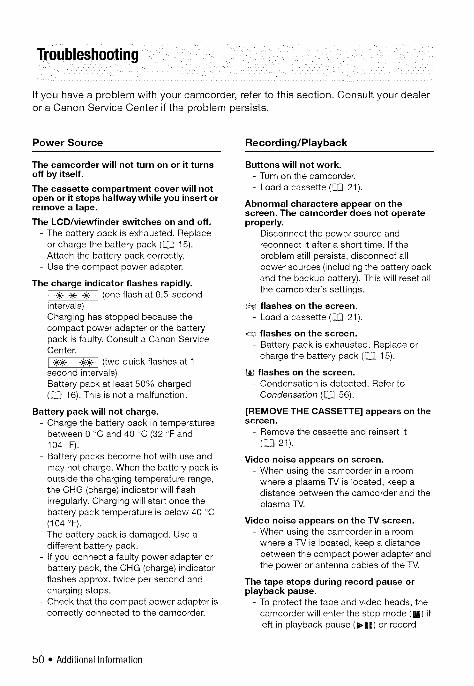
If you have a problem with your camcorder, refer to this section. Consult your dealer
or a Canon Service Center if the problem persists.
Power Source
The camcorder will not turn on or it turnsoff by itself.
The cassette compartment cover will notopen or it stops halfway while you insert orremove a tape.
The LCD/viewfinder switches on and off.
- The battery pack is exhausted. Replace
or charge the battery pack ([IT-] 15).- Attach the battery pack correctly.
- Use the compact power adapter.
The charge indicator flashes rapidly.
- _ (one flash at 0.5-secondintervals)Charging has stopped because the
compact power adapter or the batterypack is faulty. Consult a Canon ServiceCenter.
- _ (two quick flashes at 1-second intervals)
Battery pack at least 50% charged(CCJ 16). This is not a malfunction.
Battery pack will not charge.
- Charge the battery pack in temperaturesbetween 0 °C and 40 °C (32 °F and
104 °F).- Battery packs become hot with use and
may not charge. When the battery pack is
outside the charging temperature range,the CHG (charge) indicator will flash
irregularly. Charging will start once thebattery pack temperature is below 40 °C(104 °F).
- The battery pack is damaged. Use adifferent battery pack.
- If you connect a faulty power adapter orbattery pack, the CHG (charge) indicatorflashes approx, twice per second and
charging stops.- Check that the compact power adapter is
correctly connected to the camcorder.
Recording/Playback
Buttons will not work.- Turn on the camcorder.
- Load a cassette (C[3 21).
Abnormal characters appear on thescreen. The camcorder does not operateproperly.
- Disconnect the power source andreconnect it after a short time. If the
problem still persists, disconnect all
power sources (including the battery packand the backup battery). This will reset all
the camcorder's settings.
flashes on the screen.
- Load a cassette (_ 21).
_:_\Jflashes on the screen.
- Battery pack is exhausted. Replace orcharge the battery pack (C'[.315).
[] flashes on the screen.- Condensation is detected. Refer to
Condensation (CJ_ 56).
[REMOVE THE CASSETTE] appears on thescreen.
- Remove the cassette and reinsert it
([_J 21).
Video noise appears on screen.
- When using the camcorder in a roomwhere a plasma TV is located, keep adistance between the camcorder and the
plasma TV.
Video noise appears on the TV screen.
- When using the camcorder in a roomwhere a TV is located, keep a distance
between the compact power adapter andthe power or antenna cables of the TV.
The tape stops during record pause orplayback pause.
- To protect the tape and video heads, thecamcorder will enter the stop mode (m) if
left in playback pause (_||) or record
50 ,, AdditionalInformation

pause (OH) mode for 4 minutes 30
seconds. To resume the operation press[Start/Siopi (when recording) or push thejoystick (A) toward I_/11 (during
playback),
Recording
Image will not appear on the screen.
- Set the camcorder to _ mode([::_ 23).
[SET THE TIME ZONE, DATE AND TIME]appears on the screen.
- Set the time zone, date and time (C[:J 20).- Replace the backup lithium battery
([_ 17) and set the time zone, date andtime.
Pressing _Start/Stop_will not start recording.- Set the camcorder to _ mode
(E_ 23).
- Load a cassette ([:_ 21).- Tape reached the end ("_ END" appears
on the screen). Rewind the tape orreplace the cassette (_ 21).
- Cassette is protected (FS_ flashes on the
screen). Change the position of theprotect switch ([:_ 55).
Camcorder will not focus.
- Autofocus does not work on that subject.Focus manually ([,_L]32).
- If you are using the viewfinder, adjust itwith the dioptric adjustment lever (L_ 23).
- Lens is dirty. Clean the lens with a soft
lens-cleaning cloth (LT,-]56). Never usetissue paper to clean the lens.
Sound is distorted.
- When recording near loud sounds (such
as fireworks or concerts), sound maybecome distorted.
Viewfinder picture is blurred.
- Adjust the viewfinder with the dioptricadjustment lever ([:_ 23).
!
Playback does not start.
- Load a cassette (LT.321).
- Set the camcorder to mode(L,T_,.]27).
- Tape reached the end (" E_] END" appearson the screen). Rewind the tape (L_ 21).
No sound from the built-in speaker.- Open the LCD panel.
- Speaker volume is turned off. Adjust thevolume with the [SPEAKER VOLUME]setting (L.q_27).
Image will not appear on the TV screen.- Check again that the camcorder is
properly connected to the TV (E_ 39).
Tape is running, but image will not appearon the TV screen.
- TV/VlDEO selector on the TV is not set to
VIDEO, Set the selector to VIDEO (E:_ 40).- Video heads are dirty, Clean the video
heads ([:Z-J2).
- You attempted to play back or dub acopyright protected tape (C]:] 42). Stop
playbacWdubbing.
Editing
Cannot record with this camcorder videoinput from an external video deviceconnected using a DV cable.
- Wrong signal standard. Refer also to theinstruction manual of the connecteddevice.
Playback
During playback there is video noise.
- Video heads are dirty. Clean the videoheads (L_ 2).
AdditionalInformation • 51

List of Messages(inalphabeticalorder)
CHANGE THE BATTERY PACK
- Battery pack is exhausted. Replace orcharge the battery pack (LT_.-]15).
CHECK THE CASSETTE [INCORRECTTAPE SPECIFICATION]
- You attempted to play back a taperecorded in HD (high definition) standard.
CHECK THE INPUT
- The DV cable is not correctly connected
to the DV terminal ([Z] 39), or theconnected digital device is turned off.
CONDENSATION HAS BEEN DETECTED
- Condensation has been detected in the
camcorder ([:_ 56).
CONDENSATION HAS BEEN DETECTEDREMOVE THE CASSETTE
- Condensation has been detected in the
camcorder (L_ 56). Remove the cassette.
COPYRIGHT PROTECTED DUBBINGRESTRICTED
- You attempted to dub a copyright
protected tape (EZ3 42).
COPYRIGHT PROTECTED PLAYBACK ISRESTRICTED
- You attempted to play back a copyright
protected tape ([:_ 42).
HEADS DIRTY, USE CLEANING CASSETTE
- Video heads are dirty. Clean the videoheads (C[3 2).
INCORRECT TAPE SPECIFICATIONPLAYBACK IS RESTRICTED
- You attempted to play back a taperecorded in a different television system
(PAL or SECAM) or in a recordingstandard not supported by thiscamcorder.
INPUT SIGNAL NOT SUPPORTED
- The digital device connected with the DVcable is incompatible with the camcorder.
REMOVE THE CASSETTE
- Camcorder stopped operating to protect
the tape. Remove the cassette andreinsert it ([:Z) 21).
SET THE TIME ZONE, DATE AND TIME
- You have not set the time zone, date andtime. This message appears each time
you turn the power on until you set thetime zone, date and time ([:_ 20).
TAPE END
- Tape reached the end. Rewind the tape orreplace the cassette.
THE TAPE IS SET FOR ERASUREPREVENTION
- Cassette is protected. Replace the
cassette or change the position of theprotect switch ([.'_ 55).
52 • AdditionalInformation

HandlingPrecautions
Camcorder
• Do not carry the camcorder by theLCD panel. Be careful when closingthe LCD panel.
• Do not leave the camcorder in placessubject to high temperatures (like theinside of a car under direct sunlight),or high humidity.
• Do not use the camcorder near strongelectromagnetic fields such as aboveTVs, near plasma TVs or mobilephones.
• Do not point the lens or viewfinder atstrong light sources. Do not leave thecamcorder pointed at a brightsubject.
• Do not use or store the camcorder in
dusty or sandy places. Thecamcorder is not waterproof - avoidalso water, mud or salt. If any of theabove should get into the camcorderit may damage the camcorder and/orthe lens.
• Be careful of heat generated bylighting equipment.
• Do not disassemble the camcorder. Ifthe camcorder does not function
properly, consult qualified servicepersonnel.
• Handle the camcorder with care. Do
not subject the camcorder to shocksor vibration as this may causedamage.
• When mounting the camcorder on atripod, make sure that the tripod'sfastening screw is shorter than5.5 mm (0.2 in.). Using other tripodsmay damage the camcorder.
!
• When recording movies, try to get acalm, stable picture.Excessive camcorder movement
while shooting and extensive use offast zooms and panning can result injittery scenes. In extreme cases, theplayback of such scenes may result invisually induced motion sickness. Ifyou experience such a reaction,immediately stop the playback andtake a rest break as necessary.
Long-term storage
If you do not intend to use thecamcorder for a long time, store it in aplace free of dust, in low humidity, andat temperatures not higher than 30 °C(86 °F).
AdditionalInformation • 53

Back side of the battery pack
Battery Pack
DANGER!
Treat the battery pack with care.
• Keep it away from fire (or it might
explode),
• Do not expose the battery pack to
temperature higher than 60 °C
(140 °F). Do not leave it near a heateror inside a car in hot weather.
• Do not try to disassemble or modify it.
• Do not drop it or subject it to shocks.
• Do not get it wet.
• Attach the terminal cover whenever a
battery pack is not in use. Contactwith metallic objects may cause ashort circuit and damage the batterypack.
• Dirty terminals may cause a poorcontact between the battery packand the camcorder. Wipe theterminals with a soft cloth.
Long-term storage
• Store battery packs in a dry place attemperatures no higher than 30 °C(86 °F).
• To extend the battery life of thebattery pack, discharge it completelybefore storing it.
• Charge and discharge all your batterypacks fully at least once a year.
About the battery terminal cover
The battery terminal cover has a [E::3]-shaped hole. This is useful when youwish to differentiate between chargedand uncharged battery packs.
Terminal cover attached
Charged Uncharged
Cassette
• Rewind tapes after use. A slack ordamaged tape may cause videoproblems and/or audio distortionsduring playback.
• Return cassettes to the case and
store them upright. Rewind tapesfrom time to time if they are stored fora long time.
• Do not leave the cassette in thecamcorder after use.
• Do not use spliced tapes ornonstandard cassettes as they maydamage the camcorder.
• Do not use tapes that have beenjammed as video heads may becomedirty.
• Do not insert anything into the smallholes of the cassette, or cover themwith cellophane tape.
• Handle cassettes with care. Do not
drop or subject them to severeimpact as this may damage thecassettes.
54 • AdditionalInformation
• Withcassettesequippedwithamemoryfunction,metalplatedterminalsmaybecomedirtywithuse.Cleantheterminalswithacottonswabafterabout10timesofremovingandreinsertingthecassette.Thememoryfunctionisnotsupportedbythecamcorder.
Protecting Tapes from Accidental Erasure
To protect your recordings from accidentalerasure, slide the tab on the cassette toSAVE or ERASE OFR
!_!i_i_!_i!_!i_i_ii;¸i¸¸¸I_i!!i_¸I¸I'I¸!!¸!!II¸_;i;;:¸II¸¸¸!!_¸:i_
Lithium ButtonBattery
WARNING!
• The battery used in this device may
present a fire or chemical burn hazardif mishandled.
• Do not disassemble, modify, immerse
in water, heat above 100 °C (212 °F) or
incinerate the battery.
• Replace with a CR1616 battery made
by Panasonic, Hitachi Maxell, Sony,
Toshiba, Varta or Renata. Use of other
batteries may present a risk of fire or
explosion.
• Do not insert the battery into the
mouth. If swallowed, seek medical
assistance immediately. The battery
case may break and the battery fluids
may cause internal damage.
• Keep the battery out of the reach ofchildren.
• Do not recharge, short-circuit or insert
the battery in the wrong direction.
• Dispose of the used battery according
to applicable recycling regulations.
• Do not pick up the battery usingtweezers or other metal tools, as thiswill cause a short circuit.
• Wipe the battery with a clean drycloth to ensure proper contact.
• ForCalifornia,USAonly:Included lithiumbattery contains Perchlorate Material- special handling may apply. Fordetails see www.dtsc.ca.gov/hazardouswaste/perchlorate.
AdditionalInformation • 55

Cleaning
Camc0rder Body* Use a soft, dry cloth to clean the
camcorder body. Never usechemically treated cloth or volatilesolvents such as paint thinner.
Lens and Viewfinder
* If the lens surface is dirty, theautofocus may not work properly.
* Remove any dust or dirt particlesusing a non-aerosol type blowerbrush.
* Use a clean, soft lens-cleaning clothto gently wipe the lens or viewfinder.Never use tissue paper.
LCD Screen
* Clean the LCD screen using a clean,soft lens-cleaning cloth.
* Condensation may form on thesurface of the screen when the
temperature changes suddenly. Wipeit with a soft dry cloth.
Condensation
Moving the camcorder rapidly betweenhot and cold temperatures may causecondensation (water droplets) to formon its internal surfaces. Stop using thecamcorder if condensation is detected.
Continued use may damage thecamcorder.
Condensation may form in the followingcases:* When the camcorder is moved
quickly from cold to warm places* When the camcorder is left in a humid
room* When a cold room is heated rapidly
To AVOID CONDENSATION
* Do not expose the camcorder tosudden or extreme changes intemperature.
* Remove the cassette, place thecamcorder in an airtight plastic bagand let it adjust to temperaturechanges slowly before removing itfrom the bag.
WHEN CONDENSATIONIS DETECTED
* The camcorder automatically shutsoff, the warning message[CONDENSATION HAS BEENDETECTED] appears for approx.4 seconds and [] starts flashing.
* If a cassette is loaded, the warningmessage [REMOVE THE CASSETTE]appears and [] starts flashing.Remove the cassette immediatelyand leave the cassette compartmentopen. Leaving the cassette in thecamcorder may damage the tape.
* A cassette cannot be loaded whencondensation is detected.
RESUMINGUSE
The precise time required for waterdroplets to evaporate will varydepending on the location and weatherconditions. After the condensation
warning stops flashing, wait for 1 morehour before resuming use.
56 ,, AdditionalInformation

Usingthe CamcorderAbroad
Power Sources
You can use the compact poweradapter to operate the camcorder andto charge battery packs in any countrywith power supply between 100 and240 V AC, 50/60 Hz. Consult the CanonService Center for information on plugadapters for overseas use.
Playback on a rv Screen
You can only play back your recordingson TVs compatible with the NTSCsystem. NTSC is used in the followingregions/countries:
!j_
Americas: All of North America andCentral America; most Caribbeanislands (except in French territories likeGuadeloupe and Martinique); most ofSouth America (except in Argentina,Brazil and Uruguay). Asia: Only inJapan, the Philippines, South Korea,Taiwan and Myanmar. Oceania: USterritories (Guam, American Samoa,etc.) and some Pacific islands likeMicronesia, Samoa and Tonga.
Trademark Acknowledgements• Mini_'v---- isa trademark.• Microsoft, Windows and Windows Vista are trademarks or registered trademarks of Microsoft Corporation in the UnitedStates and/or
other countries.
• Macintosh and Mac 0S are trademarks of Apple Inc., registered in the U.S.and other countries.• 0ther names and products not mentioned abovemay be trademarks or registered trademarks of their respective companies.
AdditionalInformation ,, 57

SS-600/SS-650ShoulderStrap
MiniDVvideocassette
TL-H30.5Tele-converter
WD-H30.5Wide-converter
00 ..............................................FS-30.5UFilter Set
SC-2000SoftCarryingCase
CBC-NB2CarBatteryCharger
CB-2LWBattery Pack Battery Charger
iiiii'_ !\, _ _ _ CA-590Compact}_ S PowerAdapter**i i c i_J_._................................../:7
VCR
Commerciallyavailable DVBrecorder/digitalDVcable devicewithBVterminal
* The BP-2L5 is not available as a separate optional accessory.** CA-590E including power cord, in Asia.
58 ,, AdditionalInformation

,_;_:_;i;!_:iiii!i!i,@!ii ii:}::ii__¸¸
Call or visit your local retailer/dealer for genuine Canon video accessories. You canalso obtain genuine accessories for your Canon camcorder by calling:1-800-828-4040, Canon U.S.A. Information Center.
Use of genuine Canon accessories is recommended.
This product is designed to achieve excellent performance when used with genuine
Canon accessories. Canon shall not be liable for any damage to this product and/or
accidents such as fire, etc., caused by the malfunction of non-genuine Canon
accessories (e.g., a leakage and/or explosion of a battery pack). Please note that this
warranty does not apply to repairs arising out of the malfunction of non-genuine Canon
accessories, although you may request such repairs on a chargeable basis.
Battery PacksWhen you need extra battery packs, selectthe NB-2LH, BP-2L13 or BP-2L14.
CB-2LW Battery Charger
Use the battery charger to charge batterypacks. It plugs directly into a power outletwithout a cable.
Charging TimesThe charging times given in the following table are approximate and vary accordingto charging conditions and initial charge of the battery pack.
Using the camcorder 145 min. 155 min. 250 min. 285 min.
Using the CB-2LW Battery Charger 105 min. 160 min. 175 min. 205 min.
AdditionalInformation • 59

Recording and Playback Times
The recording and playback times given in the following table are approximate andvary according to recording mode and charging, recording or playback conditions.The effective usage time of the battery pack may decrease when recording in coldsurroundings, when using the brighter screen settings, etc.
Maximumrecordingtime
Viewfinder 100 min. 140 min. 250 min. 300 min.
LCDscreen 100 min. 135 min. 250 min. 300 min.
.............................................Typical recording time* ..........
Viewfinder 55 min. 75 min. 130 min. 155 min.
LCDscreen 50 min. 75 min. 130min. 155min.
Playbacktime 115 min. 160 rain. 285 rain. 330 min. :
* Approximate times for recording with repeated operations such as start/stop, zooming, andpower on/off.
CBC-NB2 Car Battery Charger
Use the car battery charger to charge battery
packs on the go. The car battery cable plugs
into your car's cigarette lighter and runs off a
12-24 V DC negative ground battery.
TL-H30.5 Tele-converterThis Tele-converter lens increases the focal
length of the camcorder lens by a factor of1.7.
* The image stabilizer is not as effectivewhen the Tele-converter is attached.
* The minimum focusing distance with theTL-H30.5 attached is 3 m (9.8 ft.) at fulltelephoto; 3 cm (1.2 in.) at full wide angle.
WD-H30.5 Wide-converter
This lens decreases focal length by a factorof 0.7, giving you a wide perspective forindoor shots or panoramic views.
60 • AdditionalInformation

FS-30.5U Filter Set
Neutral density and MC protector filters helpyou to control difficult lighting conditions.
!
Shoulder StrapYou can attach a shoulder strap for moresecurity and portability.Pass the ends through the strap mount andadjust the length of the strap.
SC-2000 Soft Carrying CaseA handy camcorder bag with paddedcompartments and plenty of space foraccessories.
This mark identifies genuine Canon video accessories. When youuse Canon video equipment, we recommend Canon-brandaccessories or products bearing the same mark.
AdditionalInformation • 61
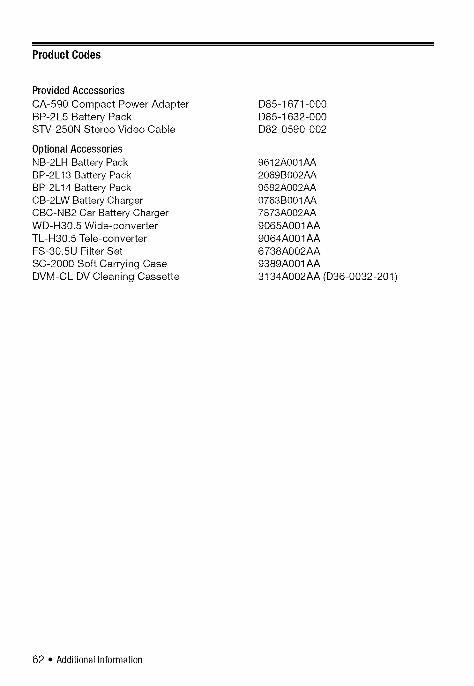
Product Codes
Provided Accessories
CA-590 Compact Power AdapterBP-2L5 Battery PackSTV-250N Stereo Video Cable
Optional AccessoriesNB-2LH Battery PackBP-2L13 Battery PackBP-2L14 Battery PackCB-2LW Battery ChargerCBC-NB2 Car Battery ChargerWD-H30.5 Wide-converterTL-H30.5 Tele-converterFS-30.5U Filter Set
SC-2000 Soft Carrying CaseDVM-CL DV Cleaning Cassette
D85-1671-000D85-1632-000D82-0590-002
9612A001AA2069B002AA9582A002AA0763B001AA7873A002AA9065A001AA9064A001AA6738A002AA9389A001AA
3134A002AA (D36-0032-201)
62 ° AdditionalInformation

!i_i;i_;!ii!i:i:iiill!i!;i!i!!_!i!¸ ii;;:::il¸_¸¸
ZR960
System
Video Recording System 2 rotary heads, helical scanning DVsystem (consumerdigital VCRSDsystem), digitalcomponent recording
Audio Recording System PCMdigital sound: 16 bit (48 kHz/2 channels)
Television System EIAstandard (525 lines, 60 fields) NTSCcolor signal
Image Sensor 1/6-inch CCD, approx. 680,000 pixelsEffective pixels1 (allfigures are approximate values)
16:9 Movies (advancedzoom) 360,000 (r) / 450,000 (w) pixels(optical zoom) 360,000 pixels
4:3 Movies 340,000 pixels
Compatible Tapes Videocassettes bearing the _iri_ _ mark
Tape Speed SP: 18.81 mm/s (0.74 ips); LP:12.56 mm/s (0.49 ips)
Maximum Recording Time SP: 80 minutes; LP: 90 minutes(60 rain. tape)
LCD Screen 2.7 in., wide, TFT color, approx. 112,000 pixels
Viewfinder 0.27 in., wide, TFTcolor, approx. 123,000 pixels
Microphone Stereo electret condenser microphone
Lens f=2.6-96.2 ram, F/2.0-5.2, 37x optical zoom35 mm equivalent (all figures are approximate values)
16:9 Movies (advancedzoom) 41.3-1,695 mm(optical zoom) 45.8-1,695 mm
4:3 Movies 49.8-1,843 mm
Lens Configuration 10 elements in 8 groups (1 double-sided, aspheric element)
AF system TTL autofocus, manual focus available
Filter Diameter 30,5 mm
White Balance Auto white balance, preset white balance(DAYLIGHT,TUNGSTEN)or custom whitebalance
Minimum Illumination 5 Ix (_ mode, Auto slow shutter [ON],Shutter speed 1/30)1.3 Ix ([NIGHT]recording program, Shutter speed 1/8)
Minimum Focusing Distance 1 m (3.3 ft.); 1 cm (0.39 in.) at full wide angle
Recommended Illumination More than 100 Ix
Image Stabilization Electronic
1 Whentwo values are given, the first indicates the value at full telephoto (1")and the second indicates the value at full wide-angle (W).
AdditionalInformation • 63

Input/Output Terminals
AV Terminal C43.5 turn minijack, output onlyVideo: 1Vp-p/75 _ unbalancedAudio: -10 dBV(47 k_ load/3 k_ or less)
DV Terminal 4 pin (IEEE1394standard); input/output
MIC Terminal C43.5 rnmstereo minijack-57 dBV(with 600 _ mic)/5 _ or more
Power/Others
Power supply (rated) 7.4 VDC (battery pack), 8.4 V DC(compact power adapter)
Power consumption 2.1 W (viewfinder), 2.2 W (LCDscreen, normal brightness)
Operating Temperature 0 - 40 °C (32 - 104 °F)
Dimensions (W x H x D) 68 x 83 x 123 mm (2,7 x 3.3 x 4.8 in,) excluding the grip belt
Weight (camcoPder body only) 390 g (13.8 oz.)
CA-590Compact Power Adapter
Power input 100 - 240 VAC, 50/60 Hz, 0.14 - 0.08 A
Rated output 8.4 V DC,0.6 A
Operating temperature 0 - 40 °C (32 - 104 °F)
Dimensions 46 x 26 x 70 mm (1.8 x 1.0 x 2.8 in.)
Weight 95 g (3.4 oz,)
BP-2L5BatteryPack
Battery type RechargeableLithium Ion Battery
Rated voltage 7.4 VDC
Operating temperature 0 - 40 °C (32 - 104 oF)
Battery capacity 530 mAb
Dimensions 33.3 x 16.2 x 45.2 mm (1,3 x 0,64 x 1,8 in.
Weight 40 g (1,4 oz,)
Weight and dimensions are approximate. Errors and omissions excepted.The information in this manual is verified as of January 2009. Subject to changewithout notice.
64 • AdditionalInformation
!_!_i_i_;!_i!;!i_i_ii;¸i¸¸¸I_i!!i;¸I¸I'I¸!!¸!!II¸;;i;;:¸II¸¸¸!!_¸:i_
Index Fir_eworks program)• (recording ....... 30
FUNC. menu .................. 18, 45
6-second auto date ................ 48gGrip belt ........................ 17
Abroad, using the camcorder ........ 57
Aspect ratio
of a connected TV (TV type) ...... 47
of movies (Widescreen) ......... 24
Audio output channel .............. 37
Auto slow shutter ................. 46
AV terminal ...................... 38
nBackup battery ................... 17
Battery pack
Charging ..................... 15
Remaining charge indicator ...... 14
Beach (recording program) .......... 30
Beep ........................... 49
mCompact power adapter ............ 15Condensation .................... 56
Connections
to a computer ................. 43
to a TV/VCR .................. 38
ElData code ....................... 28
Date and time
Date format ................... 49
Daylight saving time ............ 20
Time zone .................... 20
Digital effects ..................... 35
Digital video input (DV dubbing) ...... 41DV terminal ...................... 39
mEASY (recording program) ........... 24End search ...................... 28
Error messages ................... 52
Exposure ........................ 33
gImage effects .................... 35
Image stabilizer .................. 46
mJoystick ........................ 18
Joystick guide ................... 18
nLanguage ....................... 19LCD screen ...................... 20
LCD video light ................... 32LP mode ........................ 46
Maintenance ..................... 56
Manual exposure adjustment ........ 33
Manual focus .................... 32
Markers ......................... 48
MIC terminal ..................... 36
Microphone ..................... 36
Mode switch ..................... 24
13Night (recording program) .......... 30
mOnscreen display selection ......... 28
gP (recording program) .............. 31
Playback ........................ 27
Portrait (recording program) ......... 30
Power save ...................... 49
mQuick Start function ............... 25
AdditionalInformation • 65

imlRecording ....................... 23
Recording mode .................. 46
Recording programs ............ 29, 31
Recording reminder ............... 14
Remaining tape indicator ........... 14
Reviewing movies (Record review) .... 26
im
IIiTelephoto ....................... 25
Transferring movies to a computer ... 44
Tripod .......................... 53
Troubleshooting .................. 50
im
Screen icons ..................... 13
Self timer ........................ 32
Serial number .................... 12
Setup menus .................. 19, 46
Shutter speed .................... 31
Snow (recording program) .......... 30
SP mode ........................ 46
Special scene (recording programs) ... 29
Sports (recording program) .......... 30
Spotlight (recording program) ........ 30Sunset (recording program) ......... 30
Video heads, cleaning .............. 2
Videocassettes ................ 21,54
Viewfinder ...................... 23
Volume ......................... 27
White balance ................... 34
Wide angle ...................... 25Widescreen 16:9 ................. 24
Wind screen ..................... 47
Zoom
Advanced zoom .............. 25
Zoom speed ................. 46
Zoom type ................... 25
66 • AdditionalInformation
[ U.S.A. ICANON CONSUMER DIGITAL VIDEO EQUIPMENT LIMITED WARRANTY FORTHE UNITED STATES
The limited warranty set forth below is given by CanonU.S,A, Inc. ("Canon USA")with respect to CanonConsumer Digital VideoEquipment (the "Equipment") purchased in the UnitedStates, This limited warranty is only effective upon presentation of your Bill of Saleor other proofof purchase.The Equipment is warranted under normal, non-commercial, personal use, against defective materials orworkmanship as follows:Parts: Defective parts will be exchangedfor new parts or comparable rebuilt parts for a period of ONEYEARfrom the date of originalpurchase, except for a defective Video Head,which will be exchangedfor a period of three months from the date of purchase,Labor: Fora period of ONEYEARfrom the dateof original purchase, labor will be provided free of charge by our factory service centers ordesignated service facilities located in the United States.When returning Equipment under this warranty, you must pre-pay the shipping charges, andyou must enclose the Bill of Sale or otherproof of purchase with a complete explanation of the problem. During the ONE-YEARwarranty period, repairs will be made and theEquipment will be return-shipped to you free of charge, Forrepairs after the warranty period is over, you will be given an estimate of thecost of repair and anopportunity to approve or disapprove of the repair expense before it is incurred, If you approve, repairs will be madeand the Equipment will be return-shipped to you. (shipping charges apply). If you disapprove, we will return-ship the equipment at nocharge to you.
Non-Canon brand peripheral equipment and software which may be distributed with, or factory loaded on, the Equipment, aresold "AS IS" without warranty of any kind by Canon USA,including any implied warranty regarding merchantability or fitnessfor a particular purpose. The sole warranty with respect to such non-Canon brand items is given by the manufacturer orproducer thereof. If the Equipment contains a hard disk drive, Canon USA recommends that data stored on that drive beduplicated or backed up to prevent its loss in the event of failure or other malfunction of such drive.
CanonUSA shall have no responsibility under this limited warranty for use of the Equipment in conjunction with incompatible peripheralequipment and incompatible software.
In order to obtain warranty service, contact the authorized Canonretail dealer from whom you purchased the Equipment or call theCANONINFORMATIONCENTERAT 1-800-OK-CANON).Youwill be directed to the nearestservice facility for your Equipment,
This Limited Warranty covers all defects encountered in normal use of the Equipment anddoes not apply in the following cases:A) Loss or damage to the Equipment due to abuse, mishandling, accident, improper maintenance, or failure to follow operating
instructions;B) If the Equipment is defective as a result of leaking batteries, sand, dirt orwater damage;C) If defects or damages are caused by the use of unauthorized parts or by service other than by CanonUSA'sfactory service
centers or authorized service facilities;D) If the Equipment is used for commercial or industrial use.
This Limited Warranty does not cover cabinet (exterior finish), video cassette tape, head cleanings, nor does it apply to Equipmentpurchasedoutside the United States, Thiswarranty does not cover units sold to rental firms, military operations, hotels, schools,hospitals or for othercommercial, industrial, or institutional applications. These usesare covered only by such specific warranty asCanon mayissue with such sales,This Limited Warranty does not apply to accessoriesor consumables for the Equipment, which are sold "AS IS", without warranty of anykind by Canon USA,Please retain this warranty card and your Bill of Sale as a permanent record of your purchase. Thiscard is most important in order to besure you are contacted right away should there be a safety inspection, modification or product recall under applicable laws orregulations,
NOIMPLIEDWARRANTY,,INCLUDINGMERCHANTABILITYANDFITNESSFORA PARTICULARPURPOSEAPPLIESTO THISEQUIPMENTAFTERTHEAPPLICABLEPERIODOFEXPRESSWARRANTYORGUARANTY,EXCEPTAS MENTIONEDABOVE,GIVENBYANY PERSON,FIRMORCORPORATIONWITHRESPECTTO THISEQUIPMENTSHALLBINDTHE UNDERSIGNED(SOMESTATESDONOTALLOWLIMITATIONSONHOWLONGAN IMPLIEDWARRANTYLASTS,SOTHE ABOVELIMITATIONOREXCLUSIONMAYNOTAPPLYTOYOU).CANONUSA SHALLNOTBELIABLEFORLOSSOFREVENUESORPROFITS,EXPENSEFORSUBSTITUTEEQUIPMENTORSERVICE,STORAGECHARGES,LOSSORCORRUPTIONOFDATA,INCLUDINGWITHOUTLIMITATION,LOSSORCORRUPTIONOF DATASTOREDONTHEEQUIPMENT'SHARDDRIVE,ORANY OTHERSPECIAL,INCIDENTALORCONSEQUENTIALDAMAGESCAUSEDBYTHE USE,MISUSEORINABILITYTO USETHEEQUIPMENT,REGARDLESSOFTHE LEGALTHEORYONWHICHTHE CLAIMIS BASED,ANDEVENIFCANONUSA HAS BEENADVISEDOFTHEPOSSIBILITYOFSUCHDAMAGES.NORSHALLRECOVERYOFANY KINDAGAINSTCANONUSABE GREATERTHANTHEPURCHASEPRICEOFTHEEQUIPMENTSOLDBYCANONUSAANDCAUSINGTHE ALLEGEDDAMAGE,WITHOUTLIMITINGTHE FOREGOING,YOUASSUMEALL RISKAND UABILITYFORLOSS,DAMAGEORINJURYTOYOUANDYOURPROPERTYANDTO OTHERSANDTHEIRPROPERTYARISINGOUTOFUSE,MISUSEORINABILITYTOUSETHE EQUIPMENTNOTCAUSEDDIRECTLYBYTHE NEGLIGENCEOFCANONUSA.(SOMESTATESDONOTALLOWTHEEXCLUSIONORLIMITATIONOF INCIDENTALORCONSEQUENTIALDAMAGES,SOTHE ABOVELIMITATIONMAYNOTAPPLYTOYOU).THISWARRANTYSHALLNOTEXTENDTOANYONEOTHERTHANTHEORIGINALPURCHASEROFTHISEQUIPMENTORTHE PERSONFORWHOMITWASPURCHASEDAS AGIFT.Thiswarranty gives you specific legal rights, andyou may also have other rights which vary from state to state.CANONU.S.A., INC.
Introduction,, 67

ICANADAJ
CANON CONSUMER DIGITAL VIDEO EQUIPMENT LIMITED WARRANTY
The limited warranly set forth below is given by Canon Canada Inc, (" Canon Canada") with respect to Canon Consumer Digital Video Equipment (the
"Equipment") purchased in Canada, This limited warranty is only effective upon presentation of a bill of sale or other proof of purchase for this
Equipment to a Canon Service Facility when repairs are required,
The Equipment is warranted under normal, non-commercial, personal use, againsl defective materials or workmanship as follows:
Parts: Defective parts will be exchanged for new parts or, at Canon Canada's option, comparable rebuilt parts for a period of one year from the date of
original purchase, except Video Heads which will be exchanged for a period of 3 months from the date of purchase,
Labour; For a period of one year from the date of original purchase, labour will be provided free of charge by our Canon Service Facilities in Canada,
]his limited warraniy covers all defects except where:
(a) The loss or damage to the product results from:
i) accident, natural disaster, mishandling, abuse, neglect, unauthorized product modification or failure ts follow instructions contained in the
instruction manual;
ii) the use (If accessories, attachments, products, supplies, parts or devices with the Equipment that do not conform to Canon specifications
or that cause abnormally frequent service problems;
iii) repairs or services performed by any party other than a Canon Service Facility;
iv) defective baiteries or any exposure to water, sand or dirt;
v) shipping (claim musl be presented to the shipper);
(b) Any serial number on the video Equipment is altered or removed,
(c) The Equipment is used for commercial, professional or industrial purposes,
This limited warranly does not cover the cabinet (exterior finish) of the Equipment, media, nor does it apply ts Equipment purchased outside Canada,
if the Equipment contains a hard disk drive, Canon Canada recommends that data stored on that drive be duplicated or backed up to prevent its loss
in the event of a failure or other malfunction of such drive,
TO OBTAIN WARRANTY SERVICE
Ship your Equipment in its original carton, box or equivalent, properly packed, fully insured with shipping charges prepaid, together with a copy of
your bill of sale or other proof of purchase and a description of the problem ts any of the Canon Service Facilities in Canada,
LIMITATIONS
Except as otherwise required by applicable legislation, this warranly is in lieu ol all other warranties, conditions, guarantees or representations,
express or implied, statutory or otherwise, relative to the Equipment, including implied warranties or conditions of merchantabilify or fitness for a
particular purpose,
Canon Canada assumes no liability for special, consequential or incidental damages, loss or corruption of data including, without limitation, data
stored on the hard disk drive of the Equipment or loss that may arise, whether on account of negligence or otherwise, from the use, misuse or inability
to use the Equipment (including loss of profit, revenue, media or enjoyment) or from failure to conform to any express or implied warranties,
conditions, guarantees or representations, Any recovery under this limited warranly shall not exceed the purchase price of the equipment, Canon
Canada does not assume or authorize any other person to assume for Canon Canada any other liability with respect to this equipment.
This warranty does not extend to any person other than the original purchaser of the Equipment or the person for whom it was purchased as a gift and
,slates your exclusive remedy,
NOTICE TO CONSUMER
if you plan to take important videos or if the producf has not been used for some time, please check all funcbons with the instruction book before
using it,
68 • Introduction

CANADA
MEXICO
CANON U.S.A., mNC.NEW JERSEY OFFmCE
100 Jamesburg Road, Jamesburg, NJ 08831 USA
CANON U.S.A., mNC.CHICAGO OFFICE
100 Park Blvd., Itasca, IL 60143 USA
CANON U.S.A., mNC.LOS ANGELES OFFmCE
15955 Alton Parkway, Irvine, CA 92618 USA
CANON U.S.A., mNC.HONOLULU OFFICE
210 Ward Avenue, Suite 200, Honolulu, HI 96814 USA
If you have any questions, call the Canon U.S.A. information
Center toll-free at 1-800-828-4040 (U.S.A. only).
+
+
CANON CANADA mNC.
6390 Dixie Road, Mississauga, ON L5T 1P7CANON CANADA mNC. CALGARY
2828 16th Street NE, Calgary, AB T2E 7K7CANON CANADA mNC. MONTREAL
8801 Route Transcanadienne, Saint-Laurent, QC H4S 1Z6
Ifyou have any questions, call the Canon Canada Information Center
toll free (in Canada only) at 1-800-OK-CANON (1-800-652-2666).
Si vous avez des questions, veuillez tel6phoner 1-800-OK-CANON
(1-800-652-2666, sans frais au Canada seulement).
CANON MEXICANA, S DE RL DE CV
Blvd. Manuel ,_vila Camacho No. 138, Piso 17
Col. Lomas de Chapultepec
C.R 11000 Mexico, D.R, Mexico
CANON U.S.A., mNC.NEW JERSEY OFFmCE
100 Jamesburg Road, Jamesburg, NJ 08831 USA
CENTRO Y CANON LATIN AMERICA, iNC.
SURAMERICA 703 Waterford Way, Suite 400, Miami, FL 33126 USA
ASIA CANON HONGKONG COMPANY LTD.
19/F, The Metropolis Tower, 10 Metropolis Drive,
Hunghom, Kowloon, Hong KongTel: +852 3191 2333, Fax: +852 2428 3963
PUB. DIM-0915-000 © CANON INC. 2009