Embed Size (px)
Citation preview
DIGITAL COMPASS WITH ALTIMETER Instruction Manual
1. Introduction 1.1 Features:
Altimeter (m, feet) Digital compass Barometric pressure (hPa, inHg, mmHg) Temperature (℃ or ℉)256 set of altitude and barometric pressure data history Forecast icons based on changing barometric pressure 12/24 clock format Perpetual calendar Time and date by manual setting LED backlight Lanyard included for easy carrying
1.2 Button function If key idle 30minutes and pressure change within 0.4hpa, LCD off. Press any button again to resume nomal LCD display.
1.2.1 The “ALTITUDE/+” button- While in setting mode, press “ALTITUDE/+” button to increase the value - While in normal display, press “ALTITUDE/+” button to shift the display of barometer and
absolute/relative altitude. - While in absolute altitude display mode, hold the “ALTITUDE/+” button for 2s, the absolute
altitude will be reset to relative altitude and the initial value is zero. Hold the “ALTITUDE/+” button for 2s, the relative altitude will be reset to absolute altitude again. Relative altitude mode is useful when accumulated altitude reading is desired.
1.2.2 The “COMPASS/-” button - While in setting mode, press “COMPASS/-” button to decrease the value - While in normal display, press “COMPASS/-” button to enter compass mode - While in compass mode, press “COMPASS/-” to shift the display of the bearing direction in compass points and in digital.
- Hold the “COMPASS” button for 2s to enter Calibration mode.
1.2.3 The “SET” button - While in normal display, press “SET” button to shift the display of time and date - While in normal display, hold the “SET” button for 6s to enter energy saving mode: LCD off, but real time clock is still running. Press any button again to resume normal LCD display mode. - While in normal display, hold the “SET” button for 2s to enter setting mode
1.2.4 The “HISTORY” button - While in normal display, press “HISTORY” button to display the history data of barometer or
altitude with the time and date at which these data were recorded, press “ALTITUDE/+” to 1
to make a proper reset.
noWait 10 seconds before re-insert the battery again
scroll up the history record, press “COMPASS/-” to scroll down the history record. Press “HISTORY” button again to exit the history mode and return the normal display. While in history mode, “HIS” will be displayed on the temperature reading area(4), the history data sets number will be displayed at the center of compass.
- While in normal display, press “HISTORY” button for 2s to enter store data interval setting. Press “ALTITUDE/+” button to increase the value. Press “COMPASS/-” button to decrease the value. Press ”HISTORY” button to confirm the setting and exit
- The program mode can be exited at any time by pressing ‘HISTORY” button.
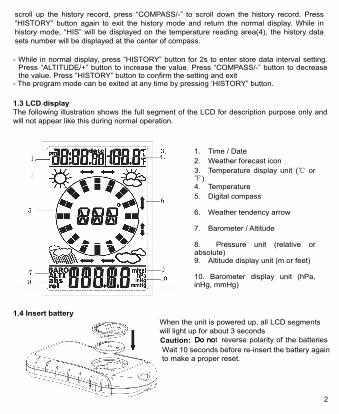
1.3 LCD display The following illustration shows the full segment of the LCD for description purpose only and will not appear like this during normal operation.
1. Time / Date 2. Weather forecast icon 3. Temperature display unit (℃ or ℉)4. Temperature 5. Digital compass
6. Weather tendency arrow
7. Barometer / Altitude
8. Pressure unit (relative or absolute) 9. Altitude display unit (m or feet)
10. Barometer display unit (hPa, inHg, mmHg)
1.4 Insert battery When the unit is powered up, all LCD segments will light up for about 3 secondsCaution: DoDo not reverse polarity of the batteries
2
2. Altitude Mode 2.1 Absolute altitude As the absolute altitude is calculated from the air pressure the change of air pressure would affect
the
altitude
reading.
To
achieve
a more
accurate
reading,
it needs
to
be
calibrated
as
pressure may
change
gradually.
Important note:
In
order
to
set
the
correct
absolute
altitude
reading,
the
altitude
must
be
known.
That information
can
be
found
by
utilizing
a topographical
map
identifying
the
current
location
with the
associated
altitude
marked.
The
user
can
then
proceed
and
follow
the
instructions
to
calibrate the
absolute
altitude.
To calibrate
the
absolute
altitude
In
absolute
altitude
display
mode,
hold
the
“SET”
button
for
2s
to
enter
setting
mode,
press
“SET”
button
to
select
the
absolute
altitude
setting.
While
the
digits
are
selected
(flashing),
press
the
“ALTITUDE”
button
to
increase
the
digit
amount.
Press
“COMPASS”
button
to decrease
the
digit
amount.
2.2
Relative
altitude
Relative
altitude
can
be
set
whenever
required
over
the
whole
measurement
range.
To
set
the
relative
altitude
to
zero While
in
absolute
altitude
display
mode,
hold
the
“ALTITUDE/+”
button
for
2s,
the
absolute
altitude
will
be
reset
to relative
altitude
and
the
initial
value
is
zero.
3.SET
Mode -
Hold
the
“SET”
button
for
2s
while
in
normal
display
to
enter
setting
mode
- Press
“
SET”
button
to
select
the
following
setting
in
sequence: 12/24
hour
format
Manual
time
setting
(hours/minutes) Calendar
setting
(year/month/date
Temperature
display
unit
degree
Celsius
or
Fahrenheit
Pressure
display
unit
in
hPa
or
mmHg
or
inHg
Altimeter
display
unit
in
m
or
feet Absolute
altitude
calibrate
In
the
above
setting
modes,
press “ALTITUDE”
button
or
“COMPASS”
button
to
change
or
scrolls
the
value.
Hold
the “ALTITUDE”
button
or
“COMPASS”
button
for
3
second
will increase/decrease
digits
in
great
steps.
Press
the
“SET”
button
to
accept
the
change
and
advance
to
the
next
setting
mode.
Continue
to
press
the
“SET”
button
to
toggle
through
the
setting
mode
until
return
to
the
normal
Mode
4.
COMPASS
Mode 4.1
Precautions
when
using the
Compass
3
Keep your digital compass away from magnets or appliances which may contain magnetic objects, such as: mobile phones, speakers, motors, etc. This compass like most magnetic compasses, points to the magnetic North, which is slightly difference from the true North. Check section ‘3.2 Magnetic Declination’ for more information.
To achieve a accurate result, you should avoid measuring a direction on the following conditions:
The compass is too close to magnetic objects The compass is too close to metal objects The compass is too close to an electrical appliance. The compass is inside a moving object or a concrete building
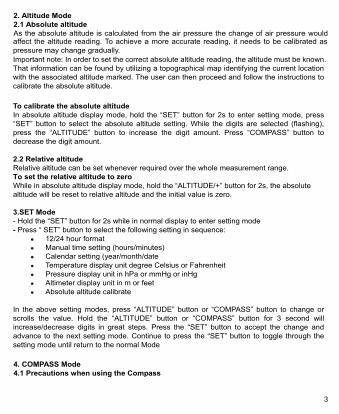
4.2 Magnetic Declination
What is Magnetic Declination - The Magnetic North Pole is slightly difference from the True North Pole. Most magnetic
compasses, point to the Magnetic North Pole. On the contrary, everything measured from a map is related to the True North Pole.
- The angular difference between Magnetic North Pole and True North Pole is called magnetic declination. Its amount (degrees and minutes) and direction (easterly and westerly) depend on where you are.
- For serious compass user or users who intends to perform accurate navigation, the compass must be adjusted to compensate for magnetic declination.
Magnetic Declination Information - Most topographic maps show magnetic north pole and or the magnetic declination information. - The manual includes the magnetic declination for some major cities. Check the ‘Magnetic Declination at Major Cities’ section for more detail. - For those cities whose names are not included in the list, you may like to refer to the online magnetic declination information.
4.3 Magnetic Declination Compensation - compensate an object’s bearing by subtract westerly (W) magnetic declination or add easterly (E) magnetic declination with the magnetic bearing.
Example - 26° Westerly magnetic declination and the compass needle points 326° (MB). - The true bearing will be 326°(MB)-26°(W) = 300°
4
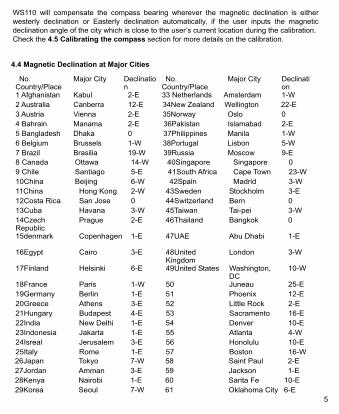
WS110 will compensate the compass bearing wherever the magnetic declination is either westerly declination or Easterly declination automatically, if the user inputs the magnetic declination angle of the city which is close to the user’s current location during the calibration. Check the 4.5 Calibrating the compass section for more details on the calibration.
4.4 Magnetic Declination at Major Cities
No. Country/Place
Major City Declination
No.Country/Place
Major City Declination
1 Afghanistan Kabul 2-E 33 Netherlands Amsterdam 1-W 2 Australia Canberra 12-E 34New Zealand Wellington 22-E 3 Austria Vienna 2-E 35Norway Oslo 0 4 Bahrain Manama 2-E 36Pakistan Islamabad 2-E 5 Bangladesh Dhaka 0 37Philippines Manila 1-W 6 Belgium Brussels 1-W 38Portugal Lisbon 5-W 7 Brazil Brasilia 19-W 39Russia Moscow 9-E 8 Canada Ottawa 14-W 40Singapore Singapore 0 9 Chile Santiago 5-E 41South Africa Cape Town 23-W 10China Beijing 6-W 42Spain Madrid 3-W 11China Hong Kong 2-W 43Sweden Stockholm 3-E 12Costa Rica San Jose 0 44Switzerland Bern 0 13Cuba Havana 3-W 45Taiwan Tai-pei 3-W 14Czech Republic
Prague 2-E 46Thailand Bangkok 0
15denmark Copenhagen 1-E 47UAE Abu Dhabi 1-E
16Egypt Cairo 3-E 48United Kingdom
London 3-W
17Finland Helsinki 6-E 49United States Washington, DC
10-W
18France Paris 1-W 50 Juneau 25-E 19Germany Berlin 1-E 51 Phoenix 12-E 20Greece Athens 3-E 52 Little Rock 2-E 21Hungary Budapest 4-E 53 Sacramento 16-E 22India New Delhi 1-E 54 Denver 10-E 23Indonesia Jakarta 1-E 55 Atlanta 4-W 24Isreal Jerusalem 3-E 56 Honolulu 10-E 25Italy Rome 1-E 57 Boston 16-W 26Japan Tokyo 7-W 58 Saint Paul 2-E 27Jordan Amman 3-E 59 Jackson 1-E 28Kenya Nairobi 1-E 60 Santa Fe 10-E 29Korea Seoul 7-W 61 Oklahoma City 6-E
5
30Malaysia Kuala Lumpur
1-E 62 Salem 18-E
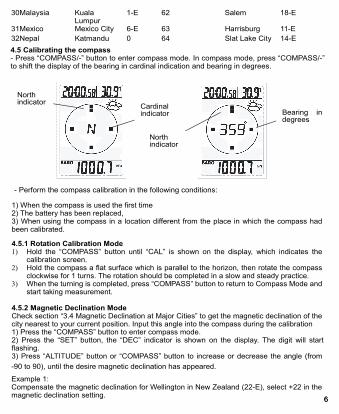
31Mexico Mexico City 6-E 63 Harrisburg 11-E 32Nepal Katmandu 0 64 Slat Lake City 14-E 4.5 Calibrating the compass- Press “COMPASS/-” button to enter compass mode. In compass mode, press “COMPASS/-” to shift the display of the bearing in cardinal indication and bearing in degrees.
- Perform the compass calibration in the following conditions:
Northindicator Cardinal
indicator
Northindicator
Bearing in degrees
1) When the compass is used the first time 2) The battery has been replaced, 3) When using the compass in a location different from the place in which the compass had been calibrated.
4.5.1 Rotation Calibration Mode 1) Hold the “COMPASS” button until “CAL” is shown on the display, which indicates the
calibration screen. 2) Hold the compass a flat surface which is parallel to the horizon, then rotate the compass
clockwise for 1 turns. The rotation should be completed in a slow and steady practice. 3) When the turning is completed, press “COMPASS” button to return to Compass Mode and
start taking measurement.
4.5.2 Magnetic Declination Mode Check section “3.4 Magnetic Declination at Major Cities” to get the magnetic declination of the city nearest to your current position. Input this angle into the compass during the calibration 1) Press the “COMPASS” button to enter compass mode. 2) Press the “SET” button, the “DEC” indicator is shown on the display. The digit will start flashing. 3) Press “ALTITUDE” button or “COMPASS” button to increase or decrease the angle (from -90 to 90), until the desire magnetic declination has appeared.
Example 1: Compensate the magnetic declination for Wellington in New Zealand (22-E), select +22 in the magnetic declination setting. 66
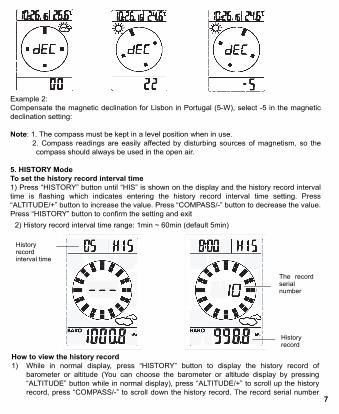
Example 2: Compensate the magnetic declination for Lisbon in Portugal (5-W), select -5 in the magnetic declination setting:
Note: 1. The compass must be kept in a level position when in use. 2. Compass readings are easily affected by disturbing sources of magnetism, so the
compass should always be used in the open air.
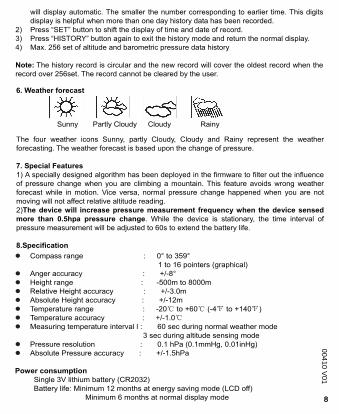
5. HISTORY Mode To set the history record interval time 1) Press “HISTORY” button until “HIS” is shown on the display and the history record interval time is flashing which indicates entering the history record interval time setting. Press “ALTITUDE/+” button to increase the value. Press “COMPASS/-” button to decrease the value. Press “HISTORY” button to confirm the setting and exit
2) History record interval time range: 1min ~ 60min (default 5min)
How to view the history record 1) While in normal display, press “HISTORY” button to display the history record of
barometer or altitude (You can choose the barometer or altitude display by pressing “ALTITUDE” button while in normal display), press “ALTITUDE/+” to scroll up the history record, press “COMPASS/-” to scroll down the history record. The record serial number
History record interval time
The record serial number
History record
77
00410 V01
will display automatic. The smaller the number corresponding to earlier time. This digits display is helpful when more than one day history data has been recorded.
2) Press “SET” button to shift the display of time and date of record. 3) Press “HISTORY” button again to exit the history mode and return the normal display. 4) Max. 256 set of altitude and barometric pressure data history
Note: The history record is circular and the new record will cover the oldest record when the record over 256set. The record cannot be cleared by the user.
6. Weather forecast
Sunny Partly Cloudy Cloudy Rainy
The four weather icons Sunny, partly Cloudy, Cloudy and Rainy represent the weather forecasting. The weather forecast is based upon the change of pressure.
7. Special Features 1) A specially designed algorithm has been deployed in the firmware to filter out the influence of pressure change when you are climbing a mountain. This feature avoids wrong weather forecast while in motion. Vice versa, normal pressure change happened when you are not moving will not affect relative altitude reading. 2)The device will increase pressure measurement frequency when the device sensed more than 0.5hpa pressure change. While the device is stationary, the time interval of pressure measurement will be adjusted to 60s to extend the battery life.
8.Specification Compass range : 0° to 359°
1 to 16 pointers (graphical) Anger accuracy : +/-8° Height range : -500m to 8000m Relative Height accuracy : +/-3.0m Absolute Height accuracy : +/-12m Temperature range : -20℃ to +60℃ (-4℉ to +140℉) Temperature accuracy : +/-1.0℃ Measuring temperature interval l : 60 sec during normal weather mode
3 sec during altitude sensing mode Pressure resolution : 0.1 hPa (0.1mmHg, 0.01inHg) Absolute Pressure accuracy : +/-1.5hPa
Power consumption Single 3V lithium battery (CR2032)
Battery life: Minimum 12 months at energy saving mode (LCD off) Minimum 6 months at normal display mode 88

![[Slides] Strengthening Employee Relationships in the Digital Era by Altimeter Group](https://img.dokumen.tips/doc/110x75/55a44b151a28ab74028b4750/slides-strengthening-employee-relationships-in-the-digital-era-by-altimeter-group.jpg)

![Altimeter / Compass Adventure Watch · Altimeter / Compass Adventure Watch)21n* 14.0 13.0 Power Saving Mode Hold [LAP/RST.] ... - La montre La Crosse Technology XG-55 possède 2 alarmes](https://img.dokumen.tips/doc/110x75/5b827ec57f8b9a2b6f8eb1c3/altimeter-compass-adventure-watch-altimeter-compass-adventure-watch21n.jpg)


![[Infographic] The 2014 State of Digital Transformation by Altimeter Group](https://img.dokumen.tips/doc/110x75/546f32d0af7959685b8b4e11/infographic-the-2014-state-of-digital-transformation-by-altimeter-group.jpg)
