Embed Size (px)
Citation preview

VistA Imaging System
DICOM Importer II User Manual
February 2013 – Revision 8 MAG*3.0*118
Department of Veterans Affairs Office of Enterprise Development
Health Provider Systems
Department of Veterans Affairs Office of Enterprise Development
Health Provider Systems
ii DICOM Importer II User Manual February 2013 VistA Imaging 3.0, MAG*3.0*118
DICOM Importer II User Manual VistA Imaging MAG*3.0*118 February 2013
Property of the US Government This is a controlled document. No changes to this document may be made without the express written consent of the VistA Imaging development group.
While every effort has been made to assure the accuracy of the information provided, this document may include technical inaccuracies and/or typographical errors. Changes are periodically made to the information herein and incorporated into new editions of this document.
Product names mentioned in this document may be trademarks or registered trademarks of their respective companies, and are hereby acknowledged.
VistA Imaging Office of Enterprise Development Department of Veterans Affairs Internet: http://www.va.gov/imaging VA intranet: http://vaww.va.gov/imaging
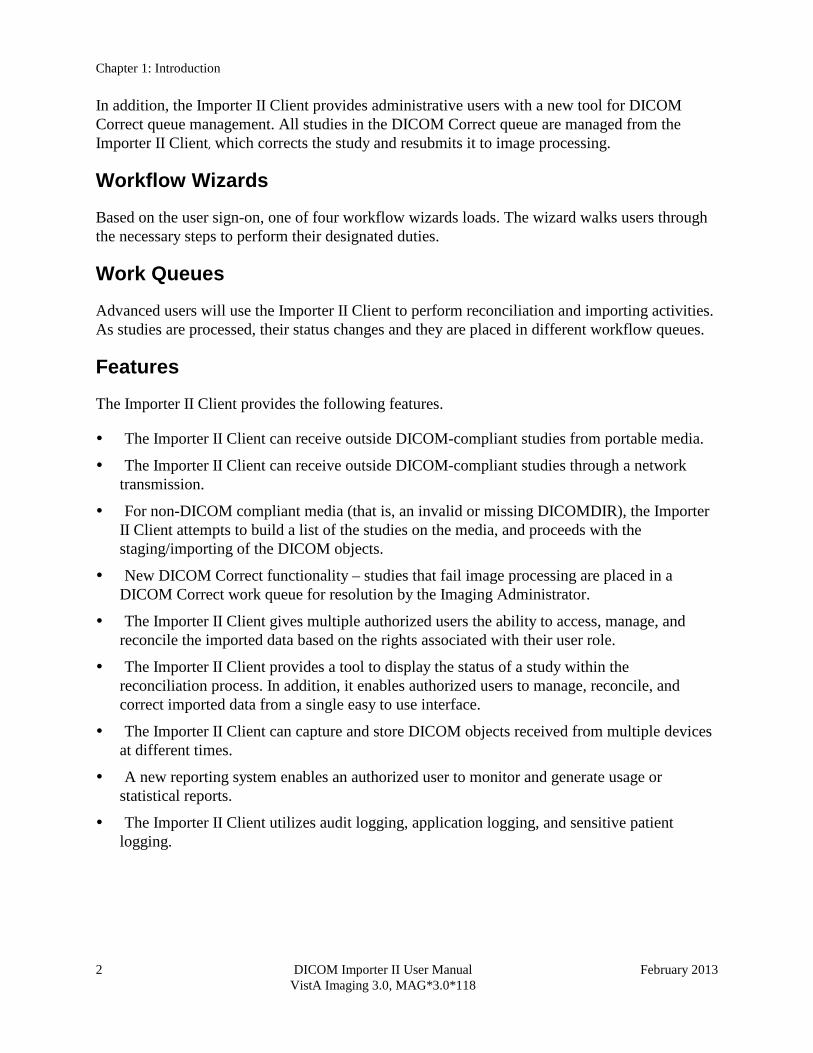
Revision History
Date Rev Notes
June 3, 2011
1 Document created for MAG*3.0*118. M. Kaji, D. White
November 29, 2011
2 Document updated to reflect changes to the GUI for Beta testing. Roy R. Seabolt
March 16, 2012
3 Major edit - Verified and updated procedures, edited content, and updated formatting and styles. Mike Mitchell.
April 9, 2012
4 Document updated to reflect changes from the Formal Review WPR. Mike Mitchell
September 18, 2012
5 Major edit – Added and updated procedures, and edited content. Mike Mitchell, Jon Louthian
October 29, 2012
6 Major content edit and update. Mike Mitchell, Jon Louthian
January 22, 2013
7 Incorporated comments from VA Formal WPR – P.Yeager, M.Mitchell
February 25, 2013
8 Incorporated comments from VA eWPR – P.Yeager,M.Mitchell

February 2013 DICOM Importer II User Manual iii VistA Imaging 3.0, MAG*3.0*118
Preface
Terms of Use
Use of the DICOM Importer II is subject to the following provisions:
Caution: Federal law restricts this device to use by or on the order of either a licensed practitioner or persons lawfully engaged in the manufacture or distribution of the product.
Caution: The FDA classifies VistA Imaging, and the DICOM Importer II (as a component of VistA Imaging) as a medical device. Unauthorized modifications to VistA Imaging, such as the installation of unapproved software, will adulterate the medical device. The use of an adulterated medical device violates US federal law (21CFR820).
Document Conventions
This document uses the following typographic conventions.
Symbol/Typeface Meaning/Use Example
Bold User input, selection, GUI element (menu item, button, field)
Click Finish. Choose Open from the File menu. Type the user account name in the Name field.
Monospaced font (typically in a box) (Bold indicates user input or selection).
Command-line sample or output (such as character-based screen captures and computer source code), menus, file names
Navigate to the \Docs\Imaging_Docs_Latest folder.
Italics Emphasis, reference to section in the document or another document, or a variable
For more information, see the VistA Imaging DICOM Gateway Installation Guide.
Square brackets, monospace or italics
Variable, placeholder, VistA menu
Access the Kernel Installation and Distribution System Menu [XPD MAIN]. ;;3.0;IMAGING;**[Patch List]**;Mar 19, 2002;Build 1989;Feb 21, 2011 MAG*3.0*<PatchNumber>.KID

iv DICOM Importer II User Manual February 2013 VistA Imaging 3.0, MAG*3.0*118
Getting Help
If you encounter any problems using the Importer II Client, contact your local Imaging Coordinator or support staff. If the problem cannot be resolved locally, use Remedy to place a service request, or contact CPS (Clinical Product Support) at 1-888-596-4357.

February 2013 DICOM Importer II User Manual v VistA Imaging 3.0, MAG*3.0*118
Contents Chapter 1: Introduction .............................................................................................................................. 1
Staging .................................................................................................................................................... 1 Graphical User Interface ......................................................................................................................... 1 Workflow Wizards ................................................................................................................................... 2 Work Queues .......................................................................................................................................... 2 Features .................................................................................................................................................. 2 User Roles .............................................................................................................................................. 3 Basic Media Staging User ...................................................................................................................... 3 Advanced Media Staging User ............................................................................................................... 3 Contracted Study Reconciliation Administrator ...................................................................................... 4 Artifact Reconciliation Administrator ....................................................................................................... 4 Report User ............................................................................................................................................ 5 Associated Security Keys ....................................................................................................................... 5
Chapter 2: Setting Up the Importer II Client ............................................................................................. 7
Prerequisites ........................................................................................................................................... 7 Microsoft .NET Framework ..................................................................................................................... 7 Installing the Importer II Client ................................................................................................................ 9 Configuring the Importer II Client .......................................................................................................... 11 Verifying the Installation ........................................................................................................................ 12 Starting the Importer II Client ................................................................................................................ 13 Stopping the Importer II Client .............................................................................................................. 14
Chapter 3: Staging the Data ..................................................................................................................... 15
Intake Staging ....................................................................................................................................... 15 DICOM Correct ..................................................................................................................................... 15 Network Import ..................................................................................................................................... 15 Non-Compliant Media ........................................................................................................................... 16 User Roles ............................................................................................................................................ 16 Staging Media when a Patient Record Exists in VistA Imaging ............................................................ 16 Staging Media when a Patient Record does not Exist in VistA Imaging ............................................... 20 Advanced Staging of Patient Data ........................................................................................................ 22
Chapter 4: Working with Studies and Orders (Reconciling) ................................................................. 27
Direct Import of Electronic Media.......................................................................................................... 27 Import Reconciliation Workflow Industry Standard for DICOM Import ................................................. 27 Importing Ordered Studies using IRWF................................................................................................ 27 Importing Unordered Studies using IRWF ............................................................................................ 27 Reconciling ........................................................................................................................................... 28 User Roles ............................................................................................................................................ 28 Entering the Reconciliation Workflow through Staged Media ............................................................... 29 Entering the Reconciliation Workflow through Direct Import ................................................................ 31 Reconciling Studies with Existing Orders ............................................................................................. 32 Reconciling Studies Requiring New Radiology Orders ......................................................................... 39 Reconciling Partially Imported Studies ................................................................................................. 47 Deleting Studies from Staged Media .................................................................................................... 52
Chapter 5: Managing Import Queues ...................................................................................................... 55

vi DICOM Importer II User Manual February 2013 VistA Imaging 3.0, MAG*3.0*118
Reverting Items Stuck in Reconciliation ............................................................................................... 55 Viewing Importer Items Currently Being Processed by an HDIG ......................................................... 61 Viewing Failed Importer Items .............................................................................................................. 62 Viewing the Application Log File ........................................................................................................... 65
Chapter 6: Viewing Study Data and Images ........................................................................................... 69
Optionally Viewing the DICOM Header and Group Information ........................................................... 71
Chapter 7: Running Usage Reports ........................................................................................................ 73
Sample Reports .................................................................................................................................... 73 User Role .............................................................................................................................................. 75 Running a Usage Report ...................................................................................................................... 75
Appendix A: Setting Up Outside Imaging Locations for the Importer II Client ................................... 81
Step 1 – Identify Imaging Types and Divisions that Need “No Credit” Imaging Locations ................... 82 Step 2 – Create the OUTSIDE STUDY Entry in the CAMERA/EQUIP/RM File ................................... 84 Step 3 – Add New Outside Imaging Locations for each Imaging Type to Divisions ............................. 86 Step 4 – Define Outside Imaging Locations Parameters ...................................................................... 92 Step 5 – OUTSIDE STUDY Camera/Equip/Room for All Radiology Imaging Location ........................ 96 Step 6 – Populate VistA Imaging Outside Imaging Location File ......................................................... 97
Appendix B: Handling Parent-Descendent Procedure Orders with the Importer II Client ................. 99
How it Works ........................................................................................................................................ 99 Questions .............................................................................................................................................. 99 How Outside Fee-basis Imaging Contractors Work ........................................................................... 100 How to Use the Importer II Client for DICOM Images for Parent/Descendent Procedures ................ 100
Appendix C: Problems Seen in Importing DICOM Objects from Media ............................................. 103
Glossary ................................................................................................................................................... 105
Index ......................................................................................................................................................... 111

February 2013 DICOM Importer II User Manual 1 VistA Imaging 3.0, MAG*3.0*118
Chapter 1: Introduction
The Digital Imaging and Communications in Medicine (DICOM) Importer II (hereafter referred to as the Importer II Client) is a client/server application that utilizes desktop client software, supported by server software on the Hybrid DICOM Image Gateway (HDIG), to transfer DICOM objects from studies performed outside the Department of Veterans Affairs (VA) into the VistA Imaging system. The Importer II Client supports sharing prior study images from the following:
VA Polytrauma clinicians
Prior studies performed outside the VA
Contracted studies performed outside the VA
This software streamlines the reconciliation of patient names and study identifiers between the outside study data and VA systems. The software breaks the processing down into three independent steps. These steps are as follows:
Staging
Reconciliation
Importing
The steps are performed through the new Importer II Client. The software introduces the following new concepts.
Staging
Multi-user GUI
Workflow Wizards
Work Queues
Staging
Staging allows a user to copy a study from external media (for example, CD, DVD, flash drive, or external hard drive) to a network share for reconciliation by an authorized user.
Graphical User Interface
The graphical user interface of the Importer II Client is built on the VistA Imaging System Architecture (VISA) within a desktop client.
This approach allows multiple users to perform staging/import/reconciliation activities, using the client hardware (media drives) and software (Importer II Client), to stage study data (external media) for later reconciliation and importing. This eliminates the need to have direct access to a server to perform import activities.
Chapter 1: Introduction
2 DICOM Importer II User Manual February 2013 VistA Imaging 3.0, MAG*3.0*118
In addition, the Importer II Client provides administrative users with a new tool for DICOM Correct queue management. All studies in the DICOM Correct queue are managed from the Importer II Client, which corrects the study and resubmits it to image processing.
Workflow Wizards
Based on the user sign-on, one of four workflow wizards loads. The wizard walks users through the necessary steps to perform their designated duties.
Work Queues
Advanced users will use the Importer II Client to perform reconciliation and importing activities. As studies are processed, their status changes and they are placed in different workflow queues.
Features
The Importer II Client provides the following features.
The Importer II Client can receive outside DICOM-compliant studies from portable media.
The Importer II Client can receive outside DICOM-compliant studies through a network transmission.
For non-DICOM compliant media (that is, an invalid or missing DICOMDIR), the Importer II Client attempts to build a list of the studies on the media, and proceeds with the staging/importing of the DICOM objects.
New DICOM Correct functionality – studies that fail image processing are placed in a DICOM Correct work queue for resolution by the Imaging Administrator.
The Importer II Client gives multiple authorized users the ability to access, manage, and reconcile the imported data based on the rights associated with their user role.
The Importer II Client provides a tool to display the status of a study within the reconciliation process. In addition, it enables authorized users to manage, reconcile, and correct imported data from a single easy to use interface.
The Importer II Client can capture and store DICOM objects received from multiple devices at different times.
A new reporting system enables an authorized user to monitor and generate usage or statistical reports.
The Importer II Client utilizes audit logging, application logging, and sensitive patient logging.
Chapter 1: Introduction
February 2013 DICOM Importer II User Manual 3 VistA Imaging 3.0, MAG*3.0*118
User Roles
The Importer II Client is a role-based application. Regardless of users’ job titles, their role falls into one or more of the following categories based on tasks required to handle patient data at the site hospital. The following roles are associated with the Importer II Client.
Basic Media Staging User (BMSU)
Advanced Media Staging User (AMSU)
Contracted Study Reconciliation Administrator (CSRA)
Artifact Reconciliation Administrator (ARA)
Report User (RU)
Each chapter of this user manual provides the information necessary to perform a major task associated with the Importer II Client. Within each chapter is a discussion of how a particular user role applies to that task.
Note: Roles can be combined when performing these tasks. Refer to the individual chapters of this manual to determine how roles can be combined for the described task.
Important: By default, VistA Imaging users cannot access the Importer II Client or data unless they have the appropriate security key. See the section Associated Security Keys at the end of this chapter for more information.
Basic Media Staging User
The BMSU is the person performing the staging. A BMSU may be file room staff, front desk registration staff, or other staff having minimal medical knowledge. The responsibilities of the BMSU are as follows.
Receive media from the patient.
Log into the Importer II Client, search for the patient, and select the patient.
Copy contents from external media to the network staging location.
Advanced Media Staging User
The AMSU is the person performing the staging. An AMSU may be file room staff, front desk registration staff, or other staff having some medical knowledge. The responsibilities of the AMSU are as follows.
Receive media from the patient.

Chapter 1: Introduction
4 DICOM Importer II User Manual February 2013 VistA Imaging 3.0, MAG*3.0*118
Log into the Importer II Client, search for the patient, select the patient, and optionally view/select individual studies from the media.
Copy selected studies from external media to the network staging location.
Contracted Study Reconciliation Administrator
The CSRA is a clinician who can identify the original order for a contracted study, performed by an outside facility, for the patient. A CSRA can match the outside contracted study to the original order so that it can be imported. The CSRA also has the required medical knowledge to perform reconciliation activities on orders placed in VistA, and to have a study performed at an outside location. The responsibilities of the CSRA are as follows.
Possess all of the capabilities designated to the AMSU.
Work with orders that must already exist on VistA.
Select the procedure/study previously ordered by the provider and match the appropriate staged study to the selected order.
Designate the study for “I”mporting.
Ensure that the imported study is in VistA Imaging for use by medical staff.
Important: The CSRA is not allowed to import and process unordered studies. If the CSRA encounters an unordered study that needs to be imported, the workflow for the Staging user is used.
Artifact Reconciliation Administrator
The ARA is a clinician with in-depth knowledge of the radiology workflow. They can identify the VistA order that corresponds to the procedure performed by a non-VA imaging facility. The responsibilities of the ARA are as follows.
Note: This is the power-user role.
Manage all aspects of the reconciliation process, including the ability to create new radiology orders, match artifacts to existing studies, update or delete information, perform DICOM Correct functions, and perform all AMSU, CSRA, and RU functions.
Identify the VistA procedure that corresponds to the one performed on the outside for a prior study.
Log into the Computerized Patient Record System (CPRS) and identify the patient and procedure/study on the system or, if necessary, create and register a new procedure/study.
Use the patient’s identifying information to retrieve the staged data from the network storage location.
Reconcile any staged data by matching it with orders and ensure that the reconciled orders are released to the PACS system.

Chapter 1: Introduction
February 2013 DICOM Importer II User Manual 5 VistA Imaging 3.0, MAG*3.0*118
Release the procedure/study to image processing for storage in the VistA Imaging file system, ensuring the imported study is available to the medical staff that is treating the patient.
Reconcile studies sent to the DICOM Correct queue to ensure the information is available to clinicians in a timely manner.
Report User
The responsibilities of the RU include generating reports on statistical data such as the number of studies imported, the number of studies requiring manual reconciliation, and so on.
Note: This role is for an administrator interested in gathering statistics on system processing.
Associated Security Keys
Each role mentioned in the Introduction is associated with security keys that provide rights from minimum rights (BMSU) to maximum rights (ARA).
Note: Users of any of the following security keys must also have access to the MAG DICOM VISA secondary menu option.
KEY NAME DESCRIPTION
MAGV IMPORT MEDIA STAGER Users holding this security key may use the Importer II Client to stage (copy) from media to the staging persistent storage, where it waits for reconciliation processing.
MAGV IMPORT STAGE MEDIA ADV
Users holding this security key may use the Importer II Client to perform all functions of the MAGV IMPORT MEDIA STAGER security key plus the following:
• Stage (copy) studies from media to staging to persistent storage.
• View images on the media.
MAGV IMPORT RECON CONTRACT
Users holding this security key may use the Importer II Client to perform all functions of the MAG IMPORT STAGE MEDIA ADV security key. In addition, users may use the Importer II Client to associate study DICOM objects with an existing Rad/Consult order for reconciliation.

Chapter 1: Introduction
6 DICOM Importer II User Manual February 2013 VistA Imaging 3.0, MAG*3.0*118
KEY NAME DESCRIPTION
MAGV IMPORT RECON ARTIFACT Users holding this security key may use the Importer II Client to perform all functions of the MAGV IMPORT RECON CONTRACT security key plus the following:
• Place new radiology orders through the Importer II Client.
• Perform DICOM Correct activities to manage problem studies in the DICOM Correct queue.
• Perform queue management activities.
• Perform reporting activities.
MAGV IMPORT REPORTS Users holding this security key may use the Importer II Client to view and print Importer reports, as well as save report contents to a text file.

February 2013 DICOM Importer II User Manual 7 VistA Imaging 3.0, MAG*3.0*118
Chapter 2: Setting Up the Importer II Client
This chapter provides information for setting up the Importer II Client on a VistA Imaging system.
Prerequisites
VistA Imaging system running MAG*3.0*118 or later
Microsoft .NET 2.0 and .NET 4 installed
Contact System Administration at your local site for more information, and to perform any of the following applicable tasks.
Permission may be required to use the CD/DVD on the local computer where the Importer II Client is going to be used for importing. Permission may be granted through VA IT group permissions.
The computer containing the Importer II Client must have the correct drivers installed to use the drives on the computer.
If the Importer II Client is installed on a Windows XP computer, then the correct codecs must be installed to allow the reading of CDs and DVDs.
When the Importer II Client is installed on a Windows 7 computer, the correct codecs allowing the reading of CDs and DVDs are included.
Note: The Importer II Client may be set to read CD-Rs and DVD-Rs by default. Issues may arise if a CD-RW or DVD-RW is received.
Microsoft .NET Framework
If the computer planned to run the Importer II Client does not have Microsoft .Net Framework 2.0 and 4 installed, then it must be installed prior to installing the Importer II Client.
1. To verify that .NET 2.0 and .NET 4 are on the PC, click Start | Settings | Control Panel | Add or Remove Programs.

Chapter 2: Setting Up the Importer II
8 DICOM Importer II User Manual February 2013 VistA Imaging 3.0, MAG*3.0*118
2. Scroll down the list of installed programs and look for Microsoft .NET Framework 2.0 and Microsoft .NET Framework 4. If they are installed, then go to the next section, Installing the Importer II.

Chapter 2: Setting Up the Importer II
February 2013 DICOM Importer II User Manual 9 VistA Imaging 3.0, MAG*3.0*118
3. To install .NET 2.0 (an earlier version of .NET), go to ftp://ftp.imaging.med.va.gov/software/NET_Framework2_0-SP2-X86/ and download and run the installation file. To install .NET 4 go to ftp://ftp.imaging.med.va.gov/software/NET_Framework4_0Full/ and download and run the installation file. Follow the instructions to complete the installs.
Installing the Importer II Client
MAG*3.0*118 requires that the Importer II Client be installed on any system where a user performs staging, reconciliation, reporting, or DICOM Correct activities. Use of the Importer II Client is security key driven, so that only users who have the required security keys are able to log in and use it.
1. Go to the software release folder: ftp://ftp.imaging.med.va.gov/software/Released_Software/MAG3_0P118/
2. Drag the MAG3_0P118_ImporterII_Setup.exe file from the folder to the desktop.
Or
Right-click the file and click Copy, then move the cursor to the desktop, right-click again and click Paste.
3. Double-click the MAG3_0P118_ImporterII_Setup icon on the desktop.

Chapter 2: Setting Up the Importer II
10 DICOM Importer II User Manual February 2013 VistA Imaging 3.0, MAG*3.0*118
4. At the Welcome to the InstallShield Wizard for VistA Imaging DICOM Importer II screen, click Next.
The installation starts.

Chapter 2: Setting Up the Importer II
February 2013 DICOM Importer II User Manual 11 VistA Imaging 3.0, MAG*3.0*118
5. At the InstallShield Wizard Completed screen, click Finish.
The Importer II Client and DICOM Viewer are installed.
Configuring the Importer II Client
The only configuring involved with the installation of the Importer II Client is specifying the correct SiteId settings. To implement this change, complete the following:
1. In Windows Explorer, go to C:\Program Files\VistA\Imaging\Importer (for Windows 7 users go to C:\Program Files(x86)\VistA\Imaging\Importer).
2. Right-click the ImagingShell.exe.config file.
3. Click Open With.

Chapter 2: Setting Up the Importer II
12 DICOM Importer II User Manual February 2013 VistA Imaging 3.0, MAG*3.0*118
4. In the Open With window, select Notepad and click OK to edit the file.
5. Change the value for SiteId to match the value of the local Station Number. Note that more than one SiteId can be entered here, with each value delimited by a comma and formatted as the following: <add key=”SiteId” value=”<value1[,value2,value3]>”/>
Example: <add key=”SiteId” value=”660,660AA”/>
When the changes are complete, go to the File menu and click Save.
Note: There must be at least one HDIG configured with the same SiteId, or the reconciled work items will never be processed by an HDIG.
Verifying the Installation
To verify that the installation and configuration was successful, start the Importer II Client using the steps in the following section, Starting the Importer II. If you are able to get to the DICOM Importer Home screen, the installation and configuration were successful.

Chapter 2: Setting Up the Importer II
February 2013 DICOM Importer II User Manual 13 VistA Imaging 3.0, MAG*3.0*118
Starting the Importer II Client
1. Click Start | All Programs | VistA Imaging Program | Importer II to start the Importer II Client.
2. If more than one station number was configured at installation, then the Select Station Number dialog box displays. If the dialog displays, select the desired station number and click OK. Otherwise, go to the next step.
3. At the VistA Sign-on dialog box, enter an access code into the Access Code text box.
4. Enter a verify code into the Verify Code text box.
5. Click OK.

Chapter 2: Setting Up the Importer II
14 DICOM Importer II User Manual February 2013 VistA Imaging 3.0, MAG*3.0*118
6. The system displays the DICOM Importer Home screen, as shown below. Buttons are enabled or disabled based on the security keys assigned to the logged-in user.
Stopping the Importer II Client
1. At the Importer window, go to the File menu and do one of the following:
a. Click Exit to close the Importer II Client.
Or
b. Click Log Out to log out and return to the login dialog box.
Note: In either case, if you are currently in the middle of the reconciliation workflow, you are asked if you want to abandon your current work before the exit or logout continues.

February 2013 DICOM Importer II User Manual 15 VistA Imaging 3.0, MAG*3.0*118
Chapter 3: Staging the Data
There are three ways in which DICOM objects are staged and made available in the DICOM Import List: Intake Staging, DICOM Correct, and Network Import.
Intake Staging
When using intake staging, patients deliver external media so that the VA may import the studies into VistA Imaging.
Note: The media readers on the user’s computer need to be unlocked before staging data. This is accomplished through VA IT group permissions.
If the media is DICOM-compliant, then the Importer II Client allows the user to stage the data to the Staging network share. If the media is not DICOM-compliant, then the Importer II Client attempts to determine the issue and, if possible, resolve the issue.
Note: For each issue with non-compliant media, a warning is displayed.
DICOM Correct
The Importer II Client introduces a centralized work queue for studies requiring corrections (DICOM Correct). These corrections are made through the Importer II Client.
Specifically, the Importer II Client enables authorized users to centrally manage and correct studies performed at the facility, but rejected by image processing for various reasons. The ability to correct images from a single workstation significantly improves workflow and simplifies the effort of correcting studies performed by the facility. The PACS administrator can view and correct all studies requiring correction in the Importer II Client user interface without having to log on to each imaging server. The centralized management also improves server security.
Users who hold the MAGV IMPORT RECON ARTIFACT security key can use the Importer II Client, DICOM Correct functionality to fix errors in studies in the DICOM Correct queue.
Note: Resolving DICOM Corrects follows the same workflow as reconciling staged studies. Step-by-step instructions for reconciling a staged study needing DICOM Correct can be found in the section Entering the Reconciliation Workflow through Staged Media located in Chapter 4: Working with Studies and Orders (Reconciling).
Network Import
When using network import, studies are transmitted directly from an outside facility to the VA over a network (for example, a DICOM proxy server). For each incoming study, a new Importer II Client work item is created, and then the images are automatically staged under that work item.

Chapter 3: Staging the Data
16 DICOM Importer II User Manual February 2013 VistA Imaging 3.0, MAG*3.0*118
For more information on setting up an import location through the AE Security Matrix, see the DICOM Gateway Planning and Installation Instructions.
Non-Compliant Media
The following are examples of non-compliant media.
Media contains no DICOMDIR file or contains an invalid DICOMDIR file – The Importer II Client reads all of the DICOM objects on the media and attempts to build a list similar to the DICOMDIR reference file. If successful, the study is staged. If unsuccessful, the media is rejected and a message displays to the user.
Media contains a DICOMDIR file, but the number of images on the media does not match the DICOMDIR record. A warning displays and the user may choose to cancel or continue.
Media contains DICOM objects, but one or more of them are not currently supported by VistA.
– If at least one DICOM object on the media is supported, a warning displays indicating the number of unsupported images that will not be imported, and the user is allowed to continue or cancel. The SOP class UIDs of the unsupported objects are written to the log file for later use by technical support.
− If none of the DICOM objects on the media are currently supported by VistA, the user is notified that import is not possible.
Media does not contain any DICOM objects – media is rejected and staging is not possible.
Media presented is a medical CD/DVD in a vendor proprietary format – media is rejected and staging is not possible.
Media presented is a medical CD/DVD in an encrypted format – if the password is unavailable, then the media is rejected and staging is not possible.
User Roles
Staging is primarily the task of the BMSU or the AMSU.
In addition, instructions are provided for advanced staging of patient data and for optionally viewing the DICOM header and group information (see the section Optionally Viewing the DICOM Header and Group Information in Chapter 6 for more information).
Staging Media when a Patient Record Exists in VistA Imaging
The following procedure shows how to stage media when a patient record exists on the local VistA database.
Role: The BMSU’s task is to download all the supported DICOM files on the external media to a designated Staging storage location.

Chapter 3: Staging the Data
February 2013 DICOM Importer II User Manual 17 VistA Imaging 3.0, MAG*3.0*118
Note: Because most patients already have their medical records in the system, the assumption is that patient data at intake is known.
1. When receiving media from a patient at intake, go to a designated machine to download from the external media.
2. Start the Importer II Client. (See Starting the Importer II for instructions on starting the Importer II Client.)
3. At the DICOM Importer Home screen, under Stage Media for Future Import, click Stage Media to copy the media to your Staging storage location for import processing. Buttons are enabled or disabled based on the security keys assigned to the logged-in user.
4. At the Stage Media for Import screen, under Patient, click Select Patient.
Note: Patient is known is selected by default.

Chapter 3: Staging the Data
18 DICOM Importer II User Manual February 2013 VistA Imaging 3.0, MAG*3.0*118
5. In the Patient Lookup window enter the patient information (partial, full name, or identifier) and click Search to locate the patient.
6. From the list of patient names returned, select the appropriate patient name and click OK.

Chapter 3: Staging the Data
February 2013 DICOM Importer II User Manual 19 VistA Imaging 3.0, MAG*3.0*118
7. At the Stage Media for Import screen (redisplayed with the patient data), under Media Details, select the drive letter, for staging data, from the Drive drop-down box and click Stage for Import.
Note: Making a selection from the Media Origin drop-down box is optional during media staging; however, it is required during the reconciliation process. Selecting a value for the media origin during staging, allows this information to be pre-populated during the reconciliation process performed by the ARA.
8. In the Staging Complete dialog box, click OK to confirm that staging completed successfully, and then remove the media from the drive.
9. Exit or log out of the Importer II Client by following the steps found in Stopping the Importer II.

Chapter 3: Staging the Data
20 DICOM Importer II User Manual February 2013 VistA Imaging 3.0, MAG*3.0*118
Staging Media when a Patient Record does not Exist in VistA Imaging
The following procedure shows how to stage media when a patient record does not exist in the VistA database.
Role: The BMSU’s task is to download all the files on the media to a designated permanent storage location.
1. When receiving media from a patient at intake, go to a designated machine to download from the external media.
2. Start the Importer II Client. (See Starting the Importer II for instructions on starting the Importer II Client.)
3. At the DICOM Importer Home screen, under Stage Media for Future Import, click Stage Media to copy the media to your Staging storage location for import processing. Buttons are enabled or disabled based on the security keys assigned to the logged-in user.

Chapter 3: Staging the Data
February 2013 DICOM Importer II User Manual 21 VistA Imaging 3.0, MAG*3.0*118
4. At the Stage Media for Import screen, under Patient, select Patient is unknown.
5. Under Media Details, select the drive letter for staging media from the Drive drop-down box, and click Stage for Import.
Note: Making a selection from the Media Origin drop-down box is optional during media staging; however, it is required during the reconciliation process. Selecting a value for the media origin during staging, allows this information to be pre-populated during the reconciliation process performed by the ARA.
6. In the Staging Complete dialog box, click OK to confirm that staging completed successfully, and then remove the media from the drive.
7. Exit or log out of the Importer II Client by following the steps found in Stopping the Importer II.
Chapter 3: Staging the Data
22 DICOM Importer II User Manual February 2013 VistA Imaging 3.0, MAG*3.0*118
Advanced Staging of Patient Data
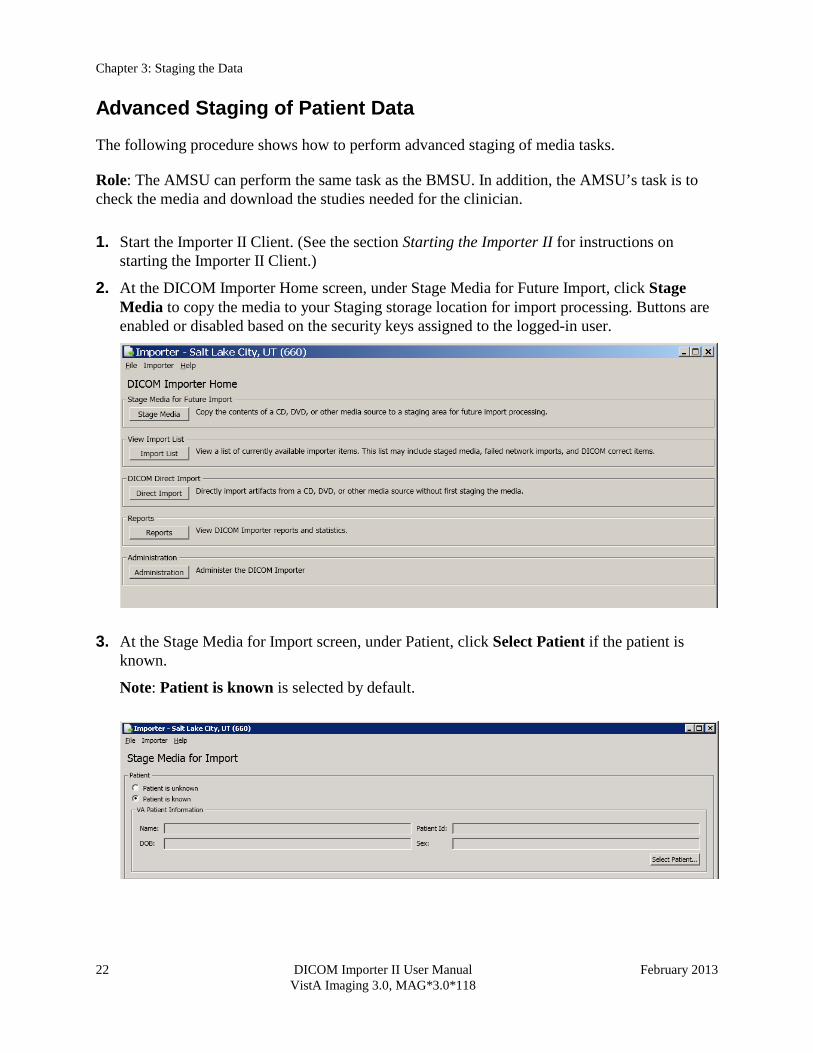
The following procedure shows how to perform advanced staging of media tasks.
Role: The AMSU can perform the same task as the BMSU. In addition, the AMSU’s task is to check the media and download the studies needed for the clinician.
1. Start the Importer II Client. (See the section Starting the Importer II for instructions on starting the Importer II Client.)
2. At the DICOM Importer Home screen, under Stage Media for Future Import, click Stage Media to copy the media to your Staging storage location for import processing. Buttons are enabled or disabled based on the security keys assigned to the logged-in user.
3. At the Stage Media for Import screen, under Patient, click Select Patient if the patient is known.
Note: Patient is known is selected by default.

Chapter 3: Staging the Data
February 2013 DICOM Importer II User Manual 23 VistA Imaging 3.0, MAG*3.0*118
4. In the Patient Lookup window, type patient information (partial or full name or identifier) and click Search to locate the patient.
5. From the returned list of patient names, select the appropriate patient name and click OK.
Steps 6-7 are optional. These steps detail the use of the Enable Advanced Options button. If you wish to stage the entire CD and do not need to select specific studies for staging, you can go directly to step 8.

Chapter 3: Staging the Data
24 DICOM Importer II User Manual February 2013 VistA Imaging 3.0, MAG*3.0*118
6. At the Stage Media for Import screen (redisplayed with the patient data), under Media Details, select the drive letter from the Drive drop-down box and then click Enable Advanced Options (now enabled).
Note: Making a selection from the Media Origin drop-down box is optional during media staging; however, it is required during the reconciliation process. Selecting a value for the media origin during staging, allows this information to be pre-populated during the reconciliation process performed by the ARA.

Chapter 3: Staging the Data
February 2013 DICOM Importer II User Manual 25 VistA Imaging 3.0, MAG*3.0*118
7. At the Stage Media for Import, under Advanced Options, you can select one or more studies to stage. Once at least one study is selected, the Stage for Import button becomes enabled. If you would like to view more information about the currently selected study, including viewing its images, click View Study. For instructions on viewing study data and images, see Chapter 6: Viewing Study Data and Images.
The Study Details window displays.

Chapter 3: Staging the Data
26 DICOM Importer II User Manual February 2013 VistA Imaging 3.0, MAG*3.0*118
8. At the Stage Media for Import screen (now redisplayed), click Stage for Import.
9. In the Staging Complete dialog box, click OK to confirm that staging was successful and then remove the media from the drive.
10. Exit or log out of the Importer II Client by following the steps found in Stopping the Importer II.

February 2013 DICOM Importer II User Manual 27 VistA Imaging 3.0, MAG*3.0*118
Chapter 4: Working with Studies and Orders (Reconciling)
Direct Import of Electronic Media
If media is not received directly from a patient, it can be sent electronically. In such a case, a CSRA or an ARA can bypass the step in staging and perform a direct import of the media by accessing it in a designated queue. In this way, files can be automatically loaded to a designated location (staging share) so that studies can be reconciled with orders as part of the Importer II Client reconciliation process.
Import Reconciliation Workflow Industry Standard for DICOM Import
The Integrating the Healthcare Enterprise (IHE) Import Reconciliation Workflow (IRWF) integration profile specifies the industry-standard technique for importing DICOM objects.1 With the IRWF, patient and study identification information is obtained from a study on the local system. This information is then used to replace the values of the corresponding data elements in the DICOM objects that will be imported. To provide an audit trail, the original DICOM values, along with the import application attributes, are saved elsewhere in the DICOM header (see the section Optionally Viewing the DICOM Header and Group Information in Chapter 6 for more information). DICOM objects from the outside study, now containing the local patient and study identification, are then imported and associated with the study on the local system.
Importing Ordered Studies using IRWF
When importing ordered studies using IRWF, both the patient and the study are already registered on the local system. The patient and study identification information, from each local study, is used to update the DICOM objects from the original outside study. Importation then takes place and the DICOM objects from each outside study are associated with the corresponding ordered study on the local system.
Importing Unordered Studies using IRWF
When importing unordered studies using IRWF, it is necessary to make sure that the patient is registered in the local system. Then a corresponding equivalent study must be created in the local system for every unordered outside study that is going to be imported. The patient and study identification information, for each newly created local study, is used to update the DICOM objects from the original outside study. Importation then takes place and the DICOM objects from each outside study are associated with its corresponding newly created study on the local system.
1 IHE Import Reconciliation Workflow, IHE Technical Framework, vol I, Rev. 8.0, 2007-08-30.

Chapter 4: Working with Studies and Orders (Reconciling)
28 DICOM Importer II User Manual February 2013 VistA Imaging 3.0, MAG*3.0*118
The Importer II Client can handle both ordered and unordered studies.
Ordered studies are those that already have corresponding orders on the local VistA system. There are three types of ordered studies.
– Prior exam or historical study (physician performed a study on the patient)
– Contracted study with the order already there (physician places an order with an outside contractor to perform a study on the patient who is at a remote site)
− DICOM Correct – A study in the DICOM Correct work queue that has an information mismatch and needs to be corrected
Unordered studies The classic example is the unordered prior study that was performed while the patient was being treated at an outside facility. The patient then brings the media containing the prior study and presents it to the local VA at intake for treatment.
– If CSRAs encounter this situation, then they must work with the ARA or the clinician to resolve the problem.
– If ARAs encounter this problem for a Radiology based study, then the software allows them to place an on-demand radiology order and set the order status.
− If the study is a Consult, then ARAs need to navigate to the CPRS subsystem and place the order. When they return to the Importer II Client and refresh the screen, the order is then listed.
Reconciling
The original patient/study information and the VA hospital information must be reconciled. For example, the Patient’s ID may be different from the Patient ID assigned by the location where the study was completed. In addition, the VA has an accession number associated with the patient that is different from the accession number used when the imaging facility performed the study. These two sets of data must be reconciled to match the patient’s data on the media with the correct patient/study in VistA.
User Roles
The ARA has all rights including staging media, placing on-demand radiology orders, and reconciling orders and staged studies. An ARA also has rights to correct studies that are in the DICOM Correct queue.
The CSRA has the rights to stage media and reconcile studies with pending orders, and to perform a direct import.
Important: Only an ARA can create radiology orders, generate reports, or review reports.

Chapter 4: Working with Studies and Orders (Reconciling)
February 2013 DICOM Importer II User Manual 29 VistA Imaging 3.0, MAG*3.0*118
Entering the Reconciliation Workflow through Staged Media
Role: As the ARA or the CSRA, you choose to reconcile and import previously staged studies.
The first way to enter the Reconciliation Workflow is by selecting previously staged media. Media is staged through one of the following processes.
You or another user staged media using the Importer II Client, through one of the Media Staging scenarios described in Chapter 3: Staging the Data.
An HDIG staged the media through a Network Import.
An HDIG staged the media because a DICOM Correct was necessary.
Regardless of how the media was staged, the method for entering the Reconciliation Workflow is as follows.
1. Start the Importer II Client. (See the section Starting the Importer II for instructions on starting the Importer II Client.)
2. At the DICOM Importer Home screen, under View Import List, click Import List.
3. The DICOM Import List screen displays. The list contains a set of optional filters that you can use to narrow down the results displayed in the list.
The Item Type filter lets you narrow down the results by staging method: StagedMedia, NetworkImport, or DicomCorrect.
The Source filter lets you narrow down the list by the source of the work item: a particular client machine, a particular HDIG, and so on.
The Patient Name filter lets you narrow down the list by patient name.

Chapter 4: Working with Studies and Orders (Reconciling)
30 DICOM Importer II User Manual February 2013 VistA Imaging 3.0, MAG*3.0*118
Note: If you logged in as a CSRA, you will ONLY see work items in the list that were staged as FEE origin, or that came in through a network import as FEE origin. Items that were staged with no origin specified, or with a different origin than FEE, will not be available for you to reconcile. They must be reconciled by an ARA.
4. Once you have identified the Importer item of interest, select it from the list, and then click Process Import Item (now enabled).
5. The Importer II Client displays the Study List screen, containing all the studies on the selected media. At this point, you have entered the Reconciliation Workflow. Refer to one of the two Reconciliation scenarios (Reconciling Studies with Existing Orders or Reconciling Studies Requiring New Radiology Orders) for further instructions.

Chapter 4: Working with Studies and Orders (Reconciling)
February 2013 DICOM Importer II User Manual 31 VistA Imaging 3.0, MAG*3.0*118
Entering the Reconciliation Workflow through Direct Import
The previous section discussed entering the reconciliation workflow by choosing a staged media Importer item. However, you can directly enter the workflow without prior staging if you have a CD or DVD containing the data, or a folder on a local drive containing studies you wish to import. This is called a Direct Import.
Role: As the ARA or the CSRA, your task involves importing directly from physical media (CD, DVD, local folder on a hard drive, and so on) without performing the staging step first.
1. Start the Importer II Client. (See the section, Starting the Importer II for instructions on starting the Importer II Client.)
2. At the DICOM Importer Home screen, under DICOM Direct Import, click Direct Import.
3. At the DICOM Direct Import screen, under Media Source, you have two choices from which to select your media:
a. Select Choose a Drive to an external drive (CD, DVD, and so on) or
b. Select Choose a Folder to choose a specific folder containing DICOM studies you wish to import. Note that the folder and all subfolders are scanned for DICOM media.
4. Choose a valid media source, and then click Reconcile Studies.

Chapter 4: Working with Studies and Orders (Reconciling)
32 DICOM Importer II User Manual February 2013 VistA Imaging 3.0, MAG*3.0*118
5. The Importer II Client displays the Study List screen, containing all the studies on the selected media. At this point, you have entered the Reconciliation Workflow. Refer to one of the two Reconciliation scenarios (Reconciling Studies with Existing Orders or Reconciling Studies Requiring New Radiology Orders) for further instructions.
Reconciling Studies with Existing Orders
The following procedure shows how to reconcile studies with pending orders. The Reconciliation Workflow is the same for both staged media and direct imports.
Role: As the ARA or the CSRA, your task begins after selecting a staged Importer item, or through direct import of media, and involves reconciling studies with pending orders.
1. Start the Importer II Client. (See the section Starting the Importer II for instructions on starting the Importer II Client.)
2. Go to the Study List by selecting a staged Importer item (see Entering the Reconciliation Workflow through Staged Media), or by initiating a Direct Import (see Entering the Reconciliation Workflow through Direct Import).
3. Under Study List, select the appropriate study. Optionally, click View Study to verify that you selected the correct study (see Chapter 6: Viewing Study Data and Images for details). Once you are satisfied that you have selected the correct study, click Reconcile Study.
Study List Status Indicator Definitions
Letter Indicator (color) Definition
C (red) Study is reconciled and all images are processed
P (yellow) Study is reconciled and some images are processed, but not all images
I (green) Study is reconciled and images are waiting for processing
D (pink) Study is marked for deletion
Note: Orders that have a status of complete (C) cannot have images added to it. An Administrative override must be performed to change the status of the order.
Important: DICOM Correct studies should be processed before they are reported as completed (C).

Chapter 4: Working with Studies and Orders (Reconciling)
February 2013 DICOM Importer II User Manual 33 VistA Imaging 3.0, MAG*3.0*118
Status Indicators C – Study is reconciled and all images are processed P – Study is reconciled and some images are processed, but not all images I – Study is reconciled and images are waiting for processing D – Study is marked for deletion Modalities DX – Digital Photography IO – Intra-oral Radiography PX – Panoramic X-Ray XC – External-camera Photography
4. The first step in the reconciliation process is the Patient Selection screen. The DICOM Patient Information section displays patient demographic information as found in the DICOM header. The VA Patient information section may or may not be populated for you already, as described in the following three scenarios:
a. If a patient is selected during staging, then the VA Patient Information section is pre-populated with that patient’s information. You are asked to verify that the patient is correct. If the patient is incorrect, you are allowed to change it by clicking Change Patient.

Chapter 4: Working with Studies and Orders (Reconciling)
34 DICOM Importer II User Manual February 2013 VistA Imaging 3.0, MAG*3.0*118
b. If you have already reconciled a different study in the same Importer session, and the patient demographics in the DICOM header for the current study identically match the demographic information in the DICOM header for a previously reconciled study, then the Importer II Client pre-populates the patient information for you saving you the time of searching again. If the patient is incorrect, you are allowed to change it by clicking Change Patient.
c. If neither of the above scenarios is applicable, the Importer II Client does not pre-populate a patient for you. You are required to search for and select the appropriate patient before the system allows you to continue.

Chapter 4: Working with Studies and Orders (Reconciling)
February 2013 DICOM Importer II User Manual 35 VistA Imaging 3.0, MAG*3.0*118
5. Once the patient is searched for (or verified if pre-populated), click Next.
6. If you are logged in as an ARA, the next step is to choose the study origin and target order. If you are logged in as a CSRA, you will NOT see this step and are instead taken directly to the Choose Existing Order screen, since the study origin is already set to FEE, and you do not have the option to create a new radiology order.
7. Since in this scenario the order already exists, select Use an Existing Order for target order.
8. Click Next.

Chapter 4: Working with Studies and Orders (Reconciling)
36 DICOM Importer II User Manual February 2013 VistA Imaging 3.0, MAG*3.0*118
9. At the Choose Existing Order screen, select the appropriate existing order. The list displays both RAD (radiology orders) and CON (consults orders).
10. If a radiology order is chosen, the exam status is updated to EXAMINED by default. This is to allow local workflow to be followed to close out the exam. If you know that the exam should be completed as-is (no additional images need to be added, or no diagnostic codes need to be entered, and so on), then you may choose to advance the status to COMPLETE from here by selecting the checkbox. This option is not available for consults, only radiology orders.
11. Click Next.

Chapter 4: Working with Studies and Orders (Reconciling)
February 2013 DICOM Importer II User Manual 37 VistA Imaging 3.0, MAG*3.0*118
12. At the Reconciliation Summary screen, verify that the study matches the order and then click Return to Study List.
13. At the Study List screen, note the marker added in the Status column of the study. If there are other studies on the media you wish to import, you can continue reconciling them. When all studies of interest are reconciled, click Submit Import Request.

Chapter 4: Working with Studies and Orders (Reconciling)
38 DICOM Importer II User Manual February 2013 VistA Imaging 3.0, MAG*3.0*118
Status Indicators C – Study is reconciled and all images are processed P – Study is reconciled and some images are processed, but not all images I – Study is reconciled and images are waiting for processing D – Study is marked for deletion Modalities DX – Digital Photography IO – Intra-oral Radiography PX – Panoramic X-Ray XC – External-camera Photography
14. At the Import Confirmation screen, verify that the studies you wish to import are displayed, and verify that the reconciliation looks correct. If it does not, you may return to the study list to update the reconciliations. If you are satisfied with the reconciliations, click Import.

Chapter 4: Working with Studies and Orders (Reconciling)
February 2013 DICOM Importer II User Manual 39 VistA Imaging 3.0, MAG*3.0*118
15. In the Queued for Import dialog box, click OK indicating that the work item is queued for import processing.
16. The system returns you to either the Direct Import home screen or the DICOM Import List, depending on how you originally entered the reconciliation workflow. From here, you can continue to work on other Importer scenarios, or you may exit or log out of the Importer II Client by following the steps found in Stopping the Importer II.
Reconciling Studies Requiring New Radiology Orders
The following procedure shows how to reconcile studies with pending orders.
Role: As the ARA, your task begins after selecting a staged Importer item, or through direct import of media, and involves creating a new radiology order during reconciliation. This scenario is not available to the CSRA.

Chapter 4: Working with Studies and Orders (Reconciling)
40 DICOM Importer II User Manual February 2013 VistA Imaging 3.0, MAG*3.0*118
1. Start the Importer II Client. (See the section Starting the Importer II for instructions on starting the Importer II Client.)
2. Go to the Study List by selecting a staged Importer item (see Entering the Reconciliation Workflow through Staged Media), or by initiating a Direct Import (see Entering the Reconciliation Workflow through Direct Import).
3. At Study List screen, select the appropriate study. Optionally, click View Study to verify that you selected the correct study (see Chapter 6: Viewing Study Data and Images for details). Once you are satisfied that you have selected the correct study, click Reconcile Study.
Status Indicators C – Study is reconciled and all images are processed P – Study is reconciled and some images are processed, but not all images I – Study is reconciled and images are waiting for processing D – Study is marked for deletion Modalities DX – Digital Photography IO – Intra-oral Radiography PX – Panoramic X-Ray XC – External-camera Photography

Chapter 4: Working with Studies and Orders (Reconciling)
February 2013 DICOM Importer II User Manual 41 VistA Imaging 3.0, MAG*3.0*118
4. The first step in the reconciliation process is the Patient Selection screen. The DICOM patient information section displays patient demographic information as found in the DICOM header. The VA Patient information section may or may not be populated for you already, as described in the following three scenarios:
a. If the user selects a patient during staging, the VA Patient Information section is pre-populated with that patient’s information. You are asked to verify that the patient is correct. If the patient is incorrect, you are allowed to change it by clicking Change Patient.
b. If you have already reconciled a different study in the same Importer session, and the patient demographics in the DICOM header for the current study identically match the demographic information in the DICOM header for a previously reconciled study, the Importer II Client pre-populates the patient information for you, saving you the time of searching again. If the patient is incorrect, the system allows you to change it by clicking Change Patient.

Chapter 4: Working with Studies and Orders (Reconciling)
42 DICOM Importer II User Manual February 2013 VistA Imaging 3.0, MAG*3.0*118
c. If neither of the above scenarios is applicable, the Importer II Client does not pre-populate patient information for you. You are required to search for and select the appropriate patient before the system allows you to continue.
5. Once the patient is searched for (or verified if pre-populated), click Next.
If you logged in as an ARA, the next step is to choose the study origin and target order. If you logged in as a CSRA, you do NOT see this step. Instead, the system takes you directly to the Choose Existing Order screen, since the study origin is already set to FEE, and you do not have the option to create a new radiology order.

Chapter 4: Working with Studies and Orders (Reconciling)
February 2013 DICOM Importer II User Manual 43 VistA Imaging 3.0, MAG*3.0*118
6. In this scenario, we need to create a new radiology order. To create a new radiology order, select Create Radiology Order under Target Order. Selecting this option creates a non-credit order. If different crediting is required for the order, then create the order through CPRS, and fall back to the Use an Existing Order flow.
7. Click Next.
The Create New Radiology Order screen consists of three groups of information. Under VA Patient Information there is selected identifying information for the patient selected in the previous step, as found in the VA patient record. Under Original Study Information there is study information retrieved from the DICOM metadata for the selected study. Under VA Order Details, there are data entry fields, which are needed to create a new radiology order in VistA.
8. Perform the following steps under VA Order Details.
a. Select the appropriate Ordering Provider.
b. Select the appropriate Ordering Location.
c. Select the appropriate Procedure.
d. Optionally, select any applicable Procedure Modifiers.

Chapter 4: Working with Studies and Orders (Reconciling)
44 DICOM Importer II User Manual February 2013 VistA Imaging 3.0, MAG*3.0*118
Caution: The Set the exam to COMPLETE after import checkbox is a convenience feature, which allows the system to complete the exam for you without the need to go into any external applications. However, this feature should be used with caution. If additional work should be performed prior to exam completion (for example, diagnostic codes need to be entered, additional reports or images need to be added at a later time, and so on), then do not select to complete the exam from here and leave this checkbox cleared..
9. Click Next.

Chapter 4: Working with Studies and Orders (Reconciling)
February 2013 DICOM Importer II User Manual 45 VistA Imaging 3.0, MAG*3.0*118
10. At the Reconciliation Summary screen, verify that the study matches the order and then click Return to Study List.
11. At the Study List screen, note the marker added in the Status column of the study. If there are other studies on the media you wish to import, you can continue reconciling them. When all studies of interest have been reconciled, click Submit Import Request.

Chapter 4: Working with Studies and Orders (Reconciling)
46 DICOM Importer II User Manual February 2013 VistA Imaging 3.0, MAG*3.0*118
Status Indicators C – Study is reconciled and all images are processed P – Study is reconciled and some images are processed, but not all images I – Study is reconciled and images are waiting for processing D – Study is marked for deletion Modalities DX – Digital Photography IO – Intra-oral Radiography PX – Panoramic X-Ray XC – External-camera Photography
12. At the Import Confirmation screen, verify that the study or studies you wish to import are
displayed, and verify that the reconciliation looks correct. If it does not, you may return to the study list to update the reconciliations. If you are satisfied with the reconciliations, click Import.

Chapter 4: Working with Studies and Orders (Reconciling)
February 2013 DICOM Importer II User Manual 47 VistA Imaging 3.0, MAG*3.0*118
13. In the Queued for Import dialog box, click OK indicating that the work item is queued for import processing.
14. The system returns you to either the Direct Import screen or the DICOM Import List screen, depending on how you originally entered the reconciliation workflow. From here, you can continue to work on other Importer scenarios, or you may exit or log out of the Importer II Client by following the steps found in Stopping the Importer II.
Reconciling Partially Imported Studies
Occasionally, a piece of media that you are attempting to import contains images for a study in which some of the images on the media already exist in VistA, while others do not. This is termed a partially imported study, and the system displays these studies in the study list with a status indicator of P.
Role: As the ARA or the CSRA, your task begins after the media is staged or through direct import of media, and involves adding additional images to a partially imported study.
1. Start the Importer II Client. (See the section Starting the Importer II for instructions on starting the Importer II Client.)
2. Go to the Study List by selecting a staged Importer item (see Entering the Reconciliation Workflow through Staged Media), or by initiating a Direct Import (see Entering the Reconciliation Workflow through Direct Import).

Chapter 4: Working with Studies and Orders (Reconciling)
48 DICOM Importer II User Manual February 2013 VistA Imaging 3.0, MAG*3.0*118
3. At the Study List screen, select a partially imported study (P). The system displays the Study Details panel for the selected study. The Study Information column shows patient and study information obtained from the DICOM header. Since the study is partially imported, the Order Information column is populated with the patient and order data that the existing images were filed under. At this point, you can optionally click View Study, to verify that you selected the correct study (see Chapter 6: Viewing Study Data and Images for details). When you are satisfied that you have selected the correct study, click Reconcile Study.
Status Indicators C – Study is reconciled and all images are processed P – Study is reconciled and some images are processed, but not all images I – Study is reconciled and images are waiting for processing D – Study is marked for deletion Modalities DX – Digital Photography IO – Intra-oral Radiography PX – Panoramic X-Ray XC – External-camera Photography
Chapter 4: Working with Studies and Orders (Reconciling)
February 2013 DICOM Importer II User Manual 49 VistA Imaging 3.0, MAG*3.0*118
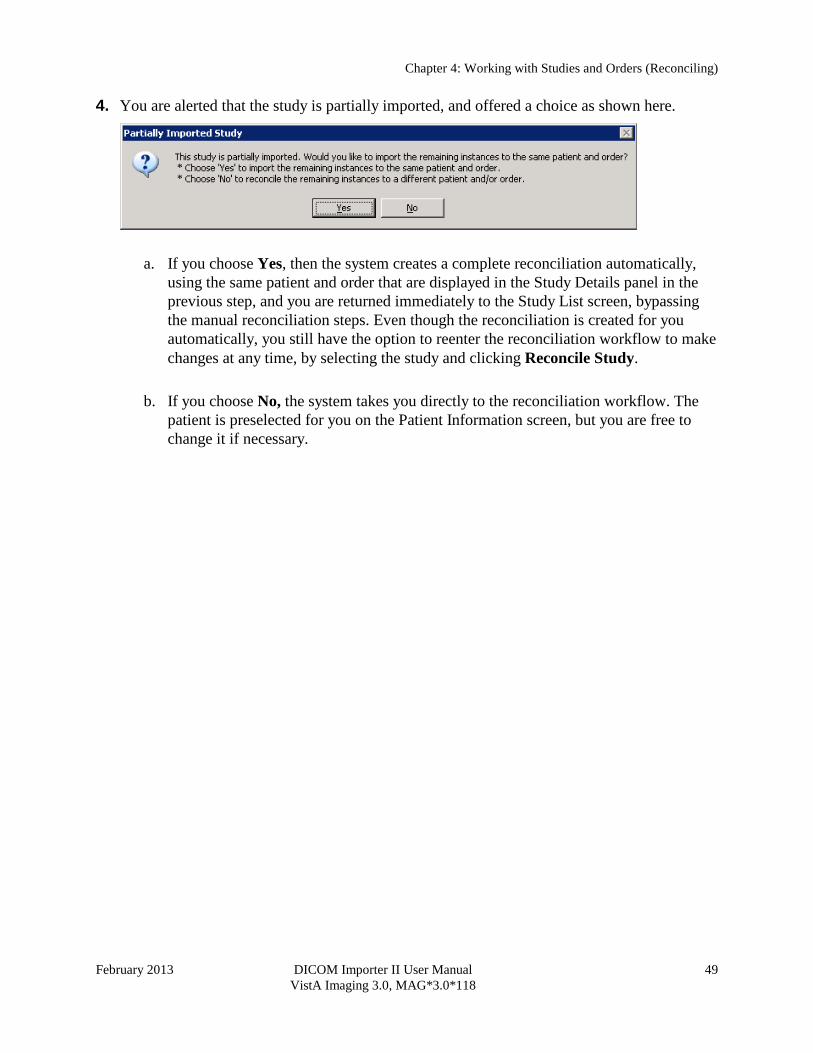
4. You are alerted that the study is partially imported, and offered a choice as shown here.
a. If you choose Yes, then the system creates a complete reconciliation automatically, using the same patient and order that are displayed in the Study Details panel in the previous step, and you are returned immediately to the Study List screen, bypassing the manual reconciliation steps. Even though the reconciliation is created for you automatically, you still have the option to reenter the reconciliation workflow to make changes at any time, by selecting the study and clicking Reconcile Study.
b. If you choose No, the system takes you directly to the reconciliation workflow. The patient is preselected for you on the Patient Information screen, but you are free to change it if necessary.

Chapter 4: Working with Studies and Orders (Reconciling)
50 DICOM Importer II User Manual February 2013 VistA Imaging 3.0, MAG*3.0*118
5. Regardless of whether you chose automatic or manual reconciliation in the previous step, once the reconciliation is complete the system gives the study a new status of PI as shown below. This indicates that the study is partially imported and that the remaining images are reconciled and ready for import. If there are other studies on the media you wish to import, you can continue reconciling them. When all studies of interest are reconciled, click Submit Import Request.
Status Indicators C – Study is reconciled and all images are processed P – Study is reconciled and some images are processed, but not all images I – Study is reconciled and images are waiting for processing D – Study is marked for deletion Modalities DX – Digital Photography IO – Intra-oral Radiography PX – Panoramic X-Ray XC – External-camera Photography

Chapter 4: Working with Studies and Orders (Reconciling)
February 2013 DICOM Importer II User Manual 51 VistA Imaging 3.0, MAG*3.0*118
6. At the Import Confirmation screen, verify that the study or studies you wish to import are displayed, and verify that the reconciliation looks correct. If it does not, you may return to the study list to update the reconciliations. If you are satisfied with the reconciliations, click Import.
7. In the Queued for Import dialog box, click OK indicating that the work item is queued for import processing.

Chapter 4: Working with Studies and Orders (Reconciling)
52 DICOM Importer II User Manual February 2013 VistA Imaging 3.0, MAG*3.0*118
8. The system returns you to either the Direct Import screen or the DICOM Import List screen, depending on how you originally entered the reconciliation workflow. From here, you can continue to work on other Importer scenarios, or you may exit or log out of the Importer II Client by following the steps found in Stopping the Importer II.
Deleting Studies from Staged Media
A piece of staged media that you are attempting to import will occasionally contain multiple studies. If you know that you do not need one or more of these studies, you can choose to delete them from the staged media bundle. This has the benefit of freeing up space on the imaging share, since Importer items and their extra studies remain on the system for a configurable amount of time after submission and processing.
Role: As the ARA or the CSRA, your task begins after the media is staged, and involves deleting unneeded studies from a staged media bundle. This workflow does not apply to Direct Import
1. Start the Importer II Client. (See the section Starting the Importer II for instructions on starting the Importer II Client.)
2. Go to the Study List by selecting a staged Importer item (see Entering the Reconciliation Workflow through Staged Media).
3. At the Study List screen, select a study that you wish to delete. At this point, you can optionally click View Study, to verify that you selected the correct study (see Chapter 6: Viewing Study Data and Images for details).

Chapter 4: Working with Studies and Orders (Reconciling)
February 2013 DICOM Importer II User Manual 53 VistA Imaging 3.0, MAG*3.0*118
4. Once you are satisfied that the correct study is selected, click Delete. (This button is only available for staged media, not direct import). The system gives the study a status of D, and updates the text of the Delete button to Don’t Delete. If you decide that you do not actually wish to delete the study, make sure it is selected, and then click Don’t Delete. Otherwise, click Submit Import Request to continue the deletion process.
Note: The system does not actually delete the media until you submit the Importer item, so you can toggle back and forth as often as you like on this screen.
Status Indicators C – Study is reconciled and all images are processed P – Study is reconciled and some images are processed, but not all images I – Study is reconciled and images are waiting for processing D – Study is marked for deletion Modalities DX – Digital Photography IO – Intra-oral Radiography PX – Panoramic X-Ray XC – External-camera Photography
Chapter 4: Working with Studies and Orders (Reconciling)
54 DICOM Importer II User Manual February 2013 VistA Imaging 3.0, MAG*3.0*118
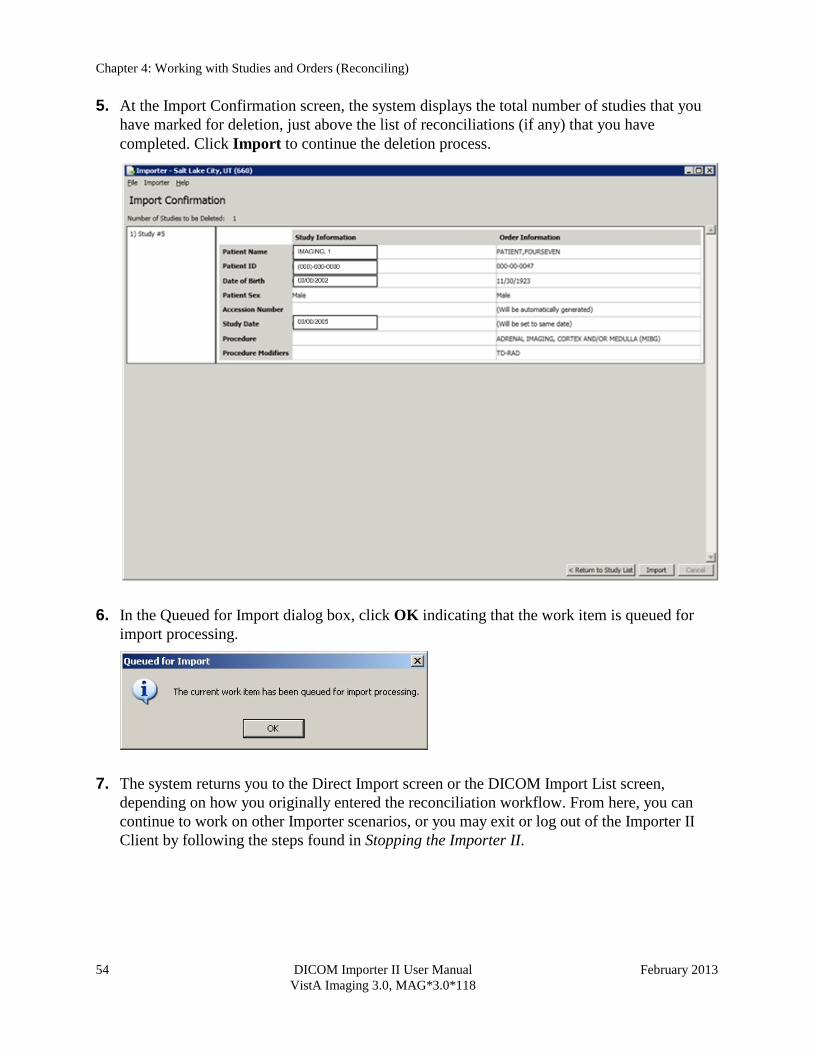
5. At the Import Confirmation screen, the system displays the total number of studies that you have marked for deletion, just above the list of reconciliations (if any) that you have completed. Click Import to continue the deletion process.
6. In the Queued for Import dialog box, click OK indicating that the work item is queued for import processing.
7. The system returns you to the Direct Import screen or the DICOM Import List screen, depending on how you originally entered the reconciliation workflow. From here, you can continue to work on other Importer scenarios, or you may exit or log out of the Importer II Client by following the steps found in Stopping the Importer II.

February 2013 DICOM Importer II User Manual 55 VistA Imaging 3.0, MAG*3.0*118
Chapter 5: Managing Import Queues
Managing import queues involves performing periodic maintenance involving the following tasks:
Reverting work items stuck in reconciliation.
Viewing the Importer items that are currently being processed by an HDIG.
Viewing failed Importer items.
Role: The ARA handles these tasks exclusively.
Reverting Items Stuck in Reconciliation
If a user selects an item from the Import List, and the user’s Importer II Client or workstation crashes before the item is cancelled or submitted for processing, the Importer item they were actively working will be stuck in a status of In Reconciliation. When this occurs, the Importer item no longer shows up in the Import List, and is therefore unavailable for subsequent reconciliation attempts.
The Revert Import Item screen allows an administrator to identify Importer items that are stuck in reconciliation, revert them back to a status of New, and delete reconciliations that were partially completed, if any. This process restores the Importer item to a known good state, so that it is available once again for selection in the Import List.

Chapter 5: Managing Import Queues
56 DICOM Importer II User Manual February 2013 VistA Imaging 3.0, MAG*3.0*118
Use caution when reverting Importer items. The Revert Items list shows all Importer items that are currently in reconciliation, including items that are not stuck and are actively being worked on. The “stuck” items must be identified using data such as the last person to modify the item, the timestamp of the modification, or other identifying information. If an item that is currently being worked is inadvertently reverted, then the user gets an error when they attempt to submit the import, and will have to go back to the Import List and repeat the reconciliation process.
The following procedure shows how to revert items stuck in reconciliation.
Note: As the ARA, the administrator tasks require the MAGV IMPORT RECON CONTRACT security key.
Chapter 5: Managing Import Queues
February 2013 DICOM Importer II User Manual 57 VistA Imaging 3.0, MAG*3.0*118
1. Start the Importer II Client. (See the section Starting the Importer II for instructions on starting the Importer II Client.)
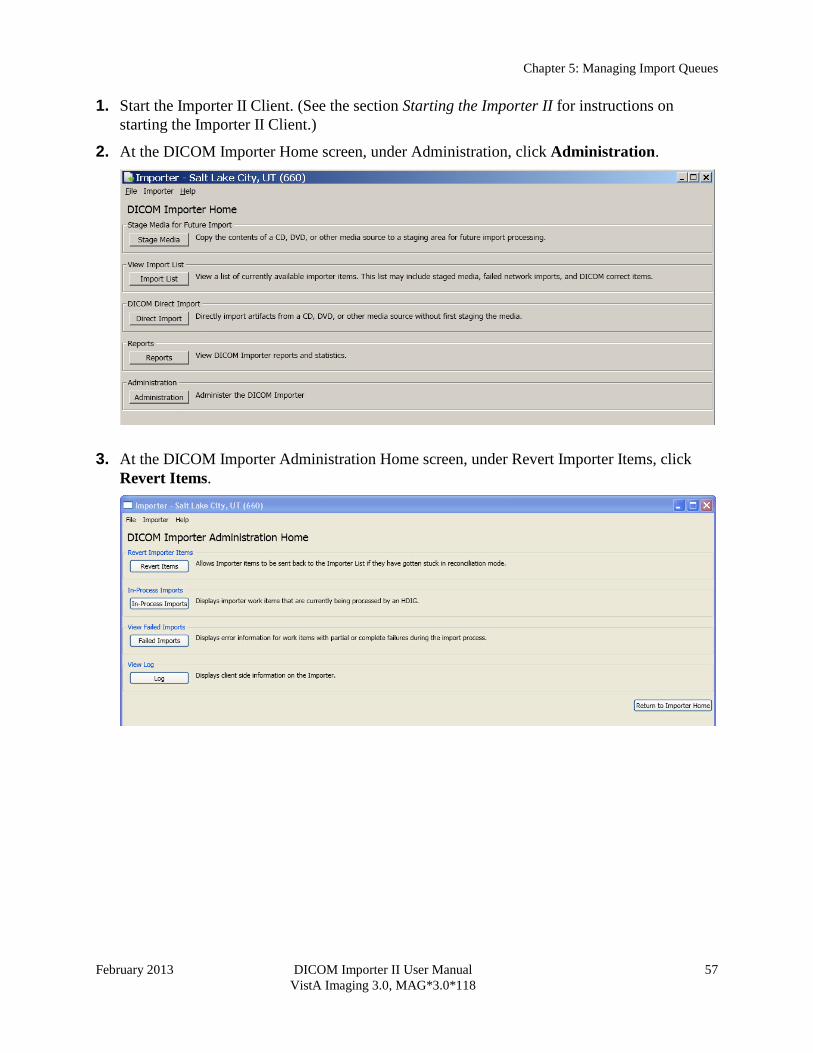
2. At the DICOM Importer Home screen, under Administration, click Administration.
3. At the DICOM Importer Administration Home screen, under Revert Importer Items, click Revert Items.

Chapter 5: Managing Import Queues
58 DICOM Importer II User Manual February 2013 VistA Imaging 3.0, MAG*3.0*118
4. At the Revert Import Item screen, select the Importer item that is stuck in reconciliation, being especially careful not to select other import items that are not stuck, and click Revert Import Item.
5. If the reverted item was the last one in the list, the system displays the No Items in Reconciliation dialog box. Click OK to dismiss the dialog.

Chapter 5: Managing Import Queues
February 2013 DICOM Importer II User Manual 59 VistA Imaging 3.0, MAG*3.0*118
6. At the Revert Import Item screen, click Return to Administration Home.
7. At the DICOM Importer Administration Home screen, click Return to Importer Home.

Chapter 5: Managing Import Queues
60 DICOM Importer II User Manual February 2013 VistA Imaging 3.0, MAG*3.0*118
8. At the DICOM Importer Home screen, under View Import List, click Import List to verify the reverted item is now listed.
9. Exit or log out of the Importer II Client by following the steps found in Stopping the Importer II.

Chapter 5: Managing Import Queues
February 2013 DICOM Importer II User Manual 61 VistA Imaging 3.0, MAG*3.0*118
Viewing Importer Items Currently Being Processed by an HDIG
The Importer II Client allows users to reconcile DICOM studies with the correct VA Patient and Order data. However, the work of actually importing the studies into VistA is handled asynchronously by an HDIG.
Administrators have the ability to view the current work status for each of the HDIGs for the logged in station number.
1. Start the Importer II Client. (See the section Starting the Importer II for instructions on starting the Importer II Client.)
2. At the DICOM Importer Home screen, under Administration, click Administration.
3. At the DICOM Importer Administration Home screen, under In-Process Imports, click In-Process Imports.

Chapter 5: Managing Import Queues
62 DICOM Importer II User Manual February 2013 VistA Imaging 3.0, MAG*3.0*118
4. At the In-Process Importer Items screen, the system displays a list of items (if any) that the HDIGs are currently processing for the logged in station number. The list shows high-level details, including the IEN of the Importer item, the type, when the item was submitted, who submitted the item, and which HDIG is currently processing the item.
5. The list does not refresh automatically, but you can click Refresh In-Process Import List at any time to refresh the list manually. When you are finished working with in-process Importer items, you can continue working on other Importer use cases, or you may exit or log out of the Importer II Client by following the steps found in Stopping the Importer II.
Viewing Failed Importer Items
The Importer II Client allows users to reconcile DICOM studies with the correct VA Patient and Order data. However, the work of actually importing the studies into VistA is handled asynchronously by an HDIG. Because the import process is asynchronous, errors during import cannot be displayed in real time when the user submits the studies for processing. Instead, the Importer II Client supplies functionality to view failed import items after the processing is complete.
The following steps describe how an administrator can see a list of failed work items for the logged in station number, and view details related to each of the failures.

Chapter 5: Managing Import Queues
February 2013 DICOM Importer II User Manual 63 VistA Imaging 3.0, MAG*3.0*118
1. Start the Importer II Client. (See the section Starting the Importer II for instructions on starting the Importer II Client.)
2. At the DICOM Importer Home screen, under Administration, click Administration.
3. At the DICOM Importer Administration Home screen, under View Failed Imports, click Failed Imports.

Chapter 5: Managing Import Queues
64 DICOM Importer II User Manual February 2013 VistA Imaging 3.0, MAG*3.0*118
4. At the Failed Import Items screen, the system displays a list of items (if any) that failed at some point during import processing. When you select an item from the list, the system displays the details of the item in the Importer Item Error Details scrolling text box. This data gives you a significant amount of information to assist in resolving the issue.
5. Once an item is selected, you have several options:
a. In the event that you need to send the error details to support personnel in an email, you can select the error details text and copy it to the system clipboard through the standard Ctrl+C keyboard combination.
b. If you determine that the error is probably due to a transient condition (for example, a file failed to copy because of a temporary network issue), you may choose to resubmit the Importer item by clicking Resubmit Import Item. This resubmits the Importer item to the HDIG in order to attempt processing again for those objects that failed import previously. If they fail again, the Importer item reappears in the Failed Import Items list after processing. Resubmission is only successful for a subset of errors, as described above.

Chapter 5: Managing Import Queues
February 2013 DICOM Importer II User Manual 65 VistA Imaging 3.0, MAG*3.0*118
c. If you determine that the issue is resolved in another manner and that you no longer need the Importer item, you may delete it by clicking Delete Import Item. For example, you may determine that all images are successfully transmitted, but the Importer item failed because the HDIG is not able to complete the exam automatically after import. If you are able to complete the exam through some other means (for example, CPRS), then you may safely delete the Importer item.
6. When you are finished working with failed Importer items, you can continue working on other Importer use cases, or you may exit or log out of the Importer II Client by following the steps found in Stopping the Importer II.
Viewing the Application Log File
The Importer II Client allows administrators to view log files from within the Importer II Client.
1. Start the Importer II Client. (See the section Starting the Importer II for instructions on starting the Importer II Client.)
2. At the DICOM Importer Home screen, under Administration, click Administration.

Chapter 5: Managing Import Queues
66 DICOM Importer II User Manual February 2013 VistA Imaging 3.0, MAG*3.0*118
3. At the DICOM Importer Administration Home screen, under View Log, click Log.
4. At the Log screen, the system displays the contents of the latest application log file. You can copy text out of the log to the system clipboard by selecting it and pressing the Ctrl+C key combination on your keyboard.
5. The list does not refresh automatically, but you can click Refresh at any time to refresh the display manually. When you are finished working with the application log, you can continue

Chapter 5: Managing Import Queues
February 2013 DICOM Importer II User Manual 67 VistA Imaging 3.0, MAG*3.0*118
working on other Importer scenarios, or you may exit or log out of the Importer II Client by following the steps found in Stopping the Importer II.


February 2013 DICOM Importer II User Manual 69 VistA Imaging 3.0, MAG*3.0*118
Chapter 6: Viewing Study Data and Images
This chapter describes the steps required for viewing study data and images. Study data, images, and DICOM headers can be viewed when performing advanced staging, or from the Study List screen during the reconciliation workflow.
1. At the Study Details window, enter image numbers in the text box under Images and click View Images.
The images now display in the DICOM Viewer.

Chapter 6: Viewing Study Data and Images
70 DICOM Importer II User Manual February 2013 VistA Imaging 3.0, MAG*3.0*118
2. Additional series may be selected, to review the images and DICOM information.
Note: If you need to view the DICOM header and group information, then follow the procedure in the next section,
Optionally Viewing the DICOM Header and Group Information for details on the institution, address, physician name, and so on. In addition, follow this procedure to resolve any issues with the order.
3. In the File menu, click Exit to close the DICOM Viewer application.
4. In the Study Details window, click Close.

Chapter 6: Viewing Study Data and Images
February 2013 DICOM Importer II User Manual 71 VistA Imaging 3.0, MAG*3.0*118
Optionally Viewing the DICOM Header and Group Information
The following procedure shows how to view DICOM header and group information.
1. On the ViewInfo menu in the DICOM Viewer window, click DICOM Header.
The DICOM Header window displays.
2. Check the DICOM header information by clicking the Header tab. The displayed metadata lists provide details such as the name of the institution and department, date, and physician name.

Chapter 6: Viewing Study Data and Images
72 DICOM Importer II User Manual February 2013 VistA Imaging 3.0, MAG*3.0*118
3. Click the Group 2 tab to view the technical information.
4. Close the DICOM Header, Importer, and Study Details windows.
The Importer window redisplays, so that the staging of media for import can continue.

February 2013 DICOM Importer II User Manual 73 VistA Imaging 3.0, MAG*3.0*118
Chapter 7: Running Usage Reports
Reports can be displayed on a screen, sent to a printer, or exported to a file. The Importer II Client can also generate a real-time report, which displays the total data imported into a network share location, by showing the following:
Import Details
Totals by Location
Totals by Modality
All generated errors are written to the Application log.
Sample Reports
The Import Details report displays a statistical count for studies, series in a study, and objects (images or reports) both successful and failed that are imported on a specified date or a range of dates.

Chapter 7: Running Usage Reports
74 DICOM Importer II User Manual February 2013 VistA Imaging 3.0, MAG*3.0*118
The Totals by Location report displays a statistical count for studies, series in a study, and objects (images or reports) both successful and failed that are imported on a specified date for a specified location.

Chapter 7: Running Usage Reports
February 2013 DICOM Importer II User Manual 75 VistA Imaging 3.0, MAG*3.0*118
The Totals by Modality report displays a statistical count for studies, series in a study, and objects (images or reports) both successful and failed that are imported on a specified date. The report also contains the breakdown by modality, as seen in the following example.
User Role
The role of the RU is to generate statistical reports at the Study level.
Running a Usage Report
The following procedure shows how to run a usage report.
Role: As the RU (or ARA), your task is to run usage reports.
1. Start the Importer II Client. (See Starting the Importer II for instructions on starting the Importer II Client.)
2. At the VistA Sign-on dialog box, enter an access code into the AccessCode text box and a verify code into the Verify Code text box to log in to the Importer II Client.
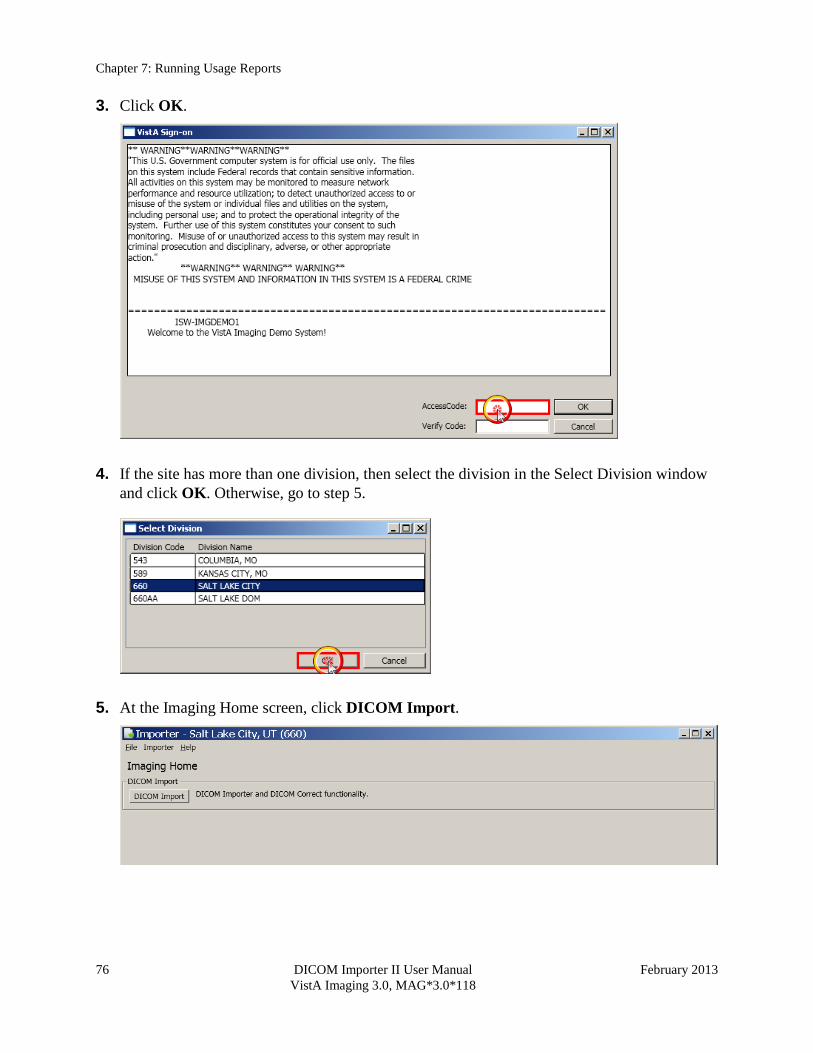
Chapter 7: Running Usage Reports
76 DICOM Importer II User Manual February 2013 VistA Imaging 3.0, MAG*3.0*118
3. Click OK.
4. If the site has more than one division, then select the division in the Select Division window and click OK. Otherwise, go to step 5.
5. At the Imaging Home screen, click DICOM Import.

Chapter 7: Running Usage Reports
February 2013 DICOM Importer II User Manual 77 VistA Imaging 3.0, MAG*3.0*118
6. At the DICOM Importer Home screen, under Reports, click Reports.
7. At the Reports Home screen, under Filters, select one of the following report types from the Report Type drop-down box.
Import Details
Totals by Location
Totals by Modality
8. Click the calendar icon at the far right end of the Start Date and End Date text boxes to specify the date range. Select dates from the corresponding pop-up calendars.

Chapter 7: Running Usage Reports
78 DICOM Importer II User Manual February 2013 VistA Imaging 3.0, MAG*3.0*118
9. Click View Report to display the data, as seen in the following examples of the three report types.
10. To print the report, click Print in the bottom-right corner of the Importer window.

Chapter 7: Running Usage Reports
February 2013 DICOM Importer II User Manual 79 VistA Imaging 3.0, MAG*3.0*118
11. In the Print dialog box, specify the printing preferences and click Print.
12. To save the report, click Save As in the bottom-right corner of the Importer window.
13. In the Save As dialog box, specify the path and file name, and then click Save.
14. Exit or log out of the Importer II Client by following the steps found in Stopping the Importer II.


February 2013 DICOM Importer II User Manual 81 VistA Imaging 3.0, MAG*3.0*118
Appendix A: Setting Up Outside Imaging Locations for the Importer II Client
When a prior unordered outside radiology study is imported into VistA, an order is automatically placed for it. The VistA order, created for the outside radiology study, should not accrue workload statistics for VA technical or professional components, because the exam was neither performed in the VA, nor interpreted by the VA. For this reason, the order created on VistA should use a RADIOLOGY IMAGING LOCATION (#79.1) with a CREDIT METHOD = No Credit.
The VistA Imaging OUTSIDE IMAGING LOCATION file (#2006.5759) is used by the Importer II Client to designate the entry in the Radiology IMAGING LOCATIONS file (#79.1) with CREDIT METHOD = No Credit (which is to be used for the order created on VistA). There has to be one entry in the VistA Imaging OUTSIDE IMAGING LOCATION file (#2006.5759) for each enabled Radiology Imaging Type in each division.
The standard Radiology Package tools are used for creating the entries in the Radiology IMAGING LOCATIONS file (#2006.5759). These include Parameter Set-up [RA SYSLOC] and Division Parameter Set-up [RA SYSDIV] options of the System Definition Menu [RA SYSDEF]. VistA Imaging provides the IMPORTER menu [MAG IMPORTER MENU] for constructing the OUTSIDE IMAGING LOCATION file (#2006.5759).
A Radiology/Nuclear Medicine Automated Data Processing Coordinator (ADPAC) should perform the modifications to Radiology Division and Imaging Locations files, as they should have the necessary menu privileges.
Note: If a site already has a No Credit outside location established for a Radiology Imaging Type for a division, it may be used instead of creating a new one.

Appendix A: Setting Up Outside Imaging Locations for the DICOM Importer II
82 DICOM Importer II User Manual February 2013 VistA Imaging 3.0, MAG*3.0*118
Step 1 – Identify Imaging Types and Divisions that Need “No Credit” Imaging Locations
This step is performed by VistA Imaging site personnel.
Log into VistA and select the VistA Imaging System Manager menu [MAG SYS MENU]. Then select the IMPORTER Menu [MAG IMPORTER MENU] and the Check Outside Imaging Location file option [MAG CHECK OUT IMG LOC]. In this example, there are two enabled Image Types (General Radiology and Nuclear Medicine) for the Salt Lake City Division.
IMAGing System Manager Menu
HL7 Imaging HL7 Messaging Maintenance ...
IX Image Index Conversion Menu ...
LS Edit Network Location STATUS
TR Telereader Menu ...
Ad hoc Enterprise Site Report
Configure AE Security Matrix Settings
Delete Image Group
Enter/edit Reason
Imaging Database Integrity Checker Menu ...
Imaging Site Reports ...
Importer Menu ...
Select Imaging System Manager Menu Option: IMPORTER Menu
Build Outside Imaging Location file
Check Outside Imaging Location file
Display Studies to be Imported
Select Importer Menu Option: CHECK Outside Imaging Location file
Checking the Radiology files...
Division: SALT LAKE CITY
GENERAL RADIOLOGY - Define “No Credit” Imaging Location!
NUCLEAR MEDICINE - Define “No Credit” Imaging Location!
Please define missing “No Credit” imaging locations for the aforementioned

Appendix A: Setting Up Outside Imaging Locations for the DICOM Importer II
February 2013 DICOM Importer II User Manual 83 VistA Imaging 3.0, MAG*3.0*118
divisions and imaging types (using the Location Parameter Set-up [RA SYSLOC]
and Division Parameter Set-up [RA SYSDIV] options of the System Definition
Menu ... [RA SYSDEF] options) and then run this option again.
Note that the SALT LAKE CITY Division has two Imaging Types (GENERAL RADIOLOGY and NUCLEAR MEDICINE) that need to have a NO CREDIT Imaging Location defined for them. The Radiology ADPAC does this in Steps 2 – 4 of this appendix.
If the site has a No Credit imaging location already defined for the imaging type, the ADPAC does not have to create a new No Credit imaging location. However, the ADPAC should create the OUTSIDE STUDY Camera/Equip/Rm and assign it to the No Credit imaging location.

Appendix A: Setting Up Outside Imaging Locations for the DICOM Importer II
84 DICOM Importer II User Manual February 2013 VistA Imaging 3.0, MAG*3.0*118
Step 2 – Create the OUTSIDE STUDY Entry in the CAMERA/EQUIP/RM File
A Radiology ADPAC performs this step.
Select the System Definition Menu [RA SYSDEF] from the Supervisor Menu [RA SUPERVISOR]. Edit the Camera/Equip/Rm parameters. Create a new OUTSIDE STUDY and enter the description, Study performed outside of this facility.
Exam Entry/Edit Menu ...
Films Reporting Menu ...
Management Reports Menu ...
Outside Films Registry Menu ...
Patient Profile Menu ...
Radiology/Nuclear Med Order Entry Menu ...
Supervisor Menu ...
Switch Locations
Update Patient Record
User Utility Menu ...
Select Rad/Nuc Med Total System Menu Option: Supervisor Menu
HL7 Radiology HL7 Menu ...
Access Uncorrected Reports
Delete a Report
Delete Printed Batches By Date
Exam Deletion
Inquire to File Entries
List Exams with Inactive/Invalid Statuses
Maintenance Files Print Menu ...
Mass Override Exam Status
Override a Single Exam’s Status to ‘complete’
Print File Entries
Rad/Nuc Med Personnel Menu ...
Restore a Deleted Report
Search File Entries
Switch Locations
System Definition Menu ...

Appendix A: Setting Up Outside Imaging Locations for the DICOM Importer II
February 2013 DICOM Importer II User Manual 85 VistA Imaging 3.0, MAG*3.0*118
Unverify a Report for Amendment
Update Exam Status
Utility Files Maintenance Menu ...
Select Supervisor Menu Option: System Definition Menu
Camera/Equip/Rm Entry/Edit
Division Parameter Set-up
List of Cameras/Equip/Rms
Location Parameter List
Location Parameter Set-up
Print Division Parameter List
Select System Definition Menu Option: CAMERA/Equip/Rm Entry/Edit
Select Camera/Equip/Room: OUTSIDE STUDY
Are you adding ‘OUTSIDE STUDY’ as a new CAMERA/EQUIP/RM (the 10TH)? No// Y
(Yes)
CAMERA/EQUIP/RM DESCRIPTION: Study performed outside of this facility
CAMERA/EQUIP/RM: OUTSIDE STUDY//
DESCRIPTION: Study performed outside of this facility
Replace
Select Camera/Equip/Room:

Appendix A: Setting Up Outside Imaging Locations for the DICOM Importer II
86 DICOM Importer II User Manual February 2013 VistA Imaging 3.0, MAG*3.0*118
Step 3 – Add New Outside Imaging Locations for each Imaging Type to Divisions
A Radiology ADPAC performs this step.
For each division, enter the name of each outside imaging location; one for each Imaging Type for the Division. The suggested naming convention is as follows:
OUTSIDE <Division Mnemonic> <Imaging Type Abbreviation>
Naming Convention Example
In this fictitious example, the facility has the following Imaging Types enabled.
Imaging Type (from IMAGING TYPE file #79.2) Abbreviation
GENERAL RADIOLOGY RAD
NUCLEAR MEDICINE NUC MED
ULTRASOUND US
MAGNETIC RESONANCE IMAGING MRI
CT SCAN CT
ANGIO/NEURO/INTERVENTIONAL ANGIO
CARDIOLOGY STUDIES (NUC MED) CARD
VASCULAR LAB VAS
MAMMOGRAPHY MAM
Let us say that the facility has two divisions, SALT LAKE CITY VAMC and CLEAR WATER LAKE VAMC. We chose SLC as the division mnemonic for the first, and CWL as the mnemonic for the second.
Here is the list of Outside Imaging Locations that we need to add to the system.
OUTSIDE SLC RAD OUTSIDE CWL RAD OUTSIDE SLC NUC MED OUTSIDE CWL NUC MED OUTSIDE SLC US OUTSIDE CWL US OUTSIDE SLC MRI OUTSIDE CWL MRI OUTSIDE SLC CT OUTSIDE CWL CT OUTSIDE SLC ANGIO OUTSIDE CWL ANGIO

Appendix A: Setting Up Outside Imaging Locations for the DICOM Importer II
February 2013 DICOM Importer II User Manual 87 VistA Imaging 3.0, MAG*3.0*118
OUTSIDE SLC CARD OUTSIDE CWL CARD OUTSIDE SLC VAS OUTSIDE CWL VAS OUTSIDE SLC MAM OUTSIDE CWL MAM
End of Naming Convention Example.
In the rest of the examples, there is only the SALT LAKE CITY Division and two IMAGE TYPES: GENERAL RADIOLOGY and NUCLEAR MEDICINE.
Select the System Definition Menu [RA SYSDEF]. Select a Division. Accept the defaults until reaching the Imaging Locations Associated with this Division section. Enter the name of each outside imaging location, one for each Imaging Type for the Division.
In this example, we are creating the Imaging Locations, OUTSIDE SLC RAD and OUTSIDE SLC NUC MED (the others are created the same way). For each location, select HOSPITAL LOCATION TYPE: CLINIC, HOSPITAL LOCATION TYPE EXTENSION: CLINIC//, and the appropriate Imaging Type.
Exam Entry/Edit Menu ...
Films Reporting Menu ...
Management Reports Menu ...
Outside Films Registry Menu ...
Patient Profile Menu ...
Radiology/Nuclear Med Order Entry Menu ...
Supervisor Menu ...
Switch Locations
Update Patient Record
User Utility Menu ...
Select Rad/Nuc Med Total System Menu Option: supervisor Menu
HL7 Radiology HL7 Menu ...
Access Uncorrected Reports
Delete a Report
Delete Printed Batches By Date
Exam Deletion
Inquire to File Entries
List Exams with Inactive/Invalid Statuses
Maintenance Files Print Menu ...
Mass Override Exam Status
Override a Single Exam’s Status to ‘complete’

Appendix A: Setting Up Outside Imaging Locations for the DICOM Importer II
88 DICOM Importer II User Manual February 2013 VistA Imaging 3.0, MAG*3.0*118
Print File Entries
Rad/Nuc Med Personnel Menu ...
Restore a Deleted Report
Search File Entries
Switch Locations
System Definition Menu ...
Unverify a Report for Amendment
Update Exam Status
Utility Files Maintenance Menu ...
Select Supervisor Menu Option: system Definition Menu
Camera/Equip/Rm Entry/Edit
Division Parameter Set-up
List of Cameras/Equip/Rms
Location Parameter List
Location Parameter Set-up
Print Division Parameter List
Select System Definition Menu Option: division Parameter Set-up
Select Division: 660 SALT LAKE CITY UT 660
...OK? Yes// (Yes)
Division-wide Order Entry Parameters:
------------------------------------
ASK ‘IMAGING LOCATION’: NO//
TRACK REQUEST STATUS CHANGES: NO//
CLINICAL HISTORY MESSAGE:
Exam Entry/Edit Parameters:
---------------------------
DETAILED PROCEDURE REQUIRED: no//
ASK ‘CAMERA/EQUIP/RM’: no//
AUTO USER CODE FILING: yes//
TRACK EXAM STATUS CHANGES: no//
TIME LIMIT FOR FUTURE EXAMS:

Appendix A: Setting Up Outside Imaging Locations for the DICOM Importer II
February 2013 DICOM Importer II User Manual 89 VistA Imaging 3.0, MAG*3.0*118
Films Reporting Parameters:
---------------------------
ALLOW STANDARD REPORTS: yes//
ALLOW BATCHING OF REPORTS: yes//
ALLOW COPYING OF REPORTS: yes//
IMPRESSION REQUIRED ON REPORTS: yes//
ALLOW VERIFYING BY RESIDENTS: yes//
ALLOW RPTS ON CANCELLED CASES?: no//
WARNING ON RPTS NOT YET VERIF?: yes//
AUTO E-MAIL TO REQ. PHYS?:
ALLOW E-SIG ON COTS HL7 RPTS: no//
INTERPRETING STAFF REQ’D?: YES//
Miscellaneous Division Parameters:
----------------------------------
PRINT FLASH CARD FOR EACH EXAM: no//
PRINT JACKET LBLS W/EACH VISIT: no//
CONTRAST REACTION MESSAGE:
RPHARM DOSE WARNING MESSAGE:
No existing text
Edit? NO//
HL7 Applications Associated with this Division:
-----------------------------------------------
Select HL7 RECEIVING APPLICATION:
Imaging Locations Associated with this Division:
------------------------------------------------
Select IMAGING LOCATION: TD-MAINRAD// OUTSIDE SLC RAD
Are you adding ‘OUTSIDE SLC RAD’ as
a new HOSPITAL LOCATION? No// Y (Yes)
HOSPITAL LOCATION TYPE: C CLINIC
HOSPITAL LOCATION TYPE EXTENSION: CLINIC//
Are you adding ‘OUTSIDE SLC RAD’ as
a new IMAGING LOCATIONS (the 3RD)? No// Y (Yes)
IMAGING LOCATIONS TYPE OF IMAGING: ?

Appendix A: Setting Up Outside Imaging Locations for the DICOM Importer II
90 DICOM Importer II User Manual February 2013 VistA Imaging 3.0, MAG*3.0*118
Enter an imaging type for this location.
Answer with IMAGING TYPE TYPE OF IMAGING, or ABBREVIATION
Choose from:
ANGIO/NEURO/INTERVENTIONAL
CARDIOLOGY STUDIES (NUC MED)
CT SCAN
GENERAL RADIOLOGY
MAGNETIC RESONANCE IMAGING
MAMMOGRAPHY
NUCLEAR MEDICINE
ULTRASOUND
VASCULAR LAB
IMAGING LOCATIONS TYPE OF IMAGING: GENERAL RADIOLOGY
Are you adding ‘OUTSIDE SLC RAD’ as
a new IMAGING LOCATIONS (the 3RD for this RAD/NUC MED DIVISION)? No// Y
(Yes)
Select IMAGING LOCATION: OUTSIDE SLC NUC MED
Are you adding ‘OUTSIDE SLC NUC MED’ as
a new HOSPITAL LOCATION? No// Y (Yes)
HOSPITAL LOCATION TYPE: C CLINIC
HOSPITAL LOCATION TYPE EXTENSION: CLINIC//
Are you adding ‘OUTSIDE SLC NUC MED’ as
a new IMAGING LOCATIONS (the 4TH)? No// Y (Yes)
IMAGING LOCATIONS TYPE OF IMAGING: NUCLEAR MEDICINE
** Caution: You are activating a new Imaging Type. **
This means you will have to assign procedures to
this imaging type. Workload reports will be printed
separately for this Imaging Type.
Are you sure? YES
Are you adding ‘OUTSIDE SLC NUC MED’ as
a new IMAGING LOCATIONS (the 4TH for this RAD/NUC MED DIVISION)? No//
(No)??

Appendix A: Setting Up Outside Imaging Locations for the DICOM Importer II
February 2013 DICOM Importer II User Manual 91 VistA Imaging 3.0, MAG*3.0*118
Select IMAGING LOCATION:
Division Parameters have been set!
Imaging Location TD-RAD is OK.
Imaging Location TD-MAINRAD is OK.
Imaging Location file #79.1 entry OUTSIDE SLC RAD has a missing
or invalid DSS ID. The Radiology/Nuclear Medicine ADPAC should
use the Location Parameter Set-up [RA SYSLOC] option to enter
a valid imaging DSS Code for this imaging location.
Select Division:
Camera/Equip/Rm Entry/Edit
Division Parameter Set-up
List of Cameras/Equip/Rms
Location Parameter List
Location Parameter Set-up
Print Division Parameter List
Select System Definition Menu Option:

Appendix A: Setting Up Outside Imaging Locations for the DICOM Importer II
92 DICOM Importer II User Manual February 2013 VistA Imaging 3.0, MAG*3.0*118
Step 4 – Define Outside Imaging Locations Parameters
A Radiology ADPAC performs this step.
Use the Location Parameter Set-up menu [RA SYSLOC] option to specify the CAMERA/EQUIP/RM, and set the CREDIT METHOD to No Credit and the DSS ID to X-RAY.
Select Rad/Nuc Med Total System Menu Option: supervisor Menu
HL7 Radiology HL7 Menu ...
Access Uncorrected Reports
Delete a Report
Delete Printed Batches By Date
Exam Deletion
Inquire to File Entries
List Exams with Inactive/Invalid Statuses
Maintenance Files Print Menu ...
Mass Override Exam Status
Override a Single Exam’s Status to ‘complete’
Print File Entries
Rad/Nuc Med Personnel Menu ...
Restore a Deleted Report
Search File Entries
Switch Locations
System Definition Menu ...
Unverify a Report for Amendment
Update Exam Status
Utility Files Maintenance Menu ...

Appendix A: Setting Up Outside Imaging Locations for the DICOM Importer II
February 2013 DICOM Importer II User Manual 93 VistA Imaging 3.0, MAG*3.0*118
Select Supervisor Menu Option: system Definition Menu
Camera/Equip/Rm Entry/Edit Division Parameter Set-up List of Cameras/Equip/Rms Location Parameter List Location Parameter Set-up Print Division Parameter List Select System Definition Menu Option: LOC 1 Location Parameter List 2 Location Parameter Set-up CHOOSE 1-2: 2 Location Parameter Set-up
Select Location: OUTSIDE SLC RAD
...OK? Yes// Y (Yes) (GENERAL RADIOLOGY-660) Imaging Location: OUTSIDE SLC RAD Flash Card Parameters: ---------------------- HOW MANY FLASH CARDS PER VISIT: DEFAULT FLASH CARD FORMAT: No default flash card printer has been assigned. Contact IRM. Jacket Label Parameters: ------------------------ As specified in the division parameters, no jacket labels will be printed automatically upon a patient visit. DEFAULT JACKET LABEL FORMAT: No default jacket label printer has been assigned. Contact IRM. Exam Label Parameters: ---------------------- HOW MANY EXAM LABELS PER EXAM: 1// DEFAULT EXAM LABEL FORMAT: Exam label printer is always the same as the flash card printer. Order Entry Parameters: ---------------------- No default request printer has been assigned. Contact IRM. Report Parameters: ------------------ DEFAULT REPORT HEADER FORMAT: DEFAULT REPORT FOOTER FORMAT: REPORT LEFT MARGIN: 10// REPORT RIGHT MARGIN: 70//
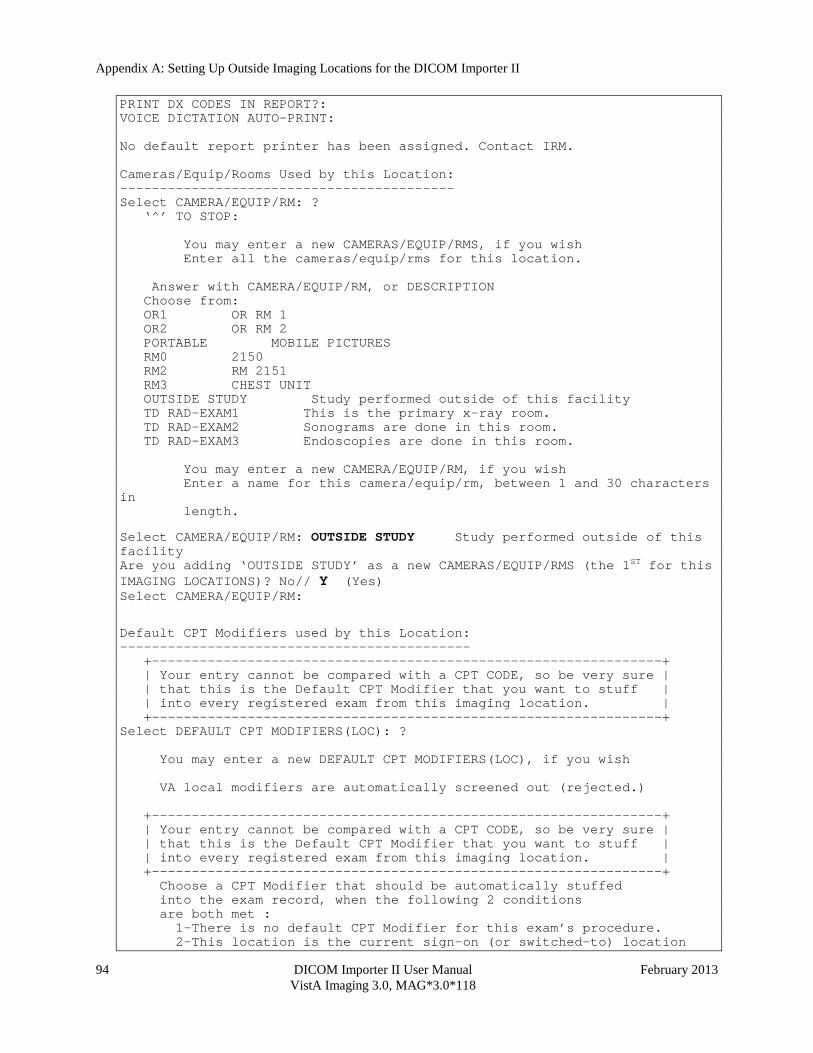
Appendix A: Setting Up Outside Imaging Locations for the DICOM Importer II
94 DICOM Importer II User Manual February 2013 VistA Imaging 3.0, MAG*3.0*118
PRINT DX CODES IN REPORT?: VOICE DICTATION AUTO-PRINT: No default report printer has been assigned. Contact IRM. Cameras/Equip/Rooms Used by this Location: ------------------------------------------ Select CAMERA/EQUIP/RM: ? ‘^’ TO STOP: You may enter a new CAMERAS/EQUIP/RMS, if you wish Enter all the cameras/equip/rms for this location. Answer with CAMERA/EQUIP/RM, or DESCRIPTION Choose from: OR1 OR RM 1 OR2 OR RM 2 PORTABLE MOBILE PICTURES RM0 2150 RM2 RM 2151 RM3 CHEST UNIT OUTSIDE STUDY Study performed outside of this facility TD RAD-EXAM1 This is the primary x-ray room. TD RAD-EXAM2 Sonograms are done in this room. TD RAD-EXAM3 Endoscopies are done in this room. You may enter a new CAMERA/EQUIP/RM, if you wish Enter a name for this camera/equip/rm, between 1 and 30 characters in length. Select CAMERA/EQUIP/RM: OUTSIDE STUDY Study performed outside of this facility Are you adding ‘OUTSIDE STUDY’ as a new CAMERAS/EQUIP/RMS (the 1ST for this IMAGING LOCATIONS)? No// Y (Yes) Select CAMERA/EQUIP/RM: Default CPT Modifiers used by this Location: -------------------------------------------- +----------------------------------------------------------------+ | Your entry cannot be compared with a CPT CODE, so be very sure | | that this is the Default CPT Modifier that you want to stuff | | into every registered exam from this imaging location. | +----------------------------------------------------------------+ Select DEFAULT CPT MODIFIERS(LOC): ? You may enter a new DEFAULT CPT MODIFIERS(LOC), if you wish VA local modifiers are automatically screened out (rejected.) +----------------------------------------------------------------+ | Your entry cannot be compared with a CPT CODE, so be very sure | | that this is the Default CPT Modifier that you want to stuff | | into every registered exam from this imaging location. | +----------------------------------------------------------------+ Choose a CPT Modifier that should be automatically stuffed into the exam record, when the following 2 conditions are both met : 1-There is no default CPT Modifier for this exam’s procedure. 2-This location is the current sign-on (or switched-to) location

Appendix A: Setting Up Outside Imaging Locations for the DICOM Importer II
February 2013 DICOM Importer II User Manual 95 VistA Imaging 3.0, MAG*3.0*118
at the time of registration. If your entry is invalid, then during exam registration, this Default CPT Modifier will NOT be stuffed, instead, an error message with the name of the rejected CPT Modifier would be displayed. Answer with CPT MODIFIER, or NAME, or CODE, or BEGIN CPT RANGE, or END CPT RANGE Do you want the entire CPT MODIFIER List? N Select DEFAULT CPT MODIFIERS(LOC): Recipients of the ‘Stat’ Alert for this Location: ------------------------------------------------- Select STAT REQUEST ALERT RECIPIENTS: ALLOW ‘RELEASED/NOT VERIFIED’: no// no INACTIVE: TYPE OF IMAGING: GENERAL RADIOLOGY// CREDIT METHOD: 0// ? Enter the type of credit this location will receive for this examination. Choose from: 0 Regular Credit 1 Interpretation Only 2 No Credit 3 Technical Component Only CREDIT METHOD: 0// 2 No Credit DSS ID: ? Enter a valid stop code for this imaging location. Only Stop Codes entered in the Imaging Stop Codes file may be selected. Answer with CLINIC STOP NAME, or AMIS REPORTING STOP CODE Do you want the entire CLINIC STOP List? DSS ID: X-RAY 105 Imaging Location OUTSIDE SLC RAD is OK. Select Location:
Note: Update the other locations in exactly the same fashion.

Appendix A: Setting Up Outside Imaging Locations for the DICOM Importer II
96 DICOM Importer II User Manual February 2013 VistA Imaging 3.0, MAG*3.0*118
Step 5 – OUTSIDE STUDY Camera/Equip/Room for All Radiology Imaging Location
A Radiology ADPAC performs this step.
Every Radiology Imaging Location that is used as a contract outside imaging facility needs to have the OUTSIDE STUDY camera/equipment/room assigned to it. When the study is imported, the examination/report status of the case is advanced to either, Examined/No Report if it is to be read locally, or Complete/Electronically Filed if it is finished.
If DICOM objects are imported for a study with a Radiology Imaging Location that does not have the OUTSIDE STUDY camera/equipment/room assigned to it, then a message like the one that follows displays in the Importer II Client session. The examination/report status then needs to be manually advanced.
************************************************************************************ *** WARNING: Exam/Report status not advanced to COMPLETE/ELECTRONICALLY FILED *** *** *** *** The Camera/Equipment/Room “OUTSIDE STUDY” is not defined for the Radiology *** *** Imaging Location “XXXXXXXXXX” that is used for this study. *** *** *** *** The data required to advance the status of this case performed at an outside *** *** location has not been entered. *** *** *** *** Due to this condition, the status of the study had not been automatically *** *** advanced. Please manually advance its status by entering the necessary data *** *** using the Radiology package status tracking option. *** *** *** *** Message generated at MUMPS line tag ERR1102+13^MAGDAIRC ***
************************************************************************************

Appendix A: Setting Up Outside Imaging Locations for the DICOM Importer II
February 2013 DICOM Importer II User Manual 97 VistA Imaging 3.0, MAG*3.0*118
Step 6 – Populate VistA Imaging Outside Imaging Location File
VistA Imaging site personnel perform this step.
Log into VistA and select the VistA Imaging System Manager Menu [MAG SYS MENU]. Then select the IMPORTER menu [MAG IMPORTER MENU] and the Build Outside Imaging Location file option [MAG BUILD OUT IMG LOC]. In this example, there are two enabled Image Types (General Radiology and Nuclear Medicine) for the Salt Lake City Division. Both of these now have CREDIT METHOD = No Credit entries in the Radiology DIVISION and IMAGING LOCATIONS file. The Build Outside Imaging Location file option interactively helps to add/change entries in the file.
When finished, run the Check Outside Imaging Location file option [MAG CHECK OUT IMG LOC] to verify that everything is set up correctly.
Select OPTION NAME: IMPORTER MENU Build Outside Imaging Location file Check Outside Imaging Location file Display Studies to be Imported Select Importer Menu Option: Build Outside Imaging Location file Checking the Radiology files... Division: SALT LAKE CITY Checking the OUTSIDE IMAGING LOCATION file (#2006.5759)... Division: SALT LAKE CITY GENERAL RADIOLOGY - Create record in file #2006.5759! NUCLEAR MEDICINE - Create record in file #2006.5759! Please fix the aforementioned problems in the OUTSIDE IMAGING LOCATION file (#2006.5759) and then run this option again. OUTSIDE IMAGING LOCATIONS for SALT LAKE CITY (660) -------------------------------------------------- GENERAL RADIOLOGY – (not defined yet) OUTSIDE SLC RAD Use this value?? n// YES NUCLEAR MEDICINE – (not defined yet) OUTSIDE SLC NUC MED Use this value?? n// YES Build Outside Imaging Location file Check Outside Imaging Location file Display Studies to be Imported
OUTSIDE SLC RAD
OUTSIDE SLC NUC MED
OUTSIDE SLC RAD

Appendix A: Setting Up Outside Imaging Locations for the DICOM Importer II
98 DICOM Importer II User Manual February 2013 VistA Imaging 3.0, MAG*3.0*118
Select Importer Menu Option: Check Outside Imaging Location file Checking the Radiology files... Division: SALT LAKE CITY Checking the OUTSIDE IMAGING LOCATION file (#2006.5759)... Division: SALT LAKE CITY GENERAL RADIOLOGY - OUTSIDE SLC RAD NUCLEAR MEDICINE - OUTSIDE SLC NUC MED Build Outside Imaging Location file Check Outside Imaging Location file Display Studies to be Imported Select Importer Menu Option:
February 2013 DICOM Importer II User Manual 99 VistA Imaging 3.0, MAG*3.0*118
Appendix B: Handling Parent-Descendent Procedure Orders with the Importer II Client
VistA Radiology2 supports the ability to order parent procedures. Parent procedures are associated with two or more descendent procedures. When the patient is registered for the parent procedure, a separate distinct radiology study, with its own unique accession number, is created for each descendent procedure.
An example of a parent procedure may be ANKLES, BILATERAL, 2 VIEWS, which is associated with two descendant procedures: LEFT ANKLE 2 VIEWS and RIGHT ANKLE 2 VIEWS. When the patient is registered for ANKLES, BILATERAL, 2 VIEWS, two studies are created, one for LEFT ANKLE 2 VIEWS and one for RIGHT ANKLE 2 VIEWS.
How it Works
The provider orders the parent procedure through CPRS. This goes into the ORDER file (#100) and when signed the same order is filed in the RAD/NUC MED ORDERS file (#75.1). When this order is registered (for example, by the Importer II Client or the REG EDIT menu option), individual studies are created for each descendent procedure and are then filed into the EXAMINATIONS (#70.03) multiple, which is a sub-file of the RAD/NUC MED PATIENT file (#70). Unique accession numbers are created for each procedure of the study. The study for each procedure is then treated as a separate entity for examination purposes.
Each study for each procedure may have its own unique diagnostic report (that is, being defined as an Exam Set – the default) or there may be a single diagnostic report referenced by the descendant procedures (that is, being defined as a Print Set). A parent procedure can be designated as a print set by exercising the Procedure Enter/Edit option and setting the SINGLE REPORT field (#18) of the parent procedure in the RAD/NUC MED PROCEDURES file (#71) to Yes.
Questions
If the VA orders a parent procedure as a fee-basis contracted examination, then how does the contractor perform the procedure, how are the resultant DICOM objects created, and how should those DICOM objects be imported into VistA?
2 Greg Cebelinski of the Radiology Development Team and Jeannie Jernigan of the Fayetteville, NC VAMC contributed to this document.

Appendix B: Handing Parent-Descendent Procedure Orders with the Importer II
100 DICOM Importer II User Manual February 2013 VistA Imaging 3.0, MAG*3.0*118
How Outside Fee-basis Imaging Contractors Work
The outside imaging contractor can execute an order of ANKLES, BILATERAL, 2 VIEWS by two methods.
Method 1 – The contractor can perform two separate studies, one for the left ankle and one for the right ankle.
Method 2 – The contractor can perform a single study, which includes both ankles.
Depending upon how the contractor executes the order, there are two methods to represent the DICOM images for the examination(s).
Method 1 – If the contractor performs the bilateral ankle order as two separate studies (one for the left ankle and the other for the right ankle), then there is two different contractor-assigned accession numbers (Study Instance UIDs, procedure names, and so on) for each study. Each DICOM image must have either the Series Laterality or the Image Laterality attribute.
Method 2 – If the contractor performs the bilateral ankle order as one study, then there is one contractor-assigned accession number (Study Instance UID, procedure name, and so on) for all the DICOM images.
– The contractor may choose to use two separate series (one for the left ankle and the other for the right ankle) and specify the Series Laterality for all of the DICOM images in that series. In this case, each series has a unique Series Instance UID.
− The contractor may also chose to use one series for all of the ankle images, and specify the Image Laterality for each DICOM image in the series. In this case, there is only one Series Instance UID for the entire study.
How to Use the Importer II Client for DICOM Images for Parent/Descendent Procedures
The choice of method used by the contractor to perform the examination(s), and how the resultant images are represented in DICOM, have a great bearing on how the images should be imported into another system.
The Importer II Client does not handle parent/descendent procedures automatically. Some manual effort is required to do this properly. The level of effort depends on how the study is performed and how the DICOM images are created. The following procedure may be used as a guideline.
1. Use Importer menu option 2 – Import Outside Contracted studies.
2. Using the Importer, determine whether the contractor chose to perform the bilateral ankle as one study or as two separate studies.

Appendix B: Handing Parent-Descendent Procedure Orders with the Importer II
February 2013 DICOM Importer II User Manual 101 VistA Imaging 3.0, MAG*3.0*118
3. If the contractor chose to perform the bilateral ankle as two separate studies, then the images from the left outside study are imported to the left VistA study and the images from the right outside study are imported to the right VistA study. Perform the following instructions to complete Step 3.
a. Select the LEFT side study in the Importer.
b. Use the lookup in Radiology Order file option.
c. Select the patient and the order for the parent procedure.
d. Import the LEFT side study.
e. Exit the Importer II Client.
f. Using the VistA Rad application (the Radiology package to view by case) or CPRS Imaging (local only) Reports tab, confirm that the second study for the right side study is created as a result of the bilateral study order (parent/descendant). This study will be in a waiting for exam status. Obtain the accession number for it.
g. Use Importer menu option 2 – Import Outside Contracted studies, and re-enter the Importer II Client.
h. Select the RIGHT side study in the Importer.
i. Use the Modality Worklist look up option.
j. Select the VistA RIGHT side procedure study for the patient by entering its accession number for the query key.
k. Import the RIGHT side study.
l. Confirm that the RIGHT side images from the outside study are attached to the VistA RIGHT side study, and that the study is completed (Exam Status = Exam Complete and Report Status = Electronically Filed).
4. If the contractor performed the bilateral ankle order as one study, then there is only one accession number, Study Instance UID, procedure name, and so on for all the DICOM images. All of the outside images are imported to the LEFT VistA study. Perform the following instructions to complete step 4.
a. Select the study in the Importer.

Appendix B: Handing Parent-Descendent Procedure Orders with the Importer II
102 DICOM Importer II User Manual February 2013 VistA Imaging 3.0, MAG*3.0*118
b. Use the lookup in Radiology Order file option.
c. Select the patient and the order for the parent procedure.
d. Import the study.
– The Importer registers the parent procedure and automatically creates a study for the LEFT ANKLE 2 VIEWS procedure and a study for the RIGHT ANKLE 2 VIEWS procedure.
− The accession number for the study for the LEFT ANKLE 2 VIEWS procedure is returned and all the images are imported to it.
e. In the Radiology package, insert your local combined standard report stub to indicate that the images and report are uploaded to the LEFT study. Then update the status manually in the Radiology package per local policy/procedures.
It is beyond the scope of the Importer II Client to be able to identify which images are for the left ankle and import them to the left procedure, and to identify which images are for the right ankle and import them to the right side procedure. Two facets of this scenario are difficult. First, the Importer II Client works at the study level and not the series or image level. Second, DICOM images from one study cannot be filed with two different studies in VistA, because this would create duplicate Study Instance UIDs and possibly duplicate Series Instance UIDs (if all the images were in the same series). This is a violation of the DICOM Standard and not a limitation of the Importer II Client or VistA Imaging.
Note: It is advantageous to require that the outside contracted vendor perform the bilateral ankle as two separate studies. By implementing this requirement, the images can be properly associated with the corresponding two VistA studies.

February 2013 DICOM Importer II User Manual 103 VistA Imaging 3.0, MAG*3.0*118
Appendix C: Problems Seen in Importing DICOM Objects from Media
The Importer II Client is designed to work with media that is formatted according to the DICOM Standard and the IHE PDI integration profile. DICOM objects on compliant media usually are able to be imported. Those on non-compliant media may not be able to be imported.
Here is a list of some of the problems that one should expect to see.
The media is just blank.
The media is written improperly. Here is an example where the vendor did not enter the files into the directory correctly:
E:\>dir Volume in drive E has no label. Volume Serial Number is 8B34-8C3C Directory of E:\ The parameter is incorrect. 12:00 AM 3,920 DICOMDIR The parameter is incorrect. 12:00 AM 759 DiscView.htm The parameter is incorrect. 12:00 AM 240 QuickViewer.txt The parameter is incorrect. 12:00 AM 105,320 Readme1st.htm
01/15/2010 08:49 AM <DIR> Readme1st_files The parameter is incorrect. 01/15/2010 08:49 AM 72 autorun.bat The parameter is incorrect. 01/15/2010 08:49 AM 29 autorun.inf
01/15/2010 08:49 AM <DIR> data 6 File(s) 110,340 bytes4 2 Dir(s) 0 bytes free E:\>
There is no DICOMDIR on the media and the images are kept in separate sub-folders. The Importer II Client cannot be used directly.
If there are DICOM files on the media, then they might be able to be sent to a C-Store process on the Importer II gateway. The BATCH_SEND_IMAGE.BAT batch file may be able to be used to extract the DICOM files from the media and send them. Otherwise, it may be necessary to use a commercial product (like Sorna3) to read the media and send the DICOM files to the C-Store process.
There are errors in DICOMDIR.
– The file name of each DICOM object uses forward slashes, rather than back slashes, as required by the DICOM Standard.
– The Referenced SOP Class UID is wrong. (One vendor used the Media Storage Directory Storage SOP Class. Another vendor used the character string SOP UID. It must be the same as the SOP Class UID of the DICOM object.)
3 http://www.sorna.com/
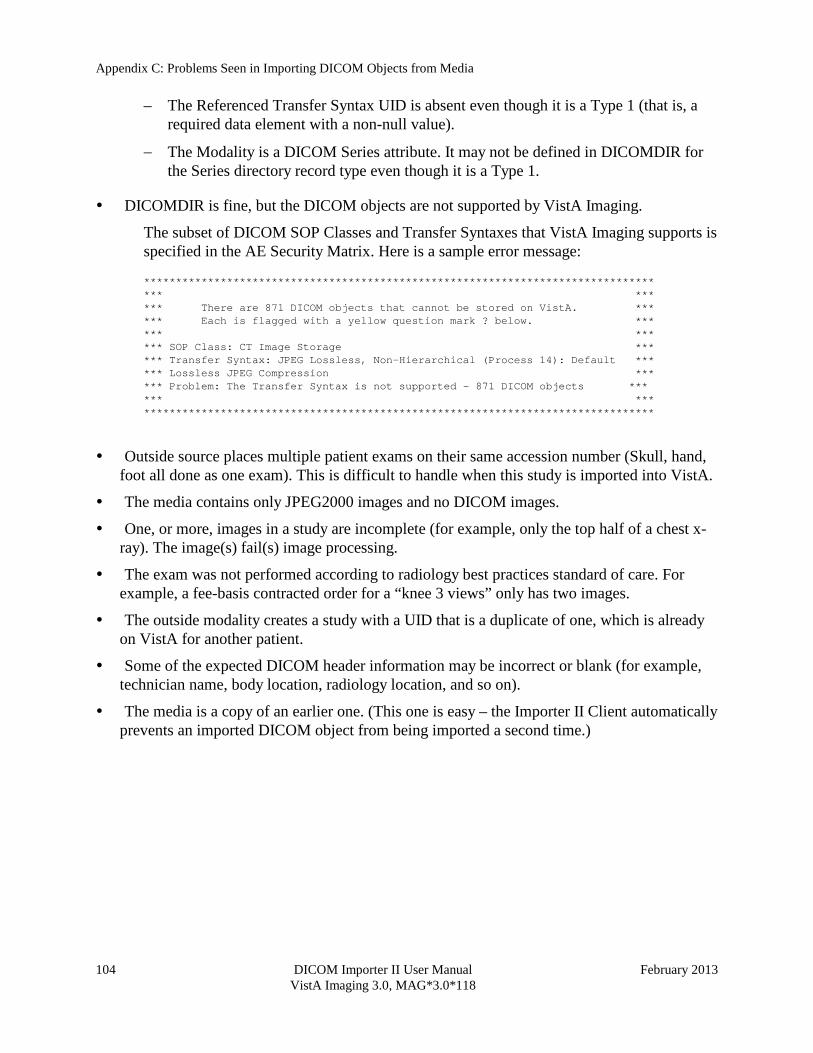
Appendix C: Problems Seen in Importing DICOM Objects from Media
104 DICOM Importer II User Manual February 2013 VistA Imaging 3.0, MAG*3.0*118
– The Referenced Transfer Syntax UID is absent even though it is a Type 1 (that is, a required data element with a non-null value).
− The Modality is a DICOM Series attribute. It may not be defined in DICOMDIR for the Series directory record type even though it is a Type 1.
DICOMDIR is fine, but the DICOM objects are not supported by VistA Imaging.
The subset of DICOM SOP Classes and Transfer Syntaxes that VistA Imaging supports is specified in the AE Security Matrix. Here is a sample error message:
******************************************************************************** *** *** *** There are 871 DICOM objects that cannot be stored on VistA. *** *** Each is flagged with a yellow question mark ? below. *** *** *** *** SOP Class: CT Image Storage *** *** Transfer Syntax: JPEG Lossless, Non-Hierarchical (Process 14): Default *** *** Lossless JPEG Compression *** *** Problem: The Transfer Syntax is not supported – 871 DICOM objects *** *** *** ********************************************************************************
Outside source places multiple patient exams on their same accession number (Skull, hand, foot all done as one exam). This is difficult to handle when this study is imported into VistA.
The media contains only JPEG2000 images and no DICOM images.
One, or more, images in a study are incomplete (for example, only the top half of a chest x-ray). The image(s) fail(s) image processing.
The exam was not performed according to radiology best practices standard of care. For example, a fee-basis contracted order for a “knee 3 views” only has two images.
The outside modality creates a study with a UID that is a duplicate of one, which is already on VistA for another patient.
Some of the expected DICOM header information may be incorrect or blank (for example, technician name, body location, radiology location, and so on).
The media is a copy of an earlier one. (This one is easy – the Importer II Client automatically prevents an imported DICOM object from being imported a second time.)
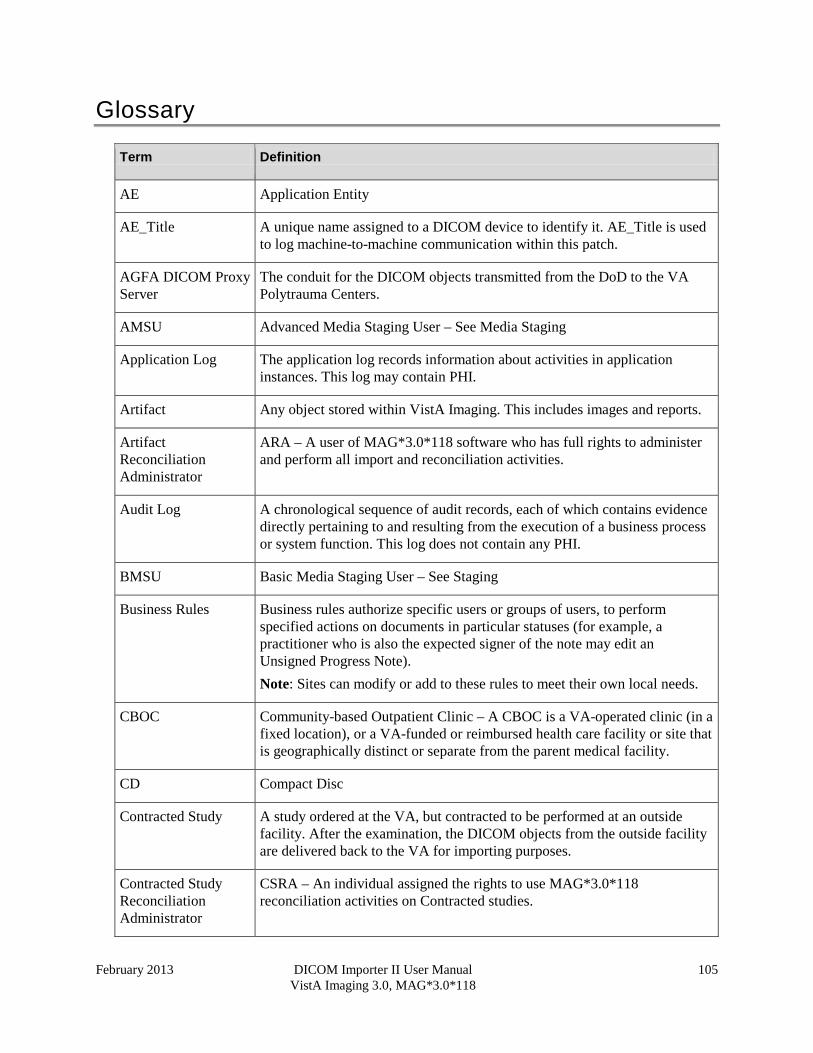
February 2013 DICOM Importer II User Manual 105 VistA Imaging 3.0, MAG*3.0*118
Glossary
Term Definition
AE Application Entity
AE_Title A unique name assigned to a DICOM device to identify it. AE_Title is used to log machine-to-machine communication within this patch.
AGFA DICOM Proxy Server
The conduit for the DICOM objects transmitted from the DoD to the VA Polytrauma Centers.
AMSU Advanced Media Staging User – See Media Staging
Application Log The application log records information about activities in application instances. This log may contain PHI.
Artifact Any object stored within VistA Imaging. This includes images and reports.
Artifact Reconciliation Administrator
ARA – A user of MAG*3.0*118 software who has full rights to administer and perform all import and reconciliation activities.
Audit Log A chronological sequence of audit records, each of which contains evidence directly pertaining to and resulting from the execution of a business process or system function. This log does not contain any PHI.
BMSU Basic Media Staging User – See Staging
Business Rules Business rules authorize specific users or groups of users, to perform specified actions on documents in particular statuses (for example, a practitioner who is also the expected signer of the note may edit an Unsigned Progress Note). Note: Sites can modify or add to these rules to meet their own local needs.
CBOC Community-based Outpatient Clinic – A CBOC is a VA-operated clinic (in a fixed location), or a VA-funded or reimbursed health care facility or site that is geographically distinct or separate from the parent medical facility.
CD Compact Disc
Contracted Study A study ordered at the VA, but contracted to be performed at an outside facility. After the examination, the DICOM objects from the outside facility are delivered back to the VA for importing purposes.
Contracted Study Reconciliation Administrator
CSRA – An individual assigned the rights to use MAG*3.0*118 reconciliation activities on Contracted studies.

Glossary
106 DICOM Importer II User Manual February 2013 VistA Imaging 3.0, MAG*3.0*118
Term Definition
cPACS Commercial PACS (see the definition for PACS)
CPRS Computerized Patient Record System
Data Sources Database structures or files that contain required information.
Decryption A security tool used to decode protected information.
DICOM Digital Imaging and Communications in Medicine – a protocol for sharing and viewing medical images. DICOM has traditionally been used for radiology images, and most recently used for images in other specialties such as cardiology, dental, gastrointestinal endoscopy, and ophthalmology.
DICOM Correct The name assigned to the software routine used to correct DICOM objects that fail processing on the DICOM Gateway.
DICOM Gateway Interface between VistA and external DICOM Application Entity
DICOMDIR A file that is a unique and mandatory DICOM Directory file that contains the Media Storage Directory SOP Class as described in DICOM PS 3.10 2008.
Direct Import Copying DICOM objects from an external media bundle, matching it to the VA study, updating necessary data sources, and sending the objects to the HDIG for processing, bypassing Importer II Persistent Storage.
DoD Department of Defense
DVD Digital Versatile Disc
EMR Electronic Medical Record
Encryption The translation of data into a form that is unintelligible without a deciphering mechanism.
GUI Graphical User Interface
HDIG Hybrid DICOM Imaging Gateway – A gateway that runs both the legacy gateway and the VISA gateway.
High Impact Systems An information system in which a least one security objective (that is, confidentiality, integrity, or availability) is assigned a FIPS 199 potential impact value of high.
HIPAA Health Insurance Portability and Accountability Act
HIS Hospital Information System

Glossary
February 2013 DICOM Importer II User Manual 107 VistA Imaging 3.0, MAG*3.0*118
Term Definition
IEN Internal Entry Number
IHE Integrating the Healthcare Enterprise
Imaging Type A VistA Radiology Package entity that roughly designates a class of DICOM modalities. For example, General Radiology consists of CR, DX, and RF. CT, MRI, and Ultrasound are other examples of Imaging Types. The Imaging Type must be specified when placing a radiology order.
Importer II Client Software that performs the automated DICOM import process from outside facilities.
Importer II Persistent Storage
Storage area within Vista Imaging where DICOM objects awaiting reconciliation or DICOM Correction are stored.
Importing Accepting study data from an authorized source, updating relevant data sources, and sending it to the HDIG for processing.
IRA Initial Requirements Analysis
IRWF Import Reconciliation Workflow
ISO Information Security Officer – Individual responsible to the senior agency information security officer, authorizing official, or information system owner for ensuring that the appropriate operational security posture is maintained for an information system or program.
Media Bundle Used to reference all data on an external data source being processed by the MAG*3.0*118 software,
Media Formats Media Formats and Physical Media for Data Interchange (such as a CD, DVD, flash drive, or external hard drive) are defined in DICOM PS 3.12 2008.
Media Storage Application Profile
Defines a selection of choices at the various layers of the DICOM Media Storage Model which are applicable to a specific need or context in which the media interchange is intended to be performed as described in DICOM PS 3.11 2008.
Modality Code A code defined by the DICOM Standard that identifies the type of exam being performed (for example, CR, CT, MR, US).
Modality Device The type of DICOM device being used to generate or utilize DICOM objects.
MUMPS Massachusetts General Hospital Utility Multi-Programming System
NSR New Service Request

Glossary
108 DICOM Importer II User Manual February 2013 VistA Imaging 3.0, MAG*3.0*118
Term Definition
Ordered Study A study that is ordered at the VA and is performed at the VA or contracted to be performed at an outside facility.
Ordering Location The VistA HIS location, which is recorded as the source of the order (for example, for a Polytrauma patient, it would be the Polytrauma ward).
Ordering Provider The VistA HIS provider who is recorded as the originator of the order (for example, for a Polytrauma patient, it may be the chief of the Polytrauma Service).
Outside Facility External to the local facility. It can be another VA facility, a DoD facility, or another institution.
Outside Imaging Location
A VistA HIS/Radiology Package location where the examination is recorded as being performed. For the Importer II Client, this is designated as an outside, no credit imaging location. Each radiology Imaging Type must have a corresponding Imaging Location. The Imaging location must be specified when placing a radiology order.
PACS Picture Archive and Communications System
PDI Portable Data for Imaging
PHI Protected Health Information – is individually identifiable health information transmitted by electronic media, maintained in electronic media, or transmitted or maintained in any other form or medium. PHI excludes education records covered by the Family Educational Rights and Privacy Act, as amended, 20 U.S.C. 1232g, records described at 20 U.S.C. 1232g(a)(4)(B)(iv), and employment records held by a covered entity in its role as employer.
PII Personally Identifiable Information (see definition for Sensitive Personal Information (SPI))
Previously Imported Study
A study that already has some or all of its DICOM objects imported into the VA’s system.
Queue A storage location for imported artifacts
Reconciliation Administrator
A user of MAG*3.0*118 software who has full rights to administer and perform all import and reconciliation activities.
Report User RU – A MAG*3.0*118 user who has the ability to generate reports that summarize the activities performed by the MAG*3.0*118 software.
RIS Radiology Information System
RPC Remote Procedure Call

Glossary
February 2013 DICOM Importer II User Manual 109 VistA Imaging 3.0, MAG*3.0*118
Term Definition
RSD Requirements Specification Document
SCP Service Class Provider
SCU Service Class User
SDD Software Design Document
SOP Service Object Pair
SOP Class Unique Id assigned by the DICOM Standard to identify DICOM objects.
SPI Sensitive Personal Information – The term, with respect to an individual, means any information about the individual maintained by an agency, including the following: (i) education, financial transactions, medical history, and criminal or employment history; (ii) Information that can be used to distinguish or trace the individual’s identity, including name, social security number, date and place of birth, mother’s maiden name, or biometric records.
Staging Copying study data from either media or an authorized network location into temporary persistent storage for later reconciliation. There are two types of staging (controlled by keys):
• Basic Staging – an authorized user copies all study data from an authorized source to Importer II Persistent Storage.
• Advanced Staging – an authorized user can view source data by study and copy data by study to Importer II Persistent Storage.
Supported SOP Class A DICOM Object that can be processed by the DICOM Gateway and delivered to other Vista Imaging applications for use within Vista Imaging.
System Auditing System audit logs must record sufficient information to establish what events occurred, the sources, and the outcomes of the events. Additional details such as type, location, and subject are also required for moderate and high-risk systems.
TCP/IP Transmission Control Protocol/Internet Protocol
UID DICOM Unique Identifier
UML Unified Modeling Language
Unordered Study An independently performed study from an outside facility and its DICOM objects, which are delivered to the VA for importing purposes.
VA Department of Veterans Affairs

Glossary
110 DICOM Importer II User Manual February 2013 VistA Imaging 3.0, MAG*3.0*118
Term Definition
VA Sensitive Patients Patients tagged in VA systems as requiring additional measures to ensure their health information is protected. Typically, these are employees or VIPs receiving treatment through VA facilities.
Validated The process of successfully matching an order, DICOM images, and an optional report of imported objects that allows the study to be processed by the DICOM Gateway.
Verifying Provider A VistA HIS provider who has permissions to verify radiology reports.
VISA VistA Imaging System Architecture
VISN Veterans Integrated Service Network
VistA Veterans Health Information Systems and Technology Architecture
VistA HIS A system that has the ability to store multimedia objects as part of its electronic medical record (EMR). VistA includes the CPRS, which supports order entry, tracking, result entry, and result reporting functions. VistA also includes a complete RIS. VistA Imaging provides a full infrastructure to acquire, store, archive, display, and communicate DICOM and other types of multimedia objects, and is directly interfaced to both CPRS and the RIS. This combination provides PACS capabilities with the VistA HIS for both clinical specialties as well as radiology.
VistA Imaging DICOM Gateway
A suite of software used to transfer image files from an acquisition modality or a commercial PACS to VistA, or from VistA to a commercial PACS or workstations.
VistA Study A VistA Radiology study as identified by a corresponding Order and Accession Number, CPRS Consult Request Tracking Consult, or a Procedure Request.
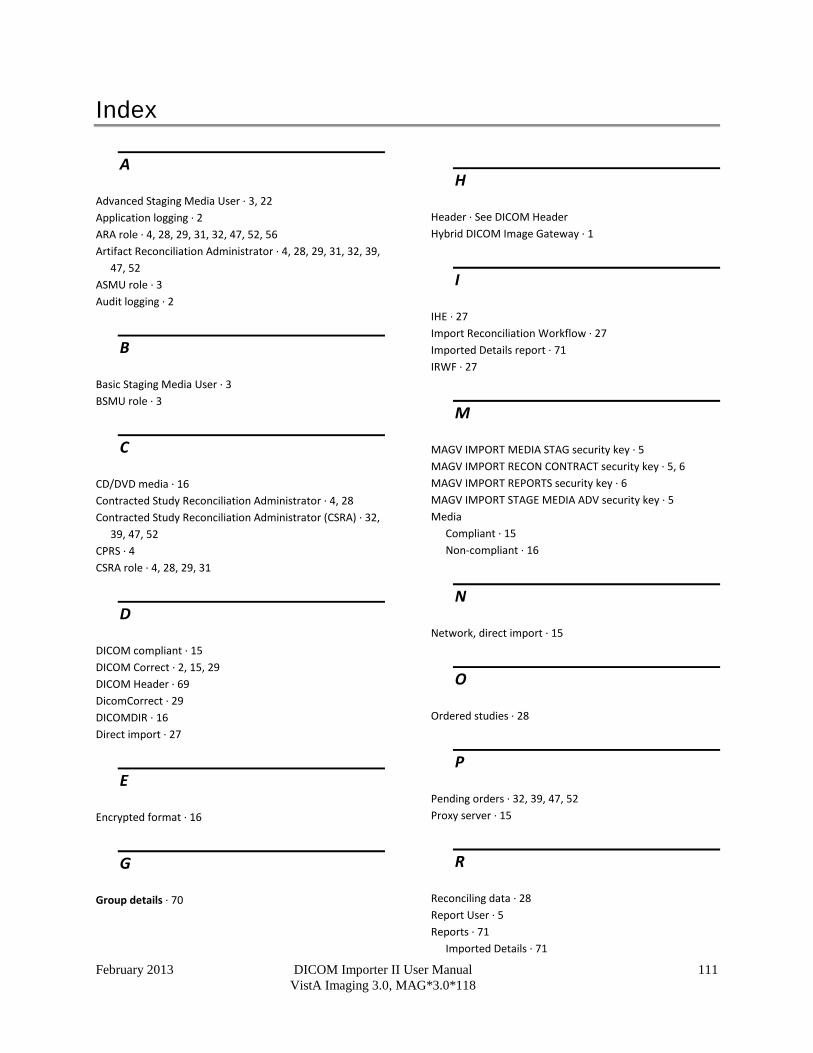
February 2013 DICOM Importer II User Manual 111 VistA Imaging 3.0, MAG*3.0*118
Index
A
Advanced Staging Media User · 3, 22 Application logging · 2 ARA role · 4, 28, 29, 31, 32, 47, 52, 56 Artifact Reconciliation Administrator · 4, 28, 29, 31, 32, 39,
47, 52 ASMU role · 3 Audit logging · 2
B
Basic Staging Media User · 3 BSMU role · 3
C
CD/DVD media · 16 Contracted Study Reconciliation Administrator · 4, 28 Contracted Study Reconciliation Administrator (CSRA) · 32,
39, 47, 52 CPRS · 4 CSRA role · 4, 28, 29, 31
D
DICOM compliant · 15 DICOM Correct · 2, 15, 29 DICOM Header · 69 DicomCorrect · 29 DICOMDIR · 16 Direct import · 27
E
Encrypted format · 16
G
Group details · 70
H
Header · See DICOM Header Hybrid DICOM Image Gateway · 1
I
IHE · 27 Import Reconciliation Workflow · 27 Imported Details report · 71 IRWF · 27
M
MAGV IMPORT MEDIA STAG security key · 5 MAGV IMPORT RECON CONTRACT security key · 5, 6 MAGV IMPORT REPORTS security key · 6 MAGV IMPORT STAGE MEDIA ADV security key · 5 Media
Compliant · 15 Non-compliant · 16
N
Network, direct import · 15
O
Ordered studies · 28
P
Pending orders · 32, 39, 47, 52 Proxy server · 15
R
Reconciling data · 28 Report User · 5 Reports · 71
Imported Details · 71

Index
112 DICOM Importer II User Manual February 2013 VistA Imaging 3.0, MAG*3.0*118
Totals by Location · 71 Totals by Modality · 71
Roles · 3 RU role · 5, 73
S
Security keys · 5 Sensitive patient logging · 2 Staging
Advanced · 22 Basic · 16
Studies Ordered · 28 Unordered · 28
T
Terms of use · 3
Totals by Location report · 71 Totals by Modality report · 71
U
Unordered studies · 28
V
Vendor proprietary format · 16 VISA · 1 VistA Imaging System Architecture · 1
W
Workflows Queues · 2 Wizards · 2