Embed Size (px)
Citation preview

www.SCDLifestyle.com
Presentation Handout
Diarrhea:A Root Cause Approach toStopping Diarrhea Quickly
www.SCDLifestyle.com 2 of 21
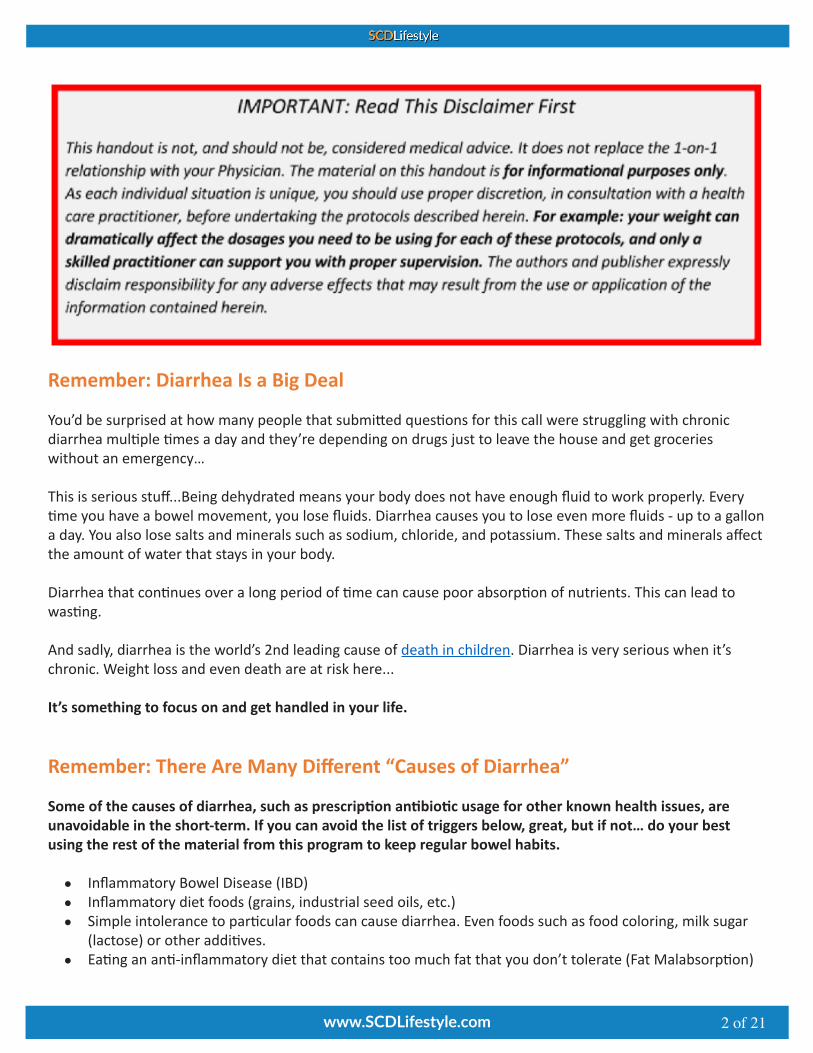
Remember: Diarrhea Is a Big Deal
You’d be surprised at how many people that submitted questions for this call were struggling with chronic diarrhea multiple times a day and they’re depending on drugs just to leave the house and get groceries without an emergency…
This is serious stuff...Being dehydrated means your body does not have enough fluid to work properly. Every time you have a bowel movement, you lose fluids. Diarrhea causes you to lose even more fluids - up to a gallon a day. You also lose salts and minerals such as sodium, chloride, and potassium. These salts and minerals affect the amount of water that stays in your body.
Diarrhea that continues over a long period of time can cause poor absorption of nutrients. This can lead to wasting.
And sadly, diarrhea is the world’s 2nd leading cause of death in children. Diarrhea is very serious when it’s chronic. Weight loss and even death are at risk here...
It’s something to focus on and get handled in your life.
Remember: There Are Many Different “Causes of Diarrhea”
Some of the causes of diarrhea, such as prescription antibiotic usage for other known health issues, are unavoidable in the short-term. If you can avoid the list of triggers below, great, but if not… do your best using the rest of the material from this program to keep regular bowel habits.
● Inflammatory Bowel Disease (IBD)● Inflammatory diet foods (grains, industrial seed oils, etc.)● Simple intolerance to particular foods can cause diarrhea. Even foods such as food coloring, milk sugar
(lactose) or other additives.● Eating an anti-inflammatory diet that contains too much fat that you don’t tolerate (Fat Malabsorption)
www.SCDLifestyle.com 3 of 21
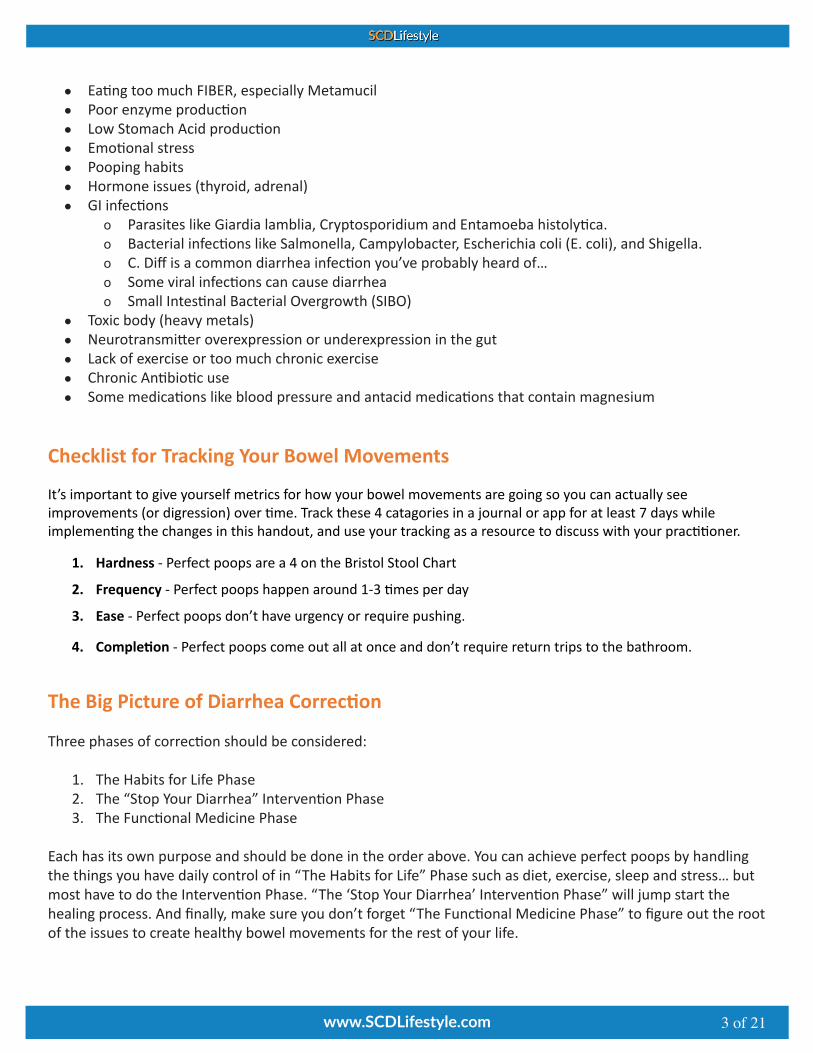
● Eating too much FIBER, especially Metamucil● Poor enzyme production● Low Stomach Acid production● Emotional stress● Pooping habits● Hormone issues (thyroid, adrenal)● GI infections
o Parasites like Giardia lamblia, Cryptosporidium and Entamoeba histolytica.o Bacterial infections like Salmonella, Campylobacter, Escherichia coli (E. coli), and Shigella.o C. Diff is a common diarrhea infection you’ve probably heard of…o Some viral infections can cause diarrheao Small Intestinal Bacterial Overgrowth (SIBO)
● Toxic body (heavy metals)● Neurotransmitter overexpression or underexpression in the gut● Lack of exercise or too much chronic exercise● Chronic Antibiotic use● Some medications like blood pressure and antacid medications that contain magnesium
Checklist for Tracking Your Bowel Movements
It’s important to give yourself metrics for how your bowel movements are going so you can actually see improvements (or digression) over time. Track these 4 catagories in a journal or app for at least 7 days while implementing the changes in this handout, and use your tracking as a resource to discuss with your practitioner.
1. Hardness - Perfect poops are a 4 on the Bristol Stool Chart
2. Frequency - Perfect poops happen around 1-3 times per day
3. Ease - Perfect poops don’t have urgency or require pushing.
4. Completion - Perfect poops come out all at once and don’t require return trips to the bathroom.
The Big Picture of Diarrhea Correction
Three phases of correction should be considered:
1. The Habits for Life Phase 2. The “Stop Your Diarrhea” Intervention Phase3. The Functional Medicine Phase
Each has its own purpose and should be done in the order above. You can achieve perfect poops by handling the things you have daily control of in “The Habits for Life” Phase such as diet, exercise, sleep and stress… but most have to do the Intervention Phase. “The ‘Stop Your Diarrhea’ Intervention Phase” will jump start the healing process. And finally, make sure you don’t forget “The Functional Medicine Phase” to figure out the root of the issues to create healthy bowel movements for the rest of your life.

www.SCDLifestyle.com 4 of 21
PHASE 1: The Habits For Life
The material on this handout is for informational purposes only. As each individual situation is unique, you should use proper discretion, and consultation with a healthcare practitioner, before undertaking the protocols described herein. For example: your weight can dramatically affect the dosages you need to be using for each of these protocols, and only a skilled practitioner can support you with proper supervision. THESE PROTOCOLS ARE FOR PEOPLE 100 LBS OR OVER. THEY NEED TO BE CUSTOMIZED. Please review the herbs in these supplements and look for ingredients that might have been a problem for you in the past.
DIET HABITS
Eat the custom diet for you that satisfies the following…
● A nutrient dense anti-inflammatory diet made up of meats, fruits, vegetables, and healthy fats. (Paleo, SCD, GAPS, and WAPF are all great places to build a solid foundation)
● Plenty of fat● Plenty of salt● Carbohydrate intake: 70-300g (you will find best range individually) ● Bacteria intake - probiotics and/or fermented foods (Prescript Assist is a great probiotic)● Drink 6-10 glasses of water a day
LIFESTYLE HABITS
Sleep● Try to get 8-plus hours of sleep each night● Nap as needed, use 20-min naps instead of stimulants in the afternoon
Exercise● If you’re having diarrhea - DO NOT MAKE THE EXERCISE MISTAKE
o No marathons, Crossfit, etc. (Overtraining is a trigger)● Movement is the key
o Play as a form of exercise● Get outside
Stress ● Lower it by any means necessary, including: meditation, yoga, and journaling
Well-Being● Cultivate an attitude of gratitude – write 3 things you’re grateful for at the end of each day● Do things that make you happy
Toilet habits● Don’t try to hold it, just go when you need to go● Don’t rely on Imodium AD and things like that long term, wean off them
www.SCDLifestyle.com 5 of 21
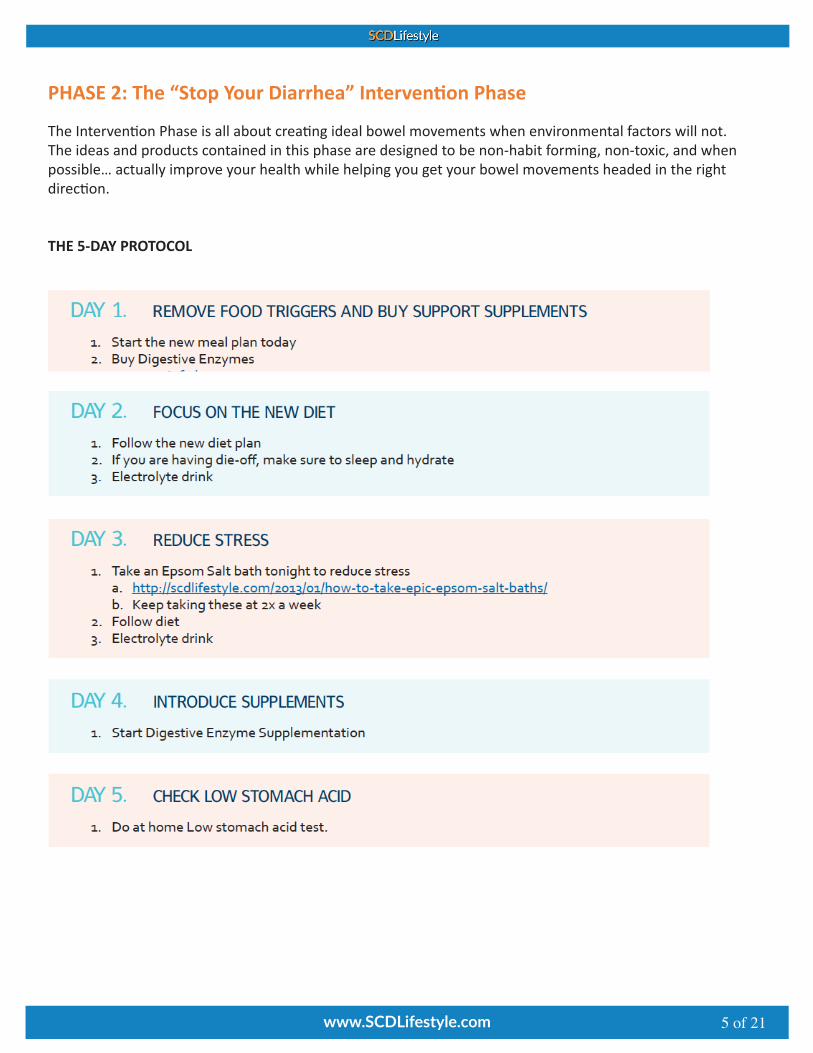
PHASE 2: The “Stop Your Diarrhea” Intervention Phase
The Intervention Phase is all about creating ideal bowel movements when environmental factors will not. The ideas and products contained in this phase are designed to be non-habit forming, non-toxic, and when possible… actually improve your health while helping you get your bowel movements headed in the right direction.
THE 5-DAY PROTOCOL

www.SCDLifestyle.com 6 of 21
THE 5-DAY MEAL PLAN
A brief calorie statement: We don’t expect you to track calories, but we need to chat about it briefly. The meal plans that accompany this guide will be set up to provide an average of 2000-2500 calories a day. But these are example meal plans and building something specific to you would require a lot more time and knowledge.

www.SCDLifestyle.com 7 of 21
NOTE: In the menu below when it says chicken soup, please eat as many bowls as desired. Also, if you are hungry, you may run out of chicken soup fast. If this happens, please go back to the store and make another batch.
Help, I need more calories! When some people look this menu over they will want to eat more calories or eat less meat. If this applies to you, then I want to give you a few approved substitutions. The first is to use tablespoons of coconut oil. We like Nutiva or Gold EFA brands, but seriously take 1-2 tablespoons and eat it right off the spoon with each meal. Each tablespoon is about 120 calories of anti-inflammatory fats that will also help your immune system. Another idea you can try is to drizzle olive oil all over your food.
Below are some brief recipes and instructions for preparing and cooking the foods talked about in this guide. We don’t claim to be chefs, but we have been cooking almost daily for 5 years now. That being said, if you know of a faster, better or easier way to perform any of these recipes, by all means do it your way instead. These instructions are for those, like us, who at one point didn’t know a paring knife from a chef knife or baking from broiling.
Day 1 - Remove Food Triggers and Buy Support Supplements
For day one of this protocol, we are going to focus on two things: food and digestive enzymes. Below, you’ll find a new diet plan we want you to follow for the following 5 days. Removing specific foods and starting digestive enzymes alone can stop some of the worst diarrhea or loose stools. So, we’ll start here and keep building out the protocol as we focus on getting you to your healthy goals.
When it comes to digestive enzymes, if you already have some in the house, please keep taking them or start taking them again. But not all enzyme products are created equally, and while most seem to make sense in theory it’s been our experience in the last 5 years that this is rarely the case. So, if you haven’t tried the brand or dosage we recommend, I’d strongly urge you to give them a shot. I can’t begin to tell you how many people see dramatic health shifts just by switching supplements or correcting dosing problems. So, as you’re waiting for the enzymes to get to your door, focus on what you have access to and switching to the following food plan.
RECIPE: Homemade Chicken Soup
Homemade chicken soup is a delicious and anti-inflammatory soup that is easy on the stomach. The most nutritious way of making it is by using a full organic/pasture-raised chicken carcass. This way you’ll get added nutrients from the bones, collagen and ligaments. However, if your kitchen equipment can’t fit a full bird or you can’t find one of high enough quality, then please use 6 lbs of bone-in chicken thighs. You will still get more flavor and extra nutrients versus using chicken breasts. Don’t use store bought chicken soups as they aren’t prepared in this way and don’t have all the great nutrients of a homemade one.
• full chicken or 6 Lbs of bone-in chicken thighs • 10 large carrots• 2 large onions• 4 celery stalks• parsley• sea salt

www.SCDLifestyle.com 8 of 21
NOTE: If you or your loved ones cannot tolerate chicken, please follow the instruction below using peeled, de-veined shrimp. Use 4-6 lbs of shrimp to replace the chicken.
Step 1. Insert the full chicken or 6 lbs of thighs/shrimp in the largest pot, or slow cooker (crock pot), you have.Step 2. Peel about ten carrots and add to chicken.Step 3. Add about two large sliced onions, a few stalks of celery, and some parsley.Step 4. Generously season with sea salt.Step 5. Fill pot or slow cooker with water until most of the space is taken up (leave 1-2 inches unfilled at the top).Step 6. Simmer for at least 4 hours (can do up to 8 hours if you would like).Step 7. Once the soup has cooled enough as to not burn yourself, slowly lift the full chicken from the pot using 2 spatulas or tongs. Place it on a plate. Get out another scrap plate and place it beside you. Next, using kitchen tongs and forks, peel the meat away from the bone and put the meat on the new plate (leaving behind any bones or inedible parts of the chicken). Before returning the de-boned chicken to the soup, follow step 8.Step 8. Onions, celery, and parsley can be eaten if desired, but it’s worth noting that those who are really sick and have been having diarrhea for an extended length of time do better not eating them.Step 9. Enjoy! Eat as much or as often as you’d like.
RECIPE: Honey Mustard Salmon
● 16 oz of Wild-caught Salmon● 6 Tablespoons of Honey● 6 Tablespoons of Stone-Ground Mustard (no added gums or sugars)● 1 Tablespoon of Apple Cider Vinegar
Step 1. Pre-heat your oven to 415°F. Step 2. In a mixing bowl, add honey, mustard and apple cider vinegar; mix until even. The mixture should coat a spoon and not run off too fast. If the mixture is too thick, slowly add more apple cider vinegar or water. Step 3. Place the salmon filet on a pan with raised sides. Then, evenly spread the mixture over the fish until coated thoroughly. If your mixture is too thick, add water or more apple cider vinegar. Step 4. Bake the salmon to desired doneness. Keep in mind that it usually takes about 10-12 minutes to get to well-done.
RECIPE: Turkey Breakfast Sausage
● 4 lbs of Ground Turkey● 3 Teaspoons of Sea Salt● 2 Tablespoons of Water● 2 Tablespoons of Thyme● 2 Tablespoons of Black Pepper● 2 Tablespoons of Sage

www.SCDLifestyle.com 9 of 21
Step 1. Place foil on a flat pan and roll the ground turkey into a long tube. Then, add the water, salt, and spices. The important thing is to knead the spices into the meat and then make it into a perfect log.Step 2. Wrap the foil around the log and poke holes through it. Step 3. Bake it at 300°F for about 2 hours and check the temperature. It’s considered done when it reaches 165°F. Cut it up into patties and freeze them for a great breakfast treat.
RECIPE: Beef Burgers
● 2 lbs of Ground Beef● 2 Tablespoons of Sea Salt● 1.5 Tablespoons of Black Pepper
Step 1. Unwrap the ground beef and put it in a mixing bowl. Step 2. Add 2 Tbsp of salt and 1.5 Tbsp of black pepper. Work the spices evenly into the beefStep 3. Create patties. Typically 3 patties can be made out of 1 pound of beef.Step 4. Cook on a grill or pan until desired doneness is achieved.
RECIPE: Applesauce
• 5 medium apples (makes about 1 large jar of sauce)• optional: cinnamon
Step 1. Begin by peeling the skin off of the apples. Step 2. Core the apple or slice off pieces of the apple leaving the seeds and core intact. Throw the skin and core away. Step 3. Cut the apple pieces into smaller bite-sized pieces. Next, add the pieces of peeled and chopped apple to a pot and fill with water till it covers the apples completely. Step 4. Place the apples on the stove and heat until boiling. Reduce heat and let simmer for about 20 minutes or until easily pierced by a fork. The ripeness of the apples will greatly affect cooking time.Step 5. When the apples are soft enough that the fork pierces them easily, strain the water off. Now you can either eat them as is or add them to a food processor/blender to make applesauce out of them.
Note: If you’d prefer to bake or steam them, that is perfectly fine as long as they are cooked until fork-tender.Feel free to use cinnamon to spice it up.
RECIPE: Cooked Cucumbers
• 1 Lb cucumbers
Step 1. Begin by peeling the skin off the cucumbers. Usually this is best done with a swivel peeler or knife. Step 2. Cut the cucumber in half down the middle (long ways). This will leave you with two long pieces of cucumber. If your cucumbers contain seeds in the middle, use a spoon and run it through the middle to eliminate any seeds.

www.SCDLifestyle.com 10 of 21
Step 3. Chop the cucumber into bite-sized pieces and place in a pot to boil. After the pot is filled with cucumbers, fill with cold water until the cucumbers are covered. Place pot on stove over high heat. Step 4. When water begins boiling, reduce heat to a simmer and cover. Cook until fork-tender. This usually takes 10-15 minutes or so, but your time may vary depending on heat and ripeness of cucumbers.
Note: If you’d prefer to bake or steam them, that is perfectly fine as long as they are cooked until fork-tender.
RECIPE: Cooked Carrots
• 1 Lb bag of large carrots (I like rainbow carrots!)
Step 1. Begin by peeling the carrots using a swivel peeler. Also cut off both ends of the carrots. The outer skin contains many potential toxins and is harder to digest.Step 2. Cut into 1-2 inch pieces and place into a pot that will be used to boil them.Step 3. When the pot is 3/4 full of peeled and chopped carrots, put cold water into the pan until carrots are covered. Step 4. Place on stove and bring to a boil. Once boiling is reached, reduce heat to a low simmer and cover. Cook until a fork easily pierces the pieces of carrot. This can take 30 minutes to many hours depending on the equipment and ripeness of the carrots.
Note: If you’d prefer to bake or steam them, that is perfectly fine so long as they are cooked until fork-tender.
RECIPE: Cooked Zucchini
• 1 Lb zucchini
Step 1. Begin by peeling the skin off the zucchini. Usually this is best done with a swivel peeler or knife. Step 2. Cut the zucchini in half down the middle (long ways). This will leave you with two long pieces of zucchini. If your zucchini contain seeds in the middle, use a spoon and run it through the middle to eliminate any seeds.Step 3. Chop the zucchini into bite-sized pieces and place in a pot to boil. After the pot is filled with zucchini, fill with cold water until the cucumbers are covered. Place pot on stove over high heat. Step 4. When water begins boiling, reduce heat to a simmer and cover. Cook until fork-tender. This usually takes 10-15 minutes or so, but your time may vary depending on heat and ripeness of cucumbers.
Note: If you’d prefer to bake or steam them, that is perfectly fine as long as they are cooked until fork-tender.
RECIPE: Cooked Pear Sauce
• 5 medium pears (makes about 1 large jar of sauce)• optional: cinnamon

www.SCDLifestyle.com 11 of 21
Step 1. Begin by peeling the skin off of the pears. Step 2. Core the pears or slice off pieces of the pears leaving the seeds and core intact. Throw the skin and core away. Step 3. Cut the pears pieces into smaller bite-sized pieces. Next, add the pieces of peeled and chopped pear to a pot and fill with water till it covers the apples completely. Step 4. Place the pears on the stove and heat until boiling. Reduce heat and let simmer for about 20 minutes or until easily pierced by a fork. The ripeness of the pears will greatly affect cooking time.Step 5. When the pears are soft enough that the fork pierces them easily, strain the water off. Now you can either eat them as is or add them to a food processor/blender to make pear sauce out of them.
Note: If you’d prefer to bake or steam them, that is perfectly fine as long as they are cooked until fork-tender.Feel free to use cinnamon to spice it up.
Get the Right Digestive Enzymes
The number one supplement that can help you to better digestion right now is high-quality digestive enzymes. This supplement along with diet changes can be enough to stop ongoing diarrhea. We’ve personally tried all the major brands and have gotten the feedback of 1000’s of other people on what works best for digesting food and firming up stools. The best digestive enzymes on the market right now are:
http://scdlifestyle.com/LGdiarrhea
The dosage we’ve seen to be most effective is 1-4 capsules per meal. You will need to test the number you take to find the proper dosage for your body.
It’s rare, but some people with severe inflammation of the lining of the stomach can experience irritation upon starting digestive enzymes. If that happens to you, increase very slowly over a 2-3 week period by starting with ¼ capsule per meal for several days. Then, bump it up to ½ capsule for a while, then ¾ capsule, and finally a full capsule. If you still experience irritation, stay at a lower amount.
Important Note from Jordan and Steve:
There is no such thing as a perfect protocol or perfect supplement, as all have advantages and drawbacks. Every effort has been made to find products that work in clinical practice, are high quality and have the least amount of fillers possible.
Thorough testing of the products and protocols has taken place. Sometimes we couldn’t find the most ideal filler ingredients in supplements. It has been our experience that the fillers included in this program don’t cause issues with the majority of people and even in those that they might, the benefits of the protocol outweigh the risks.
www.SCDLifestyle.com 12 of 21
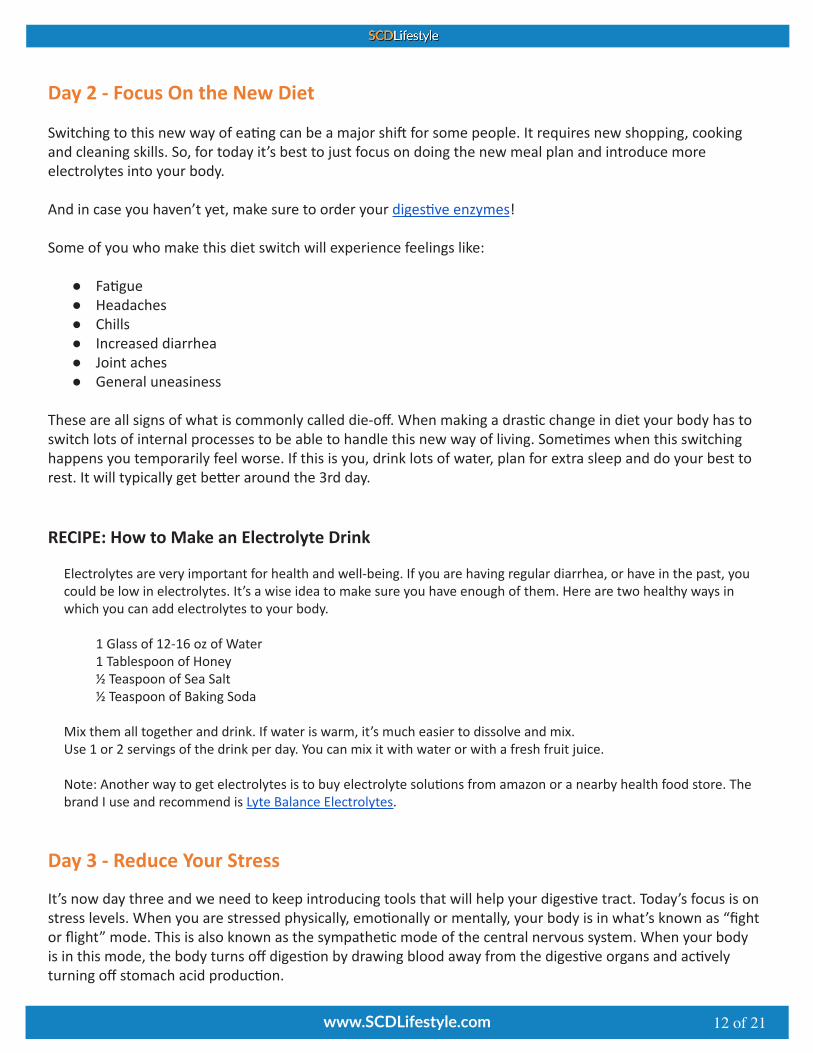
Day 2 - Focus On the New Diet
Switching to this new way of eating can be a major shift for some people. It requires new shopping, cooking and cleaning skills. So, for today it’s best to just focus on doing the new meal plan and introduce more electrolytes into your body.
And in case you haven’t yet, make sure to order your digestive enzymes!
Some of you who make this diet switch will experience feelings like:
● Fatigue● Headaches● Chills● Increased diarrhea ● Joint aches● General uneasiness
These are all signs of what is commonly called die-off. When making a drastic change in diet your body has to switch lots of internal processes to be able to handle this new way of living. Sometimes when this switching happens you temporarily feel worse. If this is you, drink lots of water, plan for extra sleep and do your best to rest. It will typically get better around the 3rd day.
RECIPE: How to Make an Electrolyte Drink
Electrolytes are very important for health and well-being. If you are having regular diarrhea, or have in the past, you could be low in electrolytes. It’s a wise idea to make sure you have enough of them. Here are two healthy ways in which you can add electrolytes to your body.
1 Glass of 12-16 oz of Water1 Tablespoon of Honey½ Teaspoon of Sea Salt½ Teaspoon of Baking Soda
Mix them all together and drink. If water is warm, it’s much easier to dissolve and mix. Use 1 or 2 servings of the drink per day. You can mix it with water or with a fresh fruit juice.
Note: Another way to get electrolytes is to buy electrolyte solutions from amazon or a nearby health food store. The brand I use and recommend is Lyte Balance Electrolytes.
Day 3 - Reduce Your Stress
It’s now day three and we need to keep introducing tools that will help your digestive tract. Today’s focus is on stress levels. When you are stressed physically, emotionally or mentally, your body is in what’s known as “fight or flight” mode. This is also known as the sympathetic mode of the central nervous system. When your body is in this mode, the body turns off digestion by drawing blood away from the digestive organs and actively turning off stomach acid production.
www.SCDLifestyle.com 13 of 21
So, if we want to have great digestion, we need to create a life in which we are switching back to the parasympathetic mode, or “rest and digest” mode. This is opposite of the “fight or flight” mode and it’s the mode we want the body to be in to allow it to digest properly and repair itself.
So, today we are going to keep eating the diet plan and continue to drink the electrolyte drink. But now I want you to try an epsom salt bath. It’s the one way I know of that’s an almost fool proof way to take your body and switch it into rest and digest mode. Follow the directions in this article:
http://scdlifestyle.com/2013/01/how-to-take-epic-epsom-salt-baths/
Going forward I want you taking at least 2 of these baths per week, and if possible more.
Day 4 - Start Supplementation
If you haven’t started using digestive enzymes, then today is the day. Hopefully the ones you ordered a few days ago have arrived. We strongly recommend that you use our preferred brand, as we’ve seen it have the best results (especially for those with diarrhea). You’ll keep focusing on less stress and a better diet, but today digestive enzymes are a big step. For many people, they can almost be like a diarrhea off-switch.
To introduce the enzymes, I want you to take 1 pill at the end of your first major meal today. If you think your digestion was improved at your next meal, then try 2 pills. Stay at 2 pills per meal for at least 1 day and see if your stomach feels better and your poops firm up.
After that, you can test upping the amount of pills you are taking per meal to 3 and even 4 per meal. (Some people will need 4 per meal due to the state of their digestive tract.)
Now, some people may react to the digestive enzymes with some irritation. It’s a small percentage of people, but it could happen. If it does, try cutting a capsule in half and trying a smaller dosage. This might do the trick. If you still get some irritation, most practitioners we’ve talked with would encourage you to continue taking them for a week and see if the pain reduces. In any case of pain, please speak with your medical practitioner and get specific advice for you regarding how to proceed.
Day 5 - Check For Low Stomach Acid
Keep working on your new diet and digestive enzymes, but today I also want you to begin thinking about your stomach acid levels.
Low stomach acid is very common in those who are experiencing loose stools and diarrhea. Without the proper stomach acid levels, it becomes very hard to control the speed of your digestion.
There are 3 different tests you can do to find out if you have low stomach acid. Learn more about How to Test for Low Stomach Acid
www.SCDLifestyle.com 14 of 21
Remember, not all tests are created the same. In this case, the more time and money you invest the better your results will be. However, most people won’t need to break the bank to figure this out.The Heidelberg Stomach Acid Test
The gold standard medical test for low stomach acid available right now is called ”The Heidelberg Stomach Acid Test.” This test is the most costly of the bunch but it will give you exact, non-biased results you need to analyze your stomach acid. It usually costs around $350 and unfortunately most insurance plans won’t cover it. But always call ahead because prices change and so does insurance coverage.
The Heidelberg test works by using a small capsule with a radio transmitter that records the pH of your stomach as you drink a solution of Sodium Bicarbonate. The result of the test is a graph showing your pH levels at regular intervals of time. It really doesn’t get any more descriptive than this. Plus, there have been more than 140 scientific studies to back it up.
Upon conclusion of the test, you’ll have a graph showing your specific stomach response to the challenge solution. From this test, the doctor can determine if you have any forms of hypochlorhydria, hyperchlorhydria, or achlorhydria. This is the best test for all stomach acid related problems.
The Baking Soda Stomach Acid Test
This test works by drinking baking soda and creating a chemical reaction in your stomach between the baking soda (sodium bicarbonate) and hydrochloric acid (HCL). The result is carbon dioxide gas that causes burping. Ingesting baking soda is an old-school natural home remedy for upset stomachs. This test will only cost you about $3 if you need to buy a new box of baking soda. Many people choose to try this test first because it’s very safe, low-cost and you can get started tomorrow if it is in the cupboard.
But, there are problems with this test. Overall, there are a lot of variables to control. Trying to minimize all the variables can be tough and I would recommend performing the test 3 consecutive mornings to find an average. By doing this, you’re looking for more of a pattern than a one time test of “yes” or “no.” Also, to increase accuracy of the test, you must do it as soon as you wake up in the morning before putting anything in your mouth.
For the record, I’m unaware of any scientific studies that prove this method of stomach acid testing is either reliable or accurate. The results of this test can vary widely and it’s up to your interpretation, both of which are not ideal.
Here’s the quick, at-home way to see if you have low stomach acid:1. Mix 1/4 teaspoon of baking soda in 4-6 ounces of cold water first thing in the morning before eating or
drinking anything.2. Drink the baking soda solution.3. Time how long it takes you to belch. Time up to five minutes.4. If you have not belched within five minutes, stop timing.
In theory, if your stomach is producing adequate amounts of stomach acid you’ll likely belch within two to three minutes. Early and repeated belching may be due to excessive stomach acid (but don’t confuse these burps with small little burps from swallowing air when drinking the solution). Any belching after 3 minutes indicates a low acid level.

www.SCDLifestyle.com 15 of 21
Because the time frames can vary person-to-person, as well as how they drink the solution, this test is only a good indicator that you might want to do more testing to determine your stomach acid.
This test is not accurate enough to rule out low stomach acid. To rule out low stomach acid you will need to try the Heidelberg test or Betaine HCL challenge test.
Betaine HCL Challenge Test for Low Stomach Acid
The most reliable test you can perform at home is the Betaine HCL challenge test. In fact, if you do enough searching on the web, you’ll find several health websites who will try to sell you a kit to perform the steps below (don’t fall for this, duh). This test can be performed safely if you follow the directions below. It will cost you around $20 or less to do this test.
Note: NSAIDs and Corticosteroids increase the chances of ulcers in the stomach and together with Betaine HCL increase the risk of gastritis. If you’re on either of these medications or have taken them in the past, consult a physician before trying this test or supplementing with Betaine HCl.
Each case of low stomach acid is unique and will require a custom dosage of HCL, but one way you can find out if you have low stomach acid is by using Betaine HCL supplements. Dr. Jonathan Wright suggests using (1) 650 mg or less pill that includes Pepsin.
To perform the test, do the following:
1. Buy some Betaine HCL with pepsin2. Eat a high protein meal of at least 6 ounces of meat3. In the middle of the meal, take 1 Betaine HCL pill4. Finish your meal as normal and pay attention to your body
There’s really only 2 outcomes from this test.
The first is that you won’t notice anything. As you go about your normal life after the meal, nothing will change. This means it is very likely you have low stomach acid levels.
If you start to feel stomach distress characterized as heaviness, burning, or hotness – then these are signs that you don’t have low acid levels.
This test isn’t completely fool-proof either and should be repeated at least one more time on a different day to confirm the first test. One of the biggest causes of false test results is the amount of protein eaten at the meal, so make sure to eat a chunk of meat with the test. If you do get some burning, don’t worry it will pass in about an hour. You can also mix up a ½ teaspoon of baking soda and drink it to help stop the discomfort.After getting 2 positive tests, it is time to start supplementing with Betaine HCL to get your stomach acid levels where they need to be for good digestion.
Betaine HCL Supplementation
If you’ve just learned that you have low stomach acid and you don’t fix it, you’ll likely have subpar health forever… What should you do now? The first step is to replace the lost stomach acid until you figure out
www.SCDLifestyle.com 16 of 21
the root cause. One of the most common methods of supplementing for low stomach acid is using Betaine Hydrochloride (HCL).
Betaine HCL increases the level of hydrochloric acid in the stomach necessary for proper digestion and assimilation of nutrients from food. Normal levels of hydrochloric acid are required for complete digestion of proteins and absorption of amino acids. It’s also required for the extraction of vitamin B12 from our food. Betaine HCL helps to restore the proper acid levels in the stomach and maintain healthy GI function.
In case you didn’t know, stomach acid is a key component of our immune system that is needed to kill off any potential pathogenic bugs in our food. If the acid levels aren’t strong enough, besides not properly sterilizing our food, the stomach could delay emptying causing a multitude of digestive problems.
After switching my diet to SCD, I was still burping a lot after meals, having a decent amount of gas and feeling bloated all the time. Supplementing with Betaine HCL improved all of the digestive problems overnight.
Before Supplementing with Betaine HCL, Read This
It’s important to understand the risks of Betaine HCL supplementation. It’s generally safe for most people. However, in the book Why Stomach Acid is Good For You, Dr. Wright recommends doing so under the guidance of a physician.
People that are “high risk” shouldn’t take Betaine HCL without supervision. You’re high risk if you’re consuming any anti-inflammatory medicines. Examples of those are: corticosteroids, aspirin, Indocin, ibuprofen (Motrin, Advil) or other NSAIDs. These drugs can damage the GI lining and supplementing with HCL could aggravate it, increasing the risks of bleeding or ulcer.
Okay red tape and warnings aside – you can do this safely and it will help your health tremendously when you correct low stomach acid levels. Did you know your stomach wall is about 5 mm thick? And did you know the stomach is built with ridges on the inside that act like a rock crusher as it pulverizes your food?
I tell you this because I want you to know that your stomach isn’t some weak organ, it’s a beast that can easily handle extreme acid levels. The amazing part is, if this acid got out of the stomach it could burn right through every other cell in the body. Our stomachs were built to create and contain acid and making short work of what we eat. Supplementing with Betaine HCL will help it work like it was designed, because every meal you eat with low acid it has to work harder than it should.
How to figure out your Betaine HCL dose
Each person will have a specific supplementary HCL dosage. Unfortunately, there isn’t a special formula I can give you to figure it out. This is a case of trial and error until you get to the correct dosage. Failing to get to your correct dosage can remove the benefits of supplementing.
You must find the right dosage for you situation. If you fail to do the trial and error, you’re wasting your time and money.
This is a very common problem we see with our readers. Remember, the stomach is purposely built to handle extreme acid environments. If your correct dosage is 2400 mg and you’re only taking 1200 mg, you’re not

www.SCDLifestyle.com 17 of 21
really doing your stomach any favors. You must follow the process below to figure out the right dosage to get the maximum benefit.
1. Eat a meal that contains at least 15-20 grams of protein (about 4-6 ounces of meat).2. Start by taking 1 pill (650 mg of less) of Betaine HCL during the beginning of the meal.3. Finish the meal as normal and observe your body for any changes in feeling associated with the
stomach and belly button area. Things to look for: heaviness, hotness, burning, or other GI distress.4. Stay at this dosage of 1 pill for another day of meals with protein and if you don’t notice anything on
the 3rd day, try 2 pills.5. Stay there for another day and then try 3 pills.6. Keep increasing the number of pills taken with each meal until you notice some GI discomfort described
in step #3.
When this happens, you will know your ideal Betaine HCL dosage is 1 pill less. For example, if you felt the discomfort going from 5 pills to 6 pills, then 5 pills is your proper dosage for a normal meal.A couple points to clarify:
- If you eat a snack or a meal without much protein, you won’t need as much Betaine HCL (for a small snack like a piece of fruit you won’t need any at all).
- When you experience the GI discomfort finding your correct dosage, you can mix ½ teaspoon of baking soda in 8 oz of water and drink it to help lessen the pain.
- Dr. Wright notes in his book that “paradoxically adverse symptoms are most likely to occur in individuals with the lowest levels of stomach acid. This is because these people are most likely to have atrophic gastritis (a thinned-out stomach lining), which makes them much more sensitive to even small quantities of HCL than a normal, thicker stomach lining.” This makes sense because a super inflamed stomach lining won’t have its normal protective barrier intact to contain the strong acids. In this case, it is wise to start with digestive bitters or get smaller dose Betaine HCL pills (think 350mg or less).
- If you have low stomach acid and you can’t supplement with Betaine HCL, there’s a few natural methods to help with symptoms. Start by taking a shot of lemon juice or vinegar before a meal to help the symptoms of indigestion. But know that these don’t actually help the digestion of food only the symptoms. A supplement that can help the digestion is digestive bitters.
I Need to Take How Many Betaine HCL Pills?
It’s very common for people to stop short of their needed Betaine HCL dosage. In fact, in the beginning I was nervous about taking 6 pills at a meal. But trust me, there is nothing to worry about. Dr. Wright reports that the common Betaine HCL dosage range in his clinical practice is 3,250-4,550 mg per meal. That means there are also plenty of people who need above 5,000 mg for an effective dosage.
Remember, a normal functioning stomach is capable of producing and handling extreme acid ranges. If your dosage starts getting extremely high without any GI distress (step #3), you must use your GI symptoms as a guide instead. These include burping, bloating, farting, and stool consistency. Keep everything else the same in your diet as you wait for these indicators to change for the better. Just because you can take 20 pills, doesn’t mean you should. It could be that at 11 pills all of your problems disappear. For this group of people try to find

www.SCDLifestyle.com 18 of 21
the minimum dose needed to help your GI symptoms.
Best Betaine HCL Supplement Brands
When choosing a Betaine HCL supplement, it’s important to choose one that includes pepsin. It’s assumed by the medical research that when supplementing with HCL you need to supplement with pepsin. That is why most Betaine HCL supplements you’ll find include it and Dr. Wright recommends it. I also try to look for a brand that has a minimal amount of additives in the pills. I like the following brands: Thorne Betaine HCL and Now Foods Betaine HCL.
Day 6 - Moving On and More Help
If your diarrhea is under control, the next step for you is to move on to creating your custom diet. Some who do this will immediately see symptoms come back, and it’s important to know what to do. For others, if the diarrhea hasn’t stopped, then you’ll need more help.
If your symptoms come back as soon as you start introducing new foods, pull back your diet diversity to the Day 5 meal plan. If you had a reaction, it’s because typically the vegetables have caused your flare up. So, what you should plan to do is begin to build what we call a “safe zone.”
Your “safe zone” is typically a group of foods consisting of meats and 5-7 vegetables and 5-7 fruits that you can eat and not have any issues with. To find this “safe zone,” start from Day 5 of the meal plan. Then, use the 3 Day Rule of food introductions and pick one new fruit or vegetable to introduce. Make sure you cook it and then test it for the next 3 days. Keep them up as long as the test goes well. Over the next few weeks your gut will keep healing and your diet will keep getting more diverse.
Those of you who haven’t gotten your diarrhea to fully stop after day 5, hang in there and keep eating a diet close to Day 4 and Day 5 where everything is fully cooked. Make sure you’ve tried up to 4 digestive enzymes with your meals and have tested Betaine HCL.
If you’ve done everything as the plan says, the next step is to go to work hard on the “Functional Medicine Phase” to get at even more of the root cause diarrhea triggers, which we’re going to talk about next.
Advanced Short-Term Help
LDN – Low Dose Naltrexone
LDN is a powerful prescription drug that could be a very important tool in your toolbox for helping to defeat diarrhea. It can be used to help control inflammation and calm an overactive immune system, especially in those with autoimmune disease like Jordan had.
Naltrexone was approved in 50 mg doses by the FDA in 1984 to be used on heroin and opium addicts because it blocks the drugs effect on their brains. How does this relate to us and our gut issues? Over time, physicians started to realize the effects of low doses (4.5 mg) of naltrexone on the body’s immune system. It works by
www.SCDLifestyle.com 19 of 21
taking it at night. During the period from 2:00 AM to 4:00 AM your brain is actively scanning your body and running diagnostics on each system. The LDN blocks your brain’s opioid receptors during that time period, resulting in your brain assuming it did not make enough of two chemicals that your immune system needs each day: endorphin and enkephalin. So, the next day it produces a little more and each night the LDN makes it think it didn’t produce enough… slowly building up the levels of those two chemicals in your blood.
People with any level of autoimmune disease that have low amounts of these chemicals are seeing drastic improvements from LDN treatment. For you and I, it can assist in any level of damage from Celiac disease, Crohn’s disease, CFS, IBS, Ulcerative Colitis, Autism Spectrum Disorder, and all the way to HIV or Cancers. The only side effects that I experienced when I took was an enhanced sleep state where I feel almost conscience while I am sleeping. It can make for some interesting dream experiences.
For More information:http://www.lowdosenaltrexone.orghttp://www.ldnresearchtrust.org
The Powerful Anti-inflammatory Supplement Stack
Curcumin is an active ingredient in Turmeric that has been shown in clinical studies to be a wonder supplement. It helps with inflammation and many other conditions. The problem is it’s sometimes hard to actually absorb via supplementation and the doses needed are variable and typically higher than most people try. Boswellia is a very healing and anti-inflammatory herb that, when used in conjunction with curcumin, has, in our experience, helped stop diarrhea.
Because it’s difficult to know what dose might work for you, please use these two phases of programs in order. The higher dose program isn’t always the best approach. Start on the phase 1 protocol and if you don’t notice a decrease in inflammation or diarrhea within 7 days, proceed on to the phase 2 protocol.
For a quick summary on Curcumin (Turmeric) please read this: http://www.med.nyu.edu/content?ChunkIID=21874
For a quick summary on Boswellia please read this: http://www.med.nyu.edu/content?ChunkIID=21617
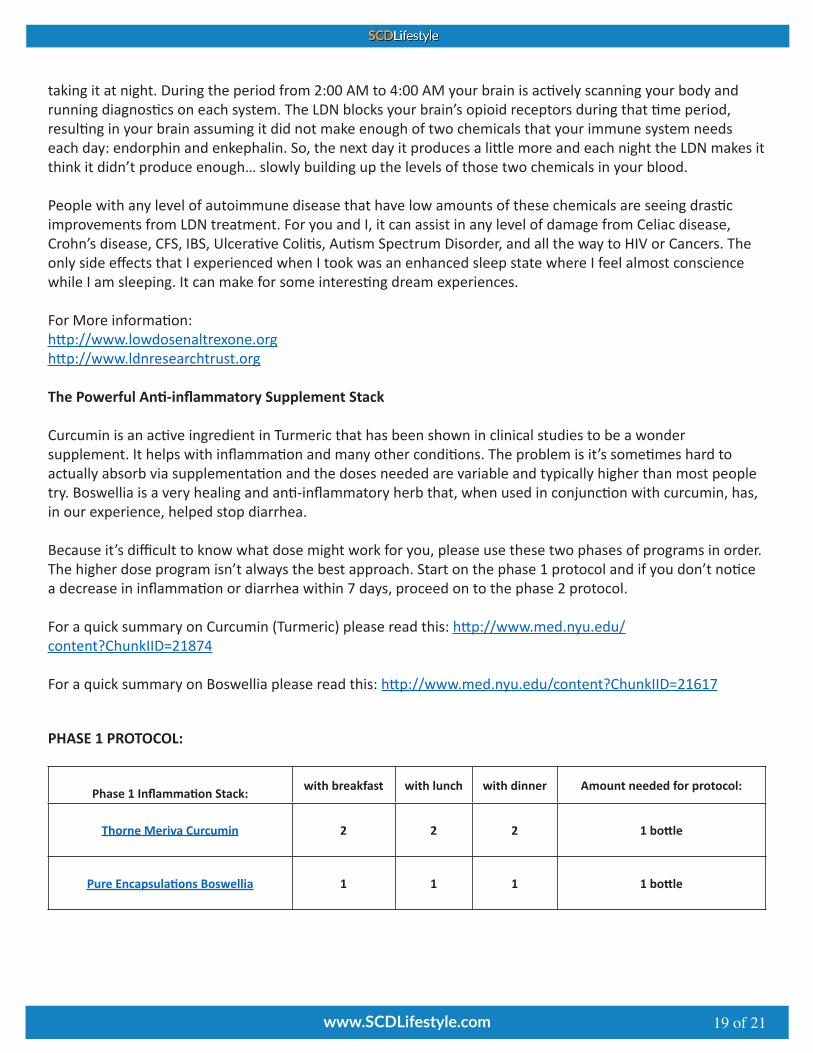
PHASE 1 PROTOCOL:
Phase 1 Inflammation Stack:
with breakfast with lunch with dinner Amount needed for protocol:
Thorne Meriva Curcumin 2 2 2 1 bottle
Pure Encapsulations Boswellia 1 1 1 1 bottle

www.SCDLifestyle.com 20 of 21
PHASE 2 PROTOCOL:
Phase 2 Inflammation Stack: with breakfast with lunch with dinner Amount needed for protocol:
Thorne Meriva Curcumin 4 4 4 1 bottle
Pure Encapsulations Boswellia2
2 2 1 bottle
As with all material presented in this handout, these are ideas to be discussed with your doctor. It is not wise to try anything without supervision.
PHASE 3: Functional Medicine Help
The root causes of diarrhea can be many and often varied person-to-person. In one person it could be Small Intestinal Bacterial Overgrowth (SIBO), while in another it could be a parasitic infection and Adrenal Fatigue. The body is an interconnected system and if one part has been “broken” for some time, the other areas of the system will have been negatively impacted and now might need to be “re-built.” In this phase, it’s very important that you work with a skilled practitioner, specifically those who know Functional Medicine.
***If you don’t have a way to get the tests below, you can order some of them online here***
GUT INFECTIONS● Tests to get:
o SIBO breath testo Stool Testing (always order 2 different tests together):
▪ DRG labs DNA/PCR Stool Test▪ BioHealth #401H▪ Doctors Data Parasitology X3
● What to do about it: Work with an experienced functional medicine practitioner who can interpret the results (more on how to find one below)
HORMONE PROBLEMS (THYROID, ADRENAL FATIGUE, ETC.)● Tests to get:
o Adrenal Fatigue - BioHealth #201/#205o Female Hormones – BioHealth #208 o Thyroid – Blood panels that measure TSH, Free T4, Free T3, Reverse T3, TPO and Tg AB
● What to do about it: Work with an experienced functional medicine practitioner who can interpret the results (more on how to find one below)
DETOXIFICATION PROBLEMS● Tests to get:
o Genova #0091 Organic Acids Profile● What to do: poop, pee, and sweat every day

www.SCDLifestyle.com 21 of 21
GENERAL SUPPORT PROTOCOL:
Liver Support for Detox: with breakfast with lunch with dinner Amount needed for protocol:
Ovation Acetyl-Glutathione (60cap) 1 1 1 bottles
(You can purchase Ovation Acetyl-Glutathione from us HERE)
(1 bottle will last 30 days at this dosage - you’ll likely need several bottles)
NEUROTRANSMITTER PROBLEMS● Work with a Kalish Trained Practitioner to get this properly tested first● You can find one near you here: http://kalishinstitute.com/practitioner-directory/● Case Study Paper: http://www.ncbi.nlm.nih.gov/pmc/articles/PMC3108661/
Remember: Retest 30-60 Days after Completing any Protocol
During any programs, typically at a minimum you should retest every 6 months, if not every 3 months. With thyroid programs that involve prescription replacement, try to wait 6 weeks after a dosage change to retest.
These protocols work well, but nothing is 100% and everyone is in a very different situation. Always make sure to retest 30-60 days after completing any protocol and verify that is in fact helping. In some cases, you won’t be out of the woods yet and you’ll need to get back on the protocol again. That’s where a good practitioner can come in and help.
If the protocol didn’t work, it’s time to start looking for your other root causes. Never give up!
If You Need a Skilled Practitioner…
We highly recommend working with a Functional Medicine Practitioner who was trained in Functional Medicine. They’re going to have experience using protocols like this and are well-suited to help you.
Need help finding someone?
We are no longer doing 1-on-1 consulting, but we have built relationships with two world-class Functional Medicine Practitioners. Here’s a special link to book an appointment with one of these amazing practitioners and start getting help right now:
http://scdlifestyle.com/practitioners/
In good health,
- Jordan and Steve