Embed Size (px)
Citation preview
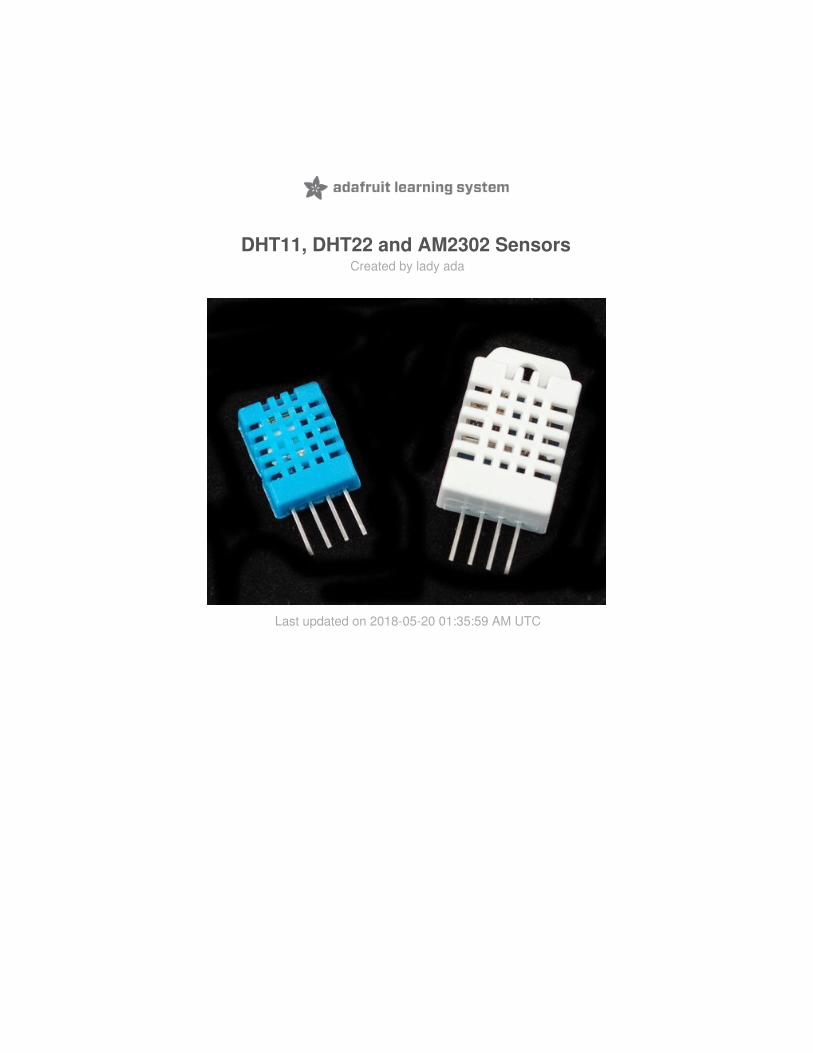
DHT11, DHT22 and AM2302 SensorsCreated by lady ada
Last updated on 2018-05-20 01:35:59 AM UTC
233
55
7999
101113
Guide Contents
Guide ContentsOverview
DHT11 vs DHT22
Connecting to a DHTxx SensorAM2302 (wired DHT22) temperature-humidity sensor
Using a DHTxx SensorDHT CircuitPython CodeAdafruit CircuitPython Module InstallWiringUsageExample CodeDownloads
© Adafruit Industries https://learn.adafruit.com/dht Page 2 of 13

OverviewThis tutorial covers the low cost DHT temperature & humidity sensors (https://adafru.it/aJU). These sensors are verybasic and slow, but are great for hobbyists who want to do some basic data logging. The DHT sensors are made oftwo parts, a capacitive humidity sensor and a thermistor (https://adafru.it/aHD). There is also a very basic chip insidethat does some analog to digital conversion and spits out a digital signal with the temperature and humidity. The digitalsignal is fairly easy to read using any microcontroller.
DHT11 vs DHT22
We have two versions of the DHT sensor, they look a bit similar and have the same pinout, but have differentcharacteristics. Here are the specs:
DHT11 (http://adafru.it/386)
Ultra low cost3 to 5V power and I/O2.5mA max current use during conversion (while requesting data)Good for 20-80% humidity readings with 5% accuracyGood for 0-50°C temperature readings ±2°C accuracyNo more than 1 Hz sampling rate (once every second)Body size 15.5mm x 12mm x 5.5mm4 pins with 0.1" spacing
DHT22 (http://adafru.it/385)
Low cost3 to 5V power and I/O
© Adafruit Industries https://learn.adafruit.com/dht Page 3 of 13

2.5mA max current use during conversion (while requesting data)Good for 0-100% humidity readings with 2-5% accuracyGood for -40 to 80°C temperature readings ±0.5°C accuracyNo more than 0.5 Hz sampling rate (once every 2 seconds)Body size 15.1mm x 25mm x 7.7mm4 pins with 0.1" spacing
As you can see, the DHT22 (http://adafru.it/385) is a little more accurate and good over a slightly larger range. Bothuse a single digital pin and are 'sluggish' in that you can't query them more than once every second or two.
You can pick up both the DHT11 (http://adafru.it/386) and DHT22 (http://adafru.it/385) from the adafruit shop!
© Adafruit Industries https://learn.adafruit.com/dht Page 4 of 13

Connecting to a DHTxx SensorLuckily it is trivial to connect to these sensors, they have fairly long 0.1"-pitch pins so you can plug them into anybreadboard, perfboard or similar.
Likewise, it is fairly easy to connect up to the DHT sensors. They have four pins
1. VCC - red wire Connect to 3.3 - 5V power. Sometime 3.3V power isn't enough in which case try 5V power.2. Data out - white or yellow wire3. Not connected4. Ground - black wire
Simply ignore pin 3, its not used. You will want to place a 10 Kohm resistor between VCC and the data pin, to act as amedium-strength pull up on the data line. The Arduino has built in pullups you can turn on but they're very weak, about20-50K
AM2302 (wired DHT22) temperature-humidity sensor
$15.00IN STOCK
ADD TO CART
© Adafruit Industries https://learn.adafruit.com/dht Page 5 of 13

This diagram shows how we will connect for the testing sketch. Connect data to pin 2, you can change it later to anypin.
If you have an AM2302
DHT22 and AM2302 often have a pullup already inside, but it doesn't hurt to add another one!
© Adafruit Industries https://learn.adafruit.com/dht Page 6 of 13

Using a DHTxx SensorTo test the sketch, we'll use an Arduino. You can use any micrcontroller that can do microsecond timing, but since its alittle tricky to code it up, we suggest verifying the wiring and sensor work with an Arduino to start.
Begin by downloading the DHT library from our github repository. (https://adafru.it/aJW) To download, clickthe DOWNLOADS button in the top right corner. Rename the uncompressed folder DHT and make sure that itcontains the dht.cpp file and others. Then drag the DHT folder into the arduinosketchfolder/libraries/ folder. You mayhave to create that libraries sub-folder if it doesnt exist. Restart the IDE.
IMPORTANT: As of version 1.3.0 of the DHT library you will also need to install theAdafruit_Sensor (https://adafru.it/aZm) library, which is available from the Arduino library manager:
Now load up the Examples->DHT->DHTtester sketch
© Adafruit Industries https://learn.adafruit.com/dht Page 7 of 13

If you're using a DHT11 sensor, comment out the line that sets the type:
and uncomment the line that says:
This will make the data appear correctly for the correct sensor. Upload the sketch!
You should see the temperature and humidity. You can see changes by breathing onto the sensor (like you would tofog up a window) which should increase the humidity.
You can add as many DHT sensors as you line on individual pins, just add new lines such as
DHT dht2 = DHT(pin, type);
below the declaration for the initial dht object, and you can reference the new dht2 whenever you like.
//#define DHTTYPE DHT22 // DHT 22 (AM2302)
#define DHTTYPE DHT11 // DHT 11
© Adafruit Industries https://learn.adafruit.com/dht Page 8 of 13

DHT CircuitPython CodeAdafruit CircuitPython Module Install
To use the DHT sensor with your Adafruit CircuitPython board you'll need to installthe Adafruit_CircuitPython_DHT (https://adafru.it/Beq) module on your board.
First make sure you are running the latest version of Adafruit CircuitPython (https://adafru.it/Amd) for your board. Inparticular for Gemma M0, Trinket M0, and M0 basic boards you must be running CircuitPython 2.1.0 or higher to haveaccess to the necessary pulseio module!
Next you'll need to install the necessary libraries to use the hardware--carefully follow the steps to find and install theselibraries from Adafruit's CircuitPython library bundle (https://adafru.it/zdx). Our introduction guide has a great page onhow to install the library bundle (https://adafru.it/ABU) for both express and non-express boards.
Remember for non-express boards like the, you'll need to manually install the necessary libraries from the bundle:
adafruit_dht.mpy
You can also download the adafruit_dht.mpy from its releases page on Github (https://adafru.it/Ber).
Before continuing make sure your board's lib folder or root filesystem has the adafruit_dht.mpy module copied over.
Wiring
DHT wiring is very simple:
The left-most pin is power. We recommend powering from 5V (sometimes 3V is not enough) - this is OK even ifyou are using 3.3V logicThe second pin is data. Connect a 10K pullup resistor from this pin to 3.3V. If you are using a DHT11 it's required.If you're using a DHT22 or AM2302 you can sometimes leave this offSkip the third pinThe right-most pin is ground
For the DATA pin you must pick a pin that has PWM support (pulseio) - Check the board's guide for what pinshave timers available
© Adafruit Industries https://learn.adafruit.com/dht Page 9 of 13

Here's an example using a Trinket M0 - you can use any
CircuitPython board, just check that the Data pin is
pulseio -capable.
In this example we'll use a Feather M0 and DHT22
sensor connected to pin D6
https://adafru.it/A0o
https://adafru.it/A0o
Usage
To demonstrate the usage of the DHT sensor module you can connect to your board's serial REPL and run Pythoncode to read the temperature and humidity.
Next connect to the board's serial REPL (https://adafru.it/Awz)so you are at the CircuitPython >>> prompt.
Next import the board and adafruit_dht modules, these are necessary modules to initialize and access the sensor:
© Adafruit Industries https://learn.adafruit.com/dht Page 10 of 13

You may also want to try powering the DHT sensor from 5V (we found sometimes it really needs more power) but stillhaving the 10K pull-up resistor to 3.3V volts)
Now create an instance of either the DHT11 or DHT22 class, depending on the type of sensor you're using (for theAM2302 sensor use the DHT22 class). You must pass in the pin which is connected to the signal line, for example aDHT22 or AM2302 sensor connected to board pin D6 would need this code:
Note for a DHT11 sensor you'd instead use adafruit_dht.DHT11 in place of the adafruit_dht.DHT22 code above.
At this point you're all set and ready to start reading the temperature and humidity! You can do this by reading thetemperature property which returns temperature in degrees Celsius:
To read the humidity grab the value of the humidity property, it will return the percent humidity as a floating pointvalue from 0 to 100%:
In most cases you'll always get back a temperature or humidity value when requested, but sometimes if there'selectrical noise or the signal was interrupted in some way you might see an exception thrown to try again. It's normalfor these sensors to sometimes be hard to read and you might need to make your code retry a few times if it fails toread. However if you always get errors and can't ever read the sensor then double check your wiring (don't forget thepull-up resistor if needed!) and the power to the device.
Example Code
Here's a full example sketch which also manages error-retry logic (which will happen once in a while.
Don't forget to change the logic pin to whatever pin you're using! Then save this as main.py on your CircuitPythonboard
import boardimport adafruit_dht
dht = adafruit_dht.DHT22(board.D6)
dht.temperature
dht.humidity
© Adafruit Industries https://learn.adafruit.com/dht Page 11 of 13

If you are using a DHT11, change the code to use a adafruit_dht.DHT11(board.D2) object.
Open the REPL to see the output! Breathe on the sensor to see it move temperature and humidity up (unless you are aWhite Walker in which case the temperature will go down)
import boardimport timeimport adafruit_dht
dht = adafruit_dht.DHT22(board.D2)
while True: try: temperature = dht.temperature humidity = dht.humidity # Print what we got to the REPL print("Temp: {:.1f} *C \t Humidity: {}% ".format(temperature, humidity)) except RuntimeError as e: # Reading doesn't always work! Just print error and we'll try again print("Reading from DHT failure: ",e.args)
time.sleep(1)
© Adafruit Industries https://learn.adafruit.com/dht Page 12 of 13

Downloads
Arduino library and example code for DHT sensors (https://adafru.it/aJX)Adafruit_Sensor library (https://adafru.it/aZm) (required by the DHT library above)DHT11 datasheet (https://adafru.it/aJY)(in chinese, so see the DHT22 datasheet too!)DHT22 datasheet (https://adafru.it/aJZ)K&R Smith calibration notes (https://adafru.it/BfU)
© Adafruit Industries Last Updated: 2018-05-20 01:35:58 AM UTC Page 13 of 13