Embed Size (px)
Citation preview

30
DEVELOPMENT OF IDEAS:
PRODUCTION & WORK DRAWINGS
SYNOPSIS1) ORIGINS INFLUENCES, INSPIRATIONS
A key element of my film will be explaining how and why I made the decision to buy and convert a truck. I want to introduce how my family and I went travelling around Australia for a year and how that has motivated me to travel again. I also want to share my environmental values and the things that I do to be sustainable and will continue to do when living in my truck.
2) VISION & DESIGNWHAT I WANT TO ACHIEVE
In this section I plan to explore expand on how my values and interests inspired my de-sign. Values like environmental sustainability and living with a smaller ecological footprint, and interests like surfing, skate-boarding, and woodworking, were important inspirations and motivations during this phase. I will show my sketches and the other preparation steps such as research.
3) SOURCING OF MATERIALS As I have the goal to make my design as environmentally friendly as possible, I plan to use as many recycled materials as products and take advantage of discarded scrap product from the local industrial area such as pallets, insulation cutoffs, gut-tering. Although I would like to use all recycled products I will have to buy products online, like solar panels and DC fridge and in shops. This will need to be reflected in the film
4) BUILDINGSHOWING THE BUILDING PROCESS
Showing the process of build-ing/installing elements into the truck. I want to make it clear that I completed most of the buiild myself and that somebody did not do the work for me,
5) CHALLENGESOUTLINING THE LIMITING FACTORS
Throughout my film I am inev-itably going to face issues and problems which I will have to overcome. Problems are an essential part of any big project and sharing them will mean others can also learn from my mistakes. I want to convey the message that the path to achieve your goals may not be easy and straightforward, but you can still get there. Sharing my challenges is a way in which I hope to make viewers of my film feel more empowered.
6) FINALTHE END RESULT AND DRIVING THE TRUCK
At the end of the film, I hope to have completed the build of my truck, and show scenes of me travelling. I want to show what the interior looks like.
In the narration I will be talking about what I like about the truck and what my plans going for-ward are.

31
SCRIPT
SEQUENCE OF EVENTS VISUALS/TECHNIQUESI think a lot about the future . . . not only where I am going personally, but also what the future will look like for our planet. Our obsession with tech-nology and convenience just isn’t sustainable.Too many deny, or are unaware, of how this con-sumerism impacts our planet. As a society there is a lack of action to fix this growing problem, but there are ways we can make a small difference as an individual.
• Driving on a road • Montage of unsustainable activities (driving,
phone usage, and other conveniences. • 3d animation of a globe. Starts out red and
then turns green as I say that there are things we can still change to lessen our impact.
I reduce reuse and recycle as much as I can. Both me and my family eat a plant- based diet. I hate plastic, so I’ve trained my family to use paper mushroom bags instead of single use produce bags.I also have a hobby business, Coastal Upcycling, where I recycle skateboard decks into surfboard wax combs and homewares. I still want to pur-sue my passions, while being true to my values, but reducing my environmental footprint isn’t always easy.
• Making a meal: super shallow depth of field, natural lighting of chopping vegetables.
• Using mushroom bags for lettuce• Buying in bulk • All of the ways in which I reduce, reuse and
recycle: reusable chopsticks, glass contain-ers, and using reusable coffee cups.
• Coastal upcycling shots
When I was fourteen, my family and I travelled around Australia for a year. Living on the road and meeting other travellers, exposed me to alternative ways of living. During that year, we saw and experienced so much. My apprecia-tion for Australia’s nature is much greater. As a skateboarder and surfer, travelling gave me the opportunity to skate new parks and surf different beaches. I’ve known since, that want to travel again.
• Map around australia • Trim paths for the route • Photos pop up in squares along points in the
route. • Images of our trip• Calendar starts flipping really fast forward to
2018
Just after my seventeenth birthday, I bought my-self a box body delivery truck. My goal was to convert it into a sustainable home on wheels.
• Over the shoulder into a mask of screen (dol-ley forward shot) of trucksales.com
• As zooming into photo of truck you hear and see me click the “buy” button.
• Introduction to truck
I developed dozens of designs...but, eventually I came up with a rough plan that continued to evolve throughout the build. There was a tonne of work to be done. Before I started, I did many hours of research. I had to get my head around the new compo-nents I needed, like AC and DC electrical appli-ances, solar panels, inverters, and pumps.
• Stop motion of truck on desk• Truck turns into real photo of truck• Sitting at computer (timelapse) • Spinning clock animation behind the comput-
er screen (feathered and blurry)• Close-up of eyes • Close-up hands typing• On screen: numbers and letters appearing -
AC v.s D.C, 2L per minute, mpt controller, etc.

32
SEQUENCE OF EVENTS VISUALS/TECHNIQUESBy recycling and upcycling materials, I was able to do the fitout for almost no cost. Waste from industrial areas, like off-cuts of wood, pallets, plywood boxes were plentiful. Although the busi-nesses considered these to be trash they were incredibly useful for my project.
• Collection of materials• Picking up plywood• Collecting pallets • Masked shape around it tracked to the object• Making of shots
This project didn’t progress without complica-tions. During critical parts of the build weather stopped me from working. I also broke my humerus earlier this year while skateboarding. I underwent surgery and had plates and 14 screws put in. It was another 3 months until I was able to work again.
• Rotoscoped rain animation. • B roll sequence of rain • • Hospital room b-roll• Blood pressure machines• Me in a sling• X rays
I then went on to finish the carpentry, my bed, bench, the kitchen, and all of the finishing work. I did most of the build myself, but my dad was a great help with the electrical. The low voltage lights, fans, fridge and solar panels we installed will help me be self sufficient and sustainable. I will also only use the truck for long distances and use my bike or skateboard for local transport.
• Show the bench, kitchen, bed and painting (timelapse).
• Slow motion shallow depth of field shots of the interior
• Drone shot going up from the solar panels. • Shot zooming out of one roller door, panning
back and then going into the next roller door, masked out. Zoom into a road.
Travelling around Australia in my home on wheels, will help me find a balance, where I can pursue my passions, yet be true to my values.I’m proud of the work I’ve done, and I’m ready to see where this journey takes me.
• Long single shot of the truck driving away into the distance.
SCRIPT: CONTINUED

33
STORYBOARDING
DRAFT STORYBOARD 01
DRAFT STORYBOARD 02

34
DRAFT STORYBOARD 03
DRAFT STORYBOARDS: EVALUATIONI filmed and edited draft 2 and 3. I was happy with the way that these scenes ended up however, my script has changed. Some of the clips I had filmed in draft 3 will be able to be used in the final. On the other hand, the shots I filmed for draft 2 , are going to be completely cut. In complet-ing these draft edits I have further developed the style of animation I wanted to incorporate. The map in draft A, has changed to be cohesive with the rotoscope style animation I want to pursue.

35
REFINED STORYBOARD
STORYBOARDING: EVALUATIONIn my final project I have followed this storyboard. Having really clear visuals and detailed an-notations to refer to while filming was helpful as it reminded me of all of the aspects I wanted to include such as shallow depth of field, and the camera motion. Having this reminder ensured I did not have to retake the shots later on. .
36
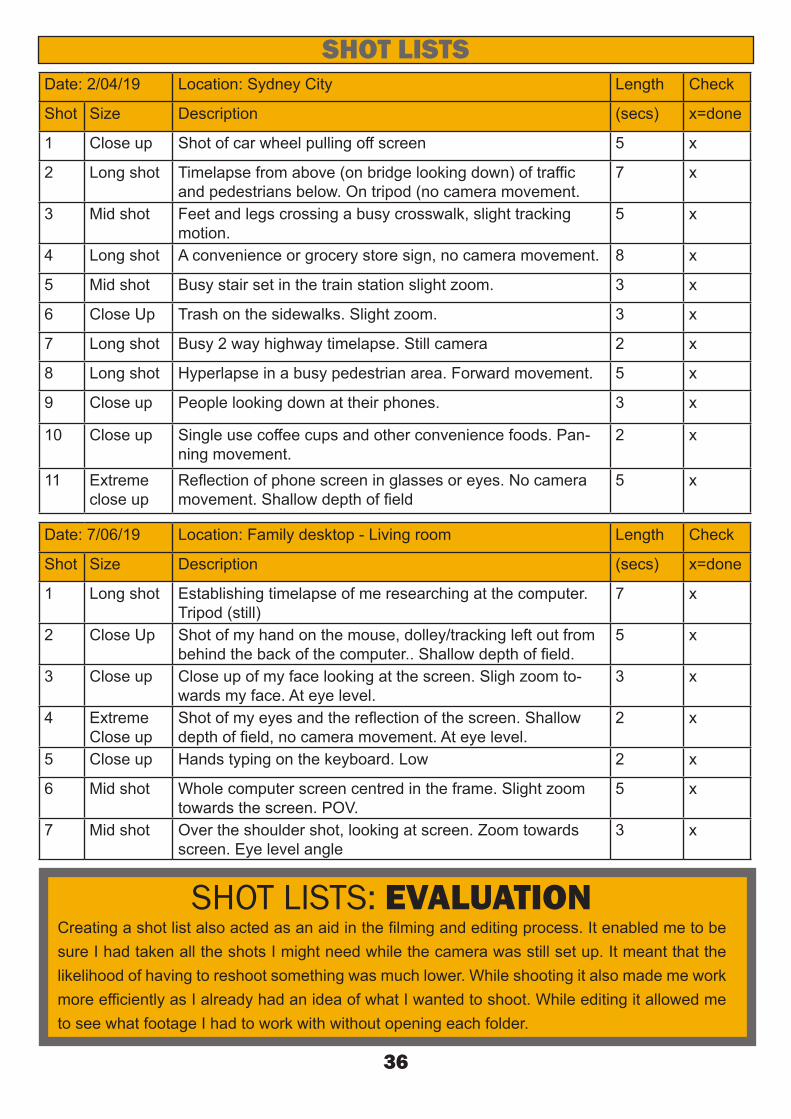
SHOT LISTSDate: 2/04/19 Location: Sydney City Length Check
Shot Size Description (secs) x=done
1 Close up Shot of car wheel pulling off screen 5 x
2 Long shot Timelapse from above (on bridge looking down) of traffic and pedestrians below. On tripod (no camera movement.
7 x
3 Mid shot Feet and legs crossing a busy crosswalk, slight tracking motion.
5 x
4 Long shot A convenience or grocery store sign, no camera movement. 8 x
5 Mid shot Busy stair set in the train station slight zoom. 3 x
6 Close Up Trash on the sidewalks. Slight zoom. 3 x
7 Long shot Busy 2 way highway timelapse. Still camera 2 x
8 Long shot Hyperlapse in a busy pedestrian area. Forward movement. 5 x
9 Close up People looking down at their phones. 3 x
10 Close up Single use coffee cups and other convenience foods. Pan-ning movement.
2 x
11 Extreme close up
Reflection of phone screen in glasses or eyes. No camera movement. Shallow depth of field
5 x
Date: 7/06/19 Location: Family desktop - Living room Length Check
Shot Size Description (secs) x=done
1 Long shot Establishing timelapse of me researching at the computer. Tripod (still)
7 x
2 Close Up Shot of my hand on the mouse, dolley/tracking left out from behind the back of the computer.. Shallow depth of field.
5 x
3 Close up Close up of my face looking at the screen. Sligh zoom to-wards my face. At eye level.
3 x
4 Extreme Close up
Shot of my eyes and the reflection of the screen. Shallow depth of field, no camera movement. At eye level.
2 x
5 Close up Hands typing on the keyboard. Low 2 x
6 Mid shot Whole computer screen centred in the frame. Slight zoom towards the screen. POV.
5 x
7 Mid shot Over the shoulder shot, looking at screen. Zoom towards screen. Eye level angle
3 x
SHOT LISTS: EVALUATIONCreating a shot list also acted as an aid in the filming and editing process. It enabled me to be sure I had taken all the shots I might need while the camera was still set up. It meant that the likelihood of having to reshoot something was much lower. While shooting it also made me work more efficiently as I already had an idea of what I wanted to shoot. While editing it allowed me to see what footage I had to work with without opening each folder.

37
PMT 01: RECORDING AUDIOTechnologies Used: Zoom H4N, dell Laptop, Adobe Audition
Difficulty Level: Easy Est. Time Spent: 30 minutes
DEVELOPMENT OF IDEAS:
PROTOTYPING, MODELLING & TESTING
PRODUCTION In the production phase of this process I set up my laptop in a quiet room to read my script. I then set up the Zoom H4N recorder on the tripod. Settings: The Audio was set to WAV 96khz 24bit. This produces very high quality audio and the file size is quite large. However because the portion of the script I was reading was very small, The file size was not an issue. When recording I ensured that I stayed very still so that any noise from rustling clothing/jewellery was not picked up in the recording. I also waited 3-4 seconds after beginning the recording before I spoke and waited 3-4 seconds after I finished speaking before I ended the recording.
POST PRODUCTION: NOISE REDUCTIONI first went into the effects panel and in the amplitude and compression menu I selected channel mixer. From channel mixer I chose: fill right with left. Next I selected an area of the clip where I was not talking and pressed Cntrl shift P to take a noise print. I then opened up the noise reduction panel. I dragged down the yellow line to meet up with the green to reduce any high points. I also re-duced the noise by 10% and adjusted the noise reduction to be by 20db. I also ensured that the FFT size was 4096 to get a high quality recording before exporting as an mp3 file.
FINAL EVALUATION: RECORDING AUDIOI was pleased with the final outcome of these recordings, however I found that the final result sounded a little too unnatural. I think next time I will have to speak closer to the microphone and therefore I will have to manipulate the files less, in order to get rid of the background/ambient noise of the room. I have also slightly changed my script so I will not be able to use these record-ings.

38
PMT 02: KEYING OUT COLOURSTechnologies Used: Adobe After effects, Adobe Photoshop
Difficulty Level: Easy Est. Time Spent: 30 minutes
PMT 03: CELL ANIMATION Technologies Used: Adobe Premiere Pro, Adobe Photoshop, Intuos graphics tablet Difficulty Level: Easy Est. Time Spent: 30 mins
PRODUCTION From the effects panel, I selected the Linear Colour Key tool and used the dropper to choose the green I wanted to remove. There was a green outline (spilling) but when I adjusted the settings to remove the green, I was left with unclean edges on my text.
CREATING AND STITICHING FRAMES TOGETHERI wanted to end up with a title that changed every frame as if it was a frame by frame animation. Using the pen tool in after effects I wrote four different “pallet wood” and put them onto a green background and exported them as JPEG’s. In Premiere pro I created a nested sequence. I then re-peated the nested sequence so that the clip would last more than four frames. I then nested togeth-er all of the duplicates.
FINAL EVALUATION: KEYING OUT COLOURS
FINAL EVALUATION: CELL ANIMATION
When keying out the background I was unhappy with the edges of the letters. In the future I will use the “Keylight, Key Cleaner, and Advanced Spill Suppressor” tool rather than the “Line-ar Colour Key” to remove the green. This tool enables you to remove any spilling of the green. Making these changes will greatly reduce the time it will take me to achieve the animation components of my film and create a much cleaner and higher quality result.
Creating the text was a lengthy process and required me to keep track of a lot of different files. When doing this in the future I will use Adobe Animate. This will remove a lot of unnecessary steps: saving each file, nesting the sequences, duplicating the frames and changing the back-ground colour for each frame. Making these changes will greatly reduce the time it will take me to achieve the animation components of my film.

39
PMT 04: FILMING A HYPERLAPSE Technologies Used: Canon 750d, Adobe Premiere pro, Difficulty Level: Easy Est. Time Spent: 2.5 hours
PRODUCTION To do this effect I needed to take many different photos and between each take one step forward. I had to make sure that each of my steps were evenly spaced, so I moved forward one line of bricks each time moved. In each image, I needed to line up a certain point of the building to the grid in the viewfinder. I chose the edge of the Zara Home sign. I shot all of the photos in manual, ensuring that they were correctly exposed. I wanted to capture the hustle and bustle, so I chose Pitt street in the city of Sydney.
POST PRODUCTIONIn Premiere Pro I had to Import all of the images I wanted to make up my hyperlapse. I then had to create a new sequence and then move all of my images into the timeline. The program automatical-ly scaled the images so I had to adjust this by going into the effects and controls menu. In this menu I selected scale, rescaled the image and then applied these attributes to all of the other files. I then had to change the length and duration to make each last one frame and tick Ripple Edit. I then ex-ported it, imported it and then tried to apply warp stabilizer.
FINAL EVALUATION: FILMING A HYPERLAPSE During this prototype, it took me a long time to understand the very basics and layout of the program. An issue that I faced was aligning all of the images. As my location was a crowded area, I did not think a tripod was appropriate or practical. However as a result it was a lot hard-er to line up all of the images. When I made them into a timelapse in Premiere Pro, It looked very shaky, but I could not apply the warp stabilization tool as the hyperlapse was too shaky. I would still like to include a hyperlapse in my project as I think it is a good way to set the mood and pace, and to introduce a setting. In the future, I will go at a quieter time of day or pick a different location where it is not as busy.

40
PMT 05: TEXT TRACKING IN AFTER EFFECTS Technologies Used: After Effects, Benro tripod, Photoshop Difficulty Level: Intermediate Est. Time Spent: 3 hours
PRODUCTION In the production of creating the text tracking clip I filmed my truck pulling in from the left side of the frame to the centre. I used a tripod to keep the camera still. I used the 18-55mm lens and shot in manual to allow me to set the ISO, shutter speed and aperture to what was needed.
POST PRODUCTIONThe first step I took towards achieving this effect was to use photoshop to create a text layer with a transparent background (PNG), matching the colours of the text to the colour of the yellow wall in the background. I then opened After Effects and imported both my text layer and the clip of the truck. I set a tracker, tracked the motion from the door handle of the truck, to create a path. I then transformed and adjusted the positioning relative to the path.
FINAL EVALUATION: FILMING A HYPERLAPSE This technique worked out as I planned. It served as a good way of learning the software, how-ever this clip didn’t make it into the final edit. It took me a few tries to set the path in the right position. Also, as I am still trying to learn the program it took me longer than I had anticipated, and after changes to my script, I have decided that this clip no longer has a place in the film.

41
PMT 06: SQUIGGLE ROTOSCOPE ANIMATIONTechnologies Used: After effects, Canon 750d
Difficulty Level: Easy Est. Time Spent: 1 hour
PRODUCTION To capture the clip I needed to I parked my truck and set up a tripod, camera and 18-55mm lens and centered the front of the truck in the frame. I also shot in manual mode, and adjusted the settings to ensure that it was exposed properly.
POST PRODUCTIONThe steps in post production included importing and selecting the file. I then opened the paint tool, changed the size and ensured that the duration of my drawing was set to single frame. Frame by frame, I then scribbled lines around the “ISUZU” and “NKR” lettering on my truck. I then rendered my clip.
FINAL EVALUATION: FILMING A HYPERLAPSE The only issue I faced was minor. I did not know how to change any of the settings while my project was in the render que.This included choosing the file where I wanted it to save, frame rate and resolution. I am pretty happy with the way this turned out, however, I was a bit rushed. I also only had access to a mouse, so the lines are inaccurate. Using a tablet will allow me to use pressure to have variation in my line thickness. I might also create these animations sepa-rately to the video rather than directly onto the clip so that I can edit them individually.