Embed Size (px)
Citation preview
Software Engineering
Competence Center
TUTORIAL
© Copyright Software Engineering Competence Center 2013
Development and Deployment of JAX-WS
Web Services using ApacheCXF and Mule ESB
Ahmed Mohamed Gamaleldin Senior R&D Engineer-SECC
Development and Deployment of JAX-WS Web Services using ApacheCXF and Mule ESB | Tutorial Page 2
Abstract
Service-oriented architecture (SOA) is a set of principles and methodologies for
designing and developing software in the form of interoperable services. These
services are usually representing business functionalities that are built as
software components which can be reused for different purposes. SOA could be
considered as a paradigm shift and a new architectural view for the system
design. This tutorial explains the development of services using Apache-CXF
engine. In addition, the tutorial explains how to deploy services in Mule ESB and
how to create consumers (clients) for these services in an easy and standard
way.
Keywords: Service Oriented Architecture (SOA), Enterprise Service Bus (ESB),
JMS (Java messaging system)

Development and Deployment of JAX-WS Web Services using ApacheCXF and Mule ESB | Tutorial Page 3
Table of Contents
1. Introduction 4
2. ESB installation and configuration 5
3. Service developing and deploying in Mule 8
3.1. Hello Service Example 9
3.1.1. Service 9
3.1.2. Client 13
3.2. Deploying web service in Mule 16
4. Summary 21
5. References 21
6. Abbreviations 21
Development and Deployment of JAX-WS Web Services using ApacheCXF and Mule ESB | Tutorial Page 4
1. Introduction
Service-oriented architecture (SOA) is a set of principles and methodologies for
designing and developing software in the form of interoperable services. These
services are usually representing business functionalities that are built as
software components which can be reused for different purposes.
SOA appears when you are thinking of integration, different applications that are
built on different technologies and platforms can be integrated using SOA. For
example, several departments within an organization can develop and deploy
SOA services in different implementation languages; their clients (other
departments or even external clients) will benefit from a well-defined interface
to access them and this will also enable the service reuse in different
applications.
Developing or deploying SOA services is not sufficient to enable the integration
between different platforms, it could be considered as the initial step which is a
mandatory one. The key technology that plays the major role for enabling the
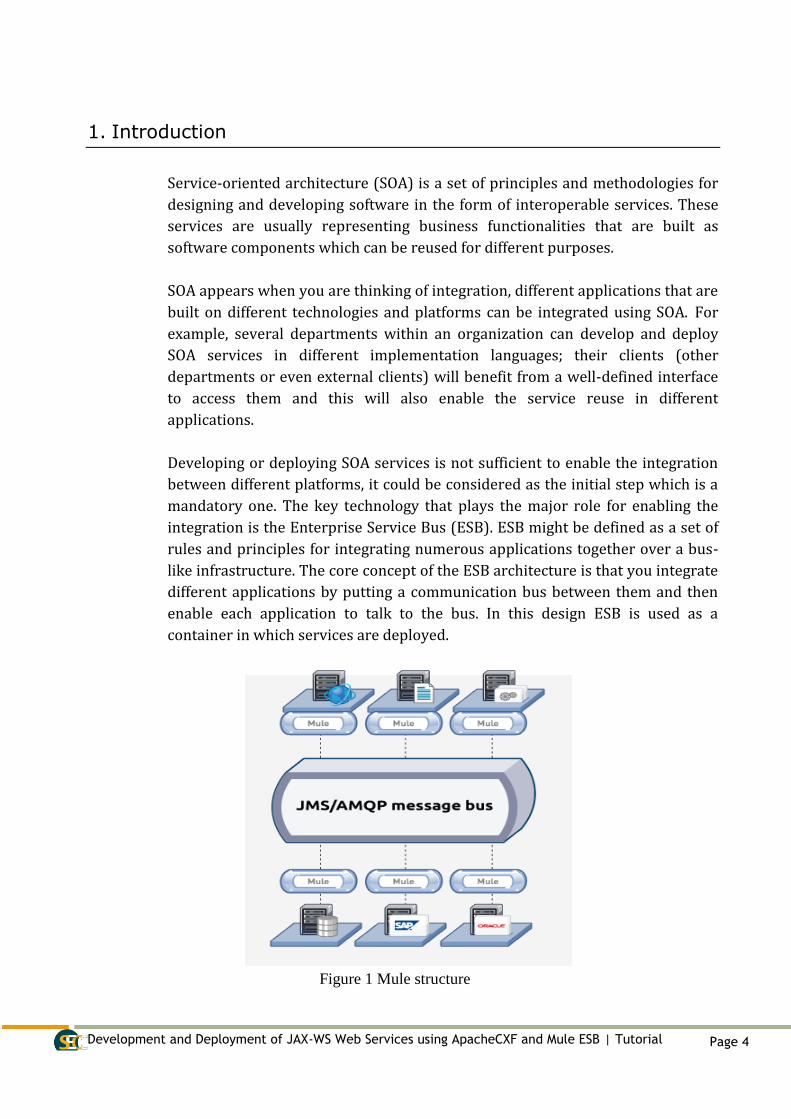
integration is the Enterprise Service Bus (ESB). ESB might be defined as a set of
rules and principles for integrating numerous applications together over a bus-
like infrastructure. The core concept of the ESB architecture is that you integrate
different applications by putting a communication bus between them and then
enable each application to talk to the bus. In this design ESB is used as a
container in which services are deployed.
Figure 1 Mule structure
Development and Deployment of JAX-WS Web Services using ApacheCXF and Mule ESB | Tutorial Page 5
The concept of ESB was born out of the need to switch from the concept point-
to-point integration in which the integration between software components is
done in a customized way based on the application, the integration is scattered
within the code and that for sure causes a very hard to management and a big
difficulty in code maintaining and extendibility.
All of the ESB products available enable users to integrate their applications in
this bus-based architecture, but differ in the way that they do it and the
capabilities that they offer like routing, transformation,…etc
Figure 1 explains the basic idea of one of the most famous ESB tools, namely the
Mule ESB. Each service deployed in the ESB can communicate with other
services by passing messages formatted as JMS messages to the bus and the bus
is capable of routing these messages to the endpoint service. More information
about Mule can be easily found through its web site [1]
This tutorial uses Mule standalone ESB v3.3 for the following reasons:
1. It is easy to learn
2. It is a simple and lightweight integration platform
3. It provides various methods for implementing and consuming Java based
web services
4. It supports different web services protocols like SOAP and REST
5. It is free (open source) and has a very rich documentation
2. ESB Installation and Configuration
One of the most common methods for developing and deploying Mule-based web
services is to use Eclipse+MuleIDE environment for development and to install
Mule standalone on your target server then deploy your service in it.
Mule ESB provides very easy installation steps for its standalone version:
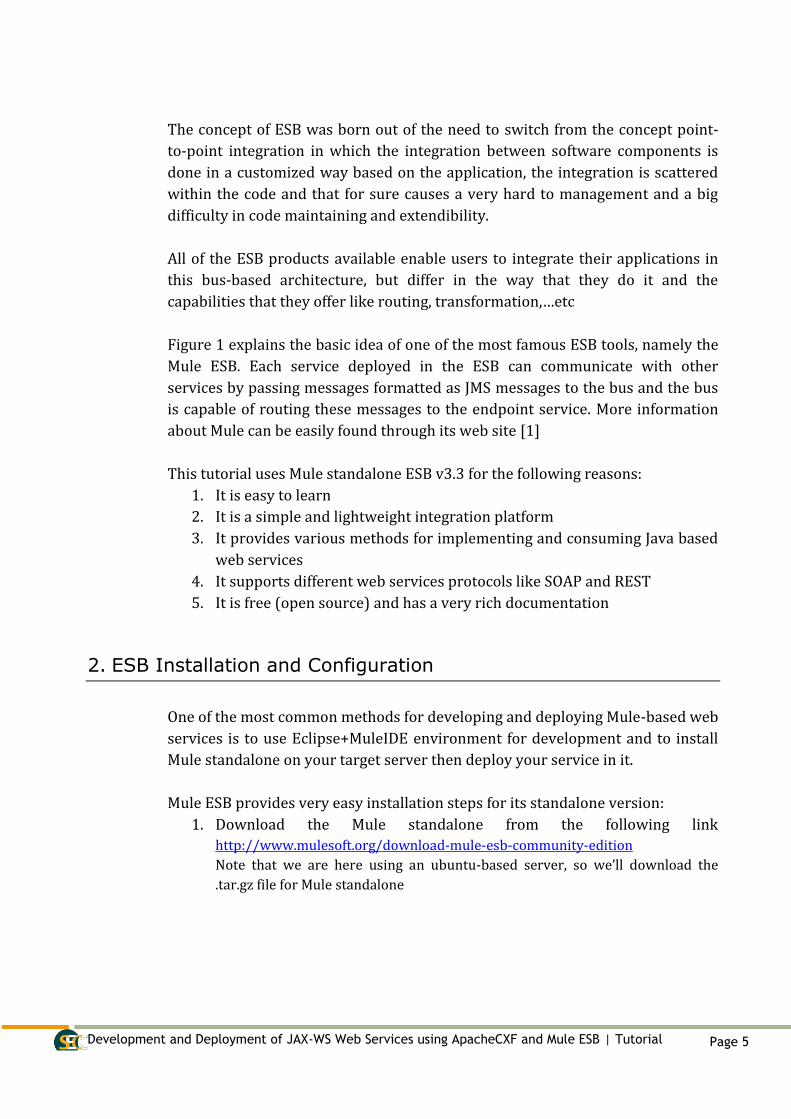
1. Download the Mule standalone from the following link
http://www.mulesoft.org/download-mule-esb-community-edition Note that we are here using an ubuntu-based server, so we’ll download the
.tar.gz file for Mule standalone
Development and Deployment of JAX-WS Web Services using ApacheCXF and Mule ESB | Tutorial Page 6
2. Extract the .tar.gz file in a path like /home/user/MuleESB
3. Add an environmental variable called MULE_HOME which points to the
installation path (/home/user/MuleESB)
This is done by adding the following line to your /etc/environment file
MULE_HOME=/home/user/MuleESB
4. Add $MULE_HOME/bin to the PATH environmental variable.
This is done by adding the following line to your /etc/environment file
PATH=$PATH:/home/user/MuleESB
For the development purpose, the following tools are needed:
1. Install Java JDK SE Standard Edition 1.6.0_26 or above
2. Install Eclipse version 3.4 or above(Eclipse Juno for JavaEE is preferred)
3. Download the Mule standalone from the following link
http://www.mulesoft.org/download-mule-esb-community-edition
Note that here we’ll download the .zip version such that we’ll use it for
our development in a Windows environment.
4. Extract the .zip file in a path like D:\MuleESB
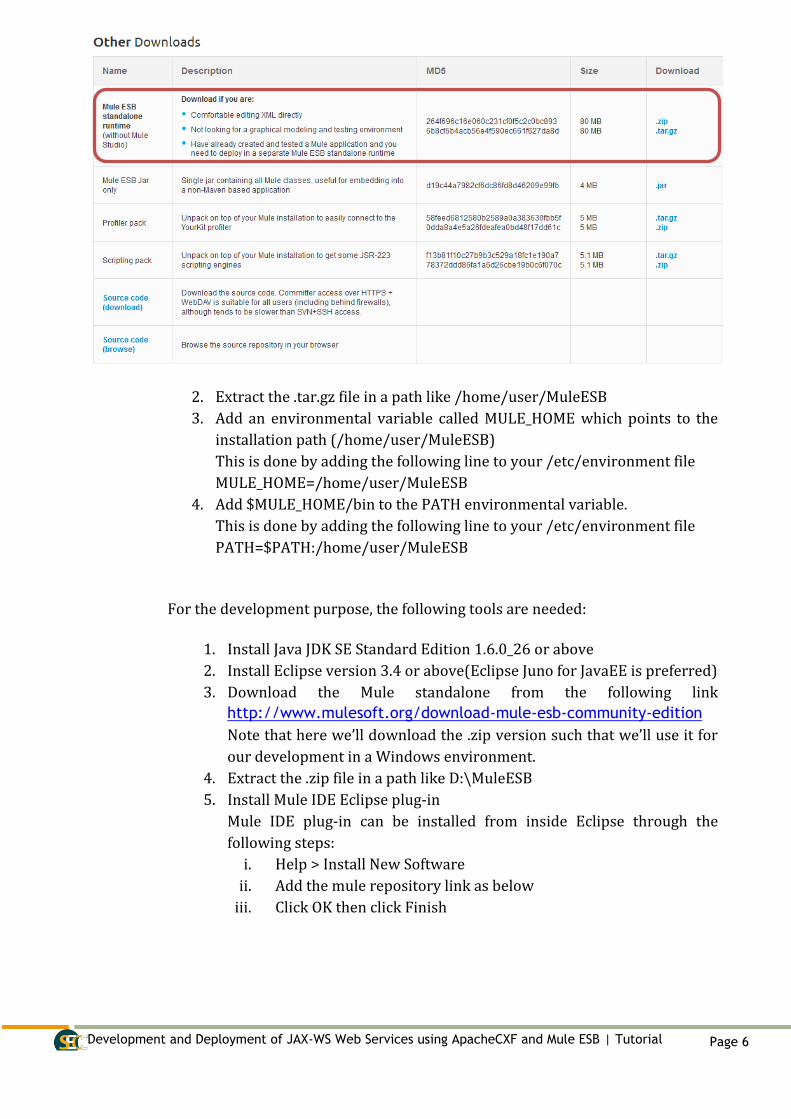
5. Install Mule IDE Eclipse plug-in
Mule IDE plug-in can be installed from inside Eclipse through the
following steps:
i. Help > Install New Software
ii. Add the mule repository link as below
iii. Click OK then click Finish
Development and Deployment of JAX-WS Web Services using ApacheCXF and Mule ESB | Tutorial Page 7
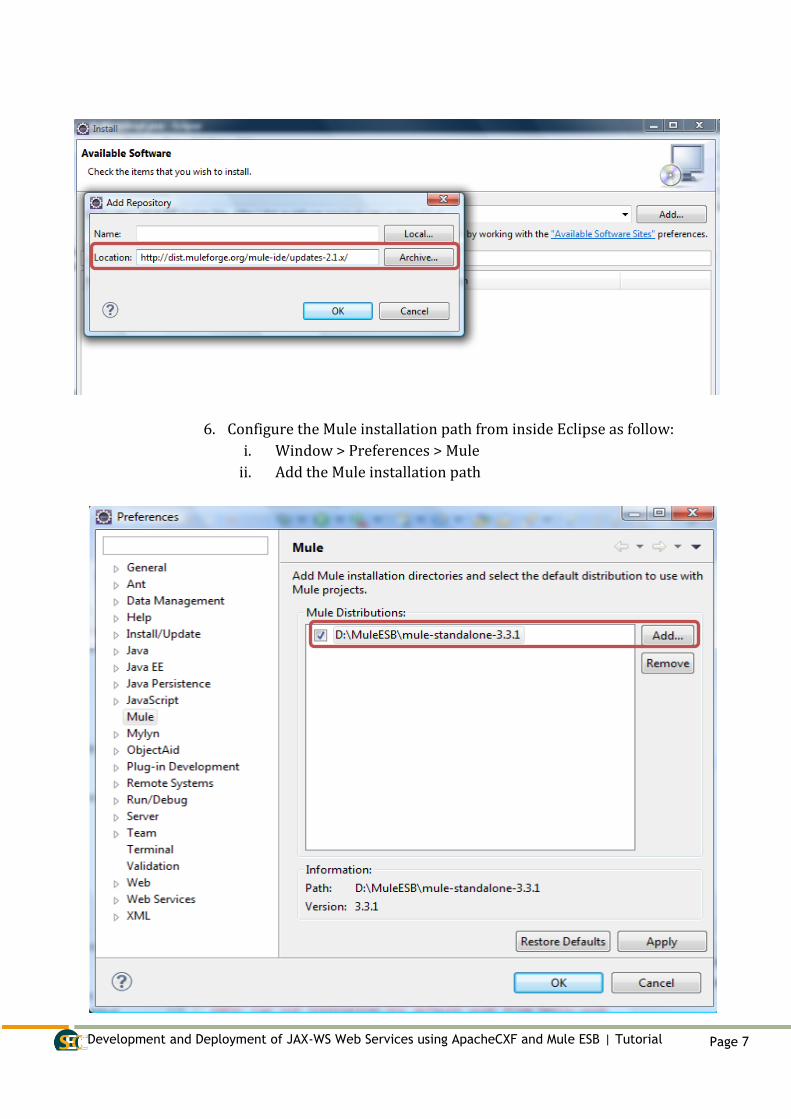
6. Configure the Mule installation path from inside Eclipse as follow:
i. Window > Preferences > Mule
ii. Add the Mule installation path
Development and Deployment of JAX-WS Web Services using ApacheCXF and Mule ESB | Tutorial Page 8
3. Service Developing and Deploying in Mule
Mule provides three ways to build a web service:
1. Using the JAX-WS front end to build a code-first web service employing
the standard JAX-WS annotations with the JAXB data binding
2. Using the JAX-WS front end to build a WSDL-first web service
3. Using the "simple" front end in CXF to create a web service from simple
POJOs
Apache CXF is an open source services framework which helps the developer to
build and develop services using frontend programming APIs, like JAX-WS and
JAX-RS. These services can speak a variety of protocols such as SOAP,
XML/HTTP, RESTful HTTP, or CORBA and work over a variety of transports such
as HTTP, JMS or JBI.
Building Web Services with Apache CXF and JAX-WS as a frontend programming
API is the most common method especially for Java experts who are willing to
build their services in java.
The service development method explained in this tutorial is the first one in
which the web service is implemented in Java with the JAX-WS API front end
then it is deployed in the Mule server to generate the WSDL file of the service
from which the web service client is generated using Apache CXF wsdl2java tool.
Mule incorporates a vast amount of concepts but based on our scope, we’ll just
focus on the basic and main concepts that must be understood before going on in
this tutorial:
1. The main concept of the mule is the “flow” which defines how the
message in received and how it is processed and finally how it is exposed
to the end user. The mule flow with all of its components is described in
the mule configuration files.
2. Mule Configuration files (mule-config.xml) are files in which Mule is told
how to receive messages, how to route them to different components and
how to transform messages etc.
3. The <inbound-endpoint> element specifies how the flow receives
messages. The address attribute of the <inbound-endpoint> element
contains an URI that specifies the protocol and address of the endpoint.
The exchange-pattern attribute specifies the exchange pattern used when
interacting with the message.
Development and Deployment of JAX-WS Web Services using ApacheCXF and Mule ESB | Tutorial Page 9
3.1. Hello Service Example
The following steps will explain the steps required for developing, deploying and
creating the client for a very simple Hello service in a clear and systematic way.
3.1.1. Service
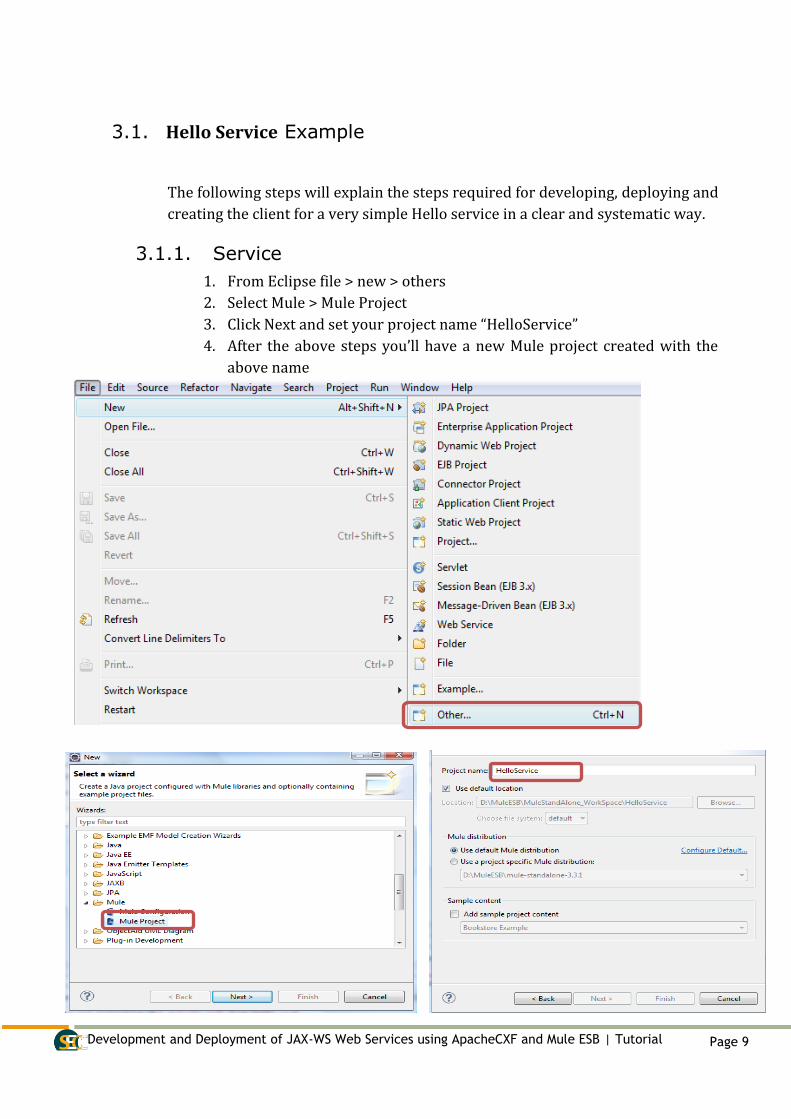
1. From Eclipse file > new > others
2. Select Mule > Mule Project
3. Click Next and set your project name “HelloService”
4. After the above steps you’ll have a new Mule project created with the
above name
Development and Deployment of JAX-WS Web Services using ApacheCXF and Mule ESB | Tutorial Page 10
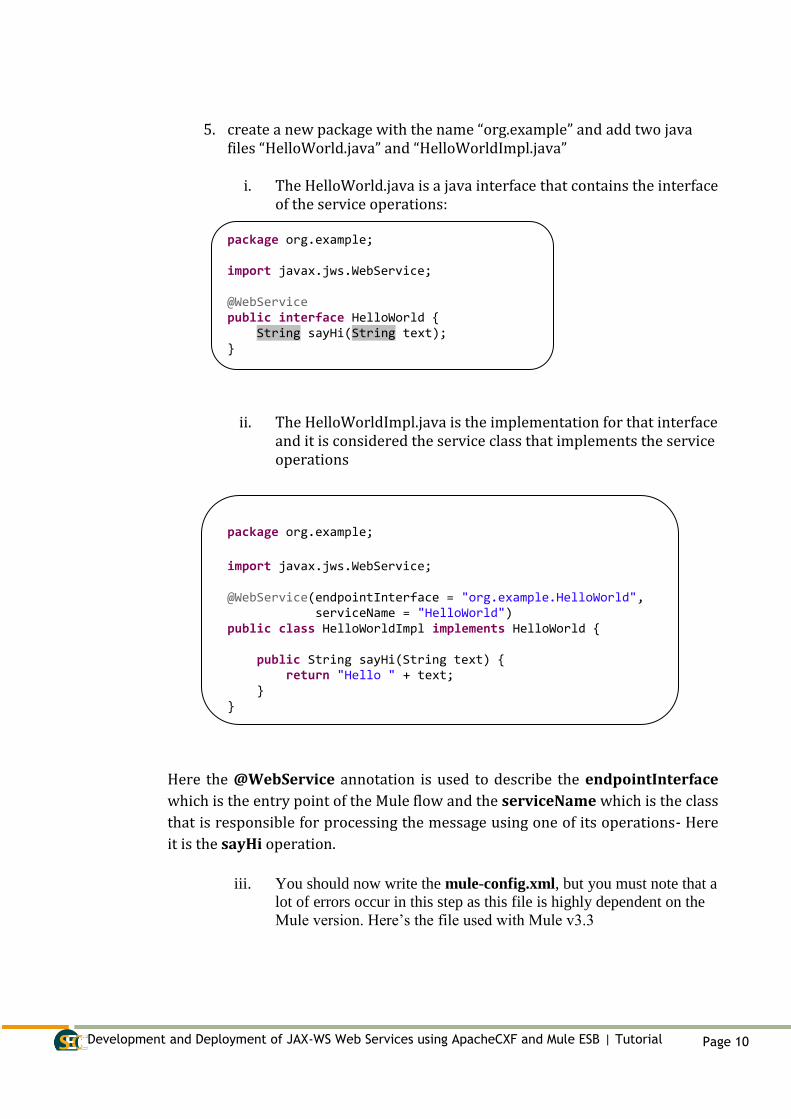
5. create a new package with the name “org.example” and add two java files “HelloWorld.java” and “HelloWorldImpl.java”
i. The HelloWorld.java is a java interface that contains the interface of the service operations:
package org.example; import javax.jws.WebService; @WebService public interface HelloWorld { String sayHi(String text); }
ii. The HelloWorldImpl.java is the implementation for that interface and it is considered the service class that implements the service operations
package org.example;
import javax.jws.WebService; @WebService(endpointInterface = "org.example.HelloWorld", serviceName = "HelloWorld") public class HelloWorldImpl implements HelloWorld { public String sayHi(String text) { return "Hello " + text; } }
Here the @WebService annotation is used to describe the endpointInterface
which is the entry point of the Mule flow and the serviceName which is the class
that is responsible for processing the message using one of its operations- Here
it is the sayHi operation.
iii. You should now write the mule-config.xml, but you must note that a
lot of errors occur in this step as this file is highly dependent on the
Mule version. Here’s the file used with Mule v3.3

Development and Deployment of JAX-WS Web Services using ApacheCXF and Mule ESB | Tutorial Page 11
<?xml version="1.0" encoding="UTF-8"?> <mule xmlns:http="http://www.mulesoft.org/schema/mule/http" xmlns:doc="http://www.mulesoft.org/schema/mule/documentation" xmlns="http://www.mulesoft.org/schema/mule/core" xmlns:xsi="http://www.w3.org/2001/XMLSchema-instance" xmlns:cxf="http://www.mulesoft.org/schema/mule/cxf" xmlns:stdio="http://www.mulesoft.org/schema/mule/stdio" xmlns:spring="http://www.springframework.org/schema/beans" xsi:schemaLocation=" http://www.mulesoft.org/schema/mule/http http://www.mulesoft.org/schema/mule/http/current/mule-http.xsd http://www.springframework.org/schema/beans http://www.springframework.org/schema/beans/spring-beans-current.xsd http://www.mulesoft.org/schema/mule/core http://www.mulesoft.org/schema/mule/core/current/mule.xsd http://www.mulesoft.org/schema/mule/cxf http://www.mulesoft.org/schema/mule/cxf/current/mule-cxf.xsd http://www.mulesoft.org/schema/mule/stdio http://www.mulesoft.org/schema/mule/stdio/3.2/mule-stdio.xsd " version="CE-3.3.1"> <flow name="helloService"> <http:inbound-endpoint address="http://localhost:63081/hello" exchange-pattern="request-response"> <cxf:jaxws-service serviceClass="org.example.HelloWorld"/> </http:inbound-endpoint> <component class="org.example.HelloWorldImpl" /> </flow> </mule>
the above frame describes the Mule flow , we are interested here with the
following attributes:
i. address: this is the http entry point of the flow, this will be used later to be
able to run the service through the web browser and to be able to get the
wsdl file.
ii. exchange-pattern: determines how endpoint handles the messages, it is
here request-response which means that this flow receives the message
and responds to the service caller.
iii. serviceClass: this is the class that contains the implementation of the
service operations
iv. class: this is the service component class which is here the interface of the
service
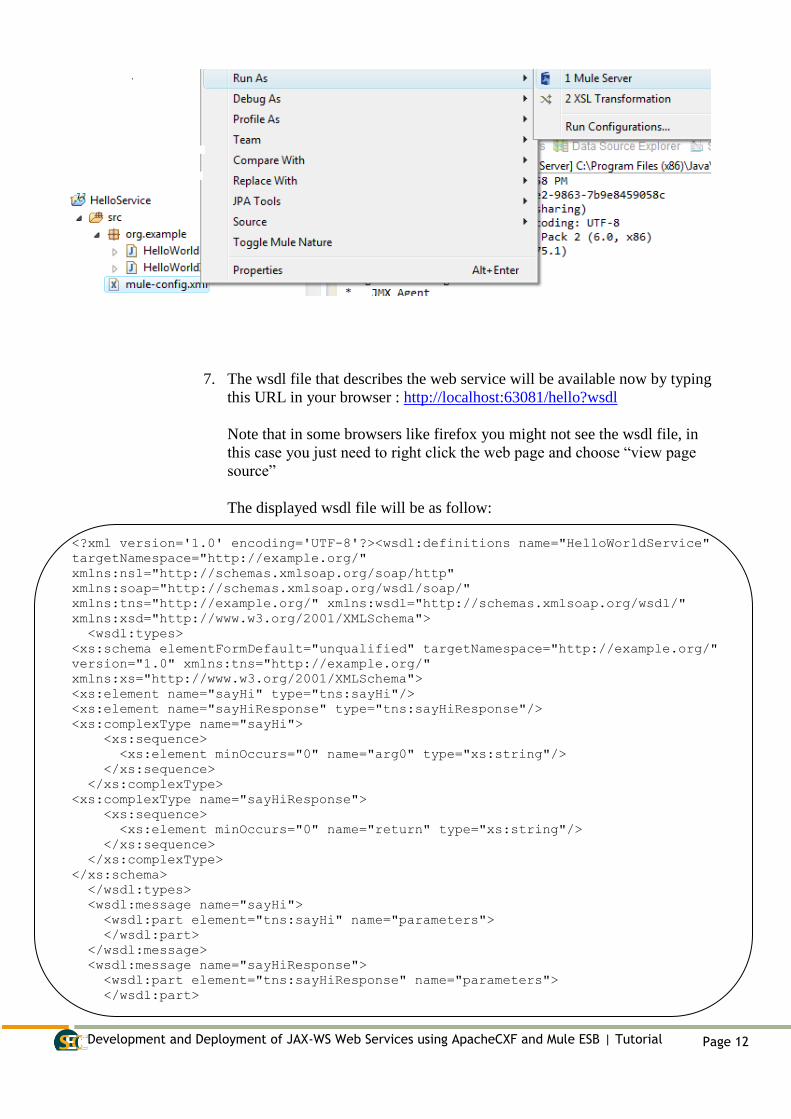
6. Run the Mule server to invoke the service and to get the wsdl file that
describes the service:
Right click the mule-config.xml file > Run As > Mule Server
Development and Deployment of JAX-WS Web Services using ApacheCXF and Mule ESB | Tutorial Page 12
7. The wsdl file that describes the web service will be available now by typing
this URL in your browser : http://localhost:63081/hello?wsdl
Note that in some browsers like firefox you might not see the wsdl file, in
this case you just need to right click the web page and choose “view page
source”
The displayed wsdl file will be as follow:
<?xml version='1.0' encoding='UTF-8'?><wsdl:definitions name="HelloWorldService"
targetNamespace="http://example.org/"
xmlns:ns1="http://schemas.xmlsoap.org/soap/http"
xmlns:soap="http://schemas.xmlsoap.org/wsdl/soap/"
xmlns:tns="http://example.org/" xmlns:wsdl="http://schemas.xmlsoap.org/wsdl/"
xmlns:xsd="http://www.w3.org/2001/XMLSchema">
<wsdl:types>
<xs:schema elementFormDefault="unqualified" targetNamespace="http://example.org/"
version="1.0" xmlns:tns="http://example.org/"
xmlns:xs="http://www.w3.org/2001/XMLSchema">
<xs:element name="sayHi" type="tns:sayHi"/>
<xs:element name="sayHiResponse" type="tns:sayHiResponse"/>
<xs:complexType name="sayHi">
<xs:sequence>
<xs:element minOccurs="0" name="arg0" type="xs:string"/>
</xs:sequence>
</xs:complexType>
<xs:complexType name="sayHiResponse">
<xs:sequence>
<xs:element minOccurs="0" name="return" type="xs:string"/>
</xs:sequence>
</xs:complexType>
</xs:schema>
</wsdl:types>
<wsdl:message name="sayHi">
<wsdl:part element="tns:sayHi" name="parameters">
</wsdl:part>
</wsdl:message>
<wsdl:message name="sayHiResponse">
<wsdl:part element="tns:sayHiResponse" name="parameters">
</wsdl:part>

Development and Deployment of JAX-WS Web Services using ApacheCXF and Mule ESB | Tutorial Page 13
</wsdl:message>
<wsdl:portType name="HelloWorld">
<wsdl:operation name="sayHi">
<wsdl:input message="tns:sayHi" name="sayHi">
</wsdl:input>
<wsdl:output message="tns:sayHiResponse" name="sayHiResponse">
</wsdl:output>
</wsdl:operation>
</wsdl:portType>
<wsdl:binding name="HelloWorldServiceSoapBinding" type="tns:HelloWorld">
<soap:binding style="document"
transport="http://schemas.xmlsoap.org/soap/http"/>
<wsdl:operation name="sayHi">
<soap:operation soapAction="" style="document"/>
<wsdl:input name="sayHi">
<soap:body use="literal"/>
</wsdl:input>
<wsdl:output name="sayHiResponse">
<soap:body use="literal"/>
</wsdl:output>
</wsdl:operation>
</wsdl:binding>
<wsdl:service name="HelloWorldService">
<wsdl:port binding="tns:HelloWorldServiceSoapBinding" name="HelloWorldPort">
<soap:address location="http://localhost:63081/hello"/>
</wsdl:port>
</wsdl:service>
</wsdl:definitions>
From the wsdl file above you’ll need to know the following:
i. < wsdl:operation > tag which determines the operations defined in
your service
ii. < wsdl:port > tag which defines how you bind with the service in the
client project
iii. <soap:address> tag which defines the URL of the http end point of the
service. In case of your service deployed on a remote server, you must
change your local host with the server IP
You must now save the wsdl file with a name like hello.wsdl. you can
do that by simply clicking file > Save Page As from your web
browser.
3.1.2. Client
For the service client, you’ll need to follow these steps:
1. Create a new java project from Eclipse with the name
“HelloServiceClient”
Development and Deployment of JAX-WS Web Services using ApacheCXF and Mule ESB | Tutorial Page 14
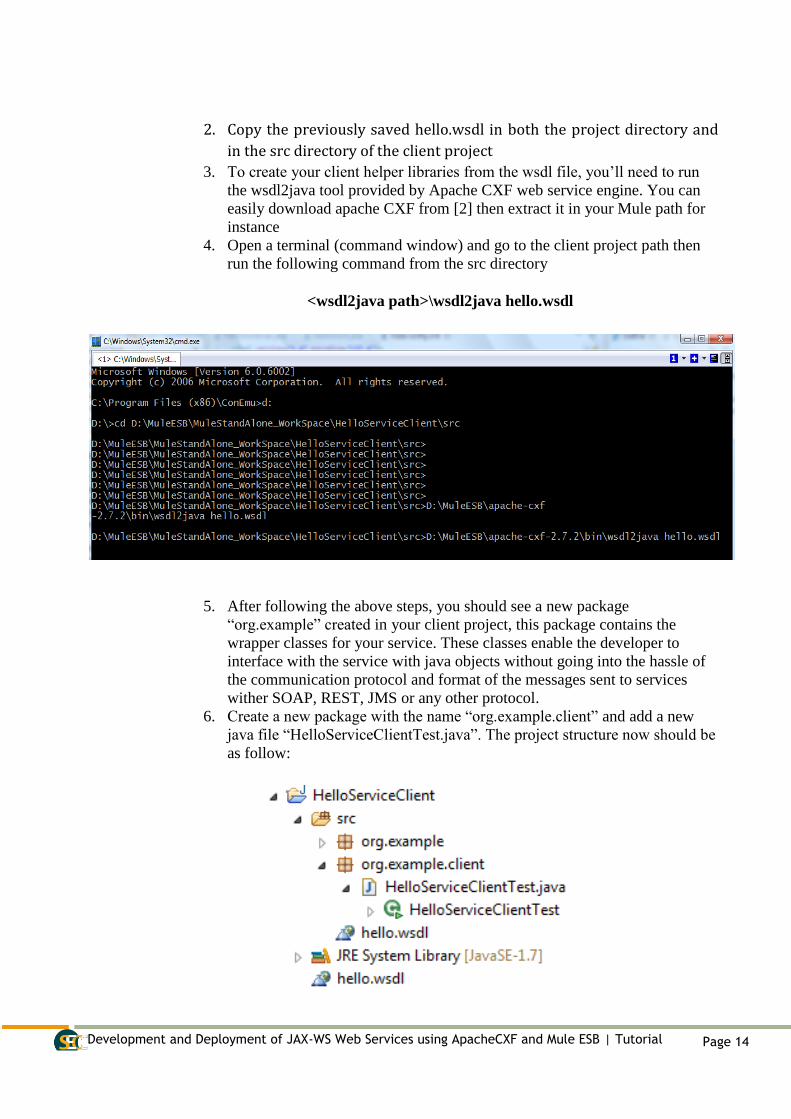
2. Copy the previously saved hello.wsdl in both the project directory and
in the src directory of the client project
3. To create your client helper libraries from the wsdl file, you’ll need to run
the wsdl2java tool provided by Apache CXF web service engine. You can
easily download apache CXF from [2] then extract it in your Mule path for
instance
4. Open a terminal (command window) and go to the client project path then
run the following command from the src directory
<wsdl2java path>\wsdl2java hello.wsdl
5. After following the above steps, you should see a new package
“org.example” created in your client project, this package contains the
wrapper classes for your service. These classes enable the developer to
interface with the service with java objects without going into the hassle of
the communication protocol and format of the messages sent to services
wither SOAP, REST, JMS or any other protocol.
6. Create a new package with the name “org.example.client” and add a new
java file “HelloServiceClientTest.java”. The project structure now should be
as follow:
Development and Deployment of JAX-WS Web Services using ApacheCXF and Mule ESB | Tutorial Page 15
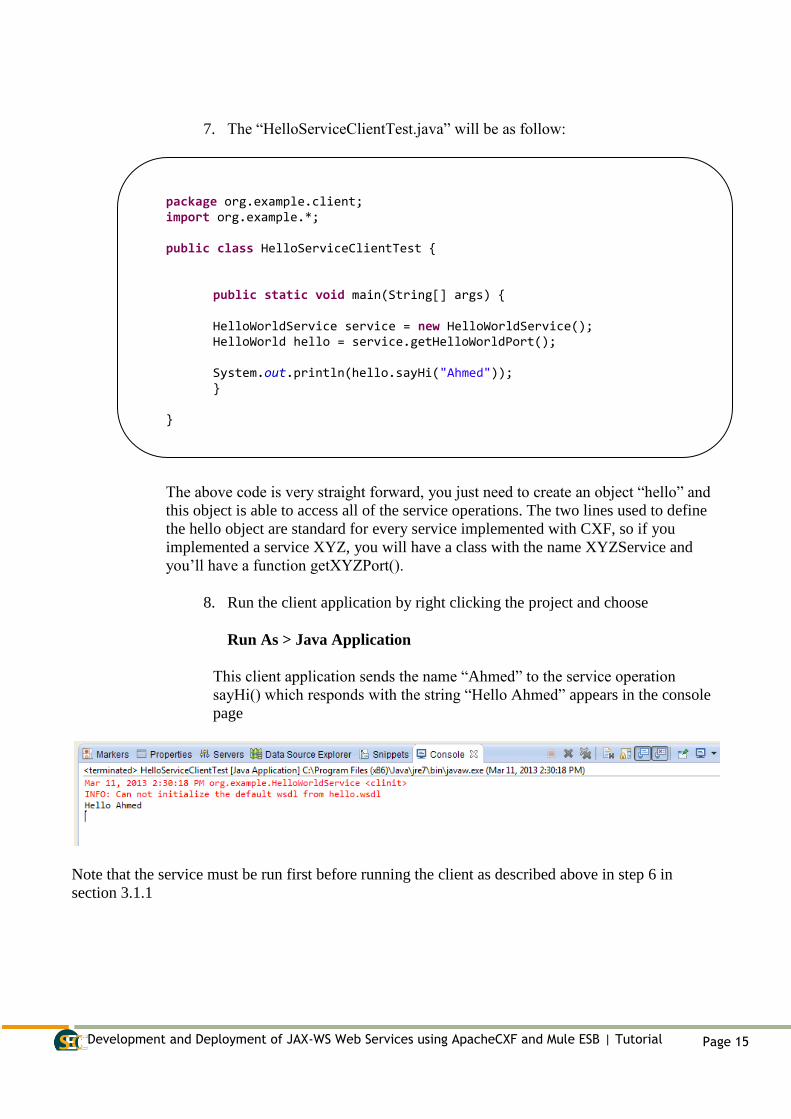
7. The “HelloServiceClientTest.java” will be as follow:
package org.example.client; import org.example.*; public class HelloServiceClientTest { public static void main(String[] args) { HelloWorldService service = new HelloWorldService(); HelloWorld hello = service.getHelloWorldPort(); System.out.println(hello.sayHi("Ahmed")); } }
The above code is very straight forward, you just need to create an object “hello” and
this object is able to access all of the service operations. The two lines used to define
the hello object are standard for every service implemented with CXF, so if you
implemented a service XYZ, you will have a class with the name XYZService and
you’ll have a function getXYZPort().
8. Run the client application by right clicking the project and choose
Run As > Java Application
This client application sends the name “Ahmed” to the service operation
sayHi() which responds with the string “Hello Ahmed” appears in the console
page
Note that the service must be run first before running the client as described above in step 6 in
section 3.1.1
Development and Deployment of JAX-WS Web Services using ApacheCXF and Mule ESB | Tutorial Page 16
mvn install:install-file -DgroupId=com.sibjars -DartifactId=sofia -Dversion=1.0 -
Dpackaging=jar -Dfile=D:\MuleESB\ServiceAdaptationLayer\sofia_kp.jar
mvn install:install-file -DgroupId=com.sibjars -DartifactId=jdom -Dversion=1.0 -
Dpackaging=jar -Dfile=D:\MuleESB\ServiceAdaptationLayer\jdom.jar
mvn install:install-file -DgroupId=com.sibjars -DartifactId=comm -Dversion=1.0 -
Dpackaging=jar -Dfile=D:\MuleESB\ServiceAdaptationLayer\comm.jar
3.2. Deploying Web Service in Mule
Deploying services in Mule is done in different ways. The method that is covered
here is called hot deployment, in which your service is packaged as a zip file and
deployed in Mule server such that it can invoke it when it starts up.
To be able to perform this hot deployment, you should follow these steps:
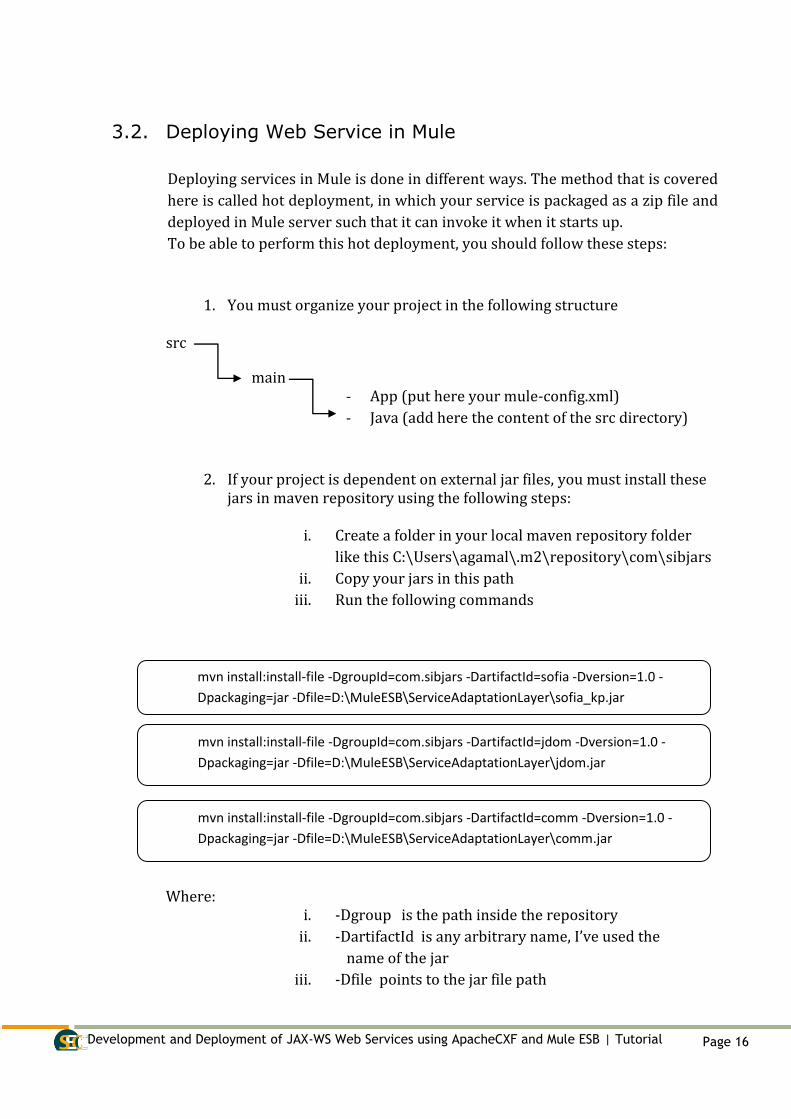
1. You must organize your project in the following structure
src
main - App (put here your mule-config.xml)
- Java (add here the content of the src directory)
2. If your project is dependent on external jar files, you must install these jars in maven repository using the following steps:
i. Create a folder in your local maven repository folder
like this C:\Users\agamal\.m2\repository\com\sibjars
ii. Copy your jars in this path
iii. Run the following commands
Where: i. -Dgroup is the path inside the repository
ii. -DartifactId is any arbitrary name, I’ve used the
name of the jar
iii. -Dfile points to the jar file path
Development and Deployment of JAX-WS Web Services using ApacheCXF and Mule ESB | Tutorial Page 17
3. Copy your service project in another path as a backup then create a
pom.xml file in your service project directory
4. The pom.xml file is the file used by a tool called “Maven” this is a project
management tool that can be used to build the Mule project as a zip file
with all info included to be run on a remote server.
The structure of the pom.xml file is out of this tutorial scope, for more
info about that you can check Maven web site [3]
5. The pom.xml has a standard structure for building Mule projects. You
will not need to change anything in the file except if you want to add an
extra dependency for your project like external jar files, as in step 6
6. Add the dependency of these jar files in the pom.xml file as follow:
<dependency> <groupId>com.sibjars</groupId> <artifactId>comm</artifactId> <version>1.0</version> </dependency>
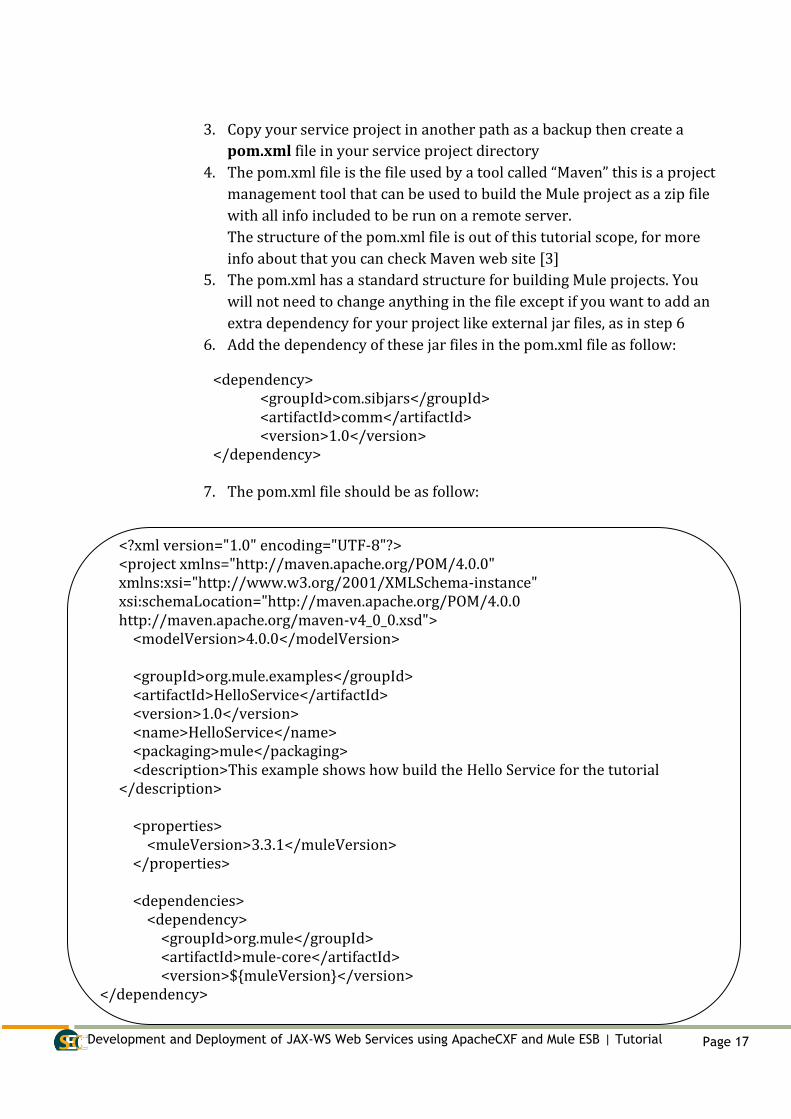
7. The pom.xml file should be as follow:
<?xml version="1.0" encoding="UTF-8"?> <project xmlns="http://maven.apache.org/POM/4.0.0" xmlns:xsi="http://www.w3.org/2001/XMLSchema-instance" xsi:schemaLocation="http://maven.apache.org/POM/4.0.0 http://maven.apache.org/maven-v4_0_0.xsd"> <modelVersion>4.0.0</modelVersion> <groupId>org.mule.examples</groupId> <artifactId>HelloService</artifactId> <version>1.0</version> <name>HelloService</name> <packaging>mule</packaging> <description>This example shows how build the Hello Service for the tutorial </description> <properties> <muleVersion>3.3.1</muleVersion> </properties> <dependencies> <dependency> <groupId>org.mule</groupId> <artifactId>mule-core</artifactId> <version>${muleVersion}</version>
</dependency>

Development and Deployment of JAX-WS Web Services using ApacheCXF and Mule ESB | Tutorial Page 18
<dependency> <groupId>org.mule.modules</groupId> <artifactId>mule-module-spring-config</artifactId> <version>${muleVersion}</version> </dependency> <dependency> <groupId>org.mule.transports</groupId> <artifactId>mule-transport-vm</artifactId> <version>${muleVersion}</version> </dependency> <dependency> <groupId>org.mule.modules</groupId> <artifactId>mule-module-cxf</artifactId> <version>${muleVersion}</version> </dependency> <dependency> <groupId>org.mule.modules</groupId> <artifactId>mule-module-client</artifactId> <version>${muleVersion}</version> </dependency> <!-- Better testing of XML --> <dependency> <groupId>org.mule.tests</groupId> <artifactId>mule-tests-functional</artifactId> <version>${muleVersion}</version> <scope>test</scope> </dependency> <dependency> <groupId>com.sibjars</groupId> <artifactId>sofia</artifactId> <version>1.0</version> </dependency> <dependency> <groupId>com.sibjars</groupId> <artifactId>jdom</artifactId> <version>1.0</version> </dependency> <dependency> <groupId>com.sibjars</groupId> <artifactId>comm</artifactId> <version>1.0</version> </dependency> </dependencies>

Development and Deployment of JAX-WS Web Services using ApacheCXF and Mule ESB | Tutorial Page 19
<repositories> <repository> <id>codehaus</id> <name>Codehaus Maven 2.x Release Repository</name> <url>http://repository.codehaus.org</url> <snapshots> <enabled>false</enabled> </snapshots> </repository> <repository> <id>codehaus-snapshots</id> <name>Codehaus Maven 2.x Snapshots Repository</name> <url>http://snapshots.repository.codehaus.org</url> <snapshots> <enabled>true</enabled> </snapshots> <releases> <enabled>false</enabled> </releases> </repository> </repositories> <pluginRepositories> <pluginRepository> <id>apache-plugin-snapshots</id> <name>Apache Maven Plugins Snapshot Repository</name> <url>http://people.apache.org/maven-snapshot-repository</url> <snapshots> <enabled>true</enabled> </snapshots> <releases> <enabled>false</enabled> </releases> </pluginRepository> </pluginRepositories> <build> <defaultGoal>install</defaultGoal> <finalName>${project.artifactId}</finalName> <plugins> <plugin> <groupId>org.apache.maven.plugins</groupId> <artifactId>maven-compiler-plugin</artifactId> <version>2.3.2</version>
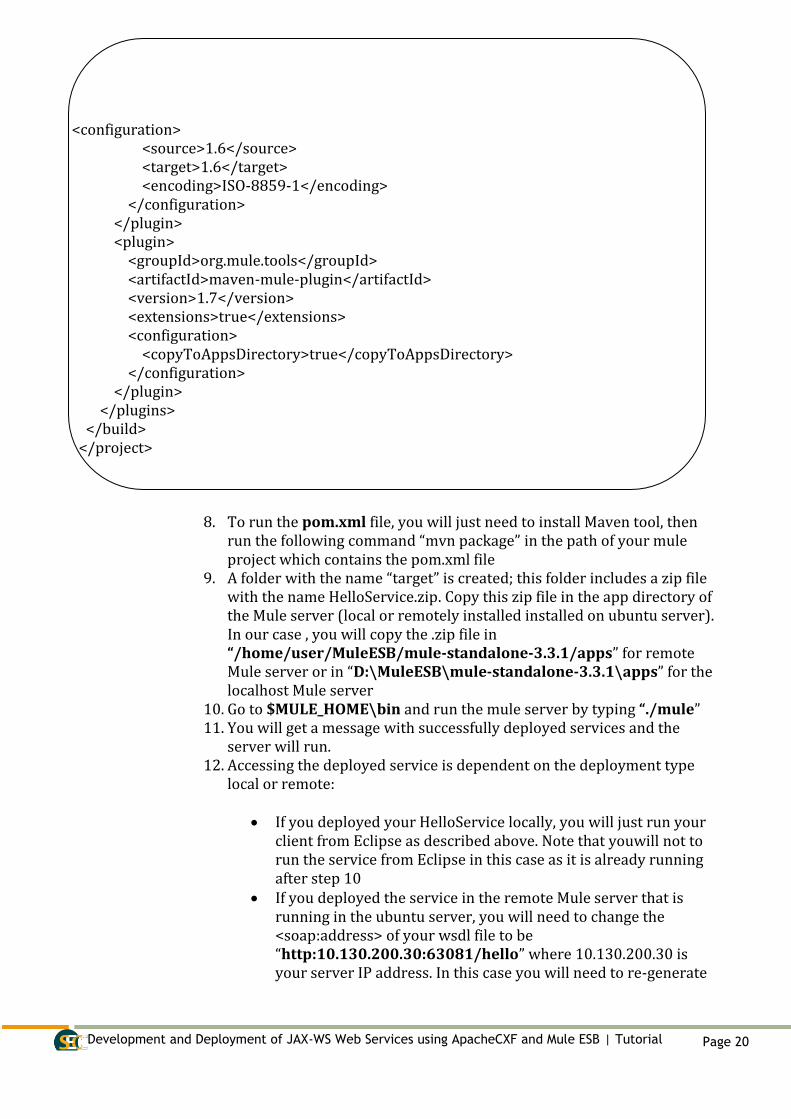
Development and Deployment of JAX-WS Web Services using ApacheCXF and Mule ESB | Tutorial Page 20
<configuration> <source>1.6</source> <target>1.6</target> <encoding>ISO-8859-1</encoding> </configuration> </plugin> <plugin> <groupId>org.mule.tools</groupId> <artifactId>maven-mule-plugin</artifactId> <version>1.7</version> <extensions>true</extensions> <configuration> <copyToAppsDirectory>true</copyToAppsDirectory> </configuration> </plugin> </plugins> </build> </project>
8. To run the pom.xml file, you will just need to install Maven tool, then run the following command “mvn package” in the path of your mule project which contains the pom.xml file
9. A folder with the name “target” is created; this folder includes a zip file with the name HelloService.zip. Copy this zip file in the app directory of the Mule server (local or remotely installed installed on ubuntu server). In our case , you will copy the .zip file in “/home/user/MuleESB/mule-standalone-3.3.1/apps” for remote Mule server or in “D:\MuleESB\mule-standalone-3.3.1\apps” for the localhost Mule server
10. Go to $MULE_HOME\bin and run the mule server by typing “./mule” 11. You will get a message with successfully deployed services and the
server will run. 12. Accessing the deployed service is dependent on the deployment type
local or remote:
If you deployed your HelloService locally, you will just run your client from Eclipse as described above. Note that youwill not to run the service from Eclipse in this case as it is already running after step 10
If you deployed the service in the remote Mule server that is running in the ubuntu server, you will need to change the <soap:address> of your wsdl file to be “http:10.130.200.30:63081/hello” where 10.130.200.30 is your server IP address. In this case you will need to re-generate

Development and Deployment of JAX-WS Web Services using ApacheCXF and Mule ESB | Tutorial Page 21
the client helper classes using wsdl2java tool as your wsdl has been changed (Refer to the client generation steps)
4. Summary
This tutorial provided a step-by-step approach for the development,
consumption, and deployment of web services using the Apache-CXF technology
in conjunction with the Mule ESB. A simple example was used to explain the
different steps in details with an emphasis on the tips and tricks of using Mule,
which sometimes may cause confusion especially for the beginners of using
Mule.
5. References
[1] http://www.mulesoft.org/
[2] http://cxf.apache.org/
[3] http://maven.apache.org/
6. Abbreviations
SOA Service Oriented Architecture
ESB Enterprise Service Bus
HTTP Hypertext Transfer Protocol
JMS Java Message Service