Embed Size (px)
Citation preview

Developing, Deploying and Running a Hello World BPEL Process with the Eclipse BPEL Designer and Apache
ODE
A click-by-click Instruction by Simon Moser and Tammo van Lessen
1 Introduction In this Tutorial, we will show how to develop a Hello World Process with the Eclipse BPEL Designer and subsequently deploy it to the Apache ODE runtime. This tutorial consists of three parts: First, we will take a deep dive into installation and configuration. We’ll show how to install and configure ODE, how to install and set up the latest and greatest BPEL Designer in Eclipse, and how to bring them together. Section 3 will then show how to model a Hello World BPEL Process and how to deploy it to ODE using the setups we made in the first part. Finally, Section 4 will show us how to run our newly developed and deployed Hello World Process.

2 Installation and Configuration
2.1 Installing and Configuring ODE
1. Download an Apache Tomcat Server at http://tomcat.apache.org/. We used version 5.5 for this tutorial – so to be on the safe side, stick with version 5.5.
2. Install Tomcat to a directory of your choice. We used C:\apache\tomcat-5.5.26. This directory will be referred to as TOMCAT_INSTALL_DIR throughout the remainder of this document.
3. Download a war deployable Apache ODE file from http://ode.apache.org/getting-ode.html. Use the apache-ode-war-1.2.zip available at that site. Extract the zip file to a temporary directory. In that temporary directory, you will find a file called ode.war. Copy ode.war to the TOMCAT_INSTALL_DIR\webapps directory.
4. Open a command prompt and point it to TOMCAT_INSTALL_DIR\bin directory. Type “catalina run” and hit return as shown in the screencap below. This will configure and start the tomcat server.
5. In order to verify that ODE has been successfully installed, check the
TOMCAT_INSTALL_DIR\webapps directory. It should now have a subdirectory “ode”

6. In your console Windows, hit CRTL-C to terminate the tomcat after you verified that ODE got installed correctly.
2.2 Installing and Configuring Eclipse with the BPEL Designer
1. Get an Eclipse 3.3 (Europa) from http://www.eclipse.org/downloads/download.php?file=/technology/epp/downloads/release/europa/winter/eclipse-rcp-europa-winter-win32.zip. Note: The BPEL Designer is currently not tested with Eclipse 3.4 2. Extract it to your machine and start Eclipse.exe from the extract directory. Note:
Make sure that you use at least a JDK 1.5 as your java virtual machine. 3. Once started, go to the Help -> Software Updates -> Find and Install Menu
4. Select “Search for new Features to Install”, then click Next.

5. Define a new remote update site with the following location: http://download.eclipse.org/technology/bpel/update-site/
6. In the list make sure “BPEL” is selected, click Finish. You maybe have to pick a
download mirror site of your choice. After a little time, the following Window appears. Expand the BPEL Tree, selecting all entries, then click next until you can click Finish, then finish.
Note: The update from this location will include all the necessary Eclipse components that are needed to run the BPEL Designer. Things like EMF, GEF, JEM, and WST. If you have these already installed then most likely nothing besides the BPEL designer will be installed.

7. After the download and Install is finished, you get asked to restart your Eclipse. Restart it.
8. To verify the installation has been successful, after the restart, click on File->New->Other. Verify that there is a BPEL 2.0 Entry in the Wizard
2.2.1 Getting the latest and greatest BPEL Designer code 9. In order to use the Apache ODE integration plugins, you need the latest and
greatest BPEL Designer plugins. Therefore, switch to the CVS perspective by clicking Window->Open Perspective->Other->CVS Repository Exploring.
10. Right-click in the “CVS Repositories” View to add a new Repository Location. 11. Fill the dialog as follows and click Finish.

12. Expand “org.eclipse.bpel/plugins” under HEAD. Select the following plugins:
* org.eclipse.bpel.apache.ode.deploy.model * org.eclipse.bpel.apache.ode.deploy.ui * org.eclipse.bpel.apache.ode.runtime * org.eclipse.bpel.common.model * org.eclipse.bpel.common.ui * org.eclipse.bpel.model * org.eclipse.bpel.runtimes * org.eclipse.bpel.ui * org.eclipse.bpel.wsil.model
Right-click on the selection and select “Check out”. Wait until the checkout operation has been finished. 13. Switch Back to the Java Perspective by selecting Window->Open Perspective-
>Other->Java(default) 14. In case you’ll find some compile errors. Go to Window->Preferences->Java-
>Compiler-> Errors/Warnings. Expand the “Deprecated and restricted API” section. Set the “Forbidden reference (access rules)” to “Warning” (instead of Error). Click OK, click “Yes” on the rebuild dialog that appears.

15. Now your package Explorer View should show all the plug-ins, and no compile errors should be there.
2.2.2 Configuring a launch configuration 16. Next, we will configure a launch configuration so that we run an eclipse out of
our eclipse. Therefore, click on the little arrow next to the run-button, and select “Open Run Dialog”.
17. Select “Eclipse Application”, then click the “New launch configuration” button.

18. Fill in a Location (e.g. “C:\RuntimeWorkspace”), click “Apply” and “Run”
19. Shortly after you should see a new Eclipse Workbench coming up. Close the
Welcome Screen to you see a new, blank Eclipse workspace.
2.3 Setting up the Eclipse BPEL Designer with ODE
1. In this new, blank Eclipse workspace you first need to create an ODE server. Therefore, open the Server view under Window->Show View->Other->Server->Servers.
2. In the servers View windows, right-click and select “New->Server”. 3. From the List, select “Apache->ODE v1.x Server”. Click Next. 4. Configure it as shown in the screencap below.
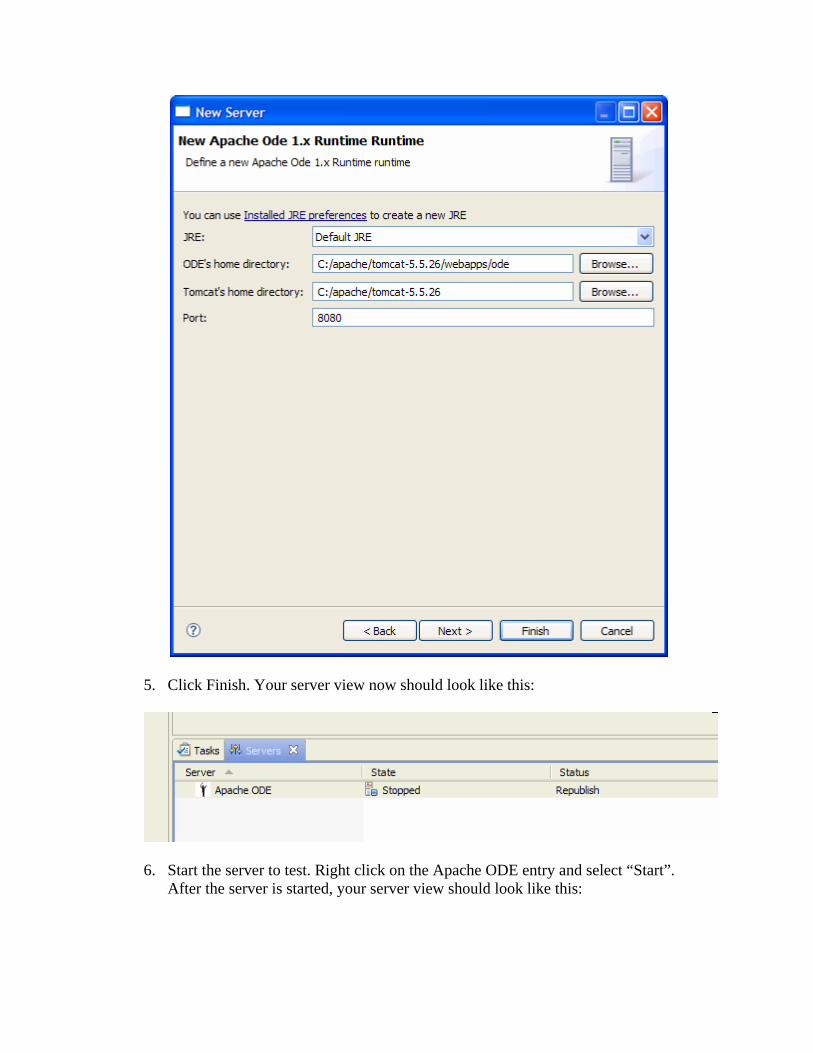
5. Click Finish. Your server view now should look like this:
6. Start the server to test. Right click on the Apache ODE entry and select “Start”.
After the server is started, your server view should look like this:

3 Modeling and Deploying a Hello World BPEL 1. Create a new BPEL Project called “ODE_Test”. Therefore, select File->New-
>Other->BPEL 2.0->BPEL Project. Fill in the first page like shown in the screencap (Note: Make sure “Apache Ode 1.x Runtime” is selected as Target Runtime). Then, click Next.
2. On the second server page, select “BPEL 2.0 Facet” as shown in the screencap.
Click Finish.

3. Create a new “Hello World” Process. Therefore, select File->New->Other-
>BPEL 2.0->New BPEL Process File. Click Next. Fill in the Details as shown in the screencap below.

Click Next. On the second page, make sure that the Project “ODE_Test” is selected as project. Click Finish. 4. The BPEL Editor will now open and show the newly created process. In order for
our Hello World process to work, we’ll add an Assign Activity between the ReceiveInput and ReplyOutput activities. Note: You have to expand the Palette if not shown in order to be able to pick the assign activity.
5. Right-click on the Assign activity, and select “Show in properties”. 6. At the bottom left of the Assign Details Page, select “New”. 7. Then, assign “input -> payload -> input” to “output -> payload -> result” as
shown in the screencap. Save the process.
8. An “initializer” popup dialog appears. Click Yes. Now we are finished modeling
the HelloWorld process. 9. In order to run the process, we must provide a Port and a Binding for the Process
Interface. Therefore, double-click on the file “HelloWorldArtifacts.wsdl” that got created in the “ODE_Test” Project.
10. The WSDL Editor opens. Right click in the Canvas and select “Add Service”. A New Service Appers on the screen. Name it “HelloWorldProcessService”. It also has a Port called “NewPort”. Select it, right-click and select “Show properties”. Rename it to “HelloWorldProcessPort”.
11. Specify a Binding. Right-click again somewhere in the whitespace of the WSDL Editor and select “Add Binding”. A new Binding element appears on the screen. Click on it and rename it “HelloWorldSOAPBinding”. In the PortType Box, select “Hello World”. Finally, click on the “Generate Binding Content” Button. In the Protocol, select “SOAP”, click Finish.
12. Click again on the “HelloWorldProcessPort” and go to its properties. In the Binding Combo, you can now select “HelloWorldSOAPBinding”. Finally, in the address field, type http://localhost:8080/ode/processes/HelloWorld. Your WSDL Editor now should look like this:

13. Save the WSDL Editor. 14. Create a new BPEL ODE Deployment Descriptor. Therefore, select File->New-
>Other->BPEL 2.0->Apache ODE Deployment Descriptor.

15. Click Next. Browse for “ODE_Test” as container, leave the name as
“deploy.xml”. Click Finish. 16. After click Finish, a new File “deploy.xml” got created. If it gets opened in an
XML Editor, then close that XML Editor, right click on “deploy.xml” and select “Open With -> ODE Deployment Descriptor Editor”

17. Fill in the Deployment Descriptor: In the “Inbound Interfaces” section, click in
the “Associated Port” column for the “client” Partner link. A drop down box appears. Select “HelloWorldProcessPort”. Click in the white space of the Deployment Descriptor Editor. The “Related Service” and “Binding Used” columns should automatically be filled in, and the Editor should become dirty. Save the deploy.xml.

18. Now all the Modeling is complete: We have a BPEL Project (ODE_Test), a BPEL Process (HelloWorld.bpel), the Web Service File (HelloWorldArtifacts.wsdl) is fully specified and there is an ODE deployment descriptor (deploy.xml). It is time to add the project to the Server.
19. Therefore, go back to the server view. Right click on the Apache ODE entry and select “Add and Remove Project”. Note: If a popup appears, of if the dialog appears and is empty on the left side, then close your runtime eclipse and start it again using the “Run” button (see Configuring a launch configuration – step 16).
20. A Dialog appears that should look like the following:
21. Select the entry on the left, click “Add”, then click “Finish”

22. Start the server (if it is stopped), or publish the server (if it is already started). Right-click on the server and select either “start” or “publish”.
23. Deployment was successful if your console has two lines similar to this:
24. You can also double-check in ODE’s administrative console. Point your browser
to http://localhost:8080/ode/. Select “Services”. A list of all installed services appears. If it has a “HelloWorld” entry, deployment of the process went fine.

4 Running the Hello World BPEL Process with the Eclipse Web Service Explorer
1. In Eclipse’s Project Explorer, right-click on the “HelloWorldArtifacts.wsdl” and
select “Web Services -> Test with Web Services Explorer”
2. The Web Service Explorer starts. In the Navigator on the left side, expand the tree
until you see “process” (see screenshot)

3. On the right side, enter “Hello ODE!” in the input field.
4. Hit the “Go” Button. In the Eclipse Console View, you’ll see a run trace similar to the one on the next page:

DEBUG - GeronimoLog.debug(66) | Received request message for HelloWorld.{http://helloWorld}process DEBUG - GeronimoLog.debug(66) | Starting transaction. DEBUG - GeronimoLog.debug(66) | Routed: svcQname {http://helloWorld}HelloWorldProcessService --> BpelProcess[{http://helloWorld}HelloWorld-5] DEBUG - GeronimoLog.debug(66) | ODE routed to operation Operation: name=process style=REQUEST_RESPONSE,1 Input: name=null Message: name={http://helloWorld}HelloWorldRequestMessage Part: name=payload elementName={http://helloWorld}HelloWorldRequest Output: name=null Message: name={http://helloWorld}HelloWorldResponseMessage Part: name=payload elementName={http://helloWorld}HelloWorldResponse from service {http://helloWorld}HelloWorldProcessService DEBUG - GeronimoLog.debug(66) | Invoking ODE using MEX {MyRoleMex#hqejbhcnphr3i550cwxlrl [Client hqejbhcnphr3i550cwxlrk] calling {http://helloWorld}HelloWorldProcessService.process(...)} DEBUG - GeronimoLog.debug(66) | Message content: <?xml version="1.0" encoding="UTF-8"?> <message><payload><HelloWorldRequest xmlns="http://helloWorld" xmlns:q0="http://helloWorld" xmlns:soapenv="http://schemas.xmlsoap.org/soap/envelope/" xmlns:xsd="http://www.w3.org/2001/XMLSchema" xmlns:xsi="http://www.w3.org/2001/XMLSchema-instance"> <input>Hello ODE!</input> </HelloWorldRequest></payload></message> DEBUG - GeronimoLog.debug(66) | Routed: svcQname {http://helloWorld}HelloWorldProcessService --> BpelProcess[{http://helloWorld}HelloWorld-5] DEBUG - GeronimoLog.debug(66) | invoke() EPR= null ==> BpelProcess[{http://helloWorld}HelloWorld-5] DEBUG - GeronimoLog.debug(66) | Commiting ODE MEX {MyRoleMex#hqejbhcnphr3i550cwxlrl [Client hqejbhcnphr3i550cwxlrk] calling {http://helloWorld}HelloWorldProcessService.process(...)} DEBUG - GeronimoLog.debug(66) | Commiting transaction. DEBUG - GeronimoLog.debug(66) | >> handleWorkEvent(jobData={mexid=hqejbhcnphr3i550cwxlrl, pid={http://helloWorld}HelloWorld-5, type=INVOKE_INTERNAL}) DEBUG - GeronimoLog.debug(66) | InvokeInternal event for mexid hqejbhcnphr3i550cwxlrl DEBUG - GeronimoLog.debug(66) | GET MEX property org.apache.ode.bpel.myRoleSessionId = null DEBUG - GeronimoLog.debug(66) | GET MEX property org.apache.ode.bpel.myRoleSessionId = null DEBUG - GeronimoLog.debug(66) | GET MEX property org.apache.ode.bpel.partnerRoleSessionId = null DEBUG - GeronimoLog.debug(66) | INPUTMSG: 12.process: MSG RCVD keys=[] mySessionId=null partnerSessionId=null DEBUG - GeronimoLog.debug(66) | INPUTMSG: 12.process: routing failed, CREATING NEW INSTANCE DEBUG - GeronimoLog.debug(66) | BpelRuntimeContextImpl created for instance 501. INDEXED STATE={}

DEBUG - GeronimoLog.debug(66) | SELECT: PickResponseChannel#9: USING CORRELATOR 12.process DEBUG - GeronimoLog.debug(66) | SELECT: PickResponseChannel#9: CHECKING for NEW INSTANCE match DEBUG - GeronimoLog.debug(66) | INPUTMSGMATCH: Changing process instance state from ready to active DEBUG - GeronimoLog.debug(66) | SELECT: PickResponseChannel#9: FOUND match for NEW instance mexRef={MyRoleMex#hqejbhcnphr3i550cwxlrl [Client hqejbhcnphr3i550cwxlrk] calling {http://helloWorld}HelloWorldProcessService.process(...)} DEBUG - GeronimoLog.debug(66) | Processing an async reply from service {http://helloWorld}HelloWorldProcessService DEBUG - GeronimoLog.debug(66) | ProcessImpl {http://helloWorld}HelloWorld-5 completed OK. DEBUG - GeronimoLog.debug(66) | Received myrole mex response callback DEBUG - GeronimoLog.debug(66) | Handling response for MEX {MyRoleMex#hqejbhcnphr3i550cwxlrl [Client hqejbhcnphr3i550cwxlrk] calling {http://helloWorld}HelloWorldProcessService.process(...)} DEBUG - GeronimoLog.debug(66) | Starting transaction. DEBUG - GeronimoLog.debug(66) | Response message <?xml version='1.0' encoding='utf-8'?><soapenv:Envelope xmlns:soapenv="http://schemas.xmlsoap.org/soap/envelope/"><soapenv:Body><HelloWorldResponse xmlns="http://helloWorld"> <result>Hello ODE!</result> </HelloWorldResponse></soapenv:Body></soapenv:Envelope> DEBUG - GeronimoLog.debug(66) | Releasing mex hqejbhcnphr3i550cwxlrl DEBUG - GeronimoLog.debug(66) | Comitting transaction. DEBUG - GeronimoLog.debug(66) | Reply for HelloWorld.{http://helloWorld}process DEBUG - GeronimoLog.debug(66) | Reply message <?xml version='1.0' encoding='utf-8'?><soapenv:Envelope xmlns:soapenv="http://schemas.xmlsoap.org/soap/envelope/"><soapenv:Body><HelloWorldResponse xmlns="http://helloWorld"> <result>Hello ODE!</result> </HelloWorldResponse></soapenv:Body></soapenv:Envelope>