Embed Size (px)
Citation preview

Developers's guide

WebFMX 1.02
© 2013 Cybele Software
Table of Contents
Introduction 4
Architecture 5
Getting Started 7
................................................................................................................................... 81 Installing WebFMX
................................................................................................................................... 92 Compiling and testing your application
.......................................................................................................................................................... 12Registering the application in WebFMX Server
................................................................................................................................... 133 Accessing the app from the Web
................................................................................................................................... 154 Application Execution behavior
Programming Reference 16
................................................................................................................................... 171 TPlatformHTML5
.......................................................................................................................................................... 18Properties
......................................................................................................................................................... 18RemoteInfo
......................................................................................................................................................... 19DevServer
......................................................................................................................................................... 20Enabled
......................................................................................................................................................... 21FontMode.......................................................................................................................................................... 22Methods
......................................................................................................................................................... 22AddDefaultWebFonts
......................................................................................................................................................... 23ClearWebFonts
......................................................................................................................................................... 24DownloadFile
......................................................................................................................................................... 25ResizeRemote
......................................................................................................................................................... 26RegisterWebFont.......................................................................................................................................................... 27Events
......................................................................................................................................................... 27OnAppTerminate
......................................................................................................................................................... 28OnBrowserResize
......................................................................................................................................................... 29OnSupportsWebFont
................................................................................................................................... 302 TRemoteInfo
.......................................................................................................................................................... 31Properties
......................................................................................................................................................... 31Width
......................................................................................................................................................... 31Height
......................................................................................................................................................... 31BrowserWidth
......................................................................................................................................................... 32BrowserHeight
......................................................................................................................................................... 32ScreenWidth
......................................................................................................................................................... 33ScreenHeight
......................................................................................................................................................... 33Username
......................................................................................................................................................... 33UniqueBrowserId
......................................................................................................................................................... 34PeerIP
......................................................................................................................................................... 34UserAgent
......................................................................................................................................................... 35ScreenResolution
................................................................................................................................... 363 TDevServer
.......................................................................................................................................................... 37Properties
......................................................................................................................................................... 37Enabled
......................................................................................................................................................... 37Port
......................................................................................................................................................... 37StartBrowser
................................................................................................................................... 394 TFontMode
................................................................................................................................... 405 TScreenResolution
3Contents
3
© 2013 Cybele Software
WebFMX Server Manager 42
................................................................................................................................... 441 General
................................................................................................................................... 452 Applications
.......................................................................................................................................................... 47Application profile
......................................................................................................................................................... 49General
......................................................................................................................................................... 51Credentials
......................................................................................................................................................... 52Permissions.......................................................................................................................................................... 53Weblink profile
......................................................................................................................................................... 54Permissions
................................................................................................................................... 553 Licenses
Managing the SSL Certificate 56
................................................................................................................................... 571 The Default Embedded Certificate
................................................................................................................................... 582 A Self-signed Certificate
................................................................................................................................... 593 A CA Certificate
Appendix A - Dialogs 61
................................................................................................................................... 621 Message Dialogs
.......................................................................................................................................................... 63Message Dlg
.......................................................................................................................................................... 64Input Box
.......................................................................................................................................................... 65Formatted Message
................................................................................................................................... 662 Printing Dialogs
.......................................................................................................................................................... 67Page Setup
.......................................................................................................................................................... 68Print
................................................................................................................................... 693 File Dialogs
.......................................................................................................................................................... 70Open File
.......................................................................................................................................................... 71Save As
Appendix B - Tailoring the interface 72
................................................................................................................................... 721 Customizing the Web Interface
.......................................................................................................................................................... 73Changing the logo
.......................................................................................................................................................... 74Customizing the web files
.......................................................................................................................................................... 75Files Location
Appendix C - JavaScript API 77
................................................................................................................................... 781 Deploying
................................................................................................................................... 792 Modifying the HTML file
................................................................................................................................... 813 Connect method
.......................................................................................................................................................... 83Placement
.......................................................................................................................................................... 84Application
.......................................................................................................................................................... 85Settings
.......................................................................................................................................................... 86Events
................................................................................................................................... 874 Authentication Scheme
.......................................................................................................................................................... 88Generating the key
.......................................................................................................................................................... 90Validating the key
................................................................................................................................... 915 SSL Certificate

WebFMX 1.04
© 2013 Cybele Software
1 Introduction
WebFMX is a solution that allows you to remote FireMonkey applications to the Web.By just adding 1 line of code to the FireMonkey's project, the application becomesdual-platform; Windows and HTML5, thus it can be run as usual on a windowsenvironment, or it can be installed on a WebFMX Server environment and be accessedremotely from any HTML5 compliant Web Browser.
Why WebFMX?
1. Enables you to create dual-platform Windows/HTML5 FireMonkey Apps,effortless.
2. Expands applications availability by delivering them instantly to usersanywhere on any device.
3. Reduces dramatically the Total cost of ownership (TCO), by slashing IT costsand simplifying administration avoiding costly virtualization/remoting solutionssuch as Citrix XenApp® or Microsoft™ RemoteApp.
See more:
Architecture
Getting Started
Installing WebFMX
Compiling the application
Registering the application
Accessing the app from the Web
WebFMX Server Manager
Managing the SSL Certificate
Customizing the Web Interface
Copyright © 2014, Cybele Softw are Inc. All rights reserved.

Introduction 5
© 2013 Cybele Software
2 Architecture
WebFMX is composed by:
WebFMX Client: HTML5 Web BrowserWebFMX Server: Windows Service WebFMX Platform runtime: Runtime unit(s) included in the FireMonkey application
WebFMX Platform runtime is a set of Delphi units that plugs into FireMonkey'sframework to redirect Windows calls and drawing commands to the remote HTML5canvas

WebFMX 1.06
© 2013 Cybele Software
Requirements:
Applications
The application project must use the FireMonkey HD framework.Delphi XE3 or Delphi XE4
WebFMX Server
Windows XP 32-bit / Windows XP 64-bitWindows Vista 32-bit / Windows Vista 64-bitWindows 7 32-bit / Windows 7 64-bitWindows Server 2008 32-bit / Windows Server 2008 64-bit
Web Client
HTML5-compliant Web Browser

Architecture 7
© 2013 Cybele Software
3 Getting Started
To get started, use this section to cover the fundamental aspects of WebFMX. You will
learn how to create all the needed configurations in a simple step by step guide so thatyou can start enjoying the benefits of WebFMX:
1. Installing WebFMX2. Compiling and testing your application3. Registering the application in WebFMX Server4. Accessing an application from the Web
Find a more exhaustive reference of the available options here:
Programming Reference
WebFMX Server Manager
Managing the SSL Certificate
Appendix A - Dialogs
Appendix B - Tailoring the interface
Appendix C - JavaScript API

WebFMX 1.08
© 2013 Cybele Software
3.1 Installing WebFMX
WebFMX can be installed using the setup file provided:
1. Download the installer from one of the links below:
Exe File http://www.cybelesoft.com/downloads/webfmx.exe
Zip Filehttp://www.cybelesoft.com/downloads/webfmx.msi
2. Execute the installer on the target machine.
3. Select type of environment to install:

Getting Started 9
© 2013 Cybele Software
WebFMX Server
This environment is where FireMonkey apps will be run and acceded remotely.This is not needed for development purposes but, it could be installed fortesting the application.The WebFMX Server is a HTTP/WebSocket Server that maintains thecommunication between the Web Browser and the WebFMX Runtime inside theFireMonkey application.On this installation mode, the WebFMX Server will be installed as a WindowsService.
Development Environment
This environment is meant to be installed on the developer machine. Thismode installs the WebFMX runtime units that you need to include in yourFireMonkey application's project. It includes also a WebFMX Server that willexecute in a "development mode", to quickly test your application from aWeb Browser.
4. Press Next and wait for the installation process to finish. When it is done, pressthe "Finish" button.
3.2 Compiling and testing your application
In order to create a dual Windows/HTML5 FireMonkey application, you have to compile
this application including the WebFMX.Platform.dcu unit. By default, the WebFMX.Platform.dcu unit will be accessible on the installation directory, under the folderbelow:

WebFMX 1.010
© 2013 Cybele Software
C:\Program Files (x86)\WebFMX\dev\XE3\win32
C:\Program Files (x86)\WebFMX\dev\XE3\win64
C:\Program Files (x86)\WebFMX\dev\XE4\win32
C:\Program Files (x86)\WebFMX\dev\XE4\win64
The source file will only be available when you install using the Development
installation mode.
If you install the Development Environment these paths will be automatically added tothe Delphi XE3 and Delphi XE4 Library Paths (32 bits and 64 bits paths).
Follow the next steps to compile your application:
1. Open your Rad Studio or Delphi XE3 or Delphi XE4.
3. Open your application project.
4. Add the unit WebFMX.Platform to the Uses of your project source file.
program MyApp;
uses FMX.Forms, WebFMX.Platform, MyApp.Main in MyApp.Main.pas' {Form1};
{$R *.res}
begin Application.Initialize; Application.CreateForm(TForm1, Form1); Application.Run;end.
5. Compile Your Program and Run it.
6. Observe on the Task Bar that the WebFMX Development Server icon will appear.
7. Right-click on the icon, and after that click on the "Open" menu.
Getting Started 11
© 2013 Cybele Software
A Web browser window will be opened with your application running inside.
If you don't want the debugging mode to start a new WebFMX Server or want to specifythe port in which it will start, you can set change the DevServer property. You may alsoconfigure WebFMX not to open a new browser window while running your application.
WebFMX 1.012
© 2013 Cybele Software
3.2.1 Registering the application in WebFMX Server
Each application that needs to be accessed through the WebFMX Server, has to be
added as an application profile.
We consider you have already Compiled and tested your application with the WebFMXruntime units.
To create an application profile, follow these steps:
1. Open the WebFMX Server Manager, available in the Start Menu.
2. Go to the "Applications" tab.
3. Click on the Add button.
4. Give a name to the application and inform the application path and file name.
7. Press OK and Apply on the Server Manager screen.
Now the application is ready to be accessed from the Web.
Getting Started 13
© 2013 Cybele Software
3.3 Accessing the app from the Web
Follow the next steps to access registered FireMonkey applications using the Web
Browser:
1. Open your preferred Web Browser.
2. Type in the WebFMX Server Address.
3. Inform your username and password, if required.
4. If you have created only one profile application, WebFMX Server will connect youdirectly to the application.
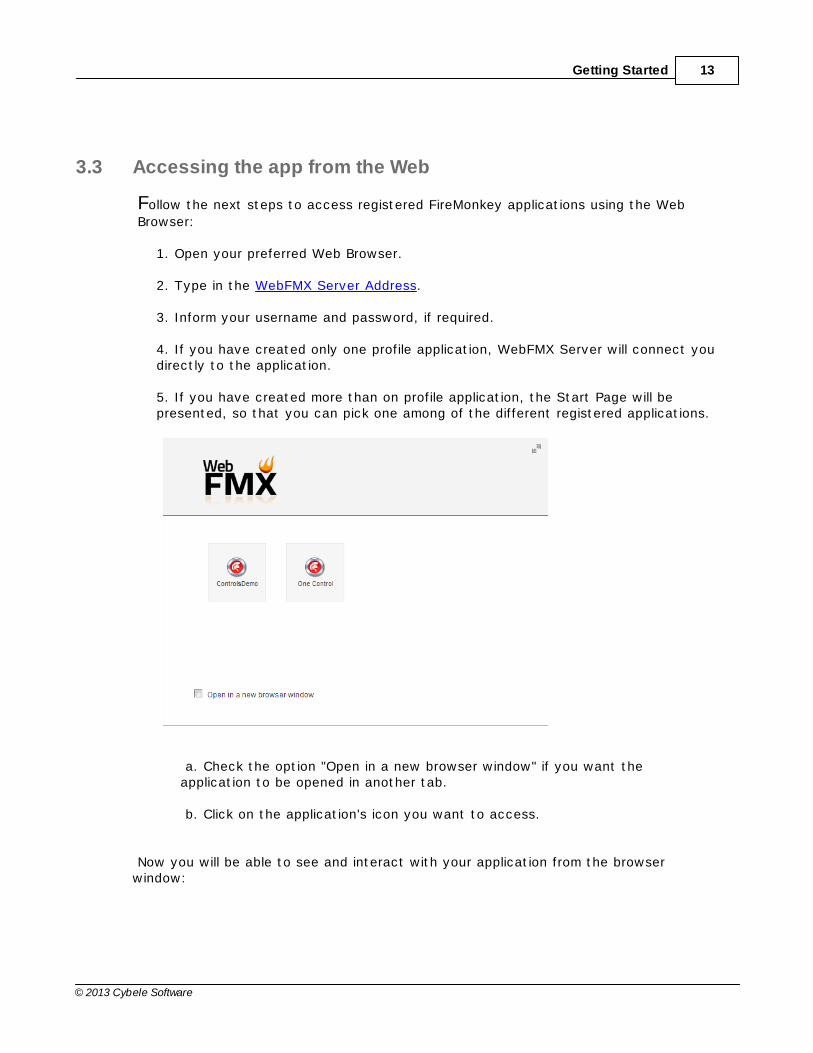
5. If you have created more than on profile application, the Start Page will bepresented, so that you can pick one among of the different registered applications.
a. Check the option "Open in a new browser window" if you want theapplication to be opened in another tab.
b. Click on the application's icon you want to access.
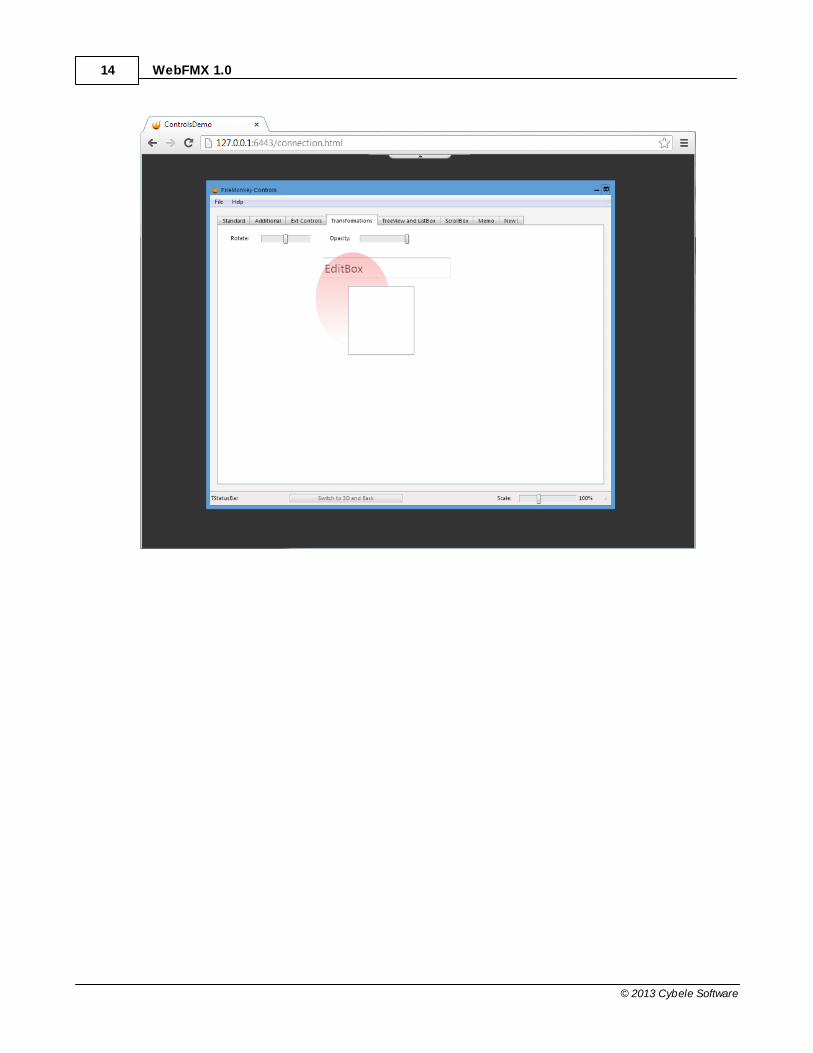
Now you will be able to see and interact with your application from the browserwindow:
WebFMX 1.014
© 2013 Cybele Software

Getting Started 15
© 2013 Cybele Software
3.4 Application Execution behavior
After you compile your application with the WebFMX.Platform runtime unit, it will get
to be started in two platforms: Windows and Web (HTML5). This topic is intended to let you know the occasions in which each platform will bestarted as default:
Windows Shell: When the application is started from the windows shell, it will behave as anormal Windows Application.
Delphi: When the application is run under Delphi, a development server instance will bestarted and the Web Platform will be started on a new browser window.
WebFMX Service: If the application is accessed through the WebFMX Web Server, it will also workthrough the Web Platform (HTML5).
If you want to disable that the HTML5 platform you can set the PlatformHTML5 Enabledproperty to false. That way the application will stop responding web requests.
These can be useful during a integration period, in case you want to release theapplication before you have finished the WebFMX integration, or if you want to debugyour application using the Windows platform.
WebFMX 1.016
© 2013 Cybele Software
4 Programming Reference
WebFMX provides some programming resources, inside the WebFMX.Platform unit that
will allow you to:
1. Retrieve information regarding the client browser and other end user environmentvariables such as application resolution, authentication information, IP and browserinformation.
2. Manipulate the application resolution.
3. Manipulate the fonts and WebFonts mapping.
4. Download files.
5. Disable the WebFMX.Platform and have only the Windows platform activated.
6. Enable/Disable the Development Server while debugging the application.
Getting Started
1. Add the WebFMX.Platform into the uses list of the unit you are working with.
2. Access the global variable PlatformHTML5 and its properties, methods and eventsin order to access these programming resources.
See also
Throughout the next topics, find a detailed description of all public WebFMXclasses, including the main TPlatformHTML5.

Programming Reference 17
© 2013 Cybele Software
4.1 TPlatformHTML5
This class provides you access to all public methods, properties and events for
interacting with some of the WebFMX settings and behaviors.
Properties
RemoteInfoDevServerEnabledFontMode
Methods
AddDefaultWebFontsClearWebFontsDownloadFileResizeRemoteRegisterWebFont
Events
OnAppTerminateOnBrowserResizeOnSupportsWebFonts
Remarks
The PlatformHTML5 global variable holds a TPlatformHTML5 class object that isautomatically instantiated every time your application is executed.
See also
Find on the TRemoteInfo and TDevServer topics more information regarding theRemoteInfo and DevServer properties.

WebFMX 1.018
© 2013 Cybele Software
4.1.1 Properties
4.1.1.1 RemoteInfo
The RemoteInfo object allows you to retrieve information regarding the end-user
environment as well as to manipulate some of its settings.
Delphi Syntax
var RemoteInfo : TRemoteInfo;
RemoteInfo := Objec t.RemoteInfo;
Remarks
Every time you run your application, the PlatformHTML5 object's RemoteInfoproperty will be loaded with the user environment settings and all these values willbe kept updated by WebFMX Server.
See also
Read the DevServer topic for settings regarding the Development Server.
Programming Reference 19
© 2013 Cybele Software
4.1.1.2 DevServer
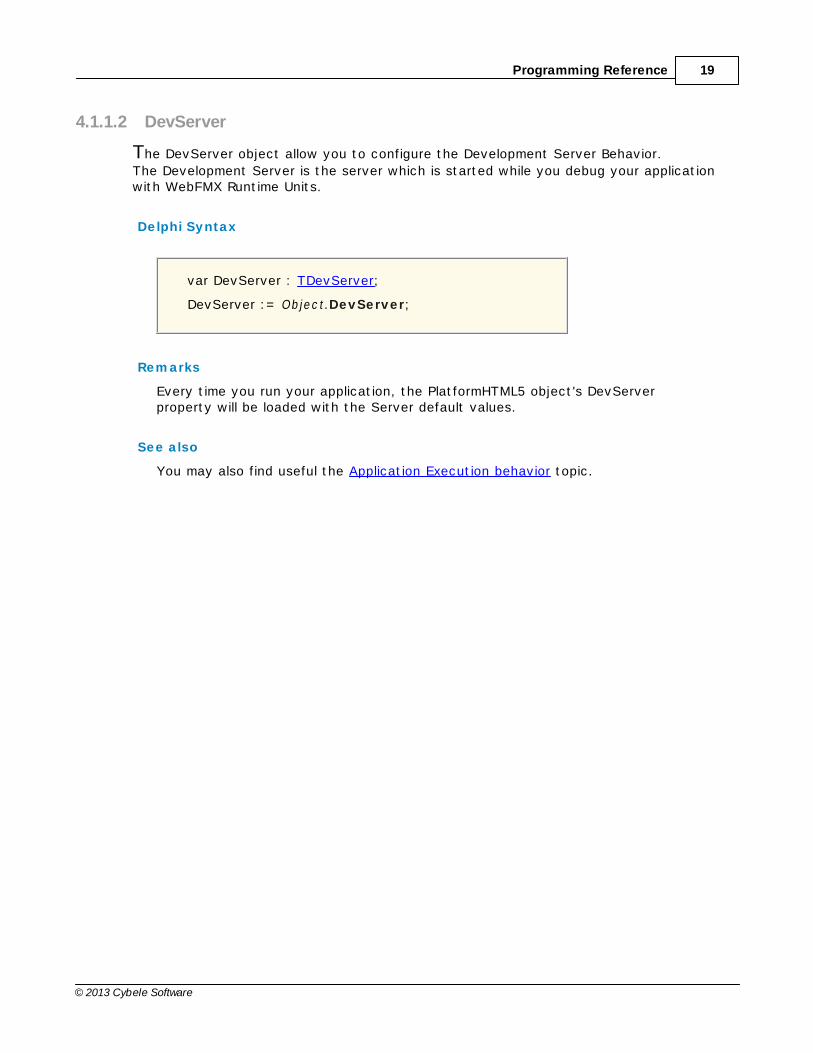
The DevServer object allow you to configure the Development Server Behavior.
The Development Server is the server which is started while you debug your applicationwith WebFMX Runtime Units.
Delphi Syntax
var DevServer : TDevServer;
DevServer := Objec t.DevServer;
Remarks
Every time you run your application, the PlatformHTML5 object's DevServerproperty will be loaded with the Server default values.
See also
You may also find useful the Application Execution behavior topic.

WebFMX 1.020
© 2013 Cybele Software
4.1.1.3 Enabled
Enables/disables the WebFMX Platform. By default this property is set to true, if you
set it to false, the application will not be accessed from the web.
Delphi Syntax
Objec t.Enable [:= Boolean];
Remarks
When enabled, the applications uses WebFMX platform when:a) The application is run under Delphib) The application is accessed through the WebFMX Web Server.
When the application is started from the windows shell, it will behave as a normalWindows Application.
See also
See also The Application Execution behavior topic.

Programming Reference 21
© 2013 Cybele Software
4.1.1.4 FontMode
There are some Windows fonts that are not supported or do not exist in Web format.
Through the FontMode property you may configure how WebFMX should solve thisfonts issues:
Delphi Syntax
Objec t.FontMode [:= TFontMode ];
See also
Read also the TFontMode topic, in order to understand how each mode will work.

WebFMX 1.022
© 2013 Cybele Software
4.1.2 Methods
4.1.2.1 AddDefaultWebFonts
This method adds default font mappings for non-supported WebFonts that are known
by WebFMX Server.
Delphi Syntax
Objec t.AddDefaultWebFonts;
Remarks
So far, the known non supported fonts configured by default on WebFMX Serveralong with its mappings are:
Segoe UI Open+Sans:400italic,700italic,400,700
Segoe UI Light Open+Sans:300italic,300
See also
Read also the TFontMode topic, the OnSupportsWebFont event topic and theClearWebFonts and RegisterWebFont method topics.

Programming Reference 23
© 2013 Cybele Software
4.1.2.2 ClearWebFonts
This method clears all default and registered WebFont mappings.
Delphi Syntax
Objec t.ClearWebFonts;
Remarks
Once you call this method to clear all the default and registered WebFontmappings, you should either set the TFontMode to fmBitmap or fmAuto or alsoRegister new WebFont mappings through the RegisterWebFont method.
See also
You may find useful the TFontMode and FontMode topics, the OnSupportsWebFontevent topic and the AddDefaultWebFonts and RegisterWebFont method topics.
WebFMX 1.024
© 2013 Cybele Software
4.1.2.3 DownloadFile
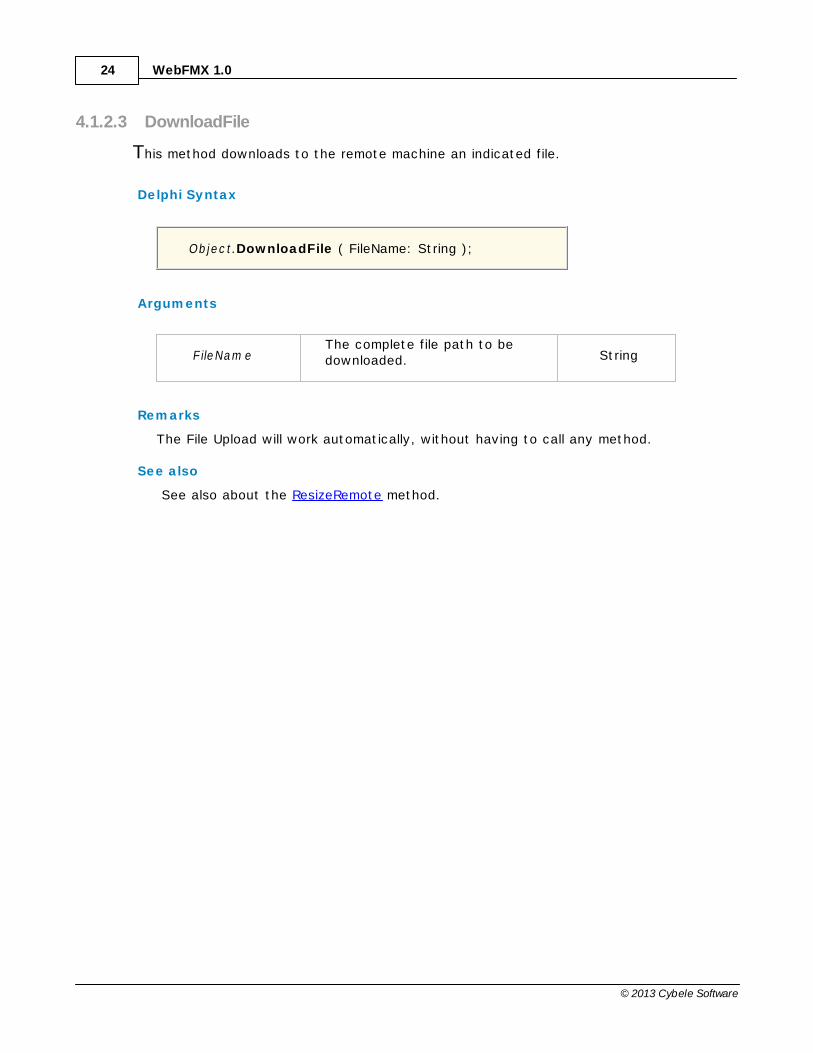
This method downloads to the remote machine an indicated file.
Delphi Syntax
Objec t.DownloadFile ( FileName: String );
Arguments
F ileNam eThe complete file path to bedownloaded. String
Remarks
The File Upload will work automatically, without having to call any method.
See also
See also about the ResizeRemote method.

Programming Reference 25
© 2013 Cybele Software
4.1.2.4 ResizeRemote
This method resizes the remote application to an indicated width and height value.
Delphi Syntax
Objec t.ResizeRemote ( width, height: Integer );
Arguments
w idthThe customized value to resizethe application width in pixels. Integer
heightThe customized value to resizethe application height in pixels. Integer
See also
See also about the OnBrowserResize event and the RemoteInfo property.
WebFMX 1.026
© 2013 Cybele Software
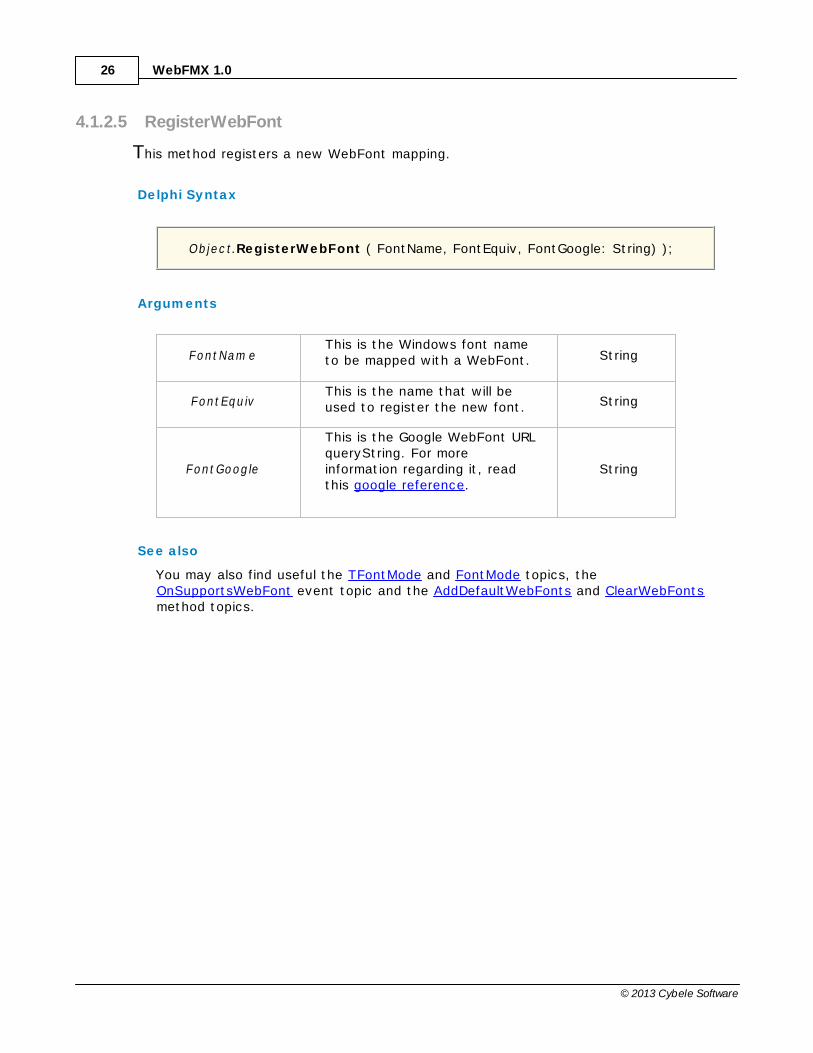
4.1.2.5 RegisterWebFont
This method registers a new WebFont mapping.
Delphi Syntax
Objec t.RegisterWebFont ( FontName, FontEquiv, FontGoogle: String) );
Arguments
FontNam eThis is the Windows font nameto be mapped with a WebFont. String
FontEquivThis is the name that will beused to register the new font. String
FontGoogle
This is the Google WebFont URLqueryString. For moreinformation regarding it, readthis google reference.
String
See also
You may also find useful the TFontMode and FontMode topics, theOnSupportsWebFont event topic and the AddDefaultWebFonts and ClearWebFontsmethod topics.

Programming Reference 27
© 2013 Cybele Software
4.1.3 Events
4.1.3.1 OnAppTerminate
This event is fired whenever the application is going to be terminated.
Delphi Syntax
Objec t.OnAppTerminate := MyOnAppTerminate;
procedure MyOnAppTerminate( Sender: TObject );begin // Your code hereend;
Arguments
Sender The Sender object. TObject
Remarks
When this event is fired the application termination can not be undone anymore.

WebFMX 1.028
© 2013 Cybele Software
4.1.3.2 OnBrowserResize
This event is fired whenever the end-user resizes the browser window.
Delphi Syntax
Objec t.OnBrowserResize := MyBrowserResizeEvent;
procedure MyBrowserResizeEvent(Sender: TObject; var AHandled: Boolean);begin AHandled := True; // Your code hereend;
Arguments
Sender The Sender object. TObject
AHandled
Prevents WebFMX from resizingautomatically the application, whenthe ScreenResolution property is set to"srFitToBrowser" or "srFitToScreen".
Boolean
See also
Read also the ResizeRemote and the RemoteInfo topics.
Programming Reference 29
© 2013 Cybele Software
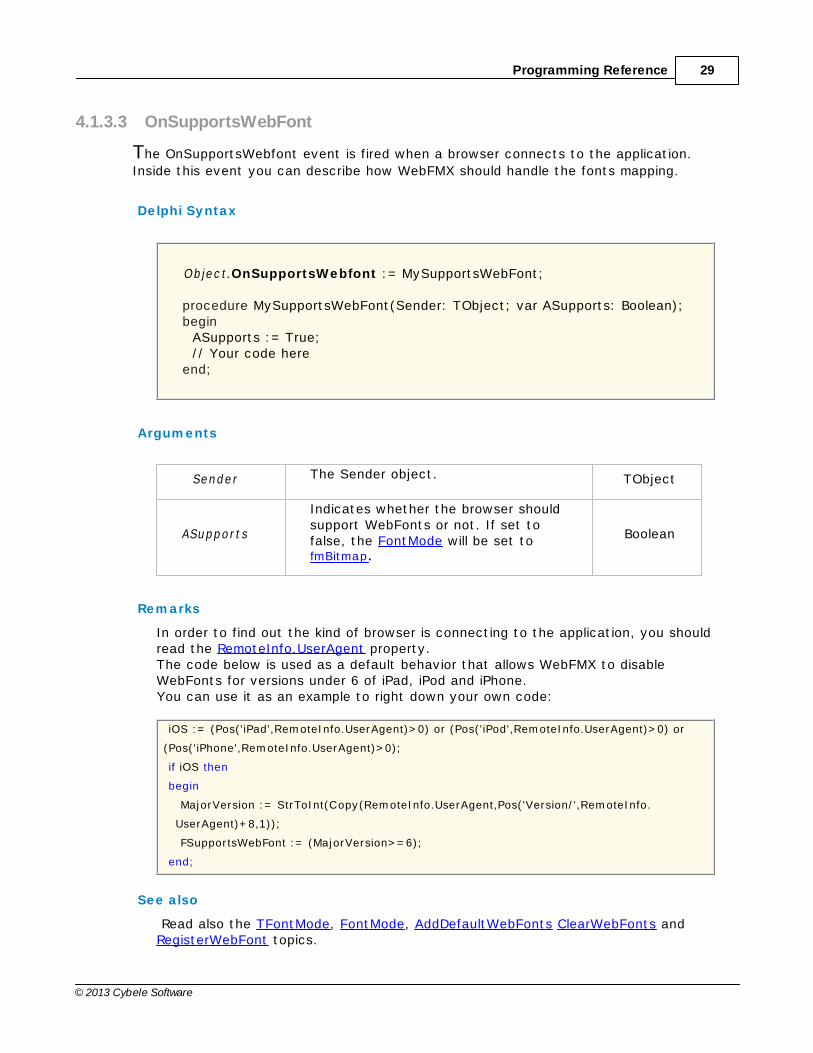
4.1.3.3 OnSupportsWebFont
The OnSupportsWebfont event is fired when a browser connects to the application.
Inside this event you can describe how WebFMX should handle the fonts mapping.
Delphi Syntax
Objec t.OnSupportsWebfont := MySupportsWebFont;
procedure MySupportsWebFont(Sender: TObject; var ASupports: Boolean);begin ASupports := True; // Your code hereend;
Arguments
Sender The Sender object. TObject
ASupport s
Indicates whether the browser shouldsupport WebFonts or not. If set tofalse, the FontMode will be set tofmBitmap.
Boolean
Remarks
In order to find out the kind of browser is connecting to the application, you shouldread the RemoteInfo.UserAgent property. The code below is used as a default behavior that allows WebFMX to disableWebFonts for versions under 6 of iPad, iPod and iPhone.You can use it as an example to right down your own code:
iOS := (Pos('iPad',RemoteInfo.UserAgent)>0) or (Pos('iPod',RemoteInfo.UserAgent)>0) or
(Pos('iPhone',RemoteInfo.UserAgent)>0);
if iOS then
begin
MajorVersion := StrToInt(Copy(RemoteInfo.UserAgent,Pos('Version/',RemoteInfo.
UserAgent)+8,1));
FSupportsWebFont := (MajorVersion>=6);
end;
See also
Read also the TFontMode, FontMode, AddDefaultWebFonts ClearWebFonts andRegisterWebFont topics.

WebFMX 1.030
© 2013 Cybele Software
4.2 TRemoteInfo
The TRemoteInfo class holds the properties with information regarding the end-user
remote environment.
Properties
WidthHeightBrowserWidthBrowserHeightScreenWidthScreenHeightUsernameUniqueBrowserIdPeerIPUserAgentScreenResolution
Remarks
Whenever you run your application, a TRemoteInfo object is instantiatedautomatically and set as a property of the PlatformHTML5 object.
See also
Read also, about the TPlatformHTML5 DevServer property.

Programming Reference 31
© 2013 Cybele Software
4.2.1 Properties
4.2.1.1 Width
Current width of the application.
Delphi Syntax
var width : Integer; width := Objec t.Width;
Remarks
The width is a read only property. In order to modify the application width, youshould use the method ResizeRemote.
See also
You may also read the topics Height, BrowserWidth, BrowserHeight, ScreenWidth,ScreenHeight and ScreenResolution regarding the application resolution.
4.2.1.2 Height
Current height of the application.
Delphi Syntax
var height : Integer; height := Objec t.Height;
Remarks
The height is a read only property. In order to modify the application height, youshould use the method ResizeRemote.
See also
You may also read the topics Width, BrowserWidth, BrowserHeight, ScreenWidth,ScreenHeight and ScreenResolution regarding the application resolution.
4.2.1.3 BrowserWidth
Current width of the end-user browser window.
Delphi Syntax
var browserWidth : Integer; browserWidth := Objec t.BrowserWidth;

WebFMX 1.032
© 2013 Cybele Software
Remarks
The browserWidth is a read only property. In order to modify the application width,you should use the method ResizeRemote.
See also
You may also read the topics Width, Height, BrowserHeight, ScreenWidth,ScreenHeight and ScreenResolution regarding the application resolution.
4.2.1.4 BrowserHeight
Current height of the end-user browser window.
Delphi Syntax
var browserHeight : Integer; browserHeight := Objec t.BrowserHeight;
Remarks
The browserHeight is a read only property. In order to modify the application height, you should use the method ResizeRemote.
See also
You may also read the topics Width, Height, BrowserWidth, ScreenWidth,ScreenHeight and ScreenResolution regarding the application resolution.
4.2.1.5 ScreenWidth
Width of the end-user screen.
Delphi Syntax
var screenWidth : Integer; screenWidth := Objec t.ScreenWidth;
Remarks
The screenWidth is a read only property. In order to modify the application width,you should use the method ResizeRemote.
See also
You may also read the topics Width, Height, BrowserWidth, BrowserHeight,ScreenHeight and ScreenResolution regarding the application resolution.

Programming Reference 33
© 2013 Cybele Software
4.2.1.6 ScreenHeight
Height of the end-user screen.
Delphi Syntax
var screenHeight : Integer; screenHeight := Objec t.ScreenHeight;
Remarks
The screenHeight is a read only property. In order to modify the application height,you should use the method ResizeRemote.
See also
You may also read the topics Width, Height, BrowserWidth, BrowserHeight,ScreenWidth and ScreenResolution regarding the application resolution.
4.2.1.7 Username
WebFMX authenticated username.
Delphi Syntax
var userName : String; userName := Objec t.UserName;
Remarks
The UserName is a read only property.
See also
Read the Permissions topic to learn how to give users permission to access your
application.
4.2.1.8 UniqueBrowserId
UniqueBrowserID identifies an instance of a Web Browser. Each time an end-user
opens the application from a different browser window, this ID will have a differentvalue.
Delphi Syntax

WebFMX 1.034
© 2013 Cybele Software
var browserID : String; browserID := Objec t.UniqueBrowserID;
Remarks
The UniqueBrowserID is a read only property.
See also
Read the UserAgent property topic, to learn how to retrieve more information
about the end-user web browser.
4.2.1.9 PeerIP
IP address of the end-user.
Delphi Syntax
var peerIP : String; peerIP := Objec t.PeerIP;
Remarks
The PeerIP is a read only property.
See also
Besides the end-user IP, you may have more information regarding the end-userbrowser through the UserAgent property.
4.2.1.10 UserAgent
User-Agent of the browser that have been used to open the WebFMX application.
Delphi Syntax
var userAgent : String; userAgent := Objec t.UserAgent;
Remarks
The UserAgent is a read only property.
See also
Read the UniqueBrowserID property topic, to learn how to retrieve more informationregarding the web browser.
Programming Reference 35
© 2013 Cybele Software
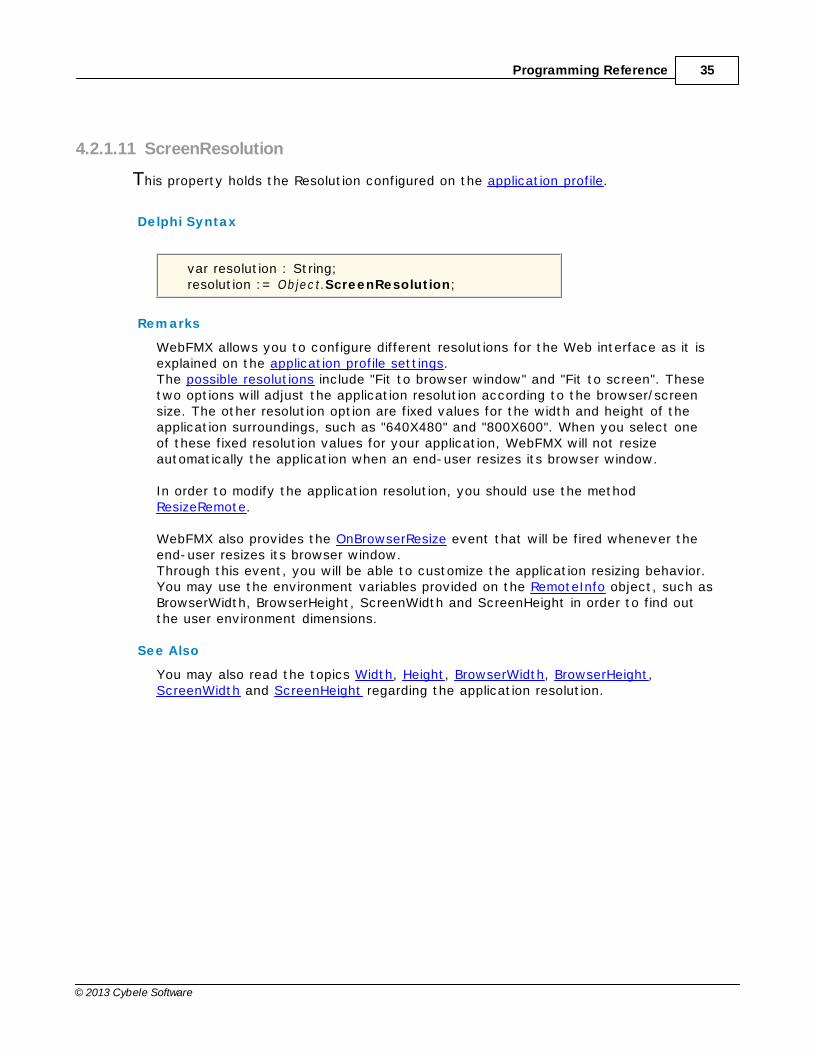
4.2.1.11 ScreenResolution
This property holds the Resolution configured on the application profile.
Delphi Syntax
var resolution : String; resolution := Objec t.ScreenResolution;
Remarks
WebFMX allows you to configure different resolutions for the Web interface as it isexplained on the application profile settings.The possible resolutions include "Fit to browser window" and "Fit to screen". Thesetwo options will adjust the application resolution according to the browser/screensize. The other resolution option are fixed values for the width and height of theapplication surroundings, such as "640X480" and "800X600". When you select oneof these fixed resolution values for your application, WebFMX will not resizeautomatically the application when an end-user resizes its browser window.
In order to modify the application resolution, you should use the method ResizeRemote.
WebFMX also provides the OnBrowserResize event that will be fired whenever theend-user resizes its browser window. Through this event, you will be able to customize the application resizing behavior.You may use the environment variables provided on the RemoteInfo object, such asBrowserWidth, BrowserHeight, ScreenWidth and ScreenHeight in order to find outthe user environment dimensions.
See Also
You may also read the topics Width, Height, BrowserWidth, BrowserHeight,ScreenWidth and ScreenHeight regarding the application resolution.

WebFMX 1.036
© 2013 Cybele Software
4.3 TDevServer
The TDevServer class holds the properties that allows you to modify some of the
Development Server settings.
Properties
EnabledPortStartBrowser
Remarks
Whenever you run your application, a TDevServer object is instantiatedautomatically as a property of the PlatformHTML5 object. Read the DevServerproperty topic, for more information.
See also
Read also, about the TPlatformHTML5 RemoteInfo property.

Programming Reference 37
© 2013 Cybele Software
4.3.1 Properties
4.3.1.1 Enabled
Allows you to disable the development server that runs whenever you compile an
application with the WebFMX.Platform runtime unit.
Delphi Syntax
Objec t.Enabled [:= Boolean];
Remarks
The Enabled is a read/write property.
See also
If you were looking to disable the whole PlatformHTML5, read this topic: Enabled.
4.3.1.2 Port
Allows you to change the port on which the Development Web Server will answer.
Delphi Syntax
Objec t.Port [:= Integer];
Remarks
The Port is a read/write property.
See also
Read also the Enabled and StartBrowser topics.
4.3.1.3 StartBrowser
Configures whether the server will open a new browser window when running the
application from the development environment.
Delphi Syntax
Objec t.StartBrowser [:= Boolean];
WebFMX 1.038
© 2013 Cybele Software
Remarks
The StartBrowser is a read/write property.
See also
Read also the Enabled and Port topics.

Programming Reference 39
© 2013 Cybele Software
4.4 TFontMode
The TFontMode enumerates the possible Font Modes that WebFMX works with.
Values
fmWebFont
This mode sets the application to use WebFonts. WebFMX automatically maps some notsupported fonts and you are able to map others,by calling the method RegisterWebFont for eachone of them.
fmBitmap
This mode will send each letter as a small pngimage and will store them into the web browsercache. This will ensure maximum fidelity, but itcan be sometimes a little slower than theWebFonts mode.
fmAuto
On this mode, WebFMX will use WebFont orBitmap based on the result of the OnSupportsWebFont event. Inside the event you should indicate theenvironments where the WebFonts should beenabled and the other ones where WebFMXshould work with the Bitmaps mode.
See also
Read also about the FontMode property, the OnSupportsWebFont event and themethods AddDefaultWebFonts, ClearWebFonts and RegisterWebFont.
WebFMX 1.040
© 2013 Cybele Software
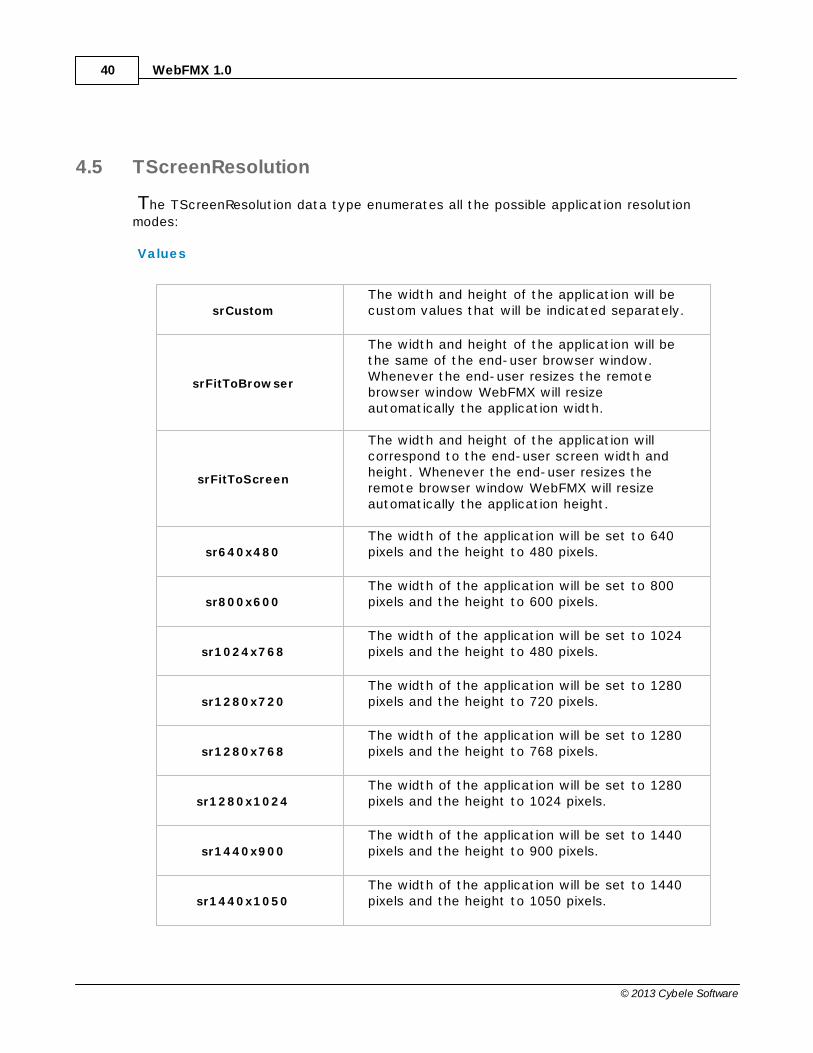
4.5 TScreenResolution
The TScreenResolution data type enumerates all the possible application resolution
modes:
Values
srCustom
The width and height of the application will becustom values that will be indicated separately.
srFitToBrowser
The width and height of the application will bethe same of the end-user browser window.Whenever the end-user resizes the remotebrowser window WebFMX will resizeautomatically the application width.
srFitToScreen
The width and height of the application willcorrespond to the end-user screen width andheight. Whenever the end-user resizes theremote browser window WebFMX will resizeautomatically the application height.
sr640x480
The width of the application will be set to 640pixels and the height to 480 pixels.
sr800x600
The width of the application will be set to 800pixels and the height to 600 pixels.
sr1024x768
The width of the application will be set to 1024pixels and the height to 480 pixels.
sr1280x720
The width of the application will be set to 1280pixels and the height to 720 pixels.
sr1280x768
The width of the application will be set to 1280pixels and the height to 768 pixels.
sr1280x1024
The width of the application will be set to 1280pixels and the height to 1024 pixels.
sr1440x900
The width of the application will be set to 1440pixels and the height to 900 pixels.
sr1440x1050
The width of the application will be set to 1440pixels and the height to 1050 pixels.

Programming Reference 41
© 2013 Cybele Software
sr1600x1200
The width of the application will be set to 1600pixels and the height to 1200 pixels.
sr1680x1050
The width of the application will be set to 1680pixels and the height to 1050 pixels.
sr1920x1080
The width of the application will be set to 1920pixels and the height to 1080 pixels.
sr1920x1200
The width of the application will be set to 1920pixels and the height to 1200 pixels.
See also
Read also about the OnBrowserResize event, the ResizeRemote method and theScreenResolution property.

WebFMX 1.042
© 2013 Cybele Software
5 WebFMX Server Manager
The WebFMX Server Manager is the tool to manage the WebFMX Server, from where you
can manage FireMonkey's applications profiles, permissions and settings related to theWebFMX service.To access The WebFMX Server Manager go over the Start Menu options and look for the"WebFMX Server Manager" item.
The WebFMX Server Manager is has the following tabs:
General
Applications
Licences
Its main menu has two sub-menus:
File Menu:
The File Menu is composed by the following options:
Language
Allows you to choose different languages for theapplication.Click on the Language that you want theapplication to work with. English is the default language.
SaveClick to save any change done on the systemSettings.
ExitClick on this option to exit the WebFMX ServerManager.
Help Menu:

WebFMX Server Manager 43
© 2013 Cybele Software
The Help Menu is composed by the following options:
HelpTakes you to the application online guide.
Buy Takes you to the Cybele Software's Buy page.
About WebFMXClick on the About to see the application versionand build number.

WebFMX 1.044
© 2013 Cybele Software
5.1 General
On WebFMX manager "General" tab you will find the following options:
Bind to IPUse this option to restrict access to the service to onespecific IP address. The "All unassigned" option allowsaccess through all the available IP addresses.
Protocol Choose between the http and https protocol.
Manage CertificateAllows you to specify the SSL certificate. WebFMX Serveralready comes with a self-signed certificated, that is goodenough for testing purposes.
PortChoose which port will WebFMX Server be listening on. Ifthe port is not available, you will see an error message onthe status bar.
Always remember to press "Apply" in order to save the changes.

WebFMX Server Manager 45
© 2013 Cybele Software
5.2 Applications
The "Applications" tab will allow you to configure the FireMonkey applications locations and
settings as well as the user permissions to access them.
On WebFMX Server Manager's "Applications" tab you will find the following options:
Application List
This list shows the available applications. Youcan enable or disable them by checking thebox to the left of the name.
NameName of theapplication.
Target
The application pathand the webaddress in case ofthe Web Linkprofiles.
Add Press this button to add a new application.
EditSelect an application and press this button toedit it.
RemoveSelect an application and press this button toremove it.
WebFMX 1.046
© 2013 Cybele Software
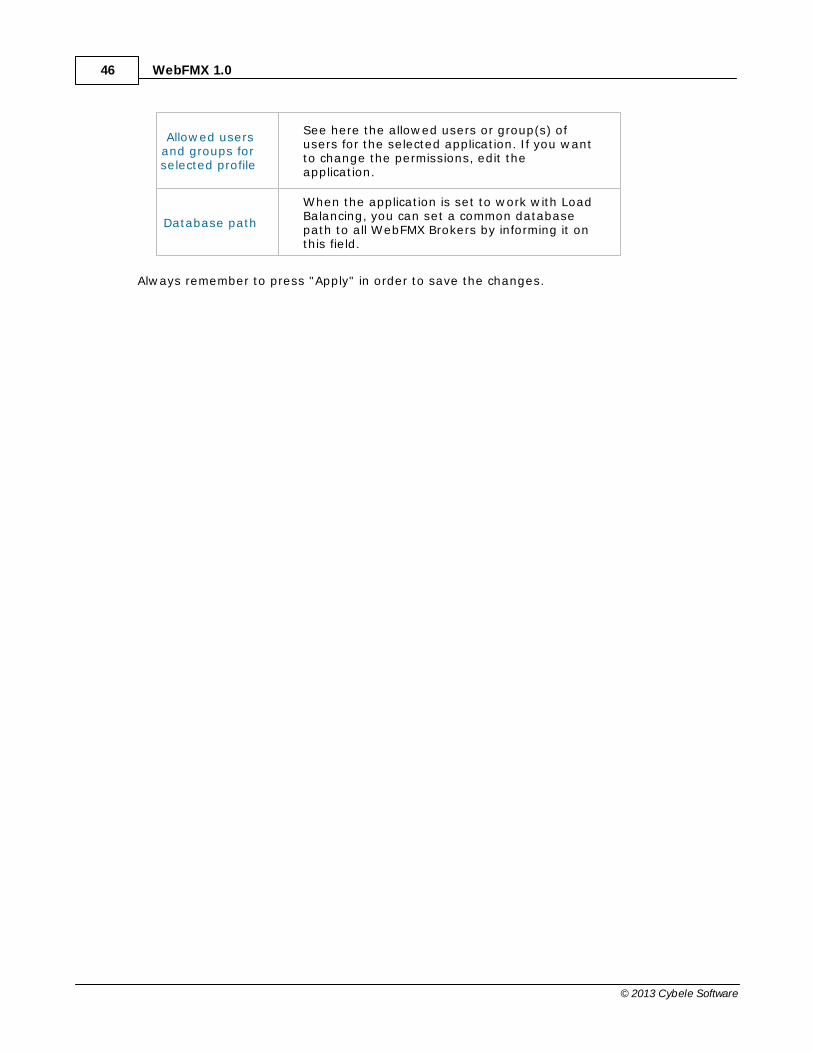
Allowed usersand groups forselected profile
See here the allowed users or group(s) ofusers for the selected application. If you wantto change the permissions, edit theapplication.
Database path
When the application is set to work with LoadBalancing, you can set a common databasepath to all WebFMX Brokers by informing it onthis field.
Always remember to press "Apply" in order to save the changes.
WebFMX Server Manager 47
© 2013 Cybele Software
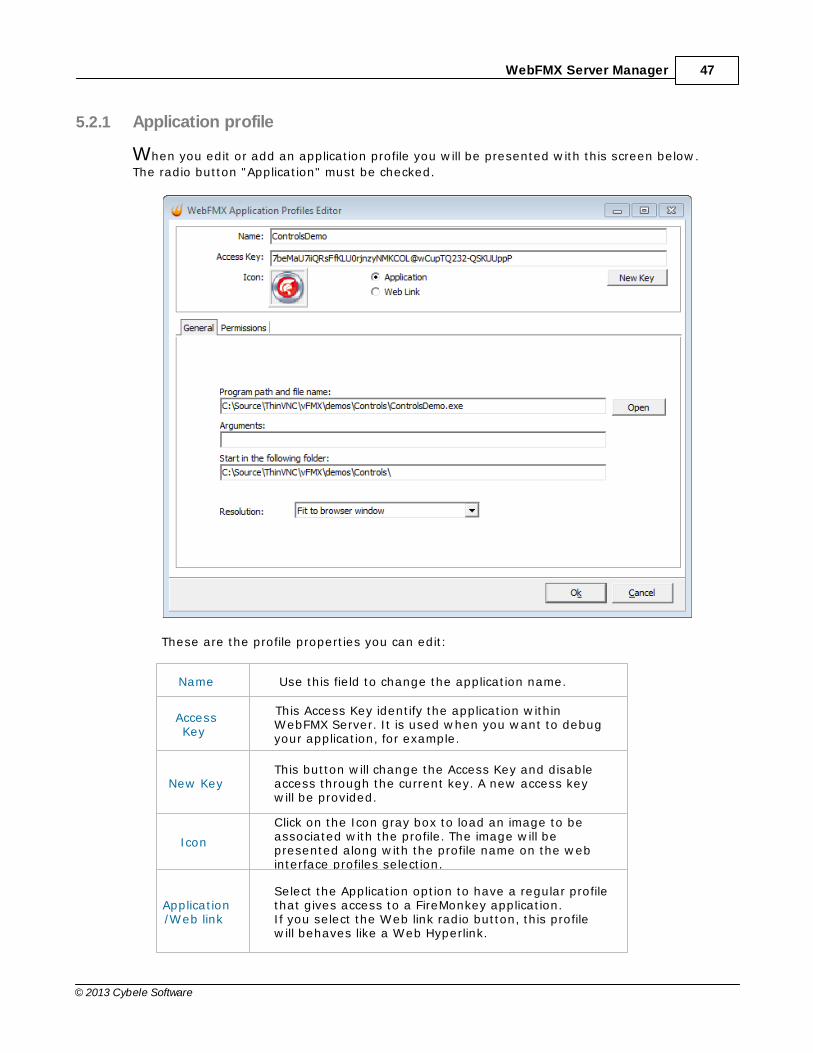
5.2.1 Application profile
When you edit or add an application profile you will be presented with this screen below.
The radio button "Application" must be checked.
These are the profile properties you can edit:
Name Use this field to change the application name.
AccessKey
This Access Key identify the application withinWebFMX Server. It is used when you want to debugyour application, for example.
New KeyThis button will change the Access Key and disableaccess through the current key. A new access keywill be provided.
Icon
Click on the Icon gray box to load an image to beassociated with the profile. The image will bepresented along with the profile name on the webinterface profiles selection.
Application/Web link
Select the Application option to have a regular profilethat gives access to a FireMonkey application.If you select the Web link radio button, this profilewill behaves like a Web Hyperlink.

WebFMX 1.048
© 2013 Cybele Software
The properties located inside the tabs will be described throughout the next subtopics.
WebFMX Server Manager 49
© 2013 Cybele Software
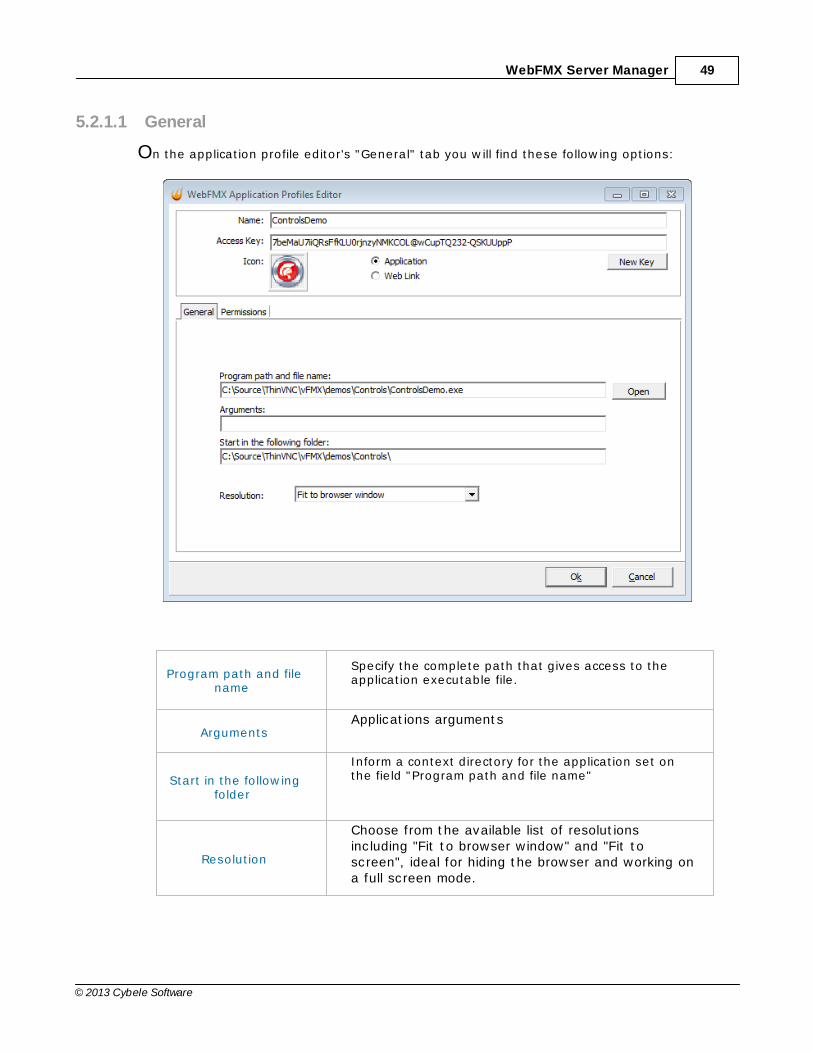
5.2.1.1 General
On the application profile editor's "General" tab you will find these following options:
Program path and filename
Specify the complete path that gives access to theapplication executable file.
ArgumentsApplications arguments
Start in the followingfolder
Inform a context directory for the application set onthe field "Program path and file name"
Resolution
Choose from the available list of resolutionsincluding "Fit to browser window" and "Fit toscreen", ideal for hiding the browser and working ona full screen mode.

WebFMX 1.050
© 2013 Cybele Software
Idle Timeout
Set a timeout in minutes if you want WebFMXServer to wait this period before killing theapplication once the browser has been closed. Timeout 0 will kill the application immediately afterthe browser has been closed.
WebFMX Server Manager 51
© 2013 Cybele Software
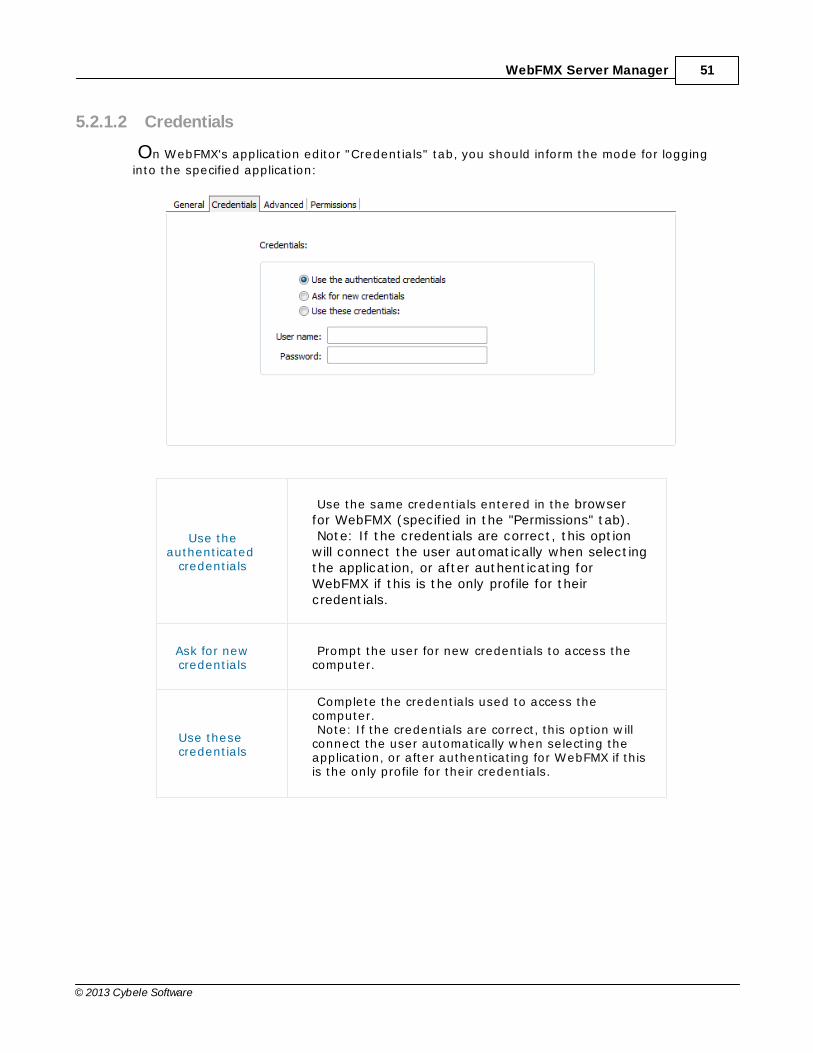
5.2.1.2 Credentials
On WebFMX's application editor "Credentials" tab, you should inform the mode for logging
into the specified application:
Use theauthenticated
credentials
Use the same credentials entered in the browserfor WebFMX (specified in the "Permissions" tab). Note: If the credentials are correct, this option
will connect the user automatically when selectingthe application, or after authenticating forWebFMX if this is the only profile for theircredentials.
Ask for newcredentials
Prompt the user for new credentials to access thecomputer.
Use these credentials
Complete the credentials used to access thecomputer. Note: If the credentials are correct, this option will
connect the user automatically when selecting theapplication, or after authenticating for WebFMX if thisis the only profile for their credentials.

WebFMX 1.052
© 2013 Cybele Software
5.2.1.3 Permissions
Here you need to select the users that will access this application. If you don't select any
user, this application will not be accessed.These are the options you will find on the application profile editor "Permissions" tab:
Allow anonymousaccess
Check this option to make this applicationavailable without any authentication. Use thisoption, if you want this profile to be available foreveryone. This means that everybody accessingWebFMX will have access to this application. Checking this option will disable the Add andRemove buttons.
AddPress "Add" to access the windows dialog for
selecting Active Directory users.
Remove Press "Remove" to remove a user for this profile.
If you want a user or a user group to access more than one application, you need tocreate more application profiles and then add this user to each profile.The authenticated user will be able to choose from the available application profiles on
the Web interface.
WebFMX Server Manager 53
© 2013 Cybele Software
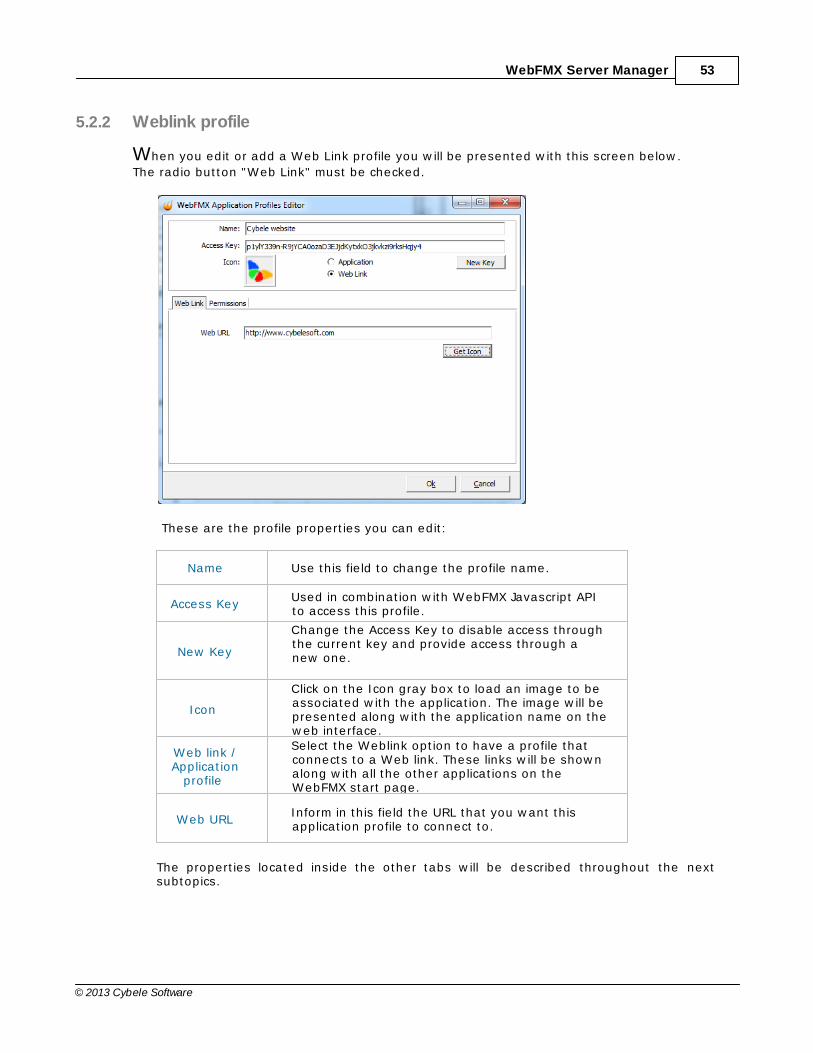
5.2.2 Weblink profile
When you edit or add a Web Link profile you will be presented with this screen below.
The radio button "Web Link" must be checked.
These are the profile properties you can edit:
Name Use this field to change the profile name.
Access KeyUsed in combination with WebFMX Javascript APIto access this profile.
New Key
Change the Access Key to disable access throughthe current key and provide access through anew one.
Icon
Click on the Icon gray box to load an image to beassociated with the application. The image will bepresented along with the application name on theweb interface.
Web link /Application
profile
Select the Weblink option to have a profile thatconnects to a Web link. These links will be shownalong with all the other applications on theWebFMX start page.
Web URLInform in this field the URL that you want thisapplication profile to connect to.
The properties located inside the other tabs will be described throughout the nextsubtopics.

WebFMX 1.054
© 2013 Cybele Software
5.2.2.1 Permissions
Here you need to select the users that will access this application profile. If you don't select
any users, this profile will not be available from the Web interface.These are the options you will find under the "Permissions" tab:
Allow anonymousaccess
Check this option to make this applicationavailable without any authentication. Use thisoption, if you want this profile to be available foreveryone. This means that everybody accessingWebFMX home page will see this profile. Checking this option will disable the Add andRemove buttons.
AddPress "Add" to access the windows dialog forselecting Active Directory users.
RemovePress "Remove" to remove a user for thisapplication profile.
If you want a user or a user group to access more than one application, you need tocreate more profiles and then add this user to each profile.The authenticated user will be able to choose from the Web interface which applications/he will connect to.
WebFMX Server Manager 55
© 2013 Cybele Software
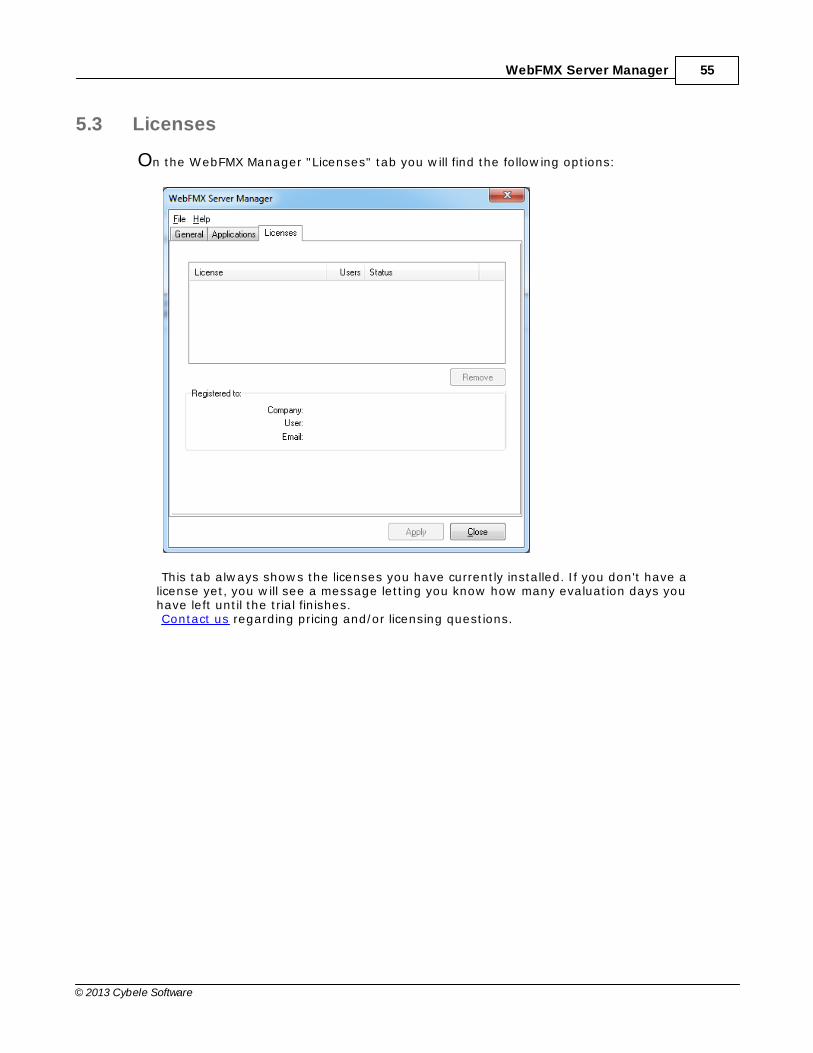
5.3 Licenses
On the WebFMX Manager "Licenses" tab you will find the following options:
This tab always shows the licenses you have currently installed. If you don't have alicense yet, you will see a message letting you know how many evaluation days youhave left until the trial finishes.Contact us regarding pricing and/or licensing questions.

WebFMX 1.056
© 2013 Cybele Software
6 Managing the SSL Certificate
An SSL certificate is an effective way to secure a website against unauthorized interception
of data. At its simplest, an SSL Certificate is used to identify the website and encrypt alldata flowing to and from the Certificate holder's Web site. This makes all exchangesbetween the site and its visitors 100 percent private. A valid SSL certificate is included with the WebFMX Server installation and allcommunications are already encrypted with the product's default certificate. You may wantto create your own certificate to identify your company better.
Managing the SSL Certificate
1. There are two forms of creating your own SSL certificate:
a. Create A self-signed certificate
b. Use A CA Certificate
2. Once you already have your certificate files, go to WebFMX Server Settings "Generaltab".
3. Click on the "Manage Certificate" option.
4. On this screen you should inform the location of the certificate files, as follows:
Certificate FileInform the path to the certificate file.
CA FileIf the certificate is issued by a unknown CA, you should fill in the pathname to the CA
certificate.
Private KeyYou should inform the pathname to the certificate private key file.
Pass PhraseInform the password, if there is any, used when the private key was generated.
Note: The path names can be absolute (C:\MyCertPath\UserThisCert.pem) or relative tothe path where WebFMX Server is installed (\cert\UserThisCert.perm).

Managing the SSL Certificate 57
© 2013 Cybele Software
6.1 The Default Embedded Certificate
A certificate called "self-signed.pem" is included with the WebFMX Server installation. You
will find it inside the \cert directory, located inside the WebFMX Server application path.
If you want to use this default certificate you should have the files set as the imagebelow:
You'll find these settings inside the WebFMX Server Manager 'General' tab, by clickingon the 'Manage certificate' button.
Because this certificate is not issued by a known Certificate Authority (CA), the webbrowsers will warn you they can not verify its authority.

WebFMX 1.058
© 2013 Cybele Software
6.2 A Self-signed Certificate
This option is used to create your own self-sign certificate.
1. Go to the WebFMX Server Settings "Security tab".
2. Press the 'Manage certificate' button.
3. Press the "Create a self-signed certificate" button.
4. Fill in the form below with your organization data:
5. The "Common Name" field should be filled with the server+domain that will be usedto access the WebFMX Server (webfmx.mycompany.com).
6. Press Create.
7. Select the location where you want the certificate to be stored.
8. The application will start using this self-signed certificate just created by you.
Because this certificate is not issued by a known Certificate Authority (CA), the webbrowsers will warn you they can not verify its authority.

Managing the SSL Certificate 59
© 2013 Cybele Software
6.3 A CA Certificate
In order to use this option you will have to get a certificate from a known Certificate
Authority (CA). Some CA examples are GoDaddy, VeriSign, Thawte, GeoTrust and NetworkSolutions.
The CA will ask you for a "certificate request". Create one following the next steps:
1. Go to the WebFMX Server Settings "Security tab".
2. Press the 'Manage certificate' button.
3. Click on the "Create a certificate request" button.
4. Fill in the form below with your organization data:
5. The "Common Name" field should be filled with the server+domain that will be used toaccess the WebFMX server (webfmx.mycompany.com)
6. Press "Create" and the application will generate two files.
7. The first window will ask you a location to keep the private key file: "Where do youwant the private key file to be stored".
a. Inform a name for your private key.b. Select a place to keep it safe. c. Press the "Save" button.
8. The second window will ask you a location to keep the request file: "Where do youwant the request file to be stored.".

WebFMX 1.060
© 2013 Cybele Software
a. Inform a name for the request file.b. Select a directory where you can find the file later on to send to the CA.c. Press the "Save" button.
9. The first file is the certificate private key. It should always be kept safe with you.
10. Send only the request file to the CA.
After the CA validation process, place the certificate they sent to you on WebFMX Servercert directory and inform the path to the files on WebFMX Server Manager, ManageCertificate option (Certificate file, CA file and Private Key).

Managing the SSL Certificate 61
© 2013 Cybele Software
7 Appendix A - Dialogs
In WebFMX, window frames have a "web-native" interface. The same happens withstandard dialog boxes, that are translated to HTML dialogs.
Find on the next topics how each one of these dialogs will be shown on the Windowsand HTML5 platforms:
Message Dialogs
MessageDlgInputBoxFormatted Message
Printing Dialogs
Page SetupPrint
File Dialogs
Open FileSave As

WebFMX 1.062
© 2013 Cybele Software
7.1 Message Dialogs
The Message Dialogs implemented in WebFMX are:
MessageDlgInputBoxFormatted Message
Appendix A - Dialogs 63
© 2013 Cybele Software
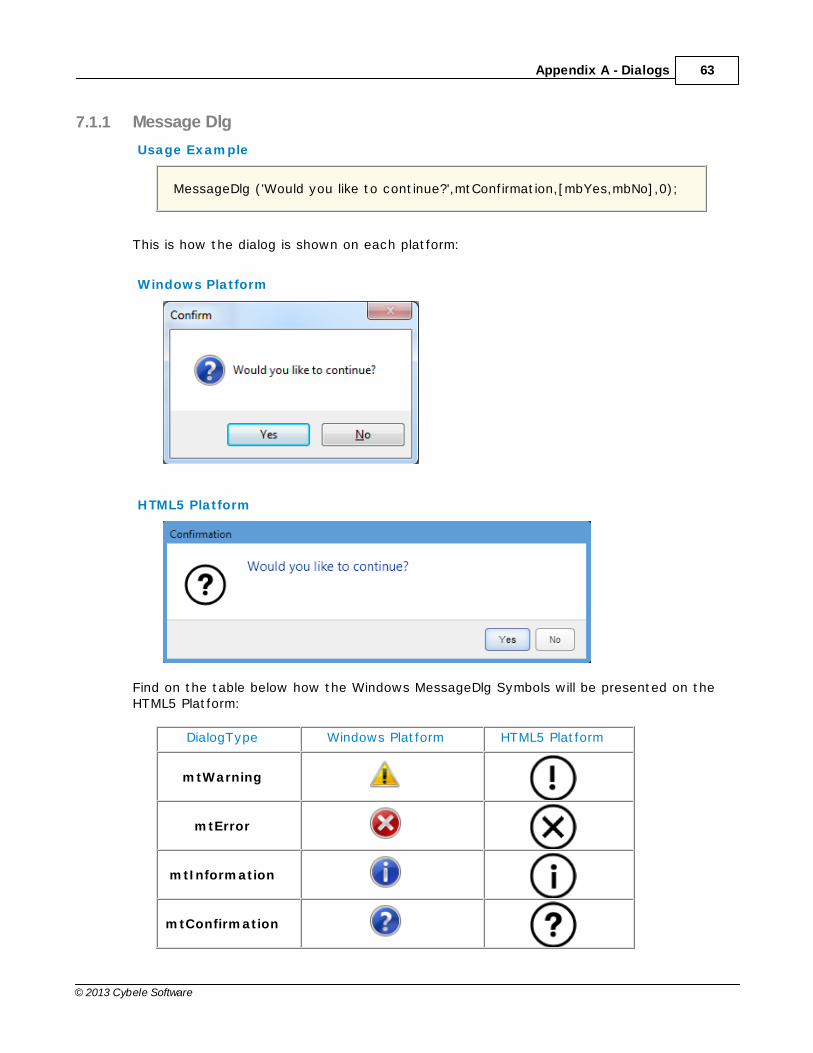
7.1.1 Message Dlg
Usage Example
MessageDlg ('Would you like to continue?',mtConfirmation,[mbYes,mbNo],0);
This is how the dialog is shown on each platform:
Windows Platform
HTML5 Platform
Find on the table below how the Windows MessageDlg Symbols will be presented on theHTML5 Platform:
DialogType Windows Platform HTML5 Platform
mtWarning
mtError
mtInformation
mtConfirmation

WebFMX 1.064
© 2013 Cybele Software
7.1.2 Input Box
Usage Example
value := InputBox( 'Input Test' , 'Please type a name' , '' );
This is how the dialog is shown on each platform:
Windows Platform
HTML5 Platform

Appendix A - Dialogs 65
© 2013 Cybele Software
7.1.3 Formatted Message
Usage Example
ShowMessageFmt( '%d/%d = %1.2f' , [2, 5, 2/5] );
This is how the dialog is shown on each platform:
Windows Platform
HTML5 Platform

WebFMX 1.066
© 2013 Cybele Software
7.2 Printing Dialogs
The Printing Dialogs implemented in WebFMX are:
PageSetupPrint
Appendix A - Dialogs 67
© 2013 Cybele Software
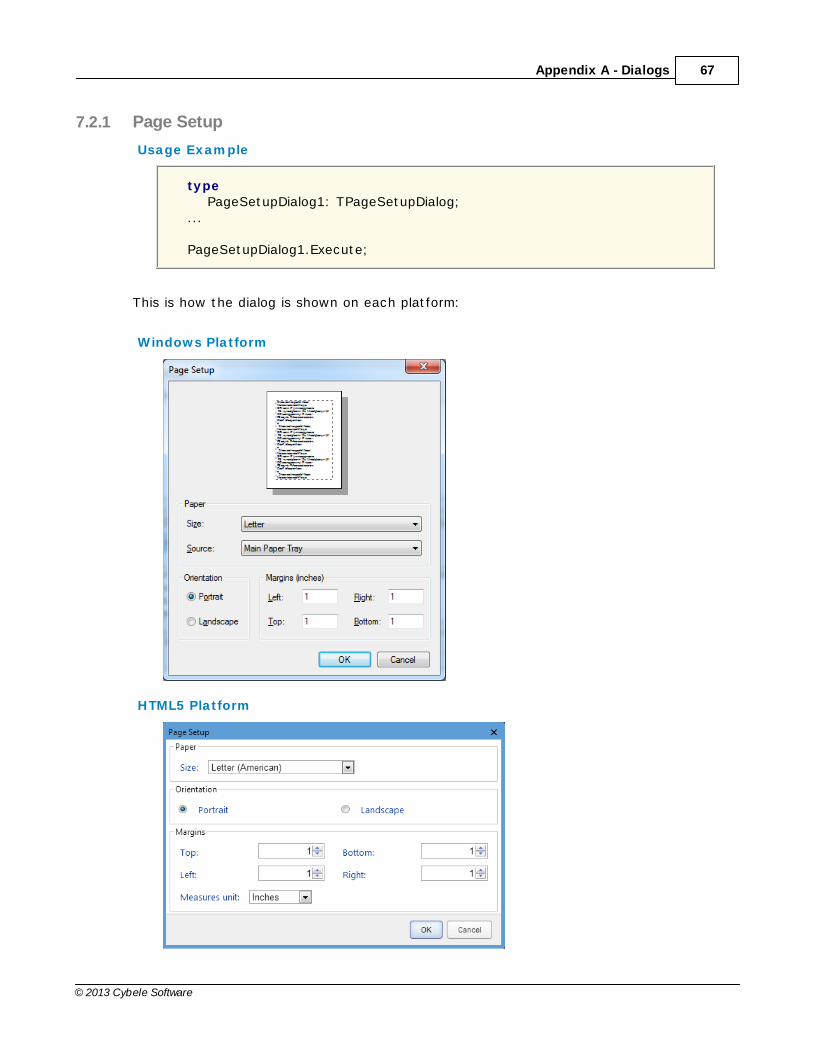
7.2.1 Page Setup
Usage Example
type PageSetupDialog1: TPageSetupDialog;...
PageSetupDialog1.Execute;
This is how the dialog is shown on each platform:
Windows Platform
HTML5 Platform

WebFMX 1.068
© 2013 Cybele Software
7.2.2 Print
Usage Example
type PrintDialog1: TPrintDialog;...
PrintDialog1.Execute;
This is how the dialog is shown on each platform:
Windows Platform
HTML5 Platform

Appendix A - Dialogs 69
© 2013 Cybele Software
7.3 File Dialogs
The File Dialogs implemented in WebFMX are:
Open FileSave As

WebFMX 1.070
© 2013 Cybele Software
7.3.1 Open File
Usage Example
type OpenDialog1: TOpenDialog;...
OpenDialog1.Title := 'Open file';OpenDialog1.Execute;
This is how the dialog is shown on each platform:
Windows Platform
HTML5 Platform
In order to open a File from the remote machine the user will be able to make an uploadof one local file into the server.

Appendix A - Dialogs 71
© 2013 Cybele Software
7.3.2 Save As
Usage Example
type SaveDialog1: TSaveDialog;...
SaveDialog1.Title := 'Save As...';SaveDialog1.Filter := '*.txt';SaveDialog1.FileName := 'somefile.txt';SaveDialog1.Execute;
This is how the dialog is shown on each platform:
Windows Platform
HTML5 Platform
In order to save a File from the remote machine WebFMX will do a download into theLocalMachine.

WebFMX 1.072
© 2013 Cybele Software
8 Appendix B - Tailoring the interface
8.1 Customizing the Web Interface
WebFMX allows you to modify the web interface and tailor it to your brandingscheme.
Customizing the application logo and other image files can be very simple, onceit only requires you to have the new image file and tell the application where itis located.
Customizing the structure and style of the application may be a little bit morecomplex. These kind of customizations have to be done at a programming level(HTML and CSS).
Read also how to protect the customized web files in the Files Location topic.

Appendix B - Tailoring the interface 73
© 2013 Cybele Software
8.1.1 Changing the logo
Modifying the application logo can be as simple as copying the new logo image andtelling WebFMX application where it is located:
1. Create a folder called "BrandingFiles", if it doesn't exist yet, under the folderwebfmx located inside the WebFMX installation directory. (e.g.: C:/Program Files/WebFMX/webfmx)
2. Copy your own logo image file to the "BrandingFiles" folder.
3. Create the WebAliases.ini file and configure it:
a. Create a file called "WebAliases.ini" in the installation directory (e.g.: C:/Program Files/WebFMX/WebAliases.ini). If the file already exists, only append thelines to it.
b. Configure the redirection of the logo files you want to substitute, following thetwo examples below (webFMX.png.png and favicon.ico):
[Alias]
;=================;Main logo;=================/images/webFMX.png.png=BrandingFiles\MyLogo.png
;=================;Favicon;=================/favicon.ico=BrandingFiles\MyFavicon.ico
c. Save it.
4. Open the application to see the changes.
Take into account:
a. Any line in the "WebAliases.ini" file starting with a semicolon will not beconsidered by the application. It can be used to leave comments in the file.
b. You can substitute any interface image or file, by following the same stepsdescribed above.
c. Sometimes the favicon is not shown right the way, because the browser keepshistory of the images. In that case, you should clean the browser cache beforetrying out the changes.
WebFMX 1.074
© 2013 Cybele Software
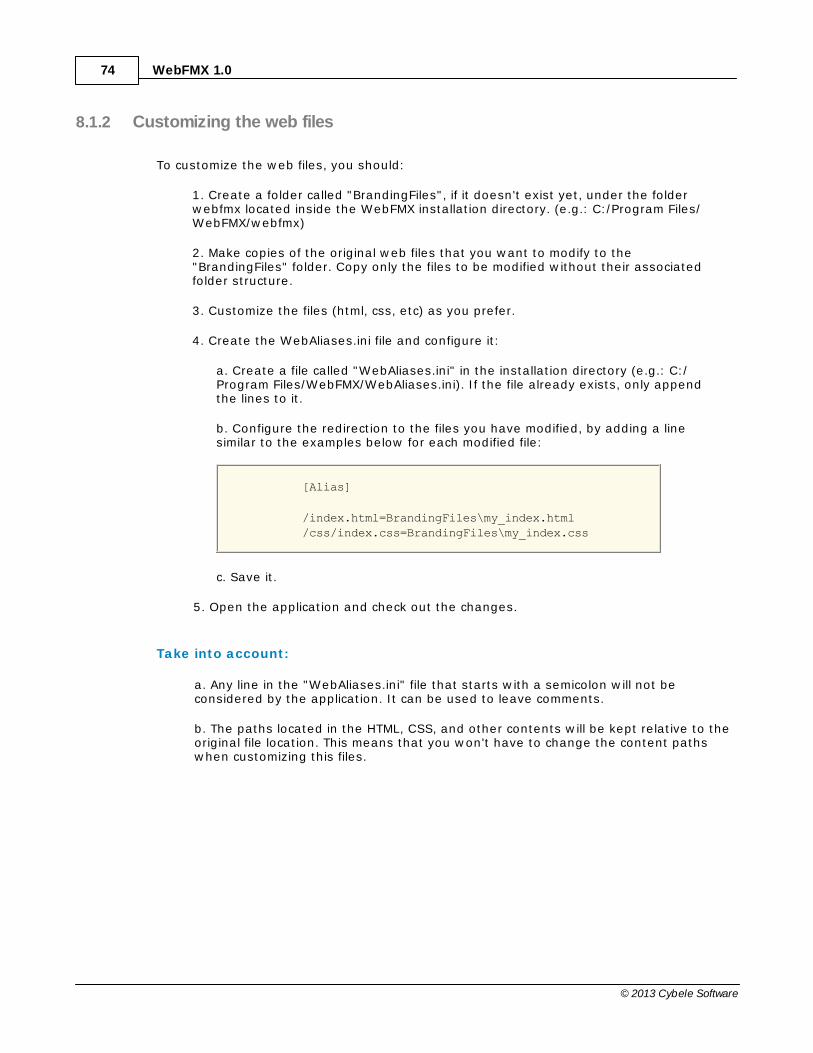
8.1.2 Customizing the web files
To customize the web files, you should:
1. Create a folder called "BrandingFiles", if it doesn't exist yet, under the folderwebfmx located inside the WebFMX installation directory. (e.g.: C:/Program Files/WebFMX/webfmx)
2. Make copies of the original web files that you want to modify to the"BrandingFiles" folder. Copy only the files to be modified without their associatedfolder structure.
3. Customize the files (html, css, etc) as you prefer.
4. Create the WebAliases.ini file and configure it:
a. Create a file called "WebAliases.ini" in the installation directory (e.g.: C:/Program Files/WebFMX/WebAliases.ini). If the file already exists, only appendthe lines to it.
b. Configure the redirection to the files you have modified, by adding a linesimilar to the examples below for each modified file:
[Alias]
/index.html=BrandingFiles\my_index.html/css/index.css=BrandingFiles\my_index.css
c. Save it.
5. Open the application and check out the changes.
Take into account:
a. Any line in the "WebAliases.ini" file that starts with a semicolon will not beconsidered by the application. It can be used to leave comments.
b. The paths located in the HTML, CSS, and other contents will be kept relative to theoriginal file location. This means that you won't have to change the content pathswhen customizing this files.
Appendix B - Tailoring the interface 75
© 2013 Cybele Software
8.1.3 Files Location
We recommend that you to create a new folder in order to keep the customized filesinstead of leaving it all together with the original ones. On doing so, you will:
a) Have the possibility to get back to the original interface configuration, at anytimeb) Make sure that your files will be safe after a version upgrade.
You can also choose whether to place the files inside or outside the webroot structure.Read next, how each option will behave differently.
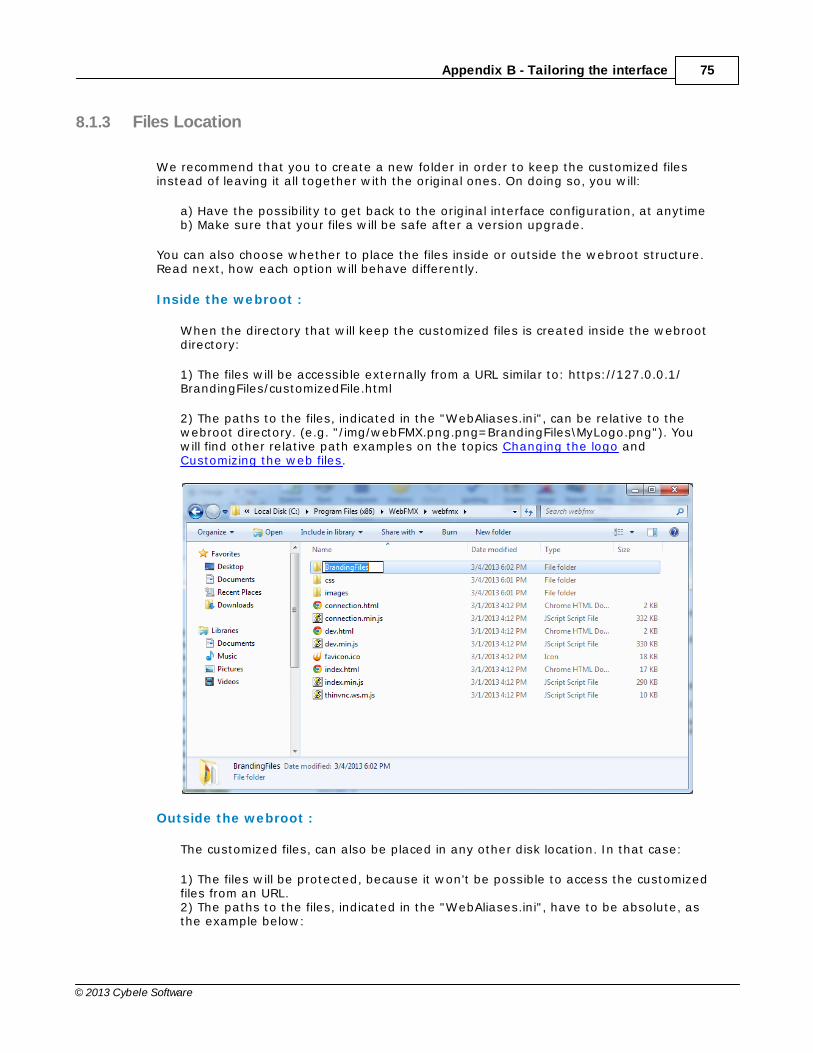
Inside the webroot :
When the directory that will keep the customized files is created inside the webrootdirectory:
1) The files will be accessible externally from a URL similar to: https://127.0.0.1/BrandingFiles/customizedFile.html
2) The paths to the files, indicated in the "WebAliases.ini", can be relative to thewebroot directory. (e.g. "/img/webFMX.png.png=BrandingFiles\MyLogo.png"). Youwill find other relative path examples on the topics Changing the logo andCustomizing the web files.
Outside the webroot :
The customized files, can also be placed in any other disk location. In that case:
1) The files will be protected, because it won't be possible to access the customizedfiles from an URL. 2) The paths to the files, indicated in the "WebAliases.ini", have to be absolute, asthe example below:

WebFMX 1.076
© 2013 Cybele Software
[Alias]
/index.html=c:/BrandingFiles/my_index.html/images/webFMX.png.png=c:/BrandingFiles/MyLogo.png

Appendix B - Tailoring the interface 77
© 2013 Cybele Software
9 Appendix C - JavaScript API
WebFMX's JavaScript API enables you to embed FireMonkey applications into pre-existing Web environments.
In order to integrate WebFMX into your web page you will be required to modify theHTML page by adding some Javascript code.From this point on, we consider you have already installed and configured WebFMX. Ifnot, go back to the Getting Started topic.
To learn how to use the SDK library, read the following topics:
Deploying
Modifying the HTML file
Connect method
Authentication Scheme
SSL Certificate
Take a look also on the sdk.html file available in the WebFMX server installationdirectory, under the folder WebFMX. After configuring the profileKey parameter onthe connect method, you can try it out from the browser through the address http(s)://server_IP:port/sdk.html.

WebFMX 1.078
© 2013 Cybele Software
9.1 Deploying
These are the files that should be deployed within your application/website, when usingthe WebFMX SDK. All the files can be found inside the application directory under the WebFMX folder.
1. The sdk.m in.js library2. The w ebfm x.ui.c ss and the popups.c ss 3. The whole c ss.m directory. These are the styles for mobile devices.4. The whole im ages/c ore directory.
The images and the mobile stylesheets (items 3 and 4 above) must be placed in thesame subdirectory tree relative to sdk.min.js location.

Appendix C - JavaScript API 79
© 2013 Cybele Software
9.2 Modifying the HTML file
You need a remote application container in your web page. This can be either:
A div elementAn iframe elementA new browser window
You will be able to configure this through the connection mode (step 6b explainedfurther below).
Modifying your html file, step-by-step:
1. Open the HTML page for editing.
2. Add these meta tags into the <head> tag:
<meta http-equiv="Content-Type" content="text/html; charset=utf-8" /><meta http-equiv="X-UA-Compatible" content="chrome=1"/>
3. If you want the WebFMX integration to work with iOS, add the following <meta>tags into the <head> tag.
<link rel="apple-touch-icon" href="images/icon.png"/><meta name="apple-mobile-web-app-capable" content="yes" /><meta name="viewport" content="width=device-width, initial-scale=1.0,maximum-scale=1.0, minimum-scale=1.0, user-scalable=no, target-densityDpi=device-dpi"/>
4. Add a reference to the css stylesheet files into the <head> tag. These files mustbe deployed with your website/application.
<link rel="stylesheet" type="text/css" href="css/popups.css"/><link rel="stylesheet" type="text/css" href="css/webfmx.ui.css"/>
5. Add the following libraries inside the <head> tag:
a. The jQuery library (jquery.min.js):
<script src="https://ajax.googleapis.com/ajax/libs/jquery/1.6.1/jquery.min.js" type="text/javascript"></script>
b. Point a script tag to the WebFMX SDK client library (sdk.min.js): this file will haveto be deployed with your website/application. The tag below should be added to the<head> section, too.
<script src="sdk.min.js" type="text/javascript"></script>
WebFMX 1.080
© 2013 Cybele Software
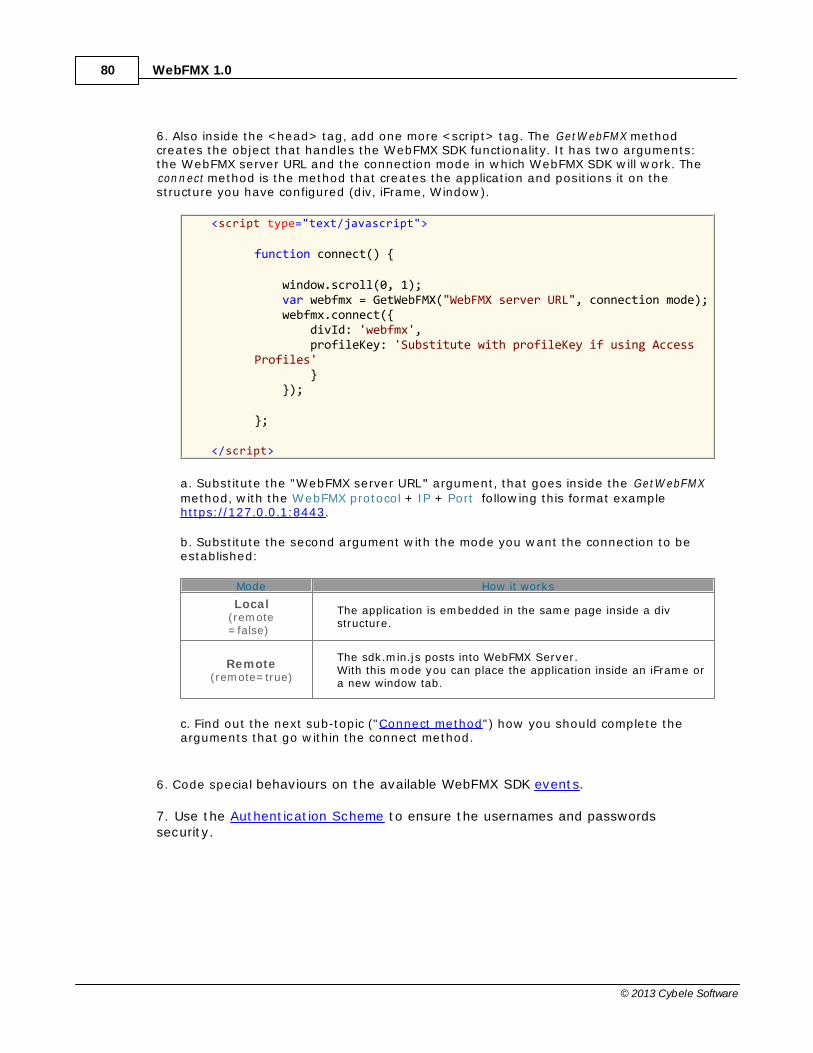
6. Also inside the <head> tag, add one more <script> tag. The GetW ebFMX methodcreates the object that handles the WebFMX SDK functionality. It has two arguments:the WebFMX server URL and the connection mode in which WebFMX SDK will work. The connect method is the method that creates the application and positions it on thestructure you have configured (div, iFrame, Window).
<script type="text/javascript">
function connect() {
window.scroll(0, 1); var webfmx = GetWebFMX("WebFMX server URL", connection mode); webfmx.connect({ divId: 'webfmx', profileKey: 'Substitute with profileKey if using AccessProfiles' } });
};
</script>
a. Substitute the "WebFMX server URL" argument, that goes inside the GetW ebFMXmethod, with the WebFMX protocol + IP + Port following this format examplehttps://127.0.0.1:8443.
b. Substitute the second argument with the mode you want the connection to beestablished:
Mode How it works
Local(remote=false)
The application is embedded in the same page inside a divstructure.
Remote(remote=true)
The sdk.min.js posts into WebFMX Server. With this mode you can place the application inside an iFrame ora new window tab.
c. Find out the next sub-topic ("Connect method") how you should complete thearguments that go within the connect method.
6. Code special behaviours on the available WebFMX SDK events.
7. Use the Authentication Scheme to ensure the usernames and passwordssecurity.

Appendix C - JavaScript API 81
© 2013 Cybele Software
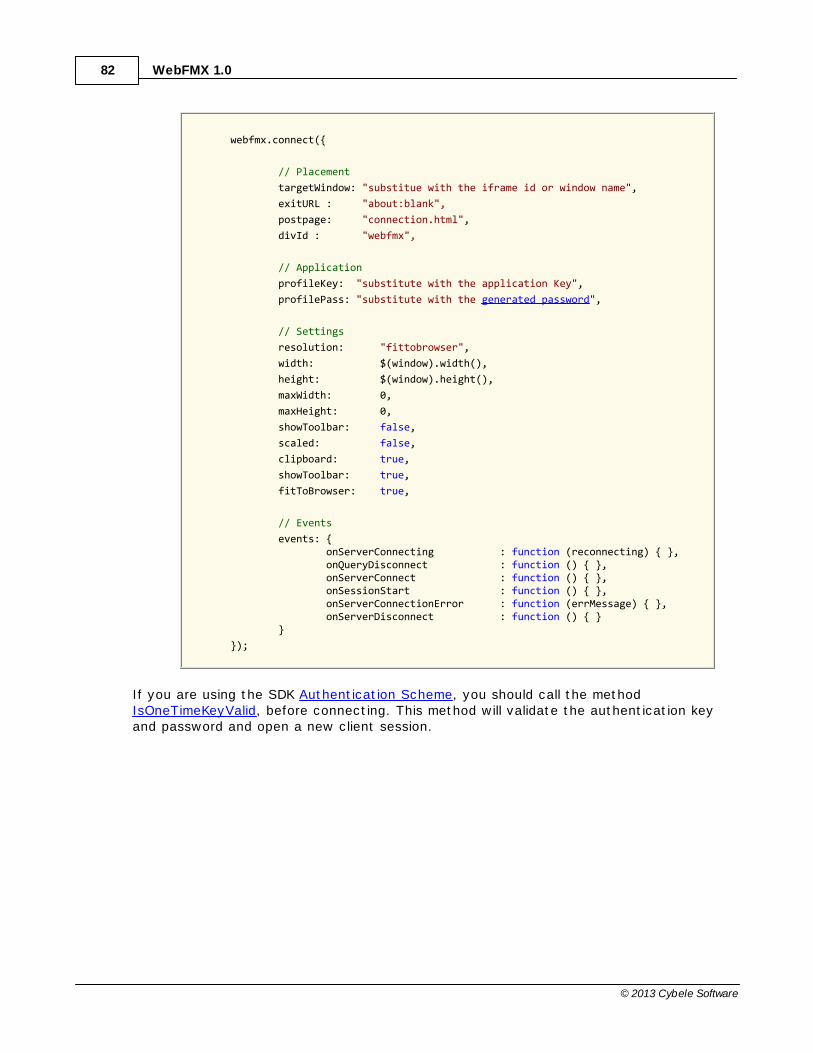
9.3 Connect method
The "connect" method creates the application and places it on the specified htmlstructure. In order to do so, it expects a JSON object as argument in which you caninform all the desired settings. If you want to understand exactly how each setting willinfluence on the connection, read the following topics:
Placement parameters
Application parameters
Settings parameters
Event parameters
Right bellow, you will find the connect method with all the possible parameters set.They should not be sent all together, because each mode and environment will requirea different JSON object setup.
The Placement parameters will be required depending on the connection mode
(remote or local).
The Application parameters will configure which application and the authentication
information generated previously.
The other parameters (Settings and Events) are optional and should be sent
whenever you need to change a determined WebFMX behavior.
WebFMX 1.082
© 2013 Cybele Software
webfmx.connect({
// Placement
targetWindow: "substitue with the iframe id or window name",
exitURL : "about:blank",
postpage: "connection.html",
divId : "webfmx",
// Application
profileKey: "substitute with the application Key",
profilePass: "substitute with the generated password",
// Settings
resolution: "fittobrowser",
width: $(window).width(),
height: $(window).height(),
maxWidth: 0,
maxHeight: 0,
showToolbar: false,
scaled: false,
clipboard: true,
showToolbar: true,
fitToBrowser: true,
// Events
events: { onServerConnecting : function (reconnecting) { }, onQueryDisconnect : function () { }, onServerConnect : function () { }, onSessionStart : function () { }, onServerConnectionError : function (errMessage) { }, onServerDisconnect : function () { }
}
});
If you are using the SDK Authentication Scheme, you should call the methodIsOneTimeKeyValid, before connecting. This method will validate the authentication keyand password and open a new client session.

Appendix C - JavaScript API 83
© 2013 Cybele Software
9.3.1 Placement
Find below all the parameters related to the application placement. Some of the parameters should be sent only when the connection mode is set toRemote and some of them should be sent only when the connection mode is Local.
Parameter What it means Type/format Default
send whenmode
remote local
targetWindow
Inform "_self" to have theconnection opened over thecurrent window. The "*"value will open a newwindow with a nameassigned by WebFMX. If youinform an existing windowname or iframe id, WebFMXwill position the connectionon this target and if thetarget does not exist, a newwindow will be created withthe that name.
string"*" ,
"_self" ,target
window(iframe id or
windowname)
"_self" yes no
exitURLAssign an URL to redirectafter the connection hasclosed.
stringURL
"about:blank" yes no
postpage
This parameter configuresthe server HTML file. Theembedded file name is'connection.html'. You onlyhave to change this value incase you have customizedthis file.
stringhtml filename
"connection.html"
yes no
divId
div id where the remotedesktop will be placed, whenusing local mode.
stringdiv id
"webfmx" no yes

WebFMX 1.084
© 2013 Cybele Software
9.3.2 Application
These are the parameters related to the application.
Parameter What it means Type/format
profileKey
Key that identifies the application to be started.You will find the key information by editing theapplication on the WebFMX Server ManagerApplication tab.
stringprofile key
profilePass
Generated one-time password, used to validatethe user from the client side.
stringpassword

Appendix C - JavaScript API 85
© 2013 Cybele Software
9.3.3 Settings
Find below all the settings that can be configured through WebFMX SDK connectmethod.
Parameter What it means Type/format
Default
resolution
"fittobrowser", "fittoscreen","fixed", when fixed, theparameters width and height willbe considered.
stringresolutio
n
"fittobrowser"
width
Application environment width. Itwill only be considered when theresolution parameter is set to"fixed".
integerpixels
$("#deskdiv").width()
height
Application environment height.It will only be considered whenthe resolution parameter is setto "fixed".
integerpixels
$("#deskdiv").height()
maxWidth
Maximum width for theapplication environment. Onlyavailable when the settingfitToBrowser below is enabled.
integerpixels
0
maxHeight
Maximum height for theapplication environment. Onlyavailable when the settingfitToBrowser below is enabled.
integerpixels
0
showToolbar
Set false to hide WebFMXtoolbar.
boolean
true,false
true
scaled
By setting this option, you willhave the connection imagescaled. The original desktop sizewill be the maximum limit sizeapplied to the connection.It works only when thefitToBrowser property isenabled.
boolean
true,false
false
clipboard
Enables/disables the applicationclipboard.
boolean
true,false
true
fitToBrowser
Set this property to true in orderto have the application divadjusted to the web browsersize. If this property is set tofalse, you will have to managemanually the div location andsize.
boolean
true,false
true

WebFMX 1.086
© 2013 Cybele Software
9.3.4 Events
These are the events that can be handled from the WebFMX SDK.
Event Parameters When it is triggered
onServerConnecting reconnecting
This event is fired during theserver connectionestablishment. The reconnecting argumentinforms whether this is areconnection or a first-timeconnection.
onQueryDisconnect -
Anytime the Web client isabout to be disconnected, the"onQueryDisconnect" willbe triggered. It is intendedto validate with the user ifthe disconnection is desired.
onServerConnect -
The "onServerConnect" event isfired every time a "connect"command is exchanged betweenthe browser and the WebFMXServer. It is a way of makingsure the server received asent "connect" command.
onSessionStart -
This event will be fired whenthe client session has beenstarted on WebFMX Server.
onServerConnectionError errMessage
If an error prevents theclient connection to beestablished, this event willbe fired. The errMessageargument brings the errormessage.
onServerDisconnect -
Anytime the Web client getsdisconnected from the WebFMXserver, the"onServerDisconnect" will befired. It could be triggeredbecause the connection waslost incidentally or alsobecause the user disconnectedfrom the server on purpose.

Appendix C - JavaScript API 87
© 2013 Cybele Software
9.4 Authentication Scheme
This SDK is intended to embed a FireMonkey application within an existing website/application.In this multi-application context, the authentication process involves two steps thatwere designed to ensure the security of the exchanged data among the differentapplications components:
1. Generating an authentication key from the website/application server side2. Validating this key from the application client side, before starting theFireMonkey application (connect method).
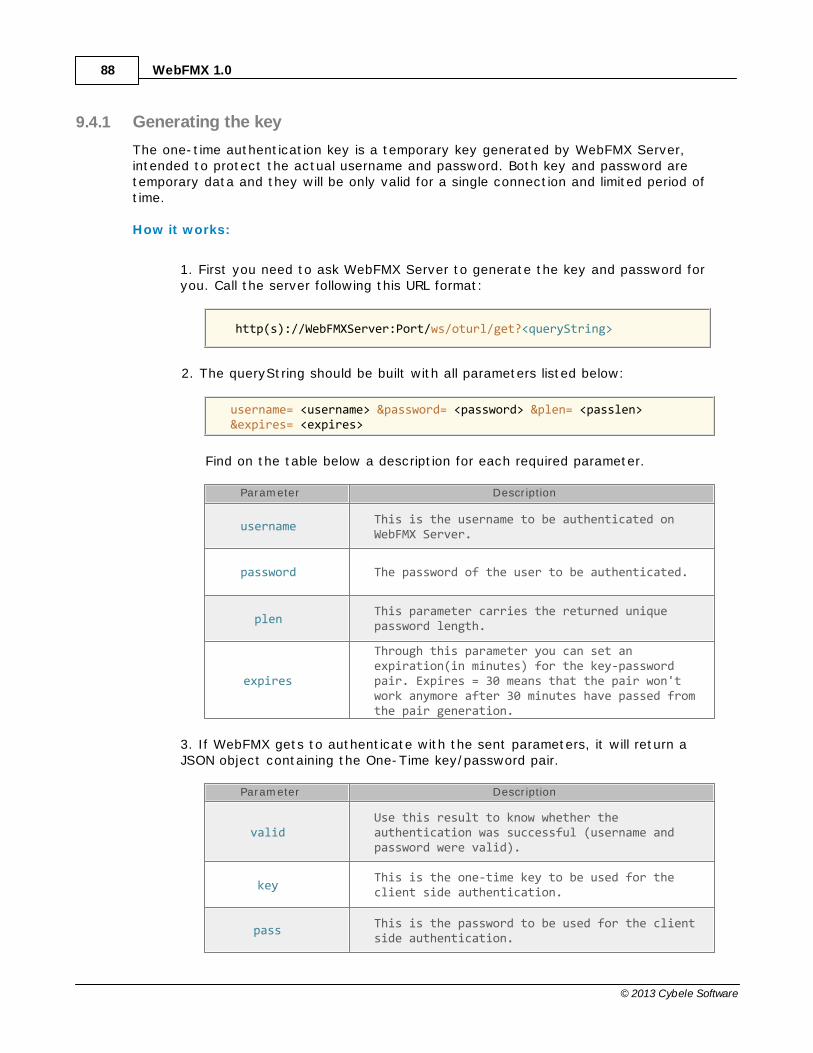
WebFMX 1.088
© 2013 Cybele Software
9.4.1 Generating the key
The one-time authentication key is a temporary key generated by WebFMX Server,intended to protect the actual username and password. Both key and password aretemporary data and they will be only valid for a single connection and limited period oftime.
How it works:
1. First you need to ask WebFMX Server to generate the key and password foryou. Call the server following this URL format:
http(s)://WebFMXServer:Port/ws/oturl/get?<queryString>
2. The queryString should be built with all parameters listed below:
username= <username> &password= <password> &plen= <passlen>&expires= <expires>
Find on the table below a description for each required parameter.
Parameter Description
usernameThis is the username to be authenticated onWebFMX Server.
password The password of the user to be authenticated.
plenThis parameter carries the returned uniquepassword length.
expires
Through this parameter you can set anexpiration(in minutes) for the key-passwordpair. Expires = 30 means that the pair won'twork anymore after 30 minutes have passed fromthe pair generation.
3. If WebFMX gets to authenticate with the sent parameters, it will return aJSON object containing the One-Time key/password pair.
Parameter Description
validUse this result to know whether theauthentication was successful (username andpassword were valid).
keyThis is the one-time key to be used for theclient side authentication.
passThis is the password to be used for the clientside authentication.

Appendix C - JavaScript API 89
© 2013 Cybele Software
4. If the authentication was successful, write on the end HTML file thegenerated key and password information, so that they can be used for theclient-side key/password Validation.
JavaScript example:
This is a JavaScript example. The actual GetOneT im eKey method should betranslated to the Server side programming language and only invoked from there toavoid username/password exposure on the client side.
function GetOneTimeKey(username,password) { var otkey = getOneTimeKey(username, password); if (!otkey.valid) { alert('Invalid username/password'); } return otkey; }
function getOneTimeKey (username, password, passlen, expires) { var returl = ""; if (!passlen) passlen = 8; if (!expires) expires = 30; $.ajax({ url: "http(s)://WebFMXServer:port" + "/ws/oturl/get?username=" + username + "&password=" + password + "&plen=" +passlen + "&expires=" + expires, async: false, dataType: "html", statusCode: { 200: function (data) { returl = eval("("+data+")"); } } }); return returl;}

WebFMX 1.090
© 2013 Cybele Software
9.4.2 Validating the key
After you have generated the one-time key and password on the server side and havewritten them on the HTML file, you should call the IsOnTimeKeyValid method from theclient-side. This method checks whether this authentication credentials are valid andopens a new Web client session, using Ajax.
After invoking this method, you will be able to call the Connect method, responsible tocreate and place the FireMonkey application on the HTML container.
JavaScript example:
function ValidateOneTimeKey(key, pass) { webfmx.isOneTimeKeyValid( key, pass, function () { connect(); }, function () { alert('error'); } );}
Parameters:
Parameter Description Type
key one-time generated key String
pass one-time generated password. String
successfunction to be executed in case theauthentication info is validated.
function
errorfunction to be executed in case theauthentication info is not valid.
function
Read also:
Read also the connect method, called in case of the validation success.
Appendix C - JavaScript API 91
© 2013 Cybele Software
9.5 SSL Certificate
When you embed WebFMX into a website and the browser can not verify theconfigured certificate authenticity, your integration will not work.There are two ways of handling this issue:
1. Using your own certificate
If you already have your own certificate or if you will get one from a CertificateAuthority (CA) , the only thing you will have to do is configure the certificate asdescribed on "A CA Certificate" section.
2. Using the HTTP protocol
Otherwise, you should configure the WebFMX protocol to HTTP. This setting isavailable on the WebFMX Manager General tab.
Keep in mind you will have to change the protocol on the GetWebFMX server parameteras well.

WebFMX 1.092
© 2013 Cybele Software