Embed Size (px)
Citation preview

Detecting and Preventing Data Exfiltration Through Encrypted Web Sessions via Traffic Inspection
George J. Silowash Todd Lewellen Joshua W. Burns Daniel L. Costa
March 2013
TECHNICAL NOTE CMU/SEI-2013-TN-012
CERT® Program
http://www.sei.cmu.edu

CMU/SEI-2013-TN-012
SEI markings v3.2 / 30 August 2011
CMU/SEI-2013-TN-012
Copyright 2013 Carnegie Mellon University
This material is based upon work funded and supported by Department of Homeland Security under Contract No. FA8721-05-C-0003 with Carnegie Mellon University for the operation of the Software Engineering Institute, a federally funded research and development center sponsored by the United States Department of Defense.
Any opinions, findings and conclusions or recommendations expressed in this material are those of the author(s) and do not necessarily reflect the views of Department of Homeland Security or the United States Department of Defense.
NO WARRANTY. THIS CARNEGIE MELLON UNIVERSITY AND SOFTWARE ENGINEERING INSTITUTE MATERIAL IS FURNISHED ON AN “AS-IS” BASIS. CARNEGIE MELLON UNIVERSITY MAKES NO WARRANTIES OF ANY KIND, EITHER EXPRESSED OR IMPLIED, AS TO ANY MATTER INCLUDING, BUT NOT LIMITED TO, WARRANTY OF FITNESS FOR PURPOSE OR MERCHANTABILITY, EXCLUSIVITY, OR RESULTS OBTAINED FROM USE OF THE MATERIAL. CARNEGIE MELLON UNIVERSITY DOES NOT MAKE ANY WARRANTY OF ANY KIND WITH RESPECT TO FREEDOM FROM PATENT, TRADEMARK, OR COPYRIGHT INFRINGEMENT.
This material has been approved for public release and unlimited distribution except as restricted below.
Internal use:* Permission to reproduce this material and to prepare derivative works from this ma-terial for internal use is granted, provided the copyright and “No Warranty” statements are includ-ed with all reproductions and derivative works.
External use:* This material may be reproduced in its entirety, without modification, and freely distributed in written or electronic form without requesting formal permission. Permission is re-quired for any other external and/or commercial use. Requests for permission should be directed to the Software Engineering Institute at [email protected].
* These restrictions do not apply to U.S. government entities.
Carnegie Mellon®, CERT® are registered in the U.S. Patent and Trademark Office by Carnegie Mellon University.
DM-0000116

CMU/SEI-2013-TN-012
CMU/SEI-2013-TN-012 | i
Table of Contents
Acknowledgments vii
Abstract ix
1 Introduction 1 1.1 Audience and Structure of this Report 2 1.2 Conventions Used in this Report 2
2 A Note on Implementation 4
3 Mitigating Insider Threats: Tools and Techniques 5 3.1 The CERT Insider Threat Database 5 3.2 The Man-in-The-Middle (MiTM) Proxy 6 3.3 The Inspection Process 6 3.4 Blocking and Monitoring Online Activity 7 3.5 Legal Disclosure 7 3.6 Privacy Concerns 7 3.7 Blocking Cloud-Based Services 8
4 Creating the Proxy Server 9 4.1 The Squid Proxy Server 10 4.2 The Squid Configuration File 13
4.2.1 The Custom Squid Configuration File 14 4.2.2 Certificate Cache Preparation 15
4.3 The Self-Signed Root Certification Authority (CA) Certificate 15 4.3.1 The Client Certificate 16
4.4 Squid Configuration to Start on System Startup 17 4.5 Installation of Supporting Squid Services 18
4.5.1 C-ICAP and ClamAV 18
5 Configuring Clients 20 5.1 Configure the Proxy Server for the Client 20 5.2 Install a New Trusted Root Certificate 20
6 Blocking File Attachments Using Access Control Lists (ACLs) 22
7 Block File Attachments Using Signatures 25 7.1 Hexadecimal ClamAV Signatures 26
8 Tagging Documents to Prevent Exfiltration 29 8.1 Configuring the Tagger Tool 29 8.2 Using the Tagger Document Tagging Tool 30 8.3 Using Advanced Tagger Tool Features 31
8.3.1 Using the Tagger Configuration File 31 8.3.2 Creating ClamAV Signatures 32
8.4 Automating the Tagger Tool 33 8.5 Using Tagger Tool Logs 33
8.5.1 Using Tag Tamper Protection 34
9 Using Advanced Security and Privacy Techniques 35 9.1 Preventing Access to Websites with Bad or Invalid Certificates 35

CMU/SEI-2013-TN-012
CMU/SEI-2013-TN-012 | ii
9.2 Enabling Privacy for Specific Websites 36 9.3 Ensuring Proxy Server Security 38
10 Bringing It All Together with Logs 40 10.1 Actual Case 40 10.2 Log Review 40 10.3 Theft of Intellectual Property Near Separation 42
11 Conclusions 43
Appendix A: Tagger Tool Technical Discussion 45
Appendix B: Contents of the /opt/squid/etc/squid.conf File 51
References 53

CMU/SEI-2013-TN-012
CMU/SEI-2013-TN-012 | iii
List of Figures
Figure 1: SSL Traffic Inspection 6
Figure 2: The wget Command to Download Squid 11
Figure 3: Command Line to Configure Squid 12
Figure 4: Squid Checking and Building Configuration 12
Figure 5: Squid 'make' Process After Successful Installation 13
Figure 6: The Text Editor nano Creating /opt/squid/etc/squid.conf (Partial Configuration Shown) 14
Figure 7: Creating Self-Signed Certificates 16
Figure 8: Removable Media Listing 17
Figure 9: C-ICAP Installation 19
Figure 10: Editing the /etc/default/c-icap File 19
Figure 11: Blocked Attachment with Squid ACL 24
Figure 12: Sensitive Attachment Blocked 28
Figure 13: Example tagger.properties File 30
Figure 14: Sample Tagger Log File 34
Figure 15: Tamper Log 34
Figure 16: SSL Certificate Error 36
Figure 17: Certificate Comparison 38
Figure 18: C-ICAP Log file 41
Figure 19: Squid Access Log 41
Figure 20: Tagger PDF Dictionary Entry 45
Figure 21: Office Document custom.xml File 47
Figure 22: custom.xml File of a Tagged Document 48
Figure 23: [Content_Types].xml Addition for custom.xml Part 49
Figure 24: .rels Addition for custom.xml Part 49

CMU/SEI-2013-TN-012
CMU/SEI-2013-TN-012 | iv

CMU/SEI-2013-TN-012
CMU/SEI-2013-TN-012 | v
List of Tables
Table 1: Hexadecimal Comparison of Project Names 25
Table 2: Common Document Markings 26
CMU/SEI-2013-TN-012
CMU/SEI-2013-TN-012 | vi

CMU/SEI-2013-TN-012
CMU/SEI-2013-TN-012 | vii
Acknowledgments
We extend special thanks to our sponsors at the U.S. Department of Homeland Security, Office of Cybersecurity and Communications, Federal Network Resilience Division for supporting this work.

CMU/SEI-2013-TN-012
CMU/SEI-2013-TN-012 | viii

CMU/SEI-2013-TN-012
CMU/SEI-2013-TN-012 | ix
Abstract
Web-based services, such as email, are useful for communicating with others either within or out-side of an organization; however, they are a common threat vector through which data exfiltration can occur. Despite this risk, many organizations permit the use of web-based services on their systems. Implementing a method to detect and prevent data exfiltration through these channels is essential to protect an organization’s sensitive documents.
This report presents methods that can be used to detect and prevent data exfiltration using a Linux-based proxy server in a Microsoft Windows environment. Tools such as Squid Proxy, Clam Antivirus, and C-ICAP are explored as means by which information technology (IT) professionals can centrally log and monitor web-based services on Microsoft Windows hosts within an organi-zation. Also introduced is a Tagger tool developed by the CERT Insider Threat Center that ena-bles information security personnel to quickly insert tags into documents. These tags can then be used to create signatures for use on the proxy server to prevent documents from leaving the organ-ization. In addition, the use of audit logs is also explored as an aid in determining whether sensi-tive data may have been uploaded to an internet service by a malicious insider.

CMU/SEI-2013-TN-012
CMU/SEI-2013-TN-012 | x

CMU/SEI-2013-TN-012
CMU/SEI-2013-TN-012 | 1
1 Introduction
Malicious insiders attempting to remove data from organizational systems may have various ways of doing so, such as by using email and cloud storage services. These internet-based services can present challenges to organizations.
Organizations may have a legitimate business need for using various internet-based services for communication, such as email. However, these same online services can be used by a malicious insider to steal intellectual property or other sensitive company information. The challenge to many of these services is that the communications channel is encrypted; therefore, the contents cannot be inspected.
Staff members of the CERT® Program, part of Carnegie Mellon University’s Software Engineer-ing Institute, have seen instances in which email played a role in a malicious insider’s attack. Giv-en these observations and other considerations that we discuss later in this report, organizations must establish and implement effective methods and processes to prevent unauthorized use of online services while allowing users with a genuine business need to access these services.
In this report, we explore methods to inspect encrypted communications channels and offer meth-ods to prevent data from being exfiltrated from the organization’s systems. While this report spe-cifically targets secure webmail services, the same methods are effective for online services , such as Microsoft’s SkyDrive or Google Docs, that allow files to be uploaded or attached whether en-crypted or not.
We explore how data exfiltration attempts can be prevented using Squid Caching Proxy, C-ICAP, and ClamAV, all of which are open-source software packages. In addition, the CERT Insider Threat Center developed a tool to assist organizations in tagging sensitive documents with key-words to prevent data exfiltration. This tool is freely available and was developed in the Java lan-guage to allow for portability across operating system platforms.
The solution presented in this report is not a silver bullet to prevent data exfiltration. This solution is another layer of security that should be added to existing organizational security policies and practices, end-user training, and risk mitigation.
The CERT Insider Threat Center chose to develop a data loss prevention (DLP) tool simply be-cause there was not a comparable open-source product available1. There are many commercial products available, but they can be expensive for organizations with limited capital to invest in DLP solutions. Our hope is that this technical control helps to fill the gap and can be easily im-
® CERT is registered in the U.S. Patent and Trademark Office by Carnegie Mellon University.
1 The CERT Insider Threat Center evaluated MyDLP (http://www.mydlp.com). Our solution is more “light weight” and requires no client applications to be installed on user’s workstations. This configuration aids rapid deploy-ment since our solution is network based and reduces the the likelihood of being tampered with by end users.

CMU/SEI-2013-TN-012
CMU/SEI-2013-TN-012 | 2
plemented by organizations of all sizes with the help of this document and either a dedicated serv-er or virtual machine to deploy it on.
Before implementing any of the practices in this report and before using any of the information obtained from these practices, legal counsel must be consulted to ensure compliance with applica-ble laws and company policies.
1.1 Audience and Structure of this Report
This report is a hands-on guide for system administrators and information security teams who are implementing traffic inspection technologies within the organization. We assume administrators have some experience with Ubuntu Linux and Microsoft Windows system administration in an Active Directory domain environment. We provide detailed steps for installing the necessary components so that administrators with little experience will have the system online quickly.
The solution presented in this report was tested in a virtual lab with several client computers and the proxy server described herein. It is possible to create a large-scale implementation of this solu-tion using various methods, including the use of multiple proxies, but these methods are beyond the scope of this document. System administrators are encouraged to read more about the Squid Caching Proxy, C-ICAP, and ClamAV to more finely tune their systems to ensure peak perfor-mance.
The remainder of this report is organized as follows: • Mitigating Insider Threats: Tools and Techniques
• Creating the Proxy Server
• Configuring Clients
• Blocking File Attachments Using Access Control Lists (ACLs)
• Tagging Documents to Prevent Exfiltration
• Using Advanced Security and Privacy Techniques
• Bringing It All Together with Logs
• Conclusions
• Appendix A: Tagger Tool Technical Discussion2
• Appendix B: /opt/squid/etc/squid.conf file contents
1.2 Conventions Used in this Report
This report contains commands that may span multiple lines. Commands are formatted using the Courier New font and end with a “” symbol. Each command should be entered as shown, disregarding any formatting constraints in this report. The “” symbol marks the end of the command and indicates that the “Enter” key may then be pressed. An example of a multi-line command in this document is
2 The Tagger tool is available for download on the CERT website [CERT 2012].

CMU/SEI-2013-TN-012
CMU/SEI-2013-TN-012 | 3
/tmp/squid-3.1.19/configure --enable-icap-client --enable-
follow-x-forwarded-for --enable-storeio=aufs --
prefix=/opt/squid/ --disable-ident-lookups --enable-async-io=100 --enable-useragent-log --enable-ssl --enable-ssl-
crtd

CMU/SEI-2013-TN-012
CMU/SEI-2013-TN-012 | 4
2 A Note on Implementation
Technical controls developed by the CERT Insider Threat Center should be tested in a non-production environment before being implemented on production systems. Prior to applying this signature, the organization should facilitate proper communication and coordination between rel-evant departments across the enterprise, especially information technology, information security, human resources, physical security, and legal. This cooperation is necessary to ensure that any measures taken by the organization to combat insider threat comply with all organizational, local, and national laws and regulations.
The CERT Insider Threat Center encourages feedback on this control as well as any of the others published on our website. Please let us know if this control helps you or about any improvements or changes you think may improve the effectiveness of it.

CMU/SEI-2013-TN-012
CMU/SEI-2013-TN-012 | 5
3 Mitigating Insider Threats: Tools and Techniques
We define a malicious insider as a current or former employee, contractor, or business partner who • has or had authorized access to an organization’s network, system, or data
• intentionally exceeded or misused that access
• negatively affected the confidentiality, integrity, or availability of the organization’s infor-mation or information systems
Malicious insiders are able to act within an organization by taking advantage of weaknesses they find in systems. Organizations must be aware of such weaknesses and how an insider may exploit them; organizations must also be aware of the many ways in which weaknesses are introduced.
For example, an organization may have relaxed or nonexistent acceptable-use policies for internet access. In other cases, a lack of situational awareness introduces weaknesses that malicious insid-ers can exploit. Additionally, an organization that allows its employees to use web-based services, such as email, increases the potential for data leakage. Establishing proper auditing policies and technical controls, as discussed in this report, mitigate some of these risks.
Our research has revealed that most malicious insider crimes fit under one of three categories: IT sabotage, theft of intellectual property, and fraud. This report focuses on the theft of information using web-based services, in particular, email.
The tools and techniques presented in the following sections represent only a subset of practices an organization could implement to mitigate insider threats. For example, organizations may wish to deploy commercially available software to prevent data loss. These tools and methods can be used by organizations of any size; we intentionally selected open-source and public-domain tools since they are freely available to the public.
3.1 The CERT Insider Threat Database
The CERT Program’s insider threat research is based on an extensive set of insider threat cases that are available from public sources, court documents, and interviews with law enforcement and/or convicted insiders, where possible. The database contains more than 700 cases of actual malicious insider crimes. Each case is entered into the database in a consistent, repeatable manner that allows us to run queries to search for specific information.
The database breaks down the complex act of the crime into hundreds of descriptors, which can be further queried to provide statistical validation of our hypotheses. Since the database has cap-tured granular information about insider threat cases, it provides a way to find patterns of insider activity, discover possible precursors to insider attacks, and identify technical and nontechnical indicators of insider crime. These analyses help us to recognize trends and commonalities and formulate techniques that may be helpful in mitigating insider threats.

CMU/SEI-2013-TN-012
CMU/SEI-2013-TN-012 | 6
3.2 The Man-in-The-Middle (MiTM) Proxy
The solution in this report uses a type of MiTM “attack” to intercept and inspect SSL encrypted communication using automated means. While it is technically possible to use this proxy server to intercept and record secure transactions, doing so presents many legal issues and is outside the scope of this report.
The intention of this report is to enable information security professionals to detect and prevent sensitive company information from being exfiltrated outside of the organization through both clear text and encrypted means using automated mechanisms. This detection and prevention is done through the use of detection signatures and rules to block certain types of network traffic.
3.3 The Inspection Process
To inspect encrypted web traffic, the communications channel must be terminated at the proxy server, inspected, then re-encrypted and sent to its final destination. Encrypted traffic cannot be inspected through any other means.
Figure 1: SSL Traffic Inspection
In Figure 1, a WidgetTech (our hypothetical organization) employee requests use of the company-managed system to request a secure website, such as a personal email service (e.g., Gmail). The managed system is configured to send all website requests to a proxy server. The proxy server intercepts this request and makes the request for the site on behalf of the user. The secure web session is then established between the proxy server and the requested website.
The requested site most likely uses a commercial, trusted certificate provider, such as Verisign, to provide the certificates needed to establish an encrypted web session. Once the session is estab-lished, the proxy server establishes a secure session back to the user’s computer using a company signed, dynamically generated certificate. The user’s web browser trusts this connection because the company’s public key for the dynamic certificate is installed in the “Trust Root Certification Authorities” store of the web browser. The user’s only way of detecting that this process is occur-ring is by examining the certificate chain in the web browser.
It is necessary to add monitoring and security to the proxy server to prevent abuse and data leak-age. (Securing the proxy server is covered in a later section.)

CMU/SEI-2013-TN-012
CMU/SEI-2013-TN-012 | 7
3.4 Blocking and Monitoring Online Activity
Employees need to understand what is expected of them while using any organization’s compu-ting resource. Organizations must develop, implement, and enforce an Acceptable Use Policy (AUP) or Rules of Behavior (RoB) for all employees and trusted business partners. These policies and rules must clearly define what employees can and cannot do while using organizational com-puters and networks. Annual security refresher training that includes training on these policies is recommended. This training enables the organization to have employees reaffirm these policies every year.
3.5 Legal Disclosure
Before implementing any type of monitoring program, organizations must consult with legal counsel to develop a program that is lawful.3 The organization must disclose to all employees and trusted business partners that all activity on employer-owned devices and systems is being moni-tored and that employees should have no expectation of privacy in this activity, subject to appli-cable laws.
The disclosure should also state that the contents of encrypted communication are also subject to monitoring. Login banners on all entry points into information systems, including workstations, network infrastructure devices, and VPN connections should be implemented. These login ban-ners should clearly state that all communication, including encrypted communication, are moni-tored and privacy is not afforded.
The following is a comment made on the Squid-Cache Wiki that emphasizes the legal, privacy, and ethical issues related to SSL:
HTTPS was designed to give users an expectation of privacy and security. Decrypting HTTPS tunnels without user consent or knowledge may violate ethical norms and may be illegal in your jurisdiction. Squid decryption features described here and elsewhere are designed for de-ployment with user consent or, at the very least, in environments where decryption without con-sent is legal. These features also illustrate why users should be careful with trusting HTTPS connections and why the weakest link in the chain of HTTPS protections is rather fragile. De-crypting HTTPS tunnels constitutes a man-in-the-middle attack from the overall network secu-rity point of view. Attack tools are an equivalent of an atomic bomb in real world: Make sure you understand what you are doing and that your decision makers have enough information to make wise choices [Squid-Cache Wiki 2012a].
3.6 Privacy Concerns
Organizations must consider the ethical issues related to employee privacy and security when at-tempting to prevent data exfiltration through encrypted channels by intercepting and inspecting the data communications stream. Certain websites, such as those for financial institutions and
3 Any suggestions in this report are based on the U.S. Privacy Framework, which is available on the White House
website [White House 2012].

CMU/SEI-2013-TN-012
CMU/SEI-2013-TN-012 | 8
health care providers, have an associated high expectation of privacy and security as illustrated by the additional laws governing these areas. Organizations may not want to accept the risk of inter-cepting these sensitive websites, thereby possibly exposing them to unacceptable legal risk and exposure. Therefore, precautions can be implemented to prevent secure websites from being in-tercepted by using the steps outlined in this report. To prevent these sites from being inspected, see Section 9.2, Enabling Privacy for Specific Websites, for further discussion and configuration instructions.
3.7 Blocking Cloud-Based Services
Organizations must perform a risk assessment to determine if cloud-based email services, such as Google’s Gmail and Microsoft’s Hotmail, present unacceptable risks to the organization. These services should be blocked if they present an unacceptable risk to the organization. If cloud-based email services are prohibited within an organization and the technical controls, such as a content filtering solution, are in place to prevent access to these services, this document outlines measures the organization can implement to provide additional layers of security.
Blocking can be accomplished through a variety of methods. The organization can use a content filtering solution to block webmail services. One such solution is the open-source product Squid Proxy. Squid can be configured to block access to entire webmail sites. However, this type of blocked access may not be granular enough. This report explores other methods for blocking sen-sitive data.

CMU/SEI-2013-TN-012
CMU/SEI-2013-TN-012 | 9
4 Creating the Proxy Server
The CERT® Insider Threat Center chose to use Ubuntu Linux Version 10.04 64-bit Desktop in-stalled in VMware Workstation. A default installation with all available patches was used for test-ing.4 Other distributions of Linux could be used, but were not tested. A static IP address must be configured as well.5 In addition to the base installation of Ubuntu, three additional packages must be installed to support building and configuring the software.
To install the additional dependencies, execute the following instructions:
1. Open a terminal window and enter the following command:
sudo apt-get install build-essential
2. Accept all the defaults for the install. Once the “build-essential” package has installed, enter the following command:
sudo apt-get install libssl-dev
3. Accept all the defaults for the install. 4. The “rcconf” package is needed to control which scripts will execute on startup. In particu-
lar, this package is used to start Squid Proxy. Enter the following command:
sudo apt-get install rcconf
5. Accept all defaults for the install.
After these three dependencies are installed, other software packages can be installed. Several additional open-source software packages are required to make sure the proxy server functions:
Squid “Squid is a caching proxy for the Web supporting HTTP, HTTPS, FTP, and more. It reduces bandwidth and improves response times by caching and reusing frequently requested web pages [Squid-Cache.org 2012a].”
C-ICAP C-ICAP is an implementation of the internet Content Adaptation Protocol (ICAP).
“ICAP, the Internet Content Adaption Protocol, is a protocol aimed at providing simple object-based content vectoring for HTTP services. ICAP is, in essence, a lightweight protocol for execut-ing a "remote procedure call" on HTTP messages. It allows ICAP clients to pass HTTP messages
4 Installation of Ubuntu is outside the scope of this report. The software and documentation can be found on the
Ubuntu website (http://www.ubuntu.com/).
5 Information about configuring a static IP address can be found on the Ubuntu website (https://help.ubuntu.com/10.04/serverguide/C/network-configuration.html).

CMU/SEI-2013-TN-012
CMU/SEI-2013-TN-012 | 10
to ICAP servers for some sort of transformation or other processing ("adaptation"). The server executes its transformation service on messages and sends back responses to the client, usually with modified messages [Elson 2003].”
Clam Antivirus (ClamAV) ClamAV is an open-source, GPL licensed, antivirus engine [ClamAV 2012a].
The following sections discuss how to install and configure each of these software packages. Some Linux system administration experience using the command line is helpful in using these instructions.
A word of caution using the sudo command
Any time a command is preceded with sudo the user must understand that the command that follows it is executing with administrative permission and a password for an administrative user (someone in the /etc/sudoers file) is required. The sudo command allows commands to execute with root permis-sions; therefore, the utmost care must be taken when using the sudo command.
4.1 The Squid Proxy Server
The CERT Insider Threat Center chose to use Squid, an open-source caching proxy server, to ac-complish the tasks described in this report. Squid is capable of providing access control to various websites. When coupled with other open-source products, such as DansGuardian6 or Squid-Guard,7 a robust filtering capability can be obtained. These additional products allow an organiza-tion to filter sites based on category; however, these products are beyond the scope of this docu-ment.
The Squid software package is available from the Ubuntu repositories; however, the pre-compiled version does not support some of the features that are needed. Therefore, Squid will need to be downloaded and installed from the squid-cache.org website. Version 3.1.19 is the version that we tested for this report.
Before the software is downloaded, compiled, and installed, several directories must be created. The CERT Insider Threat Center chose to install Squid into /opt/squid. To create this directory, execute the following command in a terminal window:
sudo mkdir /opt/squid
6 More information about DansGuardian can be found on the DansGuardian website (http://dansguardian.org/).
7 Information about SquidGuard can be found on the SquidGuard website (http://www.squidguard.org/).

CMU/SEI-2013-TN-012
CMU/SEI-2013-TN-012 | 11
The software is downloaded to the /tmp directory. To obtain a copy of the software, open a ter-minal window and execute the following command:
wget –P /tmp http://www.squid-cache.org/Versions/v3/3.1/squid-3.1.19.tar.gz
Figure 2: The wget Command to Download Squid
As depicted in Figure 2, change to the /tmp directory to begin working with the Squid archive that was just downloaded. Then enter the tar command to extract all of the directories and files to the /tmp directory. Enter the following commands to execute these tasks:
cd /tmp
tar xvzf squid-3.1.19.tar.gz
Once complete, a new directory, squid-3.1.19, is created with the uncompressed files and addi-tional sub-directories that need to be configured and compiled to install Squid.
Squid is now ready to be configured and compiled. To compile Squid, execute the following in-structions:
1. For Squid packages to be built, elevated permissions are needed for the following two steps due to the way the configure and make install commands execute. Enter the follow-ing command to switch to the root user and enter the password for the current user (who should have sudo permissions) when prompted:
sudo su
The following sections discuss how to install and configure each of these software pack-ages. Some Linux system administration experience using the command line is helpful in using these instructions.
Caution: All commands executed now through the end of this procedure will execute with root privileges.

CMU/SEI-2013-TN-012
CMU/SEI-2013-TN-012 | 12
2. In a terminal window, enter the following command. (The command wraps across several lines below, but should be entered on one command line. See Figure 3.)
/tmp/squid-3.1.19/configure --enable-icap-client --enable-follow-
x-forwarded-for --enable-storeio=aufs --prefix=/opt/squid/ --
disable-ident-lookups --enable-async-io=100 --enable-useragent-log
--enable-ssl --enable-ssl-crtd
Figure 3: Command Line to Configure Squid
If successful, you should see many lines of text scroll by on the screen indicating that Squid is checking for other dependencies. The last few lines displayed on the screen should look similar to Figure 4.
Figure 4: Squid Checking and Building Configuration

CMU/SEI-2013-TN-012
CMU/SEI-2013-TN-012 | 13
3. The make file is now ready and Squid is ready to be compiled and installed. In the termi-nal window, enter the following commands:
cd /tmp/squid-3.1.19
make && make install
The process takes several minutes to complete as Squid is compiled and installed to the /opt/squid directory. If the process is successful, the last few lines of output should be similar to Figure 5.
Figure 5: Squid 'make' Process After Successful Installation
Permissions for the Squid log directory must be modified. The root user currently owns the /var/logs directory; however, the Squid process executes as user nobody and group nogroup. Enter the following command to change permissions:
chown nobody:nogroup /opt/squid/var/logs
Once the installation is complete, enter the following command to exit root privileged mode:
exit
4.2 The Squid Configuration File
Squid must now be configured to intercept and scan various types of content. The configuration file is located in /opt/squid/etc/squid.conf. This file is the default configuration file; how-ever, for the purposes of the solution described in this report, a custom configuration is required. Execute the following command to rename the default configuration:
sudo mv /opt/squid/etc/squid.conf
/opt/squid/etc/squid.conf.default

CMU/SEI-2013-TN-012
CMU/SEI-2013-TN-012 | 14
4.2.1 The Custom Squid Configuration File
A custom configuration file is now created using a text editor in the terminal window. For the purposes of this report, the text editor nano is used for creating the configuration file. Other edi-tors are available, such as vi, but their use is beyond the scope of this report.
In a terminal window, execute the following command to start the nano text editor creating a new file called /opt/squid/etc/squid.conf:
sudo nano /opt/squid/etc/squid.conf
A new screen appears that is similar to the one in Figure 6; however, nothing is displayed in the editor because the file is empty. Figure 6 and Appendix A contain the text of the configuration file that must be entered into the editor. Save the configuration file by pressing <CTRL> + <O> and then <ENTER>; then exit nano by pressing <CTRL> + <X>.
Figure 6: The Text Editor nano Creating /opt/squid/etc/squid.conf (Partial Configuration Shown)

CMU/SEI-2013-TN-012
CMU/SEI-2013-TN-012 | 15
Two additional files are needed for optional features described later in this document. Execute the following commands to create the supporting directory structure and empty files:
sudo mkdir /opt/squid/lists
sudo touch /opt/squid/lists/certexcept.domains
sudo touch /opt/squid/lists/sslbypass.domains
The use of these files is later explained in Section 8, Tagging Documents to Prevent Exfiltration.
4.2.2 Certificate Cache Preparation
Next, the cache for storing certificates is created. A directory to store the certificates and a tool to prepare the directory for storage are used. Complete the following steps in a terminal window to perform these tasks [Squid-Cache Wiki 2012b]:
1. Create the directory for certificate storage by entering the following command in the ter-minal window:
sudo mkdir /opt/squid/var/lib/
2. Prepare the directories for certificate storage by entering the following command:
sudo /opt/squid/libexec/ssl_crtd -c -s /opt/squid/var/lib/ssl_db
3. The Squid user needs to have permission to access this directory. Therefore, the user needs to have ownership. Enter the following command to change ownership:
sudo chown -R nobody /opt/squid/var/lib/ssl_db
4.3 The Self-Signed Root Certification Authority (CA) Certificate
A self-signed public/private certificate pair is required to sign the dynamically created certificates as illustrated in Figure 1. Complete the following steps to create the public/private certificates. Certificates are valid for a set period of time. Organizations should consider how long the signing certificate is valid as part of a risk assessment and management process.
If the organization already has a policy that defines how long a certificate for sensitive applica-tions is to be valid, then this time period should be used for the following steps.
Organizations lacking a policy may wish to create certificates that are valid for one year (365 days). However, this approach could create administrative issues that should be considered before deciding on a validity period. Please see Section 4.3.1, The Client Certificate, for further discus-sion on this topic.
For the purposes of this report, a period of one year or 365 days is assumed. The Fully Qualified Domain Name (FQDN) of the proxy server is also required. The FQDN of the proxy server in this example is proxy.corp.merit.lab. Complete the following steps to create the necessary certificates:

CMU/SEI-2013-TN-012
CMU/SEI-2013-TN-012 | 16
1. Create the directory where the certificates will be stored by entering the following command:
sudo mkdir /opt/squid/ssl_cert
2. Create the self-signed certificates by entering the following commands:
cd /opt/squid/ssl_cert
sudo openssl req -new -newkey rsa:1024 -days 365 -nodes -x509 -
keyout CA_pvk.pem -out CA_crt.pem
After executing the previous command, you should see a screen that is similar to Figure 7. Provide the information requested. When prompted for the Common Name, enter the FQDN of the proxy server.
The private key is stored in the file CA_pvk.pem and the public key is stored in CA_crt.pem.
Figure 7: Creating Self-Signed Certificates
4.3.1 The Client Certificate
As mentioned in the prior section, there are several considerations to be addressed before generat-ing the client certificate. Primarily, the length of time the certificate is valid must be determined. The amount of time a certificate is valid directly affects how often the certificate must be renewed and how often client-side certificates must be deployed.
In a smaller organization, these considerations may not be that critical; however, for organizations that have hundreds or thousands of computers, these considerations quickly become a configura-tion management issue. Additionally, every time a new certificate pair is generated, the SSL cer-

CMU/SEI-2013-TN-012
CMU/SEI-2013-TN-012 | 17
tificate cache on the proxy server must be cleared and reinitialized [Squid-Cache Wiki 2012b]. Therefore, the organization should carefully select a certificate validity period that balances ad-ministrative overhead with risk.
The client certificate was generated in the previous step; however, it needs to be converted to a format that is recognized by most browsers. In the terminal window, execute the following com-mand:
sudo openssl x509 -in CA_crt.pem -outform DER -out CA_crt.der
The certificate is now in a format readable by web browsers and is copied from the proxy to a removable USB storage device. On Ubuntu systems, USB storage media are typically mounted in the /media folder.8 Within the /media folder is a subfolder that Ubuntu has assigned to the USB device. The following command will list the devices mounted within the /media folder:
ls /media
Figure 8: Removable Media Listing
In Figure 8, the removable USB device that has been mounted is called KINGSTON. Replace KINGSTON with the name of your device in the following command to copy the certificate to the USB device:
cp /opt/squid/ssl_cert/CA_crt.der /media/KINGSTON/CA_crt.der
Dismount the media by entering the following command, replacing KINGSTON with the name of your device:
umount /media/KINGSTON
The USB device can now be safely removed from the system to prepare for deploying the certifi-cate to client computers, which will be addressed in Section 5.2, Install a New Trusted Root Cer-tificate.
4.4 Squid Configuration to Start on System Startup
Since a custom build of Squid has been implemented, rather than using the default install utilizing the Aptitude package manager, a startup script must be placed in the /etc/init.d/ directory. The Squid startup script is in the /tmp/squid-3.1.19/contrib/ directory. Execute the follow-ing commands to copy the file, edit it, and set it to execute on startup:
8 Unlike the Ubuntu Workstation software used in this report, Ubuntu Server installations do not automatically
mount removable media. To learn how to mount removable media on server installations, please refer to the Mount/USB section of the Ubuntu website (https://help.ubuntu.com/community/Mount/USB).

CMU/SEI-2013-TN-012
CMU/SEI-2013-TN-012 | 18
1. Copy the file to the startup script directory by entering the following command:
sudo cp /tmp/squid-3.1.19/contrib/squid.rc /etc/init.d/squid
2. Edit the file so the path is correct.
a. Enter the command sudo nano /etc/init.d/squid
b. Find the first line of the file: #!/sbin/sh and change it to #!/bin/sh
c. Find the line near the top of the file (usually line 8) that reads: PATH=/usr/local/squid/sbin:/usr/sbin:/usr/bin:/sbin:/bin and replace it with PATH=/opt/squid/sbin:/usr/sbin:/usr/bin:/sbin:/bin
d. Press <CTRL> + <O> then <ENTER> to save the file; then press <CTRL> + <X> to exit.
3. Enable execution permissions by entering the following command:
sudo chmod +x /etc/init.d/squid
4. Set the script to execute on startup by entering the following command:
sudo rcconf --on squid
4.5 Installation of Supporting Squid Services
For Squid to scan outbound web-based traffic, two additional software packages are required, both of which are fairly straightforward to configure and do not require custom packages to be compiled. The Ubuntu repositories contain the installation packages needed.
4.5.1 C-ICAP and ClamAV
The C-ICAP package is now installed. This package assists in antivirus scanning of the content entering and exiting the proxy. Since C-ICAP depends on ClamAV, both packages will automati-cally be installed as shown in Figure 9. These two packages are critical for detecting and prevent-ing sensitive information from leaving the organization.
To begin installing the C-ICAP package, enter the following command:
sudo apt-get install c-icap
CMU/SEI-2013-TN-012
CMU/SEI-2013-TN-012 | 19
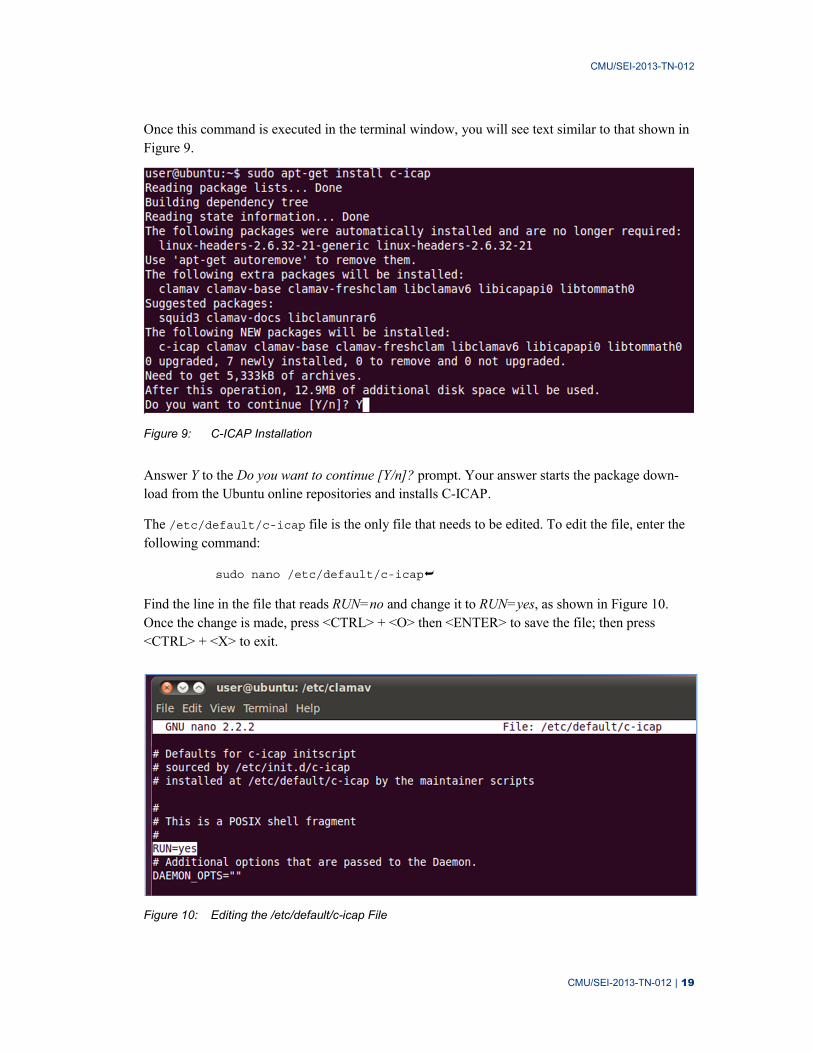
Once this command is executed in the terminal window, you will see text similar to that shown in Figure 9.
Figure 9: C-ICAP Installation
Answer Y to the Do you want to continue [Y/n]? prompt. Your answer starts the package down-load from the Ubuntu online repositories and installs C-ICAP.
The /etc/default/c-icap file is the only file that needs to be edited. To edit the file, enter the following command:
sudo nano /etc/default/c-icap
Find the line in the file that reads RUN=no and change it to RUN=yes, as shown in Figure 10. Once the change is made, press <CTRL> + <O> then <ENTER> to save the file; then press <CTRL> + <X> to exit.
Figure 10: Editing the /etc/default/c-icap File

CMU/SEI-2013-TN-012
CMU/SEI-2013-TN-012 | 20
5 Configuring Clients
Every client that connects to the proxy server must be configured to connect to it and trust the dynamically generated certificates created by it. The following steps assume a corporate environ-ment uses Microsoft Active Directory, Group Policy, and Internet Explorer 9 as the web browser. Internet Explorer is configured through Group Policy to apply custom browser settings across the enterprise. Google Chrome utilizes Internet Explorer’s proxy settings. Therefore, while not tested, Chrome should inherit Internet Explorer’s Group Policy settings.
Google released an enterprise version of Google Chrome that can be more granularly managed through Group Policy. More information about Google Chrome’s Enterprise version is available on the Google Chrome for Business website (http://support.google.com/a/bin/topic.py?hl=en&topic=1064255).
Mozilla Firefox is configured to work with the proxy server by utilizing similar settings outlined for Internet Explorer. However, these settings are outside the scope of this report. More infor-mation about enterprise deployment is found at https://wiki.mozilla.org/Deployment:Deploying_Firefox.
5.1 Configure the Proxy Server for the Client
Microsoft’s TechNet website offers detailed instructions on how to create a Group Policy to push Internet Explorer proxy settings to enterprise managed systems. Follow the steps in the article How to Force Proxy Settings Via Group Policy to apply the proxy setting group policy [Microsoft 2012b].
To configure the proxy server, you need the IP address of the proxy server and the port the proxy is listening on. In this report, the proxy is listening on the default port 3128.
The perimeter firewall should be configured to permit only port 80 (HTTP) and port 443 (HTTPS) traffic from the proxy or from other machines with a defined business need and exception. Cli-ents’ computers should not be permitted to access the internet directly.
5.2 Install a New Trusted Root Certificate
The Trusted Root certificate that was created in Section 4.3.1, The Client Certificate, and export-ed to removable media must be deployed to every computer in the organization that will use the proxy server. If the certificate is not installed, client computers will display a certificate error message indicating the site cannot be trusted. Installing the certificate in the Trusted Root Certifi-cation Authorities store prevents this error from occurring.

CMU/SEI-2013-TN-012
CMU/SEI-2013-TN-012 | 21
Microsoft has a Tech Net article that describes how to deploy certificates in a domain environ-ment. See the article “Manage Trusted Root Certificates” [Microsoft 2012a], in particular, refer to the section “Adding certificates to the Trusted Root Certification Authorities store for a domain” for step-by-step instructions. This article is also useful in scenarios where a domain is not used, such as in a small organization.

CMU/SEI-2013-TN-012
CMU/SEI-2013-TN-012 | 22
6 Blocking File Attachments Using Access Control Lists (ACLs)
Organizations can choose simply to block file uploads to specific sites using custom Access Con-trol Lists. This approach allows the organization to prevent necessary web files from being used to upload documents to defined sites. However, this restriction may not be desirable since it is not a very granular approach to prevent data loss.
Blocking file uploads is relatively simple to implement. However, this method can become diffi-cult to administer without fundamental knowledge of how web applications operate. Using this approach is especially difficult if the sites that are being blocked change their upload methodolo-gy. Nonetheless, an administrator with a basic understanding of web applications can quickly and effectively implement this approach to block all attachments from being sent through specific webmail services.
Whenever a user initiates uploading an attachment through a webmail service, such as Google Gmail, Microsoft Hotmail, or Yahoo Mail, a series of HTTP requests are sent from the browser to the service to do one or both of the following:
1. download (GET) necessary code to assist in the upload process
2. upload (POST) the files to the email provider
If the necessary requests can be intercepted by the proxy and either changed, redirected, or blocked, the browser will be unable to upload the attachment to the webmail service. Each web-mail service has a unique way of allowing attachments to be sent over email, so a bit of reverse engineering is required for the administrator to determine which web requests should be blocked by the proxy to prevent the document upload, ideally without “breaking” the user’s session to the webmail service in the process.
To demonstrate this process, we used Google’s Gmail service as an example. Every time a user chooses to attach a document in an email, a specific POST request is made to a specific Gmail URL. In one of our tests, this request looked something like the following:
POST https://mail.google.com/mail/ota?zx=24i9nkai14gs
Where
POST is the type of HTTP request method
https:// specifies the web protocol to be used by the browser
mail.google.com/mail/ota is the URL being requested
zx=24i9nkai14gs is a parameter used in the request (likely an identifier)

CMU/SEI-2013-TN-012
CMU/SEI-2013-TN-012 | 23
The parameter value changes for each request made to Google’s Gmail service. Since this string is not common across all requests to attach files in a Gmail message, it is not useful in this report to identify common request strings.
Since we identified the common URL used by Gmail to upload attachments, we can create a rule in the Squid proxy to block any requests to mail.google.com/mail/ota. Such a block can be configured by creating a regular expression that extracts the URL from the web request and then configuring Squid to block all requests that match the regular expression. By blocking requests to that specific URL, the proxy prevents its clients from posting any attachments in Gmail messages.
The rule can be configured in two parts. The first is to add a two-line rule in squid.conf, and the second is to create a corresponding file that contains a list of regular expressions. These regular expressions match requests to webmail service URLs that assist the client with the attachment upload process.
The rule in squid.conf 9 is
acl WebmailAttachments url_regex "/opt/squid/etc/mailattachments"
http_access deny WebmailAttachments
The first line creates an Access Control List rule named WebmailAttachments defined by the regu-lar expressions in the file /opt/squid/etc/mailattachments. The second line specifies that Squid should deny HTTP requests that match the regular expressions in the WebmailAttachments access control list. The two lines go hand-in-hand; one specifies the requests that apply to this access control list; the other specifies what should be done with those requests when they pass through the proxy.
The /opt/squid/etc/mailattachments file is a list of regular expressions for URLs assisting with uploading attachments. Since Gmail is the only service for which the necessary URL was found in this example, the file only has one regular expression:
mail.google.com/mail/ota*
If additional URL regular expressions are found, they can be inserted into the file one line at a time.
9 The last three lines in the squid.conf file in Appendix B enable the ACL feature. The lines need to be uncom-
mented, that is, have the “#” removed from the beginning of the line to enable the feature.

CMU/SEI-2013-TN-012
CMU/SEI-2013-TN-012 | 24
When implemented, all of the proxy’s clients are unable to add attachments when composing an email message in Gmail. This restriction is demonstrated in Figure 11.
Figure 11: Blocked Attachment with Squid ACL

CMU/SEI-2013-TN-012
CMU/SEI-2013-TN-012 | 25
7 Block File Attachments Using Signatures
Organizations that choose to allow access to various web-based email sites and other sites where data can be uploaded (e.g., cloud storage services, discussion forums, blogs) need to be able to prevent proprietary information from being exfiltrated outside of the organization’s network. To accomplish this restricted ability, document signatures need to be developed.10 These signatures are used in conjunction with the ClamAV antivirus engine on the proxy server to block selected documents from leaving the organization. Essentially, sensitive documents are falsely recognized as viruses using the signatures created and are therefore prevented from leaving the organization.11
There are several methods that can be used to block file attachments. Pattern matching is based on case-sensitive text strings. ClamAV scans a file using a hexadecimal pattern. If the pattern is found, ClamAV flags the file as a virus and Squid blocks the attachment from leaving. The hexadecimal sig-natures are based on case-sensitive keywords. These keywords are words that the organization deter-mines to be confidential; documents with these words in them should not leave the organization. This collection of keywords is often referred to as a “dirty word” list. Therefore, the organization must de-termine what words or phrases belong on the dirty word list and develop ClamAV signatures for each. Remember that hexadecimal (hex) signatures are based on a string that is case sensitive.
For example, if an organization has a project code named “Green Knight” it may want to block any document containing this phrase. Table 1 illustrates the differences in the hex signatures that need to be created. This list can grow quickly if there are many variations or if the organization wants to create signatures for every possible permutation of the phrase.12 Furthermore, the signatures that are needed to detect data exfiltration may change with the use of other languages or code pages.
Plain Text Hexadecimal ANSI Encoded Text
Green Knight 477265656e204b6e69676874
GREEN KNIGHT 475245454e204b4e49474854
Table 1: Hexadecimal Comparison of Project Names
If the organization uses a standard template for all documents that are of a sensitive nature, then the number of signatures needed may be reduced. For example, if an organization marks all sensi-
10 In this context, we use the term “signature” to refer to a data description method that allows another piece of
data to be uniquely identified. It does not refer to message authentication signatures or autographs.
11 Though ClamAV recognizes the intellectual property documents as viruses, it does not act on the files. ClamAV simply alerts the Squid proxy of the event and the Squid proxy blocks the file from travelling to the external net-work.
12 Text can be converted to hex using a variety of tools. There are many websites that offer this service. One such site is: the String-Functions website (http://string-functions.com/string-hex.aspx).

CMU/SEI-2013-TN-012
CMU/SEI-2013-TN-012 | 26
tive documents in the header and footer area of a document using a mandatory phrase such as “COMPANY CONFIDENTIAL,” then only one signature may be necessary. However, if a mali-cious insider alters the header of the document, either by deleting it completely or by changing just one character, the signature is rendered ineffective.
Some common document markings are shown in Table 2 with their associated hex value. These hex values can be used for creating ClamAV signatures.
Plain Text Hexadecimal ANSI Encoded Text
COMPANY CONFIDENTIAL 434f4d50414e5920434f4e464944454e5449414c
PROPRIETARY 50524f5052494554415259
CONFIDENTIAL 434f4e464944454e5449414c
FOR OFFICIAL USE ONLY 464f52204f4646494349414c20555345204f4e4c59
FOUO 464f554f
SECRET 534543524554
TOP SECRET 544f5020534543524554
Table 2: Common Document Markings
Signatures can also be created for other types of data embedded within a document. For example, document templates may be created with key metadata tags. Any document created from one of those templates contains the embedded metadata.
7.1 Hexadecimal ClamAV Signatures
Once you identify key phrases and their associated hex values, the ClamAV signature can be cre-ated. ClamAV hex signatures have the following format [ClamAV 2012b, page 8]:
MalwareName:TargetType:Offset:HexSignature
In this report, we focus only on the MalwareName and HexSignature fields. Each signature creat-ed in this section uses a TargetType of 0, which means the signature applies to any file; the Offset field is *, which indicates the hex signature can be found anywhere in the file.

CMU/SEI-2013-TN-012
CMU/SEI-2013-TN-012 | 27
A Note About “Virus” Signature Names
The signatures that are created in this report are created for detecting sensitive keywords or phrases in files. The virus name assigned to the signature may give away too much information to an end user if they see a virus-detected page. If you name a virus with the sensitive string (e.g., Green_Knight), this name may alert the end user that some type of scanning and blocking is being performed if they receive an error (e.g., Virus Detected: Green_Knight). Therefore, the malicious insider could alter documents, removing all references to “Green Knight.”
We advise that organizations design their own virus-naming convention that is meaningful to helpdesk and security personnel but that has little meaning to the end user. For example, a virus signature could simply be named “WidgetTech-0001.” A spreadsheet or database could be used to cross refer-ence the signature name with the hex value and keyword or phrase.
Virus names cannot contain spaces. For the purposes of this report, obscure filenames are not used.
The following signature searches any type of document for the key phrase “FOR OFFICIAL USE ONLY”: FOR_OFFICIAL_USE_ONLY:0:*:464f52204f4646494349414c20555345204f4e4c59
ClamAV signatures are stored in the /var/lib/clamav directory. The file can be named any-thing as long as it ends in .ndb. For the following example, the signature file is named sensi-tive.ndb. Open a terminal window and execute the following command:
sudo nano /var/lib/clamav/sensitive.ndb
Enter this signature on one line exactly as displayed. If this will be the only signature in the file, do not press enter at the end of the signature line (thereby creating a line space) as this will create an invalid signature file. Once the signature is created, press <CTRL> + <O> then <ENTER> to save the file; then press <CTRL> + <X> to exit.
To apply the signature, the proxy server must be restarted. Therefore, the proxy should be config-ured with a variety of signatures to avoid multiple restarts. To restart the server, enter the follow-ing command in a terminal window13:
sudo shutdown –r now
13 It is possible to shutdown and restart the Squid and C-ICAP processes; however, doing so was not always reli-
able during our testing in the lab.

CMU/SEI-2013-TN-012
CMU/SEI-2013-TN-012 | 28
Once the signatures are created and the proxy server is restarted, it will begin to block attachments that match the signatures created in the previous steps. Figure 12 illustrates a malicious insider attempting to email sensitive documents out of an organization in the hopes of landing a new po-sition at a competitor. The proxy server blocked the sensitive attachment.
Figure 12: Sensitive Attachment Blocked
Writing ClamAV signatures for specific sequences of data is a much more granular way of pre-venting the exfiltration of intellectual property over email. Rather than taking the “black and white” approach of blocking all attachments, organizations can block only the attachments that contain short string sequences commonly present in intellectual property files. Furthermore, this method increases the usability of webmail services for users who are sending non-sensitive docu-ments for legitimate purposes.

CMU/SEI-2013-TN-012
CMU/SEI-2013-TN-012 | 29
8 Tagging Documents to Prevent Exfiltration
The CERT Insider Threat Center developed a tool called Tagger to enable information security personnel to quickly insert tags into documents. These tags can then be used to create signatures for use on the proxy server to prevent documents from leaving the organization. The Tagger tool was developed using Java to allow maximum portability across operating systems.14 The tool is capable of inserting phrases into Microsoft Office (e.g., Word, Excel, PowerPoint) and Adobe PDF documents that are undetectable to the end user of the application to view the document. These phrases, or tags, are inserted into the metadata of the document. The metadata also is not viewable in Microsoft Office or Adobe PDF document properties.
8.1 Configuring the Tagger Tool
The Tagger tool has two options that are configurable using the tagger.properties file. This file can be edited using any text-editing program. The five configurable options are
• location and filename for signatures
• location and filename for the log file
• signature Prefix
• signature Offset
• zip command
When the Tagger tool is executed, it automatically generates a virus signature file, as defined in the tagger.properties file, for use with ClamAV on the proxy server. The virus signature file con-tains the hex signatures for the tags you mark documents with. The default signature file is sigs.ndb, as indicated on line four of Figure 13. An alternate path and filename may be defined, such as D:\INFOSEC\DocSec\signatures.ndb.
The Tagger tool creates detailed logs that are stored in a location as defined by line seven of the tagger.properties file. An alternate path and filename may be defined, such as D:\INFOSEC\DocSec\logs\tagger.log.
The tool automatically generates signature names for the tags used to mark a document. These signature names can be customized by changing the signature_prefix found on line 10 in Figure 13. The default is Sample_Sig. The signature_offset setting found on line 13 works in conjunction with the signature_prefix setting. This setting determines where the tagger tool should start num-bering the rules. By default, as defined in the tagger.properties file, rules will begin numbering at one. The default options will result in a virus named Sample_Sig-1 and will increment by one thereafter.
14 The Tagger tool is available for download from the SEI website [CERT 2012].

CMU/SEI-2013-TN-012
CMU/SEI-2013-TN-012 | 30
Figure 13: Example tagger.properties File
The Tagger tool also requires an external zipping engine, as discussed in Appendix A: Tagger Tool Technical Discussion. The Tagger tool is distributed with the 7-Zip command line executa-ble. The 7-Zip executable is called by the Tagger tool only to zip files. To support other zipping tools, the zip.command setting was used. This setting is the command that the Tagger tool uses for creating all zip archives. Use the <inputFolder> and <outputFile> tags as placeholders in the command.
File separators must be escape-broken. In Windows, this means using two backslashes in file paths. The portions of the command that specify the input and output should be wrapped in quota-tion marks to ensure that the full paths to all files can be correctly computed. This includes not only the <inputFolder> and <outputFile> tags, but any text that is appended or prepended to the tags. By default, the Tagger tool is configured to call the 7-Zip executable bundled with the Tag-ger tool distribution, as seen in line 23 of Figure 13.
8.2 Using the Tagger Document Tagging Tool
The Tagger tool is invoked via the command line and several different options are available. To invoke the tool, Java must be installed on the machine used to deploy the tool. In addition, the path to the Java executable must be in the system path. In the following examples, we assume that the tool is used on a Microsoft Windows machine (i.e., server or workstation). The minimum command to tag a document is
java -jar Tagger.jar [-r] [-v] <input> <tag>
The switches or options available at the command line are
• -v: enables verbose logging (optional)
• -r: enables recursive tagging of the input directory and subdirectories (optional)

CMU/SEI-2013-TN-012
CMU/SEI-2013-TN-012 | 31
The <input> field in the command specifies the file or directory of files to be tagged. If the tool is given a directory to tag, it attempts to tag all Microsoft Office or Adobe PDF documents in the directory and if given the -r option, it also tags all subdirectories in the directory. If the path to the file or filename contains any spaces, the complete path and filename must be enclosed in quota-tion marks.
The <tag> field is the string of text that is embedded into the document. If the string of text that is used as a tag contains any spaces, the tag must be enclosed in quotation marks. The following command tells the tagging tool to tag all documents in the D:\Projects\ directory and subdirec-tories with the COMPANY CONFIDENTIAL tag and to display a detailed log of its actions on the screen.
java -jar Tagger.jar -r -v “D:\Projects\” “COMPANY CONFIDENTIAL”
8.3 Using Advanced Tagger Tool Features
The document Tagger tool has additional features that facilitate automated document tagging. These features include a configuration file that can be used to specify which files or directories to tag with a particular string and the ability to generate the necessary ClamAV signatures.
8.3.1 Using the Tagger Configuration File
A configuration file can be used to feed Tagger a list of files and directories to tag with a specific string of text. This feature allows an information security team the ability to define multiple direc-tories or particular files to tag. To use a configuration file, the following command format is used:
java -jar Tagger.jar --runconfig <configfile> [-v]
A configuration file, identified as <configfile> in this command, must be defined before using the tool in configuration file mode. Use a text editor to create a file with any name. Place the name of each file or directory to be tagged on a new line. There are three different types of parameters that can be specified in the file:
• Tag a specific file with a string of text.
D:\Projects\GreenKnight\Proposal.docx,GREEN KNIGHT
• Tag all files in a directory with a string of text.
D:\Memos,CONFIDENTIAL
• Tag all files in a directory and all subdirectories with a string of text. The recurse option at the end of the following command instructs the Tagger tool to recursively tag documents within subfolders.
D:\Personnel,COMPANY SENSITIVE,recurse

CMU/SEI-2013-TN-012
CMU/SEI-2013-TN-012 | 32
The following is a sample configuration:
D:\Projects\GreenKnight\Proposal.docx,GREEN KNIGHT
D:\Memos,CONFIDENTIAL
D:\Personnel,COMPANY SENSITIVE,recurse
NOTE
Do not use quotation marks around paths/filenames or tags in the configuration file.
The following is a sample command that would read a configuration file:
java -jar Tagger.jar --runconfig D:\INFOSEC\DocSec\run.cfg
8.3.2 Creating ClamAV Signatures
The Tagger tool also has the capability to generate the necessary ClamAV signatures to prevent documents from leaving the organization through web-based services. This feature can be useful if you want to flag documents containing sensitive keywords without tagging them. There are two methods that can be used to create the signatures:
1. using a single tag on the command line 2. creating a text file with tags that will be batch processed
To create a signature from the command line, use the following command:
java -jar Tagger.jar --defgen <tag>
The --defgen option tells the tool to create a signature for the <tag> value. The following com-mand is an example:
java -jar Tagger.jar --defgen “GREEN KNIGHT”
This command yields the following signature:
Sample_Sig:0:*:475245454e204b4e49474854
A Note About the Virus Signature Naming Convention Used by the Tagger Tool
The Tagger tool generates a virus signature with a name defined by the signature_prefix setting in the tagger.properties file. It does not append a number to the signature name. Therefore, the end user must either determine a number to append or rename the virus completely. This virus signature is used by ClamAV to block documents. The format was chosen as a way to obscure the virus name as discussed in Section 7.1, Hexadecimal ClamAV Signatures.

CMU/SEI-2013-TN-012
CMU/SEI-2013-TN-012 | 33
After the signature is created, it can be placed into a virus-definition file as described in Section 7.1, Hexadecimal ClamAV Signatures. If a list of signatures must be developed, the Tagger tool can read a plain text file of tags (each on a new line) and write a signature file. This feature is available by executing the Tagger tool with the following command format:
java -jar Tagger.jar --defgen --file <inputfile> <outputfile>
For example, the following command would read in a file called D:\INFOSEC\DocSec\tags.txt and write the file to D:\INFOSEC\DocSec\sensitive.ndb. The output signature file must end in .ndb once it is stored on the Squid Proxy Server. It can be named anything on a Windows ma-chine. Please see Section 7.1, Hexadecimal ClamAV Signatures, for further implementation guid-ance.
java -jar Tagger.jar --defgen --file D:\INFOSEC\DocSec\tags.txt
D:\INFOSEC\DocSec\sensitive.ndb
8.4 Automating the Tagger Tool
The Tagger tool was designed with automation in mind, hence the --runconfig option. The tool can be automatically executed on a regular basis to ensure that sensitive files are tagged. The Task Scheduler service in Microsoft Windows can be used to schedule a task that tags documents on a regular basis, while on a Linux-based system, cron can be used. In either case, the runconfig op-tion should be used to identify sets of files to be tagged.
It may be desirable to configure the tool to run during low usage periods on servers that have high volumes of file access activity. Initial document tagging may take longer than future tagging op-erations due to the way Tagger processes the files. For example, a scheduled task on a file server could be created for the following command using the Task Scheduler service available within Microsoft Windows:
java -jar Tagger.jar --runconfig D:\INFOSEC\DocSec\run.cfg
The task must run with the necessary permissions to read the configuration file (including the tag-ger.properties file) and to read and write all files that will be tagged. The tool also must have permission to write to the tagger log file. The configuration file should only be able to be read by the Tagger tool. Others, such as administrators, should not have access to the configuration file; if necessary, they should be given read-only access. Only approved personnel should have read and write permissions to the configuration file. This restricted access prevents malicious insiders from modifying which documents are tagged.
8.5 Using Tagger Tool Logs
The Tagger tool was designed to provide a detailed level of logging. All logs are stored in the log file defined in the tagger.properties log file. (See Section 8.1, Configuring the Tagger Tool, for more information.)
Documents that have never been tagged will generate events in the log file similar to the ones in Figure 14. When a PDF file is tagged, the Tagger tool captures a cryptographic SHA-256 hash or

CMU/SEI-2013-TN-012
CMU/SEI-2013-TN-012 | 34
finger print of the file, both before and after it is tagged. The hashing function was added to assist digital forensic investigators should a malicious insider attempt to exfiltrate data. Each line in the event log records four different pieces of information: event type, computer name, date and time, and event information.
Figure 14: Sample Tagger Log File
An event type can be one of three messages:
1. INFO: These types of events are for informational purposes and contain detailed information about what the Tagger tool is doing.
2. WARN: Messages with the WARN value set alert the end user to a problem with a tag in a file. This event may be triggered if a file’s tags have been tampered with.
3. ERROR: An error message indicates that there was an error processing a file.
8.5.1 Using Tag Tamper Protection
The Tagger tool was designed to detect tampering of the tags within a document. This detection is accomplished through the use of a SHA-256 bit cryptographic hash of the tag that has been insert-ed into a document. If someone were to discover the tag inserted into a document and modify it, the Tagger tool would detect this change the next time it is used to tag the document and record an event similar to the one shown in Figure 15. The warning event records the hash of what was de-tected and what it should have been. It then proceeds to update the tag with the value requested.
Figure 15: Tamper Log
These log files could be collected by a third party tool and correlated to better detect malicious insiders. For example, if the tagger logs were combined with the C-ICAP and Squid logs, multiple tagger warning events coupled with the Squid proxy denials may indicate intent to circumvent data leakage protections in place. Organizations should retain all logs that may be used to take any employment action.

CMU/SEI-2013-TN-012
CMU/SEI-2013-TN-012 | 35
9 Using Advanced Security and Privacy Techniques
The configuration steps outlined in Section 4, Creating the Proxy Server, detail how to get a serv-er up and running relatively quickly. However, there are some additional security practices an organization should implement to further enhance the security of the proxy server and the privacy of the users.
9.1 Preventing Access to Websites with Bad or Invalid Certificates
Internet-facing websites may use invalid certificates to secure their websites. For example, these certificates may be expired or self-signed, much like those discussed in the previous section, The Self-Signed Root Certification Authority (CA) Certificate. If the organization chooses to allow sites with invalid certificates and signs them with their own certificate, the end user is presented with a valid certificate and has no indication that there may be a problem with the site. Therefore, the configuration detailed in this report prohibits connections to secure websites that have certifi-cate problems [Squid-Cache.org 2012b].
The following is a comment made on the Squid-Cache Wiki as part of a discussion about certifi-cates:
Ignoring certificate errors is a security flaw. Doing it in a shared proxy is an extremely dan-gerous action. It should not be done lightly or for domains which you are not the authority owner (in which case please try fixing the certificate problem before doing this) [Squid-Cache Wiki 2012b].
If an end user receives an error message similar to the one in Figure 16, then an exception may be needed to allow access to the site. An administrator can view the reason the site was blocked by viewing the /opt/squid/var/logs/cache.log file. Errors are typically noted by the message Error negotiating SSL connection.

CMU/SEI-2013-TN-012
CMU/SEI-2013-TN-012 | 36
Figure 16: SSL Certificate Error
If the organization has a business need to access a website that has a certificate error, an exception must be added to the /opt/squid/lists/sslbypass.domains file. To do this, open a ter-minal window and use the following procedure:
4. Enter the following command:
sudo nano /opt/squid/lists/certexcept.domains
5. Enter the domain name on a new line, ensuring it begins with a period:
.example.com
6. Once the exception has been entered, press <CTRL> + <O> then <ENTER> to save the file, then press <CTRL> + <X> to exit.
7. Squid will need to be reloaded with the new exception:
sudo /etc/init.d/squid reconfigure
9.2 Enabling Privacy for Specific Websites
Organizations may have privacy and security concerns as well as legal requirements that disallow the inspection of encrypted web traffic. Legal counsel must be consulted to further determine which sites should be considered for exemption. For example, an organization may not want to know a user’s banking details; therefore, exceptions to banking sites that users access must be created.
For this example, to establish the exception list, the organization may simply want to research the banks in the local area that employees or trusted business partners may use and identify their as-sociated websites. Another technique would be to review DNS logs over a period of time, looking for possible banking websites. This approach can be very time consuming. Finally, there are sev-eral free and commercial sites that offer lists of websites that have already been categorized. A

CMU/SEI-2013-TN-012
CMU/SEI-2013-TN-012 | 37
site that lists some of the available categorized websites is available on the Squid Guard web-site(http://www.squidguard.org/blacklists.html).15 To add sites to the SSL exception list, execute the following procedure:
1. Enter the following command in a terminal window:
sudo nano /opt/squid/lists/sslbypass.domains
2. Enter the domain name on a new line, ensuring it begins with a period:
.example.com
3. Once the exceptions have been entered, press <CTRL> + <O> then <ENTER> to save the file, then press <CTRL> + <X> to exit.
4. Squid will need to be reloaded with the new exception:
sudo /etc/init.d/squid reconfigure
Once the Squid configuration has reloaded, the sites listed in the /opt/squid/lists/sslbypass.domains file will no longer be intercepted. These sites will continue to be proxied, but they will use the actual site’s certificate rather than the proxy certifi-cate to encrypt web traffic.
Figure 17 illustrates the differences between intercepted and bypassed SSL encrypted traffic. The certificate on the left shows the site signed by the organization’s internal proxy, proxy.corp.merit.lab, indicating that the site is being intercepted by the proxy. The certificate on the right is displayed when the exception is added to the sslbypass.domains file as directed previ-ously.
15 Be sure to abide by the licensing agreement for each list or website.

CMU/SEI-2013-TN-012
CMU/SEI-2013-TN-012 | 38
Figure 17: Certificate Comparison
9.3 Ensuring Proxy Server Security
The proxy server processes sensitive information. End users will believe that their communication is secure; however, data passing through the proxy can be viewed as plain text because the proxy is breaking the SSL web session and re-establishing it to aid inspection. Therefore, the proxy server must be properly secured to prevent unauthorized access.
It is technically possible to use this proxy server to intercept and record secure transactions, there-by requiring additional physical and logical mechanisms to prevent misuse.
The organization should consider following accepted Linux best practices for securing the proxy server. The following are additional considerations to further secure the system:
1. Provide any administrator who has access to the proxy server with additional training that identifies what he or she can and cannot do with the system. The training should address pri-vacy issues as well as issues identified by the organization’s legal counsel, which may in-clude issues related to regulations, laws, and company policy.
2. Allow only a limited number of users that have a valid business need and need to know to access to the proxy server.
3. Permit remote administration only from a management network using encrypted protocols, such as SSH with two-factor authentication. SSH can be configured to use password and cer-tificate-based authentication.
4. Configure a host-based firewall to permit connections only to essential services, such as the proxy server (TCP 3128 in this report), SSH, DNS, HTTP, and HTTPS.

CMU/SEI-2013-TN-012
CMU/SEI-2013-TN-012 | 39
5. Configure ACLs for the Squid Proxy server. Consult the Squid documentation for additional details [Squid-Cache Wiki 2012c].
6. Review the configuration of Squid, ClamAV, and C-ICAP to further customize the installa-tion and enhance the performance of the proxy server.

CMU/SEI-2013-TN-012
CMU/SEI-2013-TN-012 | 40
10 Bringing It All Together with Logs
Logs are essential for detecting possible data exfiltration attempts. Both Squid Proxy and the C-ICAP service provide log details that assist an administrator in understanding what has happened. These logs can be centrally collected by a Security Information and Event Management (SIEM) system, sent to a SYSLOG server, or reviewed locally. The latter is explored further in this report; the other options are beyond the scope of this document.
10.1 Actual Case
Consider the following actual case:
The insider, a foreign national, was employed as a researcher at the victim organization, a chemical company. The victim organization specialized in the research and synthesis of large quantities of chem-ical compounds.
The insider used a personal computer to access files containing four recipes on the victim organiza-tion’s network. The insider then sent the files to an outsider, a family member, who worked for a com-petitor. The insider and outsider also started a website for a new business that would directly compete with the victim organization, but did not officially register the business in a foreign country.
The insider was caught when a co-worker saw the insider download, convert, and email files containing trade secrets using a personal computer. The co-worker reported the action to management, who worked with IT to set up logging and monitored the insider's activity more closely. The next day, the insider sent another email to the outsider, including company confidential chemical production methods, was caught and put on administrative leave. The insider was charged with theft of trade secrets; the case outcome is still pending.
By implementing the methods described in this report, the organization would have been able to detect and possibly prevent the incident earlier, thereby reducing the damage that the organization sustained.
10.2 Log Review
There are two logs that need to be reviewed to detect data exfiltration events:
1. The C-ICAP log: /var/log/c-icap/server.log 2. The Squid log: /opt/squid/var/log/access.log
Various tools, including nano (which has been used throughout this report) can be used to review the logs.
The first file to examine, the C-ICAP log, is typically smaller and easy to parse.

CMU/SEI-2013-TN-012
CMU/SEI-2013-TN-012 | 41
Figure 18 shows two attempts to exfiltrate sensitive documents from the system. This information can be correlated with Squid’s access.log file.
Mon Apr 30 16:16:23 2012, general, VIRUS DETECTED: FOR_OFFICIAL_USE_ONLY.UNOFFICIAL.
Mon Apr 30 16:16:26 2012, general, VIRUS DETECTED: FOR_OFFICIAL_USE_ONLY.UNOFFICIAL.
Figure 18: C-ICAP Log file
The Squid access log records the communications stream between the client and the proxy server. In Figure 19, the highlighted transactions can be correlated based on the event times. Using the Squid access log, it can be determined that a user at a workstation with the IP address of 192.168.59.128 attempted to send a sensitive document through web-based email, in this case, Gmail. This document contained the sensitive phrase, FOR OFFICIAL USE ONLY. The Squid log shows the request to POST the document was denied as indicated by the HTTP/1.1 403 status code.
192.168.59.128 - - [30/Apr/2012:16:16:23 -0400] "POST
https://mail.google.com/mail/u/0/channel/bind? HTTP/1.1" 400 554 TCP_MISS:DIRECT
192.168.59.128 - - [30/Apr/2012:16:16:23 -0400] "POST
https://mail.google.com/mail/u/0/ota? HTTP/1.1" 200 474 TCP_MISS:DIRECT
192.168.59.128 - - [30/Apr/2012:16:16:23 -0400] "POST
https://mail.google.com/mail/u/0/? HTTP/1.1" 403 891 NONE:NONE
192.168.59.128 - - [30/Apr/2012:16:16:24 -0400] "GET
https://mail.google.com/mail/u/0/channel/test? HTTP/1.1" 200 420 TCP_MISS:DIRECT
192.168.59.128 - - [30/Apr/2012:16:16:26 -0400] "POST
https://mail.google.com/mail/u/0/ota? HTTP/1.1" 200 474 TCP_MISS:DIRECT
192.168.59.128 - - [30/Apr/2012:16:16:26 -0400] "POST
https://mail.google.com/mail/u/0/? HTTP/1.1" 403 891 NONE:NONE
192.168.59.128 - - [30/Apr/2012:16:16:37 -0400] "POST
https://mail.google.com/mail/u/0/? HTTP/1.1" 200 1678 TCP_MISS:DIRECT
192.168.59.128 - - [30/Apr/2012:16:16:46 -0400] "GET
https://mail.google.com/mail/u/0/images/cleardot.gif? HTTP/1.1" 200 463
TCP_MISS:DIRECT
192.168.59.128 - - [30/Apr/2012:16:16:59 -0400] "GET
https://chatenabled.mail.google.com/mail/images/cleardot.gif? HTTP/1.1" 200 502
TCP_MISS:DIRECT
192.168.59.128 - - [30/Apr/2012:16:18:57 -0400] "POST
https://mail.google.com/mail/u/0/? HTTP/1.1" 200 1280 TCP_MISS:DIRECT
Figure 19: Squid Access Log

CMU/SEI-2013-TN-012
CMU/SEI-2013-TN-012 | 42
To further identify who attempted to send this file outside of the organization, the proxy server events could be correlated to Dynamic Host Configuration Protocol (DHCP) logs and Microsoft Windows logon events. If file auditing is enabled for sensitive files, the exact file could then be identified. If the organization identifies numerous exfiltration attempts, further monitoring should be done to determine the cause of the issue and to determine if the activity is malicious.
10.3 Theft of Intellectual Property Near Separation
The CERT Insider Threat Center has found that malicious insiders stole IP within 30 days of res-ignation [Moore 2011]. Therefore, organizations should establish a company policy to search log files within the past 30 days of an employee turning in their resignation.
The Squid Proxy log (/opt/squid/var/logs/access.log), C-ICAP log (/var/log/c-icap/server.log), file access logs from a file server, and domain login events can be correlated to identify a malicious insider attempting to exfiltrate data from the organization. A SIEM tool, such as ArcSight, or a machine data engine, such as Splunk [Splunk 2012] can be used to central-ly collect, query, and send alerts about these logs.
Numerous Squid Proxy denials, C-ICAP alerts, and file access logs that can be linked to an indi-vidual user should raise cause for concern as these events may indicate the user is attempting to exfiltrate data. Other exfiltration methods may have been used, such as USB removable media or the company email system. Therefore, logs surrounding these types of events should also be re-viewed.
The CERT Insider Threat Center has several publications, now available or soon to be available, that can assist an organization in detecting these types of data exfiltration events:
• Insider Threat Control: Using Centralized Logging to Detect Data Exfiltration Near Insider Termination [Hanley 2011]
• Insider Threat Control: Understanding Data Loss Prevention (DLP) and Detection by Corre-lating Events from Multiple Sources16
• Insider Threat Control: Using Universal Serial Bus (USB) Device Auditing to Detect Possible Data Exfiltration by Malicious Insiders16
16 Publication of these document is pending. Check the CERT website periodically to see if the files have been
published (http://www.cert.org/insider_threat/).
Search Faster
During testing of the proxy server in the lab, the CERT Insider Threat Center tested searching with “grep” for specific results to quickly identify exfiltration attempts. This use of grep was successful for some of our searches. For example, to quickly search the Squid access.log file for HTTP 403 status messages, the following command was used:
sudo cat access.log | grep 403

CMU/SEI-2013-TN-012
CMU/SEI-2013-TN-012 | 43
11 Conclusions
Access to web-based email services may be vital to company operations and for employee morale. However, these services allow malicious insiders the ability to exfiltrate data easily. Therefore, careful control is needed to balance organizational or employee needs with the risk of losing sen-sitive data. This risk must be addressed through policy and technical means.
In this report, we presented methods that organizations can employ to prevent access to attach-ment upload services offered by various websites. These methods allow management to be aware of activities that are occurring in the organization. The methods presented in this report offer sev-eral key advantages that can assist an organization in its efforts to monitor potential incidents of data theft:
1. Employees can access web-based email services while certain features are either disabled or more carefully monitored.
2. Signatures can be created for data that have been identified as sensitive and can be prevented from leaving the organization while other information can flow freely.
By implementing the proxy server and combining it with a SIEM solution, organizations are able to more quickly identify possible data exfiltration events while preventing the information from leaving the organization’s systems.

CMU/SEI-2013-TN-012
CMU/SEI-2013-TN-012 | 44

CMU/SEI-2013-TN-012
CMU/SEI-2013-TN-012 | 45
Appendix A: Tagger Tool Technical Discussion
Currently the Tagger tool supports Microsoft Office and PDF documents.17 When executed, the Tagger tool determines the file type and processes the document for that specific file type.
PDF Documents
A PDF document is tagged by inserting two entries into the PDF dictionary. The PDF dictionary is the core component of a PDF document, and is nothing more than a table containing key value pairs, known as the dictionary’s entries. A PDF document can have multiple dictionaries; and a single dictionary can contain multiple additional dictionaries.
An example of a dictionary entry from a tagged PDF document is shown in Figure 20.
<</MarkInfo <</Marked true>>
/4954435f7461675f6e616d65(CONFIDENTIAL)
/Type/Catalog/StructTreeRoot 3 0 R
/Lang(en-US)/Pages 4 0 R
/656d616e5f6761745f435449(41f0c9c802bd8c3b29e5e62b4cc4e606bfc943d8109c8005c67f6e43
8314d09c)
>>
Figure 20: Tagger PDF Dictionary Entry
The Tagger tool is able to take advantage of the fact that dictionary entries with invalid names are ignored by a viewing application such as Adobe Acrobat. In the previous example, a valid entry key would be /Lang(en-US)/Pages, while the entry key /4954435f7461675f6e616d65 is not valid. However, entries with invalid keys are accessible programmatically by examining the PDF dic-tionary; the Tagger tool uses this ability to insert metadata in the PDF document that is hidden from the user.
The entry /4954435f7461675f6e616d65(CONFIDENTIAL) specifies the actual tag entry, which is broken into the entry key of /4954435f7461675f6e616d65 and the entry value of CONFIDENTIAL. The entry value is used by ClamAV to flag the document.
17 The Tagger tool is available for download on the SEI website [CERT 2012].

CMU/SEI-2013-TN-012
CMU/SEI-2013-TN-012 | 46
The last entry in the dictionary is used to verify that the dictionary entries have not been tampered with. The value of this dictionary entry is a SHA-256 hash of the value from the first dictionary entry (i.e., the tag).
When a PDF document is tagged by the tool, the dictionary is inspected and the dictionary entries are analyzed. There are three possibilities with regards to the PDF’s dictionary entries:
1. The PDF dictionary has both entries, and they are validated to be correct. 2. The PDF dictionary does not have either entry; therefore it has not been tagged yet. 3. The PDF dictionary has only one entry (tag or hash), or has both entries, but they are not
valid. In either case the file has been tampered with.
In the first case, no further action is necessary and the file is closed. In the second and third cases, the Tagger tool writes the correct entries out to the dictionary, and saves the file.
Microsoft Office Documents
Microsoft Office documents are tagged by unzipping the document, inserting two “hidden” prop-erties into the document’s custom.xml file, and zipping the document back up to its original loca-tion. Starting with Microsoft Office 2007, Office documents began to use the Office Open XML (OOXML) file formats, which store document data in zip files containing XML and other data files.
OOXML files can be opened to view and edit the component parts that define the document’s structure and content. The custom.xml part of a document is located in the docProps directory of an OOXML file, and contains any custom document properties added to the document by a user. A document’s custom properties are editable via the File->Properties->Advanced Properties menu option in the Office application.
The Tagger tool modifies the custom.xml file of OOXML files to include “hidden” custom proper-ty entries that correspond to the tag. These entries are hidden in the sense that they are stored in the document’s XML upon load or save but are not presented to the user for viewing or editing in Office (e.g., Word, Excel, and PowerPoint) user interfaces.
Custom properties are defined by type, name, value, and internal ID. The name is stored in the custom.xml file as the name attribute of a <Property> node. The value is stored in the custom.xml file as the contents of a <vt:lpwstr> node, which is contained in a <Property> node. The type is stored in the custom.xml file as the fmtid attribute, and represents a globally unique identifier (GUID) that corresponds to the types of custom properties that the OOXML formats support (e.g., number, date, text, yes/no). The ID is stored in the custom.xml file as the pid attribute, and pro-vides a unique numeric identifier to each custom property. A sample custom.xml file with one custom property definition for a text property named Sample with a value of Property appears in Figure 21.

CMU/SEI-2013-TN-012
CMU/SEI-2013-TN-012 | 47
<?xml version="1.0" encoding="UTF-8" standalone="yes"?>
<Properties xmlns="http://schemas.openxmlformats.org/officeDocument/2006/custom-
properties"
xmlns:vt="http://schemas.openxmlformats.org/officeDocument/2006/docPropsVTypes">
<property fmtid="{D5CDD505-2E9C-101B-9397-08002B2CF9AE}" pid="2" name="Sample">
<vt:lpwstr>Property</vt:lpwstr>
</property>
</Properties>
Figure 21: Office Document custom.xml File
The goal of tagging Office documents is to add entries to the custom.xml file that persist upon editing and saving the document but not displayed in the document’s list of custom properties from within in the Office application’s Advanced Properties dialogs. This task is achieved by set-ting the value of the fmtid attribute (i.e., the attribute that specifies the property type) of a property entry in the custom.xml file to a GUID Microsoft Office can’t derive a type for.
As long as the value of the fmtid attribute is a well-formed GUID (i.e., a brace-enclosed, 32-character hexadecimal string separated into five hyphen-separated fields of lengths 8-4-4-4-12), the property will persist in the document. If the value of the fmtid attribute is not one of the GUID’s that the Office applications recognize as a valid type, the property is excluded from the list of custom properties that is presented to a user in the Advanced Properties dialog. As a con-vention, the “fmtid” attributes generated by the Tagger tool always contain the GUID {00000000-0000-0000-0000-000000000000}.
When the Tagger tool tags an Office document, two property nodes are inserted into the cus-tom.xml file: one that represents the tag that was specified as input to the tool, and one that pro-vides a mechanism for tag tamper protection.
The first property node is known as the tag node, and represents the tag that was specified as input to the tool. The value of the tag node’s name attribute is a hexadecimal representation of the tag. The value of the tag node’s pid attribute is the largest integer value, chosen to avoid adding prop-erties with duplicate IDs, which would invalidate the document. A large number was chosen be-cause Office applications generate IDs incrementally starting at 1. The value of the tag node’s vp:lpwstr child node is the tag that was specified as input to the tool.
The second property node is known as the metadata node, and contains hashed information about the tag node that can be used to verify that the tag node has not been modified by any other means than the Tagger tool. The value of the metadata node’s name attribute is a hexadecimal represen-tation of the reverse of the tag. For example, if the input tag is SampleTag, the value of the metadata node’s name attribute would be the hexadecimal value of gaTelpmaS, or 656d616e5f6761745f435449.

CMU/SEI-2013-TN-012
CMU/SEI-2013-TN-012 | 48
The value of the metadata node’s pid attribute is one less that the value of the tag node’s pid at-tribute. The value of the metadata node’s vp:lpwstr child node is the SHA-256 hash of the XML text of the tag node. This naming “synchronizes” the metadata node with the tag node, and allows the tool to detect the case where a tag node is tampered with.
In subsequent runs of the Tagger tool for a tagged document, if the current value of the metadata node’s vp:lpwstr child node does not match the hash of the tag node or either the metadata node or the tag node is missing, the Tagger tool flags the document as tampered with and regenerates the tag and metadata nodes as necessary. Figure 22 shows the custom.xml file generated for a document that had the custom property shown in Figure 21 and was subsequently tagged with the value SampleTag.
<?xml version="1.0" encoding="utf-8"?>
<Properties xmlns="http://schemas.openxmlformats.org/officeDocument/2006/custom-
proper-
ties"xmlns:vt="http://schemas.openxmlformats.org/officeDocument/2006/docPropsVTypes"
>
<property fmtid="{D5CDD505-2E9C-101B-9397-08002B2CF9AE}" name="Sample" pid="2">
<vt:lpwstr>Property</vt:lpwstr>
</property>
<property fmtid="{00000000-0000-0000-0000-000000000000}"
name="4954435f7461675f6e616d65" pid="2147483647">
<vt:lpwstr>SampleTag</vt:lpwstr>
</property>
<property fmtid="{00000000-0000-0000-0000-000000000000}"
name="656d616e5f6761745f435449" pid="2147483646">
<vt:lpwstr>09b5914f2ef0b4ca56df44418f74ef14a07a30c21f3b9114cb4659ca6604cb64</vt:lpws
tr>
</property>
</Properties>
Figure 22: custom.xml File of a Tagged Document
The custom.xml file is not written for Office documents that do not specify custom properties. To handle this case, the Tagger tool must create the custom.xml file and update two other files to en-sure that the custom.xml file persists upon subsequent changes to the document. The two addition-al files that must be updated when the custom.xml file is added are the [Content_Types].xml file and the .rels file.

CMU/SEI-2013-TN-012
CMU/SEI-2013-TN-012 | 49
The [Content_Types].xml file is found at the root of every Office Open XML Formats document and specifies the types of parts that the document contains. When a custom.xml file is to be added to a document, an <Override> node that specifies the name and content type of the custom.xml part must be added to the [Content_Types].xml file. Figure 23 shows a sample <Override> node generated by the Tagger tool for a [Content_Types].xml file.
<Override PartName="/docProps/custom.xml" ContentType="application/vnd.openxmlformats-
officedocument.custom-properties+xml"/>
Figure 23: [Content_Types].xml Addition for custom.xml Part
The .rels file is found in the _rels directory of every Office Open XML Formats document. The .rels file defines the relationships between the different parts of the document. When a custom.xml file is added to a document, a <Relationship> node, which identifies the custom.xml file as a file that contains the document’s custom properties, must be added to the .rels file.
Figure 24 shows a sample <Relationship> node generated by the Tagger tool for a .rels file. The ID was set to rId999. This assignment is made to ensure that duplicate relationship ID’s are not entered for a document. A large number was chosen because the Office applications assign ID numbers incrementally starting at 1.
<Relationship Id="rId4"
Type="http://schemas.openxmlformats.org/officeDocument/2006/relationships/custom-
properties" Target="docProps/custom.xml"/></Relationships>
Figure 24: .rels Addition for custom.xml Part
Java Zip Library and C-ICAP Conflicts
The decision to use an external zipping program rather than the built-in Java functions was due to how C-ICAP currently handles files. The C-ICAP server expects a file header to be present in the data stream that describes the data being sent to it along with the expected length of the file in order to properly send the file to ClamAV for scanning. However, the Java libraries that handle the zipping function do not support placing the necessary file header information at the beginning of the file. Rather, the information is placed at the end of the file that leads to the C-ICAP server failing to properly handle the data stream. The Java libraries do follow the zipping standard, but they will not work for the purposes of this technical note.
It is possible to modify the C-ICAP source code to better handle filtering files. This is something the CERT Insider Threat Center will consider improving in the future.
Future Enhancements
The following enhancements may be made in addition to those covered in this report:
• Add functionality to support multiple tags per document. Currently the Tagger tool only sup-ports one tag and will overwrite the tag each time it is executed.

CMU/SEI-2013-TN-012
CMU/SEI-2013-TN-012 | 50
• Add the ability to untag a document.
• Add the ability to display all tags in a particular document.
• Add support for tagging additional file types, including JPEG, PNG, and TIFF.
• Add functionality to support the specification of a maximum log file size, which, when met, begins writing log messages to a new file.

CMU/SEI-2013-TN-012
CMU/SEI-2013-TN-012 | 51
Appendix B: Contents of the /opt/squid/etc/squid.conf File
#The below lines are used to create the man in the middle proxy by generating #dynamic certificates signed by the organization's certification authority #By default, the proxy will be listening on port 3128 as defined by http_port 3128 below. http_port 3128 ssl-bump generate-host-certificates=on dynamic_cert_mem_cache_size=4MB cert=/opt/squid/ssl_cert/CA_crt.pem key=/opt/squid/ssl_cert/CA_pvk.pem sslcrtd_program /opt/squid/libexec/ssl_crtd -s /opt/squid/var/lib/ssl_db -M 4MB sslcrtd_children 5 #---------------------------------- #Accept all HTTP requests http_access allow all #---------------------------------- #The below lines define the Squid access log path and store the #logs in a webserver like format #30 files of history will be kept logformat common %>a %ui %un [%tl] "%rm %ru HTTP/%rv" %>Hs %<st %Ss:%Sh access_log /opt/squid/var/logs/access.log common logfile_rotate 30 log_access allow all always_direct allow all #The below lines allow for domains defined in the sslbypass.domains file to bypass #SSL inspection acl sslbypass dstdomain "/opt/squid/lists/sslbypass.domains" ssl_bump deny sslbypass ssl_bump allow all #---------------------------------- #The below lines prevent web sites that have certificate errors from being

CMU/SEI-2013-TN-012
CMU/SEI-2013-TN-012 | 52
#accessed. Domains listed in the certexcept.domains file are permitted. acl certexceptions dstdomain "/opt/squid/lists/certexcept.domains" sslproxy_cert_error allow certexceptions sslproxy_cert_error deny all #---------------------------------- #The below lines are required for the C-ICAP server to call clamav to scan #files uploaded/downloaded using the proxy icap_enable on icap_preview_enable on icap_preview_size 1024 icap_send_client_ip on icap_send_client_username on icap_service_failure_limit -1 #---------------------------------- #If the c-icap service is running on another server, change the 127.0.0.1 IP address #in the below lines. Ensure that the c-icap port is correct and firewalls are permitting #the traffic icap_service service_req reqmod_precache 0 icap://127.0.0.1:1344/avscan adaptation_access service_req allow all icap_service service_resp respmod_precache 0 icap://127.0.0.1:1344/avscan adaptation_access service_resp allow all #---------------------------------- #The below lines are used to block all attachments from uploading to #sites defined in the /opt/squid/etc/mailattachments file. #Uncomment the below lines to enable this feature #acl WebmailAttachments url_regex "/opt/squid/etc/mailattachments" #deny_info ERR_NO_ATTACHMENTS WebmailAttachments #http_access deny WebmailAttachments

CMU/SEI-2013-TN-012
CMU/SEI-2013-TN-012 | 53
References
URLs are valid as of the publication date of this document.
[ClamAV 2012a] ClamAV. About ClamAV. http://www.clamav.net/lang/en/ (2012).
[ClamAV 2012b] ClamAV. Creating Signatures for ClamAV. http://www.clamav.net/doc/latest/signatures.pdf (2012).
[Elson 2003] Elson, J. & Cerpa A. Internet Content Adaptation Protocol (ICAP). http://tools.ietf.org/html/rfc3507#page-3 (2003).
[Hanley 2011] Hanley, Michael & Montelibano, Joji. Insider Threat Control: Using Centralized Logging to De-tect Data Exfiltration Near Insider Termination (CMU/SEI-2011-TN-024). Software Engineering Institute, Carnegie Mellon University, 2011. http://www.sei.cmu.edu/library/abstracts/reports/11tn024.cfm
[Microsoft 2012a] Microsoft. Manage Trusted Root Certificates. http://technet.microsoft.com/en-us/library/cc754841.aspx (2012).
[Microsoft 2012b] Microsoft. How to Force Proxy Settings Via Group Policy. http://social.technet.microsoft.com/wiki/contents/articles/5156.how-to-force-proxy-settings-via-group-policy.aspx (2012).
[Moore 2011] Moore, Andrew P.; Cappelli, Dawn M.; Caron, Thomas C.; Shaw, Eric; Spooner, Derrik; & Trze-ciak, Randall F. A Preliminary Model of Insider Theft of Intellectual Property (CMU/SEI-2011-TN-013). Software Engineering Institute, Carnegie Mellon University, 2011. http://www.sei.cmu.edu/library/abstracts/reports/11tn013.cfm
[CERT 2012] CERT. Downloading Tagger. http://www.cert.org/download/tagger/ (2012).
[Splunk 2012] Splunk. What Is Splunk?. http://www.splunk.com/product (2012).
[Squid-Cache.org 2012a] Squid-Cache.org. Squid: Optimising Web Delivery. http://www.squid-cache.org/ (2012).

CMU/SEI-2013-TN-012
CMU/SEI-2013-TN-012 | 54
[Squid-Cache.org 2012b] Squid-Cache.org. Squid Configuration Directive sslproxy_cert_error. http://www.squid-cache.org/Doc/config/sslproxy_cert_error/ (2012).
[Squid-Cache Wiki 2012a] Squid-Cache Wiki. Squid-in-the-middle SSL Bump. http://wiki.squid-cache.org/Features/SslBump (2012).
[Squid-Cache Wiki 2012b] Squid-Cache Wiki. Dynamic SSL Certificate Generation. http://wiki.squid-cache.org/Features/DynamicSslCert (2012).
[Squid-Cache Wiki 2012c] Squid-Cache Wiki. Squid ACL. http://wiki.squid-cache.org/SquidFaq/SquidAcl (2012).
[White House 2012] White House. Consumer Data Privacy in a Networked World: A Framework for Protecting Pri-vacy and Promoting Innovation in the Global Digital Economy, February 2012. http://www.whitehouse.gov/sites/default/files/privacy-final.pdf

CMU/SEI-2013-TN-012
REPORT DOCUMENTATION PAGE Form Approved OMB No. 0704-0188
Public reporting burden for this collection of information is estimated to average 1 hour per response, including the time for reviewing instructions, search-ing existing data sources, gathering and maintaining the data needed, and completing and reviewing the collection of information. Send comments regard-ing this burden estimate or any other aspect of this collection of information, including suggestions for reducing this burden, to Washington Headquarters Services, Directorate for information Operations and Reports, 1215 Jefferson Davis Highway, Suite 1204, Arlington, VA 22202-4302, and to the Office of Management and Budget, Paperwork Reduction Project (0704-0188), Washington, DC 20503. 1. AGENCY USE ONLY
(Leave Blank)
2. REPORT DATE
March 2013
3. REPORT TYPE AND DATES COVERED
Final
4. TITLE AND SUBTITLE
Detecting and Preventing Data Exfiltration Through Encrypted Web Sessions via Traffic Inspection
5. FUNDING NUMBERS
FA8721-05-C-0003
6. AUTHOR(S)
George J. Silowash, Todd Lewellen, Joshua W. Burns, and Daniel L. Costa
7. PERFORMING ORGANIZATION NAME(S) AND ADDRESS(ES)
Software Engineering Institute Carnegie Mellon University Pittsburgh, PA 15213
8. PERFORMING ORGANIZATION REPORT NUMBER
CMU/SEI-2013-TN-012
9. SPONSORING/MONITORING AGENCY NAME(S) AND ADDRESS(ES)
AFLCMC/PZE/Hanscom Enterprise Acquisition Division 20 Schilling Circle Building 1305 Hanscom AFB, MA 01731-2116
10. SPONSORING/MONITORING AGENCY REPORT NUMBER
n/a
11. SUPPLEMENTARY NOTES
12A DISTRIBUTION/AVAILABILITY STATEMENT
Unclassified/Unlimited, DTIC, NTIS
12B DISTRIBUTION CODE
13. ABSTRACT (MAXIMUM 200 WORDS)
Web-based services, such as email, are useful for communicating with others either within or outside of an organization; however, they are a common threat vector through which data exfiltration can occur. Despite this risk, many organizations permit the use of web-based services on their systems. Implementing a method to detect and prevent data exfiltration through these channels is essential to protect an organization’s sensitive documents.
This report presents methods that can be used to detect and prevent data exfiltration using a Linux-based proxy server in a Microsoft Windows environment. Tools such as Squid Proxy, Clam Antivirus, and C-ICAP are explored as means by which information technology (IT) professionals can centrally log and monitor web-based services on Microsoft Windows hosts within an organization. Also introduced is a Tagger tool developed by the CERT Insider Threat Center that enables information security personnel to quickly insert tags into documents. These tags can then be used to create signatures for use on the proxy server to prevent documents from leaving the organi-zation. In addition, the use of audit logs is also explored as an aid in determining whether sensitive data may have been uploaded to an internet service by a malicious insider.
14. SUBJECT TERMS
Insider Threat, Data Loss Prevention, SSL inspection, data classification
15. NUMBER OF PAGES
67
16. PRICE CODE
17. SECURITY CLASSIFICATION OF REPORT
Unclassified
18. SECURITY CLASSIFICATION OF THIS PAGE
Unclassified
19. SECURITY CLASSIFICATION OF ABSTRACT
Unclassified
20. LIMITATION OF ABSTRACT
UL NSN 7540-01-280-5500 Standard Form 298 (Rev. 2-89) Prescribed by ANSI Std. Z39-18
298-102


