Embed Size (px)
Citation preview

Designing Reports using SQL Server 2012 Reporting Services
Updated May 18, 2012

Designing Reports Using SSRS
Using Microsoft’s Business Intelligence Suite to Design Reports from REMOTE
Once you receive your University of Arkansas MEC account, access will be via remote desktop connection. Remote access documentation is at the following link:
http://enterprise.waltoncollege.uark.edu/Remote_Desktop_MEC_GW.pdf
SQL Server Data Tools (formerly Business Intelligence Development Studio) provides tools that assist in all phases of business intelligence from building the data warehouse, creating and analyzing cubes to data mining and report designing. The following provides a report designing example using the UA_SAMSCLUB datasets.
Click StartAll ProgramMicrosoft SQL Server 2012 SQL Server Data Tools as shown below.
SQL Server Data Tools uses Microsoft Visual Studio (VS) as the Integrated Development Environment which will be familiar to VB.NET or C# users. When VS opens, most likely the top will include the menu and tool bar with the Start Page tab active. Along the left of the Start page are three windows: Recent Projects, if any; Getting Started and Visual Studio Headlines.
Last updated 5/19/2023 12:42 AM Page 2
Designing Reports Using SSRS
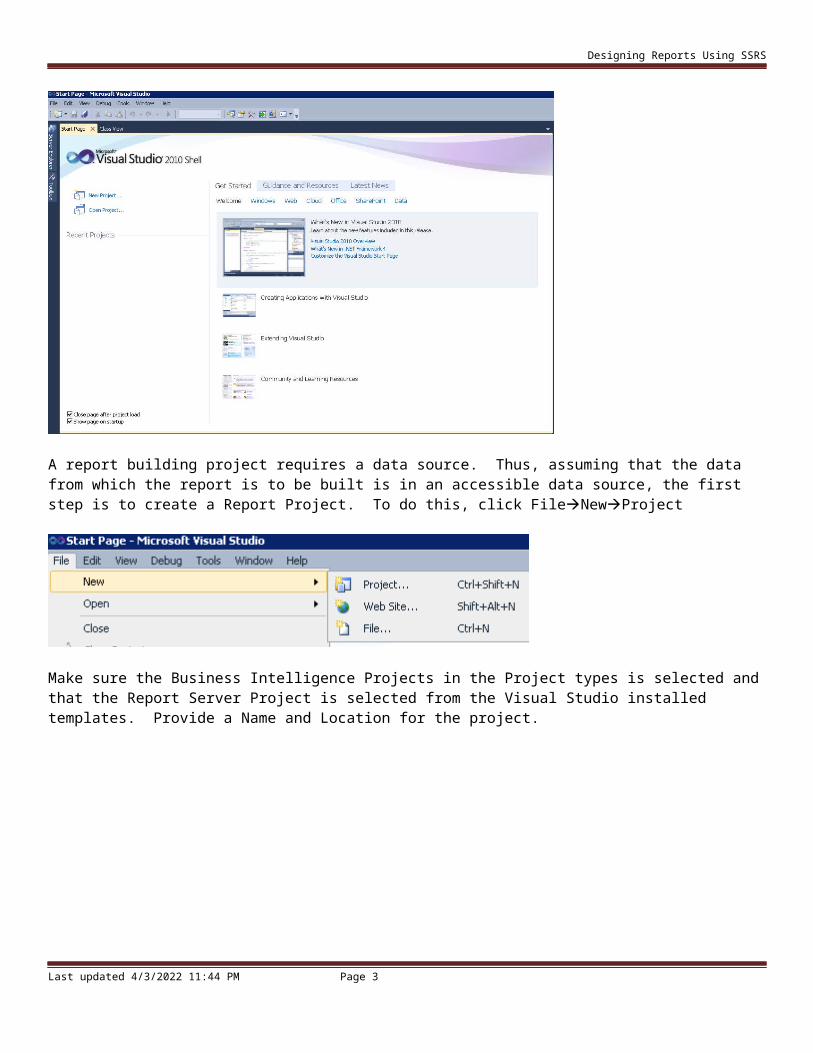
A report building project requires a data source. Thus, assuming that the data from which the report is to be built is in an accessible data source, the first step is to create a Report Project. To do this, click FileNewProject
Make sure the Business Intelligence Projects in the Project types is selected and that the Report Server Project is selected from the Visual Studio installed templates. Provide a Name and Location for the project.
Last updated 5/19/2023 12:42 AM Page 3

Designing Reports Using SSRS
Click the OK button. Visual Studio opens – and the default location for Solution Explorer is the top right. You may need to use the horizontal scroll bar to scroll to the right to see the Solution Explorer. If it is not there, then click View on the menu and then click Solution Explorer. The name of your project (UA_SAMS in this case) should be visible with a number of other entries as shown.
Steps required to design a Report include:
Create Shared Data SourcesCreate Reports
Create Shared Data Source
This step requires creating a shared data source to be used for report designing. Thus, right-click Shared Data Sources in the Solution Explorer and Click Add New Data Source… the Data Source Wizard opens to its Welcome page (not shown).
Last updated 5/19/2023 12:42 AM Page 4

Designing Reports Using SSRS
The Shared Data Source Wizard opens … Provide a name and type of data source from the drop down list of options. Note that you can use relational databases (Microsoft SQL Server) or cubes (Microsoft SQL Server Analysis Services).
We use Microsoft SQL Server Analysis Services for this example. Click the Edit… button to create the connection string. Enter ENT-ASRS1 for the Server name and select the UA_SAMSCLUB_STAR Analysis Services database from the drop down list of databases, as shown in the screen shot below.
Click the Test Connection button to ensure a connection exists to the database. Click OK to close the Connection Properties window. Click OK again to close the Shared Data Source window. Now, we are ready to create Reports.
Create ReportsLast updated 5/19/2023 12:42 AM Page 5

Designing Reports Using SSRS
In the Solution Explorer, right click Reports and click Add New Report. This starts a Report Wizard to assist you with designing your report; click the Next button.
Click Query Builder… to design the query for your report.
Last updated 5/19/2023 12:42 AM Page 6
Select UA_SAMS shared data source and click Next. Note that you can create a new shared data source at this stage if you prefer to by selecting the New data source radio button. For this example, we use the data source we just created (UA_SAMS).

Designing Reports Using SSRS
The Query Builder page of the Report Wizard shown below, provides a drag and drop capability to design a report. It looks similar to the cube browser page of Analysis Services.
For this example, drag the Item Quantity and Total Scan Amount from the Measures list to the data pane. Then, drag the attribute Transaction Type Description from the Scan Type Dimension and State and City attributes
Last updated 5/19/2023 12:42 AM Page 7
Filter Pane
Data pane

Designing Reports Using SSRS
from the Store Dimension, as shown below. Once finished selecting the attributes, click the OK button. Note that, you can filter your report as well by adding a filter expression in the filter pane.
This screen of the Report Wizard shows you the query string. Click Next.
Last updated 5/19/2023 12:42 AM Page 8

Designing Reports Using SSRS
Select the Report Type Tabular and click Next.
In the Design the Table window of the wizard, choose how to group the data in the table
Hold Ctrl+Shift to select the State, City, Item_Quantity, and Total_Scan_Amount from the Available fields list and click Details> button to move them to the details displayed fields side. Select Transaction_Type_Desc and
Last updated 5/19/2023 12:42 AM Page 9

Designing Reports Using SSRS
click Group> to move that field to the Group by displayed fields side. At the end, you will have a screen as shown below. Click Next.
Choose the Table Design to be Stepped, Include subtotals and Enable drilldown. Click Next.
Last updated 5/19/2023 12:42 AM Page 10
Note - Table Design for tabular reports:
•Stepped – Displays hierarchy of data in such a way that repeated values are not shown, but only the first occurrence is shown. This results a report that looks like it is “stepped.”
•Block – Displays the hierarchy of data where values are repeated.
•Include Subtotals – Includes subtotals for each grouping.
•Enable drilldown – Enables the user to drill down into the details of a grouping. This option is only available for Stepped reports.

Designing Reports Using SSRS
Choose the Table Style and click Next.
To complete the Report wizard, provide a Report name (UA_SAMS for this example) and see the Report Summary page and click Finish.
Now, you can see your report Design and make any changes. Screen below shows a report Design.
Click the Preview tab to see a preview of your report. Note that the report is grouped by Transaction Type Description (Purchase and Return).
Last updated 5/19/2023 12:42 AM Page 11

Designing Reports Using SSRS
You can drill down and see your report by State and City.
Note that this report is saved locally; you can deploy it to the server to allow access from multiple users.
To deploy your project, right click the project in the solution explorer and select Properties. Set the properties of the TargetServerURL as shown in the screen below. Provide a name (that you can uniquely identify) for your
Last updated 5/19/2023 12:42 AM Page 12

Designing Reports Using SSRS
TargetDataSourceFolder and TargetReportFolder and you must enter the TargetServerURL as http://ENT-ASRS.waltoncollege.uark.edu/reportserver and click Apply and OK.
Return to the Solution Explorer and right click the UA_SAMS project and click Deploy. You will see at the left bottom of your screen that Deploy succeeded or any error messages if it doesn’t.
Once the report is deployed, it means a copy of your report is saved on the server. In which case you can view and edit the report in the Report Manager.
Report Manager
Last updated 5/19/2023 12:42 AM Page 13

Designing Reports Using SSRS
Report Manager is a Web-based report access and management tool that you access through Microsoft Internet Explorer. Now that your report is deployed to the server, you can view, export (to a different format, excel, pdf, etc) and print your report in the Report Manger using the reporting services website. To access the reporting services website, open your browser and go to http://ent-asrs.waltoncollege.uark.edu/Reports/.Enter your walton credentials (the login and password supplied by the University of Arkansas) if prompted.
Last updated 5/19/2023 12:42 AM Page 14
Your Home page will look similar to this screen – which shows the Data source and Report we just created and deployed to the server.

Designing Reports Using SSRS
Click the UA_SAMS report under the UA_SAMS folder. You will be able to view your report in a web page as shown below.
Last updated 5/19/2023 12:42 AM Page 15

Designing Reports Using SSRS
You can also export this report to PDF format by selecting a format Acrobat (PDF) file and click Export as shown below.
You can then save your report in PDF format which is more convenient for printing and emailing.
Last updated 5/19/2023 12:42 AM Page 16

Designing Reports Using SSRS
We can do some formatting changes to our report to make it look more professional. Click the Design Tab and select the top Header row as shown below.
The Properties window (right bottom by default) is displayed. Change the BackgroundColor to DimGray. Select the row below the header and change the BackgroundColor to DarkGray. Select the Title UA SAMS and change the Color to DimGray in the properties window.
Last updated 5/19/2023 12:42 AM Page 17

Designing Reports Using SSRS
Your report Design will look similar to the screen below. Note that the Item Quantity detail field is selected.
Select the Item_Quantity detail field and change the Format in the Properties window to N0 to change it to a Number format with no decimal points. Select the the Total_Scan_Amount detail field and change the Format in the Properties window to C2 to change it to a Currency format with two decimal points. Similarly, change the format of the Sums above these fields to appropriate format string. As you can see from the Properties window, you can similarly change the Font, Size and more.
Last updated 5/19/2023 12:42 AM Page 18

Designing Reports Using SSRS
Now, click the Preview tab to view you report. You can drag and increase/decrease the sizes of the report boxes in the Design tab of your report to make sure the numbers are displayed properly. Note that this report looks more professional after simple formatting than the one on page 13. Click Save to save the changes made.
Last updated 5/19/2023 12:42 AM Page 19

Designing Reports Using SSRS
Note that this report is saved locally; you can deploy it to the server to allow access from multiple users. Once deployed, you can view your report from within Report Manager (web based).
You can also add an Image to your report, like Company Logo. In the Design tab, align the title to the right and move the report table a little down to make a space for the Logo. Then, select Image from the Toolbox and click on the left of the screen to the top right of the report.
This starts a wizard; you can select how your image is stored (four options given). In this example, select the image to be stored as a part of the report (Embedded). Click Next.
Last updated 5/19/2023 12:42 AM Page 20

Designing Reports Using SSRS
Click on Import to browse to your computer and choose the image you would like to add. Once you select the picture, click OK (For this exercise, you may use the image found in S:\Logo\waltonlogo.jpg
Your screen will look similar to the one below. View your report by clicking the Preview tab.
Last updated 5/19/2023 12:42 AM Page 21

Designing Reports Using SSRS
You can move the boxes and tables, and image of the report up and down, right and left until you achieve a good looking report.
Last updated 5/19/2023 12:42 AM Page 22

Designing Reports Using SSRS
Change the Title (UA_SAMS) of the report to UA SAMSCLUB SALES. Click the Design tab, select the title and overwrite it with the new name and change the font size to Tahoma, 18pt, Bold.
Last updated 5/19/2023 12:42 AM Page 23

Designing Reports Using SSRS
Click the Preview tab to view your report. Click Save to save the changes made locally, and you can also deploy it to the Server and make it accessible to multiple users.
You can also launch Report Builder, a report design tool used for creating and modifying model-driven, ad hoc reports in the Report Manager. Report Builder allows business users to create their own reports based on a user-friendly report model created in Model Designer.
To create a report model, start a new project. To do this, click FileNewProject or click the new project icon.
Be sure the Business Intelligence Projects in the Project types is selected and that the Report Model Project is selected from the VS installed templates. Provide a Name and Location for the project.
Last updated 5/19/2023 12:42 AM Page 24

Designing Reports Using SSRS
Click the OK button. The new report model project is created – and the default location for Solution Explorer is the top right. You may need to use the horizontal scroll bar to scroll to the right to see the Solution Explorer. If it is not there, then click View on the menu and then click Solution Explorer.
The Data Source Wizard then allows the creation of a connection by clicking the New… button.
Last updated 5/19/2023 12:42 AM Page 25
The next step requires creating a data source to be used for the report model. Thus, right-click Data Sources in the Solution Explorer and click New Data Source…Clicking the new Data Source option, the Data Source Wizard opens to its Welcome page. Click Next >

Designing Reports Using SSRS
Leave the default Provider: as SQLClient Data Provider. Enter the Server name ent-asrs1. Also, leave the default security as Windows Authentication. Use the drop down list box to select a database that is going to be used by the report model (for this example, the database is UA_SAMSCLUB_STAR).
Click Finish after you give name to your Data Source (in this example UA SAMSCLUB STAR).
Last updated 5/19/2023 12:42 AM Page 26
Click the Test Connection button to ensure a connection exists to the database and click OK.
Then, click Next.

Designing Reports Using SSRS
Next, a Data Source View will be needed. The Data Source View is sort of an abstract client view of the data. Right-click Data Source Views in the Solution Explorer and click Add New Data Source View to open the Data Source View Wizard. Click the Next button on the Welcome page (not shown).
Note that the Relational data source is the one just created. Actually, this page allows creating a new data source in case one has not yet been created. Because the desired data source exists, click the Next button to define the Data Source View.
Last updated 5/19/2023 12:42 AM Page 27

Designing Reports Using SSRS
Last updated 5/19/2023 12:42 AM Page 28
From the Available objects of the Select Tables and Views dialog, locate and click the desired data sources in Available objects and click the > to move them to the list of Included objects. In this example, all the tables except the two STORE_INFORMATION tables, sysdiagrams, vScanRep, and UserAccess tables will be used for reporting and thus they are all selected and moved to the Included objects list. Click the Next button.

Designing Reports Using SSRS
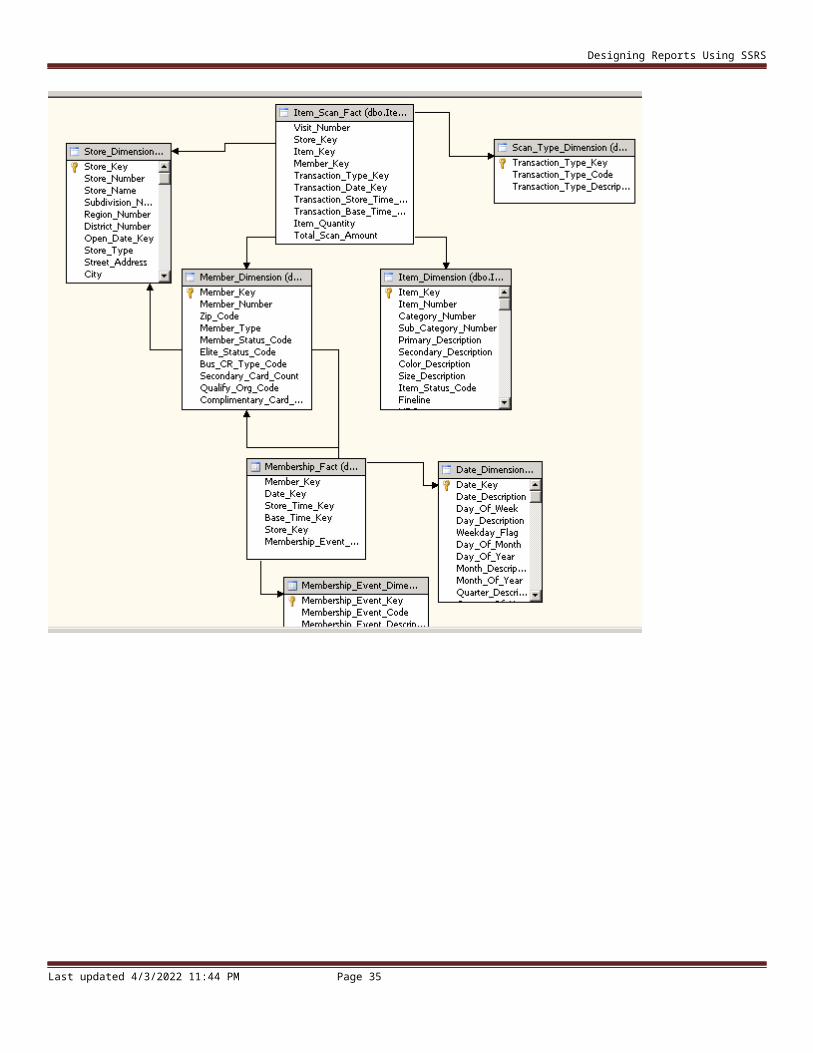
Click Finish. You can look at the data source view by double clicking UA SAMSCLUB STAR.dsv. Note that Item_Scan_Fact and Membership_Fact tables do not have a primary key. We can add a Logical Primary key to make sure those tables are included in the report model (Note: If a table doesn’t have a primary key, the Report Model Wizard excludes it.)
Last updated 5/19/2023 12:42 AM Page 29

Designing Reports Using SSRS
The Data Source View is displayed as shown below (double click on your .dsv file).
Last updated 5/19/2023 12:42 AM Page 30
Set Member_Key as the Logical Primary Key for the Membership_Fact table
Set Visit_Number as the Logical Primary Key for the Item_Scan_Fact table

Designing Reports Using SSRS
Now that we have a Data Source View, we are ready to build a Report Model.
Accept the defaults in the Select report model generation rules page (shown below).
Last updated 5/19/2023 12:42 AM Page 31
Right-click Report Models in the Solution Explorer and click Add New Report Model to open the Report Model Wizard. Click the Next button on the Welcome page (not shown).
In the Select Data Source View page, select UA SAMSCLUB STAR.dsv. Note that the Available data source view is the one just created. Actually, this page allows creating a New Data Source View… in case one hasn’t yet been created. Because the desired data source exists, click the Next button.

Designing Reports Using SSRS
Last updated 5/19/2023 12:42 AM Page 32
Accept the defaults in the Select report model generation rules page (shown on the left).
In the Collect Model Statistics page of the Report Model Wizard, make sure that Update model statistics before generating is selected.

Designing Reports Using SSRS
Last updated 5/19/2023 12:42 AM Page 33
Provide a name, (UA SAMSCLUB STAR in this example) then Run it to create the new report model.
It is processing rules on tables and columns…

Designing Reports Using SSRS
Project creation succeeded. Use the Solution Explorer to deploy the report model.
Last updated 5/19/2023 12:42 AM Page 34
Click Finish to close the Report Model Wizard.
Designing Reports Using SSRS
Last updated 5/19/2023 12:42 AM Page 35
Before deploying the project, right-click the project in the solution explorer and select Properties to make sure the project is deployed to the appropriate server.
Provide a name (that you can uniquely identify) for your TargetDataSourceFolder = Data Sources ES90000 and TargetModelFolder = Models ES90000 (used ES90000 in this example, since logged in as ES90000 and you may use your unique user id ES#####).
Then, you must set the TargetServerURL as http://Ent-ASRS.waltoncollege.uark.edu/reportserver and click Apply and OK.

Designing Reports Using SSRS
Deploy succeeded.
NOTE: If for some reason, you make changes to your model and need to redeploy it, you may receive an error saying ‘The model ID of the submitted model must match that of the current model’. In such an instance all you need to do is just log in to the reporting server web site (Report Manager), go to your models folder and delete the report model. Then, re-deploy and its updated version is back in the folder.
Last updated 5/19/2023 12:42 AM Page 36
Return to the Solution Explorer, right-click the project and click Deploy.

Designing Reports Using SSRS
Log in back to your Report Manager (using your UA credentials) or refresh the page if you are still logged on. Your Report Manager home page will look similar to the screen below. Note that new Data Sources ES##### and Models ES##### folders are added to the home page.
Click the Models ES##### folder to see the model created above. Note that the UA SAMSCLUB STAR model is shown below.
Last updated 5/19/2023 12:42 AM Page 37

Designing Reports Using SSRS
Now that you have created a report model that connect to and retrieve data from a Microsoft SQL Server relational data source and deployed to the server, you can use the Report Builder to create ad hoc reports. To create ad hoc reports, click the Report Builder button on the Report Manager home page. The Application Run – Security Warning page will appear when you run the Report Builder for the first time in your desktop; click the Run button.
It will automatically open the Microsoft Report Builder page. Create a table (columnar) report that uses the UA SAMSCLUB STAR data source.
Last updated 5/19/2023 12:42 AM Page 38

Designing Reports Using SSRS
Select the data source you want to use to create your report and select Report Design of Table (columnar) as shown in the screen shot above and click OK. Then, design your ad hoc reports in the Report Designer page by dragging and dropping fields to the design area.
Last updated 5/19/2023 12:42 AM Page 39
Design areaEntities list
Attributes/Fields list

Designing Reports Using SSRS
In the Explorer pane, select the Item Scan Fact entity from the Entities list and add the # Item Quantity and the # Total Scan Amount attribute to the report. Drag both attributes to the Drag and drop column fields area in the Design Area.
Select the Transaction Type entity from the Entities list and add the Transaction Type Description attribute to the table in the report to the front that it shows as the first column. Edit the Transaction Type Description text box and replace the Text with Transaction Type.
Select the Store entity from the Entities list and add the State attribute to the table in the report just between Transaction Type and Item Quantity that it shows as the second column.
Resize the text boxes appropriately. Set the format of the Total Scan Amount value to display values as currency. To do this, right click the value under the Total Scan Amount and select Format… as shown below.
Select the number with currency value in front, set the Decimal places: to 2, Symbol: $, check the Use 1000 Separator box and show Negative numbers in brackets (see screen below) and click OK.
Your Design page will look similar to this screen below.Last updated 5/19/2023 12:42 AM Page 40

Designing Reports Using SSRS
Add a Filter to the report so that it contains the State of WI only. Click the Filter button in the toolbar…see the screen above. Click Store entity from the Entities list and double click the State attribute from the Fields list. Select WI from the dropdown list of States. So, you will have State equals WI and click OK. Note that you can add as many filters as you wish and you can also change the parameter equals to other parameters listed below just by clicking the equals link and selecting a different parameter.
Last updated 5/19/2023 12:42 AM Page 41

Designing Reports Using SSRS
Add a title to the report – Samsclub WI Stores, and format it - like change font type and size, bold, center, etc. You Designer page will look similar to the screen below. Note that the Design Report button is selected in the toolbar.
You can view your report by clicking the Run Report button in the toolbar. The report will look similar to the one below
Last updated 5/19/2023 12:42 AM Page 42

Designing Reports Using SSRS
You can return back to the Design Report toolbar and add some more attributes.
Select the Store entity from the Entities list and add the City attribute to the table in the report- drag and drop City just after the State attribute, as shown on the screen below.
You can delete columns by just right clicking the attribute and clicking Delete to exclude it from your report
Click Run Report toolbar to view the report.
You need to save the ad hoc report so that you will be able to view/update it again. To save it in the server, click File > Save As… Save it to the default location in the server as shown below, after providing a name. In this example, the name provided is AdHocReport1 and click Save.
Last updated 5/19/2023 12:42 AM Page 43

Designing Reports Using SSRS
You can return to your Report Manager and browse to the Models ES##### folder and view your report.
Note that you can also use the Report Manager to create Report Model to be used by the Report Builder to create ad hoc reports. Below is how to create a model for Report Builder using Report Manager.
Last updated 5/19/2023 12:42 AM Page 44

Designing Reports Using SSRS
The first step is creating a data source to use for your report model. The second step is generating the report model. Once that is done you can use the report model to create reports. To create a data source: In your Web browser, type the URL http://ENT-ASRS.waltoncollege.uark.edu/Reports for your report server in the address bar. Click New Data Source.
In the Name box, enter a name for the data source. Optionally, enter a brief description of the mode in the Description text box. Verify that the Enable this data source check box is selected. See screen below.
In the Connection type list, select the data source type to which you want to connect. The connection type for this example is Microsoft SQL Server. Options include Microsoft SQL Server Analysis Services and Oracle. In the Connection string box, enter the connection string that points to the database. [Data Source=msenterprise; Initial Catalog=UA_SAMSCLUB_STAR]
Select the connection method that Report Builder users will need to use to connect to the database. Select the Windows integrated security radio button and click OK. Verify that the Data Source is added to your Home page in the Report Manager.
Last updated 5/19/2023 12:42 AM Page 45

Designing Reports Using SSRS
To create a report model from the data source: In Report Manager, select the data source that you want to use for your model. Click RepMgrSamsDS data source. The Properties page is displayed. Verify that you want to use the options specified for the data source. Click Generate Model at the bottom of the page.
In the Name box, enter a name for the report model- RepMgrSamsModel. In the “Description” box, enter a brief description of the model, optional. To specify a new location to save the report model to, click “Change Location.” By default, the report model is saved to Report Manager Home. Click OK.
By default, if you do not Change Location, the report model is saved to Report Manager Home. Click OK. Verify that the model is added to your Report Manager Home page.
Last updated 5/19/2023 12:42 AM Page 46

Designing Reports Using SSRS
At this point you are ready to create a report using Report Builder. Click the Report Builder button on the toolbar within Report Manager. This will launch Report Builder and display the report model just created and other models that can be used to build a report by following the example of creating ad hoc reports above.
Last updated 5/19/2023 12:42 AM Page 47