Embed Size (px)
Citation preview

Designer Quick Start Guide v201310 Page 1 of 14
Designer Software Quick Start Guide The Project Designer Software is the program that you will use to create your projects that will be uploaded to the memory card and carved or cut on your CarveWright System. It comes in Basic and Advanced versions.
Project Designer 3.0 Software
This is the newest version of the Project Designer Software. If you did not purchase it with your machine, it can be added. More information about upgrade options is available from our online store.
Project Designer 2.0 Software
The 2.0 upgrade is no longer available for purchase, but you can still download it from our website,
if you are licensed to use it.
Project Designer Basic Software
This is the free version that comes with every machine.
Table of Contents:
STEP 1: DETERMINE OS INSTRUCTIONS TO USE
STEP 2: DOWNLOADING & INSTALLING DESIGNER SOFTWARE - WINDOWS
STEP 2: DOWNLOADING & INSTALLING DESIGNER SOFTWARE - MAC
STEP 3: LOCATE YOUR MACHINE SERIAL NUMBER
STEP 4: REGISTERING THE DESIGNER SOFTWARE
STEP 5: SOFTWARE & PATTERN ACTIVATION
STEP 6: REGISTERING ADDITIONAL COMPUTERS
STEP 7: MAINTAINING REGISTRATION
KEYS TO SUCCESS

Designer Quick Start Guide v201310 Page 2 of 14
STEP 1: DETERMINE OS INSTRUCTIONS TO USE
Your computer’s operating system (OS) will determine how you install the software.
Windows 8: Here's what the Start screen looks like in Windows 8:
Windows 7 & Windows Vista: Here's what the Start menu looks like in Windows 7 and Windows Vista:
Windows XP Here's what the Start menu looks like in Windows XP:
Windows will need a video card with Open GL 2.1 or higher to display the Open with Preview in Designer 2.0. Most manufacturers have updated drivers available on their websites. Apple Mac OS: Here's what the Start menu looks like in Apple Mac:
1. From the Mac menu bar select the Apple icon
2. Click on 'About This Mac'
A new window will open showing the exact version of Mac OS X that is installed. Designer on Mac requires the X11 windowing system.The latest release of MacOS (Mountain Lion) no longer includes it. You will need to install it per the following instructions from Apple support. http://support.apple.com/kb/ht5293 FOLLOW THE CORRECT INSTRUCTIONS BASED ON YOUR COMPUTER’S OS:
• Windows Vista, 7 & 8 users should follow the RUN AS ADMINISTRATION instructions in this guide. • Windows XP users can use these instructions, but you do NOT need to use the RUN AS ADMINISTRATOR
command, just left double-click to open file or icon. • Mac users only need to drag the designer.dmg file into their Applications folder to install.
PROCEED TO STEP 2: DOWNLOADING & INSTALLING THE DESIGNER SOFTWARE (SELECT WINDOWS OR MAC)
What is an Operating System?
From Wikipedia: An operating system (OS) is a collection of software that manages computer hardware resources and provides common services for computer programs. The operating system is an essential component of the system software in a computer system. Application programs usually require an operating system to function.
Different Types & Versions:
Windows: XP, Vista, Windows 7, & Windows 8
Mac: Leopard 10.5, Snow Leopard 10.6, Lion 10.7, Mountain Lion 10.8

Designer Quick Start Guide v201310 Page 3 of 14
STEP 2: DOWNLOADING & INSTALLING DESIGNER SOFTWARE – WINDOWS
After determining your computer’s operating system (OS), you will also need to determine which version of Designer you have a license to use or download. A Basic Designer license (1.187) comes with every machine, Designer 2.0 & 3.0
are purchased and must be activated like an add-on to your Customer Account with a serial number (4 sets of letters or numbers).
Select one of these two download options:
DOWNLOADING FROM NEW DISC:
1 Insert the Designer Installation disc. (Autorun will try to RUN the installation.) 2 XP users can select “RUN” & proceed to next page; Vista, 7 & 8 users select “Cancel” & “Finish” 3 Navigate to install disc from START > COMPUTER > DISK DRIVE 4 Find the designer_#_###.exe file. (#=version number) 5 Right-click on the file using your mouse & select “RUN AS ADMINISTRATOR” If a security prompt displays requesting permission to install the application, click “Allow” to continue the installation. (Windows doesn’t know who CarveWright is.)
Proceed to next page
DOWNLOADING FROM CW WEBSITE:
1 Download the latest version for your system. Located at www.carvewright.com > SUPPORT > GETTING STARTED (Select which version you need to download.) 2 XP users can Select RUN & Proceed to next page; Vista, 7 & 8 users Select SAVE instead of RUN. Place it in a location where you can find it. The download will default to your DOWNLOADS folder, unless you specify a different location. 3 Locate the installation file, right-click on it and select “RUN AS ADMINISTRATOR”. If securities prompt displays requesting permission to install the application, click “Allow” to continue the installation. (Windows doesn’t know who CarveWright is.)
Proceed to next page
SIDEBAR NOTES:
RUN AS ADMINISTRATOR:
Even though you may be the administrator of your computer, anytime you install or manage licenses using Windows Vista, 7 or 8 with any version of Designer, you will need to use the RUN AS ADMINISTRATOR COMMAND.
This requires that you physically RIGHT-CLICK on the file or icon and select the RUN AS ADMINISTRATOR command.
INSTALL LATEST VERSION:
If your disc is NOT brand new, please throw it away and go to www.carvewright.com to download the latest version. Designer Software Updates is available under the SUPPORT menu (top) & the Quick Links menu (bottom).
If you have a prior installation from an old disc or have version 1.182 or older already installed, you must first go into your CONTROL PANEL and remove that old installation.
SECURITY OR FIREWALL SOFTWARE:
Your computer may have software that will prevent the installation file from properly downloading. You may need to loosen or temporarily turn off these systems.
Designer Quick Start Guide v201310 Page 4 of 14
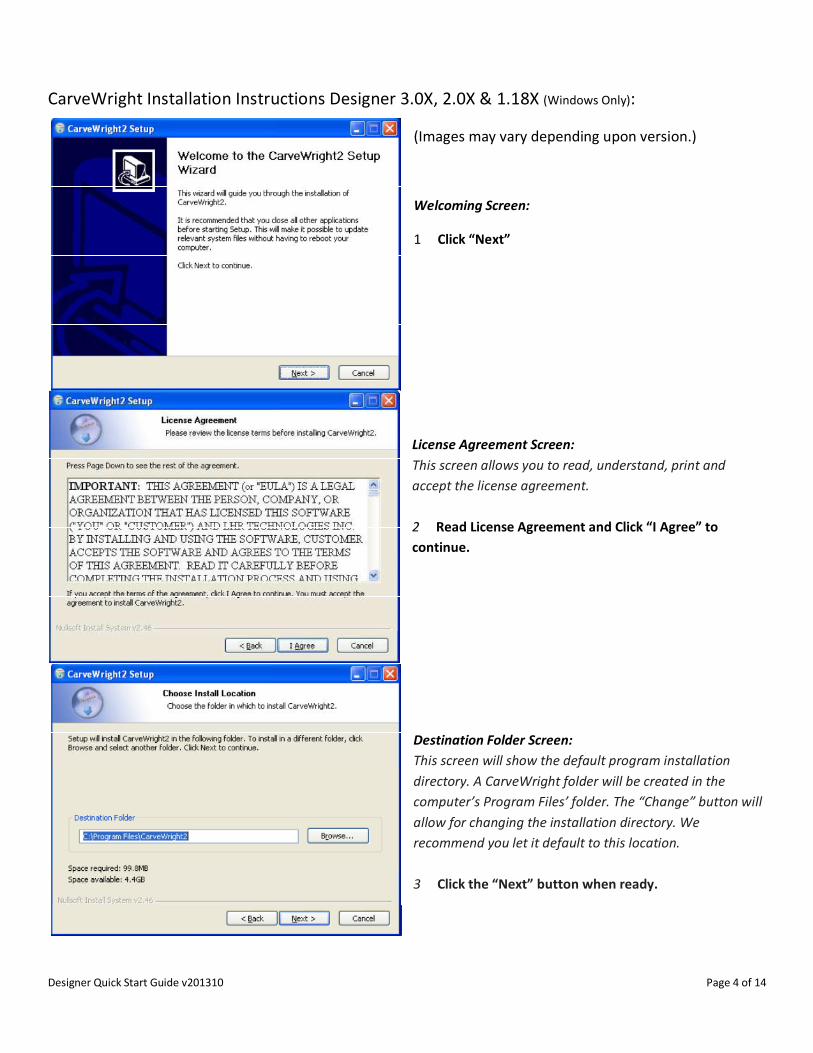
CarveWright Installation Instructions Designer 3.0X, 2.0X & 1.18X (Windows Only):
(Images may vary depending upon version.)
Welcoming Screen:
1 Click “Next” License Agreement Screen: This screen allows you to read, understand, print and accept the license agreement. 2 Read License Agreement and Click “I Agree” to continue.
Destination Folder Screen: This screen will show the default program installation directory. A CarveWright folder will be created in the computer’s Program Files’ folder. The “Change” button will allow for changing the installation directory. We recommend you let it default to this location. 3 Click the “Next” button when ready.

Designer Quick Start Guide v201310 Page 5 of 14
Start Menu Screen: This screen shows the default location in the Start Menu Folder. It is recommended to accept the default location. 4 Click the “Next” button when ready.
Install Options (for Designer 3.0X & 2.0X only; 1.18X will NOT see this screen): You now have the option of setting a desktop icon and/or creating a quick launch icon. You can also select, if you want the software to automatically check for Designer updates. Checking for updates will only occur when the CarveWright software is running. 5 Make your selections and Click the “Install” button when ready. The next step will install the required Microsoft Runtime Package. 6 Click “Yes” to proceed.

Designer Quick Start Guide v201310 Page 6 of 14
Installing:
The rest of the installation will complete.
Installation Completed Screen:
This screen displays that the installation process is complete and prompts whether or not to show the readme file. 7 Click “Finish” button when ready.
PROCEED TO STEP 3: LOCATE YOUR MACHINE SERIAL NUMBER
READ ME FILE NOTE: The Readme File will show the current software version installed and the major updates/changes that have been made to the software/firmware for the CarveWright System. The wizard will default to showing you the “read me” file once you close this box. You can de-select this item, if you do not wish to see this file. The readme file can also be accessed from our website at www.carvewright.com under SUPPOR T > DOWNLOAD INSTALLERS > CarveWright Basic Download > ChangeLog.
DO NOT ATTEMPT TO FOLLOW THE INSTALLATION INSTRUCTIONS ON THIS READ ME FILE.
Designer Quick Start Guide v201310 Page 7 of 14
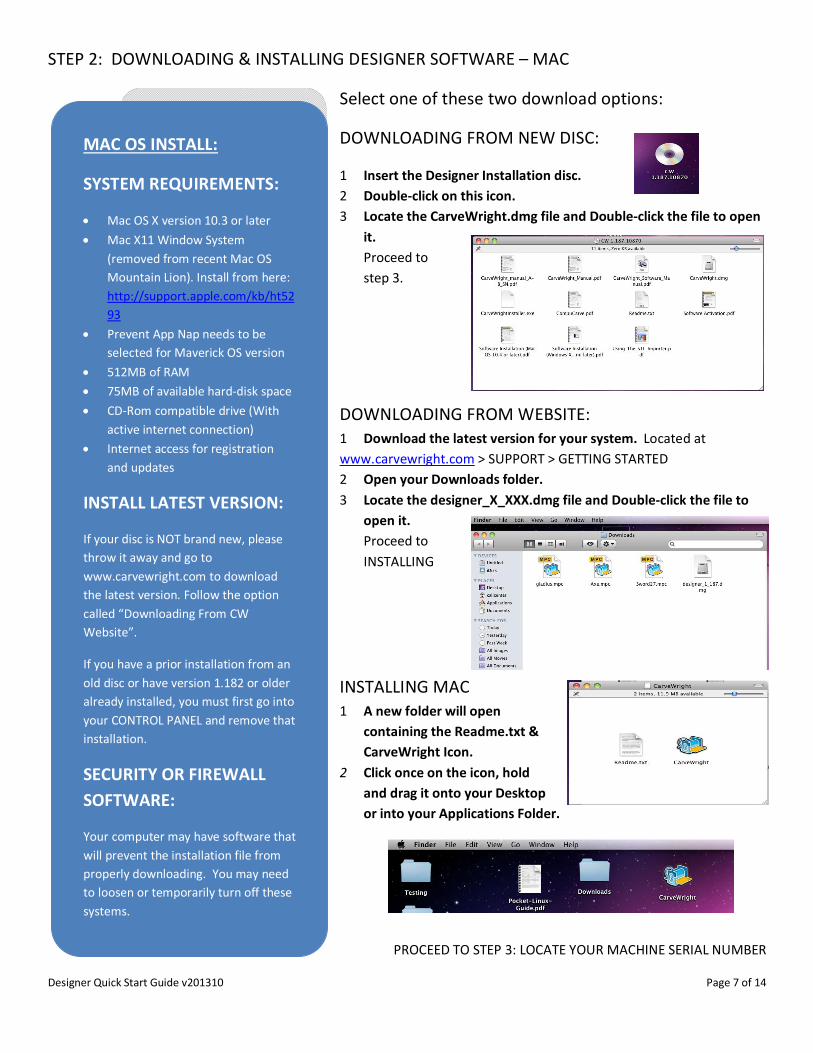
STEP 2: DOWNLOADING & INSTALLING DESIGNER SOFTWARE – MAC
Select one of these two download options:
DOWNLOADING FROM NEW DISC:
1 Insert the Designer Installation disc. 2 Double-click on this icon. 3 Locate the CarveWright.dmg file and Double-click the file to open
it. Proceed to step 3.
DOWNLOADING FROM WEBSITE: 1 Download the latest version for your system. Located at www.carvewright.com > SUPPORT > GETTING STARTED 2 Open your Downloads folder. 3 Locate the designer_X_XXX.dmg file and Double-click the file to
open it. Proceed to INSTALLING
INSTALLING MAC 1 A new folder will open
containing the Readme.txt & CarveWright Icon.
2 Click once on the icon, hold and drag it onto your Desktop or into your Applications Folder.
PROCEED TO STEP 3: LOCATE YOUR MACHINE SERIAL NUMBER
MAC OS INSTALL:
SYSTEM REQUIREMENTS:
• Mac OS X version 10.3 or later • Mac X11 Window System
(removed from recent Mac OS Mountain Lion). Install from here: http://support.apple.com/kb/ht5293
• Prevent App Nap needs to be selected for Maverick OS version
• 512MB of RAM • 75MB of available hard-disk space • CD-Rom compatible drive (With
active internet connection) • Internet access for registration
and updates
INSTALL LATEST VERSION:
If your disc is NOT brand new, please throw it away and go to www.carvewright.com to download the latest version. Follow the option called “Downloading From CW Website”.
If you have a prior installation from an old disc or have version 1.182 or older already installed, you must first go into your CONTROL PANEL and remove that installation.
SECURITY OR FIREWALL SOFTWARE:
Your computer may have software that will prevent the installation file from properly downloading. You may need to loosen or temporarily turn off these systems.

Designer Quick Start Guide v201310 Page 8 of 14
STEP 3: LOCATE YOUR MACHINE SERIAL NUMBER
MACHINE SERIAL NUMBER:
Before you can complete the registration process you will need the machine serial number. It is located where the electrical cord comes out of the front of the machine, as pictured below. It will be in the following format: XX.###.### (Two CAPITAL letters dot three numbers dot three numbers) You can write it down here: ___ ___ . ___ ___ ___ . ___ ___ ___ The Machine Serial Number can also be retrieved from the options menu on the machine: 1. Place your memory card into the machine slot.
(Memory Card must always be in before turning on or machine off before taking out.) 2. Power on the machine ON/OFF switch. 3. From the Main Menu, press the “0” key to display the Options Menu. 4. Press “4” key to display the Machine Serial Number. It will be the same number found on the back of the
machine
PROCEED TO STEP 4: REGISTRATION OF THE DESIGNER SOFTWARE

Designer Quick Start Guide v201310 Page 9 of 14
STEP 4: REGISTRATION OF THE DESIGNER SOFTWARE
REGISTERING FOR THE FIRST TIME:
When you first get your new machine, you will need to CREATE A CUSTOMER ACCOUNT. If this is a second or third new machine, it just needs to be added to your existing Customer Account.
1. Locate your Designer Icon, either from your Desktop or PROGRAMS.
2. Open (if Mac or Windows XP) or right-click
on the icon using your mouse & select “RUN AS ADMINISTRATOR” (if using Windows Vista, 7 or 8) Welcome Screen: When the software is opened and not registered, a screen will display how many days are remaining to use the software without activating. It is possible to play with the software for thirty days. You cannot save or upload a project to the memory card and carve on the machine until it is registered. To use the software without activating the software, select the “Continue without Activating” button.
3. To register the software, select the “Register Now” button.
4. Acknowledge that you have read the manuals & watched the video by clicking on all 3 check boxes and “Next”. All three are available at www.carvewright.com under SUPPORT.
WHAT IS A CUSTOMER ACCOUNT?
When you purchased the machine, you may have created a STORE ACCOUNT. It is only for online purchases. A CUSTOMER ACCOUNT uses a different piece of software than the store and is where you will manage your machine, software licenses and computer registration.
YOU WILL ONLY EVER CREATE ONE CUSTOMER ACCOUNT
Even if you don’t remember your username & password, your machine is already registered to you and that is where all of your licenses are saved and available.
There will be two different ways to REGISTER YOUR SOFTWARE:
The First Time & Any Other Time:
• The First Time, you will create a CUSTOMER ACCOUNT.
• Any Other Time, you will select the option that says, “I ALREADY HAVE A CUSTOMER ACCOUNT”.
RECOVERING YOUR PASSWORD
It is generally a good idea to use the same username & password that you set up for your store account. (Cuts down on the confusion.)
Passwords can be recovered or reset at the same location that you login. You must know your username & email address that is on file. Call us, if you can’t remember any of that.
Designer Quick Start Guide v201310 Page 10 of 14
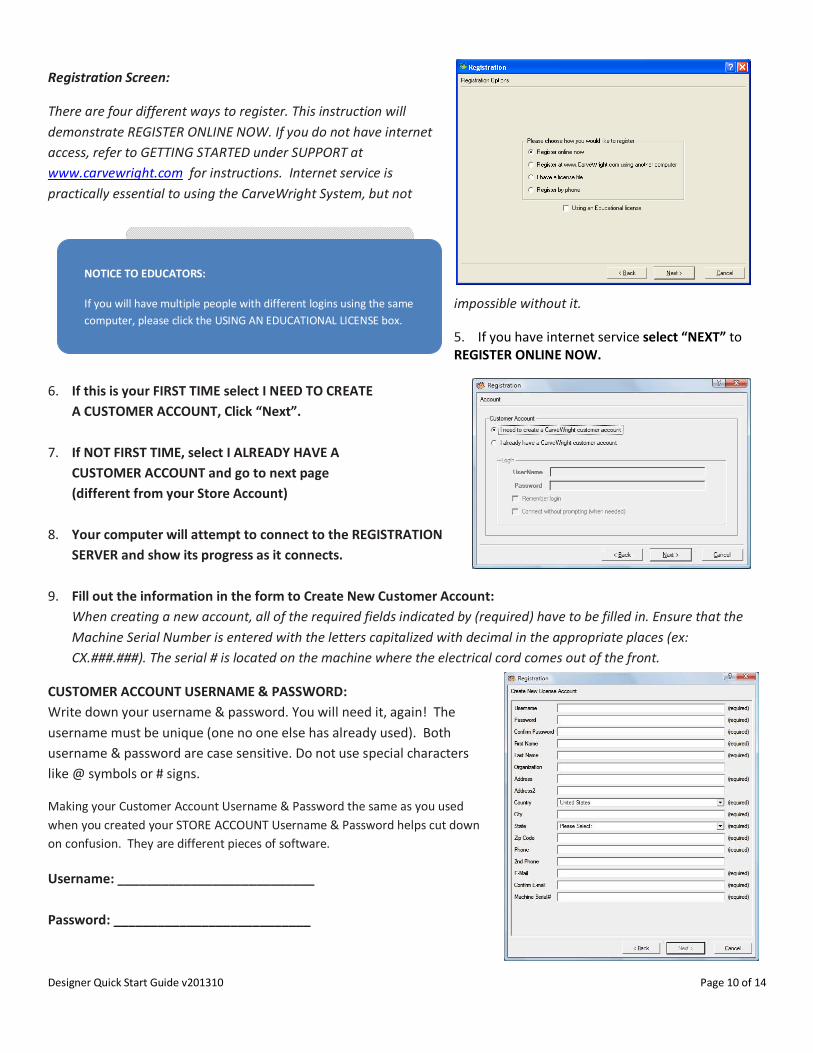
Registration Screen:
There are four different ways to register. This instruction will demonstrate REGISTER ONLINE NOW. If you do not have internet access, refer to GETTING STARTED under SUPPORT at www.carvewright.com for instructions. Internet service is practically essential to using the CarveWright System, but not
impossible without it.
5. If you have internet service select “NEXT” to REGISTER ONLINE NOW.
6. If this is your FIRST TIME select I NEED TO CREATE
A CUSTOMER ACCOUNT, Click “Next”.
7. If NOT FIRST TIME, select I ALREADY HAVE A CUSTOMER ACCOUNT and go to next page (different from your Store Account)
8. Your computer will attempt to connect to the REGISTRATION
SERVER and show its progress as it connects.
9. Fill out the information in the form to Create New Customer Account: When creating a new account, all of the required fields indicated by (required) have to be filled in. Ensure that the Machine Serial Number is entered with the letters capitalized with decimal in the appropriate places (ex: CX.###.###). The serial # is located on the machine where the electrical cord comes out of the front.
CUSTOMER ACCOUNT USERNAME & PASSWORD: Write down your username & password. You will need it, again! The username must be unique (one no one else has already used). Both username & password are case sensitive. Do not use special characters like @ symbols or # signs.
Making your Customer Account Username & Password the same as you used when you created your STORE ACCOUNT Username & Password helps cut down on confusion. They are different pieces of software.
Username: ___________________________ Password: ___________________________
NOTICE TO EDUCATORS:
If you will have multiple people with different logins using the same computer, please click the USING AN EDUCATIONAL LICENSE box.

Designer Quick Start Guide v201310 Page 11 of 14
I ALREADY HAVE A CUSTOMER ACCOUNT:
Whether you are registering a second computer or having to reregister a computer that has changed it’s Computer ID, you will always use the same customer account by selecting “I already have a CarveWright Customer Account”, enter Username & Password. With the current username & registered email address, you can have your password reset. If you don’t remember, call LHR and we can help you get it figured out.
10. Naming your Computer: The software recognizes your computer by its unique Computer ID, but you and LHR staff need to be able to recognize it by the Computer Name. Give your computer a unique & descriptive name, such as HP Laptop2013 or Office Dell PC. These names can be edited by you, but you must call LHR to have an old computer deactivated.
11. Confirmation Screen: A confirmation will display on the screen thanking you for registering your machine/software. It will show you your machine(s) serial number(s), unlock code, registration date and warranty status.
12. Write down your machine UNLOCK CODE: _________________________
13. Click “Finish”.
PROCEED TO STEP 5: SOFTWARE & PATTERN ACTIVATION

Designer Quick Start Guide v201310 Page 12 of 14
STEP 5: SOFTWARE & PATTERN ACTIVATION
Now that you have created your Customer Account, you can register any advanced software, patterns, collections, projects or subscriptions. There are two ways to do it:
• The first way is preferred and has fewer steps. It is through your Designer Software.
• The second way is through your Customer Account on the internet,
but then you need to go into your Designer Software and UPDATE LICENSES.
For detailed directions based on the product you are activating, go to our website and look under SUPPORT > SOFTWARE & PATTERN ACTIVATION. Here is a link: http://www.carvewright.com/support-page/getting-started/activation/
STEP 6: REGISTERING A SECOND COMPUTER
1. Install the correct version of Designer Software onto your computer, per the instructions in STEP 2.
2. Open based on your computer’s operating system. 3. Go to Continue Without Activation > Help > Manage Licenses > Update
Licenses.
YOU ARE NOW READY TO USE THE SOFTWARE.
STEP 7: MAINTAINING REGISTRATION:
Re-registering a computer:
Sometimes a computer that was once registered suddenly decides it needs to be registered again. Our system operates off of your Computer ID and if for some reason that ID changes, then it will tell you that you need to register. Some of the reasons include: you changed your hard drive, updated your operating system or some of your security software ran and reset the Computer ID. Look at your customer account and see if you have a license available to re-register it. If you do, go ahead and register it following the registration instructions. Then send an email asking us to remove the first installation on that computer (we need to know what unique name you gave it). Deactivating a Computer Registration:
If you get a message that says “No Licenses Available”, send us a note or call us and we can deactivate it for you to free up a license. Customers cannot deactivate a computer through their Customer Account. You have to get us to do it. Just call us or send us an email letting us know, which one to remove. You will need to tell us what you named the computer. Edit only allows you to change what you named your computer. We do have to be in the office to deactivate a computer. It is very important to deactivate computers that you no longer need!
CUSTOMER ACCOUNT is where you REGISTER & MANAGE:
• Machines • Licenses • Computers
Products Requiring Activation:
• Advanced Software
• Pattern • Collection/Library • Project • Subscription
Possible Required Steps:
• Purchase • Activation • Download • Installation
Not all products require all steps.

Designer Quick Start Guide v201310 Page 13 of 14
Updating Project Designer:
You can Check for Updates from your Project Designer software by going to HELP > Check for Updates. If you have a software disk that is more than a month old, throw it in the trash! Get the latest version from our website. It is recommended that you do not update your software over the weekend when we are not here. You may need to re-register your computer and if you don’t have a license available, then you will be unable to resolve the problem until Monday when we return. Usernames & Passwords:
There are three different areas to log into from our website. Each may have a different username and/or password.
Each one also has a separate area where you log into your account. Each also has a place to recover or reset your password. Username & passwords are case sensitive. Do not include any special characters such as @, #, * etc. You can use _ instead of spaces. Once into your account, you can go in and manage your account information. If you have forgotten your User Name or email, please call 713-473-6572.
KEYS TO SUCCESS:
• Keep Yourself Safe: Refer to Owner’s Manual for Safety Information • Properly Setup Your Machine: Refer to Owner’s Manual or GETTING
STARTED for unpacking and setup instructions • Maintain Your Machine: Refer to Owner’s Manual and
the Maintenance section of this website; specifically 1) Keeping your machine clean, 2) Lubricating as needed, 3) Checking the head-pressure
• Memory card in before turning on; machine off before taking it out • Electrostatic shock can fry your controller – sticking a hose into it while it is turned on is a BAD IDEA!! There are better ways to
control the dust. See RingNeckBlues DC Insert or Erwin’s Dust Devil under Third Party in our online store. • Use Properly Prepared Materials: Make sure to only carve approved materials that are properly prepared including straight, flat
& free of defects • Know Your Machine: Knowing what your machine is thinking, asking, & doing at each step is critical to efficiency & success • Design Your Projects for Success: As with most things there are more ways than one to design your artistic masterpiece. Make
sure you use good design practices and be prepared to test carve projects. The Tutorials under support are a great resource. • Let Us Know How You are Doing: Sign up for our Community Forum & LIKE our Facebook page to post your projects & show
them off • Learn the 7 Inch Rule to avoid “snipe” and breaking your 1/8″ cutting bit • Items from Pattern Depot & Software must be purchased, activated, downloaded and/or installed. • Red circle with 16 bit in PatternDepot refers to the resolution being higher than the original patterns that were 8 bit resolution. • Refer to the website SUPPORT PAGE: for help in learning, maintaining, troubleshooting & repairing your system • Customer Service is here to help you. Call us at 713-473-6572 • Have Fun!
Store Account: Where you make online purchases.
Username:
Password:
Email:
Customer Account: Where you manage computers, licenses and register machines.
Username:
Password:
Email:
Community Forum Account: Where you “chat” with other users, trouble shoot issues, learn new techniques and share your success.
Username:
Password:
Email:

Designer Quick Start Guide v201310 Page 14 of 14
ADDITIONAL ADVANCED SOFTWARE OPTIONS
CarveWright’s Designer software is everything that you need to get started. Everyone’s individual advanced software needs are different; therefore these features are available separately. This way, you purchase just the software you need to keep your costs low and tailored to fit. Then, as your skills increase, projects demand or budgets allow, you can grow your system at your own pace or purchase it all at once. Here are brief descriptions of those advanced features:
Centerline Text:
The Centerline Text Feature adds an additional Rout Mode for the Text Tool feature. This feature is designed specifically for use with the 60° and 90° V-groove bits (purchased separately), which carve text with pin-point accuracy. Centerline text carves point-to-point in vector mode following the center of the letter. The depth of the centerline is determined by the width of the font selected.
Conforming Vectors:
The Conforming Vectors feature allows for v-bit routing along a carved surface. Without Conforming Vectors, these types of routs can only be made to the top of a flat surface material. Now you can apply the conform feature to Centerline Text, lines drawn with the drawing tools, the Outline tool, and importer DXF files making them fit to carved regions, domes, textures and even patterns.
Pattern Editor:
The Pattern Editor Software allows the manipulation of a scanned or imported image on a pixel by pixel level. This software is included FREE with purchase of Scanning Probe, but can be purchased by itself.
Keyhole Function:
The Keyhole Function allows for plunge cutting keyhole shaped mounting slots in items such as picture frames and plaques. It includes the software and keyhole bit.
DXF Importer:
Introducing the ability to import 2D vector files saved in DXF (Drawing eXchange Format) file format. Manipulate the files with the DXF Importer software and save to a format that can be cut out on your CarveWright.
STL Importer:
The STL Importer is an add-on feature for the CarveWright Designer software, which allows users to convert 3D STL models, created from any 3rd party 3D graphics program, and slice them into patterns for the use in the CarveWright Designer software. Now you can take your 3D computer models and make them into 3D physical models!
2D Vector Drawing Suite:
The newly introduced Vector Drawing Suite (2D Advanced) is an add-on feature that allows you to use very advanced drawing tools & image tracing abilities that before were only available from 3rd party software packages.
3D Pattern Modeling Suite:
The Pattern Modeling Suite (3D Advanced) allows the modeling of 3D relief patterns in the CarveWright Project Designer software. These tools are easy-to-use and make your own custom pattern design fun and simple.
Additional tutorials and videos for these advanced features are available at www.carvewright.com under SUPPORT > TUTORIALS > SOFTWARE.


![Quick Start Guide - CORPORATE MONTAGE EUROPE GMBH · [Start > All Programs > Bentley > AECOsim Building Designer V8i (SELECTseries 3)] to start the application with the Electrical](https://img.dokumen.tips/doc/110x75/60398328084b5758f82c4f5f/quick-start-guide-corporate-montage-europe-gmbh-start-all-programs-.jpg)