Embed Size (px)
Citation preview

Deployment Guide
Nitro Pro 12
June 12, 2018

1
1. INTRODUCTION 2
2. INSTALLATION PREREQUISITES 3
2.1. SYSTEM REQUIREMENTS 3
2.2. INSTALLATION FILES (BUSINESS VERSUS ENTERPRISE LICENSING) 3 2.3. ENTERPRISE DEPLOYMENT UTILITY 4
2.4. DMS PLUGIN INSTALLER 4
3. INSTALLATION 6
3.1. LICENSE ACTIVATION 6
3.2. STANDARD DEPLOYMENT ON PC/LAPTOP 9
3.3. MICROSOFT SCCM AND OTHER DEPLOYMENT SOLUTIONS 10
3.4. VIRTUAL DESKTOP INFRASTRUCTURES (VDI) 10
3.5. HOSTED DESKTOP / HOSTED APPLICATION 111
3.6. MICROSOFT APP-V 111
3.7. CITRIX PROVISIONING SERVICES / MACHINE CREATION SERVICES 144
4. CUSTOMISING MSI PROPERTIES 155
4.1. CUSTOMISABLE MSI PROPERTIES 155
4.2. COMMAND PROMPT INSTALLATIONS 166
4.3. ENTERPRISE DEPLOYMENT UTILITY 177
4.4. ORCA 244
5. INTEGRATION WITH DOCUMENT MANAGEMENT SYSTEMS 266
5.1. WORKSITE ERROR! BOOKMARK NOT DEFINED.6
6. UPDATING NITRO PRO 31
6.1. MINOR / MAJOR RELEASE 31
6.2. PRESERVING CONFIGURATION SETTINGS 31
7. SPECIAL CONFIGURATIONS 32
7.1. SETTING NITRO PRO AS DEFAULT PDF APPLICATION IN WINDOWS 8.1 AND 10 32
7.2. SETTING DEFAULT APPLICATIONS USING POWERSHELL SCRIPT 35
7.3. CONFIGURATION OPTIONS FOR NITRO IE ADD-ON 36
7.4. CONFIGURATION OPTIONS FOR NITRO MS OFFICE PLUGINS 39
7.5. MICROSOFT RIGHTS MANAGEMENT SERVICES (RMS) AND AZURE INFORMATION PROTECTION (AIP) 41
8. CONTACTING SUPPORT 41

2
1. Introduction
The Nitro MSI deployment package is designed for enterprise environments where applications are deployed business-
wide. To better suit a large user base, and to better conform with typical internal security policies and user rights, some
front-end options have been disabled.
The following guide explains best practices and requirements in relation to various deployment methods. These settings
can be applied in a number of different ways to suit individual customers’ requirements and preferences.
Please note that Nitro Pro is also available as an executable (.exe) installer. This file is provided for single-user retail
customers, and is not covered by the instructions below. All methods described in this document apply only to the MSI
(.msi) deployment package.
If you require any further assistance, please refer to the Nitro Knowledge Base or Support Forum, or contact Nitro
Customer Support (see Section 8).

3
2. Installation prerequisites
2.1. System requirements
Desktops: Windows 10, 8, and 7 (64 bit)
Servers: Microsoft Windows Server 2008 R2, 2012, 2012 R2 (64 bit), 2016
Processor: 1.5 GHz or faster
RAM: 1GB
Available hard disk space: 4.5GB
Display screen resolution: 1024x768
Microsoft Office integrated features: MS Office 2013 (32bit or 64bit), Microsoft Office 2016 (32bit or 64bit)
Video hardware acceleration (optional)
2.2. Installation Files (Business vs Enterprise Licensing)
Nitro Pro uses two different licensing methods—Business and Enterprise—which correlate with the type of license
purchased.
Please ensure you are using the correct MSI package based on your license.
Both MSI packages contain the same version of Nitro Pro and provide the same features, but the licensing system differs
based on your license type. The two types of licensing methods are difficult to distinguish before being installed, so if
you are unsure, please refer to the descriptions below and re-download the correct package using the links provided.
Business license
A Business license is a numeric code (18 digits), for example:
234600-012345-543210
It requires the MSI deployment package provided by the Business Downloads web page:
https://www.gonitro.com/enterprise-installers/v12/vlp/msi/download
Figure 1

4
Enterprise license
An Enterprise license consists of a license file (.lic) with a 32-digit alphanumeric name, for example:
1b2c3d4e-a1b2-c3d4-e5f6-z1y2x3w4v5u6.lic
This string is referred to as the “UUID”. The actual license code is contained within the file and consists of an
alphanumeric string of several hundred characters.
The Enterprise license requires the MSI deployment package provided by the Enterprise Downloads web page:
https://www.gonitro.com/enterprise-installers/v12/enterprise/msi/download
Figure 2
PLEASE NOTE: Using the wrong license/deployment package combination will result in a failed activation of Nitro Pro,
and the application will need to be reinstalled using the correct deployment package.
2.3. Enterprise Deployment Utility
The Enterprise Deployment Utility is a visual configuration tool that makes it easy to create an MST file that applies your
custom configurations to your Nitro Pro deployment. It provides one of the methods of customizing MSI properties
described in Section 4.
The utility is provided as a 32-bit or 64-bit executable file (.exe), which will allow customization for both the Business
and Enterprise deployment packages. The latest version of the utility is available via the Business and Enterprise
Downloads web pages linked above in Section 2.2.
2.4. DMS Plugin installer
Nitro Pro integrates with various document management systems (DMS), enabling opening, editing and saving
documents to DMS locations.
Nitro Pro has two types of integrations when configuring DMS: native integration with SharePoint 365 and iManage
WorkSite, and integration via DMS connector plugin. The DMS connector plugin must be used when connecting to DMS
systems via OmTools configuration.

5
If connecting via OmTools, you must have a DMS plugin installer, which is available for download on the Enterprise and
Business Downloads pages linked to in Section 2.2 (Fig. 3).
Figure 3
Procedure:
1) Install Nitro Pro
2) Install the Nitro DMS Connector
3) A new folder will be created on your desktop with shortcuts for each step
4) Configure access for your DMS as required and exit the configuration tool
5) Optional: Add additional configuration parameters to the XML files as described in Section 3
6) Test to ensure that the DMS can be correctly accessed via Nitro (under the File > Open menu)
7) Create the installer for deployment with the new configuration
8) You will now have three files for deployment: nitro_dms2_x86.msi, nitro_pdf_dms2_x86.mst and nitro_
pdf_dms2_x86.cab that can now be copied to a network share for deployment

6
3. Installation
Nitro Pro can be installed using one of two methods:
1) Starting the MSI file and completing the installation wizard
2) Using the command line or a script to run the msiexec command
Deploying via a software package, e.g. Microsoft System Center Configuration Manager (SCCM), usually utilises one of
the above methods.
NOTE: Certain deployment methods have special requirements. Please refer to the following sections in this chapter
for more information. Failure to fulfill the requirements detailed may result in a non-working deployment of Nitro
Pro.
3.1. License activation
Nitro Pro can be activated using one of three methods:
• During deployment by providing an MST file that contains the license
• After installation through the Nitro Pro user interface
• After installation using the ActivateSN.exe tool, either scripted or via command prompt (Enterprise license only)
During deployment using an MST file
There are a number of ways to adjust MSI properties during the installation, see Chapter 4: Customising MSI Properties
for more information.
EXAMPLE: using the Enterprise Deployment Utility to create an MST file containing the license
1) Open the Enterprise Deployment Utility (Nitro_EnterpriseDeployment.exe) Fig. 4
2) Click “Browse” and open the Nitro Pro .msi file
7
3) Switch to the “Serial Number” section and add your Business or Enterprise license
4) Click “Generate MST File”. The file will be saved in the same locations as the MSI file opened in step 1.
5) Nitro Pro can now be installed by using the MSI and the MST file, e.g. by running the following command in
CMD window:
Msiexec -i <path to MSI file> TRANSFORMS=<path to MST file>
After Installation, using the Nitro Pro User Interface
Once Nitro Pro is installed, go to the Help tab, and click on the “Activate” button. You will be presented with a popup
window prompting for license information.
Figure 5
If the window asks for first name, last name, and a serial number, it expects an Enterprise license to be entered. If you
have a Business license, you need to reinstall Nitro Pro using the correct installation file (see Chapter 2.2: Business vs
Enterprise Licensing).
Figure 4

8
Figure 6
If the window asks for a serial number only, it expects a Business license to be entered (again, reinstall if this is the
wrong type of license for you).
Figure 7
After activation, the “Activate” button disappears from the user interface. You can click on “About Nitro Pro” to
deactivate, if necessary.
After installation, using the ActivateSN.exe Tool
This tool is installed with Nitro Pro in the same install location (usually C:\Program Files\...), but only for Enterprise
licenses. It can be called via a script or a command line, using the following syntax:
“C:\Program Files\Nitro\Pro 11\ActivateSN.exe” –s <INSERT-SERIAL-NUMBER-HERE>
It is also possible to disable encryption of the license, which is required by certain deployment methods as described in
the following sections. Example:
“C:\Program Files\Nitro\Pro 11\ActivateSN.exe” -e false -s <INSERT-SERIAL-NUMBER-HERE>

9
3.2. Standard deployment on PC/Laptop
Nitro Pro can be installed on a Windows-based computer that meets the prerequisites by simply starting the MSI
installation file with a double-click. Using that method, some customisations are possible, see below.
Figure 8
Set Nitro Pro as the default handler for PDF files
When checked, the installation process will set Nitro Pro as your default PDF application. When unchecked, it will leave
the application that is currently set as the default PDF application on your computer.
NOTE: Due to a change in the behaviour of Windows 8 and later, this option is not possible for those operating
systems. The default application has to be set manually after installation, or automatically following one of the
methods described in Chapter 7.
Install Nitro Pro Plugin for Internet Explorer and Firefox
When checked this will install the Nitro Pro add-in that allows the opening of PDF files from webpages within the
Internet browser. It will also set the Nitro add-in as default, meaning that if other PDF add-ins have been installed
previously, they will no longer be used to open PDF files in the browser. If you prefer to use your existing add-ins, leave
this box unchecked.
Install Nitro toolbar for Word, Excel, PowerPoint, and Outlook
When checked, this will install and activate the Nitro Pro MS Office plugin, which adds the Nitro Pro ribbon to the user
interface of the listed applications. It will not deactivate or overwrite any other Office add-ins you may be using.
NOTE: If you require any additional customisation of the installation procedure or application settings, please refer to
Chapter 4: Customising MSI Properties.

10
3.3. Microsoft SCCM and other Deployment Solutions
If you use Microsoft SCCM (or a similar solution) to deploy MSI-based application packages, you can use it to deploy
Nitro Pro like any other application in your environment. Command line switches, or an MST (transform) file, can be
used to customise the installation. Please see Chapter 4: Customising MSI Properties for more information.
3.4. Virtual Desktop Infrastructures (VDI)
Nitro Pro is fully supported for deployment on VDI infrastructures, such as Citrix XenDesktop or VMWare Horizon.
Installation can be performed similarly to any other MSI-based application in your environment, with the following
considerations:
1) All deployments to virtual machines (i.e. where Nitro Pro is installed and running on virtual hardware and/or
virtualised operating systems) require an Enterprise license. Please refer to Chapter 2.2: Enterprise vs Business
Licensing.
2) Where a “master image” is being used to deploy to multiple identical hosts, encryption of the license key needs
to be disabled when installing Nitro Pro on the master image. This can be done using the methods described in
Chapter 4: Customising MSI Properties.
Example: use the Enterprise Deployment Utility to create an MST file with the following settings:
Figure 9
NOTE: The license is encrypted by default. If the license key in use needs to be replaced after installation, the method
using the ActivateSN.exe as described in Chapter 3.1: License Activation needs to be followed. Using the Nitro Pro UI
to change the license key will encrypt it.

11
3.5. Hosted Desktop / Hosted Application
Nitro Pro is fully supported for deployment on hosted desktop or hosted application environments, such as Citrix
XenApp or Microsoft Remote Desktop Services. Installation can be performed similarly to any other MSI-based
application in your environment, with the following considerations:
1) All deployments to virtual machines (i.e. where Nitro Pro is installed and running on virtual hardware and/or
virtualised operating systems) require an Enterprise license. Please refer to Chapter 2.2: Enterprise vs Business
Licensing.
2) If an Enterprise license is used, access to Nitro Pro must be controlled by e.g. using an Active Directory GPO,
AppLocker, or the published application settings in the Citrix admin console. Failure to do so may result in
accidental overuse of the license.
3) For Business licensing, a “server license” is required, which has two constraints: number of activations (A) and
number of users per server (B). Number of activations limits the number of servers on which Nitro Pro can be
installed. Number of users limits the number of simultaneous instances of Nitro Pro that can be run on a single
server. Once (B) has been reached, any subsequent users connecting to the same server will not be able to
launch Nitro Pro. If Nitro Pro is registered as the default PDF viewer for that user, this may lead to issues unless
you provide an alternative. The product of (A) x (B) equals the total number of licenses purchased, which must
be at or below the total number of Nitro users in the environment.
NOTE FOR ALL POINTS ABOVE: Nitro does not offer concurrent user licensing at this time. The number of licenses
purchased must equal or exceed the total number of Nitro users in the environment, even if the number of concurrent
users at any given time is lower than that.
4) Installation should be completed using Install Application on Terminal Server, found under the Control Panel.
See the Microsoft best practices article: http://technet.microsoft.com/en-us/library/cc742815(WS.10).aspx
5) If you choose to install the Nitro Pro add-ins for Microsoft Office or Internet Explorer, please note that the add-
ins will be installed for all users. However, the load behaviour of the add-ins can be controlled on a per user or
per group basis using AD GPOs – see Chapter 7: Special Configurations.
3.6. Microsoft App-V
Nitro Pro can be deployed using App-V; however, there are a number of considerations. Please ensure you understand
the points below in order to achieve a successful outcome.
1) Deployment via App-V requires an Enterprise License. Please refer to Chapter 2.2: Enterprise vs Business
Licensing.
2) Encryption of the license key needs to be disabled when sequencing the App-V package. This can be done using
the methods described in Chapter 4: Customising MSI Properties (see example below).
3) It is recommended to use Nitro Pro 11.0.6 or later, and App-V versions 5.1 or later.

12
4) The Nitro Pro add-ins for Microsoft Office and Internet Explorer are not supported in an application streaming
deployment.
5) The Nitro PDF Creator (printer) cannot be streamed via App-V and must be excluded from the App-V package.
However, this tool is necessary for creating PDF files and converting other file formats to PDF, and it must be
installed separately on all target devices, as per instructions below. Please contact Nitro Support to obtain the
standalone printer installation file.
Example: Creating an MST file using the Enterprise Deployment Utility
1) Open the Enterprise Deployment Utility (Nitro_EnterpriseDeployment.exe)
2) Click “Browse” and open the Nitro Pro .msi file
3) On the “General” tab, disable the following settings:
a. Install toolbars for Microsoft Word, Excel, Powerpoint
b. Install printer driver
Figure 10
4) On the “Default Applications & Add-Ons” tab, disable the following setting:
a. Install Nitro Pro SharePoint and PDF Viewer IE add-ons

13
Figure 11
5) On the “Serial Number” tab
a. Click “Load From File” and import your Enterprise license from the .lic file
b. Uncheck the “Encrypt” setting
Figure 12

14
6) Tick the box to agree to Terms of Service and click “Generate MST File. The file will be saved in the same
location as the MSI file opened at step 2.
Sequencing Nitro Pro in App-V
1) Start the Sequencing Wizard, select File / New Package. For more information please refer to
https://technet.microsoft.com/en-us/library/cc817128.aspx
2) Install Nitro Pro with the transform file (MST file)
a. Open command prompt as administrator and start the installation using the msiexec command
Example:
msiexec /i “C:\nitro _xxxx.msi” TRANSFORMS=”C:\nitro_xxxx.mst”
3) On the Launch Application page, start the application and click Launch (this step is optional)
4) On the Sequence Package page, click Finish
Install the standalone driver on the target device master image
5) Install the Creator to any folder except "Program Files" or "Program Files (x86)"
6) Use the “INSTALLLOCATION” PROPERTY to specify the folder path:
7) Open command prompt as an Administrator
8) Run the following command:
msiexec /i Nitro_Creator_x64.msi INSTALLLOCATION="c:\Nitro\Creator"
9) Reboot
3.7. Citrix Provisioning Services / Machine Creation Services
Nitro Pro is fully supported on devices with streamed operating systems using Citrix PVS or MCS. The following
considerations must be met for successful deployment:
1) All deployments to streamed operating systems require an Enterprise license. Please refer to Chapter 2.2:
Enterprise vs Business Licensing.
2) Encryption of the license key needs to be disabled when deploying Nitro Pro. This can be done using the
methods described in Chapter 4: Customising MSI Properties
3) If, in addition to PVS/MCS, other technologies such as e.g. XenApp or App-V are used to provide access to Nitro
Pro for users, please refer to the relevant sections of this guide for additional requirements.

15
4. Customising MSI Properties
Many properties of the MSI deployment package can be customised by using a command prompt, or by creating an MST
file to be used by the installation process. The table below is a partial list of customisable properties, followed by specific
examples using the available methods of customisation. If you require additional customisation, please contact Nitro
Support.
NOTE: The Enterprise Deployment Utility is the most convenient and recommended method of adjusting MSI
properties. A command prompt can be used to adjust many but not all of these settings, and is commonly used if only
one or two simple settings need to be changed.
ORCA can be used to make very extensive changes to the installation process, but not all of the possible options are
documented in this guide. It is highly recommended that only experienced admins use this tool.
4.1. Customisable MSI properties
Property Description
NPSERIAL Enter your Enterprise or Business license number
PROXYSERVER Business licenses require Internet access to activate Nitro
Pro. If you are using a proxy server, please specify the
required information in the format 'server:port'
(example: 169.0.0.11:8080)
PROXYUSER Username for Internet access via a proxy server
PROXYPASS Password for Internet access via proxy server
DT_SHORTCUT Create a desktop shortcut for Nitro Pro (Yes=1/No=0)
OFFICEADDINS Install Nitro Pro add-ins for MS Office (Yes=1/No=0)
NP_PDF Default PDF file association (e.g. NitroPDF.Document.10,
AcroExch.Document)
NP_FDF Default FDF file association (e.g. NitroPDF.FDFDoc.10,
AcroExch.FDFDoc)
MAXCPUCOREUTILIZATION Maximum number of CPU cores to be used by Nitro Pro
0 = automatically allocate number of cores to be used
(default)
1 = 1 core (recommended for Citrix and Terminal Server
deployments)
2 = 2 cores
3 = 3 cores
4 = 4 cores
CLOUDENABLE Enable Nitro Pro to connect to Nitro Cloud (adds relevant
buttons to the UI)
DROPBOXDISABLED Configure connection to Dropbox storage from within Nitro
Pro (Disabled=1/Enabled=0)
ONEDRIVEDISABLED Configure connection to OneDrive storage from within Nitro
Pro (Disabled=1/Enabled=0)
GOOGLEDRIVEDISABLED Configure connection to Google Drive storage from within
Nitro Pro (Disabled=1/Enabled=0)
NPBROWSERPLUGIN Install Nitro Pro Internet browser add-in (Yes=1/No=0) Table 1
16
4.2. Command Prompt Installations
Msiexec.exe is a Windows program that interprets and installs application packages. It can be used via the command
prompt (CMD) or a script. More information and a full list of options are available at https://msdn.microsoft.com/en-
us/library/windows/desktop/aa367988(v=vs.85).aspx. The utility can be used to simply install Nitro Pro, but also to
customise many of the parameters documented in this chapter.
The basic syntax of the command to install an application is:
msiexec /i InstallationFile /<options> Property=Value
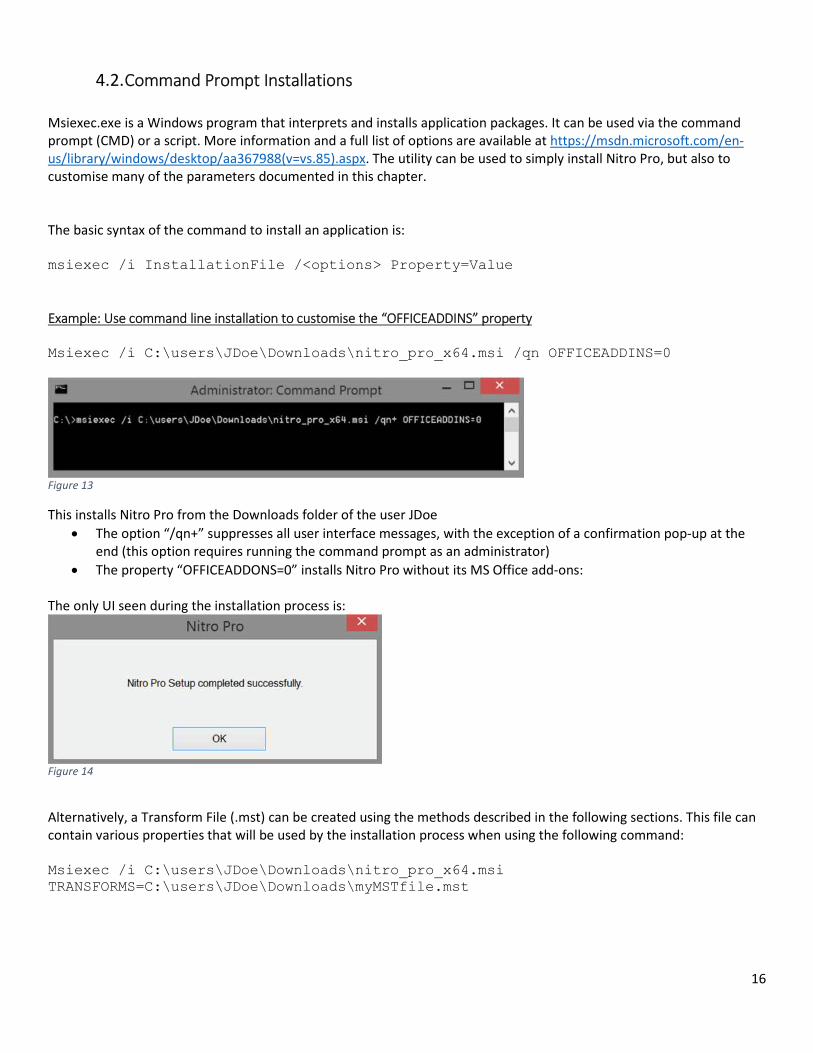
Example: Use command line installation to customise the “OFFICEADDINS” property
Msiexec /i C:\users\JDoe\Downloads\nitro_pro_x64.msi /qn OFFICEADDINS=0
Figure 13
This installs Nitro Pro from the Downloads folder of the user JDoe
• The option “/qn+” suppresses all user interface messages, with the exception of a confirmation pop-up at the
end (this option requires running the command prompt as an administrator)
• The property “OFFICEADDONS=0” installs Nitro Pro without its MS Office add-ons:
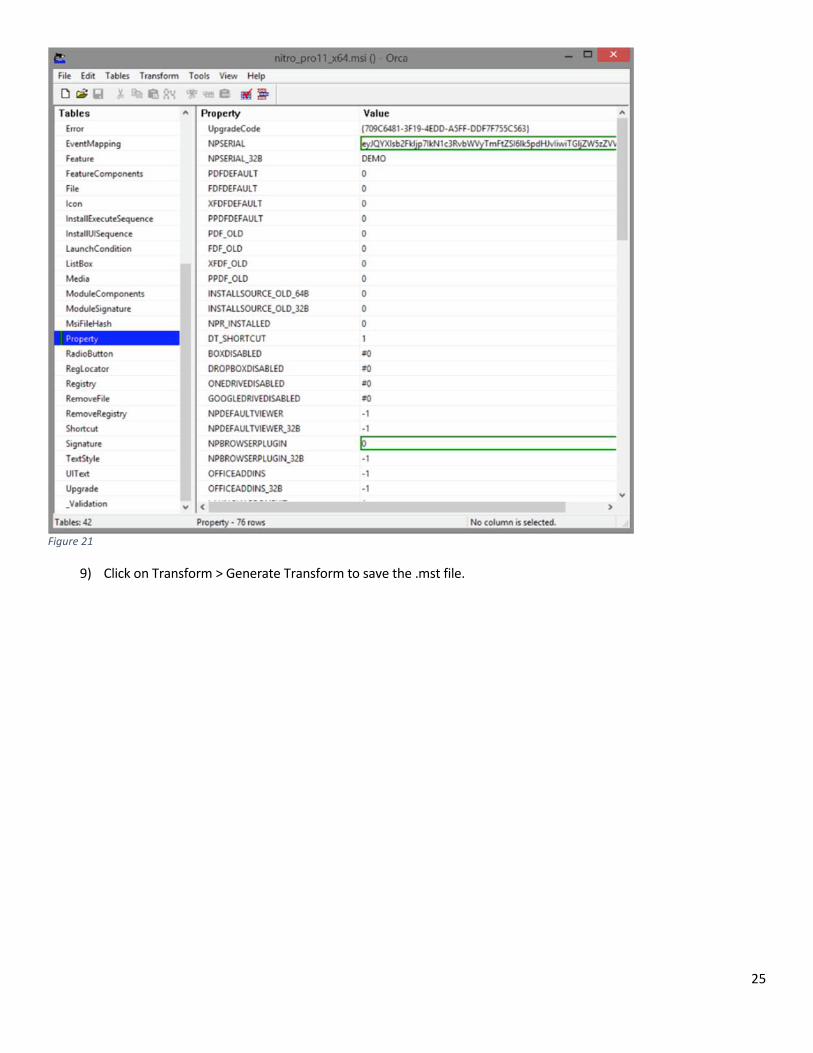
The only UI seen during the installation process is:
Figure 14
Alternatively, a Transform File (.mst) can be created using the methods described in the following sections. This file can
contain various properties that will be used by the installation process when using the following command:
Msiexec /i C:\users\JDoe\Downloads\nitro_pro_x64.msi TRANSFORMS=C:\users\JDoe\Downloads\myMSTfile.mst

17
Figure 15
4.3. Enterprise Deployment Utility
The Enterprise Deployment Utility is a visual configuration tool that makes it easy to create an MST file that applies your
custom configurations to your Nitro Pro deployment. It provides one of the methods for customizing MSI properties.
The following screenshots show the default settings used by the Nitro Pro installation, and the tables explain the
customisations possible using the Enterprise Deployment Utility.
NOTE: Nitro recommends any setting checked by default to be left as-is, unless otherwise noted.
“General” settings
Figure 16

18
Setting MSI Property Description
Create desktop shortcut DT_SHORTCUT Leaving this box checked will result in a
Nitro Pro desktop icon/shortcut being
added to the users' desktops.
Install toolbars for
Microsoft Word, Excel,
PowerPoint
OFFICEADDINS Leaving this box checked will install the
Nitro Pro plugin directly to the Office
toolbar/ribbon, allowing PDFs to be
easily created/converted directly from
Office applications, including Word,
Excel, and PowerPoint.
Uninstall Nitro Pro v10
and earlier (v11 will be
uninstalled
automatically)
NITRO10_UNINSTALL Checking this box will uninstall previous
major versions (Nitro Pro 10.x.x and
Nitro Pro 11.x.x) when installing Nitro
Pro 12.
Install printer driver INSTALL_PRINTER_DRIVER Installation without the printer driver is
required for App-V deployments. For all
other deployments, unchecking this
setting will prevent users from being
able to create PDF files.
Enable cloud features
like eSignatures and
document collaboration
CLOUDENABLE Checking this box will enable Nitro
Cloud to be accessed directly from
Nitro Pro. Unchecking this box will
suppress all direct links to Nitro Cloud
and its functionality.
Enable integration with
Dropbox
DROPBOXDISABLED Leaving this box checked will enable
users to access PDF documents directly
from Dropbox.
Enable integration with
Google Drive
GOOGLEDRIVEDISABLED Leaving this box checked will enable
users to access PDF documents directly
from Google Drive.
Enable integration with
Box
BOXDISABLED Leaving this box checked will enable
users to access PDF documents directly
from Box.
Enable integration with
OneDrive Personal
ONEDRIVEDISABLED Leaving this box checked will enable
users to access PDF documents directly
from OneDrive Personal accounts.
Enable integration with
OneDrive for Business
ONEDRIVEBUSIESSDISABLED Leaving this box checked will enable
users to access PDF documents directly
from OneDrive for Business accounts.
Enable integration with
SharePoint 365
SHAREPOINT365DISABLED Leaving this box checked will enable
users to access PDF documents directly
from SharePoint 365.
Enable crash reporting (Registry)
kBugsplatEnableCrashReporting Leaving this box checked will provide
users with the option to submit a
Bugsplat crash report should Nitro Pro
terminate after encountering an issue.
The Crash Reporter will send a

19
detailed report that will help Nitro's
engineers to diagnose the issue.
Send PDF during crash
report
(Registry)
kBugsplatSendPDFDuringCrashReport Leaving this box checked will provide
users with the option to submit a
Bugsplat crash report should Nitro Pro
terminate after encountering an issue.
The Crash Reporter will send a
detailed report that will enable Nitro's
engineers to diagnose the issue.
Table 2
“Default Applications & Add-Ons” settings
Figure 17
Setting MSI Property Description
Default PDF Viewer
(Windows 7 only)
NP_PDF, NP_FDF Set the default PDF application by
selecting it from the dropdown.
NOTE: Due to a change in the
behaviour of Windows 8 and later,
this is not possible for those operating
systems. The default application must

20
be set manually after installation, or
automatically following one of the
methods described in Chapter 7.
Display message if not
the default PDF viewer
(Registry)
kPrefGeneralMsgIfNotDefaultPDFViewer
If this box is checked, users will receive
a notification that Nitro Pro is not the
default PDF viewer.
Install Nitro Pro
SharePoint and PDF
Viewer IE add-ons
NPBROWSERPLUGIN Checking this box will install the Nitro
Pro Internet browser add-ons. The
SharePoint IE add-on will allow
opening files from SharePoint. The
PDFViewer add-on will enable viewing
of PDFs in the web browser.
Set Nitro PDF Viewer IE
add-on as default
SET_DEFAULT_MIME_GUID PDF documents opened in Internet
Explorer will use the Nitro Pro add-on.
Set Adobe Acrobat PDF
Viewer IE add-on as
default
SET_DEFAULT_MIME_GUID PDF documents opened in Internet
Explorer will use the Adobe Acrobat
add-on.
NOTE: this setting will not verify
whether the Adobe add-on is actually
installed.
Allow opening PDF
documents from Nitro
Pro IE add-on in Adobe
PDF viewer
IE_ALLOW_ADOBE_BUTTON Checking this box will enable a button
to allow PDF documents opened in the
Nitro Pro browser add-on to be
opened in Adobe Acrobat. This option
is recommended when you need to
work with XFA documents.
Table 3

21
“Serial Number” settings
Figure 18
Setting MSI Property Description
Load From File / Textbox NPSERIAL Click “Load from File” to upload your Nitro Pro
license file (.lic) if you are using an Enterprise
license; paste your license code into the text
field if you are using a Business license
Proxy… PROXYSERVER,
PROXYUSER, PROXYPASS
Business licenses require Internet access to
activate Nitro Pro. If you are using a proxy
server, please specify the required
information in the format 'server:port'
(example: 169.0.0.11:8080), as well as the
required username and password
Encrypt NPSERIALENCRYPTED By default Nitro Pro encrypts the license code.
Certain deployments require this setting to be
disabled (see Chapter 3)
Table 4

22
“Application” settings
Figure 19
Setting MSI Property Description
Do not display Learning
Center at startup
(Registry)
kLCShowAtStartup
Checking this box will suppress the new user
tutorial upon starting Nitro Pro.
Hide buttons to contact
Nitro Support Team
NPCUSTOMIZE Checking this box will disable users from
accessing the Nitro Support Team from the
Nitro Pro user interface, as well as other
support tools.
Enable metrics ANALYTICSDISABLED Leaving this box checked will enable click
tracking and aggregation of usage
metrics. No personally-identifiable
information is collected or passed to Nitro.
Table 5

23
“Print” settings
Figure 20
Setting MSI Property Description
Default Settings In most cases, we recommend selecting
“Default” from the dropdown.
Optimize for PCL driver (Registry)
PrintBandSize,
PrintBandCountForIgnore
If you experience issues when printing large
image/graphic files to specific printers
(typically Xerox brand PCL pull print drivers),
selecting “Optimize for PCL Driver” is expected
to resolve these specific printing issues. This
setting can also be changed post-deployment
for individual users via the registry key
settings.
Table 6

24
4.4. ORCA
Orca is an MSI database editor provided as part of the Microsoft Windows SDK. For more information visit:
https://msdn.microsoft.com/en-us/library/aa370557(v=vs.85).aspx
https://msdn.microsoft.com/en-us/library/aa370834(v=vs.85).aspx
Orca enables you to create a Transform File (.mst) that can be used to customise an installation via a command line or
with Group Policy Objects/Active Directory software deployment methods.
NOTE: ORCA can be used to make very extensive changes to the installation process, but not all of the possible
options are documented in this guide. It is highly recommended that only experienced admins use this tool.
Example: Create an MST file that includes the license, does not install the Nitro Pro Internet Explorer add-in, and enables the
integration with Nitro Cloud for eSignature and document collaboration.
1) Install Orca from the link above and start the program
2) Click on File > Open, and browse to the location of the Nitro Pro installation MSI
3) Click Transform, and then click New Transform
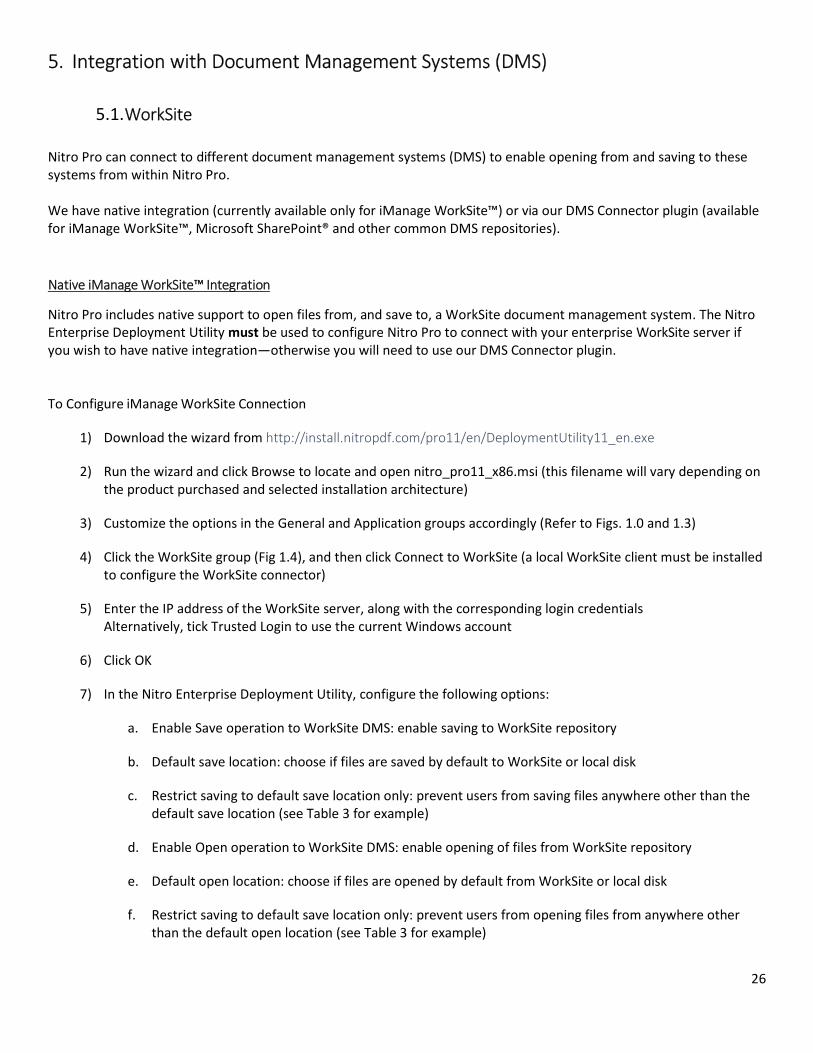
4) Scroll down the left column and select the Property table.
5) Find NPSERIAL in the right column, and double click on the entry DEMO to edit. Replace this with your license
number.
6) Find NPBROWSERPLUGIN and change the value to 0
7) Find CLOUDENABLE and change the value to 1
8) Your changes will be highlighted in green
25
Figure 21
9) Click on Transform > Generate Transform to save the .mst file.
26
5. Integration with Document Management Systems (DMS)
5.1. WorkSite
Nitro Pro can connect to different document management systems (DMS) to enable opening from and saving to these
systems from within Nitro Pro.
We have native integration (currently available only for iManage WorkSite™) or via our DMS Connector plugin (available
for iManage WorkSite™, Microsoft SharePoint® and other common DMS repositories).
Native iManage WorkSite™ Integration
Nitro Pro includes native support to open files from, and save to, a WorkSite document management system. The Nitro
Enterprise Deployment Utility must be used to configure Nitro Pro to connect with your enterprise WorkSite server if
you wish to have native integration—otherwise you will need to use our DMS Connector plugin.
To Configure iManage WorkSite Connection
1) Download the wizard from http://install.nitropdf.com/pro11/en/DeploymentUtility11_en.exe
2) Run the wizard and click Browse to locate and open nitro_pro11_x86.msi (this filename will vary depending on
the product purchased and selected installation architecture)
3) Customize the options in the General and Application groups accordingly (Refer to Figs. 1.0 and 1.3)
4) Click the WorkSite group (Fig 1.4), and then click Connect to WorkSite (a local WorkSite client must be installed
to configure the WorkSite connector)
5) Enter the IP address of the WorkSite server, along with the corresponding login credentials
Alternatively, tick Trusted Login to use the current Windows account
6) Click OK
7) In the Nitro Enterprise Deployment Utility, configure the following options:
a. Enable Save operation to WorkSite DMS: enable saving to WorkSite repository
b. Default save location: choose if files are saved by default to WorkSite or local disk
c. Restrict saving to default save location only: prevent users from saving files anywhere other than the
default save location (see Table 3 for example)
d. Enable Open operation to WorkSite DMS: enable opening of files from WorkSite repository
e. Default open location: choose if files are opened by default from WorkSite or local disk
f. Restrict saving to default save location only: prevent users from opening files from anywhere other
than the default open location (see Table 3 for example)

27
8) Click Generate MST File to create an MST
NOTE: When settings c) and d) described in Step 7 above are disabled, users must hold the Shift key while
clicking the Create, Convert, and Add Files buttons in Nitro's creation and conversion tools. An example is
illustrated below in Table 3.0.
Command Default Location Shift Operator Result
Save files WorkSite
File saved to local disk
Open files
Local Disk
Files added from WorkSite
Table 7
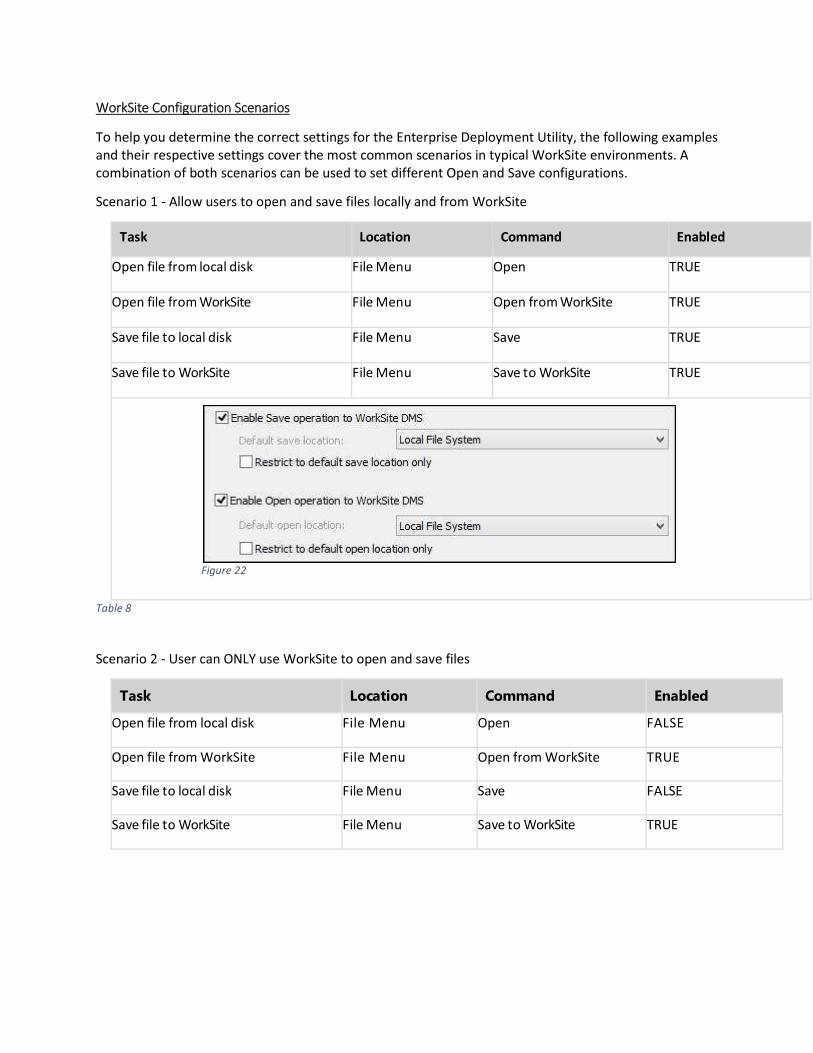
WorkSite Configuration Scenarios
To help you determine the correct settings for the Enterprise Deployment Utility, the following examples
and their respective settings cover the most common scenarios in typical WorkSite environments. A
combination of both scenarios can be used to set different Open and Save configurations.
Scenario 1 - Allow users to open and save files locally and from WorkSite
Task Location Command Enabled
Open file from local disk File Menu Open TRUE
Open file from WorkSite File Menu Open from WorkSite TRUE
Save file to local disk File Menu Save TRUE
Save file to WorkSite File Menu Save to WorkSite TRUE
Figure 22
Table 8
Scenario 2 - User can ONLY use WorkSite to open and save files
Task Location Command Enabled
Open file from local disk File Menu Open FALSE
Open file from WorkSite File Menu Open from WorkSite TRUE
Save file to local disk File Menu Save FALSE
Save file to WorkSite File Menu Save to WorkSite TRUE

Nitro Pro – Deployment Guide
29
Figure 23
Table 9
Connecting to WorkSite™ and other DMS via the DMS Connector Plugin
Nitro Pro can also connect to WorkSite™, SharePoint® and other supported document management
systems through an additional DMS plugin.
Note: Connecting to your DMS via the DMS Connector plug-in needs to be done after installation of
Nitro Pro.
REQUIREMENTS:
• A test workstation environment, which should already have the required DMS client
• Software installed and configured for your organization
• Nitro DMS Connector installer - nitro_dms2_x86.msi
PROCEDURE:
1) Install Nitro Pro
2) Install Nitro DMS Connector
3) A new folder will be created on your desktop with shortcuts for each step
a. Configure access for your DMS as required and exit the configuration tool
b. Optional: Add additional configuration parameters the XML files as described in the
next section
c. Test to ensure that the DMS can be correctly accessed via Nitro (under the File > Open
menu)
d. Create the installer for deployment with the new configuration
4) You will now have three files for deployment: nitro_dms2_x86.msi, nitro_pdf_dms2_x86.mst
and nitro_pdf_dms2_x86.cab that can now be copied to a network share for deployment.

Nitro Pro – Deployment Guide
30
Note: If you are generating this on an operating system earlier than Windows 7, or Windows 2008
R2, you will need to replace the MSI in the output folder with the original MSI used for installation.
Additional Configuration Options
In addition to the configuration options displayed via the configuration tool, additional configuration
options can be found within swiftwriter.xml. These preferences have been added to enforce strict
document management workflows present with some Enterprise systems. These should only be set in
Nitro if your DMS workflows also restrict these options.
• AllowSaveOverwrite: true/false, show the “overwrite existing version” options when saving the
document
• AllowSaveNewVersion: true/false, show the “save new version” button when saving the
document
• AllowSaveNewDocument: true/false, show the “save new document” button when saving the
document.
SharePoint® specific Configuration Information
When configuring on-premise SharePoint® servers, make sure that you have the domain specified for
your user details; for example, “domain\username”.
When connecting to SharePoint® 365:
• You can only use the option “Connect using this user” for configuring the user login details
• “Claims Based Authentication” needs to be selected
In addition, there may be a scenario for SharePoint® 365 in which you need to install Nitro Pro onto a
Terminal Server, so you'll need to allow the end-users to configure their own login details.
The DMS connector’s configuration file is stored at: C:\Program Files (x86)\Common
Files\Omtool\OmDMSDB.xml. If you go into this file, there should be a node called
<configuration>
You then need to add this value into the node: <prUserSpecific>true</prUserSpecific>
Save this change, and then this will then save the OmDMSDB.xml configuration file into
c:\Users\%username%\AppData\Roaming\Omtool\DMS for each user, where you can then
configure the connection settings for each individual user once you’ve completed the installation.
Nitro Pro – Deployment Guide
31
6. Updating Nitro Pro
6.1. Minor / Major release
The MSI installer does not automatically check for updates, because in many environments the end user
will not have permission to install software updates. For users who are deploying with the default
preferences, no additional steps need to be taken. Nitro Pro can simply be delivered as an update via
your chosen deployment tool.
If you have custom preferences embedded in a .cab file however, you will need to recreate the
transform file first, then update using your chosen deployment tools.
To obtain the latest installation files, please contact your Nitro Customer Support Representative.
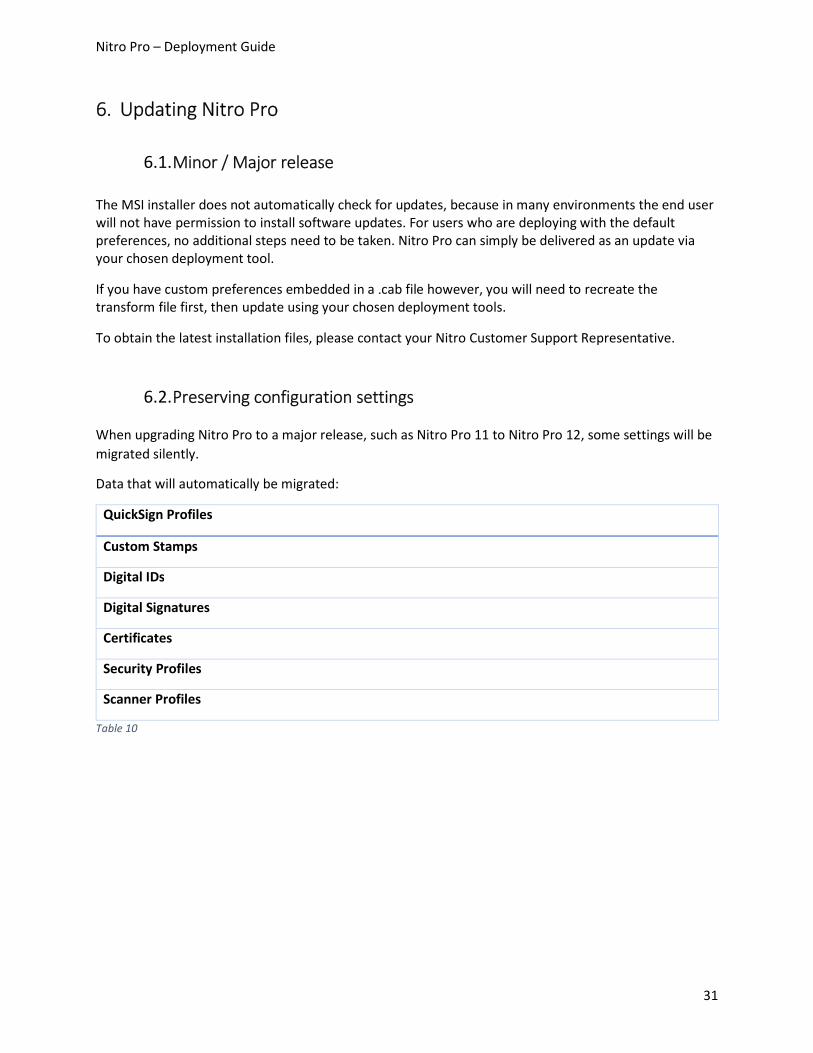
6.2. Preserving configuration settings
When upgrading Nitro Pro to a major release, such as Nitro Pro 11 to Nitro Pro 12, some settings will be
migrated silently.
Data that will automatically be migrated:
QuickSign Profiles
Custom Stamps
Digital IDs
Digital Signatures
Certificates
Security Profiles
Scanner Profiles
Table 10

Nitro Pro – Deployment Guide
32
7. Special configurations
7.1. Setting a default PDF application using an Active Directory GPO
On Microsoft operating systems Windows 8.1 and later, an application can no longer be set as a default
for certain file types during the installation procedure. Some applications use unsupported methods to
accomplish this, but Nitro Pro adheres to the guidelines provided by Microsoft.
In order to allow an admin to control the default settings, the file type association can be pushed using a
GPO as described in the following steps.
Creating an XML file that contains the default application associations
1) On a computer that has Nitro Pro installed and (manually) set to be the default PDF
application, open an elevated command prompt and run the following command:
Dism.exe /online /export-defaultappassociations:C:\temp\CustomFileAssoc.xml
Figure 24
2) OPTIONAL STEP: Open the XML file in Notepad or a similar editor, then use the “Find” function
to find all entries relating to Nitro. Delete all other associations.
NOTE: Using the XML file without completing step 2 will overwrite other file type associations on the
user’s computer as well, which may or may not be desired.
Nitro Pro – Deployment Guide
33
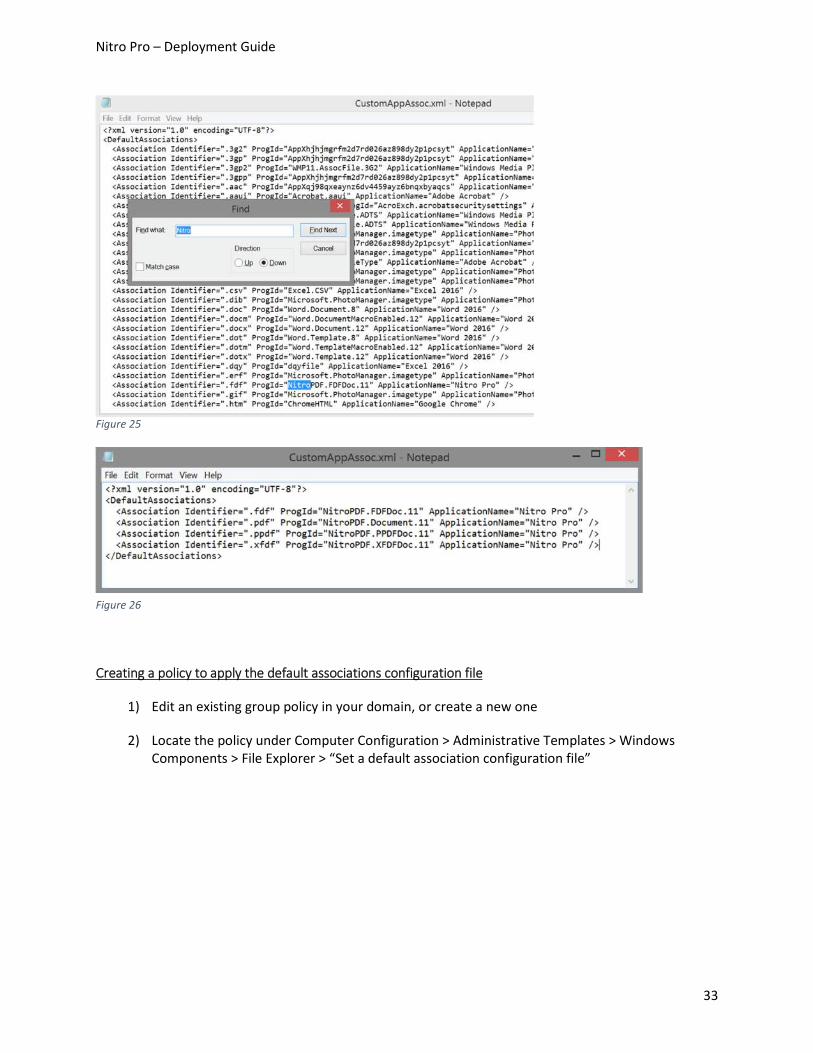
Figure 25
Figure 26
Creating a policy to apply the default associations configuration file
1) Edit an existing group policy in your domain, or create a new one
2) Locate the policy under Computer Configuration > Administrative Templates > Windows
Components > File Explorer > “Set a default association configuration file”

Nitro Pro – Deployment Guide
34
Figure 27
3) Enable the policy and configure it to use the XML file created in the previous section
NOTE: The path in the “Options” section of the policy is relative, i.e. if you configure the location of
the file to be used as “C:\...” make sure the XML file exists on all client computers in that location. If
you use a mapped network drive instead, ensure all clients have access to it, and that the mapping
occurs before the policy applies, or it will fail.

Nitro Pro – Deployment Guide
35
Figure 28
NOTE: The file type association will be applied every time the policy applies. If a user manually
changes this setting, or another application changes it, it will be reset with the next policy refresh (e.g.
reboot).
7.2. Setting Default Applications using PowerShell Script
The following PowerShell script will enable you to set Nitro Pro as default application for viewing PDF
files and choose default Internet Explorer add-ons for viewing PDF files in the browser.
By running this script, Nitro Pro will be set as a default application at the local machine level (HKLM) for
all users. You can also choose to set Nitro Pro or Acrobat Internet Explorer add-on as default, which will
enable users to view PDF files in the chosen IE add-on.
http://install.nitropdf.com/professional_1200108/set-nitro-defaults/set-nitro-defaults.zip
Preconditions
1) Nitro Pro must be installed on user's machines

Nitro Pro – Deployment Guide
36
2) Adobe Acrobat (Reader or Pro) must be installed on user's machines if setting Acrobat IE add-
on as default (this condition is not verified as part of the script)
Parameters
The script includes three possible command line parameters, which can be used in different sequence.
Command Line Outcome OS Version
-set_nitro_default_viewer Sets Nitro Pro as system default PDF viewer Windows 7 only
-set_nitro_ie_plugin Sets Nitro Pro IE add-on as default for
opening PDFs in browser
Windows 7, 8.1, and 10
-setacrobat_ie_plugin Sets Acrobat IE add-on as default Windows 7, 8.1, and 10
Example 1
powershell -noprofile -executionpolicy bypass -file ".\set-nitro-defaults.ps1" -set_nitro_default_viewer -set_nitro_ie_plugin
After script execution, Nitro Pro will be set as a default PDF viewer in system settings
and Nitro Pro add-on will be set as default Internet Explorer add-on for PDF viewing in Internet
browser.
Example 2
powershell -noprofile -executionpolicy bypass -file ".\set-nitro-defaults.ps1" -set_acrobat_ie_plugin
After script execution Acrobat add-on will be set as default Internet Explorer add-on for PDF viewing in
Internet browser.
Example 3
powershell -noprofile -executionpolicy bypass -file ".\set-nitro-defaults.ps1" -set_nitro_default_viewer -set_acrobat_ie_plugin
After script execution Nitro Pro will be set as default PDF viewer in system settings
and Acrobat add-on will be set as default Internet Explorer add-on for PDF viewing in Internet browser.
7.3. Setting Default Internet Explorer add-ons
If a user has multiple PDF add-ons installed for Internet Explorer (e.g. the Nitro IE add-on and also the
Acrobat add-on), one of them will be set as the default and used by IE to open PDF files. Typically, the
default is the last one installed. Internet Explorer does not offer a method in its user interface to change
this default setting, only to enable/disable individual add-ons. If one is set to be the default but is
Nitro Pro – Deployment Guide
37
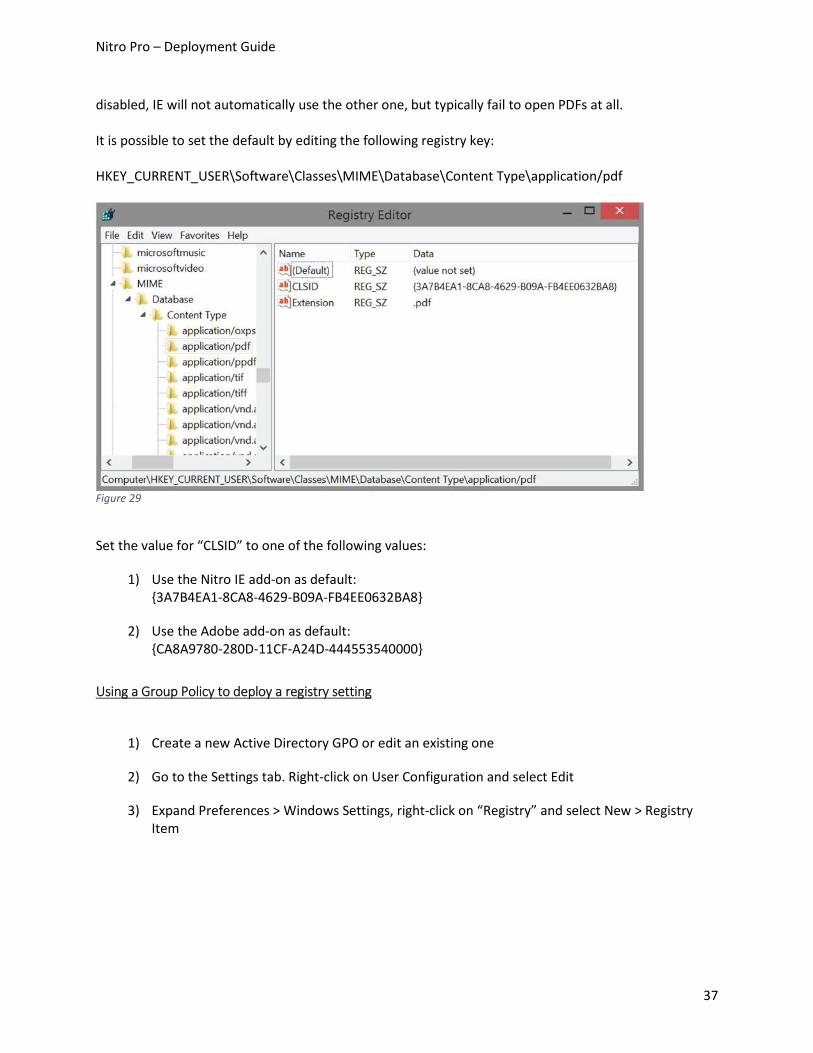
disabled, IE will not automatically use the other one, but typically fail to open PDFs at all.
It is possible to set the default by editing the following registry key:
HKEY_CURRENT_USER\Software\Classes\MIME\Database\Content Type\application/pdf
Figure 29
Set the value for “CLSID” to one of the following values:
1) Use the Nitro IE add-on as default:
{3A7B4EA1-8CA8-4629-B09A-FB4EE0632BA8}
2) Use the Adobe add-on as default:
{CA8A9780-280D-11CF-A24D-444553540000}
Using a Group Policy to deploy a registry setting
1) Create a new Active Directory GPO or edit an existing one
2) Go to the Settings tab. Right-click on User Configuration and select Edit
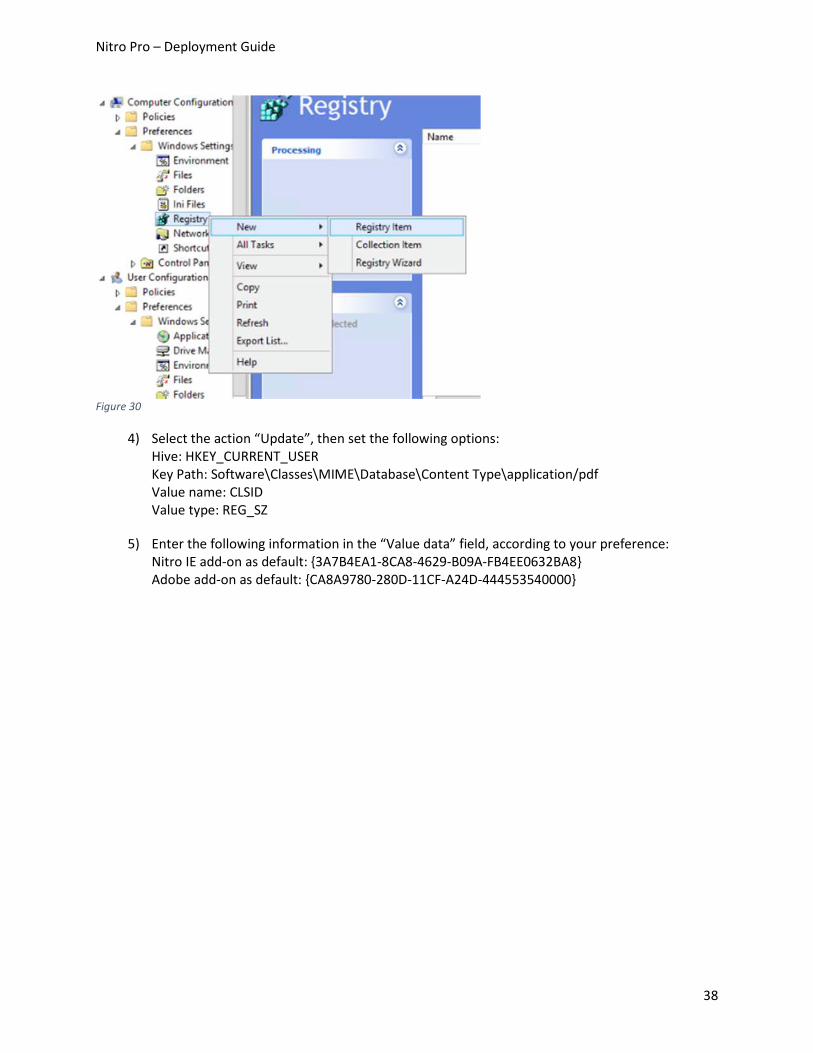
3) Expand Preferences > Windows Settings, right-click on “Registry” and select New > Registry
Item
Nitro Pro – Deployment Guide
38
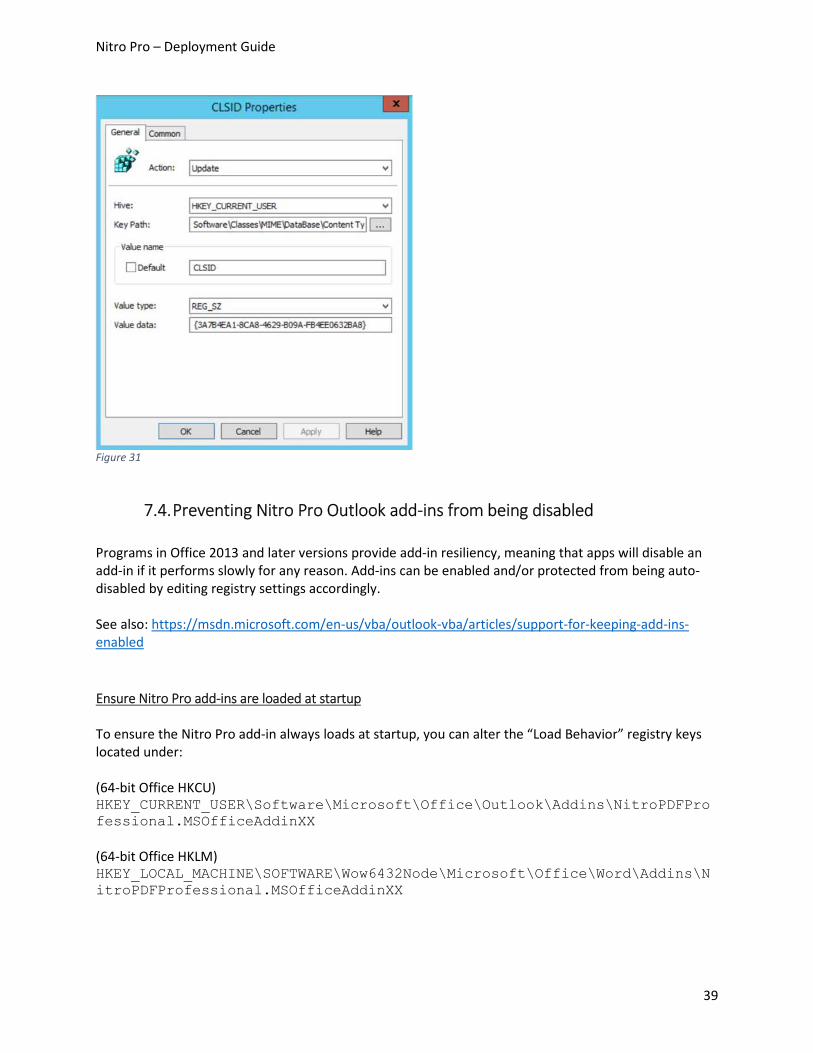
Figure 30
4) Select the action “Update”, then set the following options:
Hive: HKEY_CURRENT_USER
Key Path: Software\Classes\MIME\Database\Content Type\application/pdf
Value name: CLSID
Value type: REG_SZ
5) Enter the following information in the “Value data” field, according to your preference:
Nitro IE add-on as default: {3A7B4EA1-8CA8-4629-B09A-FB4EE0632BA8}
Adobe add-on as default: {CA8A9780-280D-11CF-A24D-444553540000}
Nitro Pro – Deployment Guide
39
Figure 31
7.4. Preventing Nitro Pro Outlook add-ins from being disabled
Programs in Office 2013 and later versions provide add-in resiliency, meaning that apps will disable an
add-in if it performs slowly for any reason. Add-ins can be enabled and/or protected from being auto-
disabled by editing registry settings accordingly.
See also: https://msdn.microsoft.com/en-us/vba/outlook-vba/articles/support-for-keeping-add-ins-
enabled
Ensure Nitro Pro add-ins are loaded at startup
To ensure the Nitro Pro add-in always loads at startup, you can alter the “Load Behavior” registry keys
located under:
(64-bit Office HKCU)
HKEY_CURRENT_USER\Software\Microsoft\Office\Outlook\Addins\NitroPDFProfessional.MSOfficeAddinXX
(64-bit Office HKLM)
HKEY_LOCAL_MACHINE\SOFTWARE\Wow6432Node\Microsoft\Office\Word\Addins\NitroPDFProfessional.MSOfficeAddinXX

Nitro Pro – Deployment Guide
40
NOTE: Replace “XX” in the registry keys above with your version of Nitro Pro, e.g. “12”. Nitro
recommends setting the value to 3 to load them at startup.
Figure 32
3 - Loaded - Load at startup
The application tries to load the VSTO Add-in when the application starts. This is the default value when
you build or publish a VSTO Add-in in Visual Studio. If the application successfully loads the VSTO Add-in,
the LoadBehavior value remains 3. If an error occurs when loading the VSTO Add-in, the LoadBehavior
value changes to 2, and remains at 2 after the application closes.
Prevent Nitro Pro add-ins from being disabled automatically
To ensure that the Add-in never becomes disabled, Nitro recommends adding the
ClassID NitroPDFProfessional.MSOfficeAddinXX to the ‘DoNotDisableAddinList’:
NOTE: Replace “XX” in the value above with your version of Nitro Pro, e.g. “12”.
HKEY_CURRENT_USER\Software\Microsoft\Office\16.0\Outlook\Resiliency\DoNotDisableAddinList
Figure 33

Nitro Pro – Deployment Guide
41
NOTE: The above registry keys can be deployed via Active Directory GPO. Please see Chapter 7.3 for an
overview of this method.
7.5. Rights Management Services (RMS) and Azure Information Protection
(AIP)
To access PDF files that have been protected using Microsoft’s Rights Management technology, the
machines accessing the protected files will need to install Microsoft’s Active Directory Rights Management
Service (AD RMS) Client 2.1 and Microsoft Online Services Sign-In Assistant. Nitro Pro will then be able to
decrypt RMS protected PDF files and grant RMS defined permissions to users.
8. Contacting Support
If you experience any issues, please contact our support team through our website:
http://www.gonitro.com/support
To ensure a quicker response, please include as much information as possible, including:
• Company Name
• Your Nitro Account Executive
• Serial number(s)
• License type(s)
• Application version
• Operating System(s)
• Anti-virus software used
• Deployment methods
For Remote Desktop Services/XenApp deployments please also include the following in your support
request:
• Server Operating System
• Application Delivery method (RDS, Streamed, Published App, Published Desktop, etc.)
• Size of farm
• Virtualization methods (if any)