Embed Size (px)
Citation preview

Deploying the ARX with Dell NX3000 and Microsoft Windows Storage Server 2008
DEPLOYMENT GUIDEVersion 1.0

Table of Contents
Table of Contents
Deploying the F5 ARX with the Dell NX3000Prerequisites and configuration notes ................................................................................. 1Configuration example ............................................................................................................ 2
Configuring the Dell NX3000 Server and EqualLogic Storage array .................. 3Configuring NIC teaming ........................................................................................................ 3Installing the Host Integration tool ....................................................................................... 5Running the Remote Setup Wizard ...................................................................................... 6Configuring the array with the Group Manager GUI ....................................................... 9Creating the Volumes ............................................................................................................ 10Running the Microsoft iSCSI Initiator ............................................................................... 11Adding the Volumes to the Storage Server with Disk Manager .................................. 13Joining the Active Directory Domain ................................................................................. 15Sharing the Virtual Disks ....................................................................................................... 16Assigning Local Administrator privileges for the ARX Proxy User ............................ 17
Configuring the ARX device .................................................................................................. 19Creating the CIFS Namespace ............................................................................................. 19Creating a Volume .................................................................................................................. 21Adding the External Filers ..................................................................................................... 23Adding the root level and CIFS shares .............................................................................. 24Creating the Share farm ........................................................................................................ 26Creating the File Placement Policy ..................................................................................... 27Creating the Virtual Service ................................................................................................. 30
Verifying Storage Integration ............................................................................................... 33Mounting the Virtual Server CIFS share ............................................................................ 33Generating an ARX Metadata Report ................................................................................ 35Viewing the shares from the backend server perspective ............................................ 38
F5 Deployment Guide i

Deploying the F5 ARX with the Dell NX3000Welcome to the F5 and Dell ™ NX3000 deployment guide. This guide provides step by step procedures for deploying the Adaptive Resource Switch (ARX) with Dell NX3000 with Microsoft® Windows® Storage Server 2008.
The F5 ARX file virtualization platform decouples file access from physical file locations within Network Attached Storage (NAS) environments. The ARX platform automates file migration to the appropriate tier of storage without affecting data access, thus minimizing backup and recovery windows.
For more information on the ARX series, see http://www.f5.com/products/arx-series/
This deployment guide is broken up into the following major sections:
◆ Configuring the Dell NX3000 Server and EqualLogic Storage array, on page 3
◆ Configuring the ARX device, on page 19
To provide feedback on this deployment guide or other F5 solution documents, contact us at [email protected].
Prerequisites and configuration notesThe following are prerequisites and configuration notes for this deployment:
◆ ARX is configured for network access and the initial switch interview has been completed. If this has not been completed refer to the ARX Hardware Installation guide for specific details.
◆ Dell NX3000 Servers are physically installed and powered on.
◆ Dell EqualLogic™ Arrays are powered on and available on the storage LAN.
◆ This document is based on the fact that the Microsoft Active Directory Domain is preconfigured and the F5 Secure Agent is installed.
◆ An NFS Export with root access is available as an ARX Metadata store.
◆ The ARX platform is deployed in redundant pairs. The secondary switch is a Hot Standby switch. See the ARX product documentation on how to deploy a highly available configuration..
Product Tested Version Tested
Microsoft Windows Storage Server 2008 v6.0.6001
Dell EqualLogic Array Controller Firmware v4.3.2
Dell Host Integration Tool 3.3.1
F5 ARX Switch Firmware 5.1.0
1
Deploying the F5 ARX with Dell NX3000 and Microsoft Windows Storage Server 2008
Configuration exampleIn the following diagram, we show basic connectivity between clients, ARX and Dell NX3000 with EqualLogic Storage Array. In this configuration, a client attempts to retrieve a file from a file share. The ARX proxies the request, and transparently retrieves the file from the server that is storing the file. We configure a policy on the ARX that on a daily schedule checks the last time files were modified, and migrate the file to the appropriate filer if the conditions of the policy are met. In our example, the ARX policy is checking for a last modified time of less than (or more than) 30 days. If the policy matches, then the ARX moves the file between the backend filers according to policy.
The network configuration defined in the lab utilized an ARX1000 with 4 Gigabit Ethernet links configured into a LACP bundle between the ARX and the core switch. The server Gig-E connections are bundled into two 4 Gig-E Smart Load Balancing connections. One bundle dedicated to client traffic. And another bundle dedicated for iScsi storage array access. The Active Directory (AD) Primary Domain Controller was on a different subnet than the Dell Storage servers. The Dell Storage server is assigned to the AD domain. The Proxy User is assigned local Administrator group privileges for each Dell Servers.
Figure 1 Logical configuration example
F5® Deployment Guide 2

Configuring the Dell NX3000 Server and EqualLogic Storage array
The Dell servers come with Windows 2008 Storage Server software pre installed. The servers need network configured, Host integration tools installed, storage arrays initialized, iScsi targets discovered, and disk volumes created and shared.
This section addresses the configuration of the PS5000 iScsi storage array. The two arrays are configured for RAID volumes. One is configured for RAID 10 as a tier 1 filer, and the second configured as RAID 50 to be the tier 2 filer. The server is added to the Active Directory Domain. The volume is shared to the network.
There are several levels of authentication and access control that are available to the system administrator. This deployment guide uses a very relaxed stance on access credentials for demonstration purposes only. The access rights for a live deployment most likely would not use such relaxed security policies.
Configuring NIC teamingThe Dell NX3000 has the Broadcom Advanced Control Suite (BACS) application. This application can configure NIC Teaming for aggregating individual 1 Gbps NICs into a logical 4 Gbps LAN Interface.
We configure the NIC Team for Smart Load Balancing and Failover. This configuration does not require special LAN switch configuration changes.
In our example, the NX3000 devices were configured with 8 Gig-E connections. In this section, we create two NIC teams each containing 4 port members.
To configure NIC teaming
1. From the Windows Start menu, select Broadcom, and then click Broadcom Advanced Control Suite 3. The BACS application opens. The adapters initially come up as Unassigned adapters.
2. From the Team Management pane, right-click Teams and then select Create Team. The Team wizard opens.
3. In our example, we do not use Expert Mode. Click the Next button.
4. In the Name box, type a name for the team. In our example, we are configuring the NIC team that handles client side network traffic, so we type Team Client Side.
5. Select a Team type. We click Smart Load Balancing and Failover because it is the type that supports TCP offload. The other two methods do not support TCP offload and would require additional LAN switch configuration changes. Click Next.
3

Deploying the F5 ARX with Dell NX3000 and Microsoft Windows Storage Server 2008
6. From the Available Adapters box, select the an interface wired to the client side LAN and click the Add button. Repeat this step for all client side LAN interfaces (in our example, we add 3 more interfaces). These members are the individual Gig-E NIC interfaces. Click Next.
Figure 2 Assign the Team Members
7. In our example, we do not configure a standby member. A standby member is a NIC Interface that is available as a hot standby interface. This interface goes active if another member fails. Click Next.
8. You can optionally enable the LiveLink feature. In our example, the LiveLink feature is not enabled. Click Next.
9. In the Manage VLAN section, we click Skip Manage VLAN. It is possible for these NIC teams to include VLAN tags when sending traffic, but in our example we are not sending VLAN Tagged Ethernet frames. Click Next.
10. Click Save changes and continue to manage more teams and then click the Finish button.
11. Important: Repeat this entire procedure to create a second NIC team for the iSCSI storage LAN.
Once the two teams have been configured, they appear in the Team menu tree in the BACS tool (see Figure 3). These two teams are added to the available network interfaces in the Network Connections section of the Control Panel.
F5® Deployment Guide 4

Figure 3 NIC Team configuration complete
12. From the Windows Control Panel, and open Network Connections. You see all the network interfaces listed, including the two new NIC Teams.
13. Right-click each BASP Virtual Adapter and configure the IP address for each team. Note: For the interface Team Client Side specify a default gateway. Only configure one default gateway entry. Do not define a default gateway for the Team Storage Side.
14. Important: Repeat this entire procedure on the second storage server.
Installing the Host Integration toolThe storage arrays ships with a Host Integration tool application on CD. This tool helps with integrating Windows 2008 Storage Server with the iScsi Storage Arrays. This kit includes the Auto-Snapshot Manager, Virtual Disk Service Provider, Remote Setup Wizard, and the iScsi Initiator. To install insert the CD and start the installation.
5

Deploying the F5 ARX with Dell NX3000 and Microsoft Windows Storage Server 2008
Accept the license terms and select the default settings for a complete installation. If requested to reboot the server: reboot and then continue with the Remote Setup Wizard in the next section.
Important
Also install the Host Integration tool on the second storage server.
Running the Remote Setup WizardThe next task is to run the remote setup wizard. This initializes the PS Series array, configures the server to have access, and configures Multi-Path IO settings.
To run the remote setup wizard
1. After the server reboots, log into the Windows Server as the Administrator. The remote setup wizard opens.
2. Click Initialize a PS Series array and then click Next. The wizard shows a progress dialog warning it may take up to a minute to complete. All arrays that were discovered are listed.
3. Select the appropriate array from the list and then click Next.
4. In the Member Information box, complete the following. In this example, the first array is configured with IP addresses from the Storage Network address space:
a) In the Member Name box, type a name. In our example, we type Eql-1.
b) In the IP Address box, type the IP address of the array.
c) In the Subnet Mask box, type the subnet mask.
d) In the Default Gateway box, type the default gateway.
e) Make sure Create a new group is selected (see Figure 4).
f) Click Next.
F5® Deployment Guide 6

Figure 4 Array Initialization
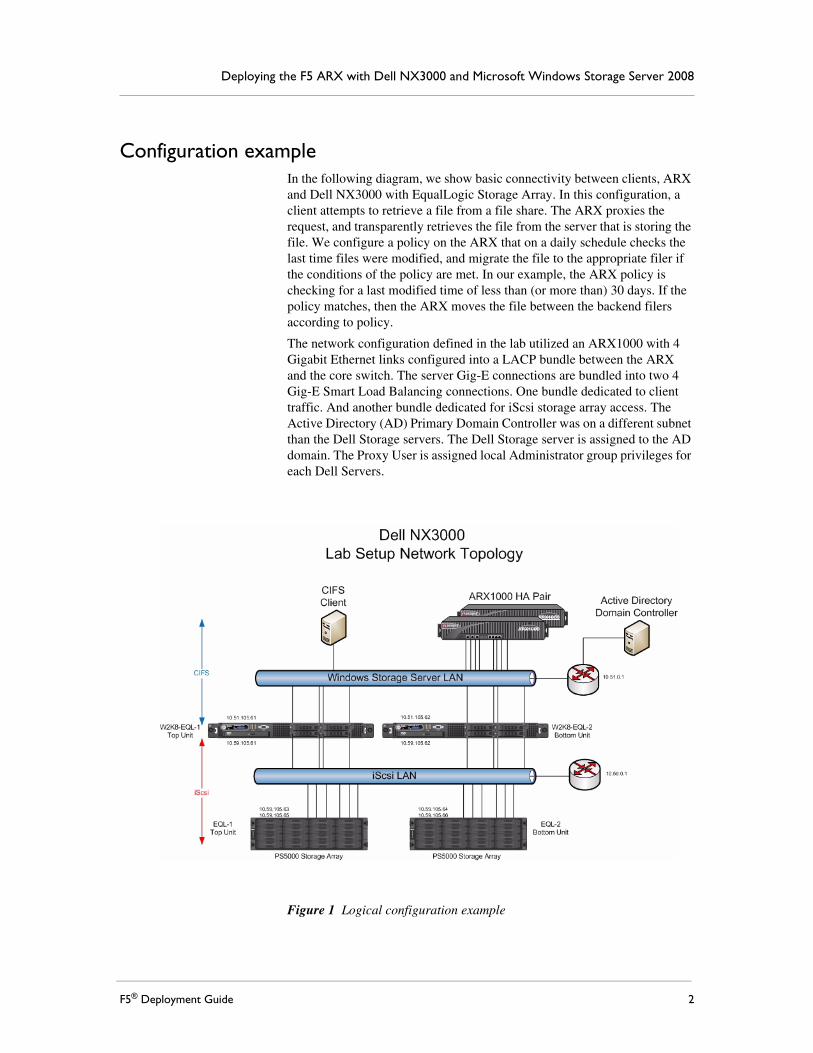
5. On the Create a New Group screen, complete the following. This is a Dell Storage group that is used to logically group multiple storage arrays into a common pool for management purposes.
a) In the Group Name, type a name for the group. In our example, we type Eql-1-Group.
b) In the Group IP Address box, type the IP address.
c) From the RAID policy list, select a RAID policy. In our example, we select RAID 10.
d) In the Credentials section, type and confirm the Admin Password and Membership passwords.
e) In the CHAP credentials section, type the User name, and type and confirm the Password (see Figure 5).
f) Click the Next button. The Storage array may take a few minutes to complete.
6. Once the array completes, click Finish.
Note
This is the first array to be configured. This is associated to the Tier-1 filer server. RAID 10 is chosen for this server. RAID 50 should be chosen for the Tier-2 storage array.
7
Deploying the F5 ARX with Dell NX3000 and Microsoft Windows Storage Server 2008
Figure 5 Create a new Group
Configuring the server to access the PS Series arrayThe next step is to configure the server to access the PS Series array. In the following procedure, you run the Remote Setup Wizard again.
To configure the server to access the PS Series array
1. From the Start menu, select EqualLogic, and then click Remote Set up Wizard.
2. Click Configure this computer to access a PS Series SAN and then click Next.
3. From the Groups accessible from this computer box, select the Group you configured in the preceding procedure, and then click the Finish button.
Configuring the multi-path IO settingsThe next task is to define the Multi-path IO settings. In the following procedure, you run the Remote Setup Wizard yet again.
To configure the multi-path IO settings
1. From the Start menu, select EqualLogic, and then click Remote Set up Wizard.
2. Click Configure MPIO Settings for this computer and then click Next.
3. Make sure both subnets you configured in Configuring NIC teaming, on page 3 in the included box.
F5® Deployment Guide 8

4. All other fields are optional. In our example, we leave them at the defaults.
5. Click Finish.
Figure 6 Configure MPIO settings
Important
Return to Configuring the server to access the PS Series array, on page 8 and repeat these procedures on the second storage array. Use a RAID50 layout.
Configuring the array with the Group Manager GUIThe Group Manager GUI is a web based application. Many of the following procedures are performed from the Group Manager interface.
To configure the array using the Group Manager GUI
1. Open a web browser and type the IP address of the Group you created. In our example, the address for our EQL-1-Group is http://10.59.105.65.
2. Login as grpadmin and use the password you created in Step 5 of Running the Remote Setup Wizard, on page 6.The initial page loads and reports there is one group member in one storage pool with a total of 1.8TB of usable disk space (see Figure 7). In the next section, we create the Volumes.
9

Deploying the F5 ARX with Dell NX3000 and Microsoft Windows Storage Server 2008
.
Figure 7 Group Manager GUI
Creating the VolumesIn this section, we create the Volumes. For demonstration purposes, we create two Volumes of equal size. Each has 10% of the volume reserved for snapshot data. Depending upon your equipment configuration these values may differ.
To create the Volumes
1. From the Group Manager interface, in the Activities pane, under Getting Started, click Create Volume. The Create Volume wizard opens.
2. In the Volume Name box, type a name. In our example, we type Eql-Vol-1. Click Next. The Space page opens.
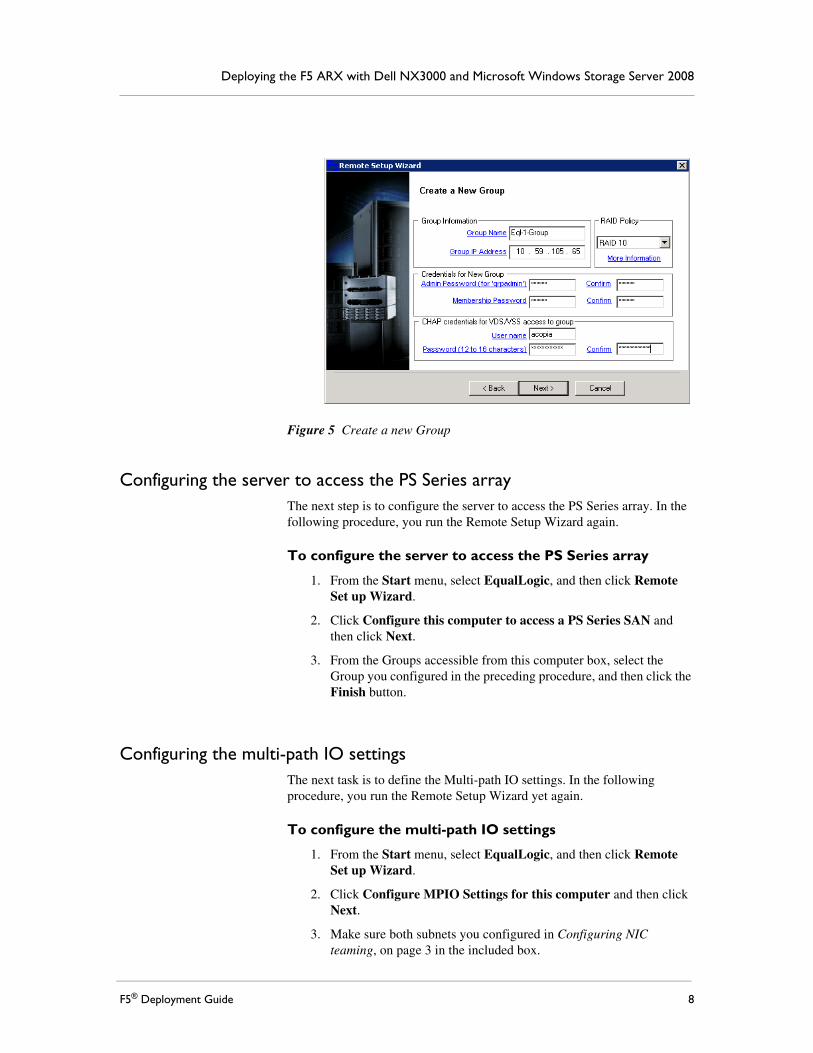
3. In the Volume size box, type a number and then select MB or GB. In our example, we are creating two 750 GB volumes, so we type 750 and click GB.
4. In the Snapshot reserve box, type a percentage. In our example, we type 10. Click Next.
F5® Deployment Guide 10
Figure 8 Volume Size
5. On the iSCSI Access page, click Restricted Access.In our example, iSCSI initiator access is restricted to specific hosts. We allow all hosts on the Storage Network LAN access to this volume. We click Restricted Access, check the Limit access by IP address box, and then type the IP address of the Storage Network LAN using a wildcard for the last octet (10.59.105.*). We leave the Access type at Set read-write.
6. Click Next.
7. Review the Summary page and then click Finish.
8. Important: Repeat this entire procedure to create a second 750GB volume.When both Volumes have been created, the group summary screen reports the two Volumes are available.
9. Important: Repeat this procedure (creating both Volumes) on the second storage array.
Running the Microsoft iSCSI InitiatorThe iSCSI initiator is an application that binds the server to the iSCSI storage array. It authenticates to the iSCSI targets and makes the targets available to the operating system.
11

Deploying the F5 ARX with Dell NX3000 and Microsoft Windows Storage Server 2008
The Microsoft iSCSI Software Initiator enables the connection of a Windows host to an external iScsi storage array. The Microsoft iSCSI software initiator makes it possible for businesses to take advantage of existing network infrastructure to enable block-based Storage Area Networks.
To run the iSCSI Initiator
1. From the Windows Server Start menu, select Administrative Tools, and then click iSCSI Initiator.
Figure 9 iScsi General Settings
For this demonstration the iSCSI array authenticates by this server’s source IP Address.
2. Click the Targets tab. Our example server has three targets to which it can logon.
3. Select one of the targets, and then click Log on.Note: If you get an access denied error, ignore it and continue to logon the other two targets.
4. On the Log on to Target screen, check the Automatically restore this connection when the system reboots and Enable Multi-Path boxes. This makes the target persistence and enables support for the MPIO driver. Click OK.
5. Repeat Steps 3 and 4 for each of the targets.
F5® Deployment Guide 12
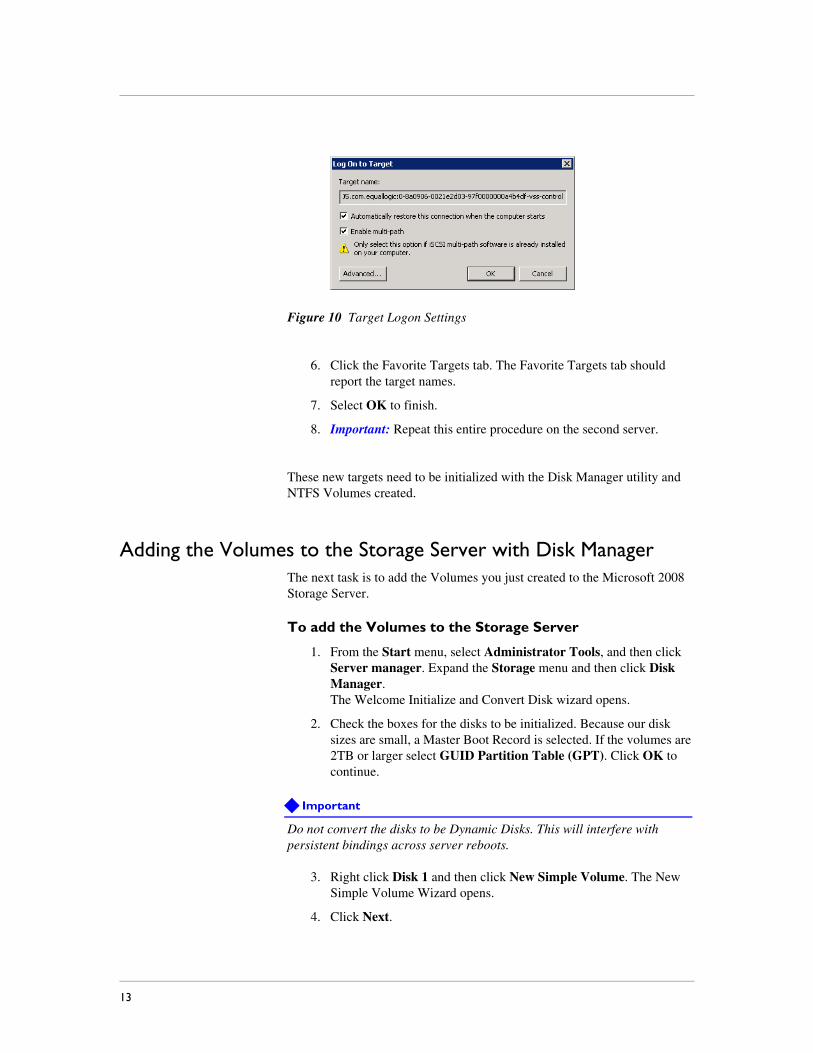
Figure 10 Target Logon Settings
6. Click the Favorite Targets tab. The Favorite Targets tab should report the target names.
7. Select OK to finish.
8. Important: Repeat this entire procedure on the second server.
These new targets need to be initialized with the Disk Manager utility and NTFS Volumes created.
Adding the Volumes to the Storage Server with Disk ManagerThe next task is to add the Volumes you just created to the Microsoft 2008 Storage Server.
To add the Volumes to the Storage Server
1. From the Start menu, select Administrator Tools, and then click Server manager. Expand the Storage menu and then click Disk Manager. The Welcome Initialize and Convert Disk wizard opens.
2. Check the boxes for the disks to be initialized. Because our disk sizes are small, a Master Boot Record is selected. If the volumes are 2TB or larger select GUID Partition Table (GPT). Click OK to continue.
Important
Do not convert the disks to be Dynamic Disks. This will interfere with persistent bindings across server reboots.
3. Right click Disk 1 and then click New Simple Volume. The New Simple Volume Wizard opens.
4. Click Next.
13

Deploying the F5 ARX with Dell NX3000 and Microsoft Windows Storage Server 2008
5. In the Simple volume size in MB box, type the disk size, or leave the default (the full disk size). We leave this at the default. Click Next.
6. Click the Assign the following drive letter box, and select a letter from the list. Click Next.
7. On the Format Partition page, click the Format this volume with the following settings button, and then perform the following:
a) From the File system list, select NTFS.
b) From the Allocation unit size list, select a size. We leave this setting at Default.
c) In the Volume label box, type a label for this Volume. In our example, we type Eql-Vol-1.
d) Check the Perform a quick format box.
e) Click Next.
Figure 11 Format Partition
8. Review the Summary and then click Finish.
9. Important: Repeat this procedure for Disk 2; assigning it a different drive letter. You see the new disks shown as Online, Formatted, and Healthy (see Figure 12).
10. Important: Repeat this entire procedure (creating both disks) on the second server.
F5® Deployment Guide 14

Figure 12 New disks on the Disk Management screen
Joining the Active Directory DomainThe next task is to configure the Windows Storage Server to be a Domain Computer.
To configure the Windows Storage Server as a domain computer
1. From the Windows Start menu, click Control Panel, and then click System. The System Properties screen opens.
2. Click the Computer Name tab, and then click the Change button.
3. In the Member of section, click the Domain button, and type the appropriate domain in the box. In our example, we type siterequest.com.
4. Click the OK button. A Windows Security box opens.
5. Type the name and password of an administrator account on the domain, and then click OK.You must reboot the server to complete the domain join process.
6. Important: Repeat this procedure on the second server.
15

Deploying the F5 ARX with Dell NX3000 and Microsoft Windows Storage Server 2008
Sharing the Virtual DisksIn order for the new Storage Volumes to be available to the ARX, the volumes need to be shared. The share permissions are also defined to allow read write access.
You need to create a root level directory on each of the two disks. These directories are shared to the network as CIFS Shares. The ARX creates a share farm with these shares.
To share the virtual disks
1. Log into the server using an account with administrator privileges.
2. Open a command prompt, and use the mkdir command to create two new root-level directories. In our example, we type:
mkdir e:\Eql1-Vol-1
mkdir f:\Eql1-Vol-2
3. Use the net share <sharename>=<full path> command to create the shares. In our example, we type
net share Eql1-Vol-1=e:\Eql1-Vol-1
Eql1-Vol-1 was shared successfully.
net share Eql1-Vol-2=f:\Eql1-Vol-2
Eql1-Vol-2 was shared successfully.
4. Use the net share command to view the network shares on the server.
C:\Users\Administrator>net share
Share name Resource Remark
-----------------------------------------------------------------------
C$ C:\ Default share
E$ E:\ Default share
F$ F:\ Default share
IPC$ Remote IPC
ADMIN$ C:\Windows Remote Admin
Eql1-Vol-1 e:\Eql1-Vol-1
Eql1-Vol-2 f:\Eql1-Vol-2
NASUtils C:\NASUtils Powervault NAS Utilities
5. Type Exit.The shares have been created with default permissions. The permissions on the share need to be modified to allow read/write access. You can do this using the Windows Explorer tool.
To modify the share permissions
1. Launch Windows Explorer, and then open the drives that are being shared.
F5® Deployment Guide 16

2. Right click the shared folder and then click Share.
Figure 13 Share option thru Windows Explorer
3. Select the Change Sharing Permissions option. The list of file owners and permissions is displayed.
4. Type the name of the Domain User that will be used as the ARX Proxy User, and then click the Add button. This user is configured as a member of the Local Administrator Group for this server in the next procedure. In our example, the Domain user is named plain. This user is added to the list of users with read-only permissions.
5. Right click the user and then click Co-Owner.
6. Click Share to continue, and then click Done to complete the share permission changes.
7. Important: Repeat this for the second shared folder and the two shared folders on the second server.
Assigning Local Administrator privileges for the ARX Proxy UserThe Dell Windows 2008 Storage Server needs to have a domain user added to the local administrator group. This user is called the ARX Proxy User. The ARX device uses these user credentials to authenticate to the CIFS Shares.
To add the Proxy User to the local Administrators group
1. From the Windows Start menu, select Administrative Tools and then click Computer Management. The Computer Management application opens.
2. Expand Local Users and Groups, and then double-click the Administrators group. The list of administrator equivalent users opens.
17

Deploying the F5 ARX with Dell NX3000 and Microsoft Windows Storage Server 2008
3. Click the Add button. Type a user name, and then click Check names. In our example, we type plain. If requested, domain administrator login credentials maybe necessary. Enter the credentials and select OK. A list of domain users matching the search criteria are listed.
4. Select the user you created from the list and then click OK to add the user to the local group.
5. Click OK to continue. The Domain User is now a member of the Local Administrators group on the server.
6. Important: Repeat these steps for the second server.
This completes the Dell configuration. Continue with the following section to configure the ARX device.
F5® Deployment Guide 18

Configuring the ARX deviceThis section we configure the ARX to access the Dell NX3000 Storage servers. We create a CIFS namespace with 4 shares added to it. The shares are incorporated into a managed volume with a file placement policy. Each storage tier is configured as a Share farm. As files age and are not modified for more than 30 days they are moved between these shares depending upon the file last modified time.
Creating the CIFS NamespaceThe first task in configuring the ARX is to create a CIFS Namespace.
To create the CIFS namespace
1. From the left navigation pane, click Common Operations.
2. Click the Create Namespace button. The Create Namespace wizard opens.
3. In the Namespace name box, type a name. In our example, we type Dell. You can optionally type a description.
4. From the Protocol list, click the CIFS box, and then click Next
5. In the CIFS authentication protocol section, check the Use Kerberos, Use NTLM, and Use NTLMv2 boxes.
6. Click the Add button to create a new NTLM Auth Server definition. The new NTLM authentication server page opens. Complete the following:
a) In the NTLM Auth. Server Name box, type a name for the server. In our example, we type siterequest.com.
b) In the IP Address box, type the IP address of the server. We type 10.10.10.1.
c) In the Port box, type the port. We type 25805.
d) In the Secure Agent Password box, type the password. This is the password assigned on the Domain Controller for the Secure Agent application. Confirm the password in the next box.
e) In the Windows Domain Name and Pre Win2k Domain boxes, type the Windows domains. In our example, we type siterequest.com in both boxes (see Figure 14).
f) Click Save to return to the CIFS authentication page.
19

Deploying the F5 ARX with Dell NX3000 and Microsoft Windows Storage Server 2008
Figure 14 Authentication Server parameters
7. In the Proxy User section, click the Add button to add a proxy user. This is the Domain User that is a member of the Local Administrators Group defined in section Assigning Local Administrator privileges for the ARX Proxy User, on page 17. Perform the following to create a new proxy user:
a) In the Proxy User Name box, type a name. In our example, we type arx_proxy_user. You can optionally type a description in the next box.
b) In the Proxy User Account box, type the user account. In our example, we type plain.
c) In the Proxy User Account Password box, type the password. Confirm the password in the next box.
d) In the Windows Domain Name and Pre Win2k Domain boxes, type the Windows domains. In our example, we type siterequest.com in both boxes.
e) Click Save to return to the CIFS authentication page.
Figure 15 New ARX Proxy User
F5® Deployment Guide 20
8. Click the Next button.
9. Review the Summary and click Finish.
Creating a VolumeThe next task is to incorporate the backend filer CIFS shares into an ARX Managed Volume. File placement policy is managed at the volume level. In this example, we place the Volume Metadata onto an existing NFS export. ARX best practices state Metadata should be created on an NFS export if one is available. Alternatively, a CIFS share could be used.
To create a Volume on the ARX
1. From the left navigation pane, click Common Operations.
2. Click the Create Volume button. The Create Managed Volume wizard opens.
3. From the Namespace list, select the name of the CIFS namespace you created in the preceding procedure. In our example, we select Dell.
4. In the Volume Name box, type a name for the Volume. In our example, we type /Vol. You can optionally type a description.
5. Click Next.
6. From the Metadata file server row, click the Add button to create an external filer. The new file server wizard opens. Complete the following:
a) In the Name box, type a name for this File Server. In our example, we type Metadata-Server.
b) In the Primary IP Address box, type the primary IP address.
c) In the Secondary IP Address box, type any secondary IP addresses, and click the Add button. In our example, we do not include any secondary IP addresses.
d) In the Description box, you can optionally type a description.
e) Make sure there is a check in the This file server supports snapshots box.
f) From the File Server Type list, select NetApp.
g) In the Management IP Address box, type the management IP address.
h) From the Management Protocol list, select the appropriate protocol. In our example, we select SSH.
i) In the Management Proxy User box, type the proxy user you created. In our example, we type arx-proxy-user.
21

Deploying the F5 ARX with Dell NX3000 and Microsoft Windows Storage Server 2008
j) In the Ignore names (optional) box, type any directories the ARX should ignore, and click the Add button. An example is for the ARX to ignore Snapshot directories on EMC or NetApp filers. Or for the ARX to limit the total number of simultaneous CIFS Connections to the external filer.
k) Click the Save button. You return to the managed volume wizard.
7. From the Metadata file server protocol list, select a protocol. In our example, we select NFS version 3 UDP.
8. From the Metadata file server list, select the file server you just created (if it is not already selected). In our example, we select Metadata-Server.
9. In the Metadata CIFS share / NFS path box, type the path. In our example, we type /metadata5.
10. Click Next. The CIFS parameter option page opens.
11. In the Auto-synchronization section, check the box.
12. In the Filer Subshares section, check the Allow filer subshares to be exported by this volume box.
13. In the CIFS Attributes section, check the Auto detect CIFS Attributes box.
14. Click Next. The Volume CIFS parameters page opens.
Figure 16 CIFS Parameters
15. From the VPU ID list, select Dynamic.
16. In the Conflict Resolution section, click the Files and directories can be renamed during import and re-import button.
F5® Deployment Guide 22

17. Check the Enable the volume when finished box, and then click Next.
18. Review the summary, and then click Finish.
Adding the External FilersThe next task is to add the two NX3000 Servers as external filer entries within the ARX. This entry is referenced later when we add the filer shares to the managed volume.
To add the External Filers
1. From the navigation pane, click File Servers.
2. Click the Add button. The Add File Server screen opens.
3. In the Name box, type a name for this File Server. In our example, we type W2K8-EQL-1.
4. In the Primary IP Address box, type the primary IP address.
5. In the Secondary IP Address box, type any secondary IP addresses, and click the Add button. In our example, we do not include any secondary IP addresses.
6. In the Description box, you can optionally type a description.
7. In the Ignore names (optional) box, type any snapshot directories the ARX should ignore on the backend file shares, and click the Add button.
8. Click the OK button. You return to the File Server Summary page.
9. Click OK to complete the file server addition.
10. Important: Repeat this procedure to add another external filer. In our example, we create W2K8-EQL-2.The File Server Summary displays. In this example, we defined the the Metadata Server and the two NX3000 servers.
Figure 17 File Server Summary
23

Deploying the F5 ARX with Dell NX3000 and Microsoft Windows Storage Server 2008
Adding the root level and CIFS sharesFirst file share we add is the root level share. The subsequent shares adapt to the root volume permissions.
To add a root level share
1. From the left navigation pane, click Common Operations.
2. Click the Add Share button. The Add Share Wizard opens.
3. In the Share Name box, type a name for this Share. In our example, we type Eql-vol-1.
4. From the Namespace list, select the name of the namespace you created in Creating the CIFS Namespace, on page 19. In our example, we select Dell.
5. From the Volume list, select the name of the Volume you created in Creating a Volume, on page 21. In our example, we select /Vol. Click the Next button.
6. From the File Server list, select the name of the file server you created in Adding the External Filers, on page 23. In our example, we select W2K8-EQL-1.
7. In the CIFS Share box, type the name of the CIFS share.In our example, we type Eql1-Vol-1.
8. In the Import Conflict Resolution section, check all of the boxes (see Figure 18).
9. Make sure the Enable this share when finished and Allow this switch to import this share, even if it is owned by another ARX boxes are checked.
10. Click the Next button.
11. Review the summary, and click the Finish button.
12. Important: Repeat this entire procedure to add the remaining Dell Unified Storage shares to the volume. In our example, we repeat these steps three times for the following shares: \\W2K8-EQL-1\Eql1-Vol-2, \\W2K8-EQL-2\Eql2-Vol-1, and \\W2K8-EQL-2\Eql2-Vol-2.
F5® Deployment Guide 24

Figure 18 File Server and Share selection
Once all the shares have been added to the Volume, the Managed Volume Details page reports the share status. The following image shows the root level share is online and the three newly added shares are Importing.
Figure 19 Manage Volume Details: Share list
25

Deploying the F5 ARX with Dell NX3000 and Microsoft Windows Storage Server 2008
Creating the Share farmA share farm is a load balancing feature. When files are migrated to the share farm, the files are placed within the share farm members in a round robin manner. If a managed volume needs more capacity, the user can add more shares to the share farm and dynamically redistribute files across all shares.
In this example, we group two shares together from the Tier-1 Server W2K8-EQL-1, and a second share farm that includes the two shares from the Tier-2 Server W2K8-EQL-2. This allows for simple capacity expansion for either tier. As more capacity is needed for either tier simply add another share to the respective sharefarm.
To create the Share farm
1. From the left navigation pane, click Common Operations.
2. Click the Load Balancing button. The Load Balancing Wizard opens.
3. In the Policy name box, type a name for this policy. In our example, we type W2K8-EQL-1.
4. From the Namespace list, select the name of the namespace you created in Creating the CIFS Namespace, on page 19. In our example, we select Dell.
5. From the Managed volume list, select the name of the Volume you created in Creating a Volume, on page 21. In our example, we select /Vol. Click the Next button.
6. Click the boxes of the file shares to be included in the share farm. In our example we select the Eql1-Vol-1 and Eql1-Vol-2 file shares. This is the tier-1 server share farm. Click the Next button.
Figure 20 Selecting the shares for the share farm
7. From the Load Balancing Algorithm list, select an appropriate load balancing method. In our example, we select Round-Robin.
8. In the Constraint Options section, click the Place new files in the same shares as their parent directories box.
F5® Deployment Guide 26

9. In the Enable section, ensure the Enable this load balancing policy when finished box is checked.
10. Click the Next button.
11. Review the summary and then click the Finish button.
12. Important: Next, create the tier-2 share farm with the remaining shares on the W2K8-EQL-2 server.
To create the tier-2 share farm, repeat the preceding procedure, using a unique name and selecting the appropriate shares from the list. In our example, we name the farm W2K8-EQL-2, and select the Eql2-Vol-1 and Eql2-Vol-2 shares.
Creating the File Placement PolicyA file placement policy rule is assigned to a managed volume. It facilitates file movement between backend file shares based on file attributes. The files can be placed based by modified time, last access time, file name, and applied as a scheduled event. The ARX periodically (on schedule) scans the metadata store and check for policy matches. If a match is located, the ARX processes the rule and moves the file according to the policy definition. Policy rule enumeration can be limited by a time of day rule as well as restrict the total time a policy is allowed to process files.
In this example we create a Policy rule to move files that have not been modified for more than 30 days onto the Tier-2 NX3000 Storage. The files are copied to the Tier-2 Share farm. The policy is enumerated every day at 1AM.
To create the file placement policy
1. From the left navigation pane, click Common Operations.
2. Click the Tiered Storage button. The Tiered Storage Wizard opens.
3. In the Policy name prefix box, type a prefix. In our example, we type Tiered_EQL.
4. From the Namespace list, select the name of the namespace you created in Creating the CIFS Namespace, on page 19. In our example, we select Dell.
5. From the Managed volume list, select the name of the Volume you created in Creating a Volume, on page 21. In our example, we select /Vol.
6. From the Number of tiers list, select a number of tiers. In our example we select 2. Click the Next button.
7. For Tier 1, select the first Share Farm you created in Creating the Share farm, on page 26. In our example, we select W2K8-EQL-1. Click the Next button.
27

Deploying the F5 ARX with Dell NX3000 and Microsoft Windows Storage Server 2008
8. For Tier 2, select the second Share farm you created in Creating the Share farm, on page 26. In our example, we select W2K8-EQL-2. Click the Next button.
9. The next step is to specify the criteria for moving files and the schedule. Click the Add button to the right of Schedule to define the schedule to be associated with the policy.
a) In the Schedule Name box, type a name for this schedule. In our example, we type Tiering_Schedule.
b) In the Start Time fields, you can specify a specific start time. In our example, we leave the fields at the default.
c) In the Interval section, click the Hours button, from the Hour list, select 1, and then click the Add button.
d) The other fields are optional, configure as applicable for your deployment.
e) Click the Save button (see Figure 21). You return to the Tiered Storage Wizard.
Figure 21 Creating a new policy schedule
F5® Deployment Guide 28
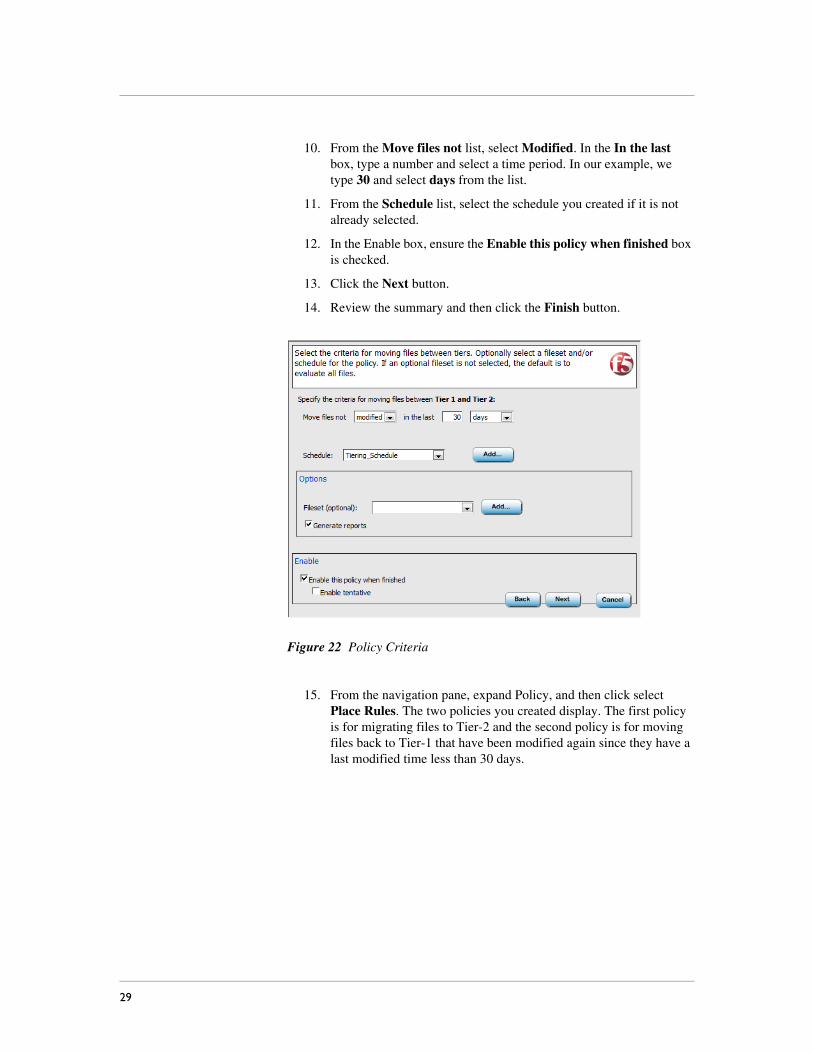
10. From the Move files not list, select Modified. In the In the last box, type a number and select a time period. In our example, we type 30 and select days from the list.
11. From the Schedule list, select the schedule you created if it is not already selected.
12. In the Enable box, ensure the Enable this policy when finished box is checked.
13. Click the Next button.
14. Review the summary and then click the Finish button.
Figure 22 Policy Criteria
15. From the navigation pane, expand Policy, and then click select Place Rules. The two policies you created display. The first policy is for migrating files to Tier-2 and the second policy is for moving files back to Tier-1 that have been modified again since they have a last modified time less than 30 days.
29

Deploying the F5 ARX with Dell NX3000 and Microsoft Windows Storage Server 2008
Figure 23 Placerule Summary
Creating the Virtual ServiceThe Virtual Service is how the ARX presents CIFS Shares to the network clients. Clients send file requests through the Virtual Service and the ARX proxies these requests to the appropriate backend filer.
To create the virtual service
1. From the navigation pane, click Virtual Services.
2. Click the Add button. The Add Virtual Service Wizard opens.
3. From the Namespace list, select the namespace you created in Creating the CIFS Namespace, on page 19. In our example, we select Dell.
4. Click the Create a new virtual service (VIP) button.
a) In the Virtual service DNS name box, type the DNS name for the virtual service. In our example, we type dell.siterequest.com.
b) In the IP Address box, type the IP address of the VIP. In our example, we type 172.30.72.246.
c) In the Subnet Mask box, type the appropriate subnet mask. In our example, we type 255.255.255.192.
d) From the VLAN ID list, select the appropriate VLAN ID. In our example, we select 301 (see Figure 24).
F5® Deployment Guide 30

Figure 24 New Virtual Service Wizard
5. Ensure the Enable the virtual service when finished box is checked.
6. Click the Next button.
7. From the Windows Domain Name box, select the Windows domain name. In our example, we select siterequest.com.
8. In the Pre Win2k Domain box, type the Pre Win2k Windows domain name. In our example, we type siterequest.
9. The other settings on this screen are optional, configure as appropriate for your deployment. In our example, we leave the rest of the settings at the default level.
10. Click the Next button. The Virtual Service Exports screen opens.
11. In the New Export section, from the Volume list, select the Volume you created in Creating a Volume, on page 21. In our example, we select /Vol.
12. In the Volume Path box, type the Volume Path. In our example, we type /.
13. In the Export Name box, type a name for the Export. In our example, we type dell_share.
14. Configure the other options as applicable for your configuration, and then click the Add Export button.
15. Click the Next button.
16. Review the summary and then click Finish.
Review the Virtual Service by selecting Virtual Services from the left pane in the GUI.
31

Deploying the F5 ARX with Dell NX3000 and Microsoft Windows Storage Server 2008
Figure 25 Virtual Service Summary
Notice the admin state is enabled and the status is ready. For Kerberos authentication the virtual service needs to join the Active Directory Domain.
17. Check the box for new Virtual Service and then click the Join Domain button.
Figure 26 Join Active Directory Domain dialog
18. Type the Username and User Password and then click OK.
F5® Deployment Guide 32

Verifying Storage IntegrationIn this section, we verify the configuration is operating properly. We use a test client to map the Virtualized Volume to a drive letter. Files are copied to the mapped drive. An ARX report is generated to show where the files were placed on the backend storage arrays.
The Dell Server Volumes are displayed to show how the file stripping is depicted on the back end storage and compared to the client's view of the file space.
This section contains the following procedures:
1. Mounting the Virtual Server CIFS share, on page 33
2. Generating an ARX Metadata Report, on page 35
3. Viewing the shares from the backend server perspective, on page 38
Mounting the Virtual Server CIFS shareTo confirm the Virtual Service is operating properly, we map a network drive to the Virtual Service Export from a Windows Client. The export shows some files and directories exist. The user cannot determine which of the four backend file shares the files reside. The ARX has merged the files and directories into one common virtual path.
To map the Virtual Service CIFS Share to drive letter
1. From a Windows client, open Windows Explorer, and, from the Tools menu, select Map Network Drive.
2. Select an unused Drive Letter and the network folder. The folder is comprised of the Virtual Service FQDN and export path.
3. From the Drive list, select an unused Drive Letter.
4. In the Folder box, type the network folder. The folder is comprised of the Virtual Service FQDN and export path.
5. Select Connect using a different user name and specify the Domain User with the proper access rights. In our example, we use the Proxy User credentials.
6. Click Finish. Microsoft Windows mounts the drive. The drive can be explored and the following screen displays the file contents of the virtual service export.
33

Deploying the F5 ARX with Dell NX3000 and Microsoft Windows Storage Server 2008
Figure 27 Managed Volume share contents
In this example, there are four root level directories. Under these directories there is various test content. The content is stripped across the backend servers and presented as a unified volume to the client.
The volume statistics can be viewed from the ARX by clicking the Managed Volume in the left pane and then clicking the volume (/Vol in our example).
F5® Deployment Guide 34

Figure 28 Managed Volume Details
In our example the volume contains approximately 49K files file distributed within 2100 directories across 4 shares.
Generating an ARX Metadata ReportThe file placement can be determined by creating an ARX report. The administrator can also view the directory contents on the backend servers and see how the files are placed. In this section we demonstrate how to create an ARX Report.
To Generate an ARX Metadata report
1. From the navigation pane, click the Managed Volumes and then click the volume (/Vol in our example).
2. From the Managed Volume Details screen, click Report.
35

Deploying the F5 ARX with Dell NX3000 and Microsoft Windows Storage Server 2008
Figure 29 Volume Metadata Report
3. On the Report Volume page, complete the following:
a) In the Path box, type the path. In our example, we type /.
b) In the Report type row, click Metadata.
c) In the Output Report Name box, type a name. In our example, we type Dell_Report_1.
d) Click OK.
The ARX generates the report, which is accessible from the navigation pane by clicking Reports, and then clicking the name of the report you just created.
The following snippet of the report displays filenames and the file shares where they are located.
**** Metadata-Only Report: Started at Mon Jan 25 11:26:27 2010 ****
**** Software Version: 5.01.000.11927 (Nov 23 2009 21:57:26) [nbuilds]
**** Hardware Platform: ARX-1000+
**** Report Destination:
**** Namespace: Dell
**** Volume: /Vol
**** Path: /Vol
Share Physical Filer
-------------------- ----------------------------------------------------------
[Eql1-vol-1 ] 10.51.105.61:Eql1-Vol-1
[Eql1-Vol-2 ] 10.51.105.61:Eql1-Vol-2
[Eql2-Vol-1 ] 10.51.105.62:Eql2-Vol-1
[Eql2-Vol-2 ] 10.51.105.62:Eql2-Vol-2
**** Legend:
**** FL = File: The reported entry is a file.
**** DR = Directory: The reported entry is a directory.
F5® Deployment Guide 36

**** SL = Symlink: The reported entry is a symbolic link.
**** LN = Link: The reported entry has a link count greater than one.
**** NL = No Lock: Was unable to lock parent directory during report.
**** CC = NFS case-blind name collision.
**** IC = Name contains invalid CIFS characters.
**** FN = Name may conflict with a filer-generated name.
**** SP = A persistent split is registered in the metadata, due to a FGN.
**** NF = Name is only accessible to NFS clients.
Type Share Path
--------------------- -------------------- -------------------------------------
[ DR ] [Eql1-Vol-2 ] /test_folder_2
[ DR ] [Eql1-Vol-2 ] /testdata_cv_72_4
[ DR ] [Eql1-Vol-2 ] /ftp
[ DR ] [Eql1-vol-1 ] /test_folder
[FL ] [Eql1-vol-1 ] /test_folder/hello_World.txt
[FL ] [Eql1-Vol-2 ] /test_folder_2/hello_again.txt
**** Total Files: 47,421
**** Total Directories: 2,145
**** Total Hard Links (nlink>1): 0
**** Total Symlinks: 0
**** Total Locking Errors: 0
**** Total items: 49,566
**** Elapsed time: 00:00:05
**** Metadata-Only Report: DONE at Mon Jan 25 11:26:27 2010 ****
This metadata report was edited for ease of demonstration, as a full report can be very lengthy. The report shows that all the file contents are residing on the W2K8-EQL-1 Tier-1 server within the two file shares. The Policy schedule has not executed yet.
The policy schedule is set for 1AM. Once the policy schedule is hit, the ARX enumerates the files that are eligible for Tier-2. These are files that have not been modified in more than 30 days. You can run another metadata report and it shows files on all 4 shares within both of the NX3000 server.
When the policy runs, a report generates. The following is an example of the report contents.
**** File Placement Report: Started at Mon Jan 25 14:00:00 2010 ****
**** Software Version: 5.01.000.11927 (Nov 23 2009 21:57:26) [nbuilds]
**** Hardware Platform: ARX-1000+
**** Report Destination:
Place Rule: Tiered_EQL_tier-2-W2K8-Eql-2
Configuration:
From fileset: Tiered_EQL_tier-2 (files only)
Target share-farm: W2K8-Eql-2
Schedule: Tiering_Schedule
37

Deploying the F5 ARX with Dell NX3000 and Microsoft Windows Storage Server 2008
Report: Tiered_EQL_2
Report Verbose: Disabled
Report Delete Empty: Enabled
Report Errors Only: Disabled
Migrate limit: 0
Volume Scan: Enabled
Inline Notifications: Disabled
Promote Directories: Disabled
Auto-Close Files: Disabled
Tentative: No
State: Enabled
Scan Statistics:
Scan Started: Mon Jan 25 14:00:11 2010
Scan Completed: Mon Jan 25 14:47:30 2010
Elapsed Time: 00:47:19
Number of Times Paused: 0
Total Time Paused: 00:00:00
Number of Times Stopped by Low Space: 0
Time Waiting for Free Space: 00:00:00
Files Scanned: 47421
Directories Scanned: 2146
Files in Fileset: 47419
Files Migrated: 47419
Size of Files Migrated: 106 GB
Directories Promoted: 0
Failed Migrations: 0
Size of Failed Migrations: 0 B
Failed Directory Promotes: 0
Files Forced Closed: 0
Suppressed Error Messages: 0
Total processed: 47,419
Elapsed time: 00:47:30
**** File Placement Report: DONE at Mon Jan 25 14:47:30 2010 ****
When this policy ran it enumerated the Tier-1 filer sharefarm for the first time. 106GB of file content was identified as older than 30 days. This content was moved from Tier-1 to Tier-2. The duration of this migration was 47 minutes. Subsequent enumerations would contain much less data and complete quicker.
Viewing the shares from the backend server perspectiveIf a user browses the backend file servers, they can see the files placed on the backend filers. The ARX created directories and placed files by policy onto the backend servers. Some directories exist on all filers but not
F5® Deployment Guide 38

necessarily all directories depending if a file within those directories is to be placed in the share. The union of all the backend filer directories and files is the Virtual Service share.
Important
Users must not make changes to the backend files directly. File manipulation must occur through the Virtual Service. If files and directories are modified on the backend directly, this causes a Metadata inconsistency.
These inconsistencies can be resolved by the ARX.
Navigate the file systems on each server and open the shared folders.
This example shows the Dell Unified Storage Volumes from the server's point of view. Notice that some Subdirectories are present on all four windows volumes, but not all directories. As files are migrated between tiers the ARX maintains a consistent directory tree. If a directory is required and is not present, the ARX creates it in order to keep the consistent directory trees. Figure 30 represents the Tier-1 Server directory layout. Files are written to this share farm in a round robin fashion.
Figure 30 Tier-1 Server Share directory contents
Figure 31 represents the Tier-2 Server directory layout. All the files within these two directories are older than 30 days. As the files in the Tier-1 shares within the test folder directories become older than 30 days (since they were last modified), they are migrated to the Tier-2 share farm.
39

Deploying the F5 ARX with Dell NX3000 and Microsoft Windows Storage Server 2008
Figure 31 Tier-2 Server Share directory contents
ConclusionThis deployment guide demonstrated the way to integrate F5 ARX platform with Dell NX3000 Storage Servers with EqualLogic iSCSI Arrays. The deployment enables tiering model between Multiple NX3000 Unified Storage Platforms with different RAID algorithms applied across the tiered storage.
For more information on configuring the F5 ARX, refer to the documentation, available on Ask F5.
F5® Deployment Guide 40