Embed Size (px)
Citation preview

DensityPRO Measurement SystemsDensityPRO & DensityPRO-T DensityPRO NAI & DensityPRO NAI+ Gamma Density Measurement Systems User Manual PN 1-0702-016 EZ Cal II Version 1.0.0.766


DensityPRO Measurement Systems
DensityPRO & DensityPRO-T DensityPRO NAI & DensityPRO NAI+ Gamma Density Measurement Systems User Manual PN 1-0702-016 EZ Cal II Version 1.0.0.766


© 2014 Thermo Fisher Scientific Inc. All rights reserved.
“Microsoft” and “Windows” are either trademarks or registered trademarks of Microsoft Corporation in the United
States and/or other countries. “HART” is a registered trademark of the HART Communication Foundation.
“FOUNDATION Fieldbus” and “Fieldbus Foundation” are registered trademarks of Fieldbus Foundation. “National Instruments” is a registered trademark of National Instruments Corporation.
All other trademarks are the property of Thermo Fisher Scientific Inc. and its subsidiaries.
Thermo Fisher Scientific Inc. (Thermo Scientific) makes every effort to ensure the accuracy and completeness of this manual. However, we cannot be responsible for errors, omissions, or any loss of data as the result of errors or omissions. Thermo Scientific reserves the right to make changes to the manual or improvements to the product at any time without notice.
The material in this manual is proprietary and cannot be reproduced in any form without expressed written consent from Thermo Scientific.

This page intentionally left blank

Thermo Scientific DensityPRO User Manual v
Revision History
Revision Level Date Comments
A 06-2014 Initial Release per ERO 8465

This page intentionally left blank

Thermo Scientific DensityPRO User Manual A-vii
Contents
Safety Information & Guidelines ................................................................................. xiii
Safety Considerations ..................................................................................................... xiii
Warnings, Cautions & Notes .......................................................................................... xiv
Quick Setup ....................................................................................................................... xv
Setup ................................................................................................................................ xv
Standardization ................................................................................................................ xv
Calibration ....................................................................................................................... xvi
Product Overview ........................................................................................................... 1-1
Introduction .................................................................................................................... 1-1
Function .......................................................................................................................... 1-2
Source ........................................................................................................................ 1-2
Detector Transmitter ................................................................................................. 1-2
Communications & Measurement Display ................................................................ 1-2
Display Background ............................................................................................... 1-2
Local Display (Integrated Unit) .............................................................................. 1-3
Display & Keypad (Remote Unit) ........................................................................... 1-3
Inputs & Outputs ................................................................................................... 1-4
Features .......................................................................................................................... 1-5
Setup Wizard ............................................................................................................. 1-5
Instantaneous Response ............................................................................................ 1-6
Multiple Readouts ..................................................................................................... 1-6
Extensive Alarms ....................................................................................................... 1-6
Totalizers & Batch Control ......................................................................................... 1-6
Output Signals ........................................................................................................... 1-6
Additional Documents .................................................................................................... 1-6
EZ Cal II Overview ........................................................................................................... 2-1
Features .......................................................................................................................... 2-1
Startup ............................................................................................................................ 2-2
The Measurement Display ............................................................................................. 2-2
The Setup Wizard ........................................................................................................... 2-2
Chapter 1
Chapter 2

viii DensityPRO User Manual Thermo Scientific
Startup & the Setup Wizard ........................................................................................... 3-1
Booting ........................................................................................................................... 3-1
Adjusting Contrast While Booting ............................................................................. 3-1
Keypad Overview ........................................................................................................... 3-1
Using the Keypad with the Menu Screens ................................................................ 3-1
Using the Keypad with the Edit Screens ................................................................... 3-1
Editing Fields with Dropdown Menus ....................................................................... 3-2
Menu Screens: Keypad Display vs. EZ Cal II .................................................................. 3-2
Upload / Download Configuration ................................................................................. 3-3
Upload Configuration ................................................................................................. 3-3
Download Configuration ............................................................................................ 3-3
EZ Cal II Control Buttons ................................................................................................ 3-4
User Modes & Passwords .............................................................................................. 3-4
Password Entry/Validation ........................................................................................ 3-6
System Timeout ............................................................................................................. 3-7
The Setup Wizard ........................................................................................................... 3-7
Temperature Compensation .................................................................................... 3-14
Standardization ........................................................................................................ 3-17
Gauge Calibration .................................................................................................... 3-19
Operation .......................................................................................................................... 4-1
Communication Setup .................................................................................................... 4-1
Com A / Com B (RS232) ............................................................................................. 4-1
RS485 .................................................................................................................... 4-3
Ethernet ..................................................................................................................... 4-3
USB Port ..................................................................................................................... 4-4
System Control ............................................................................................................... 4-4
Configuration ............................................................................................................. 4-5
System Status ................................................................................................................ 4-6
Mode/Fault Alarm Setup ................................................................................................ 4-7
System Tab ................................................................................................................ 4-9
System Status Tab ................................................................................................... 4-12
Application Tabs ...................................................................................................... 4-12
Commands .................................................................................................................... 4-14
Common Action ....................................................................................................... 4-14
Chapter 3
Chapter 4

Thermo Scientific DensityPRO User Manual A-ix
Hold Current Output ................................................................................................. 4-16
Hold Relay Output .................................................................................................... 4-16
Alarm Action ............................................................................................................ 4-17
Physical Inputs & Outputs ............................................................................................ 4-18
Analog (Current & Voltage) Inputs ........................................................................... 4-18
Current Tabs ........................................................................................................ 4-18
Calibration ...................................................................................................... 4-22
Voltage Tabs ....................................................................................................... 4-23
Digital Inputs ........................................................................................................... 4-25
Current Output ......................................................................................................... 4-28
Calibration ........................................................................................................... 4-30
Relay Outputs .......................................................................................................... 4-31
Detector ........................................................................................................................ 4-33
Detector Screens .......................................................................................................... 4-34
Setup Tab ................................................................................................................. 4-34
Detector Setup .................................................................................................... 4-34
Detector Configuration ........................................................................................ 4-36
Count Tab ................................................................................................................. 4-37
Current Input Tab ..................................................................................................... 4-38
RTD Input Tab .......................................................................................................... 4-39
Calibration ........................................................................................................... 4-40
Status Tab ................................................................................................................ 4-41
Diagnostics Tab ....................................................................................................... 4-42
Application ................................................................................................................... 4-43
Configuration ........................................................................................................... 4-43
Application Screens ..................................................................................................... 4-44
Setup Tabs ............................................................................................................... 4-44
Density Setup ...................................................................................................... 4-44
Input Configuration Setup ................................................................................... 4-49
Temperature Compensation Setup ..................................................................... 4-52
Additional Measurement Setup .......................................................................... 4-54
General Setup ..................................................................................................... 4-57
Standardization ........................................................................................................ 4-58
Using as a Default Calibration Value .................................................................. 4-58

x DensityPRO User Manual Thermo Scientific
Gauge Calibration .................................................................................................... 4-60
CAL Data Tab ...................................................................................................... 4-61
Point Data Tab (Polynomial) ................................................................................ 4-62
Point Data Tab (Breakpoint Table) ...................................................................... 4-64
Totals ....................................................................................................................... 4-64
Totalizers #1 – #4 ................................................................................................ 4-66
All Totalizer ......................................................................................................... 4-68
Action ....................................................................................................................... 4-69
Measurement Data .................................................................................................. 4-70
Process Alarm .......................................................................................................... 4-70
High and Low Alarms .......................................................................................... 4-71
Alarm Functions .................................................................................................. 4-73
Calibration .................................................................................................................... 4-76
Output Calibration ................................................................................................... 4-79
Keypad Display Menu Tree of DensityPRO Gauges ................................................. A-1
Flashing the Application Firmware ............................................................................ B-1
Flash Application Firmware ............................................................................................ B-1
Programming the Main CPU ...................................................................................... B-2
Density Calculation ....................................................................................................... C-1
Basic Density Calculation ............................................................................................... C-1
Standardization Term ................................................................................................ C-3
Slope Correction Factor ............................................................................................. C-3
General Density Calculation ...................................................................................... C-3
Single-Phase Material .................................................................................................... C-4
Single-Phase Density Calculation .............................................................................. C-4
Additional Measurements ..................................................................................... C-7
Slurry Material ............................................................................................................... C-8
Slurry Density Calculation ......................................................................................... C-8
Additional Measurements ................................................................................... C-14
Proppant ................................................................................................................... C-17
In Situ Calculation ................................................................................................... C-18
Emulsion Material ........................................................................................................ C-19
Emulsion Density Calculation .................................................................................. C-19
Additional Measurements ................................................................................... C-25
Appendix A
Appendix B
Appendix C

Thermo Scientific DensityPRO User Manual A-xi
Solution Material ......................................................................................................... C-25
Solution Calculation ................................................................................................ C-26
Additional Measurements ................................................................................... C-31
Temperature Compensated Density ............................................................................. C-32
Temperature Compensated Calculation .................................................................. C-32
Standardization with Temperature Compensation .................................................. C-33
Temperature Compensation during Calibration ....................................................... C-33


Thermo Scientific DensityPRO User Manual xiii
Safety Information & Guidelines
All persons installing, using or maintaining this equipment must read and understand the information contained in this section.
Safety Considerations
Failure to follow appropriate safety procedures and/or inappropriate use of the equipment described in this manual can lead to equipment damage or injury to personnel.
Any person working with or on the equipment described in this manual is required to evaluate all functions and operations for potential safety hazards before commencing work. Appropriate precautions must be taken as necessary to prevent potential damage to equipment or injury to personnel.
The information in this manual is designed to aid personnel in correctly and safely installing, operating, and/or maintaining the system described; however, personnel are still responsible for considering all actions and procedures for potential hazards or conditions that may not have been anticipated in the written procedures. If a procedure cannot be performed safely, it must not be performed until appropriate actions can be taken to ensure the safety of the equipment and personnel. The procedures in this manual are not designed to replace or supersede required or common sense safety practices. All safety warnings listed in any documentation applicable to equipment and parts used in or with the system described in this manual must be read and understood prior to working on or with any part of the system.
Caution: Using this equipment in a manner not specified by Thermo Scientific may impair the protective features provided by the product, leading to equipment damage and/or personnel injury.

Safety Information & Guidelines
Warnings, Cautions & Notes
xiv DensityPRO User Manual Thermo Scientific
Warnings, Cautions &
Notes
The following admonitions are used throughout this manual to alert users to potential hazards or important information. Failure to heed the warnings and cautions in this manual can lead to injury or equipment damage.
Warning: The triangular icon displayed with a warning advises the user about the type of hazard covered by the warning. See the table below for the types of warning symbols used in this manual.
Table 1. Types of Warnings
Symbol Warning Type Description
General Notifies users of procedures, practices, conditions, etc., which may result in injury or death if not carefully observed or followed.
Electrical Safety Notifies users of procedures, practices, conditions, etc., which involve electrical circuitry and may result in injury or death if not carefully observed or followed.
Ionizing Radiation
Notifies users of procedures, practices, conditions, etc., where ionizing radiation may be present and may result in health issues or death if not carefully observed or followed.
Caution: Cautions notify users of operating procedures, practices, conditions, etc., which may result in equipment damage if not carefully observed or followed.
Note: Notes emphasize important or essential information or a statement of company policy regarding an operating procedure, practice, condition, etc.

Thermo Scientific DensityPRO User Manual A-xv
Quick Setup
The procedures described in this section assume you will access the menu items directly.
Setup The minimum data needed to make a density measurement is listed below.
– Pipe inside diameter
– Mea #1 reading for 20.00 mA output
– Mea #1 reading for 4.000 mA output
– Position of decimal in readout 1
– Cal density point 1
– Standardization and/or Calibration
Standardization There are four methods of standardization: on water, on process, deferred, and other.
Standardization on water is the most common standardization method. In this case, Cal density point 1 would be .9982 (density of water at 20°C).
Standardization can be done on process by taking process samples during the standardization cycle. The average of these samples is then entered into the Cal density point 1. In many cases, no other calibration is needed for the gauge to operate satisfactorily.
Standardization may be deferred if the process is running and cannot be stopped to standardize on water or empty pipe. When standardization is deferred, the standardization is skipped and a calibration is done in the same manner standardization on process is done. At any time later, the standardization can be done on water or an empty pipe.
Other methods of standardization are on an empty pipe and on fluid other than the process. When either of these other methods is used, a first point calibration must be done on process. The standardization in this case is not associated with any process density. It is only a repeatable radiation condition. The first point calibration is associated with the standardization through the first point calibration density and a CAL/STD ratio where the ratio is equal to the signal at the calibration density divided by the standardization signal.

Quick Setup
Calibration
xvi DensityPRO User Manual Thermo Scientific
Calibration There are two types of calibration: a one point calibration and a two point calibration.
The two calibration points allow you to have two calibration points in the region of interest, and standardization can then be used to compensate for pipe wear and process buildup on the pipe walls. The first point calibration can be thought of as an offset. It will move the response curve up or down.
The second point calibration is a slope correction. The slope correction pivots around the first cal point. The slope can be set using the second point calibration or entered directly.
If the gauge is standardized on water or on process, the standardization serves as the first calibration point.

Thermo Scientific DensityPRO User Manual 1-1
Chapter 1
Product Overview
Introduction Note: This manual provides user instructions for the DensityPRO, DensityPRO-T, DensityPRO NAI and DensityPRO NAI+ gauges. For the purposes of this manual, DensityPRO will refer to the complete family of gauges, unless otherwise specified.
The Thermo Scientific DensityPRO family of gauges has been designed to provide reliable, accurate process material density measurements for a wide variety of challenging applications. The instrument is mounted outside of the process vessel and never contacts the process material. It can also measure the density of almost any liquid, slurry (solid material in a carrier fluid), emulsion (two different fluids), or solution (a solute material dissolved in a solvent fluid).
After the gauge calculates the process material density, it can convert the measurement into a number of forms. For slurries, the gauge can provide measurements based on the ratio of solid to carrier. Similar measurements can be made for emulsions and solutions.
By inputting flow data, the gauge can generate mass flow measurements. It can also accept a 4–20 mA current output from a magnetic flow sensor. For applications that require temperature compensation, the gauge accepts a temperature input to compensate the density measurement for changes in process temperature.
The gauge consists of the source head, which contains the radioisotope source, and the detector-transmitter, which contains the scintillator detector and electronics. The radioisotope source emits gamma radiation that passes through the process material. The detector measures the energy of the radiation arriving at the detector after passing through the process material (and vessel walls). The gauge determines the density of the process material by measuring the amount of radiation arriving at the detector, which varies with the density of the process material.
Figure 1-1. DensityPRO Measurement System

Product Overview
Function
1-2 DensityPRO User Manual Thermo Scientific
Function
Source A Cesium (Cs-137) radioisotope source is used for most applications, and a Cobalt (Co-60) source is available for applications requiring a higher energy source. The radioisotope is bound in ceramic or glass pellets and doubly encapsulated in a pair of sealed stainless steel containers. The resulting source capsule is highly resistant to vibration and mechanical shock.
The source capsule is further enclosed in the source head, a lead-filled, welded steel housing. A shaped opening in the lead shielding directs the gamma radiation beam through the process material towards the detector. Outside of the beam path, the energy escaping the source head is very low and well within prescribed limits. Closing the source shutter allows the beam to be turned off (the shutter blocks the radiation) during installation or servicing of the gauge. All source housings meet or exceed the safety requirements of the U.S. Nuclear Regulatory Commission (NRC) and Agreement State regulations. Refer to the gamma radiation safety guide (P/N 717904).
Detector Transmitter
The gauge uses a scintillator-type detector to measure the radiation reaching the detector from the source. The detector consists of either a special NaI (sodium iodide) scintillator material or a PVT (polyvinyl toluene) scintillator material coupled to a photomultiplier tube with the associated electronics. When radiation strikes the scintillator material, small flashes of light are emitted. As the density of the process material increases, more gamma radiation is absorbed by the process material and fewer light pulses are generated by the scintillator material. The photomultiplier tube and associated detector electronics convert the light pulses into electrical pulses that are processed to determine the process material density and related measurement values.
Communications & Measurement
Display
Communication with the gauge is via the RS485 and RS232 serial ports, USB, or Ethernet from a PC running EZ Cal II software. Once the gauge is set up, the primary measurement (density) can be viewed on the display and on the EZ Cal II software.
Display Background
The display on the DensityPRO units provides measurement data to the user.
Figure 1-2. Measurement Data Display

Thermo Scientific DensityPRO User Manual A-1-3
Local Display (Integrated Unit)
The DensityPRO integrated units have an optional local display that scrolls the data on the screen. The display scrolls the data and units for Measurements 1 – 4 on the two line display at a speed (scroll time) determined by the user.
Display & Keypad (Remote Unit)
The purpose of the display and keypad on the DensityPRO remote transmitter is to provide the user with the ability to access the configuration menus and system data information.
Figure 1-3. Keypad
1. The display and keypad provide the user with the following: The ability to configure communication ports A and B.
The ability to configure the Ethernet port.
The option to configure the system control setup.
The option to display the system status.
The option to configure the alarms and display the status of alarms.
The option to configure the execution of system commands.
The option to configure physical Input and Output setup and display the current status of each.
The option to configure detector setup.
The option to configure density application setup.
The option to enter a special password for cold and warm start operation.
The option to change the password mode entry.
The option to display user interface menu text in the following languages:
English
Chinese (available in future releases)
Portuguese (available in future releases)
Spanish (available in future releases)

Product Overview
Function
1-4 DensityPRO User Manual Thermo Scientific
2. When the user first starts up the system, the display informs the user that the system is booting.
Figure 1-4. Boot Screen
3. When navigating the menus, the keypad has the following functions: a. F1 allows the user to move back to a previous screen.
b. F2 allows the user to edit the screen, if applicable.
c. F3 allows the user to move to the next screen.
4. When editing information, the keypad has the following functions: a. F1 cancels and returns to the previous screen without saving.
b. F2 saves and submits the newly input information into the gauge.
c. F3 allows the user to move to the next screen.
5. Pressing the Exit Setup key allows the user to jump to one of the default screens. If the platform is standardized, the screen will default to the Measurement Data screen. If the platform is not standardized, the screen will default to the Application Select screen. Pressing Back (F1) will bring the user back to the previous screen.
6. Pressing the F1 key while the Measurement Data screen is displayed provides the user with instructions for contrast adjustment.
7. Pressing the F3 key while the Measurement Data screen is displayed provides the user access to the system data and time settings menu.
Inputs & Outputs The DensityPRO gauges provide the user with numerous inputs and outputs, which can be found in the table below.
THERMO SCIENTIFIC
MS2011
SYSTEM IS BOOTING

Product Overview
Features
Thermo Scientific DensityPRO User Manual 1-5
Table 1-1. Inputs & Outputs
Type Description
Inputs – Three 4–20 mA inputs, full scale ± 0.3% over operating temperature range; fault high/low detection
– Two 0 to 10 VDC voltage inputs, full scale ± 0.3% over operating temperature range
– Two digital inputs (DI) provide contact input with internal +5 VDC wetting voltage
– Temperature compensation circuitry with 100-ohm Platinum RTD, 3- or 4-wire; full scale ± 0.4ºC over operating temperature
Current outputs – 4–20 mA output, full scale ± 0.3% over operating temperature range Isolated, loop-powered (default)
Isolated, self-powered output
– Optional Intrinsically Safe Input/Output 4–20 mA output, full scale ± 0.3% over operating temperature range temperature range Isolated, loop-powered (default)
Isolated, self-powered output
Contact closure (relay) outputs Two relays, DPDT-fully sealed 8 A at 250 VAC
Serial outputs – RS485 half duplex – RS232 full duplex
– Fieldbus: A DensityPRO gauge is available from the Fieldbus Foundation™ website. The DD is a DD4 or DD5, interpreted by a host implementing DD Services 4.x or 5.x.
– (Pending)
– (Pending)
Features
Setup Wizard The setup wizard enables you to quickly configure the gauge by requiring you to enter all of the basic parameters. Additional menu groups contain fields in which you can enter specialized parameters and commands, allowing you to customize the gauge for a wide variety of applications.
Note: The setup wizard is only available when using the PC-based EZ Cal II software.

Product Overview
Additional Documents
1-6 DensityPRO User Manual Thermo Scientific
Instantaneous Response
Thermo Fisher’s Dynamic Process Tracking (DPT) ensures there is no lag time in the system’s response to significant changes in process density. When changes reach a user set threshold, the DPT feature reduces the normal averaging time constant to a faster, user-set time constant, ensuring a rapid, smooth output response. When the process stabilizes, the time constant automatically goes back to the original setting, to reduce the fluctuations inherent in radiation-based measurements. In this way, process density changes are immediately reflected in the transmitter output, while the effects of statistical variations in the radiation measurement are greatly reduced.
Multiple Readouts Select up to four measurement values for display: density, bulk density, solid and carrier concentrations, the ratio of solids to carrier, bulk mass flow, bulk volume flow, and the rate of change of any of these measurements.
Extensive Alarms Up to sixteen process alarms may be assigned in the system, in addition to system fault alarms and warning alarms
Totalizers & Batch Control
A maximum of four independent totalizers can be set to count elapsed time or cumulative mass/volume when a flow input signal is provided and a mass/volume flow measurement is defined.
Output Signals Any measurement can be assigned to the 4–20 mA current outputs, or the measurement values can be sent to a remote terminal or host computer as serial data.
Additional Documents
In addition to this guide, the following documents must be read and understood by all persons installing, using, or maintaining this equipment:
– DensityPRO NAI installation guide (P/N 1-0702-015)
– DensityPRO installation guide (P/N 1-0702-144)
– Gamma Radiation Safety (P/N 717904)

Thermo Scientific DensityPRO User Manual 2-1
Chapter 2
EZ Cal II Overview
Features The EZ Cal II PC user interface software provides a way for users to interact with the DensityPRO gauges.
The DensityPRO integrated units provide the option of having a local display screen, but do not have a keypad. This prohibits users from controlling and configuring the gauge. Connecting the integrated unit to a PC running the EZ Cal II software provides the user with these abilities.
The DensityPRO remote units include a keypad and display screen. All of the operations available to the user through use of the gauge’s keypad are also available in the EZ Cal II software. Using the software allows the user to be away from the gauge and provides a more user-friendly interface for interaction.
The EZ Cal II PC user interface software provides the user with:
– The ability to connect to the gauge via USB, RS232, RS485 (2/4wire), and Ethernet.
– The ability to configure communication ports A and B.
– The ability to configure the Ethernet port.
– The option to configure the system control setup.
– The option to display the system status.
– The option to configure the alarms and display the status of alarms.
– The option to configure the execution of system commands.
– The option to configure physical Input and Output setup and display the current status of each.
– The option to configure detector setup.
– The option to configure density application setup.
– The option to flash application firmware to the gauge’s main board.
– Access to a gauge setup wizard for quick gauge configuration.
– Access to a calibration wizard to calibrate all physical inputs and outputs.
– An option to upload configuration from a gauge to the PC and save it to a file.
– An option to download a file configuration from a PC to the gauge.
– The option to enter a special password for cold and warm start operation.

EZ Cal II Overview
Startup
2-2 DensityPRO User Manual Thermo Scientific
– The option to display user interface menu text in the following languages:
English
Chinese (available in future releases)
Portuguese (available in future releases)
Spanish (available in future releases)
– The option to change the password mode entry.
Startup Connect the serial port on a PC (Com A or Com B) to the RS232 serial port of the DensityPRO gauge. This connection enables you to communicate with the gauge from a PC running EZ Cal II software.
The Measurement
Display
The measurement display shows the primary density or density-related measurement, along with any additional measurements that you define in the setup. The measurement display is shown continuously, except when the setup menus are being accessed. The displayed measurement values are updated approximately every second. All measurements are updated even when they are not being displayed.
The Setup Wizard
The setup wizard provides you with a step-by-step procedure for entering the data required for gauge operation. To start the wizard, open the EZ Cal II software and click on the small blue wizard’s cap on the task bar, underneath the View menu option.

Thermo Scientific DensityPRO User Manual 3-1
Chapter 3
Startup & the Setup Wizard
Booting When power is applied to a DensityPRO gauge connected to the EZ Cal II software, a message will be displayed on screen informing the user that the system is booting. During the booting process, the only keys on the gauge’s keypad that maintain functionality are the contrast keys, represented by up and down arrows.
Adjusting Contrast While Booting
If the user adjusts the contrast during the booting process, the gauge will save the new contrast setting once booting is complete. If no change in contrast is made, the previously saved contrast setting will be applied to the display screen.
Keypad Overview
The keypad is a five by five membrane keypad comprised of input keys and operational keys. The numeric keys 0 through 9 and the character keys representing a decimal point (.) and a dash (-) allow the user to input data into the gauge using the keypad. The arrow keys allow the user to scroll through information on the screens. Additionally, the up and down arrow keys are used to adjust the display contrast. The F1, F2 and F3 keys provide different functionalities based on the information on the display. Some of the functionalities include moving the user back to the previous screen, moving the user forward to the next screen, selecting a field for editing, and submitting newly-input information.
Using the Keypad with the Menu
Screens
The menu screens organize data collected by the DensityPRO gauge into categories and subjects designed to help direct the user to the correct data. The organization of the display menu screens is very similar to that of the EZ Cal II software. Using the up and down arrows allows the user to scroll through the menu items on the display screen until reaching the desired category of information. Pressing the F1 key will bring the user back to the previous screen, while the F3 key will move the user to the next screen associated with the selected menu.
Note: The up and down arrows can only scroll through menu items when viewing the menu screens. The contrast control function is not available.
Using the Keypad with the Edit
Screens
The edit screens allow the user to analyze data, interact with the gauge, and take action. Edit screens run in a read mode and a write mode.
Read mode displays data to the user. The screen continues to display up-to-date information. Pressing the F2 button will open the screen to write mode.

Startup & the Setup Wizard
Menu Screens: Keypad Display vs. EZ Cal II
3-2 DensityPRO User Manual Thermo Scientific
Note: Once a screen has been opened for editing, the up and down arrows regain contrast control functionality.
If the screen is opened in write mode and the user is not logged in, the screen will change to the password screen so the user may log in with a password. Only users with engineering access may submit changes to the information stored in the gauge’s database.
In writing mode, the function keys perform different operations.
– F1 will exit write mode without saving any changes.
– F2 will submit and save the new data.
– F3 will move the user through the different fields available for editing on the screen.
Editing Fields with Dropdown Menus
An arrow in front of a displayed field indicates a dropdown menu associated with that field. Once the field is selected, the up and down arrow keys enable the user to explore the dropdown selections. If a field contains more characters than the screen can display, using the right and left arrows will shift the data provide visibility.
Once changes are complete, press the F2 button to submit and save the data to the gauge.
Menu Screens: Keypad Display
vs. EZ Cal II
Because the DensityPRO integrated units do not include a keypad display, it is recommended that the EZ Cal II software be utilized to achieve full functionality. For the purposes of this manual, functionality will be primarily demonstrated through instructions on the operation of the EZ Cal II software. A complete map of the DensityPRO NAI+ keypad display screens can be found in Appendix A, Keypad Display Menu Tree of DensityPRO Gauges. Each section of instruction on the EZ Cal II software will provide the location of the corresponding keypad display screens in Appendix A.

Startup & the Setup Wizard
Upload/Download Configuration
Thermo Scientific DensityPRO User Manual 3-3
Upload / Download
Configuration
The Upload/Download Configuration screen can be accessed either by selecting the screen from the Functions dropdown menu at the top of the screen, or by clicking the second to last icon button, which is circled in Figure 3-1.
Figure 3-1. File Configuration Screen
Upload Configuration
Uploading a configuration file provides the user with a way to save all configured parameters from the gauge to the computer. In the event of a cold start, the file can then be downloaded back to the gauge to reinstall the set parameters.
1. To save a file configuration from the gauge to the computer, click the Upload CFG from Gauge button.
2. Enter a name for the configuration file and click Save. 3. To abort the upload, click the Abort button.
Download Configuration
1. To download a previously-saved configuration file back to the gauge, click the Browse File button.
2. Select the .cfg file to be downloaded and click Open. The name of the file will appear in the File Name field.
3. To save the file as a shortcut for quick access in the future, click the Save to List button. Doing this will add the file to the Save Old Config Files list box. Once a file has been saved to this list, the user can set up the file for download to the gauge by simply double-clicking the file name and clicking the Download File to Gauge button. To delete a file from the list, highlight the file and click the Delete button.
This will delete the file from the list but not from the computer.

Startup & the Setup Wizard
EZ Cal II Control Buttons
3-4 DensityPRO User Manual Thermo Scientific
4. In order to save the configuration to the gauge permanently, click the Write to Flash Again button. This will ensure that the specified parameters are loaded each time the system boots. Sometimes it may be preferable to load parameters into the gauge for only a
short time, such as while running a specific test. In this instance, once the parameters have been downloaded to the gauge, the process is complete. Once the gauge is shut down, the configuration parameters will revert to the last configuration written to flash.
EZ Cal II Control Buttons
The following buttons are seen consistently throughout the EZ Cal II software:
– Abort – Stops the current process.
– Auto Refresh – Continuously refreshes the screen with data from the gauge.
– Back – Moves the user to the previous screen.
– Cancel – Closes the current screen.
– Home – Returns the user to the Detector and Application Type Selection screen, Figure 3-3.
– Next – Moves the user to the next available screen.
– Refresh – Updates the screen with the latest information from the gauge.
– Submit – Saves any information entered on the current screen to the gauge.
If a screen has multiple Submit buttons, each button will apply to a separate, portioned-off area of the screen.
User Modes & Passwords
Password protection limits access to the gauge’s setup parameters based on the access level rights granted through the four user modes below.
– Display List –This is normal mode of operation. The local display will scroll through a list of measurement data with no ability to view or modify the database via Remote Backplane (RPB) display/keypad. Remote read access to the database is available however no writes to are allowed.
– Operator Mode – The local display on the RBP will be running the user menu interface, allowing a user to view the configuration of the gauge. Remote read access to the database is available, however no writes to are allowed.
– Technician Mode – The local user can configure a small sub-set of the database within the gauge via the front panel menu system on the RBP. Remote write access is also available to a small subset of the gauge database so that calibration and standardization can be performed.

Startup & the Setup Wizard
User Modes & Passwords
Thermo Scientific DensityPRO User Manual 3-5
– Engineer Mode – Local and remote users have full read/write access to the gauge’s database.
The password configuration is accessible from the following interface ports:
– Com A
– Com B
– Ethernet
– USB
– Local Display/Keypad
– Fieldbus Interface
Only one port may have access to Engineer mode at any time. The exception to this is the Fieldbus port, which always has Engineering access, regardless of the operational modes of the other ports.
The default operation mode is Display List. If no activity is detected on the port for five minutes, the unit will default back to Display List. See System Timeout for additional information.
The following values are available for diagnostics purposes, to be used in other processes and for display purposes.
– Com A Password Mode
– Com B Password Mode
– Ethernet Password Mode
– USB Password Mode
– Remote Display Password Mode
– Current Password Mode
– Engineering Mode Count
– Operator Mode Count
– Technician Mode Count
– Invalid Password Count
The following values shall be available for editing purpose when the gauge is in engineering mode.
– Engineering Password
– Technician Password
– Operator Password
– Engineering Mode Count

Startup & the Setup Wizard
User Modes & Passwords
3-6 DensityPRO User Manual Thermo Scientific
– Technician Mode Count
– Operator Mode Count
To access the information on the Password Entry screen using only the remote transmitter keypad, see Figure A-2.
Password Entry/Validation
The Password Entry/Validation screen can be accessed either by selecting the screen from the Functions dropdown menu at the top of the screen, or by clicking the last icon button, which is circled in Figure 3-2.
Figure 3-2. Password Entry Screen
The DensityPRO gauges have been previously configured with passwords for Engineer, Technician and Operator modes. Currently, Engineer and Display List are the only functioning modes. Technician and Operator mode will be available in future software releases.
– To keep passwords hidden by having them display as asterisks onscreen at key-in, enable the Display Password Mode field. Disabling this field will show the information entered.
– Enter the password into the User Password Entry textbox to enter Engineer mode.

Startup & the Setup Wizard
System Timeout
Thermo Scientific DensityPRO User Manual 3-7
The fields representing the inputs will display the current operational mode of each port. If the user connects to the gauge through Com A and enters the Engineer mode password, Com A Password Mode will display Engineer, while the other port fields say Display List.
– The Mode Count fields indicate how many times the gauge has been accessed in each respective mode.
– The passwords for the different access levels may be changed by manually changing them in the Password Setup section of this screen.
Note: Passwords must be numeric only so as to be accessible when working at the keypad display.
System Timeout If a user does not interact with the gauge for five minutes, the display will time out and begin showing the scrolling measurement screens. Each time a button on the keypad is pressed or the user interacts with the EZ Cal II software, the timeout period resets to five minutes.
During standardization and calibration the timeout function is inactive and will not occur.
The Setup Wizard
Begin the density setup using the setup wizard. To start the wizard, click on the small blue wizard’s cap on the task bar, underneath the View menu option.
Figure 3-3. Detector and Application Type Selection

Startup & the Setup Wizard
The Setup Wizard
3-8 DensityPRO User Manual Thermo Scientific
1. Click the indicator to select the appropriate detector and application. 2. Next, select an application for the detector from the dropdown list immediately to
the right. Selecting a General Density or Oilfield application – in this case, Density – will preload a number of the gauge parameters with factory defaults typical for the chosen type of application.
Note: For the purposes of setup in this manual, the Density application will be used.
3. Click the Next button to move to the Density Application Selection window.
Figure 3-4. Application Type Selection
a. General Density – The most generic of the application selections, this selection configures the gauge for a typical remove slurry application. When in doubt, this is a good default application. The configuration is very similar to the default configuration found in our previous products.
b. Oilfield – An application expressly designed for the DensityPRO NAI-O gauges used in the hydraulic fracturing, or fracking, industry, this configuration is very similar to the fracking preload configuration found in our previous products.

Startup & the Setup Wizard
The Setup Wizard
Thermo Scientific DensityPRO User Manual 3-9
4. After selecting the type of application, click the Next button to proceed to the Wizard Type Selection screen.
5. Like the Upload / Download Configuration screen, the Setup Wizard allows the user to upload and download configuration files. However, while the Upload/Download Configuration screen manages system-wide gauge parameters, the buttons on this screen supply the user with a smaller set of parameters. a. To save setup parameters to the computer for future reference, click Upload
CFG from Gauge.
i. Only the parameters related to the selected wizard type will be uploaded.
b. Name the file and click Save.
c. To download density setup parameters back to the gauge, click the Open file button and select the desired file.
i. Only the parameters related to the selected wizard type will be uploaded.
d. Click Download File to Gauge.
6. Click the Next button to proceed to the next screen.
Figure 3-5. Wizard Type Selection
7. Select Density Setup.

Startup & the Setup Wizard
The Setup Wizard
3-10 DensityPRO User Manual Thermo Scientific
Figure 3-6. Source Head, Isotope & Material Type Selection
8. Designate the source head type, radioactive isotope and process material type by clicking the dropdown selections next to each respective option. Source Head Geometry – The source head geometry option allows the
program to include a very small correction factor in the single point calibration calculation. The source head model number is stamped on the identification plate on the source housing. If the model number of the source head is unknown, or when using a head other than those on the dropdown list, select the default, 5201.
Isotope – The isotope option allows the program to select the appropriate half-life for the radioactive material and to properly correct for the natural decay of the source over time. The isotope is stamped on the identification plate on the source housing. Almost all of the sources supplied by Thermo Fisher are Cesium 137 (Cs-137) with a 30-year half life. When the isotope is not known, it is usually wise to select Cs-137 as the option.
Note: Selecting the wrong isotope will not affect the initial calibration, but will result in a small measurement error with time.
Material Type – The material type option allows the software in the gauge to apply the appropriate calibration equations for various types of process materials. The available options are slurry, solution, single-phase or emulsion.
After selecting the material type, click the Next button to move to the next screen. The options on this screen are dependent on the material type selected.

Startup & the Setup Wizard
The Setup Wizard
Thermo Scientific DensityPRO User Manual 3-11
If slurry was selected, enter the carrier density (specific density of the carrier liquid). The default value is 1.0. Enter the solids density (the dry solid density of suspended solids) in g/cc. The default value is 2.65. Enter the attenuation coefficients of the carrier and solid in cm2/g. The default values for these options are .086 and .077, respectively.
If solution was selected, enter the solvent density (the specific density of the solvent liquid) in g/cc. The default value is 1.0. Enter the solute density (the dry solid density of the suspended solute) in g/cc. The default value is 2.65. Enter the attenuation coefficients of the solvent and solute in cm2/g. The default values for these options are .086 and .077, respectively.
Select single phase when it is unnecessary or impossible to describe the process material as slurry, emulsion, or solution. For example, foam plastic, a mixture of plastic and gas, might be measured as a single-phase material if the gas in the mixture only varies the material’s density and has little effect on the measurement.
For an emulsion, the Fluid 1 Density is the specific density of the carrier liquid in g/cc. The default value is 1.0. The Fluid 2 Density is the specific density of the suspended liquid in g/cc. The default value is 2.65 g/cc. Enter the attenuation coefficients of the carrier liquid and the suspended liquid in cm2/g. The default values for these options are .086 and .077, respectively.
Note: If you want to measure the overall density of the process material only, you can select single-phase, regardless of the material’s makeup.
9. After making the appropriate selections on this screen, click the Next button to proceed to the Gravity & Attenuation screen.

Startup & the Setup Wizard
The Setup Wizard
3-12 DensityPRO User Manual Thermo Scientific
Figure 3-7. Gravity & Attenuation
The information requested on this screen will vary depending on the material type selected in the previous screen.
10. Enter the information for the appropriate material. Slurry
Carrier Density (g/cc)
Solid Density (g/cc)
Carrier Attenuation (cm2/gr)
Solid Attenuation (cm2/gr)
Solution
Solvent Density (g/cc)
Solute Density (g/cc)
Solvent Attenuation (cm2/g)
Solute Attenuation (cm2/g)
Single Phase
Carrier Density (g/cc)
Carrier Attenuation (cm2/g)
Emulsion
Fluid 1 Density (g/cc)
Fluid 2Density (g/cc)
Fluid 1 Attenuation (cm2/g)
Fluid 2 Attenuation (cm2/g)

Startup & the Setup Wizard
The Setup Wizard
Thermo Scientific DensityPRO User Manual 3-13
11. Click the Next button to move to the next screen.
Figure 3-8. Primary Measurement Setup
12. Make a selection from the Primary measurement dropdown. 13. Enter a unit of measure for the pipe, as well as the pipe’s inside diameter. 14. Select a unit of measure from the Density Unit dropdown. 15. Click Next to proceed.
Figure 3-9. Polynomial Coefficients

Startup & the Setup Wizard
The Setup Wizard
3-14 DensityPRO User Manual Thermo Scientific
16. Enter the polynomial coefficients for polynomials A, B, C and D. 17. Click Next to complete Density Setup.
Figure 3-10. Setup Completion
18. Once the density setup is complete, the user may save the file to the computer, or save the file to the computer and download it to the gauge by clicking the appropriate button.
19. Click the Next button to return to the Wizard Type Selection screen, Figure 3-5, and complete the device configuration.
20. The remaining gauge setup parameters can be configured from the Wizard Type Selection screen by selecting Temperature Compensation, Standardization or Gauge Calibration.
Note: The Standardization and Gauge Calibration options only configure these parameters. Configuring the parameters does not initiate any action.
Temperature Compensation
Material density varies with temperature. In many applications, this variation is insignificant. However, for certain materials, temperature compensation is required to provide accurate density measurements as the process temperature changes.
Temperature compensation is used to compensate for the effects of process material temperature variations. Gauges configured with the temperature compensation option will display the process density corrected back to the customer-supplied reference temperature.

Startup & the Setup Wizard
The Setup Wizard
Thermo Scientific DensityPRO User Manual 3-15
The DensityPRO family of gauges will accept a process temperature input from a 3- or 4-wire RTD, as a 4–20 mA signal from an existing temperature transmitter, or as a manual value entered into the transmitter by the operator.
1. Select Temperature Compensation and click the Next button to bring up the following screen. If your application requires temperature compensation, ensure that the parameters on this screen are entered correctly.
Figure 3-11. Temperature Setup
Note: To use temperature compensation, specify material densities that are correct at a reference temperature outside the expected process temperature range. The default reference temperature is 20°C (68°F).
Temp. Input Source – In order for the temperature compensation function to work, a temperature signal input is required. The DensityPRO devices will accept input directly from an RTD or from a 4–20 mA temperature transmitter. Alternately, a fixed temperature can be manually specified.
Temperature Unit – Specify the temperature units as ºC or ºF.
Temp Hold Constant (ºC) – If Manual Value was selected as the input source; enter the constant temperature value in this textbox. The default value is 20º.
Temperature at 4 mA and 20 mA – Input the temperatures for both 4 mA and 20 mA in these textboxes.
2. Click the Next button to proceed.

Startup & the Setup Wizard
The Setup Wizard
3-16 DensityPRO User Manual Thermo Scientific
Figure 3-12. Polynomial Equations, Reference Temperature & Offset Correction
Figure 3-13. Temperature Compensation Coefficients
3. Once the temperature compensation setup is complete, save the file, if desired, and click the Next button to return to the Wizard Type Selection Screen.

Startup & the Setup Wizard
The Setup Wizard
Thermo Scientific DensityPRO User Manual 3-17
Standardization
1. Select Standardization and click the Next button to advance to the following screen.
Figure 3-14. Standardization Condition, Sample Time & Density
This screen defines the standardization condition, the standardization time and the density of the material in the pipe at standardization. Standardization On – The four options for the standardization condition are
None, Pipe Full, Pipe Empty or Bypassed.
Select None to bypass the setting.
Pipe Full is the most common selection and should be used anytime there is carrier or process material in the pipe during a standardization.
Pipe Empty may be used in certain selected conditions where the presence of process material is being simulated by a calibration block or some other means.
Caution: The Bypass option should only be used if recommended by a Thermo Fisher technical support specialist. This option inserts a value of one for the standardization count, which under some circumstances can have detrimental effects.

Startup & the Setup Wizard
The Setup Wizard
3-18 DensityPRO User Manual Thermo Scientific
STD Sample Time (sec) – The standardization sample time is the amount of time, in seconds, that the detector will average the incoming signal. Choosing an appropriate value for this parameter will depend on your process conditions. In situations where the process density is quite steady, such as when running water through a pipe, there should not be any significant swings in the density value, and, therefore, the detector count should be stable. Under these conditions, a relatively short standardization time, in the order of 60 to 300 seconds may be appropriate. When standardizing on a live process, it is more likely that the density value will change over time. In these conditions it is desirable to use a much longer sampling time, more in the order of 600 to 900 seconds.
STD Density – Enter the standardized density of the material in g/cc.
2. Click the Next button to view the Remaining Time Screen.
Figure 3-15. Remaining Time
This screen provides the user with a countdown of the time remaining sample time, as well as the date, time and standardization count when the last sample was taken. When the sample time ends, the result of the standardization will be displayed in the Detector Avg Count textbox. Click the Accept STD button to accept the standardization, or the Reject STD button to reject the standardization and run a new standardization.
3. Once the standardization parameters have been completed, click the Next button to finish standardization.
4. Save the file, if desired, and click the Next button once more to reach the Wizard Type Selection Screen.

Startup & the Setup Wizard
The Setup Wizard
Thermo Scientific DensityPRO User Manual 3-19
Gauge Calibration 1. Select Gauge Calibration and click the Next button to advance to the following screen.
Figure 3-16. Gauge Calibration
This screen asks for two pieces of information – the type of calibration to be performed and the calibration sample time, in seconds. CAL Method – The DensityPRO gauge can perform two types of calibration.
A polynomial calibration typically only requires basic gauge information and one calibration point to calculate a calibration curve. This is the most common type of calibration method used in Thermo Fisher density gauges, and, unless otherwise advised, utilization of this calibration method is recommended.
In some instances a polynomial method may not be the most ideal method of calibration. For those instances, a breakpoint table is available to establish the calibration curve.
CAL Sample Time (sec) – Like the standardization time, the calibration time is a period, measured in seconds, during which the instrument will average the detector counts. Again, the sample time should be based on process conditions. Typical calibration sample times run between 300 and 900 seconds.
2. Click the Next button to move to the Remaining Time Screen.

Startup & the Setup Wizard
The Setup Wizard
3-20 DensityPRO User Manual Thermo Scientific
3. Enter the calibrated density in the CAL Density textbox, and choose which calibration point to use from the CAL Point dropdown. After point 1 is calibrated, this dropdown list will give the user the option of selecting 1 or 2 points, and so on. Up to 10 points can be configured.
4. Click Start CAL to begin the gauge calibration. 5. The Time Remaining (sec) indicator will count down the remaining sample time.
Figure 3-17. Calibration Remaining Time & Average Counts
6. Should there be a need to stop the calibration before completion, click the Abort CAL button.
7. The Detector Avg Count field displays live data during the calibration. 8. Once the calibration is complete, the CAL Temperature and CAL/Ref from Latest
textboxes will auto-populate with information gathered during the calibration. 9. Click the Next button to advance through polynomial and breakpoint table
screens of density point data collected during the gauge calibration. 10. Save the file to the computer or save the file to the computer and download it to
the DensityPRO gauge.
Note: To exit the Setup Wizard without saving the input data, click the Cancel button.

Startup & the Setup Wizard
The Setup Wizard
Thermo Scientific DensityPRO User Manual 3-21
Figure 3-18. Calibration Point Data, Polynomial
Figure 3-19. Calibration Point Data, Breakpoint Table

Startup & the Setup Wizard
The Setup Wizard
3-22 DensityPRO User Manual Thermo Scientific
Detector 1 has now been successfully set up for a density application. Once the data has been saved, click the Home button to return to the first screen of the Setup Wizard.
Once Detector 1 has been configured for a density application and saved, there are additional parameters that can be programmed from the EZ Cal II software.
See the section regarding Application for further information.

Thermo Scientific DensityPRO User Manual 4-1
Chapter 4
Operation
Communication Setup
Communication with the DensityPRO gauges is via an RS232 single-drop serial port, an RS485 multi-drop serial port, a USB cable, or an Ethernet cable from a PC running EZ Cal II software. Once the gauge is set up, the primary measurement (density) can be viewed on the display and on the EZ Cal II software.
To communicate with the gauge from a PC, the PC must be running the Thermo Scientific EZ Cal II software. To access the Communication Setup screens using only the gauge display, see Figure A-1.
Com A / Com B (RS232)
The serial port on a PC can connect directly to the gauge’s RS232 serial port (Com A or Com B).
To configure the Com A and Com B ports, select Communication Setup from the EZ Cal II menu tree.
Figure 4-1. Communication Setup, Com A / Com B

Operation
Communication Setup
4-2 DensityPRO User Manual Thermo Scientific
The default communication settings for the RS232 (Com A and Com B) ports of the gauge and for the Thermo Scientific EZ Cal II are:
– Unit ID: 1
– Baud Rate: 9600
– Parity: None
– Data Bits: 8
– Stop Bits: 1
1. Enable or disable the selected port. 2. When configuring an RS485 port, assign a unit identification number between 1
and 32. 3. Select the appropriate baud rate from the dropdown list. The dropdown contains
options for 9600, 19200, 38400, 57600 and 115200. The higher the baud rate, the faster the data transfer.
4. Select Even, Odd or None from the Parity dropdown. 5. Choose the appropriate number of data bits, either 7 or 8. 6. Select 1, 1.5 or 2 stop bits. For most communications, 1 stop bit should be
appropriate. 7. Port Mode:
a. For Com A, select from RS232, RS232 with RTS/CTS and UART Logic Level.
b. For Com B, select fromRS232, RS232 with RTS/CTS, 2-Wire RS485 and 4-Wire RS485.
8. Indicate ASCII or RTU as the proper Modbus Protocol. 9. Select the Floating Format, either Normal or Reversed. This selection determines
the order in which bytes and words will be sent. 10. The Rx Count, Tx Count and Error Count fields will auto-populate. 11. After selecting the appropriate parameters, click Submit to save the data, Refresh
to update the data throughout, or Cancel to exit Communication Setup without saving.
12. Repeat steps 1 – 11 to configure the Com B port, if desired.

Operation
Communication Setup
Thermo Scientific DensityPRO User Manual 4-3
RS485 To communicate with multiple gauges via RS485 party line, each unit must be assigned a unique unit identification number so it can be addressed individually. By default, all gauges are assigned unit number one (1).
Note: Connecting a PC serial port (COM) to the RS485 port on the gauge requires an RS485/RS232 converter.
To assign a unique unit number to each gauge, you must be able to communicate with each one individually. Disconnect each gauge from the party line in turn and communicate with the disconnected gauge directly. Alternatively, remove power from all gauges except one and assign a unit number to the powered gauge. Repeat this procedure for the remaining gauges.
If trouble arises when using another device on the RS485 chain, verify that the device is properly terminated for its position on the chain. To terminate a device, connect a 120-ohm resistor between its RS485 +/- data terminals. Never terminate more than the first and last device in the chain.
Ethernet Each DensityPRO unit includes a 10 Base-T minimum Ethernet port on the Main CPU PCA. Operators should ensure the area is non-hazardous before connecting or disconnecting the Ethernet cable.
The Communication Setup screens also allow for configuration of the Ethernet port.
Figure 4-2. Communication Setup, Ethernet
13. Enable or Disable the Ethernet port. 14. Configure the Ethernet IP address, Subnet Mask, and Ethernet IP Gateway. 15. For Modbus using TCP/IP, enter the Modbus encapsulated port number and IP
port number in the indicated textboxes.

Operation
System Control
4-4 DensityPRO User Manual Thermo Scientific
16. Select the Floating Format, either Normal or Reversed. This selection determines the order in which bytes and words will be sent.
17. The MAC address should only be configured or changed by Thermo Scientific technical support personnel.
Note: For help in establishing the correct information to input onto this screen, please see your system administrator.
18. Once all information has been entered, click Submit to save the data, Refresh to update the data throughout, or Cancel to exit Communication Setup without saving.
USB Port The Main CPU PCA includes a USB port, which allows the user to connect to the system using a type A Male to Mini 5-pin Male USB cable. Operators should ensure the area is non-hazardous before connecting or disconnecting the USB cable.
System Control The options under the System Control menu tree in EZ Cal II are not identical to the options available in the transmitter display screens of the DensityPRO gauges. This section covers the EZ Cal II System Control screen. For the complete menu tree of the DensityPRO integrated unit, see Figure A-2.
From the EZ Cal II menu tree, select System Control.
Figure 4-3. System Control Configuration

Operation
System Control
Thermo Scientific DensityPRO User Manual 4-5
Configuration The System Control Configuration screen provides the user with the ability to set up system parameters related to items such as the system clock and the LCD screen. The gauge should be able to read and write any of these parameters as requested by the user.
To access the information on the System Control Configuration screen using only the remote transmitter keypad, see Figure A-2.
1. Set the system date and time. a. Choose the desired date format. The available options are:
MM/DD/YY
DD/MM/YY
YY/MM/DD
b. In the System Date textbox, enter the current date.
c. Enter the current time in the System Time textbox, using the format HH:MM:SS.
To synchronize the date and time of the DensityPRO system with that of the PC in use, check the Use PC Date/Time textbox.
2. The LCD scroll time dictates the length of time information takes to scroll across the LCD screen. If the system in use is an integrated system, enter the desired scroll time in the Integrate Scroll Time (sec) textbox. If the system in use is a remote system, enter the desired scroll time in the Remote Scroll Time (sec) textbox.
3. The LCD contrast can be adjusted on the Remote unit by adjusting the LCD Contrast value. The value can range from 0 – 99.
Note: At this time, it is strongly recommended that configuration information be saved to your computer. If the work has been completed off-line, connect to the density gauge via one of the serial ports and upload the configuration file to the gauge.

Operation
System Status
4-6 DensityPRO User Manual Thermo Scientific
System Status The System Status screen auto-populates with information about the system status, and information setup of the detector.
To access the information on the System Status screen using only the remote transmitter keypad, see Figure A-4.
Figure 4-4. System Status
– The system level information provides details related to the hardware version, firmware version and the number of available peripherals in the gauge.
– The detector status gives details about firmware located in the RBP.
The only action the user may take on this screen dictates how the data will be viewed.
1. To capture new, updated information, click the Refresh button. 2. To have the information constantly updating on the screen, check the Auto
Refresh checkbox. 3. To exit the screen, click the Cancel button.

Operation
Mode/Fault Alarm Setup
Thermo Scientific DensityPRO User Manual 4-7
Mode/Fault Alarm Setup
The purpose of the mode/fault alarms is to detect change in the alarm status and drive the selected current or relay outputs based on the alarm action setup.
There are six Mode/Fault Alarm tabs.
Note: The Mode/Fault Alarm Setup screens are organized slightly differently within the gauge. System and application alarm information are often together on the same display screen. Reviewing the complete Mode/Fault Alarm Setup map will aid in navigation of the keypad display.
– The System tab, shown in Figure 4-6, allows the user to configure system-wide alarms.
– The System Status tab, shown in Figure 4-7, displays the alarms from the System screen and shows whether or not the alarms are currently in an active state.
– The Application tabs (#1 - #4), shown in Figure 4-8, allow the user to configure application-specific alarms.
Alarms have three operational modes.
– Disable – The alarm is disabled, and no alarm action is executed.
– Enable – The alarm is enabled. The selected alarm action is executed based on the alarm set condition.
– Inhibit – The alarm is temporary disabled. Another operation may change the mode of this alarm from Inhibit to Enable.
After selecting an operational mode, the user may select an output source for the alarm action. The actions available are:
– Do Nothing (Do not take any actions)
– Relay Output A
– Relay Output B
– Current Output A
– Current Output B
– Current Output C
Once an output source has been selected, an alarm action can be selected on either the Current Output or Relay Outputs screens. For further information on these screens, see these respective sections.

Operation
Mode/Fault Alarm Setup
4-8 DensityPRO User Manual Thermo Scientific
Found on System Tab Found on Relay Output Screen
Found on Application Tab Found on Current Output Screen
Figure 4-5. Alarm Configuration Map

Operation
Mode/Fault Alarm Setup
Thermo Scientific DensityPRO User Manual 4-9
System Tab To access the information on the Mode/Fault Alarm Setup System tab using only the remote transmitter keypad, see Figure A-6.
Figure 4-6. Mode/Fault Alarm Setup, System Tab
The following alarms are available for configuration on the System tab of the Mode/Fault Alarm screen.
1. Hold Mode Active Alarm a. The alarm is triggered when any of the items listed below are in hold mode.
i. Current output A or B or C.
ii. Relay A or B.
iii. Measurements 1, 2, 3 or 4.
b. The alarm clears when all of the items listed above are out of hold mode.
2. RBP Communication Failed Alarm: a. The alarm is triggered when RBP communication errors occurs.
b. The alarm clears when RBP communication errors are removed.
3. Fieldbus Communication Failed Alarm a. This alarm has not yet been implemented, but will be available in future
releases.
4. System Fault Alarm a. The alarm is triggered when any of the following actions occur.
i. Diagnostic error:
ii. An Input Scan Error occurs and the gauge has a problem reading any of the following devices:
Analog inputs

Operation
Mode/Fault Alarm Setup
4-10 DensityPRO User Manual Thermo Scientific
Main Board Temperature
Detector Analog input
Detector RTD input
b. The alarm clears when the error condition is removed.
5. Current Output A at Minimum Alarm a. The alarm is triggered when the current output A value is below the minimum
set value.
b. The alarm is cleared when the current output A value is above the minimum set value.
6. Current Output A at Maximum Alarm a. The alarm is triggered when the current output A value is above the maximum
set value.
b. The alarm is cleared when the current output A value is below the maximum set value.
7. Current Output B at Minimum Alarm a. The alarm is triggered when the current output B value is below the minimum
set value.
b. The alarm is cleared when the current output B value is above the minimum set value.
8. Current Output B at Maximum Alarm a. The alarm is triggered when the current output B value is above the maximum
set value.
b. The alarm is cleared when the current output B value is below the maximum set value.
9. Current Output C at Minimum Alarm a. The alarm is triggered when the current output C value is below the minimum
set value.
b. The alarm is cleared when the current output C value is above the minimum set value.
10. Current Output C at Maximum Alarm a. The alarm is triggered when the current output C value is above the maximum
set value.
b. The alarm is cleared when the current output C value is below the maximum set value.
11. Current Output A at Fault Low Alarm a. The alarm is triggered when the current output A value is below the minimum
value set by the Namur Standard.
b. The alarm is cleared when the current output A value is above the minimum value set by the Namur Standard.

Operation
Mode/Fault Alarm Setup
Thermo Scientific DensityPRO User Manual 4-11
12. Output A at Fault High Alarm a. The alarm is triggered when the current output A value is above the maximum
value set by the Namur Standard.
b. The alarm is cleared when the current output A value is below the maximum value set by the Namur Standard.
13. Current Output B at Fault Low Alarm a. The alarm is triggered when the current output B value is below the minimum
value set by the Namur Standard.
b. The alarm is cleared when the current output B value is above the minimum value set by the Namur Standard.
14. Output B at Fault High Alarm a. The alarm is triggered when the current output B value is above the maximum
value set by the Namur Standard.
b. The alarm is cleared when the current output B value is below the maximum value set by the Namur Standard.
15. Current Output C at Fault Low Alarm a. The alarm is triggered when the current output C value is below the minimum
value set by the Namur Standard.
b. The alarm is cleared when the current output C value is above the minimum value set by the Namur Standard.
16. Output C at Fault High Alarm a. The alarm is triggered when the current output C value is above the maximum
value set by the Namur Standard.
b. The alarm is cleared when the current output C value is below the maximum value set by the Namur Standard.

Operation
Mode/Fault Alarm Setup
4-12 DensityPRO User Manual Thermo Scientific
System Status Tab As previously stated, the System Status tab displays the alarms from the System tab and shows whether or not the alarms are currently in an active state.
To access the information on the Mode/Fault Alarm Setup System Status tab using only the remote transmitter keypad, see Figure A-7.
Figure 4-7. Mode/Fault Alarm Setup, System Status Tab
Application Tabs The Application tabs are organized so that the alarm’s operational mode is in the left column, with the options for action on the right. The bottom of the tab includes information on the status of each alarm, showing whether or not they are currently in an active state.
To access the information on the Mode/Fault Alarm Setup Application tabs using only the remote transmitter keypad, see Figure A-6 for the top half of the screen, and Figure A-7 for the bottom half of the screen.

Operation
Mode/Fault Alarm Setup
Thermo Scientific DensityPRO User Manual 4-13
Figure 4-8. Mode/Fault Alarm Setup, Application Tabs
The following alarms are available for configuration on the Application tabs of the Mode/Fault Alarm tab.
1. Standardization Mode Active Alarm a. The alarm is triggered when the density process is in standardization mode.
b. The alarm clears when
i. Standardization is aborted.
ii. Standardization is accepted.
iii. Standardization is rejected
2. Calibration Mode Active Alarm a. The alarm is triggered when the density process is in calibration mode.
b. The alarm clears when
i. Calibration is aborted.
ii. Calibration is accepted.
iii. Calibration is rejected
3. X-Ray Mode Engaged Alarm a. The alarm is triggered when X-ray engaged is active.
b. The alarm clears when X-ray engaged becomes inactive.
4. IBP Communication Failed Alarm a. The alarm is triggered when the detector is present and an IBP
communication error occurs.
b. The alarm clears when IBP communication errors are removed.

Operation
Commands
4-14 DensityPRO User Manual Thermo Scientific
5. Totalizer Overrun Alarm a. The alarm is triggered when a totalizer value goes above 1,000,000.
b. The alarm clears when the user takes action to clear the mode/fault Tachometer Accumulation totalizer overrun flag.
6. Calibration Aborted Alarm a. The alarm is triggered when the calibration is aborted.
b. The alarm clears when the user restarts the calibration process.
7. Detector Over Range Alarm a. The alarm is triggered when the IBP channel one data count is more than
150,000 for NAI units or more than 2,000,000 for PVT units.
b. The alarm clears when the IBP channel one data count is less than 150,000150,000 for NAI units or less than 2,000,000 for PVT units.
8. Detector Under Range Alarm a. The alarm is triggered when the IBP channel one data count is less than 200
for NAI units or less than 400 for PVT units.
b. The alarm clears when the IBP channel one data count is more than 200 for NAI units or more than 400 for PVT units.
Commands The system commands provide the user with the ability to directly control certain functions of the gauge.
Once the desired command or commands have been selected, click the Submit button to execute. Click the Refresh button to reset the screen or the Cancel button to exit.
To access the information on the Commands tab using only the remote transmitter keypad, see Figure A-8.
Common Action The Common Actions dropdown provides the user a way to change a large group of parameters with one command.
Figure 4-9. Commands Screen

Operation
Commands
Thermo Scientific DensityPRO User Manual 4-15
– Do nothing – No action is executed. This is the default selection. When a command is selected and submitted the action will be performed. After the action is complete the value will return to Do Nothing.
– Erase all RAM and set defaults (Cold Start) – This is the same as a cold start. Data in the active configuration will be reset to default values, the remote backplane and all detectors will be reset.
– Warm Start – This is the equivalent of resetting the processor. The main board and the Remote Backplane will be reset to a power-on state.
– Erase all CAL and STD data for all applications – All of the data associated with the density calibration and standardization, will be reset to default values.
– Erase calibration data for all applications – All of the data associated with the density calibration is reset to default values.
– Calculate Slope Correction Factor for all applications – Recalculates the slope correction factor if the second calibration point is not zero.
– Perform Catch-up function for all applications – The filtered data counts are initialized to the raw data counts. The response time of the filtered data counts to a sudden change in raw data counts is determined by the time constant. When the raw data count changes suddenly, the filtered data counts may take a long time to reflect the average raw data count value. When the Perform Catch-up function is used, the filtered data counts are initialized to the value of the raw data counts. This function can currently be accomplished by changing the time constant back to the previous value. Be aware that the dynamic tracking performs a similar function. When the dynamic tracking threshold is exceeded, a faster time constant is used until the filtered data counts catch-up to the raw data counts. The Perform Catch-up function can be used even when dynamic tracking is enabled.
In addition to the common actions listed above, which allow the user to apply the common action to the entire system, the Common Action dropdown also allows the user to apply the same actions to individual applications.

Operation
Commands
4-16 DensityPRO User Manual Thermo Scientific
Figure 4-10. Sample Selection Options for Common Action
The final item on the Common Action dropdown list is Perform Self Test. Currently this function is nonoperational. It will be utilized in future versions of the EZ Cal II software.
Hold Current Output
Below the Common Action dropdown list on the Commands screen are the Hold Current Output A, B and C dropdown lists. Each of these lists contains the same options for holding the preferred current.
– Do Nothing – No action is taken when the submit button is pressed.
– Hold at minimum – The current output value is held at the minimum value entered.
– Hold at maximum – The current output value is held at the maximum value entered.
– Hold at set value – The current output value is held at the set hold value.
– Hold at Fault Low – The current output value is held at the Fault Low value.
– Hold at Fault High – The current output value is held at the Fault High value.
– Clear Hold value – If the Hold/Live value is set to Hold, then it is reset to Live.
Hold Relay Output The Hold Relay Output A and B sections are for display purposes only and are not configurable by the user.

Operation
Commands
Thermo Scientific DensityPRO User Manual 4-17
Alarm Action The Alarm Action dropdown list allows the user to make changes to alarms as a group, either system-wide or by application.
– Do Nothing – No action is taken when sent to the gauge.
– Clear all alarms for all applications – Currently this option is non-functional and no action is taken upon its selection. This option will be utilized in future versions of the EZ Cal II software.
– Disable all alarms – Any process alarm or mode/fault alarm that is in an enabled state is changed to the inhibit state. This option is available for all applications or individual applications.
– Enable all alarms – Any process alarm or mode/fault alarm that is in the inhibit state is changed to an enabled state. This option is available for all applications or individual applications.
– Erase all process alarm assignments – All configurations associated with setting up a process alarm are set to the default values. These values include Measurement ID, Action, Action Delay, Set Point, Clear Point, and the Enable/Disable setting. This option is available for all applications or individual applications.
– Erase all mode/fault alarm assignments – All configurations associated with setting up a mode/fault alarm are reset to the default value. Enable/Disable setting, Action. This option is available for all applications or individual applications.
– Erase all alarm assignments, all mode/fault/process alarms for all applications – This option allows the user to perform the Erase all process alarm assignments action and the Erase all mode/fault alarm assignments action simultaneously. This option is not available for individual applications.

Operation
Physical Inputs & Outputs
4-18 DensityPRO User Manual Thermo Scientific
Physical Inputs & Outputs
Analog (Current & Voltage) Inputs
The function of an analog input is to connect external signals, such as temperature, pressure, flow or density, to the gauge for conversion into a form to be used by the internal measurement process. Further, the analog input signal in the gauge is mapped to an input type such as temperature, pressure, flow, or density, and appropriate unit and measurement ranges are assigned.
The analog inputs offer a way for the user to provide additional process information to the gauge. This information may be used by the gauge to provided additional types of measurements.
For a density application, the analog inputs will be used to provide temperature and flow information. The temperature information may be used for temperature-compensated density calculation. The flow information may be used for mass and/or volume flow calculation.
Two types of analog inputs are available on the gauge: current inputs, labeled 4–20 In 1 and 4–20 In 2 on the main board, and voltage inputs, labeled Vdc In 1 and Vdc In 2 on the main board.
Note: All four of the Current/Vdc Input tabs are essentially the same, except the current tabs reference milliamps and the voltage tabs reference volts.
Current Tabs Within the EZ Cal II software, select Current/Vdc Input from the menu tree on the left to bring up the tabs containing the analog input tabs. The Current Input #1 (mA #1) tab will display by default.

Operation
Physical Inputs & Outputs
Thermo Scientific DensityPRO User Manual 4-19
Figure 4-11. Current Input Tabs
To access the information on the Current Input tabs using only the remote transmitter keypad, see Figure A-9.
The current inputs can operate in Live mode or Manual mode. In the Manual mode, the user may enters a value in the Manual Value (EU) textbox. In Live mode, the user does not have this option.
Once a value in engineering units have been entered into the Manual Value (EU) field, the EZ Cal II software will convert that value into milliamps and display that value in the Present Value field.
1. Choose the type of input from the selections in the dropdown list. Not Used
Temperature (Used for Density)
Pressure (Used for Level)
Flow (Used for Density)
Density (Used for Level)
Based on the input type selected, the fields available for configuration and the information contained in the dropdown lists may change. The following tables provide the units available for selection based on the various type of input.

Operation
Physical Inputs & Outputs
4-20 DensityPRO User Manual Thermo Scientific
Table 4-1. Temperature Input, Engineering Unit
Display Description
ºC Degree Celsius
ºF Degree Fahrenheit
Table 4-2. Pressure Input, Engineering Unit
Display Description
PSI_G Pounds per square inch gauge
KPA_G Kilopascal
BAR_G Bar
PASCAL_G Pascal
Table 4-3. Flow Input
Engineering Unit Flow Time Unit
US Gallon Seconds
UK Gallon Minutes
Cubic cm Hours
Cubic meter Days
Cubic inch Weeks
Cubic feet Months
Cubic yard Years
Custom Units

Operation
Physical Inputs & Outputs
Thermo Scientific DensityPRO User Manual 4-21
Table 4-4. Density Input, Engineering Unit
Display Description
g/cc grams per cubic centimeter
lb/US gal pounds per US gallon
lb/UK gal pounds per UK gallon
lb/cu ft pounds per cubic foot
ston/cu yd short tons per cubic yard
lton/cu yd long tons per cubic yard
g/l grams per liter
oz/cu m ounces per cubic meter
lb/cu in pounds per cubic inch
g/cu in grams per cubic inch
lb/cu yd pounds per cubic yd
kg/cu m kilograms per cubic meter
deg API degrees API
degBaum lt degrees Baume light
degBaum hv degrees Baume heavy
degree Twaddle degrees Twaddle
2. Define the input operating range by entering the Minimum mA and Maximum mA into the corresponding textboxes.
3. In the Min Value @ Min mA textbox, enter the minimum value, in engineering units, that corresponds to the value entered in the Minimum mA textbox.

Operation
Physical Inputs & Outputs
4-22 DensityPRO User Manual Thermo Scientific
4. In the Max Value @ Max mA textbox, enter the maximum value, in engineering units, that corresponds to the value entered in the Maximum mA textbox.
5. Additional fields on this screen, which are listed below, are for display purposes only and are not configurable by the user. Live Value (EU) – This field displays the live calibrated value in engineering
units in both Live and Manual modes.
Raw Value (mA) – This field displays the live calibrated value in milliamps in both Live and Manual modes.
#1 mA Min Value – This field displays the expected minimum analog input value provided by the user during calibration.
#2 mA Mid Value – This field displays the expected midpoint analog input value in a three point calibration provided by the user during calibration.
#3 mA Max Value – This field displays the expected maximum analog input value provided by the user during calibration.
#1 Raw Min Value – This field displays the measured minimum value read from the device.
#2 Raw Mid Value – This field displays the measured midpoint value read from the device.
#3 Raw Max Value – This field displays the measured maximum value read from the device.
Calibration Points – This field displays the number of points the current information used to calibrate the current input.
Status – This field displays Live or Manual, depending on the operating mode selected, as well as low and high alarm conditions.
Calibration All four of the current inputs can be calibrated using two or three calibration points. The calibration process for the current inputs should be completed by selecting Calibration from the Functions menu or by clicking the fourth icon button, the wrench. Selecting either of these options will guide the user through the calibration process step-by-step. For further information, see Calibration.

Operation
Physical Inputs & Outputs
Thermo Scientific DensityPRO User Manual 4-23
Voltage Tabs To access the information on the Voltage Input tabs using only the remote transmitter keypad, see Figure A-10.
Figure 4-12. Voltage Input Tabs
The voltage inputs can operate in Live mode or Manual mode. In the Manual mode, the user may enter a value in the Manual Value (EU) textbox. In Live mode, the user does not have this option.
Once a value in engineering units has been entered into the Manual Value (EU) field, the EZ Cal II software will convert that value into volts and display that value in the Present Value field.
1. Choose the type of input from the selections in the dropdown list. Not Used
Temperature (Used for Density)
Pressure (Used for Level)
Flow (Used for Density)
Density (Used for Level)
Based on the input type selected, the fields available for configuration and the information contained in the dropdown lists may change. See Table 4-1 – Table 4-4 for units available based on input selection.
2. Define the input operating range by entering the Minimum Volt and Maximum Volt into the corresponding textboxes.

Operation
Physical Inputs & Outputs
4-24 DensityPRO User Manual Thermo Scientific
3. In the Min Value @ Min Volt textbox, enter the minimum value, in engineering units, that corresponds to the value entered in the Minimum Volt textbox.
4. In the Max Value @ Max Volt textbox, enter the maximum value, in engineering units, that corresponds to the value entered in the Maximum Volt textbox.
5. Additional fields on this screen, which are listed below, are for display purposes only and are not configurable by the user. Live Value (EU) – This field displays the live calibrated value in engineering
units in both Live and Manual modes.
Raw Value (Volt) – This field displays the live calibrated value in volts in both Live and Manual modes.
#1 Volt Min Value – This field displays the expected minimum voltage input value provided by the user during calibration.
#2 Volt Mid Value – This field displays the expected midpoint voltage input value in a three point calibration provided by the user during calibration.
#3 Volt Max Value – This field displays the expected maximum voltage input value provided by the user during calibration.
#1 Raw Min Value – This field displays the measured minimum value read from the device.
#2 Raw Mid Value – This field displays the measured midpoint value read from the device.
#3 Raw Max Value – This field displays the measured maximum value read from the device.
Calibration Points – This field displays the number of points the current information used to calibrate the voltage input.
Status – This field displays Live or Manual, depending on the operating mode selected, as well as low and high alarm conditions.

Operation
Physical Inputs & Outputs
Thermo Scientific DensityPRO User Manual 4-25
Digital Inputs Digital inputs trigger the execution of functions associated with a selected detector’s open and close contact actions configured by the user. The two digital inputs available to the user can be accessed by selecting Digital Input from the EZ Cal II menu tree.
To access the information on the Digital Input tabs using only the remote transmitter keypad, see Figure A-14.
Figure 4-13. Digital Inputs
1. Select an operational mode from the Manual/Live dropdown. a. In Live mode, the digital inputs detect transitions from open to close and close
to open and execute the selected open and close contact actions on the specified detector.
b. If the user selects Manual mode, the Manual Value dropdown becomes available. This allows the user to set the output to an open or closed state.
i. When Open is selected, the digital input terminal is not connected to ground.
ii. When Close is selected, the digital input terminal is connected to ground.
Note: Actions selected from the Open Contact Action and Close Contact Action dropdowns are not executed when operating the digital input in manual mode.
2. Assign a detector from the Action Destination dropdown. 3. Choose open and close contact actions from the appropriate dropdowns.
a. Selecting an open contact action determines the operation to be performed when the digital input switches from closed to open.
b. Selecting a close contact action determines the operation to be performed when the digital input switches from open to closed.
The action items in both dropdown lists are the same.

Operation
Physical Inputs & Outputs
4-26 DensityPRO User Manual Thermo Scientific
Table 4-5. Digital Input Contact Action Items
Action Description
Do Nothing No Action is required. (Default)
Start STD and use results
1. The standardization has to have been executed at least once from the user interface before using the discrete input.
2. Start the standardization using the last values entered for standardize on (bypass, pipe empty, pipe full), standardization time, and density.
3. After the standardization has finished accept the average counts during standardization. The action is ignored if the standardization has not been executed from the user interface.
Finish STD Accept the average counts during standardization. If standardization has not finished the standardization is stopped and the average counts in process are accepted.
Hold Current Out A@ hold value Current output A is held at the hold value
Hold Current Out A@ Min value Current output A is held at the minimum value
Hold Current Out A@ Max value Current output A is held at the maximum value
Hold Current Out A@ Fault Hi value Current output A is held at the fault high value
Hold Current Out A@ Fault Lo value Current output A is held at the fault low value
Clear All Alarms No Action is taken
Clear All holds
All outputs in Hold mode shall be set to Live 4. Measurement #1 through Measurement #4
5. Current Outputs A through C
6. Relays A and B
Hold Measurement #1@ hold value The value for measurement #1 Hold/Live register is set to hold
Hold Measurement #2@ hold value The value for measurement #2 Hold/Live register is set to hold
Hold Measurement #3@ hold value The value for measurement #3 Hold/Live register is set to hold
Hold Measurement #4@ hold value The value for measurement #4 Hold/Live register is set to hold
Enable all alarms Any process alarm and mode/fault alarm in the inhibit state is set to the enable state
Disable all alarms Any process alarm and mode/fault alarm in the enable state is set to the inhibit state
Clear relay and totalizers Set all the totalizers value to zero and zero any pending relay outputs
Fast catch-up The filtered data counts are initialized to the raw data counts

Operation
Physical Inputs & Outputs
Thermo Scientific DensityPRO User Manual 4-27
Table 4-5. Digital Input Contact Action Items - Continued
Action Description
Note: When a sudden change in raw data counts occurs, the response time of the filtered data counts is determined by the time constant and may take a significant amount of time to reflect the average raw data count value. The Fast Catch-up function initializes the filtered data counts to the value of the raw data counts. This can currently be accomplished by changing the time constant and setting it back to the previous value.
Dynamic tracking performs a similar function. When the dynamic tracking threshold is exceeded, a faster time constant is used until the filtered data counts catch up to the raw data counts. The Fast Catch-up function can be used when dynamic tracking is enabled.
Inhibit totalizer 1 The value of totalizer 1 stops accumulating
Inhibit totalizer 2 The value of totalizer 2 stops accumulating
Inhibit totalizer 3 The value of totalizer 3 stops accumulating
Inhibit totalizer 4 The value of totalizer 4 stops accumulating
Inhibit all totalizers The values of all totalizers 1 through 4 stop accumulating
Enable totalizer 1 Totalizer 1 is enabled
Enable totalizer 2 Totalizer 2 is enabled
Enable totalizer 3 Totalizer 3 is enabled
Enable totalizer 4 Totalizer 4 is enabled
Enable all totalizers All Totalizers, 1 through 4, are enabled
Zero totalizer 1 The value of totalizer 1 is set to zero, The totalizer is still enabled
Zero totalizer 2 The value of totalizer 2 is set to zero, The totalizer is still enabled
Zero totalizer 3 The value of totalizer 2 is set to zero, The totalizer is still enabled
Zero totalizer 4 The value of totalizer 2 is set to zero, The totalizer is still enabled
Clear all totalizers The value of all totalizers, 1 through 4, are set to zero and the totalizers are disabled
4. Choose whether to Enable or Disable the Invert Input function. 5. Additional fields on this screen are for display purposes only and are not
configurable by the user. Present Value – This field displays the real-time current status, either Open or
Close, of the digital input.
Status – This field displays either Live or Manual, depending on the operational mode selected.
6. Click the Submit button to save the current selections. Click Refresh to update the system with the new information. Click the Cancel button to exit the screen.

Operation
Physical Inputs & Outputs
4-28 DensityPRO User Manual Thermo Scientific
Current Output An analog output represents a measurement value in a 4–20 mA signal to an external process. Analog outputs can be mapped to one of the four measurements (Measurement ID) available for a selected detector (Input ID).
To access the information on the Digital Input tabs using only the remote transmitter keypad, see Figure A-15.
Note: Each input ID (Detectors 1 – 4) has four associated measurement IDs (Measurements 1 – 4).
The analog output provides the user with additional process information from the gauge, such as density, temperature, pressure or flow, in the form of an analog signal.
There is one current output on the main board, labeled 4–20 Out A. The two current outputs on the ISIO board are labeled 4–20 Out B and 4–20 Out C.
In the EZ Cal II software, select Current Output from the menu tree on the left to bring up the tabs containing the current output screens.
Note: Unless otherwise noted, the information provided about the Current Output screens applies to the tabs for Current Outputs A, B and C.
Figure 4-14. Current Output Tabs
1. Select an Input ID and a Measurement ID from the indicated dropdowns. The measurements in the Measurement ID dropdown are associated with the detector specified in the Input ID field.
2. Based on the selections in these two fields, Output Type will automatically display the measurement type, such as density, pressure or temperature, and Source (EU) will automatically display the configured engineering units.
Operation
Physical Inputs & Outputs
Thermo Scientific DensityPRO User Manual 4-29
3. Define the output operating range by entering the Min Current and Max Current. 4. In the Min Value @ Min Current textbox, enter the minimum value, in
engineering units, that corresponds to the value entered in the Min Current textbox.
5. In the Max Value @ Max Current textbox, enter the maximum value, in engineering units, that corresponds to the value entered in the Max Current textbox.
6. Choose an operational mode from the Hold/Live dropdown. Live – The selected Measurement ID is currently driving the current output.
Hold Minimum – The current output is set to the Min Current value.
Hold Maximum – The current output is set to the Max Current value.
Fault High – The current output is set to the high value determined by the Namur Standard (20.5 mA).
Fault Low – The current output is set to the low value determined by the Namur Standard (3.8 mA).
Hold Value – The current output is set to the value entered by the user in the Hold Value (EU) textbox.
Once a value in engineering units have been entered into the Hold Value (EU) field, the EZ Cal II software will convert that value into milliamps and display that value in the Present Value field.
7. The Alarm Action dropdown allows the user to designate what happens when an alarm associated with the selected current output is triggered. None – Do not take any alarm action.
Set Output to minimum – Sets the current output to the Min Current value.
Set Output to maximum – Sets the current output to the Max Current value.
Set Output to fault low – Sets the current output to the low value established by the Namur standard (3.8 mA).
Set Output to fault high – Sets the current output to the high value established by the Namur standard (20.5 mA).
Hold Output at set value – Sets the current output to the value designated in the Hold Value (EU) field.
Clear Hold value – Sets the operational mode of the current output to Live.
8. Enter the HART ID in the appropriate textbox if a Hart Communication Protocol is connected to the gauge. This option is only available on the Current Output C tab.

Operation
Physical Inputs & Outputs
4-30 DensityPRO User Manual Thermo Scientific
9. Additional fields on these screens, which are listed below, are for display purposes only and are not configurable by the user. Mode – On the Current Output A tab, this field always displays Normal at
this time. On the Current Output C tab, this field displays whether the gauge is connected to a Hart Communication Protocol.
Live Value (EU) – This field displays the live calibrated value in engineering units in both Live and Manual modes.
Calibration Points – This field displays the number of points the current information used to calibrate the current input.
#1 mA Min Value – This field displays the expected minimum analog input value provided by the user during calibration.
#2 mA Mid Value – This field displays the expected midpoint analog input value in a three point calibration provided by the user during calibration.
#3 mA Max Value – This field displays the expected maximum analog input value provided by the user during calibration.
#1 Raw Min Value – This field displays the measured minimum value read from the device.
#2 Raw Mid Value – This field displays the measured midpoint value read from the device.
#3 Raw Max Value – This field displays the measured maximum value read from the device.
Status – This field displays one of the following:
Live – Current output is being driven by the selected measurement ID.
Hold – Current output is being driven based on the Hold Value (EU).
Low Alarm – The current output value is below the Min Current value.
High Alarm – The current output value is above the Max Current value.
Fault Low Alarm – The current output is below the value defined by the Namur standard.
Fault High Alarm – The current output is above the value defined by the Namur standard.
Calibration Current outputs can be calibrated using two or three points. The calibration process for the current outputs should be completed by selecting Calibration from the Functions menu or by clicking the fourth icon button, the wrench. Selecting either of these options will guide the user through the calibration process step-by-step. For further information, see Calibration.

Operation
Relay Outputs
Thermo Scientific DensityPRO User Manual 4-31
Relay Outputs There are two relay outputs on the system that allow the user to provide additional process information from the gauge to the outside world. The function of a relay output is to provide alarm signal and/or totalizer pulses to an external system for monitoring or processing purposes.
To access the information on the Digital Input tabs using only the remote transmitter keypad, see Figure A-16.
Figure 4-15. Relay Outputs
1. Select an operational mode from the Hold/Live dropdown. a. In Live mode, the relay output will be controlled by a mode/fault alarm,
process alarm or totalizer. If the relay has not been assigned to an alarm, it will be set to the Default Relay Value.
b. In Hold mode, the relay will be held on or off based on the setting of the Hold Value field.
2. If Hold mode is selected, indicate a hold value by using the Hold Value dropdown. Hold ON – The coil is energized.
Hold OFF – The coil is de-energized. This is the default value.
3. Select either Process Alarm or Totalizers from the Process Function dropdown. a. If Process Alarm is selected, the Alarm Action dropdown allows the user to
designate what happens when an alarm associated with the selected relay output is triggered. In this mode, the relays can be configured to output a signal based on either mode/fault or process alarm conditions.
Do Nothing – Any alarm assigned to the relay has no effect on the relay’s state.

Operation
Relay Outputs
4-32 DensityPRO User Manual Thermo Scientific
Hold Relay ON – When the alarm assigned to the relay is active, the relay will be energized. When the alarm assigned to the relay is inactive, the relay will return to a de-energized state.
Hold Relay OFF – When the alarm assigned to the relay is active, the relay will be de-energized. When the alarm assigned to the relay is inactive, the relay will return to an energized state.
Clear Hold – The Hold/Live field will be set to Live mode when the alarm assigned to the relay is active, and it will remain in Live mode once the alarm becomes inactive.
b. If Totalizer is selected from the Process Function dropdown, the Total Selection dropdown allows the user to select a totalizer.
i. If no totalizer is selected from the Total Selection dropdown, the relay remains at its default state.
ii. When a totalizer is selected from the Total Selection dropdown, the indicated totalizer associated with the detector designated in the Detector ID field will drive the relay.
4. Enter a pulse width value in the Pulse Width (30-200 ms) field. a. Entering 0 will generate no relay pulse output.
b. A value of 30 – 200 bases the relay pulse output on pulse width at 10 ms intervals.
Note: If the process function is set to Totalizer, the relays will operate at a maximum frequency with a period of twice the pulse width.
The gauge outputs totalizer pulses on a relay as long as there are pulses available from the selected totalizer – even when the relay pulses accumulate at a faster rate than they can be output.
5. Selecting No from the Invert Output dropdown maintains the output of the relay in its normal state. Selecting Yes from the dropdown will invert the output of the relay.
6. Additional fields on this screen, which are listed below, are for display purposes only and are not configurable by the user. Present Value – This field displays the current live status (On or Off) of the
relay.
Status – This field displays Live or Hold, depending on the selected operational mode.

Operation
Detector
Thermo Scientific DensityPRO User Manual 4-33
Detector From the EZ Cal II menu tree, click Detector to view all of the detector counts in a graphic representation.
1. Select the number of detectors to view on the graph by using the Detector indicator. Each detector will be represented by a different color on the graph.
2. The Update Period (ms) field allows the user to determine the update rate of the counts. The entry in this field can range from 1 – 2000 ms.
3. Click Run Char to begin a real-time graphic view of the detector counts. 4. Click Freeze Char to pause the detector count chart.
Figure 4-16. Detector Count Screen

Operation
Detector Screens
4-34 DensityPRO User Manual Thermo Scientific
Detector Screens
From the EZ Cal II menu tree, click Detector #1. By default, the Setup tab is displayed.
Setup Tab To access the information on the Detector Setup tab using only the remote transmitter keypad, see Figure A-3, Figure A-5, Figure A-17.
Figure 4-17. Detector Setup Tab
Detector Setup Many of the fields on the Detector Setup tab provide the user with the ability to set up the detector parameters based on application-specific requirements.
1. Enter the density time constant, in seconds, in the Density Time Constant (sec) textbox.
2. Choose whether to enable or disable dynamic tracking from the Dynamic Tracking Enable dropdown. a. Enabling dynamic tracking ensures rapid, smooth filtered counts in response
to significant changes in the process level. The dynamic tracking system contains a slow filter and a fast filter. Initially, filter data counts use the slow filter. The fast filter uses a normal averaging time constant. The difference between the data counts of the slow and fast filters are monitored constantly. When the difference exceeds the dynamic tracking threshold percentage, which has a default value of 5.3% of filtered counts, dynamic tracking is activated. The output then switches to the faster filter, with the fast signal using the value of slow signal as a starting point. After one fast filter time constant, the difference of the slow and fast filters is calculated. If the difference falls below the threshold value, dynamic tracking is de-activated and the output switches back to the slow filter, with the slow signal using the value of fast signal as a starting point.

Operation
Detector Screens
Thermo Scientific DensityPRO User Manual 4-35
b. When Disable is selected, no action will be taken.
3. In the Dynamic Tracking Time (sec) textbox, enter a length of time, in seconds, to perform dynamic tracking.
4. In the Dynamic Tracking Threshold % textbox, enter the dynamic tracking threshold in a percentage.
5. Choose whether to enable or disable the X-ray hold function by using the X-ray Threshold Enable dropdown. a. The X-ray safeguard, calculated at a rate of 10 times per second, computes the
difference between the data counts filtered by the filter time constant and the counts filtered by the time constant divided by 16. If the difference is greater than the X-ray safeguard threshold value and X-ray Threshold Enable is enabled, the X-ray safeguard is active and the high voltage will hold at the last valid value. The X-ray Safeguard will be active for at least the amount of time entered in the X-ray Threshold Min Hold Time (sec) textbox. At the end of minimum hold time, if the count is below the threshold, the hold will be cleared. If it is still above the threshold, the system will stay in the hold condition for another cycle of the minimum hold time. The system will continue to repeat cycles of the minimum hold time, if necessary, until the time entered in the X-ray Threshold Max Hold Time (sec) is reached. When the maximum hold time is reached, the X-ray safeguard will be disabled for one minute to allow the system to recover. Once that minute is up, the X-ray Safeguard will activate again and respond to future events.
b. When Disable is selected, no action will be taken.
6. Enter the X-ray threshold minimum hold time, in seconds, in the X-ray Threshold Min Hold Time (sec) textbox.
7. Enter the X-ray threshold maximum hold time, in seconds, in the X-ray Threshold Max Hold Time (sec) textbox.
8. Designate an X-ray safeguard threshold value in the X-ray Safeguard Threshold textbox.
9. Enter a time, in seconds, in the Flow Time Constant (sec) textbox.

Operation
Detector Screens
4-36 DensityPRO User Manual Thermo Scientific
Detector Configuration
The detector configuration parameters on the Detector Setup tab provide the user with the ability to view and configure high voltage power supply parameters for the detector. The gauge has the ability to read and write any of these parameters as requested by the user. When the system is shut down, the last stable high voltage control information will be used at the next startup.
Each gauge can utilize up to two high voltage power supplies.
1. The Force Hi Voltage #0 Hold Value dropdown provides the user with the option to place the detected high voltage power supplies in hold mode. a. If Yes is selected, the system will hold the high voltage at the value designated
in the Hi Voltage #0 Value textbox.
b. If No is selected, the system will use live system data as the Hi Voltage #0 Value.
2. The following fields are intended for display only, however, the user has the ability to modify the values in these fields. Last HV Control Time Constant
Last CPLD Window Count
Last Board Temp ºC
Last Hi Voltage #0 Control
Last Hi Voltage #0 Setup
Min CPLD Channel 1 Window Count
Warning: Making changes to these parameters may cause the system to become unstable.

Operation
Detector Screens
Thermo Scientific DensityPRO User Manual 4-37
Count Tab The Count tab displays the specified detector counts in a graphic representation.
Figure 4-18. Detector Count Tab
1. Enter a time, in milliseconds, in the Update Period (ms) field to establish an update rate for the counts. The entry in this field can range from 1 – 2000 ms.
2. Click Run Char to begin a real-time graphic view of the detector counts. 3. Click Freeze Char to pause the detector count chart.

Operation
Detector Screens
4-38 DensityPRO User Manual Thermo Scientific
Current Input Tab There is one available current input per detector. Information regarding the current input can be found on the Current Input tab.
Figure 4-19. Current Input Tab
For information related to configuring these fields, see Analog (Current & Voltage) Inputs.
To access the information on the Detector Current Input tab using only the remote transmitter keypad, see Figure A-12.

Operation
Detector Screens
Thermo Scientific DensityPRO User Manual 4-39
RTD Input Tab The RTD Input tab is used for temperature compensated density measurement or to monitor the process temperature.
To access the information on the Detector RTD Input tab using only the remote transmitter keypad, see Figure A-13.
Figure 4-20. RTD Input Tab
1. Choose the type of input from the selections in the dropdown list. Not Used
Temperature
2. Indicate the input units as degrees Fahrenheit or Celsius from the Engineering Unit dropdown.
3. Define the input operating range by entering the Minimum (ºC) and Maximum (ºC) into the corresponding textboxes.
4. The current inputs can operate in Live mode or Manual mode. If Manual mode is selected, enter a value in the Manual Value (EU) textbox.
5. Select the RTD Wire Type from the dropdown. The RTD input supports 3- or 4-wire RTDs.
6. Additional fields on this screen, which are listed below, are for display purposes only and are not configurable by the user. Live Value (EU) – This field displays the live calibrated value in engineering
units in both Live and Manual modes.
Raw Value (ºC) – This field displays the live calibrated value in degrees Celsius in both Live and Manual modes.

Operation
Detector Screens
4-40 DensityPRO User Manual Thermo Scientific
#1 EU Min Value – This field displays the minimum temperature value, in engineering units, that was applied by the user to the RTD input during calibration.
#2 mA Mid Value – This field displays the midpoint temperature value, in engineering units, that was applied by the user to the RTD input during calibration.
#3 mA Max Value – This field displays the maximum temperature value, in engineering units, that was applied by the user to the RTD input during calibration.
#1 Raw Min Value – This field displays the minimum temperature value read by the system during calibration.
#2 Raw Mid Value – This field displays the midpoint temperature value read by the system during calibration.
#3 Raw Max Value – This field displays the maximum temperature value read by the system during calibration.
Calibration Points – This field displays the number of points the current information used to calibrate the current input.
Status – This field displays Live or Manual, depending on the operating mode selected, as well as low and high alarm conditions.
Calibration RTD inputs can be calibrated using two or three points. The calibration process for the RTD inputs should be completed by selecting Calibration from the menu or by clicking the fourth icon button, the wrench. Selecting either of these options will guide the user through the calibration process step-by-step. For further information, see Calibration.

Operation
Application
Thermo Scientific DensityPRO User Manual 4-41
Status Tab The Status Tab displays detector status and information.
To access the information on the Detector Status tab using only the remote transmitter keypad, see Figure A-4.
Figure 4-21. Detector Status Tab
All of the fields on this screen, which are listed below, are for display purposes only and are not configurable by the user.
– Filtered Data Count
– CAL/STD Count/sec
– IBP Firmware Version
– IBP Compile Date/Time
– Analog Input (Raw)
– Power Supply Type
– DAC Output 0 Volt
– DAC Output 1 Volt
– Preamp Type
– CPLD Version
– Battery Voltage
– CPLD Status
– System Status Summary
– System Err Code #1
– System Err Code #2
– Software Err Code

Operation
Detector Screens
4-42 DensityPRO User Manual Thermo Scientific
Diagnostics Tab The Diagnosis Tab displays values to the user for diagnostic purposes.
To access the information on the Detector Diagnosis tab using only the remote transmitter keypad, see Figure A-5.
Figure 4-22. Detector Diagnosis Tab
All of the fields on this screen, which are listed below, are for display purposes only and are not configurable by the user. However, the data may be configurable by the user on other screens.
– High voltage Time Constant in seconds
– Data Count
– Top Count
– Center Count
– Base Count
– HV Monitor Voltage 0
– HV Monitor Voltage 1
– CPU Board Temperature (ºC)
– Last Board Temperature (ºC)
– RTD Raw Temperature (ºC)
– IBP Board Temperature (ºC)
– IBP Board Temperature (Stable ºC)
– Last CPLD Window Count

Operation
Application
Thermo Scientific DensityPRO User Manual 4-43
– Last Hi Voltage 0 Control
– Last Hi Voltage 0 Step
– Stable Hi Voltage 0 Step
– Top Count Stable
– High Voltage 0 Volt (Auto Control)
– High Voltage 1 Volt (Auto Control)
– Last HV Control TC
– Min CPLD 1 Window Count
– Main System Err status
– Main Runtime Err status
– Main System Initialization Err status
Application Each set of Application screens relates to the Detector screens of the same number. For instance, information entered in the screens accessed by selecting Application #1 from the menu tree will be applied to Detector #1, whereas information entered on the Application #2 screens will be applied to Detector #2.
Configuration The Application Configuration screen can be reached by selecting Application from the menu tree. To access the information on the Application Configuration screen using only the remote transmitter keypad, see Figure A-17.
Figure 4-23. Application Configuration Screen

Operation
Application Screens
4-44 DensityPRO User Manual Thermo Scientific
Application Screens
Select Application #1, 2, 3 or 4 from the menu tree on the left.
Setup Tabs
Density Setup The Density Setup tab provides the user with a way to configure the primary measurement. This can also be accomplished by using the Setup Wizard. The Setup Wizard can be accessed through the Functions dropdown menu or by clicking the blue wizard’s cap icon near the top right corner of the screen.
To access the information on the Application Density Setup tabs using only the remote transmitter keypad, see Figure A-17.
Figure 4-24. Application Screens, Density Setup Tab
The primary measurement, Measurement #1, is dedicated to density measurement based on detector counts. The value and units of this measurement are determined by the material type and primary measurement selected on the Density Setup screen. The primary measurement can only be assigned to one input.
1. Indicate the type of source head in use by using the Source Head dropdown list. 5176 source head
5190 source head
5193 source head
5200 source head

Operation
Application Screens
Thermo Scientific DensityPRO User Manual 4-45
5201 source head
5202 source head
5203 source head
5204 source head
5206 source head
5207 source head
5208 source head
5210 source head
5211 source head
6000 source head
2. Specify an Isotope from the dropdown list. Cs137
Co60
Am241
Other
3. Make a selection from the Material Type dropdown. The option selected will be displayed as the Material Type on the Additional Measurement tab. a. If slurry is selected as the material type, the following fields will be available:
Carrier Density g/cc
Solid Density g/cc
Carrier Attenuation (cm2/g)
Solid Attenuation (cm2/g)
b. If single phase is selected as the material type, the following fields will be available:
Solid Density g/cc
Solid Attenuation (cm2/g)
c. If emulation is selected as the material type, the following fields will be available:
Fluid 1 Density g/cc
Fluid 2 Density g/cc
Fluid 1 Attenuation (cm2/g)
Fluid 2 Attenuation (cm2/g)

Operation
Application Screens
4-46 DensityPRO User Manual Thermo Scientific
d. If solution is selected as the material type, additional options will be available.
i. Selecting a type of solution from the Solution Type dropdown list will configure the polynomial coefficients with default values.
Suc 0-100%
D-Frac 0-60%
D-Gluc 0-10%
NaCl 0-50%
NaOH 0-50%
KCL 0-24%
KOH 0-52%
HCL 0-40%
H2PO3 0-40%
A-Lac 0-18%
H-Lac 0-18%
User Defined
ii. The following fields will be available when solution is selected as the material type:
Solvent Density (g/cc)
Solute Density (g/cc)
Solvent Attenuation (cm2/g)
Solute Attenuation (cm2/g)
iii. The fields listed below auto-populate with information when solution is selected as the material type, however, the user may override the populated information by manually entering new values.
Solution Poly A Coeff
Solution Poly B Coeff
Solution Poly C Coeff
Solution Poly D Coeff
4. Select a Primary measurement from the dropdown list. The option selected in this field will affect information on the Action tab. a. If Slurry is selected as the material, the primary measurements available are:
Density
Solids content/vol

Operation
Application Screens
Thermo Scientific DensityPRO User Manual 4-47
Carrier content/vol
Solids/carrier
% by weight solids
% by weight carrier
% by volume solids
% by volume carrier
b. If Single phase is selected as the material, the primary measurements available are:
Density
Bulk Density
c. If Emulsion is selected as the material, the primary measurements available are:
Density
Fluid 2 Content/vol
Fluid 1 Content/vol
Fluid 2/Fluid 1
% by weight Fluid 2
% by weight Fluid 1
% by volume Fluid 2
% by volume Fluid 1
d. If Solution is selected as the material, the primary measurements available are:
Solute content/vol
Solvent content/vol
Solute/Solvent
% by weight Solute
% by weight Solvent
% by volume Solute
% by volume Solvent
Bulk Density

Operation
Application Screens
4-48 DensityPRO User Manual Thermo Scientific
5. Select a primary unit of measure from the Density Unit (Primary) dropdown. The selection made on this tab will provide the unit information for the Action and Measurement Data tabs. g/cc – gram/cubic centimeter
lb/US gal – pound/US gallon (U.S. liquid)
lb/UK gal – pound/UK gallon (UK or imperial gal.)
lb/cu ft – pound/cubic foot
ston/cu yd – short ton (2000 pounds)/cubic yard
lton/cu yd – long ton (2240 pounds)/cubic yard
g/l – gram/liter
oz/cu in – ounce/cubic inch
lb/cu in – pound/cubic inch
g/cu in – gram/cubic inch
lb/cu yd – pound/cubic yard
kg/cu m – kilogram/cubic meter
deg API – degree American Petroleum Institute
degBaum lt – degree Baume, light scale
degBaum hv – degree Baume, heavy scale
6. Next, specify the unit of measure for the inside diameter of the pipe. The available selections are: cm – centimeter
mm – millimeter
in – inch
ft – foot
yd – yard
m – meter
7. Finally, enter the inside diameter of the pipe in the Pipe Inside Diameter textbox and click the Submit button to save the data.

Operation
Application Screens
Thermo Scientific DensityPRO User Manual 4-49
Input Configuration Setup
The Input Configuration Setup tab let the user assign the type of input connected to the DensityPRO gauge and to set that input’s operating range for use with additional parameters in calculations. The user can assign analog inputs to the density, temperature, pressure and/or flow parameters, as well as the units in which those parameters should be displayed.
The information entered on this tab affects the information displayed on the Additional Measurement tab. If analog input Main Board 4-20mA #1 is assigned to Temperature Input and the Temperature Unit is set to ºF on this tab, choosing Temperature from one of the Measurement # dropdowns on the Additional Measurement tab will associate the input with that measurement number on the Action and Measurement Data tabs.
While the Input Configuration tab allows the user to link four analog and measurement inputs, there are only three measurements available on the Additional Measurement tab.
To access the information on Application Input Configuration Setup tabs using only the remote transmitter keypad, see Figure A-17 and Figure A-18.
Figure 4-25. Application Screen, Input Configuration Tab
1. Determine which physical input will be connected to the device. Assign an analog input to a measurement type by selecting the input from the Density, Temperature, Pressure or Flow Input dropdown lists.

Operation
Application Screens
4-50 DensityPRO User Manual Thermo Scientific
Table 4-6. Available Inputs
Available Selection Input
Density Temperature Pressure Flow
Not Used/Calculated
Main Board 4-20mA #1
Main Board 4-20mA #2
Main Board 0-10V #1
Main Board 0-10V #2
Detector Board 4-20mA input
Detector Board RTD input
2. Choose engineering units from the dropdown that corresponds with the selected input type. The following tables provide the units available for selection based on the various types of input.
Table 4-7. Density Input, Density Units
Display Description
g/cc grams per cubic centimeter
lb/US gal pounds per US gallon
lb/UK gal pounds per UK gallon
lb/cu ft pounds per cubic foot
ston/cu yd short tons per cubic yard
lton/cu yd long tons per cubic yard
g/l grams per liter
oz/cu m ounces per cubic meter
lb/cu in pounds per cubic inch
g/cu in grams per cubic inch
lb/cu yd pounds per cubic yd
kg/cu m kilograms per cubic meter
deg API degrees API
degBaum lt degrees Baume light
degBaum hv degrees Baume heavy
degree Twaddle degrees Twaddle

Operation
Application Screens
Thermo Scientific DensityPRO User Manual 4-51
Table 4-8. Temperature Input, Temperature Units
Display Description
ºC Degree Celsius
ºF Degree Fahrenheit
Table 4-9. Pressure Input, Pressure Units
Display Description
g/cc grams per cubic centimeter
lb/US gal pounds per US gallon
lb/UK gal pounds per UK gallon
lb/cu ft pounds per cubic foot
Table 4-10. Flow Input, Flow Units
Flow Volume Unit Flow Time Unit Mass Flow Unit (mass)
Mass Flow Unit (time)
US Gallon Seconds Pounds Seconds
UK Gallon Minutes Short Tons Minutes
Cubic cm Hours Long Tons Hours
Cubic meter Days Metric Tons Days
Cubic inch Weeks Grams Weeks
Cubic feet Months Kilograms Months
Cubic yard Years Ounce Years
Custom Units
3. Select a measure of velocity from the Velocity Unit dropdown. ft/s
m/s
4. Indicate a unit of measure from the Bulk Solids flow Unit dropdown. Lb/cu ft
kg/cu m
g/l
5. Provide a value for the Bulk Density value textbox.

Operation
Application Screens
4-52 DensityPRO User Manual Thermo Scientific
Temperature Compensation Setup
The Temperature Compensation Setup tab allows the user to establish how the process temperature is provided to the system.
To access the information on the Application Temperature Compensation Setup tabs using only the remote transmitter keypad, see Figure A-18.
Figure 4-26. Application Screen, Temperature Compensation Tab
1. Select an input source from the Temp Input Source dropdown list. a. Using the default selection, Not used, signifies that temperature compensation
is disabled.
b. Selecting Manual Value allows the user to provide a fixed value for the process temperature.
i. If Manual Value is selected as the input source, enter a temperature hold value in degrees Celsius in the Temp Hold Constant (°C) textbox.
c. When Detector RTD Input is selected, the process temperature will be measured using the RTD connected to the detector.
d. When Detector 4–20mA Input is selected, the detector’s user-configured 4–20mA input will provide the process temperature.
i. If this input is selected, the Temperature at 4mA and Temperature at 20mA fields become active. Manually enter the desired values in the corresponding textbox.
ii. When Detector RTD or Detector 4–20mA Input is chosen as the input source, the Temperature unit list box becomes active, allowing users to designate the temperature measurement as Celsius or Fahrenheit.

Operation
Application Screens
Thermo Scientific DensityPRO User Manual 4-53
2. Specify the temperature compensation polynomial equation. The options available under the Temp Comp Poly (eq1) and (eq2) dropdowns are: User defined
H20, <90 C, REF 20
Not Used (Temp Comp Poly (eq2) only)
In addition to the dropdown function, these fields are manually configurable by the user. Select User-defined and enter the desired equation.
3. The following textboxes are intended for user-defined variables: Temperature Compensation Coefficient A Equation 1
Temperature Compensation Coefficient B Equation 1
Temperature Compensation Coefficient C Equation 1
Temperature Compensation Coefficient D Equation 1
Temperature Compensation Coefficient A Equation 2
Temperature Compensation Coefficient B Equation 2
Temperature Compensation Coefficient C Equation 2
Temperature Offset Correction
This field provides the user with a quick way to correct temperature offset. In most cases, temperature offset correction is not needed and can remain at zero.
Reference Temperature in ºC
4. Use the Use Temp Comp during STD dropdown to indicate if temperature compensation should be used during standardization. a. Selecting No means that temperature compensation will not be used during
standardization.
b. If Yes is selected, the gauge will compensate the density for temperature if standardization is initiated with the pipe full.

Operation
Application Screens
4-54 DensityPRO User Manual Thermo Scientific
Additional Measurement Setup
There are a total of four measurements available on a DensityPRO gauge. The gauge can convert the basic density measurement into a variety of output measurements appropriate for specific applications based on the type of material selected. Given temperature input, the gauge can compensate the density measurement for changes in the process temperature. If flow input is provided via additional inputs, the gauge is capable of calculating a mass flow or a volume flow.
The purpose of providing additional measurements is to allow the user to configure a second, third and forth measurement as appropriate for a specific application.
To access the information on Application Additional Measurement Setup tabs using only the remote transmitter keypad, see Figure A-18.
Note: Additional measurements are closely linked with an application’s input configuration setup. See the section Input Configuration Setup for additional details.
Note: The Analog Input Type must be configured correctly for each selection made on the Input Configuration Setup tab. See the section Analog (Current & Voltage) Inputs for additional details.
Figure 4-27. Application Screen, Additional Measurement Setup Tab

Operation
Application Screens
Thermo Scientific DensityPRO User Manual 4-55
The Additional Measurement tab allows the user to assign measurement inputs to measurements two, three and four.
1. The Material Type will auto-populate based on information configured on the Density Setup screen.
2. Measurements #2, #3 and #4 allow the user to choose the measurement type. a. The Density measurement is derived from the primary density measurement
or the measurement from density information on the Input Configuration tab.
b. The Solids content/volume measurement is derived from the primary density measurement value if no additional density information is configured on the Input Configuration tab.
c. The Carrier content/volume measurement is derived from the primary density measurement value if no additional density information is configured on the Input Configuration tab.
d. The Solids/carrier measurement is derived from the primary density value and is primarily used for oilfield applications.
e. The % by weight solids measurement is derived from the primary density measurement.
f. The % by weight carrier measurement is derived from the primary density measurement.
g. The % by volume solids measurement is derived from the primary density measurement.
h. The % by volume carrier measurement is derived from the primary density measurement.
i. The Bulk Mass Flow measurement is derived from the primary density measurement and the flow measurement selected from the Input Configuration tab.
j. The Solids Mass Flow measurement is derived from the primary density measurement and the flow measurement selected from the Input Configuration tab.
k. The Carrier Mass Flow measurement is derived from the primary density measurement and the flow measurement selected from the Input Configuration tab.
l. The Bulk Volume Flow measurement is derived from the flow measurement selected from the Input Configuration tab.
m. The Solids Volume Flow measurement is derived from the primary value, Carrier Density constant, Solid Density constant and in conjunction with the flow measurement selected from the Input Configuration tab.

Operation
Application Screens
4-56 DensityPRO User Manual Thermo Scientific
n. The Carrier Volume Flow measurement is derived from the primary density value, Carrier Density constant, Solid Density constant and in conjunction with the flow measurement selected from the Input Configuration tab.
o. The Bulk Solids Flow measurement is derived from the primary density value, Carrier Density value, Solid Density value, Bulk Solid Density constant and in conjunction with the flow measurement selected from the Input Configuration tab.
p. The Temperature measurement is derived from the analog input selection made in Input Configuration.
q. The Velocity measurement value is derived based on the flow selection made under Input Configuration and based on the pipe inside diameter. The measurement will be automatically converted to the user-selected unit, either ft/sec or m/sec.
r. The Proppant measurement is derived from the primary density value, the primary density constant carrier density value and the solid density value.
3. Each measurement unit will auto-populate based on the measurement type selected.
4. Use the fields under Number of Decimal Places to determine the number of decimal places to display. These fields are configurable from 0 to 4.
5. In each instance where the Density, Temperature, Pressure or Flow Inputs are set to Not Used, then Measurement #1 will be used on the Measurement Data tab.

Operation
Application Screens
Thermo Scientific DensityPRO User Manual 4-57
General Setup The General setup screen allows the user to read and modify parameters associated with the system. The DensityPRO gauge will be read and will write any of these parameters as requested by the user.
To access the information on Application General Setup tabs using only the remote transmitter keypad, see Figure A-3.
Figure 4-28. Application Screen, General Setup Tab
1. Select a source type from the Source Type (Hi Voltage Control) dropdown. Cs137 (Cesium 137)
Co60 (Cobalt 60)
Am241 (Americium 241 Beryllium)
Other
2. The user has the option of entering the requested information into the following textboxes: Radioactive Source Serial Number
Radioactive Source Tag Number
Radioactive Source Assay Date (MM/YY)

Operation
Application Screens
4-58 DensityPRO User Manual Thermo Scientific
Radioactive Source Activity (mCi)
Isotope Half Life (years)
3. The Detector Data Counts Hold Mode dropdown allows the user to operate in Live mode or Hold mode. In the Hold mode, the user may enter a value in the Detector Data Counts Hold Value textbox. In Live mode, the user does not have this option.
4. The user has the option of entering values into the following textboxes: Total Background Counts
Detector under range limit (cps)
Detector over range limit (cps)
Total Raw Data Count (cps)
Total Filtered Data Count (cps)
Standardization Standardization is defined as a process that takes a radiation measurement for a standard process configuration to establish a reference point for the gauge. This process also ensures confidence in the accuracy of the calibration curve. The procedure requires the measurement section to be either pipe empty or full. When full is selected, the pipe should be filled with carrier or to be in some other repeatable condition.
The standardization measurement provides the gauge with a standard configuration reference point. During the standardization cycle, the gauge averages the detector signal. The default cycle time lasts about two minutes. This averaged detector signal provides a repeatable measurement of the signal produced in the standard configuration.
Once the standardization measurement is completed, it can be repeated later to compensate for any changes, such as increased attenuation due to process material buildup on the pipe walls. The gauge can then adjust the calibration values based on the new standardization value. The calibration values are adjusted automatically whenever a new standardization is performed. Thus, it is not necessary to repeat the calibration measurements.
Using as a Default Calibration Value
By default, the gauge uses carrier density as the calibration (CAL) point. For some applications, this default CAL point may provide adequate measurement accuracy without performing any additional calibration measurements. For example, if the standardization is performed on a pipe full of clean carrier (for a slurry material type) and solids concentration is selected as the primary measurement, the measurement readout should be reasonably accurate.

Operation
Application Screens
Thermo Scientific DensityPRO User Manual 4-59
To access the information on Application Standardization tabs using only the remote transmitter keypad, see Figure A-18.
Figure 4-29. Application Screen, Standardization Tab
1. Select a condition from the Standardization On dropdown. None
Pipe Empty
Pipe Full
Bypassed
2. Standardization counts are averaged over a user-defined period of time. Enter a time period, in seconds, in the STD Sample Time (sec) textbox. The time can range from 1 second to 65,535 seconds.
3. When the Standardization On field is set as Pipe Full, the STD Density Value textbox becomes available to the user. Enter a standardization density value. The units displayed are those associated with the primary density measurement.
4. The following commands are available for the standardization: Start STD – Begin the standardization cycle.
Abort STD – Abort or reject the standardization cycle before cycle completion. When the user terminates the standardization cycle, the value of the standardization counts and the standardization date and time stored in the gauge remain unchanged.

Operation
Application Screens
4-60 DensityPRO User Manual Thermo Scientific
Accept STD – Accept the standardization value before or after the cycle completes. When the user accepts the standardization value before the cycle completes, the date, time and value of the standardization counts at the time of acceptance are stored in the gauge.
Reject STD – Reject the standardization value after completion of the standardization cycle. If the user rejects the standardization, the value of the standardization counts and the standardization date and time stored in the gauge are unchanged.
Note: The high voltage must be stable during the standardization cycle. If the high voltage is unstable, the cycle will abort.
Gauge Calibration When a calibration is required, a one point calibration provides a reference measurement at one density in the range of interest. This form of calibration is sufficient in most instances. If greater measurement accuracy is required, two-point calibration can be performed. The calibration density value is currently entered only in g/cc. In future software releases the user will be able to select the calibration density units.
To access the information on Application Gauge Calibration tabs using only the remote transmitter keypad, see Figure A-19.
Figure 4-30. Application Screen, Gauge Calibration CAL Data Tab

Operation
Application Screens
Thermo Scientific DensityPRO User Manual 4-61
CAL Data Tab
1. Select a method of density calibration from the CAL Method dropdown. Polynomial
Breakpoint Table
2. Choose the point to be calibrated using the CAL Point field. Initially, the only selection available is 1. Once Point 1 has been calibrated and accepted, Point 2 will become available for selection from the dropdown. The CAL Point field will allow the user to calibrate up to 10 points.
Note: When a standardization cycle is run and accepted on a full pipe, the system uses this data as Point 1 for calibration purposes. The user will then have the option of recalibrating Point 1 or calibrating Point 2.
3. Calibration counts are averaged over a user-defined period of time. Enter a time period, in seconds, in the CAL Sample Time (sec) textbox. The time can range from 1 second to 65,535 seconds.
4. Enter a calibration density value. The units displayed are those associated with the primary density measurement.
5. The following commands are available for the gauge calibration process: Start CAL – Begin the calibration cycle.
Abort CAL – Abort or reject the calibration cycle before cycle completion. When the user terminates the calibration cycle, the value of the calibration counts and the density stored in the gauge remain unchanged.
Accept CAL – Accept the calibration value before or after the cycle completes. When the user accepts the calibration value before the cycle completes, the values of the calibration counts and the density at the time of acceptance are stored in the gauge.
Reject CAL – Reject the calibration value after completion of the calibration cycle. If the user rejects the calibration, the value of the calibration counts and the density stored in the gauge are unchanged.
6. The fields listed below are for display purposes only and are not configurable by the user. Time Remaining (sec)
Detector Average Count
Calibration/Reference Latest
Calibration Temperature

Operation
Application Screens
4-62 DensityPRO User Manual Thermo Scientific
Point Data Tab (Polynomial)
Figure 4-31. Application Screen, Gauge Calibration Point Data Tab (Polynomial)
1. Selecting Polynomial as the density calibration method on the CAL Data tab introduces a distinct set of fields on the Point Data tab of the Gauge Calibration screen. The accepted calibration values calculated on the CAL Data tab will auto-populate the fields listed below on the Point Data tab. The user may also manually change these values by entering new data into the textboxes. Cal Density Point #1
Cal/Ref for Point #1
Count Rate for Point #1
Cal Density Point #2 (If Point 2 is calibrated)
Cal/Ref for Point #2 (If Point 2 is calibrated)
Count Rate for Point #2 (If Point 2 is calibrated)
Slope Correction factor
2. The slope correction factor is automatically calculated by the gauge using the calibration points accepted by the user. However, changes to data fields, both on the Point Data tab and Density Setup tab, will affect the slope correction factor. If any of the fields listed below are changed, clicking the Calculate Slope Correction Factor button will recalculate the slope correction factor based on the current data. The result of this calculation will then be displayed in the Slope Correction factor textbox.

Operation
Application Screens
Thermo Scientific DensityPRO User Manual 4-63
a. Gauge Calibration Point Data tab:
Cal Density Point #1
Cal/Ref for Point #1
Count Rate for Point #1
Cal Density Point #2 (If Point 2 is calibrated)
Cal/Ref for Point #2 (If Point 2 is calibrated)
Count Rate for Point #2 (If Point 2 is calibrated)
b. Density Setup tab:
Carrier Density (Slurry)
Carrier Attenuation Coefficient (Slurry)
Solids Density (Slurry)
Solids Attenuation Coefficient (Slurry)
Solvent Density (Solution)
Solvent Attenuation Coefficient (Solution)
Solute Density (Solution)
Solute Attenuation Coefficient (Solution)
Solid Density (Single Phase)
Solid Attenuation (Single Phase)
Fluid 1 Density (Emulsion)
Fluid 1 Attenuation Coefficient (Emulsion)
Fluid 2 Density (Emulsion)
Fluid 2 Attenuation Coefficient (Emulsion)
Pipe Inside Diameter
3. The Last STD Date/Time field displays the date and time of the last standardization and is not configurable by the user.
4. The Last STD Count field will auto-populate with the results of the previous standardization count, but the user may manually change the data, if desired.

Operation
Application Screens
4-64 DensityPRO User Manual Thermo Scientific
Point Data Tab (Breakpoint Table)
Selecting Breakpoint Table as the density calibration method on the CAL Data tab, introduces a different set of fields on the Point Data tab of the Gauge Calibration screen. The breakpoint table displays the density of each calibrated point, as well as the point’s count rate and calibration/standardization ratio.
Figure 4-32. Application Screen, Gauge Calibration Point Data Tab (Breakpoint Table)
Additionally, this tab allows the user to view displayed point data, to change the point data by manually entering new values, and to submit or delete point data.
Totals The purpose of the totalizers is to calculate the amount of mass or volume flow measured by a gauge over a period of time. There are four totalizers available for each detector, and each totalizer can be configured to totalize mass or volume flow.
To access the information on Application Totals tabs using only the remote transmitter keypad, see Figure A-19.

Operation
Application Screens
Thermo Scientific DensityPRO User Manual 4-65
Figure 4-33. Application Screen, Totals Tab
Measurements #2 – #4 on the Additional Measurements Setup tab are available for flow input selection. In order to totalize, the selected measurement must be configured for a mass or volume flow, and the flow must be above the flow threshold limit set by the user. Furthermore, the totalizer value may be scaled based on the units/pulse configured by the user. The figures in this section illustrate the totalizer configuration process.
Flow measurements can be configured and then associated with a totalizer. First, on the Input Configuration Setup tab, configure the flow input along with its flow volume unit and time. Second, associate the measurements to mass or volume flow on
the Additional Measurements Setup tab.
Note: The input must be configured to represents flow.
Figure 4-34. Totalizer Flow Input and Measurement Selection

Operation
Application Screens
4-66 DensityPRO User Manual Thermo Scientific
The following outline provides basic steps for configuration the totalizer. Each totalizer can be setup to totalize on the same or different measurements.
Figure 4-35. Totalizer Setup
A totalizer can be attached to a relay to output pulses. (See the Relay Outputs section for further details).
Totalizers #1 – #4
1. Choose an action state for Totalizer #1 from the Selection dropdown. Disable – If the totalizer is disabled, the totalizer value stops accumulating,
even when the value of the input is greater than or equal to the threshold limit. If the totalizer has not been previously enabled, the Totalizer Value field will be set to zero.
Enable – This allows the totalizer to start accumulating when the value of the input is greater than or equal to the threshold limit. If the totalizer has been enabled previously, the Totalizer Value resumes accumulating at the previous value.
Clear – The Totalizer Value and any pending relay counts are set to zero. The totalizer returns to its previous state of disabled, enable or inhibit.
Inhibit – The Inhibit state is for use with the Enable All action. When the Enable All action is requested, all Totalizers in the Inhibit state will be changed to the Enable state. All Totalizers that are in the Disable state will stay disabled.

Operation
Application Screens
Thermo Scientific DensityPRO User Manual 4-67
2. Make a selection from the Input dropdown to designate which input to totalize. None – No input is selected to totalize. The Totalizer Value will not increase.
Measurement #1: The value of Measurement #1 is totalized. This will be either the Live or Hold value, depending on what the Hold/Live field is set to for Measurement #1 on the Application Action tab.
Measurement #2: The value of Measurement #2 is totalized. This will be either the Live or Hold value, depending on what the Hold/Live field is set to for Measurement #2 on the Application Action tab.
Measurement #3: The value of Measurement #3 is totalized. This will be either the Live or Hold value, depending on what the Hold/Live field is set to for Measurement #3 on the Application Action tab.
Measurement #4: The value of Measurement #4 is totalized. This will be either the Live or Hold value, depending on what the Hold/Live field is set to for Measurement #4 on the Application Action tab.
3. Select a measurement unit from the Totalizer Value dropdown. The available units are: US gallon
Imperial gallon
Cubic centimeter
Cubic meter
Cubic inch
Cubic feet
Cubic yard
Ounces
Pounds
Short tons
Long tons
Kilograms
Metric tons
Grams
4. The totalizers give the user the option to link measurement data to a totalizer by selecting Measurement # from the Input dropdown. The measurement value of the specified Measurement # will then be input into the totalizer. The value of the input must be greater than or equal to the value entered in the Threshold Limit field before the totalizer value will accumulate. When this condition is met, the total of the input value is accumulated.

Operation
Application Screens
4-68 DensityPRO User Manual Thermo Scientific
5. Enter a value that represents the magnitude of each pulse output in the Units/Pulse textbox.
6. The following fields are for display purposes on this screen, though their data may be used in other processes. These fields are not configurable by the user. Threshold Unit – The unit of measure associated with the Input. The
Threshold Limit should use the same units.
Totalizer Value – Displays the current value accumulated by the totalizer since it was last cleared. When a totalizer is active, the value updates every second. Any flow that occurred while the totalizer was disabled or inhibited is not included in the value, nor is any flow that occurred when the input value was below the Threshold Limit.
Note: The Totalizer Value will roll over at 1,000,000.
All Totalizer Choosing an action state from the Selection dropdown under All Totalizer at the bottom of the Totals tab will apply the selected state to any of the configured totalizers.
– Disable – The Disable state in the All Totalizer Selection dropdown sets all four totalizers to a disabled state. In a disabled state, the totalizer values stop accumulating, even when the values of the inputs are greater than or equal to the threshold limits. If a totalizer has not been previously enabled, the Totalizer Value field in that totalizer’s area will be set to zero.
– Enable – When the Enable state is chosen from the All Totalizer Selection dropdown, all Totalizers in the Inhibit state will be changed to the Enable state. This allows the totalizers to begin accumulating when the values of the inputs are greater than or equal to the threshold limits. If a totalizer has been enabled previously, the Totalizer Value resumes accumulating at the previous value.
– Clear – For all of the totalizers, the Totalizer Value and any associated relay counts are set to zero when the Clear state is selected. The totalizers then return to their previous state of disabled, enable or inhibit.
– Inhibit – When Inhibit is selected from the All Totalizer Selection dropdown, all enabled totalizers will change to an inhibit state. All totalizers that are in the Disable state will stay disabled.

Operation
Application Screens
Thermo Scientific DensityPRO User Manual 4-69
Action The Application Action tab provides the user the ability to hold the measurements configured on the Additional Measurement Setup tab at the desired value. The following options apply to Measurements #1 – #4.
To access the information on Application Action tabs using only the remote transmitter keypad, see Figure A-20.
Figure 4-36. Application Screen, Action Tab
1. Choose an operational mode from the Hold/Live dropdown. Live
Hold
If Hold is selected, the Hold Value textbox becomes available to the user. Enter a hold value for the measurement, using the same units used in the measurement’s configuration.
2. The following fields utilize values from other processes. These fields are not configurable by the user on this screen. Allocation – Displays the type of measurement: Density, Pressure,
Temperature or Flow.
Current Value – Displays the current measurement value.
Unit – Displays the units associated with the measurement’s configuration.

Operation
Application Screens
4-70 DensityPRO User Manual Thermo Scientific
Measurement Data The Measurement Data tab displays the live measurement values and configured measurement units for Measurements #1 – #4 to allow for further analysis. These fields are not configurable by the user.
To access the information on Application Measurement Data tabs using only the remote transmitter keypad, see Figure A-19.
Figure 4-37. Application Screen, Measurement Data Tab
Process Alarm The process alarms provide a signal to the external device when the process value goes above or below a set point value. The gauge provides sixteen process alarms. The system can be configured to setup a process alarm based on one of the four measurements. An alarm is activated when the measurement value reaches the specified set point. The relative values assigned to the set point and clear point determines whether the alarm is a high alarm or low alarm. The alarm condition must exist for at least the duration of action delay time for the alarm to trigger and take the selected action.
To access the information on Application Process Alarm tabs using only the remote transmitter keypad, see Figure A-20.

Operation
Application Screens
Thermo Scientific DensityPRO User Manual 4-71
Figure 4-38. Process Alarm Tabs
High and Low Alarms If the set point value is greater than the clear point, the alarm is a High alarm. In this case, the alarm is activated as the measurement value increases above the set point value. The alarm stays active until the measurement value again goes below the clear point. If the clear point value is greater than the set point, then the alarm is a Low alarm. In this case, the alarm is activated as the measurement value goes below the set point. The alarm stays active until the measurement value again goes above the clear point.
In the high alarm depiction below, the measurement rises above the set point and remains there longer than 10 seconds, the time entered in the Action Delay (sec) textbox. Therefore, after 10 seconds, the alarm is triggered and continues until the measurement drops below the clear point. In the second instance, the measurement does not rise above the set point for 10 seconds, so the alarm is not triggered.
In the low alarm depiction, the measurement drops below the set point and remains there longer than 10 seconds, the time entered in the Action Delay (sec) textbox. Therefore, after 10 seconds, the alarm is triggered and continues until the measurement rises above the clear point. In the second instance, the measurement does not drop below the set point for 10 seconds, so no alarm occurs.

Operation
Application Screens
4-72 DensityPRO User Manual Thermo Scientific
Figure 4-39. High and Low Alarms

Operation
Application Screens
Thermo Scientific DensityPRO User Manual 4-73
Alarm Functions The function of the process alarms is to provide a critical signal to the gauge based on the user’s configuration. There are a total of sixteen alarms available per detector. Each alarm can be set to trigger on any one of the four measurements. The process alarms report high-limit alarms and low-limit alarms based on the set and clear point values and on the action delay time set by the user.
1. Choose an operational mode from the Setup dropdown. Disable – The alarm is disabled; no alarm action is executed.
Enable – The alarm is enabled. The alarm action will be executed based on Set Point and Clear Point conditions.
Inhibit – The alarm is temporary disabled. An alarm action may change the setup of this alarm from Inhibit to Enable.
2. Assign the alarm to a measurement by making a selection from the Measurement ID dropdown. The alarm will then monitor the selected measurement and trigger the alarm based on the set point and clear point. The following selections are available in the Measurement ID dropdown: None
Measurement #1
Measurement #2
Measurement #3
Measurement #4
3. The alarm is only triggered if the alarm condition exists after a user-defined amount of time. If the alarm condition does not exist for the designated time, the alarm will not trigger. Enter the desired wait time before the alarm triggers in the Action Delay (Sec) textbox.
4. Select an alarm action from the Action dropdown. The available options are listed below. a. Do Nothing – No Action is taken.
b. Relay Output A
i. At the Set Point, action must be taken based on the Alarm Action setting located on the Relay Output A tab.
ii. At the Clear Point, relay operation is reset to Normal operation.
c. Relay Output B
i. At the Set Point, action must be taken based on the Alarm Action setting located on the Relay Output B tab.
ii. At the Clear Point, relay operation is reset to Normal operation.
d. Current Output A
i. At the Set Point, action must be taken based on the Alarm Action setting located on the Current Output A tab.

Operation
Application Screens
4-74 DensityPRO User Manual Thermo Scientific
ii. At the Clear Point, Current Output A is set back to normal operation.
e. Current Output B
i. At the Set Point, action must be taken based on the Alarm Action setting located on the Current Output B tab.
ii. At the Clear Point, Current Output B is set back to normal operation.
f. Current Output C.
i. At the Set Point, action must be taken based on the Alarm Action setting located on the Current Output C tab.
ii. At the Clear Point, Current Output C is set back to normal operation.
g. When Clear all Holds is selected, all Hold/Live values are set to Live for the following items:
Measurements #1 through #4
Current Outputs A through C
Relays A and B
h. Clear all alarms (Not Applicable)
i. No action is taken when sent to the gauge. This will be used in future applications to clear latching alarms.
i. Clear all Totalizers (Do not enable):
i. The value of totalizers 1 through 4 are set to zero and the totalizers are disabled.
j. Inhibit all Totalizers
i. Any totalizer (totalizers 1 through 4) in the enable state will be placed in the inhibit state.
k. Enable all Totalizers
i. Any totalizer in the inhibit state will be placed in the enable state.
l. Inhibit totalizer 1
i. If totalizer 1 is in the enable state, it will be placed in the inhibit state.
m. Enable totalizer 1
i. If totalizer 1 is in the inhibit state, it will be placed in the enable state.
n. Zero totalizer 1
i. Set the totalizer count to zero while the alarm is active. The totalizer will start accumulating when the alarm condition clears.
o. Inhibit totalizer 2
i. If totalizer 2 is in the enable state, it will be placed in the inhibit state.

Operation
Application Screens
Thermo Scientific DensityPRO User Manual 4-75
p. Enable totalizer 2
i. If totalizer 2 is in the inhibit state, it will be placed in the enable state.
q. Zero totalizer 2
i. Set the totalizer count to zero while the alarm is active. The totalizer will start accumulating when the alarm condition clears.
r. Inhibit totalizer 3
i. If totalizer 3 is in the enable state, it will be placed in the inhibit state.
s. Enable totalizer 3
i. If totalizer 3 is in the inhibit state, it will be placed in the enable state.
t. Zero totalizer 3
i. Set the totalizer count to zero while the alarm is active. The totalizer will start accumulating when the alarm condition clears.
u. Inhibit totalizer 4
i. If totalizer 4 is in the enable state, it will be placed in the inhibit state.
v. Enable totalizer 4
i. If totalizer 4 is in the inhibit state, it will be placed in the enable state.
w. Zero totalizer 4
i. Set the totalizer count to zero while the alarm is active. The totalizer will start accumulating when the alarm condition clears.
5. Enter a set point value, in the same units as the selected measurement, in the Set Point textbox.
6. Enter a clear point value, in the same units as the selected measurement, in the Clear Point textbox.
7. The following fields display values that are available to be used in other processes. These fields are for display purposes and are not configurable by the user on this screen. Unit – Displays the units of the selected measurement.
Alarm Status – Displays Set or Clear, based on whether the alarm is active or not.

Operation
Calibration
4-76 DensityPRO User Manual Thermo Scientific
Calibration The DensityPRO gauges have the ability to calibrate all physical inputs and outputs. To begin input/output calibration, select Calibration from the Functions dropdown menu at the top of the screen or click the fourth icon button, the wrench.
To access the information on Input/Output Calibration using only the remote transmitter keypad, see Figure A-9 through Figure A-15. Beginning with Figure A-9, each Physical I/O subsection has screens for calibration.
Figure 4-40. Calibration Selection Screen
1. Select an input from the list. The available inputs for calibration are: Current Input #1
Current Input #2
Vdc Input #1
Vdc Input #2
Detector Current Input
RTD Input

Operation
Calibration
Thermo Scientific DensityPRO User Manual 4-77
2. Choose a 2-point or 3-point calibration. 3. Click the Next button to capture the calibration minimum point.
Figure 4-41. Input Calibration, Minimum Point
4. Click Start Calibrate to begin calibration. 5. Once the raw minimum value stabilizes, click Freeze Count to capture the data. 6. Enter the new minimum value. If the data captured as the raw minimum was 3.98
mA, but it should be reading 4 mA, enter 4 in the Enter new Min Value textbox. a. If there is a problem with the data, the user has the option to abort the
calibration by clicking the Abort CAL button, and can return to the previous screen by pressing the Back button.
b. To recalculate the point, click Start Calibrate before clicking the Submit button.
c. If the point data is satisfactory, click Submit to save and Next to move to the next point.
In a 2-point calibration, the next screen will calibrate the maximum values.
In a 3-point calibration, the next screen will calibrate the mid-point values. Submit that information and click the Next button to proceed to the maximum point value screen.

Operation
Calibration
4-78 DensityPRO User Manual Thermo Scientific
7. Follow steps 4 – 6 to calibrate the remaining point(s).
Figure 4-42. Input Calibration, Maximum Point
8. Once the CAL Max Point data has been submitted, click the Next button to complete the calibration and return to the Calibration Selection screen.

Operation
Calibration
Thermo Scientific DensityPRO User Manual 4-79
Output Calibration
1. Select an output from the list. The available outputs for calibration are: Current Output A
Current Output B
Current Output C
2. Choose a 2-point or 3-point calibration. 3. Click the Next button to capture the calibration minimum point.
Note: A digital multi-meter must be connected to the output for accurate calibration.
Figure 4-43. Output Calibration, Minimum Point
4. Click Start Calibrate to begin calibration. 5. Once the actual raw minimum current stabilizes on the multi-meter, click Freeze
Count to capture the data. 6. Enter the actual raw minimum current. If the Required Min mA is 4, and the
multi-meter is reading 4.03, enter 4.03 in the Actual Raw Min mA textbox. a. If there is a problem with the data, the user has the option to abort the
calibration by clicking the Abort CAL button, and can return to the previous screen by pressing the Back button.

Operation
Calibration
4-80 DensityPRO User Manual Thermo Scientific
b. To recalculate the point, click Start Calibrate before clicking the Submit button.
c. If the point data is satisfactory, click Submit to save and Next to calibrate the next point.
In a 2-point calibration, the next screen will calibrate the maximum values.
In a 3-point calibration, the next screen will calibrate the mid-point values. Submit that information and click the Next button to proceed to the maximum point value screen.
7. Follow steps 4 – 6 to calibrate the remaining point(s).
Figure 4-44. Output Calibration, Maximum Point
8. Once the CAL Max Point data has been submitted, click the Next button to reach accept or reject the calibration on the CAL Point Completed Screen.

Operation
Calibration
Thermo Scientific DensityPRO User Manual 4-81
Figure 4-45. Output Calibration, CAL Point Completed
9. Click Next to return to the Calibration Selection screen.


Thermo Scientific DensityPRO User Manual A-1
Appendix A
Keypad Display Menu Tree of DensityPRO Gauges
MAIN MENU
COMMUNICATION SETUP
SYSTEM CONTROL SYSTEM STATUS
Mode/Fault Alarm Setup MORE…
COMMUNICATION SETUP
Com A Com B Ethernet
Com A SETTING PORT MODE: Enabled UNIT ID: 1 BAUD RATE: 9600 PARITY: None DATA BITS: 8 STOP BITS: 1
Com A SETTING PORT MODE: RS232 MODBUS PRTL: RTU FLOAT FRMT NORMAL RX COUNT: 624 TX COUNT: 624 ERROR COUNT: 0
BACK NEXT BACK NEXT BACK EDIT NEXT BACK EDIT
COMMUNICATION SETUP
Com A Com B Ethernet
Com B SETTING PORT MODE: Enabled UNIT ID: 1 BAUD RATE: 9600 PARITY: None DATA BITS: 8 STOP BITS: 1
Com B SETTING PORT MODE: RS232 MODBUS PRTL: RTU FLOAT FRMT NORMAL RX COUNT: 624 TX COUNT: 624 ERROR COUNT: 0
BACK NEXT BACK EDIT NEXT BACK EDIT
COMMUNICATION SETUP
Com A Com B Ethernet
Ethernet Setting IP ADDRESS: B 010.210.064.096 ETHERNET IP GATEWAY: B 010.210.054.001
Ethernet Setting ETHERNET MAC ADDRESS: B 0050C24DF19A ETHERNET SUBNET MASK: B 255.255.254.000
Ethernet Setting PORT MODE: Disabled ENCAPS PORT: 5002 IP PORT NUM: 502 MODBUS PRTL: RTU FLOAT FRMT: Normal
BACK NEXT BACK EDIT NEXT BACK EDIT NEXT BACK EDIT
Figure A-1. Communication Setup

Keypad Display Menu Tree of DensityPRO Gauges
A-2 DensityPRO User Manual Thermo Scientific
MAIN MENU COMMUNICATION SETUP
SYSTEM CONTROL SYSTEM STATUS
Mode/Fault Alarm Setup MORE…
SYSTEM CONTROL
CONFIGURATION PASSWORD ENTRY DETECTOR CONFIG
GENERAL
SYSTEM CONFIGURATION
DATE/TIME SETTING SYSTEM SETTING
DATE/TIME SETTING DATE DISPLAY FORMAT B MM/DD/YYSYS DATE: 10/30/13 SYS TIME: 08:39:04
BACK NEXT BACK NEXT BACK NEXT BACK EDIT NEXT
SYSTEM CONFIGURATION
DATE/TIME SETTING SYSTEM SETTING
SYSTEM SETTING
DISPLAY SETTING SYSTEM START
DISPLAY SETTING LCD SCROLL TIME (SEC) BINTERGRATE: 10 BREMOTE: 0 REMOTE LCD SCREEN CONTRAST: 20 TIMEOUT (SEC): 300
BACK NEXT BACK NEXT BACK EDIT NEXT
SYSTEM SETTING
DISPLAY SETTING SYSTEM START
SYSTEM START
WARM START COLD START
WARM START
ENTER CODE TO PERFORM WARM START B 0
BACK NEXT BACK NEXT BACK EDIT START
SYSTEM START
WARM START COLD START
COLD START ENTER CODE TO PERFORM COLD START B 0
BACK NEXT BACK EDIT START
SYSTEM CONTROL
CONFIGURATION PASSWORD ENTRY DETECTOR CONFIG
GENERAL
PASSWORD ENTRY
PASSWORD VALIDATION PASSWORD SETUP
PASSWORD VALIDATION USER PASSWORD ENTRY B 0 DISPLAY PASSWORD MODE B DISPLAY INVALID PASSWORD B COUNT: 0
PASSWORD VALIDATION ENGINEER MODE COUNT B 7 TECHNICIAL MODE COUNT B 0 OPERATOR MODE COUNT B 0
PASSWORD VALIDATION COM A PASSWORD MODE B DISPLAY COM B PASSWORD MODE B DISPLAY Ethernet PASSWORD MODE B DISPLAY
BACK NEXT BACK NEXT BACK NEXT BACK NEXT BACK NEXT
PASSWORD VALIDATION USB PASSWORD MODE B DISPLAY SMART PASSWORD MODE B DISPLAY CURRENT PASSWORD MODE B DISPLAY
BACK NEXT
PASSWORD ENTRY
PASSWORD VALIDATION PASSWORD SETUP
PASSWORD SETUP
ENGINEER TECHNICIAN OPERATOR
ENGINEER PASSWORD PASSWORD B 0 CHANGE TIMES B 0 MODE COUNT B 0
BACK NEXT BACK NEXT BACK EDIT
PASSWORD SETUP
ENGINEER TECHNICIAN OPERATOR
TECHNICIAN PASSWORD PASSWORD B 0 CHANGE TIMES B 0 MODE COUNT B 0
BACK NEXT BACK EDIT
PASSWORD SETUP
ENGINEER TECHNICIAN OPERATOR
OPERATOR PASSWORD PASSWORD B 0 CHANGE TIMES B 0 MODE COUNT B 0
BACK NEXT BACK EDIT
Figure A-2. System Control (Sheet 1 of 2)

Keypad Display Menu Tree of DensityPRO Gauges
Thermo Scientific DensityPRO User Manual A-3
MAIN MENU COMMUNICATION SETUP
SYSTEM CONTROL SYSTEM STATUS
Mode/Fault Alarm Setup MORE…
SYSTEM CONTROL
CONFIGURATION PASSWORD ENTRY DETECTOR CONFIG
GENERAL
DETECTOR CONFIG
HI VOLTAGE SETTING CAL/STD
HV CONTROL PARAMETERS
Hi VOLTAGE SETTING FORCE HV#0 HOLD VALUE B NO HV #0 VALUE: 650.0000
HI VOLTAGE SETTING FORCE HV#1 HOLD VALUE B NO HV #1 VALUE: 0.000000
BACK NEXT BACK NEXT BACK EDIT NEXT BACK NEXT
DETECTOR CONFIG
HI VOLTAGE SETTING CAL/STD
HV CONTROL PARAMETERS
DETECTOR SETTING CAL/STD CONTROL B STATUS: NOT in C CAL/STD TIME B 0
BACK NEXT BACK NEXT
DETECTOR CONFIG
HI VOLTAGE SETTING CAL/STD
HV CONTROL PARAMETERS
HV CONTROL PARAMETERS
PLEASE NOTE: CHANGE THESE PARAMETERS MAY CAUSE SYSTEM UNSTABLE
BACK NEXT BACK EDIT NEXT
SYSTEM CONTROL
CONFIGURATION PASSWORD ENTRY DETECTOR CONFIG
GENERAL
GENERAL Source Type (HV CONTROL) B CS137 Isotope Half Life (Year) B 30.07000
GENERAL RADIOACTIVE SOURCE SERIAL NUMBER B 1111 TAG NUMBER B 2222
GENERAL RADIOACTIVE SOURCE ASSAY DATE (MM/YY) B 11/11 RADIOACTIVE SOURCE ACTIVITY (MCI) B 0.000000
GENERAL Reactor Data Count Hold B MODE: LIVE B VALUE: 850.0000 BACKGROUND COUNTS B 3.000000
BACK EDIT NEXT BACK EDIT NEXT BACK EDIT NEXT BACK EDIT NEXT BACK EDIT NEXT
Figure A-3. System Control (Sheet 2)

Keypad Display Menu Tree of DensityPRO Gauges
A-4 DensityPRO User Manual Thermo Scientific
MAIN MENU COMMUNICATION SETUP
SYSTEM CONTROL SYSTEM STATUS
Mode/Fault Alarm Setup MORE…
SYSTEM STATUS
SYSTEM DETECTOR DIAGNOSIS
SYSTEM STATUS
SYSTEM PHYSICAL I/O
COMMUNICATION PORTS TEMPERATURE & VRef
SYSTEM STATUS LAST SYSTEM START B DATE: 10/25/13 B TIME: 10:01:00 MAIN CPU COMPILE B DATE: Oct 24 2013 B TIME: 16:01:57
SYSTEM STATUS MAIN CPU FIRMWARE VERSION B 01.000a MAIN CPU FIRMWARE PART NUMBER B 9‐0700‐003
BACK NEXT BACK NEXT BACK NEXT BACK NEXT BACK NEXT
SYSTEM STATUS
SYSTEM PHYSICAL I/O
COMMUNICATION PORTS TEMPERATURE & VRef
PHYSICAL I/O ANALOG/CURRENT B INPUT: 4 B OUTPUT: 1 DIGITAL RELAY B INPUT: 2 B OUTPUT: 2
PHYSICAL I/O Fieldbus IO Type B NONE ISIO BOARDS: 0 PULSE INPUT: 0
PHYSICAL I/O DETECTOR: 1 POWER SUPPLY COUNT B NONE
BACK NEXT BACK NEXT BACK EDIT NEXT BACK EDIT NEXT
SYSTEM STATUS
SYSTEM PHYSICAL I/O
COMMUNICATION PORTS TEMPERATURE & VRef
COMMUNICATION PORTS SERIAL PORT B 2 USB HOST/DEVICE PORT B 1 ETHERNET PORT B 1
BACK NEXT BACK
SYSTEM STATUS
SYSTEM PHYSICAL I/O
COMMUNICATION PORTS TEMPERATURE & VRef
TEMPERATURE & VRef 4.096 V Ref B 4.091785 3.000 V Ref B 2.996655
BACK NEXT BACK
SYSTEM STATUS
SYSTEM DETECTOR DIAGNOSIS
DETECTOR STATUS
COMPONENTS SYSTEM & SOFTWARE
NaI
DETECTOR COMPONENTS POWER SUPPLY TYPE B ONE POWE PREAMP TYPE: NaI CPLD B STATUS: SW2 B VERSION: 1
DETECTOR COMPONENTS DAC OUTPUT 0 VOLT B 4.567845 DAC OUTPUT 1 VOLT B 0.000000 BATTERY VOLTAGE B 0.141935
BACK NEXT BACK NEXT BACK EDIT NEXT BACK EDIT NEXT
DETECTOR STATUS
COMPONENTS SYSTEM & SOFTWARE
NaI
SYSTEM & SOFTWARE IBP COMPILE B DATE: Jul 18 2013 B TIME: 14:10:49 IBP FIRMWARE B VERSION: 01.000a
SYSTEM & SOFTWARE SYSTEM STATUS SUMMARY B DYNAMIC CAL/STD COUNT/SEC B 0 ANALOG INPUT (RAW) B 0.000716
BACK NEXT BACK EDIT NEXT BACK EDIT NEXT
DETECTOR STATUS
COMPONENTS SYSTEM & SOFTWARE
NaI
NaI NaI FILTERED DATA B COUNT: 1135
BACK NEXT BACK
Figure A-4. System Status (Sheet 1 of 2)

Keypad Display Menu Tree of DensityPRO Gauges
Thermo Scientific DensityPRO User Manual A-5
MAIN MENU COMMUNICATION SETUP
SYSTEM CONTROL SYSTEM STATUS
Mode/Fault Alarm Setup MORE…
SYSTEM STATUS
SYSTEM DETECTOR DIAGNOSIS
DIAGNOSIS
NaI TEMPERATURE
HIGH VOLTAGE (HV) MAIN BOARD
NaI COUNT OF NaI B BASE: 51 B TOP: 51 B DATA: 51 B CENTER: 51
NaI NaI TOP COUNT STABLE B 1 LAST CPLD WINDOW B COUNT: 1
BACK NEXT BACK NEXT BACK NEXT BACK NEXT
DIAGNOSIS
NaI TEMPERATURE
HIGH VOLTAGE (HV) MAIN BOARD
CPU BOARD TEMP CPU BOARD TEMP (degC) B 29.50000 LAST BOARD TEMP (degC) B 25.00000 RTD RAW TEMP (degC) B 232.3488
IBP BOARD TEMP IBP BOARD TEMP (degC) B 30.92034 IBP BOARD TEMP (STABLE degC) B 26.60043
BACK NEXT BACK NEXT BACK NEXT
DIAGNOSIS
NaI TEMPERATURE
HIGH VOLTAGE (HV) MAIN BOARD
HIGH VOLTAGE (HV) HV CONTROL TC (SEC) B 4 HV MONITOR VOLTAGE 0 B 3.326960 HV MONITOR VOLTAGE 1 B 2.080314
HIGH VOLTAGE (HV) LAST HI VOLTAGE #0 B CONTROL: 650.0000 B STEP: 0.800000 STABLE HI VOLTAGE #0 B STEP: 0.800000
HIGH VOLTAGE (HV) HV 0 VOLT AUTO CONTROL B 653.0000 HV 1 VOLT AUTO CONTROL B 0.000000
BACK NEXT BACK NEXT BACK NEXT BACK NEXT
HIGH VOLTAGE (HV)
LAST HV CONTROL TC B 2 MIN CPLD 1 WINDOW COUNT B 200
BACK NEXT
DIAGNOSIS
NaI TEMPERATURE
HIGH VOLTAGE (HV) MAIN BOARD
MAIN BOARD MAIN Err STATUS B Sys None B SysInit None B RUNTIME None
BACK NEXT BACK EDIT NEXT
Figure A-5. System Status (Sheet 2)

Keypad Display Menu Tree of DensityPRO Gauges
A-6 DensityPRO User Manual Thermo Scientific
MAIN MENU COMMUNICATION SETUP
SYSTEM CONTROL SYSTEM STATUS
Mode/Fault Alarm Setup MORE…
Mode/Fault Alarm Setup
MODE/FAULT 1 MODE/FAULT 2
STATUS
Mode/Fault Alarm Setup MODE ACTIVE
X‐RAY COMMUNICATIONS
SYSTEMS SENSORS
MODE ACTIVE STD MODE ACTIVE ALM B Disabled CAL MODE ACTIVE ALM B Disabled HOLD MODE ACTIVE ALM B Disabled
MODE ACTIVE STD ACTION B Do Nothi CAL ACTION B Do Nothi HOLD ACTION B Do Nothi
BACK NEXT BACK NEXT BACK NEXT BACK EDIT NEXT BACK EDIT NEXT
Mode/Fault Alarm Setup MODE ACTIVE
X‐RAY COMMUNICATIONS
SYSTEMS SENSORS
X‐RAY XRAY MODE ENGAGED ALM B Disabled
X‐RAY X‐RAY ACTION B Do Nothi
BACK NEXT BACK EDIT NEXT BACK EDIT NEXT
Mode/Fault Alarm Setup MODE ACTIVE
X‐RAY COMMUNICATIONS
SYSTEMS SENSORS
COMMUNICATIONS RBP COMM FAILED ALM B Disabled IBP COMM FAILED ALM B Disabled Fieldbus Comm Failed ALM B Disabled
ACTION B Do Nothi IBP ACTION B Do Nothi FIELDBUS ACTION B Do Nothi
BACK NEXT BACK EDIT NEXT BACK EDIT NEXT
Mode/Fault Alarm Setup MODE ACTIVE
X‐RAY COMMUNICATIONS
SYSTEMS SENSORS
SYSTEMS ENABLE SYS FAULT ALM B Disabled TOTALIZE OVERRUN ALM B Disabled CAL ABORTED ALM B Disabled
SYSTEMS SYS FAULT ACTION B Do Nothi TOTAL OVERRUN ACTION B Do Nothi CAL ABORTED ACTION B Do Nothi
BACK NEXT BACK EDIT NEXT BACK EDIT NEXT
Mode/Fault Alarm Setup MODE ACTIVE
X‐RAY COMMUNICATIONS
SYSTEMS SENSORS
SENSORS SENSOR OVER RANGE ALM B Disabled SENSOR Under Range ALM B Disabled
SENSORS Sensor Over Range Action B Do Nothi Sensor Under Range Action B Do Nothi
BACK NEXT BACK EDIT NEXT BACK EDIT NEXT
Mode/Fault Alarm Setup
MODE/FAULT 1 MODE/FAULT 2
STATUS
MODE/FAULT 2
AO #A AO #B AO #C
AO #A
@MIN/MAX ALM @LOW/HIGH FAULT ALM
AO #A AO #A @MIN ALM B Disabled AO # A @MAX ALM B Disabled
AO #A AO #A @MIN ALM ACTION B Do Nothi AO #A @MAX ALM ACTION B Do Nothi
BACK NEXT BACK NEXT BACK NEXT BACK EDIT NEXT BACK EDIT NEXT
AO #A
@MIN/MAX ALM @LOW/HIGH FAULT ALM
AO #A AO #A @FAULT LOW ALM B Disabled AO #A @FAULT HI ALM B Disabled
AO #A AO #A @MIN ALM ACTION B Do Nothi AO #A @MAX ALM ACTION B Do Nothi
BACK NEXT BACK EDIT NEXT BACK EDIT NEXT
Figure A-6. Mode/Fault Alarm Setup (Sheet 1 of 2)

Keypad Display Menu Tree of DensityPRO Gauges
Thermo Scientific DensityPRO User Manual A-7
MAIN MENU COMMUNICATION SETUP
SYSTEM CONTROL SYSTEM STATUS
Mode/Fault Alarm Setup MORE…
Mode/Fault Alarm Setup
MODE/FAULT 1 MODE/FAULT 2
STATUS
Mode/Fault Alarm Setup
MODE/FAULT 1 MODE/FAULT 2
Mode/Fault Alarm Setup MODE ACTIVE
X‐RAY COMMUNICATIONS
SYSTEMS SENSORS
MODE ACTIVE STD MODE ACTIVE ALM B NO CAL MODE ACTIVE ALM B NO HOLD MODE ACTIVE ALM B NO
BACK NEXT BACK NEXT BACK NEXT BACK
Mode/Fault Alarm Setup MODE ACTIVE
X‐RAY COMMUNICATIONS
SYSTEMS SENSORS
X‐RAY XRAY MODE ENGAGED ALM B NO
BACK NEXT BACK
Mode/Fault Alarm Setup MODE ACTIVE
X‐RAY COMMUNICATIONS
SYSTEMS SENSORS
COMMUNICATIONS RBP COMM FAILED ALM B NO IBP COMM FAILED ALM B NO FIELDBUSCOMMFAILED ALM B NO
BACK NEXT BACK
Mode/Fault Alarm Setup MODE ACTIVE
X‐RAY COMMUNICATIONS
SYSTEMS SENSORS
SYSTEMS ENABLE SYS FAULT ALM B NO TOTALIZE OVERRUN ALM B NO CAL ABORTED ALM B NO
BACK NEXT BACK
Mode/Fault Alarm Setup MODE ACTIVE
X‐RAY COMMUNICATIONS
SYSTEMS SENSORS
SENSORS SENSOR OVER RANGE ALM B NO SENSOR Under Range ALM B NO
BACK NEXT BACK
Mode/Fault Alarm Setup
MODE/FAULT 1 MODE/FAULT 2
MODE/FAULT 2
AO #A AO #B AO #C
AO #A
@MIN/MAX ALM @LOW/HIGH FAULT ALM
AO #A AO #A @MIN ALM B NO AO # A @MAX ALM B NO
BACK NEXT BACK NEXT BACK NEXT BACK
AO #A
@MIN/MAX ALM @LOW/HIGH FAULT ALM
AO #A AO #A @FAULT LOW ALM B NO AO #A @FAULT HI ALM B NO
BACK NEXT BACK
Figure A-7. Mode/Fault Alarm Setup (Sheet 2)

Keypad Display Menu Tree of DensityPRO Gauges
A-8 DensityPRO User Manual Thermo Scientific
MAIN MENU COMMUNICATION SETUP
SYSTEM CONTROL SYSTEM STATUS
Mode/Fault Alarm Setup MORE…
MAIN MENU
COMMANDS PHYSICAL I/O DETECTOR PREV…
COMMON ACTION
COMMON & ALARM ACTION HOLD CURRENT OUTPUT
HOLD RELAY HOLD VALUE
COMMON & ALARM ACTION COMMON ACTION B Do Nothi ALARM ACTION B Do Nothi
BACK NEXT BACK NEXT BACK NEXT BACK EDIT
COMMON ACTION
COMMON & ALARM ACTION HOLD CURRENT OUTPUT
HOLD RELAY HOLD VALUE
COMMON & ALARM ACTION HOLD CURRENT OUTPUT A B Do Nothi HOLD CURRENT OUTPUT B B Do Nothi HOLD CURRENT OUTPUT C B Do Nothi
BACK NEXT BACK EDIT
COMMON ACTION
COMMON & ALARM ACTION HOLD CURRENT OUTPUT
HOLD RELAY HOLD VALUE
HOLD RELAY HOLD RELAY A B HOLD OFF HOLD RELAY B B HOLD OFF
BACK NEXT BACK EDIT
COMMON ACTION
COMMON & ALARM ACTION HOLD CURRENT OUTPUT
HOLD RELAY HOLD VALUE
HOLD VALUE Current Out A Hold Value B 0.000000 Current Out B Hold Value B 0.000000 Current Out C Hold Value B 0.000000
BACK NEXT BACK EDIT
Figure A-8. Commands

Keypad Display Menu Tree of DensityPRO Gauges
Thermo Scientific DensityPRO User Manual A-9
MAIN MENU COMMUNICATION SETUP
SYSTEM CONTROL SYSTEM STATUS
Mode/Fault Alarm Setup MORE…
MAIN MENU
COMMANDS PHYSICAL I/O DETECTOR PREV…
BACK EDIT NEXT BACK EDIT NEXT
PHYSICAL I/O
CURRENT/Vdc INPUT
DIGITAL INPUT CURRENT OUTPUT
MORE…
PHYSICAL I/O mA #1 mA #2 Vdc #1 Vdc #2 DET #1 RTD #1
mA #1 INPUT SOURCE MANUAL SETUP RANGE SETUP CALIBRATE
DIAGNOSTICS
INPUT SOURCE INPUT TYPE B Not Used ENGINEER UNIT B Not Used FLOW TIME UNIT B Not Used
BACK NEXT BACK NEXT BACK NEXT BACK EDIT
mA #1 INPUT SOURCE MANUAL SETUP RANGE SETUP CALIBRATE
DIAGNOSTICS
MANUAL SETUP MANUAL/LIVE B LIVE MANUAL (EU) VALUE B 12.00000
BACK NEXT BACK EDIT
mA #1 INPUT SOURCE MANUAL SETUP RANGE SETUP CALIBRATE
DIAGNOSTICS
RANGE SETUP MIN mA: 4.000000 MAX mA: 20.00000 Min Value @ Min mA B 4.000000 Max Value @ Max mA B 20.00000
BACK NEXT BACK EDIT
mA #1 INPUT SOURCE MANUAL SETUP RANGE SETUP CALIBRATE
DIAGNOSTICS
CALIBRATION MENUS
CALIBRATION POINTS mA CALIBRATION RAW CALIBRATION BEGIN CALIBRATION
CALIBRATION POINTS CALIBRATION POINTS B 3PointCa
BACK NEXT BACK NEXT BACK EDIT
CALIBRATION MENUS
CALIBRATION POINTS mA CALIBRATION RAW CALIBRATION BEGIN CALIBRATION
mA CALIBRATION #1 mA Min VALUE B 0.000000 #2 mA Mid VALUE B 2.00000 #3 mA Max VALUE B 0.00000
BACK NEXT BACK EDIT
CALIBRATION MENUS
CALIBRATION POINTS mA CALIBRATION RAW CALIBRATION BEGIN CALIBRATION
RAW CALIBRATION #1 RAW Min VALUE B ‐0.019 #2 RAW Mid VALUE B 1.991 #3 RAW Max VALUE B ‐0.018
BACK NEXT BACK EDIT
Figure A-9. Physical I/O, Current/Vdc Inputs (Sheet 1 of 5)
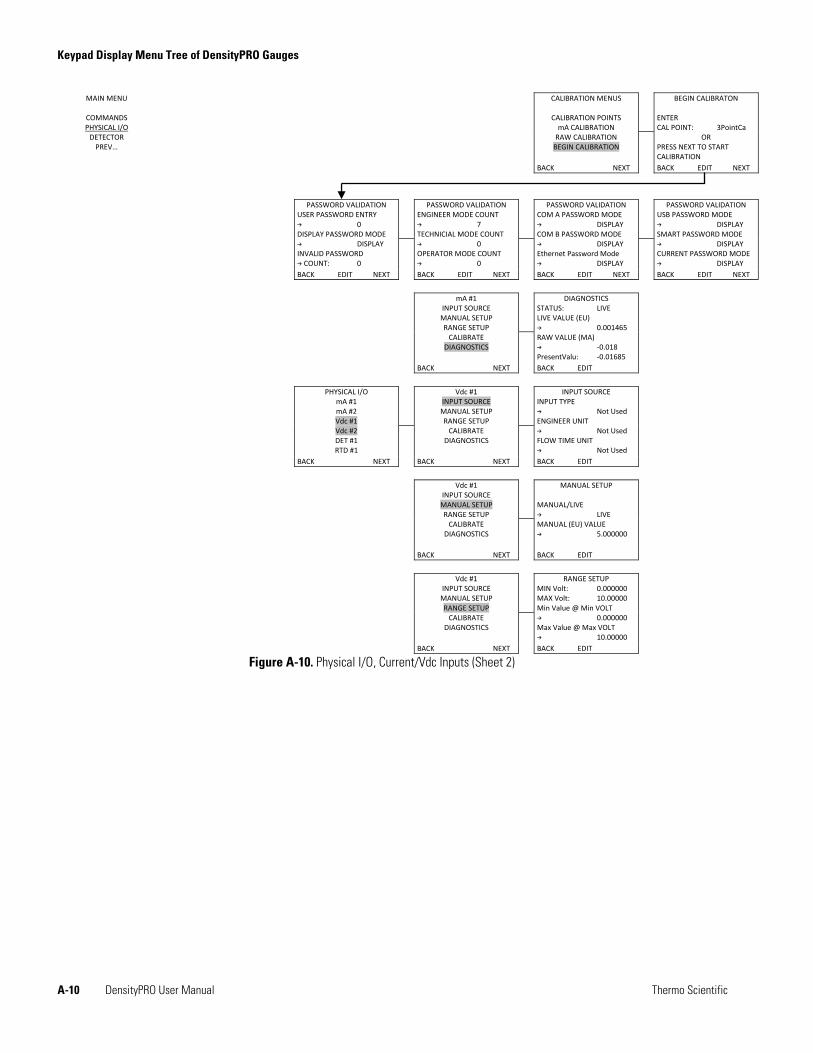
Keypad Display Menu Tree of DensityPRO Gauges
A-10 DensityPRO User Manual Thermo Scientific
MAIN MENU
COMMANDS PHYSICAL I/O DETECTOR PREV…
CALIBRATION MENUS
CALIBRATION POINTS mA CALIBRATION RAW CALIBRATION BEGIN CALIBRATION
BEGIN CALIBRATON ENTER CAL POINT: 3PointCa
OR PRESS NEXT TO START CALIBRATION
BACK NEXT BACK EDIT NEXT
PASSWORD VALIDATION
USER PASSWORD ENTRY B 0 DISPLAY PASSWORD MODE B DISPLAY INVALID PASSWORD B COUNT: 0
PASSWORD VALIDATION ENGINEER MODE COUNT B 7 TECHNICIAL MODE COUNT B 0 OPERATOR MODE COUNT B 0
PASSWORD VALIDATION COM A PASSWORD MODE B DISPLAY COM B PASSWORD MODE B DISPLAY Ethernet Password Mode B DISPLAY
PASSWORD VALIDATION USB PASSWORD MODE B DISPLAY SMART PASSWORD MODE B DISPLAY CURRENT PASSWORD MODE B DISPLAY
BACK EDIT NEXT BACK EDIT NEXT BACK EDIT NEXT BACK EDIT NEXT
mA #1 INPUT SOURCE MANUAL SETUP RANGE SETUP CALIBRATE
DIAGNOSTICS
DIAGNOSTICS STATUS: LIVE LIVE VALUE (EU) B 0.001465 RAW VALUE (MA) B ‐0.018 PresentValu: ‐0.01685
BACK NEXT BACK EDIT
PHYSICAL I/O mA #1 mA #2 Vdc #1 Vdc #2 DET #1 RTD #1
Vdc #1 INPUT SOURCE MANUAL SETUP RANGE SETUP CALIBRATE
DIAGNOSTICS
INPUT SOURCE INPUT TYPE B Not Used ENGINEER UNIT B Not Used FLOW TIME UNIT B Not Used
BACK NEXT BACK NEXT BACK EDIT
Vdc #1 INPUT SOURCE MANUAL SETUP RANGE SETUP CALIBRATE
DIAGNOSTICS
MANUAL SETUP MANUAL/LIVE B LIVE MANUAL (EU) VALUE B 5.000000
BACK NEXT BACK EDIT
Vdc #1 INPUT SOURCE MANUAL SETUP RANGE SETUP CALIBRATE
DIAGNOSTICS
RANGE SETUP MIN Volt: 0.000000 MAX Volt: 10.00000 Min Value @ Min VOLT B 0.000000 Max Value @ Max VOLT B 10.00000
BACK NEXT BACK EDIT
Figure A-10. Physical I/O, Current/Vdc Inputs (Sheet 2)

Keypad Display Menu Tree of DensityPRO Gauges
Thermo Scientific DensityPRO User Manual A-11
MAIN MENU
COMMANDS PHYSICAL I/O DETECTOR PREV…
Vdc #1 INPUT SOURCE MANUAL SETUP RANGE SETUP CALIBRATE
DIAGNOSTICS
CALIBRATION MENUS
CALIBRATION POINTS VOLT CALIBRATION RAW CALIBRATION BEGIN CALIBRATION
CALIBRATION POINTS CALIBRATION POINTS B 2PointCa
BACK NEXT BACK NEXT BACK EDIT
CALIBRATION MENUS
CALIBRATION POINTS VOLT CALIBRATION RAW CALIBRATION BEGIN CALIBRATION
VOLT CALIBRATION #1 VOLT Min VALUE B ‐0.01900 #2 VOLT Mid VALUE B ‐0.01700 #3 VOLT Max VALUE B ‐0.01500
BACK NEXT BACK EDIT
CALIBRATION MENUS
CALIBRATION POINTS VOLT CALIBRATION RAW CALIBRATION BEGIN CALIBRATION
RAW CALIBRATION #1 RAW Min VALUE B ‐0.019 #2 RAW Mid VALUE B ‐0.017 #3 RAW Max VALUE B ‐0.015
BACK NEXT BACK EDIT
CALIBRATION MENUS
CALIBRATION POINTS VOLT CALIBRATION RAW CALIBRATION BEGIN CALIBRATION
BEGIN CALIBRATON ENTER CAL POINT: 2PointCa
OR PRESS NEXT TO START CALIBRATION
BACK NEXT BACK EDIT NEXT
PASSWORD VALIDATION
USER PASSWORD ENTRY B 0 DISPLAY PASSWORD MODE B DISPLAY INVALID PASSWORD B COUNT: 0
PASSWORD VALIDATION ENGINEER MODE COUNT B 7 TECHNICIAL MODE COUNT B 0 OPERATOR MODE COUNT B 0
PASSWORD VALIDATION COM A PASSWORD MODE B DISPLAY COM B PASSWORD MODE B DISPLAY Ethernet Password Mode B DISPLAY
PASSWORD VALIDATION USB PASSWORD MODE B DISPLAY SMART PASSWORD MODE B DISPLAY CURRENT PASSWORD MODE B DISPLAY
BACK EDIT NEXT BACK EDIT NEXT BACK EDIT NEXT BACK EDIT NEXT
Vdc #1 INPUT SOURCE MANUAL SETUP RANGE SETUP CALIBRATE
DIAGNOSTICS
DIAGNOSTICS STATUS: LIVE LIVE VALUE (EU) B 0.001465 RAW VALUE (MA) B ‐0.018 PresentValu: ‐0.01685
BACK NEXT BACK EDIT
Figure A-11. Physical I/O, Current/Vdc Inputs (Sheet 3)

Keypad Display Menu Tree of DensityPRO Gauges
A-12 DensityPRO User Manual Thermo Scientific
MAIN MENU
COMMANDS PHYSICAL I/O DETECTOR PREV…
PHYSICAL I/O mA #1 mA #2 Vdc #1 Vdc #2 DET #1 RTD #1
DET #1 INPUT SOURCE MANUAL SETUP RANGE SETUP CALIBRATE
DIAGNOSTICS
INPUT SOURCE INPUT TYPE B Not Used ENGINEER UNIT B Not Used FLOW TIME UNIT B Not Used
BACK NEXT BACK NEXT BACK EDIT
DET #1 INPUT SOURCE MANUAL SETUP RANGE SETUP CALIBRATE
DIAGNOSTICS
MANUAL SETUP MANUAL/LIVE B LIVE MANUAL (EU) VALUE B 12.00000
BACK NEXT BACK EDIT
DET #1 INPUT SOURCE MANUAL SETUP RANGE SETUP CALIBRATE
DIAGNOSTICS
RANGE SETUP MIN mA: 4.000000 MAX mA: 20.00000 Min Value @ Min mA B 4.000000 Max Value @ Max mA B 20.00000
BACK NEXT BACK EDIT
DET #1 INPUT SOURCE MANUAL SETUP RANGE SETUP CALIBRATE
DIAGNOSTICS
CALIBRATION MENUS
CALIBRATION POINTS EU CALIBRATION RAW CALIBRATION BEGIN CALIBRATION
CALIBRATION POINTS CALIBRATION POINTS B 3PointCa
BACK NEXT BACK NEXT BACK EDIT
CALIBRATION MENUS
CALIBRATION POINTS mA CALIBRATION RAW CALIBRATION BEGIN CALIBRATION
mA CALIBRATION #1 mA Min VALUE B 4.000000 #2 mA Mid VALUE B 12.00000 #3 mA Max VALUE B 20.00000
BACK NEXT BACK EDIT
CALIBRATION MENUS
CALIBRATION POINTS EU CALIBRATION RAW CALIBRATION BEGIN CALIBRATION
RAW CALIBRATION #1 RAW Min VALUE B 4.000000 #2 RAW Mid VALUE B 12.00000 #3 RAW Max VALUE B 20.00000
BACK NEXT BACK EDIT
CALIBRATION MENUS
CALIBRATION POINTS EU CALIBRATION RAW CALIBRATION BEGIN CALIBRATION
BEGIN CALIBRATON ENTER CAL POINT: 3PointCa
OR PRESS NEXT TO START CALIBRATION
BACK NEXT BACK EDIT NEXT
PASSWORD VALIDATION USER PASSWORD ENTRY B 0 DISPLAY PASSWORD MODE B DISPLAY INVALID PASSWORD B COUNT: 0
PASSWORD VALIDATION ENGINEER MODE COUNT B 7 TECHNICIAL MODE COUNT B 0 OPERATOR MODE COUNT B 0
PASSWORD VALIDATION COM A PASSWORD MODE B DISPLAY COM B PASSWORD MODE B DISPLAY Ethernet Password Mode B DISPLAY
PASSWORD VALIDATION USB PASSWORD MODE B DISPLAY SMART PASSWORD MODE B DISPLAY CURRENT PASSWORD MODE B DISPLAY
BACK EDIT NEXT BACK EDIT NEXT BACK EDIT NEXT BACK EDIT NEXT
DET #1 INPUT SOURCE MANUAL SETUP RANGE SETUP CALIBRATE
DIAGNOSTICS
DIAGNOSTICS STATUS: LIVE LIVE VALUE (EU) B 0.001465 RAW VALUE (MA) B ‐0.018 PresentValu: ‐0.01685
BACK NEXT BACK EDIT
Figure A-12. Physical I/O, Current/Vdc Inputs (Sheet 4)

Keypad Display Menu Tree of DensityPRO Gauges
Thermo Scientific DensityPRO User Manual A-13
MAIN MENU
COMMANDS PHYSICAL I/O DETECTOR PREV…
PHYSICAL I/O mA #1 mA #2 Vdc #1 Vdc #2 DET #1 RTD #1
RTD #1
INPUT & WIRE TYPE MANUAL SETUP RANGE SETUP CALIBRATE
DIAGNOSTICS
INPUT SOURCE INPUT TYPE B Temperat ENGINEER UNIT B DegC FLOW TIME UNIT B 3 Wire R
BACK NEXT BACK NEXT BACK EDIT
RTD #1
INPUT & WIRE TYPE MANUAL SETUP RANGE SETUP CALIBRATE
DIAGNOSTICS
MANUAL SETUP MANUAL/LIVE B LIVE MANUAL (EU) VALUE B 20.00000
BACK NEXT BACK EDIT
RTD #1
INPUT & WIRE TYPE MANUAL SETUP RANGE SETUP CALIBRATE
DIAGNOSTICS
RANGE SETUP MIN (degC) B 0.000000 MAX (degC) B 100.0000
BACK NEXT BACK EDIT
RTD #1
INPUT & WIRE TYPE MANUAL SETUP RANGE SETUP CALIBRATE
DIAGNOSTICS
CALIBRATION MENUS
CALIBRATION POINTS EU CALIBRATION RAW CALIBRATION BEGIN CALIBRATION
CALIBRATION POINTS CALIBRATION POINTS B 3PointCa
BACK NEXT BACK NEXT BACK EDIT
CALIBRATION MENUS
CALIBRATION POINTS EU CALIBRATION RAW CALIBRATION BEGIN CALIBRATION
EU CALIBRATION #1 EU Min VALUE B 0.000000 #2 EU Mid VALUE B 50.00000 #3 EU Max VALUE B 100.0000
BACK NEXT BACK EDIT NEXT
CALIBRATION MENUS
CALIBRATION POINTS EU CALIBRATION RAW CALIBRATION BEGIN CALIBRATION
RAW CALIBRATION #1 RAW Min VALUE B 0.000000 #2 RAW Mid VALUE B 50.00000 #3 RAW Max VALUE B 100.0000
BACK NEXT BACK EDIT
CALIBRATION MENUS
CALIBRATION POINTS EU CALIBRATION RAW CALIBRATION BEGIN CALIBRATION
BEGIN CALIBRATON ENTER CAL POINT: 3PointCa
OR PRESS NEXT TO START CALIBRATION
BACK NEXT BACK EDIT NEXT
PASSWORD VALIDATION USER PASSWORD ENTRY B 0 DISPLAY PASSWORD MODE B DISPLAY INVALID PASSWORD B COUNT: 0
PASSWORD VALIDATION ENGINEER MODE COUNT B 7 TECHNICIAL MODE COUNT B 0 OPERATOR MODE COUNT B 0
PASSWORD VALIDATION COM A PASSWORD MODE B DISPLAY COM B PASSWORD MODE B DISPLAY Ethernet Password Mode B DISPLAY
PASSWORD VALIDATION COM A PASSWORD MODE B DISPLAY COM B PASSWORD MODE B DISPLAY Ethernet PASSWORD MODE B DISPLAY
BACK EDIT NEXT BACK EDIT NEXT BACK EDIT NEXT BACK EDIT NEXT
RTD #1
INPUT & WIRE TYPE MANUAL SETUP RANGE SETUP CALIBRATE
DIAGNOSTICS
DIAGNOSTICS STATUS: LIVE LIVE VALUE (EU) B 0.001465 RAW VALUE (MA) B ‐0.018 PresentValu: ‐0.01685
BACK NEXT BACK EDIT
Figure A-13. Physical I/O, Current/Vdc Inputs (Sheet 5)

Keypad Display Menu Tree of DensityPRO Gauges
A-14 DensityPRO User Manual Thermo Scientific
MAIN MENU
COMMANDS PHYSICAL I/O DETECTOR PREV…
PHYSICAL I/O
CURRENT/Vdc INPUT DIGITAL INPUT
CURRENT OUTPUT MORE…
DIGITAL INPUT
DIGITAL INPUT #1 DIGITAL INPUT #2
DIGITAL INPUT #1
INPUT MANUAL SETUP CONTACT ACTION DIAGNOSTICS
INPUT INVERT INPUT B Disabled
BACK NEXT BACK NEXT BACK NEXT BACK EDIT
DIGITAL INPUT #1
INPUT MANUAL SETUP CONTACT ACTION DIAGNOSTICS
MANUAL SETUP MANUAL VALUE B OPEN MANUAL/LIVE B LIVE
BACK NEXT BACK EDIT
DIGITAL INPUT #1
INPUT MANUAL SETUP CONTACT ACTION DIAGNOSTICS
CONTACT ACTION OPEN CONTACT ACTION B Do Nothi CLOSE CONTACT ACTION B Do Nothi ACTION DESTINATION B NONE
BACK NEXT BACK EDIT
DIGITAL INPUT #1
INPUT MANUAL SETUP CONTACT ACTION DIAGNOSTICS
DIAGNOSTICS STATUS B LIVE PRESENT VALUE B OPEN
BACK NEXT BACK EDIT
Figure A-14. Physical I/O, Digital Input

Keypad Display Menu Tree of DensityPRO Gauges
Thermo Scientific DensityPRO User Manual A-15
MAIN MENU
COMMANDS PHYSICAL I/O DETECTOR PREV…
PHYSICAL I/O
CURRENT/Vdc INPUT DIGITAL INPUT
CURRENT OUTPUT MORE…
CURRENT OUTPUT
CURRENT OUTPUT #A CURRENT OUTPUT #B CURRENT OUTPUT #C
CURRENT OUTPUT #A MEASUREMENT SOURCE
MODE AND HOLD RANGE SETTINGS ALARM ACTION CALIBRATE
DIAGNOSTICS
MEASUREMENT SOURCE INPUT ID B NONE MEASUREMENT ID B NONE
MEASUREMENT SOURCE OUTPUT TYPE B NONE SOURCE UNIT (EU) B NONE
BACK EDIT NEXT BACK NEXT BACK NEXT BACK EDIT NEXT BACK EDIT NEXT
CURRENT OUTPUT #A MEASUREMENT SOURCE
MODE AND HOLD RANGE SETTINGS ALARM ACTION CALIBRATE
DIAGNOSTICS
MODE AND HOLD MODE B NORMAL HOLD/LIVE B LIVE HOLD VALUE (EU) B 0.000000
BACK NEXT BACK EDIT
CURRENT OUTPUT #A MEASUREMENT SOURCE
MODE AND HOLD RANGE SETTINGS ALARM ACTION CALIBRATE
DIAGNOSTICS
RANGE SETTINGS MIN mA: 4.000000 MAX mA: 20.00000 Min Value@Min mA B 0.000000 Max Value@Max mA B 100.0000
BACK NEXT BACK EDIT
CURRENT OUTPUT #A MEASUREMENT SOURCE
MODE AND HOLD RANGE SETTINGS ALARM ACTION CALIBRATE
DIAGNOSTICS
ALARM ACTION ALARM ACTION B NONE
BACK NEXT BACK EDIT
CURRENT OUTPUT #A MEASUREMENT SOURCE
MODE AND HOLD RANGE SETTINGS ALARM ACTION CALIBRATE
DIAGNOSTICS
CALIBRATION MENUS
mA CALIBRATION RAW CALIBRATION BEGIN CALIBRATION
mA CALIBRATION #1 mA Min VALUE B 4.000000 #2 mA Mid VALUE B 12.00000 #3 mA Max VALUE B 20.00000
BACK NEXT BACK NEXT BACK EDIT
CALIBRATION MENUS
mA CALIBRATION RAW CALIBRATION BEGIN CALIBRATION
RAW CALIBRATION #1 RAW Min VALUE B 4.000000 #2 RAW Mid VALUE B 12.00000 #3 RAW Max VALUE B 20.00000
BACK NEXT BACK EDIT
CALIBRATION MENUS
mA CALIBRATION RAW CALIBRATION BEGIN CALIBRATION
BEGIN CALIBRATON ENTER CAL POINT: 3PointCa
OR PRESS NEXT TO START CALIBRATION
BACK NEXT BACK EDIT NEXT
PASSWORD VALIDATION USER PASSWORD ENTRY B 0 DISPLAY PASSWORD MODE B DISPLAY INVALID PASSWORD B COUNT: 0
PASSWORD VALIDATION ENGINEER MODE COUNT B 7 TECHNICIAL MODE COUNT B 0 OPERATOR MODE COUNT B 0
PASSWORD VALIDATION COM A PASSWORD MODE B DISPLAY COM B PASSWORD MODE B DISPLAY Ethernet Password Mode B DISPLAY
PASSWORD VALIDATION USB PASSWORD MODE B DISPLAY SMART PASSWORD MODE B DISPLAY CURRENT PASSWORD MODE B DISPLAY
BACK EDIT NEXT BACK EDIT NEXT BACK EDIT NEXT BACK EDIT NEXT
CURRENT OUTPUT #A MEASUREMENT SOURCE
MODE AND HOLD RANGE SETTINGS ALARM ACTION CALIBRATE
DIAGNOSTICS
DIAGNOSTICS STATUS: B LIVE LIVE VALUE (EU) B 0.000000 PRESENT VALUE B 4.0000
BACK NEXT BACK EDIT
Figure A-15. Physical I/O, Current Output

Keypad Display Menu Tree of DensityPRO Gauges
A-16 DensityPRO User Manual Thermo Scientific
MAIN MENU
COMMANDS PHYSICAL I/O DETECTOR PREV…
PHYSICAL I/O
CURRENT/Vdc INPUT DIGITAL INPUT
CURRENT OUTPUT MORE…
PHYSICAL I/O
RELAY OUTPUT PREV…
RELAY OUTPUT
CONFIG SETUP HOLD SETUP DIAGNOSTICS
ALARM & PROCESS DETECTORS & TOTALS
CONFIG SETUP INVERT OUTPUT B NO PULSE WIDTH (30‐200 mS) B 30
BACK NEXT BACK NEXT BACK NEXT BACK EDIT
RELAY OUTPUT
CONFIG SETUP HOLD SETUP DIAGNOSTICS
ALARM & PROCESS DETECTORS & TOTALS
HOLD SETUP HOLD/LIVE B LIVE HOLD VALUE B NONE
BACK NEXT BACK EDIT
RELAY OUTPUT
CONFIG SETUP HOLD SETUP DIAGNOSTICS
ALARM & PROCESS DETECTORS & TOTALS
DIAGNOSTICS STATUS: LIVE PRESENT VALUE B OFF
BACK NEXT BACK EDIT
RELAY OUTPUT
CONFIG SETUP HOLD SETUP DIAGNOSTICS
ALARM & PROCESS DETECTORS & TOTALS
ALARM & PROCESS ALARM ACTION B DO NOTHI PROCESS FUNCTION B PROCESS
BACK NEXT BACK EDIT
RELAY OUTPUT
CONFIG SETUP HOLD SETUP DIAGNOSTICS
ALARM & PROCESS DETECTORS & TOTALS
DETECTORS & TOTALS DETECTOR ID B DET 1 TOTAL SELECTION B NONE
BACK NEXT BACK EDIT
Figure A-16. Physical I/O, Relay Output

Keypad Display Menu Tree of DensityPRO Gauges
Thermo Scientific DensityPRO User Manual A-17
MAIN MENU COMMUNICATION SETUP
SYSTEM CONTROL SYSTEM STATUS
Mode/Fault Alarm Setup MORE…
MAIN MENU
COMMANDS PHYSICAL I/O DETECTOR PREV…
SELECT DETECTOR
DET1
BACK NEXT BACK NEXT BACK NEXT
DETECTOR CONFIG
SETTING MEASURMNT & APPLICATION
DETECTOR SETTING
SETUP
DETECTOR SETUP
DYNAMIC TRACKING X‐RAY TIME
DYNAMIC TRACKING DYNAMIC TRACKING B ENABLE: Enabled TIME (SEC): 16 DYNAMIC TRACKING THRESHOLD% B 5.300000
BACK NEXT BACK NEXT BACK NEXT BACK EDIT NEXT
DETECTOR SETUP
DYNAMIC TRACKING X‐RAY TIME
X‐RAY X‐RAY THRESHOLD ENABLE B Disabled X‐RAY SAFEGUARD THRESHOLD B 0.200000
X‐RAY X‐RAY THRESHOLD MIN HOLD TIME B 20 X‐RAY THRESHOLD MAX HOLD TIME B 300
BACK NEXT BACK EDIT NEXT BACK EDIT NEXT
DETECTOR SETUP
DYNAMIC TRACKING X‐RAY TIME
TIME DENSITY TIME CONSTANT B (SEC): 128 FLOW TIME CONSTANT B (SEC): 1
BACK NEXT BACK EDIT NEXT
DETECTOR CONFIG
SETTING MEASURMNT & APPLICATION
APPLICATION SELECT SELECT APPLICATION NUMBER B 1
APPLICATION SELECT SELECT TYPE OF APP#X B DENSITY
DENSITY APP SUBTYPE SELECT DENISTY APP SUBTYPE B GENERAL
BACK NEXT BACK EDIT NEXT BACK EDIT NEXT BACK EDIT NEXT
DENS MEASURE SETUP
SETUP STANDARDIZATION GAUGE CALIBRATION MEASUREMENT DATA
TOTALS MORE…
SETUP
DENSITY SETUP INPUT CONFIGURATION TEMP COMPENSATION Additional Measurement
SOURCE SETTING SOURCE HEAD B 5201 sou ISOTOPE B Cs137 MATERIAL TYPE B Slurry
GRAVITY/ATTENUATION DENSITY (g/cc) B CARRIER: 1.000000 B SOLID: 2.650000 ATTENUATION (cm2/g) B CARRIER: 0.086000 B SOLID: 0.077000
MEASUREMENT/UNITS PRIMARY MEASUREMENT B Density DENSITY UNIT (PRIMARY) B g/cc # DECIMAL PLACE MEA #1 B 2
BACK NEXT BACK NEXT BACK EDIT NEXT BACK EDIT NEXT BACK EDIT NEXT
MEASUREMENT/UNITS
SOLUTION TYPE B Suc 0 – 10 PIPE UNIT: in PIPE INSIDE DIAMETER B 10.00000
POLY COEFS SOLUTION POLY A COEFF B 1.000000 SOLUTION POLY B COEFF B 1.000000
POLY COEFS SOLUTION POLY C COEFF B 1.000000 SOLUTION POLY D COEFF B 1.000000
BACK EDIT NEXT BACK EDIT NEXT BACK EDIT NEXT
SETUP
DENSITY SETUP INPUT CONFIGURATION TEMP COMPENSATION Additional Measurement
INPUT CONFIGURATION
INPUT UNIT
INPUT CONFIGURATION DENISTY INPUT B Not Used TEMPERATURE INPUT B Not Used
INPUT CONFIGURATION PRESSURE INPUT B Not Used FLOW INPUT B Not Used
BACK NEXT BACK NEXT BACK EDIT NEXT BACK EDIT NEXT
Figure A-17. Detector (Sheet 1 of 4)

Keypad Display Menu Tree of DensityPRO Gauges
A-18 DensityPRO User Manual Thermo Scientific
MAIN MENU
COMMANDS PHYSICAL I/O DETECTOR PREV…
INPUT CONFIGURATION
INPUT UNIT
UNIT FLOW VOLUME UNIT B US GALLO FLOW TIME UNIT B Seconds
UNIT MASS FLOW UNITS (MASS) B Pounds MASS FLOW UNITS (TIME) B Seconds
BACK NEXT BACK EDIT NEXT BACK EDIT NEXT
UNIT
DENSITY UNIT B g/cc TEMPERATURE UNIT B DegF PRESSURE UNIT B BAR_G
UNIT VELOCITY UNIT B ft/s BULK SOLIDS FLOW UNIT B lb/cu ft BLUK DENSITY VALUE B 125.0000
BACK EDIT NEXT BACK EDIT NEXT
SETUP
DENSITY SETUP INPUT CONFIGURATION TEMP COMPENSATION Additional Measurement
TEMP COMP SETTING TEMP INPUT SOURCE B Not Used TEMPERATURE UNIT B None TEMP HOLD CONSTANT B (degC) 32.00000
TEMP COMP SETTING TEMPERATURE at 4mA B (degC): 4.000000 TEMPERATURE at 20mA B (degC): 20.00000
TEMP COMP SETTING Temp Comp Poly (eq1) B User Def Temp Comp Poly (eq2) B User Def
BACK NEXT BACK EDIT NEXT BACK EDIT NEXT BACK EDIT NEXT
TEMP COMP SETTING
Reference Temperature B (degC): 20.00000 Temp Offset Correction B 1.000000 USE TEMP COMP DURING B STD: NO
TEMP COMP SETTING Temp Comp Coeff B A (eq1): 0.000000 B B (eq1): 0.000000 B C (eq1): 0.000000 B D (eq1): 0.000000
TEMP COMP SETTING Temp Comp Coeff B A (eq2): 0.000000 B B (eq2): 0.000000 B C (eq2): 0.000000
BACK EDIT NEXT BACK EDIT NEXT BACK EDIT NEXT
SETUP
DENSITY SETUP INPUT CONFIGURATION TEMP COMPENSATION Additional Measurement
Additional Measurement
MEASUREMENT TYPE/UNIT DECIMAL PLACES
Additional Measurement MATERIAL TYPE B Slurry MEASUREMENT TYPE/UNIT #2: Proppant g/cc #3: Proppant g/cc #4: Proppant g/cc
BACK NEXT BACK NEXT BACK EDIT NEXT
Additional Measurement MEASUREMENT TYPE/UNIT DECIMAL PLACES
Additional Measurement # DECIMAL PLACES MEA #2 B 2 # DECIMAL PLACES MEA #3 B 2 # DECIMAL PLACES MEA #4 B 2
BACK NEXT BACK NEXT
DENS MEASURE SETUP SETUP
STANDARDIZATION GAUGE CALIBRATION MEASUREMENT DATA
TOTALS MORE…
STANDARDIZATION
ENTER STD LAST STANDARDIZATION
STANDARDIZATION Standardization On B Pipe Emp STD Sample Time (Sec) B 120 STD DENSITY VALUE B 0.000000
STANDARDIZATION
BACK NEXT BACK NEXT BACK EDIT NEXT BACK START STD
STANDARDIZATION
ENTER STD LAST STANDARDIZATION
CAL DENS POINT DATA COUNT RATE POINT #1 B 1138.000 LAST STD COUNT B 1134.000 LAST STD DATE/TIME B 10/28/13 12:07:41
CAL DENS POINT DATA CAL DENS POINT #1 B 3.000000 CAL/REF POINT #1 B 1.003527 COUNT RATE POINT #1 B 1138.000
BACK NEXT BACK NEXT BACK EDIT NEXT
Figure A-18. Detector (Sheet 2)
1) A-

Keypad Display Menu Tree of DensityPRO Gauges
Thermo Scientific DensityPRO User Manual A-19
MAIN MENU
COMMANDS PHYSICAL I/O DETECTOR PREV…
DENS MEASURE SETUP SETUP
STANDARDIZATION GAUGE CALIBRATION MEASUREMENT DATA
TOTALS MORE…
GAUGE CALIBRATION
CAL DATA POINT DATA
GAUGE CALIBRATION DENSITY CAL METHOD B Polynomi CAL SAMPLE TIME (SEC) B 120
GAUGE CALIBRATION
CAL DENSITY B 0.000000 CAL POINT B 1
GAUGE CALIBRATION
BACK NEXT BACK NEXT BACK EDIT NEXT BACK EDIT NEXT BACK START CAL
GAUGE CALIBRATION
CAL DATA POINT DATA
POINT DATA
POLYNOMIAL BREAKPOINT TABLE
LAST STANDARDIZATION
CAL DENS POINT DATA CAL DENS POINT #1 B 0.000000 CAL/REF POINT #1 B 0.000000 COUNT RATE POINT #1 B 0.000000
CAL DENS POINT DATA COUNT RATE POINT #1 B 0.000000 LAST STD COUNT B 0.000000 LAST STD DATE/TIME B 00/00/00 00:00:00
BACK NEXT BACK NEXT BACK EDIT NEXT BACK
CAL DENS POINT DATA
LAST STD COUNT B 0.000000
CAL DENS POINT DATA Slope Correction Factor B 1.000000 Calculate Slope Corre ction Factor B NO
BACK EDIT NEXT BACK EDIT NEXT
POINT DATA
POLYNOMIAL BREAKPOINT TABLE
LAST STANDARDIZATION
CAL DENS POINT DATA DENS @ BREAKPOINT B 1: 0.000000 B 2: 0.000000 B 3: 0.000000 B 4: 0.000000 B 5: 0.000000
CAL DENS POINT DATA COUNT RATE POINT #1 B 0.000000 LAST STD COUNT B 0.000000 LAST STD DATE/TIME B 00/00/00 00:00:00
BACK NEXT BACK EDIT NEXT BACK NEXT
CAL DENS POINT DATA
LAST STD COUNT B 0.000000
BACK EDIT NEXT
POINT DATA
POLYNOMIAL BREAKPOINT TABLE
LAST STANDARDIZATION
CAL DENS POINT DATA LAST STD COUNT B 0.000000
BACK NEXT BACK EDIT NEXT
DENS MEASURE SETUP SETUP
STANDARDIZATION GAUGE CALIBRATION MEASUREMENT DATA
TOTALS MORE…
MEASUREMENT DATA MEASUREMENT VALUE #1: 0.00 g/cc #2: 0.00 g/cc #3: 0.00 g/cc #4: 0.00 g/cc
BACK NEXT BACK EDIT NEXT
DENS MEASURE SETUP SETUP
STANDARDIZATION GAUGE CALIBRATION MEASUREMENT DATA
TOTALS MORE…
TOTALS
TOTALIZER #1 TOTALIZER #2 TOTALIZER #3 TOTALIZER #4
TOTALIZER #1 SELECTION: DISABLE INPUT: MEASR1 THRESHOLD UNIT B g/cc THRESHOLD LIMIT B 0.000000
TOTALIZER #1
TOTALIZER UNITS/PULSE B 1.000000 TOTALIZER VALUE B 0.000000 Cubic me
BACK NEXT BACK NEXT BACK EDIT NEXT BACK EDIT NEXT
Figure A-19. Detector (Sheet 3)
2) A

Keypad Display Menu Tree of DensityPRO Gauges
A-20 DensityPRO User Manual Thermo Scientific
MAIN MENU
COMMANDS PHYSICAL I/O DETECTOR PREV…
DENS MEASURE SETUP SETUP
STANDARDIZATION GAUGE CALIBRATION MEASUREMENT DATA
TOTALS MORE…
DENS MEASURE SETUP
ACTION PROCESS ALARMS
ACTION
MEASUREMENT #1 ACTION MEASUREMENT #2 ACTION MEASUREMENT #3 ACTION MEASUREMENT #4 ACTION
MEASUREMENT #1 ACTION ALLOCATION: Density HOLD/LIVE: LIVE HOLD VALUE: 0.000000 CURRENT VALUE B 0.00 UNIT: g/cc
BACK NEXT BACK NEXT BACK NEXT BACK EDIT NEXT
DENS MEASURE SETUP SETUP
STANDARDIZATION GAUGE CALIBRATION MEASUREMENT DATA
TOTALS MORE…
DENS MEASURE SETUP
ACTION PROCESS ALARMS
ALARM SETUP
ALARM #1 ALARM #2 ALARM #3 ALARM #4
ALARM #1 SETUP SETUP: Disabled ACTION B Do Nothi B DLAY (SEC): 0 SET POINT: 0.000000 CLEAR POINT: 0.000000
ALARM #1 SETUP MEASUREMENT ID B NONE UNITS B NONE ALARM STATUS B CLEAR
BACK NEXT BACK NEXT BACK NEXT BACK EDIT NEXT BACK EDIT NEXT
Figure A-20. Detector (Sheet 4)

Thermo Scientific DensityPRO User Manual B-1
Appendix B
Flashing the Application Firmware
Flash Application
Firmware
The first time you apply power to the gauge, the screen shown in Figure B-1 should display. If this screen does not appear, the gauge has been at least partially set up. If you are unsure about what settings have been entered, or if the gauge has been moved to a new location, it is recommended that the gauge be reset to the factory defaults and set up again. To reset all entries in EZ Cal II, including the communication settings, to the factory defaults, go to Commands Common Action Erase all Ram and set defaults (Cold Start).
If access to this screen is desired at a later time, it may be accessed by selecting PC Comm Setup from the Functions dropdown menu at the top of the screen, or by clicking the first icon button, which is circled in Figure B-1.
Figure B-1. Local PC Communication Setup Screen

Flashing the Application Firmware
Flash Application Firmware
B-2 DensityPRO User Manual Thermo Scientific
Programming the Main CPU
1. Use a three-wire cable to connect PC-to- J2A of the Main CPU PCA. The cable connections are shown in the table below.
Table B-1. RS232 Local Port Connection
PC (DB9) Main CPU – J2A (COMM A)
Pin 3 - TX RX
Pin 2 - RX TX
Pin 5 - GND GND
2. Open EZ Cal II and set the communications parameters as shown below. Unit ID: 1
Port: Select the associated Com port
Baud rate: 9600
Parity: None
Data Bits: 8
Stop Bits: 1
Time Out (sec): 8
3. Click the green Connect button. 4. A Communication Fail pop-up window will be displayed. Click the OK button.
Figure B-2. Communication Fail Window
5. From the Functions dropdown on the menu bar, select Flash Application Firmware to bring up the following screen. This screen can also be accessed by clicking the second icon button, circled in the figure below.

Flashing the Application Firmware
Flash Application Firmware
Thermo Scientific DensityPRO User Manual B-3
Figure B-3. Flash Application Screen
6. Select the firmware to flash and navigate to the correct file. 7. Choose the correct S19 file and click the Open button.
Figure B-4. Open S19 File
8. Cycle the system power. 9. From the Flash Application Screen, click the Start Flash button to start
programming the Main CPU. 10. Once the application has flashed successfully, close EZ Cal II. 11. Cycle the system power. The system is now ready for programming.


Thermo Scientific DensityPRO User Manual C-1
Appendix C
Density Calculation
Basic Density Calculation
The basic density calculation converts the measured intensity of the radiation to a density value. This calculation is the basis for all of the various density calculations used in the gauge. The terms used to calculate density consist of constants, user entered values, measured values, and calculated values.
– Constants – These terms are fixed values that the user may be able to read.
G: Geometry factor (0.85) – The geometry factor does not have any units. It is used to correct for the location of the source relative to the detector with different source heads and mounting configurations. History has determined that this value can be a constant.
– User Inputs – These are values entered by the user. The user shall be able to read and write the value for the items in this section.
L: Pipe ID – The inside diameter of pipe in centimeters (cm). The default value is 0 cm.
Dc: Density of the carrier – The density of the carrier fluid in grams per cubic centimeter (g/cm3). The default value is 1 g/cm3.
µc: Attenuation Coefficient of the carrier – The attenuation coefficient of the carrier fluid in square centimeters per gram (cm2/g). The default value is 0.086 cm2/g.
Ds: Density of the solid – The density of the solid material in grams per cubic centimeter (g/cm3). The default value is 2.65 g/cm3.
µs: Attenuation Coefficient of the solid – The attenuation coefficient of the solid material in square centimeters per gram (cm2/g). The default value is 0.077 cm2/g.
Ibkg: Background radiation – The radiation measured at the detector with the shutter on the source closed in counts per second (cps). The default value is 3 cps.
The background radiation is determined by measuring the radiation intensity at the detector with the shutter closed and using the following equation.
Ibkg (cps) = Measured Radiation Intensity (mr/hr) x 300 (cps/(mr/hr))
Dcal1: Density for calibration point 1 – The density of the process material in grams per cubic centimeters (g/cm3) during calibration. The default value is 0 g/cm3.

Density Calculation
Basic Density Calculation
C-2 DensityPRO User Manual Thermo Scientific
Dcal2: Density for calibration point 2 – The density of the process material in grams per cubic centimeters (g/cm3) during calibration. The default value is 0 g/cm3. Refer to Slope Correction Factor for the use of this value.
– Measured Values – These are the process values read by the gauge.
I: Radiation Intensity – The intensity of the radiation from the detector in counts per second (cps).
Ical1: Radiation Intensity for calibration point 1 – The intensity of the radiation from the detector in counts per second (cps) when measuring the density of calibration point 1 (Dcal1).
Ical2: Radiation Intensity for calibration point 2 – The intensity of the radiation from the detector in counts per second (cps) when measuring the density of calibration point 2 (Dcal1). Refer to Slope Correction Factor for the use of this value.
Istd: Radiation Intensity during standardization – The intensity of the radiation from the detector in counts per second (cps) during the standardization. Refer to Standardization Term for additional information.
– Calculated Values – These are values the gauge calculates using the constants, user inputs and measured values.
D: Density – The bulk density of the process material.
S: Slope Correction Factor – A unit less correction used to improve the accuracy of the density calculation after a second calibration point is entered. The user shall also be able to read and write this value.
To calculate the basic density, follow Equation 1.
In1
1
Equation 1

Density Calculation
Basic Density Calculation
Thermo Scientific DensityPRO User Manual C-3
Standardization Term
The standardization term is the average radiation intensity in counts per second over a period of time. This value should be measured with a repeatable point in the process. An example of a repeatable point in the process is an empty pipe or a pipe full of a material with a known density. The standardization term can be used to correct for buildup in the pipe or pipe wear.
To include the standardization term in the basic density calculation, the radiation intensity (I), background intensity (Ibkg), and calibration intensity (Ical) are divided by the standardization intensity (Istd).
This results in the following equation.
In 1
1
Equation 2
Slope Correction Factor
To improve the accuracy of the density calculation, the slope correction factor (S) is included in the density calculation. The slope correction factor is calculated when the second calibration point is complete. To obtain the information for the second calibration point, the user must enter the second calibration density and the gauge must measure the radiation intensity for the second calibration density.
The user has the option to edit the slope correction factor. Additionally, if any of the terms used to calculate the slope correction factor are modified after calibrating the second calibration point, the slop correction factor can be recalculated.
The following equation is used to calculate the slope correction.
In21
∗ 1 2
Equation 3
General Density Calculation
The following is the equation to calculate density including slope correction factor.
Equation 4

Density Calculation
Single-Phase Material
C-4 DensityPRO User Manual Thermo Scientific
Single-Phase Material
This section describes measuring the density of a single-phase material. Equation 4 is used to measure density of a single-phase material.
The following definitions are used for density and bulk density.
– Density – Density is defined for substances such as liquids, gases, and solids.
– Bulk Density – Bulk density is a characteristic of substances such as powders,granules, and other particles like solid substances.
Single-Phase Density
Calculation
The density for a single-phase material should be calculated using Equation 4. Initially the slope correction factor will be 1. When a second calibration point is used, the slope correction factor should be calculated using Equation 3. The user shall have the option to modify and/or recalculate the slope correction factor at any time.
The parameters below are used to calculate the density of a single-phase material.
– Constants
G: Geometry factor (Default = 0.85) – The geometry factor does not have anyunits. It is used to correct for the location of the source relative to the detectorwith different source heads and mounting configurations. History hasdetermined that this value can be a constant.
– User Inputs
Material Type – The user shall be able to select one of the following material types. The section on Single-Phase Material only applies to the selection of “Single Phase” for the material type.
Single Phase
Slurry
Emulsion
Solution
Primary Measurement – When the user selects a material type of single phase,the primary measurement will be density.
Unit for Measurement #1 – The user has the ability to select the units forMeasurement #1. The following unit selections are available.
Grams per cubic centimeter (g/cm3 or g/cm3)
Pounds per US gallon (lb/gal)
Pounds per UK gallon (lb/ImpGal)
Pounds per cubic foot (lb/ft3 or lb/ft3)
Short tons per cubic yard (STon/yd3 or STon/yd3)
Long tons per cubic yard (LTon/yd3 or LTon/yd3)

Density Calculation
Single-Phase Material
Thermo Scientific DensityPRO User Manual C-5
Grams per liter (g/L)
Ounces per cubic inch (oz/in3 or oz/in3)
Pounds per cubic inch (lb/in3 or lb/in3)
Grams per cubic inch (g/in3 or g/in3)
Pounds per cubic yard (lb/yd3 or lb/yd3)
Kilogram per cubic meter (kg/m3 or kg/m3)
Degree API (degAPI) (Available after implementation of the 3680 CutPRO application)
% Consistency (Available after implementation of the 3680 CutPRO application)
API (Available after implementation of the 3680 CutPRO application)
SGU 15 / SGU 60 (Available after implementation of the 3680 CutPRO application)
ID: Pipe ID – Inside diameter of pipe in units selected by the user.
Pipe ID Units – Units of measure for the inside diameter of the pipe.
Centimeters (cm)
Millimeters (mm)
Inches (in)
Feet (ft)
Yards (yd)
Meters (m)
(µs) – Attenuation coefficient of the solids – The attenuation coefficient for a single-phase material is entered as the attenuation coefficient of the solid, µs in the general density equation. The value of the attenuation coefficient depends on the composition of the process material and the type of source used, cesium-137 (Cs-137) or cobalt-60 (Co-60).
(Ibkg): Background radiation – Background radiation at the detector.
Calibration density units – The user may select the density units used for calibration from the options below.
Grams per cubic centimeter (g/cm3 or g/cm3)
Pounds per US gallon (lb/gal)
Pounds per Imperial gallon (lb/ImpGal)
Pounds per cubic foot (lb/ft3)

Density Calculation
Single-Phase Material
C-6 DensityPRO User Manual Thermo Scientific
Short tons per cubic yard (STon/yd3 or STon/yd3)
Long tons per cubic yard (LTon/yd3 of LTon/yd3)
Grams per liter (g/L)
Ounces per cubic inch (oz/in3 or oz/in3)
Pounds per cubic inch (lb/in3 or lb/in3)
Grams per cubic inch (g/in3 or g/lb3)
Pounds per cubic yard (lb/yd3 or lb/yd3)
Kilogram per cubic meter (kg/m3 or kg/m3)
Degree API (deg API) (Available after implementation of the 3680 CutPRO application)
(Dc1u): Density for calibration point 1 – The user enters the density for the first calibration point in the selected units. This shall be entered when standardizing on a full pipe or when the first point of the calibration is performed.
(Dc2u): Density for calibration point 2 – Calibration point 2 shall be an optional calibration point. The user enters the density for the second calibration point in the same units as selected for the first calibration point. This shall be entered when the second point of the calibration is performed.
– Measured Inputs
(I): Radiation Intensity – Counts per second from the detector. The radiation intensity shall be the filtered counts.
(Istd): Standardization Counts – The average count rate per second from the detector during standardization. The detector will calculate the average count rate during the standardization cycle.
(Ical1): Calibration point 1 counts – The average count rate per second from the detector during calibration of the first point. The detector will calculate the average count rate during the calibration cycle or during the standardization cycle when standardized on a full pipe.
(Ical2): Calibration point 2 counts – The average count rate per second from the detector during calibration of the second point. The detector will calculate the average count rate during the calibration cycle.

Density Calculation
Single-Phase Material
Thermo Scientific DensityPRO User Manual C-7
– Calculated Values
L: Pipe ID (cm) – Inside diameter of the pipe converted from user selected units to centimeters.
(Dc): Density of the carrier material – For a single-phase material Dc = 0 (g/cm3).
(µc): Attenuation of carrier material – For a single-phase material µc = 0 (cm2/g).
(Ds): Density of the solid material – For a single-phase material Ds = 1 (g/cm3).
(Dcal1): Calibration point 1 Density – Density for calibration point 1 (Dc1u) converted to grams per cubic centimeter (g/cm3).
(Dcal2): Calibration point 2 Density – Density for calibration point 2 (Dc2u) converted to grams per cubic centimeter (g/cm3).
D: Density of process material – The density of the process material in g/cm3 calculated using Equation 4.
Additional Measurements
In addition to Measurement #1, three additional measurements, Measurements #2 – #4 are available to display additional parameters measured or calculated by the gauge. These additional measurements are also capable of displaying the values from the analog inputs.
– Density – Displays the density in units from the list in Units for Measurement #1.
– Bulk Density – Bulk density is the same as density for a single-phase material type.
– Temperature – Displays the value of an analog input or the RTD input in the user selected units.
Degree C (Deg C)
Degree F (Deg F)
– Flow Velocity – Displays the velocity of the input configured as a flow type in the user-selected units.
Feet per second (ft/sec)
Meters per second (m/sec)

Density Calculation
Slurry Material
C-8 DensityPRO User Manual Thermo Scientific
Slurry Material
Slurry Density Calculation
When the process material is slurry, the gauge will be able to calculate the density of the material, and will also be able to provide information on the carrier and solids.
The density for a slurry material shall be calculated using Equation 4. Initially the slope correction factor will be 1. If a second calibration point is used, calculate the slope correction factor using Equation 3. The user has the option to modify and/or recalculate the slope correction factor at any time.
The parameters below are used to calculate the density of a slurry material.
– Constants
G: Geometry factor (Default = 0.85) – The geometry factor does not have any units. It is used to correct for the location of the source relative to the detector with different source heads and mounting configurations. History has determined that this value can be a constant.
– User Inputs
Material Type – The user has the option of selecting any of the following material types.
Single Phase
Slurry
Emulsion
Solution
This section only applies to the selection of Slurry for the material type.
Primary Measurement – When the user selects a material type of slurry, the following options are available for the Primary Measurement.
Density – The density of the slurry is calculated using Equation 4. The value will be displayed in the unit’s selected from the list in Units for Measurement #1.
Solids content/volume
D = density of the slurry from Equation 4 (g/cc)
Dc = density of the carrier (g/cc)
Ds = density of the solids (g/cc)
Ms = Solid content per volume (g/cc)
∗
Equation 5

Density Calculation
Slurry Material
Thermo Scientific DensityPRO User Manual C-9
The value will be displayed in the unit’s selected from the list in Units for Measurement #1.
Carrier content/volume
D = density of the slurry from Equation 4 (g/cc)
Dc = density of the carrier (g/cc)
Ds = density of the solids (g/cc)
Mc = Carrier content per volume (g/cc)
∗
Equation 6
The value will be displayed in the unit’s selected from the list in Units for Measurement #1.
Solids/carrier – The solids/carrier is the same calculation as the proppant calculation. (Refer to Proppant.)
Percent by weight solids
D = density of the slurry from Equation 4 (g/cc)
Dc = density of the carrier (g/cc)
Ds = density of the solids (g/cc)
Spw = percent by weight solids (%)
∗ 100
Equation 7
The value for Measurement #1 shall be displayed in percent (%).
Percent by weight carrier: The percent by weight carrier is calculated using Equation 8.
D = density of the slurry from Equation 4 (g/cc)
Dc = density of the carrier (g/cc)
Ds = density of the solids (g/cc)
Cpw = percent by weight carrier (%)
100
Equation 8
The value for measurement #1 shall be displayed in percent (%).
Percent by volume solids
D = density of the slurry from Equation 4 (g/cc)

Density Calculation
Slurry Material
C-10 DensityPRO User Manual Thermo Scientific
Dc = density of the carrier (g/cc)
Ds = density of the solids (g/cc)
Spv = percent by volume solids (%)
∗ 100
Equation 9
The value for measurement #1 shall be displayed in percent (%).
Percent by volume carrier
D = density of the slurry from Equation 4 (g/cc)
Dc = density of the carrier (g/cc)
Ds = density of the solids (g/cc)
Cpv = percent by volume carrier (%)
100
Equation 10
The value for measurement #1 shall be displayed in percent (%).
Percent Consistency (Available after implementation of the 3680 CutPRO application)
SGU 15 / SGU 60 (Available after implementation of the 3680 CutPRO application)
Units for Measurement #1 – When the user designates the Primary Measurement as density, carrier content per volume, or solids content per volume, the units displayed for Measurement #1 are user selectable. The following unit selections are available.
Grams per cubic centimeter (g/cm3 or g/cm3)
Pounds per US gallon (lb/gal)
Pounds per UK gallon (lb/ImpGal)
Pounds per cubic foot (lb/ft3)
Short tons per cubic yard (STon/yd3)
Long tons per cubic yard (LTon/yd3)
Grams per liter (g/L)
Ounces per cubic inch (oz/in3)
Pounds per cubic inch (lb/in3)
Grams per cubic inch (g/in3)

Density Calculation
Slurry Material
Thermo Scientific DensityPRO User Manual C-11
Pounds per cubic yard (lb/yd3)
Kilogram per cubic meter (kg/m3)
ID: Pipe ID – Inside diameter of pipe in units selected by the user.
Pipe ID Units: Units of measure for the inside diameter of the pipe.
Centimeters (cm)
Millimeters (mm)
Inches (in)
Feet (ft)
Yards (yd)
Meters (m)
Dc: Density of the carrier material – Density of the carrier in grams per cubic centimeter.
µc: Attenuation of the carrier material – The value of the attenuation coefficient depends on the composition of the process material and the type of source used, cesium-137 (Cs-137) or cobalt-60 (Co-60).
Ds: Density of the solid material – Density of the solids in grams per cubic centimeter.
(µs): Attenuation coefficient of the solids – The value of the attenuation coefficient depends on the composition of the process material and the type of source used, cesium-137 (Cs-137) or cobalt-60 (Co-60).
(Ibkg): Background radiation – Background radiation at the detector in counts per second (CPS).
Calibration density units – The user can select the density units used for calibration from the following options.
Grams per cubic centimeter (g/cm3)
Pounds per US gallon (lb/gal)
Pounds per Imperial gallon (lb/ImpGal)
Pounds per cubic foot (lb/ft3)
Short tons per cubic yard (STon/yd3)
Long tons per cubic yard (LTon/yd3)
Grams per liter (g/L)
Ounces per cubic inch (oz/in3)
Pounds per cubic inch (lb/in3)

Density Calculation
Slurry Material
C-12 DensityPRO User Manual Thermo Scientific
Grams per cubic inch (g/in3)
Pounds per cubic yard (lb/yd3)
Kilogram per cubic meter (kg/m3)
Degrees Baume Light (degBaum lt)
Degrees Baume Heavy (degBaum hv)
Solids content/volume: Units shall be from the list in Units for Measurement #1.
Dc1u = density for calibration point 1 (g/cc) calculated using Equation 11.
Dc = density of the carrier (g/cc) Ds = density of the solids (g/cc)
Ms = Solid content per volume entered by the user and converted tograms per cubic centimeter.
1 ∗
Equation 11
Carrier content/volume: Units shall be from the list in Units for Measurement #1.
Dc1u = density for calibration point 1 (g/cc) calculated usingEquation 12
Dc = density of the carrier (g/cc) Ds = density of the solids (g/cc)
Mc = Carrier content per volume (g/cc) entered by the user andconverted to grams per cubic centimeter.
1 ∗
Equation 12
Solids/Carrier:
Note: Gauge will not be calibrated in these units. This is the proppant calculation.
Percent by weight solids (%):
Dc1u = density for calibration point 1 (g/cc) calculated usingEquation 13
Dc = density of the carrier (g/cc) Ds = density of the solids (g/cc)
Spw = Percent by weight solids in percent (%) entered by the user.

Density Calculation
Slurry Material
Thermo Scientific DensityPRO User Manual C-13
1∗
100 ∗
Equation 13
Percent by weight carrier (%):
Dc1u = density for calibration point 1 (g/cc) calculated usingEquation 14
Dc = density of the carrier (g/cc) Ds = density of the solids (g/cc)
Cpw = Percent by weight carrier in percent (%) entered by the user
1∗
100100 ∗
Equation 14
Percent by volume solids (%):
Dc1u = density for calibration point 1 (g/cc) calculated usingEquation 15
Dc = density of the carrier (g/cc) Ds = density of the solids (g/cc)
Spv = Percent by volume solids in percent (%) entered by the user
1100
∗
Equation 15
Percent by volume carrier (%):
Dc1u = density for calibration point 1 (g/cc) calculated usingEquation 16
Dc = density of the carrier (g/cc) Ds = density of the solids (g/cc)
Cpv = Percent by volume carrier in percent (%) entered by the user
1100
100∗
Equation 16
(Dc1u): Density for calibration point 1 – The user enters the density for the first calibration point in the selected units, reference. The density shall be entered when standardizing on a full pipe or when the first point of the calibration is performed.
(Dc2u): Density for calibration point 2 – Calibration point 2 shall be anoptional calibration point. The user enters the density for the secondcalibration point in the same units as selected for the first calibration point.The density shall be entered when the second point of the calibration isperformed.

Density Calculation
Slurry Material
C-14 DensityPRO User Manual Thermo Scientific
– Measured Inputs
I: Radiation Intensity – Counts per second from the detector. The radiation intensity shall be the filtered counts.
Istd: Standardization Counts – The average count rate per second from the detector during standardization. The detector will calculate the average count rate during the standardization cycle.
Ical1: Calibration point 1 counts – The average count rate per second from the detector during calibration of the first point. The detector will calculate the average count rate during the calibration cycle or during the standardization cycle when standardized on a full pipe.
Ical2: Calibration point 2 counts – The average count rate per second from the detector during calibration of the second point. The detector will calculate the average count rate during the calibration cycle.
– Calculated values
L: Pipe ID (cm) – Inside diameter of the pipe converted from user selected units to centimeters.
Dcal1: Calibration point 1 Density – Density for calibration point 1 (Dc1u) converted to grams per cubic centimeter.
Dcal2: Calibration point 2 Density – Density for calibration point 2 (Dc2u) converted to grams per cubic centimeter.
D: Density of process material – Calculated using Equation 4.
Additional Measurements
In addition to Measurement #1, three additional measurements, Measurements #2 – #4 are available to display additional parameters measured or calculated by the gauge. These additional measurements are also capable of displaying the values from the analog inputs.
– Density (Reference Primary Measurement)
– Solids content/volume (Reference Primary Measurement)
– Carrier content/vol (Reference Primary Measurement)
– Solids/carrier (Reference Proppant)
– Percent by weight solids (Reference Primary Measurement)
– Percent by weight carrier (Reference Primary Measurement)
– Percent by volume solids (Reference Primary Measurement)
– Percent by volume carrier (Reference Primary Measurement)
– Bulk Mass Flow rate – The flow rate of the slurry calculated using the density of the slurry.

Density Calculation
Slurry Material
Thermo Scientific DensityPRO User Manual C-15
D = Density of slurry in grams per cubic centimeters calculated using Equation 4.
Qv = Volumetric flow rate of slurry in cubic centimeters per second.
Qmd = Bulk mass flow rate of slurry in grams per second calculated using Equation 17.
∗
Equation 17
– Solids Mass Flow rate – The flow rate of the solids in the slurry calculated using the density of the solids.
D = Density of slurry in grams per cubic centimeter calculated using Equation 4
QV = Volumetric flow rate of slurry in cubic centimeters per second; measured by the gauge using an analog input.
Spw = Percent by weight solids in percent (%) calculated using Equation 7.
Qms = Solids mass flow rate in grams per cubic centimeter calculated using Equation 18.
100∗ ∗
Equation 18
– Carrier Mass Flow rate – The flow rate of the carrier in the slurry calculated using the density of the carrier.
D = Density of slurry in grams per cubic centimeter calculated using Equation 4.
Qv = Volumetric flow rate of slurry in cubic centimeters per second; measured by the gauge using an analog input.
Cpw = Percent by weight carrier: The percent by weight carrier is calculated using Equation 8.
Qmc = Carrier mass flow rate calculated using Equation 19.
100∗ ∗
Equation 19
– Bulk Volumetric Flow rate – The volumetric flow rate of the slurry measured by the flow input.
Solids Volumetric Flow rate – The volumetric flow rate of solids flowing in the slurry.
Qv = Volumetric flow rate of slurry in cubic centimeters per second; measured by the gauge using an analog input.

Density Calculation
Slurry Material
C-16 DensityPRO User Manual Thermo Scientific
Spv = percent by volume solids (%) calculated using Equation 9.
Qvs = Solids volumetric flow rate calculated using Equation 20.
100∗
Equation 20
– Carrier Volumetric Flow rate – The volumetric flow rate of the carrier flowing in the slurry.
Qv = Volumetric flow rate of slurry in cubic centimeters per second; measured by the gauge using an analog input.
Cpv = percent by volume carrier (%) calculated using Equation 10.
Qvc = Carrier volumetric flow rate calculated using Equation 21.
100∗
Equation 21
– Bulk Solids Flow rate (Reference In Situ Calculation)
– Temperature – The temperature measured by the temperature input.
– Velocity – The velocity of the slurry
Qv = Volumetric flow rate of slurry in cubic centimeters per second; measured by the gauge using an analog input.
L = Inside diameter of the pipe in centimeters.
V = Velocity of the slurry calculated using volumetric flow rate.
∗4
Equation 22
– Proppant – Reference Proppant.

Density Calculation
Slurry Material
Thermo Scientific DensityPRO User Manual C-17
Proppant The proppant calculation is used when oil wells are fractured. It calculates the amount of solids per gallon of fluid. Two units have been used in the past for the amount of solids added per gallon of fluid: Pounds Proppant Added (PPA) and Pounds Sand Added (PSA). To accommodate the English and metric systems the following units will be available.
– lb/gal (PPA) – pounds per gallon (Pound Proppant Added) for English units.
– g/l (PPA) – grams per liter (Pounds Proppant Added) for metric units.
The proppant calculation will be available for Measurements #2 – #4.
The proppant calculation is also the calculation for solids/carrier.
To calculate Pounds Proppant Added, the density of the slurry is calculated using Equation 4.
– User Inputs
Dc: Density of the carrier material – Density of the carrier in grams per cubic centimeter.
Ds: Density of the solid material – Density of the solids in grams per cubic centimeter.
– Calculated Values
D: Density of the slurry – Calculated using Equation 4 in grams per cubic centimeter.
PPA: Pounds Proppant Added – Calculated using Equation 23 in grams per cubic centimeter.
1
Equation 23
The value displayed for PPA shall have user selectable units.
lb/gal (PPA) – pounds per gallon (Pound Proppant Added) for English units.
g/l (PPA) – grams per liter (Pounds Proppant Added) for metric units.

Density Calculation
Slurry Material
C-18 DensityPRO User Manual Thermo Scientific
In Situ Calculation The in situ volume is the volume of loose material. The in situ calculation uses the density of the slurry to calculate the volume of dry solids. Dredging would be an example of an application that would use in situ volume.
– User Inputs
Dc: Density of the carrier material – Density of the carrier in grams per cubic centimeter.
Ds: Density of the solid material – Density of the solids in grams per cubic centimeter.
DB: Bulk Density of the solid material – Density of the dry solids in grams per cubic centimeter.
– Measured Values
Qv: Volume Flow: Volume flow of slurry in cubic centimeters per second.
– Calculated Values
D: The density of the slurry calculated in grams per cubic centimeter using Equation 4.
DDS: Grams of dry solid per cubic centimeter of slurry (g/cm3) calculated using Equation 24.
QmDS: Mass flow of dry solids in the slurry calculated in grams per second using Equation 25.
QBS: Volume flow of dry solids. This is the Bulk Solids Flow in cubic centimeters per second, and is calculated using Equation 26.
∗
Equation 24
∗
Equation 25
Equation 26

Density Calculation
Emulsion Material
Thermo Scientific DensityPRO User Manual C-19
Emulsion Material
An emulsion material is one fluid suspended in another fluid. Emulsions will be treated similarly to slurries by the gauge. Fluid 1 will be treated as the carrier and fluid 2 will be treated as the solid.
Emulsion Density Calculation
When the process material is an emulsion the gauge will be able to calculate the density of the material, as well as be able to provide information on the fluid 1 and fluid 2.
Calculate the density for an emulsion material using Equation 4. Initially, the slope correction factor will be 1. When a second calibration point is used, calculate the slope correction factor using Equation 3. The user has the option to modify or recalculate the slope correction factor at any time.
The parameters below are used to calculate the density of an emulsion material.
– Constants
G: Geometry factor (Default = 0.85) – The geometry factor does not have any units. It is used to correct for the location of the source relative to the detector with different source heads and mounting configurations. History has determined that this value can be a constant.
– User Inputs
Material Type – The user has the option of selecting any of the following material types.
Single-Phase
Slurry
Emulsion
Solution
This section only applies to the selection of Emulsion for the material type.
Primary Measurement – When the user selects emulsion as the material type, the following options are available for the Primary Measurement.
Density – The density of the emulsion is calculated using Equation 4. The value will be displayed in the unit’s selected from the list in Units for Measurement #1. Some of the terms of Equation 4 are redefined for an emulsion.
Dc: Density of the fluid 1
µc: Attenuation Coefficient of the fluid 1
Ds: Density of the fluid 2
µs: Attenuation Coefficient of the fluid 2

Density Calculation
Emulsion Material
C-20 DensityPRO User Manual Thermo Scientific
Fluid 2 content/volume – The content per volume of fluid 2 is calculated using Equation 5, with the terms defined as follows.
D = density of the emulsion from Equation 4 (g/cc) Dc = density of fluid 1 (g/cc)
Ds = density of the fluid 2 (g/cc)
Ms = fluid 2 content per volume (g/cc)
The value shall be displayed in the unit’s selected from the list in Units for Measurement #1.
Fluid 1 content/volume – The content per volume of fluid 1 is calculated using Equation 6, with the terms defined as follows.
D = density of the emulsion from Equation 4 (g/cc) Dc = density of the fluid 1 (g/cc)
Ds = density of the fluid 2 (g/cc)
Mc = Fluid 1 content per volume (g/cc)
The value shall be displayed in the unit’s selected from the list in the Units for Measurement #1.
Fluid 2/Fluid 1 – This calculation is the same as the proppant calculation in Proppant. The terms are defined as follows.
D = density of the emulsion from Equation 4 (g/cc) Dc = density of the fluid 1 (g/cc)
Ds = density of the fluid 2 (g/cc)
PPA = the amount of fluid 2 added (g/cc)
The value displayed for PPA shall have user-selected units.
lb/gal (FL2A)
g/l (FL2A)
Percent by weight fluid 2 – The percent by weight of fluid 2 is calculated using Equation 7, with the terms defined as follows.
D = density of the emulsion from Equation 4 (g/cc) Dc = density of the fluid 1 (g/cc)
Ds = density of the fluid 2 (g/cc)
Spw = percent by weight fluid 2 (%)
The value for measurement #1 shall be displayed in percent (%).

Density Calculation
Emulsion Material
Thermo Scientific DensityPRO User Manual C-21
Percent by weight fluid 1 – The percent by weight of fluid 1 is calculated using Equation 8, with the terms defined as follows.
D = density of the emulsion from Equation 4 (g/cc) Dc = density of the fluid 1 (g/cc)
Ds = density of the fluid 2 (g/cc)
Cpw = percent by weight fluid 1 (%)
The value for measurement #1 shall be displayed in percent (%).
Percent by volume fluid 2 – The percent by volume of fluid 2 is calculated using Equation 9, with the terms defined as follows.
D = density of the emulsion from Equation 4 (g/cc) Dc = density of the fluid 1 (g/cc)
Ds = density of the fluid 2 (g/cc)
Spv = percent by volume fluid 2 (%)
The value for measurement #1 shall be displayed in percent (%).
Percent by volume fluid 1 – The percent by volume of fluid 1 is calculated using Equation 10, with the terms defined as follows.
D = density of the emulsion from Equation 4 (g/cc) Dc = density of the fluid 1 (g/cc)
Ds = density of the fluid 2 (g/cc)
Cpv = percent by volume fluid 1 (%)
The value for measurement #1 shall be displayed in percent (%).
Units for Measurement #1 – When the Primary Measurement is selected to be Density, Fluid 1 content per volume or Fluid 2 content per volume, the units displayed for Measurement #1 are user selectable from the following options.
Grams per cubic centimeter (g/cm3)
Pounds per US gallon (lb/gal)
Pounds per UK gallon (lb/ImpGal)
Pounds per cubic foot ( lb/ft3)
Short tons per cubic yard (STon/yd3)
Long tons per cubic yard (LTon/yd3)
Grams per liter (g/L)
Ounces per cubic inch (oz/in3)
Pounds per cubic inch (lb/in3)

Density Calculation
Emulsion Material
C-22 DensityPRO User Manual Thermo Scientific
Grams per cubic inch (g/in3)
Pounds per cubic yard (lb/yd3)
Kilogram per cubic meter (kg/m3)
ID: Pipe ID – Inside diameter of pipe in units selected by the user.
Pipe ID Units – Units of measure for the inside diameter of the pipe.
Centimeters (cm)
Millimeters (mm)
Inches (in)
Feet (ft)
Yards (yd)
Meters (m)
Dc: Density of fluid 1 material – Density of fluid 1 in grams per cubic centimeter.
µc: Attenuation of fluid 1 material – The value of the attenuation coefficient depends on the composition of the process material and the type of source used, cesium-137 (Cs-137) or cobalt-60 (Co-60).
Ds: Density of fluid 2 material – Density of fluid 2 in grams per cubic centimeter.
µs: Attenuation coefficient of fluid 2 – The value of the attenuation coefficient depends on the composition of the process material and the type of source used, cesium-137 (Cs-137) or cobalt-60 (Co-60).
Ibkg: Background radiation – Background radiation at the detector in counts per second (CPS).
Calibration density units – The user can select the density units used for calibration from the following options.
Grams per cubic centimeter (g/cm3)
Pounds per US gallon (lb/gal)
Pounds per Imperial gallon (lb/ImpGal)
Pounds per cubic foot (lb/ft3)
Short tons per cubic yard (STon/yd3)
Long tons per cubic yard (LTon/yd3)
Grams per liter (g/L)
Ounces per cubic inch (oz/in3)

Density Calculation
Emulsion Material
Thermo Scientific DensityPRO User Manual C-23
Pounds per cubic inch (lb/in3)
Grams per cubic inch (g/in3)
Pounds per cubic yard (lb/yd3)
Kilogram per cubic meter (kg/m3)
Fluid 2 content/volume – Units shall be from the list in Units for Measurement #1. The value shall be calculated using Equation 11 with the terms defined as follows.
Dc1u = density for calibration point 1 (g/cc)
Dc = density of the fluid 1 (g/cc)
Ds = density of the fluid 2 (g/cc)
Ms = Fluid 2 content per volume entered by the user and convertedto grams per cubic centimeter.
Fluid 1 content/volume – Units shall be from the list in Units for Measurement #1. The value shall be calculated using Equation 12 with the terms defined as follows.
Dc1u = density for calibration point 1 (g/cc)
Dc = density of the fluid 1 (g/cc)
Ds = density of the fluid 2 (g/cc)
Mc = Fluid 1 content per volume (g/cc) entered by the user andconverted to grams per cubic centimeter.
Fluid 2/Fluid 1
Note: Gauge will not be calibrated in these units. This is the proppant calculation.
Percent by weight fluid 2 (%) – The value shall be calculated using Equation 13 with the terms defined as follows. Dc1u = density for calibration point 1 (g/cc)
Dc = density of the fluid 1 (g/cc)
Ds = density of the fluid 2 (g/cc)
Spw = Percent by weight fluid 2 in percent (%) entered by the user.
Percent by weight fluid 1 (%) – The value shall be calculated using Equation 14 with the terms defined as follows.
Dc1u = density for calibration point 1 (g/cc)
Dc = density of the fluid 1 (g/cc)
Ds = density of the fluid 2 (g/cc)

Density Calculation
Emulsion Material
C-24 DensityPRO User Manual Thermo Scientific
Cpw = Percent by weight fluid 1 in percent (%) entered by the user.
Percent by weight volume fluid 2 (%) – The value shall be calculated using Equation 15 with the terms defined as follows.
Dc1u = density for calibration point 1 (g/cc)
Dc = density of the fluid 1 (g/cc)
Ds = density of the fluid 2 (g/cc)
Spv = Percent by volume solids in percent (%) entered by the user.
Percent by weight volume fluid 1 (%) – The value shall be calculated using Equation 16 with the terms defined as follows.
Dc1u = density for calibration point 1 (g/cc)
Dc = density of the fluid 1 (g/cc)
Ds = density of the fluid 2 (g/cc)
Dc1u = density for calibration point 1 (g/cc)
(Dc1u): Density for calibration point 1 – The user enters the density for the first calibration point in the selected units. The density shall be entered when standardizing on a full pipe or when the first point of the calibration is performed.
(Dc2u): Density for calibration point 2 – Calibration point 2 shall be an optional calibration point. The user enters the density for the second calibration point in the same units as selected for the first calibration point. The density shall be entered when the second point of the calibration is performed.
– Measured Inputs
I: Radiation Intensity – Counts per second from the detector. The radiation intensity shall be the filtered counts.
Istd: Standardization Counts – The average count rate per second from the detector during standardization. The detector will calculate the average count rate during the standardization cycle.
Ical1: Calibration point 1 counts – The average count rate per second from the detector during calibration of the first point. The detector will calculate the average count rate during the calibration cycle or during the standardization cycle when standardized on a full pipe
Ical2: Calibration point 2 counts – The average count rate per second from the detector during calibration of the second point. The detector will calculate the average count rate during the calibration cycle.

Density Calculation
Solution Material
Thermo Scientific DensityPRO User Manual C-25
– Calculated values
L: Pipe ID (cm) – Inside diameter of the pipe converted from user selected units to centimeters.
Dcal1 – Calibration point 1 Density – Density for calibration point 1 (Dc1u) converted to grams per cubic centimeter.
Dcal2 – Calibration point 2 Density – Density for calibration point 2 (Dc2u) converted to grams per cubic centimeter.
D: Density of process material – Calculated density of the process material in grams per cubic centimeter using Equation 4.
Additional Measurements
In addition to Measurement #1, three additional measurements, Measurements #2 – #4 are available to display additional parameters measured or calculated by the gauge. These additional measurements are also capable of displaying the values from the analog inputs.
– Density (Reference Primary Measurement)
– Fluid 2 content per volume (Reference Primary Measurement)
– Fluid 1 content per volume (Reference Primary Measurement)
– Fluid 2/Fluid 1(Reference Primary Measurement)
– Percent by weight fluid 2 (Reference Primary Measurement)
– Percent by weight fluid 1 (Primary Measurement)
– Percent by volume fluid 2 (Reference Primary Measurement)
– Percent by volume fluid 1 (Reference Primary Measurement)
– Temperature – The temperature measured by the temperature input.
– Flow Velocity – The velocity of the emulsion calculated using Equation 22 with the terms defined as follows.
– Qv = Volumetric flow rate of the emulsion in cubic centimeters per second; measured by the gauge using an analog input.
– L = Inside diameter of the pipe in centimeters
– V = Flow Velocity of the emulsion
Solution Material
A solution material is a solute dissolved in a solvent. When using general density Equation 4 for a solution, the solvent will be the carrier and the solute will be the solid.

Density Calculation
Solution Material
C-26 DensityPRO User Manual Thermo Scientific
Solution Calculation
When the process material is a solution the gauge will be able to calculate the density of the material and provide information on the solvent and solute.
The density for a solution material should be calculated using Equation 4. Initially, the slope correction factor will be 1. When a second calibration point is used, use Equation 3 to calculate the slope correction factor. The user has the option to modify or recalculate the slope correction factor at any time.
The parameters below are used to calculate the density of a solution material.
– Constants
G: Geometry factor (Default = 0.85) – The geometry factor does not have any units. It is used to correct for the location of the source relative to the detector with different source heads and mounting configurations. History has determined that this value can be a constant.
– User Inputs
Material Type – The user has the option of selecting any of the following material types.
Single-Phase
Slurry
Emulsion
Solution
This section only applies to the selection of Solution for the material type.
Primary Measurement – When the user selects a material type of solution, the following options are available for the primary measurement.
Density – The density of the solution is calculated using equation (4). The value shall be displayed in the unit’s selected from the list in Units for Measurement #1. Some of the terms of Equation 4 are redefined for a solution.
Dc – Density of the solvent
µc – Attenuation Coefficient of the solvent
Ds – Density of the solute
µs – Attenuation Coefficient of the solute
Solute content/volume – Solute content per volume is calculated using a fourth order polynomial.
D = density of the solution from Equation 4 (g/cc)
Dc = density of solvent (g/cc)
Ddiff = difference in solution density and solvent density (g/cc)

Density Calculation
Solution Material
Thermo Scientific DensityPRO User Manual C-27
Equation 27
A, B, C, D = Coefficients provided by the user or from a list ofmaterials defined in Table B-1, Solution Coefficients.
Mconc = Concentration of solute or solute content per volume (g/cc)
∗ ∗ ∗ ∗
Equation 28
The value of Mconc shall be displayed in the unit’s selected from the list in Units for Measurement #1.
Table C-1. Solution Coefficients
Material A B C D
Sucrose (0-100%) 2.598 0.1775 0.3503 0.0
D-Fructose (0-60%) 2.559 0.4315 0.0 0.0
D-Glucose (0-10%) 2.639 -0.09384 0.0 0.0
Sodium Chloride (NaCl) (0-50%) 1.408 1.050 -1.346 0.0
Sodium Hydroxide (NaOH) (0-50%) 0.8871002 1.138 -1.151 1.981
Potassium Chloride (KCl) (0-24%) 1.571 1.082 -1.786 0.0
Potassium Hydroxide (KOH) (0-52%) 1.098 0.885498 -0.3265 0.0
Hydrogen Chloride (HCl) (0-40%) 2.035 2.411 -12.50 48.56
Phosphoric Acid (H3PO4) (0-40%) 1.866 1.288 -8.047 18.07
A-Lactose (0-18%) 2.518 1.053 -6.338 0.0
H-Lactose (0-18%) 2.656 0.8647003 -4.504 0.0
Solvent content/volume – The solvent content per volume is calculated.
D = density of the solution from equation (4) (g/cc)
Mconc = solute content per volume from Equation 28 (g/cc) Msolv = Solution content per volume
Equation 29
The value of Msolv shall be displayed in the unit’s selected from the list in Units for Measurement #1.
Solute/Solvent – The solute/solvent is similar to the solids/carrier ratio for slurries.
D = density of the solution from Equation 4 (g/cc)
Dc = density of the solvent (g/cc)

Density Calculation
Solution Material
C-28 DensityPRO User Manual Thermo Scientific
Mconc = solute content per volume from Equation 28 (g/cc)
Solute per Solvent= the amount of solute added (g/cc)
∗
Equation 30
The value of Solute per Solvent shall be displayed in the unit’s selected from the list in Units for Measurement #1.
Percent by weight solute – The percent by weight of solute is calculated.
D = density of the solution from Equation 4 (g/cc)
Mconc = solute content per volume from Equation 28 (g/cc) Sspw = percent by weight solute (%)
∗ 100%
Equation 31
The value for measurement #1 shall be displayed in percent (%).
Percent by weight solvent – The percent by weight of solvent is calculated.
D = density of the solution from Equation 4 (g/cc)
Mconc = solute content per volume from Equation 28 (g/cc) Cspw = percent by weight solvent (%)
1 ∗ 100%
Equation 32
The value for measurement #1 shall be displayed in percent (%).
Percent by volume Solute – The percent by volume solute is calculated.
Mconc = solute content per volume from Equation 28 (g/cc) Ds = density of the solute (g/cc)
Sspv = percent by volume solute (%)
∗ 100%
Equation 33
The value for measurement #1 shall be displayed in percent (%).
Percent by volume solvent – The percent by volume of solvent is calculated.
D = density of the solution from Equation 4 (g/cc) Dc = density of the solvent (g/cc)

Density Calculation
Solution Material
Thermo Scientific DensityPRO User Manual C-29
Mconc = solute content per volume from Equation 28 (g/cc)
Cspv = percent by volume solvent (%)
∗ 100%
Equation 34
The value for measurement #1 shall be displayed in percent (%).
Bulk Density – Bulk density is the same as item 1 Density above unless temperature compensation is used. When temperature compensation is used, Bulk Density is the uncompensated density. For more information on temperature compensation, see Temperature Compensated Density.
Units for Measurement #1 – When the Primary Measurement is selected to be Density, solvent content per volume or solute content per volume, the user may select the units displayed for Measurement #1 from the following options.
Grams per cubic centimeter (g/cm3 or g/cm3)
Pounds per US gallon (lb/gal)
Pounds per UK gallon (lb/ImpGal)
Pounds per cubic foot (lb/ft3)
Short tons per cubic yard (STon/yd3)
Long tons per cubic yard (LTon/yd3)
Grams per liter (g/L)
Ounces per cubic inch (oz/in3)
Pounds per cubic inch (lb/in3)
Grams per cubic inch (g/in3)
Pounds per cubic yard (lb/yd3)
Kilogram per cubic meter (kg/m3)
ID: Pipe ID – Inside diameter of pipe in units selected by the user.
Pipe ID Units – Units of measure for the inside diameter of the pipe.
Centimeters (cm)
Millimeters (mm)
Inches (in)
Feet (ft)
Yards (yd)
Meters (m)

Density Calculation
Solution Material
C-30 DensityPRO User Manual Thermo Scientific
Dc: Density of solvent material – Density of the solvent in grams per cubic centimeter.
µc: Attenuation of solvent material – The value of the attenuation coefficient depends on the composition of the process material and the type of source used, Cesium-137 (Cs-137) or Cobalt-60 (Co-60).
Ds: Density of solute material – Density of the solute in grams per cubic centimeter.
µs: Attenuation coefficient of solute – The value of the attenuation coefficient depends on the composition of the process material and the type of source used, Cesium-137 (Cs-137) or Cobalt-60 (Co-60).
Ibkg: Background radiation – Background radiation at the detector in counts per second (CPS).
Calibration density units – The user may select the density units used for calibration from the following options.
Grams per cubic centimeter (g/cm3)
Pounds per US gallon (lb/gal)
Pounds per Imperial gallon (lb/ImpGal)
Pounds per cubic foot (lb/ft3)
Short tons per cubic yard (STon/yd3)
Long tons per cubic yard (LTon/yd3)
Grams per liter (g/L)
Ounces per cubic inch (oz/in3)
Pounds per cubic inch (lb/in3)
Grams per cubic inch (g/in3)
Pounds per cubic yard (lb/yd3)
Kilogram per cubic meter (kg/m3)
Solute content per volume – Units shall be from the list in Units for Measurement #1 .
Dsc1u = density for solution calibration point 1 (g/cc) Need to complete the rest of the calibration units.
(Dc1u): Density for calibration point 1 – The user enters the density for the first calibration point in the selected units. The density should be entered when standardizing on a full pipe or when the first point of the calibration is performed.

Density Calculation
Solution Material
Thermo Scientific DensityPRO User Manual C-31
(Dc2u): Density for calibration point 2 – Calibration point 2 is an optionalcalibration point. The user enters the density for the second calibration pointin the same units as selected for the first calibration point. The density shouldbe entered when the second point of the calibration is performed.
– Measured Inputs
I: Radiation Intensity – Counts per second from the detector. The radiationintensity will be the filtered counts.
Istd: Standardization Counts – The average count rate per second from thedetector during standardization. The detector will calculate the average countrate during the standardization cycle.
Ical1: Calibration point 1 counts – The average count rate per second fromthe detector during calibration of the first point. The detector will calculatethe average count rate during the calibration cycle or during thestandardization cycle when standardized on a full pipe.
Ical2: Calibration point 2 counts – The average count rate per second fromthe detector during calibration of the second point. The detector will calculatethe average count rate during the calibration cycle.
– Calculated values
L: Pipe ID (cm) – The inside diameter of the pipe converted from user-selected units to centimeters.
Dcal1: Calibration point 1 Density – Density for calibration point 1 (Dc1u)converted to grams per cubic centimeter.
Dcal2: Calibration point 2 Density – Density for calibration point 2 (Dc2u)converted to grams per cubic centimeter.
D: Density of process material – Calculated density of the process material ingrams per cubic centimeter using Equation 4.
Additional Measurements
In addition to Measurement #1, three additional measurements, Measurements #2 – #4 are available to display additional parameters measured or calculated by the gauge. These additional measurements are also capable of displaying the values from the analog inputs.
– Density (Reference Units for Measurement #1)
– Solute content per volume (Reference Units for Measurement #1)
– Solvent content per volume (Reference Units for Measurement #1)
– Solute/Solvent (Reference Units for Measurement #1)
– Percent by weight Solute (Reference Units for Measurement #1)
– Percent by weight Solvent (Reference Units for Measurement #1)

Density Calculation
Temperature Compensated Density
C-32 DensityPRO User Manual Thermo Scientific
– Percent by volume solute (Reference Units for Measurement #1)
– Percent by volume solvent Units for Measurement #1)
– Temperature – The temperature measured by the temperature input.
– Flow Velocity – The velocity of the solution calculated using Equation 22 with theterms defined as follows.
– Qv = Volumetric flow rate of the solution in cubic centimeters per second;measured by the gauge using an analog input.
– L = Inside diameter of the pipe in centimeters. V = Flow Velocity of the emulsion.
Temperature Compensated
Density
Temperature Compensated
Calculation
The temperature compensation formula will compensate single phase, the carrier for slurry, solvent for solution, or fluid 1 for emulsion. Use the formula a second time for the solid, solute or fluid 2.
– ∆ ρ – Change in density of carrier/solvent/fluid 1 or bulk density withtemperature.
– A, B, C – Coefficients of the single phase, carrier, solvent, or fluid onecharacterization polynomial.
– ∆T – Difference in process temperature and reference temperature.
– ∆T = TProcess – TReference
– TProcess – The temperature of the material in the process.
– TReference – The temperature of the material the density is corrected to.
– ρTref = ρBulk + ∆ρ
– ρTref – The density of the material at the reference temperature.
– ρBulk – The density of the material measured in the process at the processtemperature.
∆ρ A∗∆T B∗∆T2 C∗∆T3
Equation 35

Density Calculation
Temperature Compensated Density
Thermo Scientific DensityPRO User Manual C-33
Standardization with Temperature
Compensation
When Use Temp Comp during STD is set to Yes the density will be compensated for temperature if the standardization is done with the pipe full.
The density during standardization (Cal Density Point #1) will be the density of the process at the reference temperature. Internally, the gauge will store the density at the process temperature. This will be at a location other than the modbus register.
The gauge will use the temperature compensation input source selected by the user to determine the process temperature during standardization. At the end of the standardization, the temperature from the temperature compensation input source chosen by the user will be saved. Before the temperature is saved, it is corrected with the Temperature Offset Correction.
Equation 36
– Tstored – The temperature value stored during the standardization and/orcalibration cycle.
– Tinput – The temperature for the user-selected input, determined by selecting NotUsed, Manual Value, Detector RTD Input or Detector 4-20 mA Input as theTemperature Input Source.
– Toffset – The value entered by the user for Temperature Offset Correction. This isa quick way to correct temperature offset. Normally when the RTD or currentinput is calibrated, the Temperature Offset Correction is not needed and can beset to zero.
Temperature Compensation
during Calibration
Temperature compensation is enabled by selecting a Temperature Input Source other than Not Used. When temperature compensation is enabled, the gauge will use the temperature input source selected by the user to determine the process temperature during calibration. At the end of the calibration, the temperature from the temperature compensation input source selected by the user will be saved in Calibration Temperature. Before the temperature is saved, it is corrected with Temperature Offset Correction value as described in Standardization with Temperature Compensation.
The density values entered for Cal Density Point #1 and Cal Density Point #2 are the density at the reference temperature.
The density measured during calibration will be at the process temperature. Internally, the gauge will store the value of the density at the process temperature for calibration point 1 and calibration point 2. This will be in a location other than the modbus register.

Density Calculation
Temperature Compensated Density
C-34 DensityPRO User Manual Thermo Scientific
The parameters below are used to calculate the density of a solution material.
– Constants
G: Geometry factor (Default = 0.85) – The geometry factor does not have anyunits. It is used to correct for the location of the source relative to the detectorwith different source heads and mounting configurations. History hasdetermined that this value can be a constant.
– User Inputs
T: Pipe ID – The inside diameter of the pipe converted from user-selectedunits to centimeters.
Dc@ref – The density of the carrier, solvent, or fluid 1 at the referencetemperature.
µc – The attenuation coefficient of the carrier, solvent or fluid 1.
Ds@ref – The density of the solid, solute, or fluid 2 at the referencetemperature.
µs – The attenuation coefficient of the solid, solute, or fluid 2.
Ibkg – Background radiation at the detector in counts per second (CPS)
Dstd@ref – The density of the process material at the reference temperaturewhen standardizing on process.
Dcal1@ref – The density of the process material at the reference temperatureduring calibration of point 1.
Dcal2@ref – The density of the process material at the reference temperatureduring calibration of point 2.
Tref – Reference temperature
A1, B1, C1 – Coefficients of the carrier, solvent or fluid 1characterizationpolynomial.
Temperature Input Source – The user selects how the process temperature isprovided to the system.
Not Used – Temperature compensation is disabled. This is the defaultselection.
Manual Value – The user will provide a fixed value for the processtemperature.
Detector RTD Input – The process temperature is measured using the RTDconnected to the detector.
Detector 4-20mA Input – The user will configure the 4-20mA input on thedetector to provide the process temperature.

Density Calculation
Temperature Compensated Density
Thermo Scientific DensityPRO User Manual C-35
Manual Temperature – A user input value for the process temperature when Manual Value is selected as the Temperature Input Source.
– Measured Inputs
I – Counts per second during process
Istd@proc – Average counts per second at process temperature during standardization
Ical1@proc – Average counts per second at process temperature during calibration for point 1
Ical2@proc – Average counts per second at process temperature during calibration for point 2
Tproc – Temperature of the process material
– Calculated Values
Tdelta – The difference between the Process temperature and the reference temperature.
Equation 37
Dc@proc – Density of the carrier/solvent/fluid one at the process temperature.
@ @ 1∗ 1∗
Equation 38
Dcal1@proc – Density of the process at the process temperature during calibration of point 1.
@ ∗ 1@ @1@ ∗ @ @
Equation 39
@ @
Equation 40
1@@ ∗ @
@ ∗ @ @
Equation 41
Dcal2@proc – Density of the process at the process temperature during calibration of point 2.
@ ∗ 2@ @2@ ∗ @ @
Equation 42

Density Calculation
Temperature Compensated Density
C-36 DensityPRO User Manual Thermo Scientific
@ @
Equation 43
2@@ ∗ @
@ ∗ @ @
Equation 44
Dproc – Density of the process material at the process temperature.
In@
1@@
@ @@ @
1@
Equation 45
Ws – Percent weight by solid/100
@ ∗ @∗ @ @
Equation 46
Dref – Density of the process material at the reference temperature.
@ ∗ @@ ∗ @ @
Equation 47
S – Slope correction for density calculation
@ @@ @
In2@1@
∗ 1@ 2@
Equation 48


Thermo Fisher Scientific81 Wyman StreetP.O. Box 9046Waltham, Massachusetts 02454-9046United States
www.thermofisher.com


![DensityPRO Measurement Systems › TFS-Assets › CAD › ... · [9-0700-6] and EZ CAL II software [9-0700-007] all be at version 3.600 or newer. Failure to upgrade the CPU Remote](https://img.dokumen.tips/doc/110x75/5f0d8cc97e708231d43ae9f3/densitypro-measurement-systems-a-tfs-assets-a-cad-a-9-0700-6-and-ez.jpg)