Embed Size (px)
Citation preview

DENSITY DETERMINATION KIT HR-AZ series HR-A series F Z- i s e r i e s FX - i s e r i e s
1WMPD4002606B

This Manual and Marks Product Safety Signs and Labels All safety messages are identified by the following, “WARNING” or “CAUTION”, of ANSI
Z535.4 (American National Standard Institute: Product Safety Signs and Labels). The meanings are as follows:
WARNING A potentially hazardous situation which, if not avoided, could result in death or serious injury.
CAUTION A potentially hazardous situation which, if not avoided, may result in minor or moderate injury.
Note Provides information useful for the user to operate the instrument.
This is a hazard alert mark.
Note This manual is subject to change without notice at any time to improve the product.
The contents of this manual and the specifications of the instrument covered by this manual
are subject to change for improvement without notice. © 2015 A&D Company Ltd. All rights reserved.
No part of this publication may be reproduced, transmitted, transcribed, or translated into any language in any form by any means without the written permission of A&D Company Ltd.

1
Contents
1. INTRODUCTION ....................................................................................................................................... 2
1-1. Precautions ............................................................................................................................................. 2
2. UNPACKING THE KIT ............................................................................................................................... 2
3. DENSITY MEASUREMENT PRINCIPLES ................................................................................................ 3
3-1. Density .................................................................................................................................................... 3
3-2. Specific Gravity ....................................................................................................................................... 3
3-3. Archimedes’ Principle Of Density Measurement .................................................................................... 3
3-4. Density Of A Solid ................................................................................................................................... 3
3-5. Density Of A Liquid ................................................................................................................................. 3
4. ERROR FACTORS .................................................................................................................................... 4
4-1. Buoyancy Of Air ...................................................................................................................................... 4
4-2. Volume Of Float ...................................................................................................................................... 4
4-3. Temperature Of Liquid ............................................................................................................................ 4
4-4. Influence Of Wire .................................................................................................................................... 5
4-5. Surface Tension ...................................................................................................................................... 5
4-6. Bubbles ................................................................................................................................................... 5
5. MEASURING THE DENSITY OF A SOLID ............................................................................................... 6
5-1. Assembling The Kit: HR-AZ / HR-A Series ............................................................................................ 6
5-2. Assembling The Kit: FZ-i / FX-i Series ................................................................................................... 7
5-3. Measuring The Density Of A Solid ......................................................................................................... 8
6. MEASURING THE DENSITY OF A LIQUID ............................................................................................ 10
6-1. Assembling The Kit: ............................................................................................................................. 10
6-2. Measuring The Density Of A Liquid ...................................................................................................... 10
7. FREQUENTLY ASKED QUESTIONS ..................................................................................................... 11
8. WATER RESISTANT DIGITAL THERMOMETER AD-5625 ............................................................................ 12
8-1. For Safe Use ........................................................................................................................................ 12
8-2. Precautions When Handling ................................................................................................................. 12
8-3. Each Part Name ................................................................................................................................... 13
8-4. Replacing The Battery .......................................................................................................................... 14
8-5. Operating the Thermometer ................................................................................................................. 15
8-6. Daily Care ............................................................................................................................................. 18
8-7. Specifications........................................................................................................................................ 18

2
1. Introduction Thank you for purchasing the AD-1654 density determination kit. The AD-1654, when combined with one of
A&D electronic balances (HR-AZ / HR-A and FZ-i / FX-i series), allows the density of a solid and liquid to be
measured easily. Before using the AD-1654, please read this manual thoroughly and keep it at hand for future
reference.
1-1. Precautions The kit allows the density of a solid or liquid to be measured. However, the results of measurements may be
affected by various factors that could cause errors.
Do not use the kit for measuring the density of chemically active substances.
Ex.: strong acid, strong alkali solution.
After using the density determination kit, clean all surfaces to remove rust and oxides.
A balance is a precision instrument. Avoid shocks and excessive loads.
Maintain the ambient temperature, samples and the kit at a constant temperature.
Use the AD-1654 with A&D electronic balances (HR-AZ / HR-A and FZ-i / FX-i series).
2. Unpacking The Kit
0.2
Float Wire Float hook Thermometer clamp Thermometer Tweezers
B44342 B49799 C42200 1-608-02 AD5625 AD-1689
Density pan Density pan stand Liquid container Beaker stand
1653-1 4028902 PMP Beaker 3015239
with balance weight (50) 3515503
FZ-i / FX-i 10mg FZ-i / FX-i 1mg Spanner for Kit box
Balance weight (71) Balance weight (34) Balance weight Stores the kit after use.
4030262 4030264
71 mm 34 mm
3
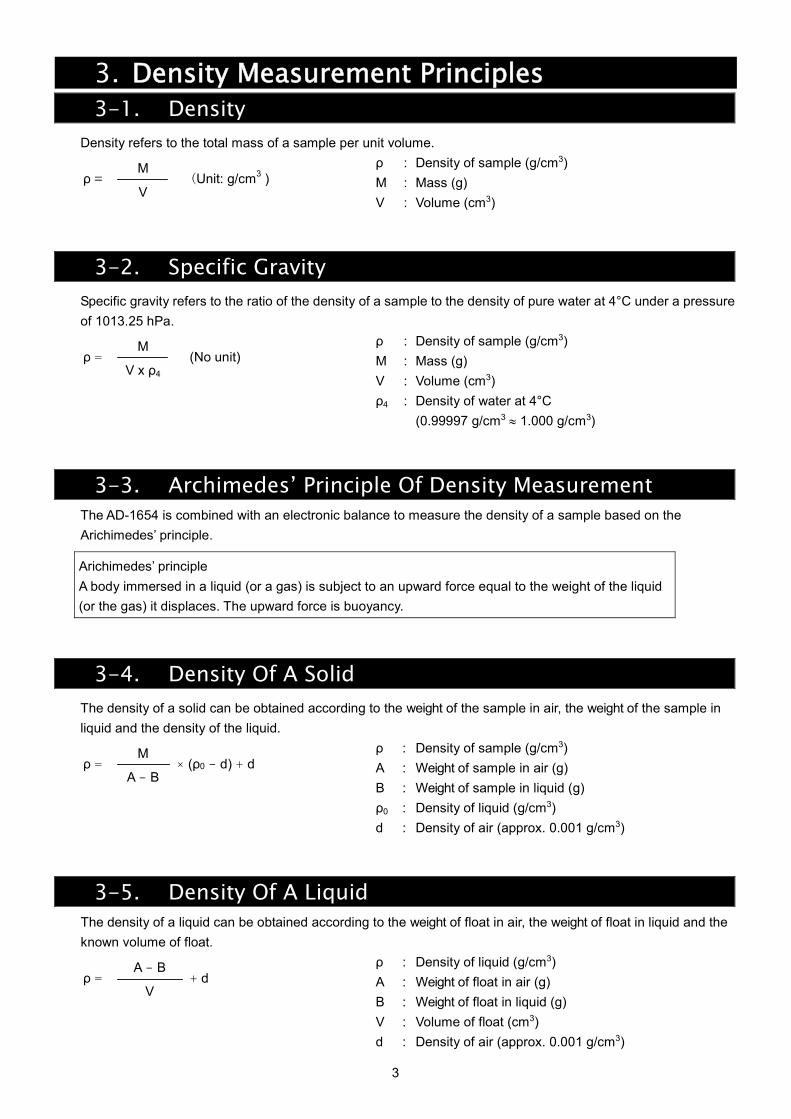
3. Density Measurement Principles 3-1. Density
Density refers to the total mass of a sample per unit volume.
M ρ = (Unit: g/cm3 ) V
ρ : Density of sample (g/cm3)
M : Mass (g)
V : Volume (cm3)
3-2. Specific Gravity Specific gravity refers to the ratio of the density of a sample to the density of pure water at 4°C under a pressure
of 1013.25 hPa.
M ρ = (No unit) V x ρ4
ρ : Density of sample (g/cm3)
M : Mass (g)
V : Volume (cm3)
ρ4 : Density of water at 4°C
(0.99997 g/cm3 1.000 g/cm3)
3-3. Archimedes’ Principle Of Density Measurement The AD-1654 is combined with an electronic balance to measure the density of a sample based on the
Arichimedes’ principle.
Arichimedes’ principle
A body immersed in a liquid (or a gas) is subject to an upward force equal to the weight of the liquid
(or the gas) it displaces. The upward force is buoyancy.
3-4. Density Of A Solid The density of a solid can be obtained according to the weight of the sample in air, the weight of the sample in
liquid and the density of the liquid.
M ρ = × (ρ0 - d) + d A - B
ρ : Density of sample (g/cm3)
A : Weight of sample in air (g)
B : Weight of sample in liquid (g)
ρ0 : Density of liquid (g/cm3)
d : Density of air (approx. 0.001 g/cm3)
3-5. Density Of A Liquid The density of a liquid can be obtained according to the weight of float in air, the weight of float in liquid and the
known volume of float.
A - B ρ = + d V
ρ : Density of liquid (g/cm3)
A : Weight of float in air (g)
B : Weight of float in liquid (g)
V : Volume of float (cm3)
d : Density of air (approx. 0.001 g/cm3)
4
4. Error Factors The results of measurements may be affected by various factors that could cause errors
4-1. Buoyancy Of Air A density measurement is influenced by an upward force of 0.0010 to 0.0014 g/cm3 (buoyancy of air).
The density of air can be obtained by the equation below:
0.0012932 P d = × 1 + 0.0036728 × t 1013.25
d : Density of air (g/cm3)
t : Air temperature (°C)
P : Atmospheric pressure (hPa)
When measurement accuracy of three significant digits is necessary, consider the buoyancy of air, add 0.001
g/cm3 to the measured value to compensate for the error due to the air density.
4-2. Volume Of Float The tolerance of the measured value of the volume of the float is ±0.01 cm3.
In liquid density measurement, the decimal places beyond the third decimal place of the measured value contain
errors.
When measurement accuracy to the third decimal place or beyond is necessary, measure the volume of the
float using distilled water.
A - B d = - 0.0035 ρ - d
V : Volume of float (cm3)
A : Mass of float in air (g)
B : Mass of float in liquid (g)
ρ : Density of distilled water at t °C (g/cm3)
d : Buoyancy of air at t °C (g/cm3)
0.0035 : Correction value for the wire (diameter of 1 mm) of the density
pan connecting the upper and lower pans (when the beaker
provided with this kit is used)
4-3. Temperature Of Liquid The density of the liquid that is used for measuring the density of a solid varies with the liquid temperature.
Therefore, the decimal places beyond the second decimal place of the measured value contain errors.
Obtain the density of a liquid according to the temperature from Table 1 for distilled water or from other reference
documents for other liquids.
When measurement accuracy to the third decimal place or beyond is necessary, use a thermometer with a
tolerance of ±0.2 °C or less.

5
4-4. Influence Of Wire In solid density measurement, the surface of the liquid rises when a solid sample is placed on the density pan,
which is immersed in the liquid, At this time, the buoyancy corresponding to the weight of the raised liquid is
exerted on the wire (diameter of 1 mm) connecting the upper and lower pans. If the surface of the liquid rises 1
mm, the buoyancy exerted on the wire is about 0.8 g/cm3. To minimize the error due to the buoyancy, select a
sample with a smaller volume or correct the value by calculation.
In liquid density measurement, a force (buoyancy ) is exerted on the wire (diameter of 0.2 mm) suspending the
float, when immersed in the liquid. Immersing the wire by 10 mm exerts a buoyancy of about 0.3 mg on the wire.
However, this buoyancy influence can be ignored. When obtaining the liquid density, the difference between the
weight of the float in air and in water is divided by the volume of the float, as described in "3-5. Density of a Liquid". This calculation reduces the error due to buoyancy such that it is negligible.
4-5. Surface Tension In solid density measurement, a force (surface tension) of about 5 mg is exerted on the pan between the wire
(diameter of 1 mm) of the density pan and the liquid surface.
The surface tension can be reduced by about 1 mg by adding a surfactant (for example, a wetting agent used for
developing photographs). Adding 0.1 mL (density: 1.2 g/cm3) of a surfactant to 200 mL of water will increase the
density of water by about 0.0001 g/cm3.
In liquid density measurement, a force (surface tension) of about 1 mg is exerted on the wire (diameter of 0.2
mm) suspending the float. However, this surface tension influence can be ignored. When obtaining the liquid
density, the difference between the weight of the float in air and in water is divided by the volume of the float, as
described in "6. Measuring The Density Of A Liquid". This calculation reduces the error due to surface
tension such that it is negligible.
4-6. Bubbles The buoyancy of a bubble of 1 mm in diameter is about 0.5 mg. Bubble generation depends on the shape and
material of the sample, so take care when making measurements.
In solid density measurement, a surfactant may be added to reduce the influence of bubbles.

6
5. Measuring The Density Of A Solid Assemble the kit as described in the procedure below. Note that the assembly procedure depends on the balance model.
5-1. Assembling The Kit: HR-AZ / HR-A Series 1. Remove the weighing pan, pan support, breeze break
ring and dust plate from the balance.
2. Fasten the balance weight (50) and
spring washer to the density pan stand
with the cone boss.
(In the first time ,they are assembled in factory)
3. Place the density pan stand on the balance.
4. Place the beaker stand so that it does not touch
the density pan stand.
5. Attach the thermometer clamp to the beaker and
insert the thermometer into the thermometer clamp.
6. Pour a liquid with a known density (such as distilled
water) into the beaker and place the beaker on the
beaker stand.
7. Place the density pan on the density pan stand.
8. Adjust the amount of the liquid so that the sample,
when placed on the lower pan (in the liquid), is
about 10 mm below the surface of the liquid.
9. When the value displayed on the balance is stable,
press the RE-ZERO key to set the displayed
value to zero. Now the balance is ready for density
measurement.
HR-AZ / HR-A series balances are equipped with a
density mode to calculate the density of a solid. For
details, refer to the instruction manual of HR-AZ /
HR-A series.
Step 1. Weighing pan Pan support Breeze break ring
Step 2. Balance weight
Step 3. Density pan stand
Step 4. Beaker stand
Step 5. Thermometer clamp and Thermometer
Step 7. Density pan
Step 6. Beaker
Fasten the balance weight and spring washer to the density pan stand with the cone boss. (Assembled in factory)
Density pan stand
HR-AZ / HR-A
Balance weight (50)
4030263
Spring washer and cone boss
HR-AZ / HR-A series for density measurement

7
5-2. Assembling The Kit: FZ-i / FX-i Series 1. Remove the weighing pan, pan support and breeze break from the balance.
2. Fasten a proper balance weight and spring washer to the density pan stand with the cone boss.
Mini. display Models Balance weight Number
10 mg FX-1200i, FX-2000i, FX-3000i, FX-5000i, FZ-1200i, FZ-2000i, FZ-3000i, FZ-5000i
Balance weight(71) 4030262
1 mg FX-120i, FX-200i, FX-300i, FX-500i, FZ-120i, FZ-200i, FZ-300i, FZ-500i,
Balance weight(34) 4030264
3. Place the density pan stand on the balance.
4. Place the beaker stand so that it does not touch
the density pan stand.
5. Attach the thermometer clamp to the beaker
and insert the thermometer into the
thermometer clamp.
6. Pour a liquid with a known density (such as
distilled water) into the beaker and place the
beaker on the beaker stand.
7. Place the density pan on the density pan stand.
8. Adjust the amount of the liquid so that the
sample, when placed on the lower pan (in the
liquid), is about 10 mm below the surface of the
liquid.
9. When the value displayed on the balance is
stable, press the RE-ZERO key to set the
displayed value to zero. Now the balance is
ready for density measurement.
Step 1. Breeze break Weighing pan Pan support
Step 2. Balance weight
Step 3. Density pan stand
Step 4. Beaker stand
Step 5. Thermometer clamp and Thermometer
Step 7. Density pan
Step 6. Beaker
Fasten the balance weight and spring washer to the density pan stand with the cone boss. (Assembled in factory)
Density pan stand
FZ-i / FX-i series
Balance weight (71) or
Balance weight (34)
Spring washer and cone boss
FZ-i / FX-i series for density measurement

8
5-3. Measuring The Density Of A Solid The density of a solid is obtained by averaging
the measured values.
1. Start the measurement when water temperature
becomes stable.
2. Press the RE-ZERO key to set the displayed
value to zero.
3. Place the sample on the upper pan in air and
record the value A.
4. Press the RE-ZERO key to set the displayed
value to zero.
5. Place the sample on the lower pan in liquid and
record the value B.
Keep the depth of approximately 10 mm
under liquid surface.
6. Obtain the density of water according to the
temperature. (Refer to Table 1)
Table 1 Density of distilled water Temperature °C +0 +1 +2 +3 +4 +5 +6 +7 +8 +9
0 0.99984 0.99990 0.99994 0.99996 0.99997 0.99996 0.99994 0.99990 0.99985 0.99978 10 0.99970 0.99961 0.99949 0.99938 0.99924 0.99910 0.99894 0.99877 0.99860 0.99841 20 0.99820 0.99799 0.99777 0.99754 0.99730 0.99704 0.99678 0.99651 0.99623 0.99594 30 0.99565 0.99534 0.99503 0.99470 0.99437 0.99403 0.99368 0.99333 0.99297 0.99259
40 0.99222 0.99183 0.99144 0.99104 0.99063 0.99021 0.98979 0.98936 0.98893 0.98849 50 0.98804 0.98758 0.98712 0.98665 0.98618 0.98570 0.98521 0.98471 0.98422 0.98371 60 0.98320 0.98268 0.98216 0.98163 0.98110 0.98055 0.98001 0.97946 0.97890 0.97834 70 0.97777 0.97720 0.97662 0.97603 0.97544 0.97485 0.97425 0.97364 0.97303 0.97242 80 0.97180 0.97117 0.97054 0.96991 0.96927 0.96862 0.96797 0.96731 0.96665 0.96600 90 0.96532 0.96465 0.96397 0.96328 0.96259 0.96190 0.96120 0.96050 0.95979 0.95906
At sea level (1 atmosphere), the density of water reaches maximum at 3.98 °C. Unit: g/cm3
7. Use the following equations to obtain the density. Three significant digits: A ρ = × ρ0 |B|
ρ : Density of sample (g/cm3)
A : Value A : Weight of sample in air (g)
B : Value B : | Weight of sample in air - Weight of sample in liquid | (g)
ρ0 : Density of liquid (g/cm3)
d : Density of air (approx. 0.001 g/cm3)
Four or more significant digits: M ρ = × (ρ0 - d) + d |B|
Ex.: Display of HR-AZ
key Step 2.
Step 3.
Sample in air
Step 4.
Step 5.
Sample in the liquid
key
Value A
Value B
Temperature
Approx. 10 mm
under liquid surface
The upper pan
The lower pan

9
Example of recording sheet Value A : Weight of sample in air (g) 4.8102 g
Value B : | Weight of sample in air - Weight of sample in liquid | (g) 0.5946 g
Temperature of liquid (°C) 26. °C
Density of liquid (g/cm3) 0.99678 g/cm3
Weight of sample in air ρ = × Density of liquid (g/cm3) Weight of sample - Weight of sample in air in liquid
8.06 g/cm3 (Calculated)
Value A : Weight of sample in air (g) 4.8102 g
Value B : | Weight of sample in air - Weight of sample in liquid | (g) 0.5946 g
Temperature of liquid (°C) 26. °C
Density of liquid (g/cm3) 0.99678 g/cm3
Atmospheric pressure (hpa) 1013 hpa
Density of air (g/cm3) 0.0012 g/cm3
Weight of sample in air ρ = × ( Density of liquid - Density of air ) + Density of air (g/cm3) Weight of sample - Weight of sample in air in liquid
8.055 g/cm3 (Calculated)

10
6. Measuring The Density Of A Liquid Assemble the kit as described in the procedure below.
6-1. Assembling The Kit: 1. For the procedure up to the setting of the beaker stand,
refer to the assembly procedure for each balance model
described in "5.Measuring The Density Of A Solid".
2. Attach the thermometer clamp to the beaker and insert
the thermometer into the thermometer clamp.
3. Place the beaker on the beaker stand.
4. Connect the float to the float hook using the wire.
The length of wire must be approx. 30 mm.
5. Hook the float hook on the density pan stand.
6. When the value displayed on the balance is stable, press
the RE-ZERO key to set the displayed value to zero.
Now the balance is ready for density measurement. Example of the assembled HR-AZ series
6-2. Measuring The Density Of A Liquid Use the following procedure to obtain the density of a liquid.
1. With the float hanging, press the RE-ZERO key to
set the displayed value to zero.
2. Pour the liquid of which you want to measure the
density into the beaker.
Make sure that the float is about 10 mm below
the surface of the liquid.
3. When the value displayed on the balance is
stable, record the value A ignored the minus sign.
4. Use the following equations to obtain the density
of the liquid.
|A| ρ= +d V
ρ : Density of liquid (g/cm3)
A : | Weight of float in air - Weight of float in liquid | (g)
V : Volume of float (cm3)
d : Density of air (approx. 0.001 g/cm3)
The volume of the float is printed. Ex:10.00 cm3
Approx. 30 mm Step 4.
Step 5.
Ex.: Display of HR-AZ
Step 1.
Step 3.
Value A
Float in liquid
Float in air
Temperature
key Step 2.
Approx. 10 mm
under liquid surface

11
Example of recording sheet Value A : | Weight of float in air - Weight of float in liquid | (g) 9.9704 g
Temperature of liquid (°C) 25 °C
Volume of float (g/cm3) 10.01 cm3
Density of air (g/cm3) 0.001 g/cm3
Weight of float - Weight of float in air in liquid ρ = + Density of air (g/cm3) Volume of float
0.997 g/cm3 (Calculated)
7. Frequently Asked Questions
Questions Answers
I’d like to measure the density of a resin pellet
or sheet, which floats in water. Is it possible?
Use a liquid that has a lower density than water and does not
dissolve the sample, such as methanol (density 0.798) or kerosene
(density 0.80). The density of the liquid used is measured using the
float provided with the kit.
Can a sample containing bubbles be
measured?
The density of a sample with bubbles can be measured as it is. But
as time passes, the bubbles disappear and the apparent density
may change. A sample that floats in water due to the low density
can not be measured.
The measurement repeatability may be
affected by the water’s surface tension. What
can I do about this?
A few drops of a surfactant (for example, a mild detergent for
washing dishes) added to the water reduce the influence of surface
tension. A few drops of a surfactant will affect the liquid density only
a very small amount. When methanol is used in place of water, the
influence of surface tension is small, even without a surfactant.
When tap water is used, bubbles are gradually
generated on the sample surface and a
measurement error occurs. What can I do
about this?
Tap water contains dissolved gases such as oxygen and carbon
dioxide. When tap water is used, the released dissolved gases
generate bubbles. It is recommended that pure water or distilled
water, which contains few dissolved gases, be used.
When I try to measure a highly water- repellent
material such as rubber, bubbles stick to the
sample. What can I do about this?
Before measurement, soak the sample in the water with an
appropriate amount of surfactant added. Doing this increases the
sample surface hydrophilicity and makes it more difficult for bubbles
to stick to the sample surface.
Up to what size of sample can be measured?
In consideration of the density pan size, the maximum sample size
that can be measured is:
Diameter 25 mm, Height 30 mm,
Can I measure the density of a liquid with a
high viscosity?
A liquid with a viscosity up to 500 mPa·s can be measured. If the
viscosity exceeds this value, the float takes excessive time to sink
and a measurement error occurs. Measuring adhesive is not
recommended because the adhesive sample may be difficult to
remove from the float.
Does using a semi-micro balance improve
accuracy?
The effects of surface tension cause errors in the measurement
value of around 0.2 to 1.0 mg. In measurement using the 0.1 mg
range, the magnitude of error and the level of balance accuracy are
almost the same. In measurement using the 0.01 mg range, the
magnitude of error greatly exceeds the level of balance accuracy,
so using a semi-micro balance is not recommended.

12
8. Water Resistant Digital Thermometer AD-5625 8-1. For Safe Use
Please take the following precautions when operating this device.
- Repair
Opening the case to attempt repair of the device should not be done by anyone other than designated repair staff.
Doing so will not only void the warranty, but also may result in mechanical error or loss of functionality.
- Error in the device
When an error has been found in the device, stop using it immediately and attach a label indicating the device is
“Faulty” or store it in a location where it will not be used inadvertently. Continuing to use the device without proper
repair could be highly dangerous. Please contact A&D or the authorized dealer in your area for advice on repair of
the device.
8-2. Precautions When Handling - After using the device for measuring very high (50°C or higher) or low (0°C or lower) temperatures, the probe
should not be handled until it has returned to a normal temperature range. Doing so may result in burning or other
damage to skin.
- The sheath (metal part) of the probe can be used for temperatures up to 260°C, but the plastic display section
should only be used in temperatures up to 60°C. Please ensure the display section is not exposed to
temperatures exceeding this. Doing so may result in mechanical error or deformation.
- Please note that the end of the sheath is sharp, so may cause harm to people or objects. When being carried or
not in use, please keep in the sheath holder.
- Please ensure the device is not subject to severe impacts, vibrations or electric shocks. This may result in
mechanical error.
- Do not use the device in direct sunlight for a prolonged period of time, in an unventilated vehicle or close to a heat
source. The operating temperature range for the device is 0 to 40°C. Use outside this temperature range may lead
to mechanical error.
- Do not use the device in an area which may be subject to sudden rises in temperature, high levels of humidity or a
lot of dust.
- The device has a waterproof design, however it is best not to place it in water or leave it for a long time in an area
where it may become wet.
- The waterproof performance of the device conforms to protection level 7 of JIS C 0920 and can be submerged in
still water at a depth of up to 1 meter for 30 minutes.
- If the battery is nearly consumed, there may be difficulties operating the device properly or obtaining a value on
the display. In this case, please exchange the battery with a new one following the procedure detailed in “8-4.
Replacing The Battery”.
13
- Using the device in a location with a strong magnetic or electric field (near a television, IH cooker, microwave
oven, etc.), may impact on its performance. Please try to avoid measurement in such locations.
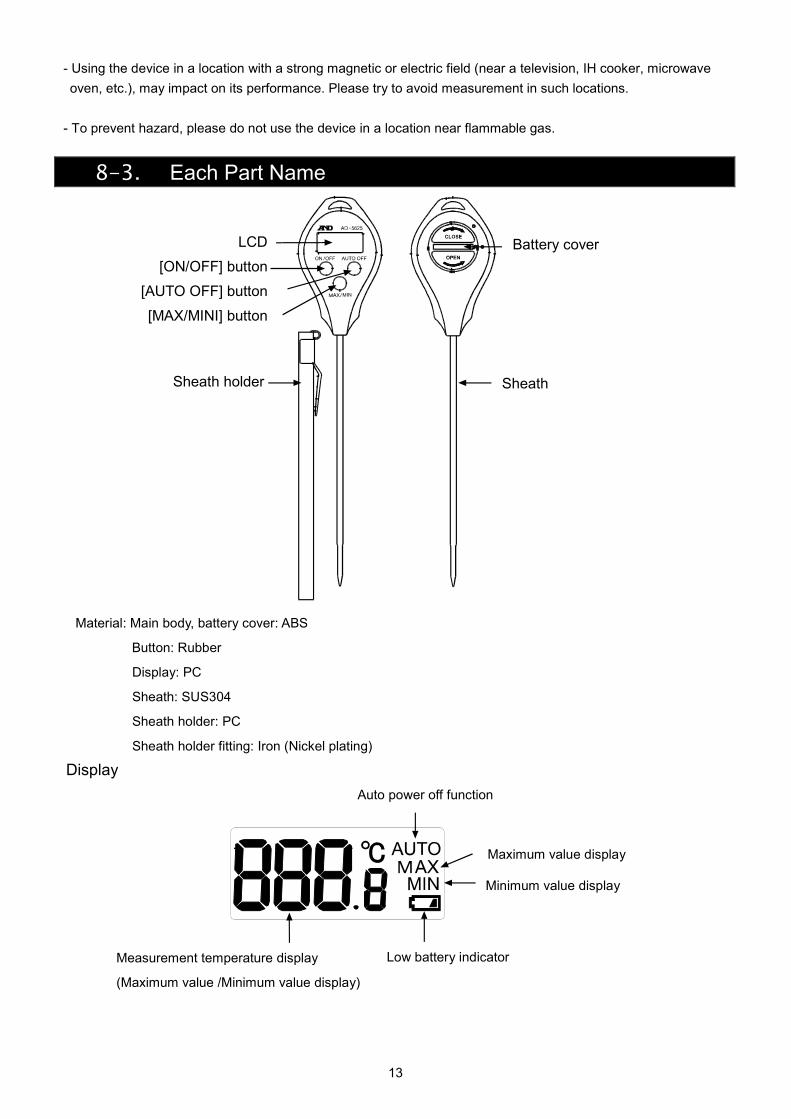
- To prevent hazard, please do not use the device in a location near flammable gas.
8-3. Each Part Name
Material: Main body, battery cover: ABS
Button: Rubber
Display: PC
Sheath: SUS304
Sheath holder: PC
Sheath holder fitting: Iron (Nickel plating)
Display
LCD
[ON/OFF] button
[AUTO OFF] button
[MAX/MINI] button
Battery cover
Sheath Sheath holder
Low battery indicator
Minimum value display
Maximum value display
Measurement temperature display
(Maximum value /Minimum value display)
Auto power off function

14
Error display
lo Appears when the measurement temperature is below the lower limit for the display range, or there
is an error in the temperature sensor or internal circuit.
Hi Appears when the measurement temperature exceeds the upper limit for the display range, or there
is an error in the temperature sensor or internal circuit.
8-4. Replacing The Battery The battery has not been installed in the device when purchasing this device. Properly install the battery in the
device by the following procedure.
Also, when the “ ” appears at the bottom right on the display, replace the old battery with new one by the
following procedure.
* Purchase the battery at your local convenience store, supermarket, home center or electrical store.
* When the main body is damp, wipe the moisture fully and exchange the battery.
The device may be damaged if water gets inside.
Replacing the battery (1) Turn the battery cover on the rear side of the main body in counter clockwise direction by using a coin, and
remove the battery cover from the device.
(2) Remove the old battery from the device.
(3) Put a new CR2032 coin type lithium battery with the + side of the battery facing outward in the device.
(4) Put the battery cover back on the device.
As shown in the figure below, put the battery cover so that the upper mark on the main body and the mark on
the battery cover join together, and turn the battery cover in clockwise direction using a coin until the mark on
the battery cover joins the lower mark on the main body.
The battery cover not secured properly may result in water entering and damaging the device.
CAUTION
Precautions on the battery use - The provided battery is for monitoring purpose, and its life may therefore be shorter than the battery life
specified in this manual.
- Remove the battery from the device and keep it elsewhere when you are not using the device for a long
period of time,
- Be sure the specified battery (CR2032 coin type lithium battery 1pc) is used.
- Mind the direction for polarity. Reverse polarity may not only cause operation errors but also damage the
device.
- The battery should not be recharged, short-circuited, disassembled, or thrown into the fire, Such action
CLOSE
OPEN

15
may cause a burst or leak of liquid of the battery.
- Keep the battery out of children’s reach. Talk to a doctor immediately in case a child swallowed the
battery.
- For environmental protection, dispose of a spent battery by following your local regulations.
8-5. Operating the Thermometer Measuring the temperature (1) Press the [ON/OFF] button to turn the power on.
(2) Remove the sheath holder when it is attached to the sheath.
(3) Measure the temperature by one of the following methods depending on the material to be measured.
When measuring the liquid
Immerse the sensor into the position where you would like to measure the
temperature.
When there is steam arising from the liquid, handle the device so that the
display is not exposed to the steam. Otherwise the steam may damage the
device.
When measuring the semisolid material
Stick the sensor to the depth where you would like to measure the temperature
in the material.
Attempting to forcibly stick the sensor into the material when the measurement
material is too solid may damage the sheath. In such case, a device that
enables smooth insertion of the sensor is required.

16
When measuring the gas
Place the sensor in the location where you would like to measure the temperature and wait until the display
becomes stable.
When measuring a high temperature atmosphere such as steam, use a shield to protect the display from high
temperature.
CAUTION
The device detects a temperature at the tip of the sheath.
To protect the device from damage, handle the device so that the part other than the sheath is not
exposed to high or low temperature of the substance to be measured.
Using the maximum and minimum temperature memory The device can automatically store the maximum and minimum
temperature measured after the battery was installed in the
device (Or for after the memory was reset).
Gas Shield
Sheath Temperature detection part
Press the
[MAX/MIN] button
Press the [MAX/MIN]
button
Press the [MAX/MIN]
button
Currently measured temperature
Maximum temperature display
Minimum temperature display
17
The device automatically displays the current measurement temperature if no operation is made for 30 seconds
while on the maximum or minimum temperature display
To check the maximum and minimum temperatures for a new measurement, reset the memory before starting the
measurement by following the “Resetting the maximum and minimum temperature memory” described below.
CAUTION
The maximum and minimum temperatures memorized in the device are reset automatically when the
battery was removed from the device.
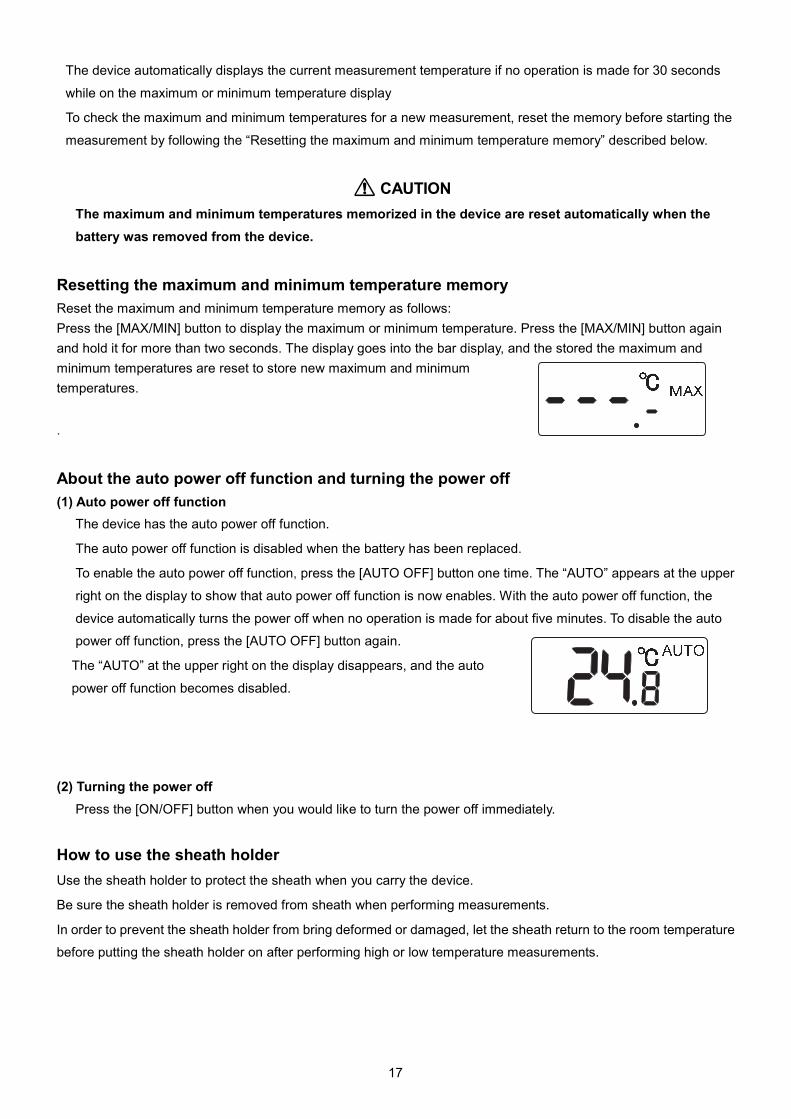
Resetting the maximum and minimum temperature memory
Reset the maximum and minimum temperature memory as follows:
Press the [MAX/MIN] button to display the maximum or minimum temperature. Press the [MAX/MIN] button again
and hold it for more than two seconds. The display goes into the bar display, and the stored the maximum and
minimum temperatures are reset to store new maximum and minimum
temperatures.
.
About the auto power off function and turning the power off
(1) Auto power off function
The device has the auto power off function.
The auto power off function is disabled when the battery has been replaced.
To enable the auto power off function, press the [AUTO OFF] button one time. The “AUTO” appears at the upper
right on the display to show that auto power off function is now enables. With the auto power off function, the
device automatically turns the power off when no operation is made for about five minutes. To disable the auto
power off function, press the [AUTO OFF] button again.
The “AUTO” at the upper right on the display disappears, and the auto
power off function becomes disabled.
(2) Turning the power off
Press the [ON/OFF] button when you would like to turn the power off immediately.
How to use the sheath holder
Use the sheath holder to protect the sheath when you carry the device.
Be sure the sheath holder is removed from sheath when performing measurements.
In order to prevent the sheath holder from bring deformed or damaged, let the sheath return to the room temperature
before putting the sheath holder on after performing high or low temperature measurements.
18
8-6. Daily Care Accurate measurements can not be made if the temperature detection part is dirty. It should be kept clean when
performing measurements.
Avoid rubbing it when the main body is dirty. Instead, rinse the dirt off using water.
When the dirt is heavy, wipe it off gently using a kitchen sponge, etc., dampened with ph-neutral detergent.
Do not use abrasives or volatile solvents such as thinner or benzine, etc.
8-7. Specifications Sensor : Thermistor
Temperature measurement range : -40.0℃ to +260.0℃
Display resolution : 0.1℃
Measurement accuracy : ±1.0℃ (-9.9 to 59.9℃)
±2.0℃(-19.9 to -10.0℃, 60.0 to 99.9℃)
±3.0℃(-29.9 to -20.0℃, 100.0 to 199.9℃)
±4.0℃(-40.0 to -30.0℃, 200.0 to 260.0℃)
Display refreshment interval : Every one second
Waterproof level : JIS IPX7 (Waterproof for 30 minutes at a water depth of 1 meter, still water at room
temperature)
Power supply : CR2032 x 1 pc
Battery life : Approx.1 year (When used for one hour per day)
Operating temperature and humidity : 0 to 40℃, 75%RH or less
(No condensation) (Excluding the sheath)
Storage temperature and humidity :0 to 50℃, 75%RH or less
(No condensation)
External dimension of the sheath : Φ2.8mm (The tip is Φ2.2mm, the length is 20 mm),Approx. 120mm
External dimension : 40(W) x 187(H) x 17(D) mm (The protrusion is not included.)
Weight : Approx. 27g (The battery and sheath holder is included.)
Standard accessory : Instruction manual, sheath holder, battery (For monitor battery)

19

20


1-243 Asahi , Kitamoto-shi, Saitama 364-8585, JAPAN Telephone: [81] (48) 593-1111 Fax: [81] (48) 593-1119 A&D INSTRUMENTS LIMITED Unit 24/26 Blacklands Way, Abingdon Business Park, Abingdon, Oxfordshire OX14 1DY United Kingdom Telephone: [44] (1235) 550420 Fax: [44] (1235) 550485 A&D ENGINEERING, INC. 1756 Automation Parkway, San Jose, California 95131, U.S.A. Telephone: [1] (408) 263-5333 Fax: [1] (408)263-0119 OOO A&D RUS OOO "ЭЙ энд ДИ РУС" 121357, Российская Федерация, г.Москва, ул. Верейская, дом 17 ( Business-Center "Vereyskaya Plaza-2" 121357, Russian Federation, Moscow, Vereyskaya Street 17 ) тел.: [7] (495) 937-33-44 факс: [7] (495) 937-55-66 A&D Technology Trading(Shanghai) Co. Ltd 爱安德技研贸易(上海)有限公司 中国 上海市浦东新区浦东大道138号永华大厦21楼A室 邮编200120
( 21F Room A, Majesty Building, No.138 Pudong Avenue, Pudong New Area, Shanghai, 200120, China ) 电话: [86] (21) 3393-2340 传真: [86] (21) 3393-2347 A&D INSTRUMENTS INDIA PRIVATE LIMITED 509, Udyog Vihar, Phase- , Gurgaon - 122 016, Haryana, India Telephone: 91-124-4715555 Fax: 91-124-4715599
BackCover 1WMPD4000338J .
![Archimedes Powerpoint 8.12.2008.ppt [Kompatibilitätsmodus]haftendorn.uni-lueneburg.de/geschichte/griechen/Archimedes-berlips-nolte.pdf · Biographie IBiographie I • Archimedes](https://img.dokumen.tips/doc/110x75/5d66c48288c99356168b52cb/archimedes-powerpoint-8122008ppt-kompatibilitaetsmodus-biographie-ibiographie.jpg)