Embed Size (px)
Citation preview

Delta Dental of Rhode IslandOnline Enrollment System
User Guide
Welcome to Delta Dental of Rhode Island’s online enrollment system.
This system allows you to flexibly manage eligibility and benefit details for your employees and their dependents in real time. Through this portal, you can:
• Enroll new employees
• Add dependents
• Terminate coverage for a subscriber or dependent
• Update subscriber information
• Reinstate coverage for a subscriber or dependent
• Transfer a subscriber to a different plan
• Process COBRA transactions
This guide outlines steps for the most common enrollment tasks. If you have additional questions or need assistance, call 1-800-843-3582.
D_empog_216

How to Enroll a New Employee
How to Add Dependents
How to Add Additional Dependents
How to Work With Existing Employee Accounts
How to Update Employee Information
How to Add Dependent Coverage
How to Cancel Dependent Coverage
How to Reinstate Dependent Coverage
How to Cancel Coverage
How to Change an Employee’s Plan
How to Enroll an Employee in COBRA
How to Order an ID Card
How to See Previous Transactions for Employees
How to Access Benefit Information
1
3
4
5
6
7
8
9
10
11
12
13
14
15
Table of Contents

1
After you have logged into your employer account using your Username and Password:
1 Click ‘Enroll New Employees’ in the menu at left
The ‘Enroll New Employee’ screen will appear
2 Select the appropriate Group and Division from the drop-down menus (Note: These boxes appear only for accounts with multiple groups or divisions)
3 Select the appropriate ‘Qualifying Event’ from the drop-down menu (Note: If new hire is selected, box will appear for employee’s date of hire)
4 Select the appropriate ‘Effective Date’ from the drop-down menu (Note: Date options are customized for your group and your “retro period.” See current and future dates by scrolling down)
5 Enter the employee’s information. Note: If you receive an “invalid address” message after entering the address but you know that the address is correct, you can override the message and continue with the address you entered
6 Click the purple ‘Enroll New Employee’ button at bottom of page
The ‘Enroll New Employee – Confirm’ screen will appear
7 Check the information that appears for any errors
8 Click the purple ‘Complete New Enrollment’ button at bottom of page
The ‘Enroll New Employee – Complete’ screen will appear
How to Enroll a New Employee
Check the box for employees who choose not to use a Social Security number. The system will then generate a unique identifier.

2
You may now select from three actions:
A Click the purple ‘Add a Dependent’ button at bottom left to add a dependent to this employee’s coverage (the ‘Add Dependent(s)’ screen will appear)
B Click the purple ‘Enroll Another Employee’ button in the bottom center to enroll a different employee (you will return to the ‘Enroll New Employee’ screen)
C Click the purple ‘Return to Employer Home’ button at bottom right to return to the main Employer Home screen (you will return to the ‘Welcome to Employers Online’ screen)
Enroll a New Employee (Next Steps)
A B C

3
Add spouse and dependent coverage at the ‘Add Dependent(s)’ screen.
To add an employee’s spouse:
1 Enter the spouse’s first name, middle initial and last name
2 Enter the spouse’s date of birth
3 Enter the spouse’s email address
Note: To add additional dependents, see instructions on page 4. If there are no additional dependents, proceed to step 4.
4 Click the purple ‘Submit’ button at bottom of page (Hint: If you don’t see the ‘Submit’ button, maximize your screen view and scroll to the bottom)
5 Click the purple ‘Confirm Dependent(s)’ button at bottom of page
How to Add Dependents
4
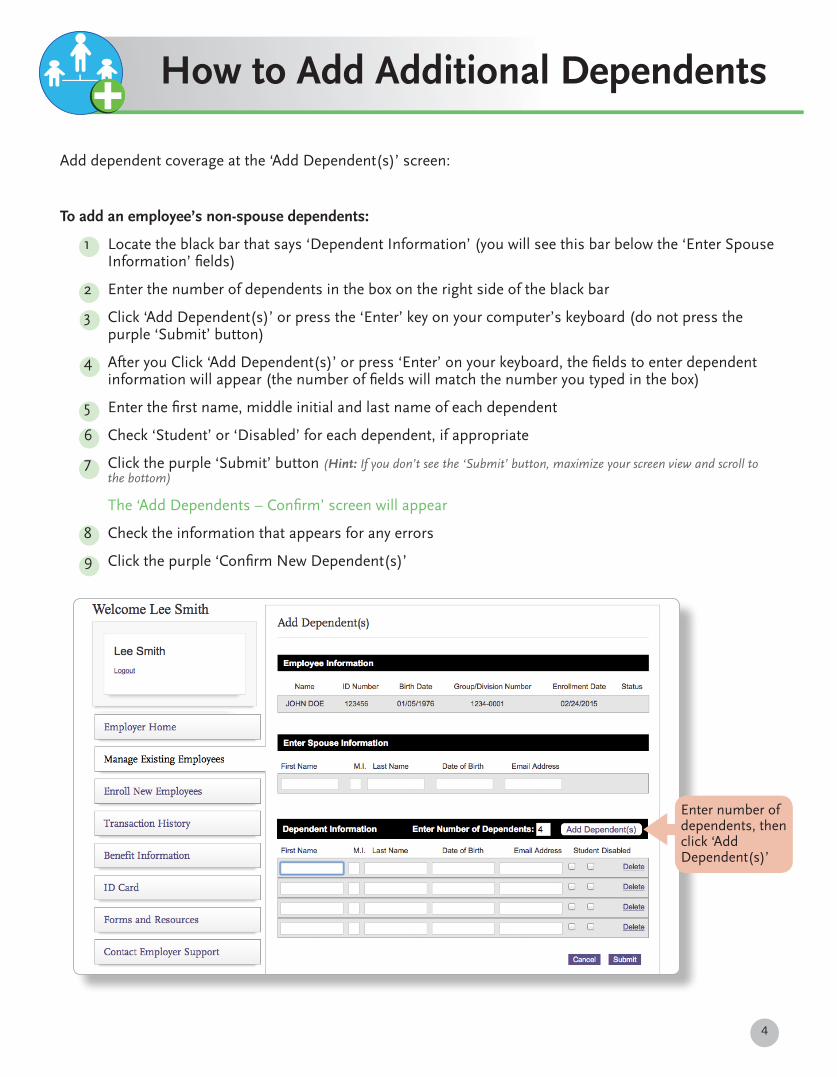
Add dependent coverage at the ‘Add Dependent(s)’ screen:
To add an employee’s non-spouse dependents:
1 Locate the black bar that says ‘Dependent Information’ (you will see this bar below the ‘Enter Spouse Information’ fields)
2 Enter the number of dependents in the box on the right side of the black bar
3 Click ‘Add Dependent(s)’ or press the ‘Enter’ key on your computer’s keyboard (do not press the purple ‘Submit’ button)
4 After you Click ‘Add Dependent(s)’ or press ‘Enter’ on your keyboard, the fields to enter dependent information will appear (the number of fields will match the number you typed in the box)
5 Enter the first name, middle initial and last name of each dependent
6 Check ‘Student’ or ‘Disabled’ for each dependent, if appropriate
7 Click the purple ‘Submit’ button (Hint: If you don’t see the ‘Submit’ button, maximize your screen view and scroll to the bottom)
The ‘Add Dependents – Confirm’ screen will appear
8 Check the information that appears for any errors
9 Click the purple ‘Confirm New Dependent(s)’
How to Add Additional Dependents
Enter number of dependents, then click ‘Add Dependent(s)’

5
For existing employees, you can add or remove a dependent, change or cancel coverage, update employee information, manage COBRA transactions or request an ID card.
To locate an employee’s record:
1 Log in to your employer account using your Username and Password
The ‘Welcome to Employers Online’ screen will appear
2 Click ‘Manage Existing Employees’ in the menu at left
3 Search for an individual employee by name or ID number
4 To see all employee records, click the purple ‘View All Employees’ button at top right of screen. The arrows next to each column allow you to sort the list in ascending or descending order
5 Select an employee account by clicking on the employee name
6 The ‘Employee Profile’ screen will appear and the ‘Employee Info’ tab at top will be highlighted green
From here you have the option to print your employee’s roster, export it to an excel spreadsheet and export it to a PDF.
Please note: when you export to an excel spreadsheet, the leading zeros for each subscriber ID number will not appear.
How to Work With Existing Employee Accounts
Filter employee list by “All,” “Active” or “Terminated”
A.
A.

6
Update employee information at the ‘Employee Profile’ screen:
1 Locate the record of the employee whose information you are updating
2 Click the employee’s name
3 Click the employee’s name in the ‘Current Coverage Information’ field
The ‘Employee Profile’ screen will appear
4 Make any necessary information changes to fields that appear
5 Click the purple ‘Update Employee Information’ button at bottom right
Note: If you attempt to change more than two information fields, you will see the following message:
“If you are enrolling a new employee, hit ‘Cancel’ at the bottom of this screen and click the ‘Enroll New Employees’ tab on the side navigation at the left. If you are trying to term a current employee, hit ‘Cancel’ and click the green ‘Add/Cancel Coverage’ tab at the top of the Employee Profile.”
How to Update Employee Information

7
Add or cancel coverage for existing employees and/or their dependents at the ‘Employee Profile’ screen.
To add a dependent:
1 Click the ‘Add/Cancel Coverage’ tab at the top of the ‘Employee Profile’ screen
2 Select ‘Add Dependent’ from the menu that appears
3 Select ‘Effective Date’ from the drop-down menu
4 Select ‘Qualifying Event’ from the drop-down menu
5 Click purple ‘Start Enrollment’ button at bottom right
6 Follow steps to add dependents (see page 4)
How to Add Dependent Coverage

8
To cancel dependent coverage:
1 Click the ‘Add/Cancel Coverage’ tab at the top of the ‘Employee Profile’ screen
2 Select ‘Cancel Dependent’ from the menu that appears
3 Select the cancellation date from the drop-down menu
4 Check the box next to the dependent’s name
5 Click purple ‘Cancel Coverage’ button at bottom right
The ‘Cancel Dependents – Confirm’ page will appear
6 Check the information that appears for any errors
7 Click purple ‘Confirm’ button at bottom right
Confirmation page will appear
How to Cancel Dependent Coverage

9
To reinstate dependent coverage:
1 Click the ‘Add/Cancel Coverage’ tab at the top of the ‘Employee Profile’ screen
2 Select ‘Reinstate Dependent’ from the menu that appears
3 Check the box next to the dependent’s name
4 Select effective date from the drop-down menu
5 Click purple ‘Reinstate Dependent(s)’ button at bottom right
The ‘Reinstate Dependent(s) – Confirm’ screen will appear
6 Check the information that appears for any errors
7 Click purple ‘Reinstate Dependent(s)’ button at bottom right
Confirmation page will appear
How to Reinstate Dependent Coverage

10
To cancel employee (and dependent) coverage:
1 Click the ‘Add/Cancel Coverage’ tab at the top of the ‘Employee Profile’ screen
2 Select ‘Cancel Coverage’ from the menu that appears
3 Select effective cancellation date from the drop-down menu
4 Click purple ‘Cancel Coverage’ button at bottom right
The ‘Cancel Coverage – Confirm’ screen will appear
5 Check the information that appears for any errors
6 Click purple ‘Complete Cancellation’ button at bottom right
Confirmation page will appear
How to Cancel Coverage

11
Change an employee’s plan (within group coverage) at the ‘Employee Profile’ screen for the employee.
1 Click the ‘Change Plan’ tab at the top of the ‘Employee Profile’ screen
2 Select ‘Change Plan’ from the menu that appears
3 Select the appropriate plan from the ‘Change To’ drop-down menu
4 Select the ‘Effective Date’ from the drop-down menu
5 Click purple ‘Change Plan’ button at bottom right
The ‘Change Plan – Confirm’ screen will appear
6 Check the information that appears for any errors
7 Click purple ‘Change Plan’ button at bottom right
Confirmation page will appear
How to Change an Employee’s Plan

12
Enroll employees and their dependents in COBRA at the ‘Employee Profile’ screen:
1 Click the ‘COBRA’ tab at the top of the ‘Employee Profile’ screen
2 Select ‘Enroll in COBRA’ from the menu that appears
3 Select the appropriate enrollees from the on-screen choices
4 Click purple ‘Continue’ button at bottom right
The ‘Enroll in COBRA’ screen will appear
5 Confirm the information that appears
6 Click purple ‘Enroll in COBRA’ button at bottom right
7 The ‘Enroll in COBRA – Confirm’ screen will appear
Check the information that appears for any errors
8 Click purple ‘Confirm Enrollment in COBRA’ button at bottom right
Confirmation page will appear
How to Enroll an Employee in COBRA

13
Order an ID card at the ‘Employee Profile’ screen:
1 Click the ‘ID Card’ tab at the top of the ‘Employee Profile’ screen
2 You may order an ID card in two ways:
o Order a card that you can print from your desk
o Order a card from Delta Dental of Rhode Island that will arrive by mail in approximately 10 days
3 Click purple ‘Send a Copy to Your Printer’ button for a printable version
4 Or, click purple ‘Request a Copy Be Sent By Mail in 10 Days’ button for an ID card by mail
Note: You may also order ID cards by clicking on ‘ID Card’ in the menu at left.
How to Order an ID Card

14
Delta Dental of Rhode Island’s online enrollment system processes transactions and changes in real time, giving you the flexibility to make as many changes as you need to for employees in one session and eliminat-ing the need to cancel transactions.
You can see your transactions on the ‘Transaction History’ page. To access this page:
1 Log in to your employer account using your Username and Password
The ‘Welcome to Employers Online’ screen will appear
2 Click ‘Transaction History’ in the menu at left
3 Select ‘Transaction Type’ and ‘Search Date’ from the drop-down menus
4 Enter the employee’s ID number or last name
5 Click purple ‘Search’ button at bottom right
6 Click on the employee’s name to see all transactions for that employee, as well as Eligibility History, Current Coverage Information and Current Employee Address Information
7 If you need to make additional changes to an employee account, click ‘Manage Existing Employees’ in the menu at left
How to See Previous Transactions for Employees
15
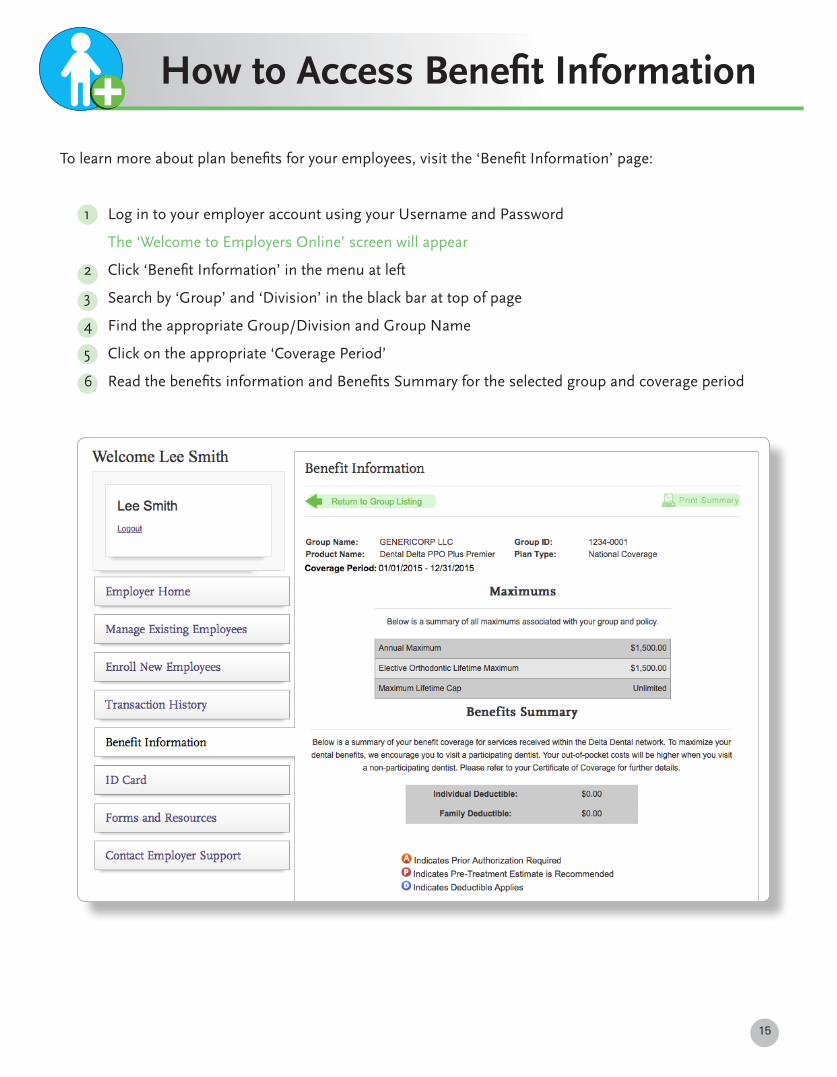
To learn more about plan benefits for your employees, visit the ‘Benefit Information’ page:
1 Log in to your employer account using your Username and Password
The ‘Welcome to Employers Online’ screen will appear
2 Click ‘Benefit Information’ in the menu at left
3 Search by ‘Group’ and ‘Division’ in the black bar at top of page
4 Find the appropriate Group/Division and Group Name
5 Click on the appropriate ‘Coverage Period’
6 Read the benefits information and Benefits Summary for the selected group and coverage period
How to Access Benefit Information


![DELTA DENTAL OF RHODE ISLAND ending December 31, … · DELTA DENTAL OF RHODE ISLAND ... Life, Accident & Health [ ] Property/Casualty ... Other debt and other fixed income securities](https://img.dokumen.tips/doc/110x75/5afa27d97f8b9ad2208ed85f/delta-dental-of-rhode-island-ending-december-31-dental-of-rhode-island-.jpg)


![DELTA DENTAL OF RHODE ISLAND ending December … · DELTA DENTAL OF RHODE ISLAND ... Life, Accident & Health [ ] ... Other debt and other fixed income securities (excluding short](https://img.dokumen.tips/doc/110x75/5afa27d97f8b9ad2208ed87a/delta-dental-of-rhode-island-ending-december-dental-of-rhode-island-life.jpg)


![HEALTH ANNUAL STATEMENT - Rhode Island … · DELTA DENTAL OF RHODE ISLAND ... Life, Accident & Health [ ] Property/Casualty ... Other debt and other fixed income securities](https://img.dokumen.tips/doc/110x75/5afa27d97f8b9ad2208ed889/health-annual-statement-rhode-island-dental-of-rhode-island-life-accident.jpg)